1
Owner's
Manual
(RRFTSMRNo
6.5 HORSEPOWER
22" REAR DISCHARGE
POWER PROPELLED
ROTARY LAWN MOWER
Model No.
917.377573
=
•
°
•
Safety
Assembly
Operation
Maintenance
•
•
Espafiol
Repair Parts
CAUTION:
Read and follow al!
Safety Rules and Instructions
before operating this equipment
Sears, Roebuck and Co,, Hoffman Estates, IL 60179
Warranty
Safety Rules
Assembly
Operation
Maintenance Schedule
Maintenance
LIMITED TWO YEAR WARRANTY
2
2
4
6
"_0
10
Product Specifications
Service and Adjustments
Storage
Troubleshootirtg
Repair Parts
Parts Ordering
ON CRAFTSMAN
11
!3
14
I5
34
Back Cover
POWER MOWER
For two years from date of'purchase, when this Craftsman Lawn Mower _s maintained,
lubricated, and tuned up according to the operating and maintenance instructions in the
owner's manual, Sears will repair free of charge any defect in material or workmanship°
If this Craftsman Lawn Mower is used for commercial or rental purposes, this warranty
applies for only 90 days from the date of purchase,
This Warranty does not cover:
° Expendable items which become worn during normal use, such as rotary mower
blades, blade adapters, belts, air cleaners and spark plug,
,, Repairs necessary because of operator abuse or negligence, including bent crankshatts and the failure to maintain the equipment according to the instructions contained in the owner's manual
Warranty service is available by retumfng the Craftsman power mower to the nearest
Sears Service Center/Department
in the United States. This warranty applies only while
this product is in use in the United States.
This Warranty gives you specific legal rights, and you may also have other rights which
vary from state to state,
SEARS, ROEBLJCK AND CO., D/817 WA, HOFFMA N ESTATES, ILLINOIS 60179
TRAINING:
* Read this operator's manual carefully.
Become familiar with the controls and
know how to operate your mower
property. Learn how to quickly stop
mower.
° Do not alfow children, to use your mower_
Never allow adults to use mower withoul
proper instructions.
o Keep the area of operation clear of all
persons, especially small children and
pets,
o Use mower only as the manufacturer
intended and as described in this manual.
• Do not operale mower if it has been
dropped or damaged in any manner.
Always have damage repaired before
using your mower,
" Do not use accessory attachments that
are not recommended by the manufac-
turer. Use of such attachments
hazardous.
may be
• The blade turns when the engine is
running.
PREPARATION;
• Always thoroughly check the area to be
mowed and clear it of all stones, sticks,
wires, bones, and other foreign objects.,
These objects will be thrown by the blade
and can cause severe injury,
• Nways wear safety glasses or eye
shields when starting and while using
your mower.
• Dress properly. Do not operate mower
when barefoot or wearing open sandals,
Wear only solid shoes with good traction
when mowing.
,, Check fuel tank before starting engine,
Do not fill gas tank indoors, when the
engine is running or when the engine is
hot.Allowthe enginetocootforseveral
minutesbeforefillingthega¢tank,Clean
off anyspilledgasolinebeforestartingthe
engine,
• Alwaysmakewheelheightadiustments
beforestartingyourmower,Never
attempttodo thiswhiletheengineis
running_
, Mowonlyin daylightor goodartificial
light.
OPERATION;
• Keepyoureyesandmindonyourmower
andthe areabeingcut°Donotlet other
interestsdistractyou.
, Donotmowwetor slipperygrass.Never
runwhileoperating your mower. Always
be sure of your footing .... keep a firm
hold on the handles and walk.
, Do not put hands or feet near or under
rotating parts. Keep clear of the discharge
opening at all times.
• Always stop the engine whenever you
leave or are not using your mower, or
before crossing driveways, walks, roads,
and any gravel--covered
areas.
• Never direct discharge of material toward
bystanders nor allow anyone near the
mower while you are operating ito
• Before cleaning, inspecting, or repairing
your mower, stop the engine and make
absolutely sure the blade and all moving
parts have stopped° Then disconnect the
spark plug wire and keep it away from the
spark plug to prevent accidental starting.
• Do not continue to run your mower if you
hit a foreign object° Follow the procedure
outlined above, then repair any damage
before restarting and operating you
mower.
• Do not change the governor settings or
overspeed the engine. Engine damage or
personal injury may result.
• Do not operate your mower if it vibrates
abnormally. Excessive vibration is an
indication of damage; stop the engine,
safely check for the cause of vibration
and repair as required°
• Do not run the engine indoors. Exhaust
fumes are dangerous.
• Never cut grass by pulling the mower
towards you. Mow across the face of
slopes, never up and down or you might
lose your footing. Do not mow excessively steep slopes. Use caution when
operating the mower on uneven terrain
or when changing directions -- maintain
good footing.
• Never operate your mower without
proper guards, plates, grass catcher or
other safety devices in place.
MAINTENANCE
AND
STORAGE:
• Check the blade and the engine mounting bolts often to be sure they are
tightened properly.
° Check all bolts, nuts and screws at
frequent intervals for proper tightness to
be sure mower is in safe working
condition.
,, Keep all safety devices in place and
working,
• To reduce fire hazard, keep the engine
free of grass, leaves or excessive grease
and oil,
• Check grass catcher often for deterioration and wear and replace worn bags°
Use only replacement bags that are
recommended by and comply with
specifications of the manufacturer of your
mowen
° Always keep a sharp blade on your
mower
• Allow engine to cool before storing in any
enclosure,
• Never store mower with fuel in the tank
inside a building where fumes may reach
an open flame or an ignition source such
as a hot water heater, space heater,
clothes dryer, etc,
CAUTION;
Always disconnect spark plug
wire and place wire where it cannot contact
spark plug in order to prevent accidental
starting when setting up, transporting,
adjusting or making repairs.
WARNING
The engine exhaust from this product
contains chemicals known to the State of
California to cause cancer, birth defects, or
other reproductive harm.
Theseaccessories
wereavailable
whenthislawnmowerwas
produce& They are also
available at most Sears retail outlets and service centers, Most Sears stores can also order
repair parts for you, when you provide the model number of your lawn mower. Some of these
accessories may not apply to your lawn mower_
LAWN MOWER PERFORMANCE
CLIPPING DEFLECTOR
FOR REAR DISCHARGE LAWN MOWERS
MULCHER KITS
STABILIZER
GRASS CATCHERS
FOR
SIDE D_SOHARGE
LAWN MOWERS
GRASS CATCHERS
FOR
REAR DISCHARGE
LAWN MOWERS
GAS CANS
LAWN MOWER
MAINTENANCE
MUFFLERS
AIR FILTERS
BLADES
BLADE ADAPTERS
Read these instructionsand this manual in its
entirety before you attempt to assemble or
operate your new lawn mower. Your new lawn
mower has been assembled at the factory with
the exception of those parts left unassembled
for shipping purpose& Atl parts such as nuts,
washers, bolts, etc., necessary to complete the
assembly have been placed in the parts bag.
To ensure safe and proper operation of your
lawn mower, at! parts and hardware you
assemble must be tightened securely. Use the
correct tools as necessary to ensure proper
tightness.
TO REMOVE
CARTON
LAWN
MOWER
FROM
• Remove loose pads included with mower.
,, Cut down two end corners of carton and lay
end pane[ down flat.
= Remove all packing malerials except
padding between upper and lower handle
and padding holding operator presence
control bar to upper handle.
•
SPARK PLUGS
WHEELS
ENGINE OIL
• Rolt tawn mower out of carton and check
carton thoroughly for additional loose parts.
HOW TO SET UP YOUR LAWN
MOWER
TO UNFOLD HANDLE
IMPORIANT:
Unfold handles carefully so as
not to pinch or damage control cables.
• Raise handles until lower handle section
locks into place in mowing position,
• Remove protective padding, raise upper
handle section into place on lower handle
and tighten both handle knobs,
° Remove handle padding holding operator
presence control bar to upper handle.
° Your lawn mower handle can be adjusted
foryour mowing comfort. Refer to "Adjust
Handle" in the Service and Adjustment
section of this manual.
NOTE: Forshippingpurposes, the rear
TO PREPARE
wheels on you[ lawn mower are not adjusted
to the same position as the front wheels,,
Before operating mower adjust a{I wheels to
the same cutting height position_
NOTE;
Operator
bar
F
Upp_
Lilt up
Mowing
position
Lower handle
TO INSTALL ATTACHMENTS
Your lawn mower was shipped ready to be
used as a mulchero To convert to bagging or
discharging:
• Open rear door and remove mulcher plug,
Store mulcher plug in a safe place.
• You can now install catcher or optional
clipping deflector,
• To return to mulching operation, instail
mulcher plug into discharge opening of
mower. Be sure all tabs are seated
propedy
before
BATTERY
Your battery
must be charged
you can start your
= Disconnect engine battery (male) from
battery connector (female)
• Connect battery charger connector
(male) to battery connector (female)°
• Plug battery charger into 110 volt A,C,
outlet,
- Leave battery charger connected for 24
hours before starting your engine for the
first time,
° After charging, connect engine connector (male) to battery connector (female).
Your engine has an integral alternator for
partial charging. Connect your battery
charger to charge battery as required.
IMPORTANT: The engine alternator will
not charge a descharged battery,,
At the end of the mowing season the
battery should be charged for 48 hours to
protect the battery during w{nter storage.
CAUTION; Always disconnect the engtne
connector (male) from the battery
connector (female) to prevent accidental
starting when transporting or staring your
lawn mower after the season,
F_ngine
connector
(male)
Battery
charger
Mulcher plug
CAUTION:
Do not run your lawn mower
without mulcher plug in place or approved
dipping deflector or grass catcher in p_ace,
Never attempt to operate the lawn mower with
lhe rear door removed or propped open.
lawn mower,,
Battery connector
(female)
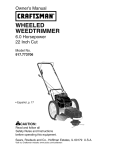
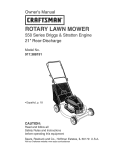
KNOW YOUR LAWN MOWER
READ THIS OWNER'S MANUALAND SAFETY RULES BEFORE OPERATING YOUR LAWN
MOWER. Compare the illustrations with your lawn mower to familiarize yourself with the
location of various controls and adjustments, Save this manual br future reference.
r_bs_"_ym'b'ot_,"'may
appear on your lawn mower or in Iimrature suppliecl vvl_
Learn and understand there meanfng.
,
CArmeN
ENGINE
OR WARNING
ON
IIIH,
ENGINE
FAST
SLOW
CHOKE
FUEL
OIL
DANGER, KEEP HANDS
OFF
IIII
11]
AND FEET
!
I
!!
Operator presence
AWAY
[
==
i
Drive control lever
Electric start key
cable
Slader handle
./"
Handle knob
Gasoline cap
Primer
Housing
Ddve cover
Engine oil cap w/dipstick
Wheel adjuster
(on each wheel)
MEETS CPSC SAFETY REQUIREMENTS
Sears rotary walk-behind power lawn mowers conform to the safety standards of the American
National Standards Institute and the U,S. Consumer Product Safety Commission. The blade
turns when the engine is running.
Operator presence control bar - must be
held down to the handle to start the engine.
Release to stop the engine.
Primer - pumps additional fuel from the
carburetor to the cylinder for use when starting
a cold engine.
Starter handle - used for starling Ihe engine.
Electric start key - used for starting the
engine,
Drive control lever- used to engage powerpropelled forward motion of lawn mower.
Mulcher plug - must be removed to convert to
bagging or discharging operation.
Theoperationof anylawnmowercan
resultin foreignobjectsthrow_,intothe
eyes,whichcan resultin severeeye
damage.Alwayswearsafetygfasseser
eyeshieldswhileoperatingyourlawn
moweror performinganyadiustmentsor
repairs_Werecommenda widevision
safetymaskoverthe spectaclesor
standardsafetyglasse&
HOWTO USEYOURLAWN MOWER
CAUTION: Donotrdnyourlawnmower
withoutmuicherplateinplaceanddoorclosed
orwithoutanapproved
clippingdeflector
or
grasscatcher
inplace,Neverattemptto
operatethelawnmowerwiththereardoor
removed
orproppedopen,
ENGINESPEED
Theenginespeedwas set at the factory
for optimum performance,
adjustable,
ENGINE ZONE CONTROL
Speed is not
CAUTION:
Federal regulations require an
engine control to be installed on this lawn
mower in order to minimize the risk of blade
contact injury. Do not under any circumstances
attempt to defeat the function of the operator
control The blade turns when the engine is
running.
• Your lawn mower is equipped with an
operator presence control bar whtch
requires the operator to be positioned
behind the lawn mower handle to star[ and
operate the lawn mower
Plate Tab
Lower Wheels
""
_
"*
'
for High Cul
--
Lever
Raise Wheels lor Low Cut
TO ATTACH GRASS CATCHER
, Close the flip lid. Flip lid must be closed
while operating lawn mower.
• Uft the rear door on the mower housing and
p_acethe grass catcher frame onta the
formed tabs on the rear door hinge bracket.
• The grass catcher is secured to the lawn
mower housing when the rear door is
lowered onto the grass catcher frame_
CAUTION:
Do not run your lawn mower
without clipping deflector or approved grass
catcher in place, Never attempt to operate the
Iawn mower with the rear door removed or
propped open.
Hinge
Rear door
Formed
_bs
TO EMPTY GRASS CATCHER
TO ADJUST CUTTING HEIGHT
o Raise wheels for low cut and tower wheels
for high cut°
• Adjust cutting height to suit your requirements. Medium position is best for most
lawns,
• To change cutting height, squeeze adjuster
lever toward wheel Move wheel up or
down to sub your requirements. Be sure all
wheels are in the same setting.
NOTE: Adjuster Is propedy positioned
when plate tab inserts into hole in lever.
Also, 9-position adjusters (if so equipped)
allow lever to be positioned between the
plate tabs°
* To remove grass catcher, release operator
presence control bar to stop engine.
• Lift up rear door and remove the grass
catcher by the handle.
o Do not drag the bag when emptying; it wilt
cause unnecessary wear.
DRIVECONTROL
° Self-propelling is controlled by holding
the operator presence control bar down
Io the handle and pushing the drive
control lever forward until it clicks; then
release the lever.
• Forward motion will stop when the
operator presence control bar is
released. To stop forward motion
without stopping engine, release the
operator presence control bar slightly
until the drive control disengages,
Hold
operator presence control bar down to
handle to continue mowing without self..
propelling_
° To keep drive control engaged when
turning corners, push down on handle
and lift front wheels off ground while
turning lawn mower..
Operator presence
,
To engage drive
control
control bar
Drive
Drive control
desengaged
BEFORE STARTING ENGINE
OIL.
Your lawn mower is shipped without oil in the
engine.
• Be sure mower is level and area around
oil lill is clean.
• Remove engine oil cap w/dipstick and fill
to the full line on the dipstick°
• Use 20 ozs. of oil, For type and grade
of oil to use, see "ENGINE" in Maintenance section of this manual.
,, Pour oil slowly. Do not over fill,
• Check oil level before each use. Add oil
if needed. Fill to full line on dipstick,
• To read proper level, tighten engine oil
cap each time_
• Reinstall engine oil cap and tighten.
° Change the oil after every 25 hours of
operation or each season, You may
need to change the oil more often under
dusty, dirty conditions.
ADD GASOLINE
° Fill fuel tank. Use fresh, clean, regtJlar
unleaded gasoline with a minimum of 87
octane. Do not mix oi! with gasoline. Pur..
chase fuel in quantities that can be used within
30 days to assure fuel freshness.
IMPORTANT: When operating in
temperatures below 32°F(0°C), use fresh,
dean winter grade gasoline to help insure
good cold weather starting.
WARNING: Experience indicates that alcohol
blended fuels (called gasohol or using ethanol
or methanol) can attract moisture which leads
to separation and formation of acids during
storage, Acidic gas can damage the fuel
system of an engine while in storage. To avoid
engine problems, the fuel system should be
emptied before storage of 30 days or longer.
Drain the gas tank, start the engine and let it
run until the fuel lines and carburetor are
empty. Use fresh fuel next season. See
Storage Instructions for addilional information.
Never use engine or carburetor cleaner
products in the fuel tank or permanent
damage may occur,
CAUTION:
Fill to bottom of gas tank filler
neck. Do not overfill. Wipe off any spilled oil
or fuel. Do not store, spill or use gasoline near
an open flame,
Engine oi! cap wt
Gasoline filler cap
TO START ENGINE
. To start a cold engine, push primer five (5)
times before trying to start, Use a firm push,
This slep is not usually necessary when
starting an engine which I_as already run for a
few minutes.
. Hold operator presence control bar down 1o
the handteo
• Turn electric start key clockwise to crank
engine,
IMPORTANT: Do not crank engine more than
five continous seconds between each time you
try to start..Wait 5 to t0 seconds between ech
attempt,
o Tostartengineusingthe auxiliary
starterhandle,followthestepsabove.
Exchangethe useofthe startkeyfor
starterhandle Pullstarterhandlequickly,
Donotallowstarterropeto snap back.
• To stop engine, release operator
presence control bar.
NOTE:
In cooler weather
it may be
necessary
to repeat priming steps.
In
warmer weather
over priming may
cause flooding and engine will not
start. If you do flood engine wait a few
minutes before attempting
to start and
do not repeat priming steps°
MOWING TIPS
• Under certain conditions, such as very' tal!
grass, it may be necessary to raise the
height of cut to reduce pushing effort and to
keep from overloading the engine and
leaving clumps of grass clippings.
° For extreme;y heavy cutting, reduce the
width of cut and raise the rear of the lawn
mower housing one (t) wheel adjuster
setting higher than the front for bette_"
discharge of gras&
• When using a rear discharge lawn mower in
moisl, heavy grass, clumps of cut grass
may not enter the grass catcher. R_"Juce
ground speed (pushing speed) and/or run
the lawn mower over the area a second
time.
. if a trail of grass clippings is left on the right
side of a rear discharge lawn mower, mow
in a clockwise direction with a small overlap
to collect the clippings on the next pass.
• Keep top of engine around starter clear and
clean of grass clippings and chaff, This will
help engine air flow and extend engine life.
• Pores in cloth grass catchers can become
filled with dirt and dust with use and
catchers will collect less grass. To prevent
this, regularly hose catchers off with water
and let dry before using.
MULCHING
MOWING
TIPS
IMPORTANT:
Forbest performance, keep
mower housing free of built-up grass and
trash. See %leaning" in Maintenance section
of this manual.
• The special mulching blade will recur the
grass clippings many times and reduce
them in size so that as they fall onto the
lawn they wilt disperse into the grass and
not be noticed, Also, the mulched grass will
biodegrade quickly to provide nutrients for
the lawn, Always mulch with your highest
engine (blade) speed as this wilt provide the
best recurringaction of the blades.
• Avoid cutting your lawn when it is wet. Wet
grass tends to form clumps and interferes
with the mulching action_ The best time to
mow your lawn is the early afternoon, At
this time the grass has dried and the newly
cut area will not be exposed to the direct
sun_
• For best results, adjust the lawn mower
cutting height so that the lawn mower cuts
off only the top one-third of the grass blades
If the lawn is overgrown it will be necessary
to raise the height of cut to reduce pushing
effort and to keep from overloading the
engine and leaving clumps of mulched
grass, For extremely heavy mulching,
reduce your width of cut by overlapping
previously cut path and mow slowly.
. Certain types of grass and grass conditions
may require that an area be mulched a
second IFmeto completely hide the
clippings_ When doing a second cut, mow
across or perpendicular to the first cut path,
• Change your cuing pattern from week to
week. Mow north to south one week then
change to east to west the next week. This
wifl help prevent matling and graining of the
lawn.
Max 1/3
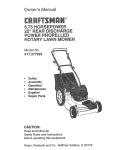
AS YOU COMPLETE
DATES
ii
fl
Check for Loose Fasleners
L_t___.
,CieaNInspectGrass Catcher
;(I,fEqulpp,ed)
M
_(pr-
_
Clean Lawn Mower
_
_
___
_
Blade
__._,
G
Chle¢,_
..--_t'/_.,3-.._w__.
_",
If
t,/
Engine Oil Leve|
,
l/
clean Air Filter
J_
_j_
1 i_spe_tMUiii_
/
,_
E
I
V"_
Replace Air Fiffer Paper Cartridge
1 - Change
more
.........
tv#'
..........
Lubrication Chart
Clear,aatletyIRecharg'e
........
IEfeclrtc Start Mowers_
E
..........
.......
_
RE ,(P,ower-PropelledMowers)
ChecPJSharpen/Replace
._
_Li.._
(Power.Propelled
Cfean Under Drive Mowers)
Cover
Cheek drive bert/pulleys
.....
often when operet}rtg
under
t, h_eVy |cad or in h_gP, arnhten!
.........
temperatures
2 - Service mere often M_ea operating in dirty ot dusty cendltione
3 * Replace blades mo,ze often when mo'Mng |n sandy soil
4 - Charge
GENERAL
4B hout_ at end _f season
RECOMMENDATIONS
LUBRICATION
The warranty on this lawn mower does not
cover items that have been subjected to
operator abuse or negligence. To receive
full value from the warranty, operator must
maintain mower as instructed in this
manual,
CHART
(_) Wheel
adjusler
Some adjustments will need to be made
periodically to properly maintain your unit.
All adjustments in the Service and
Adjustments section of this manual should
be checked at least once each season.
- Once a year, replace the spark plug,
replace air fiiter element and check
blade for wear. A new spark plug and
clean/new air filter element assures
proper air-fuel mixture and helps your
engine run better and last longer.
, Follow the maintenance schedute in this
manual,
BEFORE EACH USE
(_) Handle bracket
mounting pin
, Check engine oil level.
• Check for loose fasteners.
LUBRICATION
IMPORTANT: Do not oil or grease plastic
wheel bearings, Viscous lubdcanls vail attract
dust and dirt that will shorten the life of the self
Keep unil wel! lubricated
TION CHART")_
lubricating bearings. If you feel they must be
lubricated, use only a dry, powdered graphite
type lubricant sparingly,
(See "LUBRICA-
®
Engine oil
(_ Rear door
hinge
(_ Spraylubricant
®
10
Refer to Maintenance"ENGINE" section,,
PRODUCT
SPECiFiCATIONS
MODEL NUMBER
SERIAL
917.377573
NUMBER
DATE OF PURCHASE
HORSEPOWER:
65
DISPLACEMENT:
12.56 CU_ tNo
GASOLINE
1 _6 QUARTS
CAPACITY/TYPE:
UNLEADED
OIL TYPE (API-SF/SG!SH):
REGULAR
SAE 30 (ABOVE 32°F)
SAE 5W-30 (BELOW 32°F)
i
iOIL CAPACITY:
SPARK PLUG(GAP:
20 OZS,
,030")
CHAMPION
VALVE CLEARANCE:
RJ19LM
OR J19LM
INTAKE:
004"
- .008"
EXHAUST:
,004"
-.008"
SOLID STATE IGNITION
AIR GAP:
,0125 IN.
BLADE BOET TORQUE:
35-40 FT, LBS,
The model and serial numbers will be found on a decal attached to the rear of the
lawn mower housing_Record
provided above_
both serial number and date of purchase in space
LAWN MOWER
A_ways observe safety rules ,when performing
any maintenance.
"[IRES
,, Keep tires free of gasoline, oil, or insect
control chemicals which can harm rubber,
• Avoid stumps, stones, deep ruts, sharp
objects and other hazards that may cause
tire damage.
BLADE CARE
For best results, mower blade must be kept
sharp. Replace bent or damaged blades.
TO REMOVE BLADE
• Disconnect spark plug wire from spark plug
and place wire where it cannot come in
contact with spark plug.
,, Turn lawn mower on its side. Make sure air
filter and carburetor are up.
,, Use a wood block between blade and
mower housing to prevent blade from
turning when removing blade bolt.
o Protect your hands with gloves and/or wrap
blade with heavy cloth.
• Remove blade bolt by turning counterclockwise, Use a 9/16" box or open-end
wrench.
° Remove blade and attaching hardware
(bolt, lock washer and hardened washer).
NOTE: Remove lhe blade adapter and
check the key inside hub of blade adapter.
The key must be in good condition to work
properly, Replace adapter if damaged.
TO REPLACE BLADE
• Position the blade adapter on the engine
crankshaft, Be sure key in adapter and
crankshaft keyway are aligned,
• Position blade on the blade adapter aligning
the two (2) holes in the blade with the raised
lugs on the adorer.
• Be sure the trailingedge of blade (opposite
sharp edge) is up toward the engine.
° install the blade bolt with the lock washer
and hardened washer into blade adapter
and crankshaft
,, Use block of wood between blade and lawn
mower housing and tighten the blade bolt,
turning clockwise.
• The recommended tightening torque is 3540 ft. Ibs.
IMPORTANT:
treated.
11
Blade bolt [s grade 8 heat
• Remove any trash or grass cuttings from
inside the dust cover, pinion and/or drive
wheel gear teeth.
° Put wheels back in place.
. If after cleaning, the drive wheels do not
turn freely, contact your nearest
authorized service center,
GEAR CASE
NOTE: We do not recommend sharpening
blade ° but if you do, be sure the blade
is balanced.
TO SHARPEN BLADE
Care should be taken to keep the blade
balanced. An unbalanced blade will
cause eventual
damage
to lawn mower or
• To keep your drive system working
properly, the gear case and area around
the drive should be kept clean and free
of trash build:up. Clean under the drive
cover twice a season
• The gear case is filled with lubricant to
the proper level at the factory. The only
time the lubricant needs attention is if
service has been performed on the gear
case,
° ff lubricant is required, use only Texaco
Starplex Premium 1 Grease, Par[ No.
750355, Do not substitute_
engine°
• The blade can be sharpened with a file or
on a grinding wheel. Do not attempt to
sharpen while on the mower.
• To check blade balance, drive a nail into a
beam or wall. Leave about one inch of the
straight nail exposed. PJace center hofe of
blade over the head of the nai!. If blade is
balanced, it should remain in a horizontal
position. If eilher end of the btade moves
downward, sharpen the heavy end until the
blade is balanced
B|ade
adapter "'-_._
Crank shaft
keyway
"'"-"_"
gey_
ENGINE
LUBRICATION
_
Use only high quality detergent oil rated
with APt service classification SF, SG, or
SH. Select the oil's SAE viscosity grade
according to your expected operating
temperature.
i\\
Cha_tkLock
\
Trailin
washer Hardened edge
washer
GRASS CATCHER
Blade
adapter
NOTE; Although multi-viscosity otis (5W30,
10W30 etc.) improve starling in cold weather,
these multi-viscosity oils wilt result in increased
oil consumption when used above 32°F.
Check your engine oil level more frequently to
avoid possible engine damage from running
low on oil,
° The grass catcher may be hosed with
water, but must be dry when used,
, Check your grass catcher often for damage
or deterioration. Through normal use it will
wear. If catcher needs repladng, replace
only with a manufacturer approved
replacement calcher, Give the lawn mower
model number when ordering,
Change after the first 25 hours of operation at
least once a year if the lawn mower is not used
for 25 hours in one year.
DRIVE WHEELS
Check front drive wheels each time before
you mow to be sure they move freely.
The wheels not turning freely means trash,
grass cuttings, etc, are in the drive wheel
area and must be cleaned to free drive
wheels,
If necessary to clean the drive wheels,
check both front wheels.
Check the crankcase oil level before starting
the engine and after each five (5) hours of
continuous use. Tighten oil plug securely each
time you check the oil level,
.
Remove hubcaps, hairpin cotters and
washers.
,, Remove wheels lrom wheel adjusters
12
TO CHANGE ENGINE OIL
CAUTION:
Petroleum solvents, such as
kerosene, are not to be used to clean
cartridge. They may cause deterioration of lhe
cartridge. Do not oil cartridge+ Do not use
pressurized air to clean or dry cartridge,
NOTE: Before tipping lawn mower to drain
oil, drain fuel tank by running engine until fuel
lank is empty,
+ Disconnect spark plug wire from spark plug
and place wire where it cannot come in
contact w_th spark plug.
. Remove engine oil cap; lay aside on a clean
surface,
• Tip lawn mower on its side as shown and
drain oil into a suitable container. Rock lawn
mower back and forth to remove any oil
trapped inside of engine.
. Wipe off any spilled oil on lawn mower and
on side of engine+
• Fill engine with oil. Fill only to the "FULL"
line on the dipstick DO NOT overfill,
• Replace engine oil cap.
• Reconnect spark plug wire
MUFFLER
Inspect and replace corroded muffler as it
could create a fire hazard and/or damage,
SPARK PLUG
Change your spark plug each year to make
your engine start easier and run better. Set
spark plug gap at +030inch.
CLEANING
IMPORTANT:
For best performance, keep
mower housing free of built-up grass and
trash° Clean the underside of your mower after
each use.
CAUTION:
Disconnect spark plug wire lrom
spark plug and place wire where it cannot
come in contact with the spark plug.
o Turn lawn mower on its side. Make sure air
filter and carburetor are up. Clean the
underside of your lawn mower by scraping
to remove build°up of grass and trash.
. Clean engine often to keep trash from
accumulating A clogged engine runs hotter
and shortens engine life.
* Keep finished surfaces and wheels free of
all gasoline, oit,etc.
o We do not recommend using a garden
hose to dean lawn mower unless the
electrical system, muffler, air filter and
carburetor are covered to keep water out.
Water in engine can result in shortened
engine life,
Container
AIR FILTER
Your engine will not run properly add may
be damaged by using a dirty air filter.
Replace the air filter every year, more
often if you mow in very dusty, dirty
conditions+ Do not wash air filter.
TO CHANGE
AIR FILTER
,, Remove the air filter by turning clockwise to the stop and pull away from
collar.
,, Remove filter from inside of cover,
• Clean the inside of the cover and the
CLEAN UNDER DRIVE COVER
Clean under drive cover at least twice a
season. Scrape underside of cover with putty
knife or similar tool to remove any build-up of
trash or grass on underside of dr_vecover.
collar to remove any dirt accumulation,
° Insert new filter into cover.
• Put air filter cover and filter into collar
aligning the tab with the slot,
° Push in on cover and turn counterclockwise to tighten,
Collar
Turn
Clockwise
to Remove
Turn CourtierClockwise to
Slot
Air Filter
Tab
Air Filter
Cover
T_ghten
13
CAUTION: Beforeperforminganly
serviceor adjustments.
• Remove hairpin cotters.
, Disconnect the lower handle from the
handle brackets.
• Turn the handle over and reassemble the
hairpin cotters that have been removed,
• Route cable(s) below crossbar of lower
handle and reassemble the controls and the
operator presence control bar to the upper
handle.
CAUTION: The operator presence control bar
must pivot freely to pen'n_tblade/brake
engagement when control bar is released. Do
not overtighten the fasteners holding the
controls to the upper handle.
,, To change from medium low to high
posit_on only the upper handle section will
have to be turned over.
• To change from medium low to low position,
only the lower handle section will have to be
turned over.
o
•
Release control bar.
Make sure the blade and all moving
parts have completely stopped,
,,
Disconnect spark plug wire from spark
plug and place where it cannot come
in contact with plug.
LAWN MOWER
TO ADJUST CUTTING HEIGHT
See "TO ADJUST CUT'f'ING HEIGHT' in the
Operation section
of this manual°
REAR DEFLECTOR
The rear deflector, attached between the rear
wheels of your lawn mower, isprovided to
minimize the possibility that objects will be
thrown out the rear of the lawn mower into the
operator's mowing position, If the rear
deflector becomes damaged, it should be
replaced.
TO REMOVE/REPLACE DRIVE BELT
Shipping Position
• Remove drive cover. Remove belt by
pushing down on gear case pulley and roll
belt off
• Turn lawn mower on its side with carburetor
Medium Lo_
and fuel cap up,
• Remove blade,
o Remove debris shield°
o Remove belt from engine pulley on
crankshaft.
. Install new belt by reversing above steps.
• Always use factory approved belt to assure
fit and long life.
um High
High
Low
D_w
cover
Squeeze to
Remove
Belt
Push
down
Lower Handle
Hairpin
TO ADJUST HANDLE
'four lawn mower handle can be raised or
lowered for your mowing comfort, Four (4)
positions are available: high, medium high,
medium low and low, Handles are shipped
mounted in the medium low position.
• To change from medium tow to medium
high position, the upper and lower handle
sections will have to be turned over_
• Remove the cable clip&
• Remove the controls and operator presence
control bar from the upper handle.,
Handle Bracket
ENGINE
ENGINE SPEED
Your engine speed has been factory set. Do
not attempt to increase engine speed or it
may result in personal injury. If you believe
that the engine ts running too fast or too stow,
take your lawn mower to an aulhorized
service center/department for repair and
adjustmenL
14
CARBURETOR
Yourcarburetor
hasa non-adjustable
fixed
mainjetformixturecontrolIfyourengine
doesnotoperateproperlyduetosuspected
carburetor
problems,takeyourlawnmowerto
anauthorizedservicecenter/department
for
repairandadjustment,
Immediately
prepareyourlawnmowerfor
storage
attheendoftheseasonor iftheunit
willnotbeusedfor30daysor more.
LAWNMOWER
Whenlawnmoweris to be stored for a period
ENGINE
FUEL SYSTEM
of time, clean it thoroughly, remove all dirt,
grease, leaves, etc_ Store in a clean, dry area.
• Clean entire lawn mower (See "CLEANING"
in the Maintenance seclion of this manual),,
• Lubricate as shown in the Maintenance
section of this manual
° Be sure that all nuts, bolts, screws, and pins
are securely fastened. Inspect moving
parts for damage, breakage and wear.
Replace if necessary,
,, Touch up all rusted or chipped paint
surfaces; sand lightly before painting.
HANDLE
o You can fold your lawn mower handJe for
storage.
. Loosen the two (2) handle knobs on sides of
the upper handle and allow handle to fold
down to the rear',
o Squeeze the bottom ends of lower handle
loward each other until pins in handle clear
the brackets and pivot entire handle
assembly forward and allow it to rest on
mower,.
. When setting up your handle from the
storage position, the lower handle will
require manually locking into the mowing
position.
IMPORTANT:
When folding the handle for
storage or transportation, be sure to fold the
handle as shown or you amy damage the
control cables.
Operator presence control bar
.
Fold ,o_ard
for storage
L€__4_
Lower
handle
.-__
_,
_/...,_
Upper
.f handle
¢_/,)
.,/_
:'
backward
IMPORTANT:
It is important to prevent gum
deposits from forming in essential fuel system
parts such as carburetor, fuel filter, fuel hose or
tank during storage. Also, experience indicates
that alcohol blended fuels (called gasohol or
using ethanol or methanol) can attract
moisture which leads to separation and
formation of acids during storage. Acidic gas
can damage the fuel system of an engine
while in storage,
o Drain the fuel tank.
• Start the engine and let it run until the fuel
lines and carburetor are empty.
• Never use engine or carburetor cleaner
products in the fuel tank or permanent
damage may occur`
. Use fresh fuel next season.
NOTE: Fuel stabilizer is an acceptable
alternative in minimizing the formation of fuet
gum deposits during storage Add stabilizer to
gasoline in fuel tank or storage container.
Always follow the mix ratio tound on stabilizer
container, Run engine at least 10 minutes
after adding stabilizer Io allow the stabilizer to
reach the carburetor, Do not drain the gas
tank and carburetor if using fuel stabilizer.
ENGINE OIL
Drain oil (with engine warm) and replace with
clean engine oil. (See "ENGINE" in the
Maintenance section of this manual).
CYLINDER
° Remove spark plug.
° Pour one ounce (29 ml) of oil through spark
plug hole into cylinder.
° Pull starter handle sIowly a few times to
distribute oil
,, Replace with new spark plug
OTHER
° Do not store gasoline from one season to
another`
• Replace your gasoline can if your can starts
to rust. Rust and/or dirt in your gasoline will
cause problems.
Mowing
position
15
IMPORTANT:
Never cover mower while
engine and exhaust areas are still warm.
CAUTION:
Never store the fawn mowerwith
• if possible, store your unit indoors and cover
it to give protection from dust and dirt..
• Cover your unit with a suitable proteclive
cover that does not retain moisture, Do not
gasoline in the tank inside a building where
fumes may reach an open flame or spark.
Allow the engine to cool before storing in any
enclosure,
use plastic. Plastic cannot breathe which
allows condensation to form and will cause
your unit to rust,
TROUBLESHOOTING
PROBLEM
Does not start
CHART
CAUSE
CORRECTION
• Dirty, air fiiter,
• Out of fuel,
,, Stale fuel,
° C_earv'reptace air fiiter_
• Fill fuel tank.
o Drain tank and refill with
fresh clean fuel,
,, Drain fuel tank and
carburetor and refill tank
• Water in fuel.
with fresh gasoline.
° Connect wire to plug.
- Spark plug wire is
disconnected.
. Bad spark plug.
• Loose blade or broken blade
adapter.
. Control bar in released
position°
o Control bar defective,
16
,, Replace spark plug.
• Tighten blade bolt or
replace blade adapter.
° Depress control bar to
handle.
• Replace control bar.
TROUBLESHOOTING
PROBLEM
CHART
CAUSE
Loss of power
CORRECTION
• Rear of lawn mower housing
or cutting blade dragging
in heavy grass.
O
Cutting too much grass.
I
°
I
Dirty air filter.
Buildup of grass, leaves,
and trash under mower.
]bo much oil in engine°
Walking speed too fasL
, Set to "Higher Cut"
position.
- Set to "Higher Cut"
position.
* Clean!replace air filter.
- Clean underside of mower
housing,
, Check oil level.
° Cut at slower walking
speed.
Poor cut-
uneven
• Worn, bent or loose blade.
• Wheel heights uneven.
- Bui{dup of grass, leaves
and trash under mower.
Excessive
vibration
• Worn, bent or loose blade.
• Bent engin e crankshaft,
Starter rope hard
to pull
• Engine flywheel brake is on
when control bar is released.
, Bent engine crankshaft.
• Blade adapter broken.
• Blade dragging in grass,
• Replace blade, Tighten
blade bolt,
° Set all wheels at same
height
° Clean underside of
mower housing.
• Replace blade_ Tighten
blade bolt.
• Contact an authorized
service center.
* Depress control bar to
upper handle betore
pulling starter rope.
. Contact an authorized
service center.
o Replace blade adapter.
° Move lawn mower to cut
grass or to hard surface
to start engine.
Grass catcher
not filling (if so
equipped)
Hard to push
• Cutting height too Iowo
• Lift on blade worn off.
• Catcher not venting air.
• Grass is too high or wheel
height is too tow.
°
Rear of lawn mower
e
tl
housing or blade dragging
in grass
Grass catcher too full.
Handle height position not
right for you,
t7
° Raise cutting height.
o Replace blade,
• Clean grass catcher,
• Raise cutting height
= Raise rear of lawn mower
housing one (I) setting
higher.
° Empty grass catcher.
* Adjust handle height to
suit,
Garantla
Reglas de Seguridad
Montaje
Operaci6n
Man_enimienlo
Programa de Man_.enimiento
18
18
20
22
26
26
Especificaciones del Producto
Servicio y AdjusLes
Almacenamiento
Idenlificaci6n de problemas
Partes de repuesto
Orden de Parles
27
30
3I
32
Vea el manual
ingles del dueSo
Contratapa
GARANT{A LIMITADA DE DOS AI_OS PARA LA SEGADORAA MOTOR CRAFTSMAN
Per dos (2) aSos,a padkde la fecha de compra, cuando esta Segadora Craftsmanse mantenga,lubrique
y afine segun las instruccionespara la operad6n y el mantenimientoen el manual del duafio, Sears
repara_&gratis lode detectoen e! matefiaJy la ma_node obrm
Si fa SegaderaCraftsmanse usa para fines comerciafeso de arr_endo,esta garantfa s61ose aplica per
noventa (90) dfas a partirde ta leeha de compra.
Esta Garantiano cubre:
• Art{culosqua se desgastandurante ei use normal tales come las cuchillassegadoras rotatorias,los
adaptadores de la _chilfa, las oorreas, los filtros de airs y las buj_as.
• Reparacionesnecesariasdebido al abuse o a la negligenciade_operador,inclw6ndose a los
cigDeS.alesdobladosy a la falta de mantenimiento del equipo segOnles instruccionesqua se inclwen
en el manual del dueSo,
EL SERVICIO DE GARANT[AESTA D1SPON]BLEal devolver la segadpraa motor Craftsmanal centre/
deparlmento de servicioSears mas cercano en los Estados Unidos. Estagarantfa se aplica solamente
m{entrasel produc_oeste en use en Ios Estados Untdos.
Esta Garanlfale otorgaderechos legales especff_cos,y puede qua tambi6n tenga o_rosderechos qua
vat,an de estado a estadoo
Sears, Roebuck and Co., D!817WA, Hoffrnan Estales, IL 60179 USA
• Use la segadoresolamente para los fines
propuestosper el labricantey segQntas
explicacionesdescrftason este manual,
• No opera ta segadorasi se ha cards o daSado en
cualquieraforma. Siempre repare los daSos
antes de usade.
- No use acoesoriosqua no hayan side
recomendadosper st fabdcante. E1use de dichos
accesoriospuede ser peligreso.
,, La cushilY,gira cuando el motor estA
fundonando..
PREPARACl6N:
Los es_drares de seguridad exigenla presenda
del operatoren los controlespara reduck a un
minimo al desgode lesionarse Su unidad viene
equipada con dichos controfes.Per ningun mot}ve
trate dal eliminarla fund6n de los controles qua
exigen lapresendfadel operador.
ENTRENAMIENTO:
- Lea este manualdal operador
cuidadosamenie. Fa_Iiarfcese con los
controlesy aprenda a opera[ su segadora en
forma adecuada.Aprenda a parar su segadora
r_pidamente°
• No permila cluelos niAosusen su segador&
Nunca permita qua los adullos operen la
segadorasin contar con las instrucciones
adecuada&
,, Manienga el &rea de operaci6ndespejada
de gents, espec_almentede niSospequeSos
y de animaJesdom_s_ces.
• Siempre revise cuidadosamenleel 6tea qua se
va a segar y desp6jela de lodas las piedras,
palos,alambres, huesos y olros objetos
extra.ties.Estos objetos saran larwados con la
cuchiltay pueden producirtesionesgraves.
,, Siempre use anteojos de segur_dado protectores
de ojos cuando anarque y durante et t}empo
que use Iasegadorao
18
" Vfstase
en forms adecuada. No opera la
Tenga cuidado cuando opere la segadora en
terreno disparejo o cuando cambie de
direcciSn - mantenga un buen equilibdo.
• Nunca opere ra segadora sin las
protecciones adecuadas, fas planchas0 el
recogedor de c6sped y otros disposPJvosde
seguridad en su tugar
MANTENIMIENTO Y ALMACENAMIENTO:
segadora sin zapatos o con sandaJias
mientras que el motor es|_.(uncionando.
° Siegue siempre durante et dfa o con buena
luz artificial.
OPERACi6N:
, Mantenga sus ojosy su monte en la
segadora yen el &rea que se est_ cortando
No permits que olros interesesto dlstraigan.
• No corte c_sped mojado o resbaloso.Nunca
corra mtentras est8 operando su segadora.
Siempre aseg_rese de mantener e} equ[librio
- mantenga el mango agarrado firmemente y
camine.
• No ponga tas manes o los pies cerca odebsje
de las partes rotatorias Mant6ngase
alejado de ta abertura de descarga en rode
memento
• Siempre pare el motor cuando se vaya
ocuando no est,, usando su segadora, o
antes de at_vesar las entradas pars autos,
los senderos, caminos y _reas cubiertas de
fipio.
• Nunca dirija la descarga del material hacia
los espectadores nt permita a nadie cerca de
la segadora mientras la est_ operando.
,, Antes de llmpiar, inspeccfonaro de reparar I
a segadora, pare el motor y est_
completamente seguro de que la cuchilla y
que todas tas partes que se mueven se
hayan detenidoo Luego, desconecle ef
atembre de ta buifa y mant_ngalo aiejado de
_sta pars evitar et arranque per accidente.
• No contin5e haciendo funcionarsu segadora
sile pega aun objeto exlraSo Siga et
procedimiento descfito anlefiormente, !uego
repare cualquier daSo antes de volver a
arrancar y de operar su segadora,
• No cambtelos ajustes del reguiader o
hagaque el motor ands a una velocidad
excesivaoSe pueden productr daSos en et
motor y t esiones personales
• No opere su segadora si vibra fuera de Io
normal. La vibraci6n excesiva es una
indlcaci6nde dar3o;pare el motor, revise en
forma segura la cause de la vtbraci6n y hags
las reparaciones segL_nsea necesario.
• No hags funcionar el motor en
recintoscerradoso Los gases de escape son
peligrosos.
• Nunca corte el c_sped tirando la segadora
hacia usted. Siegue a l[av_s de ta cars de
las pendlentes, nunca hacla arrlba o hacia
abajo puss puede perder el equilibfio. No
siegue pendientes demastado empinadas
,. Revise ta cuch{lla y los pemos de montaje
dot motor a menudo, pars asegurarse que
est_n apretados en la forms sdecuadao
• Rev;se lodes los pemos, tuercas y tomiltos a
tntervaJosfrecuentes,pars vefiticar si est&n
apretados en forms adecuada, y
asegurarseque la segadora se encuentra en
condiciones de funcionamiento seguro.
- Mantenga lodes los dispositivos do seguridad
en su lugar y listos pars funcionar
- Pars reduclr el peligm de _ncendio,
mantenga e{ motor sin c_sped, hojas y grass
o aceile en excesoo
• Revise el recogedor de c_sped a menudo
pars verifier si hay deterioro y desgaste y
cambie las bolsas desgastadas. Use
solamente las bolsas de repuesto
recomendadas per et fabricante de su
segadora o que curnplen con las
espectficaciones de _sle.
• Siempre msntenga una cuchillaafilada en su
segadora.
• Siempre permita que et motor se enlrt'e
shies de guardarla on cualquier recinto
cerrado,
• Nunca guarde la segadora con combustible
en el eslanque dentro de un edificio endonde
los gases pueden alcanzar una llama
expuesta o una fuente de igniciSn,tel come el
calentador de ague, la estufa de
calefacci6n, la secadora de ropa, etc.
PRECAUCION: Siempre desconecte et
alambre de la buj[a y pSngalo donde no pueda
entrar en conlacto con ta bujia, pars evitar el
arranque per accidents,durante la preparaciSn,
el transporte, el ajuste o cuando se hacen
reparaciones.
PRECAUCI6N:
Es conocido per el Eslado de
California que los gases de escape del motor de
este productor conlienen qulmicos los cuales a
ciertos niveles,pueden ocasionar, e_ncer,
defeclos de nacimtento, y otros daSos al sistema
reproductive
19
Estos accesorios estaban dispon{blescuando se produjo ta segadora.Tambi_n est,fn disponibles en la
mayorfade las tiendas de Sears yen los centrosde servicio, La mayorfa de las tiendasSears tambi_n
pueden mender a pedir partes de repuesto pare usted,si teeproporcionael nOmerodel modelo de su
segadora.Algunos de eslos accesorios talvez no se apliquen a su segadora
RENIDIMIENTO
DE, LA ,S,EGADORA
i
DESV1ADOR DE RECORTEe
PARA SEGAOORAS CON DESCARGA TRASERA
.....
,,J,'HH
'
'
" "
'
JUEG09
'
PARA
SEGAOORAS
CON
;DESCARGA
RECOREDOR
TRASERA
__
MANTENIMIENTO
i
,
i
ii
,,,,,,,
, ,,, ,,,,,,
i
i
i
ii
i i
ill
ESTABIUZADORES
PARA
RECOREDOR
CON DESCARGA
LATERAL
i
ENVASES
DE GASOLINA
DE LA SEGADORA
CUCHiLLAS
FILTROS
ADAPTADORES
DE CUCHILLA
Lea estas instruccienes
y este manual
completarnente antesde tratarde montar u eperar
su segadora nueva. Su segadora nueva ha s{do
monlada en le f&bricacon la excepci6nde aqueUas
parteecluese dejaron sin montar per razones de
env[ooTodas las padescorno las tuercas, las
arandelas, les pemes, eta.,qua son necesarias
pare completarel montaje hart side colocadasen la
bolsa de partes..Para asegurarsequa su segadora
funcione en forma seguray adecuada, redeslas
partes y los articulos de ferretefia qua se monten
tlenen que ser aprelados segurarnente,Use ]as
herramientascorrectas, come sea necesario, pare
asegurar qua se aprietenadecuadamenle.
PARA REMOVER
i
PARA LA ACOLCHADORA
S_I
CJILENCIADORES
CORREAS
i i
LA SEGADORA
LA CAJA DE CARTON
DE
DE AIRE-
RUEDAS
BUJItAS
ACEtTE
DEL MOTOR
Haga radarla segadora hacia afuera de Iacaja
de cartSn y rev[eela cuidadosamente pare
veri{icar si todav[a quedan partes sueltas
adlcionaJes.
COMe
PREPARAR
SU SEGADORA
PARA DESDOBLAR EL MANGO
tMPORTANTE: Desplieguee! mango con mucho
cuidado para no pelIizcaro da5ar loscab|as de
control
• Levante los mangos ha_a que la secci6n del
mango inferiorse asegure en su lugar, en la
posici6n parasager.
• Levante la secci(_ndel mango superiorhasta su
tugar en el mange inferior, remueva la cu=Sa
protectoray aprfele ambas manitlasdel mango.
• Remuevala cuSa del mango qua sujeta la bama
de les control que ex_gela presencia del
operador junto con el mange supeder.
- El mango de ta segadora puede ajustarse segun
te acomode pare segatt.Refi_rase a "AJUSTE
DEL MANGO"en la Secci6n de Serviciey
Ajustes de asia manual
• Remueva las partes sueltas qua so inclwen con
la segador&.
• Corte las dos esquinas de los extremes de la
caja de cad6n y tienda el panel del exlremo
plane.
,, Remueva rode el material de empaque, excepto
ta cufa entre el mango superior y _|inferior,y la
cuSa qua sujeta la barr_ de los control qua exige
la presenciadel operadorjunlo con el mango
supeder
2O
i
PARAPREPARARLA
Barra de control que exige la
presencia del operado
Mango
Levanlar
para segar
Mango
infedor
PARA INSTALAR
LOS ACCESORIOS
Su segadora rue enviada ilstapara usame como
una acolchadora de capavegetal. Para converlirla
de modo que pueda ensacar o descargar.
• Abra la puerta lrasera y remueva tatapon
acoichadora, Gu_rdela en un lugar seguro.
• Ahem puede instalar el recogedoro el desviador
de recortes opcional.
,, Para votver a ta operac_6nde acetchamienlocon
capa vegetal, ins_e la tapon acolchadoraen fa
aberturade descarga de la segadora, Aseg_'Jrese
de que todas las orejas sst6n asenladas en
forma adecuada.
,,
BATER_
AVISO: Su baterla tiene que estar
cargada antes de que pueda hacer
arrancar su segadora,
• Desconecte el conector det motor (macho) al
conector de la bateria (hembra).
. Conecte el conector del cargador de la
bateria (macho) al conector de la bateria
(hembra),,
• Enchufe el cargador de la baterfa dentro del
enchufe de 110 volt C.A.
• Deje el cargador de la baterfa conectado pot
24 horas antes de hacer arrancar su motor
pot la primera vez.
• Despu_s de cargar, conecte el conector de!
motor al conector de la bateria,
Su motor cuenta con un alternador integrado
para carga parciaL Conecte su cargador de
bater_a para cargada segun sea necesario,
IMPORTANTE: Et allemador del motor no
cargara una bateria descargada.
AI finat de la temporada de siega, la bater|a se
debe cargar por 48 horas para protegerla
durante et pefiodo de almacenarniento en et
inviemo,
PRECAUClON: Siempre desconecte el
conector del motor del conector de la baterfa
para evitar el arranque por accidente al
transportar o guardar su segadora despu_s de
la temporada.
Conector clet
motor
___argador
e la
Tapon
aEcofchadora
bateria
PRECAUC|6N:
No haga funcionar su
segadora sin la tapcn acolchadoraaprobada en su
lugar,o sin el desviador de recortes, o sin et
recogedorde c_sped, aprobados, en su lugar.
Nunca trate de operar la segadoracuando se ha
removido ta puerta traserao cuando est_ un poco
abietta_
Conector
del
cargador de ta
bateria (macho)
bmeda (hembra)
21
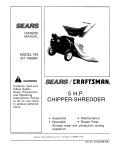
FAMILIARICESE
CON SU SEGADORA
LEA ESTE MANUAL DEL DUEllO Y LAS REGLAS DE SEGURIDADANTES DE OPERAR SU
SEGADORA. Compare las iluslradones con su segadorapara familiarizarsecon fa ubicaci6n de los
diversos contro!0sy ajustes..Guardeeste manual para referenciaen el future.
Estos s|mbolos pueden apareser sobre su segadora oen la !iteratura proporclonada con el
producto. Aprenda y comprenda sus sigr_ficadoso
Control de imputsi6n
Cord6narrancador'-._
Manitla det
mango
Tapa det deposito
de la gasolina
Recogedordelc6sped
Cebador
Caja
Cubierta de la
impulsi6n
Tapon de la
acolchadera
Tapa del deposito de acette
dal motor con varilla
indicadorade nivel
Ajustador de la rueda
(en cada ru'eda)
CUMPLE C0NL6S
REQSis-iTos DE SEGUR'i'D,_'bDE LA CPSC
Las segadoras a motor, que se oonducen desde la parle de atr#,s, rolatorias, Sears, cumplen con
los est&ndares de segufidad dot American National Standards Institute y de ta U.S° Consumer
Product Safety Commission. La cuchi!!a gira cuando el motor est#.funcionando.
i
Barra de control que exige la prencia del
operador - tiene que sujetar.se abajo, junto
con el mango, para hacer arrancar el motor.
Su_ltera para parar et molor.r
Cebador- bombea combustible adicionat
desde el carburador al cilindro para use cuando
se necesita hacer arrancar un meier frfo.
Cord6n arrancador.arrancar el motor
ii
i
ii
Llave dot arranque el_ctrico - se usa para
hacer arrancar el motor.
Palanca de control de la impulei6n - se usa
para enganchar la segadora para movimlento
hacia adelante impulsada a motor,
Tapon de la acolchadera - siluada en la
abertura de la descarga y debe set quitada
cuando se convierte la operacci6n de ensacado
a descarga.
se usa para hacer
22
La operaciOn de cualquier segadora puede
hacer que salten objetos extrafos denlro de sus
ojos, 1oque puede producir dales graves en
_stos_ Siempre t_se anteojos de seguddad o
protecciOn pare los ojos mientras opere su
segadora o cuando haga ajustes o
reparaciones. Recomendamos una mascara de
seguridad de vision amplia, para use espejuelos
o anteojos de seguddad estaP,darle,
COMe USAR SU SEGADORA
PRECAUClON, No haga funcionar su
segadora sin el desviador de recortes o sin el
recegedor de c_sped, aprobados, en su
lugar. Nunca trate de operar la segadora
cuando se ha removido la puerta trasera o
cuando est,. un poco abiert&
VELOCIDAD DEL MOTOR
Orejas de ta
placa
.,_
Pare un corte alto, baie las
ruedas
__
£_\!S't
__CJ
Man
Mar go
Para un corte bajo, levante fas ruedas
PARA MONTAR Y ADJUNTAR EL
RECOGEDOR DE CE_SPED
• Cierre la tapa soltable. La tapa soltabfe
debe estar cerrada cuando se esta
operando la segadora
o Levante la puerta trasera de la caja de la
segadora y ponga el bastidor del recogedor
de c_sped en las orejas formadas en el
puntal de bisagra de la pue_a trasera
• El recogedor de c_sped esta asegurado en
[a caja de la segadora cuando se baja [a
puerta trasera para descansar en el
bastidor de! recogedor de c_sped
PRECAUCION: No haga funcionarsu segadora
sin el desv_adorde recedes o sin e] recogedorde
c_sped, aprobados, en su lugar. Nunca trate de
operar la segadora cuando se ha removide la
pueda lrasera o cuando est_ un poco abierta.
Puerta
........ ._
trasera
Puntal de
La velocidad del motor se eslableciO en la
f_brica pare un rendimiento 6plimo.. La
velocidad no se puede ajustar.
CONTROL DE ZONA DEL MOTOR
PRECAUClON: Las regulacionesfederates
exigen que se inslale un €ontrol para e!motor en
asia segadorapara redudr a un mt'nimoel riesgo
de lesionarsedebido al conlacto con la cuchiltao
Per ningOnmolivo trate de eliminar]a funciOndot
control del operadoroLa cuchillagira cuando el
motor es_ funcionando
• Su segadora viene equipada con una barra de
control qua exige ta presenciadel operador,Io
que requiereque el operador est_ detr_s del
mango de ta segadom pare hacerla an'ancary
operada.
PARA AJUSTAR LA ALTURA DE CORTE
,, Levante las ruedas pare el code bajo y baje las
tuedas pare el code alto,.
• Ajuste la allura de code pare qua se acomode a
sus requisites. La posiciOndel medio es la major
pare la mayon'a de los c_spedes,
• Pare cambiar la alturade come,empuje ls
palancadel ajustader haciafa rueda. Mueva ta
rueda hacia arfiba o hacia aba_ode mode que
se acomode a sus requisites.Asegurese qua
todaslastuedas queden igualmenle ajustadas
b,sagra---_'_
_a,t,dor
d,,
reogedor del
Orejas
,_"
formadas
"
cesped
/
PARA VACIAR EL RECOGEDOR
DE
CESPED
• Pare remover el recogedor del c_sped suettela
barra de control del operador para poder parer el
motor
,, Levante Iapuerta de atras y remova el recogedor
del c_sped per e! mango.
AVISO: No arrastre la boise cuando Ia vacie;
se producir_ un desgaste innecesar_o.
ATENCION: El ajustador esta correctamente
colocado cuando ias orejas de laplaca estAn
insertadas en el agujero del mango.
Tambi_n, los ajustes de 9 posiciones (si
equipado) permiten qua el mango pueda ser
movido entre tas orejas de la place,
\
\
23
CONTROL DE LA IMPULSION
GASOLINA
• Uene el estanque de combustible Use gasoline
• La auloimpulsi6n se controla al sujetar la barra
regular,sin plomo, nueva y limpia con el minimo
de control que exige la presencia del operador
hacia abajo en el mango y al empujarla palanca
de 87 octanoso (El use de gasolinecon ptomo
aumenta_ los dep6sitos de 6xido de plomo y
de control de la impulsi6n hacia adelantehaste
carbono y se reducir_ la duraci6nde la v_lvula).
cluesuene "clic,"tuego se suelta la pelanca
No mezcle et aceite con la gaselina Pare
• El movimiento hacia adelanle parer&cuando la
asegurar que la gasolineutilizada sea fresca
barra de control qua exige la presenciadel
compre estanques los cuales pued_l ser
operador se suella Pare parer el movimiento
utitizadosduranle los pfimeros 30 dies.
haciaadelante sin parer el motor, suelle la barra
de control qua exige la presenciadel operador un IMPORTANTE- CUANDO SE OPERE EN
TEMPERATURAS PeR DEBAJO DE 32" F (0° C)
poco haste que se desenganche el control de la
USE GASOLINA DE CALIDAD DE INVIERNO,
impulsi6n. Sujete la barra de control que exige la
LIMPtAY NUEVA PARAAYUDARAASEGURAR
presencia del operador abaJoen conlra del
UN BUEN ARRANQUE EN CLIMA FRIQ
mango pare continuer segando sin
auloimpulsi6n
ADVERTENClA: La experiencia ha indicadoque
•Para mantenerelcontrol
de laimpulsiSn
los combuslibles mezclados con alcohol(conocidos
enganchadocuandosede vuelta
en las
come gasohol, o el use de etanel o metano!)
esquinas,
empuieelmango haciaabajoy levante pueden atraer la humedad, la que conduce a ta
lasruedasdelanleras
luera
delsueloalgirar
la
separacid_n
y forrnaciOnde _cidos durante el
segadora
atmacanamiento.La gasolina acidica puede daSar
control de
el sistema del combustiblede un motor durante el
almacenamiento.Para eviler los problemas con el
la impulsion
motor,se debe vaciar el sistema de combustible
anles de guardado per un periodo de 30 dies o
m_s..Vacie el esta.nquede combustible,haga
arrancarel motor y h_gaJofuncionarbasra que las
lineas del combuslibtey el carburadorqueden
control de la
vac[os..La prOxJmalemporada use combustible
impulsi6n
nuevo_Vea las Instruccionespare el
Almacenamiento para m&s inlormaci6n.Nunca use
conlro! de la
productosde limpieza para el motor o pare el
para enganchar el
impulsi6n
carburador en el estanque del combustiblepues se
control de la
desenganchado
pueden produclr da5os permanentes.
impulsi6n
PRECAUClON: Uene haste la pa_e
ANTES DE HACER ARRANCAR
EL
inlerior del cuelfo de relleno del estanque de
MOTOR
gasotina No lo Ilenedemasiado. Umpie e! aceite o
ACEITE
el combustible derramado No almacene, derrame
o use gasoltnacerca de una llama expuesta°
Su segadora rue enviadasin aceite en el motor,
* Asegurese que la segadora est_ nivefaday que
el area atrededordel depOsitode aceite est_
limpia. Remueva la tapa del depSsitode aceile del motor
con la vari!ia indicadorade n_vely rellene basrala
linea de Ileno en 6sta.
- Use 20 oz. de aceile. Pare el ripey tacalidad yea
"MOTOR" en la secci6n de las Manlenimentoen
este manual.
. Vacie el aceite lenlamenle_No Io tlene
demasiado.
• Revise e! nivel del aceite antes de cada use.
Agregue aceite si es necesario.Llene hasta la
linea
de lleno
en lavarilla
indicadora
de nivel
, Pare leer el nivel adecuado, aprietela tapa del
depSsito de aceile del motor cada vez.
, Vuelva a ir_.stafar
la lapa del dep6sito del aceile y
apri_tela.,
, Despu_s de las dos (2) primeras horas de siege,
cambie el aceite y cada 25 horas de ahi en
adelante Puede necesilar cambiar el aceile n_s
a menudo cuando las condiciones son
polvorosaso sucias.
24
_rapade!
deposito de
aceite del motor
con varilla
indicadora de -..
nivel
PARA HACER
ARRANCAR
Tape del
deposito de
la gasolina
EL MOTOR
•Para hacer arrancar un motor frfo, empuje el
cebador cinco (5) veces antes de tratarlo.
Empuje lirmemente. Esle paso norrnalmente
no es necesario cuando se hace arrancar un
motor que ya ha eslado funcionando per
unos cuanlos minulos
• Sujete la barra de control que exige la
presencia del operador abajo en el mango y
tire el mango del arrancador r&pidamente. No
permita que el cord6n arrancador se
devuelva abruptament.e.
tnportante:
No haga arrancar el motor m_,sde
5 segundos continuados, Espere 5 a 10
segundos entre cada vez qua irate de hacerlo
alTallc.ar,
• Para hacer arrancar ef motor usando la
manilfa de1 arrancador auxi{iar, s}ga los pesos
anteriores tntercambie eEuse de baIlave del
arranque el_ctrico per el cordon arrancador,
Tire la manilla arrancadera r_pidamen{e, No
permtla que el cordon arrancador se
devueiva abruptamente,
• Para parer el motor, suelte la barra de control
qua exige {a presencia del operador
CONSEJOS PAPA SEGAR
•
Bajo cierW,s cond}ciones, tat come c_sped muy
alto, pueda ser necesario eEeEevarla altura de]
corte para reducir el esfuerzo necesado pare
empujar la segadora y pare evitar sobrecargar et
motor, dejando montones de recoNes de c_sped.
Puede qua sea necesario reducir ta veioc{dad del
recorddo y/o haga funcionar Fasegadora sobre el
_rea per segunda vez_
o Pare un corte muy pesado, reduzca e{ ancho dot
corte pasando parcialmente per encima det lugar
anterion_nente cortado y siegue lentamente.
. Cuando use una segadora con descarga trasera
en c_sped humedo y pesedo, los rnontones det
c_sped corlado puede qua no entren en el
recogedor de c_sped Reduzca la vetocidad del
recorrido (velocidad de empuje) y/o haga
funcionar }a segadora sobre e{ &tea per segunda
vez°
•
Si queda una huella de cortes en e! lade derecho
de una segadora con descarga trasera, s{egue
en la direcci6n en qua giran las man{tlas det reloj,
solapando un poco pare recaudar _osrecortes en
la prOxima pasada.
• Los pores en los recogedores de c_sped de tela
pueden llenarse con mugre y polvo con el use y
los _gederes
recaudar_n manes c_sped
Pare eviler _sto, n_ci'eel recogedor con la
manguera de ague reguiarmente y d_je{o
secarse antes de usado.
• Manter',ga la pane eupeHer de{ motor, alrededor
del arrancador, despejada y sin recortes de
c_sped y paja Esto ayudar_ el {iujo dot aire del
motor y extender'& su durac{0n
CONSEJOS
PARA
SEGAR
Y ACOLCHAR
IMPO RTANTE: Pare obtener el major rendimeinto
mantenga la caja de la segador a sin aeumlacion de
cesped y basu_ Vea "LIMPIEZA" en seccion
de"Mantenimenld' de este manuat.
• La cuchi]la acolchadora especial va a velver a
coNar los recortes de c_sped touches veces, y
los reduce en tamaOo_ de mode qua si se caen
en e! c_sped se van a dispesar enlre _ste y no
se van a notar_ TambiOn, el c_sped acolchado se
va a deshacer r_pidamente entregando
substancias nutdlivas para el c6sped Siempre
acolche con la velocidad del motor (cuchitIa) m_s
alia, pues asf se obtendr_ la major ac,ci6n de
moore de las cuchiIlaso
• Evite cor_rel c_sped cuando es_ mojado El
c_sped mojado tiende a former montones e
inl:effiere con la acci6n de acolchado La meier
hera pare sager el c_sped es temprano en la
larde. A esa hera _sle se ha secede y el _rea
reci_n cortada no quedar_ expuesta al sol
directo
• Pare obtener los mejores resultados, ajuste la
allure del cone de la segadora de mode qua _sla
code solarnente et tercio superior de las hojas de
c_sped. En el case de qua el c_sped haya
crecIdo demasiado, puede ser necesa/io el
e_evar {a atlura del code pare reducir et esfuerzo
necesa_o pare empujar la segadora y pare evitar
sobreca[gar el motor, dejando montones de
recedes de c_sped. Pare un acolchamiento muy
pesado, reduzca et ancho dal code pasando per
encima del iugar antedormente codado y siegue
lentamente_
•CieNos lipos de c_sped y sus condiciones
pueden exigir qua un area tonga qua set
acolchada per segunda vez pare esconder
completamente los recortes Cuando se haga et
segundo cone, siegue atravesado o en {emqa
perpend{cular a la pasada del primer core
• Cambie su patron de cone de semana a
semana. Si_jue de norte a sur una semana y
luego cambie de este a oeste la prOxima
semana. Esto evitar& que el c_sped se enrede y
cambie de direcciOn
Max. 1/3
25
_'_ _
_
_o_>_
...............
FEC.AS RV,C,O
Revisersihay'sujetadores
suettos
t,/
_Limpiar/inspecdonar el recogedo: de
clasped(sl vlene equipado)
if
_L-"_V'
__Y__
E
Limpiarta segadora
G
Limpiar debaio de la cub{erie de la trans-
A
mtsi6n Isegadoras conpoder propuI_;or)
D
Rsvtsar ]as coffees y {as poleas impul.............
sadas{segadora
s con poderpmpulsor)
W"
F
........
v'
1
.........
l
t
V'3
aO Reviser ol'afilar/cambiar la cuchilla
Table de Iubrtcaci6n
A Limpiar|abatedahecargar
(segadoras con artanque et_ctrico)
M
......
RevLsat et hive| del aceite
Cambiar et ace{re det motor
V _
_1,2
Limpiar el liltro de aire
........
i
_/'2
N
Cambiar
el ¢artucho
de papel
det filtro
lt/;t
I - Garnbiat m_
a manudo otranto Se opera baJo carga l)esad_ o Bn an',blenlescon ares lempeta|uras
2 - Oar _etvfclom_s _ monLldo cu_indo se ope_e eftconI_Iclo_e_sucla_ o po_v{}rosa5
3 * Cs_q\bi_ la5 cuchff_
tf_5 a m_tIudo
Cu_:_o
sle_u_ _t%l_reno B_t_oso
4.,Caf_a_ pot 4_]hoti_sal find8 la lernpora(Ia
RECOMENDAC]ONES
TABLA
GENERALES
La garantia de esta segadora no cubre los
articulos que ban estado sujetos al abuso o a la
negligencla del operador Pare recibir todo e!
valor de la garant_a, el operador tiene que
mantener la segadora segun tas inslrucciones
descritas en este manual.
DE LUBRICAClC}N
(_
Ajusta.dpr de ;a rueda
Hay algunos ajustes que se lienen que hacer en
forma peri6dica pare poder mantener su unidad
adecuadamenteo
Todos los ajustes en la secci6n de Servicio y
Ajusles de este manual lienen que ser
revisados por Io menos un vez por cada
temporada.
• Unavez al a6o, cambie la buiia, limpie o
cambie el etemento del [iltro de aire y revise
si la cuchilla est,. desgaslada
Una bujfa
nueva y un etemento del fiRro de aire limpiol
nuevo aseguran la mezcla de aire-combustible adecuada y ayudan a que su motor
funcione mejor y que dure m_s.
• Siga el programa de mantenimiento en este
manual.
ANTES
DE CADA USO
•
- (_) Bisagra
/
(_ Clavtja de montaje
del puntal del
mango
(_)REFIERASE A LA SECCION DE
MANTENIMENTO
EN MOTOR"
IMPORTANTE,
No acerit o engrase los
rodamientos de la rueda de plastico Los
lubdcantes viscosos atraeran polve y mugra, 1o
que acortara la duracion de los rodamientos
aulo lubdcanteso Si cree que lubricarse, use
sotamenle un Iubricante tipo grafito, de polve
seco, en lorma moderad&
sueltos..
Manlenga la unidad bien lubricada
"TABt.A DE LUBRICACtON").
de la
puerta
trasera
©ROC LUaR,CANTE
Revise el nivel del aceite del motor.
, Revise si hay sujeladores
LUBRICACION
Aceite del
motor
(vea la
26
ESPECIFiCACIONES
NUMERO
DEL PRODUCTO
DE MODELO
9t7.377573
_IOMERO DE SERtE
FECHA DE COMPRA
CABALLOS
DE FUERZA:
6..5
DESPLAZAMIENTO:
12.56 CU° IN.
CAPACIDAD Y TIPO
DE GASOLINA:
1,6Cuartos
REGULAR SIN PLOMO
TIPO DE ACEITE:
(APt-SF!SG/SH)
SAE 30 (sobre 320F)
SAE 5W+30 (debajo 32°F)
CAPACIDAD
20 oz. de capacidad
DE ACEtTE:
3uJiA (ABERTURA:
FOLERANCIA
:SENCENDIDO
CHAMPION
DE VALVULA:
RJIgLM
O J19LM
ADMISION:
.004" - .008"
DESCARGA:
.004" - .008"
DE ESTADO
SOLIDO ABERTURA
TORSION
.030")
DE AIRE:
.0125 IN.
DEL PERNO
DE LA CUCHILLA:
35-40 FT. LBS.
El numL, ro del nodelo y el de serie se encuentran en la caicomania adjunta a ta parle
trasera de ta caja de la segadora. Debe registrar lanto el num6ro de serie come ta
fecha de compra y rnantengalos en un fugar seguro para refencia en et futuro,
° Remuevael pemo de la cuchilfa gir_ndolo en el
sentido contrado en que giran }as manitlasdel
retoj
- Remueva la cuchiliay los arliculos de ferreteda
adjuntadoms (el pemo, la arandela do seguddad
y la arandela endurecida)+
SEGADORA
Siempre observe las reglas de seguridad
cuando haga el rnnantenirniento_
LLANTAS
,, Mantenga las +lantassin gasolina, aceile o
substancias qul"micaspara conlrol de insectos
que pueden dafiar la goma+
• Evite lee tocones,las piedras0las grietas
profundas, los objetos afilados y otros peligros
que pueden da_ar a tas llantas.
CUIDADO DE LA CUCHILLA
AVISO: Remueva el adaptador do la cuchiltay
revise el cubo interiorde la ranura del adaplador de
la cuchitla. La ranuratiene que estar en buenas
condiciones para que funcione en forrna adecuada
Cambieel adaplador si est_ da_ado.
PARA CAMBIAR LA CUCHILLA
Para obtener los mejeres resultados, la cuchMade
la segadora tiene que mantenerse afilada.
Carnbie la cuchiIla doblada o daffada.
PARA REMOVER LA CUCHILLA
• Ponga el adaplador de la cuchilta en et cigue_al
det motor. Asegureseque la ranura del
adaptador y que el chavetero del ciguei_atest6n
alineados
- Ponga la cuchitlaen el adaptador de _,sta
alineando losdos (2) aguje,'os en la cuchiUacon
tas salientes elevadasen el adaptadoro
• Asegurese de que el horde de salida de la
cuchilla (opuestoal borde afilado) est_ hacia
arriba hacia et motor+.
• Instale el pemo de la cuchilla con ta arandela de
segurldady la arandelaendurecida en el
adaplador de la cochitlay el cigue_al
• Use un bloque de madera entre la cuchilla y la
- Desconecte el alambrede la bujia y p6ngalo en
donde no pueda entraren contacto con _sta.
- Haga descansar }a segadera en su lado.
Asegerese que el lillro de alre y que el
carburador queden mirandohacia ardbao
• Use un bloque de madera entre la cuc_ittay ]a
caja de la segadora para evitar que la cuchilla
gire cuando se le quite el pemo.
• Proteja sue manos con guantes y/e envuelva la
cuchtllacon una tela gruesa°
27
caja de fa segadoray apriete et pemo de la
cuch{llagir_ndo]oen el sentido en que giran las
marlilfasdel reloj.
• La iorsiSnpara apretarrecomendada es de 35 40 pies libras
IMPORTANTE: E1pemo la cuchilla es clase 8
Iratadoa ca{or
n0mero del modelo de la segadora cuando Io
ordene.
CAJA DE ENGRANAJES
AVISO, No recomendamos el afilar la cuchilla pete si _ohace, asegt}rese de que quede
balanceada
PARAAFILAR LA CUCHILLA
Se IJeneque tener cuidado de manieneda
balanceada_ Una cuchifla que no est,_balanceada
va a producir eventuaimenle da,5o en la segadora o
en el motor
• La cuchilla puede aft}aPsecon una lima o en una
rueda rectiticado_a. No irate de afitaria mientras
se encuentra en fa segador&
* Para revisar e] balance de la cuchi31a,clave un
clave en una viga o en ta pared. Deje alrededor
de una pulgada de un clave recto expuesto,
Ponga e] agujero central de la cuchitla sobre la
cabeza del dave. Si ]a cuchilla es_ ba]anceada
debe perrnanecer en la posiciSn horizortlaJ. Si
cualquiera de lee extremes de la cuchilta se
mueve hacia abajo, afi{e e] extreme pesado
hasta que _sta quede baianceada_.
Adaplador
de la cuchilla
Chaverlero del
siguefiat
Cuchilla
Pemo de
la cuchilla
I
Arandela
de
segddad
* Paramantener eteislema de imputsiSn
funcionando
en IOn-haadecuada, la caja de
engranajesy el ,_reaalrededor de la impulsiSn
tienenque manlenerse limpias y sin acumulaci6n
de basur& Umpie debajo de la cubierta de la
impulsiSndos veces per temporada..
• La caja de engranajesse Ilenacon lubficante
hasta et niveladecuado en la f&bric&La 6nica
vez que el lubficanle necesita alene{Snes
cuando se le ha prestado servic[o a la caja de
engranajeso
" Si se necesitalubdcante,use solamente Grasa
Texaco Starplex Premium 1, Parte No. 750355.
No use substitutes.
RUEDAS DE IMPULSION
Reviselas ruedas de impulsiSndetanleras cada vez
antes de segar,para asegumrse de que se mueven
[ibremente.
Si las ruedas no giran libremente quiere decir que
hay basura, recedesde c_sped, elo. en el &tea de
las ruedasde impu]si6ny tienen que limpiarse para
libel'arias.
Es necesario limpiarlax rdedas de impulsiSn;revise
ambas ruedas delanteras.
,, Remueva lostapacubos, las ctavrjasde horquilla
y las arandelas.
, Remueva]asruedasde los ajustadores de las
ruedas.
, Remuevala basuray bs recortes de c6sped de
dentin de la cubierta conlra e{ polvo, pifSn y/o de
los dlenles de los engranajesde las ruedas de
imputsiSn.
o Ponga {asruedasde vuettaen su lugar.
• Si despu_s de limpiarlas ruedas de impulstSnno
giran libremente,p0ngase en contacto con su
cenlro/depadamentode servicioaulorizado rr_s
coroano.
Arandeta
Endurecida
RECOGEDOR
Borde de
salida
MOTOR
Adaptador
de la
cuchilla
LUBRiCACl6N
DECESPED
(St comprado come un accesorio)
• El recogedorde c_sped puede ser rociado con el
agua de la manguera pero tiene que estar seco
cuandose vaya a usar.
, Revisesu recogedorde c6sped a menudo para
verificar si est_ dafiado o deteriorado Se va a
desgastar con el use normal Si se necesila
camblar et recogedor,cAmbielo solamenteper
uno que sea aprobado per el fabr;cante.D_ el
28
Use solamenteaceite de detergente de alia catidad
clasificadocon la clasificaci6nSF, SG o SH de
sewicio APL Seleccionela calidadde viscosidad
SAE _
temperaturade operad6n esperada.
i
CALIDADES DE VI$OOSIDAD DE SAE
|
'C 4.C"
:,!_"
-t0"
_,_,"
1o'
,_'
,30*,,
,m'
£1M_i_0E _ MF_nA'i'UF,A ANTIC1PADAANfEs eEL FRO)_IM_3CAt_lSlODE AC
_VISO: A pesar de que los aceites de
multiviscosidod(5W30, 10W30, etc.) mejoran et
arranque en clima lifo,eslos aceites de
multiviscosidadvan ha aumentar el consume de
aceite cuando se usan en temperaturas sobre 32°
F. Revise el n_el del ace/re dol motor m_s a
menudo, para evitar un posible dare en el motor,
deb_doa que no tienesufidente aceileo
Carnb{eel aceite despu_s de 25 horas de
operaci6n o pot Io menos una vez al a,5osi ta
segadora se utiliza menos 25 horas el aSo.
Revise el r_el del aceite del c&rler antes de
arrancar el motor y despu_s de cada clnco (5) horas
de uso continuado.Apr_eleel tap6n del aceite en
forma segura cada vez que revise el niveldet
aceiteo
PARACAMBIAR ELACEITE DEL MOTOR
AVlSO: Antes de tndinar la segadora para drenar
et aceite,drene el tanque de combuslJblehaciendo
cotter el motor hasta que el tanque est_ vac[oo
• Desconecteel alambre de la bujfa y p6ngatode
rnodo que no pueda entrar en con_cto con _sta.
•, Remueva la tapa del dep6sffodel aceite;d_jela a
un lado en una superfic[elimpia.
,, incline lasegadora y h_gala descar_saren su
ladoy drene el aceite en un envase adecuado.
Mueva la segadora de atr'&spara adeiantepara
removertodo el aceiteque se haya quedado
atrapado dentro del motor_
• Limpie todo et aceite derramado en ta segadora
yen et tado del motor:
• LJaneel motor con aceite. Ll_nelo solamente
hasta la linea de tleno(FULL) en la vafilla
Indicadora de niveLNO LO LLENE
DEMASIADO.
• Vuelva a poner la tapa en el dep6sito detace]re.
,, Vuelva a conectar et alambre de la bujia a &sta
Envase
FILTRO DE AIRE
Su motor no tuncionar_, en ¿orma adecuada y
puede suldr daSos si se usa un filtro de aire
sucio
Cambie el filtro de aire cada aSo, y m_.sa
menudo si siega en conctic{ones muy
polvorosas o sucias No lave el fi]tro de aire..
PARA CAMBIAR
EL F1LTRO DE AIRE
• Remueva el fitlro de aire gk_,ndolo en et
senlido en que gfrela de las maniflas del retoi
para.apretarla, hasta el tope, y retirelo det
collar.
• Remueva et filtrode la parte interior de la
cubierta.
• Limpie Ia parle interior de la cubierla y el
collar para remover toda acumutaci6n de
mugre,
, Inserle el filtro nuevo en la cubiertao
• Ponga la cubierta del filtro de aire dentro del
collar alineando la oreja con la ranura,
• Empuje ta cubierta hacia adentro y girela en
el sentido contrar}o de {as manillas del retoj
para apretarla
Gire en el
Co,_ar
Abrazadera
remover
del reloj para
/_
Ranura
Filtro de aire
sentido
Alas maniIlas
Oreja
en el
sentido
contrario las
manillas del
Cubierta del
fiffro de aire
reloj para
aprelar
S]LENCIADOR
lnspeccioney cambie el si{enciador si esta cotro_do
pues j:)roducirun petigrode incendio ylo daSo
BUJtA
Cambie su bujla cada aifiopara hacer que su motor
arranque m_s facilmentey funcione major Ajuste [a
aber_urade la bujia en 0030 pulgada
LIMPIEZA
IMPORTANTE: Para obtener el major red[mientom,
mantenga lacajadelasgadorasin
acumulacion de
cesped y gasura.Umpie la parle de su segadora
despues de cada uso.
PRECAUCl6N: Desconecte el alambre de la
bujfa y p6ngalo an donde no pueda entrar en
contaclo con _sla.
, Haga descansarla segadora en su lado..
Aseg6rese qua el filtrode aire y que el
carburador queden mirando hada arrlba. Utopia
la parle inferiorde su segadora rasp&ndolapara
remover la acumulad6n de c_sped y basura.
• Umpie el motor a menudo para evitar que se
acumule
ta basura. Un motor lapado funciona m_s
caliente y se acorta su duraci6n
• Mantenga las superficies pulidas y ias ruedassin
gasolina, aceile, etc,
• No recomendamos el uso de una manguera de
jard(n para limpiarfa segadora a menos que el
sistema elc_L,
ctdco, el silenciador, el fillrode aire y
el caff)uradorest_n tapados para evitar que les
entre el aguaoEl agua en etmotor puede acodar
la duraci6nde _ste.
LIMPIE DEBAJO DE LA CUBIERTA DE LA
IMPULSI(SN
Umple debajo de ta cubieda de ta impulsi6n por Io
menos dos vecescada temporada Raspe debajo
de la cubiertacon un cuchilfo para masilla o con una
herramienta parecida, para remover toda
acumulaci6n de c_sped o basura en la parte inferior
de la cubiertade la }mpulsi6n..
29
PRECAUCION: ANTES DE DAR
CUALQUIER SERVICIO O DE HACER
AJUSTES:
• Suat[efa bana de control y pare el motor,.
• AsegLiresequa la cuchilla y qua lodeslas pares
moviblesse hayandelenido completamente.
• Descon_cle el alambrede la bujia y p6ngalo en
donde no pueda entrer en contacto con _.stao
SEGADORA
PAPA AJUSTAR LA ALTURA DE CORTE
Vea"PARAAJUSTAR LAALTURADE CORTE" en
la secd6n de Operaci6nde este manual..
DESVlADOR TRASERO
Se proporcionaun desviador lrasero,adjunto entre
1asruedastreseresde su segadora, pare reducira
un m_nimola posibilidadqua objetos seen lanzados
hacia atuera de la parte Irasera de lasegadora, en
la posid6n en donde se encuentre el operado_Si
se da_,aef desviador debe cambiarse..
PARA REMOVER/CAMBIAR LA CORREA
DE IMPULSION
° Remuevala cubieda de ta impulsi6n Remueva
ta correa empujandohacia abaje en la pelea de
la caja de engranajes
° Haga descansarla segadora en su lade con et
fiIfrode alre y el carburadormirandohacia aniba.
, Remuevala cuchiIla
• Remuevafa defenseen centre del desperdicioo
• Remuevala correade la polea del motor en el
cigue_aL
• Inslale fa correa nuevasiguiendo los pesos
antefiores en el olden inverse,
• Siempreuse ta correaaprobada per la f_brica
pare asegurarse qua calce y dure
• Remueva la gut'adel cord6narrancadordel
mango inferior.
• Remueva las clavijas de herquiIla,
• Desconecte e! mango inferiorde los puntales del
mango,
• De vuelLael mango y vuelva a reenterlas davijas
de horquilla qua se habfan removido_
o Vuelva a reenter la guia del cord en arrancador.
• Vuelva a montar bs controles y Ia barra de
contro_que exige ta presencia del operado en el
mango superior.
PRECALICtON: La barra de cont_les qua exigen
la presenc}adel operador tJenequa p'rvotear
libremente para permitir el enganche de la cuchilIa/
freno cuando se suelta la barra de control.No
apr_etedemasiado los sujetadoresqua sujetan a los
controlesal mango superior.
,, Pare cambiar de la posidrn de mediana baia a
alia soIamante se tend_ qua darvuelta la
secci6n del mango superior.
• Pare cambiar de la posicirn med_anabaja a baja,
solamente se tendr_ que dar vuel_ ta secci6n
de! mango inferior.
Posici6n
de Envio
Mediana Alia
a
Baia
Cubierla
de fa
Mango
Inferior
impulsion
Correa
Apriete
pare
Remover
Se puede levantar o bajar el mango de su
segadora segQnle quede c6modo. Hay cuatro (4)
posicionesdisponibles:ella, mediana alia,
mediana baja, baja. Los mangos se envian
montados en ta posicirn mediana baja.
• Pare cambiar de la posid6n mediana baja a
med[ana alia, la secd6n superiory la inferiordel
mangotendr'&qqua dame vuelta.
• Remuevalas abrazaderasdel cable.
. Remuevalos controlesy la barra de controles
que exigenla presenciadot operador dei
mangosuperior
Abrazadera"
de Horquilla
Punlal del
Mango
MOTOR
VELOClDAD
DEL MOTOR
La velocidad del motor ha side ajustadaen _a,
f_brica. No Irate de aumentar la velocidaddel motor
pues se pueden produeirlesienes personaJes,Si
cree qua el motor est& funcionandodemasiado
r_pido e demasiado lenlo, IIevesu segadoraa un
centro/departamentode seMdo auterizadopare
reparedao ajustarla.
3O
CARBURADOR
Su carburador liana un chorro principalfijo no
ajustabfepare controlar la mezcfa Si su motor no
est_ lundonando en farina adecuadadebido a
problemas que se sospecha vienen del carburador,
Ileve su segadora a un centro/departamentode
servicieautorizado para reparaday/o ajustadao
lnmediatamente preparesu segadora para el
almacenamiento al finalde cada temporada o sl la
unidad no se va a user per 30 dfas o rn&s.
IMPORTANTE: Nunca manipulee el regulador
del motor, el qua ha side ajustado en lafabrica
era la veticidaddel motor adecuada, puede ser
pellgroso hater funcionar e! motor a una
velocaded per sobre et ajuste de ate velocidad
alta regulada del motor necesita ajuste,
Barra de control que exige la presencia del
operadar mango superior "_
Mango superior
Si!
.
SEGADORA
nara almacenar
Cuando se va a guarderla segadoraper cierlo
per_odode tiempo,gmplelacuidadosamente,
remueva toda la mugre, ta grasa, lashojas, etc.
Gu_rdela en un 4rea limpiay seca.
• LJmpietoda Iasegadora (Vea "LIMPIEZA"en la
seccf6n de Mantenimentode estemanuaf)
• Lubrfquela segdn se muestm en la secci6nde
Mantenirnentode este manual.
• Aseg0rese de qua todas las _Jercasy davijas y
redes lospemos y tomillosest_n aprelados en
foma segu_ InspeccJonelas partesqua se
mueven pare verilicarsi est_n daSadas,
quebradas o desgasl_dasoC_mbielassl es
_,_..
4" _Y
--
,..,,,,/
.._-_\i_.'/;'" _1" .q.../hacia
_._'';-_%,_"t_,
(Co)2.__2_))
_
/
para sager
Mango
in(erior
MOTOR
SISTEMA DE COMBUSTIBLE
IMPORTANTE: Es importante evilar cluese lormen
depositosde partes |undamentales dei sislema de
comustiNe tales come el carburador, el filtrodel
combutible, ta manguera det combuslible o en el
estar,que durante elafmacenmienlo. La
experiencea tambienendicaqua los combustibles
mezciados con alcohol (conocido come gasoholo
qua lienen etanolo melanol) pueden atraer
humedad, Io que conduce a la separati6n y a la
forrnacidnde _cidos duranle almacemamiento, fa
gasolineAcideca puedenafiar el sistema de
combustible de un motor durante el perido de
alcamenmiento.
• Drone el eslanque de combustible
• Haga arrancar el motory d_je!o lunrJonarbasra
qua las gneasdel combustible y el carburador
asianvaclos.
• Nunca use !os productos pare Iimpiezadei
ca;burador o dot motor en el estanquede
combustiblepues se pueden producir dat_os
permanentes°
• Use combustible nuevo ia pr6xima temporada,
AVISO: El estabilizadorde combustible es una
aItemativaaceptable para feducir a un minimo la
formaei6n
de dep6silos de goma en elcombuslJble
durante el pedodo de almacenamientooAgregue
estabilizadora la gasotina en el estanque de
combustibleo en el envase pare el
almacenamientooSiempre slga la proporci6n de
necesatio<
• Retoque redes lassupe_iciesqua est_n
oxidadas o con tapintura picada; use una Ilia
antes de pintar.
MANGO
• Puede dob/ar el mango de su segadora pare
el almacenamiento.
- Suelte las dos (2) manillas del mango en
cada lade del mango superior y permitaqua
el mango se done hacia detras.
• Aprlete los extremes inferloresdel mango
infeder entre sf haste qua et mango inferior
quede separado det puntal dot mango, luego
mu6valo hacia adelante.
• Cuando prepare su mango a partir de ta
posicidn de almacenamiento, el mango
interior nesecitara cerrado manualmente
pare la posici6n de sega.
IMPORTANTE: Cuando done el mango pare et
almacenamiento o et transporte,asegurese qua
!o done segun se muestra o puede dafar los
cables de control.
31
mezctaqua se encuentra en el envase del
eslabi[izador..Haga funcionarel motor per Io manes
10 minutesdespu_s de agregaJel estabifizador,
para pennifir que este [legueatcarburadoroNo
drone la gasotina det estanque de gasolinayet
carburader si se est& usando estabi[izadorde
combuslible.
ACEtTE DEL MOTOR
Drene e[ aceite (con el motor ca_iente) y c_u'nbie!o
con aceile de motor limpio. (Vea "MOTOR" en la
seccibn de Mantenirnento de este manual.)
CILINDRO
• Remueva la bujia
, Vac{e una onza (29 ml) de aceite a trav_s del
agujero de la bujfa en el cilindro.
• Tire la maniUa de arranque lentamente unas
cuanlas votes para dislribuir el aceile.,
• Vuelva a mentor la nueva bujfa
IDENTIFICACI(SN
OTROS
"
No guarde Ia gasolina de una temporada a Ja
err&
• Cambie el envase de la gasolina sf se empieza a
oxidar. La oxidaci6n y/o la mugre en su gasolina
producir#,n problemas.
• Si es posible, guarde su unidad en un recJnto
cerrado y _brala para protegerla contra el po]vo
y la mugre
• Cubra su unidad con un forte protector adecuaclo
qua no retenga ]a humedad, No use pl_Lsttco.[]
p[_slico no puede respirar, Io que permite la
formad6n de condensaci6n, Io qua produeir_ ia
oxidacbn de su unidado
IMPORTANTE: Nunca cubra la segadora
mantras el mentor y los areas de escape todavia
estan ctientes.
PRECAUCII3N:
Nunca almacene la segadora
con gasolina en el eslanque dentro de uri edilicio en
deride los gases pueden alcanzax una llama
expuesta o una chisp& Pen'nita qua se enfde el
motor antes de almacenada en alg_n recinto
cerrado,
DE PROBLEMAS
,u,_
PROBLEMA
CAUSA
CORRECCI6N
No arranca
° Filtro de aire sucioM
. Sin combustib]e_
• Combustible rancio,
• Limpie/cambie
el filtro de aire
• Liana el estanque
de combustible.
• Drene e[ eslanque
y vuelva a
tlenarle con combustible
nuevo.
• Agua en el combustible
, Drone el estanque de combustible
el carburador y'vuelva e i]enar el
estanque con gasolina
. Conecte
• Bujt'a mala.
• Cambie ta bujl'a..
,, CuchiIla suelta o adaptador
• Apriete el pemo de la cuchilla o
,' Berra de control en la
posiciSn suetta.
el alambre
a la bujfa.
cambie el adaptador de la cuehilla.
, Presione ta barra de control hacia el
mango.
,, Barra de conlrol defectuosa.
• Cambie la barra de conlroL
', Parle trasera de la
• Ajuste a la posici6n de "Code m&s
alto"
cajacuchitla
y
nuev&.
- Alambre de fa bujfa
desconectado_
de la cuehitla quebrado..
Faita de [uerza
limpio y
de la segedora
arrastr,-4,ndose en el c_sped
pesedo.
•
Jl
Est,_ cortando mucho c_sped
• Ajuste a la posici6n de "Code m_,s
alto."
Filtro de aire sucio.
, Limpielcambie el filtro de aire.
Acumulaci6n
, Umpie la parle infedor de la caja de
la segadora,
de c6sped,
hojas y basura debajo de la
segadora.
Damasiado
motor.
aceite en el
32
, Revise el nivel del acelte
_)ENTIFICACI6N
DE
PROBLEMAS
CAUSA
Mal corte -disparejo
"
•
•
Vibraci6n
excesiva
Cuchilla desgaslada, doblada o
suelta_
Altura de tas ruedas dispareja
• Cambie la cuchitta. Apriete el
pemo de la cuch]Ila.
• Ajuste todas las ruedas a ta
misma altura
Acumulaci6n de c_sped, hojas o
basura debajo de la segadora.
• Limpie la parte infedor de la
caja de la segadora,
• Cambie la cuchilta
• Cuchitla desgaslada, doblada o
suella.
• Cigue#.al del motor doblado_
Apriete el
pemo de la cuchilla,,
• P6ngase en contacto con su
centre de servicio aulodzado
m_is cercane.,
Cord6n arrancador
diffcil de tirar
• El freno del votante del motor
est_ aplicado cuando se sue!la t_
barra de control
° CigueSat del motor dobiado
•Presione
la barra de control
hacia el mango superior antes
de tirar el cord6n arrancador
• P6ngase en contacto con su
centre de servicio autonzado
m&s cercano
• Adaptador de la cuchilla
quebrado.
• La cuchi_ia se arrastra en el
c_sped.
• Cambie el adaptador
cuchitla,
• Mueva la segadora
de la
a un lugar
en donde el c_sped ha side
corlado o a una superficie
firme para haeer arrancar
motor,
Altura de corle demasiado
baia.
Levantamien!,o de la cuchilta
desgastado,
Recogedor sin ventilaci6n de
aire.
Recogedor de c_sped
no se liana (st viene
equipado)
Diffc{I de empujar
•
El c_sped est& demasiado alto
o la altura de la rueda demasiado baia,
• Parle trasera de la caja/cuchilla
de ta segadora arrastr_ndose
en el c_sped_
• Eleve la attura de code
• Cambie la cuchiltas
. Limpie et recogedor de c_sped
• Eleve Ia altura de corte.
o
i
siado
!;enoode c_sped demaecogedor
Posici6n de la altura del mango
no adecuada para usted
33
el
41
Eleve ta parte trasera de la caja
de la segadora (1) un lugar m&s
alto,
Vacie et recogedor de c_sped
Ajuste la altura de! mango de
mode qua le acomode
ROTARY
LAWN MOWER
MODEL NUMBER
GEAR CASE ASSEMBLY
KEY
NO.
PART
NO.
17490416
2
3
4
6
PART NUMBER
KEY
NO,
DESCRIPTION
PART
NO.
137055X004
137053
57072
48373
Tapptng Screw 114-2Ox
1-1/4
Engagement Bracket
Shifter
Seat
Gear Case Hafves Kit
9
10
t !
_,2
13
t4
137074
57079
13 ! 484
700343
66447
137050
77881
137051
(Includes Key Nos 4, 5,
and 7)
Beadng
Worm Shaft
45
t6
17
18
19
750436X
750369
13000003
850848
81585X004
NOTE:
All component dimensions
in U S. inches. 1 inch = 25_4 mm
34
917.377573
7025;11
DESCRIPTION
Drlve Shaft
Hardened Washer
Clulch Yoke
Bushing
Plug
Helical Gear
Clutch Jaw
Grease
E-Ring
Hi-Pro Key
SpringBracket
given
ROTARY LAWN
MOWER
MODEL
NUMBER
917.377573
4
3
\
4
It
KEY
NO.
PART
NO.
DESCRIPTION
1
2
3
t57553
750909
17411312
Batter,! Brackel
Battery
Hex Washer Head Screw
13× 750
4
5
86353
11 't549X
Connector Mounting
Battery Charger
35
Clip
¢0
ol
r_
111
Z
...J
W
ID
0
r_
W
0
Z
.,..I
a:
I-0
36
_r
Z
O
--
_
_
_
o_tr
_
__
w
D
o
0_
n"
W
ii)
_O
7
.J
a
0
nO
_
_0
_"
..s
n-
n-
_
o
0_
0
-z_
_
__ _,_l_
_=O_
g._mN
atom
_ _
_ _ _
vZ
37
_
b-,,
LO
1",,.
0"_
u.,I
Z_
Z
u,J
0
LU
0
z
J
>-
o
rr"
38
I.o
Ill
_
4
m
z
,-I
l!l
Q
_d
v'Z
0
n:
ILl
z
0
0
re.
o
ffl
Z
<
!-
W
t,-
0
_d
39
(_.RAFTSMAN
4-CYCLE
ENGINE
,
MODEL NUMBER 143_,986502
900
135
275-
46
4O
CRAFTSMAN
KEY PART
NO. NO,
1
2
6
7
12
12A
36774
26727
33734
36557
36775
36558
12B
14
15
16
17
18
36694
28277
30589
34839A
31335
651018
19
20
30
40
36281
3260O
35801
40027
40028
41
40025
4OO26
42
43
45
40006
40OO7
20381
36777
46
48
50
52
69
70
32610A
27241
36778
29914
35261
36995
72
73
75
80
8t
82
83
86
89
90
92
93
100
101
103
30572
26833
27897
30574A
30590A
30591
30588A
650488
611O04
611150
650815
650816
34443B
610118
651007
110
110A
110B
119
120
125
37047
36953
38954
36787
36825
36779
88780
126
36781
36782
130
135
150
151
602!A
35395
35991
31673
4-CYCLE
ENGINE
.......
............
KEY PART
NO. NO,
DESCRiPTiON
Cylinder (Inc) 2 & 20)
Dowel Pin
BreaIher Etemenl
Breather Ass'y. (tncl. 6 & t2A)
Breather Tube
Breather Cover & Tube
{lncL12B)
Breather Tube Elbow
Washer
Governer Rod (Ind 14)
Governer Lever
Governer Lever Clamp
Screw, Terx T-15,
6-32 x 19/64"
151A
169
172
174
178
182
184
40017
36783
36784
30200
29752
6201
26756
185
186
189
19'I
195
196
36785
32653
650831
36559
610973
35035
Extension Spring
Oa Seal
Crankshaft
Piston, Fin & Ring Sol (Std)
Piston, Pin & Ring Sol
(.010"OS)
Piston & Pin Ass'y (Std)
(tnclA3)
Piston & Pin Ass'y (910" OS)
(incl 43)
Ring Set (Sld.)
Ring Set {.010" OS)
Piston P_nRetaining Ring
Connedlng Rod Ass'y(Inci' 46)
Conneci]ng Rod Bolt
Valve Litter
Camshaft (MCR)
O_l Pump Ass'y.
• Mounting Range Gaskef
Moun_ng Flange (Inclo 72
thru83)
Oil Drain Plug (ind. 73)
Drain Plug Gasket
Oil Seal
Governor Shaft
Washer
Governor Gear Ass'y. (lnd. 81)
Governor Speot
Screw, 1t4-20x 1-1/4 =
Flywheel Key
Rywheel
Bellevitis Washer
207
2t6
223
224
238
239
241
245
250
260
261
262
263A
275
277
285
287
290
292
298
300
301
305
306
307
309
310
313
314
315
322
322A
325
34336
33086
650451
36786
650932
34338
369t 9
36905
36920
36980
30200
650831
36921
36790
650988
35000A
650926
29774
26460
28763
36916
36246
35647
36996
35499
650562
35648
34080
650767
36952
35013
610885
35249
347
370A
370C
380
390
395
400
651038
36261
36861
640069
590702
35709
36792B
416
36085
4!7
900
900
650760
Flywheel Nut
Sof_d State Ignition
Spark Plug C,ever
Screw, Torx T-15,
10.24 x 15/16"
Ground Wtre
Ground Wire
D C Starter Wire
"Cylinder Head Gasket
Cylinder Head
Exhaust Valve (Std.) (lnd 151)
Exhaust Valve (I/3Z' OS)
(Incl t51)
Intake Valve (S{d.) (fnd 151)
Intake Valve (1/32" OS}
(Ind,151)
Screw, 5/16-18 x 1q/2"
Resistor Spark Ptug (RJIgLM}
Valve Spring
Valve Spring Cap
41
MODEL
NUMBER
143.98650,2
DESCRIPTION
Intake Valve Seal
• Valve Cover Gaskel
Valve Cover
Screw, 10-24 x 9/16"
Nut & Lock Washer, 114-28
Screw, 114-28 x 7t6_
• Carburetor To intake Pipe
Gasket
Intake Pipe
Governor Link
Screw, 1/4-20 x 1/2'
SE. 8rake Bracket (lnd 195)
Terminat
Power Restart S_Ich
*i3_rottleLink
R P M Adjusting Lever
Screw, 1/4-20 x 1"
• Intake Pipe Gasket
Screw, 10-32 x 49/64"
• Air Cleaner Gasket
Air Cleaner Cot{at
Air Cleaner Filler
Air Cleaner Cover
Blower Housing
Screw, 10-24 x 9/16"
Screw, 1/4-20 x 1/2"
Starter Gritl
Mufttar
Screw, 114.20 x 2.5f16"
Starter Cup
Screw, 8.32 x 2t/64"
Fuel Line
Fuel Line Clamp
Screw, 10-32 x 35/64"
Fuel Tank (it,d. 292 & 301)
Fuel Cap
Oil RII Tube
• "O'-Ring
"O"-Ring
Screw, 10-32 x 1r2Dipstick
Spacer
Screw, 8-32 x 27164"
Alternator Co_
Conneclor Body
Connector Body
Spring Clip
Screw, I0-32 x 51/64"
Lubrica_on Decal
Primer Deca!
Carburetor (lnc! 184)
Rewind Starter
Eleclric Starie[ Motor (12 Volt)
Gasket Set
(Incl Items Marked" in Notes)
Spark Arrestor Kit ({nd 417)
(Optional}
Sc_'ew, 8-32 x 3.18
, (Op(Jonat)
Replacement Engine NONE
Replacement S/B 750832.
order from 71-999
RPM High 2900 to 3200
NOTE: This engine could have beer_ built with 590739
starter
NOTE: All component dimensions given in U S inches
1 inch = 25.4 mm
CRAFTSMA
N 4-CYC, LE ENGINE
.............
MODEL
...,
NOD
NO.
DESCRIPTION
"-,
-KEY
640069
PART
Carburelor
(tncl. 184 ot Engine
LIsD
._
",_".__
......,
.. "'__
?_
NUM,B,ER t43.986502
Pads
1631616
T'hrotlle Shaft & Lever
Assembly
_3_
,
2
4
631767
631184
Throilla Return Spring
Dust Seal Washer
.
6
640070
Throttle Shutter
16
17
7
632527
651025
650506
Fuel
Fitling
Throttle
Crack Screw/
Shutter Screw
t8
20
20A
630766
640027
640053
25
27
631867
63 t024
Tension Spring
Idle Restrtctor Screw
Idte Restdctor Screw
Idle Speed Screw
Cap
Float Bowl
Float Shaft
29
28
30
631028
632019
631021
Float Bowl "O" Ring
Float
Inlet Needle. Seal & Clip
(IncL 31)
35
36045A
31
36
37
631022
632735
632547
Primer Bulb/Retainer
Ring
Spring CItp
Main Nozzle Tube
"O" Ring, Main Nozzle
40
44
47
640030
27110
630748
48
631027
"
"',
,,-""_"'_4_
=,.
_._...?
,'
'-_
'P--"
.,/
,..-_-)
•_,'1_
KEY
NOo
--11
O
_--'t
42
PART
NO,
-1
2
3
4
5
6
7
8
590702
590599A
590600
590696
590601
590697
590698
590699
590700
1!
590703
12
590535
13
590701
Tube
High Speed Bowl Nu!
Bowt Nul Washer
Welch Plug, Idle Mixture
Well
,Welch Plug, Atmospheric
Vent
DESCRIPTION
Recoil Starter
Spring Pin (Incl., 4)
Washer
Retainer
Washer
Brake Spring
Starter Dog
Dog Spring
Putley & Rewind Spring
Ass'y
Slarter Housing Ass'y.
(40 degree grommet)
Starter Rope ( 98" X 9/
64" die,)
Starter Handle
CRAFTSMAN
.......
i
4-CYCLE
ENGINE
..................
,i
KEY
NO,
ii,
i,iii
PART
NO.
590739
590740
590616
590617
5906 t 8A
MODEL
NUMBER,
,
143.986502
....
DESCRIPTION
11
590638
12
590535
13
14
590701
590741
Rewind Slader
Retainer
Starter Dog
Dog Spring
Pulley & Rewind Spring
Ass'y
Starter Housing Ass'y
(40 degree grommet)
Starter Rope
(Length 88" x 9/64" dia )
Starter Handle
Locking Tab
KEY
NO.
PART
NO,
DESCRIPTION
1
2
3
4A
58
6
7
8
10A
11C
35709
34955
34950
34954
34949A
34953
33450
34944
34945
590500
35714
12
13
14
15
16
17
18
34947
34946
34951
34952
34948
34953
590608
3
6
7
B
ltC
,11,
12
43
Electric Starter (12 Volt)
Retainer Ring
Spring Relainer
Spring
Gear
Drive End Cap Ass'y
Lock Nut
Armalute
Housing Ass'y,
Thrusl Washer
Commutator End Cap
Ass'y.
(Incl. brushes)
Be;t, 10-32 x 3-3116"
Pinion Driver
Cup Washer
Retainer Ring
Washer
Drive Nul
Washer
For the repair or replacement parts you need
delivered directly to your home
Call 7 am - 7 pro, 7 days a week
1-800-366-PART
(t-800-366-7278)
Para ordenar piezas con entrega
domicilio - 1-800-659-7084
a
For in-house major brand repair service
Call 24 hours a day, 7 days a week
1-800-4-REPAIR
(1-800-473-7274)
Para pedir servicio de reparacidn
domicilio - 1-800-676-5811
a
For the location of a Sears Parts and
Repair Cenler in your area
Call 24 hours a day, 7 days a week
1-800-488-1222
For information on purchasing a Sears
Maintenance Agreement or to inquire
about an existing Agreement
Call 9 am - 5 pro, Monday-Saturday
1-800-827-6655
When requesting service or ordering
parts, always provide the following
information:
o PreductType
• Part Number
• Model Number • Part Description
A menca's Repair Specmt_sls
165464
05.11.98
VB
Printed in U.S.A.