1
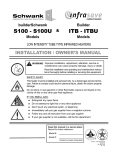
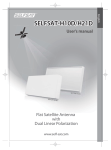
MODELS: 4002-CB, 4005-CB INFRARED PORTABLE PATIO HEATER INSTALLATION / OWNER’S MANUAL WARNING Read and understand this installation and operation manual thoroughly prior to assembly, installation, operation or service to this appliance. FOR YOUR SAFETY: This heater must only be serviced by a trained gas service technician. Failure to comply could result in personal injury, death, fire and/or property damage. Do not store or use gasoline or other flammable vapours and liquids in the vicinity of this or any other appliance. IF YOU SMELL GAS: Extinguish Don’t Go touch any electrical switch, or telephone to a neighbor and call your gas supplier immediately Follow If any open flame any and all instruction from your gas supplier your gas supplier is not available, call the fire department FIELD CONVERTIBILITY: This appliance is NOT convertible from propane gas. Member of Keep this manual in a secure place . Record the following information for future reference: Model #: 4002-CB 4005-CB Serial #: (located on heater rating label) GP-M45J-CX-01A 4005-CB, 4002-CB Manual RD: JUN 2008 R.L. 02A BA GP-M45J-CX-01A 4005-CB, 4002-CB Manual RD: JUN 2008 R.L. 02A BA MODELS: 4005-CB, 4002-CB INFRARED PORTABLE PATIO HEATER TABLE OF CONTENTS TOPIC PAGE NUMBER TOPIC PAGE NUMBER 1. GENERAL .................................................1 8. SAFE LOCATION FOR HEATER ....................8 2. INSTALLATION REQUIREMENTS..................1 8.1 CLEARANCE TO COMBUSTIBLES..........8 3. GAS SUPPLY.............................................1 9. LIGHTING INSTRUCTIONS ..........................9 3.1 GAS REQUIREMENTS - PROPANE .........2 10. TROUBLESHOOTING ...............................10 4. SPECIFICATIONS - 4005-CB & 4002-CB PROPANE MODELS ..............................3 11. STORAGE ..............................................11 5. MAIN COMPONENTS FOR ASSEMBLY ..........4 12. PREVENTATIVE CARE AND MAINTENANCE.......................................11 6. ASSEMBLY INSTRUCTIONS ........................5 13. SAFETY.................................................11 7. CONNECTION AND LEAK TESTING ..............7 14. Part List—Exploded View ………………………12 15. LIMITED WARRANTY ..............................13 NOTICE: The Manufacturer. reserves the right to make changes to equipment and specifications without obligation or notification. This publication, or parts thereof, may not be reproduced in any form, without prior written consent from the manufacturer. Unauthorized use or distribution of this publication is strictly prohibited. Schwank Group / InfraSave Technical Support: 1-877-446-3727 e-mail: [email protected] PO Box 988, 2 Schwank Way Waynesboro, Georgia, USA 30830 Phone: (706) 554-6191 Fax: (706) 554 9390 5285 Bradco Boulevard Mississauga, Ontario, L4W 2A6 Phone: (905) 712-4766 Fax: (905) 712-8336 e-mail: [email protected] www.patioschwank.com e-mail: [email protected] www.infrasave.com GP-M45J-CX-01A 4005-CB, 4002-CB Manual RD: JUN 2008 R.L. 02A BA 1. GENERAL This appliance is a transportable infrared patio, deck and garden heater for operation with LPG (Liquefied Petroleum Gas). The 4005-CB & 4002-CB burner is controlled and adjusted by the gas control knob located below the burner, and the gas supply is controlled by the valve on the portable propane gas cylinder. The gas supply is fed up through the inside of the pole using flexible gas hose. These installation and operating instructions are intended only for patio heater MODELS 4005-CB & 4002CB. All installations must conform to all local and national code requirements including the current CAN/CGAB149.1-05 (latest edition) installation code and the ANSI Z223.1 (latest edition) for the U.S.A. for gas burning appliances and equipment. 2. INSTALLATION REQUIREMENTS This Portable Patio Heater must always maintain proper clearance to combustible materials. (Top 18” sides 24” below 24”). The heater must always be placed on a stable, solid level surface. Do not use this heater in an explosive atmosphere. Keep heater away from areas where gasoline or other flammable liquids or vapors are stored. WARNING: Improper operation, installation, adjustment, alteration, servicing or maintenance can cause fire, severe property damage, serious injury or death. Carefully read this User Guide before assembling and setting up the heater. 3. GAS SUPPLY: PROPANE (CYLINDER NOT INCLUDED) A dented, rusted or damaged propane cylinder may be hazardous and should be checked by your gas supplier. The heater comes equipped with a hose assembly for hook-up to a standard propane gas tank. For your safety: Never use a propane cylinder with a damaged valve connection. Never connect an unregulated propane cylinder to the heater The propane cylinder must be designed to provide for vapor withdrawal from the operating cylinder. Although gas connections on the heater are leak tested at the factory prior to shipment, potential hazards could result during shipment. For your safety a complete gas tightness check of all connections and hoses, must also be performed at the installation site prior to use, due to potential shipment hazards. REFER TO INFORMATION REGARDING LEAK TESTING ON THE NEXT PAGE Page 1 GP-M45J-CX-01A 4005-CB, 4002-CB Manual RD: JUN 2008 R.L. 02A BA 3.1 GAS REQUIREMENTS AND LEAK TESTING: NEVER CONNECT AN UNREGULATED GAS SUPPLY TO THE HEATER. The propane connection hose supplied with the heater has a pressure regulator integrated into the hose . PRECAUTIONS: Periodically check the whole system for leaks or if the smell of gas is detected. Extinguish all open flames. Perform ALL leak testing outdoors. Never smoke while leak testing. Only parts recommended and supplied by the Manufacturer should be used for repair. Substitution could result in improper repair and cause fire, property damage, personal injury or death. Improper repair will also void the warranty. Do not use the heater until all connections have been leak tested and are sound !!! LEAK TESTING: 1. Ensure that the heater gas control knob is fully closed by turning completely clockwise. 2. Open cylinder valve for Propane supply . 3. Apply the soap solution generously to all connections and hoses. 4. Carefully examine all connections in the gas train. 5. If bubbles occur, there IS a leak. Close supply valve completely. 6. Retighten the leaking connection and repeat leak test process, until ALL leaking has ceased, no matter how small the bubbles may appear. If the leak cannot be repaired permanently, close the cylinder valve completely and contact a qualified and licensed gas technician for repair parts and service. GAS REQUIREMENTS: Maximum inlet pressure to propane regulator must not exceed 1/2 psi (14” w.c.). A Minimum supply pressure of 11.0” w.c. is required to maintain correct burner input. The pressure regulator and hose assembly supplied with the appliance MUST be used. Any replacement pressure regulator and hose must conform to standards & specifications of all national and local codes. Installation must conform with all national and local codes. Page 2 GP-M45J-CX-01A 4005-CB, 4002-CB Manual RD: JUN 2008 R.L. 02A BA 4. MODELS 4005-CB & 4002-CB Specifications: Fuel Propane Operating pressure 11” w.c. Inlet gas supply pressure minimum 12” w.c. / maximum 14” w.c. Maximum operating input rating 38,000 BTUH Low fire input rating 25,000 BTUH Cylinder size 20 lb. (cylinder not included) Cylinder connection QCC-1 Fuel consumption 20 lb. cylinder ~12 hours at maximum setting (ambient temperature affects rate of fuel delivery) Net Weight 60 lbs not including cylinder. Effective radiant range 8 to 20 foot circle (affected by wind and ambient temperature) Certifications CSA International, USA and Canada Page 3 GP-M45J-CX-01A 4005-CB, 4002-CB Manual RD: JUN 2008 R.L. 02A BA 5. MAIN COMPONENTS AND TOOLS REQUIRED FOR ASSEMBLY Model 4005-CB 4002- Tools Needed: Adjustable Wrench Slip Joint Pliers Phillips Screwdriver #2 or #3 tip Spray Bottle of Soapy Water or Paint Brush and soapy water (to check leaks) Heater Components Supplied: 4005-CB & 4002-CB Stainless Steel Hammered Black Finish finish Main burner head assembly unit 32” diameter single piece aluminum reflector 34” tall cylinder housing and base Burner post support brackets (3) 52” gas supply hose LPG Regulator on hose and QCC-1 fittings 4 ea. - M6 x 10mm machine screws for burner to upper post assembly 34” 6 ea. - M6 x 35mm with nuts for post to brackets 3 ea. - M8 x 15mm bolts for post bracket to heater base 3 ea- M8-125 Butterfly wing bolts and washers to assemble reflector to burner 2 - Wheel assemblies, nuts and bolts AAA Igniter Battery Page 4 GP-M45J-CX-01A 4005-CB, 4002-CB Manual RD: JUN 2008 R.L. 02A BA 6. ASSEMBLY INSTRUCTIONS Attach Wheel Kit to Base: Assemble wheel brackets to base ‘L’ brackets using four #8 x 3/4” bolts and nuts (Note: Bolt heads face the wheel; Position wheel brackets with curve “up”) Align pairs of holes in each end of ‘L’ brackets to those in opposite sides of the base - fasten in place with #8 x 3/4” bolts & nuts. (NOTE: Position wheel brackets with curve “up”) Assemble wheels to wheel brackets using axle bolts & nuts Wheel brackets curve ‘up’ Attach the 3 post mounting brackets to the Cylinder Base as shown. Use three M8 x 15mm bolts to secure brackets to the base Fasten the post to the top of the post brackets, aligning pre-drilled holes as shown. Use six M6 x 35mm bolts, washers & nuts to attach post to post brackets. Tighten securely. Page 5 GP-M45J-CX-01A 4005-CB, 4002-CB Manual RD: JUN 2008 R.L. 02A BA ASSEMBLY..... CONTINUED For LP connection: 1. Slide cylinder cover over post and let rest in upper position. 2. Slide gas hose up inside the post with LP regulator at bottom (regulator at lower end, inside cylinder cover) 3. Attach hose securely to burner 4. Allow burner to rest in post 5. Connect hose to gas cylinder. 6. Lift burner and leak test all connections See section 3.1 page 2, section 5.1 next page 7. Fasten burner securely in place with four 1/2” machine screws Reflector Assembly to Burner: 1. Install a washer onto threaded portion of wing bolts 2. Align holes in reflector to those in the brackets at top of burner 3. Secure reflector to burner with wing bolts. Page 6 GP-M45J-CX-01A 4005-CB, 4002-CB Manual RD: JUN 2008 R.L. 02A BA 7. CONNECTION AND TESTING: PROPANE CYLINDER CONNECTION : Lift the cylinder cover up from the base of the heater Let cover rest on top of post supports in an angle position Install a full gas cylinder on to the heater base Connect the gas regulator to the QCC-1 cylinder valve by turning the connector knob manually in a clockwise direction. DO NOT use a tool, hand tighten only Leak test the connection to the tank (see below for instruction) Replace the cylinder cover. LEAK TEST: For your safety you must perform a leak test of all connections and hoses. Ensure that the connection of gas hose to burner assembly is also leak tested. Mix equal parts of water and soap, brushing mixture on all joints. 1. Ensure that the heater gas control knob is fully closed by turning completely clockwise. 2. Open cylinder valve for Propane or supply line for Natural Gas. 3. Apply the soap solution generously to all connections and hoses. Carefully examine all connections in the gas train. If bubbles occur, there IS a leak. Close supply valve completely. Retighten the leaking connection and repeat leak test process, until ALL leaking has ceased, no matter how small. If the leak cannot be permanently repaired , close the cylinder valve completely and contact a qualified and licensed gas technician for repair parts and service. After successful leak test, ensure that the burner assembly and all other components are securely fastened. Page 7 GP-M45J-CX-01A 4005-CB, 4002-CB Manual RD: JUN 2008 R.L. 02A BA 8. A SAFE LOCATION FOR THE HEATER: Caution: When objects are left under a heater in operation, such objects will be subject to radiant heat and could be damaged. The main application of this heater is to provide radiant heat comfort in the outdoors, at poolside, spa areas, terraces, patios and work areas, etc. It is necessary to provide “wind breakers”, against wind and breezes. NOTE : This heater is approved for outdoor use only: Respect minimum clearances to combustibles as shown in figure 12 below. Install heater on a levelled, solid and stable surface. Do not install in an explosive environment. Keep away from areas where gas vapours are present or inflammable liquids are stored or used. In case of strong winds, completely shut-off the heater and the gas valve. In case of very high winds remove reflector dome. Do not move the heater when it is hot. Do Not operate the heater when the wheels are extended and exposed. 8.1 CLEARANCES TO COMBUSTIBLES Fig. 12 18” 24” The clearances to combustibles are established at points reaching a surface temperature of 1600 F. 24” 24” Some materials such as awnings or plastic may require greater distances. Respect clearances as shown: Sides of Reflector: Above Reflector: Below Reflector: 24 inches 18 inches 24 inches Page 8 GP-M45J-CX-01A 4005-CB, 4002-CB Manual RD: JUN 2008 R.L. 02A BA 9. OPERATION AND LIGHTING INSTRUCTIONS: Install ‘AAA” Battery into electronic igniter (as illustrated) by unscrewing the cap counterclockwise, insert battery with positive terminal facing “in”. ‘AAA’ Battery Replace the cap. TO TURN ON: 1. From ‘OFF’ position, turn knob 90° counter-clockwise push and hold in. 2. Press the igniter until a flame is established. 3. Release the knob and check that the flame stays on. 4. If the flame goes out, repeat steps 1 & 2 above. 5. For maximum temperature, turn knob fully counter-clockwise. TO TURN OFF: 1. Turn the knob clockwise until it stops. 2. Depress knob and turn fully clockwise to shut of the gas supply completely Warning: A 5 minute complete shut off period is required before the appliance is re-lighted. In very strong winds, turn off the heater, turn off the gas cylinder valve. Allow the heater to cool down before moving to a sheltered location. DO NOT move the heater while it is hot. Page 9 GP-M45J-CX-01A 4005-CB, 4002-CB Manual RD: JUN 2008 R.L. 02A BA 10. TROUBLE SHOOTING WARNING: THIS SECTION IS FOR CERTIFIED AND LICENSED GAS TECHNICIANS ONLY. IMPROPER ADJUSTMENT, ALTERATION, MAINTENANCE OR SERVICE PROCEDURES, CAN CAUSE FIRE, PROPERTY DAMAGE SERIOUS INJURY, OR DEATH. IMPORTANT PROPANE NOTICE: Propane tanks equipped with the Q.C.C. {quick coupling connector} have an internal excess-flow valve safety feature to prevent propane from escaping at full pressure if a gas hose is severed. If the hand wheel on the propane tank is opened too quickly, the excess flow valve could close causing the propane flow to slow down or stop. The heater will appear to 'burn' properly for a few minutes, the flame will diminish and finally extinguish. Attempts to relight the heater will fail. If this occurs: Close the hand wheel on the propane tank and let sit for a few minutes. The excess flow valve will then reset . Now turn the hand wheel on the propane tank very slowly to prevent the excess flow valve from closing again. After one complete turn, open hand wheel on propane tank all the way at normal speed. Heater should now be OK for normal operation. PROBLEM Burner will not light Burner will not stay on Low Burner Flame PROBABLE CAUSE SOLUTION Gas valve may be in OFF position or fuel cylinder is empty Turn the gas valve ON or replace LPG gas cylinder if empty. Pilot Orifice blocked Air in supply system Loose connection Electronic Igniter ‘AAA’ Battery Dead Gas pressure low with valve open full New cylinder or 1st time start up Cylinder Valve On, no gas flow Igniter assembly bent/ or out of correct position to ignite Igniter failure Clean or replace orifice Purge air from lines. Open gas line valve & depress control knob for approx 2 minutes. Check igniter lead and fittings. Check and replace if necessary Replace cylinder or regulator Purge air from lines Is cylinder full/ check regulator /hose assy. Check set-up and position then retry. You can light pilot manually with a match or taper Debris or dirt around the pilot Loose connections Clean pilot area Tighten Connections Thermocouple faulty Gas leak in the line Lack of fuel pressure Gas inlet hose is kinked or bent Spider or insect cocoon Replace Thermocouple Check connections Near empty fuel cylinder (LP) Check regulator (NG) Check / replace empty LPG gas cylinder. Check for restricted or plugged orifice. Replace empty LPG gas cylinder or defective regulator Check gas pressure (NG) Check & straighten out hose for damage Check for obstructions. Carbon on reflector & emitter screen or Thick black smoke Clean components as needed, check for probable cause, and rectify Cylinder is low on fuel Pressure is low, or regulator is defective Burner Unit Page 10 GP-M45J-CX-01A 4005-CB, 4002-CB Manual RD: JUN 2008 R.L. 02A BA 11. STORAGE When heater is not in use for a prolonged period of time, remove gas cylinder. Verify that the gas valve is fully and tightly closed. Do not store the gas cylinder indoors. Store gas cylinder in a well ventilated area. For more compact storage and to avoid damage, the reflector may be removed 12. PREVENTATIVE CARE AND MAINTENANCE The burner area is likely to attract spiders, especially inside orifices. Once a year, the heater should be inspected for spider webs, insects, and debris around burners and orifices. Plugged injectors or orifices will obstruct the gas flow to the burner. This will result in burner malfunction or possible damage. When heater is warming up or cooling down a pinging metallic noise is normal. Have heater inspected if.….. you smell gas combined with yellow tipped flames on burner. heater does not provide expected heat capacity burner makes little popping sounds while operating (other than when shutting down after being turned off). 13. SAFETY Check periodically for leaks in the system, or immediately when you smell gas. In case a leak is detected, extinguish all open flames in the area. Never leak test while smoking. If you are unable to repair a leak, turn off gas supply at the cylinder valve and contact your gas supplier or a qualified, licensed gas technician. Do not alter or modify this heater in any way Page 11 GP-M45J-CX-01A 4005-CB, 4002-CB Manual RD: JUN 2008 R.L. 02A BA Page 12 GP-M45J-CX-01A 4005-CB, 4002-CB Manual RD: JUN 2008 R.L. 02A BA LIMITED WARRANTY CERTIFICATE FOR GAS-FIRED INFRA-RED PATIO HEATERS : 4001/2 (-J), 4N11/2 (-J) / 4401/2(-J), 44N1/2(-J) 4002-CB, 4005-CB 4N/L51, 4N/L62 (-J) / 44N/L5, 44N/L6 (-J) SERIES The Manufacturer warrants that this product is free from defects in material or workmanship under normal use and service subject to the terms of this document. COMPONENT PARTS - ONE YEAR WARRANTY Subject to the conditions and limitations stated herein, during the term of this limited warranty, we will supply any component part (at our option a new or repaired component part) of the heater, as defined below, excluding any labor, which the Manufacturer’s examination determines to be defective in workmanship or material for a period of one year (1 year) from the date of installation, unless otherwise specified below. This warranty applies to the heater’s original owner, and subsequent transferees and only if the unit is installed and operated in accordance with the printed instructions accompanying the unit and in compliance with all applicable installation, building codes and good trade practices. BURNER AND MANTLE - THREE YEAR WARRANTY The Manufacturer warrants the burner and mantle for a period of three years. (3 years) WHAT IS NOT COVERED The Manufacturer shall not be responsible for any expenses, including service, labor, diagnosis, analysis, material or transportation charges incurred during removal or reinstallation of this product, or any of its components or parts. All labor or service charges shall be paid by the owner. This warranty does not cover heating products improperly installed, misused, exposed to or damaged by negligence, accident, corrosive or contaminating atmosphere, water, excessive thermal shock, impact, abrasion, normal wear due to use, alteration or operation contrary to the owner’s manual or if the serial number has been altered, defaced or removed. This warranty shall not apply if the input to the heating product exceeds by more than 2% of the rated input on the rating plate. The Manufacturer shall not be liable for any default or delay in performance by its warranty caused by any contingency beyond its control, including war, government restrictions, or restraints, strikes, fire, flood, acts of God, or short or reduced supply of raw materials or products. WARRANTY PROCEDURE To establish the installation date for any purpose under this Limited Warranty, you must retain the original records that can establish the installation date of your unit. If you do not provide such documents, the start date of the term of this Limited Warranty will be based upon the date of unit manufacture, plus thirty (30) days. Failure to maintain the equipment through regular annual service maintenance by a qualified service technician shall void the warranty. LIMITATIONS AND EXCLUSIONS This document contains all warranties made by the Manufacturer and may not be varied, altered or extended by any person. There are no promises, or agreements extending from the Manufacture other than the statements contained herein. THIS WARRANTY IS IN LIEU OF ALL WARRANTIES EXPRESSED OR IMPLIED, TO THE EXTENT AUTHORIZED BY THE LAWS OF THE JURISDICTION, INCLUDING SPECIFICALLY THE WARRANTIES OR MERCHANTIBILITY OF FITNESS FOR A PARTICULAR PURPOSE. It is understood and agreed that the Manufacturer’s obligation hereunder is limited to repairing or replacing parts determined to be defective as stated above. In no event shall the Manufacturer be responsible for any alleged personal injuries or other special, incidental or consequential damages. As to property damages, contract, tort or other claim the Manufacturer’s responsibility shall not exceed the purchase priced paid for the product. All replacement parts will be warranted for the unused portion of the warranty coverage period remaining on the applicable unit. Some Authorities do not allow certain warranty exclusions or limitations on how long a warranty lasts or the exclusions or limitations of incidental or consequential damages. In such cases, the above limitations or exclusions may not apply to you and are not intended to do so where prohibited by law. This warranty gives you specific legal rights. You may also have other rights which vary by each jurisdiction. 5285 BRADCO BLVD. MISSISSAUGA, ON, L4W 2A6 2 SCHWANK WAY, WAYNESBORO, GEORGIA. 30830-8336 SCHWANK INFRASAVE 1-877-446-3727 Fax: 905-712-8336 1-866-361-0523 Ph: 905-712-4766 Ph: 1-866– INFRASV (463 7278) Fax: 1-866-724 –9265 GP-D400-BX-03B 4000 (-J) SERIES WARRANTY March 2006 RL: 3B KH GP-M45J-CX-01A 4005-CB, 4002-CB Manual RD: JUN 2008 R.L. 02A BA