1
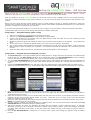
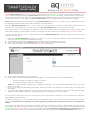
A new era of audio OWNER’S MANUAL AQ SmartSpeaker AQ Audio Limited Unit 5 Leestone Road Manchester M22 4RN AQ Audio Limited 19c Trolley Square Wilmington Delaware 19806 www.aqaudio.com ©2011 AQ Audio. All rights reserved. Features, specifications and appearance are subject to change without notice. AQ Audio is a trademark of AQ Audio Limited, registered in the UK AirPlay, Apple, Mac, iPhone, iPod, iPod Nano, iPod Classic, iTunes and iPod Touch are trademarks of Apple Inc., registered in the U.S. and other countries. iPod/iPhone not included. “Made for iPod” and “Made for iPhone” mean that an electronic accessory has been designed to connect specifically to iPod and iPhone, respectively, and has been certified by the developer to meet Apple performance standards. Apple is not responsible for the operation of this device or its compliance with safety and regulatory standards. Wi-Fi is a registered trademark of the Wi-Fi Alliance. Table of Contents Contents Page Introduction 4 Getting to Know Your AQ SmartSpeaker 5 Setting up CONNECTED Mode – iOS Devices 6 Setting up CONNECTED Mode – Any Device 7 Setting up AQ DIRECT Mode 8 Using Your AQ SmartSpeaker 9 Using More Than One AQ SmartSpeaker 10 Firmware Upgrade Procedure 11 System Reset 12 Troubleshooting Guide 12 Looking After Your AQ SmartSpeaker 14 Introduction The AQ SmartSpeaker is a totally wireless and totally portable audio system - it can play your audio and media anywhere around the house and garden direct from your iOS Device or iTunes using your existing Wi-Fi network. The AQ SmartSpeaker works with Apple’s AirPlay technology. It is able to wirelessly stream music from iTunes 10 on your Mac or PC, or from an iOS Device with iOS 4.2 or later. Throughout this manual, when you see the term “iOS Device”, it refers to any iPod, iPhone or iPad which is running Apple Operating System iOS 4.2 or later. The AQ SmartSpeaker works with Android smartphones and tablets using selected Apps available in the Google Play store. You can also use the Play To feature available in Windows Media Player on Windows 7, to stream music to the AQ SmartSpeaker . With its leading edge and patented ultra-efficient high powered digital amplifier, the AQ SmartSpeaker is able to deliver superb high quality sound from a 24W unit, giving up to 20 hours before recharge when using the AUX IN connection, and over 10 hours in CONNECTED Mode. To conserve power when running on battery, the AQ SmartSpeaker automatically powers down after 10 minutes of inactivity when in CONNECTED Mode. If you want to leave the speaker connected to the mains and switched on for long periods of time you can, it will power down after 1 week of inactivity. With more than one AQ SmartSpeaker , you can build a stereo pair by setting individual speakers to be a left or right speaker, or even set up an entire multi-room sound system. WARNING: The USB Update port is designed to allow connection of an Apple iOS device for Network Setup only. DO NOT connect it to a computer or any other USB device, as damage may occur. Important Note: Turn off the unit before inserting or unplugging audio cables from a source device’s headphone or line-level output jacks. Doing so will prolong the life of your unit, help protect your device from static electricity and prevent potential damage. Unpacking and Charging your AQ SmartSpeaker Carefully unpack your AQ SmartSpeaker and confirm that all the items shown below are included. Please charge the speaker before using it for the first time. The Speaker incorporates a Lithium-polymer battery. It is not required that you let the battery run down fully between each charging cycle, however it is recommended to occasionally allow the speaker to run until it switches off occasionally; this will help maintain the accuracy of the battery management circuit and get the best out of the available battery capacity. Due to the way Lithium batteries store power, leaving the battery fully charged for long periods of time is likely to reduce the working life of the battery. If you are not going to use the speaker for a while and the battery has just been charged, it is a good idea to run the speaker for a few hours before packing the speaker away, but do not store the speaker for long periods of time with a totally flat battery, as it may fail to recharge correctly. Please note that if you intend to run the speaker permanently connected to the mains power, it is not possible to over-charge the battery, but the management circuit will ensure that the battery is always fully charged, and the working life of the battery is likely to be reduced as a result. When charging any batteries, the power outlet should be near the equipment, and easily accessible. Getting to Know Your AQ SmartSpeaker Power/Mode button: Press this button briefly to turn the AQ SmartSpeaker on. To switch between modes, with the speaker on, briefly press the Power/Mode button. Repeatedly pressing the button will cycle through the modes in the following order: CONNECTED → AUX IN → AQ DIRECT When the speaker is on, press and hold the Power button for 2 seconds to switch it off. Volume Up/Volume Down: Briefly Press these buttons to raise/lower the volume by one step. Mute: Press and hold the Volume Down button for 2 seconds to Mute the speaker. Press and hold Volume Down again to restore the sound to its previous level. Briefly Pressing either volume button will restore the sound and raise/lower it by one step. Pressing and holding the Volume Up button will continuously increase the volume until it reaches its maximum level. Battery Status LED Descriptions Off When Plugged In: the battery is fully charged. When Running on Battery: The battery is OK. Wi-Fi LED Status Descriptions Green Connected to a wireless network. Red, flashing slowly Not connected to a network. Check Signal Strength and Network Configuration. Blinking Slow When Plugged In: The Battery has a good charge level but is not completely full, it is being charged. Red, flashing quickly Speaker is Starting Up. If this does not change, there may be a problem, see troubleshooting. Blinking Normal When Plugged In: The battery is low. It is being charged. Red / Green flashing alternately The speaker is waiting for or applying settings, see Configuration pages. Blinking Fast When Running on Battery: The battery is low and needs to be charged. Orange appears briefly A reset is being performed. Orange The speaker is in AQ DIRECT Mode. Orange, Flashing slowly There is a problem with the firmware. Try resetting the speaker, or perform a firmware upgrade. Off AUX IN Mode (if Power LED is on) Speaker is Off (if Power LED is off) Battery Status LED: The Battery Status LED is hidden just above the AQ Audio logo on the front of the speaker. It will flash to indicate the charge status of the internal battery. USB Update port: The USB Update port is designed to allow connection of an Apple iOS device for network setup only. DO NOT connect it to a computer or any other USB device, as damage may occur. Aux In Connection: When the AQ SmartSpeaker is in AUX IN Mode, you can connect any audio device to the speaker using the cable provided. Change the mode using the Power/Mode Button on the top of the speaker. Audio Mode Switch: Set to “M” if it is the only Speaker or if you are using it as part of a multi-room setup. Use “L” and “R” if you are using two Speakers as a stereo pair. DC Power Connector: Connect to a mains power socket using the supplied power adaptor to charge the internal battery. Reset Button: This button will force the speaker to restart if it becomes unresponsive. This will not delete network settings. Setting Up CONNECTED Mode – iOS Devices Before you can use CONNECTED Mode, you need to connect the AQ SmartSpeaker to your wireless network. methods on this page if you want to use an Apple iPhone, iPad, or iPod Touch to set up the speaker. Use the Once your speaker is set up in CONNECTED Mode, you can stream music from any compatible device on your wireless network. Your device remains connected to your wireless network, so you can access the internet and send live radio streams to the speaker. Before you start, ensure that the wireless network router is at least capable of wireless ‘g’ standard performance. Make sure that the router is switched on and that you know what the network name (SSID) and password (Network Key) are (note that the password or network key is likely to be case-sensitive). If you have just unpacked the speaker, or you know it is low on charge, it is a good idea to connect the speaker to the mains whilst following this process to prevent it being interrupted by the battery running out. Setup Option 1 - Using Wi-Fi Sharing (iOS 5 or later) 1. 2. 3. 4. 5. 6. 7. Ensure your iOS Device is connected to the correct Wi-Fi network Switch on your AQ SmartSpeaker by briefly pressing the power button Connect your iOS Device to the speaker using your Apple USB sync cable and make sure you have unlocked your iOS device so you can see your home screen. Simultaneously briefly press and release the Volume Up and Volume Down buttons on the speaker - do not hold them down. On your iOS Device, a message will appear asking you to share your Wi-Fi settings. Click ‘Allow’. Your network settings will be passed to the speaker automatically and it will connect to the network. Wait for the Wi-Fi LED to change to green to indicate it is connected. You may then disconnect the USB cable. This could take around 45 seconds. If the Wi-Fi LED continues to flash red, the setup was unsuccessful, Please try the setup again. Setup Option 2 - Using the AQ Connect App (iOS 4 or later) 1. 2. 3. 4. 5. The AQ Connect App is a free App available from the Apple App Store. Simply search for “AQ Connect” and install the App in the normal way. The AQ Connect App allows you to change the name of your AQ SmartSpeaker as well as offering access to the manual, tips on using AirPlay, and a way of contacting the AQ Audio support team. Turn on the AQ SmartSpeaker by briefly pressing the power button. Wait until the Wi-Fi LED changes to slow flashing red or steady green. (The LED will only go green if the speaker already has settings for a network, and that network is in range.) Connect the AQ SmartSpeaker to your iOS device using your Apple USB Sync cable (supplied with your Apple device). Tap the AQ Connect App icon to run it. Wait whilst the App communicates with the speaker, this should take 10-15 seconds. Give your Speaker a memorable name by entering it in the first box. Once you are happy with the name, click “Done”. Note: You do not have to change the name in this box if you are happy with the current name; however you still have to select the box and click “Done”. 6. Select the second box to search for your wireless router, this may take a few seconds. If the network list doesn’t show any networks, the App may be having trouble finding your router. Check that you are in range of the router and select the middle box again to re-start the search. 7. Once your router appears in the list, select it and press OK, then enter the password into the bottom box then press “Join”. NOTE: Your password may be case sensitive. 8. Once the upload is complete, the App will display the completion screen. You can now disconnect the USB cable and the AQ SmartSpeaker will automatically start the update process. 9. Wait for the Speaker to restart. The Speaker’s Wi-Fi light will cycle through a series of different colours. It will flash alternately red and green for a short time, and then it will flash red only whilst it restarts. Once it has restarted, it will flash red slowly whilst searching for the router. If you have entered the settings correctly, it will change to green to show it is connected. 10. Once the AQ SmartSpeaker is connected, you can then start to play music through the Speaker using the AirPlay function. Setting Up CONNECTED Mode – Any Device Before you can use CONNECTED Mode, you need to connect the AQ SmartSpeaker to your wireless network. Use the methods on this page if you want to use an Android Phone, Desktop Computer (Mac or Windows), or other network capable device. NOTE: Whilst you can complete this option from an iOS Device, we would recommend using one of the iOS Device-Specific options to make it easier to set up your AQ SmartSpeaker. . There is no difference in the end result, once the speaker is connected to the network, it can be seen by any compatible device. If you are using a computer, check that it has wireless capability, and can connect to your network wirelessly. If the computer has any wired connection to a network, you will need to temporarily disconnect this whilst you set up the speaker. Setup Option 3 – Manual Wireless Setup (Any Device) 1. 2. 3. 4. 5. 6. 7. 8. Turn on the AQ SmartSpeaker by briefly pressing the power button. Wait until the Wi-Fi LED changes to slow flashing red or steady green. (The LED will only go green if the speaker already has settings for a network, and that network is in range.) Press and hold both the Volume Up and the Volume Down buttons on the Speaker simultaneously for 5 seconds until the Wi-Fi LED turns Orange, then release. The AQ SmartSpeaker will then restart. The Wi-Fi LED will flash red again. After a minute or two the Wi-Fi LED will start flashing red and green alternately. The AQ SmartSpeaker is now in Configuration mode. The AQ SmartSpeaker will have created a new temporary wireless network, which you can find by searching for wireless networks from your Android phone or Computer, how you do this will depend on your device and operating system. Select “AQ Smart Speaker Setup XXXXXX” to connect. Wait until the network is connected (it may show “no internet access”, this is normal), then open a Web Browser such as Firefox, Chrome, or Safari. Type the IP address 192.168.1.12 in the address bar (not the search bar) and press return. The AQ SmartSpeaker information page should now load. Click on Speaker Setup on the left to go to the Network Setup page. From the Speaker Setup page you can change the name of your AQ SmartSpeaker . You may find this useful if you have more than one Speaker. Press the Apply button next to the name to confirm. NOTE: if you do change the name of the speaker, you will need to go back to the setup page by clicking on Speaker Setup. Choose the wireless network that you want to connect the Speaker to. This can be found in the drop down menu titled “Wireless Network (SSID)” Enter the password. (There may be a password already in the box – you will need to delete this first before entering yours) Be careful because if you get it wrong, you will need to start back at step 1. Click on Apply at the bottom then click OK to confirm the settings. A Dialog Box will appear explaining the next step. If you are sure the network settings are correct, Click OK to confirm this, the Speaker will then begin updating the settings. Depending on your browser, you may also be asked if you want the password to be stored by the browser – If you click yes, your browser will remember the wireless key you entered and automatically fill in this box the next time you go to the setup page. The AQ SmartSpeaker will automatically disconnect and start to update its settings. Once the Speaker has disconnected, the webpage will stop responding, so you can close the web browser and reconnect the computer to your normal wireless network. The Wi-Fi LED will continue to flash red and green alternately until the settings have been updated; it will then flash red quickly for a while and then change to red slow flashing. Once the Wi-Fi Led turns to green, the AQ SmartSpeaker is connected to your network. If it does not go to steady green after a minute, press the reset button on the back. The Speaker will restart and should connect, if it still does not connect, check that your configuration was correct. Setting Up AQ DIRECT Mode Your AQ SmartSpeaker will work in AQ DIRECT mode straight out of the box. To do this, simply switch the speaker to AQ DIRECT Mode by briefly pressing the Power/Mode button twice (from CONNECTED Mode). The Wi-Fi LED will turn orange. Search for and connect to the “AQ Direct Mode XXXXXX” wireless network using the device you want to play audio from, and you are ready to play. See the “Using Your AQ SmartSpeaker ” page for details of how to do this from various Apps. NOTE: When your iOS Device is connected to the AQ SmartSpeaker using AQ DIRECT Mode, you can still send and receive text messages and phone calls, but you will be unable to access the internet. When the AQ SmartSpeaker is in AQ DIRECT mode, you can connect to it and stream audio without having to enter a password, this means that anyone who is in range of your AQ SmartSpeaker can use it to stream their audio. This may be useful in certain situations, for example to allow your friends to easily use the speaker at a party, however it also means that neighbours or other people in range of your speaker can also connect to your speaker if it is in AQ DIRECT Mode. This page will show you how to add a basic password to the AQ SmartSpeaker to stop other people connecting to it and using it to play their music. 2. 3. 4. Ensure the AQ SmartSpeaker is switched on, switch to AQ DIRECT mode (by pressing the Power/Mode button briefly twice from CONNECTED mode, Wi-Fi LED goes Orange). Connect to the “AQ Direct Mode XXXXXX” wireless network using your iOS Device, Mac or PC. Open a web browser and enter 192.168.1.12 in the address bar, this will load the setup page. Click “AQ Direct Settings” on the left to load the AQ DIRECT settings page. 5. 6. Choose “WEP” from the Security drop-down box. Enter a password into the Key/Passphrase box that appears. The password MUST be one of the following: 1. ● ● 1. 2. Exactly 5 characters in length (eg “abcde” or “a1b2c”) A 10 digit hexadecimal value (eg “1234567890”) NOTE: You can also manually assign the Wi-Fi Channel from this page. If you are unsure of the setting to use, you should leave it set to “Auto”. Once you are happy with the settings, Click Apply, and then click OK in the dialog box to confirm that you are happy with the settings. The settings are applied immediately, and you can close this window, You will need to reconnect to the “AQ Direct Mode XXXXXX” wireless network using your new password before you can continue to use the speaker. You can return to this page at any time and change or remove the password, provided you are connected to the “AQ Direct Mode XXXXXX” wireless network. To switch off the security, so you no longer need to use a password, select “none” from the “Security” drop-down, then click Apply. You will then need to manually restart the speaker by pressing the reset button on the rear to complete this change. If you forget your password or mistyped it, and cannot connect, you will need to perform a system reset, which will clear all your settings and restore the factory defaults. After a system reset, you will need to re-enter your connection settings for both CONNECTED and AQ DIRECT Modes. To do this, press and hold the Volume Down, Power/Mode, and Volume Up buttons for 10 seconds. Once the Reset is confirmed the Wi-Fi LED will turn orange, and then the AQ SmartSpeaker will restart. Using Your AQ SmartSpeaker The methods on this page assume that your AQ SmartSpeaker is connected to your wireless network in CONNECTED Mode. to AQ DIRECT Mode. You can use the same methods in AQ DIRECT Mode by first switching the AQ SmartSpeaker NOTE: When you are connected to the AQ SmartSpeaker using AQ DIRECT Mode, you can still send and receive text messages and phone calls, but you will be unable to access the internet. From iTunes Your AQ SmartSpeaker can play audio files or an Internet radio station that is streaming from iTunes 10 or later on a computer, which is connected wirelessly to the same network as the Speaker. (iTunes is a free download for Mac and Windows, available at www.apple.com/itunes ) To initiate streaming from the computer, launch iTunes 10, click on the AirPlay button that appears at the bottom of the iTunes window and select the AQ SmartSpeaker from the pop-up list that appears. iTunes iOS Device AirPlay Logo NOTE: The name of the Speaker you set during network configuration is the name that appears here. From your iOS device To initiate streaming from an iOS device running iOS 4.2 or later, open an AirPlay Compatible App and tap the AirPlay button on the screen and select your Speaker from the list From Windows Media Player You need to have Windows 7 or later to connect to the AQ SmartSpeaker from Windows Media Player. Select the Play To icon in the top right corner of the library window, and choose your speaker from the list. A new window will appear with a playlist for the speaker, simply drag your media to the window to play it. If you have a playlist selected in the library window when you select the play to feature, it will be automatically added to the list. Alternatively, you can right-click a track in the library and select Play To... from the menu. Windows Media Player From Google Android Selected Android Apps, such as the AQ Play App (available soon), can play to the AQ SmartSpeaker. . Note: This section will be updated with information about the AQ Play App, once it is available. Using More than One AQ SmartSpeaker You can use multiple speakers to listen to the same source from iTunes on a computer which is wirelessly connected to the same network as all the speakers. Currently, the iPod or Music function on the iOS device only supports one Speaker at a time. It is possible to use the Remote App (free from the Apple App Store) on your iOS device to control iTunes on your computer, you can control the sound output to individual Speakers in this way. Before you start, make sure all of the speakers are switched on. Wait for them to connect to the network (the Wi-Fi light will go green). 1. Open iTunes and wait for it to detect the Speakers. The AirPlay logo will appear in the bottom right hand corner of the iTunes window. 2. Click the AirPlay icon and Select the Multiple Speakers option. This will bring up a new window with details for all of the Speakers you have on the network. 3. Select several speakers by clicking their checkboxes. The Main iTunes window will show the current number of connected Speakers next to the AirPlay logo, which will light up blue once there are speakers connected. On the back of each speaker, you can select Left (L), Right (R) or Middle (M) for each speaker. You will get the best results by choosing one Left and one Right if you are using two speakers in the same room. If you are using more than two Speakers, or they are in different rooms, using them in Middle may be more appropriate. If you are switching back to using a single speaker, check that it is in Middle mode, otherwise you will only get the left or right half of the track. Further Options Another option for using multiple speakers is by using AirFoil, an application for Mac and PC by Rogue Amoeba, which allows you to play audio from any application on your computer to your AQ SmartSpeaker. . If you own more than one iOS Device or computer, you can connect each device to a single AQ SmartSpeaker , which will allow you to listen to different music in different rooms at the same time. Using Windows Media Player's Play To feature, you can also stream to multiple speakers. Each speaker has a separate playlist and controls, so you can set up a different musical theme for each area of the house, but it is not currently possible to set up a stereo pair using this method. Firmware Upgrade Procedure Occasionally, firmware updates will be released. Check aqaudio.com and download any available update to your computer, then follow the instructions below to install the update. The update file itself has the file extension “.fw”, If you have downloaded the file in a .zip package, please ensure you extract it before proceeding. To install the update, you will need to access the AQ SmartSpeaker Setup page. Before you start, connect your AQ SmartSpeaker to the power supply. Make sure the AQ SmartSpeaker is switched on and connected to the same wireless network as your computer. NOTE: If you know the IP address of your AQ SmartSpeaker , simply enter it into any web browser to load the AQ SmartSpeaker Setup page, and skip step 1. (Apps are available to help with finding your IP address) Step 1 Check that you have the latest version of Safari installed on your computer. Open Safari and open the “bookmarks” sidebar (upper left). Under “collections”, choose “Bonjour”. Double Click the AQ Smart Speaker XXXXXX in the list under Bookmarks in the centre section. SmartSpeaker Setup page. This should load the AQ Bookmarks Bonjour Choose Your AQ SmartSpeaker Step 2 Choose “Firmware Update” from the menu on the left, then select “Upload a Firmware Update” from the drop-down box and click “Next” to continue. Step 3 Click “Choose File” and select the firmware update file you downloaded to your computer, Click upload to copy the file to the speaker. Depending on the size of the update file, this may take a few minutes. NOTE: if there is a problem with the file, an error message will be displayed. If this occurs, Click OK, and return to step 3. If this occurs more than once, please re-download the update file from aqaudio.com, ensuring to extract the .zip if necessary. Step 4 Click “Install” to start the installation process. Once you have started the installation, it cannot be interrupted. The Power LED on the top of the AQ SmartSpeaker will flash whilst the update is installing. Do not attempt to restart the speaker or disconnect the power until the upgrade is complete. The speaker will automatically restart when the installation is complete, and the white Power LED will stop flashing. Step 5 If your AQ SmartSpeaker fails to connect to your network after the update, you will need to connect your AQ SmartSpeaker™ to your network again using Options 1 2 or 3. System Reset – Troubleshooting Guide System Reset WARNING: This Factory reset procedure will restore all the settings on the AQ SmartSpeaker to their defaults. It will erase any network settings you have entered in CONNECTED Mode, and remove the security settings from the AQ DIRECT Mode. You will need to set up your network settings again. It will not remove any firmware upgrades that have been applied to the speaker. To restore the default settings, press and hold the Volume Down, Power/Mode, and Volume Up buttons for 5 seconds. The Wi-Fi LED will turn orange to confirm the reset, then the speaker will restart and return to normal operation. Troubleshooting Guide General Problems Problem Wi-Fi LED is red, flashing quickly Possible Solutions This is normal behaviour when the Speaker is first switched on. It should not persist for more than a minute. ● If this continues, there may be a problem with the firmware. Try resetting the Speaker using the reset button. If that does not resolve the issue, contact support. ● No Sound (when using AUX IN Connection ● No Sound (when using CONNECTED Mode) ● No Sound (when using AQ DIRECT Mode) ● Sound is too Quiet Ensure that the cable is plugged in fully and the speaker is switched on (white power LED on) Check that the Speaker is in AUX IN Mode (The Wi-Fi LED should be off, brielfy press Power/Mode Button to cycle through modes) ● Check the volume setting on the source device and on the speaker. When not using AirPlay, the volume controls operate independently. ● Check that the speaker has not been muted (The Power LED will flash if the speaker is muted) ● The Speaker may be out of range of the network, or not connected to a network. Check to make sure that the Wi-Fi LED is green. ● The iOS device may be out of range of the router. ● Make sure that the volume control on the iOS device is not set too low or muted. ● Try selecting the internal speaker and then re-selecting the AQ SmartSpeaker from the device list. ● Try quitting your App and re-starting it. ● Try switching off the Speaker and re-starting it. ● Check that the speaker has not been muted (The Power LED will flash when the speaker is muted) Make sure that the volume control on the iOS device is not set too low or muted. Try selecting the internal speaker and then re-selecting the AQ SmartSpeaker from the device list. ● The iOS device may be too far away from the AQ SmartSpeaker . ● Try quitting your App and re-starting it. ● Try switching off the Speaker and re-starting it. ● Check that the speaker has not been muted (The Power LED will flash when the speaker is muted) ● Try changing the volume on the AQ SmartSpeaker . iTunes will automatically reset this volume when it connects to the Speaker. ● Sound Check may be switched on. This limits the volume output of your iOS device. Turn it off from Settings>Music>Sound Check. ● Speaker stops responding (pressing buttons doesn’t do anything) ● AirPlay icon doesn't appear ● ● Press the reset button on the back of the AQ SmartSpeaker to force it to restart. NOTE: Pressing the reset button won’t affect your settings. Restart your App on an iOS Device, or Quit and re-open iTunes on a computer. Some computers may need to be restarted before the AirPlay icon will appear. Problems Using the AQ Connect App Problem Possible Solutions Wi-Fi Light is flashing red slowly ● The Speaker is not connected to the network. Either the Speaker is not in range of the network, or there is a problem with the configuration settings. ●Ensure that you have selected the name box and clicked “done” before selecting the next box down. Troubleshooting Guide - Continued Problems Connecting Using Setup Option 3 Problem Possible Solutions Unable to load to the Speaker configuration page ● Unable to connect to temporary network generated by AQ SmartSpeaker ● Configuration page stops responding or disappears after applying settings. ● This is normal - the Speaker has accepted the settings and is now restarting in order to connect to your wireless network, but the computer is still connecting to the Speaker configuration network. Close the browser window and re-connect your computer to your normal wireless network. Wi-Fi LED does not change from red & green flashing after applying the settings. ● If the Wi-Fi LED does not change from red & green flashing alternately, wait for 2 minutes to ensure that the settings have been completely loaded, and then press the reset button on the back. The Speaker will restart and should connect to the network. Wi-Fi Light is flashing red slowly ● Wireless network key is automatically filled in. ● Try disconnecting from any other networks your computer is connected to whilst loading the page, including wired networks. ● Try disconnecting from the Speaker network and reconnecting to the same network. ● Close all open web browser windows (and quit the application on an Apple machine) and restart the browser. ● Pressing the reset button on the Speaker will force it to restart. Note: after doing this you will need to restart from step one of the connect procedure. ● Occasionally, Skype may cause issues with the connection. If you use Skype, close it completely before trying again. Try disabling and re-enabling your wireless network connection. Ensure you are not connected to any other wireless network. ● Try temporarily switching off any other Wi-Fi devices, except the wireless router which you plan to connect the Speaker to. ● Try restarting the computer. ● Pressing the reset button on the Speaker will force it to restart Note: after doing this you will need to restart from step one of the connect procedure. ● The Speaker is not connected to the network. Either the Speaker is not in range of the network or there is a problem with the configuration settings. ● If you have just applied the settings, you may need to press the reset button on the back of the Speaker to finish applying the new settings. Your web browser may have stored this information from setting up a previous device, if you are not absolutely sure it is the correct key, delete it and type the correct key. For further troubleshooting and technical support, please visit our website at www.aqaudio.com Looking After Your AQ SmartSpeaker Cleaning – The AQ SmartSpeaker should be cleaned only with a dry cloth. Solvents or other cleaning chemicals should not be used. Objects and Liquid Entry – Care should be taken so that objects do not fall and liquids are not spilled into any openings or vents located on the Speaker. The unit should not be used near water. Ventilation – The AQ SmartSpeaker should be situated so that its location or position does not interfere with its proper ventilation. This is especially important whilst charging. It should not be used inside a small enclosed space such as a cupboard or placed on or wrapped with any insulating material, such as clothes, bedding, etc. The AQ SmartSpeaker should be situated away from heat sources such as radiators, stoves, fireplaces or other appliances that produce heat. It should not be placed near the ventilation holes of any other appliance. Power Sources – The AQ SmartSpeaker should be connected to a power supply only of the type described in the operating instructions or as marked on the Speaker. Periods of Non-Use – If the AQ SmartSpeaker is to be left unused for an extended period of time, the power cable should be unplugged from the speaker and the wall to prevent damage or corrosion. Servicing – The AQ SmartSpeaker contains no user-serviceable parts. Service and repair should be referred to qualified service personnel. Internal Rechargeable Lithium-Ploymer Battery This device uses an internal rechargeable lithium-Polymer battery. It is not designed to be user-replaceable, do NOT attempt to change the battery yourself. Please contact us for service information. Do NOT Dispose of the AQ SmartSpeaker or its battery in household waste. All electronic equipment contains substances, which may become harmful to the environment if they are not disposed of correctly. Always dispose of used batteries & electronics in accordance with the prevailing community regulations that apply to the disposal of batteries & electronics. If there are no local regulations concerning battery/electronics disposal, please dispose of the device in a waste bin for electronic devices. Please contact your retailer for further advice if you are unsure of the correct way to dispose of batteries & electronics. CAUTION The battery used in this device may present a risk of fire, explosion or chemical burn if mistreated. •Never use or charge the battery if it appears to be leaking, discoloured, deformed, or in any way abnormal. •Never disassemble the Speaker or attempt to remove the battery as that could cause dangerous leakage of alkaline solution or other electrolytic substance. •Do not attempt to charge the battery or use the Speaker if the ambient temperature is outside the safe operating temperature (5°C – 35° C (41° - 95° Fahrenheit)) as this may cause leakage or deterioration of the battery. •Never expose the battery to any liquid. •Never expose the battery to excessive heat such as direct sunlight or fire. •Never use the battery pack in an unventilated vehicle where excessive internal temperatures may be encountered. •Always keep the battery out of the reach of infants and small children. Specification Compatibility1 (CONNECTED Mode, AQ DIRECT mode): iTunes 10.1 (Mac and PC2) iPhone 5, iPhone 4S, iPhone 4, iPhone 3GS iPod touch (5th, 4th, 3rd 2nd generation) The new iPad, iPad 2, iPad Windows 7, Windows 8 3 Android4 Wi-Fi network compatibility: 802.11b/g Range: 40m (LOS) Amplifier power: 2x13W RMS, 24W (peak power) Frequency response: 90 Hz – 20 kHz Distortion: 0.2% Signal-to-noise ratio: > 90 dB Power Requirement: 12V DC adaptor. Li-Polymer Battery 7.4V / 5200 mAh (not user replaceable) Battery Life: AUX IN Mode: 20 hours Wireless Modes: 10 hours Dimensions (H x W x D) : 245mm x 135mm x 109mm 3 Using Windows Media Player's “Play To” feature. Weight : 1kg 4 Selected Compatible Apps only. 1 Compatibility information is correct at the time of printing. Please check www.aqaudio.com for the latest compatibility information. Compatibility applies to CONNECTED Mode and AQ DIRCET Mode only – Any device with a headphone socket can be connected using AUX IN Mode. 2 Computer must be capable of wireless connection and be connected to a wireless network. FCC Compliance & Advisory Statement Any changes or modifications not expressly approved by the party responsible for compliance could void the user’s authority to operate the equipment. Where shielded interface cables have been provided with the product or specified additional components or accessories elsewhere defined to be used with the installation of the product, they must be used in order to ensure compliance with FCC regulation. FCC Caution: To assure continued compliance, any changes or modifications not expressly approved by the party responsible for compliance could void the user’s authority to operate this equipment. (Example - use only shielded interference cable when connecting to computer or peripheral devices. FCC Radiation Exposure Statement This equipment complies -with FCC RF radiation exposure limits set forth for an uncontrolled environment. This equipment should be installed and operated with a minimum distance of 20 centimetres between the radiator and your body. This device complies with Part 15 of the FCC Rules. Operation is subject to the following two conditions: (1) The device may not cause harmful interference, and (2) This device must accept any interference received, including interference that may cause undesired operation. Disposal of Waste Electrical & Electronic Equipment This symbol on the product or on its packaging indicates that this product should not be treated as household waste. Instead it should be handed over to a suitable collection point for the recycling of electrical and electronic equipment. By ensuring this product is disposed of correctly, you will help prevent potential negative consequences for the environment and human health, which could otherwise be caused by inappropriate waste handling of this product. The recycling of materials will help to conserve natural resources. For more detailed information about recycling of this product, please contact your local Council Office, your household waste disposal service or the shop where you purchased the product. Declaration of Conformity Hereby, AQ Audio declares that this AQ SmartSpeaker is in compliance with the essential requirements and other relevant provisions of the directive 1999/5/EC., in conformity with the relevant standards.