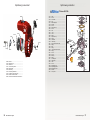
1
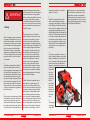
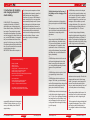
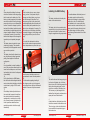
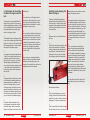
ENGLISH
Owners
Manual
Owners Manual Raket 95
Congratulations, you have made a
good choice when you picked our
engine Raket 95.
Contents
Now we beg you to read through this
User Manual before you start using
the engine. The manual is an important part of our delivery and it is a
proof of our endeavour to deliver a
good and safe product that both you
and we can be proud of.
Raket 95 is a brand new type of kart
engine. It is a two stroke engine, but it
is built on a completely new principle
for scavenging, which is called Dual
Charge. Thanks to this the Raket
95 engine has much less exhaust
emissions than any other comparable
kart engine. Dual Charge also means
a number of other advantages, e.g.
lower fuel consumption and improved
oiling of all bearings in the crankcase.
WARNING!
Under no circumstance is it
allowed to change the original
design of the engine without
a written acceptance from the
manufacturer. You should always
use original spare parts. Unauthorised changes or non original
spare parts can lead to serious
damages.
Should you one day sell your Raket
95 engine, you should pass on this
User Manual to the new owner.
If the User Manual has got lost you
can order a new one free of charge
from Radne Motor AB.
Owners Manual Raket 95.....................................................................................2
1. Safety...............................................................................................................4
2. Instructions for handling and charging a Raket 95 starter battery....................6
Safety instructions for the use of the battery and the charging of the battery:.....7
Installing the NiMH battery....................................................................................9
3. Instructions for mounting the Raket 95 engine onto the kart..........................10
4. Starting and stopping the Raket 95 engine....................................................11
5. Setting up the Raket 95 engine......................................................................12
6. Technical data for Raket 95............................................................................14
7. What do we mean by an engine of Dual Charge model?...............................15
8. Product description for homologation purposes.............................................16
1. Crankcase......................................................................................................16
2. Crankshaft......................................................................................................16
3. Cylinder..........................................................................................................16
4. Spark plug......................................................................................................17
5. Piston..............................................................................................................17
6. Carburettor.....................................................................................................17
7. Carburettor flange...........................................................................................18
8. Inlet flange......................................................................................................18
9. Ignition system................................................................................................18
10. Exhaust system............................................................................................18
11. Centrifugal clutch..........................................................................................19
12.Covers...........................................................................................................19
13. Starter system..............................................................................................19
9. Service tips.....................................................................................................20
1. Lubricating the clutch parts.............................................................................20
2. Silencer...........................................................................................................20
3. Servicing the carburettor................................................................................20
4. Starter equipment...........................................................................................23
Split drawing engine...........................................................................................24
Splitdrawing manual start...................................................................................26
Split drawing carburettor.....................................................................................27
Tillotson HS-319A...............................................................................................27
Revision 5, Februari 2011
2
Raket 95 Manual - English
www.raketengines.com
www.raketengines.com
Raket 95 Manual - English
3
IMPORTANT
1. Safety
1.
Raket 95 engines including accessories,
as supplied by Radne Motor, are only intended to be assembled on a kart and for
the purpose of driving the kart. Any other
use is forbidden unless written approval
has been received from Radne Motor.
Radne Motor accepts no responsibility
whatsoever for anything that may happen
if a Raket 95 engine is used for any other
purpose than that for which it is specifically intended.
2.
A kart that is equipped with a Raket 95
engine can attain speeds at which the
driver is exposed to obvious danger to life
and limb if the kart is handled in an irresponsible manner. Radne Motor accepts
no responsibility whatsoever for injuries
to people or damage to property that may
arise if a kart that is equipped with a Raket 95 engine, either directly or indirectly
is the cause of an accident or damage as
a result of carelessness or negligence on
behalf of the driver.
3.
During normal use, some parts in a Raket
95 engine become so warm that they can
cause burns to people who come into
contact with the warm parts. Examples of
such parts are the silencer and cylinder. It
is up to the driver to ensure that the kart
4
Raket 95 Manual - English
is equipped with appropriate protection
so that contact with warm and hot objects
is avoided, and to act in an appropriate
fashion so that such possible burn injuries
do not occur. Radne Motor accepts no
responsibility whatsoever for injuries that
may occur as a result of a person coming
into contact with the hot or warm parts of
a Raket 95 engine.
4.
During the normal use of a Raket 95
engine installed on a kart, there is a risk
for personal injuries that may occur as
a result of body parts or objects being
trapped between, or rubbing against, the
engine’s rotating parts. An example of this
could be getting a finger stuck between
the sprocket on the outbound axle and
the chain that drives the rear axle. It is
up to the driver to ensure that the kart
is equipped with appropriate protection
so that such incidences of contact are
avoided, and to act in an appropriate
fashion so that no injuries of this type
occur. Radne Motor accepts no responsibility whatsoever for injuries to people
that may occur as a result of something
becoming trapped between the rotating
parts of a Raket 95 engine.
5.
A Raket 95 engine is propelled using a
flammable fuel – alkylate petrol or 95
octane petrol. Careless handling of the
fuel can lead to fires that can cause injury
to people or damage to property. Radne
Motor accepts no responsibility whatsoever for accidents and injuries that may
occur as a result of careless handling of
fuel, for instance when filling the fuel tank,
incorrect mounting of the fuel tank onto
the kart, inappropriate construction of the
fuel tank, a fuel tank made of inappropriate materials or the existence or use of
www.raketengines.com
inappropriate materials in, or with the
drawing of, a fuel line.
6.
Raket 95 is equipped with an electric
starter system consisting of a starter
motor and a starter battery. The battery is
of the NiMH type (Nickel-metal hydride).
Please refer to the separate section in this
manual regarding handling and care of
the NiMH battery that is included with the
delivery of a Raket 95 engine. Radne Motor accepts no responsibility whatsoever
for accidents or injuries that may occur to
people or property if any battery is used
other than that which is supplied with the
original delivery or as an original spare
part battery.
battery should occur in accordance with
the instructions provided in this manual.
Radne Motor accepts no responsibility
whatsoever for injuries to people or damage to property that may occur as a result
of incorrect handling, storage or charging
of the Raket 95 NiMH battery.
7.
The driver is responsible for the mounting of the battery, battery box and cables
between the battery box and the starter
motor, in accordance with the instructions
provided in this manual. Radne Motor
accepts no responsibility whatsoever for
accidents and
injuries that
may occur
as a result
of incorrect
mounting of
the battery, battery
box and/or
the cables
between the
battery and
the starter
motor.
8.
The charging
and storage
of the NiMH
www.raketengines.com
Raket 95 Manual - English
5
2. Instructions for handling
and charging a Raket 95
starter battery.
PLEASE NOTE: These instructions
regarding the handling of a Raket 95
starter battery are an important part of
Radne Motor’s delivery of the Raket 95
kart engine. These instructions contain
information about handling of the battery
and the charging of the same. Before you
may use the NiMH battery it is important
that you read these instructions in their
entirety. If in the future you sell your Raket
95 engine together with its starter battery,
then you must ensure that the new owner
receives these instructions.
IMPORTANT! Radne Motor accepts no
If you have previous experience of leadacid batteries then please be aware that
NiMH batteries are radically different
from these. As long as a NiMH battery is
used correctly then it is a very good and
environmentally-friendly source of power
that is far superior to both lead-acid and
nickel-cadmium batteries. However, if a
NiMH battery is not handled correctly and
in accordance with these instructions,
such incorrect handling may drastically
shorten the battery’s lifespan, or else
cause injury to people or damage to
property.
Technical Data Raket 95 Battery
Battery type: NiMH
Voltage: 14,4 volt
Capacity: 3000 mAh
Charging power: 1 A, determined by the charger
Charge 5 hours, then maintenance charge
Minimum discharge voltage 11.0 volts
Maintenance charge only by Raket Original special charger
Fuse in the battery cartridge 40 A
Use in temperatures:
Storage 0-50 degrees ambient temperature
Use 0-50 degrees ambient temperature
Charge 0 - 30 degrees ambient temperature
Life expectancy 500 up and discharge cycles
Charger Raket Original special charger for NiMH
responsibility whatsoever for damages to
a Raket 95 engine that may occur if you
use any other battery than a Raket 95
original battery.
6
Raket 95 Manual - English
www.raketengines.com
Safety instructions for the use of
the battery and the charging of the
battery:
1.
Read these instructions in their entirety
before you begin to use the NiMH battery.
2.
The handling and care of the NiMH battery should never be entrusted to children
unless there is a supervising adult in
attendance.
3.
Always check that the NiMH battery is in
good condition every time before using
it. If you see that the battery is mechanically damaged, or if it appears to have
expanded in volume or if electrolyte (a
sticky gel-like substance) has penetrated
the battery, then you should discard the
battery immediately.
4.
A NiMH battery should not be thrown out
with household garbage but should be
taken for recycling in accordance with
your local guidelines regarding the management of recyclable waste.
5.
A NiMH battery should never be shorted
or exposed to high levels of heat.
6.
A NiMH battery should never be overcharged. That is why you should always
use the Raket original battery charger that
automatically stops charging when the
battery has reached its full capacity.
7.
A NiMH battery should not be discharged
so that the terminal voltage drops to below 11.0 volts. If you discharge the battery
too deeply then one of the battery’s cells
may be damaged in which case you will
no longer be able to recharge the battery
to its full capacity.
8.
www.raketengines.com
A NiMH battery should not be charged
until most of its capacity has been used
up. At that point the terminal voltage will
have dropped to 12.0 volts. In practical
terms this means that you can start your
kart approx. 50 times before you need
to charge the battery. Try to get into the
habit of charging your battery after you
have started the kart 35 – 45 times.
9.
You should always charge the battery
using the original special charger that is
supplied with the delivery of a Raket 95
engine. The charger is an intelligent-type
charger which means that it initially charges with a high current until the battery
reaches maximum capacity. After that the
charger switches over to trickle charge
mode. If you were to use a charger that
does not have this automatic function
then you would almost certainly “burn-out”
your battery because of overcharging.
10.
Never charge a battery that is warm. Let
the battery cool to normal room temperature before you start to charge it again.
11.
The time required to charge a battery that
is typically discharged is 5 hours. When
the charger notices that the battery is
fully charged it switches to trickle charge
mode.
Raket 95 Manual - English
7
12.
When charging the battery, the charger
should be connected to the charger plug
that is located on the battery box. If the
battery is to be charged once it has been
removed from the box then the charging
process should occur on an inflammable
surface. Connect the charger’s positive
terminal to the battery’s positive terminal
and the battery’s negative terminal to the
charger’s negative terminal. If the charger
is connected incorrectly it is most likely
that both the battery and the charger will
immediately and irrepairably damaged.
13.
The battery does not need to be supervised during charging. The automatic
functionality of the charger takes care of
any need for supervision.
14.
The battery should not be altered in any
way, for instance by taking it apart and
putting it back together in a different
configuration.
15.
It is not permitted to solder the battery. If
one of the connection cables should come
loose from the battery as a result of careless handling then it should be disposed
of immediately.
16.
If a fire should start in a NiMH battery
then the fire should be extinguished with
sand or alternatively the battery should be
cooled down by using a CO2 fire extinguisher.
17.
If the battery’s electrolyte should come
into contact with a person’s hands then
the electrolyte should be immediately
washed away to avoid any burns to the
skin. If someone were to get electrolyte
in their eyes then assistance from a
specialist eye doctor should be sought
immediately.
8
Raket 95 Manual - English
18.
Prior to winter, when you are no longer
using your kart, it is important that you
charge your battery before you put your
kart into storage for the winter. If you
store away your kart in the autumn with
a discharged battery then the battery will
almost certainly be inoperable when you
take out your kart again in the spring. For
this reason you should allow your battery
to remain charging on trickle charge mode
during the period that you will not be using it.
19.
If your kart is to be stored in cold storage, in other words a storage area where
minus temperatures may occur, then you
should remove the battery and store it
somewhere at normal room temperature.
20.
For information regarding handling of
the charger we refer you to the general
instructions that can be found on Mascot’s
website. Please see: http://www.mascot.
no/
Installing the NiMH battery.
1.
The battery is delivered in a battery box
made of extruded aluminium.
2.
The battery box is to be mounted onto a
console that is in turn to be mounted onto
the frame to the left of the driver’s seat,
using the supplied mounting components.
5.
The cables between the battery box and
the starter motor should be carefully
fastened to the frame by using suitable
cable clips or ties. The cables should
be fastened in such a manner that they
cannot come into contact with any hot or
warm parts of the engine that might melt
the cable casing, nor with any moving
parts that might render holes in the cable
casing.
3.
The start button and the charger plug can
be found on the battery box. In the box
there is also a 40 A fuse that prevents the
battery from being destroyed if a short
should occur outside of the battery box.
The fuse may only be changed for an
identical fuse that can be purchased as a
spare part from a Raket reseller.
4.
A cable leads from the battery box which
should be connected to the starter motor.
There is a plug on the cable that should
be connected to the equivalent plug on
the starter motor.
www.raketengines.com
www.raketengines.com
Raket 95 Manual - English
9
3. Instructions for mounting
the Raket 95 engine onto the
kart.
The process for mounting the Raket 95
engine onto your kart can of course vary
somewhat depending on what type of kart
you have. Below we provide some advice
and guidelines that are normally applicable to most types of karts.
1.
The Raket 95 engine is designed to fit directly onto the engine support that already
exists on your kart. You will need four M8
Allen (hexagonal) bolts in order to attach
the engine to the engine support.
2.
Your engine has an engine sprocket with
11 teeth. It is normally a good idea to try
an 80-tooth sprocket on the rear axle,
but then it is of course up to you to test
different settings for different tracks. A
curvy track may require a larger sprocket
= more teeth, while a straight and long
track may require a smaller sprocket on
the rear axle.
throttle shaft.
5.
You need to have a CIK-approved inlet
silencer to be able to drive and race your
kart. There are several different models
available and all are suitable for use with
the flange on the inlet crown.
6.
How you will then fasten the inlet silencer
to your kart depends on the type of inlet
silencer that you have chosen. We recommend that you are careful when it comes
to fastening the inlet silencer since this
normally is required to absorb quite hard
knocks. We can certainly recommend
the use of Radne Motor’s holder (article
number 5208).
7.
When it comes to mounting the battery,
battery box and the connection between
the battery and the starter motor, a description of how to do this can be found in
a separate section of this manual.
3.
The great majority of karts have a holder
for the silencer as standard, and the accompanying silencer is suitable for use
with such a standard holder. It comes
with three springs that hold the silencer
against the engine’s exhaust pipe, and it
will require two slightly longer springs to
hold the silencer in the support, for which
you can use the kart’s standard springs.
Raket 95 Manual - English
Thanks to the Raket 95 engine being
equipped with an electric starter it is normally very easy to start. No longer does
one need a strong mechanic who is able
to lift the rear end of the kart in order to
run-start the kart.
1.
Make sure that you have filled the tank
with fuel.
2.
If the fuel line is empty of petrol then take
away the inlet silencer if it is attached,
hold your hand over the carburettor and
give full throttle. Press the start button
and hold it in until you can see that the
fuel is being pumped to the carburettor.
engine ignite you should take your hand
away from the inlet silencer.
5.
If the engine happens to stop then press
the start button again. However this time
you should not hold your hand over the inlet holes on the inlet silencer. If the engine
does not ignite and start directly, you can
carefully try to give a little throttle. This
may be required in particular if the engine
is cold, but otherwise there is a risk that
the engine will receive too rich of a fuel
mixture.
6.
If you do not succeed in starting the
engine through the method described
then you should check the starter battery. The battery maintains its voltage as
long as it is charged, but when it begins
to approach the limits of its capacity the
voltage can reduce quickly. Low voltage
leads to less revolutions for the starter
motor and thus can cause problems
starting, especially when the engine is
warm. A fully-charged battery will normally
cope with 50 starts before it needs to be
recharged.
7.
You stop the engine via the short circuit
button that can be found on the battery
box.
Release the start button.
3.
When you start the engine you should
not apply the throttle, but hold the brake
pedal down in order to avoid the kart from
beginning to roll when the engine starts.
4.
A holder for the throttle cable can be
found between the carburettor and the
carburettor flange, while a lever with a
holder for the cable can be found on the
10
4. Starting and stopping the
Raket 95 engine.
4.
Push the start button. Normally the engine
will start directly. As soon as you hear the
www.raketengines.com
www.raketengines.com
Raket 95 Manual - English
11
5. Setting up the Raket 95
engine.
Your new engine does not require a lot of
setting up. It is essentially only the carburettor that has varying setup alternatives.
1.
Start with a default setting for the carburettor. Carefully turn both of the adjusting screws for High Speed (H) and Low
Speed (L) the whole way so that they
are fully closed. After that, open the High
Speed screw (H) 0.75 turns and the Low
Speed screw (L) 2.25 turns.
2.
Next you should screw out the idling
adjustment screw so that it just misses
making contact with the lever on the
throttle shaft. After that, screw in the idling
adjustment screw 1.5 turns. This is now
the default setting for the carburettor that
guarantees that you will be able to start
your engine.
to roll, and press quickly on the throttle.
The engine should answer directly and
increase speed until the centrifugal clutch
engages. If the engine hesitates or even
stops then you should test the effect of
slightly increasing the Low Speed screw.
Start with half a turn. When you have
found a setting at which you can apply the
gas and the engine responds immediately
then it is time to move onto the setting of
Standard Jetting
L: 2,25 turn
H: 0,75 turn
These are the minimum settings that should
not be lower
the High Speed screw (H).
6.
Drive a few laps of the track so that the
engine is really warm. Listen thereafter
3.
Start the engine. If it stops as soon as you
no longer press the start button, but continues to run if you carefully give throttle,
then you can try screwing in the idling
adjustment screw by half a turn. Don’t
overdo it however, because the engine
should be able to idle without the centrifugal clutch engaging and thus beginning to
pull the kart along with it.
4.
Now you can drive a lap or two of the
track so that the engine warms up.
5.
Begin the fine tuning with the Low Speed
screw (L). Allow someone to hold the
brake to ensure that the kart cannot begin
12
Raket 95 Manual - English
and screw in the High Speed screw too
much, because then the engine will not
receive enough fuel and as a result not
enough oil, which can lead to piston and
cylinder damage. The High Speed screw
should always remain opened at least a
0,75 turn.
7.
When you have found exactly the right
setting for the High Speed screw you
should check the settings of the Low
Speed screw and the idling adjustment
screw again. You can feel satisfied when:
- the engine idles easily without pulling
the kart, and you hear the occasional
pinging sound from the clutch but not so
often.
- the engine responds directly when
you apply the gas, both when idling and
when you are driving on the track and, for
instance, have taken your foot off the gas
going into a curve and then apply the gas
again.
- the engine winds up properly on the
track’s straight sections, but begins to
splutter at the very end of the longest
straight.
8.
If you find after having driven for a while
that you are no longer able to achieve a
correct setup then it may be time to clean
the carburettor. See the section about servicing the engine.
to how the engine sounds when you are
driving on the track’s longest straight. The
High Speed screw is correctly adjusted
when the engine begins to splutter at the
very end of the straight. If it starts to splutter any earlier then you should carefully
screw in the High Speed screw one tenth
of a turn. WARNING! Do not overdo it
www.raketengines.com
www.raketengines.com
Raket 95 Manual - English
13
6. Technical data for Raket 95
Engine model
One-cylinder two-stroke engine of Dual Charge model
Cylinder volume
94 cm3
Cylinder diameter
56 mm
Stroke
38 mm
Connecting rod length
74 mm
Carburettor
Tillotson HS 319 a, venturi 17,7 mm
Ignition system
Selettra analog
Flywheel
Selettra 113,9 mm
Starter system
Electric, integrated starter (or Magnapull cord starter)
Starter battery
Raket, 14.4 V Nickel-metal hydride (NiMH) 3.0 Ah
Spark plug
NGK BPM 8 Y
Clutch
Centrifugal clutch metal
Sprocket on clutch drum
11 teeth, type 219
Exhaust system
Tuned system with end silencer
Fuel
Alkylate or 95/98 octane lead free petrol
Petrol mix
4% of synthetic two-stroke oil
Squisch
Min 0,8 mm
Combustion chamber volume
Min.11,0 ml
Bearings
Original SKF 6203 TN9C3
Sealing rings
17x28x7 sealing lip with Teflon coating and dust seal
Idling speed
2500 rpm
Max rpm
12500 rpm
Max power
7,6 kW at 8600 rpm
Recyclable parts in the engine
82 %
Emission values CO and HC
According to EPA2 standards
Weight
12.1 kg complete engine (engine, starter battery and
silencer)
7. What do we mean by an
engine of Dual Charge model?
If one looks at the inlet in the cylinder
one can immediately see the big difference. The inlet is divided up into an upper
section and a lower section. If one then
follows the channels one will see that the
upper channels go directly into the cylinder’s upper section, while the lower section of the inlet leads via channels down
into the crankcase, just like an ordinary
two-stroke engine.
Insulating flange with two channels ensures that the two streams of air are not
Raket 95 Manual - English
When the piston moves upwards in the
cylinder, in other words during the inlet
and compression stroke, a depression
occurs in the crankcase. It is this depression that enables the engine to suck in
Air
mixed together. As you can see from the
picture of the cylinder, the two air streams
continue each of them through their respective channel into the cylinder.
You may wonder why the air that travels
on the top side of the throttle doesn’t
suddenly stop when it no longer has any
depression to pull it. Well, when it comes
to air it happens to be the case that when
one part of an air mass moves, it pulls the
surrounding air along with it.
When it comes to the operating strokes,
when the piston moves downwards
into the cylinder, a port is opened in the
cylinder at which point the air stream that
is not mixed with the fuel streams in and
rinses clean on the top side of the piston.
The result is that when the mixture of
fuel and air flows up from the crankcase
14
via the transfer channels it meets with a
clean combustion chamber. Because of
this the combustion is much purer, which
in turn means purer exhaust fumes. Raket
95 has such good values concerning
the content levels of carbon monoxide,
carbon dioxide and hydrogen carbonates
(HC) that it is able to meet the required
emission demands without the use of
catalytic exhaust emission control.
www.raketengines.com
www.raketengines.com
air through the carburettor. The throttle in
the carburettor divides up the inlet air into
one part beneath the throttle and one part
above it. It is only the air that travels beneath the throttle that then sucks up fuel
through the carburettor jet. A rubber inlet
flange sits between the carburettor and
the cylinder. The inlet flange also has a
plate that divides the air and fuel mixture
when the throttle is completely open.
However this is not the only advantage
with Dual Charge. The purer combustion
also means that the fuel consumption
is reduced and that the exhaust fumes
do not smell as bad as in the case of an
ordinary two-stroke engine. Dual Charge
engines are also much cleaner in the
crankcase which has been shown to have
a positive effect on bearings and seals.
Raket 95 Manual - English
15
8. Product description for homologation purposes
Raket 95 will be homologated in those
countries where it receives approval from
the local Automobile Sport Federations.
This product description may not be
used as a supporting document during
technical control unless the appropriate
Automobile Sport Federation’s stamp of
approval exists.
The main principle involved is that absolutely no changes or modifications may
occur. The engines should be “out of the
box”, in other words exactly as they are
delivered. Below follow some clarifications.
modification whatsoever is allowed. The
crankcase halves should both be labelled
with RAKET.
The sealing rings are “open to choice”, in
other words they may be exchanged for
any other factory make of your choosing
under the condition that the model and
the dimensions are kept the same. On
both sides there should be 17x28x7 with
sealing lip as well as dust sealing lip.
Original sealing rings have a sealing lip
that is Teflon coated.
The ball-bearings move on the crankshaft but are press fitted in the crankcase
and are original 6203 TN 9C3. It is not
permitted to change the bearings’ fitting or
placement.
The cylinder should be completely original
and absolutely no modification is allowed.
For instance it is not permitted to smooth
out the edges of the transfer ports.
The cylinder should be labelled MAHLE
56 ZK3 and display Radne Motor’s logo
2. Crankshaft
The crankshaft may not be altered in any
way. For instance it is not permitted to
balance the crankshaft by removing or
adding material. The same applies to the
and article number 35085. No other labels
are permitted.
Exception:
If a thread in the cylinder were to be damaged, for instance the spark plug thread,
then it is permitted to make the repair
with a thread kit of the Heli Coil variety.
PLEASE NOTE! It must be the same
thread as the original.
make of piston and it is very unlikely that
you will come across any pirate versions
of pistons.
The piston should be labelled on the top
with R 35087.
Piston pins, piston pin locks and piston
rings must be original.
On the top of the piston there is an arrow
indicating which side of the piston should
be facing the exhaust port.
4. Spark plug
1. Crankcase
The crankcase should have the same
design as shown in the picture.
The measurements that are of decisive
importance are those relating to the part
of the crankcase that exactly encloses the
crankshaft. In this matter absolutely no
16
Raket 95 Manual - English
connecting rod, in other words no alteration of any kind is allowed.
The needle roller bearings at either end
of the connecting rod are open to choice
with regards to factory make as long as
the same model is used. This should be
needle roller bearings in a steel basket.
3. Cylinder
The original spark plug is NGK BPM8Y,
but it may be exchanged for another
equivalent factory make. The diameter
of the thread and the thread length, 14x
9.5 mm, must always be the same as the
original.
5. Piston
You may not change to another factory
www.raketengines.com
www.raketengines.com
6. Carburettor
The carburettor is a Tillotson HS 319 A
carburettor. Absolutely no modifications
whatsoever are permitted. The venturi
diameter should be 17.7 mm and the
Raket 95 Manual - English
17
diameter at the connection for transition to
the cylinder connection should be 20.50
mm.
Parts subject to wear and tear such as
the diaphragm, gaskets and needle valve
must be original.
The throttle shaft should be an original
Tillotson with a lever for connection of the
throttle cable.
The picture illustrates the flywheel with
flange hub for manual starting. The hub
should not be removed.
screws. When the silencer is divided one
is able to check on the amount of damping material. This should be done at least
once every season, or when you notice a
change to the sound of the exhaust.
7. Carburettor flange
The carburettor flange should always
be assembled and labelled with article
number 35061.
8. Inlet flange
The rubber inlet flange should be labelled
with article number 35065 and may not be
altered in any way. The dividing plate of
treated Bakelite should be assembled.
The exhaust system, consisting of cylinder connection and complete silencer,
may not be altered or modified in any
way. The attachment of the silencer onto
the cart is open to choice, but it must be
of such a nature that the original silencer
can be used without any alterations whatsoever.
The exhaust system for Micro has a restrictor washer assembled at the cylinder
connection. The restrictor washer has a
diameter of 14 mm.
One can divide the silencer by drilling out
the rivets and replacing them with suitable
11. Centrifugal clutch
The clutch is an one piece steel clutch
with expandable arms.
The clutch is a security feature and absolutely no alterations or modifications are
allowed. In other words it is not permitted
to change the clutch weights or the clutch
springs in order to alter the number of rpm
at which the slip clutch engages.
The clutch should be fully engaged at
max 5,000 rpm.
The clutch drum has a sprocket with 11
teeth.
12. Covers
The ignition system should be original
Selettra and no modifications are allowed.
The ignition coil and flywheel should
be labelled with Selettra. The minimum
weight is 390g.
The flywheel wedge should be assembled
and may not be altered.
Raket 95 Manual - English
The engine is equipped with an electric
starter system as standard. The starter
motor should be an original Raket 95.
The engine may even be equipped with
a manual starter system also known as a
Magnapull starter.
This means that a flange hub may be assembled onto the flywheel.
10. Exhaust system
9. Ignition system
18
13. Starter system
The covers are safety features designed
to avoid contact with the rotating and
warm parts of the engine, and absolutely
no alterations or modifications are permitted. The kart may not be driven without
the covers.
www.raketengines.com
www.raketengines.com
Raket 95 Manual - English
19
9. Service tips
Experiences from the previous engine
model, Raket 85, have taught us that a
Raket engine should normally not require
any comprehensive levels of service
during a racing season, since we believe
that a Raket 95 engine will be used no
more than 50 times per season. We do
not believe that it should be necessary to
change bearings, sealing rings and piston
rings several times during a season, such
as is required with more extreme kart
engines. It is of course up to every driver
and mechanic to make their own decisions about what they think is necessary
or best.
The following simple service routines can
however be said to fall into the category
of normal maintenance work:
1. Lubricating the clutch parts.
We recommend that you lubricate the
bearing of the clutch drum. The clutch it
self shall be clean and not lubricated.
2. Silencer
As we mentioned previously, it is possible
to drill out the rivets at the back edge of
the silencer.
When you have done this you can remove
the end of the barrel and thus even the
damping material that is lying wrapped
around the barrel. Assuming that the
carburettor is setup normally and correctly
it should not be necessary to change the
damping material during a season. However we would recommend a change prior
to the start of each new season.
The carburettor is a Tillotson 319 A. If we
follow the passage of the petrol through
the carburettor we will be able to quickly
describe the carburettor’s function.
The carburettor has two caps, one made
Raket 95 Manual - English
One of these chambers is connected to
the engine’s crankcase via a channel.
When the pressure in the crankcase
changes the pump diaphragm in the
carburettor will begin to move. On the
other side of the diaphragm there is fuel in
the other chamber. When the diaphragm
moves the fuel is pumped in and out of
the chamber. Two small lip valves that are
cut-out in the same piece of rubber ensure that suction from the tank occurs and
that the fuel is pumped further towards
the carburettor’s inlet valve. The pump
cover of the carburettor. When you press
down on the diaphragm the inlet valve
opens. Turn the engine around and check
to see if there is any fuel coming from the
tank.
If no fuel is coming then you should firstly
loosen the fuel line from the tank and
blow into the hose. You should still be
pressing down on the carburettor diaphragm. You should feel that it is possible
to blow air through the carburettor. If
3. Servicing the carburettor
The only aspect of your Raket 95 engine
that requires regular service is the
carburettor. A diaphragm carburettor is a
quite amazing component that is capable
of operating in chainsaws, cutters and
other testing applications whilst working
problem-free for several years at a time.
As long as you are careful to only refuel
using well-filtered fuel, and always drive
with the inlet silencer attached, then you
should also be able to get through a season without needing to disassemble the
carburettor for cleaning and control. On
the other hand you must possess the ability to clean and setup your carburettor. To
that end there now follows a short tutorial
in carburettor service.
20
of metal while the other is mould cast.
Under the moulded cap lie a rubber
diaphragm and a gasket. There is a small
chamber on each side.
www.raketengines.com
should sustain a pressure of approx.0.5
kp/cm2.
you are not able to blow air through the
carburettor then you should take off the
moulded cap, because there is obviously
something wrong. Firstly check the small
fuel strainer (this has article number 3043
in the spare parts list). It may be clogged.
It is quite simple to check if the pump is
working correctly. Take off the spark plug
so that it will be easier to move around
the engine. Ensure that the fuel line is
correctly attached and that the carburettor is sitting correctly on the engine. All
gaskets should be OK. Ensure that the
hose running from the crankcase to the
carburettor is in place. Press carefully (we
emphasise – CAREFULLY) down on the
master diaphragm which you can reach
through the small hole on the die-cut
After that it is time to focus on the pump
diaphragm itself. It could be worn out, but
that is actually difficult to determine with
the naked eye; however if it has been
used for a while then you should change
it! Remember that one should always
change the gasket when one changes the
diaphragm.
The rule is: The diaphragm should be facing the carburettor casing – otherwise the
lip valves will not seal!
Now the pump should be working OK,
www.raketengines.com
Raket 95 Manual - English
21
which you can check by using the same
method as we have previously described.
If you still – despite everything – are not
able to receive fuel then the needle valve
must be stuck and in that case there is
nothing else to do than to continue. The
pump pushes the fuel forward towards the
needle valve, but it cannot open it through
its own force. The needle valve is held
closed by a spring that operates over a lever. The master diaphragm works against
the lever, which we know from the small
rivet in the middle of the diaphragm. One
side of the diaphragm is in contact with
the carburettor’s venturi. When the fuel is
sucked out through the needle valves, the
amount of fuel beneath the diaphragm is
however not something that we shall go
into in any more detail here.
Now we can start with the needle valve.
Take away the pressed metal cap and the
master diaphragm together with its gasket. By loosening the small screw that can
now be reached, the needle valve can be
disassembled. Be careful that the spring
does not come loose! Now you should
check the needle valve itself (nr: 25) to
ensure that its pin is totally even – change
it if you are unsure. Check that the seating at the bottom of the valve appears to
be even and undamaged. Unfortunately
it can happen that the seating sustains
damage in which case the valve will not
be able to close properly.
When you have checked and cleaned
everything it is time to reassemble the
needle valve with its lever. The spring
should not be deformed (you should
always have a couple available to change
when necessary) and the lever should
not be bent. When you assemble the
valve, the part of the lever that has a
fork that fits onto the master diaphragm’s
reduced. This in turn applies pressure to
the lever and cancels the spring’s force.
Now the inlet valve can open and more
and more fuel can flow in – the chamber
beneath the diaphragm fills up and the
diaphragm moves outwards. In this way
the spring closes the needle valve and
maintains a relatively constant amount of
fuel in readiness for the needle valves.
Fuel can find its way out of the chamber
to the carburettor’s venturi via the H and
L screws. The channels there are so thin
that the fuel will not normally escape
of its own accord but rather must be
sucked out. The shape and placement
of the channels in the venturi decide the
characteristics of the carburettor. That is
22
Raket 95 Manual - English
drops of fuel down onto the needle valve
and pump up the pressure on your pump.
At approx. 1.0 kp/cm2 the inlet valve
should open and after that it should release air through it down to a pressure of
approx. 0.5 kp/cm2. Now the valve should
be totally sealed! If this test does not
appear to have worked properly then the
question is, what should we do next? The
most common problem is probably that
the valve is not sealed, and in that case
one must search for dirt or pores or else
change the needle valve. PLEASE NOTE!
Leaking gaskets on the pump side will exhibit the same symptoms. If the opening
or sealing pressure is not correct then you
will have to change the spring and lever
until it does appear to be correct.
OK – now the valve is correctly adjusted.
What other faults could exist? The master
diaphragm – maybe?! It is most likely so
that far too many master diaphragms are
changed for no good reason. There are
strong forces at work on the diaphragm.
One should really be able to feel that it
has become stiff before it is definitely time
to change it. Check the gasket (that is
lying closest to the carburettor casing on
this side of the carburettor).
Assuming that you have cleaned the carburettor properly and that the High Speed
and Low Speed screws are not damaged,
then there is really not too much more
that can be wrong.
rivet should lie exactly at the edge of the
carburettor’s rough surface.
Now you should attach a small air pump
with a manometer (art nr: 5054) to the
fuel nipple on the pump side. Drop a few
www.raketengines.com
The only thing that remains now is to
check if the engine is difficult to start and
if it refuses to react when the setting of
the L-needle is changed. In that case
there could be dirt under the expansion
cap that is located beneath the master
diaphragm. The fuel from the Low Speed
needle passes through a small chamber
on its way out to the venturi and on very
www.raketengines.com
rare occasions this chamber can become
clogged. In such a case one should bore
a 2 mm hole in the middle of the cap (nr
20) and then pry it away using a sharp
object that one can stick into the hole.
Thereafter you should carefully check
all of the channels running to and from
the chamber and seal those with a new
expansion cap that you must carefully
put in place using a mandrel 8 mm. Now
there should not be any more faults with
your carburettor.
Normally these diaphragm carburettors
are extremely reliable. They are developed for use with chainsaws and snowmobiles. On very rare occasions one may
come across a carburettor that does not
provide satisfactory performance. In that
case you should borrow an identical one
if possible. If you notice a large difference
in the performance of the carburettor you
have borrowed compared with your own
then you should change your carburettor.
It is more or less a practical impossibility
to alter the fuel channels in a carburettor
on one’s own.
4. Starter equipment
On engines that are equipped with a
manual coil starter (or Magnapull starter),
the coil or the return spring may need to
be changed. The basic rule regarding an
eventual change is that the return spring
may never be drawn to such an extent
that it causes a stoppage for the coil when
it is fully drawn. A small amount of “give”
should always exist in the spring when the
coil is fully drawn.
Raket 95 Manual - English
23
Split drawing engine
30550 .Sparkplug NKG BPM 7A...........................
3056 Sparkplug cap...........................................
3093 Mainbearing 6203 TN9 C3........................
3095Key............................................................
32076 Ignitioncoil 95, 120 Selettra.......................
32157 Flywheel 95, 120 ES.................................
35162 Support for starter engine.........................
32162-1Support for starter engine.........................
33158 Flywheel hub 95, 120 ES..........................
35048 Carburettor Tillotson HS-319A..................
35049 Throttle cable support ..............................
35053Exhaustgasket...........................................
35059 Engine cover ............................................
35061 Sprocket cover .........................................
35065 Inletflange in rubber..................................
35086 Piston ring.................................................
35087 Piston Raket 95.........................................
35090 Cylinder gasket 0,15.................................
35090-1Cylinder gasket 0,25.................................
35091Needlebearing...........................................
35092 Crankshaft complete.................................
35096 Washer clutchdrum ..................................
35132 Exhaust flange Raket 95...........................
35144 Clutch drum...............................................
35147 Needlebearing for clutch 95......................
35150Crankcase ................................................
35151 Crankcase gasket ....................................
35154 Cover for starter support ..........................
35155 Neeedlebearing bendix.............................
35156 Support for start engine.............................
35158 Bendix for startengine...............................
35159 Startergear with clutch complete...............
35160
35161
4118
55153
55154
55159
55161
55164
6029
32112
35510
35515
35517
55164
24
Raket 95 Manual - English
www.raketengines.com
www.raketengines.com
Plug for sensor..........................................
Carburettor flange.....................................
Flywheel nut 60, 95, 120...........................
Screw 6x20 10 pc......................................
Screw 6x14 10 pc......................................
Screw 6x25 10 pc......................................
Screw 6x30 10 pc......................................
Screw 6x35 10 pc......................................
Oilsealing sprocket side Teflon..................
Startbutton for Raket 95, 120....................
Batteri/start box complete Raket...............
Batterysupport complete...........................
Clamp for battery support Raket 95..........
Screw 6 X 35.............................................
Raket 95 Manual - English
25
Split drawing carburettor
Splitdrawing manual start
Tillotson HS-319A
35059
35205
33153
33134-1
33135
55156
33131
33132
33136
55392
33138
35059Aircoat.......................................................
ITEM NO.
PART NUMBER
DESCRIPTION
33134 String disc 07-...........................................
1
35059 Fläktkåpa
33153
Start
boss..................................................
2
33134-Linhjul 0733131 Axle for stringdisc 07-................................ 33153 Sammansatt
3
35205Starthandle................................................
4
33131
33138
string.................................................
ISO
10642
- M4Start
x 12 --5
12S 33136 Frictionring Aluminium...............................
55392-Försänkt
33132 O-Ring för string disc axlee.......................
6
aluminiumbricka 6X20
55156 Screw countersunk 6x20...........................
35205-Starthandtag
7
Raket 55392
95
Countersunk aluminium washer 6X20......
8
9
10
11
33138-Startsnöre
33136-Friktionsring
Aluminium
33132-O-Ring för
linhjulsaxel 12,1X1,6
33135 Magnuapull
fjäder
26
Raket 95 Manual - English
Snörstart/QTY.
35059
1
2
1
1
3013Plate..........................................................
3014Screw........................................................
3015 Choke axle................................................ 3016Cap............................................................ 3017 Main diaphragm........................................ 3018Gasket....................................................... 3019Screw........................................................ 3020 Expansion cap........................................... 3022Screw........................................................ 3023Axle........................................................... 3024Lever......................................................... 3025Valve......................................................... 3026Spring........................................................ 3027 Expansion cap........................................... 3028Circlip........................................................ 3029 Fuel elbow................................................. 3030 Tube fitting................................................
3031 High speed mixture screw......................... 3032Spring........................................................ 3033Ball............................................................ 3034Spring........................................................ 3035 Low speed mixture screw.......................... 3036Spring........................................................ 3037Screw........................................................ 3038Screw........................................................ 3039Bushing..................................................... 3040Spring........................................................ 3041 Control plate.............................................. 3042 Filter small................................................. 3043Filter.......................................................... 3044Screw........................................................ 3045 Diaphragm Std.......................................... 3045-1 Diaphragm plastic..................................... 3045-2 Diaphragm Teflon...................................... 3046Gasket....................................................... 3047 Pump cover............................................... 3022
3016
3017
3018
3023
3027
3019
3020
3026
3024
3025
3028
3032
3031
3035
3036
3037
3039
3040
3039
3045
3038
35029
3043
3046
3041
3047
3044
1
1
1
1
1
1
www.raketengines.com
www.raketengines.com
Raket 95 Manual - English
27
Your dealer:
Radne Motor AB
Markörgatan 2, 136 44 Handen (Stockholm), Sweden
Tel 08-556 506 90, Fax 08-556 506 91
[email protected]
www.raketengines.com