1
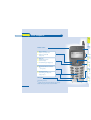
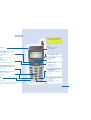
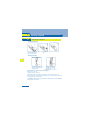
Alcatel Mobile Reflexes™
Alcatel
OmniPCX Office
OK
ARCHITECTS OF AN INTERNET WORLD
Precautions for use
howtoc
This approved DECT telephone is intended to be used with an ALCATEL cordless
PBX.
The following conditions must be respected, notably concerning the use of
radioelectric frequencies:
2
•
DECT equipment can only be used to establish links between fixed points if
these links are temporary and the equivalent isotropically radiated power at the
antenna is less than 250 mW.
•
The conditions of access to a DECT equipment telepoint network shall be
stipulated by contract with the operator of the authorized telepoint network
concerned.
•
The mains power socket used must be close to the charger/holder and easily
accessible, so that it can be used as an 'on/off' facility.
•
This telephone is specially designed for use with an ALCATEL system such as is
described in the manual.
•
Do not expose your telephone to severe conditions (rain, sea air, dust, etc.).
•
Correct operation of your telephone is not guaranteed at temperatures outside
the range -10°C to +45°C.
•
You must not switch on or use your telephone near gas or inflammable liquids.
Thank you for choosing the Mobile 100 or 200 Reflexes: this is a reliable
telephone designed to make life easier.
2
Contents
Toc
1.
Precautions for use . . . . . . . . . . . . . . . . . . . . . .
2
Your telephone . . . . . . . . . . . . . . . . . . . . . . . . .
4
Display and corresponding icons . . . . . . . . . . .
6
Status icons. MENU icons. Call icons. How to read this guide.
2.
Getting started . . . . . . . . . . . . . . . . . . . . . . . . .
10
Charging the telephone. Switching on your telephone. Accessing
the MENU and navigating. Accessories.
3.
Using your telephone . . . . . . . . . . . . . . . . . . . .
12
Making a call. Calling from your personal directory. Call
correspondent by name. Answering a call. Features in
conversation.
4.
Using your voice mailbox . . . . . . . . . . . . . . . . .
15
Initializing your voice mailbox. Diverting calls to your voice
mailbox. Consulting your voice mailbox.
3
5.
Customizing your telephone . . . . . . . . . . . . . .
17
Programming your personal directory. Activating the vibrator
(Mobile 200). Rapid customizing of the ringer.
Guarantee and clauses . . . . . . . . . . . . . . . . . . .
19
3
Your telephone
Telephone
To fi
v
Headset socket
Erase a character
Return to previous menu
Delete an entire field
(long press)
Hang up
Return to first screen
Switch off ringer
Lock/unlock keypad (long press)
Activate/disable the vibrator
(1)
(long press)
Company directory
Customizing your telephone
Light
•
Ex
(r
A
A
N
A
L
R
B
(d
A
lo
A
ch
(long press) (2)
Microphone
S
(1)
R
(
(2)
Depending on model
Special case: from the personal directory, the long press
enables a directory card to be created or modified
4
a
Telephone
et socket
se a character
urn to previous menu
ete an entire field
g press)
ng up
urn to first screen
tch off ringer
k/unlock keypad (long press)
tivate/disable the vibrator
(long press)
To find out more about this,
visit www.alcatel.com
Light
•
Exit from radio field
(rapid flashing)
Adjust audio volume
Access MENU
Navigate
Apply
Lift the receiver
Redial (long press)
Broker call
(during enquiry call)
Activate/deactivate
loudspeaker
mpany directory
tomizing your telephone
g press) (2)
Activate mute on hands free
phone
Switch on / off
nding on model
Rapid access to ringer
al case: from the personal directory, the long press
a directory card to be created or modified
charger
(long press)
adjustment
5
1
Display and corresponding icons
Other
Features 1 line of status icons and 3 lines of 16 alphanumeric characters. The
Mobile 200 also has a back-lit display and keypad.
1.1
Status icons
The status icons are displayed on the welcome screen and indicate the status of
the telephone.
Battery charge level
Initializing the voice mailbox / Consulting information
Programmed call-back time
Call diversion activated
Vibrator active Mobile 200
6
Ringer active
Ringer disabled
Radio reception quality
You can obtain details on the status icons from the tooltips that appear on the
welcome screen when you use the navigator:
Battery
full power
6
1.2
Display and corresponding icons
1
MENU icons
The MENU is accessible from the welcome screen by pressing the OK key.
(OK :
)
It provides access to all the functions available on your system.
Directories:
manage your personal directory and access the company
directory.
Redial:
call back the last number dialled.
Diversion:
divert your calls to another number.
Mailbox:
consult and send voice and text messages.
7
Call pick-up:
answer a call intended for another telephone.
Appointment:
program a call-back time.
System lock:
prohibit outgoing calls and modification of the programming.
Customizing the telephone:
program your voice mailbox, select the ringer tune, language,
etc.
Adjustment:
adjust contrast, activate or deactivate the beeps, lighting, etc.
System selection
Installation
7
Dis
1
1.3
Call icons
Making a call
Answering a call*
In conversation*
Call on hold*
Accessing the directories
Transferring a call
Switching to DTMF signals
8
Setting up a conference
Putting on common hold
Parking an external communication
* In the event of a multiple call, the icons are given indices to represent the different
correspondents.
8
1.4
Display and corresponding icons
1
How to read this guide
Press briefly on the navigation key to access the MENU
and to confirm.
Move the navigation key up or down.
Move the navigation key to the left or right.
Use the keypad to enter digits and letters.
9
Description of an action or context
Important information.
These symbols can be supplemented by small icons or texts. All default or
customized function codes are given in the table of codes in the appended sheet.
9
Dis
2
Getting started
Other
2.1
Charging the telephone
• Install the battery
Position the battery in
the slide following the
mark on the label
Slide it until it clicks into
place
• Charge battery
10
Connect the charger and
place the telephone in the
charging holder
Battery charging time
Mobile 100: ~ 5 h 00
Mobile 200: ~ 3 h 00
Additional battery: ~ 2 h 30
Characteristics of the mains power adapter
Entry : 230 V - 50 Hz
Output: 12 V DC - 500 mA
Charge the telephone regularly. The telephone can be switched on or off.
If the telephone is not used and not charged for a period of several weeks, remove
its battery and store it separately.
The Mobile 100 functions exclusively with the Ni-Mh battery, and the Mobile
200 with the Li-Ion battery.
10
2.2
Switching on your telephone
MARTIN Paul
Wed 24 May 16:30
Switch on
(long press)
Wait a moment
(about 3 seconds)
Your telephone is
switched on
• Switch off your phone
Getting started
2
Press the switch on/off key (long press).
(switch on/off :
2.3
11
)
Accessing the MENU and navigating
MARTIN Paul
Wed 24 May 16:30
Confirm
• Access the functions
mbx greeting
OK?
Select a function in the
MENU
2.4
Confirm
You can move horizontally
along the various icons within
the function
Accessories
Several charger models are available. There are various protective holders
available. Ask your engineer.
For operation in an industrial environment (dust, filings, various types of vapour
and risk of impact), it is essential to use the protective holders
11
Get
3
Using your telephone
Other
3.1
Making a call
John
in conversation
Transfer
Dial
Send the
call
Speak
Hang up
To make an external call, dial the outside line access code
before dialling your correspondent's number.
3.2
Calling from your personal directory
(Individual number)
Pers Sp Dial
Directory
12
Select the 'Directories'
function
Confirm
1-JOHN
2-PAUL
3-
Select the name of the
person you wish to call
3.3
Send the
call
Call correspondent by name
Select the 'Directories'
function
Confirm
Pers Sp Dial
Directory
Select 'Directory'
12
Confirm
Confirm access to
'Pers Sp Dial'
Type surname :
Enter the first letter of your
correspondent's surname*
Select the
desired name
Send the call
If several names come up, you can refine the search by entering the successive
letters (second, third, etc.) of the name you are looking for.Press 1 when you do
not know one of the letters of the name.
3.4
Answering a call
Sophie
is calling
13
You are receiving a
call
Using your telephone
3
Sophie
in conversation
Transfer
Off-hook
Speak
Hang up
The ringer does not ring if:
. the vibrator is active, the vibrator active icon is displayed
on the screen saver.
. the ringer is disabled, the ringer disabled icon is displayed
on the screen saver.
13
Usi
3
3.5
Features in conversation
• Make a second call
Number?
Paul
in conversation
Transfer
102
Dial the number
John
in conversation
Transfer
The first
correspondent is
placed on hold
Hang up the
ongoing call
• Switching between calls (broker call)
14
During a call, to recover the correspondent on hold:
Paul
in conversation
Transfer
John
in conversation
Transfer
Recover the correspondent
on hold
• Transferring a call
Paul
in conversation
Transfer
You are in
conversation with
the destination
number
14
Confirm the
'Transfer'
option
Send the call
4
Using your voice mailbox
Other
4.1
Initializing your voice mailbox
You can use the Voice mailbox initialization icon on the welcome screen to
initialize your voice mailbox. (Voice mailbox initialization :
)
Init
your
voice mail
Confirm
Enter your password and record your name in accordance with the
spoken instructions
Your personal code is used to access your voice mailbox and
to lock your telephone.
15
4.2
Diverting calls to your voice mailbox
Select the 'Diversion'
function
Confirm
Div Imm VMU
OK?
Select the 'Diverting to
your voice mailbox'
icon
Confirm
15
4
4.3
Consulting your voice mailbox
When you have received a message, the Voice mailbox initialization icon is
displayed on the welcome screeen. (Voice mailbox initialization :
)
1 voice mail
OK?
Confirm access to the
'Mail' function
Confirm access to the
voice mailbox
display number of
new and old
messages
Confirm
01/05 107
10 May 9:15
Play new?
Confirm
• To access voice mail functions
16
You can move horizontally along the various icons.
01/05 107
10 May 9:15
Play new?
Listen to the messages
Erase the current message
Call back the person who left the message
Send a copy of a message
Pause while listening to the message
Go back 10 seconds
Go forward 10 seconds
16
Personal
code
5
Customizing your telephone
Other
Programming your personal directory
(Individual number)
5.1
Your personal directory can contain up to 10 numbers.
Pers Sp Dial
Directory
Select the
'Directories' function
Confirm
Confirm access to
'Pers Sp Dial'
Name?
MARTIN
1-............
2-............
3-............
Select the chosen card
Confirm
(long press)
Enter the name *
Number?
0123456789
17
Confirm
Enter the number
Confirm
* To enter the name: the numeric keys have letters which can be obtained by
consecutive presses.
Example : press the 8 key twice in succession to display the letter 'U'.
5.2
Activating the vibrator (Mobile 200)
MARTIN Paul
Wed 24 May 16:30
Long press
Vibrator activated
and ringer disabled
MARTIN Paul
Wed 24 May 16:30
Long press
Vibrator disabled
and ringer
activated
This key can be used to switch rapidly from the ringer to the vibrator and viceversa.
17
5
5.3
Rapid customizing of the ringer
Depending on your activity, the ringer settings can be modified via a quick
press on the switch on/off key followed by the OK key.
(switch on/off :
, OK :
)
Switch off the
set?
Switch off the telephone
Activate/disable the vibrator (Mobile 200)
Activate/disable the ringer
Activate/disable meeting mode (progressive ringing)
Lock the keypad
18
Confirm the option of your choice using the OK key. (OK :
3EH 21011 BSAA Ed.01
18
)
Guarantee and clauses
howtoc
19
Independently of the legal warranty that covers this appliance, it is guaranteed for
1 year, parts and labour, counting from the date indictated on your invoice.
Nevertheless, if the legal warranty in effect in your coutry exceeds 1 year, then
the legal warranty is the sole warranty applicable
The invoice will be demanded if making a claim under the warranty. The warranty
does not however apply in the following cases: in the event of use that does not
comply with the instructions given in this user's manual, faults or damage caused
by natural wear, damage resulting from a cause external to the appliance (e.g.
impact, fall, exposure to dampness, etc.), noncompliant installation or
modifications or repairs carried out by people who are not approved by the
manufacturer or retailer.
No guarantee is given concerning possible interference affecting DECT
equipment, due to other authorised utilisation of the radio frequencies concerned.
Declaration of compliance
We, Alcatel Business Systems, hereby declare that we assume the Alcatel
Mobile 100 Reflexes, Alcatel Mobile 200 Reflexes and Alcatel Mobile 200
Ex Reflexes to be compliant with the essential requirements of Directive 1999/
5/CE of the European Parliament and Council. This equipment uses the DECT
harmonised frequency spectrum and can be used in all the countries of the
European Community, Switzerland and Norway.
Any unauthorised modification to the product shall render this declaration of
compliance null and void. A copy of the original of this declaration of compliance
can be obtained by post from :
Alcatel Business Systems - Technical Services - Customer Care
1, route du Dr. Albert Schweitzer - F 67408 Illkirch Cedex - France
The CE marking indicates that this product complies with the following EC
directives
-
89/336/CEE (electromagnetic compatibility)
73/23/CEE (low voltage)
199/5/CE (R&TTE)
Some of your telephone's functions require a software key or are only
accessible once programmed by your installation technician.
Copyright © ALCATEL. 2001. All rights reserved.
Alcatel Business Systems, in keeping with its policy of constant product
improvement for the customer, reserves the right to modify product
specifications without prior notice.
ALCATEL - 32, avenue Kléber, F-92707 Colombes Cedex
R.C. Paris 602 033 185
19