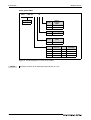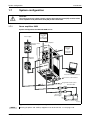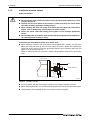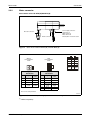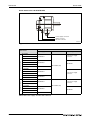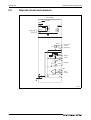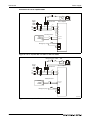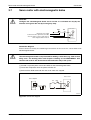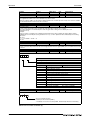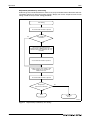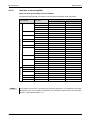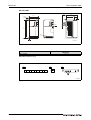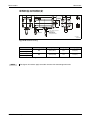
1
MITSUBISHI ELECTRIC
MELSERVO
Servo amplifier and motors
Instruction Manual
MR-J2S-B/B4
Art.-No.: 168353
07 06 2006
Version A
MITSUBISHI ELECTRIC
INDUSTRIAL AUTOMATION
Instruction Manual
Servo amplifier MR-J2S-B/B4
Art.-N0.: 168353
A
Version
06/2006 pdp
Changes / Additions / Corrections
—
About this Manual
The text, illustrations, diagrams and examples in this manual
are solely for clarification purposes for the installation,
handling and operation of the servo motors and amplifiers of the
MELSERVO J2-Super-Series.
If you have any questions concerning the programming and operation of the equipment
described in this manual, please contact your relevant sales office
or department (refer to back of cover).
Current information and answers to frequently asked questions are also
available through the Internet (www.mitsubishi-automation.com).
MITSUBISHI ELECTRIC EUROPE B.V. reserves the right to make
changes both to this manual and to the specifications and design of the
hardware at any time without prior notice.
© 06/2006
Safety Instructions
General safety instructions
For qualified staff only
This manual is intended exclusively for acknowledged and qualified electricians who are totally
conversant with the safety standards of electrical drive and automation technology. Project
management, installation, setup, maintenance and testing of the equipment must be carried out
by an acknowledged and qualified electrician who is totally conversant with the safety standards
of electrical drive and automation technology.
Proper use of equipment
MELSERVO-Series equipment is only designed for use in the areas described in this manual.
Be sure to comply with all the characteristics stated in this manual. Only additional or
supplementary devices recommended by MITSUBISHI ELECTRIC EUROPE may be used.
Any other use or application of the products is deemed to be improper.
Relevant safety regulations
All safety and accident prevention regulations relevant to your specific application must be
observed in the system design, installation, setup, maintenance, servicing and testing of these
products.
The regulations listed below are particularly important. This list does not claim to be complete;
however, you are responsible for knowing and applying the regulations applicable to you.
● VDE/EN Standards
– VDE 0100
(Regulations for electrical installations with rated voltages up to 1,000V)
– VDE 0105
(Operation of electrical installations)
– VDE 0113
(Electrical systems with electronic equipment)
– VDE 0160
(Configuration of electrical systems and electrical equipment)
● Fire prevention regulations
● Accident prevention regulations
– VBG No. 4 (electrical systems and equipment)
● Low-voltage regulation
MELSERVO J2-Super
I
Special instructions for working with this manual
In this manual special warnings that are important for the proper and safe use of the products
are clearly identified as follows:
m
b
NOTE
DANGER:
Personnel health and injury warnings. Failure to observe the precautions described
here can result in serious health and injury hazards.
CAUTION:
Equipment and property damage warnings. Failure to observe the precautions
described here can result in serious damage to the equipment or other property.
means that incorrect handling may lead to erroneous operation of the servo
amplifier or servo motor. However, there is no risk to the health of the operators or of
damage to the equipment or other property.
This note is also used to indicate an other parameter setting, an other function, an other use
or it provides information for the employment of additional or supplementary devices.
II
Compliance with EC Directives
EC directives are intended to allow the liberal sales of goods within the EU. With the
establishment of “essential safety regulations” the EC directives ensure that technical barriers
to trade between member states of the EU are excluded. In the member states of the EU the
machine directive (in force since January 1995), the EMC directive (in force since January 1996)
and the low-voltage directive (in force since January 1997) of the EC directives determine the
guarantee of the presence of fundamental safety requirements and the display of the “CE” mark.
Conformity with EC directives is indicated by the submission of a Declaration of Conformity as
well as the display of the “CE” mark on the product, its packaging or its operating instructions.
The above directives relate only to devices and systems and not to single components, unless
the components have a direct function for the end user. As a servo amplifier together with a
servo motor have to be installed with a controller and other mechanical parts in order to serve
a useful purpose for the end user, servo amplifiers do not possess this function. Consequently
they can be described as a complex component for which a conformity declaration or the “CE”
mark is not required. This position is also supported by CEMEP, the European association of
manufacturers of electronic drive technology and electrical machines.
The servo amplifiers do, however, comply with the relevant low-voltage directive, which is a
prerequisite for the “CE” mark on machines or accessories in which the servo amplifier is used.
To ensure conformity with the requirements of the EMC directive, MITSUBISHI ELECTRIC has
produced the manual “EMC INSTALLATION GUIDELINES” (article number: 103944) in which
the installation of the servo amplifier, the construction of a control cabinet and other installation
tasks are described. Please contact the relevant sales partner who is responsible for you.
MELSERVO J2-Super
III
Special safety instructions
The following notes on sources of danger should be interpreted as general guidelines for servo
drives in association with other devices. These precautions must always be observed in the
design, installation and operation of all control systems.
m
DANGER:
● Observe all safety and accident prevention regulations applicable to your specific
application. Installation, wiring and opening of the assemblies, components and
devices may only be performed with all power supplies disconnected.
● Prior to carrying out any installation work, wiring and opening assemblies,
components and devices you must disconnect the power supply to the units and
wait for at least 10 minutes. Prior to touching anything measure the residual voltage
in condensers, etc. with a voltmeter to ensure that the voltage has been sufficiently
reduced.
● Never touch the servo amplifier or servo motor or the optional brake resistor during
or shortly after operation whilst they are still live. The components can get very hot
– there is a risk of getting burned.
● Assemblies, components and devices must always be installed in a shockproof
housing fitted with a proper cover and protective equipment.
● Devices with a permanent connection to the mains power supply must be integrated
in the building installations with an all-pole disconnection switch and a suitable
fuse.
● Ground the servo amplifier and servo motor securely.
● Check power cables and lines connected to the equipment regularly for breaks and
insulation damage. If cable damage is found, immediately disconnect the equipment
and the cables from the power supply and replace the defective cabling.
● Before using the equipment for the first time check that the power supply rating
matches that of the local mains power.
● EMERGENCY OFF facilities in accordance with VDE 0113 must remain effective in
all operating modes of the servo motor. The EMERGENCY OFF facility reset function
must be designed so that it cannot cause an uncontrolled or undefined restart.
● The EMERGENCY OFF facility must be wired so that the electromagnetic brake is
also activated during an EMERGENCY OFF.
● Residual current protective devices pursuant to DIN VDE Standard 0641 Parts 1–3
are not adequate on their own as protection against indirect contact for installations
with servo amplifier. Additional and/or other protection facilities are essential for
such installations.
IV
Special safety instructions for the devices
b
CAUTION:
● During the installation of servo systems beware of the heat that builds up during
operation. Make sure that there is adequate clearance between the individual
modules and enough ventilation to allow the heat to be dissipated.
● Never install servo amplifiers or servo motors or the optional brake unit close to
easily flammable materials.
● When using a servo system always observe strict compliance with electrical
characteristics and physical dimensions.
● In the event of a defect arising in the servo amplifier, servo motor or optional brake
resistor immediately switch the power off to the servo drive, as otherwise it may
lead to overheating and self-ignition of the devices.
MELSERVO J2-Super
V
Configuration
Control power
supply
Reinforced
insulating
transformer
No-fuse
breaker
Power
supply
NFB
Servo
motor
Magnetic contactor
MC
Servo
amplifier
M
S00500C
Environment
Operate the servo amplifier at or above the contamination level 2 set forth in IEC60664-1. For
this purpose, install the servo amplifier in a control box which is protected against water, oil,
carbon, dust, dirt, etc. (IP54).
Grounding
To prevent an electric shock, always connect the protective earth terminals of the servo amplifier
to the protective earth of the control box. Do not connect two or more ground cables to the same
protective earth terminal.
Earth terminal
Earth terminal
S00501C
VI
Wiring
The cables are connected via insulated tubular cable sockets to the terminal strip of the servo
amplifier.
Crimping terminal
Insulating tube
Cable
S00502C
Use only the connectors designed for it to attach the servo motor to the servo amplifier. The
connectors can be ordered as accessories.
MELSERVO J2-Super
VII
VIII
Contents
Contents
1
Introduction
1.1
Features and configuration . . . . . . . . . . . . . . . . . . . . . . . . . . . . . . . . . . . . . . . . . . . . 1-1
1.2
Function block diagram . . . . . . . . . . . . . . . . . . . . . . . . . . . . . . . . . . . . . . . . . . . . . . . 1-2
1.2.1 Servo amplifiers 200V . . . . . . . . . . . . . . . . . . . . . . . . . . . . . . . . . . . . . . . . . . . 1-2
1.2.2 Servo amplifiers 400V . . . . . . . . . . . . . . . . . . . . . . . . . . . . . . . . . . . . . . . . . . . 1-3
1.3
Model overview . . . . . . . . . . . . . . . . . . . . . . . . . . . . . . . . . . . . . . . . . . . . . . . . . . . . . 1-5
1.3.1
1.3.2
1.3.3
1.3.4
Servo amplifiers 200V . . . . . . . . . . . . . . . . . . . . . . . . . . . . . . . . . . . . . . . . . . . 1-5
Servo amplifiers 400V . . . . . . . . . . . . . . . . . . . . . . . . . . . . . . . . . . . . . . . . . . . 1-6
Rating plate . . . . . . . . . . . . . . . . . . . . . . . . . . . . . . . . . . . . . . . . . . . . . . . . . . . 1-6
Servo motors . . . . . . . . . . . . . . . . . . . . . . . . . . . . . . . . . . . . . . . . . . . . . . . . . . 1-7
1.4
Removal and reinstallation of the front cover. . . . . . . . . . . . . . . . . . . . . . . . . . . . . . 1-10
1.5
Operating elements . . . . . . . . . . . . . . . . . . . . . . . . . . . . . . . . . . . . . . . . . . . . . . . . . 1-13
1.5.1 Servo amplifier 200V . . . . . . . . . . . . . . . . . . . . . . . . . . . . . . . . . . . . . . . . . . . 1-13
1.5.2 Servo amplifier 400V . . . . . . . . . . . . . . . . . . . . . . . . . . . . . . . . . . . . . . . . . . . 1-17
1.5.3 Servo motor . . . . . . . . . . . . . . . . . . . . . . . . . . . . . . . . . . . . . . . . . . . . . . . . . . 1-21
1.6
Functions . . . . . . . . . . . . . . . . . . . . . . . . . . . . . . . . . . . . . . . . . . . . . . . . . . . . . . . . . 1-22
1.7
System configuration . . . . . . . . . . . . . . . . . . . . . . . . . . . . . . . . . . . . . . . . . . . . . . . . 1-23
1.7.1 Servo amplifiers 200V . . . . . . . . . . . . . . . . . . . . . . . . . . . . . . . . . . . . . . . . . . 1-23
1.7.2 Servo amplifier 400V . . . . . . . . . . . . . . . . . . . . . . . . . . . . . . . . . . . . . . . . . . . 1-27
2
Installation
2.1
General environmental conditions . . . . . . . . . . . . . . . . . . . . . . . . . . . . . . . . . . . . . . . 2-1
2.1.1 Installation of servo amplifiers . . . . . . . . . . . . . . . . . . . . . . . . . . . . . . . . . . . . . 2-2
2.1.2 Installation of servo motors . . . . . . . . . . . . . . . . . . . . . . . . . . . . . . . . . . . . . . . 2-4
3
Connection
3.1
Connection of servo amplifier. . . . . . . . . . . . . . . . . . . . . . . . . . . . . . . . . . . . . . . . . . . 3-1
3.1.1
3.1.2
3.1.3
3.1.4
3.2
No-fuse circuit breakers, fuses, magnetic contactors and cables . . . . . . . . . . 3-1
Control circuit and main circuit terminal block . . . . . . . . . . . . . . . . . . . . . . . . . 3-2
Signal lines. . . . . . . . . . . . . . . . . . . . . . . . . . . . . . . . . . . . . . . . . . . . . . . . . . . . 3-5
Interfaces . . . . . . . . . . . . . . . . . . . . . . . . . . . . . . . . . . . . . . . . . . . . . . . . . . . . . 3-7
Servo motor . . . . . . . . . . . . . . . . . . . . . . . . . . . . . . . . . . . . . . . . . . . . . . . . . . . . . . . 3-10
3.2.1 Connection of servo motors . . . . . . . . . . . . . . . . . . . . . . . . . . . . . . . . . . . . . . 3-10
3.2.2 Motor connector . . . . . . . . . . . . . . . . . . . . . . . . . . . . . . . . . . . . . . . . . . . . . . . 3-11
3.3
Internal circuit and common . . . . . . . . . . . . . . . . . . . . . . . . . . . . . . . . . . . . . . . . . . . 3-14
3.4
Grounding . . . . . . . . . . . . . . . . . . . . . . . . . . . . . . . . . . . . . . . . . . . . . . . . . . . . . . . . 3-15
3.5
Power supply . . . . . . . . . . . . . . . . . . . . . . . . . . . . . . . . . . . . . . . . . . . . . . . . . . . . . . 3-16
3.5.1 Connection example . . . . . . . . . . . . . . . . . . . . . . . . . . . . . . . . . . . . . . . . . . . 3-17
3.6
Alarm occurence timing chart. . . . . . . . . . . . . . . . . . . . . . . . . . . . . . . . . . . . . . . . . . 3-20
3.7
Servo motor with electromagnetic brake . . . . . . . . . . . . . . . . . . . . . . . . . . . . . . . . . 3-21
3.8
Examples of standard wiring diagrams . . . . . . . . . . . . . . . . . . . . . . . . . . . . . . . . . . 3-24
3.9
Station number setting . . . . . . . . . . . . . . . . . . . . . . . . . . . . . . . . . . . . . . . . . . . . . . . 3-27
MELSERVO J2-Super
IX
Contents
4
Operation
4.1
Points to check prior to starting operation . . . . . . . . . . . . . . . . . . . . . . . . . . . . . . . . . 4-1
4.2
Procedures before Operation. . . . . . . . . . . . . . . . . . . . . . . . . . . . . . . . . . . . . . . . . . . 4-3
4.2.1 Start up procedure . . . . . . . . . . . . . . . . . . . . . . . . . . . . . . . . . . . . . . . . . . . . . . 4-3
4.3
Display and Operation . . . . . . . . . . . . . . . . . . . . . . . . . . . . . . . . . . . . . . . . . . . . . . . . 4-5
4.3.1 Display sequence. . . . . . . . . . . . . . . . . . . . . . . . . . . . . . . . . . . . . . . . . . . . . . . 4-5
4.3.2 Indication list . . . . . . . . . . . . . . . . . . . . . . . . . . . . . . . . . . . . . . . . . . . . . . . . . . 4-6
4.4
Test operation mode . . . . . . . . . . . . . . . . . . . . . . . . . . . . . . . . . . . . . . . . . . . . . . . . . 4-7
4.4.1 Test operation procedure. . . . . . . . . . . . . . . . . . . . . . . . . . . . . . . . . . . . . . . . 4-10
4.5
Parameter . . . . . . . . . . . . . . . . . . . . . . . . . . . . . . . . . . . . . . . . . . . . . . . . . . . . . . . . 4-11
4.5.1 Parameter write inhibit . . . . . . . . . . . . . . . . . . . . . . . . . . . . . . . . . . . . . . . . . . 4-11
4.5.2 Parameter overview . . . . . . . . . . . . . . . . . . . . . . . . . . . . . . . . . . . . . . . . . . . . 4-12
4.5.3 Parameter description:. . . . . . . . . . . . . . . . . . . . . . . . . . . . . . . . . . . . . . . . . . 4-14
4.6
Gain . . . . . . . . . . . . . . . . . . . . . . . . . . . . . . . . . . . . . . . . . . . . . . . . . . . . . . . . . . . . . 4-23
4.6.1
4.6.2
4.6.3
4.6.4
4.6.5
4.6.6
Gain adjustment. . . . . . . . . . . . . . . . . . . . . . . . . . . . . . . . . . . . . . . . . . . . . . . 4-23
Gain adjustment using setup-software. . . . . . . . . . . . . . . . . . . . . . . . . . . . . . 4-25
Auto tuning. . . . . . . . . . . . . . . . . . . . . . . . . . . . . . . . . . . . . . . . . . . . . . . . . . . 4-26
Manual gain setting . . . . . . . . . . . . . . . . . . . . . . . . . . . . . . . . . . . . . . . . . . . . 4-30
Interpolation . . . . . . . . . . . . . . . . . . . . . . . . . . . . . . . . . . . . . . . . . . . . . . . . . . 4-33
Differences in auto tuning between MR-J2 and MR-J2S . . . . . . . . . . . . . . . . 4-34
5
Special adjustment functions
5.1
Filter functions . . . . . . . . . . . . . . . . . . . . . . . . . . . . . . . . . . . . . . . . . . . . . . . . . . . . . . 5-1
5.1.1 Machine resonance suppression filter . . . . . . . . . . . . . . . . . . . . . . . . . . . . . . . 5-2
5.1.2 Adaptive vibration suppression control . . . . . . . . . . . . . . . . . . . . . . . . . . . . . . 5-4
5.1.3 Low-pass filter . . . . . . . . . . . . . . . . . . . . . . . . . . . . . . . . . . . . . . . . . . . . . . . . . 5-6
6
Absolute position detection system
6.1
General description . . . . . . . . . . . . . . . . . . . . . . . . . . . . . . . . . . . . . . . . . . . . . . . . . . 6-1
6.1.1
6.1.2
6.1.3
6.1.4
6.1.5
6.1.6
Specifications . . . . . . . . . . . . . . . . . . . . . . . . . . . . . . . . . . . . . . . . . . . . . . . . . 6-1
System configuration . . . . . . . . . . . . . . . . . . . . . . . . . . . . . . . . . . . . . . . . . . . . 6-2
Communication overview. . . . . . . . . . . . . . . . . . . . . . . . . . . . . . . . . . . . . . . . . 6-2
Battery installation procedure . . . . . . . . . . . . . . . . . . . . . . . . . . . . . . . . . . . . . 6-3
Parameter setting. . . . . . . . . . . . . . . . . . . . . . . . . . . . . . . . . . . . . . . . . . . . . . . 6-4
Absolute position detection data . . . . . . . . . . . . . . . . . . . . . . . . . . . . . . . . . . . 6-5
7
Accessories
7.1
Optional accessories . . . . . . . . . . . . . . . . . . . . . . . . . . . . . . . . . . . . . . . . . . . . . . . . . 7-2
7.1.1
7.1.2
7.1.3
7.1.4
7.2
Regenerative brake option. . . . . . . . . . . . . . . . . . . . . . . . . . . . . . . . . . . . . . . . 7-2
Cables . . . . . . . . . . . . . . . . . . . . . . . . . . . . . . . . . . . . . . . . . . . . . . . . . . . . . . . 7-8
Confection diagram of encoder cables . . . . . . . . . . . . . . . . . . . . . . . . . . . . . . 7-9
Bus cable . . . . . . . . . . . . . . . . . . . . . . . . . . . . . . . . . . . . . . . . . . . . . . . . . . . . 7-10
Special accessories . . . . . . . . . . . . . . . . . . . . . . . . . . . . . . . . . . . . . . . . . . . . . . . . . 7-11
7.2.1 Transformer . . . . . . . . . . . . . . . . . . . . . . . . . . . . . . . . . . . . . . . . . . . . . . . . . . 7-11
X
Contents
8
Maintenance and Inspection
8.1
Inspection. . . . . . . . . . . . . . . . . . . . . . . . . . . . . . . . . . . . . . . . . . . . . . . . . . . . . . . . . . 8-1
8.2
Life . . . . . . . . . . . . . . . . . . . . . . . . . . . . . . . . . . . . . . . . . . . . . . . . . . . . . . . . . . . . . . . 8-1
9
Troubleshooting
9.1
Alarms and Warnings. . . . . . . . . . . . . . . . . . . . . . . . . . . . . . . . . . . . . . . . . . . . . . . . . 9-1
9.1.1 Alarms and warning list . . . . . . . . . . . . . . . . . . . . . . . . . . . . . . . . . . . . . . . . . . 9-1
9.1.2 Alarms . . . . . . . . . . . . . . . . . . . . . . . . . . . . . . . . . . . . . . . . . . . . . . . . . . . . . . . 9-3
9.1.3 Warnings . . . . . . . . . . . . . . . . . . . . . . . . . . . . . . . . . . . . . . . . . . . . . . . . . . . . 9-10
10
Specifications
10.1 Characteristics . . . . . . . . . . . . . . . . . . . . . . . . . . . . . . . . . . . . . . . . . . . . . . . . . . . . . 10-1
10.1.1Load diagram . . . . . . . . . . . . . . . . . . . . . . . . . . . . . . . . . . . . . . . . . . . . . . . . . 10-1
10.1.2Heat loss of servo amplifier . . . . . . . . . . . . . . . . . . . . . . . . . . . . . . . . . . . . . . 10-3
10.1.3Specifications of electromagnetic brake . . . . . . . . . . . . . . . . . . . . . . . . . . . . 10-4
10.1.4Dynamic braking . . . . . . . . . . . . . . . . . . . . . . . . . . . . . . . . . . . . . . . . . . . . . . 10-6
10.2 Standard specifications . . . . . . . . . . . . . . . . . . . . . . . . . . . . . . . . . . . . . . . . . . . . . . 10-9
10.2.1Servo amplifier . . . . . . . . . . . . . . . . . . . . . . . . . . . . . . . . . . . . . . . . . . . . . . . . 10-9
10.2.2Servo motor . . . . . . . . . . . . . . . . . . . . . . . . . . . . . . . . . . . . . . . . . . . . . . . . . 10-10
10.2.3Torque characteristics . . . . . . . . . . . . . . . . . . . . . . . . . . . . . . . . . . . . . . . . . 10-13
11
EMC Directives
11.1 Requirements. . . . . . . . . . . . . . . . . . . . . . . . . . . . . . . . . . . . . . . . . . . . . . . . . . . . . . 11-1
12
Dimensions
12.1 Servo amplifiers 200V . . . . . . . . . . . . . . . . . . . . . . . . . . . . . . . . . . . . . . . . . . . . . . . 12-1
12.2 Servo amplifiers 400V . . . . . . . . . . . . . . . . . . . . . . . . . . . . . . . . . . . . . . . . . . . . . . . 12-7
12.3 Servo motors . . . . . . . . . . . . . . . . . . . . . . . . . . . . . . . . . . . . . . . . . . . . . . . . . . . . . 12-10
12.3.1HC-MFS and HC-KFS series . . . . . . . . . . . . . . . . . . . . . . . . . . . . . . . . . . . . 12-10
12.3.2HC-SFS-Serie . . . . . . . . . . . . . . . . . . . . . . . . . . . . . . . . . . . . . . . . . . . . . . . 12-13
12.3.3HC-RFS series. . . . . . . . . . . . . . . . . . . . . . . . . . . . . . . . . . . . . . . . . . . . . . . 12-15
12.4 Regenerative brake resistor option . . . . . . . . . . . . . . . . . . . . . . . . . . . . . . . . . . . . 12-17
12.5 Transformer . . . . . . . . . . . . . . . . . . . . . . . . . . . . . . . . . . . . . . . . . . . . . . . . . . . . . . 12-18
MELSERVO J2-Super
XI
Contents
XII
Features and configuration
1
Introduction
1.1
Features and configuration
Introduction
Apart from possessing the functions of the servo amplifiers MR-J2-Series, the servo amplifiers
MR-J2-Super have additional features and functions.
The servo amplifiers MR-J2S-B and MR-J2S-B4 are designed for operation with a MitsubishiMotion-Controller via a serial bus (SSCNET). For this the servo amplifier reads in the position
data directly so that it can then execute the positioning process.
Through the specification of speed and direction of rotation via the command unit, precise
positioning is possible. To protect the power transistor against over-current resulting from great
accelerations or delays or overload the servo amplifier is equipped with a speed limitation
feature. The value for speed limitation can be varied and may be specified via an external
analogue input or a parameter.
The RS232C or RS422 interface permits serial communications between the servo amplifier
and a PC. Using the Windows-supported setup software, functions such as parameter setting,
test runs, status display, amplifier setting, etc. can be carried out. By means of real-time autotuning it is possible to undertake an automatic adjustment of the amplifier settings to the
machine.
The MR-J2-Super series servo motor is equipped with an absolute position encoder which has
the resolution of 131072 pulses/rev to ensure more accurate control as compared to the MR-J2
series.
Simply adding a battery to the servo amplifier makes up an absolute position detection system.
This makes home position return unnecessary at power-on or alarm occurrence by setting a
home position once.
MELSERVO J2-Super
1-1
Introduction
Function block diagram
1.2
Function block diagram
1.2.1
Servo amplifiers 200V
Regenerative brake option
Power supply
3-phase, 200-230VAC;
1-phase, 230VAC
Servo amplifier
I>
L1
I>
L2
I>
L3
P
C
Servo motor
D
U
Main circuit
U
V
V
W
W
M
Fan
MR-J2S-200B or more
L1 1
Control
circuit
power
supply
+
L2 1
24VDC
Regenerative
brake
Base
amplifier
Voltage
detection
Overcurrent
protection
Current
detection
Electromagnetic
brake
CN2
EMG
Encoder
Position
command
input
Virtual
encoder
Model position
control
Model speed
control
Virtual
motor
Model torque
Model
position
Model
speed
Actual position
control
Actual speed
control
Current
control
CON1
MR-BAT
I/F Control
R S -23 2C
C N 1A
Controller
or
servo amplifier
C N 1B
Servo amplifier
or
termination
connector
D /A
Optional battery
(for absolute position
detection system)
CN3
Analog monitor
(2 channels)
Personal computer
S001002C
Fig. 1-1: Block diagram for Servo amplifier MR-J2-Super
1-2
Up to 750 W a 1-phase power supply is possible. For details of connecting the power
supply please see section 3.5.
The connection of terminals shown for the optional regenerative braking resistor applies
exclusively to servo amplifiers MR-J2S-350B or smaller. For exact descriptions of the
wiring of terminals for other performance classes, please see tab. 3-4.
Function block diagram
1.2.2
Introduction
Servo amplifiers 400V
MR-J2S-200B4 or less
Regenerative
brake option
Power supply
3-phase, 380–480VAC
P
Servo amplifier
Servo motor
C D
I>
L1
U
U
I>
L2
V
V
I>
L3
W
W
Main circuit
M
Fan
Power
supply
24VDC
+
−
24 V • L 1 1
Control
circuit
power
supply
0 V • L 21
24V DC
Regenerative
brake
Base
amplifier
Voltage
detection
Overcurrent
protection
Current
detection
Electromagnetic
brake
CN2
EMG
Encoder
Position
command
input
Virtual
motor
Model position
control
Virtual
encoder
Model speed
control
Model torque
Model
position
Actual position
control
Model
speed
Actual speed
control
Current
control
CON1
MR-BAT
I/F Control
R S -23 2C
C N 1A
C N 1B
Controller
or
servo amplifier
Servo amplifier
or
termination
connector
D /A
Optional battery
(for absolute position
detection system)
CN3
Analog monitor
(2 channels)
Personal computer
S001250C
Fig. 1-2: Block diagram for Servo amplifier MR-J2-Super
When connecting an optional regeneration brake resistor, always remove the lead from
across the terminals P and D.
MELSERVO J2-Super
1-3
Introduction
Function block diagram
MR-J2S-350B4 to 700B4
Regenerative
brake option
Power supply
3-phase, 380–480VAC
Servoverstärker
I>
L1
I>
L2
I>
L3
P
C
Servo motor
N
U
Main circuit
U
V
V
W
W
M
Fan
Power
supply
24VDC
+
−
24 V • L 1 1
Control
circuit
power
supply
0 V • L 21
24VDC
Regenerative
brake
Base
amplifier
Voltage
detection
Overcurrent
protection
Current
detection
Electromagnetic
brake
CN2
EMG
Encoder
Position
command
input
Virtual
motor
Model position
control
Virtual
encoder
Model speed
control
Model torque
Model
position
Model
speed
Current
control
Actual speed
control
Actual position
control
CON1
MR-BAT
I/F Control
R S -23 2C
C N 1A
C N 1B
Controller
or
servo amplifier
Servo amplifier
or
termination
connector
D /A
Optional battery
(for absolute position
detection system)
CN3
Analog monitor
(2 channels)
Personal computer
Fig. 1-3: Block diagram for Servo amplifier MR-J2-Super
When connecting an optional regeneration brake resistor, always remove the lead from
across the terminals P and C.
1-4
Model overview
Introduction
1.3
Model overview
1.3.1
Servo amplifiers 200V
MITSUBISHI MELSERVO
MR-J2S-10A
MITSUBISHI MELSERVO
MR-J2S-10A
MR-J2S-100B or less
MR-J2S-200B/350B
MITSUBISHI MELSERVO
MR-J2S-500A
OPEN
MITSUBISHI MELSERVO
MR-J2S-500A
OPEN
OPEN
C
N
1
A
C
N
1
B
)
C
N
1
B
C
N
2
E
N
C
C
N
3
)
(
C
N
1
A
C
N
3
(
C
N
2
E
N
C
MR-J2S-700B
MR-J2S-500B
MR-J2-B
Compatible servo motors
Code
Series
HC-KFS
HC-MFS
HC-SFS
10
035/13
053/13
—
HC-RFS
—
20
23
23
—
—
40
43
43
—
—
60
—
—
52
—
70
73
73
—
—
100
—
—
102
—
200
—
—
152/202
103/153
350
—
—
352
203
500
—
—
502
353/503
700
—
—
702
—
S000847T, S000955T, S000913T, S000914T
Fig. 1-4: Model designation of servo amplifiers 200V
MELSERVO J2-Super
1-5
Introduction
1.3.2
Model overview
Servo amplifiers 400V
MR-J2S-200B4 or less
MR-J2S-350B4 and MR-J2S-500B4
MR-J2S- B4
Series
Code
Power supply
4
380–480VAC
Code
Compatible
servo motors
HC-SFS
MR-J2S-700B4
60
524
100
1024
200
1524/2024
350
3524
500
5024
700
7024
S001196C, S001060E, S001061E
Fig. 1-5: Model designation of servo amplifiers 400V
1.3.3
Rating plate
MITSUBISHI
AC SERVO
MODEL
Model
Capacity
MR-J2S-60B
POWER : 600 W
INPUT
: 3,2 A 3PH + 1PH 200 – 230 V 50Hz
3PH + 1PH 200 – 230 V 60Hz
5,5 A 1PH 230 V 50/60 Hz
OUTPUT: 170 V 0 – 300 Hz 3,6 A
SERIAL : TC3XXAAAAG52
Applicable power supply
Rated output current
Serial number
MITS UB ISHI E LE CTRIC CORP ORATION
MA DE IN JAPAN NB
S001001C
Fig. 1-6: Rating plate
1-6
Model overview
1.3.4
Introduction
Servo motors
HC-MFS series
HC-KFS series
HC-SFS series
HC-RFS series
S000849C
Fig. 1-7: Servo motors
Servo motors 200V
HC - MFS Motor series
HC-MFS
HC-KFS
HC-SFS
HC-RFS
Code
Electromagnetic
brake
—
—
B
✓
Code
Rated speed [r/min]
2
2000
3
3000
Code
Rated speed
[r/min]
Code
Rated
output [W]
05
50
10
1000
31
100
15
1500
2
200
20
2000
4
400
35
3500
5
500
50
5000
7
750
70
7000
Fig. 1-8: Model designation of servo motors 200V
MELSERVO J2-Super
1-7
Introduction
Model overview
Servo motors 400V
HC - SFS
4
Motor series
HC-SFS
Code
Electromagnetic
brake
—
—
B
✔
Code
Power supply
4
400 V
Code
Rated speed
[r/min]
2
2000
Code
Rated
output [W]
Code
Rated
output [W]
5
500
35
3500
10
1000
50
5000
15
1500
70
7000
20
2000
Fig. 1-9: Model designation of servo motors 400V
NOTE
1-8
All motors conform to the following standards: EN, UL, cUL
Model overview
Introduction
MITSUBISHI
AC SERVO MOTOR
Model
Serial number
Production date
HC-MFS23
SERIAL
DATE
MITSUBISHI ELECTRIC CORPORATIO N
S00805C
Fig. 1-10: Rating plate
MELSERVO J2-Super
1-9
Introduction
1.4
Removal and reinstallation of the front cover
Removal and reinstallation of the front cover
For models MR-J2S-200B or larger the front cover must be removed before the battery holder
and terminal strips for connecting the power supply of the motor TE1) and control voltage (TE2)
are accessible.
m
DANGER:
Prior to removing the front cover the power supply must be switched off and at least
10 minutes must then elapse. This time interval is required for the condensers to
discharge to a harmless voltage level after turning off the mains power supply.
Removal the front cover for MR-J2S-200B and MR-J2S-350B
Hold down the removing knob.
Pull the front cover toward you.
Abb. 1-11:
Removal the front cover
S000513C
Reinstallation the front cover for MR-J2S-200B and MR-J2S-350B
Insert the front cover hooks into the front cover sockets of the servo amplifier.
Press the front cover against the servo amplifier until the removing knob clicks.
Abb. 1-12:
Reinstallation the front cover
S000514C
1 - 10
Removal and reinstallation of the front cover
Introduction
Removal the front cover for MR-J2S-500B, MR-J2S-350B4 and MR-J2S-500B4
Hold down the removing knob.
Pull the front cover toward you.
Abb. 1-13:
Removal the front cover
S000909C
Reinstallation the front cover for MR-J2S-500B, MR-J2S-350B4 and MR-J2S-500B4
Insert the front cover hooks into the front cover sockets of the servo amplifier.
Press the front cover against the servo amplifier until the removing knob clicks.
Abb. 1-14:
Reinstallation the front cover
S000910C
MELSERVO J2-Super
1 - 11
Introduction
Removal and reinstallation of the front cover
Removal the front cover for MR-J2S-700B and MR-J2S-700B4
Press the lock on the side of the front cover inwards.
Put a finger in the recess in the middle of the front cover and pull it off to the front.
Abb. 1-15:
Removal the front cover
S000911C
Reinstallation the front cover for MR-J2S-700B and MR-J2S-700B4
Insert the front cover hooks into the front cover sockets of the servo amplifier.
Press the front cover against the servo amplifier until the removing knob clicks.
Abb. 1-16:
Reinstallation the front cover
S000912C
1 - 12
Operating elements
Introduction
1.5
Operating elements
1.5.1
Servo amplifier 200V
Servo amplifier MR-J2S-350B or less
3456
F0 12
MR-J2S-100B or less
3456
78
9A
F012
BC DE
BC DE
789A
MR-J2S-200B and MR-J2S-350B
S000970C
Fig. 1-17: Servo amplifier MR-J2S-350B or less
Name
Description
Reference
Battery holder
Contains the battery (optional) for absolute
position data backup.
Chap. 6
Battery connector (CON1)
Used to connect the battery.
Section 6.1.4
Display
The two-digit, seven-segment LED shows the
servo status and alarm number.
Section 4.3
Station number (CS1)
Switch to set the station number of the servo
amplifier.
Section 3.9
78
9A
B
C DE
3456
No.
F0 1 2
Tab. 1-1: Operating elements and their meaning
MELSERVO J2-Super
1 - 13
Introduction
Operating elements
MR-J2S-100B or less
MR-J2S-200B and MR-J2S-350B
S000512C
Fig. 1-18: Servo amplifier MR-J2S-350B or less
No.
Name
Description
Bus cable connector (CN1A)
Used to connect the servo system controller or Section 3.1.3
preceding axis servo amplifier.
Reference
Bus cable connector (CN1B)
Used to connect the subsequent axis servo
amplifier or termination connector (MR-A-TM)
Communication connector
(CN3)
Used to connect a personal computer or output Section 3.1.3
analog monitor data.
Name plate
—
Section 1.3.3
Encoder connector (CN2)
Used for connection of the servo motor
encoder.
Section 3.1.3
Charge lamp
Lit to indicate that the main circuit is charged.
While this lamp is lit, do not reconnect the
cables.
—
Main circuit terminal block
(TE1)
Used to connect the input power supply and
servo motor.
Section 3.1.2
Control circuit terminal block
(TE2)
Used to connect the control circuit power
supply and regenerative brake option.
Section 3.1.2
Protective earth terminal (PE)
Module grounding
Section 3.4
Fan
—
—
Section 3.1.3
Tab. 1-2: Operating elements and their meaning
b
1 - 14
CAUTION:
Any mixing up of the connectors CN1A, CN1B, CN3 and CN2 can lead to a shortcircuit
and damage to the inputs and outputs.
Operating elements
Introduction
Servo amplifier MR-J2S-500B and MR-J2S-700B
9A
DE
3456
78
BC
F012
S000971C
Fig. 1-19: Servo amplifier MR-J2S-500B and MR-J2S-700B
Name
Description
Reference
Battery holder
Contains the battery (optional) for absolute
position data backup.
Chap. 6
Battery connector (CON1)
Used to connect the battery.
Section 6.1.4
Display
The two-digit, seven-segment LED shows the
servo status and alarm number.
Section 4.3
Station number (CS1)
Switch to set the station number of the servo
amplifier.
Section 3.9
78
9A
B
C DE
3456
No.
F0 1 2
Tab. 1-3: Operating elements and their meaning
MELSERVO J2-Super
1 - 15
Introduction
Operating elements
S000916C
Fig. 1-20: Servo amplifier MR-J2S-500B and MR-J2S-700B
No.
Name
Description
Reference
Bus cable connector (CN1A)
Used to connect the servo system controller or Section 3.1.3
preceding axis servo amplifier.
Bus cable connector (CN1B)
Used to connect the subsequent axis servo
amplifier or termination connector (MR-A-TM)
Communication connector
(CN3)
Used to connect a personal computer or output Section 3.1.3
analog monitor data.
Name plate
—
Section 1.3.3
Encoder connector (CN2)
Used for connection of the servo motor
encoder.
Section 3.1.3
Charge lamp
Lit to indicate that the main circuit is charged.
While this lamp is lit, do not reconnect the
cables
—
Main circuit terminal block
(TE1)
Used to connect the input power supply and
servo motor.
Section 3.1.2
Control circuit terminal block
(TE2)
Used to connect the control circuit power
supply and regenerative brake option.
Section 3.1.2
Protective earth terminal (PE)
Module grounding
Section 3.4
Fan
—
—
Section 3.1.3
Tab. 1-4: Operating elements and their meaning
b
1 - 16
CAUTION:
Any mixing up of the connectors CN1A, CN1B, CN3 and CN2 can lead to a shortcircuit
and damage to the inputs and outputs.
Operating elements
1.5.2
Introduction
Servo amplifier 400V
Servo amplifier MR-J2S-60B4 to MR-J2S-200B4
9A
F 012
CHARGE
LED1 LED2
DE
3456
78
BC
SW1
S001238C
Fig. 1-21: Servo amplifier MR-J2S-60B4 to MR-J2S-200B4
Name
Description
Reference
Battery holder
Contains the battery (optional) for absolute
position data backup.
Chap. 6
Battery connector (CON1)
Used to connect the battery.
Section 6.1.4
Display
The five-digit, seven-segment LED shows the
servo status and alarm number.
Section 4.3
Charge lamp
Lit to indicate that the main circuit is charged.
While this lamp is lit, do not reconnect the
cables
—
Station number (CS1)
Switch to set the station number of the servo
amplifier.
Section 3.9
789A
B
CDE
3 456
No.
F 012
Tab. 1-5: Operating elements and their meaning
MELSERVO J2-Super
1 - 17
Introduction
Operating elements
S001198C
Fig. 1-22: Servo amplifier MR-J2S-60B4 to MR-J2S-200B4
No.
Name
Description
Reference
Main circuit connector (CNP1)
Used to connect the input power supply
Section 3.1.3
Bus cable connector (CN1A)
Used to connect the servo system controller Section 3.1.3
or preceding axis servo amplifier.
Bus cable connector (CN1B)
Used to connect the subsequent axis servo
amplifier or termination connector
(MR-A-TM)
Section 3.1.3
Encoder connector (CN2)
Used for connection of the servo motor
encoder.
Section 3.1.3
Communication connector (CN3)
Used to connect a personal computer or
output analog monitor data.
Section 3.1.3
Name plate
—
Section 1.3.3
Regeneration connector
Used to connect the regeneration brake
option.
—
Control circuit terminal block (CN4) Used to connect the control circuit power
supply.
Section 3.1.2
Motor power supply connector
(CNP3)
Used to connect the servo motor
Section 3.1.2
Protective earth terminal (PE)
Module grounding
Section 3.4
Fan
—
—
Tab. 1-6: Operating elements and their meaning
b
1 - 18
CAUTION:
Any mixing up of the connectors CN1A, CN1B, CN2 and CN3 can lead to a shortcircuit
and damage to the inputs and outputs.
Operating elements
Introduction
Servo amplifier MR-J2S-350B4 to MR-J2S-700B4
CDE
3456
7 89 A
B
F 01 2
S000971C
Fig. 1-23: Servo amplifier MR-J2S-350B4 to MR-J2S-700B4
Name
Description
Reference
Battery holder
Contains the battery (optional) for absolute
position data backup.
Chap. 6
Battery connector (CON1)
Used to connect the battery.
Section 6.1.4
Display
The five-digit, seven-segment LED shows the
servo status and alarm number.
Section 4.3
Station number (CS1)
Switch to set the station number of the servo
amplifier.
Section 3.9
789A
B
CDE
3 456
No.
F 012
Tab. 1-7: Operating elements and their meaning
MELSERVO J2-Super
1 - 19
Introduction
Operating elements
MR-J2S-350B4 and MR-J2S-500B4
MR-J2S-700B4
S000916C
Fig. 1-24: Servo amplifier MR-J2S-350B4 to MR-J2S-700B4
No.
Name
Description
Reference
Bus cable connector (CN1A)
Used to connect the servo system controller Section 3.1.3
or preceding axis servo amplifier.
Bus cable connector (CN1B)
Used to connect the subsequent axis servo
amplifier or termination connector
(MR-A-TM)
Section 3.1.3
Communication connector (CN3)
Used to connect a personal computer or
output analog monitor data.
Section 3.1.3
Name plate
—
Section 1.3.3
Encoder connector (CN2)
Used for connection of the servo motor
encoder.
Section 3.1.3
Charge lamp
Lit to indicate that the main circuit is
charged. While this lamp is lit, do not
reconnect the cables
—
Control circuit terminal block (TE2)
Used to connect the control circuit power
supply.
Section 3.1.2
Main circuit terminal block (TE1)
Used to connect the input power supply,
regenerative brake option and servo motor.
Section 3.1.2
Protective earth terminal (PE)
Module grounding
Section 3.4
Fan
—
—
Tab. 1-8: Operating elements and their meaning
b
1 - 20
CAUTION:
Any mixing up of the connectors CN1A, CN1B, CN2 and CN3 can lead to a shortcircuit
and damage to the inputs and outputs.
Operating elements
1.5.3
Introduction
Servo motor
S000882C
Fig. 1-25: Servo motor
No.
Name
Description
Reference
Encoder connector
Cable for connection of encoders
Section 7.1.3
Power supply connector, brake Power supply cable (U, V, W), Earth cable,
Brake (for motor with electromagnetic brake)
Section 3.2
Servo motor shaft
Section 2.1.2
Shaft of servo motor
Tab. 1-9: Operating elements and their meaning
MELSERVO J2-Super
1 - 21
Introduction
1.6
Functions
Functions
Function
Description
Reference
High-resolution encoder
Motor encoder has a resolution of 131072 pulses/rev.
—
Absolute position detection
system
Merely setting a home position once makes home
position return unnecessary at every power-on.
Chap. 6
Adaptive vibration suppression
control
Servo amplifier detects mechanical resonance and
sets filter characteristics automatically to suppress
mechanical vibration.
Section 5.1.2
Vibration suppression control
Vibrations with an amplitude of ±1 impulse on stopping Parameter 24
the servo motor are suppressed.
Low-pass filter
Suppresses high-frequency resonance which occurs
as servo system response is increased.
Section 5.1.3
Machine analyzer function
By attaching the MR-J2-Super to a PC on which the
setup software is installed, the frequency
characteristics of the mechanical system can be
recorded.
—
Machine simulation
Can simulate machine motions on a personal computer —
screen on the basis of the machine analyser results.
Gain search function
Personal computer changes gains automatically and
searches for overshoot-free gains in a short time.
Real-time auto tuning
Automatically adjusts the gain to optimum value if load Section 4.6.3
applied to the servo motor shaft varies.
This function is more powerful on the MR-J2-Super
than on the MR-J2.
Analog monitor output
Servo status is output in terms of voltage in real time.
Parameter 22
Torque limit
Servo motor torque can be limited to any value.
Parameter 10, 11
Forced stop
The external EMERGENCY OFF signal (EM1) can be
released internally.
Parameter 23
Forced output signal
Output signal can be forced on/off independently of the Section 4.4
servo status.
Use this function for output signal wiring check, etc.
Test operation mode
The servo motor can be operated from the servo
amplifier without a start signal.
Section 4.4
Regenerative brake option
Used when the built-in regenerative brake resistor of
the servo amplifier does not have sufficient
regenerative capability for the regenerative power
generated.
Section 7.1.1
Setup software
Using a personal computer, parameter setting, test
operation, status display, etc. can be performed.
—
Tab. 1-10: Function description
1 - 22
—
System configuration
1.7
b
1.7.1
Introduction
System configuration
CAUTION:
To prevent an electric shock, always connect the protective earth (PE) terminal of the
servo amplifier to the protective earth (PE) of the control box.
Servo amplifiers 200V
System configuration for MR-J2S-100B or less
Serco system
controller
or
preceding axis
servo amplifier
Power supply
No-fuse circuit
breaker
Servo amplifier
Subsequent
axis servo
amplifier
or
termination
connector
Magnetic
contactor
Personal computer (optional)
Protective earth terminal
Regenerative brake option
Encoder cable
Servo motor
power supply
Servo motor
S001003C
Fig. 1-26: Overview of the system configuration for MR-J2S-100B or less
NOTE
A listing of options and auxillary equipment can be find in Tab. 1-11 on page 1-26.
MELSERVO J2-Super
1 - 23
Introduction
System configuration
System configuration for MR-J2S-200B and MR-J2S-350B
Power supply
Serco system
controller
or
preceding axis
servo
amplifier
Servo amplifier
No-fuse circuit
breaker
Subsequent
axis servo
amplifier
or
termination
connector
Magnetic
contactor
Personal computer (optional)
Protective
earth terminal
Regenerative brake
option
Encoder cable
Servo motor
power supply
Servo motor
S001004C
Fig. 1-27: Overview of the system configuration for MR-J2S-200B and MR-J2S-350B
NOTE
1 - 24
A listing of options and auxillary equipment can be find in Tab. 1-11 on page 1-26.
System configuration
Introduction
System configuration for MR-J2S-500B
Power supply
No-fuse circuit
breaker
Serco system
controller
or
preceding
axis servo
amplifier
CN1A
Subsequent
axis servo
amplifier
or
termination
connector
Magnetic
contactor
CN1B
L1, L2, L3
Regenerative
brake option
CN3
P, C
Protective
earth terminal
Personal computer (optional)
L21, L11
CN2
Servo motor
power supply
Encoder cable
Servo motor
S001005C
Fig. 1-28: Overview of the system configuration for MR-J2S-500B
NOTE
A listing of options and auxillary equipment can be find in Tab. 1-11 on page 1-26.
MELSERVO J2-Super
1 - 25
Introduction
System configuration
System configuration for MR-J2S-700B
Power supply
Serco system
controller
or
preceding
axis servo
amplifier
No-fuse circuit
breaker
CN1A
Subsequent
axis servo
amplifier
or
termination
connector
CN1B
Magnetic
contactor
CN3
L21, L11
Personal computer (optional)
P, C
CN2
Protective
earth terminal
L1, L2, L3
Regenerative
brake option
Encoder cable
Servo motor
power supply
Servo motor
S001006C
Fig. 1-29: Overview of the system configuration for MR-J2S-700B
Options and auxiliary equipment
No-fuse circuit breaker
Section 3.1.1
Magnetic contactor
Section 3.1.1
Regenerative brake option
Section 7.1.1
Cables
Section 7.1.2
Power factor improving reactor (UE/UA = 400V/230V)
Section 7.2.1
Tab. 1-11: Options and auxiliary equipment
1 - 26
Reference
System configuration
1.7.2
Introduction
Servo amplifier 400V
System configuration for MR-J2S-200B4 or less
Power supply
No-fuse
circuit breaker
Serco system
controller
or
preceding
axis servo
amplifier
Subsequent
axis servo
amplifier
or
termination
connector
CN1A
CN1B
Servo amplifier
Magnetic
contactor
CN3
L1, L2, L3
Personal computer
Regenerative
brake option
P, C
CN4
+
-
Power
supply
24VDC
Circuit protector
CN2
Protective earth terminal
Servo motor
power supply
Encoder cable
Servo motor
S001252C
Fig. 1-30: Overview of the system configuration for MR-J2S-200B4 or less
NOTE
A listing of options and auxillary equipment can be find in Tab. 1-12 on page 1-29.
MELSERVO J2-Super
1 - 27
Introduction
System configuration
System configuration for MR-J2S-350B4 and MR-J2S-500B4
Power supply
No-fuse circuit
breaker
Serco system
controller
or
preceding
axis servo
amplifier
Subsequent
axis servo
amplifier
or
termination
connector
CN1A
CN1B
Servo amplifier
Magnetic
contactor
CN3
L1, L2, L3
Regenerative
brake option
Personal computer
P, C
+
-
Power
supply
24VDC
Circuit protector
Protective earth
terminal
CN2
Servo motor
power supply
Encoder cable
Servo motor
S001253C
Fig. 1-31: Overview of the system configuration for MR-J2S-350B4 and MR-J2S-500B4
NOTE
1 - 28
A listing of options and auxillary equipment can be find in Tab. 1-12 on page 1-29.
System configuration
Introduction
System configuration for MR-J2S-700B4
Power supply
Serco system
controller
or
preceding
axis servo
amplifier
CN1A
No-fuse circuit
breaker
Subsequent
axis servo
amplifier
or
termination
connector
CN1B
Servo amplifier
CN3
Magnetic
contactor
Personal computer
+ Power
supply
- 24VDC
Circuit protector
P, C
L1, L2, L3
CN2
Protective earth terminal
Regenerative
brake option
Encoder cable
Servo motor
power supply
Servo motor
S001254C
Fig. 1-32: Overview of the system configuration for MR-J2S-700B4
Options and auxiliary equipment
Reference
No-fuse circuit breaker
Section 3.1.1
Magnetic contacto
Section 3.1.1
Regenerative brake option
Section 7.1.1
Cables
Section 7.1.2
Tab. 1-12: Options and auxiliary equipment
MELSERVO J2-Super
1 - 29
Introduction
1 - 30
System configuration
General environmental conditions
Installation
2
Installation
2.1
General environmental conditions
b
CAUTION:
● The equipment must be installed in the specified direction. Otherwise, a fault may
occur.
● Leave specified clearances between the servo amplifier and control box inside
walls or other equipment.
Environmental conditions
Data
Servo amplifier
Ambient temperature during operation 0 to +55°C (non-freezing)
Servo motor
0 to +40°C (non-freezing)
Ambient humidity during operation
Max. 90% (no condensation)
Max. 80% (no condensation)
Ambient temperature in storage
−20 to +65°C
−15 to +70°C
Max. 90% (no condensation)
Ambient humidity in storage
Max. 90% (no condensation)
Ambience
Indoors (no direct sunlight); no corrosive gas, no inflammable gas, no oil
mist, no dust)
Altitude above sea level
Max. 1000m
Protective structure
IP00
HC-KFS/MFS: IP55,
HC-SFS/RFS: IP65
Vibration
Max. 5.9m/s² (0,6 g)
Section 2.1.2
Tab. 2-1: Environmental condition overview
MELSERVO J2-Super
2-1
Installation
2.1.1
b
General environmental conditions
Installation of servo amplifiers
CAUTION:
● When installing the unit in a control box, prevent drill chips and wire fragments
from entering the servo amplifier.
● Prevent oil, water, metallic dust, etc. from entering the servo amplifier through
openings in the control box or a fan installed on the ceiling.
Installation of one servo amplifier
The servo amplifier must be installed as shown in the following diagram, upright on a vertical and
smooth wall.
Control box
Control box
C
M ITS U B IS H I
To p
A
O PEN
C
N
1
B
C
N
2
E
N
C
C
N
3
B
(
)
B
C
N
1
A
L1 L2 L3
B ottom
U
V
W
D
S000520C
Fig. 2-1: Installation direction and clearances
Minimal installation clearance [mm]
Servo amplifier
A
Servo amplifiers 200V
70
Servo amplifiers 400V
75 B
C
10
40
40
Tab. 2-2: Minimal installation clearance
2-2
D
The distance A for the servo amplifier MR-J2S-700B4 is 70mm.
120
General environmental conditions
Installation
Installation of two or more servo amplifiers and other equipment
Leave a large clearance between the top of the servo amplifier and the internal surface of the
control box. Due to the power loss of the units it must be ensured that the internal temperature
of the control cabinet does not exceed the ambient temperature of +55 °C allowed for the servo
amplifier. If necessary, the control cabinet will have to be ventilated. In this case, however, the
servo amplifier must not be installed in the flow of coolant of some other operating agent. The
fan(s) in the forced-cooling housing must be installed taking into account the provision of an
optimum supply of cool air.
For details of the heat dissipation of control cabinets and housings please see the
manufacturer’s specifications.
When using heat generating equipment such as the regenerative brake option, install them with
full consideration of heat generation so that the servo amplifier is not affected.
C
M ITS UB IS HI
M ITS UB IS HI
O PEN
C
N
2
E
N
C
C
N
3
B
A
(
(
)
C
N
1
B
)
A
O PEN
C
N
1
A
L1 L2 L3
L1 L2 L3
U
U
V
W
V
W
D
S000521C
Fig. 2-2: Installation of two or more servo amplifiers
Minimal installation clearance [mm]
Servo amplifier
A
B
C
30
10
100
Servo amplifiers 200V
Servo amplifiers 400V
D
40
120
Tab. 2-3: Minimal installation clearance
MELSERVO J2-Super
2-3
Installation
2.1.2
General environmental conditions
Installation of servo motors
Safety instructions
b
CAUTION:
● Do not hold the cable, shaft or encoder to carry the servo motor. Otherwise, a fault
or injury may occur.
● Securely fix the servo motor to the machine. If fixed insecurely, the servo motor
will come off during operation, leading to injury.
● When coupling the shaft end of the servo motor, do not subject the shaft end to
impact, such as hammering. The encoder may become faulty.
● Secure the motor shaft and rotating parts against access through appropriate
covers.
● Do not subject the servo motor shaft to more than the permissible load. Otherwise,
the shaft may break, leading to injury.
Instructions for the protection of the servo motor shaft
● When mounting a pulley to the servo motor shaft provided with a keyway, use the screw
hole in the shaft end (refer fig. 2-3). To fit the pulley, first insert a double-end stud into the
screw hole of the shaft, put a washer against the end face of the coupling, and insert and
tighten a nut to force the pulley in.
Under no circumstances must you use a hammer for installation work on the servo motor
shaft.
Servo motor
Nut
Double-end stud
Pulley
Washer
S000522C
Fig. 2-3: Installing a pulley
● For servo motors with the shaft without a keyway, use a friction coupling or the like.
● When removing the pulley, use a pulley remover to protect the shaft or the motor from impact.
● The orientation of the encoder on the servo motor cannot be changed.
2-4
General environmental conditions
Installation
● For installation of the servo motor, use spring washers, etc. and fully tighten the bolts so
that they do not become loose due to vibration.
● When using a pulley, a chain wheel or synchronising pulley select a diameter that will not
exceed the permissible radial load (see table below).
● Do not use any inelastic, rigid connections that may lead to excessive bending moments to
the shaft and thus cause the shaft to break.
Servo motor
HC-MFS
HC-KFS
L [mm]
Permissible radial load [N]
Permissible thrust load [N]
053/13
25
88
59
23/43
30
245
98
73
40
392
147
053/13
25
88
59
23/43/73
30
245
98
55
980
490
79
2058
980
103 to 203
45
686
196
353/503
63
980
392
52 to 152
HC-SFS
524 to 1524
202 to 702
2024 to 7024
HC-RFS
Tab. 2-4: Permitted radial load and axial load of servo motor
L
Radial load
Thrust load
L: Distance from flange mounting surface to load center
S000523C
Fig. 2-4: Directions of action of forces on the servo motor
MELSERVO J2-Super
2-5
Installation
General environmental conditions
Vibration
Servo motor
Vibration
HC-KFS
HC-MFS
X, Y: 49m/s2 (5g)
(refer fig. 2-6)
HC-SFS52 to 152
HC-SFS524 to 1524
HC-RFS
X, Y: 24.5m/s2 (2.5g)
(refer fig. 2-6)
HC-SFS202, 352
HC-SFS2024, 3524
X: 24.5m/s2 (2.5g)
Y: 49m/s2 (5g)
(refer fig. 2-6)
HC-SFS502, 702
HC-SFS5024, 7024
X: 24.5m/s2 (2.5g)
Y: 29.4m/s2 (3g)
(refer fig. 2-6)
Fig. 2-5: Vibration resistance of the servo motors
Servo motor
Y
X
S000518C
Vibration amplitude in X and Y direction [mm]
Fig. 2-6: Vibration directions on the servo motor
200
100
80
60
50
40
30
20
500 1000 1500 2000 2500 3000 3500
Speed [r/min]
S000519C
Fig. 2-7: Graphic representation of the vibration amplitudes of the servo motor
2-6
General environmental conditions
Installation
Protection from oil and water
When the gear box is mounted horizontally, the oil level in the gear box should always be lower
than the oil seal lip on the servo motor shaft. If it is higher than the oil seal lip, oil will enter the
servo motor, leading to a fault. Make sure there is a ventilation hole in the gear box to prevent
any pressure build up in the gear box.
The following table presents an overview of the minimum clearances between the oil level and
the servo motor shaft centre:
Servo motor
Height above oil level [mm]
52 to 152
HC-SFS
20
524 to 1524
202 to 702
25
2024 to 7024
HC-RFS
103 to 503
20
Tab. 2-5: Minimum clearances between the oil level and the servo motor shaft centre
Gear
Servo motor
Height above oil level
h
Lip
V ring
S000525C
Fig. 2-8: Arrangement
b
CAUTION:
The servo motors in the HC-MFS- and KC-KFS-Series do not have any oil seal on the
shaft. Here the sealing must occur on the gear side.
MELSERVO J2-Super
2-7
Installation
General environmental conditions
When installing the servo motor horizontally, face the power cable and encoder cable
downward. When installing the servo motor vertically, lay the cables with an adequate cable trap
to avoid mechanical load on the cable and motor.
Cable trap
S000526C
Fig. 2-9: Installing the servo motor horizontally and vertically showing cable trap
Make sure that the cables leading to the servo motor does not pass through oil or water. Due to
the effects of capillarity, oil or water could get into the motor via the cables.
Box
Servo
motor
Oil-/water pool
Incorrect! Cable trap
S000527C
Fig. 2-10: Do not lay the cables to the motor in oil or water
When the servo motor is to be installed with the shaft end at top, provide measures so that it is
not exposed to oil and water entering from the machine side, gear box, etc.
2-8
General environmental conditions
Installation
Gear
Lubricating oil
Servo motor
S000528C
Fig. 2-11: Installation of the motor with the shaft at the top
In general the installation of the servo motor can be in any desired location or position. When the
servo motor with electromagnetic brake is installed with the shaft end at top, the brake plate may
generate sliding sound but it is not a fault.
Laying the cables
The way of clamping the cable must be fully examined so that flexing stress and the cable's own
weight stress are not applied to the cable connection.
In situations where the servo motor moves, the cable must not be under tension. If the cables
are laid in a cable duct, there must be a sufficient amount of play in the cable lengths of the motor
and encoder cables.
The flexing service life of encoder cables is presented in fig. 2-12. The useful service life of the
encoder cable MR-JCCBLmM-L will be at an end after flexing 5000 times with a flexing radius
of 60 mm. In practice you should plan to have a certain safety margin. For installation on a
machine where the servo motor will move, the flexing radius should be made as large as
possible.
Number of flexings
1 × 10⁸
7
5 × 10
1 × 10⁷
6
5 × 10
High-flexible
encoder cable
MR-JCCBLM-H
MR-JHSCBLM-H
MR-ENCBLM-H
1 × 10⁶
5
5 × 10
Standard encoder cable
MR-JCCBLM-L
MR-JHSCBLM-L
1 × 10⁵
5 × 10⁴
1 × 10⁴
3
5 × 10
3
1 × 10
4
7 10
20
40
70 100
200
Flexing radius [mm]
S000529C
Fig. 2-12: Number of flexings depending on the flexing radius
MELSERVO J2-Super
2-9
Installation
2 - 10
General environmental conditions
Connection of servo amplifier
Connection
3
Connection
3.1
Connection of servo amplifier
b
3.1.1
CAUTION:
Only the voltage stated may be connected to the relevant terminals. An incorrect
voltage can lead to damage to the servo amplifier.
No-fuse circuit breakers, fuses, magnetic contactors and cables
The terminal strips for mains and motor connections become visible after opening the flap on the
front cover (MR-J2S-100B or less) or after removing the front cover (MR-J2S-200B or larger and
MR-J2S-350B4 or larger). Mains power is connected via terminals L1, L2 and L3. In the case of
200V models up to 750W a 1-phase connection is possible.
Connect the motor to the output terminals U, V and W.
For a description of the terminals for the power connections see Tab. 3-4 and Tab. 3-5 on page
3-4.
The following accessories in this section are to be used for the operation of the servo amplifier
and servo motor:
Injection
Servo amplifier 400V
Servo amplifier 200V
Servo amplifier
Dimensions [mm²]
U-V-W
Electromagnetic
brake
1.5
1.5
1.5
1.5
1.5
1.5
1.5
S-N10
1.5
1.5
1.5
1.5
S-N10
1.5
1.5
1.5
1.5
S-N10
1.5
1.5
1.5
1.5
S-N10
1.5
1.5
2.5
1.5
S-N18
2.5–4
1.5
4
1.5
S-N20
4–6
1.5
6
1.5
S-N35
4–6
1.5
6
1.5
No-fuse ciruit
breaker
Fuse
Magnetic
contactor
MR-J2S-10B
NF30, 5 A
16 A
S-N10
1.5
MR-J2S-20B
NF30, 5 A
16 A
S-N10
MR-J2S-40B
NF30, 10 A
16 A
MR-J2S-60B
NF30, 15 A
16 A
MR-J2S-70B
NF30, 15 A
16 A
MR-J2S-100B
NF30, 15 A
16 A
MR-J2S-200B
NF30, 20 A
20 A
MR-J2S-350B
NF30, 20 A
25 A
MR-J2S-500B
NF50, 50 A
50 A
L1-L2-L3 L11-L21
MR-J2S-700B
NF100, 75 A
50 A
S-N50
10
1.5
10
1.5
MR-J2S-60B4
NF30, 5 A
16 A
S-N10
1.5
1.5
1.5
1.5
MR-J2S-100B4 NF30, 10 A
16 A
S-N10
1.5
1.5
1.5
1.5
MR-J2S-200B4 NF30, 15 A
16 A
S-N10
1.5
1.5
1.5
1.5
MR-J2S-350B4 NF30, 20 A
20 A
S-N18
2.5–4
1.5
4
1.5
MR-J2S-500B4 NF30, 20 A
25 A
S-N20
4–6
1.5
6
1.5
MR-J2S-700B4 NF50, 50 A
50 A
S-N35
4–6
1.5
6
1.5
Tab. 3-1: Required equipment
MELSERVO J2-Super
3-1
Connection
3.1.2
Connection of servo amplifier
Control circuit and main circuit terminal block
Connectors
Servo amplifier
Main circuit/control circuit/
brake restistor/brake unit
TE1
MR-J2S-10B
to
MR-J2S-60B
Protective earth PE
TE2
L1 L2 L3
Front of
device
U
Back of
device
D
C
P
V W
L
L
S001222C
TE1
TE2
TE1
D
Front of
device
L1 L2 L3
MR-J2S-70B
MR-J2S-100B
C
P
TE2
PE
U
L
V W
Back of
device
L
N
Servo amplifier 200V
S000919C
S001223C
TE1
MR-J2S-200B
MR-J2S-350B
S000539C
S000540C
TE2
TE2
TE1
L1 L2 L3 U V W
L11 L21 D
P
C
N
PE
S000920C
S001224C
TE1
TE1
MR-J2S-500B
S000541C
Mounting screw for interna
brake resistor cable in the
event it is not used
TE2
L1
L11
L2
L3
L21
C
P
TE2
PE
N
U
V
W
S000921C
S001225C
S000925C
Mounting screw for internal
brake resistor cable in the
event it is not used
TE1
TE2
TE2
MR-J2S-700B
L11
L21
L1 L2 L3 C P
N U V W
TE1
PE
S000922C
Tab. 3-2: Terminals of servo amplifier 200V
3-2
S001226C
S000927C
Connection of servo amplifier
Connection
Connectors
Servo amplifier
Main circuit/control circuit/
brake restistor/brake unit
CNP1
CHARGE
CNP3
CN4
OPEN
CNP1
C
N
1
A
C
N
1
B
L1
L1
P
U
24 V/L11
L2
C
V
0 V/L21
L3
D
W
L2
L3
P
C
N
2
E
N
C
C
CNP2
D
C
N
3
(
(
MR-J2S-60B4
to
MR-J2S-200B4
CNP2
Protective earth PE
N
24V
L11
U
CNP3
V
N
0V
L21
W
PE
S001204C
S001227C
Servo amplifier 400V
TE1
TE1
MR-J2S-350B4
to
MR-J2S-500B4
S001208C
Mounting screw for interna
brake resistor cable in the
event it is not used
TE2
L1
24 V/L11
L2
L3
0 V/L21
C
P
TE2
PE
N
U
V
W
S000921C
S001228C
S000925C
Mounting screw for internal
brake resistor cable in the
event it is not used
TE1
TE2
TE2
MR-J2S-700B4
24 V/L11
0 V/L21
L1 L2 L3 C P
N U V W
TE1
PE
S000922C
S001229C
S000927C
Tab. 3-3: Terminals of servo amplifier 400V
MELSERVO J2-Super
3-3
Connection
Connection of servo amplifier
Main circuit terminal overview for MR-J2S-60B to MR-J2S-700B
Terminal
Signal
Description
L1, L2, L3 Main circuit power supply The rated voltage range is 3-phase 200 to 230V AC, 50/60 Hz. Up to 750 W
a 1-phase power supply is possible.
L11, L21
Control circuit power
supply
The rated voltage range is 1-phase 200 to 230V AC, 50/60 Hz. Here L11
must be equal in phase to L1 and L21 equal in phase to L2.
N
Brake unit option
When using the optional brake unit, connect it across the terminals P and N.
Before connecting the optional brake unit, you must disconnect the internal
brake resistor across the terminals P and C.
Do not connect a optional brake unit to the servo amplifier of MR-J2S-350B
or less.
P, C, D
Regenerative brake
option/brake unit
MR-J2S-350B or less
The terminals P and D are factory-connected. When connecting an optional
regenerative brake, always disconnect the cable connection across P and D.
Connect the optional regenerative brake across the terminals P and C.
Do not connect a optional brake unit to the servo amplifier of MR-J2S-350B
or less.
MR-J2S-500B or more
When connecting an optional regenerative brake or brake unit, always
disconnect the cable connection across P and C of the internal brake
resistor.
Connect the optional regenerative brake across the terminals P and C.
When using the optional brake unit, connect it across the terminals P and N.
U, V, W
Servo motor output
Connect to the servo motor power supply terminals U, V, W.
PE
Protective earth
Connect this terminal to the protective earth (PE) terminals of the servo
motor and control box for grounding.
Tab. 3-4: Signal overview (MR-J2S-60B to MR-J2S-700B)
Main circuit terminal overview for MR-J2S-60B4 to MR-J2S-700B4
Terminal
Signal
Description
L1, L2, L3 Main circuit power supply The rated voltage range is 3-phase 380 to 480V AC, 50/60Hz.
24V/L11,
0V/L21
Control circuit power
supply
Connect a 24VDC source here. Make sure that the plus pole of the DC
source is connected to terminal 24V/L11 and the minus pole of the DC
source to terminal 0V/L21.
N
Brake unit option
When using the optional brake unit, connect it across the terminals P and N.
Before connecting the optional brake unit, you must disconnect the internal
brake resistor across the terminals P and C.
Do not connect a optional brake unit to the servo amplifier of MR-J2S-200B4
or less.
P, C, D
Regenerative brake
option/brake unit
MR-J2S-200B4 or less
The terminals P and D are factory-connected. When connecting an optional
regenerative brake, always disconnect the cable connection across P and D.
Connect the optional regenerative brake across the terminals P and C.
Do not connect a optional brake unit to the servo amplifier of MR-J2S-200B4
or less.
MR-J2S-350B4 or more
When connecting an optional regenerative brake or brake unit, always
disconnect the cable connection across P and C of the internal brake
resistor.
Connect the optional regenerative brake across the terminals P and C.
When using the optional brake unit, connect it across the terminals P and N.
U, V, W
Servo motor output
Connect to the servo motor power supply terminals U, V, W.
PE
Protective earth
Connect this terminal to the protective earth (PE) terminals of the servo
motor and control box for grounding.
Tab. 3-5: Signal overview (MR-J2S-60B4 to MR-J2S-700B4)
3-4
Connection of servo amplifier
3.1.3
Connection
Signal lines
The servo amplifier has four signal connectors. You will find the pin configuration of the
connectors on the next page.
CN1A
1
2
RD
LG
3
4
TD
6
11
12
RD*
5
LG
TD*
16
EMG
RD
13
BT
TD
15
6
LG
19
10
LG
3
4
LG
RXD
13
4
MO1
15
6
16
6
MD
MDR
LA
8
7
MR
9
10
BAT
18
P5
20
13
14
5
LG
TD*
16
EMG
BT
15
LG
17
18
EMG*
19
20
1
2
LG
14
5
LG
CN3
11
12
RD*
9
20
1
LG
3
11
12
7
8
EMG*
CN2
2
LG
4
17
18
9
10
1
2
LG
14
7
8
CN1B
17
8
MRR
LZ
19
P5
P5
LG
3
SG
5
COM
7
LB
9
11
12
TXD
14
MO2
LG
13
MBR
15
16
LAR
18
LZR
10
20
VDD
EM1
17
LBR
19
The connector frames are connected
with the PE (earth) terminal inside the
servo amplifier.
S000974C
Fig. 3-1: Signal connector
NOTE
The display of the pin configuration in fig. 3-1 shows the view from the soldering tag side.
MELSERVO J2-Super
3-5
Connection
Connection of servo amplifier
Interface explanations
Connector
Name
Description
CN1A
Connector for bus cable from preceding axis.
Used for connection with the controller or
preceding-axis servo amplifier.
CN1B
Connector for bus cable to next axis
Used for connection with the next-axis servo
amplifier or for connection of the termination
connector.
CN2
CN3
Encoder connector
Used for connection with the servo motor encoder.
Communication connector
Used for connection with the personal computer.
Serves as an I/O signal connector when the
personal computer is not used.
Tab. 3-6: Description of interfaces CN1A, CN1B CN2 and CN3
Input signal
Signal
Forced stop
Symbol
EM1
Pin-No.
Description
I/O
CN3-20
Turning off EM1 puts the servo motor in a forced
stop status, in which the servo is switched off and
the dynamic brake is operated to stop the servo
motor. Turn on EM1 in the forced stop status to
reset this status.
DI-1
Tab. 3-7: Input signal
Output signals
Signal
Symbol
Pin-No.
Description
MBR
CN3-13
With switched off signal “Servo ON” MBR-SG is
opened.
DO1
LA
CN3-6
LAR
CN3-16
LB
CN3-7
Outputs pulses per servo motor revolution set in
parameter No. 38. In forward rotation of the servo
motor, the encoder B-phase pulse lags the
encoder A-phase pulse by a phase angle of π/2.
DO2
LBR
CN3-17
Encoder Z-phase pulse
(Differential outputs)
LZ
CN3-8
The zero-phase signal of the encoder is output.
DO2
LZR
CN3-18
Analog monitor 1
MO1
CN3-4
The data set for CH1 in parameter 22 are output
as analog via MO1-LG.
Analog
output
Analog monitor 2
MO2
CN3-14
The data set for CH2 in parameter 22 are output
as analog via MO1-LG.
Analog
output
Electromagnetic brake
interlock
Encoder A-phase pulse
(Differential outputs)
Encoder B-phase pulse
(Differential outputs)
I/O
Tab. 3-8: Output signals
Power supply
Signal
Symbol
Pin-No.
Description
VDD
CN3-10
SG
CN3-3
Internal voltage source output voltage at the terminals
VDD R SG: +24VDC ± 10 %. Output current: max.
80mA
COM
CN3-5
Common reference point for the digital inputs,
voltaically separated from terminal LG
Common for control signals
LG
CN3-1
CN3-11
Common for analog outputs MO1 and MO2
Shield
SD
Plate
24VDC output
Common for digital inputs
Tab. 3-9: Power supply
3-6
Connect the shield of signal cable here.
Connection of servo amplifier
3.1.4
Connection
Interfaces
The connection of external periphery to the interface described in section 3.1.3 is covered in the
following.
Digital input interface DI-1
Give a signal with a relay or open collector transistor.
Servo amplifier
VD D
COM
24V D C
4.7 kΩ
app ro x. 5 m A
EM 1
Tr
SG
U C ES ≤ 1V
I C EO ≤ 100 µA
S001007C
Fig. 3-2: External device connection
MELSERVO J2-Super
3-7
Connection
Connection of servo amplifier
Digital output interface DO-1
Via this interface a control lamp, a relay or an photocoupler may be addressed, for example.
Provide a diode (D) for an inductive load, or an inrush current suppressing resistor (R) for a lamp
load. (Permissable current: 40mA, inrush current: 100mA).
● Inductive Load
Servo amplifier
24 V DC
VDD
D
MBR
Tr
SG
S001008C
Fig. 3-3: Inductive load connection
b
CAUTION:
When connecting an inductive load be sure to observe the correct polarity of the
recovery diode D. Connecting it backwards could cause the servo amplifier to be
damaged.
● Lamp connection
Servo amplifier
24 V DC
VDD
R
MBR
Tr
SG
S001009C
Fig. 3-4: Lamp connection
3-8
Connection of servo amplifier
Connection
Emulated encoder output
● Differential output
max. output current: 35mA
Servo amplifier
Servo amplifier
AM26LS32 or equivalent
LA
(LB, LZ)
150 Ω
LAR
(LBR, LZR)
LA
(LB, LZ)
1,2k Ω
LAR
(LBR, LZR)
&
High-speed
photocoupler
LG
SD
SD
S000553C
Fig. 3-5: Example
A
R
T
B
R
π/2
LZ/LZR signal varies ±3/8T on
its leading edge.
Z
R
> 40 0 µs
P
n
S000554C
Fig. 3-6: Time response of the output signals
Analog output
Servo amplifier
Output ±10V/1mA
MO1
(MO2)
10k Ω
A
LG
SD
S000556C
Fig. 3-7: Example for an interface
MELSERVO J2-Super
3-9
Connection
Servo motor
3.2
Servo motor
3.2.1
Connection of servo motors
b
CAUTION:
● Ground the servo amplifier and servo motor securely.
To prevent an electric shock, always connect the protective earth terminal (PE) of
the servo amplifier marked with
, with the protective earth of the control box.
● Connect the cables to the servo amplifier and servo motor with the right terminals
and the correct phases (U, V, W) . Otherwise the servo motor will not work correctly.
● Do not connect AC power supply directly to the servo motor. Otherwise, a fault may
occure.
Connect the servo motors via corresponding power supply connector.
For grounding, connect the earth cable of the servo motor to the protective earth (PE)
terminal of the servo amplifier. Simultaneouse connect the ground cable of the servo
amplifier to the earth via the protective earth of the control box. Refer fig. 3-8.
When using a servo motor with brake then it must be connected via an external voltage
source of 24VDC.
Control box
Servo amplifier
Servo motor
PE terminal
S000557C
Fig. 3-8: Protective earth connection
3 - 10
Servo motor
3.2.2
Connection
Motor connector
Servo motor series HC-KFS (B)/HC-MFS (B)
Power supply connector
Red: Phase U
White: Phase V
Black: Phase W
Green/yellow: Protective earth
Encoder connector
Brake connector
S000883C
Fig. 3-9: Servo motor series HC-KFS (B) and HC-MFS (B)
Without
electromagnetic
brake
1
2
3
MR MRR BAT
4
5
6
With
electromagnetic
brake
1
4
1
3
2
5
2
4
3
6
MD MDR
7
8
9
P5
LG SHD
Encoder connector
Power supply connector
MR-PWCNK1
Power supply connector
MR-PWCNK2
Cable
color
Cable
color
Pin
Signal
U
Red
1
U
Red
V
White
2
V
White
3
W
Black
3
W
Black
4
Protective
earth
Green/
Yellow
4
Protective
earth
Green/
Yellow
5
B1 —
6
B2 —
Pin
Signal
1
2
View on the crimp terminals
S000981C
Fig. 3-10: Connections of power supply, encoder and electromagnetic brake
24VDC no polarity
MELSERVO J2-Super
3 - 11
Connection
Servo motor
Servo motor series HC-SFS/HC-RFS
Power supply connectors
Brake connector
Encoder connector
S000562C
Fig. 3-11: Servo motor series HC-SFS/HC-RFS
Connectors
Servo motor
Power supply
Encoder
Electromagnetic brake
HC-SFS52
HC-SFS102
In the power supply
connector
MR-PWCNS1
HC-SFS152
Servo motor 200V
HC-SFS202
HC-SFS352
MR-PWCNS2
MR-BKCN
HC-SFS502
MR-J2CNS (Set)
HC-SFS702
MR-PWCNS3
HC-RFS103
HC-RFS153
MR-PWCNS1
In the power supply
connector
HC-RFS203
HC-RFS353
MR-PWCNS2
HC-RFS503
Servo motor 400V
HC-SFS524
HC-SFS1024
HC-SFS1524
HC-SFS2024
HC-SFS3524
MR-J2CNS (Set)
MR-PWCNS2
MR-BKCN
HC-SFS5024
HC-SFS7024
MR-PWCNS3
Tab. 3-10: Power supply and encoder interfaces
3 - 12
In the power supply
connector
MR-PWCNS1
Servo motor
Connection
A
M
G
A
F
B
E
L
A
D
A
B
C
B
K
F
H
E
C
G
D
P
S
R
H
D
Power supply
connector
MR-PWCNS1
Power supply
connector
MR-PWCNS2
Power supply
connector
MR-PWCNS3
Pin
Signal
Pin
Signal
Pin
Signal
A
U
A
U
A
U
B
V
B
V
B
V
C
W
C
W
C
W
D
Protective
earth
D
Protective
earth
D
Protective
earth
C
T
J
C
B
N
G
D
B
E
F
Encoder
MR-J2CNS (Set)
Pin
Signal
Pin
A
MD
K
—
Pin
B
MDR
L
—
A
B1
C
MR
M
—
B
B2
D
MRR
N
SD
E
—
P
—
BAT
R
LG
E
—
E
B1
F
—
F
B2
G
LG
S
P5
G
B1
G
—
H
—
T
—
J
—
B2
Electromegnetic
brake
MR-BKCN
Signal
F
H
A
Signal
S000898C
Fig. 3-12: Connections of power supply, encoder and electromagnetic brake
24VDC no polarity
For the motors HC-SFS52B/102B/152B and motors HC-RFS103B/153B/203B/353B/503B
the attachment for the electromagnetic brake is integrated into the power supply connector.
MELSERVO J2-Super
3 - 13
Connection
3.3
Internal circuit and common
Internal circuit and common
Servo amplifier
24 V DC
VDD
COM
MBR
EM1
Digital input
interface
SG
LA, etc.
LAR,
etc.
Differential
output
35mA max.
LG
SD
MO1
MO2
LG
Analog
output
TXD
RS232C
RXD
CN2
MR
MRR
LG
Input
encoder
SD
S000976C
Fig. 3-13: Internal circuit and common
3 - 14
Grounding
3.4
m
Connection
Grounding
DANGER:
● Ground the servo amplifier and servo motor securely.
● To prevent an electric shock, always connect the protective earth terminal (PE) of
the servo amplifier marked with
, with the protective earth of the control box.
Control box
Power
supply
200-230V
50Hz
Servo amplifier
Line filter
MC
Servo motor
CN2
L1
Encoder
L2
L3
L11
L21
U
V
W
U
V
W
M
Controller
CN1A
Connect to
PE terminal!
Protective earth
S000983C
Fig. 3-14: Grounding
Ground the bus cable near the controller! That way you reduce the influence of external
noise. Another possibility to reduce noise interference is to build in filters.
MELSERVO J2-Super
3 - 15
Connection
3.5
m
Power supply
Power supply
DANGER:
When the servo amplifier has become faulty, switch power off on the amplifier power
side.
Power-on procedure
Always wire the power supply using the magnetic contactor with the main circuit power supply
L1, L2 and L3 or L1 and L2 for 1-phase connection.
Switch on the control circuit power supply L11, L21 simultaneously with the main circuit power
supply or before switching on the main circuit power supply. If the main circuit power supply is
not on, the display shows the corresponding warning. However, by switching on the main circuit
power supply, the warning disappears and the servo amplifier will operate properly.
The servo amplifier can accept the "servo ON" command within 3s the 3-phase power supply is
switched on.
3 - 16
Power supply
3.5.1
Connection
Connection example
Connection for servo amplifier 200V
Connection examples for 1-phase and 3-phase power supplies are illustrated in the following
diagrams:
Power
supply
230V
50Hz
ON
MC
Emergency stop
RA
Controller
emergency stop
MC
SK
Servo amplifier
MC
L1
L2
L3
L11
L21
VDD
COM
EM1
SG
Emergency stop
S000977C
Fig. 3-15: 1-phase connection of servo amplifier
Emergency stop
Controller
emergency stop
Power
supply
400V
50Hz
MC
ON
MC
RA
MC
SK
Servo amplifier
L1
L2
L3
Transformer
UE/UA = 400V/230V
L11
L21
VDD
COM
Emergency stop
EM1
SG
S000978C
Fig. 3-16: 3-phase connection of servo amplifier
Configure up the power supply circuit which switches off the magnetic contactor after
detection of alarm occurrence on the controller side.
MELSERVO J2-Super
3 - 17
Connection
Power supply
Connection for servo amplifier 400V
ON
RA
MC
MC
Emergency stop OFF
SK
Power
supply
400V
50Hz
Transformer
Servo amplifier
MC
L1
L1
L2
L3
L2
L3
P
C
Circuit protector
Power
supply
24VDC
D
+
-
2 4 V/L1 1
0 V/L 2 1
EM1
Emergency stop
SG
VDD
COM
S001239C
Fig. 3-17: Servo amplifier MR-J2S-60B4 to MR-J2S-200B4
ON
MC
RA
MC
Emergency stop OFF
SK
Power
supply
400V
50Hz
Transformer
Servo amplifier
MC
L1
L1
L2
L3
L2
L3
Circuit protector
Power
supply
24VDC
+
-
Emergency stop
2 4 V/L1 1
0 V/L 2 1
EM1
SG
VDD
COM
S001240C
Fig. 3-18: Servo amplifier MR-J2S-350B4 to MR-J2S-700B4
3 - 18
Power supply
Connection
Timing chart
"Servo ON" command accepted
(3s)
Main circuit and ON
control circuit OFF
Base circuit
ON
OFF
60m s
10m s
60m s
Servo ON command ON
(from controller) OFF
S000979C
Fig. 3-19: Timing chart for switching on the power supply
Emergency stop
For safety’s sake an EMERGENCY OFF switch must always be installed between the terminals
EM1 and SG. When the contact is interrupted, the servo motor is switched to a resistance brake
(dynamic brake) integrated into the unit and brought to a stop as soon as possible.
Simultaneously the EMERGENCY OFF message (E6) appears on the display.
During ordinary operation, do not use emergency stop circuit to alternate stop and run.
Servo amplifier
VDD
COM
Emergency stop
EM1
SG
S000980C
Fig. 3-20: Emergency stop circuit
MELSERVO J2-Super
3 - 19
Connection
3.6
b
Alarm occurence timing chart
Alarm occurence timing chart
CAUTION:
When an alarm has occurred, remove its cause, make sure that the operation signal
is not being input, ensure safety, and reset the alarm before restarting operation.
Main circuit and
control circuit
ON
OFF
Base circuit
ON
OFF
Dynamic brake
Valid
Invalid
Servo ON command
(from controller)
ON
OFF
Power OFF
Reset command
(from controller)
OFF
ON
OFF
Brake operation
Brake operation
Alarm
Power ON
ON
OFF
ON
OFF
1s
≥ 50 ms
ALARM
≥ 60 ms
Remove cause of trouble
S000975C
Fig. 3-21: Alarm occurence timing chart
3 - 20
Servo motor with electromagnetic brake
3.7
b
Connection
Servo motor with electromagnetic brake
CAUTION:
Configure the electromagnetic brake circuit so that it is activated not only by the
interface unit signals but also by a emergency stop.
EM1
Servo motor
RA
M
Emergency stop signal
Contacts must be open when servo ON,
when an alarm occurence and when an
electromagnetic brake interlock
Electromagnetic brake
Connection diagram
Please observe closely the following instructions for the use of a servo motor with
electromagnetic brake.
b
CAUTION:
The electromagnetic brake is only intended for holding a static load, e.g. from vertical
lifting axes. The braking effect and frequent switching of the EMERGENCY OFF
function will result in the destruction of the brake after only a few cycles.
Provide a separate power source of 24VDC for the electromagnetic brake.
The brake will operate when the power switches off.
Switch off the SON command after the servo motor has stopped.
Servo motor
Servo amplifier
RA
EM 1
B1
VDD
COM
M BR
M
RA
24V D C
B2
S000982C
Fig. 3-22: Connection diagram
MELSERVO J2-Super
3 - 21
Connection
Servo motor with electromagnetic brake
Setting procedure
The setting for the electromacnetic brake is as follows:
In Parameter 21 set the time delay (Tb) from electromagnetic brake operation to base circuit
shut-off, shown in fig. 3-23.
Use parameter 30 to set the rotation speed at which the electromagnetic brake is to be
activated when there is an alarm or an EMERGENCY OFF.
Timing charts
Coasting
Servo motor speed
0r/min
ON
Base circuit
OFF
Electromagnetic
brake (MBR)
Servo ON command
(from controller)
Electromagnetic
brake operation
delay time
Invalid (ON)
Valid (OFF)
ON
OFF
S000801E
Fig. 3-23: Servo ON command (from controller) ON/OFF
Dynamic brake
Dynamic brake, electromagnetic brake
Electromagnetic brake
Servo motor speed
Electromagnetic
brake release
Base circuit
ON
OFF
Electromagnetic
brake (MBR)
Emergency stop
command
(from controller)
or external
emergency stop (EM1)
Invalid (ON)
Electromagnetic brake
operation delay time
Valid (OFF)
Invalid (ON)
Valid (OFF)
S000802E
Fig. 3-24: Emergency stop command from controller or external emergency stop (EM1)
ON/OFF
3 - 22
Servo motor with electromagnetic brake
Connection
Dynamic brake
Dynamic brake, electromagnetic brake
Electromagnetic brake
Servo motor speed
ON
Base circuit
OFF
Electromagnetic
brake (MBR)
Invalid (ON)
Electromagnetic brake
operation delay time
Valid (OFF)
Invalid (ON)
Alarm
Valid (OFF)
S000803E
Fig. 3-25: Alarm occurence
Dynamic brake
Dynamic brake, electromagnetic brake
Electromagnetic brake
Servo motor speed
10 to 100 ms
Base circuit
ON
This time depends on the operation
status of servo amplifier.
OFF
Electromagnetic
brake (MBR)
Electromagnetic brake
operation delay time
Invalid (ON)
Valid (OFF)
When the main circuit power supply is off in a motor stop status
and the control circuit power supply is on, the main circuit off
warning (E9) occurs and the alarm (ALM) does not turn off.
No (ON)
Alarm
Yes (OFF)
Main circuit power
supply and control
circuit power supply
ON
OFF
S000804E
Fig. 3-26: Main and control circuit power supplies OFF
Dynamic brake
Dynamic brake, electromagnetic brake
Electromagnetic brake
Servo motor speed
15 ms or more
Base circuit
ON
OFF
Electromagnetic
brake (MBR)
Invalid (ON)
Alarm
No (ON)
This time depends on the operation
status of servo amplifier.
Electromagnetic brake
operation delay time
Valid (OFF)
When the main circuit power supply is off in a motor stop status
and the control circuit power supply is on, the main circuit off
warning (E9) occurs and the alarm (ALM) does not turn off.
Yes (OFF)
Main circuit power
supply
ON
OFF
S000899E
Fig. 3-27: Main circuit power supply OFF (control circuit power supply remains ON.)
MELSERVO J2-Super
3 - 23
Connection
3.8
Examples of standard wiring diagrams
Examples of standard wiring diagrams
In the following illustrations there is presented a wiring diagram for a 200V and a 400V servo
amplifier.
NOTE
Please take all notes given in this chapter into account.
Servo amplifier 200V
Make up a sequence which
switches off the MC at alarm
occurence or emergency stop.
supply
Servo motors
HC-KFS, HC-MFS
MR-J2S- B
MC
Power L1
TE1
I>
L1
U
1
L2
I>
L2
V
2
L3
I>
L3
W
3
M
4
MR-BAT
CN2
19
P5
11
LG
20
P5
12
LG
P5
7
P5
7
P5
2
LG
8
LG
8
LG
7
MR
1 MR
1 MR
2 MRR
2 MRR
4 MD
4 MD
5 MDR
5 MDR
3 BAT
3 BAT
9
9
MD
16 MDR
MR-J2HBUSM-A cable
is connected to CN1A
9
BAT
1
LG
Controller
CN1A
PLATE SD
A171SH
A172SH
A173UH
Terminator
MR-A-TM CN1B CN1A CN1B CN1A
MR-J2HBUS M cable
is connected between
2 amplifiers
CN1B
20
RD
GND
SD
GND
TxD
LG
RxD
LG
3
EM1
SG
13
5
MBR
COM
10
VDD
SD
6 CNT
CN3
12
11
2
1
6
EMG
18
6
5
B2
17 MRR
CON1
B1
ENCODER
Optional brake
resistor
(connection of a
brake unit to servo
P amplifiers with
500A or more is
shown on the left)
SD
6 CNT
PC
Servo motors
HC-SFS, HC-RFS
15m max.
A
B
C
D
/
10m max.
RA
24 V DC
/
4
1
14
MO1
A
LG
MO2
A
11
LG
5
16
7
17
8
18
LA
LAR
LB
LBR
LZ
LZR
PLATE
SD
Monitor output 1
10kΩ
Monitor output 2
10kΩ
Encoder A-phase
pulse
Encoder B-phase
pulse
Encoder Z-phase
pulse
2m max.
CS1
MR-J2S- B
B1
EMG
M
G
H
B2
19 P5
11 LG
20 P5
12 LG
18 P5
2 LG
7 MR
17 MRR
6 MD
16 MDR
9 BAT
1 LG
SD
S
R
C
D
A
B
F
G
N
M
ENCODER
N
24 V DC
TE2
L11
L21
C
D
P
CS1
MR-J2S- B
CS1
/
S001011C
Fig. 3-28: Standard wiring diagram for amplifier 200V
3 - 24
Examples of standard wiring diagrams
Connection
Servo amplifier 400V
Make up a sequence which
switches off the MC at alarm
occurence or emergency stop.
Servo motors
HC-SFS
MR-J2S- B4
MC
TE1
Power L1
supply L2
I>
L1
U
A
I>
L2
V
B
L3
I>
L3
W
C
M
D
Optional brake
resistor
(connection of a
brake unit to servo
P amplifiers with
350B4 or more is
shown on the left)
M R -B A T
CON1
MR-J2HBUS M-A cable
is connected to CN1A
CN2
19
P5
11
LG
20
P5
12
LG
A171SH
A172SH
A173UH
18
P5
S
2
LG
R
7
MR
17 M RR
C
D
6
A
MD
16 M DR
B
9
B AT
1
LG
F
G
N
CN3
12
11
2
1
C N 1 B C N 1A C N 1B C N 1A
C N 1B
20
MR-J2HBUS M cable
is connected between
2 amplifiers
H
B2
M
C N 1A
Controller
G
EM G
PLATE S D
B1
EN CODER
N
24 V D C
TE2
L11
L21
C
D
P
RD
GN D
SD
GN D
Tx D
LG
RxD
LG
PC
15m max.
3
EM1
SG
13
5
MBR
COM
10
VDD
4
1
14
M O1
A
LG
M O2
A
11
LG
5
16
7
17
8
18
LA
LAR
LB
LBR
LZ
LZR
PLATE
SD
/ 10m max.
RA
/ Monitor output 1
10kΩ
Monitor output 2
10kΩ
Encoder A-phase
pulse
Encoder B-phase
pulse
Encoder Z-phase
pulse
2m max.
CS1
MR-J2S- B4
CS1
MR-J2S- B4
Terminator
MR-A-TM CS1
/ S001255C
Fig. 3-29: Standard wiring diagram for amplifier 400V
MELSERVO J2-Super
3 - 25
Connection
Examples of standard wiring diagrams
m
To prevent an electric shock, always connect the protective earth terminal (PE) of the
servo amplifier marked with
, with the protective earth of the control box.
b
CAUTION:
Do not reverse the diode’s direction. Connecting it backwards could cause the
amplifier to malfunction so that signals are not output, and emergency stop and other
safety circuits are inoperable.
DANGER:
Ground the servo amplifier and servo motor securely.
If the controller is not equipped with an EMERGENCY OFF function, then an external
EMERGENCY OFF switch must be installed.
Notes to fig. 3-28 and fig. 3-29:
The connection of terminals shown for the optional regenerative braking resistor applies exclusively
to servo amplifiers MR-J2S-350B or less and MR-J2S-200B4 or less. For exact descriptions of the
wiring of terminals for other performance classes, please see Tab. 3-4 and Tab. 3-5.
CN1A, CN1B, CN2 and CN3 have the same shape. Wrong connection of the connectors will lead to
a fault or may lead to a destruction of the inputs/outputs.
The sum of currents that flow in the external relays should be 80mA max. If it exceeds 80mA, supply
interface power from external.
Prior to starting up operations the external EMERGENCY OFF signal (EM1) must be switched on
(opener). By setting parameter 23 to “0001” the external EMERGENCY OFF switch may be
deactivated.
Total length of the MR-J2HBUSM-A and MR-J2HBUSM cables = max. 30m. Use of a cable clamp or
data line filters (3–4 in a row) near the connector pull to enhance noise resistence is recommended.
Motor-side wiring after the second axis has been omitted.
Up to 8 axes (n = 0–7) can be connected. MR-H-B series servo amplifiers can be connected to the
same bus (however, it requires a different cable).
For termination the connector CN1B of the last servo amplifier must be fitted with the terminating
resistance MR-A-TM.
Only for motors with electromagnetic brake.
A 1-phase 230VAC power supply can be used with servo amplifiers rated at MR-J2S-70A or less.
Please connect the power supply using only terminals L1 and L2. Do not connect anything to L3.
3 - 26
Station number setting
3.9
Connection
Station number setting
Use the coding switch (CS1) to set the station number for the servo amplifier. If the same
numbers are set to different servo amplifier in a single communication system, the system will
not operate properly. Set the switch to "F" when executing the test operation mode using the
setup-software.
NOTE
The station number set to CS1 should be the same as the one set to the servo system
controller.
Abb. 3-30:
Station number setting switch
78 9A
B
CDE
3456
CS1
F 012
S000972C
MELSERVO J2-Super
Setting
Description
0
Station 1
1
Station 2
2
Station 3
3
Station 4
4
Station 5
5
Station 6
6
Station 7
7
Station 8
8
—
9
—
A
—
B
—
C
—
D
—
E
—
F
Test operation mode or when
machine analyzer is used (refer
section 4.6.2)
Abb. 3-31:
Station number setting
3 - 27
Connection
3 - 28
Station number setting
Points to check prior to starting operation
Operation
4
Operation
4.1
Points to check prior to starting operation
Wiring
Before starting operation, check the following:
● A correct power supply is connected to the power input terminals (3-phase: L1, L2, L3,
1-phase: L11, L21) of the servo amplifier.
● The servo motor power supply terminals (U, V, W) of the servo amplifier match in phase
with the power input terminals (U, V, W) of the servo motor.
Servo amplifier 200V
Servo amplifier 200V
M R -J 2S - B
M R -J 2S - B
L1
L2
L3
U
U
V
V
W
Servo amplifier 400V
W
L1
M
L2
L3
L 11
L11
L 21
L21
1-phase connector
M R -J 2S - B 4
U
U
V
V
M
W
W
L1
U
L2
V
L3
24 V D C
3-phase connector
+
L1 1
−
L2 1
W
U
V
M
W
3-phase connector
S001257C
Fig. 4-1: Wiring
● The servo motor power supply terminals (U, V, W) of the servo amplifier are not shorted to
the power input terminals (L1, L2, L3) of the servo motor.
L1
U
L2
V
L3
W
M
Servo amplifier
S000582C
Fig. 4-2: Short circuit
● Ground the servo amplifier and servo motor securely.
● When using a regenerative brake option or brake unit:
– always remove the lead across the terminals D and P for the servo amplifier MR-J2S350B or less and MR-J2S-200B4 or less.
– disconnect the cable connections to the internal brake resistor between the terminals P
and C for the servo amplifier MR-J2S-500B or more and MR-J2S-350B4 or more.
MELSERVO J2-Super
4-1
Operation
Points to check prior to starting operation
● 24VDC or higher voltages are not applied to the pins of connector CN3.
● SD and SG of connector CN3 are not shorted.
SD
SG
Servo amplifier
S000583C
Fig. 4-3: Short-circuit of SD and SG
● The connection cable are not under a mechanical load (tension or excessive bend etc.).
● CN1A should be connected with the bus cable connected to the servo system controller or
preceding axis servo amplifier, and CN1B should connected with the bus cable connected
to the subsequent axis servo amplifier or with the termination connector (MR-A-TM.)
Station number
The station number setting of CS1 should be the same as that of the servo system controller.
(refer section 3.9).
Parameter
Check the parameter setting on the servo system controller screen or using the setup-software.
Environment
Before starting operation, check the following:
● Signal cables and power cables are not shorted by wire offcuts, metallic dust or the like.
4-2
Procedures before Operation
4.2
m
Operation
Procedures before Operation
DANGER:
● Do not operate the switches with wet hands. You may get an electric shock.
● Do not operate the controller with the front cover removed. There is the risk of
getting an electric shock from live parts.
● During power-on or operation, do not open the front cover. You may get an electric
shock.
● Before starting operation, check the parameters. Through the incorrect setting of
parameters some machines may execute unexpected movements.
● Never touch the cooling fins of the servo amplifier, the brake resistor, servo motor
or other components while the power supply is still on or shortly after switching it
off. They can become very hot and touching them could result in serious burns.
4.2.1
Start up procedure
Power on
When the main and control circuit power supplies are switched on, "d1" (for the first axis)
appears on the servo amplifier display.
In the absolute position detection system, first power-on results in the absolute position lost (25)
alarm and the servo system cannot be switched on. This is not a failure and takes place due to
the uncharged capacitor in the encoder.The alarm can be deactivated by keeping power on for
a few minutes in the alarm status and then switching power off once and on again.
Also in the absolute position detection system, if power is switched on at the servo motor speed
of 500r/min or higher, position mismatch may occur due to external force or the like. Power must
therefore be switched on when the servo motor is at a stop.
Parameter setting
Set the parameters according to the structure and specifications of the machine.
Pr.-No. Name
7
Rotation direction setting
8
Auto tuning
9
Servo response
Setting
Description
Increase in positioning address rotates the motor in the
forward direction
0
1
5
Used
Slow response (initial value)
Tab. 4-1: Setting value and control function
After setting the above parameters, switch power off once. Then switch power on again to make
the set parameter values valid.
MELSERVO J2-Super
4-3
Operation
Procedures before Operation
Servo on
Switch the servo-on in the following procedure:
Switch on main circuit and control circuit power supply.
The controller transmits the "servo ON" command.
When placed in the "servo ON" status, the servo amplifier is ready to operate and the servo
motor is locked.
Home position return
Always perform home position return before starting positioning operation.
Stop
If any of the following situations occurs, the servo amplifier suspends the running of the servo
motor and brings it to a stop.
When the servo motor is equipped with an electromagnetic brake, refer to section 3.7.
Operation
Stopping condition
"Servo OFF" command
The base circuit is shut off and the servo
motor coasts.
Emergency stop command
The base circuit is shut off and the dynamic
brake operates to bring the servo motor to
stop. The controller emergency stop warning
(E7) occurs.
Alarm occurrence
The base circuit is shut off and the dynamic
brake operates to bring the servo motor to
stop.
External EMERGENCY OFF switch
(EM1) is pressed.
The base circuit is shut off and the dynamic
brake operates to bring the servo motor to
stop. The servo forced stop warning (E6)
occurs.
Servo system controller
Servo amplifier
Tab. 4-2: Stopping condition
4-4
Display and Operation
Operation
4.3
Display and Operation
4.3.1
Display sequence
On the servo amplifier display (two-digit, seven-segment display), check the status of
communication with the servo system controller at power-on, check the station number, and
diagnose a fault at occurrence of an alarm.
Servo amplifier power ON
Waiting for servo
system controller
power to switch ON
Servo system controller power ON
Initial data
communication
During emergency stop and forced stop
Ready OFF/
servo OFF
Refer
note
or
Ready ON
Emergency stop and forced
stop reset
When alarm
occurs, alarm
code appears.
Ready ON/
servo OFF
Refer
note
Servo ON
Refer
note
Ready ON/
servo ON
Ordinary operation
Servo system controller power OFF
Servo system controller power ON
NOTE:
The segments of b1, c1 and d1
indicate the station number. (station
1 in this example)
S000984C
Fig. 4-4: Display sequence
MELSERVO J2-Super
4-5
Operation
4.3.2
Display and Operation
Indication list
Display
Status
Description
AA
Initializing
The servo amplifier was switched on when power to the
servo system controller is off.
Power to the servo system controller was switched off
during power-on of the servo amplifier.
Ab
The station number set to the servo system controller
does not match the station number set with the coding
switch (CS1) of the servo amplifier.
Initializing
A servo amplifier fault occurred or an error took place in
communication with the servo system controller. In this
case, the indication changes: Ab AC Ad Ab.
The servo system controller is faulty.
AC
Initializing
Communication started between the servo system
controller and servo amplifier
Ad
Initializing
The initial parameters from the servo system controller
were received.
AE
Initialize completion
Initial data communication with the serco system controller
was completed.
b# Ready OFF
The ready off signal from the servo system controller was
received.
d# Servo ON
The servo on signal from the servo system controller was
received.
C# Servo OFF
The servo off signal from the servo system controller was
received
** Alarm/Warning
The alarm No./warning No. that occurred is displayed.
88
CPU error
—
JOG operation, positioning operation, programmed
operation, forced output signal
b0. Test operation mode b#.
d#.
c#.
Motor-less operation
Tab. 4-3: Indication list
4-6
The character "#" denotes any of numerals 0 to 8 and what it means is listed in Tab. 4-4.
The character "**" indicates the warning/alarm number.
To execute this functions the setup-software is required.
#
Description
0
Test operation mode
1
Station 1
2
Station 2
3
Station 3
4
Station 4
5
Station 5
6
Station 6
7
Station 7
8
Station 8
Tab. 4-4:
Meaning of character "#"
Test operation mode
4.4
b
Operation
Test operation mode
CAUTION:
● The test operation mode is designed for servo operation confirmation and not for
machine operation confirmation. Do not use this mode with the machine. Always
use the servo motor alone.
● If an operation fault occurred, use the forced stop (EM1) to make a stop.
By using a personal computer and the setup-software, you can execute jog operation,
positioning operation, motor-less operation and forced output without connecting the motion
controller.
Use the system setup according to fig. 3-28 and fig. 3-29.
NOTE
For full information of this functions, refer to the setup-software manual.
● JOG operation
Jog operation can be performed without using the servo system controller. This operation may
be used independently of whether the servo is on or off and whether the servo system controller
is connected or not.
Exercise control on the jog operation screen of the setup-software.
Initial value
Setting range
Speed [r/min]
200
0 to 5175
Acceleration/deceleration time constant [ms]
1000
0 to 20000
Tab. 4-5: JOG operation settings
Function
Button
Forward rotation start
Forward
Reverse rotation start
Reverse
Stop
Stop
Tab. 4-6: Operation method
MELSERVO J2-Super
4-7
Operation
Test operation mode
● Positioning operation
Positioning operation can be performed without using the servo system controller. This
operation may be used independently of whether the servo is on or off and whether the servo
system controller is connected or not.
Exercise control on the positioning operation screen of the setup-software.
Name
Initial value
Travel [pulse]
131072
Setting range
0 to 9999999
Speed [r/min]
200
0 to 5175
Acceleration/deceleration time constant [ms]
1000
0 to 20000
Tab. 4-7: Positioning operation settings
Function
Button
Forward rotation start
Forward
Reverse rotation start
Reverse
Pause
Pause
Tab. 4-8: Operation method
● Program operation
Program operation can be performed in two or more operation patterns combined, without using
the servo system controller. This operation may be used independently of whether the servo is
on or off and whether the servo system controller is connected or not.
Exercise control on the programmed operation screen of the setup-software..
Function
Start
Stop
Reset
Tab. 4-9: Operation method
4-8
Button
Start
Test operation mode
Operation
● Motor-less operation
Without connecting the servo motor, output signals or status displays can be provided in
response to the servo system controller commands as if the servo motor is actually running. This
operation may be used to check the servo system controller sequence. Use this operation with
the servo amplifier connected to the servo system controller.
NOTE
Motor-less operation may be used with the setup-software. However, use motor-less
operation which is available by making the servo system controller parameter setting.
Exercise control on the motor-less operation screen of the setup-software.
Load
Setting
Load torque
0
Load inertia moment ratio
Same as servo motor inertia moment
Tab. 4-10: Load settings
The following alarms and warning do not occur for operation without servo motor:
– Encoder error 1 (16)
– Encoder error 2 (20)
– Absolute position erasure (25)
– Battery cable breakage warning (92)
All other alarms and warnings occur as when the servo motor is connected
● Forced output signal
Output signals can be switched on/off forcibly independently of the servo status. Use this
function for output signal wiring check, etc.
Exercise control on the forced output screen of the setup-software.
MELSERVO J2-Super
4-9
Operation
4.4.1
Test operation mode
Test operation procedure
JOG operation, positioning operation, program operation, forced output
Switch power off.
Set the coding switch CS1 to „F“.
When CS1 is set to the station number and operation is performed by the servo system
controller, the test operation mode screen is displayed on the personal computer, but no
function is performed.
Switch servo amplifier power on. When initialization is over, the display shows the following
screen:
Decimal point flickers
Perform operation with the personal computer.
Motor-less operation
Switch off the servo amplifier.
Perform motor-less operation with the personal computer. The display shows the following
screen:
Decimal point flickers
4 - 10
Parameter
4.5
Operation
Parameter
When the servo amplifier is connected with the servo system controller, the parameters are set
to the values of the servo system controller. Switching power off, then on makes the values set
on the setup-software invalid and the servo system controller values valid.
NOTES
In the maker setting parameters, do not set any values other than the initial values.
Setting may not be made to some parameters and ranges depending on the model or
version of the servo system controller. For details, refer to the servo system controller user's
manual.
4.5.1
Parameter write inhibit
The release of access to the parameters is established via parameter 40 (parameter write
protection). Parameter No. 40 is made valid by switching power off, then on after setting its
value.
The following table provides an overview over the settings of parameter No. 40:
Setting
Function
0000
(Initial value)
Read
000A
000C
000E
100E
Write
Read
Write
Read
Write
Read
Write
Read
Write
Operation from controller
Operation from setup-software
Parameter No. 1 to No. 39
Parameter No. 1 to No. 11 and No. 40
Parameter No. 1 to No. 39
Parameter No. 40
Parameter No. 1 to No. 39
Parameter No. 1 to No. 39
Parameter No. 1 to No. 39
Parameter No. 1 to No. 40
Parameter No. 1 to No. 11 and No. 40
Parameter No. 1 to No. 40
Parameter No. 1 to No. 40
Parameter No. 40
Tab. 4-11: Parameter settings
MELSERVO J2-Super
4 - 11
Operation
4.5.2
Parameter
Parameter overview
Function
Basic
parameters
Adjustment
parameters
No. Symbol
Name
Initial value
Unit
—
1
AMS
Amplifier setting
0000
2
REG
Regenerative brake resistor
0000
—
3
—
0080
—
4
—
5
—
Reserved
—
1
—
6
FPB
Feedback pulse number
0
—
7
POL
Rotation direction selection
0
—
8
ATU
Auto tuning
0001
—
9
RSP
Response auto tuning
0005
—
10
TLP
Forward rotation torque limit
300
%
11
TLN
Reverse rotation torque limit
300
%
12
GD2
Ratio of load inertia moment to servo
7.0
motor inertia moment
Times
13
PG1
Position control gain 1
35
rad/s
14
VG1
Speed control gain 1
177
rad/s
15
PG2
Position control gain 2
35
rad/s
16
VG2
Speed control gains 2
817
rad/s
17
VIC
Speed integral compensation
48
ms
18
NCH
Machine resonance suppression filter 0000
—
19
FFC
Feed forward gain
0
%
20
INP
In-position range
100
Pulse
21
MBR
Electromagnetic brake sequence
output
0
ms
22
MOD
Analog monitor output
0001
—
23
OP1
Function selection1
0000
—
24
OP2
Function selection 2
0000
—
25
LPF
Low-pass filter for adaptive vibration
suppression control
0000
—
26
—
Reserved
0
—
Tab. 4-12: Parameter overview (1)
4 - 12
000
Customer
setting
Parameter
Operation
Function
Expansion
parameters
No. Symbol Name
Initial value
Unit
27
MO1
Analog output 1 offset
0
mV
28
MO2
Analog output 2 offset
0
mV
29
—
Reserved
0001
—
30
ZSP
Zero speed
50
r/min
31
ERZ
Error excessive alarm level
80
0.1 × r
32
OP5
Function selection 5
0000
—
33
OP6
Function selection 6
0000
—
VPI
PI-/PID control switch-over position
droop
0
Pulse
34
35
—
Reserved
0
—
36
VDC
Speed differential compensation
980
—
37
—
Reserved
0010
—
ENR
Encoder output pulses
4000
Pulse/r
38
39
—
Reserved
0
—
40
BLK
Parameter entry prohibition
0000
—
Customer
setting
Tab. 4-12: Parameter overview (2)
Set the parameter value and switch power off once, then switch it on again to make that
parameter setting valid.
The values corresponds with the factory settings of the servo amplifier. Connecting it with
the servo system controller and switching power on changes them to the settings of the
servo system controller.
Setting and changing cannot be made from the peripheral software of the motion controller.
MELSERVO J2-Super
4 - 13
Operation
4.5.3
Parameter
Parameter description:
Number
Symbol
Initial value
1
AMS
0000
Unit
Setting range
Refer description
Amplifier setting
Used to select the absolute position detection.
0
0
0
Positioning
0: Standard (incremental)
1: Absolute position detection system
2
REG
0000
Refer description
Regenerative brake resistor
Servo amplifier 200V
0
Servo amplifier 400V
0
0
0
Regenerative selection brake option
00: No brake resistor
01: FR-RC-H , FR-BU-H
80: MR-RB3H-4
81: MR-RB5H-4/MR-PWR-T-600-80
82: MR-RB3G-4
83: MR-RB5G-4/MR-PWR-T-600-47
84: MR-RB34-4
85: MR-RB54-4/MR-PWR-T-600-26
86: MR-RB1L-4/MR-PWR-T-150-270
87: MR-RB3M-4/MR-PWR-T-400-120
Regenerative selection brake option
00: No brake resistor
01: FR-RC, FR-BU
05: MR-RFH220-40
08: MR-RFH400-13
09: MR-RFH400-13
0B: MR-RFH400-6.7
0C: MR-RFH400-6.7
10: MR-RFH75-40
11: MR-RFH75-40
CAUTION:
Wrong setting may cause the regenerative brake option to burn.
NOTE:
If the regenerative brake option selected is not for use with the servo amplifier, parameter error (37) occurs.
3
0080
Reserved
Do not change this parameter.
4
0000
Reserved
Do not change this parameter.
5
Reserved
Do not change this parameter.
Tab. 4-13: Parameter list details (1)
4 - 14
1
Parameter
Operation
Number
Symbol
Initial value
6
FBP
0
Unit
Setting range
Refer description
Feedback pulse number
Set the number of pulses per revolution in the controller side command unit.
Information on the motor such as the feedback pulse value, present position, droop pulses and within-one-revolution
position are derived from this setting.
Setting
Number of feedback pulses
0
16384
1
8192
6
32768
7
131072
255
Depending on the motor resolution pulses
NOTE:
If the number of pulses set exceeds the actual motor resolution, the motor resolution is set automatically.
7
POL
0
Refer description
Rotation direction selection
Used to select the rotation direction of the servo motor.
0: Forward rotation with the increase of the address
1: Reverse rotation with the increase of the address
Forward rotation
Reverse rotation
8
ATU
0001
Refer description
Auto tuning
Used to select the gain adjustment mode of auto tuning.
0
0
0
Setting
Adjustment method
Description
0
Interpolation mode
Only position control gain 1
(Pr. 13)
1
Auto tuning mode 1
Setting for position and
rotation speed control loops
3
Auto tuning mode 2
Inertia ratio setting (Pr. 12)
Response level setting can
be changed.
4
Manual mode 1
Simple manual adjustment
2
Manual mode 2
Manual adjustment of all
gains.
Tab. 4-13: Parameter list details (2)
MELSERVO J2-Super
4 - 15
Operation
Parameter
Number
Symbol
Initial value
9
RSP
0005
Unit
Setting range
Refer description
Response auto tuning
Used to select the response of auto tuning.
0
0
0
Value
Response characteristic
Machine resonance
frequency
1
Low
15Hz
2
20Hz
3
25Hz
4
30Hz
5
35Hz
6
45Hz
7
55Hz
8
Middle
70Hz
9
85Hz
A
105Hz
B
130Hz
C
160Hz
D
200Hz
E
240Hz
F
10
TLP
High
300
300Hz
%
0–500
Forward rotation torque limit
Assume that the maximum rated torque is 100%.
Use the parameter to limit the torque in the forward rotation driving mode and reverse rotation regenerative mode.
In other than the test operation mode on the setup-software, the torque limit value on the servo system controller side
is made valid.
11
TLN
300
%
0–500
Reverse rotation torque limit
Assume that the maximum rated torque is 100%.
Use the parameter to limit the torque in the forward rotation driving mode and forward rotation regenerative mode.
In other than the test operation mode on the setup-software, the torque limit value on the servo system controller
side is made valid.
12
GD2
7.0
0–300,0
Ratio of load inertia moment to servo motor inertia moment
Used to set the ratio of the load inertia to the inertia moment of the servo motor shaft.
When auto tuning mode 1 and interpolation mode is selected, the result of auto tuning is automatically used.
13
PG1
35
rad/s
4–2000
Position control gain 1
When auto tuning 1 or 2 is switched on (parameter 8) this parameter optimises itself constantly
(no function when auto tuning is switched off).
Tab. 4-13: Parameter list details (3)
4 - 16
Parameter
Operation
Number
Symbol
Initial value
Unit
Setting range
14
VG1
177
rad/s
20–5000
Speed control gain1
If auto tuning 1 or 2 (parameter 8) or interpolation mode is selected, then this parameter will optimise itself
automatically. If auto tuning or interpolation mode is de-selected, then this parameter should not be changed.
Higher setting increases the response level but is liable to generate vibrations.
15
PG2
35
rad/s
1–1000
Position control gain 2
Set this parameter to increase position response to load disturbance. Higher setting increases the response level but
is liable to generate vibrations.
If auto tuning 1 or 2, manual setting method or interpolation mode (pr. 8) is selected, then this parameter will
optimise itself automatically. If auto tuning 1 or 2, manual setting method or interpolation mode is de-selected, then
the position control loop must be set via this parameter.
16
VG2
817
rad/s
20–5000
Speed control gain 2
Set this parameter to increase position response to load disturbance. Higher setting increases the response level but
is liable to generate vibrations.
If auto tuning 1 or 2 or interpolation mode (pr. 8) is selected, then this parameter will optimise itself automatically. If
auto tuning 1 or 2 or interpolation mode is de-selected, then the revolution speed control loop must be set via this
parameter.
17
VIC
48
ms
1–1000
Speed integral compensation
If auto tuning 1 or 2 or interpolation mode (pr. 8) is selected, then this parameter will optimise itself automatically.
18
NCH
0
Refer description
Machine resonance suppression filter
0
Resonance frequency
Setting
Frequen
cy
Setting
Frequen
cy
Setting
Frequen
cy
Setting
Frequen
cy
187.5
00
—
08
562.5
10
281.3
18
01
4500
09
500
11
264.7
19
180
02
2250
0A
450
12
250
1A
173.1
03
1500
0B
409.1
13
236.8
1B
166.7
04
1125
0C
375
14
225
1C
160.1
05
900
0D
346.2
15
214.3
1D
155.2
06
750
0E
321.4
16
204.5
1E
150
07
642.9
0F
300
17
195.7
1F
145.2
Attenuation
Setting
Attenuation
0
40 dB
1
14 dB
2
8 dB
3
4 dB
Tab. 4-13: Parameter list details (4)
MELSERVO J2-Super
4 - 17
Operation
Parameter
Number
Symbol
Initial value
Unit
Setting range
19
FFC
0
%
0–100
Feed forward gain
Pre-regulation to minimise the control deviation for position control.
When the setting is 100%, the droop pulses during operation at constant speed are nearly zero. However, sudden
acceleration/deceleration will increase the overshoot.
20
INP
100
Pulse
0–50000
In-position range
Used to set the droop pulse range in which the in-position will be output to the controller.
The control deviation is not affected by the electronic gear. Make setting in the feedback pulse unit
(parameter No. 6).
Example:
when you want to set 10µm in the conditions that the ballscrew is direct coupled, the lead is 10mm, and the
feedback pulses are 8192 pulses/rev (parameter No. 6: 1), set "8" in parameter 20 as indicated by the following
expression.
–6
10 × 10
------------------------ × 81920 = 8.192 = 8
–3
10 × 10
21
MBR
100
ms
0–1000
Electromagnetic brake sequence output
Used to set a time delay from when the electromagnetic brake interlock signal (MBR) turns off until the base circuit
is shut off.
22
MOD
0100
Refer description
Analog monitor output
0
0
MO1
The settings corresponds to MO2
MO2
23
Setting
Servo amplifier 200V
0
Servo motor speed (±8V/max. speed)
Servo amplifier 400V
1
Torque (±8V/maxi. torque)
2
Servo motor speed (+8V/max. speed)
3
Torque (+8V/maxi. torque)
4
Current set point (±8V/max. rated current)
5
Speed set point (±8V/max. speed)
6
Contouring error (±10V/128 Pulse)
7
Contouring error (±10V/2048 Pulse)
8
Contouring error (±10V/8192 Pulse)
9
Contouring error (±10V/32768 Pulse)
A
Contouring error (±10V/131072 Pulse)
B
Bus voltage (+8V/400V)
OP1
0000
Bus voltage (+8V/800V)
Refer description
Function selection 1: Used to make the servo forced stop function invalid
0
0
0
Servo forced stop selection
0: Valid (Use the forced stop EM1.)
1: Invalid (Do not use the forced stop EM1. Automatically switched on internally.)
Tab. 4-13: Parameter list details (5)
4 - 18
Parameter
Operation
Number
Symbol
Initial value
24
OP2
0000
Unit
Setting range
Refer description
Function selection 2: Used to select slight vibration suppression control and motor-less operation
0
0
Used to suppress vibration at a stop.
Made this function valid when auto tuning selection is set to "0002" in parameter
No. 8.
0: no suppression
1: suppression
Motor-less operation selection
0: invalid
1: valid
When motor-less operation is made valid, signal output or status display can be
provided as if the servo motor is running actually in response to the servo system
controller command, without the servo motor being connected. Control of operation
without servo motor occurs via the setup software.
25
LPF
0000
Refer description
Low-pass filter for automatic vibration suppression
0
Low-pass filter
0: valid
1: invalid
When the filter is activated the following limit frequency results:
VG2 × 10
Limit frequency = ------------------------------------------------2π ( 1 + GD2 × 0.1 )
Adaptive vibration suppression control
If you have selected the setting “active” or “hold” during automatic vibration
suppression, then filter (pr. 18) is ineffective.
0: invalid
1: valid
The resonance frequency is constantly determined and the filter
set accordingly.
2: held
The pre-set resonance frequency of the filter is maintained.
Adaptive vibration suppression control sensitivity selection
0: normal sensitivity
1: large sensitivity
26
0
Reserved
Do not change this parameter.
Tab. 4-13: Parameter list details (6)
MELSERVO J2-Super
4 - 19
Operation
Parameter
Number
Symbol
Initial value
Unit
Setting range
27
MO1
0
mV
−999–999
mV
−999–999
r/min
0–10000
Analog monitor 1 offset
Used to set the offset voltage of the analog monitor 1 (MO1) output.
28
MO2
0
Analog monitor 2 offset
Used to set the offset voltage of the analog monitor 2 (MO2) output.
29
0001
Reserved
Do not change this parameter.
30
ZSP
50
Entry of the rotation speed under which the output signal “Rotation speed “ is output.
31
ERZ
80
0.1 × U
0–1000
Switching threshold contouring error
If the switching threshold is exceeded error message 52 is issued.
32
OP5
0000
Refer description
Function selection 5
Used to select PI-PID control switch-over.
0
0
0
PI- PID control switch over selection
0: PI control is always valid.
1: For position control the switch-over is dependent on
contouring error (refer to parameter 34).
2: PID control is always valid.
33
OP6
0000
Refer description
Function selection 6
Used to select the serial communication baud rate, serial communication response delay time setting and encoder
output pulse setting.
0
Serial communication baud rate selection
0: 9600 Bit/s
1: 19200 Bit/s
2: 38400 Bit/s
3: 57600 Bit/s
Serial communication response delay time
0: turned off
1: The response is sent after a time delay of at least 800ms.
Encoder output pulse setting (also refer parameter No. 38)
0: Direct output of the encoder pulses
1: Setting the divisor for pulse output
Tab. 4-13: Parameter list details (7)
4 - 20
Parameter
Operation
Number
Symbol
Initial value
Unit
Setting range
34
VPI
0
Pulse
0–50000
PI-/PID control switch-over position droop
Setting the switching threshold of the contouring error (in pulses) for the switch-over from PI to PID control.
Set "0001" in parameter No. 32 to make this function valid.
35
0
Reserved
Do not change this parameter.
36
VDC
980
r/min
0–1000
Speed differential compensation
If auto tuning (pr. 8) is selected then this parameter optimises itself automatically.
37
0010
Reserved
Do not change this parameter.
38
ENR
4000
Pulse/r
Encoder simulation resolution
Setting the number of pulses (A-phase, B-phase) which is output for a complete revolution of the motor at the
simulated encoder output.
The number of A-phase and B-phase pulses actually output is 1/4 times greater than the preset number of pulses.
Therefore, set the value 4 times greater than the desired pulses.You can use parameter No. 33 to adjust the output
pulse. The maximum output frequency is 1.3Mpps (after multiplication by 4).
Setting example:
With pr. 33 the direct pulse output is selected (contents of pr. 33: 0mmm). For a target in pr. 38 of 5600, for one
revolution of the motor 5600/4 = 1400 pulses are output.
Parameter 33 is set so that (contents of pr. 33: 1mmm), the pulses that are produced for a full rotation of the motor,
are divided by the figure specified in pr. 38.
If, for example, the figure “8” is specified in parameter 38, then for one revolution of the motor (131072/8) × 1/4 =
4096 pulses are output.
39
0
Reserved
Do not change this parameter.
Tab. 4-13: Parameter list details (8)
MELSERVO J2-Super
4 - 21
Operation
Parameter
Number
Symbol
Initial value
40
BLK
0000
Unit
Setting range
Refer description
Parameter entry prohibition
Depending on the setting, various parameter ranges may be blocked for reading or writing (refer topage 4-11).
Setting
Function
0000
(Initial value)
Read
000A
Write
Read
Write
Operation from controller
Operation from
setup-software
Parameter No. 1 to No. 39
Parameter No. 1 to No. 11
and No. 40
Parameter No. 1 to No. 39
Parameter No. 40
Read
000C
000E
100E
Write
Read
Write
Read
Write
Parameter No. 1 to No. 40
Parameter No. 1 to No. 39
Parameter No. 1 to No. 11
and No. 40
Parameter No. 1 to No. 39
Parameter No. 1 to No. 40
Parameter No. 1 to No. 39
Parameter No. 1 to No. 40
Parameter No. 40
Tab. 4-13: Parameter list details (9)
Set the parameter value and switch power off once, then switch it on again to make that
parameter setting valid.
4 - 22
Gain
Operation
4.6
Gain
4.6.1
Gain adjustment
The gain adjustment in this section can be made on a single servo amplifier. For gain
adjustment, first execute auto tuning mode 1. If you are not satisfied with the movement
processes of the machine during operation, then carry out the following steps in the order that
they are specified:
● Auto tuning mode 2
● Manual setting of the gain factor 1
● Manual setting of the gain factor 2
The following table shows the items of the different gain setting methods:
Method
Parameter No. 8
setting
Inertia ratio
Automatically set
parameters
Manually set
parameters
Auto tuning 1
0001
Always estimated
GD2 (parameter No. 12), Response characteristic
PG1 (parameter No. 13), in parameter No. 9
VG1 (parameter No. 14),
PG2 (parameter No. 15),
VG2 (parameter No. 16),
VIC (parameter No. 17)
Auto tuning 2
0003
As set in parameter
No. 12
PG1 (parameter No. 13), GD2 (parameter No. 12),
Response characteristic
VG1 (Pparameter No.
in parameter No. 9
14),
PG2 (parameter No. 15),
VG2 (parameter No. 16),
VIC (parameter No. 17)
Manual mode 1 0004
VG1 (parameter No. 14) GD2 (parameter No. 12),
PG2 (parameter No. 15), PG1 (parameter No. 13),
VG2 (parameter No. 16),
VIC (parameter No. 17)
Manual mode 2 0002
—
Interpolation
mode
0000
Always estimated
GD2 (parameter No. 12),
PG1 (parameter No. 13),
VG1 (parameter No. 14),
PG2 (parameter No. 15),
VG2 (parameter No. 16),
VIC (parameter No. 17)
GD2 (parameter No. 12), PG1 (parameter No. 13),
PG2 (parameter No. 15), VG1 (parameter No. 14)
VG2 (parameter No. 16),
VIC (parameter No. 17)
Tab. 4-14: Gain setting method
MELSERVO J2-Super
4 - 23
Operation
Gain
For the gain setting please follow the instructions which are given below:
Usage
Start
Interpolation mode
for 2 or more axes
Used when you want to match
the position gain (PG1)
between 2 or more axes.
Yes
Interpolation mode
No
Operation
Allows adjustment by merely
changing the response level
setting. First use this mode to
make adjustment.
Auto tuning mode 1
Operation
Yes
No
OK?
No
OK?
Yes
Auto tuning mode 2
Used when the conditions of
auto tuning mode 1 are not
met and the inertia ratio could
not be estimated properly.
Operation
Yes
OK?
No
Manual mode 1
The manual mode permits
adjustment easily with three
gains if you were not satisfied
with auto tuning results.
Operation
Yes
OK?
No
Manual mode 2
You can adjust all gains
manually. The method is used
for the minimisation of control
times, for example.
END
S000867
Fig. 4-5: Adjustment sequence
4 - 24
Gain
4.6.2
Operation
Gain adjustment using setup-software
The following table shows the functions and adjustment when using the setup-software:
Function
Description
Adjustment
Machine analyzer
The characteristic of the whole
mechanical system can be registered
from the personal computer.
You can grasp the machine resonance
frequency and determine the notch frequency of
the machine resonance suppression filter.
You can automatically set the optimum gains in
response to the machine characteristic. This
simple adjustment is suitable for a machine
which has large machine resonance and does
not require much settling time.
Automatically
gain search
For automatic gain setting the optimum
gain is determined taking into account
the shortest possible control time.
You can automatically set gains which make
positioning setting time shortest.
Machine simulation
The optimum gain factors and command chains
Response at positioning setting of a
machine can be simulated from machine can be determined.
analyzer results on the personal
computer.
Tab. 4-15: Comparison with setup-software
NOTE
When using the machine analyzer, set the servo amplifier’s coding switch CS1 to "F".
MELSERVO J2-Super
4 - 25
Operation
4.6.3
Gain
Auto tuning
The servo amplifier is equipped with a real-time auto tuning function that constantly optimises the
gain factors of the control loops depending on the machine characteristics (inertia of mass ratio).
This allows time-consuming settings during start-up to be avoided.
Auto tuning 1
The servo amplifier is factory-set to the auto tuning mode 1. In this mode, the inertia ratio of a
machine is always estimated to set the optimum gains automatically.
The following parameters are automatically adjusted in the auto tuning mode 1:
Parameter
Symbol
Name
12
GD2
Ratio of load inertia moment to servo motor inertia
moment
13
PG1
Position control gain 1
14
VG1
Speed control gain 1
15
PG2
Position control gain 2
16
VG2
Speed control gain 2
17
VIC
Speed intergral compensation
Tab. 4-16: Parameter adjusted in the auto tuning mode 1
The auto tuning mode 1 may not be performed properly if the following conditions are not
satisfied:
● Time to reach 2000r/min is the acceleration/deceleration time constant of 5s or less.
● Speed is 150r/min or higher.
● The ratio of load inertia moment to servo motor is not more than 100times.
● The acceleration/deceleration torque is 10% or more of the rated torque.
● Under operating conditions which will impose sudden disturbance torque during
acceleration/deceleration or on a machine which is extremely loose, auto tuning may not
function properly, either. In such cases, use the auto tuning mode 2 or manual mode 1 or
2 to make gain adjustment.
Auto tuning 2
Use the auto tuning mode 2 when proper gain adjustment cannot be made by auto tuning mode
1. Since the load inertia moment ratio is not estimated in this mode, set this value in parameter
No. 12
The following parameters are automatically adjusted in the auto tuning mode 2:
Parameter
Symbol
Name
13
PG1
Position control gain 1
14
VG1
Speed control gain 1
15
PG2
Position control gain 2
16
VG2
Speed control gain 2
17
VIC
Speed intergral compensation
Tab. 4-17: Parameter adjusted in the auto tuning mode 2
4 - 26
Gain
Operation
Auto tuning mode operation
The block diagram of real-time auto tuning is shown below:
Load inertia
moment
Automatic
setting
Encoder
Control gain
PG1, VG1, PG2,
VG2, VIC
+
Command
-
+
-
Current
control
Servo
motor
Current feedback
Set 0 or 1 to turn on
Real-time auto tuning
section
Gain
table
S1
Parameter No. 9
Parameter No. 8
0
0
0
1
Auto tuning
0
0
0
5
Position/speed
feedback
Mass inertia
ratio
estimation
Pr. 12:
Mass inertia
ratio
Response level
S000987C
Fig. 4-6: Block diagram of auto tuning
When a servo motor is accelerated/decelerated, the inertia ratio estimation section always
estimates it from the current and speed of the servo motor. The results of estimation are written
to parameter No. 12. These results can be confirmed on the status display screen of setupsoftware.
If the value of the load inertia moment ratio is already known or if estimation cannot be made
properly, choose the "auto tuning mode 2" (parameter No. 8: 0003) and set the load inertia
moment ratio (parameter No. 12) manually.
From the preset load inertia moment ratio (parameter No. 12) value and response level
(parameter No. 9), the optimum control gains are automatically set on the basis of the internal
gain table.
The auto tuning results are saved in the E²PROM of the servo amplifier every 6 minutes since
power-on. At power-on, auto tuning is performed with the value of each control gain saved in the
E²PROM being used as an initial value.
NOTE
If sudden disturbance torque is imposed during operation, the estimation of the inertia ratio
may malfunction temporarily. In such a case, choose the "auto tuning mode 2" (parameter
No. 8: 0003) and set the correct load inertia moment ratio in parameter No. 12.
MELSERVO J2-Super
4 - 27
Operation
Gain
Adjustment procedure by auto tuning
Auto tuning is the standard selection. In most cases you just need to connect the motor and start
up without making any time-consuming settings. Simply turn on the response level of auto
tuning in order to carry out the setting procedure.
Auto tuning
Acceleration/deceleration repeated
Yes
Mass inertia ratio
estimation
No
Choose the auto tuning mode 2
(parameter No. 8: 0003) and set the load
inertia moment ratio (parameter No. 12)
manually.
Acceleration/deceleration repeated
Adjust response level setting so that
desired response is achieved on
vibration-free level.
Acceleration/deceleration repeated
Requested
performance satisfied?
No
Yes
END
To manual
mode
S000869C
Fig. 4-7: Adjustment procedure by auto tuning
4 - 28
Gain
Operation
Response level setting in auto tuning mode
Set the response (parameter No. 9) of the whole servo system. As the response level setting is
increased, the trackability and positioning time for a command decreases, but a too high
response level will generate vibration. Hence, make setting until desired response is obtained
within the vibration-free range.
If the response level setting cannot be increased up to the desired response because of
machine resonance beyond 100Hz, adaptive vibration suppression control (parameter No. 25)
or machine resonance suppression filter (parameter No. 18) may be used to suppress machine
resonance. Suppressing machine resonance may allow the response level setting to increase.
0 0 0 5
Response level
S000988C
Fig. 4-8: Parameter 2 setting
Value
1
Machine characteristic
Response level
Machine resonance
Low
15Hz
2
20Hz
3
25Hz
4
30Hz
5
35Hz
6
45Hz
7
55Hz
8
Middle
9
85Hz
105Hz
B
130Hz
C
160Hz
D
200Hz
F
Large
conveyor
Robot arm
General
machine tool
conveyor
70Hz
A
E
Usage
Recision
working
machine
Inserter
mounter
bonder
240Hz
High
300Hz
Tab. 4-18: Response level setting
MELSERVO J2-Super
4 - 29
Operation
4.6.4
Gain
Manual gain setting
If you are not satisfied with the adjustment of auto tuning, you can make simple manual
adjustment with three parameters.
Manual mode 1
In this mode, setting the three gains of position control gain 1 (PG1), speed control gain 2 (VG2)
and speed integral compensation (VIC) automatically sets the other gains to the optimum values
according to these gains. The setting of the inertia of mass ratio occurs in pr. 12.
User setting
PG1
VG2
VIC
GD2
Automatic setting
PG2
VG1
S000872C
Fig. 4-9: Manual mode 1
NOTE
4 - 30
If machine resonance occure, adaptive vibration suppression control (pr. 25) or machine
resonance suppression filter (pr. 18) may be used to suppress machine resonance.
Gain
Operation
● Speed control
The following table gives an overview of the parameters used for rotation speed control for the
manual setting of the gain factor.
Parameter
Symbol
Name
12
GD2
Ratio of load inertia moment to servo motor inertia moment
16
VG2
Speed control gain 2
17
VIC
Speed intergral compensation
Tab. 4-19: Parameter adjusted for speed control
For the setting please follow the instructions which are given below:
Set an estimated value to the ratio of inertia (parameter No. 12).
Set pr. 16 to a low value in the vibration- and noise-free range. Increase the value gradually
and reduce it again as soon as vibrations set in. The optimum value is reached shortly before
vibrations set in.
Set pr. 17 to a value in the vibration- and noise-free range. Decrease the value gradually
and increase it again as soon as vibrations set in. The optimum value is reached shortly
before vibrations set in.
If the gain cannot be increased due to mechanical system resonance and the desired
response cannot be achieved used the low-pass filter (parameter No. 25) or the machine
resonance suppression filter (parameter No. 18) for executing steps and .
The response level of the revolution speed control loop is specified via the gain factor VG2
(pr. 16). Increasing this value enhances response but a too high value will make the mechanical
system liable to vibrate. The actual response frequency of the speed loop is as indicated in the
following expression:
VG2
speed loop response frequency [Hz] = ---------------------------------------------------------------( 1 + ratio of inertia ) × 2π
The setting of the I-portion of the speed control loop VIC occurs via pr. 17 and can be calculated
as follows:
2000 to 3000
VIC [ms] ≥ -----------------------------------------------------------------VG2 ⁄ ( 1 + ratio of inertia )
MELSERVO J2-Super
4 - 31
Operation
Gain
● Position control
The following table gives an overview of the parameters used for position control for the manual
setting of the gain factor.
Parameter
Symbol
Name
12
GD2
Ratio of load inertia moment to servo motor inertia moment
13
PG1
Position control gain 1
16
VG2
Speed control gain 2
17
VIC
Speed intergral compensation
Tab. 4-20: Parameter adjusted for position control
For the setting please follow the instructions which are given below:
Set an estimated value to the ratio of inertia (parameter No. 12).
Set a slightly smaller value to the position control gain 1 (parameter No. 13).
Set pr. 16 to a low value in the vibration- and noise-free range. Increase the value gradually
and reduce it again as soon as vibrations set in. The optimum value is reached shortly before
vibrations set in.
Set pr. 17 to a value in the vibration- and noise-free range. Decrease the value gradually
and increase it again as soon as vibrations set in. The optimum value is reached shortly
before vibrations set in.
Increase the position control gain 1 (parameter No. 13)
If the gain cannot be increased due to mechanical system resonance and the desired
response cannot be achieved used the low-pass filter (parameter No. 25) or the machine
resonance suppression filter (parameter No. 18) for executing steps to .
While checking the settling characteristic and rotational status, fine-adjust each gain.
The response level of the position control loop is specified via the gain factor PG1 (pr. 6).
Increasing position control gain 1 improves trackability to a position command but a too high
value will make overshooting liable to occur at the time of settling. The position control gain PG1
is as indicated in the following expression:
VG2
1
1
PG1 ≤ -------------------------------------------------- × ⎛ --- to ---⎞
( 1 + ratio of inertia ) ⎝ 3
5⎠
The response level of the revolution speed control loop is specified via the gain factor VG2
(pr. 16). Increasing this value enhances response but a too high value will make the mechanical
system liable to vibrate. The response frequency of the speed loop is as indicated in the
following expression:
VG2
speed loop response frequency [Hz] = ---------------------------------------------------------------( 1 + ratio of inertia ) × 2π
The setting of the I-portion of the speed control loop VIC occurs via pr. 17 and can be calculated
as follows:
2000 to 3000
VIC [ms] ≥ ------------------------------------------VG2 ⁄ ( 1 + GD2 )
4 - 32
Gain
4.6.5
Operation
Interpolation
The interpolation mode is used to match the position control gains of the axes when performing
the interpolation operation of servo motors of two or more axes for an X-Y table or the like. In this
mode, the position control gain 1 and speed control gain 1 which determine command
trackability are set manually and the other gain adjusting parameters are set automatically.
The following table provides an overview over the parameters, which are set automatically in
interpolation mode:
Parameter
Symbol
Name
12
GD2
Ratio of load inertia moment to servo motor inertia moment
15
PG2
Position control gain 2
16
VG2
Speed control gain 2
17
VIC
Speed intergral compensation
Tab. 4-21: Parameter adjusted for interpolation mode
The following parameters are adjustable manually:
Parameter
Symbol
Name
13
PG1
Position control gain 1
14
VG1
Speed control gain 1
Tab. 4-22: Parameter adjusted for manual mode
For interpolation between several axes the gain factor of the position control loop should be set
to the same value for all axes.
For the setting please follow the instructions which are given below:
Choose the auto tuning mode 1 (parameter No. 8: 0001) and set the machine resonance
frequency of the response level 1 of 15Hz (parameter No. 9: 0001)
Increase the response level selection (parameter No. 9), and return the setting if vibration
occurs. The optimum value is reached shortly before vibrations set in.
Choose the interpolation mode (parameter No. 8: 0000).
Set the highest possible value for pr. 13 and pr. 14.
The value set for pr. 13 in step d corresponds to the upper limiting value of the gain factor
for position control loop1. Set pr. 13 to the same value as that for the axis to be interpolated.
The value set for pr. 14 in step
corresponds to the upper limiting value of the gain factor
for speed control loop1. Check the rotation and set pr. 14 of the axis to be interpolated to
a value that is at least three times the value set in step
for pr. 13.
Looking at the interpolation characteristic and rotation status, fine-adjust the gains and
response level setting.
The response level of the position control loop is specified via the gain factor PG1 (pr. 13).
Increasing PG1 improves trackability to a position command but a too high value will make
overshooting liable to occur at the time of settling. The droop pulse value is determined by the
following expression:
rotation speed [r/min]------------------------------------------------------× 131072 [pulse]
60
droop pulse value [pulsen] = -----------------------------------------------------------------------------------------------------PG1
The response level of speed control loop 1 is specified via the gain factor VG1 (pr. 14). For the
response level of the speed control loop the following applies:
VG1 ≥ PG1 × 3
MELSERVO J2-Super
4 - 33
Operation
4.6.6
Gain
Differences in auto tuning between MR-J2 and MR-J2S
Response level
In comparison to the servo amplifiers of the MR-J2-Series the area for setting response levels
has been extended for servo amplifiers of the MR-J2-Super-Series.
0 0 0 5
Response level
S000988C
Fig. 4-10: Response level setting (parameter No. 9)
MR-J2
MR-J2-Super
Response level
Machine resonance
Response level
Machine resonance
—
—
1
15Hz
1
20Hz
2
20Hz
3
25Hz
4
30Hz
5
35Hz
—
—
2
40Hz
6
45Hz
—
—
7
55Hz
3
60Hz
8
70Hz
4
80Hz
9
85Hz
5
100Hz
A
105Hz
B
130Hz
C
160Hz
D
200Hz
—
—
E
240Hz
F
300Hz
Tab. 4-23: Response level comparison
NOTE
4 - 34
Because of a slight difference in gain adjustment pattern, response may not be the same if
the resonance frequency is set to the same value.
Gain
Operation
Auto tuning selection
The MR-J2-Super series has an addition of the load inertia moment ratio fixing mode. It also has
the addition of the manual mode 1 which permits manual adjustment with three parameters.
0 0 0 1
Auto tuning selection
S000989C
Fig. 4-11: Auto tuning selection (parameter No. 9)
Gain adjustment mode
MR-J2-Super
0
0
Position control gain 1 (PG1) is
fixed
1
1
For speed and position control
—
3
No estimation of load inertia
moment ratio,
Response level setting valid
Manual mode 1
—
4
Simple manual adjustment
Manual mode 2
2
2
Manual adjustment of all gains
Auto tuning 1
Auto tuning 2
Auto tuning
invalid
Description
MR-J2
Interpolation mode
Auto tuning
Auto tuning selection
Tab. 4-24: Auto tuning comparison
MELSERVO J2-Super
4 - 35
Operation
4 - 36
Gain
Filter functions
5
Special adjustment functions
Special adjustment functions
Use the functions given in this chapter, if you are not satisfied with the machine status after making
adjustment in the methods in section 4.6.
5.1
Filter functions
The servo amplifier MR-J2-Super have different filter functions:
● Machine resonance suppression filter
● Low-pass filter
If a mechanical system has a natural resonance point, increasing the servo system response
level may cause the mechanical system to produce resonance (vibration or unusual noise) at
that resonance frequency. As a result vibrations or higher levels of noise arise. The filter
functions serve to suppress any such resonance that may appear.
Speed
control
+
-
00
Machine
resonance
suppression filter
Adaptive vibration
suppression
control
Pr. 18
0
Pr. 25
Low-pass
filter
0
Pr. 25
Current
command
M
1
except 00
Encoder
1 or 2
S000990C
Fig. 5-1: Filter function block diagram
MELSERVO J2-Super
5-1
Special adjustment functions
5.1.1
Filter functions
Machine resonance suppression filter
The machine resonance suppression filter is a notch filter. You can set the resonance frequency
and notch frequency.
Mechanical system
response level
Resonance point
Frequency
Filter curve
Notch frequency
Frequency
S000876C
Fig. 5-2: Mode of operation of the filter for the suppression of machine resonance
NOTE
5-2
The machine resonance suppression filter is a delay factor for the servo system. Hence,
vibration may increase if you set a wrong resonance frequency or a too deep notch.
Filter functions
Special adjustment functions
Parameter
● Machine resonance suppression filter (pr. 18)
Set the notch frequency and attenuation of the machine resonance suppression filter
(parameter No.18).
0
Frequency [Hz]
Setting
Frequency
Setting
Frequency
Setting
Frequency
Setting
Frequency
00
—
08
562.5
10
281.3
18
187.5
01
4500
09
500
11
264.7
19
180
02
2250
0A
450
12
250
1A
173.1
03
1500
0B
409.1
13
236.8
1B
166.7
04
1125
0C
375
14
225
1C
160.1
05
900
0D
346.2
15
214.3
1D
155.2
06
750
0E
321.4
16
204.5
1E
150
06
642.9
0F
300
17
195.7
1F
145.2
Attenuation [dB]
Setting
Attenuation
0
40
1
14
2
8
3
4
S000612C
Fig. 5-3: Machine resonance suppression filter setting
NOTES
If the frequency of machine resonance is unknown, decrease the notch frequency from
higher to lower ones in order. The optimum notch frequency is set at the point where
vibration is minimal.
A deeper notch has a higher effect on machine resonance suppression but increases a
phase delay and may increase vibration.
The machine characteristic can be grasped beforehand by the machine analyzer on the
setup software). This allows the required notch frequency and attenuation to be determined.
MELSERVO J2-Super
5-3
Special adjustment functions
5.1.2
Filter functions
Adaptive vibration suppression control
Adaptive vibration suppression control is a function in which the servo amplifier detects machine
resonance and sets the filter characteristics automatically to suppress mechanical system
vibration. Since the filter characteristics (frequency, attenuation) are set automatically, you need
not be conscious of the resonance frequency of a mechanical system. Also, while adaptive
vibration suppression control is valid, the servo amplifier always detects machine resonance,
and if the resonance frequency changes, it changes the filter characteristics in response to that
frequency.
Mechanical
system
response level
Resonance point
Mechanical
system
response level
Resonance point
Frequency
Frequency
Filter curve
Filter curve
Frequency
Frequency
Notch frequency
Notch frequency
When machine resonance is large
and frequency is low
When machine resonance is small
and frequency is high
S000878C
Fig. 5-4: Mode of operation of adaptive vibration suppression
NOTES
The machine resonance frequency which adaptive vibration suppression control can
respond to is about 150 to 500Hz. Adaptive vibration suppression control has no effect on
the resonance frequency outside this range.
Adaptive vibration suppression control may provide no effect on a mechanical system which
has complex resonance characteristics or which has too large resonance.
Under operating conditions in which sudden disturbance torque is imposed during operation,
the detection of the resonance frequency may malfunction temporarily, causing machine
vibration. In such a case, set adaptive vibration suppression control to be "held" (parameter
No. 25: "2") to fix the characteristics of the adaptive vibration suppression control filter.
5-4
Filter functions
Special adjustment functions
Parameters
Set the operation of adaptive vibration suppression control at the third digit of parameter 25.
0
0
Adaptive vibration suppression control
0: invalid
1: valid
The resonance frequency is constantly determined and the filter
set accordingly.
2: held
Filter characteristics generated so far is held.
Adaptive vibration suppression control sensitivity
0: normal sensitivity
1: large sensitivity
S000619C
Fig. 5-5: Adaptive vibration suppression control setting
NOTES
Adaptive vibration suppression control is factory-set to be "invalid" (parameter No. 25:
0000).
After first switching on the data from the determined filter curves are saved in the controller
every 10 s. After switching on again the most recently saved values are used as a start.
The fourth digit of parameter 25 is used for adaptive vibration suppression control sensitivity
setting. Selection of "large sensitivity" detects smaller machine resonance and generates a
filter to suppress machine vibration. However, since a phase delay will also increase, the
response of the servo system may not increase.
MELSERVO J2-Super
5-5
Special adjustment functions
5.1.3
Filter functions
Low-pass filter
When a ballscrew or the like is used, resonance of high frequency may occur as the response
level of the servo system is increased. To prevent this, the low-pass filter is factory-set to be valid
for a torque command. The filter frequency of this low-pass filter is automatically adjusted to the
value in the following expression:
VG2 × 10
filter frequency [Hz] = -----------------------------------------------2π ( 1 + GD2 × 0.1 )
Parameter
Set the operation of the low-pass filter at the second digit of parameter 25.
0
Low-pass filter
0: valid (automatic adjustment) initial value
1: invalid
S000626C
Fig. 5-6: Low-pass filter setting
NOTE
5-6
In a mechanical system where rigidity is extremely high and resonance is difficult to occur,
setting the low-pass filter to be "invalid" may increase the servo system response to shorten
the settling time.
General description
Absolute position detection system
6
Absolute position detection system
6.1
General description
b
6.1.1
CAUTION:
If an absolute position erase alarm (25) has occurred, always perform home position
setting again. Not doing so can cause runaway.
Specifications
Item
Description
System
Electronic battery backup system
Battery
Lithium battery A6BAT or MR-BAT
Maximum revolution range
Reference position ±32767 rev.
Maximum speed at power failure
500r/min
Battery backup time
Approx. 10000h
Data holding time during battery replacement 2h at delivery, 1h in 5 years after delivery
Battery storage period
Approx. 5 years
Tab. 6-1: Specification overview
Time to hold data by a battery with power off.
Period during which data can be held by the super capacitor in the encoder after power-off,
with the battery voltage low or the battery removed, or during which data can be held with
the encoder cable disconnected. Battery replacement should be finished within this period.
MELSERVO J2-Super
6-1
Absolute position detection system
6.1.2
General description
System configuration
Controller
Servo amplifier
CN1
CN2
CN5
Battery
Servo motor
S000994
Fig. 6-1: System configuration
6.1.3
Communication overview
Block diagram
The encoder consists of a detector designed to detect a position within one revolution and a
cumulative revolution counter designed to detect the number of revolutions. The absolute
position detection system always detects the absolute position of the machine and keeps it
battery-backed, independently of whether the servo system controller power is on or off.
Therefore, once home position return is made at the time of machine installation, home position
return is not needed when power is switched on thereafter. If a power failure or a fault occurs,
restoration is easy. Also, the absolute position data, which is battery-backed by the super
capacitor in the encoder, can be retained within the specified period (cumulative revolution
counter value retaining time) if the cable is unplugged or broken (for data holding time refer tab.
6-1).
Servo amplifier
Controller
Position data
Position control
speed control
Current
position
Home position data
Detecting the
number of
revolutions
LS0
CYC0
Battery
MR-BAT
Detecting
the position
within one
revolution
Servo motor
1 pulse/rev accumulative revolution
counter
Capacitor
High speed serial
communication
Within one-revolution counter
(Encoder)
S000995C
Fig. 6-2:
6-2
Communication block diagram
General description
6.1.4
b
Absolute position detection system
Battery installation procedure
CAUTION:
The internal circuits of the servo amplifier may be damaged by static electricity.
Always take the following precautions:
● Ground human body and work bench.
● Do not touch the conductive areas, such as connector pins and electrical parts,
directly by hand.
For battery installation please follow the instructions which are given below:
Open the operation window. (When the model used is the MR-J2-200B or MR-J2-350B,
also remove the front cover.)
Install the battery in the battery holder.
Install the battery connector into CON1 until it clicks.
Operation window
Battery connector
CON1
Battery
Battery holder
MR-J2S-100B or less
MR-J2S-200B and MR-J2S-350B
S000997C
Fig. 6-3: Battery installation for MR-J2S-350B or less
Operation window
Battery connector
Battery holder
Battery
CON1
MR-J2S-500B, MR-J2S-700B, MR-J2S-700B4 or less
S001256C
Fig. 6-4: Battery installation for MR-J2S-500B, MR-J2S-700B, MR-J2S-700B4 or less
MELSERVO J2-Super
6-3
Absolute position detection system
6.1.5
General description
Parameter setting
Set "0001" in parameter No.1 to make the absolute position detection system valid.
0
0
0
1
Absolute position detection
0: incremental system
1: absolute system
S000996C
Fig. 6-5:
6-4
Parameter No. 1
General description
6.1.6
Absolute position detection system
Absolute position detection data
You can display the absolute position data with the setup software. For this function please
follow the instruction which are given below:
Clicking "Diagnostics" in the menu.
Abb. 6-6:
Open the menu "Diagnostics"
S000999T
By clicking "Absolute Encoder Data" in the sub-menu "Diagnostics", the absolute encoder
data display window appears.
S001000T
Fig. 6-7: Absolute encoder data display window
Click the "Close" button to close the absolute encoder data display window.
MELSERVO J2-Super
6-5
Absolute position detection system
6-6
General description
Accessories
7
Accessories
m
DANGER:
b
CAUTION:
Before connecting any option or auxiliary equipment, make sure that the charge lamp
is off more than 10 minutes after power-off, then confirm the voltage with a tester or
the like. Otherwise, you may get an electric shock.
Use the specified auxiliary equipment and options. Unspecified ones may lead to a
fault or overheating of the amplifier or regenerative brake resistor.
MELSERVO J2-Super
7-1
Accessories
Optional accessories
7.1
Optional accessories
7.1.1
Regenerative brake option
b
CAUTION:
Only use the combinations of regenerative brake options and servo amplifiers, which
are listed in the following table. Otherwise, a fire may occur.
Allowable combinations of regenerative brake resistors/servo amplifiers 200V.
Regenerative power [W]
Servo
amplifier
Built-in
regenerative
brake resistor
MR-RFH75-40
(40Ω)
MR-RFH220-40
(40Ω)
MR-RFH400-13
(13Ω)
MR-RFH400-6,7
(6.7Ω)
MR-J2S-10B
—
150
—
—
—
MR-J2S-20B
10
150
—
—
—
MR-J2S-40B
10
150
—
—
—
MR-J2S-60B
10
150
—
—
—
MR-J2S-70B
20
150
400
—
—
MR-J2S-100B
20
150
400
—
—
MR-J2S-200B
100
—
—
600
—
MR-J2S-350B
100
—
—
600
—
MR-J2S-500B
130
—
—
600
—
MR-J2S-700B
170
—
—
—
600
Tab. 7-1: Allowable combinations of brake unit/servo amplifier 200V
The power values are resistor-generated powers and not rated powers.
Allowable combinations of regenerative brake resistors/servo amplifiers 400V
Regenerative power [W]
Servo
amplifier
Built-in
regenerative MR-PWR-TMR-PWR-TMR-PWR-T150-270 (270Ω) 400-120 (120Ω) 600-80 (80Ω)
brake
resistor
MR-PWR-T600-47 (47Ω)
MR-PWR-T600-26 (26Ω)
MR-J2S-60B4
30
MR-J2S-100B4 100
150
—
—
—
—
—
400
—
—
—
MR-J2S-200B4 100
—
—
600
—
—
MR-J2S-350B4 100
—
—
—
600
—
MR-J2S-500B4 130
—
—
—
600
—
MR-J2S-700B4 170
—
—
—
—
600
Tab. 7-2: Allowable combinations of brake unit/servo amplifier 400V
The power values are resistor-generated powers and not rated powers.
7-2
Optional accessories
Accessories
Selection of the regenerative brake option
● Simple selection method
In horizontal motion applications, select the regenerative brake option as described below:
When the servo motor is run without load in the regenerative mode from the running speed to
a stop, the permissible duty is as indicated in tab. 10-4, tab. 10-5 and tab. 10-6 in section 10.2.2.
For the servo motor with a load, the permissible duty changes according to the inertia moment
of the load and can be calculated by the following formula:
permissible duty for servo motor with no load (value refer 10.2)
rated speed 2
permissible duty = ----------------------------------------------------------------------------------------------------------------------------------------------------------------------- × ⎛ --------------------------------------⎞ [ times/min ]
⎝ running speed⎠
(m + 1)
load inertia moment m = ------------------------------------------------------------------------
servo motor inertia moment
From the permissible duty, find whether the regenerative brake option is required or not.
Select the regenerative brake option out of the combinations in tab. 7-1 or tab. 7-2.
MELSERVO J2-Super
7-3
Accessories
Optional accessories
● Regenerative energy calculation
Use the following method (refer tab. 7-3) when regeneration occurs continuously in vertical
motion applications or when it is desired to make an in-depth selection of the regenerative brake
option.
TF
TU
No
up
Time
t1
t2
t3
t4
(+) generative
Generated
torque
Unbalance torque
Friction torque
M
Servo motor speed
tf (1 cycle)
(− )
Time
regenerative
S000634C
Fig. 7-1: Regenerative energy
Regenerative
Torque applied to servo motor [Nm]
energy
( JL + JM ) × N0
1
- × -------------T 1 = ------------------------------------ + TU + TF
4
T Psa1
9.55 × 10
T2 = TU + TF
Energy [J]
0.1047
E 1 = ------------------ × N 0 × T 1 × T Psa1
2
E 2 = 0.1047 × N 0 × T 2 × t 1
( JL + JM ) × N0
1
- × -------------- + TU + TF
T 3 = -----------------------------------4
T Psd1
9.55 × 10
0.1047
E 3 = ------------------ × N 0 × T 3 × T Psd1
2
, T4 = TU
E4 ≥ 0
( JL + JM ) × N0
1
- × -------------- – TU + TF
T 5 = -----------------------------------4
T Psa2
9.55 × 10
0.1047
E 5 = ------------------ × N 0 × T 5 × T Psa2
2
T6 = TU + TF
( JL + JM ) × N0
1
- × -------------- – TU + TF
T 7 = -----------------------------------4
T Psd2
9.55 × 10
E 6 = 0.1047 × N 0 × T 6 × t 3
0.1047
E 7 = ------------------ × N 0 × T 7 × T Psd2
2
Absolute value of the sum total of negative energies
Tab. 7-3: Equations for calculating torque and energy in operation
7-4
Optional accessories
Accessories
Servo amplifier 400V
Servo amplifier 200V
● Power dissipation of servo motor and servo amplifier in regenerative mode
Servo amplifier
Efficiency [%]
regenerative mode
Capacitor charging [J]
MR-J2S-10B
55
9
MR-J2S-20B
70
9
MR-J2S-40B
85
11
MR-J2S-60B
85
11
MR-J2S-70B
80
18
MR-J2S-100B
80
18
MR-J2S-200B
85
40
MR-J2S-350B
85
40
MR-J2S-500B
90
45
MR-J2S-700B
90
70
MR-J2S-60B4
85
11
MR-J2S-100B4
80
18
MR-J2S-200B4
85
40
MR-J2S-350B4
85
40
MR-J2S-500B4
90
45
MR-J2S-700B4
90
70
Tab. 7-4: Power dissipation of servo motor and servo amplifier
Efficiency regenerative mode (η): Efficiency including some efficiencies of the servo motor and
servo amplifier when rated (regenerative) torque is generated at rated speed.
Since the efficiency varies with the speed and torque, allow for about 10%.
Capacitor charging (EC): Energy charged into the electrolytic capacitor in the servo amplifier.
The energy ER consumed by the regenerative brake option is calculated as follows:
ER [ J ] = η × ES – EC
Calculate the power consumption of the regenerative brake option on the basis of the energy ER
and single-cycle operation period tf [s] to select the necessary regenerative brake option.
E
P R [ W ] = ------Rtf
MELSERVO J2-Super
7-5
Accessories
Optional accessories
● Installation of regenerative brake option
When using the regenerative brake resistor remove the built-in brake resistor and fit the
regenerative brake option across P-C. Set parameter No. 2 according to the option to be used.
Servo amplifier 200V
Servo amplifier 400V
Regenerative selection
brake option
00: No brake resistor
01: FR-RC, FR-BU
05: MR-RFH220-40
08: MR-RFH400-13
09: MR-RFH400-13
0B: MR-RFH400-6.7
0C: MR-RFH400-6.7
10: MR-RFH75-40
11: MR-RFH75-40
Regenerative selection brake option
00: No brake resistor
01: FR-RC-H, FR-BU-H
80: MR-RB3H-4
81: MR-RB5H-4/MR-PWR-T-600-80
82: MR-RB3G-4
83: MR-RB5G-4/MR-PWR-T-600-47
84: MR-RB34-4
85: MR-RB54-4/MR-PWR-T-600-26
86: MR-RB1L-4/MR-PWR-T-150-270
87: MR-RB3M-4/MR-PWR-T-400-120
S000635C
Abb. 7-2: Parameter No. 2 setting
The regenerative brake option will cause a temperature rise of 100 degrees relative to the
ambient temperature. Fully examine heat dissipation, installation position, used cables, etc.
before installing the option. For wiring, use flame-resistant cables and keep them clear of the
regenerative brake option body. Always use twisted cables of max. 5m length for connection
with the servo amplifier.
For installation of an external brake resistor to the servo amplifiers MR-J2S-350B or less and
MR-J2S-200B4 or less always remove the wiring from across P-D and fit the regenerative brake
option across P-C.
Always remove the lead!
Servo amplifier
Regenerative
brake option
D
P
P
C
C
5m max.
MR-J2S-350B and less
MR-J2S-200B4 and less
S000636C
Fig. 7-3: Brake unit connection for servo amplifiers MR-J2S-350B or less and
MR-J2S-200B4 or less
7-6
Optional accessories
Accessories
For installation of an external brake resistor to the servo amplifiers MR-J2S-500B and MR-J2S700B and MR-J2S-350B4 to MR-J2S-700B4 always remove the built-in regenerative brake
resistor. To do this loosen the cables attached to terminals P and C. Then fasten the cables to
the housing of the servo amplifier using the accessory screw (refer fig. 7-5).
Always remove built-in regenerative brake resistor!
Servo amplifier
Regenerative
brake option
P
P
x
C
C
x
5m max.
MR-J2S-500B and MR-J2S-700B
MR-J2S-350B4 to MR-J2S-700B4
S000928C
Fig. 7-4: Brake unit connection for servo amplifiers MR-J2S-500B, MR-J2S-700B and
MR-J2S-350B4 to MR-J2S-700B4
MR-J2S-500B and MR-J2S-500B4
MR-J2S-700B and MR-J2S-700B4
Accessory screw
S000930C
Fig. 7-5: Mounting method of built-in regenerative brake resistor
NOTE
For dimensions of regenerative brake resistor option refer to chap. 12.
MELSERVO J2-Super
7-7
Accessories
7.1.2
Optional accessories
Cables
Use the following cables for connection of the servo motor and servo amplifier:
Servo amplifier
Termination
connector
CN1A CN1B
CN1A CN1B
CN2 CN3
CN2 CN3
PC (optional)
Motor HC-SFS/HC-RFS
Motor HC-KFS/
HC-MFS
Instructions for connecting the PC
can be found in the manual for the
Motion Controller.
!
S000992C
Fig. 7-6: Connections
Product
Description
Encoder cable for HC-KFS, HC-MFS
MR-JCCBLM-L (Standard)
Cable length in : 2, 5, 10, 20, 30m
MR-JCCBLM-H (high-flexible)
Cable length in : 2, 5, 10, 20, 30m
MR-JHSCBLM-L (Standard)
Cable length in : 2, 5, 10, 20, 30m
For CN2
Encoder cable for HC-SFS, HC-RFS
MR-ENCBLM-H
Cable length in : 2, 5, 10, 20, 30m
For CN1A
For CN1B
CN3
Encoder connector set for HC-KFS, HC-MFS
Encoder connector set for HC-SFS, HC-RFS
MR-J2CNM
MR-J2CNS
MR-ENCNS
Controller to amplifier bus cable
MR-J2HBUS M-A
Cable length in : 0.5, 1, 5m
Amplifier to amplifier bus cable
MR-J2HBUS M
Cable length in : 0.5, 1, 5m
Bus-end connector
MR-A-TM
Personal computer communications cable
MR-CPCATCBL3M
Cable length: 3m
Power supply connector set for HC-KFS, HC-MFS series
MR-PWCNK1
motor
Power supply connector set for HC-KFS,
HC-MFS series motor with electromagnetic brake
MR-PWCNK2
Power supply connector set for HC-SFS52, 102, 252,
HC-SFS524, 1024, 1524,
HC-RFS103, 153, 203
MR-PWCNS1
Power supply connector set for HC-SFS202, 352, 502,
HC-SFS2024,3524,5024
HC-RFS353, 503
MR-PWCNS2
Power supply connector set for HC-SFS702
HC-SFS7024
MR-PWCNS3
Brake connector set for HC-SFS202B, 352B, 502B, 702B
MR-BKCN
HC-SFS2024B, 3524B, 5024B, 7024B
Tab. 7-5: Overview of the prefabricated connecting cables
7-8
MR-JHSCBLM-H (high-flexible)
Cable length in : 2, 5, 10, 20, 30m
Optional accessories
7.1.3
b
Accessories
Confection diagram of encoder cables
CAUTION:
If you have fabricated the encoder cable, connect it correctly. Otherwise, misoperation
or explosion may occur.
Encoder cable for HC-KFS and HC-MFS series motor
MR-JCCBL10M-L
MR-JCCBL20M-L
MR-JCCBL30M-L
MR-JCCBL2M-L
MR-JCCBL5M-L
MR-JCCBL2M-H
MR-JCCBL5M-H
Servo amplifier
Encoder
19
11
20
12
18
2
LG
LG
7
17
6
16
9
1
LG
Plate
P5
LG
P5
LG
P5
LG
LG
LG
MR
MRR
MD
MDR
BA T
LG
LG
SD
7
11
20
12
18
2
LG
8
1
2
4
5
3
1
LG
9
Encoder
Servo amplifier
P5
LG
P5
LG
P5
LG
LG
LG
MR
MRR
MD
MDR
BA T
LG
LG
SD
MR-JCCBL10M-H
MR-JCCBL20M-H
MR-JCCBL30M-H
19
11
20
12
18
2
LG
LG
7
17
6
16
9
1
LG
Plate
7
11
20
12
18
2
LG
8
1
2
4
5
3
1
LG
9
Servo amplifier
P5
LG
P5
LG
P5
LG
LG
LG
MR
MRR
MD
MDR
BA T
LG
LG
SD
Encoder
19
11
20
12
18
2
LG
LG
7
17
6
16
9
1
LG
Plate
7
11
20
12
18
2
LG
8
1
2
4
5
3
1
LG
9
S000645C
Fig. 7-7: Pin assignment for HC-KFS and HC-MFS series motor
Encoder cable for HC-SFS and HC-RFS series motor
MR-JHSCBL2M-L
MR-JHSCBL5M-L
MR-JHSCBL2M-H
MR-JHSCBL5M-H
MR-ENCBL2M-H
MR-ENCBL5M-H
Servo amplifier
Encoder
P5
LG
P5
LG
MR
MRR
P5
LG
BA T
LG
19
11
20
12
7
17
18
2
9
1
S
R
C
R
C
D
5
3
F
G
SD
Plate
N
10m max.
MR-JHSCBL10M-L
MR-JHSCBL20M-L
MR-JHSCBL30M-L
Servo amplifier
P5
LG
P5
LG
P5
LG
LG
LG
MR
MRR
MD
MDR
BA T
LG
LG
SD
MR-JHSCBL10M-H
MR-JHSCBL20M-H
MR-JHSCBL30M-H
MR-ENCBL10M-H
MR-ENCBL20M-H
MR-ENCBL30M-H
Encoder
S
11
20
R
18
2
LG
R
C
D
4
5
F
G
LG
N
19
11
20
12
18
2
LG
LG
7
17
6
16
9
1
LG
Plate
Servo amplifier
P5
LG
P5
LG
P5
LG
LG
LG
MR
MRR
MD
MDR
BA T
LG
LG
SD
10–50m
Encoder
S
11
20
12
18
2
LG
R
C
D
4
5
F
G
LG
N
19
11
20
12
18
2
LG
LG
7
17
6
16
9
1
LG
Plate
10–50m
S000647C
Abb. 7-8: Pin assignment for HC-SFS and HC-RFS series motor
MELSERVO J2-Super
7-9
Accessories
7.1.4
b
Optional accessories
Bus cable
CAUTION:
When fabricating the bus cable, do not make incorrect connection. Doing so can cause
misoperation or explosion.
MR-J2BUS M-A
MR-J2BUS M
1
1
LG
1
1
11
11
LG
11
11
2
2
RD
2
2
*
12
12
RD*
12
12
4
4
3
3
*
14
14
13
13
*
5
5
TD
4
4
15
15
TD *
14
14
6
7
LG
5
5
16
17
LG
15
15
6
6
16
16
20
Plate
EM G
7
7
EM G *
17
17
BAT
SD
8
8
18
18
9
9
19
19
10
10
20
20
Plate
Plate
S000993C
Fig. 7-9: Connection diagram of bus cable
NOTE
7 - 10
The maximum bus cable legth is 30m.
Special accessories
Accessories
7.2
Special accessories
7.2.1
Transformer
Input: 3 × 400V
Output: 3 × 230V
Power
capacity
ED
Input current
Output current
Terminal
cross section
Power
dissipation
MT 1.3-60
1.3kVA
60%
2.02A
2.69A
3.26A
4.27A
2.5mm²
2.5mm²
103W
167W
MT 1.7-60
1.7kVA
60%
2.61A
3.89A
4.27A
6.2A
2.5mm²
2.5mm²
110W
199W
MT 2.5-60
2.5kVA
60%
3.80A
5.42A
6.28A
8.78A
2.5mm²
2.5mm²
155W
282W
MT 3.5-60
5.5kVA
60%
5.30A
8.41A
8.78A
13.80A
4mm²
4mm²
170W
330W
MT 5.5-60
5.5kVA
60%
8.26A
13.80A
4mm²
243W
MT 7.5-60
7.5kVA
60%
11.25A
18.82A
4mm²
190W
MT 11-60
11kVA
60%
16.40A
27.61A
4mm²
280W
Transformer
Tab. 7-6: Transformer
NOTE
For dimensions of transformer refer to chap. 12.
MELSERVO J2-Super
7 - 11
Accessories
7 - 12
Special accessories
Inspection
Maintenance and Inspection
8
Maintenance and Inspection
8.1
Inspection
It is recommended to make the following checks periodically:
Check for loose terminal block screws. Retighten any loose screws.
Check the servo motor bearings, brake section, etc. for unusual noise.
Check the cables and the like for scratches and cracks.
At regular intervals check that the various components all function properly.
Check the servo motor shaft and coupling for misalignment.
8.2
Life
The following parts must be changed periodically as listed below. If any part is found faulty, it
must be changed immediately even when it has not yet reached the end of its life, which
depends on the operating method and environmental conditions. For parts replacement, please
contact your sales representative.
Part name
Servo amplifier
Servo motor
Life guideline
Main circuit capacitor
10 years
Relay
Number of power-on and number of
forced stop times: 100000
Cooling fan
10000 to 30000 hours (2–3 years)
Absolute position battery
10000 hours
Bearings
20000 to 30000 hours
Encoder
20000 to 30000 hours
Oil seal, V ring
5000 hours
Tab. 8-1: Life of parts
MELSERVO J2-Super
8-1
Maintenance and Inspection
8-2
Life
Alarms and Warnings
Troubleshooting
9
Troubleshooting
9.1
Alarms and Warnings
9.1.1
Alarms and warning list
When a fault occurs during operation, the corresponding alarm or warning is displayed. If any
alarm or warning has occurred, refer to section 9.1.2 or section 9.1.3 and take the appropriate
action.
Alarm deactivation
Alarms
Display
Meaning
Power
OFF ON
RESET
command
CPU reset
10
Undervoltage
✓
✓
✓
12
Memory error 1
✓
—
—
13
Clock error
✓
—
—
15
Memory error 2
✓
—
—
16
Encoder error 1
✓
—
—
17
Board error
✓
—
—
19
Memory error 2
✓
—
—
1A
Motor combination error
✓
—
—
20
Encoder error 2
✓
—
—
24
Main ciruit error
✓
✓
✓
25
Absolute position erase
✓
—
—
30
Regenerative error
✓
✓
✓
31
Overspeed
✓
✓
✓
32
Overcurrent
✓
✓
✓
33
Overvoltage
✓
✓
✓
34
CRC error
✓
✓
✓
35
Command frequency error
✓
✓
✓
36
Transfer error
✓
✓
✓
37
Parameter error
✓
—
✓
45
Main circuit device overheat
✓
✓
✓
46
Servo motor overheat
✓
✓
✓
50
Overload 1
✓
✓
✓
51
Overload 2
✓
✓
✓
52
Error excessive
✓
✓
✓
8E
Serial communication error
✓
✓
✓
88
Watchdog
✓
—
—
Tab. 9-1: Alarm and warning overview (1)
MELSERVO J2-Super
9-1
Troubleshooting
Alarms and Warnings
Alarm deactivation
Alarme
Display
Meaning
92
Open battery cable warning
96
Home position setting warning
9F
Battery warning
E0
Excessive regenerative warning
E1
Overload warning
E3
Absolute position counter warning
E4
Parameter warning
E6
Servo forced stop warning
E7
Controller emergency stop
warning
E9
Main circuit off warning
EE
SSCNET error warning
Power
OFF
ON
RESET
command
CPU reset
Removing the cause of occurrence deactivates the alarm
automatically.
Tab. 9-1: Alarm and warning overview (2)
9-2
Deactivate the alarm about 30 minutes of cooling time for servo amplifier, servo motor and
brake unit after removing the cause of occurrence.
Alarms and Warnings
9.1.2
m
Troubleshooting
Alarms
DANGER:
When any alarm has occurred, eliminate its cause, ensure safety, then reset the alarm,
and restart operation. Otherwise, injury may occur.
If an absolute position erase alarm (25) occurred, always make home position setting
again. Otherwise, misoperation may occur.
Tab. 9-2
Prcautions at alarm occurrence:
b
CAUTION:
When any of the following alarms has occurred, always remove its cause and allow
about 30 minutes for cooling the servo amplifier, servo motor and
brake unit before resuming operation:
● Regenerative error (30)
● Overload 1 (50)
● Overload 2 (51)
If operation is resumed by switching control circuit power off, then on to reset the
alarm, the servo amplifier, servo motor and regenerative brake resistor may become
faulty.
m
NOTE
DANGER:
Brief interruption in power
If there is a loss of power lasting for longer than 60 ms, then power loss alarm (10) is
issued. If the loss of power continues for longer than another 20 ms, then the control
loop is switched off. If in this situation the voltage comes up again and at the same
time a signal “Servo ON” exists, then this would cause the servo motor to restart in an
uncontrolled manner. To prevent this from occurring you must provide a circuit
arrangement that immediately switches off a “Servo ON” signal if an alarm happens.
When an alarm occurs, the dynamic brake is operated to stop the servo motor. At this time,
the display indicates the alarm No. The setup-software may be used to refer to the cause of
alarm.
MELSERVO J2-Super
9-3
Troubleshooting
Alarms and Warnings
Display
Error
Definition
Cause
Action
10
Undervoltage
Power supply
voltage dropped to
160V (servo
amplifier 200V) and
280V (servo
amplifier 400V) or
less, respecively.
1. Power supply voltage is low.
Check the power
supply
2. There was an instantaneous control
circuit power failure of 60ms or longer.
3. The impedance of the power supply
is too high.
4. Main circuit power switched on
within 5s after it had switched off.
5. Faulty parts in the servo amplifier
Change the servo
amplifier
Faulty parts in the servo amplifier
Checking method: Alarm (12–15)
occurs if power is switched on after
CN1A, CN1Band CN3 connectors are
disconnected.
Change the servo
amplifier
12
Memory error 1
RAM, memory fault
13
Clock error
Printed board fault
15
Memory error 2
E²PROM fault
16
Encoder error 1
Communication error 1. Encoder connector (CN2)
disconnected.
occurred between
encoder and servo
2. Encoder fault
amplifier
3. Encoder cable faulty
(Wire breakage or shorted)
17
Board error 2
CPU/parts fault
19
Memory error 3
ROM, memory fault
1A
Motor
Wrong combination
combination error of servo amplifier
and servo motor.
20
Encoder error 2
Main circuit error
Change the servo
motor
Repair or change
cable
Change the servo
Faulty parts in the servo amplifier
amplifier
Checking method: Alarm 17 or 19
occurs if power is switched on after
CN1A, CN1B and CN3 connectors are
disconnected.
Wrong combination of servo amplifier
and servo motor connected.
Communication error 1. Encoder connector (CN2)
disconnected
occurred between
encoder and servo
2. Encoder fault
amplifier
3. Encoder cable faulty
(Wire breakage or shorted)
24
Connect correctly
Connection between 1. Power input wires and servo motor
load circuit and earth output wires are in contact at main
circuit terminal block (TE1).
potential
2. Too little insulation resistance
between cable or motor and earth
potential
Use correct
combination
Connect correctly
Change the servo
motor
Repair or change
cable
Connect correctly
Change the cable
3: Main circuit of servo amplifier failed. Change the servo
Checking method: Alarm 24 occurs if amplifier
the servo is switched on after
disconnecting the U, V, W power
cables from the servo amplifier.
Tab. 9-2: Failure corrective action (1)
9-4
Alarms and Warnings
Troubleshooting
Display
Error
Definition
Cause
Action
25
Absolute position
erase
Absolute position
data in error
1. Battery voltage low
Change battery
Always make home
position setting
again
2. Battery cable or battery is faulty.
Power was switched 3. Capacitor of the absolute position
on for the first time in encoder is not charged.
the absolute position
detection system.
30
Regenerative
error
Permissible
regenerative power
of the built-in
regenerative brake
resistor or
regenerative brake
option is exceeded.
After leaving the
alarm occurring for
a few minutes,
switch power off,
then on again.
Always make home
position setting
again.
1. Parameter No. 2 setting error
Set correctly
2. Built-in regenerative brake resistor
or regenerative brake option is not
connected.
Connect correctly
3. Short cycle time or continuous
regenerative operation caused the
permissible regenerative power of the
rege-nerative brake option to be
exceeded.
Checking method: Call the status
display and check the regenerative
load ratio.
1. Increase the
cycle time
2. Use the
regenerative brake
option of larger
capacity.
3. Reduce the load.
Connect the units to
4. Power supply voltage rose above
260V (servo amplifier 200V) and 535V the correct power
supply
(servo amplifier 400V) or more,
respecively.
5. Built-in regenerative brake resistor
or regenerative brake option faulty.
Regenerative
transistor fault
Change servo
amplifier or
regenerative brake
option
Change the servo
6. Regenerative transistor faulty
Checking method: 1. The regenerative amplifier
brake option has overheated
abnormally.
2. The alarm occurs even after
removal of the built-in regenerative
brake resistor or regenerative brake
option.
Built-in regenerative brake resistor or
regenerative brake option faulty.
31
Overspeed
Speed has exceeded 1. Small acceleration/deceleration time Increase
constant caused overshoot to be large. acceleration/
the instantaneous
deceleration time
permissible speed.
constant
2. Servo system is instable to cause
overshoot.
Optimise control
parameter
3. Encoder faulty
Change the servo
motor
Tab. 9-2: Failure corrective action (2)
MELSERVO J2-Super
9-5
Troubleshooting
Alarms and Warnings
Display
Error
Definition
Cause
Action
32
Overcurrent
Current that flew is
higher than the
permissible current
of the servo
amplifier.
1. Short occurred in servo amplifier
output phases U, V and W.
Correct the wiring
33
34
Overvoltage
CRC error
Converter bus
voltage exceeded
400V (servo
amplifier 200V) and
800V (servo
amplifier 400V)
respecively.
Bus cable is faulty.
Change the servo
2. Transistor of the servo amplifier
amplifier
faulty.
Checking method: Alarm (32) occurs if
power is switched on after U, V and W
are disconnected.
3. Low impedance ground fault
occurred in servo amplifier output
phases U, V and W.
Eliminate earth fault
4. External noise caused the
overcurrent detection circuit to
misoperate.
Take noise
suppression
measures.
1. Lead of built-in regenerative brake 1. Change lead
resistor or regenerative brake option is 2. Connect
open or disconnected.
correctly
2. Regenerative transistor faulty
Change servo
amplifier
3. Wire breakage of built-in
regenerative brake resistor or
regenerative brake option
1. Change servo
amplifier
2. Change
regenerative brake
option
4. The regenerative transistor is
broken.
Change servo
amplifier
5. Power supply voltage high
Connect the units to
the correct power
supply
1. Bus cable disconnected
Connect bus cable
correctly
2. Bus cable fault
Change the bus
cable
3. Noise entered bus cable
Ensure correct
cable laying and
screening
4. Termination connector disconnected Connect
termination
connector
35
36
Command
frequency error
Transfer error
Input frequency of
command pulse is
too high.
Bus cable or printed
board is faulty
Tab. 9-2: Failure corrective action (3)
9-6
5. The same No. exists in the servo
amplifier side station setting
Set station number
correctly
1. Command given is greater than the
maximum speed of the servo motor
Review operation
program.
2. Noise entered bus cable
Ensure correct
cable laying and
screening
3. Servo system controller failure
Change the servo
system controller
1. Bus cable is disconnected.
Connect the
connector of the
bus cable
2. Bus cable fault
Change the bus
cable
3. Printed board is faulty
Change the servo
amplifier
4. Termination connector
disconnected
Connect
termination
connector
Alarms and Warnings
Troubleshooting
Display
Error
Definition
37
Parameter error
Parameter setting is 1. Servo amplifier fault caused the
wrong.
parameter setting to be rewritten.
Cause
Action
Change the servo
amplifier
Change the
2. There is a parameter whose value
was set to outside the setting range by parameter value to
within the setting
the controller
range
45
46
50
Main circuit device Main circuit device
overheat
overheat.
Servo motor
overheat
Overload 1
1. Servo amplifier faulty
Change the servo
amplifier
2. The power supply was turned on
and off continuously by overloaded
status.
Check control
mode
3. Air cooling fan of servo amplifier
stops.
1. Change the
servo amplifier or
cooling fan
2. Observe max.
permitted ambient
temperature
1. Ambient temperature of servomotor
Servo motor
is over 40°C.
temperature rise
actuated the thermal
protector.
Overload of servo
amplifier
Load ratio
300%: > 2.5s
Load ratio
200%: > 100s
When planning the
system ensure that
the ambient
temperature is
always between 0
and 40 °C.
2. Servo motor is overloaded.
1. Reduce load
2. Extended cycle
time
3. Use servo motor
that provide larger
output
3. Thermal protector in encoder is
faulty.
Change servo
motor
1. The output current exceeds the
rated current continuously.
1. Reduce load
2. Extended cycle
time
3. Use servo motor
that provide larger
output
2. Servo system is unstable.
1. Repeat
acceleration/
deceleration to
execute auto tuning
2. Change auto
tuning response
setting
3. Set auto tuning
to OFF and make
adjustment
manually
3. Mechanical overload
1. Ensure that
mechanical
components run
smoothly
2. Install limit
switches
Connect correctly
4. Wrong connection of servo motor.
Servo amplifiers output terminals U, V,
W do not match servo motors input
terminals U, V, W.
5. Encoder error
Change the servo
motor
Tab. 9-2: Failure corrective action (4)
MELSERVO J2-Super
9-7
Troubleshooting
Alarms and Warnings
Display
Error
Definition
51
Overload 2
Max. output current 1. Mechanical overload
flow successively for
several seconds.
Servo motor locked:
1s or more
Cause
Action
1. Ensure that
mechanical
components run
smoothly
2. Install limit
switches
Connect correctly
2. Wrong connection of servo motor.
Servo amplifiers output terminals U, V,
W do not match servo motors input
terminals U, V, W.
52
Error excessive
3. Servo system is instable
1. Repeat
acceleration/
deceleration to
execute auto tuning
2. Change auto
tuning response
setting
3. Set auto tuning
to OFF and make
adjustment
manually
4. Encoder faulty
Change the servo
motor
1. Acceleration/deceleration time
Contouring error is
constant is too small.
greater than the
value set with
parameter 31 (initial
value: 8 revolutions).
2. Torque limit value is too small.
Increase the
acceleration/
deceleration time
constant
Increase the torque
limit value
3. Motor cannot be started due to
torque shortage caused by power
supply voltage drop.
1. Improve the
impedance of the
power supply
2. Use servo motor
which provides
larger output
4. Position control gain 1
(parameter No.13) value is small.
Increase set value
and adjust to
ensure proper
operation
5. Servo motor shaft was rotated by
external force.
1. When torque is
limited, increase
the limit value.
2. Reduce load
3. Use servo motor
that provides larger
output
6. Mechanical overload
1. Ensure that
mechanical
components run
smoothly
2. Install limit
switches
7. Encoder faulty
Change the servo
motor
Connect correctly
8. Wrong connection of servo motor.
Servo amplifiers output terminals U, V,
W do not match servo motors input
terminals U, V, W.
Tab. 9-2: Failure corrective action (5)
9-8
Alarms and Warnings
Troubleshooting
Display
Error
Definition
8E
Serial
communication
error
1. Communication cable fault
Serial
communication error (Open cable or short circuit).
occurred between
2. Personal computer faulty
servo amplifier and
personal computer.
Watchdog
CPU, parts faulty
88
Cause
Action
Repair or change
the cable
Change the
personal computer
Change the servo
Fault of parts in servo amplifier
Checking method: Alarm (88) occurs if amplifier
power is switched on after CN1A,
CN1B and CN3 connectors are
disconnected.
Tab. 9-2: Failure corrective action (6)
MELSERVO J2-Super
9-9
Troubleshooting
9.1.3
Alarms and Warnings
Warnings
If E6, E7, E9 or EE occurs, the servo off status is established. If any other warning occurs,
operation can be continued but an alarm may take place or proper operation may not be
performed. Eliminate the cause of the warning according to this section.
Display Name
Definition
92
Absolute position detection 1. Battery cable is open
system battery voltage is
low.
2. Battery voltage dropped to
2.8V or less.
Repair cable or
changed.
Home position return could 1. Contouring error is greater
not be made in the precise than the setting range of the
“In Position”.
position.
Eliminate the cause of
the contouring error
96
Open battery
cable warning
Home position
setting warning
Cause
2. Home position return was
executed during operation
command.
Action
Change battery
Reduce speed for
home position travel
3. Speed for home position
travel is too high.
9F
Battery warning
Voltage of battery for
absolute position detection
system reduced.
Battery voltage fell to 3.2V or
less.
Change the battery
E0
Excessive
regenerative
warning
Pre-warning alarm 30
Regenerative power increased
to 85% or more of permissible
regenerative power of built-in
regenerative brake resistor or
regenerative brake option.
Checking method: Call the
status display and check
regenerative load ratio.
1. Increase the cycle
time
2. Change regenerative
brake option for the one
with larger capacity.
3. Reduce load
E1
Overload warning
Pre-warning alarm 50/51
Load increased to 85% or
more of overload alarm 1 or 2
occurrence level.
Refer alarm 50/51
E3
Absolute position
counter warning
Absolute position encoder
pulses faulty
1. Electromagnetic coupling
entered the encoder.
Take electromagnetic
coupling suppression
measures.
2. Encoder faulty
Change servo motor
E4
Parameter
warning
Parameter outside setting
range
Parameter value set from
servo system controller is
outside setting range
Set it correctly
E6
Servo forced stop
warning
EM1 is off.
External forced stop was made Deactivate external
valid.
forced stop
E7
Controller
emergency stop
warning
—
Deactivate emergency
Emergency stop signal was
entered in to the servo system stop
controller.
E9
Main circuit off
warning
Servo-on (SON) was
switched on with main
circuit power off.
—
EE
SSCNET error
warning
The servo system controller —
connected is not
SSCNET-compatible.
Tab. 9-3: Meanings
9 - 10
Switch on main circuit
power
—
Characteristics
Specifications
10
Specifications
10.1
Characteristics
10.1.1
Load diagram
An electronic thermal relay is built into the servo amplifier to protect the servo motor and servo
amplifier from overloads. The working diagrams for load monitoring are presented in the
following figures. Overload 1 alarm (50) occurs if overload operation performed is above the
electronic thermal relay protection curve. Overload 2 alarm (51) occurs if the maximum current
flowed continuously for several seconds due to machine collision, etc. In the diagrams the area
underneath the solid or dotted lines represents the normal working range. The dotted line
represents the load curve when the servo motor has stopped. In a machine like the one for
vertical lift application where unbalanced torque will be produced, it is recommended to use the
machine so that the unbalanced torque is 70% or less of the rated torque.
HC-KFS
HC-MFS
HC-SFS
100 0
Operation time [s]
100
Rotation
10
Servo lock
1
0,1
0
50
100
150
200
250
30
Load ratio [%]
S000932C
Fig. 10-1: Load diagrams MR-J2S-10B to MR-J2S-100B, MR-J2S-60B4 and MR-J2S-100B4
HC-SFS
HC-RFS
100 0
Rotation
Operation time [s]
100
Servo lock
10
1
0,1
0
50
100
150
200
250
30
Load ratio [%]
S000933C
Fig. 10-2: Load diagrams MR-J2S-200B, MR-J2S-350B, MR-J2S-200B4 and MR-J2S-350B4
MELSERVO J2-Super
10 - 1
Specifications
Characteristics
HC-SFS
HC-RFS
Operation time [s]
100 00
100 0
Rotation
100
Servo lock
10
1
0
50
100
150
200
250
30
Load ratio [%]
S000953C
Fig. 10-3: Load diagrams MR-J2S-500B, MR-J2S-700B, MR-J2S-500B4 and MR-J2S-700B4
10 - 2
Characteristics
10.1.2
Specifications
Heat loss of servo amplifier
Amount of heat generated by the servo amplifier
The following table provides an overview over the power dissipation under rated load:
Servo amplifier
Servo amplifier 200V
MR-J2S-10B
At rated torque [W]
At servo off [W]
HC-KFS053
25
15
HC-KFS13
25
15
HC-MFS053
25
15
HC-MFS13
25
15
MR-J2S-20B
HC-KFS23
25
15
HC-MFS23
25
15
MR-J2S-40B
HC-KFS43
35
15
HC-MFS43
35
15
MR-J2S-60B
HC-SFS52
40
15
MR-J2S-70B
HC-KFS73
50
15
HC-MFS73
50
15
MR-J2S-100B
HC-SFS102
50
15
MR-J2S-200B
HC-SFS152
90
20
HC-SFS202
90
20
HC-RFS103
50
15
MR-J2S-350B
HC-RFS153
90
20
HC-SFS352
130
20
HC-RFS203
90
20
HC-SFS502
195
25
HC-RFS353
135
25
HC-RFS503
195
25
MR-J2S-700B
HC-SFS702
300
25
MR-J2S-60B4
HC-SFS524
40
15
MR-J2S-100B4
HC-SFS1024
50
15
MR-J2S-200B4
HC-SFS1524
90
20
HC-SFS2024
90
20
MR-J2S-350B4
HC-SFS3524
130
20
MR-J2S-500B4
HC-SFS5024
195
25
MR-J2S-700B4
HC-SFS7024
300
25
MR-J2S-500B
Servo amplifier 400V
Power dissipation
Servo motor
Tab. 10-1: Power dissipation under rated load
NOTE
The amount of heat that is lost during the generating operation is not included in the power
dissipation of the servo amplifier in operation. The calculation of the heat loss from the brake
resistor is described in section 7.1.1.
MELSERVO J2-Super
10 - 3
Specifications
10.1.3
b
Characteristics
Specifications of electromagnetic brake
CAUTION:
The electromagnetic brake is designed to hold a load. Do not use it for braking a
rotating motor.
The characteristics of the electromagnetic brake provided for the servo motor with
electromagnetic brake are indicated in the following table:
Servo motor
HC-MFS Series
053B
13B
Item
23B
43B
73B
HC-SFS Series
052B–
152B/
0524B–
1524B
202B–
702B/
2024B–
7024B
HC-RFS Series
103B–
203B
HC-KFS Series
353B
503B
053B
13B
23B
43B
Type Electromagnetic disc brake (electrically ventilated and braking by spring power)
Rated voltage 24VDC, +0%/−10%
73B
Rated current at 20°C [A] 0.26
0.33
0.42
0.8
1.4
0.8
0.96
0.26
0.33
0.42
Resistance of the
91
excitation coil at 20°C [Ω]
73
57
29
16,8
30
25
91
73
57
Capacity [W]
6.3
7.9
10
19
34
19
23
6.3
7.9
10
Inrush current [A]
0.18
0.18
0.2
0.2
0.4
0.25
0.24
0.18
0.18
0.2
Cutoff current [A]
0.06
0.11
0.12
0.08
0.2
0.085
0.10
0.06
0.11
0.12
Static friction torque [Nm] 0.32
1.3
2.4
8.3
43.1
6.8
16.7
0.32
43.1
2.4
0.03
0.03
0.04
0.1
0.03
0.04
0.03
0.1
0.03
0.1
0.12
0.12
0.12
0.12
0.12
0.08
0.12
0.12
0.02
0.03
0.03
0.03
0.03
0.03
0.01
0.03
0.03
5.6
22.0
64.0
400
4500
400
400
5.6
22.0
64
56
220
640
4000
45000
4000
4000
56
220
640
Brake looseness at servo 0.19–
motor shaft [grad]
2.5
0.12–
1.2
0.1–
0.9
0.2–
0.6
0.2–
0.6
0.2–
0.6
0.2–
0.6
0.19–
2.5
0.12–
1.2
0.1–
0.9
20000
Brake life Number of
braking cycles
[times]
20000 20000 20000
20000
20000
20000
20000
20000 20000
15
1000
200
200
4
15
Release delay time [s]
0.03
Braking
AC off
0.08
delay time (Fig. 10-4 (a))
[s] DC off (Fig.
0.01
10-4 (b, c))
Permissib per braking
le braking
moment
per hour
[Nm]
Work per
braking
[Nm]
4
32
200
32
Tab. 10-2: characteristics of the electromagnetic brake
There is no manual release mechanism. When it is necessary to hand-turn the servo motor
shaft for machine centering, etc., use a separate 24VDC power supply to release the brake
electrically.
The value for initial ON gap at 20°C.
The brake gap will increase as the brake lining wears.
10 - 4
24VDC of the internal power output for interface (VDD) cannot be used. Always use a
separate power supply.
Characteristics
Specifications
Electromagnetic brake power supply
24VDC of the internal power output for interface (VDD) cannot be used. Prepare the following
power supply for use with the electromagnetic brake only. Examples for the connection of the
brake are shown in the following diagrams:
28V AC
Electromagnetic
brake
T
(a)
28V AC
Electromagnetic
brake
VA R
T
(b)
Electromagnetic
brake
24V D C
VA R
T
: Transformer
VAR : Surge absorber
(c)
S000656C
Fig. 10-4: Brake unit connection
MELSERVO J2-Super
10 - 5
Specifications
10.1.4
Characteristics
Dynamic braking
If an alarm, an EMERGENCY OFF or a loss of power occurs, then the servo motor is switched
directly to an integrated dynamic braking unit in the amplifier and is braked. In Fig. 10-5 the delay
curve is presented.
Emergency stop (EMG)
ON
OFF
Machine speed
V0
Time constant τ
te
t
S000657C
Fig. 10-5: Dynamic brake operation diagram
The following formula can be used to calculate the approximate coasting distance:
V0 ⎧
JL ⎞ ⎫
L max = ------ ⎨ t e + τ × ⎛ 1 + ------ ⎬
⎝
60 ⎩
J M⎠ ⎭
Lmax: Maximum coasting distance [mm]
b
10 - 6
V0:
Machine's fast feed speed [mm/min]
JM:
Servo motor inertia moment [kgcm2]
JL:
Load inertia moment converted into equivalent value on servo motor shaft [kgcm2]
τ:
Brake time constant [s]
te:
Delay time of control section (There is internal relay delay time of about 30ms) [s]
CAUTION:
Use the dynamic brake for the servo amplifiers MR-J2S-10B to MR-J2S-200B and MRJ2S-60B4 to MR-J2S-200B4 only up to a maximum ratio of the mass moment of inertia
of 30, for the servo amplifiers MR-J2S-350B and MR-J2S-350B4 up to an inertia of mass
ratio of 16 and for the servo amplifiers MR-J2S-500B, MR-J2S-700B, MR-J2S-500B4
and MR-J2S-700B4 up to an inertia of mass ratio of 15. If these figures are exceeded
the integrated dynamic brake may overheat (fire risk). If there is a probability that the
figure may be exceeded, then please contact your sales representative.
Characteristics
Specifications
0.0 20
Time constant τ [s]
0.0 18
0.0 16
23
0.0 14
0.0 12
0.0 10
73
0.0 08
0.0 06
053
0.0 04
0.0 02
43
13
0
0
500
100 0
150 0
200 0
250 0
300 0
Speed [r/min]
S000958C
Fig. 10-6: Dynamic brake time constant HC-MFS
16
Time constant τ [s]
14
12
23
10
8
6
43
4
2
13
0
0
500
1000 1500 2000 2500 3000
Speed [r/min]
S000959C
Fig. 10-7: Dynamic brake time constant HC-KFS
MELSERVO J2-Super
10 - 7
Specifications
Characteristics
0.0 45
0.0 40
Time constant τ [s]
0.0 35
0.0 30
7 0 2 /7 02 4
3 5 2 /3 52 4
2 0 2 /2 02 4
0.0 25
5 2 /5 2 4
0.0 20
0.0 15
5 0 2 /5 02 4
1 5 2 /1 52 4
1 0 2 /1 02 4
0.0 10
0.0 05
0
0
500
100 0
150 0
200 0
Speed [r/min]
S000960C
Fig. 10-8: Dynamic brake time constant HC-SFS
0.0 18
Time constant τ [s]
0.0 16
0.0 14
0.0 12
0.0 10
103
503
0.0 08
153
0.0 06
0.0 04
353
0.0 02
203
0
0
500
100 0
150 0
200 0
250 0
300 0
Speed [r/min]
S000961C
Fig. 10-9: Dynamic brake time constant HC-RFS
10 - 8
Standard specifications
Specifications
10.2
Standard specifications
10.2.1
Servo amplifier
Servo amplifier MR-J2S-
10B
Main
circuit
power
supply
Voltage/
frequency
20B
40B
60B
70B
100B
200B
350B
700B
60B4
100B4
200B4
350B4
3~, 380–480VAC, 50Hz/60Hz
3~, 170–253VAC
1~, 207–253VAC
3~, 170–253VAC
3~, 323–528VAC, 50Hz/60Hz
Permissible
voltage
fluctuation
1~, 200–230VAC, 50Hz/60Hz
24VDC
Permissible
voltage
fluctuation
1~, 170–253VAC, 50Hz/60Hz
20.4–27.6VDC
Permissible
frequency
fluctuation
±5%
—
Power
supply
capacity
50W
25W
Control system
Sine-wave PWM control
Dynamic brake
Built-in
Overcurrent shut-off, regenerative overvoltage shut-off, overload shut-off (electronic thermal relay), servo motor
overheat protection, encoder fault protection, regenerative fault protection, undervoltage, instantaneous power
failure protection, overspeed protection, excessive error protection
Speed frequency
response
≥ 550Hz
Protection type
Open (IP00)
Environmental
conditions
Refer section 2.1
Weight [kg]
700B4
±5 %
Voltage/
frequency
Protective functions
500B4
3~, 200–230VAC, 50/60Hz
Permissible
frequency
fluctuation
Control
circuit
power
supply
500B
3~, 200–230VAC, 50/60Hz
1~, 230VAC, 50/60Hz
0.7
0.7
1.1
1.1
1.7
1.7
2.0
2.0
4.9
7.2
2.1
2.2
2.2
5.0
5.0
7.2
Tab. 10-3: Standard specifications of servo amplifiers
MELSERVO J2-Super
10 - 9
Specifications
10.2.2
Standard specifications
Servo motor
Servo motor
HC-MFS Series
HC-KFS Series
053
13
23
43
73
053
13
23
43
73
Applicable servo amplifier
MR-J2S-
10B
10B
20B
40B
70B
10B
10B
20B
40B
70B
Rated output [kW]
0.05
0.1
0.2
0.4
0.75
0.05
0.1
0.2
0.4
0.75
Rated torque [Nm]
0.16
0.32
0.64
1.3
2.4
0.16
0.32
0.64
1.3
2.4
Rated speed [r/min]
3000
3000
Maximum speed [r/min]
4500
4500
Instantaneous permissible speed
[r/min]
5175
5175
Maximum torque [Nm]
0.48
0.95
1.9
3.8
7.2
0.48
0.95
1.9
3.8
7.2
Inertia moment J
[kg × cm2] 0.019
0.03
0.088
0.143
0.6
0.053
0.084
0.42
0.67
1.51
Recommended ratio of load inertia
moment to servo motor shaft
inertia moment Regenerative
brake duty
cycle
[per minute] ≤ 30
≤ 10
Servo amplifier's
built-in
regenerative brake
resistor
1010
400
220
190
MR-RFH75-40
—
—
—
2400
2200
940
0.3
0.3
0.5
0.9
1.3
0.3
0.3
0.5
0.9
1.3
Power supply capacity [kVA]
Rated current [A]
0.85
1.5
2.8
5.1
0.83
0.83
1.1
2.3
5.8
Maximum current [A]
2.6
5.0
9.0
18
2.5
2.5
3.4
6.9
18.6
1.45
3.0
Speed/position detector
Encoder (resolution: 131072 pulse/rev)
Protection type
IP55
Cooling
Self-cooled
Environmental conditions
Weight [kg] Refer section 2.1
0.4
0.53
0.99
1.45
Tab. 10-4: Standard specifications of servo motors
10 - 10
3.0
0.4
0.53
0.99
Standard specifications
Specifications
Servo motor
HC-SFS Series
52
102
152
202
352
HC-RFS Series
502
702
Applicable servo amplifier
MR-J2S-
60B 100B 200B 200B 350B 500B
Rated output [kW]
0.5
Rated torque [Nm]
2.39 4.78 7.16 9.55 16.7 23.9
1.0
1.5
Rated speed [r/min]
2.0
3.5
5.0
700B
7
33.4
103
153
203
353
200B 200B 350B 500B
1.0
1.5
5.0
3.18 4.78 6.37 11.1
15.9
3000
Maximum speed [r/min]
3000
2500
2000
4500
Instantaneous permissible speed
[r/min]
3450
2850
2300
5175
Maximum torque [Nm]
7.16 14.4 21.6 28.5 50.1 71.6
100
7.95 11.9 15.9 27.9
Inertia moment J
[kg × cm2]
6.6
160
1.5
13.7 20.0 42.5
Recommended ratio of load
inertia moment to servo motor
shaft
inertia moment
Regenerative
brake duty
cycle
[per minute]
500B
3.5
2000
2.0
503
82
101
1.9
≤ 15
2.3
39.7
8.6
12
710
174
125
≤5
Servo amplifier's
built-in
regenerative
brake resistor
56
54
136
64
31
39
32
MR-RFH75-40
560
270
—
—
—
—
—
—
—
—
—
—
MR-RFH220-40
1680 810
—
—
—
—
—
—
—
—
—
—
1090 860
—
—
680
320
158
479
95
(MR(MR5450
4300
3550
669
150
RFH
RFH
400-6,7)
400-6,7)
Power supply capacity [kVA]
1.0
1.7
2.5
3.5
5.5
7.5
Rated current [A]
3.2
6
9
11
17
28
Maximum current [A]
9.6
18
27
33
51
84
MR-RFH400-13
Speed/position detector
1.7
2.5
3.5
5.5
7.5
35
6.1
8.8
14
23
28
105
18.4 23.4
37
58
70
6.2
12.0
17.0
Encoder (resolution: 131072 pulse/rev)
Protection type
IP65
Cooling
Self-cooled
Environmental conditions
Weight [kg]
10
Refer section 2.1
5.0
7.0
9.0
12.0 19.0
23
32
3.9
5.0
Tab. 10-5: Standarddaten des Servomotors
MELSERVO J2-Super
10 - 11
Specifications
Standard specifications
Servo motor
HC-SFS Series (400V type)
524
1024
1524
2024
3524
5024
7024
60B4
100B4
200B4
200B4
350B4
500B4
700B4
Rated output [kW]
0.5
1.0
1.5
2.0
3.5
5.0
7
Rated torque [Nm]
2.39
4.78
7.16
9.55
16.7
23.9
33.4
Applicable servo amplifier
MR-J2S-
Rated speed [r/min]
2000
Maximum speed [r/min]
3000
2500
2000
Instantaneous permissible speed
[r/min]
3450
2850
2300
Maximum torque [Nm]
Inertia moment J
[kg × cm2]
7.16
14.4
21.6
28.5
50.1
71.6
100
6.6
13.7
20.0
42.5
82
101
160
Recommended ratio of load inertia
moment to servo motor shaft
inertia moment
Regenerative
brake duty
cycle
[per minute]
≤ 15
Servo amplifier's builtin regenerative brake
resistor
125
200
136
64
43
39
32
MR-PWR T150-270
415
—
—
—
—
—
—
MR-PWR T400-120
—
600
—
—
—
MR-PWR T600-80
—
—
680
320
—
—
—
MR-PWR T600-47
—
—
—
—
167
150
—
MR-PWR T600-26
—
—
—
—
—
—
95
Power supply capacity [kVA]
1.0
1.7
2.5
3.5
5.5
7.5
10
Rated current [A]
1.5
2.8
4.4
5.411
8.6
14
17
Maximum current [A]
4.5
8.4
13.2
16.2
25.8
42
51
Speed/position detector
Encoder (resolution: 131072 pulse/rev)
Protection type
IP65
Cooling
Self-cooled
Environmental conditions
Weight [kg]
Refer section 2.1
5.0
7.0
9.0
12.0
19.0
23
32
Tab. 10-6: Standarddaten des Servomotors
10 - 12
The figure stated for the number of braking cycles per minute when addressing the braking
unit is the permitted figure of braking cycles per minute when the servo motor is braked
without any load from the rated speed to a standstill. If the motor is under load, then the
figure in the table must be multiplied by 1/(m + 1) (m = load moment of inertia / motor
moment of inertia).
If the recorded torque is within the range of the rated torque, then the number of braking
cycles per minute is not restricted.
If the ratio of the load inertia moment to the motor shaft inertia moment exceeds the stated
value, then please contact your sales representative.
If the servo motor is equipped with an electromagnetic brake, please take the relevant
figures from tab. 10-2.
Standard specifications
10.2.3
NOTE
Specifications
Torque characteristics
If a load is applied to the stopped servo motor, then the delivered torque should not exceed
70% of the rated torque.
Servo motors 200V
Continuous running range
Continuous running range
Speed [r/min]
Torque [Nm]
Torque [Nm]
Continuous running range
Peak running range
Continuous running range
Speed [r/min]
HC-MFS73 (B)
HC-MFS43 (B)
Peak running range
Peak running range
HC-MFS23 (B)
Torque [Nm]
Peak running range
HC-MFS13 (B)
Torque [Nm]
Torque [Nm]
HC-MFS053 (B)
Speed [r/min]
Peak running range
Continuous running range
Speed [r/min]
Speed [r/min]
S000934C
Fig. 10-10: HC-MFS series servo motor torque characteristics
Continuous running range
Continuous running range
Speed [r/min]
Speed [r/min]
HC-KFS73 (B)
Continuous running range
Speed [r/min]
Torque [Nm]
Torque [Nm]
HC-KFS43 (B)
Peak running range
Peak running range
HC-KFS23 (B)
Torque [Nm]
Peak running range
HC-KFS13 (B)
Torque [Nm]
Torque [Nm]
HC-KFS053 (B)
Peak running range
Continuous running range
Speed [r/min]
Peak running range
Continuous running range
Speed [r/min]
S000935C
Fig. 10-11: HC-KFS series servo motor torque characteristics
MELSERVO J2-Super
10 - 13
Specifications
Standard specifications
HC-SFS102 (B)
Torque [Nm]
Continuous running range
Speed [r/min]
HC-SFS352 (B)
Torque [Nm]
HC-SFS202 (B)
Torque [Nm]
Continuous running range
Speed [r/min]
Speed [r/min]
Peak running
range
Peak running range
Peak running range
Continuous running range
Speed [r/min]
HC-SFS502 (B)
Peak running range
Continuous running range
HC-SFS702 (B)
Torque [Nm]
Continuous running range
HC-SFS152 (B)
Torque [Nm]
Torque [Nm]
Peak running range
Torque [Nm]
HC-SFS52 (B)
Peak running range
Continuous running range
Speed [r/min]
Speed [r/min]
Peak running
range
Continuous
running range
Speed [r/min]
S000936C
Fig. 10-12: HC-SFS series servo motor torque characteristics
Continuous running range
Continuous running range
Speed [r/min]
Speed [r/min]
Continuous running range
Speed [r/min]
Peak running range
Continuous running range
Speed [r/min]
HC-RFS503 (B)
Torque [Nm]
Torque [Nm]
HC-RFS353 (B)
Peak running range
Peak running range
HC-RFS203 (B)
Torque [Nm]
Peak running range
HC-RFS153 (B)
Torque [Nm]
Torque [Nm]
HC-RFS103 (B)
Peak running range
Continuous running range
Speed [r/min]
S000937C
Fig. 10-13: HC-RFS series servo motor torque characteristics
10 - 14
Standard specifications
Specifications
Servo motors 400V
HC-SFS1024 (B)
Speed [r/min]
Torque [Nm]
Torque [Nm]
Torque [Nm]
Continuous running range
Speed [r/min]
HC-SFS3524 (B)
Continuous running range
Speed [r/min]
Continuous running range
Speed [r/min]
HC-SFS2024 (B)
Peak running
range
Peak running range
Peak running range
Continuous running range
Speed [r/min]
HC-SFS5024 (B)
Peak running range
Continuous running range
Speed [r/min]
HC-SFS7024 (B)
Torque [Nm]
Continuous running range
Peak running range
HC-SFS1524 (B)
Torque [Nm]
Torque [Nm]
Peak running range
Torque [Nm]
HC-SFS524 (B)
Peak running
range
Continuous
running range
Speed [r/min]
S001242C
Fig. 10-14: HC-SFS series servo motor torque characteristics
MELSERVO J2-Super
10 - 15
Specifications
10 - 16
Standard specifications
Requirements
EMC Directives
11
EMC Directives
11.1
Requirements
With regard to its electromagnetic compatibility, the servo amplifier MELSERVO J2-Super
complies with the requirements of the European Union. In order to comply with these
requirements it is necessary to equip the servo amplifier with a radio interference suppression
filter as well as installing cabling that conforms to EMC standards.
With the use of a radio interference suppression filter as well as a construction that conforms to
EMC standards the following limiting values are maintained:
● For interference emanating from the servo amplifier:
– EN 61800-3, first environment, meets immunity requirements for interference that is
cable related
– When installed in an earthed control cabinet no interference that is not cable related is
to be expected outside the cabinet.
● For the external interference affecting the servo amplifier:
– EN 50082-2
Installation instructions
● The servo amplifier is designed for installation in the control cabinet. The control cabinet
must be well earthed.
● The motor lead must be screened. The screening must be applied on both sides, high
frequency and well conducting. Maximum length ≤ 30 m.
● All cables that carry power must be laid well separated from telephone lines, signal lines or
similar.
● The earth connection for the servo amplifier should be separate, if possible.
● A minimum distance of ≥ 10 cm should always be maintained between the servo amplifier
and other operating units that may be susceptible to electromagnetic interference.
NOTES
Refer to the relevant installation manual for installation and connection instructions for the
radio interference suppression filter.
Due to their large number, it is not possible to take into account all the installation and fitting
options that may arise in practice. Consequently, in practice, situations may result that
deviate from statements made here.
MELSERVO J2-Super
11 - 1
EMC Directives
11 - 2
Requirements
Servo amplifiers 200V
Dimensions
12
Dimensions
12.1
Servo amplifiers 200V
MR-J2S-10B and MR-J2S-20B
4
50
ø6
70
135
6
20
6
C
N
3
(
)
C
N
2
E
N
C
(
C
N
1
B
)
C
N
1
A
156
OPEN
168
OPEN
L1 L2 L3
TE1
V
W
7
6
U
PE
6
TE2
Unit: mm
S000938C
Fig. 12-1: Outline drawing
Model
Weight [kg]
MR-J2S-10B
0.7
MR-J2S-20B
Tab. 12-1: Dimensioning
TE1
L1 L2 L3
U V W
TE2
PE
D
C
P L21 L11
S000665C
Fig. 12-2: Terminals
MELSERVO J2-Super
12 - 1
Dimensions
Servo amplifiers 200V
MR-J2S-40B and MR-J2S-60B
4
70
70
135
20
22
6
ø6
C
N
2
E
N
C
C
N
3
(
(
)
C
N
1
B
)
C
N
1
A
156
OPEN
168
OPEN
L1 L2 L3
TE1
V
W
6
U
7
PE
TE2
6
Unit: mm
S000939C
Fig. 12-3: Outline drawing
Model
Weight [kg]
MR-J2S-40B
1.1
MR-J2S-60B
Tab. 12-2: Dimensioning
TE1
L1 L2 L3
U V W
TE2
PE
D
C
P L21 L11
S000665C
Fig. 12-4: Terminals
12 - 2
Servo amplifiers 200V
Dimensions
MR-J2S-70B and MR-J2S-100B
6
70
70
190
20
22
6
ø6
OPEN
(
(
)
C
N
3
156
C
N
2
E
N
C
)
C
N
1
B
168
OPEN
C
N
1
A
L1 L2 L3
TE1
V
W
6
U
7
PE
TE2
6
22
42
6
Unit: mm
S000940C
Fig. 12-5: Outline drawing
Model
Weight [kg]
MR-J2S-70B
1.7
MR-J2S-100B
Tab. 12-3: Dimensioning
TE1
L1 L2 L3
U V W
TE2
PE
D
C
P L21 L11 N
S000667C
Fig. 12-6: Terminals
MELSERVO J2-Super
12 - 3
Dimensions
Servo amplifiers 200V
MR-J2S-200B and MR-J2S-350B
90
OPEN
70
195
20
78
6
6
6
C
N
1
A
C
N
1
B
C
N
2
E
N
C
C
N
3
(
(
)
)
156
168
OPEN
TE2
TE1
PE
3–M4
Unit: mm
S000941C
Fig. 12-7: Outline drawing
Model
Weight [kg]
MR-J2S-200B
2.0
MR-J2S-350B
Tab. 12-4: Dimensioning
TE1
L1 L2 L3
TE2
U
V
W
L11 L21 D
PE
P
C
N
S000669C
Fig. 12-8: Terminals
12 - 4
Servo amplifiers 200V
Dimensions
MR-J2S-500B
130
7 .5
2 x ø6
6
(70)
118
200
6
5
OP E N
OP E N
OP E N
C
N
2
E
N
C
C
N
3
T E1
(
235
250
(
)
C
N
1
B
)
C
N
1
A
T E1
6
Unit: mm
S000942C
Fig. 12-9: Outline drawing
Model
Weight [kg]
MR-J2S-500B
4.9
Tab. 12-5: Dimensioning
TE1
L1
L2
L3
PE
C
P
N
U
TE2
V
L1
W
L2
S000951C
Fig. 12-10: Terminals
MELSERVO J2-Super
12 - 5
Dimensions
Servo amplifiers 200V
MR-J2S-700B
(70)
160
10
C
N
1
A
C
N
1
B
C
N
2
E
N
C
C
N
3
62
6
(
T E2
3 35
(
)
7.5
10
138
)
2 x ø6
35 0
200
180
T E1
6
Unit: mm
S00943C
Fig. 12-11: Outline drawing
Model
Weight [kg]
MR-J2S-700B
7.2
Tab. 12-6: Dimensioning
TE1
TE2
PE
L1
L1
L2
L3
C
P
N
U
V
W
L2
S000952C
Fig. 12-12: Terminals
12 - 6
Servo amplifiers 400V
12.2
Dimensions
Servo amplifiers 400V
MR-J2S-60B4 to MR-J2S-200B4
70
90
78
195
6
6
ø6
CH AR G E
O PE N
C
N
1
A
C
N
1
B
L1
156
168
L2
L3
C
N
2
E
N
C
P
C
N
3
(
C
(
D
N
24 V
L1 1
U
V
0V
L2 1
W
6
6
Unit: mm
S001217C
Fig. 12-13: Outline drawing
Model
Weight [kg]
MR-J2S-60B4
2.1
MR-J2S-100B4
MR-J2S-200B4
2.2
Tab. 12-7: Dimensioning
CNP1
CNP2
CNP3
CN4
L1
P
U
24V • L11
L2
C
V
0V • L21
L3
D
W
PE
N
S001218C
Fig. 12-14: Terminals
MELSERVO J2-Super
12 - 7
Dimensions
Servo amplifiers 400V
MR-J2S-350B4 and MR-J2S-500B4
130
7 .5
2 x ø6
6
(70)
118
200
6
5
OP E N
OP E N
OP E N
C
N
2
E
N
C
C
N
3
T E1
(
235
250
(
)
C
N
1
B
)
C
N
1
A
T E1
6
Unit: mm
S000942C
Fig. 12-15: Outline drawing
Model
Weight [kg]
MR-J2S-350B4
5
MR-J2S-500B4
Tab. 12-8: Dimensioning
TE1
TE2
PE
L1
24V • L11
L2
0V • L21
L3
C
P
N
U
V
W
S001219C
Fig. 12-16: Terminals
12 - 8
Servo amplifiers 400V
Dimensions
MR-J2S-700B4
(70)
180
C
N
1
A
C
N
1
B
C
N
2
E
N
C
C
N
3
6
(
T E2
3 35
350
62
10
)
160
(
10
)
7.5
2 x ø6
200
138
T E1
6
Unit: mm
S000943C
Fig. 12-17: Outline drawing
Model
Weight [kg]
MR-J2S-700B4
7.2
Tab. 12-9: Dimensioning
T E1
TE2
PE
2 4V • L 11
L1
L2
L3
C
P
N
U
V
W
0 V • L 21
S001248C
Fig. 12-18: Terminals
MELSERVO J2-Super
12 - 9
Dimensions
Servo motors
12.3
Servo motors
12.3.1
HC-MFS and HC-KFS series
HC-MFS053 (B) and HC-MFS13 (B),
HC-KFS053 (B) and HC-KFS13 (B)
L
42
5
40.5
25
2.5
21.5
40
2 x ø 4.5
45
°
1
3
2
4
6.8
ø3 0h7
KL
9.9
65.5
25.2
ø4
6
35.7
2 8.7
ø 8h6
A
1
4
2
5
3
6
A
20
Power supply lead 0.3m
red: Phase U
white: Phase V
black: Phase W
green/yellow: Earth
Encoder
cable 0.3m
A
Unit: mm
S000944C
Fig. 12-19: Outline drawing
Model
Rated output [W]
L [mm]
KL [mm]
Weight [kg]
50
81.5 (109.5)
29.5
0.4 (0.75)
100
96.5 (124.5)
44.5
0.53 (0.89)
HC-MFS053 (B)
HC-KFS053 (B)
HC-MFS13 (B)
HC-KFS13 (B)
Tab. 12-10:Dimensioning
NOTE
12 - 10
The figures in brackets apply to models of motor with electromagnetic brake.
Servo motors
Dimensions
HC-MFS23 (B) and HC-MFS43 (B),
HC-KFS23 (B) and HC-KFS43 (B)
62
L
30
41
7
2.7
3
60
4 x ø 5.8
45°
1
3
2
4
ø7
10.6
0
42.8
ø1 4h6
3 8.4
ø 50h 7
A
KL
68
25.2
4
2
5
3
6
A
9 .9
Power supply lead 0.3m
red: Phase U
white: Phase V
black: Phase W
green/yellow: Earth
Encoder
cable 0.3m
1
20
A
Unit: mm
S000945C
Fig. 12-20: Outline drawing
Model
Rated output [W]
L [mm]
KL [mm]
Weight [kg]
200
99.5 (131.5)
49.1
0.99 (1.6)
400
124.5 (156.5)
72.1
1.45 (2.1)
HC-MFS23 (B)
HC-KFS23 (B)
HC-MFS43 (B)
HC-KFS43 (B)
Tab. 12-11:Dimensioning
NOTE
The figures in brackets apply to models of motor with electromagnetic brake.
MELSERVO J2-Super
12 - 11
Dimensions
Servo motors
HC-MFS73 (B),
HC-KFS73 (B)
142 (177.5 )
82
40
39
2.7
8
3
80
4 x ø 6.6
45°
1
3
2
ø 70h 7
ø9
0
58 .1
ø 19 h6
48.7
11
86.7
25.2
Power supply lead 0.3 m
red: Phase U
white: Phase V
black: Phase W
green/yellow: Earth
Encodercable 0.3 m
1
4
2
5
3
9.9
72
4
A
6
A
20
19.5
A
Unit: mm
S000946C
Fig. 12-21: Outline drawing
Model
HC-MFS73 (B)
HC-KFS73 (B)
Rated output [W]
Weight [kg]
750
3.0 (4.0)
Tab. 12-12:Dimensioning
NOTE
12 - 12
The figures in brackets apply to models of motor with electromagnetic brake.
Servo motors
12.3.2
Dimensions
HC-SFS-Serie
HC-SFS52 (B) to HC-SFS152 (B),
HC-SFS524 (B) to HC-SFS1524 (B)
L
55
130
3
ø1
45
G
F
ø1
E
65
111
81.5
ø 24h 6
45°
ø 110h 7
12
A
H
D
B
C
Power supply
connector pin
assignment
19.5
Encoder connector
KL
41
Unit: mm
Power supply connector
S000947C
Fig. 12-22: Outline drawing
Model
Rated output [kW]
L [mm]
KL [mm]
Weight [kg]
HC-SFS52 (B)
HCSFS524 (B)
0.5
120 (153)
51.5
5.0 (7.5)
HC-SFS102 (B)
HC-SFS1024 (B)
1.0
145 (178)
76.5
7.0 (9.5)
HC-SFS152 (B)
HC-SFS1524 (B)
1.5
170 (203)
101.5
9.0 (11.5)
Tab. 12-13:Dimensioning
NOTE
The figures in brackets apply to models of motor with electromagnetic brake.
MELSERVO J2-Super
12 - 13
Dimensions
Servo motors
HC-SFS202 (B) to HC-SFS702 (B),
HC-SFS2024 (B) to HC-SFS7024 (B)
79
L
18
39.5
Brake connector pin
assignment
176
45°
3
75
U
ø2
30
ø 35
#2
KL
69
A
V
A
B
B
C
W
U
D A
C B
KA
19.5
F
G
E D
0
Power supply
connector pin
assignment
ø 11 4.3
117
#1
0
ø2
V
W
Encoder connector
KB
Power supply connector
Brake connector
Unit: mm
S000948C
Fig. 12-23: Outline drawing
Model
Rated output [kW]
L [mm]
KL [mm]
KA [mm]
KB [mm]
Weight [kg]
HC-SFS202 (B)
HC-SFS2024 (B)
2.0
145 (193)
68.5
142
46
12 (18)
HC-SFS352 (B)
HC-SFS3524 (B)
3.5
187 (235)
110.5
142
46
19 (25)
HC-SFS502 (B)
HC-SFS5024 (B)
5.0
208 (256)
131.5
142
46
23 (29)
HC-SFS702 (B)
HC-SFS7024 (B)
7.0
292 (340)
210.5
150
58
32 (38)
Tab. 12-14:Dimensioning
NOTE
12 - 14
The figures in brackets apply to models of motor with electromagnetic brake.
Servo motors
12.3.3
Dimensions
HC-RFS series
HC-RFS103 (B), HC-RFS153 (B) and HC-RFS203 (B)
L
45
10
39.5
100
3
45°
4 x ø9
ø 95 h7
ø 24h6
40
ø1
15
35
96
81.5
ø1
19.5
Encoder
connector
KL
Power supply
connector
E
U
V
G
F
A
41
H B
D
C
W
Power supply
connector pin
Unit: mm
S000949C
Fig. 12-24: Outline drawing
Model
Rated output [kW]
L [mm]
KL [mm]
Weight [kg]
HC-RFS103 (B)
1.0
147 (185)
71
3.9 (6.0)
HC-RFS153 (B)
1.5
172 (210)
96
5.0 (7.0)
HC-RFS203 (B)
2.0
197 (235)
121
6.2 (8.3)
Tab. 12-15:Dimensioning
NOTE
The figures in brackets apply to models of motor with electromagnetic brake.
MELSERVO J2-Super
12 - 15
Dimensions
Servo motors
HC-RFS353 (B) and HC-RFS503 (B)
L
63
12
39.5
130
3
45 °
ø1
ø110h7
ø28h6
58
45
ø1
65
120
8 1 .5
4 x ø9
KL
19.5
Power supply connector
pin assignment
U
Encoder
connector
Power supply
connector
F
E
V
G A
D
46
B
C
W
Unit: mm
S000950C
Fig. 12-25: Outline drawing
Model
Rated output [kW]
L [mm]
KL [mm]
Weight [kg]
HC-RFS353 (B)
3.5
217 (254)
148
12 (15)
HC-RFS503 (B)
5.0
274 (311)
205
17 (21)
Tab. 12-16:Dimensioning
NOTE
12 - 16
The figures in brackets apply to models of motor with electromagnetic brake.
Regenerative brake resistor option
12.4
Dimensions
Regenerative brake resistor option
RFH75 to RFH400 and MR-PWR-T-150 to MR-PWR-T-600
12
36
7
20
4.6
12
I
L
27
Unit: mm
S000954C
Fig. 12-26: Outline drawing
Type
Regenerative power [W]
Resistor [Ω]
L [mm]
I [mm]
Weight [kg]
MR-RFH75-40
150
40
90
79
0.16
MR-RFH220-40
400
40
200
189
0.42
MR-RFH400-13
600
13
320
309
0.73
MR-RFH400-6,7
600
6,7
320
309
0.73
MR-PWR-T-150-270
150
270
90
79
0.18
MR-PWR-T-400-120
400
120
200
189
0.4
MR-PWR-T-600-80
600
80
320
309
0.64
MR-PWR-T-600-47
600
47
320
309
0.64
MR-PWR-T-600-26
600
26
320
309
0.64
Tab. 12-17:Dimensioning
MELSERVO J2-Super
12 - 17
Dimensions
12.5
Transformer
Transformer
Output voltage 230V
H
Input voltage 400V
d
L1
L3
L2
T
B
Unit: mm
S000693C
Abb. 12-27: Outline drawing
Power
[kVA]
ED
[%]
Input
current
[A]
Output
current
[A]
Terminal
crosssection
[mm²]
Power
dissipation
[W]
B
[mm]
T
[mm]
H
[mm]
L1
[mm]
L2
[mm]
L3
[mm]
d
[mm²]
Weight
[kg]
MT 1,3-60
1.3
60
2.02
2.69
3.26
4.27
2.5
2.5
103
167
219
105
163
136
201
71
7 × 12
7.0
MT 1,7-60
1.7
60
2.61
3.89
4.27
6.28
2.5
2.5
110
199
219
125
163
136
201
91
7 × 12
10.7
MT 2,5-60
2.5
60
3.80
5.42
6.28
8.78
2.5
2.5
155
282
267
115
202
176
249
80
7 × 12
16.5
MT 3,5-60
5.5
60
5.30
8.41
8.78
13.80
4
4
170
330
267
139
202
176
249
104
7 × 12
22.0
60
8.26
13.80
4
243
267
139
202
176
249
104
7 × 12
22.0
Transformer
MT 5,5-60
5.5
MT 7,5-60
7.5
60
11.25
18.82
4
190
316
160
245
200
292
112
10 × 16
28
MT 11-60
11
60
16.40
27.61
4
280
352
165
300
224
328
117
10 × 16
41
Tab. 12-18: Dimensioning
12 - 18
Index
Index
C
A
Absolute position detection system
Absolute position detection data . . . . . . . . 6-5
Battery installation . . . . . . . . . . . . . . . . . . . 6-3
Cable . . . . . . . . . . . . . . . . . . . . . . . . . . . . . . . . 3-1
Coding switch
Station number setting . . . . . . . . . . . . . . . 3-27
Communikation . . . . . . . . . . . . . . . . . . . . . 6-2
D
Parameter . . . . . . . . . . . . . . . . . . . . . . . . . 6-4
Specifications . . . . . . . . . . . . . . . . . . . . . . . 6-1
Accessories
Dimensions
Brake resistor . . . . . . . . . . . . . . . . . . . . . 12-17
Cable . . . . . . . . . . . . . . . . . . . . . . . . . . . . . 3-1
Servo amplifier 200V . . . . . . . . . . . . . . . . 12-1
Fuse . . . . . . . . . . . . . . . . . . . . . . . . . . . . . . 3-1
Servo amplifier 400V . . . . . . . . . . . . . . . . 12-7
Magnetic contactor . . . . . . . . . . . . . . . . . . . 3-1
Servo motors . . . . . . . . . . . . . . . . . . . . . 12-10
No-fuse circuit breakers . . . . . . . . . . . . . . . 3-1
Transformer . . . . . . . . . . . . . . . . . . . . . . 12-18
Power switch . . . . . . . . . . . . . . . . . . . . . . . 3-1
Display
Transformer . . . . . . . . . . . . . . . . . . . . . . . 7-11
Sequence . . . . . . . . . . . . . . . . . . . . . . . . . . 4-5
Adaptive vibration suppression control . . . . . . 5-4
Status . . . . . . . . . . . . . . . . . . . . . . . . . . . . . 4-6
Adjustment parameters . . . . . . . . . . . . . . . . . 4-12
Dynamic brake . . . . . . . . . . . . . . . . . . . . . . . . 10-6
Alarms . . . . . . . . . . . . . . . . . . . . . . . . . . . . . . . 9-3
E
Overview . . . . . . . . . . . . . . . . . . . . . . . . . . 9-1
Remedying . . . . . . . . . . . . . . . . . . . . . . . . . 9-4
Auto tuning . . . . . . . . . . . . . . . . . . . . . . . . . . . 4-26
B
Electromagnetic Compatibility . . . . . . . . . . . . 11-1
Emergency stop . . . . . . . . . . . . . . . . . . . . . . . 3-19
Encoder
Connector MR-J2S.500B/MR-J2S-700B . 1-16
Basic parameters . . . . . . . . . . . . . . . . . . . . . . 4-12
Connector MR-J2S-200B4 and less . . . . . 1-18
Battery
Connector MR-J2S-350B and less . . . . . . 1-14
<connector MR-J2S-200B4 and less . . . . 1-17
Connector MR-J2S-350B and less . . . . . 1-13
Connector MR-J2S-350B4 to
MR-J2S-700B4 . . . . . . . . . . . . . . . . . . . . 1-19
Connector MR-J2S-350B4 to
MR-J2S-700B4 . . . . . . . . . . . . . . . . . . . . . 1-20
Output . . . . . . . . . . . . . . . . . . . . . . . . . . . . . 3-9
Expansion parameters . . . . . . . . . . . . . . . . . . 4-13
Connector MR-J2S-500B/MR-J2S-700B . 1-15
Holder MR-J2S-200B4 and less . . . . . . . 1-17
Holder MR-J2S-350B and less . . . . . . . . 1-13
Holder MR-J2S-350B4 to MR-J2S-700B4 1-19
Holder MR-J2S-500B/MR-J2S-700B . . . . 1-15
Installation . . . . . . . . . . . . . . . . . . . . . . . . . 6-3
Block diagram
Servo amplifiers 200V . . . . . . . . . . . . . . . . 1-2
Servo amplifiers 400V . . . . . . . . . . . . . . . . 1-3
Bus cable . . . . . . . . . . . . . . . . . . . . . . . . . . . . 7-10
MELSERVO J2-Super
i
Index
F
Fan
N
No-fuse circuit breaker . . . . . . . . . . . . . . . . . . . 3-1
MR-J2S-200B4 and less . . . . . . . . . . . . . 1-18
O
MR-J2S-350B and less . . . . . . . . . . . . . . 1-14
MR-J2S-350B4 to MR-J2S-700B4 . . . . . . 1-20
Operation . . . . . . . . . . . . . . . . . . . . . . . . . . . . . 4-1
MR-J2S-500B/MR-J2S-700B . . . . . . . . . . 1-16
Option
Forced output signal . . . . . . . . . . . . . . . . . . . . 4-9
Cables . . . . . . . . . . . . . . . . . . . . . . . . . . . . 7-8
Forces on the servo motor . . . . . . . . . . . . . . . . 2-5
Regenerative brake . . . . . . . . . . . . . . . . . . 7-2
Front cover
Output signals . . . . . . . . . . . . . . . . . . . . . . . . . . 3-6
Removal and reinstallation . . . . . . . . . . . . 1-10
Functions
P
Overview . . . . . . . . . . . . . . . . . . . . . . . . . 1-22
Fuse . . . . . . . . . . . . . . . . . . . . . . . . . . . . . . . . . 3-1
Parameter
Adjustment parameters . . . . . . . . . . . . . . 4-12
G
Basic parameters . . . . . . . . . . . . . . . . . . . 4-12
Expansion parameters . . . . . . . . . . . . . . . 4-13
Gain
Positioning operation . . . . . . . . . . . . . . . . . . . . 4-8
Auto tuning . . . . . . . . . . . . . . . . . . . . . . . . 4-26
Procedure before operation . . . . . . . . . . . . . . . 4-1
Manual mode . . . . . . . . . . . . . . . . . . . . . . 4-30
Program operation . . . . . . . . . . . . . . . . . . . . . . 4-8
Setting using setup-software . . . . . . . . . . 4-25
Protective earth . . . . . . . . . . . . . . . . . . . . . . . . 3-10
Grounding . . . . . . . . . . . . . . . . . . . . . . . . . . . 3-15
R
I
Regenerative brake resistor
Input signal . . . . . . . . . . . . . . . . . . . . . . . . . . . . 3-6
Installation . . . . . . . . . . . . . . . . . . . . . . . . . 7-6
Inspektion . . . . . . . . . . . . . . . . . . . . . . . . . . . . . 8-1
Response level . . . . . . . . . . . . . . . . . . . . . . . . 4-29
Installation . . . . . . . . . . . . . . . . . . . . . . . . . . . . 2-1
Interfaces . . . . . . . . . . . . . . . . . . . . . . . . . . . . . 3-7
S
Interpolation . . . . . . . . . . . . . . . . . . . . . . . . . . 4-33
Servo amplifier
J
JOG operation . . . . . . . . . . . . . . . . . . . . . . . . . 4-7
M
1-phase connection . . . . . . . . . . . . . . . . . 3-17
3-phase connection . . . . . . . . . . . . . . . . . 3-17
Block diagram (200V Type) . . . . . . . . . . . . 1-2
Block diagram (400V Type) . . . . . . . . . . . . 1-3
Connection . . . . . . . . . . . . . . . . . . . . . . . . . 3-1
Magnetic contactor . . . . . . . . . . . . . . . . . . . . . . 3-1
Control circuit/main circuit terminal block . . 3-2
Maintenance . . . . . . . . . . . . . . . . . . . . . . . . . . 8-1
Features . . . . . . . . . . . . . . . . . . . . . . . . . . . 1-1
Motor connector . . . . . . . . . . . . . . . . . . . . . . . 3-11
internal circuit and common . . . . . . . . . . . 3-14
Motor-less operation . . . . . . . . . . . . . . . . . . . . 4-9
Overview of 200V Types . . . . . . . . . . . . . . 1-5
Overview of 400V Types . . . . . . . . . . . . . . 1-6
ii
Index
Servo motor
System configuration
Components . . . . . . . . . . . . . . . . . . . . . . . 1-21
for MR-J2S-100B and less . . . . . . . . . . . . 1-23
Connection . . . . . . . . . . . . . . . . . . . . . . . . 3-10
for MR-J2S-200B/MR-J2S-350B . . . . . . . 1-24
Electromagnetic brake . . . . . . . . . . . . . . . 3-21
for MR-J2S-200B4 and less . . . . . . . . . . . 1-27
Model overview 200V Types . . . . . . . . . . . 1-7
for MR-J2S-350B4/MR-J2S-500B4 . . . . . 1-28
Model overview 400V Types . . . . . . . . . . . 1-8
for MR-J2S-500B . . . . . . . . . . . . . . . . . . . 1-25
Rating plate . . . . . . . . . . . . . . . . . . . . . . . . 1-9
for MR-J2S-700B . . . . . . . . . . . . . . . . . . . 1-26
Torque characteristics . . . . . . . . . . . . . . 10-13
for MR-J2S-700B4 . . . . . . . . . . . . . . . . . . 1-29
Vibration . . . . . . . . . . . . . . . . . . . . . . . . . . . 2-6
T
Specification
Torque characteristics . . . . . . . . . . . . . . 10-13
Specifications
electromagnetic brake . . . . . . . . . . . . . . . 10-4
Test operation mode . . . . . . . . . . . . . . . . . . . . . 4-7
Transformer
Dimensions . . . . . . . . . . . . . . . . . . . . . . . 12-18
Servo amplifier . . . . . . . . . . . . . . . . . . . . . 10-9
W
Servo motor . . . . . . . . . . . . . . . . . . . . . . 10-10
Transformer . . . . . . . . . . . . . . . . . . . . . . . 7-11
Station number
Setting . . . . . . . . . . . . . . . . . . . . . . . . . . . 3-27
MELSERVO J2-Super
Warnings
Overview . . . . . . . . . . . . . . . . . . . . . . . . . . . 9-1
Remedying . . . . . . . . . . . . . . . . . . . . . . . . 9-10
iii
Index
iv
MITSUBISHI ELECTRIC
HEADQUARTERS
EUROPEAN REPRESENTATIVES
EUROPEAN REPRESENTATIVES
EURASIAN REPRESENTATIVES
MITSUBISHI ELECTRIC
EUROPE
EUROPE B.V.
German Branch
Gothaer Straße 8
D-40880 Ratingen
Phone: +49 (0)2102 486-0
Fax: +49 (0)2102 486-1120
e mail: [email protected]
MITSUBISHI ELECTRIC
FRANCE
EUROPE B.V.
French Branch
25, Boulevard des Bouvets
F-92741 Nanterre Cedex
Phone: +33 1 55 68 55 68
Fax: +33 1 55 68 56 85
e mail: [email protected]
MITSUBISHI ELECTRIC
IRELAND
EUROPE B.V.
Irish Branch
Westgate Business Park, Ballymount
IRL-Dublin 24
Phone: +353 (0) 1 / 419 88 00
Fax: +353 (0) 1 / 419 88 90
e mail: [email protected]
MITSUBISHI ELECTRIC .
ITALY
EUROPE B.V
Italian Branch
Via Paracelso 12
I-20041 Agrate Brianza (MI)
Phone: +39 (0)39 / 60 53 1
Fax: +39 (0)39 / 60 53 312
e mail: [email protected]
MITSUBISHI ELECTRIC
SPAINE
EUROPE B.V.
Spanish Branch
Carretera de Rubí 76-80
E-08190 Sant Cugat del Vallés
(Barcelona)
Phone: +34 9 3 / 565 3160
Fax: +34 9 3 / 589 1579
e mail: [email protected]
MITSUBISHI ELECTRIC
UK
EUROPE B.V.
UK Branch
Travellers Lane
GB-Hatfield Herts. AL10 8 XB
Phone: +44 (0)1707 / 27 61 00
Fax: +44 (0)1707 / 27 86 95
E-mail: [email protected]
MITSUBISHI ELECTRIC
JAPAN
CORPORATION
Office Tower “Z” 14 F
8-12,1 chome, Harumi Chuo-Ku
Tokyo 104-6212
Phone: +81 3 6221 6060
Fax: +81 3 6221 6075
MITSUBISHI ELECTRIC
USA
AUTOMATION
500 Corporate Woods Parkway
Vernon Hills, IL 60061
Phone: +1 847 / 478 21 00
Fax: +1 847 / 478 22 83
GEVA
AUSTRIA
Wiener Straße 89
AT-2500 Baden
Phone: +43 (0) 2252 / 85 55 20
Fax: +43 (0) 2252 / 488 60
e mail: [email protected]
TEHNIKON
BELARUS
Oktjabrskaya 16/5, Ap 704
BY-220030 Minsk
Phone: +375 (0) 17 / 2104626
Fax: +375 (0) 17 / 2104626
e mail: [email protected]
Koning & Hartman b.v.
BELGIUM
Researchpark Zellik
Pontbeeklaan 43
BE-1731 Brussels
Phone: +32 (0)2 / 467 17 51
Fax: +32 (0)2 / 467 17 45
e mail: [email protected]
AKNATHON
BULGARIA
4, A. Ljapchev Blvd.
BG-1756 Sofia
Phone: +359 (0) 2 / 97 44 05 8
Fax: +359 (0) 2 / 97 44 06 1
e mail: —
AutoCont
CZECH REPUBLIC
Control Systems s.r.o.
Nemocnicni 12
CZ-70200 Ostrava 2
Phone: +420 59 / 615 21 11
Fax: +420 59 / 615 25 62
e mail: [email protected]
louis poulsen
DENMARK
industri & automation
Geminivej 32
DK-2670 Greve
Phone: +45 (0) 70 / 10 15 35
Fax: +45 (0) 43 / 95 95 91
e mail: [email protected]
UTU Elektrotehnika AS
ESTONIA
Pärnu mnt. 160i
EE-11317 Tallinn
Phone: +372 (0) 6 / 51 72 80
Fax: +372 (0) 6 / 51 72 88
e mail: [email protected]
Beijer Electronics OY
FINLAND
Ansatie 6 A
FIN-01740 Vantaa
Phone: +358 (0) 9 / 886 77 500
Fax: +358 (0) 9 / 886 77 555
e mail: [email protected]
UTU POWEL OY
FINLAND
Hevoshaankatu 3
FIN-28101 Pori
Phone: +358 (0)2 / 550 8800
Fax: +358 (0)2 / 550 8841
e mail: [email protected]
UTECO A.B.E.E.
GREECE
5, Mavrogenous Str.
GR-18542 Piraeus
Phone: +302 (0) 10 / 42 10 050
Fax: +302 (0) 10 / 42 12 033
e mail: [email protected]
Meltrade Ltd.
HUNGARY
Fertõ Utca 14.
HU-1107 Budapest
Phone: +36 (0)1 / 431-9726
mail: +36 (0)1 / 431-9727
e mail: [email protected]
SIA POWEL
LATVIA
Lienes iela 28
LV-1009 Riga
Phone: +371 784 / 2280
Fax: +371 784 / 2281
e mail: [email protected]
UAB UTU POWEL
LITHUANIA
Savanoriu Pr. 187
LT-02300 Vilnius
Phone: +370 (0)5 / 232 3101
Fax: +370 (0)5 / 232 2980
e mail: [email protected]
INTEHSIS SRL
MOLDOVA
Bld. Traian 23/1
MD-2060 Kishinev
Phone: +373 (0)22/ 66 4242
Fax: +373 (0)22/ 66 4280
e mail: [email protected]
Beijer Electronics AS
NORWAY
Teglverksveien 1
NO-3002 Drammen
Phone: +47 (0) 32 / 24 30 00
Fax: +47 (0) 32 / 84 85 77
e mail: [email protected]
Koning & Hartman B.V. NETHERLANDS
Donauweg 2 B
NL-1000 AK Amsterdam
Phone: +31 (0)20 / 587 76 00
Fax: +31 (0)20 / 587 76 05
e mail: [email protected]
MPL Technology Sp. z o.o.
POLAND
ul. Sliczna 36
PL-31-444 Kraków
Phone: +48 (0) 12 / 632 28 85
Fax: +48 (0) 12 / 632 47 82
e mail: [email protected]
Sirius Trading & Services srl ROMANIA
Str. Biharia No. 67-77
RO-013981 Bucuresti 1
Phone: +40 (0) 21 / 201 1146
Fax: +40 (0) 21 / 201 1148
e mail: [email protected]
AutoCont Control s.r.o.
SLOVAKIA
Radlinského 47
SK-02601 Dolný Kubín
Phone: +421 435868 210
Fax: +421 435868 210
e mail: [email protected]
INEA d.o.o.
SLOVENIA
Stegne 11
SI-1000 Ljubljana
Phone: +386 (0) 1- 513 8100
Fax: +386 (0) 1- 513 8170
e mail: [email protected]
Aratron AB
SWEDEN
Box 20087
S-16102 Bromma
Phone: +46 (0) 8 / 40 41 600
Fax: +46 (0) 8 / 98 42 81
e mail: —
Beijer Electronics AB
SWEDEN
Box 426
S-20124 Malmö
Phone: +46 (0) 40 / 35 86 00
Fax: +46 (0) 40 / 35 86 02
e mail: [email protected]
ECONOTEC AG
SWITZERLAND
Postfach 282
CH-8309 Nürensdorf
Phone: +41 (0) 1 / 838 48 11
Fax: +41 (0) 1 / 838 48 12
e mail: [email protected]
GTS
TURKEY
Darülaceze Cad. No. 43 Kat. 2
TR-80270 Okmeydani-Istanbul
Phone: +90 (0) 212 / 320 1640
Fax: +90 (0) 212 / 320 1649
e mail: [email protected]
CSC Automation Ltd.
UKRAINE
15, M. Raskova St., Fl. 10, Off. 1010
U-02002 Kiev
Phone: +380 (0) 44 / 494 33 55
Fax: +380 (0) 44 / 494 33 66
e mail: [email protected]
Kazpromautomatics Ltd. KAZAKHSTAN
2, Scladskaya Str.
KAZ-470046 Karaganda
Phone: +7 3212 50 11 50
Fax: +7 3212 50 11 50
e mail: [email protected]
Avtomatika Sever Ltd.
RUSSIA
Lva Tolstogo St. 7, Off. 311
RU-197376 St Petersburg
Phone: +7 812 / 11 83 238
Fax: +7 812 / 11 83 239
e mail: [email protected]
Consys
RUSSIA
Promyshlennaya St. 42
RU-198099 St Petersburg
Phone: +7 812 325 3653
mail: +7 812 747 2055
e mail: [email protected]
Electrotechnical Systems
RUSSIA
Siberia
Shetinkina St. 33, Office 116
RU-630088 Novosibirsk
Phone: +7 3832 / 119598
Fax: +7 3832 / 119598
e mail: [email protected]
Elektrostyle
RUSSIA
Poslannikov Per., 9, Str.1
RU-107005 Moscow
Phone: +7 095 542 4323
Fax: +7 095 956 7526
e mail: [email protected]
Elektrostyle
RUSSIA
Krasnij Prospekt 220-1
Office No. 312
RU-630049 Novosibirsk
Phone: +7 3832 106618
Fax: +7 3832 106626
e mail: [email protected]
ICOS
RUSSIA
Ryazanskij Prospekt, 8a, Office 100
RU-109428 Moscow
Phone: +7 095 / 232 0207
Fax: +7 095 / 232 0327
e mail: [email protected]
NPP Uralelektra
RUSSIA
ul. Sverdlova 11A
RU-620027 Ekaterinburg
Phone: +7 34 32 / 53 27 45
Fax: +7 34 32 / 53 27 45
e mail: [email protected]
STC Drive Technique
RUSSIA
Poslannikov per., 9, str.1
RU-107005 Moscow
Phone: +7 095 / 790 7210
Fax: +7 095 / 790 7212
e mail: [email protected]
MIDDLE EAST REPRESENTATIVE
SHERF Motion Techn. Ltd
Rehov Hamerkava 19
IL-58851 Holon
Phone: +972 (0)3 / 559 54 62
Fax: +972 (0)3 / 556 01 82
e mail: —
ISRAEL
AFRICAN REPRESENTATIVE
CBI Ltd
SOUTH AFRICA
Private Bag 2016
ZA-1600 Isando
Phone: +27 (0)11 / 928 2000
Fax: +27 (0)11 / 392 2354
e mail: [email protected]
MITSUBISHI
ELECTRIC
Mitsubishi Electric Europe B.V. /// FA - European Business Group /// Gothaer Straße 8 /// D-40880 Ratingen /// Germany
Tel.: +49(0)2102-4860 /// Fax: +49(0)2102-486112 /// [email protected] /// www.mitsubishi-automation.com
All trademarks acknowledged /// © Mitsubishi Electric Europe B.V. /// Specifications subject to change without notice /// Art.-No.: 168353 /// 06.2006
FACTORY AUTOMATION