1
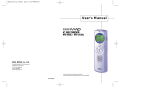
User's Manual
VOICE RECORDER
SR-320/160
SR-320SR/160SR
SAFA MEDIA Co., Ltd
19F DongWon Securities B/D, Karak-Dong, Songpa-Ku, Seoul, Korea
TEL: 02-3400-5200 (Rep.)
FAX: 02-3401-4141
Technical Support Center: 02-3400-5252
Website: www.safa.co.kr
Thank you your purchasing a RECOBOY.
Please read this User Guide before you use your RECOBOY.
There is a warranty inside of manual.
Please state the content of warranty when you purchase it.
Please keep the warranty.
SF69-00194A
Special features
Table of Contents
Preparation
1. Convenient and easy to carry slim-line design.
2. Telephone conversation recording
3. Auto power-off
4. Search & Play (INTRO SCAN)
5. Various repetitions
6. 396 recordings capacity
How to Use
Special features ............................................................... 1
Caution and Warnings.................................................... 4
Check the components .................................................. 5
Names of each part......................................................... 7
LCD Indicator and Symbols ........................................... 9
Replacing Batteries..........................................................10
Getting Started..................................................................12
Recording...........................................................................13
Voice Recording................................................................14
- Recording with the Built-in microphone ....................14
- Recording with the external microphone...................14
Recording with line-in......................................................15
- Recording from external appliances (Audio, PC)......15
- Recording the general telephone conversation .......16
- Recording the mobile phone conversation................16
7. Record mode index separation
8. Earphone monitoring during line-in recording
9. VOR (Voice Operation Recording)
10. Backlight
11. Low speed play
12. Fast saving to PC via USB(4Mbps)
Playback .............................................................................17
- Normal Playback ............................................................17
- Low-speed Playback ......................................................17
- High-speed Search 1......................................................18
- High-speed Search 2......................................................18
- Playback on other Indexes............................................18
- Repetition Playback........................................................19
Section Repetition ........................................................19
Index Repetition............................................................19
FOLD Repetition............................................................19
13. Replay function via EXTERNAL-SPEAKER. (Model SR-320SR/160SR)
14. FM Receiving and Replay function (Model SR-320SR/160SR)
Class B electronic equipment
Since this equipment is verified for domestic use by electron
suitable registration law, you can use this not only in the domestic
area but also in every place you want to use.
1
Menu function.................................................................. 20
- Mic Recording Sensitivity ............................................ 20
- VOR Function................................................................. 20
- Beep Setting................................................................... 21
- Recording Time Setting ............................................... 21
- Scan function ................................................................. 22
Clock setting ..................................................................... 22
Alarm setting.................................................................... 23
Delete Function................................................................ 24
- To delete a particular index ......................................... 24
- To Delete a FOLD........................................................... 24
To delete a particular FOLD ...................................... 24
To delete all FOLDs .................................................... 24
2
Cautions and Warnings
Saving into the external appliance...........................................25
- To save into external audio (such as cassette recorder)....25
- To save into a PC via USB............................................25
To use the external speaker (Model SR-320/160SR)............26
- To turn on.......................................................................26
Using battery...............................................................26
Using the AC power source......................................26
- To connect the main unit .............................................26
- To record and playback................................................26
Recording with microphone.....................................26
Recording telephone conversation..........................27
Playback .......................................................................27
To use FM radio receiver (Model SR-320SR/160SR)..28
- Connecting .....................................................................28
- Receiving broadcasting................................................28
- Recording broadcasting...............................................28
References
Specification.....................................................................29
Troubleshooting ..............................................................29
Warranty
Cautions
1. Do not attempt to open repair, or modify your SOUND MAP.
2. Do not use this product where the use of electronic devices is
prohibited (such as in aircraft, etc.).
3. Do not put this product or any of its accessories in your mouth.
4. Do not immerse this product in water or spill liquids on it.
Warnings
1. Do not expose your Sound Map or its accessories to any shocks.
This may cause it to malfunction.
2. Should the product become deformed or malfunction due to
exposure to smoke or hest, remove the batteries from the main unit
immediately and disconnect any external cables.
3. Do not apply excessive force to the LCD screen. It may cause
damage to the LCD or cause it to malfunction.
4. Do not expose the product to direct sunlight or any source of heat
for a prolonged period.
5. Remove the batteries if you do not intend to use this product for any
prolonged period of time.
6. Do not pull the accessory wires (earphone, earmic, or audio cables)
with excessive force.
7. Please note that we lack all sense of responsibility from damage or
demanding compensation by using this product.
8. We do not have any responsibility to the losses, vanished content
that breaks out, using this product or repairing it. So if there is
important content, please keep it in the safe recording medium.
9. Please give attention. The speaker of this product may make a
change in the content of magnetic card such as a credit card or a
transportation ticket.
10. Please note that this product is prohibited from using illegal
methods such as an invasion of a person's privacy or eavesdropping.
The design and the specifications of the Sound MAP are subject to
change without prior notice.
3
4
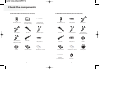
Check the components
B. Recorder and accessories (Model SR-320SR/160SR)
A. Recorder and accessories (Model SR-320/160)
RECOBOY (main unit)
Adaptor for telephone
conversation recording
Cable for telephone
conversation recording
Stereo earphone
USB cable
External Microphone
RECOBOY (main unit)
USB cable
Battery (AAA X 1)
External Microphone
Stereo earphone
Mono earphone for
mobile phone (excluded)
L
TE
TE
L
Audio Cable
USB User's manual
Battery (AAA X 1)
RECOBOY User's manual
E
LIN
CD-ROM
E
LIN
Mono earphone for
mobile phone (excluded)
Audio Cable
USB User's manual
Wall Cable
(for external speaker)
5
Battery (AA X 2)
RECOBOY User's manual
FM receiver
6
CD-ROM
External speaker
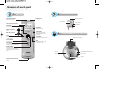
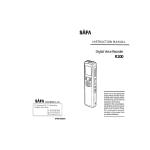
Names of each part
1
2
Main Unit
FM (Model SR-320SR/160SR)
Earphone connector
Earphone jack
Audio cable connector
(FM receiver connector)
Search Switch
Volume control
LCD (Liquid Crystal Display)
Reset Switch
Volume (UP)
(Only for play and recording functions)
REC/PAUSE
Recording and pause
Built-in Microphone
(Back)
STOP/DELETE
Stop recording, index delete,
selected FOLD delete, and all
FOLDs delete
USB cable connector
BACK
3
External-SPEAKER (Model SR-320SR/160SR)
FILE/REPEAT
Fast rewinding, index change,
and menu change
FOLD change and repeat playback
Volume (DOWN)
Telephone wire connector
NEXT
(Only for play and recording functions)
Fast forwarding, index change,
and (M)menu change
PLAY/PAUSE
(Low-speed) playback, pause and
remaining recording capacity check
M(MENU/HOLD)
Recording sensitivity, VOR, BEEP,
recording time, Index introduction
(SCAN), hold set/release, and volume
control
Recording input selection switch
Built-in
Microphone
Power On/Off
Speaker
External speaker connector
(Back)
7
8
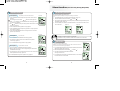
LCD Indicator and Symbols
Replacing Batteries
1
2
Be sure that the power is OFF.
Open the battery cover.
Do not replace the batteries while the
power is on. It may cause the product
malfunction.
3
Insert the batteries.
Description of Screen Display
1. Check the polarity of the batteries (Size "AAA") and close the cover.
2. When you have inserted the batteries, the LCD will display all indicators (Figure 1) and will switch to recording
and playback standby mode (Figure 2).
3. Press PLAY/PAUSE or STOP/DEL button to switch the power on. Your Sound MAP will be in the standby mode
for recording or playback. (Figure 3)
LCD screen
4. The power will be automatically shut off if no function is activated for 1 minute.
From now on, we will refer to the mode in Figure 2 as "Standby mode" (waiting for recording or playback to be
activated).
(Figure 1)
FOLD displayed
Index Display (01-99)
Recording mode
indicator
Recording sensitivity
mode indicator
Section Repeat Playback
state indicator
VOR Display
Battery indicator
FM receiving
indicator
Play time, recording time
indicator, menu change
(Figure 2)
<Standby mode>
ALARM Display
9
(Figure 3)
Battery life
Battery
Alkaline (LR03)
Recording capacity
Approximately 7 hours
(LP recording)
10
Playback capacity
Approximately 6 hours
Getting Started
Please insert batteries before you read the followings.
1
Battery indicator
Full
Approximately half used
Almost exhausted
Fully exhausted
Replace with new batteries
(The product may malfunction
if the batteries are not replaced)
Replace the batteries if mode 3 and mode 4 are displayed one after another.
Warnings
1
2
3
Switching RECOBOY On
Press the PLAY/PAUSE button to switch on the product. The
product will switch to standby mode.
Alternatively, you can press the REC/PAUSE button.
(figure 2-0)
Switching RECOBOY Off
The power will be automatically shut off if you do not do activate
any functions for 1 minute (i.e. if you don't use your RECOBOY for
one minute).
Static discharge or poor contact due to an external impact during battery
replacement may cause the product to malfunction. Remove the batteries and
insert them into the battery compartment again if this happens.
Remove the batteries from the main unit if you do not intend to use this product
for a prolonged period of time. (Leaking batteries may cause the damage to the
product)
If you don't use FM radio receiver, you should disconnect FM radio receiver from
the main unit. It will help to save a battery.
2
Locking the button (HOLD)
(Figure 2-1)
HOLD function is useful for preventing false operation during play or
recording.
1. Press and hold MENU(M) button (for about 2 seconds) in the
standby state to set the lock state (HOLD ON).
If you press any other button while the unit is in HOLD ON mode,
the LCD displays 'ON HOLD' and pressing the button will not
result in any response from the unit. (Figure 2-1)
2. Press and hold MENU/HOLD button (for about 2 seconds) in the
hold on state to release lock state.
The LCD will display 'OFF HOLD' indicating that the lock mode
has been released. (Figure 2-2)
11
<#>
12
(Figure 2-2)
Recording
Voice Recording
Please note the followings before you start recording
1
Check that the product is in standby mode.
Press the FOLD button to select the FOLD you want. The FOLD type will be scrolled (A, B, C, and
D) every time you press the button. If you do not select a FOLD, you will record in the current
FOLD. (Figure 3-1)
FOLD type
Select one of A, B, C or D.
Set recording sensitivity, file, VOR function and speed (HQ, SP, LP) before you start recording
(see Page 15 and 16).
Recording with the Built-in microphone
You can use the function when the product is on the desk or table.
1 Direct the product's built-in microphone towards the source of the sound.
2. Press the REC/PAUSE button to start recording. REC will be displayed on LCD
(Figure 4-1 and 4-2).
(Figure 3-1)
If the index of the current FOLD reaches 99, the recording will continue from the at the end last i
ndex of the next FOLD.
Press the PLAY/PAUSE button to display the remaining recording capacity. (Figure 3-2)
Slide the M(MENU) button toward NEXT to increase the size of the
index while you are recording (Index separation function).
3. Press REC/PAUSE button to pause the recording for a short moment. (Figure 4-3)
4. Press REC/PAUSE button again to continue the recording.
5. Press the STOP/DEL button or PLAY/PAUSE button during recording or during standby mode to
stop recording.
(Figure 4-1)
(Figure 4-3)
(Figure 4-2)
The maximum index number for each FOLD is 99 (Up to 396 FOLDs: 99 X 4 ).
If the recording time is longer than the available capacity or when the
index reaches 396, 'FULL' is displayed and you cannot continue recording.
(Figure 3-2)
When this happens, delete some recordings or move them to an external appliance (audio or PC)
to continue recording.
Do not remove the batteries during recording. This may cause the product to malfunction. If you intend to
record for a prolonged period of time, first replace the batteries while the unit is in standby mode or power off mode.
Do not touch or move the product while you are recording via the built-in Microphone.
This may cause unnecessary noise on your recording.
(Figure 3-3)
2
Recording with the external microphone
You can use the function when the product is in the pocket or bag.
1. Connect the external microphone supplied with your Sound MAP to the LINE Connector.
2. Follow the same procedure as with the built-in microphone.
The recording will automatically be paused when the level of sound resource
decreases while VOR is on. (Figure 3-3)
- The sound may be discontinued for a short period while VOR mode is activated.
- When you use the VOR function in Low-sensitivity mode, only loud sounds will be ecorded.
- Deactivate the VOR function when recording important conversations.
13
14
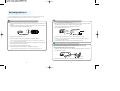
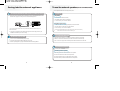
Recording with line-in
Set the recording speed (HQ, SP, LP), file, and VOR function before you start recording (see page 15 and 16).
Sound can be distorted during playback if the volume control is set too high during recording.
1
Recording from external appliances (Audio, PC)
1. Sound can be distorted during recording if the volume control of the external appliance is set
too high.
2. Connect one end of the audio cable to the Audio Cable Connector (LINE) of your Sound MAP
and the other end to the external appliance (Audio or PC).
2
Recording the general telephone conversation
Regarding the model SR-320SR/160SR, see page 26.
1. Connect the audio cable in the RECOBPY Audio Cable Connector (LINE). Connect the adapter
and the telephone with the cable for telephone conversation recording.
Then, connect the handset cable of the telephone to the adapter.
2. Adjust the Audio Cable switch to 'TEL'.
Main unit
Main unit
Handset
Adaptor for
telephone
conversation
recording
(A)
Telephone line
Audio Cable
External appliance
Audio Cable
Cable for telephone
conversation recording
3. Adjust the Audio Cable switch to 'LINE'.
Note: Some type of telephone may not be used for recording. Please test the recording.
4. Plug in the earphone to listen to the sound input from the external appliance.
It may be necessary to change the direction of installation of the adaptor (marked by (A)) depending
on your particular model of telephone.
Note: If you do not adjust the Audio Cable switch to 'LINE', you may not listen to the sound from the
earphone or the sound can be distorted.
5. The sound from the earphone may change slightly when recording starts. However, this will
not have any effect on the actual recording.
6. You can adjust the volume in the middle of recording.
7. Follow the same procedure as with the built-in microphone (See page 11).
If you do not adjust the Audio Cable switch to 'TEL', the recorded sound will be in low volume.
3. Follow the same procedure as with the built-in microphone (See page 11).
3
Recording the mobile phone conversation
Only the mobile phone equipped the earphone connector can be used for recording.
Some type of telephone may not be used for recording.
1. Connect the ear-microphone connector (excluded) to the external appliance connector and
the mobile phone connector.
3.5
Main unit
Ear-microphone
for mobile phone
conversation
recording
2.5
˙
˘ø phone
Mobile
2. Follow the same procedure as with the built-in microphone. (See page 12)
15
16
Playback
Press and hold PLAY/PAUSE button during low-speed playback to display time of the current index (recorded time:
REMAIN).
Adjust volume using Volume UP/DN button during the playback.
1
Normal Playbac
1. Press the FOLD/REPEAT button to select the FOLD (A, B, C, or D) you
want.
(figure 5-1)
High-speed Search 1
The followings are in the case of using NEXT or BACK button.
If you do not select a FOLD, the last FOLD you recorded will be played.
2. Slide the M(MENU) button toward NEXT and BACK and select the
FILE you want to start playback.
3. Press the PLAY/PAUSE button to start playback. The recorded time
will be displayed. (Figure 5-1)
3
(figure 5-2)
4. Press the PLAY/PAUSE button again to pause.
1. Press and hold (for at least 0.5 seconds) the NEXT button (
) or BACK button ( ) during
playback.
The playback stops and the time on the LCD increases or decreases rapidly.
2. Release the button when you want to start playback.
3. The search will stop when the time reaches the end of the current index if you press and hold
)
the NEXT button (
4. The search will stop when the time reaches the beginning of the current index if you
press and hold the BACK button ( ).
5. Press PLAY/PAUSE button again during pause to resume the
playback. (Figure 5-2)
4
6. Press the STOP/DELETE button during playback or pause mode to
stop playback.
High-speed Search 2
he followings are in the case of TIME setting.
2
Low-speed Playback
1. Press the REPEAT/FILE button to select the FOLD (A, B, C, or D) you
want.
(figure 5-3)
If you do not select any file, the file that you have recorded or played
the last time will be played.
4. Press PLAY/PAUSE button briefly again during the low-speed
playback to pause.
5. In low-speed playback or pause mode, press the PLAY/PAUSE button:
1) long time to resume the low-speed playback. (Figure 5-3)
2) briefly, to start normal playback. (Figure 5-4)
6. Press the STOP/DELETE button during playback or pause mode to stop
playback.
17
3. Slide the M(MENU) button toward(
want to playback.
),(
) and (
),(
). You can adjust the time and minute you
4. After adjusting the time and minute, press the MENU(M) button to start the playback on the time you
adjusted.
2. Slide the M(MENU) button toward NEXT and BACK and select the FILE
you want to start playback.
3. Press and hold PLAY/PAUSE button to start low-speed playback. The
recorded time will be displayed. (Figure 5-3)
1. Press MENU button briefly during the playback.
2. You can set up the time you want to playback.
If the recording time of the searched file is over one hour, the time indicator will flash. If not, the
minute indicator will flash.
5
(figure 5-3)
Playback on other Indexes
1. To move by one index
Slide the M(MENU) buttons toward NEXT (
state.
) BACK (
) briefly during playback or pause
The index will jump to the next or previous index for playback.
2. To move by several indexes
Slide the M(MENU) buttons toward NEXT (
move to other index fast.
) BACK (
Release the button to start playback from the index displayed.
18
) during stop state to
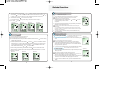
Menu function (It works only during Stop state)
6
1
Repetition Playback
Section Repetition
It repeats the specific section within one file.
The starting point is set and the
The factory default is high-sensitive mode.
Please adjust the sensitivity according to the recording circumstances.
(figure 21)
1. Press FOLD/REPEAT button briefly where you want to start the section
repetition.
Mic Recording Sensitivity
1. Press MENU(M) button once during the standby mode. (Figure 7-2)
2. Slide the M(MENU button toward NEXT (
indicator flashes (Figure 21).
) or BACK (
).
3. The mode will toggle between low sensitivity mode (LO SENSE) and high sensitivity mode
(HI SENSE) (Figure 7-1 and 7-2).
2. While
is flashing, press FOLD/REPEAT button briefly again where
you want to stop repetition.
4. Press the MENU, PLAY/PAUSE or STOP/DELETE button, or wait about 5 seconds to select
the current mode.
3. The
indicator will stop the flashing and the selected section will be
repeated continuously.
(figure 7-2)
(figure 7-1)
4. Press STOP/DELETE during repetition to stop playback.
5. Press FOLD/REPEAT button briefly during repetition to stop the repetition
and continue to playback.
6. Press and hold FOLD/REPEAT button to change the function into index
repetition (See the below).
(figure 22)
Index Repetition
It repeats one file.
Notes
1. Press and hold the FOLD/REPEAT button during playback.
2. The indicator will appear and the current index will be repeated
continuously. (Figure 22)
2
3. Press STOP/DELETE during repetition to stop playback.
FOLD Repetition
It repeats all files in one FOLD.
1. Press and hold the FILE/REPEAT button during playback.
(figure 23)
Hi SENSE : In a silent circumstance (recommended)
LO SENSE : In a noisy circumstance. Put the mic close to the source of the sound.
VOR Function
(figure 7-3)
The factory default is VOR OFF mode.
Low voice cannot be recorded with this function. (DO not use this function when
you want to record something very important.)
1. Press the MENU/HOLD button briefly and slide M(MENU) button toward
( ) during standby mode (Figure 7-3).
2. When the indicator appears on the LCD (Figure 23), press and hold the
FOLD/REPEAT button again.
2. Slide the M(MENU) button toward NEXT(
3. The FOLD appears on the LCD and the whole indices of the current FOLD
will be repeated continuously. (Figure 23)
3. The mode toggles between VOR ON and VOR OFF
(See Figures 7-3 and 7-4).
4. Press FOLD/REPEAT during FOLD repetition to stop playback.
4. Press the MENU, PLAY/PAUSE or STOP/DELETE button, or wait about 5
seconds to select the current mode.
19
) or BACK (
20
).
(figure 7-4)
3
Beep Setting
5
The factory default is BEEP ON mode.
If you select this function, you can hear 'beep' sound whenever you press
any button.
(figure 7-5)
)or BACK(
You can listen to the fist indices of all files using this function.
1. Press MENU(M) button briefly and slide the M(MENU) buttons toward(
during standby mode (Figure 7-10).
1. Press MENU(M) button briefly and slide the M(MENU) buttons
toward( ) twice during standby mode.
2. Slide the M(MENU) button toward NEXT(
Scan function
) four times
2. Press the PLAY/PAUSE button to play every index for 3 seconds from the first index of the
current file (Figures 7-10 and 7-11).
).
It helps you to find the file you want among several files.
3. The mode toggles between BEEP OFF (OFF BEEP) and BEEP ON (ON
BEEP) (See Figures 7-5 and 7-6).
(figure 7-6)
(figure 7-11)
(figure 7-10)
4. Press the MENU, PLAY/PAUSE or STOP/DELETE button, or wait about 5
seconds to select the current mode.
4
Recording Time Setting
The factory default is standard recording mode.
If you select this function, you can set up the recording quality. (Maximum recording time will be changed.)
1. Press MENU(M) button briefly and slide the M(MENU) buttons toward (
during standby mode.
2. Slide the M(MENU) button toward NEXT(
)t or BACK(
) three times
).
3. The mode toggles among long play (LP), standard play (SP), and High quality play (HQ)
(Figures 7-7, 7-8, and 7-9).
4. Press the MENU, PLAY/PAUSE or STOP/DELETE button, or wait about 5 seconds to select
the current mode.
Note: HQ mode produces higher quality of sound than SP mode, and SP mode produces higher quality of
sound than LP mode the highest quality
(figure 7-7)
(figure 7-8)
(figure 7-9)
6
Clock setting
This is for setting the present date and time. (It is essential if you want to set up alarm).
1. Press MENU(M) button briefly and slide the M(MENU) buttons toward (
standby mode (Figure 8-4).
2. Slide the M(MENU) button toward NEXT(
3. Slide the M(MENU) button toward (
toward NEXT(
)once and 'month' indicator will flash. Slide the button toward (
the button toward (
) or (
If you slide it toward BACK(
(i.e. year
) to enter into a DATE set up mode.
) to adjust 'date' you want. Slide the button
to adjust 'month'. Slide the button toward NEXT(
) or (
) to adjust 'day'.
month, month date )
22
)
) once and 'day' indicator will flash. Slide
) during DATE setting, it will be back the last category.
4. Slide the M(MENU) button toward NEXT(
21
) or BACK(
) or (
) five times during
)to enter into a "HMS" (TIME) set up mode.
Delete Function
5. Slide the M(MENU) button toward(
) or ( ) to adjust 'hour(H)' you want. Slide the button
toward NEXT( )once and 'minute(M)' indicator will flash. Slide the button toward( )or( )
to adjust 'minute'. ('Second' will be set as '00' automatically when the minute is set.)
6. Slide the button toward(
If you slide it toward(
(i.e. minute
hour)
(figure 8-1)
1
1. Press STOP/DEL button briefly during playback or stop state.
)during TIME setting, it will be back the last category.
(figure 8-3)
(figure 9-3)
The index number appears and DEL flashes while your Sound MAP
still plays the music in delete standby state.
)once to exit the clock mode.
(figure 8-2)
To delete a particular index
This is to delete indices one by one.
2. Slide the M(MENU) button toward NEXT( ) or BACK( ) to move
to the index that you want to delete
(Figure 9-3).
3. Press and hold the STOP/DEL button (for approximately 3 seconds) to
delete the current index (Figure 9-3).
(figure 8-4)
The number of indices after the deleted index will now be decreased by one
automatically.
(i.e. If you delete the index No. 02 among the indices No. 01, 02, 03, 04, and 05,
the number of index No. 01 remains as it is and the numbers of indices No. 03, 04
and 05 become 02, 03, and 04.)
4. If you do not want to delete the index, press STOP/DELETE or any
other button briefly.
7
2
Alarm setting
To Delete a FOLD
To delete a particular FOLD
This is for setting the alarm to go off at the time set.
Alarm will go off after sounding at the time set.
This is to delete all FOLD indices you select
among FOLDs of A, B, C, and D.
) six times during
1. Press and hold STOP/DELETE button (for about 3 seconds) during stop
state.
2. Slide the M(MENU) button toward NEXT( ) or BACK ( ) to select 'On ALARM'. Slide the
button toward ( ) to select 'HMS' mode. Slide the button toward ( )to adjust 'hour(H)'
you want (Figure 8-3). Slide the button toward NEXT ( )and 'minute(M)' indicator will
flash. Slide the button toward( ) or( ) to adjust 'minute'.
2. Press the FOLD button to move to the FOLD you want to delete.
3. Press and hold STOP/DELETE button (for about 3 seconds) again to
delete all the indices in the selected FOLD. Your Sound MAP will stop
playing at the FOLD. (Figure 9-1)
4. If you do not want to delete the file, press STOP/DELETE button briefly.
1. Press MENU(M) button briefly and slide the M(MENU) buttons toward (
standby mode (Figure 8-5).
3. After finishing ALARM setting, slide the button toward(
The current file appears and DEL flashes (Figure 9-1).
)once to exit the menu mode.
ALARM setting is available after CLOCK setting and slide the button toward (
into the set up mode.
(figure 8-5)
(figure 8-7)
(figure 8-6) 23
) to enter
To delete all FOLDs
This is to delete whole memories in the unit.
1. Press and hold the STOP/DELETE button (for approximately 3 seconds)
during stop mode.
The current file appears and DEL flashes (Figure 9-2).
2. Press the FOLD button to select all four FOLDs (A, B, C, D). A, B, C, D,
and "ALL DEL" will appear one after another (Figure 9-2).
3. Press and hold STOP/DELETE button again to delete all the indices in all
the FOLDs. Your Sound MAP will stop playing at the FOLD 'A'.
4. If you do not want to delete the files, press the STOP/DELETE button
briefly.
24
23
(figure 9-1)
(figure 9-2)
Saving into the external appliance
To use the external speaker (Model SR-320SR/160SR)
The back light will not flash after connecting external speaker .
1
To save into the external audio (such as cassette recorder).
1. Connect one end of the audio cable to the earphone jack of your RECOBOY and the other
end to the Mic input jack or AUX jack of the external audio appliance.
1
To turn on
Using battery
1. Insert two 1.5V batteries (size AA).
2. The ON/OFF power switch should be ON.
3. If LED comes up, it is in normal condition.
Using the AC power source
Main unit
External appliance
Audio Cable
1. Connect the direct current supply adapter (DC 4.5V.) for 300 mA.
2. Turn the switch of lower end of the right side ON.
3. If LED comes up, it is in normal condition.
You need to purchase another cable if the provided audio cable does not fit the input jack of
the external audio.
Note: After inserting batteries and you leave the switch ON, there can be inferiority.
Please make sure switch OFF or leave the battery out.
2. Press the record button on the external audio appliance and the play button on your
RECOBOY simultaneously to start recording.
2
2
To save into a PC via USB
This is to save the recorded sound into your PC promptly.
1. Insert the enclosed CD into the CD-ROM drive on your PC.
2. See the separate guide for program installation details and saving method.
To connect the main unit
1. Leave the external speaker on a suitable place and turn the power switch ON.
2. When it is connected to the main unit, the main unit will turn on automatically.
3. You can record or replay via the external speaker without batteries in the main unit.
3
To record and playback
Turn the power switch ON.
Recording with microphone.
1. Recording input select switch should be in MIC position.
2. Press PLAY button on the main unit to stop the unit.
3. Press REC button on the top of right side to start recording.
4. Follow the same procedure as with the built-in microphone.
25
26
To use FM radio receiver (Model SR-320SR/160SR)
The main unit connected to FM radio receiver does not turn off automatically.
1
Recording telephone conversation.
To connect
1. Recording input select switch should be in TEL position.
1. Connect FM radio reception to the hole between LINE/FM connector and the earphone
jack.
2. Connect the TEL connector of an external speaker with the telephone connector on the wall.
2. If it is connected properly, 'FM' appears on the LCD.
3. Connect the LINE connector of an external speaker with a telephone.
4. Follow the same procedure as with the built-in microphone.
When you don't receive or record FM radio, disconnect the FM radio receiver from the
main unit. If not, the battery will be exhausted quickly and cause a leakage.
Tip
Playback
1. Make sure the main unit is in stop state. If not, press PLAY button to stop.
2. Select the FOLD and index you want and press PLAY button to start playback via the external
speaker.
3. Follow the same procedure as with the playback of the main unit.
2
To receive broadcasting
1. Insert the earphone into earphone jack of FM receiver and listen.
2. Adjust volume of FM receiver properly.
4. The external speaker produces sound instead of built-in speaker.
Tip
Please note that FM reception can be weak when you drive a car or are
in the places where the radio field intensity is weak.
3. Press the SCAN switch of the FM receiver to listen the received broadcasting.
4. When the limit reaches the maximum of FM reception extent, it will not receive
further broadcasting.
5. Press RESET button to return to the first section.
6. Try it again.
7. The received broadcasting does not be saved in the memory after you disconnect the FM
receiver. When you connect the receiver again, you should try to receive FM again.
3
To record broadcasting
1. Press the SCAN switch of the FM receiver to listen the received broadcasting.
2. Adjust recording sensitivity (HQ, SP, and LP).
3. Press REC button to record the received broadcasting.
4. Follow the same procedure as with the built-in microphone.
27
28
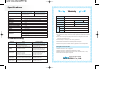
Specifications
Item
Maximum Recording Time
Weight
Power
Battery Life
Recording Media
USB speed
HQ: 70 minutes (1 hours 10 minutes)
SP: 355 minutes (5 hours 55 minutes)
LP: 570 minutes (9 hours 30 minutes)
RECOBOY
Product Name
32g (net) / 44g (battery included)
DC 1.5V, LRO3 (AAA X 1)
Model Name
Recording: 7 hours, Playback: 6 hours (LP mode)
Date of Purchase
yr
mon
day
Warranty Period
1 year
FLASH MEMORY (32MB) / FLASH MEMORY (16MB)
Location
4Mbps
Total 396 (99 per a file x 4)
Maximum Number of Recordings
Effective Maximum Output
Microphone
23mm diameter
Desktop external speaker with detachable FM radio
29
29
94
$
Name
Built-in and omni-directional capacitor microphone
Dimensions
Paid Amount
Tel
70 mW
Speaker
Feature
100.6 13.5mm(Unit only)
35 13.4mm(FM Tuner only)
114.4 51mm(Speaker only)
Cust
omer
Address
Tel
1. This product has passed through thorough quality management and testing.
2. Any malfunction during normal use will be repaired free within the warrantee
period.
3. Some service charge may apply for the services in Charged Service Guide
even in the warrantee period.
Troubleshooting
Symptom
Warranty
SR-160/160SR
SR-320/320SR
HQ: 140 minutes (2 hours 20 minutes)
SP: 710 minutes (11 hours 50 minutes)
LP: 1140 minutes (19 hours)
4. This Warranty is valid only in the country of purchase.
Check
Corrective action
LCD is blank.
The batteries are dead.
The battery polarity is wrong.
Replace the batteries with new ones
Insert the batteries with right polarity.
I cannot record
anything
RECOBOY is locked (HOLD ON mode).
Replace the batteries with new ones.
The batteries are dead.
Release the lock mode.
Replace the batteries with new ones
Delete any unnecessary recordings.
I cannot playback
RECOBOY is locked (HOLD ON mode).
The batteries are dead.
Nothing is recorded yet.
The volume control is on lowest position.
Release the lock mode.
Replace the batteries with new ones
Check the recording number.
Adjust the volume control.
I cannot hear anything
from the speaker.
Earphone is plugged in.
The volume control is on lowest position.
Pull out the earphone.
Adjust the volume control.
I cannot hear anything
from the earphone.
Earphone is not fully plugged in.
The volume control is on lowest position.
Fully plug in the earphone.
Adjust the volume control.
29
5. Please fill the warrantee form and keep it at the safe place.
6. Please contact your local dealer when any problem occurs to this product.
Charged Service Guide
1. Malfunction due to user's negligence.
2. Malfunction due to unauthorized modification or repair
3. Malfunction due to natural hazards (such as fire, seawater, flood, or war).
4. When the warrantee period is expired.
Smart Audio & Future Audiopia
SAFA MEDIA Co., Ltd.