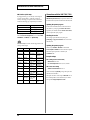
1
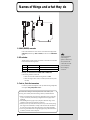
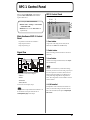
Owner's Manual
Before using this unit, carefully read the sections entitled: “USING THE UNIT
SAFELY” and “IMPORTANT NOTES” (Owner’s manual p. 2; Owner’s manual
p. 3). These sections provide important information concerning the proper
operation of the unit. Additionally, in order to feel assured that you have
gained a good grasp of every feature provided by your new unit, the Owner’s
manual should be read in its entirety. The manual should be saved and kept
on hand as a convenient reference.
Copyright © 2001 ROLAND CORPORATION
All rights reserved. No part of this publication may be reproduced in any
form without the written permission of ROLAND CORPORATION.
Roland Wen site http://www.roland.co.jp/
USING THE UNIT SAFELY
The
symbol alerts the user to important instructions
or warnings.The specific meaning of the symbol is
determined by the design contained within the
triangle. In the case of the symbol at left, it is used for
general cautions, warnings, or alerts to danger.
Used for instructions intended to alert
the user to the risk of death or severe
injury should the unit be used
improperly.
Used for instructions intended to alert
the user to the risk of injury or material
damage should the unit be used
improperly.
* Material damage refers
other adverse effects
respect to the home
furnishings, as well
animals or pets.
to damage or
caused with
and all its
to domestic
The ● symbol alerts the user to things that must be
carried out. The specific thing that must be done is
indicated by the design contained within the circle. In
the case of the symbol at left, it means that the powercord plug must be unplugged from the outlet.
104
001
• Before using this unit, make sure to read the
instructions below, and the Owner’s Manual.
..........................................................................................................
002a
• Do not open or perform any internal modifications on the unit.
..........................................................................................................
004
• Never use or store the unit in places that are:
• Subject to temperature extremes (e.g., direct
sunlight in an enclosed vehicle, near a heating
duct, on top of heat-generating equipment); or
are
• Damp (e.g., baths, washrooms, on wet floors);
or are
• Humid; or are
• Exposed to rain; or are
• Dusty; or are
• Subject to high levels of vibration.
..........................................................................................................
011
• Do not allow any objects (e.g., flammable material,
coins, pins); or liquids of any kind (water, soft
drinks, etc.) to penetrate the unit.
..........................................................................................................
013
• In households with small children, an adult
should provide supervision until the child is
capable of following all the rules essential for the
safe operation of the unit.
..........................................................................................................
014
• Protect the unit from strong impact.
(Do not drop it!)
..........................................................................................................
2
The
symbol alerts the user to items that must never
be carried out (are forbidden). The specific thing that
must not be done is indicated by the design contained
within the circle. In the case of the symbol at left, it
means that the unit must never be disassembled.
• Try to prevent cords and cables from becoming
entangled. Also, all cords and cables should be
placed so they are out of the reach of children.
..........................................................................................................
IMPORTANT NOTES
291a
In addition to the items listed under “USING THE UNIT
SAFELY” on page 2, please read and observe the
following:
Placement
354a
• Do not expose the unit to direct sunlight, place it near
devices that radiate heat, leave it inside an enclosed
vehicle, or otherwise subject it to temperature extremes.
Excessive heat can deform or discolor the unit.
355
• To avoid possible breakdown, do not use the unit in a wet
area, such as an area exposed to rain or other moisture.
Additional Precautions
553
• Use a reasonable amount of care when using the unit’s
buttons, sliders, or other controls; and when using its jacks
and connectors. Rough handling can lead to malfunctions.
556
• When connecting / disconnecting all cables, grasp the
connector itself—never pull on the cable. This way you
will avoid causing shorts, or damage to the cable’s
internal elements.
558b
• To avoid disturbing your neighbors, try to keep the unit’s
volume at reasonable levels (especially when it is late at
night).
Handling CD-ROMs
801
• Avoid touching or scratching the shiny underside
(encoded surface) of the disc. Damaged or dirty CD-ROM
discs may not be read properly. Keep your discs clean
using a commercially available CD cleaner.
3
Contents
USING THE UNIT SAFELY...................................................................................................................... 2
IMPORTANT NOTES................................................................................................................................ 3
Before you begin.....................................................................................5
Check the included items .......................................................................................................................... 5
Main features............................................................................................................................................... 5
Names of things and what they do........................................................6
Preparations for using the RPC-1 .........................................................7
Minimum requirements ............................................................................................................................ 7
Installing the RPC-1 ................................................................................................................................... 7
Installing the RPC-1 driver (Windows)................................................................................................... 7
Installing the RPC-1 driver (Macintosh) ................................................................................................. 9
About the various RPC-1 drivers ........................................................................................................... 10
RPC-1 Control Panel.............................................................................11
Main functions of RPC-1 Control Panel ................................................................................................ 11
Signal flow ................................................................................................................................................. 11
RPC-1 Control Panel ................................................................................................................................ 11
Connections with other R-BUS devices .............................................13
Connections with R-BUS devices ........................................................................................................... 13
Connections with the VM-3100Pro ........................................................................................................ 13
Connections with the VM-7200/7100.................................................................................................... 14
Connections with the XV-5080 ............................................................................................................... 15
Connections with the ADA-7000............................................................................................................ 15
Connections with the AE-7000 ............................................................................................................... 15
Connections with the VSR-880 ............................................................................................................... 16
Connections with the VS-2480 ................................................................................................................ 16
Using multiple RPC-1 units..................................................................17
Settings for using multiple RPC-1 units................................................................................................ 17
Synchronizing multiple RPC-1 units ..................................................................................................... 17
Software settings ..................................................................................18
Logic Audio settings ................................................................................................................................ 18
Cubase VST settings................................................................................................................................. 18
Sonar settings (Windows) ....................................................................................................................... 18
Troubleshooting....................................................................................19
Main specifications...............................................................................20
Information ............................................................................................22
4
Before you begin
Check the included items
The following items are included with the RPC-1. Immediately after opening the
package, please check that all items are included. If any items are missing, please
contact the retailer from whom you purchased the RPC-1.
■ RPC-1
■ Drivers/Update CD-ROM
This contains driver software for using the RPC-1, and a system program updater
that makes R-BUS devices compatible with the RPC-1.
■ RPC-1 Owner’s Manual
This document.
■ R-BUS cable
This cable is used to connect the RPC-1 to an R-BUS device.
■ Clock cable
This cable is used to synchronize multiple RPC-1 units. For details refer to “Clock In
and Clock Out Connectors.”
Main features
■ Digital multi audio
Eight input and eight output channels of digital audio can be transmitted and
received simultaneously (maximum 24 bit, 96 kHz).
■ MIDI
The RPC-1 provides 16 channels of MIDI IN/OUT on the R-BUS. This allows MTC
synchronization with a connected R-BUS device.
■ Included drivers
• Windows 95/98/Me/NT4.0/2000 and Mac OS 8.6/9.0/9.1 are supported
• Windows MME, ASIO2.0, and Apple Sound Manager compatible drivers
• MIDI driver (OMS driver for the Macintosh)
In order to use the RPC-1’s
MIDI functionality on the
Macintosh, you must
install Opcode
Corporation’s OMS 2.3.8.
Install it using the
“Drivers/Update”
CD-ROM included with the
RPC-1. For details, refer to
p. 9 “Installing the RPC-1
driver (Macintosh).”
5
Names of things and what they do
3
ON 1
2
ON 1
2
Clock In
Clock Out
2
R-BUS
1
1. R-BUS (RMDB2) connector
Connect this to R-BUS devices. This connector carries multi-channel digital audio
(8-IN, 8-OUT) in formats up to 24 bit and 96 kHz, as well as one set of MIDI IN/OUT
signals.
2. DIP switches
The DIP switches are used to specify how the RPC-1 will transmit word clock data.
Each switch has the following function.
Number
OFF
ON
SW1
Normal mode
VS-2480 mode (when RPC-1 is slave)
SW2
DIP switch function ON
DIP switch function OFF
Normally, you will leave these set at SW1: OFF and SW2: OFF.
In the following situations, set SW1: ON.
• When connected to the VS-2480 and using the RPC-1 as slave
• When connecting two RPC-1 units to each other (turn SW1 ON only for the
slave unit)
3. Clock In, Clock Out connectors
Use these to synchronize multiple RPC-1 units. (For details on using multiple units,
refer to p. 17 “Using multiple RPC-1 units.”
To avoid the risk of damage to internal components that can be caused by static
electricity, please carefully observe the following whenever you handle the board.
• Before you touch the board, always first grasp a metal object (such as a water pipe),
so you are sure that any static electricity you might have been carrying has been
discharged.
• When handling the board, grasp it only by the panel or the board’s edges. Avoid
touching any of the electronic components or connectors.
• Before you connect any cables, make sure they do not carry a static electricity charge.
Such charges can be transmitted, for example, if the other end of the cable has been
in contact with a carpet (or other object) where there is a static electricity buildup.
• Save the bag in which the board was originally shipped, and put the board back into
it whenever you need to store or transport it.
6
To prevent malfunction
and/or damage to
speakers or other devices,
always turn down the
volume, and turn off the
power on all devices
before making any
connections.
Preparations for using the RPC-1
Minimum requirements
Installing the RPC-1 driver (Windows)
In order to install the RPC-1, you must have a computer that
has a PCI slot and fulfills the following conditions.
Windows95/98
The RPC-1 operates on a 5V PCI bus. It will not operate on a
3.3V PCI bus.
Windows users
• A PC-compatible computer with Windows 95/98/Me/
NT4.0/2000 installed
• Pentium MMX 300 MHz or better CPU (PentiumII 300
MHz or better is recommended*)
• 64 MB or more RAM (128 MB or more is recommended)
* Pentium III 450MHz with 128MB of RAM or better is
recommended for 24bit-88.2/96kHz operation.
Macintosh users
• A Power Macintosh with Mac OS 8.6 or later* installed
(9.0 or later is recommended)
• Power PC G3 or better CPU (G3 300 MHz or better is
recommended)
1. When you start up your computer after installing the
RPC-1, the RPC-1 will be detected automatically, and the
“Add New Hardware wizard” will start up. Then click
“Next.”
2. Into your CD-ROM drive, insert the “Drivers/Update”
CD-ROM that was included with the RPC-1.
3. Select “Search for the best driver for your device” and
click “Next.”
4. Check “Specify a location” and click “Browse,” and
select the CD-ROM drive(Roland_rpc-1).
5. Select the “95_98_Me” folder under “DRIVERS” folder,
and click “OK.”
6. Click “Next” to begin the installation.
7. When the message of “Windows has finished installing
the software you selected that your new hardware
device requires” appears, click “Finish.”
8. Windows will start up.
• 96 MB or more RAM (128 MB or more is recommended.)
* MacOS X is not supported (will be supported in the near
future).
Installing the RPC-1
Install the RPC-1 into the PCI slot of your computer. For
details on installing a PCI card, refer to your computer’s
manual.
• Do not touch any of the printed circuit pathways or
connection terminals.
• Never use excessive force when installing a circuit
board. If it doesn’t fit properly on the first attempt,
remove the board and try again.
• When circuit board installation is complete, doublecheck your work.
1. Turn off the power of your computer, and unplug the
power cable.
2. Remove the cover of your computer, and remove the
cover of the PCI slot in which the RPC-1 will be installed.
(The screw that held the cover in place will be used to
fasten the RPC-1.)
Windows Me
1. When you start up your computer after installing the
RPC-1, the RPC-1 will be detected automatically, and the
“Add New Hardware wizard” will start up.
2. Into your CD-ROM drive, insert the “Drivers/Update”
CD-ROM that was included with the RPC-1.
3. Check “Automatic search for a better driver” and click
“Next.”
4. Two “Roland RPC-1” drivers will be recognized. Select
one of them located in
“\DRIVERS\95_98_Me\MA_DELTA.INF” under CDROM drive.
5. Click “OK” to begin the installation.
6. When the message of “Roland RPC-1 : Windows has
finished installing the software you selected that
your new hardware device requires” appears, click
“Finish.”
7. Windows will start up.
3. Insert the RPC-1 into the PCI slot. Notice that the RPC-1
cannot be inserted if it is oriented in the wrong direction.
4. Fasten the RPC-1 using the screw that had fastened the
PCI slot cover.
5. Re-attach the cover of your computer.
7
Preparations for using the RPC-1
Windows 2000
Windows XP
1. Start up your computer after installing the RPC-1.
1. Start up your computer after installing the RPC-1.
2. In order to install the RPC-1 driver, you must be logged
onto the system as Administrator. For details, contact
your system administrator.
2. In order to install the RPC-1 driver, you must be logged
onto the system as Administrator. For details, contact
your system administrator.
3. The RPC-1 will be detected automatically, and the
“Found New Hardware Wizard” will start up. Click
“Next.”
3. The RPC-1 will be detected automatically, and the
“Found New Hardware Wizard” will start up.
4. Check “Search for a suitable driver for my device”
and click “Next.”
5. The message of “Insert the manufacturer's installation
disk into the drive selected, and then click OK”
appears.
6. Into your CD-ROM drive, insert the “Drivers/Update”
CD-ROM that was included with the RPC-1 and click
“OK.”
7. Specify the location of the driver information file. The
RPC-1 driver file is located in “CD-ROM
drive(ROLAND_ RPC-1) > DRIVERS folder > WDM
folder.” Select “RolandRPC-1.inf” in the above folder
and click “Open.”
8. Click “OK.”
9. When the message of “Driver Files Search Results:
The wizard has finished searching for driver files for
your hardware device” appears, click “Next.”
4. Into your CD-ROM drive, insert the “Drivers/Update”
CD-ROM that was included with the RPC-1.
5. Click “Yes” if the message of “Digital signature Not
Found.......” appears.
6. The installing will start up.
7. When the message “Completing the Found New
Hardware Wizard : Roland RPC-1” appears, click
“Finish.”
8. Windows XP will start up.
Windows NT4.0
1. In order to install the RPC-1 driver, you must be logged
onto the system as Administrator. For details, contact
your system administrator.
2. Into your CD-ROM drive, insert the “Drivers/Update”
CD-ROM included with the RPC-1.
3. From the “Start” menu, select “Settings,” and open the
“Control Panel.”
10. Click “Yes” if the message of “Digital signature Not
Found.......” appears.
4. Double-click “Multimedia.”
11. The installing will start up.
6. Select “Unlisted or updated driver,” and click “OK.”
12. When the message “Completing the Found New
Hardware Wizard : Roland RPC-1” appears, click
“Finish.”
7. When the driver installation window appears, click
“Browse,” and select the CD-ROM drive. Select the
“WINNT” folder under “DRIVERS” folder, and click
“OK.”
13. Windows 2000 will start up.
5. Click “Devices,” and click “Add.”
8. Select “Roland RPC-1 Interface Card” in the “Add
unlisted or updated driver” window. Click “OK.”
9. When installation is finished, a message will ask you to
restart the system. Click “Restart Now” to restart the
system.
8
Preparations for using the RPC-1
Installing the RPC-1 driver (Macintosh)
OMS Setup (Macintosh)
Mac OS 8.6 or later
1. Start up “OMS Setup.” “OMS Setup” is placed into the
“OMS Applications” folder in the “Opcode” folder.
1. Into your CD-ROM drive, insert the “Drivers/Update”
CD-ROM included with the RPC-1. Then double-click the
CD-ROM icon to open it.
2. When a dialog box with a message of “Create a New
Studio Setup” appears, click “OK.”
2. If you wish to use the MIDI functionality of the RPC-1,
install “OMS 2.3.8.” (If OMS 2.3.8 is already installed, it
is not necessary to re-install it.) Open the “OMS 2.3.8”
folder, start up “Install OMS 2.3.8,” and perform the
installation as directed by the installer.After Installation,
you must restart your computer.
3. Open the “RPC-1 Driver” folder, and copy the “Roland
RPC-1 Driver” file into the “Extensions folder” of the
“System folder.”
4. If you wish to use software that is compatible with the
ASIO driver, copy the “ASIO RPC-1” file to the location
specified by your software (in the case of Logic Audio or
Cubase VST, the “ASIO Drivers” folder).
5. Copy the “RPC-1 Control Panel” file to your desktop or
other desired location (you may place it anywhere).
6. Copy the “RPC-1 OMS Driver” file into the “OMS
Folder” within the “System folder.”
7. Restart your computer.
You must install OMS 2.3.8 before installing the “RPC-1
OMS driver.”
3. A dialog to specify the MIDI interface port will appear.
Click “Search.” Neither Modem nor Printer should be
checked.
4. The device list will appear after searching. Click “OK”
after making sure that “RPC-1” is included in the device
list. If there is no list, make sure that the “Roland RPC-1
driver” or “RPC-1 OMS driver” was installed correctly.
5. Check “RPC-1” in the MIDI device list, then click “OK.”
6. When a dialog to save the setup appears, enter a name
and then save it.
7. A dialog box showing the setup documents will appear.
Double click the keyboard icon with a “?” mark to start
the setup for the equipment to be connected with the
RPC-1.
8. Make sure that this setup is the “current setup,” then
quit “OMS setup.”
“Current Setup” means the currently active setup from
the several setups available. The mark of “ ” is
indicated in the title bar of the current setup. Select
“Make Current” in the File menu to choose the current
setup.
9
Preparations for using the RPC-1
About the various RPC-1 drivers
If the RPC-1 driver is installed, the following drivers can be
used.
Refer to the manual for the software you are using, and use
the most suitable drivers.
ASIO driver
ASIO (Audio Stream In/Out) is a driver format promoted by
Steinberg Corporation for connecting audio software and
audio hardware. ASIO supports both Windows and
Macintosh platforms, and allows high-quality multi-channel
input/output.
Sound Manager driver
Sound Manager is the standard digital sound specification
for Mac OS.
To specify the RPC-1 as the output destination of Sound
Manager, make the following settings.
1. From the “control panel” of the “Apple menu,”
open “Sound.”
2. From the pull-down menu, choose “Sound In” or
“Sound Out,” and select the “RPC-1” for input and
output.
The RPC-1 comes with an ASIO2.0 driver for Windows
(95/ 98/Me/2000) and Mac OS (8.6 or later).
* Name of the ASIO driver for Windows 95/98/Me is “M
Audio Delta ASIO.”
For Macintosh, there are three version of the ASIO
driver.
ASIO2:
ASIO2.0 driver
ASIO:
ASIO2.0 driver without software monitoring
For both input and output, Sound Manager is able to handle
only 16 bit 2-channel data.
MIDI driver (Windows)
This is a driver for handling the RPC-1's MIDI data in
Windows. A Windows MME compatible MIDI driver is
included with the RPC-1.
ASIOv3: ASIO1 driver for Digital Performer.
MIDI driver (Mac OS)
EASI driver
EASI (Enhanced Audio Streaming Interface) is a driver
format promoted by E-magic Corporation for connecting
audio software and audio hardware. Like ASIO, EASI
supports both Windows and Macintosh platforms, and
allows high-quality multi-channel input/output.
The RPC-1 comes with an EASI driver for Windows 98/Me/
2000.
* Name of the EASI driver for Windows 98/Me is “M Audio
Delta EASI.”
Windows MME driver (Windows)
Windows MME (Multimedia Extensions) is the standard
multimedia function extension standard for Windows.
To specify that the RPC-1 is to handle input/output of
the system sound, make the following settings.
1. From the “Start” menu, select the “Control Panel,”
and open “Multimedia.”
2. In the “Audio” tab, specify the RPC-1 as the
preferred input/output device for playback and
recording.
10
This is an OMS driver for handling the RPC-1’s MIDI data on
the Macintosh. OMS 2.3.8 is required in order to use this.
Opcode Corporation’s OMS 2.3.8 MIDI driver is included
with the RPC-1.
OMS: This is software provided by Opcode Corporation for
setting up a MIDI environment. An “OMS 2.3.8 installer” is
included on the “Drivers/Update” CD-ROM that is supplied
with the RPC-1.
RPC-1 Control Panel
When you install the RPC-1 driver, a dedicated RPC-1
application “RPC-1 Control Panel” will be installed
together with the driver.
RPC-1 Control Panel
5
6
7
How to start up the “RPC-1 Control Panel”
1
2
3
• Windows: “Start” > “Settings” > “Control Panel”
> “Roland RPC-1 H/W”
• Macintosh: Double click the “RPC-1 Panel” icon
copied manually.
4
Main functions of RPC-1 Control
Panel
• Set parameters for the functions of the RPC-1
1. Save button
• Input/output level meters
Assign a name to the settings and save them. (On the
Macintosh, select “Save” from the “File” menu.)
• Input/output mixing, etc.
2. Delete button
Signal flow
Delete saved settings. (This function does not exist on the
Macintosh.)
OS/Software
R-BUS
IN
1/2
3/4
5/6
7/8
1/2
3/4
R-BUS
5/6
In
7/8
Monitor Mixer
Patchbay/Router
1/2
3/4
5/6
7/8
1/2
OUT 3/4
5/6
7/8
MIDI IN
Monitor Mixer
MIDI OUT
3. Load button
Load the saved settings. (On the Macintosh, select “Open”
from the “File” menu.)
WavOut
MIDI IN
MIDI OUT
The signal flow is as shown in the diagram.
• R-BUS In
• WavOut
• Monitor Mixer
The RPC-1 Control Panel always retains the last settings
entered. So, you don’t have to save the setting every time you
close out the panel. However the Save, Delete, and Load
functions expand this capability to store different sets of
control panel settings using different configuration file
names. These configurations are then available for recall at a
later date and time.
• MIDI In, MIDI Out
are used as the software input/output.
The signals that are output from the R-BUS of the RPC-1 can
be selected in the control panel. For details refer to
“Patchbay/Router page” in this chapter.
4. H/W Installed
If multiple RPC-1 units are installed, select the RPC-1 for
which you wish to make settings. For details on how the
RPC-1 units are numbered, refer to p. 17 “Using multiple
RPC-1 units.”
11
RPC-1 Control Panel
5. Monitor Mixer page
You can use the Monitor Mixer to mix the input/output into
two channels and record or monitor it. Mixing is performed
within the RPC-1, and does not burden the CPU.
• Ext. Clock Sample Rate: Select the sampling frequency
used when Master Clock is set to Ext. Clock.Only the
sampling frequency selected here can be used by the
software.
• Level meter: This shows the pre-fader level.
• Faders: Adjust the amount sent to Master.
• Solo: Solo ON/OFF
• Mute: Track mute ON/OFF
• Stereo Link: Stereo link ON/OFF
• Master Volume: Adjust the amount of Master
The settings here, such as fader and mute, do not affect the
R-BUS In, WavOut devices
By default, all inputs of the RPC-1 Monitor Mixer are muted.
6. Patchbay/Router page
If the master clock is set to Ext. Clock, it is not possible to
change the sampling frequency using the software.
DMA Buffer Size
Specify the buffer sizes for MME (Windows only), ASIO, and
Sound Manager (Macintosh only). The buffer size is closely
related to latency, and latency will decrease as you decrease
the buffer size.
Depending on the performance of your computer, the digital
data may not be transmitted correctly if the buffer size is too
small, and noise may occur. In such cases, increase the buffer
size.
Depending on the software you are using, it may be
necessary to set the buffer size within the software. For
details, refer to the manual for the software you are using.
* The default buffer size values are as follows:
Windows 95/98/Me/NT: Latency 20 ms
Select the R-BUS output source. “WavOut,” “R-BUS In” will
be selected. Normally select “WavOut.” For “R-BUS Out 1/
2” you can select “Monitor Mixer.”
7. Hardware Settings page
In this page you can make various settings for the RPC-1.
Master Clock
Select the master clock.
• Int. Clock: The RPC-1 will be the word clock master. In
this case, set the connected R-BUS device (or other RPC-1
unit) as the slave.
• Ext. Clock: The RPC-1 will be the word clock slave
(synchronize to another R-BUS device or another RPC-1
unit.) In this case, set the other R-BUS device (or the
other RPC-1 unit) as the master.
• Int.Clock Sample Rate: Select the sampling frequency
used when Master Clock is set to Int. Clock.
• Reset Rate When Idle: If this is checked, the sampling
frequency will return to the value that's been selected in
the control panel after the device is released by the
software.
12
Windows 2000 : Wave 10 ms, ASIO 2700 samples
Macintosh: ASIO, Sound Manager 1 024 samples
Multi-Track Driver Devices (Windows95/98/
Me only)
Specify how software will handle MME devices.
• Single and In-Sync: When using one software
application to handle all MME devices
simultaneously.This guarantees the synchronization of
each MME device.
• Independent: When using separate software
applications to handle each MME device.
• Multiple Card Sync: When using multiple RPC-1 units
simultaneously for more reliability of synchronization.
Sound Manager I/O (Macintosh only)
Select the R-BUS channel used by Sound Manager.
Disable Control of the Monitor Mixer and
Patchbay/Router by Audio
Applications(Windows95/98/Me only)
Check to disable control of the Monitor Mixer and patchbay/
Router by the applications.
Connections with other R-BUS devices
Connections with R-BUS devices
In order to transfer digital audio signals between R-BUS
devices, the sampling frequency of the devices must match,
and they must share the same word clock.In order for the
word clock to be shared, one device in the system must be
the word clock master. Other devices must be set to share
that clock (i.e., they must be slaves).The RPC-1 can function
either as the word clock master or slave.
If two or more word clock master devices exist in the system,
the word clock will not be shared correctly. In such cases, the
digital audio signals will not be transferred accurately, and
noise will occur. Be sure that only one device is the word
clock master.
Connections with the VM-3100Pro
VM-3100Pro settings
Use Quick Setup to make VM-3100Pro settings. (For details
refer to “VM-3100Pro Quick Setup” in this chapter.)
You can use the VM-3100Pro’s inputs 1-8 as inputs of the
RPC-1. The outputs of the RPC-1 will be sent to inputs 13-20
of the VM-3100Pro. You can use the MIDI faders, transport,
and value dial of the VM-3100Pro to remotely control your
sequencer software, and perform automix on the
VM-3100Pro. For details refer to the following pages of the
VM-3100 user’s manual: p. 43 “Controlling a MIDI
sequencer,” p. 56 “MIDI,” and p. 46 “Using a personal
computer for auto-fader functionality.” Also refer to the
manual of the sequencer software that you are using. You
can also use the VM-3100Pro as MIDI interface for your
computer.
The routing can be changed. For details refer to VM-3100
user’s manual p. 51 “Easy routing.”
Updating the system program (Ver. 1.052)
In order for the VM-3100Pro to be connected and used with
the RPC-1, system program version 1.052 or later is
required. If your VM-3100Pro is version 1.04 or earlier, you
must update the system program.
How to check the software version
When the power is turned on, the lower line of the opening
screen will show the version number as (for example) “Ver.
1.04.”
In order to use the VM-3100Pro’s Digital In, set the master
clock of the VM-3100Pro to DinA or DinB, and set the master
clock of the RPC-1 to Ext. Clock.
In order for the VM-3100Pro to control sequencer software,
that sequencer software must support MIDI control of
transport, locate, and fader control. For details refer to the
manual of the sequencer software you are using.
How to update
The directory “UPDATE > VM-3100” in the included
“Drivers/Update” CD-ROM contains the data for the update.
Perform the update procedure as directed in the
“readme.doc” file.
Example settings
RPC-1 settings (in the Control Panel)
• Master Clock: Int. Clock
• Int. Clock Sample Rate: 44.1 kHz
The VM-3100Pro operates at a sampling frequency of 44.1
kHz.
13
Connections with other R-BUS devices
VM-3100Pro Quick Setup
Connections with the VM-7200/7100
By using Quick Setup, you can instantly recall settings for
use with a connected RPC-1. At this time, settings for
remotely controlling your sequencer software will also be
recalled. The following types of Quick Setup are available.
In order to connect the VM-7200/7100 with the RPC-1, the
VM-24E I/O expansion board (an expansion board that adds
an R-BUS connector) must be installed in the VM-7200/7100.
Software to be controlled
Setting method
Logic Audio
[SHIFT] + [F1]
Cakewalk
[SHIFT] + [F2]
Cubase VST
[SHIFT] + [F3]
When you perform one of the above operations, the display
will ask “Load xxxx Configuration?” (xxxx is either LOGIC,
CAKEWALK, or CUBASE). Press [ENTER/YES].
When Quick Setup is executed, the following parameters and
routings will be changed.
Parameter
Value set
Location
Explanation
M.clk Select
RMDB-2
[Shift] + [Digital
in]
Set as slave of
RPC-1
Master Source
MIX
Master [Select]
VM-3100Pro monitors the signal sent
to the RPC-1
LocatorType
MEASURE
[System]
Use locator to transmit SPP
Control Type
Off
[System] →
[F1-F4] → [MIDI]
Don’t transmit Audio
fader values
Timing Mon.
MEASURE
[System] →
[F1-F4] → [MIDI]
Measure is received
as timing data
Beat
4/4
[System] →
[F1-F4] → [MIDI]
4/4 time signature
R-BUS Target
RPC-1
[System] →
[F1-F4] → [MIDI]
Connect with RPC-1
Transport
USER1
[System] →
[F1-F4] → [MIDI]
Transmit USER1
note
ShiftKey
OFF or C-1
[System] →
[F1-F4] → [MIDI]
OFF for Logic. Otherwise, C-1
USER1
Settings for
each program
[System] →
[F1-F4] → [MIDI]
→ [F1-F4]
Overwrite to USER1
EZR SEL
RMDB DIRECT
[EZ Routing]
Send Input 1–8 to
R-BUS
14
Updating the system program
In order for the VM-7200/7100 to be connected and used
with the RPC-1, system program version 1.60 or later is
required.If your VM-7200/7100 has version 1.50 or earlier,
you must update the system program.
Checking the version
After starting up the VM-7200/7100 system, press
[on Display] and [9]. Unit 1/2 Version is the version of the
VM-7200/7100.
Updating the system program
The directory “UPDATE > VM-7000” in the included
“Drivers/Update” CD-ROM contains the data for the update.
Perform the update procedure as directed by the
“readme.doc” file.
Example settings
RPC-1 settings (in the Control Panel)
• Master Clock: Int. Clock
• Int. Clock Sample Rate: either 32, 44.1, or 48 kHz
VM-C7200/7100 settings
• WORD CLOCK SOURCE: MULTI 1-8
Use the VM-7200/7100 patchbay to assign the inputs of the
VM-7200/7100 to the RPC-1.
The output of the RPC-1 will be input to MULTI-IN. You can
also use multiple RPC-1 units simultaneously. For details
refer to p. 17 “Using multiple RPC-1 units.”
Connections with other R-BUS devices
Connections with the XV-5080
Connections with the AE-7000
Example settings
Updating the system program
RPC-1 settings (in the Control Panel)
The version 1.01 or later system program is required in
order to connect and use the AE-7000 with the RPC-1.
• Master Clock: Int. Clock
• Int.Clock Sample Rate: either 44.1 or 48 kHz
XV-5080 settings
• Master Clock: R-BUS
For details on output destination settings of the XV-5080,
refer to “Chapter 3. Setting the output jacks” in the
XV-5080 manual.
Updating the system program
The directory “UPDATE > AE-7000” in the included
“DRIVER/UPDATE CD-ROM” contains the data for the
update. Perform the update procedure as directed in the
“readme.doc” file.
Example settings
RPC-1 settings (in the Control Panel)
• Master Clock: Int. Clock
The R-BUS of the XV-5080 is for output only. It cannot be
used for input to the XV-5080.
• Int. Clock Sample Rate: either 32, 44.1, or 48 kHz
AE-7000 settings
It is not possible to make MIDI connections using the R-BUS
of the XV-5080. To make MIDI connections, use the MIDI
connectors of the XV-5080.
• Master Clock: R-BUS
Connections with the ADA-7000
Updating the system program
The version 1.02 or later system program is required in
order to connect and use the ADA-7000 with the RPC-1.
Updating the system program
The directory “UPDATE > ADA-7000” in the included
“DRIVER/UPDATE CD-ROM” contains the data for the
update. Perform the update procedure as directed by the
”readme.doc” file.
Example settings
RPC-1 settings (in the Control Panel)
• Master Clock: Int. Clock
• Int. Clock Sample Rate: either 32, 44.1, 48, or 96 kHz
ADA-7000 settings
• Master Clock: R-BUS
The analog inputs and outputs of the ADA-7000 can be used
as inputs and outputs of the RPC-1.
If you are using a sampling frequency of 96 kHz, using a five
meter R-BUS cable (RBC-5) may cause noise to occur. If you
are using a frequency of 96 kHz, use shorter cable.
15
Connections with other R-BUS devices
Connections with the VSR-880
Connections with the VS-2480
Updating the system program
Example settings
System program version 1.03 or later is required in order to
connect and use the VSR-880 with the RPC-1. If your VSR880 has version 1.02 or earlier, the system program must be
updated.
RPC-1 settings (in the Control Panel)
Checking the version
VS-2480 settings
When the power is turned on, the lower line of the opening
screen will show the version as (for example)“– Ver. 1.02 –.”
Updating the system program
The directory “UPDATE > VSR-880” in the included
“DRIVER/UPDATE CD-ROM” contains the data for the
update. Perform the update procedure as directed in the
“readme.doc” file.
• Master Clock: Int. Clock
• Int.Clock Sample Rate: either 32, 44.1, 48, 88.2 or 96kHz
• Master Clock: R-BUS
If you connect two RPC-1 units to a VS-2480, set the VS-2480
as the word clock master, and set each of the RPC-1’s as its
slave. And then, turn the SW-1 on of each RPC-1. Notice that
each RPC-1 must receive word clock from R-BUS. For details
refer to p. 6 “Names of Things and what they do” and
p. 17 “Using multiple RPC-1 units.”
Example settings
RPC-1 settings (in the Control Panel)
• Master Clock: Int. Clock
• Int. Clock Sample Rate: either 32, 44.1, or 48 kHz
(match the setting of the VSR-880)
VSR-880 settings
• Master Clock: R-BUS
• System PRM → RBUSMute: Disable*
• Execute Shutdown([SHIFT]+[SHUT/EJECT/(STOP)])
whenever you change RBUSMute.
* RBUSMute is a parameter that was newly added in version
1.03 in order to support the RPC-1. If you are connecting an
earlier R-BUS device, set RBUSMute=Enable.
The RBUSMute parameter applies to the entire system; not
to an individual song.
In order to use the VSR-880’s R-BUS input, each input of the
input mixer must be set to R-BUS. For details, refer to
“Channel condition” on p. 79 in the “VSR-880 owner’s
manual.”
If you wish to output each track of the VSR-880 to a separate
channel, go to [LEVEL/BALANCE] → (Parameter)[|>|>] x9
and set “MST Direct Out = On.”
16
If you are using a sampling frequency of 88.2 kHz or 96 kHz,
it is not possible to use a clock cable to synchronize multiple
RPC-1 units. Supply the word clock via R-BUS.
If you are using a sampling frequency of 88.2 or 96 kHz,
using a five meter R-BUS cable (RBC-5) may cause noise to
occur. If you are using a frequency of 88.2 or 96 kHz, use
shorter cable.
Using multiple RPC-1 units
Settings for using multiple RPC-1
units
Up to four RPC-1 units can be used in a single computer.
Each RPC-1 is assigned a number from 1 through 4 in the
order in which the card was recognized (in general, starting
at the lowest-numbered PCI slot).
Immediately after an additional RPC-1 is added to a
computer in which an RPC-1 has already been installed
(i.e., immediately after the driver is installed), the
highest number will be assigned to that RPC-1. Each
subsequent time the computer is started up, the card will
be assigned a number in the order in which it was
detected.
Settings for each card are made in the RPC-1 Control Panel.
For details refer to p. 11 “RPC-1 Control Panel.”
In order to use multiple RPC-1 units simultaneously, all
cards and R-BUS devices must be synchronized.
Synchronizing multiple RPC-1 units
In order to synchronize multiple RPC-1 units, all RPC-1 units
must be set to the same sampling frequency, and share the
same word clock. The word clock can be shared in the
following two ways.
1. Supplying the word clock from R-BUS
Slave
2. Using the included clock cable to supply the
word clock
Clock Cable
Master
Slave
R-BUS
Slave
Slave
R-BUS
Set an external R-BUS device or one of the RPC-1 units as the
word clock master, and supply the word clock via the clock
cable to the other RPC-1 unit(s). In this case, use the
included clock cable to connect the Clock Out Connector of
the device supplying the word clock to the Clock In
Connector of the device receiving the word clock. Set the
master clock to Ext. Clock on each slave RPC-1 unit that is
receiving the word clock.
If you are using a sampling frequency of 88.2 kHz or 96 kHz,
it is not possible to use a clock cable to synchronize multiple
RPC-1 units. Supply the word clock via R-BUS.
If Master Clock is set to Ext. Clock, and a clock is input from
both the Clock In Connector and R-BUS, the Clock In
Connector will take priority. If you wish to input the word
clock from R-BUS, disconnect the clock cable.
Master
R-BUS
Word Clock
Slave
Slave
RPC-1 Driver ver.1.0.2 for Macintosh doesn’t support
simultaneous use of multiple RPC-1 units. This function will
be supported in the near future.
R-BUS
Set an external R-BUS device or one of the RPC-1 units as the
word clock master, and supply the word clock via the
external R-BUS device to the remaining RPC-1 unit(s). Set the
master clock to Ext. Clock on each slave RPC-1 (to which
the word clock is supplied).
If Master Clock is set to Ext. Clock, and a clock is input from
both the Clock In Connector and R-BUS, the Clock In
Connector will take priority. If you wish to input the word
clock from R-BUS, disconnect the clock cable.
17
Software settings
This section explains the audio device settings that should be
made in order to use the RPC-1 with some representative
sequencer programs.
Cubase VST settings
Audio device settings
Logic Audio settings
1. In the “Options” menu, select “Audio Setup” and then
select “System.”
Audio device settings
2. Select “Roland RPC-1 ASIO”(Win) or “ASIO RPC-1”
(Mac).
When using the ASIO driver
1. From the “Audio” menu, select “Audio Hardware &
Drivers.” On the Windows version, click “Audio
Hardware & Drivers2” tab.
2. Check “ASIO,” and from the pull-down menu choose
“Roland RPC-1 ASIO” (Win) or “ASIO2 RPC-1” (Mac).
Sonar settings (Windows)
Audio device settings (Windows 98/ME)
1. From the “Options” menu, select “Audio.”
When using the EASI driver (Windows)
2. In the “Settings” tab, click “Devices.”
1. From the “Audio” menu, select “Audio Hardware &
Drivers.”
3. In the “Input Device” area select following device.
2. Check “PC AV,” and select “Roland RPC-1 EASI.”
When using the MME driver (Windows)
1. From the “Audio” menu, select “Audio Hardware &
Drivers.”
2. Check “PC AV,” and select “EASI MME.”
• PCM In Roland RPC-1
• Mon.Mixer Roland RPC-1
4. In the “Output Device” area select “WavOut Roland
RPC-1.”
5. Set the “playback timing master” to “WavOut 1/2
Roland RPC-1,” and the “recording timing master” to
“PCM In 1/2 Roland RPC-1.”
3. Click the “Control Panel” button, and start up “MME to
EASI adapter.”
6. Click the “OK” button.
4. Check the following devices.
Audio device settings (Windows 2000/XP)
• WavOut Roland RPC-1
1. From the “Options” menu, select “Audio.”
• R-BUS In Roland RPC-1
2. In the “Settings” tab, click “Devices.”
• Monitor Mixer Roland RPC-1
3. In the “Input Device” area select “Roland RPC-1
Multichannel 1/2”–“Roland RPC-1 Multichannel
9/10.”
4. In the “Output Device” area select “Roland RPC-1
Multichannel 1/2”–“Roland RPC-1 Multichannel
7/8.”
5. Set the “playback timing master” to “Roland RPC-1
Multichannel 1/2,” and the “recording timing master”
to “Roland RPC-1 Multichannel 1/2.”
6. Click the “OK” button.
18
Troubleshooting
Problem
Suggestion
Can’t install RPC-1 in computer
Is the RPC-1 oriented correctly?
RPC-1 Control Panel won’t start
up
Is the RPC-1 inserted correctly in the PCI slot?
The dialog “Driver Version is
older than expected! Please
install latest driver.” appears,
when the RPC-1 Control Panel
starts up. (Windows 2000)
Was the driver installed correctly?
Is the RPC-1 inserted correctly in the PCI slot?
Is the R-BUS cable connected correctly?
No output/can’t input
Are you correctly synchronized with the R-BUS device? For details
refer to p. 13 “Connections with R-BUS devices.”
Are the input/output settings of the software correct?
Is the R-BUS cable connected correctly?
Can’t use MIDI
Was the driver installed correctly?
Are the MIDI settings of the R-BUS device correct?
Are you correctly synchronized with the R-BUS device? For details
refer to p. 13 “Connections with R-BUS devices.”
This kind of noise or distortion will occur when your computer has a
small size of memory, e.g. less than 64MB RAM. In this case, we strongly recommend you to use more than 128MB RAM.
There is excessive noise or
distortion
Depending on the performance of your computer, the digital data may
not be transmitted correctly if the buffer size is too small, and noise may
occur. In such cases, increase the buffer size. For details refer to p. 12
“DMA Buffer Size.”
Depending on the software you are using, it may be necessary to set the
buffer size within the software. For details, refer to the manual for the
software you are using.
19
Main specifications
■ General specifications
Sampling frequency [kHz]
R-BUS
8, 9.6, 11.025, 12, 16, 22.05, 24, 32,
44.1, 48, 88.2, 96
IN
24 bit / 8 channel
OUT
24 bit / 8 channel
MIDI
One set of IN / OUT
■ Monitor mixer in control panel
*
20
Number of input channels
16 channels
Number of output channels
2 channels
Faders
-144 – 0 dB
Level meters
Pre-fader (fixed)
Arithmetic precision
36 bit
In the interest of product improvement, the specifications and/or contents of this package are
subject to change without prior notice.
...MEMO...
21
Information
Information
When you need repair service, call your nearest Roland Service Center or authorized Roland distributor in your country as
shown below.
AFRICA
EGYPT
Al Fanny Trading Office
9, EBN Hagar A1 Askalany Street,
ARD E1 Golf, Heliopolis,
Cairo 11341, EGYPT
TEL: 20-2-417-1828
REUNION
Maison FO - YAM Marcel
25 Rue Jules Hermann,
Chaudron - BP79 97 491
Ste Clotilde Cedex,
REUNION ISLAND
TEL: (0262) 218-429
PANAMA
ITALY
ISRAEL
SUPRO MUNDIAL, S.A.
Roland Italy S. p. A.
150 Sims Drive,
SINGAPORE 387381
TEL: 6846-3676
Boulevard Andrews, Albrook,
Panama City, REP. DE PANAMA
TEL: 315-0101
Viale delle Industrie 8,
20020 Arese, Milano, ITALY
TEL: (02) 937-78300
Halilit P. Greenspoon &
Sons Ltd.
CRISTOFORI MUSIC PTE
LTD
PARAGUAY
NORWAY
SINGAPORE
Swee Lee Company
Blk 3014, Bedok Industrial Park E,
#02-2148, SINGAPORE 489980
TEL: 6243-9555
J.E. Olear y ESQ. Manduvira
Asuncion PARAGUAY
TEL: (021) 492-124
URUGUAY
POLAND
Easa Husain Al-Yousifi
Todo Musica S.A.
P. P. H. Brzostowicz
Francisco Acuna de Figueroa 1771
C.P.: 11.800
Montevideo, URUGUAY
TEL: (02) 924-2335
UL. Gibraltarska 4.
PL-03664 Warszawa POLAND
TEL: (022) 679 44 19
Theera Music Co. , Ltd.
VENEZUELA
330 Verng NakornKasem, Soi 2,
Bangkok 10100, THAILAND
TEL: (02) 2248821
Musicland Digital C.A.
Tecnologias Musica e Audio,
Roland Portugal, S.A.
TAIWAN
ROLAND TAIWAN
ENTERPRISE CO., LTD.
That Other Music Shop
(PTY) Ltd.
THAILAND
Paul Bothner (PTY) Ltd.
17 Werdmuller Centre,
Main Road, Claremont 7708
SOUTH AFRICA
P.O.BOX 23032, Claremont 7735,
SOUTH AFRICA
TEL: (021) 674 4030
ASIA
CHINA
Beijing Xinghai Musical
Instruments Co., Ltd.
6 Huangmuchang Chao Yang
District, Beijing, CHINA
TEL: (010) 6774 7491
Shanghai Xingtong Acoustics
Equipment CO.,Ltd.
5F. No.1500 Pingliang Road
New East Club Plaza, Shanghai,
CHINA
TEL: (021) 5580-0800
HONG KONG
Tom Lee Music Co., Ltd.
Service Division
22-32 Pun Shan Street, Tsuen
Wan, New Territories,
HONG KONG
TEL: 2415 0911
INDIA
Rivera Digitec (India) Pvt. Ltd.
409, Nirman Kendra Mahalaxmi
Flats Compound Off. Dr. Edwin
Moses Road, Mumbai-400011,
INDIA
TEL: (022) 493 9051
INDONESIA
VIETNAM
Saigon Music
138 Tran Quang Khai St.,
District 1
Ho Chi Minh City
VIETNAM
TEL: (08) 844-4068
AUSTRALIA/
NEW ZEALAND
AUSTRALIA
Roland Corporation
Australia Pty., Ltd.
38 Campbell Avenue
Dee Why West. NSW 2099
AUSTRALIA
TEL: (02) 9982 8266
NEW ZEALAND
Roland Corporation Ltd.
32 Shaddock Street, Mount Eden,
Auckland, NEW ZEALAND
TEL: (09) 3098 715
CENTRAL/LATIN
AMERICA
ARGENTINA
Instrumentos Musicales S.A.
Av.Santa Fe 2055
(1123) Buenos Aires
ARGENTINA
TEL: (011) 4508-2700
BRAZIL
Rua San Jose, 780 Sala B
Parque Industrial San Jose
Cotia - Sao Paulo - SP, BRAZIL
TEL: (011) 4615 5666
JUAN Bansbach
Instrumentos Musicales
Ave.1. Calle 11, Apartado 10237,
San Jose, COSTA RICA
TEL: 258-0211
Cosmos Corporation
CHILE
1461-9, Seocho-Dong,
Seocho Ku, Seoul, KOREA
TEL: (02) 3486-8855
Comercial Fancy
140 & 142, Jalan Bukit Bintang
55100 Kuala Lumpur,MALAYSIA
TEL: (03) 2144-3333
PHILIPPINES
G.A. Yupangco & Co. Inc.
339 Gil J. Puyat Avenue
Makati, Metro Manila 1200,
PHILIPPINES
TEL: (02) 899 9801
AUSTRIA
S.A.
Rut.: 96.919.420-1
Nataniel Cox #739, 4th Floor
Santiago - Centro, CHILE
TEL: (02) 688-9540
EL SALVADOR
OMNI MUSIC
75 Avenida Norte y Final
Alameda Juan Pablo ,
Edificio No.4010 San Salvador,
EL SALVADOR
TEL: 262-0788
MEXICO
Casa Veerkamp, s.a. de c.v.
Av. Toluca No. 323, Col. Olivar
de los Padres 01780 Mexico D.F.
MEXICO
TEL: (55) 5668-6699
PORTUGAL
Roland Scandinavia A/S
Nordhavnsvej 7, Postbox 880,
DK-2100 Copenhagen
DENMARK
TEL: (039)16 6200
FRANCE
Roland France SA
4, Rue Paul Henri SPAAK,
Parc de l'Esplanade, F 77 462 St.
Thibault, Lagny Cedex FRANCE
TEL: 01 600 73 500
FINLAND
GERMANY
Roland Elektronische
Musikinstrumente HmbH.
Oststrasse 96, 22844 Norderstedt,
GERMANY
TEL: (040) 52 60090
GREECE
STOLLAS S.A.
Music Sound Light
155, New National Road
Patras 26442, GREECE
TEL: (061) 043-5400
HUNGARY
Piata Libertatii 1,
RO-4200 Gheorghehi
TEL: (095) 169-5043
3-Bogatyrskaya Str. 1.k.l
107 564 Moscow, RUSSIA
TEL: (095) 169 5043
SPAIN
Roland Electronics
de España, S. A.
Calle Bolivia 239, 08020
Barcelona, SPAIN
TEL: (93) 308 1000
SWEDEN
Roland Scandinavia A/S
SWEDISH SALES OFFICE
SAUDI ARABIA
aDawliah Universal
Electronics APL
Corniche Road, Aldossary Bldg.,
1st Floor, Alkhobar,
SAUDI ARABIA
P.O.Box 2154, Alkhobar 31952
SAUDI ARABIA
TEL: (03) 898 2081
SYRIA
Technical Light & Sound
Center
Khaled Ebn Al Walid St.
Bldg. No. 47, P.O.BOX 13520,
Damascus, SYRIA
TEL: (011) 223-5384
TURKEY
Barkat muzik aletleri ithalat
ve ihracat Ltd Sti
Roland (Switzerland) AG
Musitronic AG
Gerberstrasse 5, Postfach,
CH-4410 Liestal, SWITZERLAND
TEL: (061) 927-8383
UKRAINE
TIC-TAC
Mira Str. 19/108
P.O. Box 180
295400 Munkachevo, UKRAINE
TEL: (03131) 414-40
UNITED KINGDOM
Roland (U.K.) Ltd.
Atlantic Close, Swansea
Enterprise Park, SWANSEA
SA7 9FJ,
UNITED KINGDOM
TEL: (01792) 700139
MIDDLE EAST
BAHRAIN
Moon Stores
IRELAND
CYPRUS
Audio House, Belmont Court,
Donnybrook, Dublin 4.
Republic of IRELAND
TEL: (01) 2603501
P.O. Box 62,
Doha, QATAR
TEL: 4423-554
SWITZERLAND
Warehouse Area ‘DEPO’ Pf.83
H-2046 Torokbalint, HUNGARY
TEL: (23) 511011
Roland Ireland
Gerge Zeidan St., Chahine Bldg.,
Achrafieh, P.O.Box: 16-5857
Beirut, LEBANON
TEL: (01) 20-1441
Danvik Center 28, 2 tr.
S-131 30 Nacka SWEDEN
TEL: (08) 702 0020
No.16, Bab Al Bahrain Avenue,
P.O.Box 247, Manama 304,
State of BAHRAIN
TEL: 211 005
Intermusica Ltd.
Chahine S.A.L.
Al Emadi Co. (Badie Studio
& Stores)
FBS LINES
MuTek
DENMARK
LEBANON
QATAR
RUSSIA
Houtstraat 3, B-2260, Oevel
(Westerlo) BELGIUM
TEL: (014) 575811
Abdullah Salem Street,
Safat, KUWAIT
TEL: 243-6399
ROMANIA
Siemensstrasse 4, P.O. Box 74,
A-6063 RUM, AUSTRIA
TEL: (0512) 26 44 260
BELGIUM/HOLLAND/
LUXEMBOURG
Roland Benelux N. V.
KUWAIT
Cais Das Pedras, 8/9-1 Dto
4050-465 PORTO
PORTUGAL
TEL: (022) 608 00 60
Roland Austria GES.M.B.H.
Roland Brasil Ltda
COSTA RICA
BENTLEY MUSIC SDN BHD
EUROPE
Lauttasaarentie 54 B
Fin-00201 Helsinki, FINLAND
TEL: (9) 682 4020
J1. Cideng Timur No. 15J-150
Jakarta Pusat
INDONESIA
TEL: (021) 6324170
MALAYSIA
Av. Francisco de Miranda,
Centro Parque de Cristal, Nivel
C2 Local 20 Caracas
VENEZUELA
TEL: (212) 285-8586
Roland Scandinavia As,
Filial Finland
PT Citra IntiRama
KOREA
JORDAN
AMMAN Trading Agency
245 Prince Mohammad St.,
Amman 1118, JORDAN
TEL: (06) 464-1200
SOUTH AFRICA
P.O.Box 32918, Braamfontein 2017
Johannesbourg, SOUTH AFRICA
TEL: (011) 403 4105
Roland Scandinavia Avd.
Kontor Norge
Lilleakerveien 2 Postboks 95
Lilleaker N-0216 Oslo
NORWAY
TEL: 273 0074
Room 5, 9fl. No. 112 Chung Shan
N.Road Sec.2, Taipei, TAIWAN,
R.O.C.
TEL: (02) 2561 3339
11 Melle St., Braamfontein,
Johannesbourg, SOUTH AFRICA
Distribuidora De
Instrumentos Musicales
8 Retzif Ha'aliya Hashnya St.
Tel-Aviv-Yafo ISRAEL
TEL: (03) 6823666
Radex Sound Equipment Ltd.
17, Diagorou Street, Nicosia,
CYPRUS
TEL: (02) 66-9426
Siraselviler Caddesi Siraselviler
Pasaji No:74/20
Taksim - Istanbul, TURKEY
TEL: (0212) 2499324
U.A.E.
Zak Electronics & Musical
Instruments Co. L.L.C.
Zabeel Road, Al Sherooq Bldg.,
No. 14, Grand Floor, Dubai, U.A.E.
TEL: (04) 3360715
NORTH AMERICA
CANADA
Roland Canada Music Ltd.
(Head Office)
5480 Parkwood Way Richmond
B. C., V6V 2M4 CANADA
TEL: (604) 270 6626
Roland Canada Music Ltd.
(Toronto Office)
170 Admiral Boulevard
Mississauga On L5T 2N6
CANADA
TEL: (905) 362 9707
U. S. A.
Roland Corporation U.S.
5100 S. Eastern Avenue
Los Angeles, CA 90040-2938,
U. S. A.
TEL: (323) 890 3700
IRAN
MOCO, INC.
No.41 Nike St., Dr.Shariyati Ave.,
Roberoye Cerahe Mirdamad
Tehran, IRAN
TEL: (021) 285-4169
RPC-1 driver software support
Phone : 626 - 445 - 8495 (United States)
Fax
: 626 - 445 - 7564 (United States)
e-mail : [email protected]
As of May 1, 2002 (Roland)
205
*
*
*
*
*
*
*
*
*
*
*
*
*
*
*
*
Microsoft, Windows, and Windows NT are registered trademarks of Microsoft Corporation.
Windows® 95 is known officially as: “Microsoft® Windows® 95 operating system.”
Windows® 98 is known officially as: “Microsoft® Windows® 98 operating system.”
Windows NT® is known officially as: “Microsoft® Windows NT® operating system.”
Windows ® 2000 is known officially as: “Microsoft® Windows® 2000 operating system.”
Windows® Me is known officially as: “Microsoft® Windows® Millennium Edition operating system.”
Windows ® XP is known officially as: “Microsoft® Windows® XP operating system.”
Macintosh is a registered trademark of Apple Computer, Inc.
MacOS is a trademark of Apple Computer, Inc.
Pentium is a registered trademark of Intel Corporation.
MMX is a trademark of Intel Corporation.
OMS is a trademark of Opcode System, Inc.
Sonar is a trademark of Twelve Tone Systems, Inc.
Logic Audio and EASI is a trademark of Emagic Soft- und Hardware GmbH.
Cubase VST and ASIO is trademark of Steinberg Media Technologies AG.
All product names mentioned in this document are trademarks or registered trademarks of their respective owners.
For EU Countries
This product complies with the requirements of European Directive 89/336/EEC.
For the USA
FEDERAL COMMUNICATIONS COMMISSION
RADIO FREQUENCY INTERFERENCE STATEMENT
This equipment has been tested and found to comply with the limits for a Class B digital device, pursuant to Part 15 of the
FCC Rules. These limits are designed to provide reasonable protection against harmful interference in a residential
installation. This equipment generates, uses, and can radiate radio frequency energy and, if not installed and used in
accordance with the instructions, may cause harmful interference to radio communications. However, there is no guarantee
that interference will not occur in a particular installation. If this equipment does cause harmful interference to radio or
television reception, which can be determined by turning the equipment off and on, the user is encouraged to try to correct the
interference by one or more of the following measures:
– Reorient or relocate the receiving antenna.
– Increase the separation between the equipment and receiver.
– Connect the equipment into an outlet on a circuit different from that to which the receiver is connected.
– Consult the dealer or an experienced radio/TV technician for help.
This device complies with Part 15 of the FCC Rules. Operation is subject to the following two conditions:
(1) This device may not cause harmful interference, and
(2) This device must accept any interference received, including interference that may cause undesired operation.
Tested To Comply With FCC Standards
FOR HOME OR OFFICE USE
Unauthorized changes or modification to this system can void the users authority to operate this equipment.
This equipment requires shielded interface cables in order to meet FCC class B Limit.
For the USA
Declaration of Conformity
COMPLIANCE INFORMATION STATEMENT
Model Name
Type of Eqipment
Responsible Party
Address
Telephone
: RPC-1
: R-BUS Interface Card
: Roland Corporation U.S
: 5100 S. Eastern Avenue, Los Angeles, CA 90040-2938
: (323) 890-3700
For Canada
NOTICE
This Class B digital apparatus meets all requirements of the Canadian Interference-Causing Equipment Regulations.
AVIS
Cet appareil numérique de la classe B respecte toutes les exigences du Règlement sur le matériel brouilleur du Canada.
This owner’s manual is printed on recycled paper.
40458890
’02-5-GC1-21KS