1
.IMPORTANT MANUAL
Do Not Throw Away
operator's
manual
•
•
•
•
Assembly
Operation
Maintenance
Repair Parts
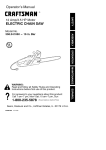
MODEL NO.
358.3550612.3/16"AV
358.3550712.3/16" AV PS
SF_/ -RS RRFT$1qR
2.3/16" AV
2.,3/16" PS. AV
GASOLINE CHAIN SAWS
al_ WARNING:
Carefully
read and follow
_lfety Rules, Precautions and
Operating Instructions, FailUre
to do so can result in serious
Record in the space provided below the Model No. and Serial No. of
your saw. These numbers are tocated on the starting instructions
decal.
Model No.
Serial No.
Retain these numbers for future •reference.
Sea,_,
530-066646-_19688
Ro(_btlok
and
Cx x, Chicag(),
-
IlL 60684
U.S.A.
@Sears,RoebuckandCo., 1988,,
ULL ONI_ Y
rARRANTY ON GASOLINE CHA
(Excluding Bar, Chain, Spark Plug, Air Filter and Starter Rope)
For one year from date of purchase, when you maintain, lubricate, and tune up your 2.3 AV or 23 RS. AV gasoline chain saw
accOrdingt_ the _pemting maintenan_e Inst_u_ti_ns in the _perat_r_s manua_ Sears wi_ repair defects in malaria_s _r w_rkmansh ip
in _is gesotine chain eaw at no charge.
This warranty exc_udes the bar_cha_n' spark p_ug_ajr _lter_and starter r_e wt_ich are expendabIe pa_rtsand becOme w_m during
normal
use.
._
If this2.3AVor 2.,3RS.AVgasolinechainsawis usedforcommercial
or rental
purposes,thiswarranty
appliesfor only30
L<`-_:__daysfr_mdate_f purchase_
WARRANTY
SERV|CE_SAVAILABLE
BYRETURN_NG
THF-CHAINSAWT_THE_NEA
RESTSEARS
SC'-RVICECENTER/DEPARTMENTIN
THEUNITEDSTATES.
Thi_ warranty gives y_u sped'_ _egalr_ghts_a.qdy_u m_y afs_ have _ther rights wh_ch_ary _mmstate t_ state`
-_
TABLE OF CONTENTS
-
B, TreeFellingTechniques ....................
14
C, Bucking ............................
_5
D. Debranchinga_d Pruning ..................
16
Maintenance ................................
17 •
A. Guide Bar and Chain .................
........
17
B. Air Filter .............
_: ....
. .......
19
_. Spark Arrestor........................
19
D. Starter Rope.. ...........................
_0
E. CarburetorAdjustments. : .................
21
F. Storage ...............................
22
G .MaintenanceAcces,_ries ..................
22
H. Troubleshooting Chart.....................
23
I. Maintenance Chart .......................
24
Repair Parts List .............................
25
Quick Reference Page .........................31
Specifications ................................
2
SPECIAL SAFETY SECTION ....................3
Know'(our Chain Saw ..........................
6
Preparing Your Saw For Use .....................
7
A.Getting
Ready ...........................
7
B.Attaching
theBarand Chain ......-,
..........7
C. ChainTension............................
8
D.Fueling
YourEngine .......................
9
E. Bar and Chain Lubr_ant ...................
10
Using YourSaw ..............................
10
A. PreOperation
Checks .....................10
B.Starting
Instructions
......................
11
Using thePowerSharp e System ................12
Types ofCutting..............................
_3
A.Basic Cutting Technique ...................
13
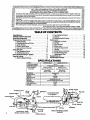
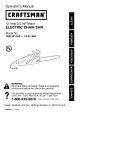
SPECIFICATIONS
MODEL
(_'6') ..........
!
_(_'_;P_)
.....
_u._. o_,_L,_E_r
2,3cu.in.
CHAIN -OREGONe
3/8P_c_LowProfile
X_Guar_P Chr_eCt_er_
SSOr_elinks
GUARD LINK
,._N_ 7_
SPA_G
SPARKPLUGGAP
M_O-DULEAIRGAP
•EUEL MIX
3/8 Pitch_ Pro_te
_rSha_
L"P_eCut_e:
56 Ddvel_n_
_
,025
,',':',',',':,,,,,,,'
......
;
Mu_-L_ • :
l
OILER
S_-EM
)
:
.......
_
16:1
Aut_,_¢
"._o='"
•
\
_Lf._---_I_
_
,.o\ I .)__ndguard
Choke
_
'
..........s_o_
{
O,.TANK
'
'N0:,_,4
:' - _Gasoline/Oi_Mixtum
s_"_U=_"g
' _F'r,=,N_c,,,..4=W
: ..........
i .............
Throttle L°ck°ut
h'o.
7_-._s3_
..........
...................
Champk_C,
Fa.............
_:__
j
....................
,,ow.,,.....oo,
tjibration Mounts
_J_
Throttle Trigger
F_,etCap
starter Handle
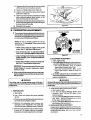
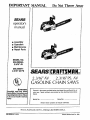
SPECIAL
SAFETY
SECTION
,
GUARD
AGAINST
KICKBACK
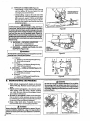
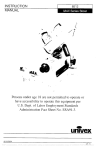
Kickbackisa dangerous reactionthat can/eadtosedous
injury. Do not rely only on the safety devices provided
with your saw. As a chain saw user, you must follow
special safety instructlonsto helpkeep yourcutting jobs
free from accident or injury.
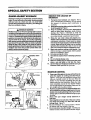
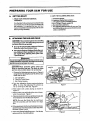
_IL KICKBACK WARNING
Kickback can occur when the moving chain contacts
an objectat the upperportion ofthetip ofthe guide bar
orwhen the wood closes in and pinchesthe sawchain
in the cut. Contactattheupperportionofthetipofthe
guidebarcan cause the chainto dig intothe object and
stop the chain for an instanL The result is a lightning
fast, reverse reaction which Idcks theguide bar up and
back toward the operator, ff the saw chain is pinched
along the top of the guide bar_ the guide bar can be
driven rapldiyback towardthe operator.Either oTthese
reactions can cause loss of saw control which can
result in serious personal injury.
................
KICKBACKPATH
Figure 1
CLEAR
WORKING AREA
EL_
LOCKED
\_
LEFT _ND
ON
UNDER
SID E
OF HANDLEBAR
,/
Figure3
ill
==
REDUCE
THE
KICKBACK
,,,,m,,=
CHANCE
,, =
OF
1. Recognize that kickback can happen. With a
basic understanding of kickback, you can reduce
the element of surprise which contributes to
accidents.
2. Neverletthemovingchaincontact any objectatthe
tip of the guide bar. Figure1.
3. Keep the working area free from obstructions
such as other trees, branches, rocks, fences,
stumps, etc. Figure 2. Eliminate or avoid any
obstructionthat your saw chain could hit while you
are cutting through a particula_ log or branch.
4. Keep your saw chain sharp and properly tensioned. Followmanufacturer_chainsharpeningand
maintenanceinstru_ons. Check tension at regular
intervalsw_ththeengines_opped,
neverwiththeengine
running. Make sure the bar clamp nuts are securely
tightenedafter tensioningthe chain. A looseor-dull
chaincanincrease the chance ofkickbackto occur.
5. Begin and continue cutting at full throttle. If the
chain is moving at a slower speed, there is greater
chance for kickback to occur,
6. Cut only one log at a time.
7. Use extreme caution when re-entering a previous
cut.
8. Do not attempt plunge cuts.
g. Watch for shifting logs or other forces that could
.....close a cut and pinch or fall into the chain.
10. Use the Reduced-Kickback Guide Bar and LowKickback Chain specified for .yoursaw.
MAINTAIN
AVOID
OBSTRUCTIONS
=l, ii
1.
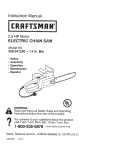
CONTROL
Keep a good firm grip on the saw with both hands
when the engine is running and don't let go.
Figure 3. A firm grip can neutralize kickback and
help you maintain control of the saw. Keep the
fingers of your left hand encircling and your left
thumb under the front handlebar, Keep your right
hand completely around the rear handle whether
you are right handed or left handed. Keep your left
arm straight with the elbow locked.
2. Positionyourlefthandonthefronthandlebarsoit
is in a straight line with your right hand on the mar
handle when making bucking cuts. Figure& Never
reverseright and left hand positionsduringany type
ofcutting.
3. Stand with your weight evenly balanced on
both fe_.I.
4. Stand slightly to the left side of the saw, to keep
your body from being in a direct line with the
• Cutting chain. Figure 3.
5. Do not overreach. You could be drawn or thrown
off balance and/ose control of the saw.
6. Do not cut above shoulder height. It is difficultto
maintain control of the saw above shoulder height.
./
iii iiii
SPECIAL
iii
.
+SAFETY
:
i..
i_
.,J
,
lira,,,, ,,,, ,,, ....
iml
SECTION
...........
i i
,, UlmllllllH i I
H
i
i
I, ,I
(continued)
iilll
ill
,i
ii
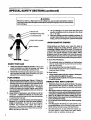
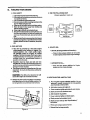
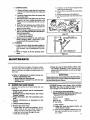
WARNING
Because a chain is a high-speed w0od-cutting tool, special safety precautions must be
observed toreducethe dsk of personal accidenls.Carelessor impmper useean cause sedous
personal injury.
4.
SAFETY
SNUG
FITTING
CLOTHING
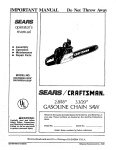
Do not attempt to use your chain saw during bad
weather conditions such as strong wind, rain, snow,
etc., or at night.
5. Plan your sawing operation carefullytn advance. Do
notstartcuttinguntilyou havea ctearworkarea, secure
footing,and ifyouare fellingtrees,aplanned retreatpath.
HAT
EARING PROTECTION
-.,,
,HEAVY DUTY GLovEs
AVOID
SHOES
TO avoid Pinch-Kickback:
Figure
4
1.
2.
YOUR
SAW
Read your Operetor's Manual carefuily untJlyoucompletely understand and followall warnings and safety
instructionsbeforeattemptingto operatethe tool.
Restdct the use of your saw toadult userswho understand and followthesafety rules,precautions and oper.
ating instructionsfoundin-thlsmanual
+PLAN
AHEAD
+
+1. Wear personalpmtective gear. Figure 4. Always use
steel-toedsafety fo_wear withnon-slipsoles;snug-fitting
clothing;heavy-dutynon-slipgloves;eyeprotectionsuch
as non-fogging,vented gogglesor face screen; an appmvedsafetyhard hat,and soundban_rs-- earplugsor
mufflers tO protect your hearing. Regular users should
have hearing checked regutadyas chain saw no_secan
+
damage hearing.
2. Keep _hiidren, bystanders, and animals Out of the
work area -- a minimum of 30 feet. Do not allow other
people or animalstobe nearthe chainsaw when starting
or operatingthe chainsaw.
3 o Do .notha.md_eor operate a cha_ saw when _ m_
fatigued, ill, or upset; or if you have taken alcohol,
drugs or medication. You must be in good physical
condition and mentally alert: Chain saw work is
strenuous. If you have any condffion that might be
aggravated by strenuouswork, check with yourdoctor
before operating a chain saw.
.=
4
FORCES
Pin0h-Kickback and Pu!!-in occur when the chain is
suddenly stopped by being pinched, caught, or by
contacting a foreign object in the wood. Thisresultsin a
reversalofthe chainforceusedtocutwoodand causesthesaw
to move in the oppositedirectionof chain rotation.PinchKickback drives the saw straight back towardthe operator.
Pull-inpulls the saw away from the operator. Either reaction
can resultinlossofcontroland possible sedous personal
injury.
SAFETY
KNOW
REACTIVE
1. Be extremely aware of situations or obstructions
that <:an cause matedal to pinch the top of or otherwise stop the chain.
2. Do not cut more than one log at a time.
3. DO not twist the saw as the bar is withdrawnfrom an
under-cut when bucking.
To avoid Pull-in:
1.
2.
Always begin cuffing with the engine at full thmffie
and the saw frame against the wood,
Use wedges made of plastic or wood, (neverof metal)
tohold the cutopen.
HANDLE
I.
FUEL WITH
CAUTION
Eliminate all soumes of sparks or flame in the areas
where fuel is mixed, poured, or stored, There should
be no smoking, open flames, or work that couldcause
sparks.
2. Mix and pour fuelin an outdoor area, on bare ground;
store fuel in a cool,dry, well-ventilated place; and use
an approved, marked containerforatl fuel purposes.
3. Wipe up all spilled fuel before starling your saw.
4. Move at least 10 feet away from fuel and fuelingslte
before starting the engine.
5. Do not smoke while handling fuelor while operating
the saw.
6. Turn the engine off and let your saw cool in a noncombustible area, not on dry leaves, straw, paper,etc.
Slowly remove the fuel tank ca.pand refuel the unit.
7. Store tooland fuel in an area where fuel vapors cannot reach sparks or open flames from water heaters,
electric motors or switches, furnaces, etc.
m
OPERATE
i
YOUR
i,,i
_
i
ui,
YOUR SAW IN GOOD
ORDER
.
1.
Have all chain saw service performed by a qualified
service dealer with the exception of the items listed
in the maintenance section of this manual. For
example, if improper toolsare used to remove or hold
the flywheeJ when servicing the clutch, structural
damage to the flywheel can occur and cause the
flywheel to burst.
2. Keep fuel and oil caps, screws and fasteners
securely tightened.
3. Keep the handles dry, clean, and free of oil or fuel
mixture.
4. Make certain the saw chain stops moving when the
throttle trigger is released. For correction,refer to
"Carburetor Adjustments:'
5_
8.
•
,i,,
i
i
[L
I,l,I
,I
SAW SAFELY
1. Do not operate a chain saw thst is damaged, improperly adjusted, or not completely and securely
assembled.
2. Operatethechainsawonlyinoutdoorareas.
3. Do not operate the saw from a ladder or in a tree.
4. Position all parts of your body to the left of cut and
away from the saw chain when the engine is
running.
5. Cut wood only. Do notcutmetal, plastics,masonry, nonwoodbuildingmaterials, et_ Do notuseyoursawtopryor
shove away limbs,rootsor otherobjects.
6. Make surethe _hain willnot mape contact withanyc;bject while slatting the engine. Nevertrytostartthesaw
when the guidebar is in a cut or Perf.
7. Use extreme caution when cutting small size brush
and saplings. Slender material can catch the saw
chain and be whipped toward you or pull you off
balance.
8. Be alert for springback when cutting a limb that is
under tension so you will not be struck by the limbor
saw when the tension in the wood fibers is released,
•9. Do not put pressure on the saw at the end of a cut.
This can cause you to lose control when the cut is
completed,
10. Stop the engine before setting the saw down.
MAINTAIN
WORKING
i
Stop the saw if the chain strikes a foreign object.
Inspectthe toolandrepairor replace partsas necessary.
Disconnect the spark plug before performing any
maintenance except for carburetor adjustments.
Never modify your saw in any way. Use only atfachmerits supplied or specifically recommended by the
manufacture[
Always replace the handguard immediately if it
becomes damaged, or broken or is otherwise
removed ÷
Keep the vibration isolators in good condition.
Periodicallyinspectisolatorsfor tear,ripsor separationof
the rubberportionfrom the metalmountings,Have your
Sears Service Center replace the isolatorsif worn or
damaged, ifvibra_onincreasesor ifmounts developanout
ofroundorswollenshapefromexposuretogasolineand!or
oil. it isrecommendedthatall isolatorsbe replacedwhen
a failure to one occurs.
CARRY
AND STORE
YOUR
SAW SAFELY
1.
Hand carrywith theengine stopped, the Muffler aw_
•from your body, and theGuideBarand Chaintothe rear
coveredpreferablywith a scabbard.
2,
Before transporting in any vehicle orstoring in any
enclosure, allow your saw to cool completely, cover
the bar and chain and propedy secure to avoid
turnover, fuel spillage or damage,
Emptythe fuel tankbefore storing the tool, Use
up fuelleft in the carburetor by starting the engine and letting the engine run until it stops,
3,
4. Store in a dry area out of the reach of children and
away from where fuel vapors can reach sparks or an
open flame from hot water heaters,furnaces, etc.
THIS SAW IS 'FOR OCCASIONAL
USE ONLY
NOTE: Exposure to vibrationsthrough prolonged useof
chain saws may produce Whitefinger disease
(Raynaud's phenomenon). This phenomenon
reduces the hand's ability to feel and regulate
temperature, produces numbness and burning
sensations and can cause nerve and circulation
damage and tissue necrosis,
An anti-vibration system designed to reduce
engine vibration is recommended for those using
chain saws on a regular or sustained basis and is
provided on this saw, An anti-vibration system
doesnotguaranteetheavoidanceofWhitefinger
disease, Continual and regular users must
monitor closely their use of chain saws and
physical condition.
Notice: Refer to the Code of Federal Regulations,Section
1910.266{5); 2.5.1 of American National Standard
Safety Requirements for Pulpwood Logging, ANSI
•03.1-1978; and relevant state safety codes when
usinga chain saw for logging purposes.
5
KNOW
A.
YOUR
CHAIN
SAW
INTRODUCTION
Yoursaw has been designed with safetyin mindand
includesthefoltowingfeaturesasstandard equipment:
--Reduced-Kickback
Guide Bar (Lo-Kick®)
-- Low-KickbackChain (Xtra-Guard®)
Spark Arrestor
Muffler Shield
-- Handguard
-- Anti-Vibration System
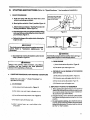
B. KICKBACK
SAFETY
FEATURES
Reduced-Kickback Guide Bar, designed with a
small radiustip whichreducesthe size ofthekickback
danger zone on the bar tip. Figure 5. A ReducedKickbackGuide Bar isone whichhas beendemonstrated to significantly reduce the number and
seriousnessof kickbackswhentestedin accordance
with the safety requirements for gasoline powered
chain saws asset bythe American National Standards
Institute, Inc., Standard Bt75.1-t985_
--
Low.Kickback Chain, designed with a contured
depthgaugeand guard linkwhichdeflect thekickback
force and allow wood to gradualty ride intothecutter.
Figure 5.Low-Kickback Saw Chainis chainwhich has
rnet the kickback performancerequirementsofANSI
B175.I when tested on a representative sample of
chain saws below 3,8 cubic inch displacement
specified in ANSI B175.1-1985.(American National
Standard for Power Tools.- GasolinePowered Chain
Saves- Safety Requirements).
Handguard, designed to reduce the chance ofyour
left handcontactingthechain if your hand slips off the
fronthandtebar.
Position of front and rear handlebars, designed
withd'_z_ce between handles and "in line" witheach
other.The spread and "in line"positionofthehandlebarsworktogether togive balanceand resistancein
controllingthe saw if kickback occurs.
_I, WARNING
Do not operate ttie chain saw unless the safetydevices
or their specified replacements are properly installed
and maintained according to the instructions in this
manual. Do not use any other guide barand chain combination that is not equivalent to the original equipment
or not certified to comply with ANSI B175.1.Failure to
follow these instructions can result in serious personal
injury.
Figure5
C. STATE AND LOCAL REQUIREMENTS.
Yoursew is equipped with a temperature limiting rnuftier and spark arresting screen which meets the
-requirements of California Codes 4442 and 4443. All
Li.S. forest land and the _
of California, Maine,
Washingtonarid Oregon requiremany internalcombustionenginestobe equippedwitha spark arrestorscreen
bylaw. Other statesare enacting similar taws.
If you operate a chain saw in a state or locale where
such regulationsexist, you arelegaliy responsib!e for
maintaining the operating condition of these parts.
'Failure to do so is a violation Of the law. Refer tothe
"Spark Arrestor"se_on for maintenance.
I
_IL WARNING
The following feature,sam included on yoursewto help
reduce the hazard of kickback, however,such features
will not totally eliminate th is dangerous reaction. As a
chain saw user, do not rely only on safety devices. You
must follow all safety precautions, instructions and
maintenancein this manual to helpavoid kiekbackand
other forcas which can resultin serious personalinjury.
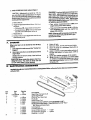
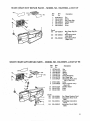
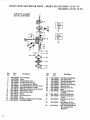
D= CARTON
CONTENTS
After you unpack the carton:
1. Check the contents against the tist below.
2. Examine the itemsfordamage. Do not usedamaged
paris.
3. Notify your Sears store immediately if a part is
missing or damaged.
NOTE: it isnormaltohearthefuel filterrattJe
inanempty
fuel tank.
Key No. : Carton Contents:
1
Powerhead
2
Guide Bar
3
8 oz_can 2.cycle Engine Oil
Operator'sManual (not shown)
-LooseParts Bag (not shown)
Qty.
1
1
1
t
t
Loose Parts Bag Contents:
4
/Chain
"1
5
6
BarAdjusting Tool
FlexWrench (for fan housing
1
1
SCrews)
PREPARING
YOUR
SAW
FOR USE
..............
A.
GETTING
YourOperator's Manualhasbeendevelopedtohelp
you prepare yoursaw for use and to understandits
safe operation. It is important that you read your
manual completelytobecomefamiliar withthe saw
beforeyoubegin assemb}y.
, ,,,,.
B,
.._
ii
ATTACHING
ii
"H
,i
2. HAVE THE FOLLOWING AVAILABLE:
READY'
1. READ YOUR OPERATOR'SMANUAL
CAREFULLY.
L,
.11111
,,,,,
,....
,,,,,,,,,,,i
HH,.HH
I.
a. Protective gloves.
b. Approved, market fuel container
c. One gallon regular unleaded gasoline
d, 8 oz. (1/2 pt.), 2-cycle, engine oil
e. Bar and Chain Lubricant.
f. BarM|usting Tool providedw_lhyoursaw.One
end ofthe toolserws as a wrench;theothercanbe
usedas a screwdriver.
.11,
I
,,,,,,,,,,,
,
,,
i
ii
i
H
THE BAR AND CHAIN
__CAUTION:t Wear protective gloves when handling
oropemting your saw.The ¢hainissharpand can cut
you even when it is not moving!
•
•
Your saw is equipped with a Reduced.Kickback
Guide Bar and a Low-Kickback Chain.
Use only the Reduced-Kickback Guide Barand
Low-Kickback Chain specified for your chain
saw model when replacing these parts. See
"Specifications"
!1
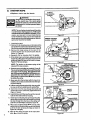
TURN
ADJUSTING
SCREW
SCREW
|
,_WARNING
Do not start engine without guide bar and chain completely assembled. Otherwise, the clutch can come off
and Serious personal injury can result.
._AUTION:I Wear protective gloves when handling or operating your saw. The chain is sharp
and can cut you even when it is not moving!
/-.-HOUSZ G
Figure6
CLUTCH
1. Remove the following parts as shownin Figure 6,
using the Bar AdjustingTool and Hex Wrench provided with the unit.
a. Bar Clamp Nut.
b. Rear Bar Clamp Screw.
c- Bar Clamp Housing.
2. Turn the Adjusting Screw counterclockwise
to move the Adjusting Pin almost as
far as it will go to the rear. Figure 6.
BARSTUD
Figure7
•3. Hold chain with cutters facing as shown in
Figure 7.
4. Place chain over and behind the clutch drum,
onto the sprocket. Figure 7.
5. Place the Guide Bar on the saw by fitting thelarge stot
in the Guide Bar overthe Bar Stud.Figure 8.
NOTE: Be sure the Guide Bar is positioned
with the adjusting pin hole below the large
slot.
STU
•6. Fit the adjusting pin intotheround holebelowthelarge
stot;fit the far_ sJotonthe mountson e_d'terside of the
Bar Stud. Figures7 and 9.
7. Fit the chain intothe GuideBar grooves-- first, the top
groove andthen, the bottom groove.
Figure 8
-NUT
j CAUTION:
JMake sure that the tabon the bottom of the
fuel tank isaligned inthe slot provided inthe fan housing.
See inset, Figure 8,
& Hold theGuide Bar againstthesaw frame and install
the Bar Clamp Housing.
9. Secure the Bar ClampHousing withthe Bar Clamp
Nut, finger tight only.TightenBar Clamp Nut after
chainistensioned.
10. Replace the Rear Bar Clamp Screw and
tighten securely.
11. Follow "Chain Tension" instructions below.
Figure9
• ,
,=1¸
C. CHAIN
"
iiiiiiii
i
i
ii ¸ _'il
i_
'"
i
i
i
iiii
ii,
i
i,
TENSION
- • Chain tension is very important:
--a
,
loose chain wilt wear the bar and i_setf.
• Chain tensioning procedure:
NOTE: The bar clamp nuts must be no more than
finger tight to tension the chain correctly.
ma loose chain can jump off the bar while
you are cutting,
: _
.:"
--a _ght chain can break or damage the saw b_
• The chain Stretches during use, especially
when new. Check tension:
-- each timethe_awis used.
more frequently when thechain isnew•
as thelchainwarms up tonormal operating temperature.
1. Hold the tip of the Guide Bar up and turn the
Adjusting Screw clockwise just until the
chain does not sag beneath the Guide Bar.
Figure 10.
2. Check the tension by lifting the chain from
the Guide Bar at the center of the bar. Figure
11.
3. Continue adjusting the Adjusting Screw until
•the tension is correct.
4. Hold the tip of the Guide Bar up and tighten
the Bar Clamp Nut with the Bar Adjusting
Tool.
5. Check the Rear Bar Clamp Screw to be sure
it is secure.
6, Recheck chain tension.
Chain tension is correct when the chain:
ICAUTION_Always wear gloves when handling
the chain. The chain is sharp and can cut you
.even When it is not moving!
--can be lifted about 118" from the Guide Bar
at a point near the middle of the bar, and"
_will
move freely around the bar,
CHAIN CAN BE
LIFTED 118" WHEN
TENSION IS CORRECT
TURN
TO LOOSEN
TENSION
.Figurei0
-8
Figure 11
........
D.
p.,,,
I=UELING
,=i=afii=
, li iii ;
,..
YOUR
.J,,,
=
..,
=...,,
......,.,......
i_,
,,=,,=ii,ii"
=
=,1
,,,,,,,,,,,,,,,,,,,,
,,,,,
ENGINE
3, USE THE FOLLOWING ONLY:
1. FUEL SAFETY
a. Use only recomreended fuel reixtures.
b. Mixand pour fuel outdoorsandwherethereare
no sparks or flames.
c_ Use a container approved for fuel
d. Donot smoke or allowsreokingnearfuelor the
tool Or whlle using the tool.
e. Wipe up all fuel spills beforestarting engine.
f. Move at least 10 feet away from fueling site
before starting engine.
g. Stop engine before rereoving fuel cap.
h. Ereptythefuel tank before storingthetool, itis
recommendedthatthe fuel tankbe emptiedafter
each use. Iffuel isleftin tank,storesofuel wiltnot
leak. "
L Storetooi and fuel in an areawherefuelvapors
cannot reach sparks or open flamesfrom water
heaters, electric motors or swit¢he_,furnaces,
etc.
,
2. FUEL MIXTURE
{16parts gasolineto I part oil.)
RL_-G_
4. DO NOT USE:
• Your tool is powered by a two-cycle engine
which i_=quiresa fuel mixture of regular un. leaded gasoline and a high quality engine
0il specially reade, for 2.cycle, air cooled
engines. The internaldesignoffife2-cycleengine
_ .. requireslubdcationofreovingparts.Lubricationis
provided when the recommended mixture
gasolineand oil is used.
• Gasoline must be clean and not over two
• reonthsold, Gasolinewiflchereicaltybreakdown
and formcompoundsthatcausehardstartingand
damage in 2-cycleengines.
• Thecorrectmeasureofgasolinetooilisvery
importanL Toomuchoilin themixturewillfoulthe
spark plug.
• BIA OIL (Boating Institute of Amedca)--- Does not haveproperadditives for air-cooled
2-cyd,e engines andcancauseengine damage.
r
] CAUTION: j Too little oil or incorrect oil will
cause the engine to overheat and seize.
O ¸
Always mix the fuel thoroughly in a container
since gasolineand oildo not readilycornbine.Do
not mixgaso/ineand oil directlyin thefue!tank.
" " AUTOMOTIVE OIL--Does not have proper additives for 2-cycle
enginesandcan causedamage."
5. HOW TO MIX FUEL AND FILL TANK
a. Pour I/2 gallonregular unleaded gasoline into an
approved, marked container.Donot mix gasoline
and oildimctl_ in the fuel tank.
b. Add entiremeasure of engine oil.
c_ Cover containertigi'_tlyand shakefor one minute.
FUEL
CAP
d. Slowlyremove fuel containercover.
e. Add rernainderof gasoline.
f. Cover containertightlyand shakeagain.
g. Slowlyremovefuel container cover.
h. Slowlyremove fuel cap. See"Specifications"
forlocation.
L Fill the tank using a spoutor funnel. •
j- Reinstallthe fuel cap securely.
Figure t2
iiiiiiiiiiiiiiiii
i =
E.
BAR AND
III.H
CHAIN
III I
'1_- Ii i
LUBRICANT
,
ii
ii
i
i
2. HOW TO FILL THE OIL TANK
a. Turn saw on its side with oil cap up. Figure
13.
b. Loosen cap slowly; wait for pressure in the
tank to be released before removing the
cap.
c. Fill the oil tank.
d. Reptace the oil cap securely.
• The guide bar and cutting chain require constant lubrication
in order to remain in
operating condition. Lubrication is provided
by the automatic oiler system when the oil
tank is kept fitled.
-- Lack of lubricant will quickly ruin the bar and
chain.
--Too little lubricant will cause overheating
shown by smoke coming from the chain and/or
discolorationofthe guide be#mi!_
, ,,,,,,111
ii
3. IMPORTANT POINTS TO REMEMBER
a. Fill the oil tank each time you refill the fuel
tank to ensure there will be sufficient oil for
the chain whenever you start and run the
saw.
•
Use Sears Bar and Chain Lubricant (#71-36554-I qt. or 71-36556 -- 1 gal.) or clean SAE 30W oil.
b. It is normal for a small amount of oil to appear under the saw after the engine stops
due to oft draining from the bar and chain,
In freezing weather oil will thicken, making
it necessary to thin bar and chain oil with a
small amount
of Diesel Fuel #1 or
Kerosene. Bar and chain oil must be free flowing for the oil system to pump enoughoil for adequate lubrication.
1. USE THE FOLLOWING:
30°F or above--Lubricant--undiluted.
• 30°F- 0°F
--95% Lubricant to
5% Diesel Fuel #1
or Kerosene.
Below OOF
_90% Lubricant to
10% Diesel Fuel #1
or Kerosene.
CAP
Figure 13
iiii
USING
YOUR
iiiiiiii
%111
i
,
iii
i
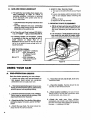
PRE-OPERATION
illl
i i
iiii
i i
, ,,,
,
iiiiiiiiii
SAW
i. ii
A.
i i
ii
iiii
i
•
.
iii i
iiiiiiiii
CHECKS
Each time before operating your saw, always:
1. ,,-Check over safety rules and precautions in
this manual. Make certain YOu completely/
understand and can apply each one.
2. ,f Check personal protective gear. Atwaysuseeye,
hearing,and headprotectiondevices;safetyfootwear;,
protecEvegloves;and snug-fittingclothing.._
3. ,,-Checkthe saw for loose bolts, nuts, or fitUngs.
Tighten, repair or replace parts as necessary.Too_s
requiredare listedin the '_.ssembly"
4. _,,Check the air filter. Cleanthe filter,if dirty,before
startingthe engine. For ioca_on, see the '_'r Filter"
section.
5, ,,-Check the saw chain. The chain should be
sharp and at the correct tension.
10
6. ,_Check the fuel tank and oil tank. Both tanks
shoutd be filled.
7. ,--Check the handles. Handles should be dry
and free of fuel mixture and oil.
8. _.-Check weather conditions. Do not use your
saw at night or during bad conditions such
as strong wind, rain, snow, etc.
9. ,_Check the work area. Keep Children,
bystanders, and animats a safe distance away
from the work area when starting or operating
the saw -- a minimum of30 feet.
iii
B.
1,
,,,,IH,
STARTING
I
I
I
I
H Hllll
I
INSTRUCTIONS
II
• _
I
•
•
•
II
(Refer to "Specifications"
BASIC PROCEDURE
I
I
I
=,iNhmTI
for location of controls.)
handwhilepullingstarter
rope with left hand.
b. Move ignition switch to "Start" positionJRgum
J
j_ .,_
_
)
__
| Use only fS-18 inches
of rope per pull.
d. Squeeze trigger withyourdght hand while pushing
saw awayfrom you and pullingthe startermpewith
your left hand. Figure 14.
Figure 14
IGNITION
sWITCH
e. Release the trlggerafter engine starts,allowing the
engine to idle.
-
/.°:
,_.WARN_G
STAR_'-,,ir_---a=_ STOP
Refer to "Carburetor
Adjustments," for
l speed.
Thechainmustnotmovewhentheenginerunsatidle
oorreotion,
f. Stop engine by moving the ignition switch to th_
"Stop" position. Figure 15,
{
15.
c, Adjust choke according to "Starting Procedu m for
Varying Conditions" berow. Figure 15,
.
"
.o.h.o...,.,,.,,g.,F
a. Hold saw firmly with the saw chain free to turn
without contacting any obiect.
I
I•
""
OKE
OF_F "': HALF
!
Figure 15
I¸
,&WARNING
:
Avoid bodily contact with the muffler when starting or
using a warm engine to avoid serious burns.
I
b. WARM ENGINE
I Always wear gloves; safety footwear; snug-fitting
•J] clothing; and eye,`&WARNING
hearing, and head protection i
[ devices when operating a chain saw.
1.)Leavechoke at the offposition.Figure15.
2.) Pul! starterrope untilengine runs.
C. REFUELED WARM ENGINE AFTER RUNNING
OUT OF FUEL
2.
STARTING PROCEDURE FOR VARYING CONDITIONS
1.)
Pullchoke tofull choke position. Figure 15.
NOTE: Be sure to follow"1. Basic Procedure," as
de..
scdbed on this page.
2.) Pult starter rope untilengine attempts torun.
a. COLDENGINE
4.) Pull starter rope until engine runs•
1.} Pull choke to full choke position. Figure 15.
2JPuli
starter rope untir engine, attempts
to run.
3.) Push c,_oke until half position is fett. Figure 15.
4=)Putf starter rope untilengine runs.
5.) After 5 second warm UP, push choke to the
off position.
3.) Push_hoke to the off position, Figure 15.
3. IMPORTANT POINTS TO REMEMBER
a. When pulling the starter rope, do not usethefull
extentofthe rope as thiscan causetheropetobreak.
Do not let thestarter rope snap back. Holdthe handle and let the rope rewindslowly.
b. If engine floods, let the unitset for a few minutes,
then repeatstartingprocedureusingthehalf-choke
posifion.
'c. For cold weather starUng,allow enginetowarmup
(1-2rain.) atthe half-chokeposition,
thenmovechoke
choketotheoffposition.Do notcut withthechokeat
the "ful!" or "half" position.
11
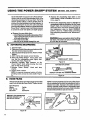
USING
THE POWER
SHARP®SYSTEM
ii
i
i,
Mode; 358.355071is equipped with a Power Sharp®
System that will perform approximately 80% of the
sharpening necessary for the saw chain. The Power
Sharp _ System utilizes a built-in grinding stone to
sharpen the cuttertopplatesand setdepth gauges.As
the buitt-insharpener is used, the cutter side plates
graduallywillbealtered.Aboutevery3rd to5thtimethe
PowerSharp® Systemis used, handfilingisrequired
to correct the cutter side plates and depth gauges,
i
A,
.
_
I
tt
ii
,itl
AUTOMATIC
,,,,,,,tt
t
,,,,
,,,,H,
,,
,,,,,,,,,,,
B., HAND
,,,
Remove the sharpening stone if a standard or
conventional chain is substituted for the Power
Sharp ® cl_ain. See instructions for removingthe
sharpeningStone and Carrier Assembly, page 13.
Use replacement chain for Model 358.355071
{22116"), Stock No. 71-3629. Followconventional
chainsharpeninginstructionsin the "Maintenance"
section.
Ratflle
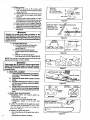
Vise
Screwdriver
EROD
ON FILE HOLDER FLAT "l
ON TOP OF CUTTER
•
,/"'_
_ROUND FILE
_L..__L_'X_/
__.
TOP [,''"_ "'_._"_,_'."
PLATE
Figure 18
DEPTH
GA UGE
SIJE-'_"_>
PLATE
. r12 ,.
ICAUTION_Always wear gloves when handling
the chain. The chain can cut you even though
it |stoo du!l to cut wood.
=
ii ii iii
iiii
ii
iiiiiiiii
i
iii
iii1" i
J
Figure 16
TOP VIEW OF CUTTER
INSPECT CUTTERSFOR GRINDING MARKS
........
Figure17
FILING
Items Required:
Gloves
5/32" dim file
File holder
•
ilrll
, ...........
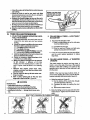
Sharpen the sideplates and depthgauges by handafter
every3rd to5th time the PowerSharp® S_tstemis used.
"
i
SHARPENING
1. Stop the engine.
2. Placesawon asolid, flat surface;and make surethat
the chainwillnot contactany object.
3. Adjustthe chain withpmpertenston.Referto"Chain
Tension:'
4. Start engine and operate at half throttle.
5. Press the Power Sharp _ Knob down until
you feel the sharpening stone lightly contatting the chain. Figure 16.
6. Maintain constant, light pressure on the
Power Sharp® Knob while moving the knob
side to side for 5 seconds.
7. Release Power Sharp® Knob and stop
engine,
8. Inspect chain cutters,
NOTE: A proper/y sharpened cutter wil! show
grinding marks across its entire width. Figure
17.
",
,,,,,,,,,,,,,,,,,,,,
• Replace the sharpening stone when a new
Power Sharp® chain is installed. See instruc.
tions, page 13.
• Sharpen the saw chain when:
--wood chips becomesrnall and powdery. (Wood
chipsmade by_ chainshourdbe aboutthesize
of the teethof the.chain.)
--saw cuts to-one side.
--saw has to be forced through the cuL
_
i
(MODEL358.355071)
...........
NOTE: ifabrasivematerials sucllas rocks,nails,sand or
dirtare contacted by the Chain,the s de platesshouldbe
checked more often. Damage to the cutterscaused by
abrasivematerials usually resultsin discolorationspots
wherethe chromehas been wom away.Cuttersidep!ares
shouldbe fileduntil these spotsareremoved.
1. Stop the engine.
2. Adjust the chain for proper tension, page 8.
3. Clampthebarinavisetoholdthech_nsteady.Donot
clamp the chain.
7. Maintain a 1/32" s_le plateproiection.Figure 20.
8. F_teall side plateson oneside of the chain, thenmove
to the other si_eof bar and file remaining side pJates.
9. Filedepthgauges accordingtoinstructionsonpage 18.
NOTE: Work at the midpoint of the bar, moving the
chainforward withascrewdriver aseach cutterisfiled.
SIDE
PLATE T=l
_L_--,132,,
_
4. Supportthe square rod on the file holder(with 5/32"
round file) on cuttertop plate.Figure18.
5, Held the fileholder level (900) withthe220 guide mark
parallelto the guide b_ Figure t9,
6. File from insidetoward outsideof cutterin one direction
only -- 2 or 3 strokesper side plate edge should be
enough. Ffgure 19.
i
PLATE /
"--
:
!
REPLACE
OR REMOVE
STONE AND CARRIER
Cm
=
" i;
,oPvl w
I
NOTE: A_d hittingthetop edge ofthecutterswl_en
filingthe side pl_e.
......
SiDE PLATE
PROJECTION
1/32"
{_" "_
_ _Tk_Figure20
i
;,,,i;,l_i;i-=_=l
......
THE
ASSEMBLY
1, Remove bar clamp housing.
2. Remove screw holding Stone and :Carrier
Assembly. Figure 21.
3, Discard old assembly.
4. Reverse procedure to install new assembly.
5, Tighten screw securely.
,_TONE &
CARRIER
.NOTE: Be careful to not overtightem (Torque
to 20-25 inch pounds.)
Figure21
6. Reassemble saw,
•'
.
;:;i _ _
_ _
TYPES
,1111 i
i
__
A, BASIC
,...............
_
_
.
- ..................... _
_ .._. -
,,
OF CUTTING
i
,111 .i
CUTTING
i,ii,,i
.
ii ,i i.
TECHNIQUE
2.
1. IMPORTANT POINTS
a. Cut wood only, Donotcutmeta!,p[_t_cs, masonry,
nonwoodbuildingmaterials,etc.Do notuseyours_v
to pry or shove av_y limbs, rootsor otherobjects.
b. Stop the saw if the chain strikes a foreignobject.
Inspect the saw and repak or replace parts as
necessary.
Keep the chain out of dirt and sand. Evenasmall
amount of dirt wilt quickly dull a chain and thus
increasethe possibilityof kickback.
...............
_ KICKBA'_' WARN'iNG ''_
Kickback can oacur when the moving chain contacts
an objectatthe upper portion ofthetip of the guide bar
orwhen the wood closes in and pinches the saw chain
in the cut. Contact at the upperportion of the tip of the
guide bar can cause the chain todig intothe object and
stop the ¢hair_for an ins_rd_ T._e resLdt_sa fighting
fast, reverse reaction which Idcks the guide bar up and
back toward the operator. If the saw chain is pinched
along the top of the guide bar, the guide bar can be
driven rapidly back toward the operator. Either ofthese
reactions can cause loss of control whichcan resuitin
serious personal injur_.
i
i
i
i
. ,]]1 iii]
UNDERSTAND RF..ACT|VE FORCES
Pinch-Kickback and Pull-In occur when the chain
issuddenlystopped bybeing pinched, caught, or
by contacting a foreign object in the wood. This
•results(n a revemaiofthe chainfom.eused tocutwood
and causes the sawtomove inthe oppos_e d{rect_on
of
chain rotation.Eitherreactioncan resultin loss ofcontroland possible seriousinjury.
* Pinch-Kickback
--occurs when thechain,on topofthe bar issuddenly
stopped when the top of thebar is used for cutting.
_rapid/y drives the saw straight back toward the
operator.
_.. , Pull-In
_can Occur when the chain o n the bottom of the
bar is suddenly stopped.
pulls the saw rapidfy forward,
3.
PROCEDURE
Practicecutting a fewsmalllogsusingthe following technique to getthe "feel" ofusingyoursaw beforeyoubegin a
major sawing operation.
a. Accelerate the engine to full throttle just before
entering the cut bysqueezing the throttle tdgger.
b. Begin cutting with the saw frame against the log.
Rgure 22.
.,
!3
c. Keep the engine at full throttle the entire timeyou
are cuffing.
d. Allow the chain to cut for you; exert only light
downward pressure. If youforce the cut, damage to
the bar,chain, or engine canresult.
e. Release the throttle trigger as soon as the cut is
completed, aJtowingtheengineto idte.Ifyou runthe
saw at ful! throttle withouta cuttingload,unnecessary
wear can occurto thechain,bar,and engine.
f. Do not put pressure onthesaw atthe end ofthe cut
to avoidlosingcontrolwhenthe cutis complete.
g. Stop the engine before setting the saw down after
cutting.
_,,,,L,,J, ; ,,,
B.
i
,,
,
,,, ,,
,
, ,,,,,,,i,,,,,
, ,,,,,,,,,,,,,,,,,
TREE FELLING
TECHNIQUES
1. PLAN YOUR SAWING OPERATION CAREFULLY IN ADVANCE
a. Clear the work area. You need a clear area all
around the tree where you can have secure
footing.
b. Study the natural conditions thatcan cause
the'tree to fall in a particular direction:
1.) The WIND direcfionand speed.
2.) The LEANofthetree.
3.) WEtGHTED withBRANCHES on one side.
•4.) ,_urroundingTREES and OBSTACLES.
c. Loolcfordecayandrot. Iftheteankisrotted,itcan
snap and fall towardtheoperator.
.d., Check for broken or dead branches which
could fall on you whilecutting.
e. Make surethereis enough room for the tree
to fall. Maintain a distance of 2_/_ tree
lengths from the nearest person or other objects. Engine noise can drown out a warning
Call.
f. Remove dirt, stones, loose bark, nails,
staples, and wire from the tree where cuts
are to be made.
g. Plan to stand on the up-hill side when cutting on a slope.
h. Plan a clear retreat path to the rear and
diagonaitothelineoffall.
Figure23.
WARNING
....
DO NOT CUT:
--=near electrical wires or buildings.
if you do not know the direction of tree fall
at night since you will not be able to see well.
_during
bad weather -- strong wind, snow, rain,
etc.
. -
Figure22
III
DON'T PUT YOURSELF
14
BEGIN CUTTING WITH
THE BOTTOM OF THE
SAW FRAME AGAINST
T
I
,,,,,,,,,,,,
L
IH,H ,
,,,,,,,,,,,,,,,,,,,,,,,,
_l,
I'll
H
2. FELLING SMALL TREES -- LESS THAN 6"
IN DIAMETER
a. If you knowthe directionof falh
1.) Make a sing{e felling cut on the side away
from the direction of fall.
2.) Cut _Jfthe waythrough.
3.) Stop the saw, put it down, and get away
quicklyon your planned retreat path.
b. tf you arc not sure which way the tree wil!fall,
use the notch method described for felling
large trees.
3.
FELLING LARGE TREES-OR MORE
6" DIAMETER
The notch method is used to cut large trees. A
notch is cut on the side of the tree in the desired
direction of fall. After a felling cut is made on the
opposite side of the tree, the tree will tend to fall
intothe notch.
NOTE: If the tree has large buttress roots, remove before making the notch. Cut into the buttresses vertically,then horizontally.Figure24.
a. Make the notchcut. Figure 25.
1:) Cut the bottom of the notch first, through
1/.3ofthe diameter of the tree.
2.) Complete the notch by making the slant
cut.
3.) I_emove the notchofwood.
b. Makethefellingcutontheoppositesideofthe
notch about 2" higher than the bottom of the
notch.
IN THESE POSITIONS
Check the lean,
Don'tcut on lean side.
Check the balance.
Don't cut on weighted s_de.
c. Leave enough uncut Wood between the felling
cut and thenotchto form a hinge. Figure 26.
J
NOTE: The hinge helps to keep the tree from
twisting and falling in the wrongdirection.
d, Use a wedge if there is any chance that the
tree wiltnot fall in the desireddirection.
oFF,
> .... f
4_
NOTE: Beforethe felling cut is complete, drive
wedgestoopenup thecut whennecessarytocon• trolthedirectionoffall. Usewoodorpfasticwedges
but never metal, to avoid kickback and chain
damage
e. Be alert for signs that the treeis ready to fall:
t,) cracking sounds
2.) wideningofthefellingcut
3.) movementintheupperbranches,
f. As the tree starts to fall, stop the saw; put it
down, and get away quickly on your planned
retreatpath.
g.
Be extremelycautious
withpartiallyfallen treesthat
maybe poodysupported.When atree doesn't fall
completely;
s_ the _aside and pundownthe
with a cable winch, block and tackle or tracts. To
avoid injury, do not cut down a partially fallen tree
withyour saw.
\
Figure26
Rgure25
_WARNING
Stay on the uphill side of the terrain to avoid the
tree rolling or sliding down hill after it isfelled,
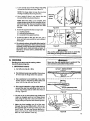
C; "BUCKING
Bucking isthe term used for cutting a fallen
tree to the desired log size.
Never turn the saw upside'down to undercuL The
I saw cannot be controlled
_WARNING
in this position.
! "
1. IMPORTANTPOINTS
a. Cut only one log at a time,
b. Cut shattered wood very carefully. Sharppieces
of wood could be flung towardthe operator.
c. Use a sawhorse to cut small 10gs. Never allow
• another person to hold the log while cuttingand
never hold the log with your leg or foot.
d°
•.
2ND CUT
4-----
Give special attention to logs under strain to
prevent the saw from pinching. Make the first
cut on the pressure side to relieve the slress on
the log Figure 27.
Figure27
,,,i, ,,H,,
I,
Do not cut in an area where logs, limbs and
roots are tangled such as in a blown down
area, Drag the/ogs into a clear area beforecut_ing by puUingout exposed and cleared logsfirst.
f. Make the first bucking Cut 113 of the way
through the tog and finish with a 2/3 cut on
the opposite side. As the log is being cut, it will
tend to bend. The Saw can become pinched or
hung In the log if you make the first cut deeper
than 1/3 of the diameter of the log.
UNDERCUT
Figure 8
ml,
,
t5
2. TYPES OF CUTTING USED F'_um28.
--Overcutling
- begin on the top side of the log
with the bottom of the saw against the log;
exert lightpressure downward.
WEDGE USED TO
HOLD CUT OPEN.
Undercutting - begin on the underside of the
fog with the top of the saw againstthe log;exert
light pressure upward. During undercutting,
the saw will tend to push back at you. Be prepared for this reaction and hold the saw firmly
to maintaincontrol.
A WARNING
If saw becomes pinched or hung in a log, don't try to
force it out. You can loose control of the saw resulting
in serious personal injury and/or damage to the saw.
Stop the saw,drive a wedge of plastic or wood intothe
cut until the saw can be removed easily. Figure 29.
Restart the saw and carefully reenter the cut, To avoid
ldckbackand chain damage, do not usea metalwedge.
Do not attempt to restart yoursawwhen itispinched or
hung in a log.
3. BUCKING-WITHOUTA SUPPORT
a. Overcutwitha 1/3diametercut.
b. Rolllogoverandflnishwithanovercut.:
4, .BUCKING _ USING ANOTHER LOG AS A
SUPPORT (Figure 30):
Figure29
B
1st
Cut
1st
USING
ANOTHER
LOG AS A SUPPORT
_k WARNING
Figure30
Do not stand on the log being cut. Any portion can roll
causing loss of footing and control.
a. In areaA:
t.) Undercut l /3 of the way throughthe log
2.) Finishwith an overcut.
b. In areaB:
"{.) Overcut, 1/3of the waythrough thelog.
2.) F_nishwith an undercut.
lAI
2nd CUT
5. BUCKING-USING A STAND (Figure 31):
a. In areaA:
I.) Undercut 1/3 of the way throughthe log.
2.) Finish with an overcut.
b. in area B:
1.) Overcut 1/3ofthewaythroughthelog.
2.) Finish with an undercut.
-
i
ii IIIIHiii
HHHHH=. IM I
.
=
,
_
Imi]H ,
D.
e Work slowly, keeping both hands on the saw
with a firm grip. Maintain secure footing and bal• ante.
• • Watch out for springpoles. Use extreme caution
when cutting small size limbs. Slender materia!
can catch the saw chain and be whipped toward
you or pullyou offbalance.
• Be alert for springback. Watch out for branches
that are bent or under pressure as you are cuing
to avoid being struck by the branch orthe saw when
the tension inthe wood fibe_,_isreleased.
• Keep a clear work area. Frequently clear branches out of the way to avoid tripping over them.
.j
_ WARNING
I Never climb into a tree to debranch or prune, Do not
_ stand on ladders, platforms, a log or in any position
| which can cause you to tose your balance or contrel of
| the saw.
16
1st
CUT
,B
1st CUT
2nd
CUT
.......
,, ,,
I Al
CUT
1st
CUT
i, illll
Figure31
HHHHH
=
WARNING
Be alert for and guard against kickback. Do not allow
the moving chain to contact any other branches or
objectsatthe nose of the guide barwhen debranching
or pruning, Allowing such contact can result in serious
personalinjury.
J
USE COMMON SENSE
MAINTAIN SECURE FOOTING
1. DEE=RANCHING
1.) Underc0t 1/3 of the way'through the limb
nearthe trunkof the tree.
2.) Finish with an overcut farther out from the
trunk.
3.) Keep out of the way ofthefallinglimb.
4.) Cut the stump flush near the trunkof the
tree.
a. Always debranch a tree after it is cut down.
Only then can debranchingbe done safelyand
properly.
b. Leavethelargerlowerlimbstosupportthe
tree as you work,
c. Start at the base of the felled tree and work
towards the top, cuffing [0ranches and
limbs. Remove small limbs with one cut. Figure32.
d. Keep the tree between you and the chain.
Cut from the side of the tree opposite the
branch you are cutting_
e. Remove larger, supporting branches with
the 113,2/3 cutting techniques described in
the bucking section.
1.) Start with an undercut.
2.) Finish with an overcut.
f. Always use an overcut to cut small and
freely hanging limbs. Undercutting could
cause limbsto fall and pinchthe saw.
2. PRUNING
Remove
small limbs
with one cuL
Figure32
a. Limit pruning to limbs shoulder he_ht or
below. Do notcut if branches are higher than
your shoulder. Get a professional to do the
job.
It
FIRSTPRUNINGCUT
b. Refer to Figure 33 for the pruning technique.
, ,, L
i,
i i
iiiiiiiiiiiiiiiiiiii
Figure33
i i
.
i
"
ii
iiiii1,,1111
iii i
i
i
•
MAINTENANCE
• Check the saw for loose bolts, screws, nuts
and fittings reguladyo Loose fasteners cari
cause an unsafe condition as well as damage
to your saw.
A good maintenance program of regular inspection and care wil_ increase the service life and
help to maintain the safety and performance of
your saw.
e Mpke all adjustments or repairs (except car.
buretor adjustments) with:
.spark plug wire disconnected
--engine cool as opposed to a unit that has
JUst been run.
,,,,H
:A.
GUIDE
i
BAR AND
,
.
,,J
i,,,_
_i.
_,,,,,
I
CHAIN
• increase the service life of your Guide Bar and
Chain by:
_Using the saw properly and as recommended
in this manual
-- Maintaining correct Chain Tension. See "Chain
• Tension" section.
--Proper lubrication. See "Bar and Chain Lubdcant:'
--I_egular
maintenance as described in this
section.
1. CHAIN MAINTENANCE
e Sharpen the chain when:
--wood chips are small and powdery. Wood
chips made by the saw chain should be
about the size of the teeth of the chain.
--saw has to be forced through the cut.
•--saw cuts to one side.
_IIbWARNING
Have all chain saw service (otherthan the items listed
inthemaintenanco section of this manual) performed
by your Sears Service Center.
_..:
.
ii
IIH
mllm
HI
.........
_CAUTtON:} Always wear gloves when handling
the chain. The chain is sharp enough to cut you
even though it is too dull to Cut wood,
a. SHARPENING INSTRUCTIONS Model 358.355061 (for Model 358.355071, see
"Using the Power sharp s System.")
Items required:
Gloves
5/32" dia. file
6" file holder
Flat file.
Depth Gauge Tool
1.) Stop engine.
2.) Adjust the chain for proper tension, see
"Chain Tension"section.
3.) Work at the midpoint of the bar, moving
the chain fol'ward by hand aS each cutter is filed.
4-/
t#
4 .) Sharpen cutters.
a.)Position
fiat side of file holder (with
5!32 "roundfile)oncuttertopplateand depth
gauge.Figure34.
b.) Hold thefileholder level withthe 30° guide
mark parallel to the center of the chain.
Figure 35c. ) File from inside toward outside of cutter,
straightacross,onforward strokeonly.Use
2 or 3 strokesper cuttingedge. Figure 35.
d. ) Keepal!cuttersthe same length.Figure36.
e. ) Fi]eenoughtommoveanydamagetocutting
edge(side&top Plate)of cutter.Figure 36.
f.) File91SGchaintomeet_tions
shown
in Figure37..
SUPPORT
ROUND
FLAT
s,D
OF FILE HOLDER
_r-l\
,Y
,LE
SIDE PLATE
Figure34
KEEP 30" MARK
PARALLEL
TO
THE CENTER OF
THE GUIDE
BAR
_1_WARNING
Maintain the proper hook angle according to the
manufacturer's
specification for the chain you are
using. Improperhookanglewillincreasethechanceof
kickback which can resuR in serious personal injury,
, Figures 37& 39,
:
Figure35
i
I
CUTTERS
•
5, ) Correct Depth Gauges
a.) Place depthgauge tool(Catalog No.
71-36557)overeachcutter depth
gauge. Figure38.
b. ) File levelwiththe fiat file ifdepth
gauge ishigherthanthe depthgauge
tool.
c. ) Maintainroundedfrontcomer of
depthgaugewitha flat file. Figure38 & 39.
REMOVE DAMAGE
_MELENGt'H
l
I
t
I
SlOE PLATE
TOP PLATE
Figure36
NOTE: The very top of the depthgauge should be fiat wit_
the front half rounded off with a flat file.
"
,_WARNING
Depth gauge tool is required to insure proper depth
gauge, Filing the depth gauge too deep will Increase
the chance of kickback which can result in serious
personal Injury.
b, CHAIN REPLACEMENT
• 1.) UseonlytheLow.KickChainspecifiedfor
yoursawin"Specificat_ons;, for replacement chain.
2.) Replace the chain when cqtters or links
break.
3.) See your Sears Service Center to replace
and sharpen individual cutters for matching your chain.
4.) Always have a worn sprocket replaced by
your Sears Service Center when installing
a new chain to avoid excessive wear to the
chain.
2. GUIDE BAR MAINTENANCE
• Conditions which can require guide bar
maintenance:
--saw cuts to one side
--saw has to be forced thro.ugh a _t
_inadequate
supply of oil to bar and
chain,
• Check the condition of the guide bar each
time the chain is sharpened. A worn guide
bar will damage the chain, and make cutting more difficult.
': ! Replace the guide bar when:
--the inside groove of the guide bar rails is
worn.
--the guide bar is bentor cracked.
,30
{oLol\(,,o
oj\
Figure 37
Figure 38
HOOK
ANGLE
TOO
.025
MUCH
SQUARED
H
HOOK
ANGLE_.a_
OFF
CORNER
ORNER
RIGHT WAY
WRONG WAY
Figure 39
(REMOVE
SAWDUST
FROM
GUIDE BAR GROOV E
Figure40
• Use only the ReducediKickback Guide'Bar
specified for your saw in "Specifications"
for
replacement.
& Remove the guide bar to service.
b. Clean oil holes at least once for eactl
five hours of operation.
c. Remove sawdust from the guide bar
groove periodically with a putty knife or
a wire. Figure40.
d, Remove burrs by tiling the side edges
of the guide bar grooves Square with a
fiat file, Figure 41o
Si
Restore square edges to an uneven rail
top by filing w_th a flat file. Figure 41,
j
Co.R CT 1 I
GUJOE
BA. WORN
GROOVES
GROOVE
FILE EDGES
SQUARE
Figure41
AIR FILTER
• A dirty air filter:.
--reduces cutting power
--increases fuel consumption
• Clean the air filter:
--Frequently, especially under very dusty
conditions.
_Always after 10 tanks of fuel mixture or 5
hours of operation whichever is less.
[CAUTION:INever operate the unit without the air
filter in place to avoid engine damage.
1, Clean off the carburetor cover and the area
around it to keep dirt and sawdust from falling into the carburetor chamber when the
cover is removed.
2. Remove the carburetor cover screws and carburetor cover. Figure42.
3. Putt out the air filter.
4. Wash the filter in soap and water.
NOTE: Be careful when replacing the carburetor cover as incorrect placement will
prevent the choke from working properly.
9. Move the choke knob all the way to the right.
10. Check the choke shutter to be sure it is
closed. Figure 51.
11. Reinstall the carburetor cover and tighten
the carburetor cover screws.
12. Check the operation of the _hoke.
NOTE: If the choke knob sticks or will not
move, remove the cover and repeat steps
11 and 12 above.
=
i
=',, ,t ,u
P_.ARBURETOR
SCREW
CARBURETOR
COVER
AIR
FILTER
_J_UT|ONJ: Do not use gasoline 0rother flammable liquid to clean the fi|ter to avoid creating a fire
hazard.
CHOKE SHUTTER
5. Squeeze the filter dry.
6, Add a small amount of oil to coat the filter.
NOTE: Avoid soaking the filter with oil
7. Squeeze out excess oil,
8. Replace filter by tucking in edges and
smoothing it flush with the carburetor housing.
Figure42
C, SPARK ARRESTOR
BAFFLE
• Carbon deposits build up on the spark arrestor, as thesaw is usedand mustbe removed to
avoidcreating a fire hazard or causing engine damage.
• Replace the spark arrestor if breaksoccur.
• Keepthesparkarrestorcleanatalltimes.
Clean:
-.as required
--at least once for each 25-30 hoursof operation
Items required: wire brush, 3t8" wrench
SPARK
AF_R_,_TOR
_;_R _---_N
Rgure 43
1. Disconnect thespark #up wire,
2, Remove theMufflerCover. Figure 43.
3. Remove thescreen from the diffuser..
4,Clean thescreen with a wire brush or replace if
5. breaks are found.
Reas.,_m ble parts.
k
k
19
.......
,,,,,_
D.
STARTER
ROPE
• Replace a starter rope that breaks.
i
REMOVE
FAN HOUSING
SCREWS
_WARNING
Always weareye protection when servicing the starter rope. The recoil spring
beneath the pulleyis undertension. If the
spring pops out, serious personal injury
can result.
NOTE: The recoil spring, locatedbeneaththepulley,
is undertension,if spring pops out, it will require
considerable timeandeffortto reinstall. Forthis
• reason, you may want to let your Sears Service
Center handlethis repair.If youdo tryto repairthe
starter ropeand therecoilspringpopsout,takethe
saw toyour Seam Service Center.
Drain the fuel tank,
2. Remove the fan housingscrewon the bottom6f_he
saw and thetwoscrewson thesideofthe fanhOL_Sing,
Use the hexwrenchprovidedwiththetool.Figure45°
3_
Remove the large screw at the rear of the
control handle and the small screw directly
below it, Figure46.
4_
Separate the fan housing from the engine.
5. If the starterrope is not broken,releasethe spring
tension by pullingabout10 inchesof ropefromthe
pulley and catchthe rope in the notchas shown.
Figure 47.Remove oldrope.
Figure 45
REMOVE CONTROL
HANDLE
1.
Figure 46
NOTE: The tension on the starterspring w_l be
reteased ifthe ropeis broken,
& Remove screwand pulleyverycarefully.Figure48.
The recoil spdng which lies beneath the pulley
must stay in the housing, fiat against the bottom. Ifthespring isdisturbed, itwili require considerable time and effort to reinstall. Twistthe
pulleygenttycountemloc_wise_as
yoUpullup
to release the spring.
7. Move away from the fuel tank with,the rope to be
instal/_. Useam_dchandmeltboth endsoftherope
to preventfraying.
& Pull the melted endsthrough a thick, clean rag while
the rope isstill hot toobtain smooth,pointedtips.
9. Insert one end of the rope through the handle and
secure with a knot. Leave 3/!6" pigtail behind knot.
Figure 47 (inset).
10. insertthe free end ofthe rope through the mpo exit
hole intothe insideof the fanhousing.
11. Guide ropeinside pulley,then upthrough tl'_ pulley
ratchetside ofpulleyholetothe outsidebypushing
tfie rel_etfirOugh from the hole on the spring cam
side with a small Phillips_rewdriver, Figure48.
• 12. Wrap rope counterclockwise_
aroundpulley
ratchetand tucklooseend back underropeleaving
a 318 to 3/4 inch tail along the ridge as shown in
Figure 48, Putltightly,
l& Wind all but about 10 inches of the rope clockwise _
aroundthe pulley,
Figure 47
Figure 48
i
.11
,
_. ....
i
.
14. Repfacepuflayinthe hdusing.Be _ure the pulleyis
all the way down and the spring is secured.
15. Replace and tighten pulfey screw. Figure48,
16. Holdthe t0inchslackinthe mpe and catchrope in
pulley"notch. Figure49.
17. Ho_dtheropetautandmake2completetumsofthe
pulley clockwise _
to place tension on the
pulley. Hold the pulley to retaintension.
lB. Align pulleynotchwithrope exit hole,puUst_ter handte tothe full extentof the rope and allowtheropeto
slowly windaround the pulley.
19. Reinstallthefanhousing.
_J
.-"
Fig ure49
..............
E. CARBURETOR
,,,,,,,, ,,
ADJUSTMENTS
CHOKE CLOSED
• The carburetorhas beenadjustedat thefactoryforsea
/evel€ondi_on_Adjustmentsmay become necessary
if thesaw is used at significantly
higheraltitudes or if
you notice any of the following conditions.
HiGH SPEED
MIX SCREW
NOTE: Be sure to properly prepare the saw as
describedin "1, Preparation;'below beforemaking
any adjustments.
Chain moves when the engine runs at idle
speed. See"2. Idle Speed Adjustment."
Saw will not idle. See "2. Idle Speed Adjustment" and"3. Low Speed Mixture Adjustment.
-- Lossofcutting power which is not corrected by
air filter cleaning. "See "5. High Speed Mixture
Adjustment."
Engine dies or hesitates when it should accelerate. See "4. Acceleration Adjustment."
t CAUTION: t Permanent damage will occur to any
2-cycle engine if incorrect carburetor adjustments are made.
•
i
If the engine will not operate propertyaffer makingthese adjustments, lake the saw to yourSears
Service Center.
LOW SPEED
MIX SCREW
IDLE SPEED
SCREW
Figure 50
2. IDLE SPEED ADJUSTMENT
a. Allow engine to idle.
b. AdjustIdle Speed Screw untilengine continues:o
run_thout stailing and wff'noutthechaJnmoving,
Turn screw clockwise _
to increa._-e
engine speed ff engine stalls dr dies.
-- Tui'nscrew counterclockwise _
to sk,w
engine down and/or to keep the chain from,
turning.
•c. No further adjustments are necessary if the
chain does not move at idlespeed and if performance is satisfactory.
WARNING
cedure. Wearyour protectivegearand follow allsafety
l instructions,
The chain may be moving during most of this pro-
1. PREPARATION
a. Stop engine,
b. Use a fresh fuel mixture with proper gasoline/
oil ratio,
c, Pl_ce the saw on a solid, ftatsurfaceaqd m_',esu_
the chain will notcontact any object.
d. Remove the carburetor cover screws and
•carburetor cover (Figure42) and locate the
three (3) carburetor adjusting screws. Figure 50.
e. Starttheengineandaltowenginetoidle3minutes
to warm UP. The engine must be at operating
temperature for proper adjustments to be made.
Recheckidlespeed after each adjustment below. The
chain must not move at idle speed toavoid seriouspersonal injury.
3, LOW SPEED MIXTURE ADJUSTMENT
a. Allow engine to idle.
b Turn the Low Speed Mixture Screw sf0wty
clockwise _
until the RPM starts to drop
Note the pesition.
c. TurntheLowSpeedMixtureSc rewcounterCtock°
wise _
unti! the RPM speeds up and sta,'ts
todrop again. Note the position.
d. Set the Low Speed Mixture Screw at the rn,dpoint between the two pesitions.
4. ACCELERATION ADJUSTMENT
ffengine dies or hesitates instead of accelerating, turn
the Low Speed Mixture Screw It16 ofa turn ata time
_unterclockwise
_
until you have smooth
acceleration.
".
21
5. HIGH SPEED_MIXTURE ADJUSTMENT
CAUTION: i Adjustments as smafl as lf16 of a
turn can affect engine performance, it is important to turn the screwonly i/16 of a turn per adjustment and test the perfo rmanceof the saw before
making further adjustments.
LCAU]'ION:.] Atoo lea, high speed setting(clockwise _
adjustment)will©auseenginedamage to any 2-cycle engine from overheating and
lack of lubrication. Never set the highspeed mixturescmwso fardockwise
_
thatyou have
high engine speed but lack power while cutting.
An effective approach follows:
a. Make a test cut.
b, Adjustthe High Speed Mixture Screw 1;t6o_a_urn
as follows:
Turn screw countemlockwise _
engine (oses power while cutting.
-- C_(_ckwise_
ifsawsmokesorIosespoweT
-- Counterclockwise _
if the saw has speed
outof the cut butlacks powerin the cut
¢ Repeat test cut
Then, turn screw clockwise _
in 1/16of a
turn increments only until the engine has
power while cutting.
NOTE: If the saw will hot operate properly after
making theseadjustments,raisethe saw toyour
Sears Service Center,
d. Continu_ 1/16ofa turn adjustments until the saw
runs smoothlyin cut.
"_":.
F.
_
iiiiiiiiiiiiiiiii
Jl
_ "
•
•
.............
•
•
i/ i
illl.
i,illi,i
i
ill
iii
iiiii iii iiii
m
ii
STORAGE
When your saw is to be stored for over 30 days,
always:
1.
2.
3.
4.
5,
Drainoil tank.
Remove, clean, and dry,the bar and chain.
Store the chain in a container filled with oil
to prevent rust.
6. Apply a coating of oii to the entire surface of
the bar and wrap it in heavy paper, cloth or
plastic.
7. Clean the outside surfaces of the engine.
8. Store the saw in adtyplace, outof the reach
of children, and away from where fuel vapors
can reach open flames from hot water heater,
furnaces, etc.
Drainfuel tankin a safemanner. (See "Fueling Your
Engine:')
Startengine _nd aflowto runat _le speed unttlthe
engine stops.
NOTE; This will remove most of the fuel from
the fue! system.
C__
Wear protective gloves when hart.
dling the chain. The chain is sharp and can
cut you even when it is not moving,
,,.
I
G.
until
MAINTENANCE
,,
I
Ill ,I,I
,,,.I
"L
NH H_I IH
I
I
I I
IlL
...... _
--
.
I
I ,l!l
,,,i
ACCESSORIES
Key
•No.
2
3
4
5
;f
Part
No.
STD360946
31059
4
v
Avallablethmugh your nearest Sears Store, Catalog Sales Office,or Service Center, but may not be furnished
. with your saw.
Catalog
No.
7! -36403
71-36524
71-36565
71-36557
73-3629
71-3631
71-36620
71-36555
7! -36554
71,.36556
71-36366
Spark
Plug
Wrench
p
Jg-Champion
CJ-8
_
File (5;32"dia,) TwinPack
File Guide
Depth Gauge Toot
ReplacementXtra GUARD® Chain (358.355061-2.3/16")
Replacement PowerSharp® Chain{358255071_2.3116"p.S.)-_
incLSt0ne and Carrier Ass'y.
Carrying Case
2_CycteEngine Oil
BarandChainLubriC_nt
_
1quart
Bar and Chain Lubricant _ 1 gallon
Guide Bar- Lo-Kick _
, ,
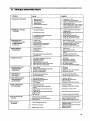
H.
TROUBLE
SHOOTING
CHART
[
TROUBLE
CAUSE
REMEDY
ENGINE
1.
2,
3.
4.
5.
t.
2.
3.
4,
5.
,,,,,
WILL NOT START
ENGINE WILL NOT IDLE
Ignition Switch off.
Fuet tank emptt.
SpankPlug notfiring.
Engine flooded.
Fuelnotreaehingcarburetor,
6. Compression few.
MoveSwitch to "'S_art."
Filltank with cOrreCtfuel mixture.
Install new plugloheek ignition system.
See Sta_ng Instructions.
Check for dir_.,,fuel fil_er:clean_Cheek f0
kinked or split fuel line: repair Orreplace.
6, Contact yourSears Se_ice Center:
I. Idle Speed set too low.
1,
PROPERLY
2.
IdleSpeedset
& Low speed screw requires adjustment
4. Crankshaft seals worn.
& Compressioh iow.
..... ,
ENGINE WILL NOT
ACCELERATE. LACKS
POWER OR DIES
tN THE CUT
I.
2.
3.
4.
5.
ENGINE SMOKES
EXCESSIVELY
1. Choke partia!lyen,
2, Air filter dirt F
& Oil rich fuelmixture.
idle
speed
screw
cloct_wise
to
3.
4
5
inccease speed.
-Adjustidle speed screweeunterdockw=s
to reduce speed.
See Carburetor Adjustments,
Contac't your Sears Sewice Center.
Contactyour Sears Service Center.
t
2.
3,
4.
5.
"Cleanorreplacea_rfil_er.
Ctean or replace Spark Plug and regap
Contac_ your Sears Service Center.
See C_rburetor Adjust ments.
ContsctyourSeareServ',,ceCente_
2.
too high.
AdjuSt
.......................
w
Air filter is dirly.
Spark plug fouled.
Carbon build-up on exhaustports.
Carburetorrequiresadjustment
L_._;Comp,.'Cssfon,
4. Hi9 h speed needle requires a_us_ment
5. Crankcase ]'eak,
1. Push Choke in.
2. Clean or replace air filter.
3. Empty fuel tank and refilf with correct fuel
mixture.
4. See Carburetor Ad!ustments.
5. Contact your Sears ServiceCente_
1.
2.
3.
4.
5.
6.
Pea Housing didyt_ylinderfins ditty.
Fuel Mixture incorrect
Spark Plug incorrect.
High Speed Mixture set too low.
Carbon buitd-upon spark arrestor screen
Carbon build-up on exhaust ports.
I, Clean area.
2, See Engine Fue,_Mixture.
3. Replace with correct plug.
4. SeeCa_uretorAdjustmenEs
5. See "Spark Arrestor'"
6 Contact your Sears Se_vlCeCente_
OIL INADEQUATE FOR
BAR AND CHAIN
LUBRICATION
1.
2.
3.
4.
Oil tankempty.
Imprepedyadjustedoile_(if$oequlpped.)
Oi| pump or oMilter _ed,
Guidebaro_lholeblocked,
1.
2.
3.
4.
CHAIN MOVES AT
IDLE SPEED
1. Idlespeedrequiresadjustment.
2, Clutch requires repai_.
1. Sea Ca_uretor AdjuSt meets.
2. Contact your Sears Service Cente_
1.
2,
3.
4.
1,
2.
3.
4.
ENGINE
RUNS HOT
C INOOE;
NOT
MOVE
WHEN ENGINEIS
ACCELEF_TED
Chain tension too tight.
Carburetor requiresadjustment.
Guide bar rails pinched,
Clutch slipping.
1. Chain tension incur/act.
2. Curlers damaged after striking foreign
material.
3. Chainwearduetoeontactwithdirt. sand
or frozen wood.
4. Cuttersdulf.impropedysharpened;depth
gauges too high,
5. Sprocketworn.
CUTS ROUGHLY
...............
CHAIN STOPS WITHIN
THE CUT
......,J
...........
J
CHAIN CUTS AT
AN ANGLE
,
,,,
FIll oiltank.
Adjustoiler.
ContactyourSearsServioeCenter.
Remove bar and c_an.
See Chain Tenmon.
SeeCarburetorAdjustments.
Repair or'replace.
ContactyourSearsServiceCenter.
I, See Chain Tension,
2. Contact your Seare Service Center.
3. Resharpen
or repiace
chain.
4. SeeChain Sharpening Instruct{on s
5. Contact your Sears Servlce Center.
,,
I. Chain cutter lopsnot filed flat.
2. Guidebarburredorbenl:railsu_even.
3 Olut_l_ s_i_ng,
I, SeeChain Sharpening Instructions.
2. Repair or replace Guide Bar,
3. C_n_et-_,._' Se_r'_ SerVice Center.
1. Cutters damaged on one side.
1. Resharpen until all cutters have _='q
u a!
angles and lengths.
F1esharpenuntil
all
cutters
have equa[
angles and _engths.
Replace guide bar.
,
2. Chain duff or=one side.
3. Guide bar bent, or worn.
23
i
'
......................
.
!. IWAINI"ENA'NCeCHAWr
inl
i ii
i
,,,,,, i
i i
= _
ti°
_O
Visuaf inspection (condition, leaks)
Complete machine
Crean
ThrOtttofrogger,safety IhrottLetock, stop switch
I I
Check operation
'i!
C_an Felt
F=iterm fuel tank
Replecepk:k-up-- when clogged _'dirty
Fuel tank
Clean
Chain orl tank
,!C_ah
Chain lubncatlon
' Check
inspect(sharpness, wear, damage)
Sawcham
Check chain tenmon
Sharpen --when
dull
Inspect (wear. damage}
x
Clean
Lubricate sprocket nose
Deburr
Replace--when
worn or damaged
Check
Clean
Replace _ when worn or damaged
Clean
Ctean
x
Check idle a_u_mentchain must not turn
Readjust idle i
Replace-- when fouled ordamaged
Spark plug
:
AIJaccessiblescrew_ and nuts
(not adiusting screws)
when cha_ turns at.idte
i
Re_ghten
Inspect{tear_ rip_ separat_n, out-of-round)
Replace * when necessary
C,_an -- when clOgged or dirtyReplace -- when worn or damaged
X
SEARS
C_IAIN SAW REPAIR
PARTS - MODEL
NO. 358.355061-2.3/16"AV
Key
No. _
101
1
2
3
4
5
6
Part
No.
STD541431
530-015623
530-012131
530=025259
530-015474
530-015463
Description
Nut
Screw
Bar Clamp Hsg.
Muffler shield
Screw
Screw
3
Decals
101
530-026864-
SEARS CHAIN SAW REPAIR
102
530-026866
103
530-026868
PARTS - MODEL NO. 358.355071-2.3116"AV
Key
No.
101-__
_10
".._'7"-__
iI
102
__
_
_--104
103 "_r-'--"Y-101
Part
No.
PS
Descr_tion
1 STD54143I
2 530-015623
3 530-023762
4 530-023761
5 530--023759
6 530-012132
7 530-069027
Nut
Screw
Spring
Washer
Knob Sharpening
Bar Clamp Hsg.
Sharpening Stone Arm
8
9
STD511002
530-069026
10
11
12
530-025259
530-015474
530-015463
Screw
Stone & Carrier Ass'y.
(IncL #8)
Muffler Shield
Screw
Screw
Ass'y. (race #9)
'Ni2
i
Bar Clamp Hsg.Decal
Lnstructions
Decal
(Left Hal o
In_%ructlons Decal
(Right Hal o
2
Deca_
101 530-026864
!02 530-026866
Bar Clamp Housing Decal
Instructions Decal (Left
Hal0
103
530-025531
104 530-026869
Sharpening Instructions
Decal
Instruction Deca! (Right
Half)
25
SEARS CHAIN SAW REPAIR PARTS - MODEL NO. 358.355061-2.3/16"AV
is
;
358.355071-2.3/16"AV
PS
61
46
48
I
20
25
54
[
Chain
Repair
Kit
63
73
#5
64
o11
Engine
Gasket
page 28 t Kit
1
77
\
\
Clutch Drum
and Sprocket
for Model
358.355071
'66
j
1-49
65
6O
51-?
26
SEARSCHAIN
Key
No.
I
2
3
4
Pan
No.
7
8
9
STD541408
530-023492
530-015236
71=36366
530-069166
530-069167
530-023792
530-015642
530-010469
10
530-069142
11
12
13
14
15
t6
I7
18
19
20
21
22
23
24
25
26
27
32
36
37
38
39
40
"530-019.059
• 530-019089
530-069193
530-069197
STD510805
530-023802
• 530-019091
• 530-023801
530-010195
530-032029
•530-022172
530-021026
• 41
530-032079
530-023519
530-032065
530-023887
530-031112
530-010221
STDSll015
530-023795
530-023843
530-015486
530--032075
530-010474
PARTS - MODEL NO. 358.355061-2.3/16"
358.355071-2.3/16"
Description
71-3629
71-363!
5
6
SAW REPAIR
Lockout
Bar Adjust. Pin
Screw
Chain 16"
358.355061
358.355071
(Ind. Stone &.Carrier Ass'y.)
Bar 16" S.N. Guide
Clutch Dram & Bearing Kit (Incl.
#23)
358.355061
358.355071
Oil Tank Vent Pin
Bar Mtg. Stud
Crankcase Ass'y. (Incl. #
1,2,3,7,8,10,11,12
& 20)
Check Valve Kit.Off Tank Press'_'_ (Knot. #!2)
Crankshaft Seal
Check Valve Gasket
Clutch Ass'y Kit (Incl. Washer)
Clutch Washer Kit (Outside)
Screw
Metering Body (;over
Metering Body Gasket
Oil Filter
Metering Body Ass'y.
Crankshaft Bearing
Crankshaft
Oil Discharge Line
Clutch Bearing
Clutch Spacer (Inside)
Roller Bearing (tad. ,12 bearings)
Thrust Washer
Clutch Tool - Optional
Oi! Cap Ass'y. (Incl. "O" Ring)
Screw
Muffler Cover
Piston Ring Retainer
Washer
Bearing Rod(Top)
(Incl. 22 Bearings)
Connecting Rod Kit (Incl. #39 &
.4O)
Key
No.
42
43
44
45
46
47
48
Description
530-0 t555 !
530-025689
STD551010
530-015557
"530-023535
530-023796
530-010588
49
530-0154f_6
50
530-027687
51
STD522505
52
STD51t005
53 * 530-019139
54
530-02587"655
530-024236
56
530-023786
57
STD511007
58
530-015499
59
STD551025
60
530-026163
61.
530-023797
62
530-023794
63
530-023787
64
STD610805
65
530-024256
.66
530-025451
67 530-015342
68
STD360946
....
.,,,
69
530--012065
70
530-015239
71
530-030054
72
73
530-031063
530-052023
74
75
76
77
530-025675
530-015531
530-015343
530-069022
"
Screw
Lower Isolator Bracket
Washer
Screw
Spacer
Spark Arrestor Screen
Piston SAt (Incl. #38,54 &
pin)
Bolt
Rear Isolator Bracket
Screw
Screw
Cylinder Gasket
Piston Ping
Switch Knob Ass'y.
Switch Ramp
Screw
Screw
Washer
Isolator Cup
Muffler Baffle
Muffler Body
Switch Clamp
Screw
Isolator
Handguard
Spacer
Spark Plug-C J-8
Cylinder
Screw
Crankcase Sealant (Op-tional)
Bar Adjusting Tool
Chain Repair Kit
(358.355061 only)
Handlebar w/Insert
Washer
Spacer
Engine Gasket Kit (*Indicares Contents)
Decals
•101
-
*Indicates Contents
Part
No.
AV
AV PS
530-026849
530-026550
Handguard Decal
Chain Tensioning Decal
.Not Shown
of Engine Gasket Kit, Key No. 77.
27
SEARS CHAIN SAWREPAIR
PARTS - MODEL
NO. 358.355061-2.3/16"AV
358.355071-2.3/16"AV
PS
21
34
64
!2
t3
I
66
,J,
39
,
,.,,
Manual
_ 70
4O
4t
42
43
22
69
I01
"_
_
17
15
SEARS CHAIN SAW REPAIR
Key
No.
1
2
3
4
5
6
Part
No.
PARTS-
Description
Flywheel Key
Flywheel Ass'y. (Incl. #15)
Spark Plug Boot
Spark Plug Connector
Switch Lead
Ignition Module Kit (Incl. #5
& 14)
7
STD510807
Screw
8
530-025691
Choke Knob
9
530-025676
Carburetor Cover
10
530-015168
Screw
!1
530-015147
Wave Washer
12
530-023806
Choke Lever
13
STD600603
Screw
14
530-039082
Spark Plug Lead Ass'y.
(Ind. #3 & 4)
15
530-023817
Starter Dog Spring
16
STD541131
Nut
17
530-015127
Washer
18
530-001648
Screw
19
530-015524
Screw
20
530-025679
Upper Isolator Bracket
21
530-024317
Isolator Pad
22
STDSt I005
Screw
23
530-015123
Washer
24
530-069200
Pulley Replacement Kit (Incl.
#23,55 & 56)
25
530-042023
Starter Spring
26
530-035181
Carburetor-WT-20
27
530-023791
Air Filter
28
STD512507
Screw
29
530-025487
Air Intake Baffle
30
STD600803
Screw
31
530-069251
Fan tisg. Kit
32
530-015342
Spacer
33
530-026163
Isolator Cup
34
530-024256
Isolator
35
530-0152_5
Screw
36
530-023865
Spacer
37
530-023805
ChOke Shutter
38
530-015254
Wave Washer
39
530-025978
. Carburetor Hsg.
*Indicates
:
530-015126
530-039111
530-003934
530-003933
530-039116
530-069202
Contems of Engine Gasket
MODEL/ 0
Key
No,
3 8.3iS5661-2.3/16
358.355071-2.3/16"
Part
No.
40
41
42
43
44
45
46
47
48
49
50
51
*530-019118
530-023366
530-023367
STD610603
530-069216
"530-023373
,530-019045
530-091878
530-015528
530-025683
530--025685
530--010729
53
54
*530-019093
530-010772
55
56
57
58
59
60
61
62
63
64
65
66
68
530-026735
530-069232
530-015650
530--015649
STD541425
530-025686
530-025687
530-015533
530-025682
530-025684
530-025681
530-015495
530-069199
69
70
530-031111
530-066646
Decals
101
102
530-026473
530-026879
530-026880
'' AV
AV PS
Description
Curb. Hsg. Gasket
Reed Valve
Washer
Screw
Line Kit
Throttle Wire Boot
Carburetor Gasket
FueI Pick-up Ass'y.
Washer
_Throttle Trigger
Throttle Wire
Fuel Cap Ass'y. (Incl. "O"
Ring)
Seat
FJael Tank Ass'y. (Ind.
#44,47,51 & 53)
Starter Handle
Rope Kit
Screw
Screw
Lock.nut
Trigger Spring
Spring Throttle Lockout Lever
Screw
Pear Handle (Right)
Throttle Lockout Lever
Rear Handle (Left)
Screw
Fan Hsg. Screws Kit (Incl.
#57,58, and 69 this page;
and #2, page 26.)
Hex Wrench
Operator's Manual
Fan ttsg. Decal
Replacement Bar & Chain Decal
358,355061
358.355071
Kit, Key No. 77, page 27.
.
29
SEARS CHAIN SAW REPAIR
Carburetor
Part No.
PARTS - MODEL NO. 358.355061-2.3/16"
358.355071-2.3116"
Assembly
530--035181
J
Repair ]
arb.
[
_at
[
I
28
Gasket
Carb.
Kit
F
29
Key
i No.
Part
No.
t
530-035006
2
530-035015
3
530-035034
4
530-035024
5
53O-O35171
6
530-03502-8
'7
530-O85169
8
530-O35167
9 * 530-085162
10 * 580-O35163
11
530-035017
12
530-035159
!3
530-035035
14
530-035168
15 ÷* 530-0351_4
Key
No.
Description
Valve
Throttle
Screw
Throttle
Shaft Asffy 2
"
Throttle Return Spring
Low Speed MixtureNeedle
Low Speed ML_ure Needle Spring
High Speed Mixture Needle
High Speed Mixture Needle Spring
Plug5/16 Dia. Welch
Plug 1/4 Dim Welch
Screw
FueI Pump Cover
Part
No.
16
17
18
19
20
21
22
23
24
÷* 530--035166
530-035027
530-035007
* 530-085008
• 530-035188
* 530-035031
* 530-035028
* 530--035016
4*530-035165
25
26
+*530-035014
530-035003
27
530-035021
28
580-035161
29
580-035173
FuelPump Diaphragm
FuelInletScreen
Throttle Rethiner Ring.
Inlet Needle Valve
Metering Lever Spring
Metering Lever
Metering Lever Pin
Screw
Metering Diaphragm
Gasket
Metering Diaphragm
Metering Diaphragm
Cover
Screw"
IdleSpeed Adjusting Screw Spring
FuelPump Gasket
Description
Metering Cover Screw
Ass'y.
Carb. Repair Kit {In-
dudes Parts Marked*)
' 30 "
Curb.Gasket/Diaphragm
Kit (Includes
Parts
Marked +)
k"
:
AV
AV PS
QUICK REFERENCE PAGE
Read and follow all Warnings and Safety lnstructions.
Failure to do so can result in serious injury.
page
SAFETY RULES AND PRECAUTIONS ...........................................
PREPARATION
..............................................
1.
2.
3.
4.
5.
3, 4 &s
4
.................
Wear pers_na_pr_tec_vegear_gfoves; safe_yf_twear; snug _tting c_thing;and eye_headngand
head protection.
Check saw for worn, ioose missing or damaged parts and repair or replace if necessary.
Check the chain for sharpness and tension.
Keep chi{dmn,bystandersand anima/sa minimumof30 feet away from theworkare_.
Plan yoursawing
operation carefully in advance.
FUEL AND OIL .............................................................
1.
2.
3.
4.
5.
6,
Eliminate all sources of sparks or flame where fuel fs mixed, poured, or stored.
Use16 part..s
regutar, unleadedgasol{neto l partair.cooled, 2-cycleen_ne oil.
Use gasoline not over 2 months old.
Mix and pour fuel in an approved,marked o0ntsinerand in an outdoorarea.
Move a minimum of 10 feet away from fuel and fueling site beforestarting engine.
Fillthe oiltank each timethe fueltank isrefueled.
STARTING
1;
2.
3.
4.
5.
THE ENGINE
5.
6,
it
THE SAW .........................................................
11
Cut wood only.
Accelerate the engine to full throttle before entering the cut,
Begin cutting with the saw frame up against the tog.
Cut only at full throttle,
Release the trigger as soon as the cut is completed.
Stop the engine before setting the saw down after cutting.
MAINTENANCE
1.
2.
3.
4.
.......................................................
Hold saw firmly with the saw chain free to turn without making contact with any object.
Push saw away from you with your right hand while pulling the starter rope with your left hand.
Use tess than the rub extent of the starter rope per pull.
Pull rope no more than 5-6 times.
Release the trigger after engine starts allowing engine to idle.
OPERATING
1.
2.
3.
4.
5.
6.
9&1o
...............................................................
18
Adjust or have the carburetor adjusted if the chain moves when the engine idles.
Disconnect spark plug before performing maintenance except for carburetor adjustment.
Check the guide bar for wear each time the chain is sharpened.
Clean the air filter frequently and always after i0 tanks of fuel mixture or 5 hours of operation,
whichever is less.
Orain fuel tank in a safe manner beforestoringthe unit for 3Oor more days.
Store saw in a dry place out of the reach of children.
J
WATCH OUT FOR
....
!CKBAcK
,
,
NOT USE
THE SAW WHEN
IT NEEDS REPAIR
NEVER USE THE SAW
WHEN TIRED
USE A FIRM GRIP
WITH BOTH HANDS
J i ,H
,
,,i
i
31
The Model Number will be found under the handte with the Sedal
Number. Always mention the Model Number when requesting service or repair parts for your Chain Saw.
All parts listed herein may be ordered from any Sears Service Center
and most Sears Stores.
WHEN ORDERING
REPAIR PARTS, ALWAYS
GIVE
FOLLOWING INFORMATION AS SHOWN IN THIS LIST.
operator's
manual
,2,
THE
The PART NUMBER
3,
The PART DESCRIPTION
The MODEL NUMBER
4.
The NAME OF ITEM
Chain Saw
358.355061-2.3t16"AV
358,355071-2.3/16"AV
PS
If the parts you need are not stocked locally, your order will be
electronically
transmitted to a Sears Repair Parts Distribution
center for handling.
MODEL
358.3550612.3/16"AV
When you buy merchandise
from Sears you get an extra
something that nobody else
can offer ... Sears Service,
358.3550712.3/16" AV PS
Across town or across the
country, Sears Service follows
you, providing
trustworthy,
competent service technicians
using, only Sears specified
factory parts.
How tO Order
Repair Parts
SEARSSERVICE
Sears,
Roebuck
and
Co., Chi_,
IlL 60684
U.S._
PR|NT_
IN U.,_.A,