1
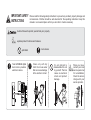
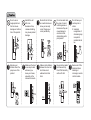
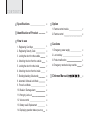
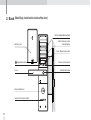
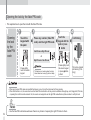
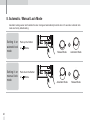
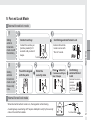
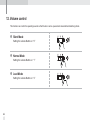
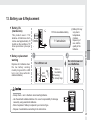
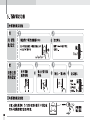
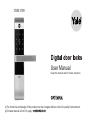
YDM 3109
User Manual
Keep this manual safe for future reference
※The functions and design of this product can be changed without notice for quality improvement.
※Chinese manual is from 33 page.
Ver. PMU-0904-01
Please read the following before using your Yale GATEMAN product
•This
product is designed and manufactured to assure personal safety. Improper use can result in personal damage or
property loss. Please observe the procedures for installation, use and servicing.
Yale GATEMAN is a precision electronic device. All safety and operating instructions should be read before the
•
product is operated.
•Refer
all servicing to qualified service personnel. Servicing is required when the product is damaged or to be re-installed.
•Check
your installation conditions with the local service provider before installation as your door prep might be different
from the standard this lock conforms with.
•The
products warranty does not cover defects or damages arising from the door defects, improper installation, lack of or
improper maintenance, improper storage, shipping and handling, ordinary wear and tear, misuse, abuse, accident,
unauthorized service or use with unauthorized service parts.
•Disassembly,
rework and reverse engineering are prohibited without a written approval of Yale except for a normal
installation of the product.
•The
trademarks, trade names, designs, copyright, patents and other proprietary right used on or embodied in the product
and this manual shall remain the exclusive property of the manufacturer, cannot be copied or used in any form without
the written authorization by Yale.
02
•Visit
our website www.yalelock.com for more information on the products.
•The
information in this manual is subject to change without notice.
IMPORTANT SAFETY
INSTRUCTIONS
Please read the following safety instructions to prevent any accident, property damage and
inconvenience. Children should be well educated for the operating instruction. Keep this
manual in a convenient place so that you can refer to it when necessary.
must be followed to protect yourself and your property.
explains product functions and features.
prohibited
Yale GATEMAN digital
door lock is a precision
electronic device.
must observe
Clean only with dry
cloth. Do not use water
that can cause damage
to the electronic circuit.
Do not attempt to
disassemble the unit
by yourself. That can
cause an electronic
shock and product
damage.
When you move,
contact your local
service personnel
for re-installation.
Check the service
charge with your
service provider.
Do not use an
inappropriate tool
that can cause
damage or malfunction of the product.
Handle the unit
with care.
Excessive force,
careless handling
may cause product
damage.
Be careful not to have
an unauthorized user
know your security
code. Change your
code periodically.
Do not use water and
any type of solvent
such as gasoline or
benzene as they can
cause damage to
electronic circuit,
deterioration and/or
paint peel-off.
Do not have your
card key lost or
stolen.
■ Immediate
re-registration of
all remaining keys
is required to
invalidate the lost
key.
Educate your
children about the
proper use of the
product.
Make sure the door
is securely locked
whenever you
leave your house,
especially in the
manual lock mode.
Make sure the distance
between the door and
door frame is not
widened more than
5mm.
Keep card key reader
part clean and dry.
Dust off dirt smoothly
with a soft cloth.
Remove all of the
batteries before
installing or
removing a remote
control module.
5mm
Overview
Proximity card identification
Safe handle
You can use your ISO 14443 A type RFID card such as credit
card or pass card as your card key.
Protects from any break-in attempts through the safe handle.
Triple access
Verification with the palm
The security code is verified by palm touching to randomize any
fingerprint residues on the keypad so protect from exposing it.
You can unlock the door by the card, the security code or the
mechanical key at your convenience. You do not need to worry
about accidental lockouts by losing or forgetting the key.
Emergency power supply
Easy re-registration of keys
When the batteries are completely discharged you can easily
supply emergency power to the lock with the 9V battery.
If you lose a key, you can invalidate the lost key by reregistering all other keys. You can register up to 40 card keys
to add users.
Anti-collision
Contacting multiple cards does not cause error to the lock. The
card key reader will recognize the card key among a pack of cards.
Volume control
You can change the volume. The break-in alarm still operates
even if the silent mode is on.
Forced lock mode
Easy and simple operation
Internal forced lock prevents anyone to unlock from the outside
and external forced lock makes only manual thumbturn
available to open the lock from the inside.
One-touch operation allows every user including children and
senior the simplest use.
Remote control
Automatic locking
You can use a remote control by installing the applicable
Remote control module. (This option may not be available
depending on your country or local dealer.)
Just closing the door will automatically lock the door. Manual
operation is also available.
Break-in / Damage alarm
80dB alarm will go off if anyone attempts to damage the lock or
forces the door open.
Smart Pad
Keypad displays functional operation with lighting.
Basic Operation
Please do remember below operation!
1. Card Key Registration
4. Unlocking the door from the outside
7. Volume control
① Contact Card key
Press
button Contact all the keys
you wish to register
on one by one
Press
button
② Wake up the lock with the palm touch, enter the
security code and retouch the lock with the palm.
① Mute : [Volume] Button
② Normal : [Volume] Button
2. Security Code Registration
③ Loud : [Volume] Button
Security Code
5. Automatic / Manual Lock Mode
Press
button Enter the security code Press
(6~12digits)
button
3. Locking the door from the outside
① The automatic Lock Sensor detects the door
closing and locks the door within 5 seconds, or
② Touch the keypad with palm for locking the
door in
[Manual Lock Mode]
8. Turning off the alarm
① Automatic Lock Mode :
Press [
] Button
① Contact the card key on [card key reader], or
② Manual Lock Mode :
Press [
] Button
② Enter the security code, or
③ Press and hold [
6. Forced Locking
① Forced Lock Mode from inside.
② Forced Lock Mode from outside.
or
Manual Lock Mode :
Press [
] Button.
With the
palm
Contact
5 seconds
Contact [ ]
3 seconds after put
security code
] button for 5 seconds
9. Emergency power supply
9V Battery can be
used to supply
electricity to the unit.
CONTENTS
Specifications
08
Identification of Product
09
How to use
Option
1. Remote control module
27
2. Remote control
28
Cautions
1. Registering Card Keys
11
2. Registering Security Code
13
1. Emergency power supply
30
3. Locking the door from the outside
14
2. Lost card key
31
4. Unlocking the door from the outside
15
3. Product malfunction
31
5. Locking the door from the inside
17
4. Emergency mechanical key override
32
6. Unlocking the door from the inside
17
7. Enabling/disabling Safe handle
18
Chinese Manual
33
8. Automatic / Manual Lock Mode
20
9. Forced Lock Mode
21
10. Break-in / Damage alarm
22
11. Wrong-try Lock-out
23
12. Volume control
24
13. Battery use & Replacement
25
14. Displaying operation status (Smart Pad)
26
Specifications
Parts
Specifications
Remarks
Front (Front Body)
68.6(W) x 306.6(H) x 27(D)(70.6)mm, Zinc die-casting
Back (Main Body)
72.8(W) x 306.6(H) x 37.0(D)(80.8), Flame-Retardant ABS, Zinc D/C
Operating temperature : -15~55℃ (5~131˚F)
Lever
Card Keys
Battery
Lock case
Option
Remote Control
Zinc die-casting
4 EA
Up to 40 keys (sold separately)
4EA 1.5V AA alkaline batteries (Operating voltage: 4.5 ~ 6 V)
Last up to 10 months (10 times used a day)
Steel and SUS304
Wireless
Optional
※Battery life may vary depending on temperature, moisture levels, frequency of use and the quality of the batteries.
※Please make sure that all parts are included when purchasing the product.
※Optional products may not be available depending on your country or local dealer.
■Basic Contents
■Option
• 4 Card keys
• Emergency keys
• Screws
• Installation Template
• 4 Batteries
• Users Manual
Front (Front Body)
08
Back (Main Body)
Lock case
Remote control
Remote control module
Identification of Product
1. Front
(Front Body, install on the outside of the door)
Keypad (10-Key)
Dead Bolt Jam Lamp
Lock case
Battery Change Lamp
Latch Bolt
Lever
※Pull down
Emergency Cover
Identification of Product
Card Key Reader
Automatic
Locking Sensor
Reset button
Emergency Power
Supply Terminal
Dead Bolt
Emergency Key
9V Emergency battery
(Optional)
Emergency Cover
09
2. Back (Back Body, install on the inside of the door)
1.5V AA Alkaline Batteries (4EA)
Battery Cover
Slot for Remote control
module(Option)
Auto / Manual Lock button
Registration button
Lever
Manual thumb turn
Internal Forced Lock Switch
10
Volume Control Switch
Safe handle button
How to Use
1. Registering Card Keys
▣ Keep the door open while you register card key to prevent yourself from accidentally
getting locked out.
How to Use
▣
▣
4 card keys are provided at
purchase and you can register
up to 40 card keys.
If you lose your current card
key, re-register all the remaining
keys to invalidate the lost key.
▣
▣
Contact your local dealer for additional
card keys.
ISO 14443 A type RFID card can be
registered as your card key.
All card keys should be registered at a time.
11
Press
[Registration] button
Contact all the card keys
you wish to register on the
[card key reader] one by one
Press
[Registration] button
Check the key
operation
Pik
Open [Battery Cover] and
Press
[Registration]
button.
If it takes too long (over 7
seconds) to contact a
card key after pressing
[Registration] button,
the card will not be
registered.
12
If you hear a “pik” sound, the
card keys are registered.
If you hear a “ti-to-ti-to” sound,
the card key had been already
registered.
•The numbers of registered
cards are shown on the
keypad.
The registration is
completed with a “pi-bibing” sound.
Opening the door with
your card key. Contact
your card key to [card
key reader]
Opening the door
with your card key
Touch the keypad with the
palm
Contact card key
2. Registering Security Code
▣ Keep the door open while you register the security code to prevent yourself from accidentally getting locked out.
▣
(6 digits)
(12 digits)
000000 ~ 000000000000
Set a code of 6~12 digits using the number buttons
▣ The old code is automatically deleted when registering a new code.
Enter your security
code
Open [Battery Cover] and
Press
[Registration]
button.
Enter the code you wish
to register. (6~12 digits)
If it takes too long (over
7 seconds) to enter the
code after pressing
[register security code]
button, the code will not
be registered.
<
> and <
>
buttons can not be used
for security codes.
Press
[Registration] button
The registration is
completed with a “pi-bibing” sound.
•When registering the
security code, it shows
what the user has just
registered in order.
Check your security
code
How to Use
Press
[Registration] button
Once registration
is completed,
make it sure to
open the lock
with your new
security code.
Opening the door with your
code
Touch with the palm [keypad]
Enter security code
Touch with the palm [keypad]
13
3. Locking the door from the outside
※Please check Automatic / Manual Lock Mode
Automatic
lock mode
The automatic lock sensor detects the door
closing and locks the door automatically
within 5 seconds.
Within 5 seconds
Di-di-ding
The door locks when touch the keypad
with the palm.
Manual
lock mode
Di-di-ding
As the automatic lock function does not work in manual lock mode, make sure to check that the door is securely locked
when leaving the premises.
14
4. Unlocking the door from the outside
Security
code
(Normal)
Contact card key
Confirming the door open
Pi-bi-bin
g
Touch the keypad
with the palm
Enter your
security code
Touch the keypad
with the palm again
or press
button
or
How to Use
Unlocking
the door
with card
key
Confirming the
door open
Pi-bi-bin
g
Confirming the lock
unlocked with a “pibi-bing” sound
•The keypad cannot be operable in case of wearing the glove.
•Using the palm or pressing
button do the same function after entering the security code.
•If the card key does not work properly, please contact the card key after touching the keypad with the palm.
15
Opening the lock by the fake PIN code
•This explains how to open the lock with the fake PIN code.
Opening
the lock
by the
fake PIN
code
Touch the
keypad with
the palm
Press any number (fake PIN
code) and the right PIN code
Fake PIN code
Confirming
Right PIN code
or
Right PIN code
Please slightly
touch the exterior
keypad.
Touch the
keypad with the
palm or press
button
or
Fake PIN code
•This feature is not working when the lock is
locked down due to wrong-try lock-out delay.
Please slightly touch
the exterior keypad
or press
button
to finish.
Pi-bi-bin
g
The lock is unlocked
with melody (“Pi-bibing”)
•When any incorrect PIN codes are inputted five times in a row, it turns the lock down for three minutes.
•When this function is on, the user cannot use the fake PIN code function until any normal verification through key, card, fingerprint, PIN code,
or opening the lock from inside is made. So, the user is encouraged to use the right PIN code without any fake number to verify the lock.
•Use the fake PIN code feature whenever there is any chance of exposing the right PIN code to others.
16
5. Locking the door from the inside
Automatic
lock mode
When set on automatic lock mode,
the automatic lock sensor detects
the door closing and locks the door
automatically within 5 seconds.
Within 5 seconds
How to Use
Use [manual thumb turn] on the
back body.
Manual
lock mode
6. Unlocking the door from the inside
Down the lever
while pressing
the Safe handle
button
① Down the lever while pressing
the Safe handle button
② Turn the manual knob
Pi-bi-bing
17
7. Enabling/disabling Safe handle
GATEMAN YDM3109 protects from any break-in attempts through the Safe handle button.
Factory default : Enabled status
Enabled
status
Safe handle
button
Disabling
Safe handle
Enabling
Safe handle
Take out the hexagon
wrench which is docked
in the battery cover.
The hexagon wrench
Take out the hexagon
wrench which is docked
in the battery cover.
The hexagon wrench
fixing bolt
Disabled
status
Turn the fixing bolt on
the side of the inner
lever to the right
while pressing the
Safe handle button.
Turn the fixing bolt on
the side of the inner lever
to the left until the Safe
handle button pops out.
Be careful not losing the fixing bolt when you loosen it to set the feature on.
18
fixing bolt
Safe handle
button
Egressing when the Safe handle egress button is on
Down the lever while pressing the
Safe handle egress button
Example
How to Use
•The
locking bolt would not be retracted in case of not pressing the button.
•When the fire detection sensor is on, the feature is still on so the user must follow the usual procedure to open the door.
19
8. Automatic / Manual Lock Mode
Automatic locking sensor which detects the door closing and automatically locks the door in 5 seconds. Automatic lock
mode is a factory default setting.
20
18
Setting it on
automatic lock
mode
Push up the Button
Setting it on
manual lock
mode
Push down the Button
on
on
Mode.
Manual Mode
Automatic Mode
Automatic Mode
Manual Mode
Mode.
9. Forced Lock Mode
External forced lock mode
①
Contact card key
Confirming external forced Lock
Contact the card key on
[card key reader] for 5
seconds until you hear 3
beeps.
External forced lock
mode is set on with
“Di-ri-ric” sound.
How to Use
Setting
external
forced lock
mode on with
the card key
5 seconds
②
Setting
external
forced lock
mode on with
the security
code
Touch the keypad
with the palm
Enter the
security code
Press
button for
3 seconds until you
hear 3 beeps
Confirming
external forced
Lock
External forced lock
mode is
completed
with “Di-ri
-ric” sound.
Internal forced lock mode
When internal forced lock mode is on, the keypad is not functioning.
A warning beep sound will go off if anyone attempts to verify by the security
code or the card from outside.
Turn the mode
21
10. Break-in / Damage alarm
80dB alarm goes off when the lock is damaged or anybody
breaks in by force while the door is locked.
Turning off the alarm
Enter your security
code
Press
[Unlock]
button on the remote
control
Press and hold
[Registration] button
for 5 seconds
Contact your card key
or
22
(Choose one of the four options below.)
or
or
11. Wrong-try Lock-out
No keypad function is available during this wrong-try lock-out delay.
The break-in and damage alarm work regardless of this function.
•If incorrect security codes or unregistered
card keys are attempted 5 times in a row,
it will lock out for about 3 minutes with the
blinking LED.
Lock-out 3 minutes
How to Use
5 times
The lighting digit on the keypad
is showing remaining time
•The system will resume the operation
Resuming
automatically after 3 minutes of lock-out.
If you press
[Registration] button on
the back body or down the lever while
pressing the Safe handle egress button,
it resumes the operation.
23
12. Volume control
This function can control the operating sounds so that the door can be opened and closed without disturbing others.
❶ Silent Mode
Setting the volume Button on “ 0 ”
❷ Normal Mode
Setting the volume Button on “ 1 ”
❸ Loud Mode
Setting the volume Button on “ 2 ”
24
13. Battery use & Replacement
■ Battery life
(stand alone)
This product uses 4 1.5V
alkaline AA batteries which
can be used approximately 10
months on the condition of 10
times open/close cycles per
day.
1.5V AA size alkaline battery
10 months
1:1 actual size
Replace all 4 batteries when
the low battery war ning
melody rings and the LED
turns red. (Use authentic
alkaline batteries)
Do not mix new and
used batteries.
The LED turn red
LED
(Red)
How to Use
■Battery replacement
warning
※ Battery life may
vary due to
temperature,
moisture,
frequency of
use, and the
quality of the
batteries.
When a
low battery
warning
melody rings
•Always
check + and - directions when inserting batteries.
the authentic alkaline batteries. It is a user’s responsibility for damage
caused by using unauthentic batteries.
•Risk of explosion if battery is replaced by an incorrect type.
•Dispose of used batteries according to the instructions.
•Use
25
14. Displaying operation status (Smart Pad)
❶ Battery Replacement warning
❹ External / Internal forced locking
Starting from the left column, the LED
comes on from left to right to left for
twice.
Battery Icon lights on.
❺ Break-in / Damage warning
❷ Dead Bolt locking motion warning
The LED keeps coming on to the
clockwise when a break-in or damage
is happened.(Alarm lasts for 30 minutes)
Locking Icon lights on.
❻ Security Code registration
❸ Wrong-try Lock-out warning
If incorrect security codes or unregistered card keys
are attempted 5 times in a row, it will lock out for about
3 minutes with the blinking LED.
Wrong-try Lock-out
warning starts
3 minutes
remaining
26
❼ Card Key registration
1 minute
passed
1 minute
passed
2 minutes
remaining
When registering the security code,
it shows what the user has just registered
in order.
(Right : In case of registering 1, 2, 3, 4, 5
and 6)
1 minute
remaining
When registering the card keys,
Keypad displays the number of registered
card keys.
(Right : is on 3 keys have been
registered)
Option
1. Remote control module
Remote control module should be installed in advance to use remote control.
Open [battery cover] and insert the module into the slot. Proper functioning of
the module can be checked by operating a remote control.
•Remote control module :
Required for the use of
remote control
Installing remote control module
Open [battery
cover] and remove
all batteries
Insert remote control
module into the slot
Put batteries back
in (Check + , directions)
Confirming
Option
Di-ri-ri-ri-ring
27
2. Remote control
The remote control is an FSK(Frequency Shift Keying) type that uses a Floating ID encoding system, which changes the
wireless code each time you use it, so that there is no risk of hacking. It is non-directional and the operational range is up
to 10~20m.
※Caution! The operational range may vary depending on the installation environment.
Re-registration automatically deletes the previous registered remote control.
Registering remote control
Press
[Registration] button
Press
buttons
,
,
Press [Registration]
button located on the
front of the remote
control with a pin
You can register up to 5
remote controls
consecutively. In order to
register consecutively,
press [Registration] button
on eaeh remote control
with 10 second intervals.
Remote control makes a
beep when it is properly
registered.
28
Press
[Registration] button
Check remote
control operation
Press [open] or
[close] button to
check the
operation
Deleting remote control registration
Press
[Registration] button
Press
buttons
,
,
Press
[Registration] button
Deleting remote control
registration
Remote control registration
is cancelled with a “di-ri-riring” sound.
Option
How to use the remote control
Locking the door
Press
[close] button, and the door
will lock within 2~3 seconds.
Unlocking the door
Press
[open] button, and the door
will unlock within 2~3 seconds.
Changing the batteries
Open up the battery cover at the back of the
remote control and change the batteries.
29
Cautions
1. Emergency power supply
In case the batteries are completely discharged 9V battery can be used to supply electricity to the unit. Unlock with the card
key or security code while contacting a 9V battery just like the below instruction. Discharged batteries should be replaced
right away.
Discharged
Holding a 9V
battery
Security code use
Change
Batteries
Confirming
Open the
door
Touch the keypad with the
palm. Enter the security code
and retouch the keypad or
press
button.
Replace all of the
batteries
30
Check out if a card
key and security
code work properly
after replacing all
batteries.
2. Lost card key
If you lose your card, rest of card keys must be re-registered to invalidate
missing one.
Lost card key
Re-registering card key
Enter the security code in case you lose the card key or you are not carrying it.
※It is a user’s liability to break the lock because the user did not register any
security code.
3. Product malfunction
Press reset button located in the left of [emergency power terminal] with a pin and
try again with the key or the security code.
If it still does not work, call for after-sales service.
Cautions
Reset Button
31
4. Emergency mechanical key override
Please operate the lock with the mechanical key when there is a problem to the lock or unlock the door that is the same
as below listed.
•Forgotten security code
•Electronic malfunction
※ Please slide the cover downward
A hole on
emergency key
Pull down the
emergency cover
• Keep the mechanical override key in a safe place.
Otherwise, you may not get a free after-sales service even within during the warranty period.
32
❶
❷
❸