1
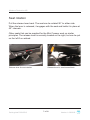
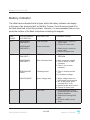
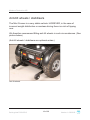
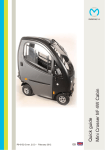
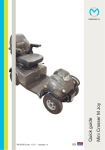
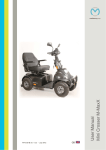
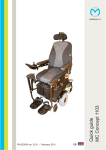
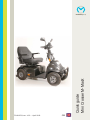
Quick guide
Mini Crosser M-MaxX
medemagroup
P9-0135-Q ver. 1.0.0 - April 2012
GB
Medema Production A/S
Quick guide P9-0135-Q
2 of 20
Version 1.0.0/2012
Medema Production A/S
Contents
Quick guide to the Mini Crosser M-MaxX ............................................... 4
Introduction................................................................................................ 4
Control panel ............................................................................................. 5
Seat rotation............................................................................................... 7
Steering column ........................................................................................ 8
Charging ..................................................................................................... 9
Battery indicator ...................................................................................... 10
General care and maintenance .............................................................. 13
Insurance.................................................................................................. 14
Serial number........................................................................................... 15
Driving the Mini Crosser M-MaxX ......................................................... 15
Getting in and out ................................................................................. 15
When driving in traffic... ........................................................................ 17
Electromagnetic compatibility ............................................................... 17
Braking systems ...................................................................................... 18
Anti-tilt wheels / stabilisers .................................................................... 19
Quick guide P9-0135-Q
3 of 20
Version 1.0.0/2012
Medema Production A/S
Quick guide to the Mini Crosser M-MaxX
Introduction
Congratulations on your new Mini Crosser M-MaxX electric mobility scooter.
You have now taken possession of an electric mobility scooter developed
for outdoor driving by active users. It is what is called a Class C vehicle in
accordance with the European classification of electric scooters.
For optimum enjoyment of this vehicle - and to avoid breakdowns and
accidents - we recommend that you read the User Manual carefully. As a
new user, you should pay particular attention to the section entitled “Driving
the Mini Crosser M-MaxX”.
Note:
This Quick Guide is to be regarded as a supplement to the User Manual.
The information in the Quick Guide cannot, therefore, be expected to be
complete.
NB: Errors and omissions excepted. Specifications subject to change.
We reserve the right to update this guide as required.
Warning!
The Mini Crosser M-MaxX is a powerful vehicle, equipped with 2 motors.
One on each rear wheel. Therefore, careful training on the use of the
vehicle is required.
The vehicle must not be lent to persons who are not completely familiar with it.
The vehicle is designed for one person only. Max. user weight 250 kg.
Medema Production A/S is not responsible for any damage or injuries
caused by inappropriate or unsafe use of the Mini Crosser.
Quick guide P9-0135-Q
4 of 20
Version 1.0.0/2012
Medema Production A/S
Control panel
Avoid subjecting the control panel to jarring and knocks. Take care when
driving and avoid hitting obstacles.
Hazard warning lights
Light switch
Speed selector
High/low switch
Indicator lights, R/L
Indicator lights, R/L
Horn
Horn
Accelerator
(four-finger control)
Lever for adjusting the angle of the
handlebars
Charging socket
Battery indicator
Key switch
Quick guide P9-0135-Q
5 of 20
Version 1.0.0/2012
Medema Production A/S
Designation
Description
Key switch
To start the vehicle:
Turn the key to driving position (1) When the Mini Crosser is turned on,
the control system performs a safety check of the electrical system.
The check lasts half a second. If the accelerator is operated during this
time, the Mini Crosser will not be able to move until you have turned
the key to 0 and back to 1.
Speed selector
The tortoise in minimum position indicates the lowest speed range.
0-6 km/h
The hare in maximum position indicates the highest speed range.
Up to 11.5 km/h
Battery indicator
Lights up when the key is turned. After approximately 1 second,
indicates the batteries’ charge level. Provides a more accurate
indication after a few minutes driving. This is not an exact
measurement and you must therefore build up some experience
with it. In the same way as the petrol gauge on a car.
When the red light is farthest from “1”, there is plenty of power in the
batteries. When the red light is farthest from “0” and flashing, it is
close to being completely discharged.
Accelerator
Activate the arm at the front slowly and the Mini Crosser will start
to move forwards. The more the arm is pressed, the faster the Mini
Crosser will move. When the arm is released, it will flip back to
starting position of its own accord and the Mini Crosser will stop.
Activating the rear arm will cause the Mini Crosser to reverse. The
magnetic brake on the rear wheels will engage when the scooter
is stationary and is equivalent to the parking brake on a car. The
accelerator can also be used to control speed downhill. In this case
the motor will act as a brake.
Light switch
Turns on the front and rear lights. The key switch must be in
position 1 (driving position).
Hazard warning
lights
Turns on all the indicator lights at once. Also works when the key is
removed or turned to position 0 (stop position).
Indicator switch
Left arrow: indicator, left-hand side. Right arrow: indicator, righthand side. Activate the same switch to turn the indicators off.
Horn
Powerful electric horn. Press the horn switch to activate.
Charging socket
Turn off the key switch during charging. Please note that it is not
possible to drive the scooter while the batteries are charging. See
also the section entitled “Batteries and charging”.
High/low switch
Switch between high and low max speed.
Quick guide P9-0135-Q
6 of 20
Version 1.0.0/2012
Medema Production A/S
Seat rotation
Pull the release lever back. The seat can be rotated 90° to either side.
When the lever is released, it engages with the seat and holds it in place at
45° intervals.
Other seats that can be supplied for the Mini Crosser work on similar
principles. The release lever is normally located on the right, but can be put
on the left if so wished.
Release lever for seat rotation.
Quick guide P9-0135-Q
Release lever for seat forward/back.
7 of 20
Version 1.0.0/2012
Medema Production A/S
Steering column
Can be adjusted forward/back with the release lever. Pull down on the lever
and pull the handlebars closer for a good driving position. Use the lever
again and push the steering column forward to make it easier to get out.
The height of the steering column can be adjusted approx. 11 cm up/down.
First remove the rubber plug covering the Allen screw. Adjust the height
using a 4 mm Allen key.
Adjusting the height of the
handlebars.
Lever for adjusting the angle of the
handlebars
Adjusting the height of the
handlebars.
Allen screw for height adjustment
Quick guide P9-0135-Q
8 of 20
Version 1.0.0/2012
Medema Production A/S
Charging
The Mini Crosser should be charged while not in use. The charger supplied
from the factory switches to trickle charging (very low power consumption)
automatically when the batteries are fully charged. You can therefore leave
the charger connected until the Mini Crosser is next used. The charger
cannot overcharge the batteries.
The charger will flash until charging is complete. Then it will show a steady
light.
IMPORTANT!
The charger must not be placed on the seat during charging.
IMPORTANT!
Never use charging devices other than those supplied from the factory
without first contacting the dealer.
For further information see the User Manual.
NEUTRIK NC3MX charging plug
Quick guide P9-0135-Q
Connect the charging plug to the 3-pin
socket on the steering column. The charging
socket is located under the protective cover.
9 of 20
Version 1.0.0/2012
Medema Production A/S
Battery indicator
The table below indicates the fault types which the battery indicator can display
in the case of an electronic fault on the Mini Crosser. Count these and read off in
the table what kind of fault they indicate. However, it is recommended that you can
quote the number of the flash code when contacting the supplier.
LED
CODE
PROGRAMMING
LCD DISPLAY
EXPLANATION
POSSIBLE CAUSE
1,1
HARDWARE
FAILSAFE 2
Loss of power
1. Short circuit in motor or
motor cable
2. Failure of control unit
HARDWARE
FAILSAFE 4
Overcurrent fault
HARDWARE
FAILSAFE 1
EEPROM fault
1. Fault in or failure of
EEPROM
HARDWARE
FAILSAFE 3
Main contactor fault
1. Main contactor welded
2. Fault in driver in main
contactor
3. Fault in coil in main
contactor
PRECHARGE
FAULT
Precharge fault
1. Fault in internal control
unit
2. Low battery voltage
HW FAILSAFE
Motor voltage fault
1. Motor voltage does not
fulfil throttle requirements.
2. M1 or M2 power shortcircuited to B- or B+.
3. Internal motor short circuit.
4. Failure of control unit
SRO
SRO fault
1. Wrong sequence of KSI,
power activation and input
data for direction
2. Selection of wrong SRO
type
3. Direction switch circuit
open
1,2
2,1
Quick guide P9-0135-Q
1. Short circuit in motor or
motor cable
2. Failure of control unit
10 of 20
Version 1.0.0/2012
Medema Production A/S
LED
CODE
PROGRAMMING
LCD DISPLAY
EXPLANATION
POSSIBLE CAUSE
2,2
HPD
HPD fault
1. Wrong sequence of KSI,
power activation and input
data for throttle
2. Wrongly set potentiometer
for throttle
2,3
PROC/WIRING
FAULT
HPD fault displayed
for >5 sec.
1. Wrongly set throttle
2. Potentiometer for throttle
defective
3. Throttle mechanism
defective
2,4
SPD LIMIT POT
FAULT
Fault in speed limit
potentiometer
1. Wiper cable for speed limit
potentiometer defective
2. Speed limit potentiometer
defective
3,1
BB WIRING
CHECK
Fault in emergency
return cable
1. BB cable open
2. BB check cable open
3,2
EM BRAKE DRVR
FAULT
Driver fault in
electromag. brake
1. Coil on electromagnetic
brake short-circuited or
open
2. Cable for electromagnetic
brake open
3,3
THROTTLE FAULT
1
Fault in throttle
1. Input wire for throttle open
2. Short circuit of input wire
for throttle til B+ or B3. Defectective throttle
potentiometer
4. Wrong choice of throttle
type
4,1
LOW BATTERY
VOLTAGE
Low battery voltage
1. Battery voltage <16 V
(24V models),
<21V (36V-models) or
<27V (48V-models)
2. Corroded or loose battery
clamp
3. Loose clamp on control
unit
4,2
OVERVOLTAGE
Overvoltage
1. Battery voltage >36 V
(24V models),
>48V (36V-models) or
>60V (48V-models)
2. Vehicle in use with charger
connected
Quick guide P9-0135-Q
11 of 20
Version 1.0.0/2012
Medema Production A/S
LED
CODE
PROGRAMMING
LCD DISPLAY
EXPLANATION
POSSIBLE CAUSE
4,3
THERMAL
CUTBACK
Over/undertemperature cutback
1. Temperature >95 ºC or
<-25 ºC
2. Overload on vehicle
3. Wrong installation of
control unit
4. Operation under extreme
conditions
Example 1: Fault 1,1 means that the battery indicator flashes as follows:
“flash” short pause “Flash” long pause
Example 2: Fault 1,2 means that the battery indicator flashes as follows:
“flash” short pause “Flash” “Flash” long pause.
Quick guide P9-0135-Q
12 of 20
Version 1.0.0/2012
Medema Production A/S
General care and maintenance
A Mini Crosser M-MaxX does not require much maintenance. It should
be kept in a generally good condition, however. The following should be
checked regularly:
•
•
•
•
Tyre pressure (if pneumatic tyres are fitted)
Tyre wear
Keep the control panel, the charging socket and the electronics box under the
seat dry.
Battery charging
Never wash the Mini Crosser with a high-pressure cleaner or direct water
jet! This could damage the Mini Crosser’s electronics.
To keep the Mini Crosser in good condition safety-wise, we recommend the
following regular checks:
Daily:
•
Test the indicators and driving lights before using the Mini Crosser in the dark
or poor visibility.
Every three months:
•
Test the brakes and motor disengagement
With the disengagement lever up, it must not be possible to push the Mini
Crosser.
•
Test the brake disengagement function
When the brake disengagement lever is up, the battery indicator should flash
to show an error if the Mini Crosser is turned on. In this case the Mini Crosser
must not be able to move when the accelerator is activated.
•
•
Test the electrical release mechanism.
Test that the Mini Crosser can be pushed when the electrical release
button is held. When the button is released, it can no longer be pushed.
Lubricate the lever arm on the brake hub with acid-free oil - left-hand rear
wheel.
Quick guide P9-0135-Q
13 of 20
Version 1.0.0/2012
Medema Production A/S
Annual
The Mini Crosser M-MaxX is designed for safe travel for at least 10 years,
up to a max. of 5,000 hours, provided it is serviced and safety-checked
every year, corresponding to 500 hours of operation. The service must be
carried out by an authorised workshop.
IMPORTANT! For safety reasons it is of the utmost importance that the
servicing and safety check intervals are complied with, as this minimises
the risk of brake failure and short-circuits in the wiring, which could
generate heat and cause a fire.
(For further information see the Service Manual.)
Insurance
In the eyes of the law a Mini Crosser M-MaxX with a maximum speed of
11.5 km/h is a cycle, so separate insurance is not required.
Most contents/home insurance policies include third-party liability insurance
for cyclists and so also cover Mini Crosser M-MaxX users.
We recommend that you talk to your insurance company about this when
the vehicle is delivered.
If necessary, comprehensive insurance will have to be taken out separately.
Quick guide P9-0135-Q
14 of 20
Version 1.0.0/2012
Medema Production A/S
Serial number
All vehicles have a serial number plate showing the year of production,
month and serial number. The same serial number can also be found on
page two of the User Manual.
Please quote the serial number when making inquiries about
servicing, spare parts, etc.
Driving the Mini Crosser M-MaxX
Getting in and out
It is important to learn a safe technique for getting in and out of the Mini
Crosser.
In general the following method should be followed:
•
•
•
•
•
Make sure that the Mini Crosser M-MaxX is off (switch turned to 0) when
getting in and out, otherwise the Mini Crosser could start if the accelerator was
touched inadvertently.
Make sure that the brake is on. (Lever for disengaging motor in down position.)
Put the steering column in vertical position.
If necessary, turn the seat through 45° or 90° and make sure that it is locked in
position (clicked into place).
If necessary, raise the armrest.
IMPORTANT!
The Mini Crosser will turn itself off automatically after it has been stationary
for 10 minutes even if the key has been turned to driving position.
To restart the vehicle, the key must be turned to stop position (0) and then
to drive position (1).
Quick guide P9-0135-Q
15 of 20
Version 1.0.0/2012
Medema Production A/S
General safety advice:
•
Make sure that the backrest is upright and the seat is as low as possible.
•
Positioning belts are recommended if the user is unable to maintain a good
driving posture independently.
•
Adjust your driving to road conditions. Take account of light, traffic and weather.
Be particularly careful when driving in the dark or in bad weather, such as rain
or snow. Avoid driving on gradients with poor surfaces, such as: snow, ice, newmown grass, wet grass and wet leaves.
•
Never drive when under the influence. This applies not only to alcohol but also
to drugs and medicines.
•
Reduce speed immediately if you feel you are losing control.
•
Always use the indicators when changing direction.
•
Check that lights and indicators are working before driving off. Use your lights
when driving after lighting-up time.
•
As far as possible, grip the handlebars firmly with both hands.
Take care not to have anything in the basket at the front that might
inadvertently operate the accelerator.
WARNING! Do not lower the handlebars so far that the accelerator
can hit you on the leg when you turn the vehicle and so be operated in
advertently. If the handlebars need to be very low, a twist grip accelerator is
recommended. This is particularly relevant if leg supports are being used.
ALWAYS switch the scooter off when it is not in use. Turn the key to 0.
Note!
Do not drive the Mini Crosser when intoxicated. This applies to both
medicine and alcohol.
Quick guide P9-0135-Q
16 of 20
Version 1.0.0/2012
Medema Production A/S
When driving in traffic...
Be particularly aware of the following when driving in traffic:
•
The Mini Crosser is a low vehicle and not always easy for other road users to
see. Make quite sure that other road users have seen you before driving onto
the highway.
•
Keep an eye on traffic behind you. Keep well over to the side of the road when
driving on busy roads.
•
Turning right and left at crossroads. Be aware of cyclists and pedestrians.
Follow the rules of the road for cyclists.
•
How quickly things are happening. How long do the lights stay green? How
quickly are cars approaching? etc.
Electromagnetic compatibility
If the Mini Crosser starts making involuntary movements or if the brakes
are released, turn the Mini Crosser off as soon as it is safe to do so. In
certain circumstances a Mini Crosser can set off shop alarms.
The Mini Crosser satisfies the requirements for the use of scooters in an
environment with electromagnetic noise. There may, however, be rare
situations in which electromagnetic noise can affect the Mini Crosser.
Sources of such noise include radio and television stations, amateur radio
transmitters and mobile phones.
If such equipment is being used close by, it is recommended that the
Mini Crosser is switched off. Mobile phones should not be used while
driving.
Quick guide P9-0135-Q
17 of 20
Version 1.0.0/2012
Medema Production A/S
Braking systems
There are two braking systems on the Mini Crosser:
•
Motor brake - adjusts vehicle speed also when going downhill.
•
Magnetic brake - the magnetic brake is automatic and engages when the
Mini Crosser stops. In an emergency, the Mini Crosser can be stopped
instantaneously by turning the key switch. Please note that this will cause very
sharp braking. The rear wheels will lock.
Must NOT be used in the normal course of driving.
The brake must never be disengaged mechanically using the disengagement
lever on a slope. This function is only designed for use when pushing the Mini
Crosser on a flat road.
Quick guide P9-0135-Q
18 of 20
Version 1.0.0/2012
Medema Production A/S
Anti-tilt wheels / stabilisers
The Mini Crosser is a very stable vehicle. HOWEVER, in the case of
incorrect weight distribution or careless driving there is a risk of tipping
over.
We therefore recommend fitting anti-tilt wheels in such circumstances. (See
picture below)
(Anti-tilt wheels / stabilisers are optional extras.)
Anti-tilt wheels
Quick guide P9-0135-Q
19 of 20
Version 1.0.0/2012
medemagroup