1
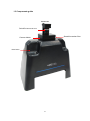
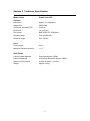
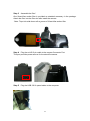
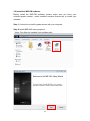
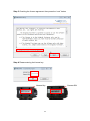
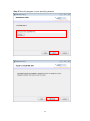
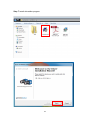
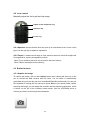
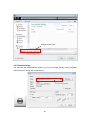
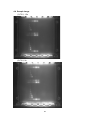
Smart View 220 Image System
Instruction manual
Catalog No. MBE-IMG-CM
www.majorsci.com
[email protected]
Version 01B
Revised on : 2012.10.23
1
Packing list
MBE-IMG-CM
-1x Scientific Camera
-1x Camera Lens
-1x SmartView Amber Filter
-1x Dark Room
-1x Connect cable
-1x SmartView 220 Instruction Manual
Signed by:
Date:
Major Science is liable for all missing or damaged parts / accessories
within 7 days after customer received this instrument package. Please
contact Major Science immediately regarding this issue. If no response
within such time period from consignee party, that will be consignee
party’s whole responsibility.
2
Table of Contents
Packing list ..................................................................................................... 2
Warning........................................................................................................... 4
Section 1
Introduction .............................................................................. 7
1.1
Overview.................................................................................................... 7
1.2
Feature ...................................................................................................... 7
1.3
Components guide ..................................................................................... 8
Section 2
Technical Specification ............................................................ 9
Section 3
Installation Instructions ......................................................... 10
3.1 Assembling and Installing the scientific camera ............................................. 10
3.2 Install the IMG-CM software .......................................................................... 12
Section 4
Operation Instructions ........................................................... 18
4.1
Control interface ...................................................................................... 18
4.2
Lens control ............................................................................................. 19
4.3
Button function ......................................................................................... 19
4.4
Sample image .......................................................................................... 22
Section 5
Trouble shooting .................................................................... 23
Section 6
Ordering Information.............................................................. 24
Section 7
Warranty .................................................................................. 25
3
Warning
Major Science SmartView 220 Image System has been tested and found to
comply with the limits for the CE regulation. Also, SmartView 220 Image
System is RoHS compliant to deliver confident product which meets the
environmental directive. These limits are designed to provide reasonable
protection against harmful interference when the instrument is operated in a
commercial environment. This instrument used together with power supply unit
generates, uses, and can radiate radio frequency energy, and if not installed
and used in accordance with the instruction manual, may cause harmful
interference to radio communications. Operation of this instrument in a
residential area is likely to cause harmful interference in which case the user
will be required to correct the interference at their expense. Changes or
modifications not expressly approved by the party responsible for compliance
could void the user’s authority to operate the equipment. It is strongly
recommended for the user to read the following points carefully before
operating this equipment.
1.
Read and follow the manual instructions carefully.
2.
Do not alter the equipment. Failure to follow these directions could result in
personal and/or laboratory hazards, as well as invalidate equipment warranty.
3.
Use a properly grounded electrical outlet with correct voltage and current
handling capacity.
4.
Disconnect from power supply before maintenance and servicing. Refer
servicing to qualified personnel.
5.
Never use this instrument series without having the safety cover correctly in
position.
6.
Do not use the unit if there is any sign of damage to the external tank or cover.
Replace damaged parts.
7.
Do not use in the presence of flammable or combustible material; fire or
explosion may result. This device contains components which may ignite such
materials.
8.
Refer maintenance and servicing to qualified personnel.
9.
Ensure that the system is connected to electrical service according to local and
national electrical codes. Failure to make a proper connection may create fire or
shock hazard.
10. Use appropriate materials and operate correctly to avoid possible hazards of
explosion, implosion or release of toxic or flammable gases arising from
overheated materials.
4
11. The unit shall be operated only by qualified personnel.
Safety Information
Use high level of precaution against any electrical device. Before connecting
the electrical supply, check to see if the supply voltage is within the range
stated at the rating label, and see to it that the device be seated firmly. Place
the unit in a safe and dry location; it must NOT touch the surrounding. Follow
the safety precautions for chemicals / dangerous materials. If needed, please
contact qualified service representative or [email protected]
Environmental Conditions
Ensure the instrument is installed and operated strictly under the following
conditions:
1.
2.
3.
4.
5.
6.
7.
Indoor use only
≤95% (non-condensing)
75 kPa – 106 kPa
Altitude must not exceed 2000 meters
Ambient to 40°C operating temperature
Pollution degree: 2
Mains supply voltage fluctuations up to ±10% of the normal voltage
Avoiding Electric Shock
Follow the guidelines below to ensure safe operation of the unit.
The scientific camera Image System has been designed to utilize shielded
wires thus minimizing any potential shock hazard to the user. Major Science
recommends against the use of unshielded wires.
To avoid electrical shock:
1. In the event of solution spilling on the instrument, it must be dried out for at least 2
hours and restored to NORMAL CONDITION before each operation.
2. Never connect or disconnect wires loading from the power jacks when the red
indicator light of power switch is on.
3. WAIT at least 5 seconds after stopping a run before handling output leads or any
connected apparatus.
4. ALWAYS make sure that your hands, work area, and instruments are clean and
dry before making any connections or operating the power supply.
5. ONLY connect the power cord to a properly grounded AC outlet.
5
Avoiding Damage to the Instrument
1. Do not attempt to operate the device if damage is suspected.
2. Protect this unit from physical damage, corrosive agents and extreme
temperatures (direct sunlight, etc.).
3. For proper ventilation and safety concerns, keep at least 10 cm of space behind
the instrument, and at least 5 cm of space on each side.
4. Use high level of precaution against the damages on the unit.
5. Do not operate the unit out of environmental conditions addressed above.
6. Prior to applying any cleaning or decontamination methods other than
manufacturer’s recommendation, users should check with the manufacturer’s
instruction to see if the proposed method will damage the equipment.
Equipment Operation
Follow the guidelines below to ensure safe operation of the unit:
1. NEVER access dangerous chemicals or other materials to prevent possible
hazard of explosion and damage.
2. Do not operate the unit without lids or covers to prevent possible hazards.
3. A temporary conductivity caused by condensation might occur even though this
series is rated Pollution Degree 2 in accordance with IEC 664.
Symbol
The symbol used on MBE-IMG-CM is explained below.
Indicates disposal instruction.
DO NOT throw this unit into a municipal trash bin when this unit has
reached the end of its lifetime. To ensure utmost protection of the
global environment and minimize pollution, please recycle this unit.
6
Section 1 Introduction
1.1 Overview
The SmartView220 system offer you convenience and preference. The
compact scientific-grade camera allows you to take pictures from the
computer and stores in the USB flash drive without any hassle. The
portable and light design allows you to carry it with ease. The SmartView
220 image system completes the MBE series for all your needs-from gel
casting, gel electrophoresis to gel documentation; all in one system. The
complete SmartView system not only saves your lab bench space, but also
provides excellent portability to move from lab to lab.
1.2 Feature
- Compact and lightweight
- Easy to install
- For scientific‐grade camera use
- Designed to use with MBE‐150 series
- Filter interchangeable for flexibility
- Image format: BMP/JPEG/TIFF/PNG(8bit)
- Images can be exported through a network Ethernet cable or USB flash drive
- Modular system allows for easy upgrade of hardware or software
- Small footprint helps conserve limited lab space
Computer/laptop recommended specification
1. Processor:1.8GHz Pentium® IV or equivalent AMD Athlon® processor
2. Memory: 1GB (512MB required for Windows® XP users)
3. Storage: 1GB available HD space
4. Media: CD-ROM drive
5. Connectivity: 1 port USB 2.0
6. Display: 1280 x 800 resolutions
7. Operating System: Windows® 7 SP1/ Windows® Vista SP1 /
Windows® XP SP3
8. (Optional) Printer: MITSUBISHI P95DW or SONY UPD897
7
1.3 Components guide
Front view
Scientific Camera & Lens
SmartView amber filter
Camera holder
Dark Room
8
Section 2 Technical Specification
Model name
Camera
Smart View 220
Resolution
Approx. 5.0 megapixel
Image Size
2592x1944
Frame per Seconds(FPS)
5 frames
Sensitivity
1.4 V/lux-sec
File format
BMP,JPEG,Tiff, PNG(8bit)
Dynamic range
Grey level(0-255)
Exposure range
0.01~30 sec
Lens
Focal Length
6 mm
Maximum Relative Aperture
1:1.2
Dark Room
Camera Holder Material
Polyoxymethylene (POM)
Darkroom Material
Acrylonitrile Butadiene Styrene (ABS)
Darkroom Dimensions
H:40cm W:34cm L:19.5cm
Weight
Approx. 0.8Kg
9
Section 3 Installation Instructions
The SmartView220 is a pre-installed instrument. User will have to do a few
procedures to install the scientific camera part. Place the unit on a sturdy, level
safe and dry place, then follow the instruction below for the scientific camera
installation.
3.1 Assembling and Installing the scientific camera
Step 1 Assemble the camera and lens
To prevent damage, the camera and lens are well packed in a box during shipping.
Unpack the camera and lens, attach the lens onto the scientific camera, and then
rotate the lens clockwise to fix both parts.
Step 2 Install the camera
Carefully place the camera onto the camera holder. Use the screw hole nearby
groove. Then fix the camera by tightening the knob on the side of the camera
holder.
10
Step 3 Assemble the filter*
One SmartView amber filter is provided as standard accessory in the package.
Attach the filter into the filter slot after install the camera.
*Note: To put the side down with a groove of SmartView amber filter.
Step 4 Plug the mini-B 5 pin cable to the camera Connector Port
This port provides power source for the scientific camera.
Step 5
Plug the USB 2.0 Hi-speed cable to the computer
11
3.2 Install the IMG-CM software
Before install the IMG-CM software, please make sure you have your
scientific-grade camera , which contains required license key to install your
software.
Step 1 Connect the scientific-grade camera with your computer
Step 2 Install MBE-IMG setup programs*
*Note: Four files are included in the software disk.
12
Step 3 Checking the license agreement then press the “next” button
1.
2.
Step 4 Please entering the license key
License Key
13
Camera S/N
Step 5 Save this program in your specifying location
14
Step 6 Complete the installation program
You could find the short-cut on the desktop.
15
Step 7 Install drvinstaller program
16
Step 8 Complete the installation program of scientific-grade camera
17
Section 4 Operation Instructions
4.1 Control interface
(b) Tool bar
(c) Capture
(d) Print
(e)Exposure time
(a) Display screen
(1)
(2)
(3)
(4)
(5)
(6)
(a) Display screen: This area shows the image of dark room.
(b) The functions of tool bar are as follows
(1) Start: Start shooting.
(2) Stop: Return to the main screen.
(3) Zoom in: To see more detail in a smaller region.
(4) Zoom out: To see less detail in a larger region.
(5) Zoom 100%: 100% of the size of the display screen.
(6) Fit to window: Adjust the display screen to the suitable.
(c) Capture: This button allows you to acquire the current image.
(d) Print: Print out the image using the printer.
(e) Exposure time: Increase/decrease the exposure time of scientific camera.
18
4.2 Lens control
Manually adjust the Iris to get the best image.
Adjust screw of aperture ring
Aperture ring
Focus ring
4.2.1 Aperture: amount that the lens can open up or close down to let in more or less
light. Use the top ring for aperture adjustment.
4.2.2 Focus**: determines its angle of view, and thus also how much the subject will
be magnified for a given photographic position.
*Note: Focus distance has been set well before leave the factory.
*Note: Please uses adjust screw carefully.
4.3 Button function
4.3.1 Acquire the image
To capture the image, click on the Capture button then a dialog will show up to ask
you to choose the data location and file name. The file name is automatically
generated using current day and time (Year/Month/Date/Minute/Second). You can use
the keyboard to change the file name then press Save to you specify folder. Before
acquiring the image, you can adjust the scientific camera exposure parameters, which
is shown on the left of the interface (show below). Use the UP/DOWN arrow or
entering a number could change the parameters.
19
Change the file name
4.3.2 Print the image
You can use the printer/thermal printer to print your image. Simply press the Print
button then your image will be printed out.
Choose the printer
20
4.3.3 Exposure time*
The default exposure time is set at 0.01 seconds .You can change the exposure time
to get the best image result. You can double click on the number then will pop out a
dialog to enter the seconds. You also can use the left/right button to
increase/decrease 0.1 second of the exposure time. The common exposure time is 30
seconds.
*Note: When exposure function is processed that will show the red light until to finish.
Processing
/Stop
Finish
21
4.4 Sample image
(1) F3.2, 1.5s
(2) F3.2, 2s
22
Section 5 Trouble shooting
Fault
Weak signals or no image
Solution
1. Check the USB connect cable is tightening
with your computer.
2. Adjust aperture to increase the incoming light.
3. Extend the exposure time to intensify the
signal.
Blurred image
Adjust the focus ring to optimize the image
Maintenance*
The CMOS lens should be cleaned with general camera cleaning kit. Dry the
filter surface with a soft cloth after each operation. Never use abrasive
cleaners, solvent based cleaners, or scouring pads.
*Note: Do not cleaning the SmartView amber filter with alcohol.
23
Section 6 Ordering Information
Cat. No.
MBE‐IMG‐CM
Accessories
MBE-IMG-CM-01
Description
SmartView220 Image System with 5MP Scientific
Camera and Hood Kit
MBE-IMG-CM-03
MBE-IMG-F1
MBE-IMG-SW
DI‐P95DW
SmartView220 Hood Kit, includes camera adapter,
amber filter, and hood
SmartView220 Holder Kit, includes camera adapter
and amber filter
5.0MP scientific grade camera, lens and USB cable
SmartView amber filter
SmartView220 Image System software
Mitsubishi P‐95DW thermal printer
MBE-G-Y1
Amber filter viewing glasses
MBE-IMG-CM-02
24
Section 7 Warranty
Major Science warrants apparatus of its manufacture against defects in
materials and workmanship, under normal service, for one year from the
shipping date to purchaser . This warranty excludes damages resulting from
shipping, misuse, carelessness, or neglect. Consumable part (filter) is not
covered by our warranty. Major Science’s liability under the warranty is limited
to the receipt of reasonable proof by the customer that the defect is embraced
within the terms of the warranty. All claims made under this warranty must be
presented to Major Science within one year following the date of delivery of the
product to the customer.
Manufacturer:
Major Science Co., Ltd.
Address:
No. 37, Wuquan 5th Rd.,
Wugu Dist., New Taipei City 24888
Taiwan
T/ 886-2-2298-1055
F/ 886-2-2299-7871
Contact Information
Address
19959 Sea Gull Way
Saratoga, CA 95070
U.S.A
T/ 1-408-366-9866
F/ 1-408-446-1107
25