1
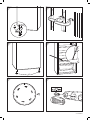
6. The following extended conditions apply to our build-in appliances. Ensure that you only build
in your appliance into suitable furniture. Therefore, by all means, read the attached installation instructions first. Do not screw the appliance on the sides. Only use the anchorage points
described. Also, ensure sufficient cooling for your build-in appliances. Damages, which occur
due to improper installation and/or wrong adjustment of the doors to the appliance or the cooling/freezing cargo, are not covered in our warranty.
7. Limitation of the warranty in the event of noise development: Any noises emerging in the
cooling and freezing appliances do not result in a claim under guarantee. This includes all
noises, as they occur in the usual operation. e.g. running noises of the compressor but also
of the cooling agent cycle are common. This also applies to all build-in appliances, as due to
the fitting into furniture noises may be intensified. Claims under guarantee are only valid for
appliances that are noisier than we have stated.
8. You must give proof of purchase. To this end, the original receipt is sufficient. Without proof
of purchase, we can unfortunately not provide any free warranty services. We recommend
keeping the original packaging in order to guarantee the safe transport of the appliance in the
event of a warranty claim.
9. The warranty expires if you or an unauthorised third party has opened the appliance and/or
has made changes to the appliance.
10. There is no claim under guarantee:
• in the event of improper handling as well as improper salt filling
• in the event of external mechanical damages to the appliance
• for transport damages
• in the event of wear and tear
• for operation and installation faults
• in the event of the appliance’s installation in wet rooms or outdoors
• for damages, which result from force majeure, water, lightning and excess voltage
• for damages to the kitchen working tops if no vapour protection strip was used
• for excessive use, in particular for any use other than private use
• in the event of non-compliance with the instruction manual
• if the appliance does not have a technical fault
• if the type labels and/or the series numbers have been removed or if they have been
made illegible
11. The warranty does not include any further liability on our part, in particular no liability for damages, which did not occur on the appliance itself or which occur due to the failure of the appliance to its repair (e.g. way and handling costs, etc.). However, our legal liability, in particular
according to the Product Liability Act, shall not be limited or excluded thereby.
12. Any guarantee services we provide do not extend the warranty period of 3 years from the
purchase date, not even regarding any possibly exchanged components.
We would like to wish you fun with your new
domestic appliance!
Kitchen tools
Double Door Refrigerator
Important document! Please, keep for proof of purchase with 3 years.
Notes for dishwashers:
If you would like to build in your dishwasher under a working top and to this end possibly remove
the supplied working top of the appliance, you must attach a vapour protection strip to the bottom
side of your kitchen working top. This is necessary in order to avoid damages to the kitchen working top due to vapours/humidity during the drying process (with the appliance door open). The
outlet hose must be laid in accordance with the instruction manual of the appliance, in order to
ensure the best possible operation of the appliance. Always ensure that after filling the softening
salt container there are no salt residues in your dishwasher. Therefore, after each salt filling a
main wash must be run. (Risk of corrosion – forfeiture of the claims under guarantee)
IE-3J-181110
with 4-star-freezer
DTL + 1026
GB
IE
Double Door Refrigerator
User‘s manual
F
J
1
2
Manufacturer´s warranty
IE
We are delighted that you have chosen to acquire one of our large domestic appliances and we
would like to wish you fun with this high-quality product. Our strict manufacturing control assures
the high standard of quality of our appliances. In the event that you still have a justified complaint,
we grant a manufacturer’s warranty for the duration of
3
4
3 years
5
from the purchase date and in accordance with the following conditions:
6
1. This warranty shall not affect your legal warranty claims as consumer towards the seller of this
appliance. The manufacturer’s warranty we grant shall not limit these rights.
7
2. The warranty we grant is only valid for the private use of the appliance and is limited to Ireland.
3. The warranty is valid for 3 years from the purchase date.
8
9
D
G
K
5. To agree a repair date, please contact our hotline number:
10
12
4. Our warranty service covers the repair of your appliance or the exchange with a comparable
appliance at our discretion for the entire duration of the warranty, the employee’s wages, material costs and transport costs for the appliance.
HOTline... 1800 554974
11
13
A brief description of your complaint would be very helpful and would aid the fast repair of the
appliance.
14
15
Before requesting the customer service, please check, if there is an operational fault or a cause,
which may not have anything to do with the function of your appliance.
Here are a few hints (depending on the kind of your appliance):
B
E
H
L
Please check first:
a) if the socket draws electricity, possibly due to the connection of another electrical appliance.
b) if the plug is in working order and if it has been plugged in to the socket firmly.
c) if the thermostat knob is turned on STOPP (cooling appliances).
Notes for cooling appliances:
After the transport before being fully functional, the appliance will need approx. 24 hours, in which
the cooling agent will stabilise. The cooling capacity starts to develop from the time of connection.
Notes for cookers:
Please ensure that your cooker/hob is connected to a separate electric circuit in order to avoid
overloads. Depending on the connection, the heating time may vary. With the connection of all
three outer cables, you will achieve the best result.
2
Important document! Please, keep for proof of purchase with 3 years.
C
A
M
P
N
Q
17
O
R
v1-09122010
IE
Contents
Scope of delivery
Scope of delivery ............................................ 4
• (see illustrations A, B and N)
1 Freezer compartment
2 Freezer rack
3 Fridge compartment
4 Thermostat and interior light
5 Glass shelf, 4 shelves
6 Drain
7 Vegetable drawer
8 Freezer compartment
9 Closed door rack
10 Open door rack, 4 x
11 Bottle rack
12 Ice cube tray
13 Egg tray
14 Ice scraper
15 Cleaning rod
16 Distance spacer (see illustration B)
17 Adjusting foot, 2 x (see illustration N).
Initial steps ....................................................... 4
Intended use .................................................... 4
5 minutes to ensure your safety ....................... 5
Symbols....................................................... 5
Expressions used ........................................ 5
Safety Instructions ...................................... 5
Preparing the appliance ................................... 7
Basic cleaning ............................................. 7
The right location ......................................... 7
Fitting the distance spacer........................... 8
Replacing the door stop............................... 8
Levelling the appliance ................................ 8
Operation ......................................................... 8
Putting into use / first freeze ........................ 9
Regulating the temperature ......................... 9
Making ice cubes......................................... 9
Rearranging the door racks ......................... 9
Switching off the appliance .......................... 9
Tips for refrigerating and freezing food .......... 10
Refrigeration tips ....................................... 10
Freezing / storing tips ................................ 10
Care and maintenance ...................................11
Cleaning the outside walls and doors .........11
Defrosting the fridge compartment .............11
Cleaning the fridge compartment ...............11
Defrosting and cleaning the freezer compartment .......................................................... 12
Checking and cleaning the door seals ....... 12
Replacing the light bulb ............................. 12
Initial steps
1. Unpack the appliance and remove all the packaging, plastic strips, tape and foam padding,
not forgetting those on the reverse of the appliance.
2. Check that the delivery is complete.
3. Check the appliance for transport damage.
4. Do not put the appliance into use if the delivery is incomplete or if you see any transport
damage. Please inform our technical advice
department.
If a problem occurs ........................................ 13
General .......................................................... 14
Environmental protection made easy......... 14
Disposing of the appliance ........................ 14
Instructions on the declaration of conformity .
14
Warranty .................................................... 14
Service ...................................................... 14
Technical specifications ................................. 15
Electrical Connection ..................................... 18
4
Intended use
The appliance is suitable for cooling fresh foodstuffs,
storing commonly available refrigerated food, freezing fresh food from room temperature and making
ice.
The appliance is only intended for domestic use.
All other forms of use are specifically excluded.
Before using the appliance, first read the
IE
safety instructions and the Operating Instructions
carefully. This is the only way to ensure that you
can use all functions safely and reliably.
You must also observe the national rules that apply in your country in addition to these Operating
Instructions.
Store all safety and operating instructions for
future reference. Pass on all safety and operating instructions to future users of the product.
5 minutes to ensure your
safety
Surely your safety is worth 5 minutes? That is all it
takes to read these safety instructions. The manufacturer is not liable for any damage due to any
failure to observe these instructions.
Symbols
Careful: risk of fire!
Expressions used
You will find the following expressions in these Operating Instructions to draw your attention:
Danger!
High risk. Non-observance may lead to death
or serious injury.
Caution!
Medium risk. Non-observance may lead to
material damage.
Important!
Slight risk. Circumstances that must be paid
attention to when dealing with the appliance.
Safety Instructions
Dangers to children and people with limited physical, sensory or mental capabilities!
This appliance is not intended for use by
people (including children) with limited physical, sensory or mental capabilities or those
lacking experience or knowledge, unless
they are supervised or instructed regarding
the use of the appliance by a person who is
responsible for their safety.
Always supervise children when they are
near the appliance, regardless of whether
it is switched on or off. To prevent children
from getting trapped inside, remove or disable the door locks or catches when the
appliance is at the end of its service life.
Children must always be supervised to ensure they do not play with the appliance.
Risk of electrical shock!
This appliance uses dangerous voltage.
Touching any live components may result in
serious injury or death. The appliance must
be connected to an earthed socket that has
been installed in accordance with the applicable regulations.
Do not put the appliance into use if the mains
lead is faulty or if the appliance has visible
signs of damage.
If the mains lead of this appliance is damaged, it must be replaced by the manufacturer, its Customer Service Department or a
similarly qualified person, in order to avoid
any dangers.
Please contact our Technical Service Department immediately if you notice any transport
damage or other visible damage.
The appliance must only be repaired by an
authorised specialist company using only
parts that meet the original appliance specifications. This appliance contains electric and
mechanical parts and components that are
an indispensible means of protection against
dangers.
5
IE
Never open the housing nor insert any objects through the openings.
Do not touch the plug with wet hands and do
not remove it from the socket by pulling the
cable.
Do not connect the appliance to a multiple
socket.
Pull the mains plug in the event of a fault,
before defrosting and/or cleaning. Do not pull
on the cable but pull the plug itself.
After installing the appliance, the mains plug
must be easily accessible. Do not use an extension cord.
Make old appliances unusable prior to
disposal: Pull out the mains plug and cut
off the mains cable. Disable the locks or
catches on doors and/or lids to prevent
children being trapped inside, endangering
their lives.
Danger of fire!
Do not place any appliance that gives off
heat, such as microwave ovens, toasters
etc., on the appliance.
Do not operate any electrical appliances inside the area where food is stored.
Do not cover or close ventilation slots. Observe the minimum distances as indicated.
Danger of explosion!
Do not store any explosive substances or
spray cans with combustible aerosols in the
appliance as they might cause flammable
mixtures to explode.
Do not operate any electrical appliances inside the appliance.
Do not freeze any highly carbonated
drinks!These bottles or cans might explode!
Only freeze high-percentage alcohol tightly
sealed and standing upright.
Do not put any glass or metal containers with
liquids in the freezer.
6
Health hazard!
Do not re-freeze food that has partially or
completely thawed. Vegetables that have
partially thawed are not bad for your health,
but their quality may have been significantly
affected. You can cook meat that has thawed
and freeze it again as a ready meal. Never
re-freeze raw meat!Ice cream and cakes that
have thawed must not be frozen again either
(risk of salmonella!).
Danger due to refrigerant!
The refrigerant circuit of your appliance
contains the environmentally friendly, but
combustible refrigerant R600a (isobutane).
Mechanical interventions in the refrigeration
system must only be carried out by authorised professionals.
Do not damage the refrigerant circuit, e. g. by
puncturing the refrigerant leads of the evaporator by sharp objects, by kinking pipes, etc.
Ejected refrigerant is flammable and can injure your eyes. If it comes into contact with
your eyes, rinse your eyes with clean water
and send for a doctor immediately.
Danger of injury!
The foodstuffs and the interiors are at very
low temperatures. Do not touch them with
wet hands. This could injure your skin. Skin
injury is also possible if your skin is dry.
Danger of burns due to low temperatures.
Never put any ice cubes or ice lollies directly from the freezer compartment into your
mouth.
Do not use damaged refrigeration batteries.
Should any fluid spill from refrigeration batteries, make sure not to swallow it!
Do not re-freeze food that has fully or partially thawed. There is a risk of food poisoning.
Do not use plinths, drawers, doors, etc. to
stand on or to support your weight: you might
get hurt.
IE
Risk of suffocation for children!
Keep the packaging film away from children
so that it cannot suffocate them.
Caution!
The thermal insulation in your appliance
consists of polyurethane with environmentally friendly pentane insulation foam. Do not
use any electric heaters, scrapers, knives or
other instruments with open flames such as
candles to defrost the appliance. The thermal insulation and interior compartments are
sensitive to heat and might melt.
Leave the appliance in a stable position for
at least 3 hours after installing it, so that the
refrigerant can settle. The compressor might
be damaged otherwise.
When you first put the appliance into use, let
it run for 24 hours without any interruption.
If you happen to switch off the appliance or
pull the mains plug from the socket during
this period, wait for at least 5 minutes before switching on the appliance again or reinserting the plug. The compressor might be
damaged otherwise.
Do not use any caustic or scouring detergents or sponges to clean the appliance.
They might damage the surfaces.
As the interior walls are sensitive to scratching and to heat, do not use any tools such as
ice scrapers, heat radiators or similar equipment to remove ice that has formed. They
might the insulation to be scratched.
Never use defrosting sprays. They can create explosive gases. Do not use any electric
heating devices, open flames or ice scrapers either. They might cause the insulation
to melt or to be scratched.
The door seal can be damaged by oil and
grease, which make the rubber porous and
brittle and cause the door seal to leak. Accordingly, only use clean water to clean the
door seal.
Detergents containing sand, soda or acid
are absolutely unsuitable. Universal cleaners
with a neutral pH value are recommended.
Make sure that no water used for cleaning
penetrates into the ventilation slots, the electrical parts and the drainage hole.
Only use light bulbs of max. 15 W, 230 V, and
fitting E 14.
Preparing the appliance
Basic cleaning
Caution!
Never use agressive or gritty cleansers or
cleansers containing soap, soda or solvents
as they might affect the surface of the appliance.
• Youcanremovethesmell that is inherent in all
new appliances by wiping the interior compartment with lukewarm water with a little vinegar
added.
The right location
Danger of fire!
Do not place any appliance that gives off
heat, such as microwave ovens, toasters
etc., on the appliance.
Do not cover or close ventilation slots.
You need a free space of 54 x 60 x 144 cm (w x d
x h) in which to install the appliance.
To achieve optimum refrigeration with the lowest
possible energy consumption, the location:
– must be a dry, properly ventilated room which is
not too warm.
– must be out of direct sunlight.
A location immediately next to an oven, heater or
radiator is not ideal. Please observe the following
minimum distances:
from electric heaters
5 cm
from radiators, oil, gas and
coal-fired heaters
50 cm
from cooling appliances
2 cm
from washing machines / dishwashers
2 cm
7
IE
Fitting the distance spacer
• To achieve sufficient air circulation, fit the distance spacer 16 in the upper part of the condenser 18 (see illustration B).
Replacing the door stop
You can alter the direction the door opens. The appliance is delivered with the door stop on the right.
You can change the location of the door stop. This
calls for some skill so please read the procedure
described below first. You need:
– a crosshead screwdriver (not included)
– a second person.
1. Make sure that the mains plug is not in the
socket.
2. Unscrew the adjusting feet 17 if they have
been installed (see illustration N)
3. Unscrew the screws from the lower hinge of
the fridge compartment door (see illustrations
C and D).
4. Remove the fridge compartment door from
the appliance.
5. Open the freezer compartment door, hold it
steady and unscrew the central hinge (see illustration E).
6. Put the freezer compartment door aside.
7. Remove the blind plugs from the left-hand
side and fit them in the holes that have now
been opened up.
8. Unscrew the hinge pin from the upper cover
(see illustration F).
9. Screw the hinge pin into the left-hand side of
the unit (see illustration G).
10. Now for the doors. There is a hinge pin holder
and a blind plug on the upper side of the
freezer compartment door and on the lower
side of the fridge compartment door. Carefully
pry out the blind plug and the hinge pin holder
and swap them (see illustration H).
8
11. Insert the hinge pin holder on the other side
of the fridge compartment door (see illustration J).
12. Place the top end of the freezer compartment
door over the upper hinge pin and hold the
door steady.
13. Put the central hinge into the lower end of the
freezer compartment door and screw it into
place (see illustration K).
14. Place the top end of the fridge compartment
door over the pin of the central hinge and
close the door.
15. Screw the lower hinge onto the appliance and
the fridge compartment door (see illustrations
L and M).
Levelling the appliance
The appliance must be on a flat, stable surface.
Check the position of the appliance, preferably
using a spirit level. The appliance must not move
when the door is opened. If the surface is not completely level, you can level the appliance using the
two front adjusting feet. Ask a second person to
help you.
1. Close the door of the appliance.
2. Tilt the appliance forwards slightly.
3. Turn the adjusting feet 17 in or out to level the
appliance (see illustration N).
4. Put the appliance back in position and use a
spirit level to check that it is properly aligned.
Operation
Danger of injury!
Never touch the ice on the walls of the interior compartment, frozen products or ice
cream with wet hands. Injury is even possible if your skin is dry. If necessary, use a dry
cloth to handle frozen products.
Health hazard!
Do not re-freeze food that has partially or
completely thawed. Vegetables that have
partially thawed are not bad for your health,
but their quality may have been significantly
affected. You can cook meat that has thawed
and freeze it again as a ready meal. Never
IE
re-freeze raw meat! Ice cream and cakes
that have thawed must not be frozen again
either (risk of salmonella!)
Danger of explosion!
Never freeze highly carbonated drinks. There
is a risk of explosion!
Caution!
Leave the appliance in a stable position for
at least 3 hours after installing it, so that the
refrigerant can settle. The compressor might
be damaged otherwise.
When you first put the appliance into use, let
it run for 24 hours without any interruption.
If you happen to switch off the appliance or
pull the mains plug from the socket during
this period, wait for at least 5 minutes before switching on the appliance again or reinserting the plug. The compressor might be
damaged otherwise.
Putting into use / first freeze
1. Insert the mains plug into a wall socket (220
- 240 V~; 50 Hz) that has been installed in accordance with the applicable regulations.
goes up, e.g. in summer.
– the temperature and volume of the products to
be refrigerated or frozen that have recently been
put in the appliance. The greater the volume of
the products and the higher their temperature,
the higher the setting should be.
– how often and how long the door is opened.
The refrigeration performance can be set continuously: from "0" (the appliance is off) to "5" (lowest
temperature setting).
1. Turn the temperature regulator in a clockwise
direction from "0" to a medium setting.
2. The ideal storage temperature for frozen food
is –18 °C. Use a fridge/frost thermometer (not
included) to check the temperature in the compartment.
3. Adjust the setting if the ambient temperature
changes.
Making ice cubes
1. Fill the ice cube tray 12 3/4 full with cold water.
2. Put it in the freezer compartment.
3. Wait for the water to freeze.
2. Open the fridge compartment door and turn
the temperature regulator 4 in a clockwise direction to position "5" (cf. illustration O).
The appliance is on, the interior light is on,
the motor starts to work, refrigerant is flowing though the pipes and you will hear a slight
"humming sound".
4. Twist the tray or briefly hold it under running
water to release the ice cubes.
3. If the appliance makes any irritating noise,
check that it is positioned stably and remove
any objects from the top of the appliance.
2. Place the door rack in its new position over
both holders on the sides and lower it into position.
4. Put the food to be refrigerated into the fridge
compartment and close the door.
5. As soon as the freezer compartment is at a
temperature of approx. –18 °C (use a fridge/
frost thermometer to check), you can store the
products to be frozen.
Regulating the temperature
The temperature regulator 4 is used to regulate
the temperature in the fridge and freezer compartments. It depends on
– the room temperature. If necessary, select a
higher setting when the ambient temperature
Rearranging the door racks
1. Lift the door rack and take it off the door (see
illustration P).
Switching off the appliance
Switch off your appliance if you intend not to use it
for a considerable period of time.
1. Set the temperature regulator 4 to "0".
2. Pull the mains plug from the wall socket if you
want to switch off the appliance for quite a long
time.
3. Empty the appliance, defrost it and clean it.
4. Leave the door ajar so that no mould forms inside.
9
IE
Tips for refrigerating and
freezing food
Refrigeration tips
– To make sure that food in the fridge compartment stays fresh and tasty, only put packed
food in the fridge compartment. Use special
plastic food containers or commonly available
foil.
– Let hot food cool down before placing it in the
fridge compartment.
– Place the food in the fridge compartment so
that the air can circulate freely. Do not cover
the shelves with paper or any similar material.
been prepared, portioned and packaged appropriately.
– Ready meals should also be frozen in portion
sizes where possible. Small volumes are easier to freeze right through to the core. Furthermore freezing several small portions is more
economical than throwing away the remnants
of a portion which is too large.
– Freeze meat, poultry and fish raw, or after preparing them, in suitable sizes for your household and thaw them again in the fridge when
you need them. Make sure that meat and other
products do not lie in the liquid produced during thawing.
– Do not put the food directly against the rear
wall as it might then freeze onto the rear wall.
– Do not add salt or spices to fresh or cooked
dishes that you want to freeze. Unsalted frozen
food has a longer storage time.
– Place a fridge thermometer on the glass panel
over the vegetable drawer so that you can
check that the temperature is right. The optimum temperature is approx. +6 °C.
– To prevent frozen food from dehydrating, taking
on another product's flavour or running, use
resistant packaging material, i.e. air and liquid
tight, not too rigid, easy to seal and to mark.
– Fruit and vegetables: put fresh fruit and vegetables in the vegetable drawer.
– Observe the producer's instructions when storing ready frozen food.
– The temperature is the lowest on the glass
plate over the vegetable drawer. This is good
for fresh meat, game, poultry, bacon, sausages
or raw fish.
– Observe the recommended storage times and
temperatures. The symbols in the door of the
freezer compartment provide a summary of
maximum storage times:
• Fish, pastry and ice cream max. 2 months
• Milk and cheese max. 3 months
• Lamb, bread and game (packed in foil) max.
4 months
• Carrots, tomatoes, shellfish (shrimps, crayfish, squid, mussels without their shells) and
food that has already been cooked max. 6
months
• Fruit cake, sealed cheese max. 8 months
• Whole chicken, goose or duck max. 10
months
• Mushrooms, steak and cauliflower max. 12
months
– The temperature is the highest in the upper
zones and in the door racks; this is good for
cheese and spreadable butter.
– Bottles, drinks cartons: put bottles and drinks
cartons in the bottle rack in the door. Place full
bottles or cartons close to the hinges so that
they are not overburdened.
Freezing / storing tips
Please observe the following points to maintain
the flavour and the nutritional value of your frozen food, to prevent your appliance from using too
much electricity and the freezer compartment from
having to be defrosted too frequently:
– Frozen food requires an even storage temperature of –18 °C.
– A maximum of 2.5 kg of fresh food can be frozen within 24 hours.
– Only freeze food of perfect quality that has
10
– Make sure that when storing fresh food it does
not touch already frozen food, as this might
cause the latter to thaw.
– Allow hot food to cool down before freezing.
This will not only save energy, but it will also
prevent excessive frost from forming in the
freezer compartment.
IE
– Do not freeze full bottles of beverages. Liquids
expand as they freeze, which might cause the
bottles to burst.
Care and maintenance
Cleaning the outside walls and doors
Caution!
Only use cleaning agents on the outside surfaces. Do not use any caustic or scouring detergents or sponges to clean the appliance.
They might damage the surfaces.
• Only clean the outside walls and door using a
moist cloth and some universal cleaning agent;
wipe again with a dry cloth.
Defrosting the fridge compartment
This is not necessary as the fridge compartment
has an automatic defrosting function. Frost and ice
are defrosted automatically and the resulting water
is collected in a condensate tray on the rear of the
appliance. The heat of the motor causes the water
to evaporate.
• Make sure that the water can drain through the
hole without being obstructed. Use the cleaning rod 15 to remove any dirt that collects in the
drainage hole (see illustration Q).
1. Set the temperature regulator 4 to "0".
2. Pull the mains plug.
3. Remove the refrigerated products and put
them in a cool place.
4. Remove the drawer, the door racks and the
shelves and clean them in lukewarm water with
some washing-up liquid. Adding some vinegar
is useful to prevent mould (cleaning vinegar,
common vinegar or vinegar essence).
5. Clean the drainage hole using the cleaning rod
15 (see illustration Q)
6. Wipe the surfaces again using clean water.
7. Wipe everything dry and leave the door open
for some time to ventilate the compartment.
8. Replace the shelves and the drawer and put
the refrigerated products back into the fridge
compartment.
9. Put the plug back into the wall socket and set
the temperature regulator 4 to the setting of
your choice.
Cleaning the fridge compartment
Caution!
As the interior walls are sensitive to scratching and to heat, do not use any tools such as
ice scrapers, heat radiators or similar equipment to remove ice that has formed.
The door seal can be damaged by oil and
grease, which make the rubber porous and
brittle and cause the door seal to leak. Accordingly, only use clean water to clean the
door seal.
Detergents containing sand, soda or acid
are absolutely unsuitable. Universal cleaners
with a neutral pH value are recommended.
Make sure that no water used for cleaning
penetrates into the ventilation slots, the electrical parts and the drainage hole.
11
IE
Defrosting and cleaning the freezer
compartment
Moisture from the food and the ambient air forms
frost inside the compartment in the appliance.
The interior walls of the freezer compartment must
be cleared of all ice and frost at least once a year
or whenever the layer of frost is approx. 5 mm
thick. Otherwise the ice will create an insulating
layer which makes refrigeration more difficult and
will increase the power consumption.
Danger!
Never use defrosting sprays. They can create explosive gases. Do not use any electric
heating devices, open flames or ice scrapers either. They might cause the insulation
to melt or to be scratched.
Caution!
Never use agressive detergents (soda,
scouring powder, etc.). They affect the plastic surfaces.
1. At least 3 hours before defrosting, set the
temperature regulator 4 to "5". This gives the
frozen food a cold reserve so that it will not
thaw too fast.
2. Set the temperature regulator to "0" after three
hours.
3. Remove the plug from the wall socket.
4. Remove the frozen food. Wrap it in a thick
layer of newspaper and place it in a laundry
basket in a cool place. You can also use the
refrigerator.
5. Leave the door open during defrosting.
6. Place a dish with hot, but not boiling water in
the freezer compartment. This accelerates
the defrosting process.
The defrosting time depends on the thickness
of the ice layer. Experience has shown that
you can start cleaning the appliance after approx. 1 hour.
7. Put some absorbant cloths in the freezer
compartment and wring them out regularly.
8. Clean the inside of the compartment by wiping it with hot water and washing-up liquid.
Add a few drops of vinegar to the water and
wipe the surface again. This prevents mould
from forming. Dry thoroughly.
12
9. The door seal can be affected by oil and
grease. Clean it with clean water only and
leave it to dry thoroughly.
10. After cleaning, rub everything dry, including
the door seal, and air everything for a short
period.
11. Put the plug back into the wall socket and set
the temperature regulator 4 to "5".
12. Put the frozen products back into the freezer
compartment.
13. Return the temperature regulator to its usual
position as soon as a temperature of –18° C
has been reached.
Checking and cleaning the door seals
Regularly check the door seals to prevent hot air
from entering the appliance.
1. You can check this by clamping thin sheets of
paper between the door and the unit at several
places. The paper should be equally difficult to
pull through in all places.
2. If the seal does not make even contact
throughout: Carefully heat the seal with a hair
dryer at the relevant locations and use your fingers to pull it out a bit.
3. Only use clean water to clean dirty seals.
Replacing the light bulb
Danger!
Only use light bulbs of max. 15 W, 230 V, and
fitting E 14.
1. Remove the plug from the wall socket.
2. Let the bulb cool down.
3. Pull the cover off the back of the light (see illustration R).
4. Unscrew the light bulb from its holder.
5. Replace it by a new light bulb of the same
type.
6. Replace the cover.
7. Put the mains plug back into the socket.
IE
If a problem occurs
All electrical appliances can be affected by faults.
As this does not always mean that the appliance is
defective, please use the table to check whether
you can remedy the fault yourself.
Danger!
Never try to repair the appliance when it has
or seems to have broken down. This might
endanger yourself and future users. Repairs
must only be carried out by authorised professional staff.
Trouble-shooting table
Problem
Possible cause
Solutions, tips
Compressor and interior
light off.
No current in the wall outlet.
Connect another appliance to check.
Mains plug is not tight.
Make sure that the mains plug has been inserted
properly.
Compressor is not running,
interior light is on.
The required temperature has been reached.
Further cooling is not required. When the inside
temperature goes up, the compressor will switch
on automatically.
New installation.
The appliance needs at least 3 hours for the refrigerant to settle.
Ambient temperature too low (less than +16 °C)
Lower the temperature regulator position.
The appliance is cooling too The temperature of the inner compartment has
much.
been set to too low a cooling level.
Lower the temperature regulator position.
The appliance does not cool The wrong temperature has been selected.
enough.
Turn the temperature regulator to a higher position.
The appliance is noisy.
The door is not closed tight or the door seal does
not make proper contact throughout.
See "Checking and cleaning the door seals".
Food is not cooled.
Only put food in that has already cooled down.
Too many products have been put in at once.
Never freeze more than 2.5 kg at a time.
A layer of ice has formed.
Defrost the freezer compartment and check the
door seal.
The ambient temperature is too low or too high
Adjust the ambient temperature to climate category "N" (+16 to +32 °C).
Several operating noises can be produced depending on the current operation; they do not
mean that a fault has occurred.
Humming – refrigeration unit is running.
Noise of a flowing liquid – refrigerant is flowing
though the pipes.
Clicking – the motor is switching on or off.
Irritating noises.
Check for stable position.
Remove any objects from the appliance.
Remove foreign objects from the rear.
13
IE
General
Environmental protection made easy
The refrigerants and foaming agents used in this
appliance are 100% CFC and FC free. This spares
the ozone layer and reduces the greenhouse effect.
Saving energy also helps to prevent our earth from
heating up excessively. Your new appliance is energy saving due to its environmentally friendly insulation and sophisticated technology.
Disposing of the appliance
Do not dispose of old appliances as domestic waste!
All users are under a statutory obligation to dispose of old appliances that
are no longer fit for use separately from
their domestic waste e.g. by handing them in
to a designated municipal collection centre. This
guarantees that old appliances are recycled effectively and that they do not harm the environment.
For this reason, electric appliances are marked
with the symbol shown in the top left-hand corner.
The appliance packaging consists of environmentally friendly materials, which you
can dispose of through the local recycling
centres. Never dispose of the grille in your regular
domestic waste!
Instructions on the declaration of conformity
This product complies with the applicable European and national guidelines and directives, as confirmed by the CE mark (the revelant statements
are available from the manufacturer).
Imported by: Vestel Germany GmbH, Parkring 6,
85748 Garching b. München
Warranty
The warranty period for this article is 36 months.
If you discover a defect during this period, contact
your supplier. Please keep your purchase receipt
and mention the model name and the PLU number
so that we can help you promptly.
14
The guarantee does not cover:
– damage to the paint due to normal wear and
tear
– damage due to other than intended use (e.g.
commercial use)
– damage due to changes to the item's construction.
Service
Although our products are checked and tested extensively before delivery, sometimes accessories
are missing or parts get damaged during transport. In such cases, please contact our hotline and
state the model name and the item number.
You can find further details for the hotline on the
enclosed guarantee card.
IE
Technical specifications
In accordance with the German power consumption indication decree of 30-10-1997
Manufacturer
Type of appliance
Silvercrest
double-door refrigerator
Model
DTL +1026
Energy efficiency class
A+
1)
Energy consumption2)
kWh/year
219
Gross capacity of the fridge litres
compartment
186
Effective capacity of the fridge litres
compartment
175
Gross capacity ****of the freezer litres
compartment3)
47
Effective capacity ****of the litres
freezer compartment3)
47
Storage time in the event of a hours
fault
15.5
Freezing capacity
2,5
kg/24h
N
Climate classification 4)
Voltage
V/Hz
220 - 240 V~ /
50Hz
max. power input
watts
185
Appliance dimensions
Height
cm
143,5
Width
cm
54,5
Depth
cm
59
PLU
49387
EAN
4024862425685
ClassificationfromA(=lowconsumption)toG(=highconsumption).
1)
2)
Energy consumption refers to the annual consumption in
kWh, determined in accordance with DIN EN 153. Deviations may occur in day-to-day use, depending on how the
appliance is used and where it is located.
*
=Compartmentat-6°Corcolder
**
=Compartmentat-12°Corcolder
*** =Deeprefrigerationstoragecompartmentat-18°C
or colder
**** =Freezercompartmentat-18°Corcolder
3)
4)
Climateclassification
means that the temperature you have set is maintained at a
'normal' ambient temperature. If the room temperature becomes considerably lower, the appliance will switch on less
often. This means that an undesirable temperature increase
may occur. We therefore advise you to make sure that 'normal' ambient temperature is maintained. 'Normal' means for
climateclassification
SN: +10 °C to +32 °C
N:
+16 °C to +32 °C
ST: +16 °C to +38 °C
T:
+16 °C to +43 °C
As these specifications refer to the ambient conditions laid down in the standard, the values in your
own home may differ from these specifications.
If the appliance is in a room where the temperature
is higher, it will have to switch on more often in
order to be able to maintain the low temperatures
inside the appliance. If the room is less warm, the
appliance will switch on less frequently.
This appliance is used for storing food and it complies with EC Regulation no. 1935/2004 EC
This appliance was designed, manufactured and
put onto the market in accordance with the following directives:
– The safety requirements of the Low Voltage Directive 2006/95/EC
–
The safety provisions of the EMC directive
2004/108/EC.
This appliance complies with the relevant versions
of the Low Voltage Directive 73/23/EEC and the
EMC Directive 89/336/EEC at the time of delivery
and has been checked for leaks prior to delivery.
The Operating Instructions are based on the standards and rules applicable in the European Union.
Observe country-specific standards and rules!
The identification plate is
located in the left bottom
corner in the fridge comgeprüfte
Sicherheit
partment. The appliance
has been checked for
compliance with standards and applicable legislation, including on product safety. The appliance
bears the GS mark for tested safety.
Operating Instructions: 91715_20101115
Copying in whole or in part is not allowed!
15
IE
GB
We are delighted that you have chosen to acquire one of our large domestic appliances and we
would like to wish you fun with this high-quality product. Our strict manufacturing control assures
the high standard of quality of our appliances. In the event that you still have a justified complaint,
we grant a manufacturer’s warranty for the duration of
3 years
from the purchase date and in accordance with the following conditions:
1. This warranty shall not affect your legal warranty claims as consumer towards the seller of this
appliance. The manufacturer’s warranty we grant shall not limit these rights.
2. The warranty we grant is only valid for the private use of the appliance and is limited to
England.
3. The warranty is valid for 3 years from the purchase date.
4. Our warranty service covers the repair of your appliance or the exchange with a comparable
appliance at our discretion for the entire duration of the warranty, the employee’s wages, material costs and transport costs for the appliance.
5. To agree a repair date, please contact our hotline number:
HOTline... 0800 9179216
A brief description of your complaint would be very helpful and would aid the fast repair of the
appliance.
Before requesting the customer service, please check, if there is an operational fault or a cause,
which may not have anything to do with the function of your appliance.
Here are a few hints (depending on the kind of your appliance):
Please check first:
a) if the socket draws electricity, possibly due to the connection of another electrical appliance.
b) if the plug is in working order and if it has been plugged in to the socket firmly.
c) if the thermostat knob is turned on STOPP (cooling appliances).
Notes for cooling appliances:
After the transport before being fully functional, the appliance will need approx. 24 hours, in which
the cooling agent will stabilise. The cooling capacity starts to develop from the time of connection.
Notes for cookers:
Please ensure that your cooker/hob is connected to a separate electric circuit in order to avoid
overloads. Depending on the connection, the heating time may vary. With the connection of all
three outer cables, you will achieve the best result.
16
Important document! Please, keep for proof of purchase with 3 years.
Manufacturer´s warranty
Notes for dishwashers:
If you would like to build in your dishwasher under a working top and to this end possibly remove
the supplied working top of the appliance, you must attach a vapour protection strip to the bottom
side of your kitchen working top. This is necessary in order to avoid damages to the kitchen working top due to vapours/humidity during the drying process (with the appliance door open). The
outlet hose must be laid in accordance with the instruction manual of the appliance, in order to
ensure the best possible operation of the appliance. Always ensure that after filling the softening
salt container there are no salt residues in your dishwasher. Therefore, after each salt filling a
main wash must be run. (Risk of corrosion – forfeiture of the claims under guarantee)
6. The following extended conditions apply to our build-in appliances. Ensure that you only build
in your appliance into suitable furniture. Therefore, by all means, read the attached installation instructions first. Do not screw the appliance on the sides. Only use the anchorage points
described. Also, ensure sufficient cooling for your build-in appliances. Damages, which occur
due to improper installation and/or wrong adjustment of the doors to the appliance or the cooling/freezing cargo, are not covered in our warranty.
7. Limitation of the warranty in the event of noise development: Any noises emerging in the
cooling and freezing appliances do not result in a claim under guarantee. This includes all
noises, as they occur in the usual operation. e.g. running noises of the compressor but also
of the cooling agent cycle are common. This also applies to all build-in appliances, as due to
the fitting into furniture noises may be intensified. Claims under guarantee are only valid for
appliances that are noisier than we have stated.
8. You must give proof of purchase. To this end, the original receipt is sufficient. Without proof
of purchase, we can unfortunately not provide any free warranty services. We recommend
keeping the original packaging in order to guarantee the safe transport of the appliance in the
event of a warranty claim.
9. The warranty expires if you or an unauthorised third party has opened the appliance and/or
has made changes to the appliance.
10. There is no claim under guarantee:
• in the event of improper handling as well as improper salt filling
• in the event of external mechanical damages to the appliance
• for transport damages
• in the event of wear and tear
• for operation and installation faults
• in the event of the appliance’s installation in wet rooms or outdoors
• for damages, which result from force majeure, water, lightning and excess voltage
• for damages to the kitchen working tops if no vapour protection strip was used
• for excessive use, in particular for any use other than private use
• in the event of non-compliance with the instruction manual
• if the appliance does not have a technical fault
• if the type labels and/or the series numbers have been removed or if they have been
made illegible
11. The warranty does not include any further liability on our part, in particular no liability for damages, which did not occur on the appliance itself or which occur due to the failure of the appliance to its repair (e.g. way and handling costs, etc.). However, our legal liability, in particular
according to the Product Liability Act, shall not be limited or excluded thereby.
12. Any guarantee services we provide do not extend the warranty period of 3 years from the
purchase date, not even regarding any possibly exchanged components.
We would like to wish you fun with your new
domestic appliance!
Important document! Please, keep for proof of purchase with 3 years.
IE
GB-3J-181110
17
IE
ELECTRICAL CONNECTION
1) For Great Britain only
Warning - this appliance must be earthed
Fuse replacement
If the mains lead of this appliance with a BS 1363A
13amp. fused plug, to change a fuse in this type of plug
use an A.S.T.A. approved fuse to BS 1362 type and proceed as follows:
1. Remove the fuse cover (A) and fuse (B).
2. Fit replacement 13A fuse into fuse cover.
3. Refit both into plug.
Important:
The fuse cover must be refitted when changing a fuse
and if the fuse cover is lost the plug must not be used
until a correct replacement is fitted.
Correct replacement are indentified by the colour insert
or the colour embossed in words on the base of the plug.
Replacement fuse covers are avaible from your local
electrical store.
2) For the Republic of Ireland only
The information given in respect of Great Britain will frequently apply, but a third type of plug and socket is also
used, the 2-pin, side earth type.
3) Socket outlet / plug (valid for both countries)
If the fitted plug is not suitable for your socket outlet,
please contact Whirpool Service for further instruction.
Please do not attempt to change plug yourself. This procedure needs to be carried out by a qualified W hirpool
technican in compliance with the manufactures instructions and current standard safety regulations.
18
UK - 16 -