1
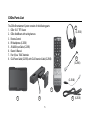
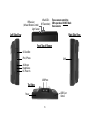
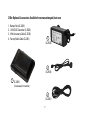
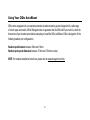
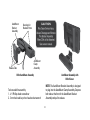
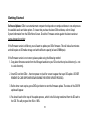
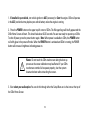
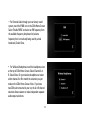
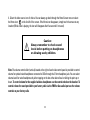
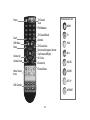
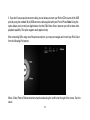
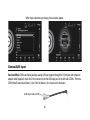
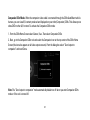
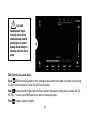
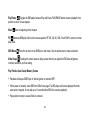
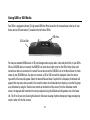
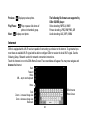
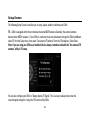
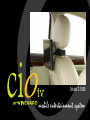
O
Model C-1000
TM
mobile entertainment system
Table of Contents
Welcome....................................................2
Product Registration...................................3
What is Mobile Digital TV?.........................4
CIOtvTM Parts List........................................5
Optional Accessories.................................7
Using your CIOtv AutoMount.....................8
Getting Started.........................................10
Touchscreen Controls...............................11
CIO Entertainment Options.......................15
Remote Control Layout and Operation......15
Remote Control Buttons...........................16
Using Mobile TV.......................................17
Using iPod® or iPhone® with CIOtv...........17
Games /AUX Input....................................20
Basic DVD Operation................................22
Using USB or SD Media...........................27
Internet....................................................28
Setup Screen...........................................29
TV......................................................29
Video .................................................30
Wireless headphone..........................30
FMM..................................................30
Wi-Fi / Network.................................31
Clock..................................................32
System Info........................................32
Wireless Headphones..............................33
Inserting Batteries..............................35
Care and Maintenance.............................36
Screen Cleaning.................................36
AutoMount Hinge Tightening ............36
Specifications..........................................37
Warranty Statement................................42
Legal Notices...........................................43
FCC Compliance.......................................44
1
Welcome
CIOtv by Winegard is a Multi-Standard Entertainment System specifically designed to OEM automotive
standards. Designed to OEM standards means that CIOtv is built to the same quality standards as a new
car and adheres to all of the Federal Motor Vehicle Safety Standards (FMVSS) as mandated by the National
Transportation Safety Administration.
While your entertainment experience is important, the safety of your passengers and family is our first priority.
Please read the owners manual thoroughly and take special note of all safety precautions noted by the following
symbol:
SAFETY PRECAUTION
!
Failure to follow operating instructions and safety precautions could result in personal injury and damage to your
CIOtv system. Before you get started, please review the following operating precautions:
• CIOtv is designed for passenger entertainment. Avoid driver distraction.
Do not operate or view CIOtv while driving.
• CIOtv is designed to provide sound through your factory sound system or wireless headphones. Always
keep sound volume at levels where you can hear outside sounds such as emergency vehicles and never wear
wireless headphones while driving.
2
• If you remove or dismount your CIOtv from the provided headrest mounting system (AutoMount), always
remove and stow the bracket assembly. A warning label is provided in two locations on the headrest bracket
assembly. Failure to do so may result in head injury.
• Make sure children are securely “belted in” while viewing CIOtv. While CIOtv is equipped with convenient
touchscreen controls, smaller children may not be able to reach the screen. A remote control is provided for
remote operation.
• To avoid draining your vehicle’s battery, DO NOT operate CIOtv for more than 15 minutes without running the
engine.
PRODUCT REGISTRATION
Please register your Winegard product by filling
out and returning the Product Registration card
provided or by completing the online registration
form at www.winegard.com/ciotv
Owner’s Manual Updates/Revisions
Updates and/or revisions to the owner’s manual
are available at www.winegard.com/ciotv
For assistance call Technical Services M-F: 7:30 AM - 6 PM (CST), Sat: 8 AM - 4 PM
(CST) at 800-788-4417.
3
What is Mobile Digital TV ?
CIOtv is equipped with the latest in digital television technology. Just like your home television, your CIOtv
television experience is digital. But that’s where the comparison stops. The CIOtv receiver can operate while
you or your vehicle is in motion.
The all new digital TV technology known as MDTV or ATSC-MH (mobile handheld) receives live TV from your
local TV station at no additional cost. It’s free. TV anywhere….anytime. NOTE: MDTV is not available in all local
channel areas.
TV stations in major markets are in the process of adding Mobile Digital TV to their regular broadcast offerings.
You’ll find that many stations have multiple MDTV channels with a variety of programming ranging from regular
network simulcast of your favorite programs to live, 24 hour news/weather, emergency reports, traffic and
business programming.
One thing to keep in mind is that MDTV is “true” broadcast TV and subject to a variety of environmental
conditions and terrain features such as severe weather, tall trees, hills and valleys. Under ideal conditions you
can expect good TV reception up to 30 or even 40 miles from the broadcast tower.
To find local ATSC-MH broadcast channels, use the channel scan feature on your CIOtv or go to
www.omvcsignalmap.com for an up-to-date listing of available MDTV stations and channels in your area.
Additional information on MDTV is available at www.openmobilevideo.com/about-mobile-dtv/mobile-dtv-101/ .
4
CIOtv Parts List
The CIOtv Entertainment System consists of the following parts:
1. CIOtv 10.2” TFT Viewer
2. CIOtv AutoMount with wiring harness
3. Remote Control
4. IR Headphones (C-2510)
5. AV AUX Input Cable (C-2545)
6. Owner’s Manual
7. Four (4) ea. “AAA” batteries
8. CLA Power Cable (C-2535) with CLA Extension Cable (C-2540)
4
(C-2510)
5
(C-2545)
(C-2540)
3
1
2
8
5
(C-2535)
4 Red LED’s
IR Receiver
(IR
Transmitter)
(Infrared Remote Control)
Light Sensor
These sensors control the
CIOtv operation. DO NOT block
these sensors.
Left Side View
Right Side View
Front Top of Viewer
SD Card Slot
iPod / iPhone
DVD
AUX Input
Headphones
DC Power In
USB Ports
Top View
DVD Eject
Button
Power
6
CIOtv Optional Accessories: Available from www.winegard/ciotv.com
1.
2.
3.
4.
Battery Pack (C-2401)
14V AC/DC Converter (C-2520)
iPod Accessory Cable (C-2530)
Factory Radio Cable (C-2201)
2
(C-2520)
3
(C-2530)
1
(C-2401)
(Used away from vehicle)
4
(C-2201)
7
Using Your CIOtv AutoMount
CIOtv comes equipped with a convenient automotive headrest mounting system designed to fit a wide range
of vehicle types and models. While Winegard makes no guarantee that the CIOtv will fit your vehicle, check the
dimensions of your headrest posts before attempting to install the CIOtv AutoMount. CIOtv is designed to fit the
following headrest post configurations:
Headrest post diameters between 10mm and 14mm.
Headrest post spread dimensions between 110mm and 170mm on center.
NOTE: For complete installation instructions, please refer to www.winegard.com/ciotv
8
AutoMount
Bracket
Assembly
Release Tabs
Openings for
Headrest Posts
AutoMount
Clamp
Assembly
CIOtv AutoMount Assembly
AutoMount Assembly with
CIOtv Viewer
NOTE: The AutoMount Bracket Assembly is designed
to plug into the AutoMount Clamp Assembly. Depress
both tabs at the front of the AutoMount Bracket
Assembly and pull to release.
Tools needed for assembly:
1. #1 Phillips head screwdriver
2. 3mm hex head key or hex head socket wrench
9
Getting Started
Software Updates: CIOtv is an entertainment computer that depends on complex software to run and process
the available audio and video options. To insure that you have the latest CIOtv software, refer to Setup/
System Information from the CIOtv Home Screen. Check the Firmware version against the latest version at
www.winegard.com/ciotv
If the Firmware version is different, you will want to update your CIOtv firmware. This will take a few minutes
and will require an SD media storage card with sufficient capacity (at least 256Mbytes).
If the Firmware version is not current, please update using the following method:
1. Copy latest firmware version from the Winegard website to your SD card at the top level directory (i.e. not in a sub directory).
2. Insert SD card into CIOtv – then turn power on (wait for screen to appear that says CIO update - DO NOT REMOVE SD CARD OR POWER DOWN DURING THE ENTIRE UPDATE PROCESS).
3. Before timer count expires, press DVD eject button to start the firmware update. The status of the CIO FW update will appear.
4. You should see the first step of the update process, which is the file being transferred from the SD card to the CIO. This will progress from 0% to 100%.
10
5. The second and last step of the update process is the programming of the CIOtv internal memory with the data from the file that was loaded to the CIOtv in the first step. This will progress from the 0% to 100%.
6. When the update is complete, the screen will say “CIO update complete”.
7. Remove SD card and reboot the CIOtv unit using the power button.
Power Up: CIOtv can be operated while mounted in your car on the CIOtv AutoMount bracket or as a hand-held
device. When mounted in your car, you can either turn on your engine or accessory power to provide power to
CIOtv. When hand-held, you have three power options: 1. Connect to power via the supplied CLA Power Cable
(C-2535). Insert the power connector into the DC Power In jack on the left side of your CIOtv, then insert the
CLA plug into your cigarette lighter receptacle. 2. Connect to power via the optional CIOtv 14V AC/DC Converter
(C-2520) or 3. Connect to power via the optional Battery Pack (C-2401).
Touchscreen Controls
Touchscreen Controls: CIOtv is controlled by state of the art Projected Capacitance Touchscreen technology.
It’s easy to use - simply touch, slide or tap the screen for adjustment or control.
Is your CIOtv installed in your car? If your CIOtv system has been professionally installed by your car dealer,
please use the following steps to get started.
11
1. If installed in your vehicle, turn vehicle ignition to ACC (accessory) or Start the engine. CIOtv will operate
in the ACC position but may deplete your vehicle battery unless the engine is running.
2. Press the POWER button on the upper top left corner of CIOtv. The Winegard logo will briefly appear and the
CIOtv Home Screen will start. This should take about 20-25 seconds. You are now ready to operate your CIOtv.
To shut off power, press the power button again. Note: When power is available to CIOtv, the POWER button
will softly glow in the power-off mode. When the POWER button is activated and CIOtv is running, the POWER
button will increase in brightness indicating power-on.
!
Note: Do not touch the CIOtv touchscreen during the boot up
process as the screen calibration may be affected. If your CIOtv
touchscreen controls fail to operate properly, shut the system
down and reboot without touching the screen.
3. Next select your audio option. You can do this through either the Setup Menu or via the icons at the top of
the CIOtv Home Screen.
12
• For External Audio through your car factory sound
system, touch the FMM icon on the CIOtv Home Screen.
Select “Enable FMM” and select an FM frequency from
the available frequency drop down list (select a
frequency that is not already being used by a local
broadcast). Select Done.
• For Wireless Headphones touch the headphones icon
at the top of CIOtv Home Screen. Select Channel A or
B. Select Done. On your wireless headphone set select
either channel A or B to match the selection you just
made on the CIOtv Home Screen. Note - If you have
two CIOtv units mounted in your car, the A or B channel
selection allows viewers to make independent separate
audio output selections.
13
4. Select the video source icon of choice. You can always go back through the Home Screen menu or select
the Home icon
at the far left of the screen. If the Home icon disappears, simply touch the screen at any
location (While video is playing, the icon will disappear after five seconds if not used).
!
Caution:
Always remember to check sound
levels before putting on headphones
or allowing use by children.
Note: The volume control slider (vertical) located at the right of each video control panel is provided to control
volume for optional wired headphones connected to CIOtv through the 3.5mm headphone jack. You can select
volume levels for wired headphones by either tapping on the bar at the desired level or sliding the point up or
down. To control volume for the supplied wireless headphones use the control wheel on the headset. To
control volume for sound provided to your factory radio via the FMM or Aux audio input use the volume
controls on your factory radio.
14
CIOtv Home Screen - Entertainment Options
Tap an icon to select your entertainment option. See detailed operating instructions for each entertainment
option below.
Note: The status icons at the lower right corner of the CIOtv Home Screen will be highlighted when an iPod
device is connected or a DVD disc or SD / USB media storage device is inserted.
Remote Control Layout and Operation
An IR sensor is located in the front panel of CIOtv. By simply pressing the remote buttons, you can control your
CIOtv while seated and using seat belts. All CIOtv functions can be controlled and activated from the remote.
15
Power
Dash
DVD Menu
Mute
Volume Up
Volume Down
Home Screen
Icons
TV Channel
Scan
FM Modulator
TV Channel Recall
Subtitles
Home Screen Icons
HOME
TV
iPOD
TV Channel List
Directional Navigation Arrows
(Up/Down/Left/Right)
OK / Enter
AUX
Channel Up
DVD/CD
Channel Down
USB/SD
SET UP
DVD Controls
INTERNET
16
Using Mobile TV
Select the TV icon from the CIOtv Home Screen. The TV screen will appear. If no channels appear on the
station list, you will first need to scan for available TV channels in your area. Select the Channel Scan icon from
the lower right corner. Channel scan usually takes several minutes to complete (you can cancel at any time by
selecting channel scan stop). When the list of available channels appears, you can scroll up or down to select
channels using either t Chan Down or uChan Up at the bottom of the screen.
Using iPod® or iPhone® with CIOtv
You can enjoy all of your iPod or iPhone audio and video files on the CIOtv big screen. CIOtv supports
on-screen control and playback of various iPod and iPhone models.
Made for iPod touch (4th generation), iPod nano (6th generation), iPod classic, iPhone 4, iPhone 3GS.
17
Note: The CIOtv on-screen control and playback feature may work with other
or later versions of iPod and iPhone products. USB connection to CIOtv via the
standard iPod/iPhone supplied cable may also support audio and video playback for a
wider variety of models. Please refer to www.winegard.com/ciotv for a full listing of
supported devices.
You can connect your iPod or iPhone to CIOtv in several ways:
1. To fully utilize CIOtv’s iPod on-screen control and playback feature, connect using the optional CIOtv iPod
cable (p/n C-2530). This will allow you to stow away and operate your device from the CIOtv Home Screen.
Select the iPod icon from the CIOtv Home Screen, then select either the Audio or Video icon. CIOtv supports full
video and audio playback.
2. You can also connect your iPod to CIOtv using an Apple® or third party supplied A/V connector cable. The
cable must have an Apple 30 pin iPod connector on one end and RCA style composite connectors (male) on the
other. Connect the cable to your Apple device, then connect the RCA connectors to the RCA connectors on the
supplied CIOtv A/V Aux Input cable (p/n C-2545). Insert the 3.5mm connector into the AUX Input jack on the left
side of the CIOtv. Select Games / Aux from the CIOtv Home Screen, then select Aux Input from the menu. Audio
or Video from your iPod/iPhone will now play on CIOtv.
Note: This option supports full audio and video playback on your CIOtv but does not allow on-screen control and
playback. Using this option, remote device output is controlled from the iPod screen.
18
3. If you don’t have a special connector cable, you can always connect your iPod to CIOtv via one of the USB
ports by using the standard 30 pin/USB connector cable supplied with your iPod or iPhone. Note: Using this
option allows you to control your Apple device from the CIOtv Home Screen, however you will not have video
playback capability. This option supports audio playback only.
After connecting CIOtv using one of the previous options, you may now navigate and control your iPod. Select
from the following iPod options:
Music, Video, Photo or Podcast selections may be made using the scroll bar at the right of the screen. Touch to
select.
19
When music selections are playing, these screens appear:
Games/AUX Input
Aux Input Mode: CIOtv can display auxiliary analog A/V input supplied through the 3.5mm jack and composite
adapter cable (supplied). Insert the 3.5mm connector into the AUX Input jack on the left side of CIOtv. From the
CIOtv Home Screen select Games / Aux. From the Games / Aux screen select Aux Input.
AV AUX Input Cable (C-2545)
20
Companion CIOtv Mode. When the companion video cable is connected through the CIOtv AutoMount vehicle
harness, you can view A/V content produced and displayed on your other (Companion) CIOtv. This allows you to
share DVD or other A/V content. To activate the Companion CIOtv mode:
1. From the CIOtv Home Screen select Games / Aux. Then select Companion CIOtv.
2. Next, go to the Companion CIOtv unit and select the Companion icon at the top center of the CIOtv Home
Screen (the icon also appears on all video output screens). From the dialog box select “Send output to
companion” and touch Done.
Note: The “Send output to companion” mode automatically defaults to off when you enter Companion CIOtv
mode or if the unit is turned off.
21
Basic DVD Operation
The CIOtv DVD system is designed specifically for automotive use where road vibration, shock and extreme
environmental conditions may exist. While the OEM grade DVD drive mechanism and laser reader are very
robust, a little care will go a long way to ensure years of trouble free use.
Never insert foreign objects, liquids, food items or anything other than a DVD disc into the DVD drive slot located
on the right side of the CIOtv player.
You can control DVD operation either from the CIOtv touchscreen or by using your CIOtv remote control. The
touchscreen controls on the DVD screen can control most primary DVD functions and DVD Menu functions.
After touching the DVD icon, the DVD control screen will appear. Insert a disc and DVD video will appear. If the
DVD fails to start touch the DVD Menu arrow at the lower right corner of the screen. Use the touch screen to go
to “Play” on the DVD menu. Select Enter.
Loading Discs:
• Insert disc with printed side facing forward so you can see the label. As you insert the disc, the drive will
gently take the disc and complete the insertion. Don’t force or hold onto the disc as it is automatically drawn
into the DVD drive. The disc will now start to play.
• To conserve energy and extend the life of the drive mechanism, the CIOtv DVD drive may power down if the
DVD function is not being used. If this occurs, the drive may not automatically take a disc when you attempt to
insert it. In this case, do not force the disc in. Simply navigate to the DVD screen from the CIOtv main menu and
try to insert the disc again.
Note: For two-sided DVDs, play one side of disc, eject disc, turn it over, and reload to play second side.
22
!
CAUTION:
Inserting hands, fingers,
or foreign objects in Disc
insertion slot may result in
personal injury or product
damage. Do not attempt to
insert more than one disc at
a time.
DVD Controls (see screen above)
Eject:
DVD discs can be ejected by either pressing the eject button on the upper right corner or by touching
the eject icon at the lower left corner of the DVD control screen.
Rew:
Reverses direction of play. Each time Rew is pressed, the speed of reverse play is increased (2X, 4X,
8X, 16X) . To cancel, press Play/Pause icon to return to normal play speed.
Prev:
Forwards to previous chapter.
23
Play/Pause:
Toggles the DVD player between Play and Pause. PLAY/PAUSE button resumes playback from
position at which it was stopped.
Next:
Goes to beginning of next chapter.
FF:
Advances DVD play. Each touch increases speed of FF (2X, 4X, 8X, 16X). Touch PLAY to return to normal
play mode. DVD Menu:
Press this to return to the DVD disc’s main menu. Use the touchscreen to make a selection.
Video Setup:
Touching this control opens a dialog screen that lets you adjust the DVD video brightness,
contrast, saturation, and hue setting.
Play Position (Last Scene) Memory Feature
• Playback will stop as DVD Player or Vehicle Ignition is switched ‘OFF’.
• When power is restored, select DVD from CIOtv home page. The DVD player will resume playback from the same point it stopped. (It may take up to 5 seconds before DVD disc resumes playback).
• Play position memory is erased if disc is removed.
24
!
CAUTION:
Attempting to play a cracked, warped, irregularly shaped, or damaged
disc could severely damage the DVD Player playback mechanism.
Playable discs
CIOtv is a multi-region DVD player capable of playing the following DVD/CD and Audio formats:
DVD media: DVD-ROM, DVD+/-R, DVD +/-RW
CD media: CD-ROM, CD-R, CD-RW, VCD, SVCD, CVD, DVCD
Video decode: DVD-Video, DVD-VR, XviD, MPEG-4
Picture decode: JPEG
Audio decode: Audio-CD, CD-DA, HDCD, MP3, WMA (Lossy)
DVD Software Updates:
While the CIOtv DVD comes from the factory ready to play, you may find it necessary to update or re-load the
software that supports the DVD drive. To update DVD software follow these steps:
1. Check the DVD firmware version against the latest version at www.winegard.com/ciotv - If the firmware
version is different, update your DVD firmware. This will take a few minutes and will require an SD media
storage card with sufficient capacity (at least 256Mbytes).
25
2. Copy the latest firmware version from the Winegard website to your SD card at the top level directory (i.e.
not in a sub directory). File will be named DvdUpdate.rom
3. Insert SD card into CIOtv – then turn power on.
4. After the Boot-up process, you will be prompted from the CIOtv Home Screen that a DVD upgrade object has
been found. Select “Upgrade” or “Cancel”.
5. If “Upgrade” is selected, the DVD ROM will be updated. DO NOT REMOVE SD CARD OR POWER DOWN
DURING THE ENTIRE UPDATE PROCESS.
6. Remove SD card and reboot the CIOtv unit using the power button.
26
Using USB or SD Media
Your CIOtv is equipped with two (2) high speed USB Host Ports located in the recessed area at the top of your
device and an SD card reader (1) located on the left side of CIOtv.
USB Ports
SD Card Slot
You may use standard USB devices or SD card storage media to play audio, video and photo files on your CIOtv.
When a USB/SD device is inserted, the USB/SD icon at the lower right corner on the CIOtv Home Screen will
show that a device is connected or inserted. You can also touch the USB/SD icon on the Home Screen to check
status of your SD/USB drives. If a device is inserted, an SD or USB icon will be displayed. Select the device
type and the file menu will appear. Select the desired files and view. If a photo file is displayed, thumbnails will
appear (this may take a few seconds). You can either select an individual photo to display or view the file group
as a slideshow by using the Touchscreen controls at the bottom of the screen. From the slideshow control
screen, the elapsed slide transition time may be adjusted using the Slideshow Configuration icon at the lower
left. The Fit to Screen icon (lower right) allows for full screen viewing of photos (temporary image resizing may
result in order to fit the full screen).
27
Previous:
Displays previous photo.
The following file formats are supported by
CIOtv SD/USB player:
Video decoding: MPEG-4, WMV
Picture decoding: JPEG, BMP, PNG, GIF
Audio decoding: AAC, MP3, WMA
Play/Pause:
Play or pause slide show of
photos in thumbnail group.
Next:
Displays next photo.
Internet
CIOtv is equipped with a Wi-Fi receiver capable of connecting your device to the internet. To get started you
must have an available Wi-Fi signal and be able to configure CIOtv to receive the local Wi-Fi signal. See the
following Setup / Network section for network connection instructions.
Touch the Internet icon on the CIOtv Home Screen. The screen below will appear. You may now navigate and
browse the Internet.
Back
Forward
Home
URL – tap to start keyboard
Home
CIOtv Internet
Home Screen
Tools
Zoom + increased image size
Zoom - decreases image size
Bookmark
28
Setup Screen
The following Setup Screen icons allow you to setup, adjust, enable or calibrate your CIOtv.
TV – CIOtv is equipped with both an internal and external MDTV antenna. Generally, the external antenna
delivers better MDTV reception. If your CIOtv is connected to an external antenna through the CIOtv AutoMount,
select TV from the Setup menu, then select “Use external TV antenna” from the TV dialog box. Select Done.
Note: If you are using your CIOtv as a hand-held device always remember to disable the “Use external TV
antenna” utility in TV setup.
You can also configure your CIOtv to “Always display TV Signal”. This is a way to always know what the
received signal strength is if using the TV function of the CIOtv.
29
Video – Video adjustment for picture brightness, contrast and the brightness of the LCD backlight can be
adjusted using the sliders on the Video Setup Screen. We recommend that you set the backlight brightness to
Auto-adjust for optimal brightness during daylight or night-time operation. CIOtv is equipped with a light sensor
that adjusts the backlight for daytime/night-time viewing. The color bars at the left of the screen show relative
brightness of the Backlight as the slider is adjusted.
To return to the factory default settings for all of the adjustments, touch the Defaults button icon. When
complete, select Done
.
Wireless Headphones – To enable wireless headphones for use with your CIOtv, select the Wireless
headphones icon and then select the desired IR channel - Channel A, Channel B or Headphones off. At the same
time, remember to set your Wireless headphones to the corresponding channel using the three way selector
switch on the headphone set. When complete, select Done
.
FMM – Select Enable FMM to start and run the FM modulator. The FM modulator allows you to play the CIOtv
audio over your factory car radio. If you have more than one CIOtv in your vehicle, remember that only one CIOtv
unit may be FMM enabled at the same time. Enable the CIOtv unit that is playing the audio selection you want
to hear on the car radio system. Select FMM frequency and set to an FM channel frequency that is not being
used by a local station. We recommend frequencies at the lower end of the FM band (88.3 – 90.1) for best
results. Remember to tune your car radio to the same frequency (it’s a good idea to set your FMM frequency
to a radio pre-set knob for quick reference and tuning). Your car radio volume control will now control volume.
When complete, select Done
.
30
Wi-Fi / Network – Select Network to set up Wi-Fi and IP
addresses. To connect to the internet, you must select a
Wi-Fi network, access, point and configure your CIOtv for
network connection.
First, select IP from the Network menu. For automatic IP
network configuration (recommended), select Use DHCP
(Dynamic Host Configuration Protocol). DHCP allows
a computer to be configured for network connection
automatically, eliminating the need to configure each time
you change location. To manually configure an IP address,
select Use Static IP and follow the configuration steps.
Remember to select Done when complete.
Next, select Wi-Fi from the Setup Screen menu. A list of
available networks will appear. (See screen shot top right).
Wi-Fi signal strength is indicated by the bars at the left and
numeric value (expressed in db) at the far right (i.e. – 85:
normally it’s best to select the network with the highest
signal strength value for best performance). Select the
desired network access point from the list. A dialog box
will appear. (See screen shot bottom right).
31
Select the Connect icon and enter a password if prompted
(a password is not required for non-protected, open
networks). Enter Done. (See screen at right).
A dialog box will appear – Connect to this access point?
Select OK or Cancel.
After initial setup, CIOtv will remember the configured
networks and passwords and will automatically try to
reconnect to the network that you were connected to last.
If you want to connect to a different previously configured
network in the list, simply select the other network from
the list.
Note: CIOtv supports WPA, WPA2 and WEP 64/128-bit wireless security protocols. (Enterprise versions are not
supported).
Clock – To set time and date options, select the Clock icon and set values using the touchscreen controls.
Select Done when complete.
System Info – Shows the current system version, software and hardware information you may need for
software updates or service. Select Done to return to Setup.
32
Wireless Headphones
CIOtv wireless headphones receive sound signals via an infrared light beam transmitted from LED’s located in
the CIOtv touchscreen. IR headphones operate in a line-of-sight orientation with the infrared LED transmitter on
the top edge of the CIOtv screen. Blocking the line of sight with a hand, book or other object might cause
interruption of the signal and sound transmission. CIOtv headphones are designed for either mid or rear seat
operating ranges up to 9 feet from the screen. See the diagram below for operating instructions.
Power/Channel Selector Switch – To
Power CIOtv headphones, set the three-way
switch as follows:
Position 1 = Power off (no light)
Position 2 = Audio Channel A (Red LED)
Position 3 = Audio Channel B (Green LED)
Volume
Battery
Compartment
Release
AUX Audio in
33
An Auto-Off Power-Saver feature automatically switches headphones ‘off’ 5 minutes after reception of the last
detected infrared transmission signal to help conserve battery power.
Position 2 and 3 switches audio reception between Channel A and Channel B. Since CIOtv can produce different
A/V options independently (i.e. MDTV, DVD, iPod Video, etc.), audio signals must be transmitted through either
channel A or B when more than one CIOtv unit is installed in your vehicle. Select the A or B channel on your
headphone set to correspond with the audio channel setting (touch the Wireless Headphone icon on the CIOtv
Home Screen) for the CIOtv unit you are viewing.
Volume - Adjusts volume level Up or Down.
!
CAUTION:
Turn headphone volume to minimum before turning power switch
‘ON’ to avoid damage to headphones or listener’s ears.
34
Aux Audio Out – A 3.5mm jack is located at the lower edge of the right side ear phone. This jack will allow
transmission of audio signals at line level if desired for additional devices.
Inserting Batteries: Remove battery compartment cover by pushing tab in and lifting cover off at the same
time. Insert two, size “AAA” batteries with correct polarity by matching + and - on batteries per the diagram
inside battery compartment.
Remove battery compartment cover by pushing
tab in and lifting cover off at the same time.
Battery
Compartment Tab
!
Safety Precaution:
Do not leave Remote Control or Headphones in direct sunlight. Damage
to the accessories may occur. In addition, rupture or chemical leakage from
batteries may cause fire or personal injury. Wash hands after handling
batteries. Keep batteries out of reach of children.
35
Care and Maintenance
CIOtv is a complex digital device. Winegard recommends that you treat CIOtv just as you would a laptop or
other hand-held digital devices including cell phones, MP3 players, etc.
!
AutoMount Assembly
Hinge Tightening
CAUTION:
1. Do not immerse CIOtv in water or expose to excessive moisture.
2. Do not expose to excessive shock or vibration.
3. Operate only within recommended temperature ranges.
4. Do not use strong chemical or abrasive cleaners or solvents to clean the screen or case. We recommend a non-abrasive micro-fiber cleaning cloth and mild solution lens cleaner.
5. Use only approved AC/DC power sources.
In the event that the hinge loosens over time and the mount tends to
droop, tighten the hinge by popping off the plastic end caps. Using an 8mm
socket, gently tighten the M5 nut on both ends. Tighten nut to a 5 N-m
(7.2 ft-lb) torque setting. DO NOT OVER TIGHTEN.
36
Specifications
Vehicle Safety Standards:
FMVSS 201 Occupant Protection in Interior Impact
FMVSS 202 Head Restraints
FMVSS 207 Seating Systems
FMVSS 210 Seat belt assembly anchorages
FMVSS 302 Flammability
DVD Laser Safety Standards:
EN 60825-1:2007 Edition 2 Safety of laser products
21 CFR 1040.10 Performance standards for light emitting products – laser
AC/DC Converter:
Rated input: 100-250VAC, 50-60Hz, 1A max
Rated output: 14V-15V DC, 3.5A max
Headphones:
Batteries: 2 ea. “AAA”
Audio bandwidth: 20Hz to 20KHz
Total harmonic distortion: 0.5% max
Signal-to-Noise Ratio: 60dB min
37
Headphones (con’t.):
Frequency response: +/-2dB within specified bandwidth
Sound pressure level: 100dB max
Carrier frequency: Channel A: 2.3MHz (left) / 2.8MHz (right)
Channel B: 3.3MHz (left) / 3.8MHz (right)
Modulation: FM wideband, +/-75KHz max center frequency deviation
Range: 3 meters min (from front surface of CIOtv)
Electromagnetic Compatibility (EMC) Standards
EU: 2006/95/EC - Low Voltage Directive
EU: 2004/108/EC - EMC Directive
EU: 2004/104/EC - Automotive EMC directive
Internal Antenna:
Frequency range: 54-88MHz, 174-216MHz, 470-698MHz
Vehicle power:
8 -16VDC, 3.5A max current
FM Modulator:
Audio bandwidth: 20Hz to 20KHz
Total harmonic distortion: 0.5% max
Signal-to-Noise Ratio: 60dB min
38
FM Modulator (con’t.):
Frequency response: +/-2dB within specified bandwidth
Carrier frequency: 88.3 to 107.9 MHz
Modulation: FM wideband, +/-75KHz max center frequency deviation
Radiated output field strength using internal antenna @3m: 10uV/m min, 250uV/m max
Conducted output power: -75dBm min, -50dBm max
Conducted output impedance: 50 ohms
Aux headphone jack:
Connector type: 3.5mm diameter, 3-contact female
Sound pressure level: 100dB (max)
Aux A/V input:
Connector type: 3.5mm diameter, 4-contact female
Video format: NTSC or Color Video Blank and Sync (CVBS) composite video
Touch Panel:
Type: Projected Capacitive with laminated impact protection layer.
Single point touch recognition
39
LCD Panel:
Display Type: AM TFT
Viewing area: 10.2 inch diagonal
Resolution: 800x480 RGB
Aspect ratio: 16:9
Contrast Ratio: 300:1 minimum
Brightness: 350cd/m^2 minimum
Viewing angle: 130° horizontal and 110° vertical planes (CR >10)
Backlight type : LED
Temperature Range:
Operating Temperature: -20C to +55C (-4F to 131F)
Storage Temperature (CIOtv Viewer and AutoMount): -40C to +85C (-40F to 185F)
Storage Temperature (Accessories): -40C to +75C (-40F to 167F)
USB Host Ports:
USB file format: FAT
Video decode: XviD, MPEG-4, WMV, H.264 MP, AVI
Picture decode: JPEG, BMP, PNG, GIF
Audio decode: AAC, MP3, WMA, WAV, OGG
40
SD card slot:
Media: Full-size SD, miniSD (with adapter), microSD (with adapter), MMC
File system: FAT
Video decode: MPEG-4, WMV
Picture decode: JPEG, BMP, PNG, GIF
Audio decode: AAC, MP3, WMA, WAV
DVD / CD drive:
Disc size: 12cm
Media Load Type: Side-load
DVD media: DVD-ROM, DVD+/-R, DVD +/-RW
CD media: CD-ROM, CD-R, CD-RW, VCD, SVCD, CVD, DVCD
Video decode: DVD-Video, DVD-VR, XviD, MPEG-4
Picture decode: JPEG
Audio decode: Audio-CD, CD-DA, HDCD, MP3, WMA (Lossy)
Anti-shock buffer memory: 16MB min
Last scene memory: supported
41
Warranty Statement
WINEGARD COMPANY CIOtv™ ONE YEAR LIMITED WARRANTY (NONTRANSFERABLE)
Terms of Warranty
Winegard Company (the Company) warrants to the original retail purchaser, that the automotive entertainment product(s) purchased from a Company
authorized dealer or retailer are free from defects in materials or workmanship under normal use and conditions for a period of one (1) year from date of
purchase, except, the remote control and headphones which are warranted for a period of sixty (60) days from date of purchase. Winegard Company (at
its option) will either repair or replace the defective product at no charge to you.
The One Year Limited Warranty is provided on the condition that the equipment is properly delivered with all handling and freight charges prepaid to your
Winegard dealer for return to our factory for repair or replacement. Winegard dealers will arrange for the replacement or repair and return to you without
charge the product which failed due to defective material or workmanship.
Should the product(s) be determined defective during the applicable warranty period, the defect(s) will be repaired or replaced at the discretion of the
Company with a new or reconditioned part(s). To obtain warranty service, the product(s) must be returned to a Company authorized dealer or retailer with
proof of warranty coverage.
This warranty covers parts, but does not cover any costs incurred in removal, shipping or reinstallation of the product. The warranty does not extend to
products which have been subjected to misuse, improper installation, or to damage caused by wind, lightning, ice or other occurrences over which the
manufacturer has no control. Dealer removal and/or replacement charges are specifically not covered under the terms of this limited warranty.
Exclusions
This limited warranty excludes:
• Elimination of externally generated static or noise, or the correction of antenna problems or weak television reception.
• Costs incurred for installation, removal or reinstallation of the product(s).
• Damage to media storage devices, video games, software, discs, speakers, accessories or vehicle electrical systems.
• Cosmetic damage or damage due to negligence, misuse, abuse, failure to follow operation instructions, accidental spills or customer applied cleaners.
• Damage due to environmental causes such as floods, airborne fallout, chemicals, salt, hail, windstorms, lightning or extreme temperatures.
• Damage due to accidents, road hazards, fire, theft or vandalism.
• Damage due to improper installation or connection, improper connection to equipment of another manufacturer, modifications of existing equipment.
• Product(s) which have been opened or tampered with for any reason or which have been damaged due to alteration or service
performed by anyone other than the Company or a Company authorized installer.
42
EXCEPT AS EXPRESSLY SET FORTH IN THIS WARRANTY, THE COMPANY MAKES NO OTHER WARRANTIES, EXPRESSED OR IMPLIED, INCLUDING ANY
IMPLIED WARRANTIES OF MERCHANTABILITY AND FITNESS FOR A PARTICULAR PURPOSE. THE COMPANY EXPRESSLY DISCLAIMS ALL WARRANTIES
NOT STATED IN THIS LIMITED WARRANTY. ANY IMPLIED WARRANTIES THAT MAY BE IMPOSED BY LAW ARE LIMITED TO THE TERMS OF THIS
EXPRESSED LIMITED WARRANTY.
Some states do not allow limitation on how long an implied warranty lasts. In such states, the limitations or exclusions of this Limited Warranty may
not apply. Some states do not allow the exclusion or limitation of incidental or consequential damages. In such states, the exclusion or limitation of this
Limited Warranty may not apply to you. This Limited Warranty gives you specific legal rights and you may have other rights, which vary from state to
state.
Legal Notices
Made for iPod and Made for iPhone
“Made for iPod” and “Made for iPhone,” mean that an electronic accessory has been designed to connect specifically to iPod or iPhone respectively, and
has been certified by the developer to meet Apple performance standards. Apple is not responsible for the operation of this device or its compliance with
safety and regulatory standards. Please note that the use of this accessory with iPod or iPhone may affect wireless performance.
iPhone, iPod, iPod classic, iPod nano and iPod touch are trademarks of Apple Inc., registered in the U.S. and other countries.
All Rights Reserved
This publication is protected and all rights are reserved. No part of it may be reproduced or transmitted by any means or in any form, without prior written
consent from Winegard Company.
The information in this manual has been carefully checked and is believed to be accurate; however, changes are made periodically in subsequent publication
editions. Winegard Company may improve and/or change products described in this publication at any time. Due to continuing improvement and product
upgrade, Winegard Company is not responsible for inaccurate information that may appear in this manual. In no event will Winegard Company be liable for
direct, indirect, special, exemplary, incidental, or consequential damages resulting from any defect or omission in this manual, even if advised of the possibility
of such damages.
In the interest of continued product improvement, Winegard Company reserves the right to make improvements in this manual and the products it
describes at any time, without notices or obligation.
CIOtv is a trademark of Winegard Company. Winegard is a registered trademark of Winegard Company.
43
FCC Compliance
FCC Statement
Changes or modifications to this product that are not expressly approved by Winegard Company could void the user’s authority to operate this equipment.
“This device complies with Part 15 of the FCC Rules. Operation is subject to the following two conditions: (1) This device may not cause harmful
interference, and (2) this device must accept any interference received, including interference that may cause undesired operation.”
FCC Radiation Exposure Statement for Portable Devices
“This equipment complies with FCC radiation exposure limits set forth for an uncontrolled environment. This equipment is in direct contact with the body
of the user under normal operating conditions. This transmitting device must not be co-located or operating in conjunction with any other antenna or
transmitter.”
Correcting Interference Issues
NOTE: This equipment has been tested and found to comply with the limits for a Class B digital device, pursuant to Part 15 of the FCC Rules. These limits
are designed to provide reasonable protection against harmful interference in a residential installation. This equipment generates, uses, and can radiate
radio frequency energy and, if not installed and used in accordance with the instructions, may cause harmful interference to radio communications.
However, there is no guarantee that interference will not occur in a particular installation. If this equipment does cause harmful interference to radio or
television reception, which can be determined by turning the equipment off and on, the user is encouraged to try to correct the interference by one or
more of the following measures:
•Reorient or relocate the receiving antenna.
•Increase the separation between the equipment and receiver.
•Connect the equipment into an outlet on a circuit different from that to which the receiver is connected.
•Consult the dealer or an experienced radio/TV technician for help.
Macrovision Statement
This product incorporates copyright protection technology that is protected by U.S. patents and other intellectual property rights. Use of this copyright
protection technology must be authorized by Macrovision, and is intended for home and other limited viewing uses only unless otherwise authorized by
Macrovision. Reverse engineering or disassembly is prohibited.
Copyright © 2011 Winegard Company, Burlington, Iowa USA. All Rights Reserved.
44
Winegard Company • 3000 Kirkwood Street • Burlington, IA 52601 • www.winegard.com
© 2011 Winegard Company • 2452221 REVJ 4/11