1
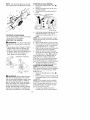
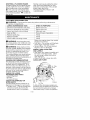
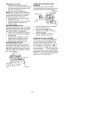
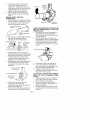
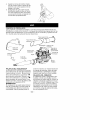
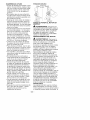
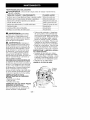
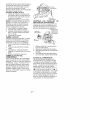
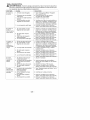
Instruction
Manual
I CRAFTSMAN°I
25cc/1.5 cu.in. 2-Cycle
200 MPH/400 CFM
GASOLINE POWERED
BLOWER/VAC
Model No.
358.794880
•
Safety
•
Assembly
•
•
Operation
Maintenance
•
Parts List
•
Espar_ol
WARNING:
Read and follow all Safety Rules and Operating
Instructions before first use of this product.
For answers to your questions about this product:
Call 7 am-7 pm, Mon.-Sat., or 10 am-7 pm, Sun.
1-800-235-5878
Sears, Roebuck
530165759
9/7/05
and Co., Hoffman
(Hours
listed are Central Time)
Estates,
IL 60179 U.S.A.
Warranty Statement
Safety Rules
Assembly
Operation
Maintenance
Storage
FULL TWO YEAR WARRANTY
2
2
4
6
9
11
Troubleshooting
Table
Emissions Statement
Parts List
Spanish
Parts and Ordering
ON CRAFTSMAN
12
12
14
17
Back
® GAS BLOWER
For two (2) years from date of purchase, when this Gas Blower is maintained,
lubricated, and tuned up according to the instructions in the instruction manual,
Sears will repair, free of charge, any defects in material or workmanship.
This warranty excludes blower tubes, spark plug, and air cleaner, which are expendable parts and become worn during normal use.
If this blower is used for commercial purposes, this warranty applies for 90 days from
the date of purchase. If this Blower is used for rental purposes, this warranty applies
for 30 days from the date of purchase. This warranty applies only while this product
is in use in the United States.
WARRANTY SERVICE IS AVAILABLE BY RETURNING THE BLOWER TO THE NEAREST
SEARS STORE OR SERVICE CENTER IN THE UNITED STATES.
This warranty gives you specific legal rights, and you may also have other rights
which vary from state to state.
Sears, Roebuck and Co., D/817WA, Hoffman Estates, IL 60179
z_
dt_ WARNING:
Failure to follow all
Safety Rules and Precautions can result in serious injury.
KNOW YOUR UNIT
• Read your instruction manual carefully until you completely understand
and can follow all warnings and
safety rules before operating the unit.
• Restrict unit to users who understand and will follow all warnings and
safety rules in this manual.
_I_WARNING:
Inspect area before
starting unit. Remove all debris and
hard objects such as rocks, glass,
wire, etc. that can ricochet, be thrown,
or otherwise cause injury or damage
during operation.
Use your unit as a blower for:
• Sweeping debris or grass clippings
from driveways, sidewalks, patios, etc.
• Blowing grass clippings, straw, or
leaves into piles, around joints, or between bricks.
Use your unit as a vacuum for:
• Picking up dry material such as
leaves, grass, small twigs, and bits of
paper.
• For best results during vacuum use,
operate your unit at high speed.
• Move slowly back and forth over the
material as you vacuum. Avoid forcing the unit into a pile of debris as
this can clog the unit.
• Keep the vacuum tube about an inch
above the ground for best results.
PLAN AHEAD
• Always wear eye protection when operating, servicing, or performing maintenance on unit. Wearing eye protection will help to prevent rocks or debris
from being blown or ricocheting into
eyes and face which can result in
blindness and/or serious injury. Eye
protection should be marked Z87.
• Always wear foot protection. Do not
go barefoot or wear sandals.
• Always wear respirator or face mask
when working with unit in dusty environments.
• Secure hair above shoulder length.
Secure or remove jewelry, loose
clothing, or clothing with loosely
hanging straps, ties, tassels, etc.
They can be caught in moving parts.
-2-
• Do not operate unit when you are
tired, ill, upset, or if you are under the
influence of alcohol, drugs, or medication.
• Keep children, bystanders, and animals away from work area a minimum of 30 feet (10 meters) when
starting or operating unit. Do not
point blower nozzle in the direction of
people or pets.
HANDLE FUEL WITH CAUTION, IT IS
HIGHLY FLAMMABLE
• Eliminate all sources of sparks or
flame (including smoking, open
flames, or work that can cause
sparks) in the areas where fuel is
mixed, poured, or stored.
• Mix and pour fuel in an outdoor area;
store fuel in a cool, dry, well ventilated
place; use an approved, marked container for all fuel purposes.
• Do not smoke while handling fuel or
while operating the unit.
• Make sure the unit is properly assembled and in good operating condition.
• Do not fill fuel tank while engine is
running.
• Avoid spilling fuel or oil. Wipe up fuel
spills before starting engine.
• Move at least 10 feet (3 meters)
away from fuel and fueling site before starting engine.
• Always store gasoline in a container
approved for flammable liquids.
OPERATE YOUR UNIT SAFELY
_WARNING:
Stop the engine before opening the vacuum inlet door. The
engine must be stopped and the impeller blades no longer turning to avoid serious injury from the rotating blades.
• Inspect unit before each use for
worn, loose, missing, or damaged
parts. Do not use until unit is in
proper working order.
• Keep outside surfaces free from oil
and fuel.
• Never start or run engine inside a
closed room, building or other unventilated area. Breathing exhaust
fumes can kill.
• To avoid static electricity shock, do
not wear rubber gloves or any other
insulated gloves while operating unit.
• Do not set unit on any surface except
a clean, hard area while engine is running. Debris such as gravel, sand,
dust, grass, etc. could be picked up by
the air intake and thrown out through
-3-
discharge opening, damaging unit,
property, or causing serious injury to
bystanders or operator.
• Avoid dangerous environments.
Do
not use in unventilated areas or
where explosive vapors or carbon
monoxide build up could be present.
• Do not overreach or use from unstable surfaces such as ladders, trees,
steep slopes, rooftops, etc. Keep firm
footing and balance at all times.
• Never place objects inside the
blower tubes; always direct the blowing debris away from people, animals, glass, and solid objects such
as trees, automobiles, walls, etc. The
force of air can cause rocks, dirt, or
sticks to be thrown or to ricochet
•
•
•
•
•
•
which can hurt people or animals,
break glass, or cause other damage.
Never run unit without the proper
equipment attached. When using
your unit as a blower, always install
blower tubes. When using the optional vacuum kit, always install vacuum tubes and vacuum bag assembly. Make sure vacuum bag assembly is completely zipped.
Check air intake opening, blower
tubes, and vacuum tubes frequently,
always with engine stopped and
spark plug disconnected.
Keep vents
and discharge tubes free of debris
which can accumulate and restrict
proper air flow.
Never place any object in air intake
opening as this could restrict proper air
flow and cause damage to the unit.
Never use for spreading chemicals,
fertilizers, or other substances which
may contain toxic materials.
To avoid spreading fire, do not use
near leaf or brush fires, fireplaces,
barbecue pits, ashtrays, etc.
Use only for jobs explained in this
manual.
MAINTAIN YOUR UNIT PROPERLY
• Have all maintenance other than the
recommended procedures described
in the instruction manual performed
by a Sears Service Center.
• Disconnect spark plug before performing maintenance except for carburetor adjustments.
• Use only recommended
Craftsman ®
replacement parts; use of any other
parts may void your warranty and
cause damage to your unit.
• Empty fuel tank before storing the
unit. Use up fuel left in carburetor by
starting engine and letting it run until
it stops.
• Do not use any accessory or attachment other than those recommended
by manufacturer for use with your unit.
• Do not store the unit or fuel in a
closed area where fuel vapors can
reach sparks or an open flame from
hot water heaters, electric motors or
switches, furnaces, etc.
• Store in a dry area out of reach of
children.
SAFETY NOTICE: Exposure to vibrations through prolonged use of gasoline
powered hand tools could cause blood
vessel or nerve damage in the fingers,
hands, and joints of people prone to circulation disorders or abnormal swelling.
Prolonged use in cold weather has been
linked to blood vessel damage in otherwise healthy people. If symptoms occur
such as numbness, pain, loss of
strength, change in skin color or texture,
or loss of feeling in the fingers, hands, or
joints, discontinue the use of this tool
and seek medical attention. An
antivibration system does not guarantee
the avoidance of these problems. Users
who operate power tools on a continual
and regular basis must monitor closely
their physical condition and the condition
of this tool.
SPECIAL NOTICE: For users on U.S.
Forest Land and in some states, including California (Public Resources Codes
4442 and 4443), Idaho, Maine, Minnesota, New Jersey, Oregon, and Washington: Certain internal combustion engines operated on forest, brush, and/or
grass covered land in the above areas
are required to be equipped with a spark
arresting screen, maintained in effective
working order, or the engine must be
constructed, equipped, and maintained
for the prevention of fire. Check with
your state or local authorities for regulations pertaining to these requirements.
Failure to follow these requirements is a
violation of the law. This unit is not factory equipped with a spark arresting
screen; however, a spark arresting
screen is available as an optional part. If
a spark arresting screen is required in
your area, contact Sears Service for the
correct kit. The spark arresting screen,
blower tubes, and nozzles must be assembled to unit to be in full compliance
with regulations.
CARTON
CONTENTS
Check carton contents against the following list.
Model 358.794880
• Blower
• Blower tube
• Elbow tube
•
A standard screwdriver
for assembly.
BLOWER
ASSEMBLY
BLOWER TUBE ASSEMBLY
If you have already assembled your
unit for use as a vacuum, remove the
vacuum tubes and collection bag.
1. Align the rib on the blower tube
with the groove in the blower outlet;
slide the tube into place.
NOTE: Knob must be loose enough to
allow blower tube to be inserted in blower outlet. Loosen knob by turning counterclockwise.
• Vacuum bag
• Upper vacuum tube
• Lower vacuum tube
• Collapsible utility bag
• 2-Cycle engine oil
NOTE: It is normal for the fuel filter to
rattle in the empty fuel tank.
ASSEMBLY
,_
WARNING:
._,
Stop engine and be
_'¢_
sure the impeller blades have stopped
turning before opening the vacuum inlet door or attempting to insert or remove the vacuum tubes. The rotating
blades can cause serious injury.
Blower
Outlet
./
Groove _
2.
,_ WARNING:
unit assembled,
sure your unit is
and all fasteners
is required
If you receive your
repeat all steps to enproperly assembled
are secure.
3.
-4-
_
Blower
Tube
Rib
Secure the tube by turning the
knob clockwise.
To remove the tube, turn the knob
counterclockwise
to loosen the
tube; remove the tube.
VACUUM
ASSEMBLY
VACUUM BAG ASSEMBLY
1. Open tile zipper on the vacuum
bag and insert the elbow tube.
2. Push the small end of the elbow
tube through the small opening in
the bag.
Elbow
Tube
Small
Opening
3.
Gently tilt the handle of the screwdriver toward the back of the unit to
release the latch while pulling up
on the vacuum inlet cover with your
other hand.
4.
Hold the vacuum inlet cover open
until upper vacuum tube is installed.
Vacuum inlet _
i,
Zipper
Opening
Retaining Post
4.
/:,_
Rib
NOTE: Make sure edge of the small
opening is flush against the flared area
of the elbow tube, and the rib on the
elbow tube is on the bottom.
3.
X_/,_,_,,
5.
6.
Close the zipper on the bag. Make
sure the zipper is closed completely.
Remove blower tube from engine.
Place the hooks of the upper vacuum tube on the retaining posts of
the unit.
Pivot the tube until it is secured
to
the blower unit by the vacuum inlet
latch.
PIVOT
Rib
Insert the elbow tube into the blower outlet. Make sure elbow tube is
aligned with the blower outlet
groove.
6. Turn knob clockwise to secure elbow tube.
VACUUM TUBE ASSEMBLY
1. Align tile lower vacuum tube as
shown. Push lower vacuum tube
into upper vacuum tube.
Upper
Inlet Cover
Latch
5.
Hook
Post
HOW TO CONVERT UNIT FROM
VACUUM USE TO BLOWER USE
1. Remove the vacuum tubes by inserting the tip of a screwdriver into
the latch area of the vacuum inlet.
2. Gently tilt handle of screwdriver toward the back of the unit to release
the latch while pulling up on the upper vacuum tube with your other
hand.
Vacuum Tube _--__
Latch Area
L°vaWe
Tubem
2.
Insert the tip of a screwdriver
the latch area of the vacuum
into
inlet.
Outlet
Latch Area
Vacuum
L__
_
Inlet
Blower
3.
4.
Cover
-5-
Remove the vacuum bag.
Close the vacuum inlet cover and
make sure it is latched closed.
5.
Reinstallthe
blowertube
(see
BLOWER TUBE ASSEMBLY).
SHOULDER STRAP ADJUSTMENT
(for vacuum use only)
1. Hold the unit as shown with the
2.
3.
4.
5.
muffler side facing away from your
body and clothes.
Pass the shoulder strap over your
head and onto your right shoulder.
Extend your left arm toward the
rear of the vacuum bag.
Adjust shoulder strap until the vacuum bag/shoulder
strap seam lies
between your thumb and index
finger.
Make sure air flows freely from the
elbow tube into bag. If bag is kinked,
the unit will not operate properly.
KNOW YOUR
BLOWER
READ THIS INSTRUCTION
MANUAL AND SAFETY
RULES BEFORE
UNIT. Compare
the illustrations
with your unit to familiarize
of the various
controls and adjustments.
Save this manual
OPERATING
YOUR
yourself with the location
for future reference.
Upper
Vacuum
Lower
Tube
Vacuum
T_
Primer
Button
Choke
Throttle
Lever
Lever
Fuel Mix
Rope
Elbow Tube
Blower
Tube
Rear
Handle
THROTTLE LEVER
The THRO'iq-LE LEVER is used to select
the engine with fewer pulls on the starter
rope. Activate primer button by pressing
it and allowing it to return to its original
position.
CHOKE LEVER
The CHOKE helps to supply fuel to the
engine to aid in cold starting. Activate
the choke by moving the choke lever to
the FULL CHOKE position. After engine
attempts to start, move the choke lever
to the HALF CHOKE position. Once engine starts, move choke lever to the
RUN position.
the desired engine speed and to stop the
engine. Move the throttle lever to the
position for full speed operation.
Move the throttle lever to the _
position for idle speed. To stop the engine,
move the throttle lever to the STOP position.
PRIMER BUTTON
The PRIMER BUqq-ONremoves air from
the carburetor and fuel lines and fills
them with fuel. This allows you to start
-6-
OPERATING TIPS
• While vacuuming or blowing debris,
hold the unit with the muffler side facing away from your body and clothes
(see OPERATING POSITION below).
• To reduce the risk of hearing loss
associated with sound level(s), hearing protection is required.
• To reduce the risk of injury associated
with contacting rotating parts, stop the
engine before installing or removing
attachments. Do not operate without
guard(s) in place.
• Operate power equipment only at reasonable hours-not early in the morning or late at night when people might
be disturbed. Comply with times listed
in local ordinances. Usual recommendations are 9:00 a.m. to 5:00 p.m.,
Monday though Saturday.
• To reduce noise levels, limit the number of pieces of equipment used at
any one time.
• To reduce noise levels, operate power blowers at the lowest possible
throttle speed to do the job.
• Use rakes and brooms to loosen
debris before blowing.
• In dusty conditions, slightly dampen
surfaces or use a mister attachment
when water is available.
• Conserve water by using power blowers instead of hoses for many lawn
and garden applications, including
areas such as gutters, screens, patios,
grills, porches, and gardens.
• Watch out for children, pets, open
windows, or freshly washed cars.
Blow debris away safely.
• Use the full blower nozzle extension
so the air stream can work close to
the ground.
• After using blowers and other equipment, CLEAN UP! Dispose of debris
in trash receptacles.
OPERATING POSITION
Protection
Blower
BEFORE
'_
STARTING
WARNING:
ENGINE
Be sure to read the
fuel information in the safety rules
before you begin. If you do not
understand the safety rules, do not
attempt to fuel your unit. Call
1-800-235-5878.
FUELING
ENGINE
_'WARNING:
Remove fuel cap
slowly when refueling.
This engine is certified to operate on unleaded gasoline. Before operation, gasoline must be mixed with a good quality
synthetic 2-cycle air-cooled engine oil.
We recommend Craftsman brand synthetic oil. Mix gasoline and oil at a ratio
of 40:1. A 40:1 ratio is obtained by mixing 3.2 ounces of oil with 1 gallon of unleaded gasoline. Included with this blower is a 3.2 ounce container of oil. Pour
the entire contents of this container into
1 gallon of gasoline to achieve the proper fuel mixture. DO NOT USE automotive
oil or boat oil. These oils will cause engine damage. When mixing fuel, follow
instructions printed on container. Once
oil is added to gasoline, shake container
momentarily to assure that the fuel is
thoroughly mixed. Always read and follow the safety rules relating to fuel before fueling your unit.
IMPORTANT
Experience indicates that alcohol
blended fuels (called gasohol or using
ethanol or methanol) can attract moisture which leads to separation and
formation of acids during storage.
Acidic gas can damage the fuel system of an engine while in storage.
To avoid engine problems, empty the
fuel system before storage for 30 days
or longer. Drain the gas tank, start the
engine and let it run until the fuel lines
and carburetor are empty. Use fresh
fuel next season.
Never use engine or carburetor cleaner products in the fuel tank or permanent damage may occur.
Fuel stabilizer is an acceptable alternative in minimizing the formation of
fuel gum deposits during storage.
Craftsman brand oil is already blended
with fuel stabilizer. See the STORAGE
section for additional information.
Vacuum
-7-
STARTING A COLD ENGINE
1. Move the throttle lever to the
position.
2. Move the choke lever to the FULL
CHOKE position.
3. Slowly press the primer button 8
times.
Throttle Lever
Primer Button
NOTE: Unit must be placed on its side
when adding fuel (see illustration below).
Choke Lever
4.
STOPPING YOUR ENGINE
• To stop the engine, move the throttle
lever to the STOP position.
STARTING THE ENGINE
_WARNING:
You MUST make sure
the tubes are secure before using the
unit.
• Fuel engine. Move at least 10 feet (3
meters) away from the fueling site.
• Hold the unit in the starting position
as shown. Make sure the blower end
is directed away from people, animals, glass, and solid objects.
STARTING
POSITION
Blower
/
Vacuum
A
WARNING:
When starting engine,
hold the unit as illustrated. Do not set
unit on any surface except a clean, hard
area when starting engine or while engine is running. Debris such as gravel,
sand, dust, grass, etc. could be picked
up by the air intake and thrown out
through the discharge opening, damaging the unit or property, or causing serious injury to bystanders or the operator.
-8-
Pull starter handle sharply until the
engine attempts to run, but no
more than 5 pulls (below 30°F, 8
pulls).
NOTE: If the engine attempts to start
before the 5th pull, go to the next step
immediately.
5. Move choke lever to HALF CHOKE.
6. Pull the starter handle sharply until
the engine runs, but no more than
5 pulls (below 30°F, 10 pulls).
7. After a 5 second warm-up, move the
choke lever to the RUN position.
8. Allow the unit to run for 30 more
seconds at RUN before moving the
throttle lever to the _
position.
If the engine has not started after 5
pulls (at HALF CHOKE), repeat the
STARTING A COLD ENGINE procedure.
If the engine still does not start, proceed to STARTING A FLOODED ENGINE.
9. To stop the engine, move the
throttle lever to the STOP position.
STARTING A WARM ENGINE
NOTE: If fuel tank is empty, add fuel;
then, follow STARTING A COLD ENGINE
procedure. Do not fill fuel tank while
engine is hot.
1. Move the throttle lever to the 4"_
position.
2. Pull the starter handle sharply until
the engine starts, but no more than
5 pulls.
NOTE: If the engine has not started,
pull starter handle sharply for 5 more
pulls. If engine still does not run, it is
probably flooded. Proceed to STARTING A FLOODED ENGINE.
3.
To stop the engine, move the
throttle lever to the STOP position.
STARTING A FLOODED ENGINE
Flooded engines can be started by placing the choke lever in the RUN position.
Move throttle lever to the fast position
'_ ; then, pull rope until engine starts.
After engine starts, move the throttle lever to the slow position _
to allow engine to idle.
CUSTOMER
Starting could require pulling the starter
rope many times depending on how
badly the unit is flooded. If the unit still
doesn't start, refer to the
TROUBLESHOOTING TABLE or call
1-800-235-5878.
RESPONSIBILITIES
,d_ WARNING;
Disconnect
service, or adjustments.
the spark plug before performing
CARE & MAINTENANCE
TASK
Check for loose fasteners
and parts
maintenance,
WHEN TO PERFORM
Before each use
Check for damaged or worn parts
Inspect and clean unit and labels
Clean air filter
Before each use
Replace
Yearly
After each use
Every 5 hours of operation
spark plug
Replace fuel filter
Check muffler mounting
_WARNING:
Yearly
screws
Avoid touching
Yearly
muf-
fler unless engine and muffler are cold.
A hot muffler can cause serious burns.
_WARNING:
Stop engine and be
sure the impeller blades have stopped
turning before opening the vacuum inlet door or attempting to insert or remove the vacuum or blower tubes.
The rotating blades can cause serious
injury. Always disconnect the spark
plug before performing maintenance or
accessing movable parts.
GENERAL RECOMMEN DATIONS
The warranty on this unit does not cover items that have been subjected to
operator abuse or negligence. To receive full value from the warranty, the
operator must maintain unit as instructed in this manual. Various adjustments
will need to be made periodically to
properly maintain your unit.
CHECK FOR LOOSE
FASTENERS AND PARTS
• Spark Plug Boot
• Air Filter
• Housing Screws
CHECK FOR DAMAGED OR
WORN PARTS
Contact Sears Service Center for replacement of damaged or worn parts.
• Throttle Lever - Ensure throttle lever
functions properly by moving the
throttle lever to the STOP position.
-9-
Make sure engine stops; then restart
engine and continue.
• Fuel Tank - Do not use unit if fuel tank
shows signs of damage or leaks.
• Vacuum Bag - Do not use vacuum
bag if it is torn or damaged.
INSPECT AND CLEAN UNIT
AND LABELS
• After each use, inspect complete unit
for loose or damaged parts. Clean
the unit using a damp cloth with a
mild detergent.
• Wipe off unit with a clean dry cloth.
CLEAN AIR FILTER
j
_-_,_)I_
Air Filter
_£_L,%4"_
% Cover
'_
_.
3"%
Screws
_'_7
Air Filter
A dirty air filter decreases engine performance and increases fuel consumption and harmful emissions. Always
clean after every 5 hours of operation.
Cleaning the air filter:
1. Clean the cover and the area
around it to keep debris from falling
into the carburetor chamber when
the cover is removed.
2. Remove parts as illustrated.
NOTE: Do not clean filter in gasoline
or other flammable solvent. Doing so
can create a fire hazard or produce
harmful evaporative emissions.
3. Wash the filter in soap and water.
4. Allow filter to dry.
5. Apply a few drops of oil to the filter;
squeeze filter to distribute oil.
6. Replace parts.
REPLACE SPARK PLUG
Replace spark plug each year to ensure
the engine starts easier and runs better.
Set spark plug gap at 0.025 inch. Ignition timing is fixed, nonadjustable.
1. Twist, then pull off spark plug boot.
2. Remove spark plug from cylinder
and discard.
Replace with Champion CJ-6Y
spark plug and tighten securely
with a 3/4 inch socket wrench.
4. Reinstall the spark plug boot.
REPLACE FUEL FILTER
To replace fuel filter, drain unit by running it dry of fuel, then remove fuel
cap/retainer assembly from tank. Pull
filter from tank and remove it from the
fuel line. Install new fuel filter on fuel
line; reinstall parts.
CHECK MUFFLER MOUNTING
SCREWS
Once each year, ensure muffler
mounting screws are secure and tightened properly to prevent damage,
Mounting
1.
2.
3.
4.
Loosen and remove the 2 screws
from the muffler cover.
Remove the muffler cover.
Tighten the 2 muffler mounting
screws securely.
Reinstall muffler cover and 2
screws. Tighten securely.
3.
CARBURETOR
ADJUSTMENT
There is no screw for idle adjustment
on your blower. The throttle lever is
used to control engine speed. The
throttle lever can be placed in one of
four positions: STOP, IDLE or ",iF,
FULLTHROTTLE or _, and one intermittent position.
If your engine will
not run properly or you require further
assistance, contact your Sears Service
Center or call our customer assistance
help line at 1-800-235-5878.
Fuel Fitter
-10-
A
_, WARNING:
Perform the following
steps after each use:
• Allow engine to cool, and secure the
unit before storing or transporting.
• Store unit and fuel in a well ventilated area where fuel vapors cannot
reach sparks or open flames from
water heaters, electric motors or
switches, furnaces, etc.
• Store unit with all guards in place.
Position unit so that any sharp object
cannot accidentally cause injury.
• Store unit and fuel well out of the
reach of children.
SEASONAL
STORAGE
Prepare unit for storage at end of season or if it will not be used for 30 days
or more.
If your unit is to be stored for a period
of time:
• Clean the entire unit before lengthy
storage.
• Store in a clean dry area.
• Lightly oil external metal surfaces.
FUEL SYSTEM
Under FUELING ENGINE in the OPERATION section of this manual, see message labeled IMPORTANT regarding
the use of gasohol in your engine.
Fuel stabilizer is an acceptable alternative in minimizing the formation of fuel
gum deposits during storage. Add stabilizer to gasoline in fuel tank or fuel storage container. Follow the mix instructions found on stabilizer container. Run
engine at least 5 minutes after adding
stabilizer.
Craftsman 40:1,2-cycle
engine oil (air
cooled) is already blended with fuel
stabilizer. If you do not use this Sears
oil, you can add a fuel stabilizer to your
fuel tank.
ENGINE
• Remove spark plug and pour 1 teaspoon of 40:1,2-cycle
engine oil (air
cooled) through the spark plug opening. Slowly pull the starter rope 8 to
10 times to distribute oil.
• Replace spark plug with new one of
recommended type and heat range.
• Clean air filter.
• Check entire unit for loose screws,
nuts, and bolts. Replace any damaged, broken, or worn parts.
• At the beginning of the next season,
use only fresh fuel having the proper
gasoline to oil ratio.
OTHER
• Do not store gasoline from one season to another.
• Replace your gasoline can if it starts
to rust.
-11
-
TROUBLESHOOTING
TABLE
,_ WARNING:
Always stop unit and disconnect spark plug before performing any of the recommended remedies below other than remedies that require operation of the unit.
TROUBLE
CAUSE
REMEDY
Engine will not
start.
1. Engh_eflooded,
1. See "Starting a Flooded Engine"
in Operation section.
2. Fill tank with correct fuel mixture.
2. Fuel tank empty.
3. Spark plug not firing.
4. Fuel not reaching
carburetor.
5. Compression
Engine will not
idle properly.
3. Install new spark plug.
4. Check for dirty fuel filter; replace.
Check for kinked or split fuel line;
repair or replace.
5. Contact Sears Service (see back cover).
low.
1. Fuel not reaching
carburetor.
2. Carburetor requires
adjustment.
3. Crankshaft seals worn.
4. Compression
Engine will not
accelerate,
lacks power, or
dies under a
load.
low.
1. Air filter dirty.
2. Fuel not reaching
carburetor.
3. Spark
plug fouled.
5. Contact
6. Contact
1. Choke partially on.
2. Fuel mixture incorrect.
3. Air filter dirty.
4. Carburetor requires
adjustment.
Engine
runs hot.
1. Fuel mixture
3. Contact
4. Contact
Sears Service
Sears Service
(see back cover).
(see back cover).
1. Clean or replace air filter.
2. Check for dirty fuel filter; replace.
Check for kinked or split fuel line;
repair or replace.
3. Clean or replace spark plug
and re-gap.
4. Contact Sears Service (see back cover).
4. Carburetor requires
adjustment.
5. Carbon build up.
6. Compression
low.
Engine smokes
excessively.
1. Check for dirty fuel filter; replace.
Check for kinked or split fuel line;
repair or replace.
2. Contact Sears Service (see back cover).
incorrect.
2. Spark plug incorrect.
3. Carburetor requires
adjustment.
4. Carbon build up.
-12-
Service (see back cover).
Service (see back cover).
1. Adjust choke.
2. Empty fuel tank and refill with
correct fuel mixture.
3. Clean or replace air filter.
4. Contact Sears Service (see back cover).
1. See "Fueling Engine" in Operation
section.
2. Replace with correct spark plug.
3. Contact Sears Service (see back cover).
4. Contact
YOUR WARRANTY RIGHTS AND OBLIGATIONS: The U.S. Environmental
Protection Agency/California Air Resources Board and Sears, Roebuck and
Co., U.S.A., are pleased to explain the
emissions control system warranty on
your year 2005 and later small off-road
engine. In California, all small off-road
engines must be designed, built, and
equipped to meet the State's stringent
anti-smog standards. Sears must warrant the emission control system on your
small off-road engine for the periods of
time listed below provided there has
Sears
Sears
Sears
Service (see back cover).
been no abuse, neglect, or improper
maintenance of your small off-road engine. Your emission control system includes parts such as the carburetor and
the ignition system. Where a warrantable condition exists, Sears will repair
your small off-road engine engine at no
cost to you. Expenses covered under
warranty include diagnosis, parts and
labor. MANUFACTURER'S
WARRANTY COVERAGE: If any emissions related part on your engine (as listed under Emissions Control Warranty Parts
List) is defective or a defect in the mate-
rials or workmanship of the engine
causes the failure of such an emission
related part, the part will be repaired or
replaced by Sears. OWNER'S WARRANTY RESPONSIBILITIES:
As the
small off-road engine engine owner, you
are responsible for the performance of
the required maintenance listed in your
instruction manual. Sears recommends
that you retain all receipts covering
maintenance on your small off-road engine, but Sears cannot deny warranty
solely for the lack of receipts or for your
failure to ensure the performance of all
scheduled maintenance. As the small
off-road engine engine owner, you
should be aware that Sears may deny
you warranty coverage if your small offroad engine engine or a part of it has
failed due to abuse, neglect, improper
maintenance, unapproved modifications,
or the use of parts not made or approved by the original equipment
manufacturer. You are responsible for
presenting your small off-road engine to
a Sears authorized repair center as
soon as a problem exists. Warranty repairs should be completed in a reasonable amount of time, not to exceed 30
days. If you have any questions regarding your warranty rights and responsibilities, you should contact your nearest
authorized service center or call Sears
at 1-800-469-4663. WARRANTY COMMENCEMENT DATE: The warranty period begins on the date the small offroad engine is purchased. LENGTH OF
COVERAGE: This warranty shall be for
a period of two years from the initial date
of purchase. WHAT IS COVERED: REPAIR OR REPLACEMENT OF PARTS.
Repair or replacement of any warranted
part will be performed at no charge to
the owner at an approved Sears Service
Center. If you have any questions regarding your warranty rights and responsibilities, you should contact your nearest authorized service center or call
Sears at 1-800-469-4663. WARRANTY
uled only for regular inspection to the
effect of "repair or replace as necessary"
shall be warranted for 2 years. Any warranted part which is scheduled for replacement as required maintenance
shall be warranted for the period of time
up to the first scheduled replacement
point for that part. DIAGNOSIS: The
owner shall not be charged for diagnostic labor which leads to the determination that a warranted part is defective if
the diagnostic work is performed at an
approved Sears Service Center. CONSEQUENTIAL DAMAGES: Sears may
be liable for damages to other engine
components caused by the failure of a
warranted part still under warranty.
WHAT IS NOT COVERED: All failures
caused by abuse, neglect, or improper
maintenance are not covered. ADD-ON
OR MODIFIED PARTS: The use of
add-on or modified parts can be
grounds for disallowing a warranty claim.
Sears is not liable to cover failures of
warranted parts caused by the use of
add-on or modified parts. HOW TO
FILE A CLAIM: If you have any questions regarding your warranty rights and
responsibilities, you should contact your
nearest authorized service center or call
Sears at 1-800-469-4663. WHERE TO
GET WARRANTY SERVICE: Warranty
services or repairs shall be provided at
all Sears Service Centers. Call
1-800-469-4663.
MAINTENANCE, REPLACEMENT
AND REPAIR OF EMISSION RELATED PARTS: Any Sears approved
replacement part used in the performance of any warranty maintenance or
repair on emission related parts will be
provided without charge to the owner if
the part is under warranty. EMISSION
CONTROL WARRANTY PARTS LIST:
Carburetor, Ignition System: Spark Plug
(covered up to maintenance schedule),
Ignition Module, Muffler including catalyst. MAINTENANCE STATEMENT:
The owner is responsible for the performance of all required maintenance as
defined in the instruction manual.
PERIOD: Any warranted part which is
not scheduled for replacement as required maintenance, or which is schedThis engine is certified to be emissions
[]
Moderate
[]
Intermediate
[]
Extended
compliant
(50 hours)
(125 hours)
(300 hours)
-13-
for the following
use:
Declaraci6n de Garantia
Reglas de Seguridad
Montaje
Uso
17
17
20
22
Almacenaje
Tabla Diagn6stica
Declaraci6n de Emision
Lista de Piezas
Mantenimiento
26
Repuestos
y Encargos
28
29
30
14
Contratapa
GARANTIA DE DOS AI_IOS COMPLETOS
PARA EL PROPULSOR
DE AIRE A
GASOLINA DE LA MARCA CRAFTSMAN ®
Durante dos (2) a_os a partir de la fecha de compra, siempre que se haga el
mantenimiento,
la lubricaci6n y los ajustes en este Propulsor de Aire a Gasolina
segl3n las instrucciones de uso y mantenimiento en el manual de instrucciones,
Sears reparar& cualquier defecto de material o mano de obra granturaitamente.
Esta garantia excluye los tubos del propulsor de aire, la bujia y el filtro de aire,
que son piezas prescindibles que se pueden gastar con el uso normal.
Si este propulsor de aire es usado con fines de uso comercial, esta garantia aplicar&
solamente per 90 dias despu6s de la fecha original de compra. Siesta propulsor es
usado con fines de alquiler, esta garantia aplicar& por solo 30 dias despues de la
fecha original de compra. Esta garantia tiene validez exclusivamente
cuando el aparato es utilizado dentro de los Estados Unidos.
SE OBTEDRA SERVlCIO BAJO GARANTIA DEVOLVlENDO EL APARATO AL TtENDA DE
SEARS O CENTRO DE SERVlCIO MAS CERCANO EN LOS ESTADOS UNIDOS.
Esta garantia confiere derechos legales especificos al propietario, que tal vez
tenga asimismo otros derechos que varian entre estados.
Sears, Roebuck and Co., D/817WA, Hoffman Estates, IL 60179
ADVERTENCIA:
De no cumplir
con todas las Reglas y Precauciones
de Seguridad, correr& el riesgo de accidentes muy graves.
CONOZCA SU APARATO
• Lea el manual de instrucciones cuidadosamente
hasta que comprenda
perfectamente todas las advertencias e instrucciones de seguridad y
las pueda cumplir, antes de poner el
aparato en funcionamiento.
• Limite el uso del aparato a aquellas
personas que comprendan todas las
advertencias e instrucciones de seguridad en este manual y vayan a
cumplir con elias.
ADVERTENCIA:
Inspeccione el
&tea antes de poner en matodos los escombros y objetos s61idos tales como
piedras, vidrio, alambre, etc., que el aparato pueda arrojar al aire o hacer rebotar
causando heridas de este o cualquier
otto modo durante el uso del mismo.
-17-
Utilice su aparato como propulsor de
aire para:
• Barrer escombros o recortes de
hierba de caminos de entrada,
aceras, patios, etc.
• Soplar recortes de hierba, para u
hojas en montones, o para remover
escombros de esquinas, alrededor
de uniones o entre ladrillos.
Utilice su aparato como aspiradora para:
• Recoger material seco come hojas,
hierba, ramas peque_as y pedazos
peque_os de papel.
• Para obtener mejores resultados al
usar la aspiradora, ponga el motor a
alta velocidad.
• Mu6vase lentamente de un lado a
otro sobre el material que de sea
aspirar. Evite el forzar el aparato a
recoger montones de desechos
pues esto podria obstruir el aparato.
• Para obtener mejores resultados,
mantenga el tube de aspiraci6n unos
3 cm (uno pulgada) m&s arriba del
suelo.
PIENSE ANTES DE PROCEDER
• Use siempre protecci6n para los ojos
al hacer uso, servicio o mantenimiento del aparato. El uso de proteci6n
de ojos ayudar& a prevenir la p6rdida de la vista y/u otras heridas
graves, provocadas per piedras o
escombros que reboten en los ojos y
en la cara al ser propulsados por el
aparato. La protecci6n para los ojos
debe ser marcada Z87.
• Use siempre protecci6n en los pies.
No use el aparato descalzo ni con
sandalias.
• Use siempre mascarilla de filtraci6n
o de protecci6n para la cara al trabajar en ambientes polvorientos.
• Mantenga el cabello por encima de
los hombros, at&ndolo para tal efecto
si es necesario. No use joyas, ropa
suelta, ni ropa con tiras, corbatas, borlas, etc. que cuelgen libremente, perque podrian quedar enredadas en las
piezas en movimiento del aparato.
• No use el aparato estando cansado,
enfermo, ansioso, ni bajo la infuencia del alcohol, las drogas u otros
medicamentos.
• Mantenga a niSos, espectadores
y
animales a una distancia minima de
10 metros (30 pies) al poner en marcha o al usar el aparato. No seSale
la boquilla en la direcci6n de la personas o de animales domesticos.
MANEJE EL COMBUSTIBLE
CON
EXTREMO CUIDADO, ES ALTAMENTE INFLAMABLE
• Elimine todas las posibles fuentes de
chispan o llamas (inclusive los cigarrillos, las llamas abertas, y cualquier
trabajo que cause chispas) en las
&reas donde se mezcla, vierte o almacena el combustible.
• Mezcle y vierta el combustible al aire
libre, almacene el combustible en un
lugar fresco, seco y bien ventilado;
sue un recipiente aprobado para
combustible y marcado para todo
manejo de combustible.
• No fume mientras trabaja con el
combustible ni cuando est6 haciendo uso del aparato.
• AsegOrese que el aparato est6 correctamente armado y en buena condici6n de funcionamiento.
• No Ilene el tanque de combustible
mientras el motor se encuentre en
marcha.
• Evite derramar el combustible o el
aceite. Limpie todos los derrames
de combustible antes de poner el
aparato en marcha.
-18-
• Alejese pot Io menos 3 metros (10
pies) del combustible y del lugar de
abastecimineto
antes de poner el
motor en marcha.
• AImac6ne siempre combustible en
un recipiente aprobado para los liquidos inflamables.
HAGA USO SEGURO
APARATO
DE SU
_lJ ADVERTENCIA:
Detenga el
motor antes de abrir la compuerta de
entrada de aire del aspirador. El motor
deber& encontrarse detenido y las cuchillas del impulsor no deber&n estar
girando para evitar serios accidentes
provocados por las cuchillas girantes.
• Verifique por inspecci6n, antes de
cada uso, que no haya piezas gastadas, sueltas, ni daSadas o piezas
que falten. No use el aparato hasta
que este se encuentre en perfectas
condiciones de funcionamiento.
• Mantenga las superficies externas
libres de aceite y de combustible.
• Nunca ponga el motor en marcha ni
Io deje en marcha dentro de un recintocerrado o en una &rea sin ventilaci6n. Respirar los vapores del combustible le podria causar la muerte.
• Para evitar el choque per electricidad est&tica, no use guantes de
goma ni ningOn otro guante aislado
al usar el aparato.
• No apoye el aparato con el motor en
marcha en ninguna superficie que
no est6 limpia o que no sea s61ida.
El aparato podria aspirar escombros
tales como gavilla, arena, polvo,
cesped, etc. por la entrada de aspiraci6n y arrojarlos por la salida de
propulsion, daSando el aparato y/u
otros objetos, o causando graves
heridas a espectadores
o al usuario.
• Evite ambientes peligrosos, No use
el aparato en lugares sin ventilaci6n
ni donde puda haber vapores explosivos o mon6xido de carbono.
• No se extienda excesivamente ni use
el aparato en superficies inestables
tales como escaleras, &rboles, declives acentuadas, techos, etc. Mantenga el equilibrio, con los pies en una
superficie estable en todo momento.
• Nunca coloque objetos dentro de los
tubos de propulsi6n; siempre dirija
los escombros en direcci6n contraria
a donde personas, animales, vidrierasu otros objetos s61idos tales como
&rboles, autom6viles,
paredes, etc.
se encuentran. La fuerza del aire
puede arrojar o hacer rebotar pie-
•
•
•
•
•
•
dras, tierra o ramas, hiriendo a personas o animales, rompiendo vidrieras o causando otros da_os.
Nunca ponga el aparato en marcha
sin toner todo el equipo correspondiente instalado. AI usar el aparato
come propulsor de aire, sirmpre
instale los tubes de propulsi6n. AI usar
el equipo opcional de aspiraci6n,
siempre instale los tubos y la bolsa de
aspiraci6n. Aseg0rese que la cremallera de la bolsa de aspiraci6n se encuentre completamente cerrada.
Inspeccione frecuentemente
la abertura de entrada de aire, los tubes de
propulsion, los tubes de aspiraci6n y
el tubo en forma de code siempre
con el motor detenido y la bujia desconectada. Mantenga las aberturas
de ventilaci6n y los tubes de descarga libres de escombros que se pueden acumular y limitar la circulaci6n
debida de aire.
Nunca coloque objeto alguno dentro
de la entrada de aire ya que de hacerIo podria limitar la circulaci6n d'aire y
daSar el aparato.
Nunca use el aparato para esparcir
substancias quimicas, fertilizantes u
otras substancias que puedan contener materiales t6xicos.
Para evitar la propagaci6n de incendios, no use el aparato cerca de hogueras de hogassecas o de matorrales, de hogares de lena, de parrillas, barbacoas, ceniceros, etc.
Use el aparato exclusivamente
para
los fines descritos en este manual.
HAGA EL MANTENIMIENTO
DEL
APARATO EN LA FORMA DEBIDA
• Permita que todo mantenimiento
aparte de los procedimientos
recomendados descritos en este manual
de instrucciones, sean efectuados
por un Centro de Servicio Sears.
• Desconecte la bujia antes de hacer
cualquier mantenimiento,
con la excepci6n de los ajustes al carburador.
• Use exclusivamente
los repuestos
recomendados
de la marca
Craftsman®; el use de cualquier otro
repuesto podr& invalidar la garantia
o da_ar el aparato.
• Vacia el tanque de combustible
antes de almacenar el aparato. Consuma el combustible restante en el
carburador poniendo el motor en
marcha y dej&ndolo en marhca hasta que se 6ste se detenga.
• No use ningOn accesorio ni pieza adicional aparte de los recomendados
-19-
por el fabricante para usar con su
aparato.
• No almacene el aparato ni el combustible en un recinto cerrado donde los
vapores el combustible puedan entrar
en contacto con chispas o llamas
abiertas procedentes de calentadores
de agua, motores o interruptores el_ctricos, calefactores centrales, etc.
• AImacene el aparato en un lugar
seco, fuera del alcance de los ni_os.
AVISO DE SEGURIDAD:
El estar expuesto alas vibraciones a trav6s del
use prolongado de herramientas de
fuerza a gasolina, puede causar
da_os a los vasos sanguineos o a los
nervios de los dedos, las manos y las
coyunturas a aquellas personal propensas a los trastornos de la circulaci6n o alas hinchazones
anormales.
El uso prolongado en climas fries ha
sido asociado con da_os a los vases
sanguineos a personas que por otra
parte se encuentran en perfecto estado de salud. Si ocurriera sintomas
tales como el entumecimiento,
el color,
la falta de sentido en los dedos, las
manos o en las coyunturas, pare de
usar esta m&quina de inmediato y procure atenci6n m6dica. Los sistemas
de anti-vibraci6n no garantizan que se
evitan tales problemas. Los usuarios
que hacen use continuo y prolongado
de las herramientas de fuerza deben
fiscalizar atnetamente su estado fisico
y el estado del aparato.
AVlSO ESPECIAL: Para los usuarios
en Tierras Forestadae en los Estados
Unidos yen aigunos estadoe, incluyendo California (C6digoe de Recursoe
P0blicoe 4442 y 4443), Idaho, Maine,
Minnesota, Nueva Jersey, Oreg6n y
Washington: Se requiere a ciertos motores de combusti6n intema operadoe
en tierrae cubiertas por boeques, matorralee y/o pasto, en las &tea anteriormente mencionadas, que vengan equipadoe con rejilla anti-chispas, mantenida en perfecto estado de funcionamiento, o que el motor est6 conetruido y
equipado para la prevenci6n de incendios y mantenido correctamente. Consuite con las autoridades eetatalee o locales acerca de los reglamente que ee
relacionene con estos requisitos. De no
cumplir con estos requisitos, usted estar& en violaci6n de la ley. Este aparato
no viene equipo de f&brica con rejilla
anti-chiepa; sin embargo la rejilla antichiepa viene disponible como pieza opcional. Si se requiere rejilla antichiepa en
la Iocalidad donde usted se encuentra,
entre en contacto con el Servicio de
Sears para obtener el equipo de repuestos correspondiente. La rejilla anti-
chispa, los tubos de propulsi6n y las boquillas deber&n estar instalados en el
aparato para estar en total cumplimiento
con el reglamento.
CONTENIDO
DE LA CAJA
Verifique que todos los articulos de la
siguiente lista esten incluidos:
Modelo 358.794880
• Propulsor de Aire
• Tubo de Propulsi6n
• Tubo en Forma de Code
• Bolea de Aspiraci6n
• Tubo de Aepiraci6n Superior
• Tubo de Aepiraci6n Inferior
• Boleo Plegable para la Escombros
• Aceite de Motor a 2 Tiempos
AVlSO: Es normal que el filtro de combustible golpetee en el tanque vacio.
MONTAJE
ADVERTENCIA:
Detenga el
motor y aseg_rese de que las cuchillas del impulsor no se encuentren girando antes de abrir la compuerta de
entrada de aire del aspirador o de intentar introducir o remover los tubos
de aspiraci6n o los tubos de propulsi6n. Las cuchillas girantes podrian
causar serios accidentes.
ADVERTENCIA:
INSTALACION
PULSION
DEL
de Aire
el Propulsi6n
_,
Tubo de
Propulsidn
2.
AeegOreee de apretar el tube al
girar la perilla hacia la derecha.
3. Para remover el tube, gire la perilla
hacia la izquierda para aflojar el tube
de propulsi6n; remueva el tubo.
MONTAJE
DEL ASPIRADOR
DE
AIRE
MONTAJE DE LA BOLSA DE ASPIRACION
1. Abra la cremallera en la bolsa de
aspiraci6n e introduzca el tubo en
forma de codo.
2. Empuje la punta pequeSa del tube
en forma de code por la abertura
pequeSa el la bolsa de aspiraci6n.
Tubo en forma
de Codo
Abertura
peque[fia
Si recibi6 el
aparato ya armado, repita todoe los
paeos para aeegurarse que el aparato
haya sido armado correctamente
y
que todoe los fijafores se encuentren
bien fijos.
• Un destornillador se requiere para el
montaje.
MONTAJE
DE AIRE
,_,__dSalida
PROPULSOR
DEL TUBO
DE PRO-
Si usted ya ha montado el aparato
para e] use come aepiradora, remueva
los tubes de la aspiradora y la bolsa
de colecci6n.
1. Alinee la moldura saliente del tube
de propulsi6n con la ranura en la
salida de aire del propulsor; gire
hasta encajar en su lugar.
Abertura de
Cremallera
Moldura Saliente
AVlSO: AsegOrese de que el borde de
la abertura pequeSa de la bolsa de encuentre pegado a la parte en forma de
embudo del tube en forma de codo, y
la moldura saliente del tubo en forma
de codo se encuentre al fondo.
3. Cierra la cremallera de la bolsa.
AsegOrese de que la cremallera se
encuentre completamente
cerrada.
4. Retire el tubo de propulsi6n.
"__drlra
AVlSO: La perilla debe ser aflojada Io
euficiente que permita al tube se
introduzca en la salida de aire de la
propulsora.
Gire la perilla hacia la izquierda para aflojar.
- 20-
5.
6.
Introduzca el tubo en forma de
codo en la salida de aire del
propulsi6n.
AsegOrese de que la
moldura del tubo en forma de codo
este alineada con la ranura de
salida de aire del propulsi6n.
Gire la perilla hacia la derecha
para apretar el tube en forma de
codo.
PIVOTE
MONTAJE DEL TUBO DE
ASPIRACION
1. Alinee el tubo de aspiraci6n inferior
come se ilustra. Introduzca el tube
de aspiraci6n inferior dentro del
tubo de aspiraci6n superior.
Tubo de aspiraci6n
superior
Tubo de aspiraci6n
inferior
2.
Area
Introduzca un destornillador dentro
del _.rea del cerradura de la
entrada de aire del aspirador.
del cerradura
SalJda de Aire
:;:ododo
3.
4.
Suavemente, gire el mango del
destornillador hacia la parte trasera
del aparato para abrir la cerradura,
mientras jala hacia arriba de la
cubierta de la entrada de aire del
aspirador con su otra mano.
Sostenga la cubierta de entrada de
aire del aspirador abierta hasta
que el tubo de aspiraci6n quede
instalado.
Entrada de Aire
del Aspirador
Oubierta de _.
((_'*;
Poste de Retenci6n_/_,'
"
Entrada de
"._:_
_
Aire ___
5.
6.
Coloque los ganchos que se
encuentran en el tubo de
aspiraci6n superior en el poste de
retenci6n del aparato.
Gire el tubo hasta que este fijo por
la cerradura de la entrada de aire.
Cerradura
de la
entrada de
aire
Ganohos
Retenci6n
COMO CONVERTIR
EL APARATO DE
USO DE ASPIRACION
A USO DE
PROPULSION
1. Remueva los tubos de aspiraci6n
introduciendo el destomillador
dentro del _trea del cerradura de la
entrada de aire.
2. Suavemente,
gire el mango del
destornillador hacia la parte trasera
del aparato para abrir el cerradura,
mientras jala hacia arriba el tubo
de aspiraci6n superior con su otra
mano.
Area del cerradura
3.
4.
Remueva la bolsa de aspiraci6n.
Cierre la cubierta de entrada de
aire del aspirador y aseg@ese que
este cerrada completamente.
5. Vuelva a instalar los tubo de
propulsi6n (vea INSTALAOION DEL
TUBO DE PROPULSION).
AJUSTE DE LA BANDA DEL HOMBRO
(para uso con el aspirador
unicamente)
1. Sujete el aparato como se ilustra
con el lado del silenciador alejado
de su cuerpo y de su ropa.
2. Pasando la banda del hombro
sobre su cabeza, col6quela en su
hombro derecho.
3. Extienda el brazo izquierdo hacia
la perte posterior de la bolsa de aspiraci6n.
- 21 -
4.
5.
Ajuste la correa de hombre hasta
que la costura entre la bolsa de aspiraci6n y la correa quede entre el
pulgar y el indice.
AsegQrese de que el aire circule
libremente desde el tube en forma
de code hasta la bolsa. Si la bolsa
se encuentra torcide, el aparato
funcionar& apropiadamente.
no
CONOZCA SU PROPULSOR
LEA EL MANUAL DE INSTRUCCIONES Y SUS REGLAS DE SEGURIDAD ANTES DE
COMENZAR A USAR ESTE APARATO. Compare las ilustraciones siguientes con su
aparato para familiarizarse con la Iocalizaci6n de los controles y ajustes del mismo. Guarde este manual para futuras referencias.
Tubo superior del
Tubo inferior del
aspirador
asplrado_%_
r _
Bombeador
Palanca del
Acelerador
_
_
\\
Palanca det
Cebador
Tapa de ta
Mezcta de
Combustible
de
Tubo en forma
de Codo
Propulsi6n
Tubo de
\
Mango
Trasero
PALANCA DEL ACELERADOR
La PALANCA DELACELERADOR se uso
para seleccionar la velocidad deseada
y para detener el motor. Mueva la palanca del acelerador a la posici6n
para m&xima velocidad. Mueva la palanca del acelerador a la posici6n -a_
para conseguir la marcha lenta. Para
detener el motor, mueva la palanca del
acelerador a la posici6n STOR
BOMBEADOR
El BOMBEADOR es usado para remover
aire de el carburador y de las lineas de
combustible y las Ilena de mezcla de
combustible. Esto le permite poner el
motor en marcha con menos firones de
la cuerda de arranque. Active el boton
del bombeador apret&ndolo y huego
dejando que retome su forma original.
PALANCA DEL CEBADOR
El CEBADOR ayuda a suiministrar combustible al motor para facilitar el arranque cuando el motor est& frio. Acione el
cebador colocando la palanca en la posici6n FULL CHOKE. Despu6s que el motor intente arrancar, mueva la palanca
del cebador a la posici6n HALF CHOKE.
Despues que el motor se haya puesto
en marcha, ponga la palanca del cebador en la posici6n RUN.
- 22 -
SUGERENCIAS
UTILES
• AI usar el aparato para soplar o para
aspirar los escombros, sujete el aparata con el lado del silenciador alejado de su cuerpo y de su ropa (vea
POSICION DE USO en la p&gina siguiente).
• Se requiere que se use protecci6n
de oidos para reducir el riesgo de la
p_rdida de la audici6n asociado con
los niveles de sonido.
• Detenga el motor antes de instalar o
remover accesorios para reducir el
riesgo asociado con el contacto de
las piezas girantes. No use este aparata sin antes tenet todos los protectotes en su lugar.
• Use el equipo de fuerza Onicamente
en horas razonables - no muy temprano en la maSana o muy tarde en
la noche cuando otras personas
podrian ser perturbadas.
Cumpla
con el horario enlistado per los estatutos locales. Usualmente se recomienda un horario normal de 9:00 a.m.
a 5:00 p.m., de lunes a s_tbado.
• Limite el usa de n_mero de piezas
de equipo al mismo tiempo para reducir los niveles de ruido.
• Para efectuar el trabajo, use los propulsores de fuerza a la menor velocidad de aceleraci6n posible para reducir los niveles de sonido.
• Use rastrillos y escobas para aflojar
escombros antes de soplarlos con el
porpulsor de aire.
• En condiciones de mucho polvo,
meje ligeramente las superficies del
suelo o use el accesorio "mister"
donde haya agua disponible.
• Conserve agua usando el propulsor
en lugar de mangueras de agua para
las tantas aplicaciones del c6sped y
de jardineria, incluyendo _.reas como
Io son canales de agua en los techos,
protecci6n de tela met_tlica en las ventanas y puertas, patios, asadores a la
parrilla, balcones y jardines.
• Tenga cuidado con los ni_os, animales dom6sticos, ventanas abiertas y carros reci6n lavados. Sople
los escombros con precauci6n.
• Use la extensi6n completa de la boquilla del propulsor para que la carriente de aire pueda trabajar cerca
del suelo.
• Despu6s de usar los propulsores de
aire y otro tipo de equipo, iLIMPIE!
Deseche los escombros en recept_tculos de basura.
POSICION DE USO
....
Protecci6n
Propulsor
ANTES DE PONER
MARCHA
Aspirador
EL MOTOR EN
ADVERTENCIA:
Aseg=3rese de
haber leido toda la informaci6n sabre el
combustible en las reglas de seguridad
antes de comenzar. Si no comprende
las reglas de seguridad, o intente
abastecer el aparato con combustible.
Llame al 1-800-235-5878.
ABASTECIMIENTO
DEL MOTOR
'_
ADVERTENCIA:
Remueva
la
tapa del tanque de combustible lentamente al reabastecer combustible.
Este motor est& habilitado para
funcionar con gasolina sin plomo. Antes
de comenzar con el usa, se deber&
mezclar la gasolina con un aceite de
sintetico de buena calidad para motores
de 2 tiempos enfriados a aire.
Recomendamos el aceite de sintetico
de la marca Craftsman. Mezcle la
gasolina con el aceite en la proporci6n
40:1. Se obtiene una proporci6n de 40:1
mezclando 3,2 onzas de aceite con
cada gal6n de gasolina sin plomo. Se
incluye con esta aparato un recipiente
de 3,2 onzas de aceite. Adiera el
contenido entero de este recipiente en 1
gal6n de gasolina para alcanzar la
mezcla apropiada del combustible. NO
USE aceite para autom6viles ni para
barcas. Estos aceites daSar&n el
motor.AI mezclar el combustible, siga las
instrucciones impresas en el recipiente.
Una vez haya aSadido el aceite a la
gasolina, agite al recipiente brevemente
para asegurar que el combustible est6
completamente mezclado. Siempre lea
y siga las instrucciones de seguridad
que tienen que ver con el combustible
antes de abastecer el aparato.
IMPORTANTE
La experiencia indic que los combustibles mezclados con alcohol, (los Ilamados gasohol o los que tienen etanol
o metanol) pueden atraer humedad, Io
- 23 -
que puede causar la separaci6n y la
formaci6n de &cidos durante el almacenaje. La gasolina &cida puede da_har
el sistema de combustible del motor
durante el almacenaje. Para evitar problemas con el motor, deber& vaciarse
el sistema de combustible
antes de
almacenar el aparato por 30 dias o
m&s. Vacia el tanque de combustible,
ponga el motor en marcha y d6jelo en
marcha hasta que las lineas de combustible y el carburador queden
vacios. Use combustible fresco en la
pr6xima temporada. Nunca use productos de limpieza de motor o carburador en el tanque de combustible ya
que de hacerlo puede provocar daSos
permanentes.
Un estabilizador de
combustible es una alternativa aceptable para minimizar la formaci6n de
dep6sitos de goma en el combustible
durante el almacenaje. El aceite de la
marcha Craftsman viene ya mezclado
con estabilizador de combustible. Vea
la secci6n de ALMACENAJE para m&s
informaci6n.
AVlSO: El aparato se debe poner de
lade al agregar el combustible (vea la
ilustraci6n abajo).
• Sostenga el aparato en la posici6n de
arranque elustrada. AsegOrese de que
la boquilla de propulsi6n no est6 direccionada hacia personas, animales, vidrieras y otros objetos s61idos.
POSICION DE ARRANQUE
Propulsor
\
/
Aspirador
_i,
ADVERTENOIA:
AI arrancar el
motor, sostenga el aparato como se
ilustra en la figura. Apoye el aparato
exclusivamente
en una superficie limpiay s61ida siempre que vaya a efectura el arranque y siempre que tenga
que apoyar el aparato con el motor en
marcha. Los escombros tales come
gravilla, arena, tierra, c6sped, etc.,
pueden ser succionados por la entrada de aire y arrojados per la salida de
propulsi6n, daflando el aparato u otros
bienes o causando graves heridas a
espectadores o al usuario.
PARA ARRANCAR
CON MOTOR
FRIO
1. Mueva la palanca del acelerador a
la posici6n 'f_.
2. Mueva la palanca del cebador a la
posici6n FULL OHOKE.
3. Lentamente, presione el bot6n del
bombeador 8 veces.
Palanca del
Bot6n del
acelerador
bombeador
PARA DETENER EL MOTOR
• Para detener el motor, mueva la palanca del acelerador a la posici6n
STOR
PARA PONER
EL MOTOR
EN MARCHA
_L. ADVERTENOIA:
Palanca del cebador
Es OBLIGATO-
RIO asegurarse que los tubos est6n
bien fijos antes de usar el aparato.
• Abastezca el motor. Ap_.rtese por Io
menos 3 metros (1 0 pies) del lugar
de abastecimiento.
4.
- 24-
Firmemente, tire del mango de la
cuerda de arranque hasta que el
motor intente arrancar, pero no
m_.s de 5 tirones (en temperatures
bajo los 30" F, 8 tirones).
AVI80: Si el motor intenta arancar
antes del quinto tir6n del mango, pase
al siguiente paso de inmediato.
5. Mueva la palanca del cebador a la
posici6n HALF CHOKE.
6. Firmemente, tire del arranque hasta que el motor arranque, pero no
m_.s de 5 tirones (en temperatures
bajo los 30 ° F, 10 tirones).
7. Despues de calentar per 5 segundos, mueva la palanca del cebador
a la posici6n RUN.
8. Permita que el aparato siga en
marcha por otros 30 segundos en
la posici6n RUN antes de mover la
palanca de] ace]erador a la posici6n _
I
Si el motor no ha arrancado despu6s
del quinto tir6n del mango de arranque
(en la posici6n HALF CHOKE), repita el
procedimiento PARA ARRANCAR CON
MOTOR FRIO. Si el motor persiste sin
arrancar, proceda con el procedimiento
baho el titulo ARRANQUE DE MOTOR
AHOGADO.
9. Para detener el motor, mueva la palanca del acelerador a la posici6n
STOP.
PARA ARRANCAR
CON EL MOTOR
CALIENTE
AVlSO: Si el tanque de combustible
est& vacio, agregue el combustible;
luego, siga el procedimiento
PARA
ARRANCAR CON MOTOR FRIO. No Ilene
el tanque de combustible mientras el
motor ester caliente.
Mueva la palanca del acelerador a
la posici6n _.
2. Firememente,
tire del mango de arranque hasta que el motor arranque, pero no m_ts de 5 tirones.
AVlSO: Si el motor no arranca, tire del
mango de arranque firmemento otras
5 veces. Si el motor persiste sin arrancar, probablemente se encuentre ahogado. Proceda con la secci6n ARRANQUE DE MOTOR AHOGADO.
3. Para detener el motor, mueva la palanca del acelerador a la posici6n
STOR
ARRANQUE
DE MOTOR AHOGADO
Los motores que se encuentren ahogados podr_.n ponerse en marcha colocando la palanca del cebador en la posici6n RUN. Mueva la palanca del acelerador a la posici6n 4"rr_
; luego, itre de
la cuerda de arranque hasta que el motor se ponga en marcha. Despu6s que
el motor se haya puesto en marcha,
mueva la palanca del acelerador a la
posici6n _
para permitir que el motor
quede en marcha lenta.
Para que el motor arranque, posiblemente tendr_, que tirar de la cuerda de
arranqeu muchas veces. Esto depende de cu_.n ahogado se encuentre
el motor. Si el aparato persiste sin arrancar, vea la TABLA DIAGNOSTICA de
este manual o Ilame al
1-800-235-5878.
- 25-
1.
RESPONSABILIDAD
_
DEL USUARIO
ADVERTENCIA:
Desconecte la bujia antes de realizar mantenimiento,
servicio, o ajustes.
TAREA DE CUIDADO Y MANTENIMIENTO
CUANDO HACER
Verificar
Verificar
que no haya fijadores flojos ni piezas sueltas
que no haya piezas daSadas o gastadas
Inspeccione
y limpie el aparato y sus placas
Limpiar el filtro de aire
Inspeccione
silenciador
y la reiilla antichispa
Cambie la bujia
Cambie el filtro del combustible
Verifique
Antes de cada uso
Antes de cada uso
Despu6s de cada uso
Cada 5 horas de uso
Cada 50 horas de uso
Anualmente
Anualmente
Anualmente
los tornillos del silenciador
• Palanca del aceleradorAsegOrese
de que la palanca del acelerador funcione de forma apropiada movi6ndola
a la posici6n STOR AsegQrese de que
el motor se detenga; luego, vuelva a
poner en marcha el motor y continue.
• Tanque de Combustible. Para de usar
el aparato si hay indicios de da_os o
p6rdidas en el tanque de combustible.
• Bolsa de la Aspiradora. Pare de usar
la bolsa de aspiraci6n si se encuentra de alquna manera rota o da_ada.
A
II
ADVERTENCIA:
Evite hacer
contacto con el silenciador a no ser
que el motor y el silenciador se encuentre fdo. El contacto con un silenciador caliente puede causar quemaduras de gran envergadura.
ADVERTENCIA:
Detenga el
motor y aseg_rese de que las cuchillas del impulsor no se encuentren girando antes de abrir la compuerta de
entrada de aire del aspirador o de intentar introducir o remover los tubos
de aspiraci6n o los tubos de propulsi6n. Las cuchillas girantes podrian
causar serios accidentes.
Siempre
desconecte la bujia antes de hacer cualquier mantenimiento
o de tener acceso a piezas movibles.
RECOMEN DACION ES GENERALES
La garantia de este aparato no cubre
los articulos que han sido sometidos al
abuso o a la negligencia pot parte del
usuario. Para recibir el valor completo
de la garantia, el usuario deber& mantener el aparato segQn las instrucclones en este manual. Hat& falta hacer varios ajustes peri6dicamente
para
mantener el aparato de forma debida.
VERIFICAR QUE NO HAYA
PIEZAS SUELTAS NI FIJADORES
FLOJOS
• Capucha de la Bujia
• Filtro de Aire
• Tornillos de la Caja
VERIFICAR
QUE NO HAYA PIEZAS
DAI_IADAS NI GASTADAS
Entre en contacto con el Centro de
Servicio Sears para el reemplazo de
piezas da_adas o desgastadas.
INSPECCIONE
Y LIMPIE EL APARATO Y SUS PLACAS
• Despues de que cada uso, inspeccione la aparato completa para saber
si hay piezas flojas o da_adas. Limpie
el aparato y las placas usando un trapo hOmedo con un detergente suave.
• S6quelo con un trapo limpio.
LIMPIE EL FILTRO DE AIRE
'/ _-
_r_f
- 26-
Filtro de #,ire
_'_4_i_ deIFiltro
Tornillos
Los filtros de aire sucios disminuyen el
rendimiento del motor e incrementan
el consumo de combustible y la producci6n de emisiones nocivas.
Siempre limpie el filtro de aire despu_s
ded cada 5 horas de uso.
Limpieza del filtro del aire:
1. Limpie la cubierta y el &rea contigua para evitar que caiga tierra en
la c&mara del carburador cuando
remueva la cubierta.
2. Retire las piezas como se ilustra.
AVlSO: No limpie el filtro de aire con
gasolina ni ning0n otro solvente inflamable, ya que de hacerlo puede
crear peligro de incendio y de emiclones evaporativas nocivas.
3. Lave el filtro con agua y jab6n.
4. Permita que el filtro se seque.
5. Aplique varias gotas de aceite al
filtro; a optima el filtro para distribuir el aceite.
6. Reponga las piezas.
CAMBIE LA BUJIA
Cambie la bujia anualmente. La separaci6n de los electrodos de la bujia
deber& set de 0,025 de pulgada. El
encendido es fijo y no es ajustable.
1. Gire y luego retire la capucha de la
bujia.
2. Retire la bujia del cilindro y des6chela.
3. C&mbiela por una bujia CJ-6Y y
ajQstela con una Ilave de 3/4 de pulgada.
4. Vuelva a instalar la capucha.
CAMBIE EL FILTRO DEL
COMBUSTIBLE
Para cambiar el filtro del combustible,
vacie el aparato de todo combustible
dejando el motor en marcha hasta que
se detenga. Luego, remueva el montaje de la tapa/retenedor
del tanque.
Tire del filtro que se encuentra en el
tanque y retirelo de la linea de combustible. Instale un filtro nuevo en la
linea de combustible; vuelva a instalar
todas las piezas.
Filtro del
CombustiMe
VERIFIQUE
LOS TORNILLOS
DE
MONTAJE DEL SILENCIADOR
Para prevenir da_os, aseg_rese anualmente de que los tornillos de montaje del silenciador se encuentren seguros y apropiadamente
ajustados.
Huecos de los
Tornillos de
Tapa del
1.
2.
3.
4.
Afloje y retire los 2 tomillos de la
tapa del silenciador.
Remueva la tapa del silenciador.
Apriete firmemente los 2 tornillos de
montaje.
Reinstale la tapa del silenciador y
los 2 tornillos. Apriete firmemente.
AJUSTE AL CARBURADOR
No hay tornillo para el ajuste de la
marcha lenta en su propulsor de aire.
La palanca del acelerador se utiliza
para ajuste de las revoluciones de la
motor. La palanca del acelerador se
puede colocar en una de cuatro
posiciones:
PARE, MARCHA LENTA o
, ACELERADOR ABIERTO o '_, y
una posici6n intermitente. Si su motor
no funciona correctamente o si usted
necesita m&s ayuda, entre en contacto
con un Centro de Servicio Sears o
Ilame a nuestro tel6fono de ayuda al
consumidor, al 1-800-235-5878.
- 27-
ADVERTENClA:
Realice los si-
guientes pasos despu6s de cada uso:
• Permita que el motor se enfr[e y fije
bien el aparato antes de guardarlo o
transportarlo.
• Guarde el aparato y el combustible
en un lugar bien ventilado donde los
vapores de combustible no puedan
entrar en contacto con chispas o llamas abiertas provenientes de termotanques, motores o interruptores
el6ctricos, calefactores centrales,
etc.
• Guarde el aparato con todos los protectores en su lugar y coloque el
aparato de modo que las piezas filosas no puedan causar heridas por
accidente.
• Guarde el aparato y el combustible
completamente
fuera del alcance de
los ni_os.
ESTACIONAL ALMACENAJE
Prepare el aparato para el almacenaje
al final de la temporada o si ca a estar
sin usar por m_.s de 30 dias.
Si va a almacenar el aparato durante
un periodo largo de tiempo:
• Limpie el aparato pot completo antes
del almacenaje.
• Almacene en un _trea limpia y seca.
• Aplique una peque_a cantidad de
aceite alas superficies externas
met_tlicas.
SISTEMA DE COMBUSTIBLE
Bajo el ABASTECIMIENTO DEL MOTOR,
en la seccion de USO de este manual,
vea el mensaje marchado como IMPORTANTE referente al uso de gasohol
en su motor.
Los estabilizadores de combustible
son una alternativa aceptable para
minimizar la formaci6n de los depositos de goma durante el almacenaje.
A_ada estabilizador a la gasolina en el
tanque de combustible o en el recipiente
para alacenaje de combustible. Siga las
instrucciones de mezcla que se encuentran en los envases del estabilizador.
Ponga el motor en marcha y d6jelo en
marcha per Io menos 5 minutos despu6s de haberle puesto el estabilizador.
El aceite de la marca Craftsman 40:1
para motores a 2 tiempos (enfriados a
aire) ya viene mezclado con estabilizador de combustible. Si no usa este
aceite, entonces puede aSadir un estabilizador al tanque de combustible.
MOTOR
• Retire la bujia y vierta una cucharadita de aceite 40:1 para motores de 2
tiempos (enfriados a aire) por la abertura de la bujia. Lentamente tire de
la cuerda de arranque de 8 a 10
veces para distribuir el aceite.
• Reemplace la bujia con otra nueva
del tipo y de la gama de calor recomendados.
• Limpie el filtro de aire.
• Examine todo el aparato para verificar que no hayan tornillos, quebradas o gastadas.
• AI principio de la pr6xima temporada,
use exclusivamente
combustible
nuevo con la proporci6n correcta de
gasolina y aceite.
OTROS
• No guarde la gasolina de una temporada a la siguiente.
• Cambie el recipiente de gasolina si
se empieza a oxidar.
- 28-
TABLA
DIAGNOSTICA
ADVERTENCIA:
Siempre apague el aparato y desconecte la bujia antes
de hacer cualquiera de las reparaciones recomendadas
a continuaci6n que
no requieran que la unidad est6 en operaci6n.
SlNTOMA
CAUSA
El motor no
1. El motor esta ahogado.
SOLUCION
arranoa.
2. El tanque de combustible
est& vacio.
3. La bujia no estA haciendo
chispa.
4. El combustible no est'.
Ilegando al carburador.
5. La compresi6n
El motor no
anda en
marcha lenta
como debe.
estA baja.
1. El combustible no est#t
llegando al carburador.
2. El carburador requier
ajuste.
3. Las lunas del cigue[_al
estan gastadas.
4. La compresi6n esta baja.
EI motor
aoelera,
falta
potencia
se para
carga.
no
le
1. El fiitro de aire est#t sucio.
2. El combustible no ester
Ilegando al carburador.
o
bajo
3. La bujia est&. carbonizada.
4. El carburador requiere
ajuste.
5. Acumulaci6n
de carbon.
6. La compresi6n
est& baja.
El motor
humea excesivamente
1. El cebador esta parcialmente accioeado.
2. La mezcla de combustible
se ha hecho incorrectamente.
3. El ffltro de aire est#t sucio.
4. El carburador requiere
ajuste.
El motor
maroha con
temperatura
elevada.
1. La mezcla de combustible
esta se he hecho
incorreotamente.
2. Se ha instalado la bujia
incorrect&
3. El carburador requiere
ajuste.
4. Acumulaci6n de carb6n.
- 29-
1. Yea "Arranque de Motor Ahogado"
en la seccion Uso.
2. Uene el tanque con la mezcla
correcta de combustible.
3. Instale una bujia nueva.
4. Verifique si el filtro de combustible no
este sucio; cambielo. Verifique si hay
dobleces en la linea de combustible
o si est#t partida; reparela o c_tmbiela.
5. Entre en contacto con el Servicio
Sears (vea parte trasera del manual).
1. Verifique si el filtro de combustible no
este sucio; cAmbielo. Verifique si hay
dobleces en la linea de combustible
o si est#t partida; rep#trela o c_tmbiela.
2. Entre en contacto con el Servicio
Sears (vea parte trasera del manual).
3. Entre en contacto con el Servicio
Sears (vea parte trasera del manual).
4. Entre en contacto con el Servicio
Sears (yea parte trasera del manual).
1. Umpie o cambie el filtro de aire.
2. Verifique si el fittro de combustible no
este sucio; cambielo. Verifique si hay
dobleces en la linea de combustible
o si est#t partida; reparela o c&.mbiela.
3. Umpie o cambie la bujia y calibre
ta separaci6n.
4. Entre en contacto con el Servicio
Sears (vea parte trasera del manual).
5. Entre en contacto con el Servicio
Sears (vea parte trasera del manual).
6. Entre en contacto con el Servicio
Sears (yea parte trasera del manual).
1. Ajuste el cebador.
2. Vacie el tanque de combustible y
ltenelo de combustible con la mezcla
correct&
3. Limpie o cambie el fiitro de aire.
4. Entre en contacto con el Servicio
Sears (vea parte trasera del manual).
1. Vea "Abastecimiento
secci6n Uso.
2. Cambie
3. Entre
Sears
4. Entre
Sears
del Motor" en la
por la bujia correct&
en contacto con et
(vea parte trasera
en contacto con et
(vea parte trasera
Servicio
del manual).
Servicio
del manual).
SUS DERECHOS Y OBLIGACIONES
DE GARANTIA:
La Agencia de Protecci6n Ambiental de los Estados Unidos, la Junta de Recursos Ambientales de California y Sears, Roebuck
and Co., U.S.A., se complacen en explicar la garantia con la que cuenta el
sistema de control de emisi6n en su
motor pequefio, modelo 2005 y m&s
adelante, para uso fuera de carretera.
En California, todos los motores pequefios para uso fuera de carretera
deben ser disefiados, construidos y
equipados para satisfacer las rigurosas normas antihumo que posee el estado. Sears deber& garantizar el sistema de control de emisi6n en su m&quina de motor pequefio para uso fuera
de carretera por los periodos de tiempo que explicamos a continuaci6n
y
con la condici6n de que su m&quina
de motor pequefio para uso fuera de
carretera no haya sufrido ningOn tipo
de abuso, negligencia o mantenimiento inapropiado.
Su sistema de control
de emisi6n incluye piezas tales come
el carburador y el sistema de ignici6n.
Donde exista una condici6n que requiera reparaci6n bajo garantia, Sears
reparar& gratis su motor pequefio para
uso fuera de carretera. Los gatos cubiertos bajo la garantia incluyen el
diagn6stico, las piezas y labor.
CUBIERTA DE GARANTIA DEL FABRICANTE: Si cualquier pieza relacionada con el sistema de emisi6n de su
motor (como hemos enumerado en la
lista de piezas de control de emisi6n
bajo garantia) se encontrara defectuosa o defectos en el material o en la labor del motor causaran que tal pieza
comenzara a fallar, la pieza ser& reparada o reemplazada
por Sears.
GARANTIA DE RESPONSABILIDAD
DE
DEL DUEI_IO: Come duefio de una
m&quina de motor pequefio para uso
fuera de carretera, usted ser& responsable per el mantenimiento
adecuado en los periodos previamente
programados
y enumerados en su
manual de instrucciones.
Sears recomienda que guarde todos los recibos que indiquen que se ha desempefiado
mantenimiento
en su
m&quina de motor pequefio para uso
fuera de carretera, pero Sears no
podr_t negar el servicio bajo garantia
Onicamente a causa de la falta de recibos o por el incumplimiento de su
parte en asegurarse que el mantenimiento programado haya side desempefiado.
Como duefio de una
m_tquina de motor pequefio para uso
fuera de carretera, usted deber_, contar con el conocimiento
de que Sears
puede negar la cubierta bajo garantia
si su m_.quina de motor pequefio para
uso fuera de carretera o alguna pieza
de la misma ha dejado de funcionar
debido al abuso, negligencia, mantenimiento inapropiado, modificaciones
no aprobadas o el uso de piezas que
no hayan sido fabricadas o aprobadas
por el fabricante original del equipo.
Es responsabilidad
suya el Ilevar su
m_tquina de motor pequefio para uso
fuera de carretera a un centre de reparaci6n autorizado Sears tan pronto
como se presente el problema.
Las
reparaciones bajo garantia deber6.n
set completadas en un periodo de
tiempo razonable, que no exceda los
30 dias. Si cuenta usted con alguna
pregunta en relaci6n a sus derechos y
responsabilidades
de garantia, usted
deber_, comunicarse con su centro de
servicio autorizado m_ts cercano o Ilamar a Sears al 1-800-469-4663.
FECHA DEL COMIENZA DE LA GARANTIA: El periodo de garantia comienza en la fecha de compra de la
m&quina de motor pequefio para uso
fuera de carretera. DURAClON DE
LA GARANTIA:
Esta garantia cuenta
con un periodo de duraci6n de dos
afios comenzando
en la fecha inicial
de compra. QUE CUBRE LA GARANTIA: REPARAClON
O REEMPLAZO DE PIEZAS. La reparaci6n o
el reemplazo de cualquier pieza garantizada ser_.n desempefiados
y ofrecidos al duefio sin costo alguno en un
Centro de Servicio Sears. Si cuenta
usted con alguna pregunta en relaci6n
a sus derechos y responsabilidades
de garantia, usted deber& comunicarse con su centro de servicio autorizado mrs cercano o Ilamar a Sears al
1-800-469-4663.
PERIODO DE GARANTIA: Cualquier pieza garantizada
que no este programada para ser reemplazada como parte del mantenimiento requerido, o que est6 programada Onicamente para inspecci6n regular
- 30-
para efectos de "reparaci6n o reemplazo si fuera necesario" deber_, garantizarse per un periodo de dos a_os.
Cualquier pieza garantizada que este
programada para ser reemplazada
come parte del mantenimiento
requerido deber_, estar garantizada por el
periodo de tiempo que comienza en la
fecha de compra inicial hasta la fecha
del primer reemplazo programado
para dicha pieza. DIAGNOSTICO:
No
se deber& cobrar al dueSo ningOn tipo
de cargos por la labor de diagn6stico
la cual determine que una pieza garantizada se encuentra defectuosa si
el trabajo de diagn6stico ha side desempeSado por un Centro de Servicio
Sears. DANOS POR CONSECUEClA:
Sears podr& ser responsable de
daSos ocurridos a otras piezas del motor causados per la falla de una pieza
garantizada que se encuentre bajo el
periodo de garantia. QUE NO CUBRE
LA GARANTIA: Todas las fallas causadas per el abuse, negligencia o
mantenimiento
inapropiado no est_tn
cubiertas.
PIEZAS ANADIDAS O MODIFICADAS:
El use de piezas aSadidas o la modificaci6n de piezas
podr&n servir como base para que se
anule la reclamaci6n de garantia. La
garantia de Sears no se responsabiliza pot el mal funcionamiento
debido al
use de piezas aSadidas o de piezas
modificadas.
Se certifica este motor para satisfacer
siguientes:
[]
Moderado
[]
Intermedio
(125 horas)
[]
Extendido
(300 horas)
COMO ENTABLAR
UNA RECLAMA-
CION: Si cuenta usted con alguna pregunta relacionada con sus derechos y
responsabilidades
de garantia, usted
deber& entrar en contacto con su centre de servicio autorizado mrs cercano
o Ilamar a Sears al 1-800-469-4663.
DONDE OBTENER SERVIClO DE
GARANTIA:
Servicio o reparaciones
bajo garantia deber_tn ser provistas en
todos los Centros de Servicio Sears.
Per favor comuniquese al
1-800-469-4663.
MANTENIMIENTO,
REEMPLAZO
Y REPARACION
DE
PIEZAS RELAClONADAS
CON LA
EMISION: Cualquier pieza de repuesto Sears aprobada y utilizada en el desempeSo de cualquier servicio de
mantenimiento o servicio de reparaci6n bajo garantia de piezas relacionadas con la emisi6n ser& provisto sin
costo alguno al dueSo si la pieza se
encuentra bajo garantia.
LISTA SE
PIEZAS DE CONTROL DE EMISION
GARANTIZADAS:
Carburador, Sistema de Ignici6n: Bujia (cubierta hasta la
fecha de mantenimiento
programada),
M6dulo de Ignici6n, Silenciador incluyendo el Catalizador.
DECLARACION DE MANTENIMIENTO:
El
due_o es responsable de adquirir todo
el mantenimiento
requerido come Io
define en el manual de instrucciones.
los requisites
(50 horas)
- 31 -
de emisi6n para los uso