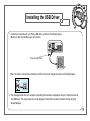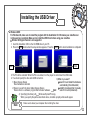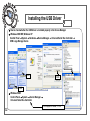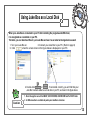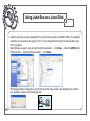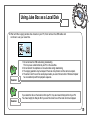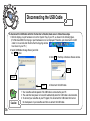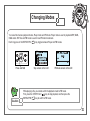
1
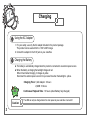
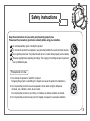
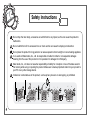
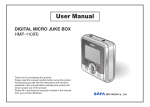
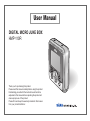
User Manual DIGITAL MICRO JUKE BOX HMP-110R Thank you for purchasing this product. Please read this manual carefully before using the product. Familiarizing yourself with the instructions and functions explained in this manual before operating the product will ensure proper use of the product. Please fill in and keep the warranty included in this manual from your product distributor. Features 1. Equipped with a 1.5GB HDD for large-scale storage. 2. Convenient downloading by the USB Mass Storage (UMS) function. 3. Supports Multi-Codec Playback for MP3, OGG, WMA and ASF files. 4. Supports Encoding for voice records and sound from external devices into MP3 file. 5. Supports Multiple-Languages. 6. Receives and records FM Radio. 7. Firmware Upgrade function. 8. Supports ID3 tags and lyrics. 9. Useful Memo function. 10. Supports 6-Mode Equalizer (EQ): Normal, Rock, Classic, Jazz, Bass, and User EQ. 11. Repeat Playback and Shuffle Playback. 12. Low and High Speed Playback. 13. My Logo function. 14. Effective Memory Management using the CD-Sync and VOR (Voice Operated Recording) functions. 15. Cool Electro-Luminescent Backlighting. 16. Rechargeable by AC Adapter and USB. 17. Convenient Navigation structure. 18. Wide LCD Window ( 128dot X 80dot ). 19. Supports Program Playlist (Bookmarks, M3U Playlist). Contents Before You Use Ȧ Charging .............................................2 Ȧ Safety Instructions ..............................3 Ȧ Package ..............................................5 Ȧ Hardware Features .............................6 Connecting to a PC Ȧ Installing Programs .............................8 Ȧ Installing the USB Driver .....................9 Ȧ Using Juke Box as a Local Disk........13 Ȧ Disconnecting the USB Cable...........16 Basic Operations Ȧ Using Juke Box.................................17 Ȧ Listening to Music.... .........................18 Ȧ Changing Modes...............................21 Ȧ Before Making a Recording ..............22 Ȧ Voice Recording ...............................24 Ȧ Recording Sound from an External Device .25 Ȧ Listening to FM Radio.......................26 Ȧ Recording to FM Radio.....................30 Ȧ Using the Menu ................................31 Advanced Operations Ȧ Repeat / Shuffle Playback ....................33 Ȧ Equalizer Function.................................34 Ȧ Playlist ...................................................35 Ȧ Navigation .............................................37 Ȧ Using the Memo Function .....................38 Ȧ Using the Logo Function .......................40 Ȧ Additional Menu Functions ....................42 Ȧ Upgrading Firmware..............................48 Customer Support Ȧ Troubleshooting.....................................49 Ȧ Specifications ........................................50 Ȧ Warranty ...............................................51 1 Charging Using the AC Adapter 1. For your safety, use only the AC adapter included in the product package. This product can be used within the 110V to 220V range. 2. Connect the adapter to the 5.0V jack on your Juke Box. Charging the Battery ƃ The battery is automatically charged when the product is connected to an external power source. ƃ When the battery is charging the backlight changes to red. When it has finished charging, it changes to yellow. Disconnect the external power source from your Juke Box when the backlight is yellow. Charging Time: 1) AC Adapter : 3 hours 2) USB: 10 hours Continuous Playback Time : 10 hours (when Battery fully charged) Caution 2 The USB can only be charged when the main power of your Juke Box is turned off. Safety Instructions Keep these instructions for your safety and preventing property loss. Please read the precautions given below carefully before using your Juke Box. Do not disassemble, repair or modify this product. Do not use the product in an airplane or any place that prohibits the use of electronic devices. Do not get the product wet. The product should not be in contact with any liquids (such as drinks). Observe copyright laws regarding recordings. The copying of recordings except for personal use is prohibited by law. Precautions for Use 1. Do not drop the product or submit it to impact. Dropping the product or submitting it to impact can cause the product to malfunction. 2. Do not place the product in an area exposed to heat, direct sunlight, dampness, moisture, rain, vibration, shock, dust or sand. Do not place the product on an incline, nor inside a car whose windows are closed. 3. Do not place the product near any kind of magnet or expose it to excessive vibration. 3 Safety Instructions Do not drop the main body, accessories or submit them to any impact, as this can cause the product to malfunction. Do not submit the LCD to excessive force or shock as this can cause the display to malfunction. Do not place the product for long periods in an area exposed to direct sunlight or near a heating appliance. In no event will Safa media, Co., Ltd. be responsible or liable for indirect or consequential damages resulting from the use of this product nor for reparation for damages from third party. Safa media, Co., Ltd. does not assume responsibility or liability for corruption or loss of the data saved in the memory while using or repairing the product. Make sure to backup important data from your product to your PC or any other storage device. Irrational or unintended use of the product, such as privacy invasion or wire tapping, is prohibited. 4 Package Earphones CD-ROM Juke Box User Manual Ҭ Accessories and its specifications are subject to change. Audio Cable Neckstrap USB Cable Juke Box Case AC Adapter 5 Hardware Features Hardware Features ڿ ۀ ڹ ۂ ڼ 6 ں ڽ ڻ ھ 1. LCD ۃ 2. REPEAT/FM Repeat mode,Switching to FM mode 3. REC/PAUSE, EQ Record/Pause, Equalizer mode 4. PLAY/PAUSE, POWER ON/OFF Playback/Pause, Power On/Off 5. STOP/HOLD Stop/Locks key 6. Necklace/Hand Strap Latch ہ 7. Earphone jack 8. Line Input jack 9. USB jack 10. DC Power jack 11.Jog Key for Navigation, Menu and Volume control (MENUŋVOLŋNAVI) Enter the Menu, Scan, toggle between FM Frequency/Preset mode Previous Song, Fast Rewind, Move to the Previous Menu Next Song, Fast Forward, Move to the Next Menu Move Up, Increase Volume – Move Down, Decrease Volume Hardware Features LCD Screen Modes Open Folder Closed Folder File Repeat mode Equalizer mode Playback screen Stop screen 001/122 ROOT LINE RECORD MUSIC *IKS[\ZMM\*Wa Recording Input Record Recording Method screen MIC MUSIC *IKS[\ZMM\*Wa[)[ 58 3 00:03:57 ST END FM screen Frequency/Preset mode NOR.REC PRES VOICE RECORD ENCV-003 128K MP3 00:03:57 11 : 02: 11 MONO Menu screen MENU RECORD 040/122 )T\PW]OPTWVMTQVM[[PI[ IT_Ia[JMMVINZQMVLWN UQVM1UTMI^QVOUaTQNM MP3 192K 00:03:57 FM Recording screen FM 87.50MHz LINE RECORD ENCL-006 128K MP3 00:00:15 13 : 10: 25 88.30 Ch 01 09 Keys available for the current menu Lyrics screen 001/122 09 Playlist screen USB Connection screen 001/122 BMKList *IKS[\ZMM\*Wa[) AM[\MZLIa*MI\TM 1ZMUMUJMZaW] 7 Software Installation When you insert the provided CD into the CD-ROM drive, the installation program will be automatically started. Install the program following the process below. Click Recommended PC Environment Click Click You will see the following icons on the desktop when installation is successfully completed. My Manager 8 Pentium 133MHz or higher CPU Windows 98SE, ME, 2000 and XP More than 20MB free HDD space 2x or higher CD-ROM USB port (ver. 1.1) VGA graphic card ƃ Install the software using the administrator’s account in Windows 2000/XP. ƃThe MP3 driver will be automatically recognized by Windows ME/2000/XP without additional software installation. However, you should install the software in order to use the additional functions such as My Logo or the memo writing functions. (Be noted that Windows 98 original version is not supported.) ƃIt cannot be installed on MAC operating system. Installing the USB Driver 1. Connect your Juke Box with your PC by USB cable, as shown in the following figure. (Make sure that the Juke Box power is turned on.) Connect by USB Cable When the cable is connected successfully, the LCD screen mode changes as shown in the following figure. 2. The message shows that your computer is searching the new device is displayed, and your computer will setup the USB Driver. The setup screen may not be displayed. Check that it has been installed correctly using the Device Manager. 9 Installing the USB Driver Ɔ Installing USB driver manually(This section is not applicable if the USB driver is installed normally.) If the USB driver is not installed automatically, install it manually as described below. ƃ Windows 2000 ME, Windows XP 1. Insert the CD in to the CD-ROM drive of PC. 2. Control Panel ƍ System ƍ Device Manager ƍ Universal Serial Bus Controller ƍ Double-click the device name with exclamation or question mark. (See page 11 to see how to select the menu.) 3. Driver ƍ Driver Update ƍ Install from the List or Specific Location ƍ Next ƍ Browse ƍ D:\Driver ƍ Next ƍ Finish Note 10 If the USB driver is not automatically recognized by Windows 2000, download and install the latest service pack from Windowsupdate.Microsoft.com. The installation method may differ depending on the types of PC and environment. If you still cannot install the USB driver, contact the support center of the PC manufacturer. If you meet an installation error continuously, reboot the PC and reconnect the USB cable again. Installing the USB Driver ƃ Windows 98SE For Windows 98, make sure to install the program with the Installation CD. Otherwise your Juke Box can not be used as a local disk. Make sure to install the USB Driver before using your Juke Box. ſ Window 98 Original Version is not supported. 1. Insert the Installation CD in to the CD-ROM drive of your PC. 2. Press the Next button when the setup window appears. Press the Finish button when installation is completed. click click 3. The PC will be rebooted. When the PC is re-started, turn the player on and connect the USB cable. 4. You should specify the drive after USB connection. 3) What do you want? 1) Mass Storage Device Search for and install the hardware New hardware is detected. automatically (Recommended) Install the hardware that I manually 2) Device to search the driver: Mass Storage Device select from a list (Advanced) Next Device driver is a software program that activates hardware. 4) Specifying the driver path Windows/System/Precopy When you specify the path as described above, local disk property window will appear. Note Make sure to reboot your computer after installing the driver. 11 Installing the USB Driver Ɔ How to check whether the USB driver is installed properly in the Device Manager ƃ Windows 2000 ME, Windows XP Control Panel ƍ System ƍ Hardware ƍ Device Manager ƍ Universal Serial Bus Controller ƍ USB Large Storage Device Click Click Click ƃ Windows 98SE Control Panel ƍ System ƍ Device Manager ƍ Universal Serial Bus Controller 12 If it is displayed as below, it’s OK. Double click Using Juke Box as a Local Disk When your Juke Box is connected to your PC after installing the programs and USB driver, it is recognized as a local disk on your PC. Therefore, you can download files to your Juke Box and use it as an external storage device as well. 1. Turn your Juke Box on. 2. Connect your Juke Box to your PC. (Refer to page 9) 3. Click when the screen shown in the figure below is displayed on your PC. Window 4. Double-click my computer or Explorer . If connected correctly, you will find that your Juke Box has been added as a local disk on your PC, as shown in the figure above. 1. Do not change the name of the MUSIC, VOICE RECORD, LINE RECORD and PLAYLIST folder. 2. A USB connection is available only when your Juke Box is turned on. Caution 13 Using Juke Box as a Local Disk 5. Select the files that you want to download from your PC and copy them to the MUSIC folder of the Juke Box local disk. (It is the same as file copying on PCs. You can drag and drop the files from the local disk to your PC to copy them.) Select the files you want to copy and click the right mouse button. ƍ Click Copy. ƍ Select the MUSIC folder of the local disk. ƍ Click the right mouse button. ƍ Click Paste. The Copying window is displayed on your PC monitor and the copy screen is also displayed on the LCD of your Juke Box, as shown in the following figures. 14 Using Juke Box as a Local Disk 6. Wait until the copying window has closed on your PC, then remove the USB cable and continue to use your Juke Box. Caution 1. Do not remove the USB cable during downloading. This may cause a malfunction to your PC or the Juke Box. 2. Do not connect the earphones or an audio cable during downloading. 3. The copying operation may be delayed if there are many folders and files are to be copied. 4. The order in which music files are displayed when you select the local disk in Windows Explorer has no relationship with their playback sequence. If you delete the files on the local disk from you PC, they are moved to Recycle Bin of your PC. You should empty the Recycle Bin if you want the correct size of the local disk to be displayed. Caution 15 Disconnecting the USB Cable To disconnect the USB cable after the file transfer is finished, make sure to follow these steps. 1. Click the Unplug or eject hardware icon on the System Tray of your PC, as shown in the following figure. (For Windows 98SE, the Unplug or eject hardware icon is not displayed. Therefore, just disconnect the USB cable 3 or 4 seconds after the time that the Copying window has closed on your PC.) Click 2. Select [USB Mass Storage Device] and click the Stop button. 3. Click OK on the Stop a Hardware Device window. click Select click Caution 16 4. Disconnect the USB cable. 1. Your Juke Box will not operate if the USB cable is connected to your PC. 2. The Juke Box main power is turned off automatically when the USB cable is disconnected. 3. To connect your Juke Box to your PC again, first disconnect the USB cable then turn on the main power of your Juke Box and then re-connect the USB cable. Using Your Juke Box Power On/Off 1. Press and hold the PLAY ( your Juke Box. ) key to turn on 2. Press and hold the PLAY ( off your Juke Box. Welcome! ) key again to turn Bye ~ loading... Press and Hold Jog Key Functions 1) ( ) Entering the Menu, Scan, toggle between FM Frequency/Preset modes 2) ( ) Previous Song, Fast Rewind, Move to the Previous Menu 3) ( ) Next Song, Fast Forward, Move to the Next Menu 4) + Move Up, Increase Volume 5) – Move Down, Decrease Volume 17 Listening to Music 1. Press and hold the PLAY ( Juke Box. ) key to turn on your 2. Select the desired file using the Jog key. Move Up Move to the Upper Folder Move to the Sub Folder/File 001/122 Press and Hold MUSIC *IKS[\ZMM\*Wa[) Move Down AM[\MZLIa*MI\TM 1ZMUMUJMZaW] 3. Press the PLAY ( ) key to playback the selected song. If you select a folder and press the PLAY ( ) key or Jog key, all the songs in the selected folder are played back sequentially starting with the first song. 001/122 MUSIC *IKS[\ZMM\*Wa[)[ 58 ST Press and shortly 18 3 00:03:57 END Caution If you press the REC/EQ key while in the PLAY ( ) or Pause mode, a recording will not occur. Listening to Music 4. Key Operations during Playback Short press : Repeat A-B Long press : Repeat/Shuffle Playback Short press : Pause Long press : Power Off Increase Volume VOL·N AV NU· I ME Short press : Previous Song Long press : Fast Rewind Short press : Next Song Long press : Fast Forward Short press : Enter Scan Mode Long press : Enter the Menu Decrease Volume Switch Equalizer Mode Short press : Stop Long press : HOLD ON/OFF 5. Enjoy your songs after setting the volume and the appropriate equalizer mode. (See page 34 ) 19 Listening to Music 5. HOLD ON/OFF ) longer to prevent key operation. Press the STOP/HOLD key ( Press the button longer again to set the hold off HOLD ON Note 20 HOLD OFF 1. HOLD will be enabled only when the power is on. 2. Set the password to prevent automatic power on when the power is turned off. (see page 46) Changing Modes Your Juke Box has two playback modes, Player mode and FM mode. Player mode is used to playback MP3, WMA, OGG and/or ASF files and FM mode is used to hear FM radio broadcasts. Each long press of the REPEAT/FM ( ) key toggles between Player and FM modes. Press and Hold Stop screen on the LCD FM mode screen on the LCD While playing a file, you cannot switch the playback mode to FM mode. First, press the STOP/HOLD ( ) key to stop playback, and then press the REPEAT/FM ( ) key to switch to FM mode. Caution 21 Before Making a Recording Ɔ Setting the Sound Quality of the Recording. Your selection will determine the file format, sound quality, and maximum recording time for your recordings. Make sure to select your desired settings before making a recording. 1. Enter MENU ƍ RECORD ƍ QUALITY . MENU RECORD MENU MENU RECORD QUALITY QUALITY METHOD 2. Select one of the following modes by using the + and – buttons on the Jog key, and then press the (MENUŋVOLŋNAVI) key. Mode 32Kbps 64Kbps 96Kbps 128Kbps 192Kbps Sound Quality of Recordings Sampling Mode Format 44KHz 44KHz 44KHz 44KHz 44KHz J.Stereo J.Stereo J.Stereo J.Stereo J.Stereo MP3 MP3 MP3 MP3 MP3 Maximum Recording Time [Minute] HMP-110R 5898 2949 1966 1474 983 Remarks Voice recording is recommended. Music/FM recording is recommended. ſ The memory capacity of this product is rated as 1.5GB, however the available capacity is 1.36GB. Your Juke Box uses a portion of the memory for its basic operations. Note 22 J-Stereo means Joint Stereo, which reduces memory usage by rendering frequencies as mono and pitches as stereo in the high-pitched range, while still producing a stereo effect. Before Making a Recording Ɔ Setting the Recording Method 1. Enter MENU ƍ RECORD ƍ METHOD. MENU RECORD MENU RECORD (When setting CD-Sync) MENU MENU METHOD CD-SYNC QUALITY METHOD 2. Select one of the following modes by using the + and – buttons on the Jog key, and then press the (MENUŋVOLŋNAVI) Mode OFF VOR CD-Sync Note key. Operation General Recording Mode When making a voice recording this function will automatically detect sections that need not be recorded because the sound level is too low, and automatically pauses the recording in those sections. When recording several files from an external device, this function automatically detects the silent sections between two files and records them as separate files by using those silent sections as the file separator. The interval of the silent section can range from 3 to 7 seconds. - In CD-Sync mode, the number of recorded files may not be the same as that of the original files. - In CD-Sync mode, recording will stop automatically if a silent section continues for more than 10 seconds after the silent interval you have selected. 23 Recording Voice Ɔ Recording Using the Built-In Microphone 1. Press the REC/EQ ( ) key in stop mode. 2. Press the REC/EQ ( ) key to pause a recording in progress, and then press the REC/EQ ( the recording. Stop mode Recording mode 3. Press the STOP/HOLD ( ) key again to resume Pause mode ) key to stop the recording. ƆRecording Using an External Microphone 1. Connect an external microphone as shown in the following figure. 2. Press the REC/EQ ( ) key in stop mode to start recording. 3. The other functions are the same as Recording Using the Built-in Microphone. Caution 24 Make sure to only briefly press the REC/EQ ( ) key to make a recording using an external microphone. If you press and hold the key, your Juke Box will operate in Recording Sound from an External Device mode, not in the Recording Using an External Microphone mode. Therefore, you may get unexpected results. Recording Sound from an External Device This function allows you to record the audio signals from an audio device or PC. 1. Connect your Juke Box to the external device using the cable included in this package. 2. Press and hold the REC/EQ ( Caution ) key while in stop mode to begin recording. Make sure to press and hold the REC/EQ ( ) key when recording sound from an external device. If you only briefly press the key your Juke Box will operate in Recording Using an External Microphone mode. Therefore you may get unexpected results. 3. The other functions are the same as Recording Using the Built-in Microphone. 1. Voice recording files are saved to the VOICE RECORD folder, and external device and FM recording files to the LINE RECORD folder. File names are automatically given. They are classified according to the recording signal, as shown in the table below. 2. To hear recorded files, select the desired files in the File Name Recording Signal VOICE RECORD and LINE RECORD folders using the Voice Recording File ENCV-001 Jog key and press the PLAY ( ) key. External Device and FM Recording ENCL-001 Note 25 Listening to FM Radio 1. Connect earphones to the earphone jack of your Juke Box. Since the earphones are used as an antenna, the reception may be poor if earphones are not connected. 2. Press and hold the REPEAT/FM ( ) key to switch to FM mode. Switching to FM mode is available only while the player is stopped. PRES MONO Increase Volume 88.30 Ch 01 3. Key Operations in FM Mode Short Press : Frequency/Preset Up Press and Hold : Auto Scan Up Short Press: Frequency/Preset Down Press and Hold: Auto Scan Down Short Press : Switch Frequency/Preset Modes Press and Hold : Enter the Menu Decrease Volume 26 Listening to FM Radio Short Press: Frequency and Memory Function Press and Hold: FM ON/OFF VOL·N AV NU· I ME Broadcast Recording 4. Select the desired broadcast by pressing the and buttons on the Jog key. Each click of the or button on the Jog key increases or decreases frequency by a step. Auto Scan: Press and Hold the or button on the Jog key to scan for the nearest broadcast frequency to the current frequency. 5. Press the MENUŋVOLŋNAVI key to switch between Frequency and Preset modes. In Frequency mode, pressing the or button on the Jog key increases or decreases the frequency. In Preset mode, the same operation moves up or down to the next stored channel, i.e., the next preset channel. These two-mode operations provide you with a convenient way to select channels. PRES MONO PRES 88.30 Ch 01 Frequency Mode screen MONO PRES 88.30 Memory 02 Preset Mode screen Ch 01 MONO 88.30 No Preset Channel When there are no channels memorized 27 Listening to FM Radio 6. Memorizing a Broadcast Channel Scan the channel you want to memorize by pressing the and buttons on the Jog key and briefly press the REPEAT/FM ( ) key. You can memorize up to 20 channels. FREQ A Broadcast Channel is Memorized STEREO 89.10MHz Memory 02 7. Automatically Memorizing a Broadcast Channel (AUTO MEMORY) Enter MENU ƍ FM ƍ AUTO MEMORY Select YES and press the (MENU VOL NAVI) key to begin the Auto Memory function. When Auto Memory is complete, your Juke Box automatically switches to Preset mode and receives Channel 1. MENU FM MENU FM ST/MONO AUTO MEMORY MENU AUTO MEMORY YES NO If a broadcast channel is already memorized, it will be overwritten by the new selected channel. Caution 28 Listening to FM Radio 8. Deleting a Memorized Channel Select the frequency to delete by pressing the or button on the Jog key and briefly press the REPEAT/FM( ) key. (The Deletion method is the same for Preset and Frequency modes.) FREQ Channel to Delete PREQ STEREO Memory 02 STEREO 89.10MHz 89.10MHz Deleted 9. Listening in Mono mode Noises may occur when you listen to a broadcast in an area where the signal is weak. If this occurs, try listening in Mono mode to decrease the noise. MENU ƍ FM ƍ ST/MONO MENU FM MENU FM ST/MONO AUTO MEMORY MENU ST/MONO STEREO MONO 29 Recording to FM Radio Recording FM Broadcasts 1. Press the REC/EQ ( ) key while listening to a broadcast channel. VOL·N AV NU· I ME FREQ STEREO 89.10 Memory 02 FM 87.50MHz LINE RECORD ENCL-006 128K MP3 00:00:15 13 : 10: 25 09 FM mode LCD screen FM mode LCD screen Press Noises may occur when you listen to a broadcast in an area where the signal is weak. 2. Press the STOP/HOLD ( ) key to stop recording. 3. To hear the recorded broadcast press and hold the REPEAT/FM ( Select the desired file in the LINE RECORD folder using the Jog key. Press the PLAY ( ) key to playback the selected file. 30 ) key to exit FM mode. Using the Menus Ɔ Menu Operations 1. To Enter a Menu Press and hold the (MENU VOL NAVI) key. MENU AUDIO Press and Hold 2. Jog Key Operations in Menu Mode Move up Move to upper menu Move to lower menu Press and Hold Move down 31 Using the Menus Ɔ List of Menu Functions Step1 Step2 Step3 QUALITY 32Kbps, 64Kbps, 96Kbps, 128Kbps, 192Kbps METHOD OFF, CD-SYNC, VOR INTRO INTRO START DISPLAY FILE NAME, ID3-TAG, LYRIC PLAY LIST OFF, BOOK MARK, M3U RECORD MUSIC Step4 P.22 General recording mode. Recorded files are separated by the sections that have no data. Recording is paused in these silent sections Play back only the first 10 seconds of the file P.23 Display File name, ID3 Tag, and Lyrics, respectively Move to General Browser, BMK List Browser, and M3U List Browser, respectively Control playback speed from low to high, i.e., 70%, 100%, and PLAY SPEED AUDIO 120% of the normal speed Ȝ : Frequency Control, Ɗ, ƌ : Level Control, : Set & Quit USER EQ LIGHT TIME The Power Off time is adjustable within 9 seconds. Always ON CONTRAST GENERAL POWER OFF SLEEP Control the contrast setting from Min. to Max. OFF, 15, 30, 60, 90 PASSWORD LANGUAGE SYSTEM Arabic, Czechoslovak, English, French, Chinese-Simp., German, Hungarian, Italian, Japanese, Korean, Polish, Portuguese, Russian, Spanish, Chinese-Trad., Turkish MEMO FM 32 MEMORY INFO ST/MONO STEREO, MONO AUTO MEMORY YES, NO Note Voice : 44KHz/J-Stereo/MP3 Line : 44KHz/J-Stereo/MP3 Set between 1min to 10 min. Power Off is available Disabled Sleep function and Automatic Turn-Off after 15, 30, 60, or 90 minutes P.45 P.50 P.35,36 P.46 P.34 P.46 P.47 P.47 P.48 Password function & Lock function P.46 Select a language P.48 Display memorized files P.38,39 Display the total capacity and used capacity P.45 Hear FM in Stereo or Mono mode P.29 Execute FM Auto Memory P.28 Repeat / Shuffle Playback ƃ Repeat Playback: Repeats only the selected folders or songs. ƃ Shuffle Playback: Plays songs in an arbitrary sequence regardless of the sequence of songs. Each press of the REPEAT/FM( ) key changes the mode. Repeat icon Operation Icon 001/122 Off MUSIC Turns off the Repeat function *IKS[\ZMM\*Wa[)[ 58 3 00:03:57 ST Repeats only the current song END Repeats only the folder containing the current song Shuffles and repeats the playback for all the songs in the folder containing the current song Shuffles and repeats the playback for all songs ƃ Repeat A-B Press the REPEAT/FM( ) key during playback to activate the Repeat A-B function. Press the key to set the start point (A), and press the key again to set the end point (B) and start Repeat A-B. If you press the key one more time, the function is deactivated. 001/122 MUSIC Repeat A-B is Activated *IKS[\ZMM\*Wa[)[ A ST B 00:03:57 END 33 Equalizer Function Ɔ Press the REC/EQ ( Press the REC/EQ ( Equalizer Icon ) key to change the Equalizer mode. ) key changes to one of the following modes. Operation Icon Remark General Mode 001/122 ROCK MUSIC CLASSIC *IKS[\ZMM\*Wa[)[ A B ST 00:03:57 These modes are set by default. JAZZ END BASS You can select your desired settings, as shown in the following figure. USER Ɔ Using the User Defined Equalizer Settings 1. Enter MENU ƍ AUDIO ƍ USER EQ. MENU MENU AUDIO AUDIO USER EQ 2. Set the equalizer settings using the Jog key. 34 Exit the Menu MENU USER EQ BAND : 60Hz Control Level LEVEL -7 Control Frequency Playlist What's a Playlist? Allows you to playback only the songs you specify among the saved songs. Ɔ Registering a Playlist 1. BOOKMARK Briefly press the Menu Key while in Playback Navigation mode or General Navigation mode, and the file icon changes to and the current or selected file is registered to the BOOK MARK list. Ɔ Playing Back Bookmarked Songs Select MENU ƍ MUSIC ƍ PLAY LIST ƍ BOOK MARK. MENU MUSIC MENU MENU MUSIC PLAY LIST OFF BOOK MARK M3U INTRO DISPLAY PLAY LIST Press the PLAY ( ) key. The songs in the BOOK MARK list are played sequentially. If you want to stop playback of the BOOK MARK list and listen again in General mode, select MENU ƍ MUSIC ƍ PLAY LIST ƍ OFF. Repeat/Shuffle playback for the BOOK MARK list is the same as in General mode. Note You can bookmark up to 100 files. If a file cannot be bookmarked because there are already 100 bookmarks, [BOOK MARK FULL] will be displayed on the LCD. 35 Playlist 2. M3U ڹOpen the music files on your Juke Box with Winamp. ںPress LIST (LIST OPTS) on the bottom right of Winamp, and press SAVE (SAVE LIST) to save the playlist in the PLAYLIST folder on your Juke Box. Make sure that the extension remains M3U. Ɔ Playing Back an M3U Playlist MENU ƍ MUSIC ƍ PLAY LISTƍ OFF. MENU MENU MUSIC MUSIC INTRO DISPLAY PLAY LIST S.A Bass 000/000 AAA If you want to stop playback of an M3U Playlist and listen again in General mode, select MENU ƍ MUSIC ƍ PLAY LIST ƍ OFF. Repeat/Shuffle playback for an M3U Playlist is the same as in General mode. 36 Caution Make sure to save the M3U playlist file in the PLAYLIST folder on you Juke Box. The PLAYLIST folder is used to store M3U files only in Windows Explorer. If you do not save the M3U file in the PLAYLIST folder, the playlist playback will not be available with your Juke Box. Note 1. A M3U file can contain up to 500 songs. 2. You cannot save more than one M3U file. ڹ ں Navigation The Navigation function allows you to search for a saved folder or files during playback. 1. To Enter Navigation Mode: key during playback. Press the (MENU VOL NAVI) 001/122 001/122 MUSIC MUSIC *IKS[\ZMM\*Wa[) *IKS[\ZMM\*Wa[)[ 58 3 ST AM[\MZLIa*MI\TM 1ZMUMUJMZaW] 00:03:57 END press 2. Navigate to your desired songs using the Jog key. 3. If you press the STOP/HOLD ( ) key to return to playback mode. 001/122 001/122 MUSIC MUSIC *IKS[\ZMM\*Wa[)[ *IKS[\ZMM\*Wa[) AM[\MZLIa*MI\TM 1ZMUMUJMZaW] Note 58 ST 3 00:03:57 END If you enter the Navigation mode during Bookmark or M3U playback, the BOOK MARK list or M3U list will be navigated. 37 Using the Memo Function Edit information about your acquaintances (telephone number, e-mail address) on your PC, then download them to your Juke Box and view the information on your Juke Box. You may need to finish the program installation on page 8 to use this function. 1. Double-click the click 5a5IVIOMZ icon to run the program. 1. New : Create a new file. 2. Open : Open a file. 3. Save : Save the edited content. 4. Find : Search for acquaintance information. 5. Print : Print a file. 6. Delete: Delete the selected acquaintance information. Name Input Box Telephone Number Input Box E-mail Address Input Box 38 Using the Memo Function 2. After inserting name/phone number/email, press the [Enter] key to save information in the selected number. 3. After inserting all acquaintance information, click the #3 toolbar (Save). KTQKS ,WV\KPIVOM\PMNQTMVIUM KTQKS 4. Download the edited file under the ROOT folder in the player. (For uploading, the player should be connected to the PC. See page 9.) 5. Select MENU ƍ SYSTEM ƍ MEMO. 6. Search the memo by pressing the jog key upward or downward. Note 1. The memo function is enabled in the stop mode only. You can input information of up to 250 persons. 2. You can use E-Book for the memo handling purpose. When you open “memo.mmo”file with Notepad, and delete the contents and copy over the novel/article contents, you can retrieve it using Menu System Memo menu. (But, File size must be smaller than 64KB). 39 Using the Logo Function Download a logo file that is created on your PC to your Juke Box. The Logo function allows a custom logo to be displayed when your Juke Box turns. You may need to complete the program installation on the page 8 to use this function. 1. Double-click the icon to run the program. 5a5IVIOMZ ھڽڼڻ ںڹ ڹOpen : Open an image file. ںSave : Save edited content. ڻRotate : Rotate the image counterclockwise. ڼRevolve : Revolve the image. ڽFlip Horizontal : Flip the image horizontally. ھFlip Vertical : Flip the image vertically. ڿPreview : Show how the image will look on the LCD. click image 40 ڿ Using the Logo Function 2. Click the Open icon on the tool-bar. 7VTa\PMXQK\]ZM[PW_V QV \PM JW` _QTT JM LQ[XTIaMLWV\PM4+, ;MTMK\ +TQKS )[PIXM\PI\_QTTJM LQ[XTIaMLWV\PM4+, 1UXWZ\MLQUIOMNQTM 3. Click the Save icon on the tool-bar when you have finished editing the image. 1V[MZ\\PMVIUMWN\PMNWTLMZ\W[I^MIVLKTQKSQ\ AW][PW]TLVW\KPIVOM\PMNQTMVIUM 4. Download the saved file under the root folder of your Juke Box. 5. Disconnect your Juke Box from your PC. Turn on your Juke Box, and the downloaded image will be displayed during boot-up. 41 Additional Menu Functions Ɔ Song Introduction (INTRO) Plays back the first 10 seconds of the saved music files so that you can know what songs they contain. 1. Enter MENU ƍ MUSIC ƍ INTRO START. MENU MENU MUSIC MENU MUSIC PLAY LIST INTRO START INTRO DISPLAY PLAY LIST 2. Press the (MENUŋVOLŋNAVI) key. Operation Mode INTRO Only the first 10 seconds of each file is played back. Ɔ Checking Memory Information. (MEMORY INFO) Enter MENU ƍ SYSTEM ƍ MEMORY INFO. MENU SYSTEM MENU MUSIC LANGUAGE MEMO MEMORY INFO Note 42 MENU MEMORY INFO TOTAL : 1.50GB REMAIN : 0.60GB 1) If you press the STOP/HOLD ( ) key during INTRO operation, the operation is cancelled. 2) If you press the PLAY ( ) key during INTRO operation, the operation is paused at the current state. 3) If you press the Next (MENUŋVOLŋNAVI) key during INTRO operation, the operation is cancelled and the next song is played back after the current song. Additional Menu Functions Ɔ Controlling Playback Speed 1. Enter MENU ƍ MUSIC ƍ PLAY SPEED. MENU MENU MUSIC MUSIC MENU PLAY SPEED PLAY SPEED LOW 100% HIGH 2. LOW plays at 70% of normal speed. HIGH plays at 120% of normal speed. MENU MENU PLAY SPEED PLAY SPEED LOW 70% HIGH LOW 120% HIGH Ɔ Setting Backlight Time 1. Enter MENU ƍ GENERAL ƍ LIGHT TIME MENU MENU MENU GENERAL GENERAL LIGHT TIME LIGHT TIME CONTRAST POWER OFF 2. Set the desired backlight time by pressing the Up and Down buttons on the Jog key, and press the (MENUŋVOLŋNAVI) key. OFF ON Setting Values Operation Backlight is turned off all the time. 7.. Backlight is turned on for a set period of time. ! Backlight is turned on all the time. 76 43 Additional Menu Functions Ɔ Controlling the Contrast 1. Enter MENU ƍ GENERAL ƍ CONTRAST MENU GENERAL MENU MENU GENERAL CONTRAST LIGHT TIME CONTRAST POWER OFF OFF ON 2. Set the desired contrast by pressing the Up and Down buttons on the Jog key, and press the (MENUŋVOLŋNAVI) key. Ɔ Changing the Auto Power Off Time The power is turned off automatically when your Juke Box is not used for a specified period of time. Follow these steps to change the time. 1. Enter MENU ƍ GENERAL ƍ POWER OFF MENU GENERAL MENU MENU GENERAL POWER OFF LIGHT TIME CONTRAST POWER OFF OFF 2 10min 2. Set the desired time by pressing the Up and Down buttons on the Jog key, and press the (MENUŋVOLŋNAVI) key. 44 Additional Menu Functions Ɔ Setting the Sleep Time Your Juke Box is turned off automatically after the specified time. It is convenient when you want fall a sleep while listening to music. 1. Enter MENU ƍ GENERAL ƍ SLEEP MENU MENU MENU GENERAL GENERAL SLEEP SLEEP PASSWORD OFF 0 90min 2. Set the desired time by pressing the Up and Down buttons on the Jog key, and press shortly the (MENUŋVOLŋNAVI) key. Ɔ Setting the Language The letters on the LCD may not be shown properly depending on the language of the operating system when you input the song information.If letters appear broken, follow these steps to change the language. 1. Enter MENU ƍ SYSTEM ƍ LANGUAGE MENU MENU MENU SYSTEM SYSTEM LANGUAGE Hungarian Italian Japanese LANGUAGE MEMO MEMORT INFO 2. Set the desired language by pressing the Up and Down buttons on the Jog key, and press shortly the (MENUŋVOLŋNAVI) key shortly. 45 Additional Menu Functions Ɔ Password setting If you have set the 4-digit password, you have to input the password when turning on the player to start the player. The password function is disabled in the factory setting (0000). 1. Select MENU ƍ GENERAL ƍ PASSWORD. MENU GENERAL MENU MENU GENERAL PASSWORD SLEEP PASSWORD 0 0 0 0 2. Input the number by pressing the jog key upward/ downward and press the (MENUŋVOLŋNAVI) shortly. 46 key Additional Menu Functions Ɔ Setting the LCD Display Mode 1. Enter MENU ƍ MUSIC ƍ DISPLAY MENU MENU MENU MUSIC MUSIC PLAY LIST INTRO DISPLAY PLAY LIST FILENAME ID3-TAG LYRIC 2. Set the desired mode by pressing the Up and Down buttons on the Jog key, and press the (MENUŋVOLŋNAVI) Mode File Name Operation Displays only the file name ID3 TAG Displays the ID3 tag. If the ID3 tag is unavailable, displays the file name only. LYRIC Displays the song lyrics. If the song lyrics are not available, displays the file name only. key. ſ Your Juke Box supports *.lrc type of lyrics life. Follow these steps to display the lyrics. 1. Edit the lyrics file using an LRC editing program on your PC. Download the edited lyrics file to your Juke Box. (Editing methods may differ from program to program. Refer to the program's user manual and manufacturer's web site.) For example, visit www.nicemusic.co.kr. 2. Download the edited lyrics file to the folder in which the song is saved. The lyrics file name must be the same as the song file name. For example, if song name is "love2.mp3", the lyric file name should be "love2.lrc". 3. Set the LCD Display mode to LYRIC. 4. Playback the song on your Juke Box, and the lyrics will be displayed on the LCD. 47 Upgrading Firmware Firmware is the internal program which operates your Juke Box. Your Juke Box provides the functionality to upgrade the firmware. Please check Safa media, Co., Ltd. web site for available firmware upgrades, anytime while using your Juke Box. If there is a new upgrade, follow these steps to upgrade the firmware of your Juke Box. 1. Copy the new firmware version file, downloaded onto your PC to the root folder of your Juke Box using the USB cable. 2. Disconnect the USB cable and power your Juke Box ON. The firmware upgrade will proceed automatically. Firmware Upgrade Screen on the LCD 48 Troubleshooting Symptom Items to Check My Juke Box The battery has run out. does not turn on. Action Recharge your battery. Recording does not work. Your Juke Box is set to Lock mode. The battery has run out. The space for recording is full. Unlock the Lock mode. Recharge your battery. Delete unnecessary files. Playback does not work. Your Juke Box is set to Lock mode. The battery has run out. There is no file. Unlock the Lock mode. Recharge your battery. Check the recording number. There is no sound The earphone plug is not firmly connected to your Juke Box. Check whether your earphones are firmly connected to your Juke Box. coming through the Change the volume. Volume is set to minimum. earphones. LCD is not displayed. The battery has run out. Recharge your battery. Downloading does not work. The battery has run out. The USB cable is not firmly or correctly connected. Recharge your battery. Check whether the USB cable is firmly and correctly connected. 49 Specifications Item Sound Quality Maximum Recording Time Recording Mono/Stereo Recording Format Recording Media Built-in Memory Supported Files MP3,WMA,OGG,ASF Frequency Band FM Antenna Charged Battery Playback Time PC Interface Operating System Main Power Maximum Output Recording Input S/N ratio Frequency Response Dimensions Weight 50 Specification See Page 22,23 1.5GB MP3: All bit rates, WMA: 32Kbps ~ 192Kbps 87.5 ~ 108 MHz Earphone type 10 hours USB2.0 Windows 98SE, ME, 2000, XP 3.7V Li-POLYMER ѳ): 15mW/CH Earphone (16ѳ Built-in microphone, external audio device, external microphone Telephone call, FM Radio 90dB 20Hz ~ 20KHz Width: 61mm, Length: 61.5mm, Height: 20.5mm 79g Warranty Services Not Covered Product Model 1. When a problem occurs due to user’s careless handling. 2. When the user does not follow the warnings and/or cautions 3. When a problem occurs due to a natural disaster such as fire, salinity, flood, war. Service Information Purchase Date Product Distributor Digital Micro Juke Box HMP-110R Year Month Day Warranty Period 1 year Purchase Price 1. This product is manufactured under strict quality control and inspection. 2. If a problem occurs within the warranty period and the product has been used normally, repairs of the product will be provided free of charge. 3. If a problem occurs within the warranty period, due to user's fault, the repair service will be charged to the user. 4. Make sure to fill in the warranty. (If any item has been skipped on the warranty, free service may not be available.) 5. If any problem occurs with your product, contact your product distributor. (Free of charge repairs or exchanges are processed after first checking with the head office.) 6. Accessories are excluded from free of charge service. 7. All items except the above items will be rewarded according to the stipulations for customer rewards. 8. The free of charge warranty period is for one year only from date of purchase ſ Damage due to consumer fault is excluded. 15F DongWon Securities B/D, 98-4 Carakbon-dong, Songpa-gu, Seoul, Korea TEL : +822-3400-5200(Rep) FAX : +822-3401-4142 A/S : +822-3400-5234 http://www.safa.co.kr http://www.safa.com.hk SF69-00420A