1
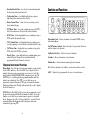
SMH250D/SMU250K
User’s Guide
W I R E L E S S C O R P O R AT I O N
7100 Technology Drive
West Melbourne, FL 32904
©2000 RELM Wireless Corporation. All Rights Reserved
ULZZ01101ZZ
RELM WIRELESS CORPORATION
7100 Technology Drive
West Melbourne, FL 32904
Safety information
Through the provisions of the Occupational Safety and Health Act (OSHA) of 1970, the
United Status Department of Labor has established an electromagnetic safety standard which
applies to the use of two-way radio equipment. The proper use of this transceiver will result in
exposure below the OSHA limit. The following precautions shall be observed:
•
DO NOT operate the transceiver of any radio equipment with the antenna touching,
or close to, the eyes, faces, or exposed body parts.
•
DO NOT operate the transmitter of any radio equipment unless all the Radio
Frequency (RF) connectors are secure and any open connectors are properly
terminated.
•
DO NOT operate the transmitter of any radio equipment near electrical blasting
caps or in an explosive environment.
•
DO NOT let children operate any transmitter-equipped radio equipment.
•
Have your radio equipment installed and service by a qualified technician.
Caution: RELM does not represent this radio to be waterproof. Do not use the radio in damp
or high-moisture environments.
©2000 RELM Wireless Corporation
All Rights Reserved
2
Registration Card is returned, on the condition that other evidence,
satisfactory to Uniden, of the date of the original installation or
purchase is provided to the Warrantor.
PROCEDURE FOR OBTAINING PERFORMANCE OF
WARRANTY: To obtain warranty service, the Customer must
return the radio properly packed, freight prepaid, to Warrantor or
any Authorized Warrantor Repair Station. It will be returned
freight prepaid.
Contents
Safety Information .......................................................................................... 2
Introduction ....................................................................................................
Congratulations ........................................................................................
Description ...............................................................................................
Service ......................................................................................................
Features ....................................................................................................
Programmable Features............................................................................
4
4
4
4
5
5
Unpacking ....................................................................................................... 6
Controls and Functions ................................................................................... 7
General Operation ......................................................................................... 8
LCD Display ............................................................................................ 8
Applying Power and Setting the Volume ................................................. 8
Channel Selection .................................................................................... 9
Transmit ................................................................................................... 9
Telephone Operation ............................................................................... 9
Receive ................................................................................................... 10
Channel Scan ......................................................................................... 10
Priority Scan ........................................................................................... 10
Modify the Channel Scan List with Channel Lock Out ......................... 10
Drop Out Delay ....................................................................................... 11
Transmit During Scan ............................................................................. 11
Transmit Time Out Timer........................................................................ 11
Busy Channel Lockout (BCLO) ........................................................... 12
A/B/C Key Functions ............................................................................. 12
Function Tones ....................................................................................... 13
Telephone Interconnect Functions ......................................................... 14
Radio Installation Considerations .................................................................
Power Requirements ..............................................................................
Antenna ..................................................................................................
Mounting ................................................................................................
Operational Check..................................................................................
Accessories............................................................................................
Technical Support and Service ...............................................................
15
15
15
15
16
16
16
Two-year Limited Warranty.......................................................................... 17
18
3
Introduction
Two-year Limited warranty
Congratulations
WARRANTOR: RELM Wireless Corporation (“RELM” or
“Warrantor”).
You now own the best value in mobile radios, a Uniden professional
communications radio. The SMH250D and SMU250K give you
consistent, outstanding performance in virtually all conditions and
situations.
ELEMENTS OF WARRANTY: RELM Wireless Corporation
warrants to the purchaser that all new Radio equipment of RELM’s
manufacture shall be free of defects in material and workmanship.
Equipment and accessory items not manufactured by RELM carry the
standard warranty of the manufacturer thereof.
Your SMH250D or SMU250K Two-Way FM Transceivers offer many
special features and can be programmed by your Uniden dealer to
provide the features that best meet your needs. Read this Operating
Guide completely to be sure you are getting the most value and
performance from your new radio.
Description
The SMH250D and SMU250K are conventional mobile Two-Way FM
Transceivers. They are microprocessor-controlled, frequencysynthesized, and programmable. They are rugged and designed for
easy installation in small spaces.
The SMH250D operates in the 146 to 174 MHz range and the
SMU250K operates in the 450 to 494 MHz range. Both have a
maximum RF power output rating of 25 watts.
Service
If your radio does not work properly, take it to a Uniden dealer for
servicing. These radios contain no user serviceable parts. Unauthorized
adjustments will void the warranty and may cause illegal radio
operation. Make sure that a qualified technician services your radio
equipment. When servicing these radios, use only factory authorized
replacement parts.
4
WARRANTY DURATION: The warranty period for all parts is two
(2) years. The warranty period shall commence upon installation of the
equipment or two (2) months from the date of shipment from the
factory, whichever comes first.
The warranty shall terminate and be of no further effect two (2) years
from its origin or at the time the Product is (a) damaged or not
maintained as reasonable, (b) modified, (c) improperly installed, (d) is
repaired by someone other than Warrantor or Authorized Warranty
Repair Station for a defect or malfunction covered by this Warranty, or
(e) used in a manner or purpose for which the Product was not
intended or in an environmental condition for which the Product was
not intended.
STATEMENT OF REMEDY: Where permitted by law, this Warranty
is in lieu of all other Warranties expressed or implied, including
warranties of merchantability or fitness for a particular purpose, and
no representative or person is authorized to assume for us any other
liability. This warranty shall not extend to incidental or consequential
damages arising from operation of Product(s) which are subject of this
Warranty. Some States do not allow limitation of implied warranties so
the above limitations may not be applicable. You may have rights as
defined by individual State law.
WARRANTY REGISTRATION CARD: In order to facilitate the
service under this Warranty, Purchaser should return the Warranty
Registration Card to Warrantor. However, return of the Warranty
Registration Card is not a precondition of this Warranty. This Warranty
will be observed by the Warrantor whether or not the Warranty
17
controls. Be sure the equipment does not interfere with the vehicle's
operation.
Features
•
Up to 9'3 programmable channels
•
Carrier squelch and multiple CTCSS/DCS operation
•
10 character Channel/Function LCD
Accessories
•
User-Configurable Channel Scan List
Standard Microphone .......................................................... AMX100A
•
Ten number pre-programmed Phone Book
Operational Check
After installation, a complete operational check by your Uniden Dealer
will assure you of a quality installation.
DTMF Encode Microphone.................................................. AMX101A
Programmable Features
Heavy Duty Microphone ..................................................... AMX105A
The operating frequencies and options have been pre-programmed into
your radio by your Uniden Dealer. Check with your Dealer for the
specific features in your radio.
Mobile Power Cord w/Fuse (15A) ....................................... AMX120A
•
Scan Type
•
Scan Dropout Delay
External Speaker (4 ohm, 10 Watt) .......................................... AMX250
•
Transmit Dwell Time
110VAC Power Supply (with built-in speaker) ................... ST14P1001
•
Transmitter Time Out Timer
220VAC Power Supply (with built-in speaker) ................... ST14P1002
•
Busy Channel Lockout
Technical Support and Service
•
Function Tone
Your Uniden dealer can provide you with technical assistance and
information. If your radio does not perform properly, take it to a
Uniden dealer for servicing. The radio contains no user-serviceable
parts. Unauthorized adjustment will void the warranty and may cause
illegal radio operation. Be sure that a qualified technician services
your radio equipment. When servicing the radio, use only factoryauthorized replacement parts.
•
TX Power High/Low
•
A/B/C Quick Key Functions
Base Station Microphone......................................................... AMX151
16
5
Unpacking
Radio Installation Considerations
The following should be included with your two-way radio:
•
Transceiver Unit
•
Power Cord
All Uniden radios and associated accessories are tested before
shipment to ensure operational status. However, since vehicle
configuration in which Uniden radios and accessories are installed are
non-standard, Uniden recommends the following installations
considerations.
•
Mounting Bracket
Power Requirements
•
Operating Guide (OM)
The SMH250D and SMU250K require a 13.6V DC, 10 ampere power
source with a negative ground. Install a fuse in the power leads
near the power source to protect the power source compartment
and passenger compartment from fire and electrical hazards. (The
AMX 120A Power Cable is equipped with an in-line 15 ampere fuse.)
If the radio is connected directly to the vehicle battery, a fuse must be
installed as close to the battery terminal as possible.
If any of these items are missing from the box, contact your Uniden
Dealer for help.
Features, specifications, and availability of optional accessories arc all
subject to change without notice.
FCC Licensing
Before you transmit with your radio, you must have the proper
license issued by the Federal Communications Commission (FCC).
Your Uniden Dealer can tell you what is required, and can help you
with all your future communication needs.
Route power leads to minimize proximity to other electrical systems
such as instruments, engine electrical components, braking systems,
entertainment systems, etc.
Secure power leads to supporting structures or components with
insulated clamps that completely isolate the power leads from the
supporting structures or components. When power leads are routed
through a firewall, bulkhead, or similar structure, use a rubber
grommet to protect power leads from chafing.
Antenna
Follow antenna manufacturer’s mounting instructions. Mount antenna
in a location which gives the highest unrestricted radiation pattern. Use
low loss, 95% shielded, Teflon coaxial cable between antenna and
radio antenna jack. Keep antenna cable length short to insure
maximum power output.
Mounting
Mount the equipment with your safety and the safety of others in
mind. Do not obstruct the operator's physical or visual access to the
controls. Ensure easy access to the microphone and radio
6
15
•
Function Disable Tone - two short low tones indicating that
the key function has been turned off.
•
No Function Tone - a low/high/low/high tone sequence
indicating the key function is not allowed.
•
Down Channel Tone - a short low tone occurring at every
down channel change.
•
PTT Error Tone - a low tone sounding as long as the PTT is
held, if transmit is not allowed on the selected channel.
•
BCLO Tone - alternating high/low tones sounding as long as
PTT is held if the channel is busy.
•
TOT Caution Tone - short high pitch beeps sounding every
second, beginning 5 seconds before transmitter shutoff occurs.
•
TOT Error Tone - a high pitch tone sounding as long as the
PTT is held, after TOT has occurred.
•
Priority Tone - a short high pitch beep sounding during scan
when the Priority Channel is received and when the
programmed Priority Channel is selected.
Controls and Functions
Microphone Jack - Allows attachment of standard, DTMF or base
station microphone.
On/Off/Volume Control - Allows the radio to be powered off and on
and the volume to be adjusted.
Up/Down Select Key - Allows selection of channels.
Scan Key - Allows automation of scan function.
Monitor Key - Allows channel monitoring before transmit.
Telephone Interconnect Functions
Phone Book - Any of 10 pre-stored memory numbers can be recalled
by the A/B/C quick keys. Press the A/B/C key to display the first
number, then press again as many times as necessary to recall the
desired number. When PHONE BOOK is displayed, press the UP/
DOWN keys to scroll through the programmed numbers until the
desired one is displayed. Press PTT to access dial tone on an
interconnect repeater, then press PTT again to transmit the number.
Numbers with more than 10 digits will automatically scroll to display
the last 10 characters.
L/O - Allows channels to be added to or removed from the scan list.
A/B/C - Option keys programmable for any of seven functions.
DTMF Redial - The A/B/C quick keys may be programmed to recall
the previously displayed Phone Book number for redial. To use this
function, access dial tone on an interconnect repeater as described
above, then press the A, B or C key and hold for 2 seconds. The last
transmitted Phone Book number will be displayed and can be
transmitted by pressing PTT.
14
7
General Operation
error tone will sound. To restore high power operation, press
and hold again for 1.5 seconds. The LCD “HIGH POWER”
display will appear and the corresponding tone will sound.
LCD Display
The liquid crystal display (LCD) has 10 characters to designate the
selected group or channel by number or name. Above the channel
designation area is a row of indicators that show which features are
enabled.
TX
The unit is transmitting
RX
A signal is being received
MON
The monitor mode is active
SCAN
Scanning is in operation
A/B/C
Indicates the programmed functions are active.
Applying Power and Setting the Volume
1. Turn the radio on by turning the POWER/VOLUME knob
clockwise. The display lights and shows the last-selected channel
name or number.
Note: To turn the radio off, turn the POWER/VOLUME knob
counterclockwise to the OFF position.
2. Press the MON key. Adjust the speaker volume to a comfortable
level by turning the POWER VOLUME knob.
•
Home Channel Select - allows one-touch selection of a preprogrammed channel. Any or all of the A/B/C keys may be
programmed for this function.
•
TX Disable - inhibits the transmit function when active. To
disable transmit, press and hold the key far at least 1.5 seconds.
The LCD “TX DISABLE” display appears and the Disable
Tone sounds. Transmit on all channels will be inhibited when
activated. Press and hold again for at least 1.5 seconds to
enable normal transmit operation.
•
Squelch Level Select - allows control of the squelch level of
all channels, useful when operating in areas with high RF noise
levels. When activated “TITE SQLCH” will be displayed for 2
seconds, then the selected channel indicator will return and the
corresponding A, B or C LCD indicator will illuminate. Press
again to restore normal squelch operation, indicated by the
“NRML SQLCH” display.
•
Option Control - allows control of an internal or external
option, indicated by the illumination of the corresponding A/B/
C LCD display.
Function Tones
The radio is equipped with several tones to indicate error conditions or
confine functions have occurred.
•
Power On Tone - a short high pitch tone indicating the radio
has powered up normally.
•
Malfunction Tone - a long low tone at power on indicating a
radio problem. If it persists, return the radio to your Uniden
dealer for repair.
•
Function Enable Tone - a short high tone indicating the key
function has been turned on.
3. Press MON again to restore coded squelch operation.
8
13
an error tone will sound as long as the PTT is held. When you release
the PTT button, the Time Out Timer is reset.
Busy Channel Lockout (BCLO)
The radio may be programmed to inhibit transmit while a signal is
being received. If so, an error tone will sound if PTT is pressed while
the channel is busy. BCLO may also be programmed to allow transmit
to occur if you are receiving a signal from someone in your system,
allowing you to maintain control of a repeater during your
conversation.
A/B/C Key Functions
The A, B and C keys can be programmed for any of several functions
as described below. If programmed for no function, pressing the
keys will only cause the error tone to sound. Check with your dealer
or equipment provider to determine the programmed function of
these keys.
•
•
•
Key Lock - prohibits activation of the Scan, Up/Down, L/O
and DTMF keys. When pressed, the LCD displays “K_LOCK
ON” for 1.5 seconds and the Enable Tone sounds. To restore
normal operation of all keys, press and hold the key for at least
1.5 seconds. The LCD will display “K_LOCK OFF” and the
Disable Tone will sound.
TAC Function - allows “talking around” the repeater by
shifting the transmit frequency to the channel’s receive
frequency. Pressing the key will cause the Enable Tone to
sound and the LCD “TAC” indicator to begin blinking. Press
the key again to disable the TAC function. The TAC function is
automatically disabled when the channel is changed or the
radio is powered off.
TX HI/LO Power - allows channels programmed for high
power to be switched to low power. Activate by pressing and
holding the key for at least 1.5 seconds. The LCD “LOW
POWER” display will appear and the tone will sound. If
pressed on channels already programmed for low power, an
12
Channel Selection
1. Up/Down Select - Press the Up/Down key (▲ or ▼) display the
desired channel. An up-select or down-select tone sounds with
each change. If you press and hold either key, the radio changes
channels rapidly.
(If programmed with a “stop”, channel changes will stop when the
highest or lowest channel number has been reached.)
2. A/B/C Key Selection - Either or all three of the A, B and C keys
may be programmed for instant selection of a pre-programmed
channel. Press the programmed key to instantly select the
programmed channel.
Transmit
1. Select the desired channel as indicated above.
2. Press the microphone PTT key. Keep the PTT button depressed
while you transmit your message. Notice that the LCD TX
indicator illuminates, indicating the transmit mode. If transmission
is difficult, try to find a higher location with fewer obstructions
between you and the repeater site. Release the PTT key when your
message is finished.
3. For best voice quality when transmitting hold the microphone
about one inch from your mouth.
Telephone Operation
1. Select a channel allowing telephone access.
2. Press the PTT to access the system then release to gain dial tone.
3. Transmit the number manually entered (requires a DTMF
microphone) or recalled as described under Phone Book.
9
4. If someone answers, key the transmitter to talk and release to
listen.
5. When transmission is complete, “hang up” the connection by
pressing the # button on the keypad.
and press SC. The channel display increments to the next higher
channel. The LCD L/O indicator appears as the first character of the
channel designator when the locked out channel is reselected.
Receive
Nuisance channels may also be deleted while scan is active, by
pressing the L/O button while receiving the channel or during the
delay after the signal is gone but before scan resumes.
Select the channel you want to receive as indicated above. Scan
operation may be activated as described below to automatically
monitor a number of channels.
To remove the lock-out condition from a channel, manually select the
channel and press L/O again.
Channel Scan
Drop Out Delay
In the scan mode, the radio alternately monitors each channel until it
receives a call. You can scan all channels in the programmed scan list,
or you can modify the scan list by locking out individual channels
from being scanned.
While scanning, the radio stops at a busy channel and receives a
transmission. When the received call is over, it resumes scanning after
a short delay.
1. Press the SC key to begin scanning. The LCD SC indicator begins
to flash.
Depending on how your radio is programmed, you will transmit on a
particular channel during the scan function.
2. The radio stops on any channel that receives a call, the LCD SC
indicator is displayed continuously and you hear the caller. When
the transmission stops, the radio resumes scanning after a brief
delay.
Transmit During Scan
•
Talk Back - If programmed for Talk Back operation, transmit
will always occur on the last received channel, even if scan has
resumed when the PTT button is pressed.
3. To disable scanning, press SC again.
•
Programmed Channel - If a specific channel has been
programmed, transmit will always occur on that channel.
Priority Scan
•
Selected Channel - If programmed for user selection, the
current selected channel will be the transmit channel, which
may be changed at any time during scan operation. You may
select the desired transmit channel by use of the Channel Up
or Down keys or the A/B/C keys programmed for instant
channel select.
If your radio has been programmed for Priority Channel operation, the
radio will sample the Priority Channel between any other receiving
channel during Scan Mode. This is usually the channel you use for
most of your communications. (Depending on programming, the
Priority Channel may be pre-programmed or it may be the channel you
select during scan.)
Modify the Channel Scan List with Channel Lock Out
Deleting channels (from the channel scan list) increases the scanning
speed. Use the (▲) or (▼) to select the desired channel
10
Transmit Time Out Timer
Continuous transmission time may be limited by programming
selection. Five seconds before the timeout, caution beeps will sound
every second. After five seconds, transmission will stop and
11