1
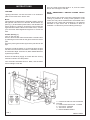
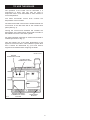
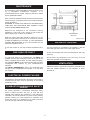
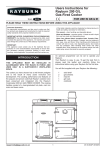
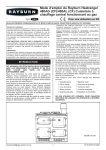
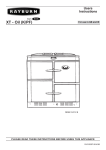
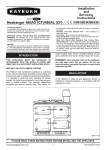
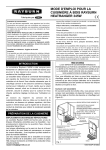
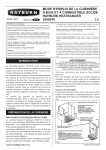
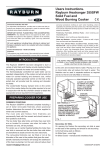
Operating Instructions for
Rayburn Heatranger 480AG (CF)/480AL (CF)
Gas Fired Central Heating Cooker
FOR USE IN GB & IE
PLEASE READ THESE INSTRUCTIONS BEFORE USING THIS APPLIANCE
Consumer Protection
As responsible manufacturers we take care to make sure that our
products are designed and constructed to meet the required safety
standards when properly installed and used.
applicable, the pertinent parts that contain any of the listed materials
that could be interpreted as being injurious to health and safety, see
below for information.
Firebricks, Fuel beds, Artificial Fuels – when handling use
disposable gloves.
IMPORTANT NOTICE: PLEASE READ THE ACCOMPANYING
WARRANTY.
Any alteration that is not approved by AGA, could invalidate the
approval of the appliance, the warranty and could also infringe the
current issue of the statutory requirements.
Fire cement – when handling use disposable gloves.
Glues and sealants – exercise caution – if these are still in liquid
form use face mask and disposable gloves.
Glass Yarn, Mineral Wool, Insulation Pads, Ceramic Fibre,
Kerosene Oil – may be harmful if inhaled, may be irritating to skin,
eyes, nose and throat. When handling avoid inhaling and contact
with skin or eyes. Use disposable gloves, face masks and eye
protection. After handling wash hands and other exposed parts.
When disposing of the product reduce dust with water spray, ensure
that parts are securely wrapped.
IMPORTANT:
This appliance could contain any of the materials that are
indicated. It is the Users/Installers responsibility to ensure that the
necessary personal protective clothing is worn when handling, where
programmer to give selected heating use.
An optional Rayburn programmer is available from your
Rayburn stockist, which will control your cooking function.
An ideal extra for people who wish to combine traditional
elegance with today’s lifestyle.
You will find supplied with your Rayburn the following:1 Solid Shelf
1 Customer Log Book
2 Grid Shelves
1 Warranty Document
1 Meat Tin
1 Installation and Servicing
1 Grill Rack
Instructions
1 Cookbook
1 Operating Instructions
INTRODUCTION
THIS APPLIANCE MUST BE INSTALLED IN
ACCORDANCE WITH THE RULES IN FORCE AND
USED ONLY IN A SUFFICIENTLY VENTILATED SPACE.
Thank you for buying this Rayburn appliance. We want
you to get the best from it, so please read this leaflet
carefully and follow the instructions before using your
Rayburn for the first time.
Your Rayburn has been designed to provide cooking,
central heating and domestic hot water when you require
it. Two separate burners provide heat for the appliance.
The cooker burner provides heat for the cooking whilst the
boiler burner provides heat for the central heating and
domestic hot water requirements.
The cooker burner should be set to run continuously alight
- at a low rate and full rate upon operation of the
thermostat.
The boiler burner is designed to operate on demand and
can be electrically controlled by a time switch or
DO NOT USE THIS APPLIANCE TO WARM A ROOM
WITH THE APPLIANCE DOORS LEFT OPEN.
DO NOT LEAVE THE ROASTING OVEN DOOR OPEN If left open for any length of time over-heating may cause
damage to some components within the appliance.
DESN 512129
[email protected]
1
01/10 EOPI 512113
Contents
SECTION
PAGE
INTRODUCTION
1
CONTROLS AND USER INFORMATION
3
INSTRUCTIONS - LIGHTING THE PILOT
MAIN BURNER LIGHTING
4
TO USE THE BOILER
5
THE COOKER AND PROGRAMMER (OPTIONAL)
6
COOKING HINTS
7
CLEANING AND CARE FOR YOUR RAYBURN
8
MAINTENANCE, GAS LEAK OR FAULT, COMBUSTION DISCHARGE
SAFETY DEVICE, AIR ENTRY LOUVRES AND VENTILATION
9
2
CONTROLS
H
DESN 511779
MARK
THE THERMODIAL ON THE MAIN OVEN DOOR IS A
GUIDE TO THE CENTRE OVEN TEMPERATURE
WHEN COOKING SEE COOKING CHART ON PAGE
3 AND COOKING HINTS ON PAGE 6 FOR FURTHER
INFORMATION.
APPROX
TEMP ºC
LOW
120
1
140
2
150
3
170
4
180
5
190
6
200
7
220
8
230
9
240
HIGH
250
MAIN OVEN TEMPERATURE SETTING
CHART
USER INFORMATION
DOOR OPENING
TO OPEN - TWIST HANDLE TO
RELEASE FROM DOOR CATCH
AND PULL OPEN
ENSURE SHELVES ARE
INSERTED AS SHOWN
3
INSTRUCTIONS
Turn the cooker thermostat knob to ‘H’, and the cooker
burner will cross light to full rate.
LIGHTING
NOTE: SMOKE/SMELL EMITTED DURING INITIAL
USAGE
Lighting instructions can also be found on an instruction
plate on the inside of the burner door.
Some parts of the cooker have been coated with a light
coating of protective oil. During initial operation of the
cooker, this may cause smoke/smell to be emitted and is
normal and not a fault with the appliance, it is therefore
advisable to open doors and or windows to allow for
ventilation. Lift the lids to prevent staining the linings.
Boiler
This appliance is fitted with an automatic ignition unit that
will light the main burner on demand. Should button (K)
(see Fig. 1) be illuminated press button, this will allow the
burner ignition to continue, should the burner illuminate
again this will indicate a fault on the boiler burner, Contact
your local Gas Safe Registered engineer to correct the
fault.
Cooker (See Fig. 1)
Turn on gas cock (E).
Press in and hold the cooker flame failure override button
(C) allowing a few seconds for the gas to reach the cooker
pilot.
Press the piezo ignitor button (D) and the pilot burner will
light.
Continue to hold the button for 15 seconds after the pilot
has been lit so that when the button is released, the pilot
should remain alight. If it does not, WAIT 3 MINUTES then
repeat the procedure.
Ensure the electricity supply is turned ON and set any
external controls to the ON position.
Turn the boiler thermostat knob to ‘MAX’, and the boiler
burner will light to full rate.
C - COOKER FLAME FAILURE OVERRIDE
BUTTON
D - PIEZO IGNITION BUTTON - COOKER
E - GAS COCK - COOKER
G - GAS COCK - BOILER
K - BOILER BURNER RESET
FIG. 1
DESN 512964
4
TO USE THE BOILER
The operation of the boiler can be automatic if a
programmer is fitted. This may also be used in
conjunction with a room thermostat or other devices to
control temperature.
The boiler thermostat control knob controls the
temperature of the hot water.
The boiler thermostat control knob is situated behind the
control door on the left hand side of the controls facia
panel (See Fig. 2).
Turning the control knob clockwise will increase the
temperature of the boiler which will provide hot water to
the radiators and to the hot water cylinder.
For safety shutdown purposes an overheat thermostat is
included (as shown in Fig. 2).
This will operate only if the water temperature in the
system is in excess of 95°C. This indicates a system fault
and it should be determined by your local service
engineer and rectified before re-lighting the boiler.
DESN 512149
BOILER
THERMOSTAT KNOB
COOKER OVEN
THERMOSTAT KNOB
FIG. 2
BOILER OVERHEAT
THERMOSTAT RESET
BUTTON
CDSD RESET
BUTTON
5
oven when the main oven is at a higher temperature ie.
over 200ºC (400ºF).
If the Rayburn is left on a high setting for a lengthy time
the lower oven may climb to a temperature higher than
half that of the main oven temperature.
THE COOKER
MAIN OVEN AND HOTPLATE CONTROL
The main oven and hotplate temperatures are controlled
by the cooker thermostat control knob which is situated
behind the controls door. See section ‘CONTROLS’ Page 3 and Fig. 2.
THE RAYBURN COOKBOOK
The cookbook supplied with your Rayburn cooker is
common to all Rayburns. When following the recipes
consult these operating instructions to ascertain details
relevant to your Rayburn.
Turning the control knob clockwise increases the
temperature.
THE HOTPLATE
The single hotplate of your Rayburn is graduated in
temperature. Just slide pans to a hotter or cooler area
depending on whether boiling or simmering is required.
The hottest area is in the middle right hand side.
PROGRAMMER
(OPTIONAL)
This control is available giving three individual time
settings and an override control. For example, it may be
used for the following:-
The hotplate temperature is also variable depending upon
the setting used, the higher the setting then the higher the
hotplate temperature.
Pre-set morning programme to turn cooker to desired
temperature, so that the cooker is available for
immediate use on rising.
Made of thick cast iron, the hotplate is machined flat. In
order to ensure perfect contact and even heat distribution
it is recommended that all pans and kettles are of a good
quality with thick bases. Pans should also have tight
fittings lids for greatest efficiency. Keep the insulated
hotplate covers down when the hotplate is not in use to
conserve heat.
The programmer can be set to give the desired cooking
temperature when you want it, without having to wait for
the warming up period. For example, if you wish to cook
breakfast at 7.30 am, the programmer can be set to give
the required heat up time prior to this. Thus, if it takes 60
minutes to come to the temperature you require, the
programmer will be set to operate at 6.30 am and the
thermostat knob (see Fig. 2) set to the position you
require, the night before. The cooker will not operate until
the programmer switches on at 6.30 am, when the cooker
will commence to warm up. The “Time-Off” will need to be
set to allow sufficient time for your cooking period.
THE MAIN OVEN
The oven thermostat control knob is marked l (OFF) then
temperature graduated (See section ’CONTROLS’ - Page
3).
THE LOWER OVEN
The temperature of the cast iron lower oven is dependent
on the temperature in the main oven. As a guide it is
around half the temperature in the main oven and can be
used for food such as meringues, casseroles, milk
puddings etc. This means that it can be used as a cooking
The recommendations for the best use of the appliance
are guidelines only and the respective settings of the
cooker thermostat knob which best suit your requirements
will be apparent with experience.
COOKING CHART MAIN OVEN
Scones
Small Cakes
Victoria Sandwich
Semi-rich fruit cake
Rich Fruit Cake
Shortcrust - tartlets
Shortcrust Pie
Quiche
Puff Pastry
Meringues
Casseroles
Bread - rolls
Bread - loaf
Soufflé
Temperature
220ºC (425ºF)
190ÞC (375ÞF)
Shelf
3
4
Approximate Time
10 - 15 mins
15 - 20 mins (Turn the tray round halfway
through cooking. For best results place
the solid plain shelf on the top runner.)
180ºC (350ºF)
3+5
20 - 30 mins (Move lower cake up when
top cake is cooked. For best results place
OR
the solid plain shelf on the top runner.)
4
20 - 30 mins (Both cakes on one shelf)
150ºC (300ºF)
4 or 5
2 hours
135ºC (275ºF)
4 or 5
Depending on size
200ºC (400ºF)
2 or 3
20 mins
200ºC (400ºF)
4 or 5
45 mins
200ºC (400ºF) - 220ºC (425ºÞF)
Floor
45 mins
210ºC (410ºF) - 220ºC (425ºF)
2 or 3
15 mins
100ºC (212ºF) - 120ºC (240ºF)
5
1 1/2 - 2 hours
120ºC (240ºF)
4 or 5
3 hours or more
210ºC (410ºF) - 220ºC (425ºF)
2
15 - 20 mins
210ºC (410ºF) - 220ºC (425ºF)
4 or 5
35 mins
180ºC (350ºF)
4
30 mins
lf positions are counted downwards ie. top shelf position is number 1
The positions are a guide only and can of course be altered to suit.
6
COOKING HINTS
The ovens are indirectly heated from the outside by hot
gases from the heat source so that no flame or elements
are within the ovens. This means that full use can be
made of the whole cooking space. Both ovens are vented
to the flue so cooking smells disappear to the outside.
Cast iron retains the heat so you can peep at a cake or
soufflé to see how it is cooking without it sinking. As the
meat tin supplied with your Rayburn fits directly on to the
runners the grid shelves are left free for other dishes. For
safety reasons the grid shelves are non-tilt, use as
directed in section ‘USER INFORMATION’ page 3.
MAIN OVEN
This oven is hotter towards the top than the bottom.
THERMODIAL
The thermodial on the main oven door is guide to the
condition of the internal oven. On opening, the pointer will
appear to drop as it registers cooler air away from the
oven, do not worry, close the door and after a few minutes
it will regain its position. ‘USER INFORMATION’ page 3.
For perfect results turn food during cooking.
As a guide, the numbered setting on the cooker control
knob gives the approximate temperatures shown in the
chart on page 3 under ‘CONTROLS’.
The following table gives an indication of the heat up time
from the LOW setting (‘L’ on control knob).
SETTING
LOWER OVEN
A valuable oven for more slower or more gentle cooking
when the main oven is turned up high, as it is roughly half
the temperature of the main oven. Ideal for meringues,
casseroles, milk puddings, egg custards etc. When
cooking a casserole in this oven allow it to heat through
and simmer for 5-10 minutes on the hotplate or main oven
floor before transferring to the lower oven. Although there
are runners on the sides of the oven for the grid
shelf/meat tin, dishes may also be cooked on the floor of
the oven.
APPROXIMATE
APPROXIMATE
MAIN OVEN
HEAT UP TIME
TEMPERATURE ºC FROM LOW
2
150
20 MINS
6
200
35 MINS
9
240
55 MINS
The Low setting may vary, dependent upon weather
conditions.
SOLID SHELF
The solid shelf can be used as a baking sheet or as a heat
deflector to protect food from overbrowning/cooking. It is
ideal as a solid baking sheet as it maximises the whole
oven area. When in position the solid shelf and the space
above can still be used for cooking, while it is protecting
food below. As a heat deflector slide it in two runners
above the food. To be effective it must be used from cold
and therefore it should be stored outside the oven.
When the ovens are not required during the day or
overnight, then turn to the LOW (L) setting to give a low
burning rate.
On low settings the oven can be used for long slow
cooking such as casseroles, stock, soup, ratatouille,
curries meringues, creme caramel, rice pudding etc. Turn
up to a higher setting for baking fruit cakes, victoria
sandwiches, small cakes, soufflés, scones, bread and
roasting etc. (See temperature/setting chart on previous
page for details).
HOTPLATE
Apart from its obvious use for boiling and simmering, the
hotplate can be used directly, for making toast, toasted
sandwiches, drop scones, see the Rayburn cookbook for
details. After cooking directly on the hotplate make sure
you brush off any crumbs or this could impair the boiling
performance of the kettle or saucepans.
One of the many benefits of the cast iron oven is that the
floor of the oven is hot and can be used as a cooking area
in its own right.
1. For Baking - no need to bake a pastry case or quiche
“blind” just place the flan dish directly on the oven
floor for the whole, or part of, the cooking time to
achieve “soggy-free” pastry bases that are crisp and
golden. in the same way an apple pie can be part
cooked on the oven floor to ensure a well cooked
base.
ACCESSORIES
Further accessories tins, shelves, solid shelves
saucepans, kettles etc are available from your Rayburn
Stockist or visit www.agacookshop.co.uk for UK
customers.
LOCATION OF GRID SHELVES
To ensure the correct operation of the oven grid shelves
ensure that they are inserted as shown. (See section
‘USER INFORMATION’) - page 3.
2. For Frying - when the oven is hot the floor of the oven
can be used for frying. Think of it as a hidden hot plate.
A cast iron dish is recommended. Allow it to heat up
first before adding the food. It’s an excellent method
of frying bacon and egg, fish such as trout/salmon or
onions etc. Any fat splashes are carbonised on the
insides of the oven so cleaning is minimal (carbonised
crumbs can be brushed out using a stiff brush) and
frying smells are taken away through the flue.
DOORS
To open the doors. Twist the handle slightly to disengage
the door catch from the locking spindle and pull door open
(See section ‘USER INFORMATION’) page 3.
To close the doors. Gently push the door shut until the
door catch engages with the locking spindle.
The top of the oven is where the grilling takes place. Do
this when the oven is turned up to a high setting. The heat
radiating from the roof of the oven seals and cooks the
food efficiently. Arrange the food on the grill rack in the
meat tin set on the highest set of runners.
IT IS NOT ADVISABLE TO PUT VERY WET CLOTHES
OR TOWELS ONTO THE HANDRAIL, AS THIS MAY
CRAZE THE ENAMEL.
7
Cleaning and Caring for your Rayburn
REMEMBER: BE CAREFUL OF THE HOT APPLIANCE
DO NOT USE A STEAM CLEANER TO CLEAN THIS COOKER.
Enamelled Top Plate and Front Plate
z
z
z
z
z
z
z
It is not advisable to put very wet clothes onto the handrail, as this may craze enamel.
To keep the vitreous enamelled surface bright and clean, wipe over daily with a soapy damp cloth, followed by a
clean dry cloth.
Wipe off any condensation on the front plate as it occurs or the vitreous enamel may be permanently discoloured.
If milk or fruit juice or anything containing acid is spilt on the top plate or down the cooker, be sure to wipe it
immediately or the vitreous enamel may be permanently discoloured.
Keep a damp cloth handy while cooking, to wipe up spills as they occur, so they do not harden and become more
difficult to remove later. Look for cleaners carrying the VEA (Vitreous Enamel Association) approval logo as this
indicates they can be used on your Rayburn.
For stubborn deposits, gentle localised soaking, not flooding, is easier than rubbing and hot water and detergent will
soften most burnt on stains in about 10 minutes.
A soap impregnated pad can be carefully used on the vitreous enamel (look for VEA mark on suitable cleaners).
VITREOUS Tested and
recommended
ENAMEL
for use on
ASS.
vitreous
enamel
Important Note: AGA recommend Vitreous Enamel Association approved cleaners for cleaning the vitreous enamelled
surfaces of this product.
But they are unsuitable for use on; chrome and stainless steel components, including the insulating covers, hand-rails and
their brackets.
The insulating covers should be cleaned with a NON-ABRASIVE mild detergent, applied with a soft (coarse-free) cloth and
lightly polished up afterwards with a soft (coarse-free) duster or tissue to bring it back to its original lustre.
DO NOT USE ABRASIVE PADS, THAT ARE NOT VEA APPROVED, OVEN CLEANER, OR CLEANERS CONTAINING
CITRIC ACID ON ENAMELLED SURFACES.
Oven Door Linings
z
Using oven gloves carefully lift off the oven doors, lay them on a tea towel to protect the enamel. They can then be
cleaned with a cream cleanser or soap impregnated pad. Do not however, immerse the doors in water as they are
packed with insulating material which will be damaged by excessive moisture.
Insulating Lids
z
z
Chrome
Linings
Wipe over with a soapy damp cloth followed by a polish with a clean dry cloth.
The linings of the insulating lids may be cleaned with a cream cleanser or soap impregnated pad.
Ovens and Hotplate
z
z
z
Use a wire brush for cleaning the hotplate to remove any burnt-on spills.
In the Main Oven spills and fat splashes are carbonised at high temperatures, occasionally brush out with a wire
brush. Do not use oven cleaners.
The Lower Oven should also be brushed or wiped out occasionally.
DO NOT USE ANY OVEN CLEANERS
Accessories
z
Oven furniture such as Meat Tins, Solid Plain Shelves, Grid Shelves and Grill Racks should be cleaned in hot
soapy water, soak if necessary, a nylon scouring pad can be used.
DO NOT PLACE IN THE DISHWASHER OR USE CAUSTIC CLEANERS.
8
MAINTENANCE
It is important to have the appliance serviced once a year
by a competent maintenance engineer. It is
recommended that a regular servicing contract is made
with a registered installer.
With normal use a Boiler/Cooker annual service should be
carried out by a competent person in accordance with gas
safety regulations.
WARNING: IF A GAS LEAK OR FAULT IS SUSPECTED,
TURN OFF THE APPLIANCE AND CONSULT YOUR
LOCAL REGISTERED INSTALLER.
Rayburns are designed to be continuous burning
appliances. If left unlit for any length of time, leave the
doors slightly open to allow air circulation.
CDSD RESET
BUTTON
Both the cooker and boiler should be turned off, by the
user, the night before servicing is to commence, in order
to allow the appliance to cool down. A HOT APPLIANCE
CANNOT BE SERVICED. To turn off the boiler turn the
boiler thermostat knob to ‘O’.
FIG. 3
DESN 511788
AIR ENTRY LOUVRES
To turn the cooker off, turn the cooker thermostat knob to
‘l’.
Air entry louvres for combustion are located on the left
hand and right hand side of the lower plinth panel.
GAS LEAK OR FAULT
These must be kept free of lint (household dust, fluff, dog
hairs etc).
If a gas leak exists or is suspected the unit MUST be
isolated from the gas supply by turning off the gas at the
meter or appliance gas cocks, and the electrical supply.
The appliance MUST not be used until the fault has been
investigated and rectified, by your installer/service
engineer.
You MUST IMMEDIATELY report the suspected gas
escape to your installer/service engineer, or to the local
gas supplier.
Do not allow any obstruction to the air entry, as it will
affect the operation of the appliance.
VENTILATION
Please see that the permanent ventilation provided for the
safe and reliable operation of your Rayburn is never
blocked off.
ELECTRICAL POWER FAILURE
The appliance will automatically close down until power is
restored and will then revert to operating at the setting
previously in use.
COMBUSTION DISCHARGE SAFETY
DEVICE
For safety purposes a combustion discharge safety
device is fitted (C.D.S.D. See Fig. 3). This will only
operate under adverse flue conditions. If the switch has
operated, it should be pushed in to reset. If this problem
persists contact your local engineer to determine and
rectify the cause. It is important not to reset more than
once as this may indicate a flue blockage.
9
10
11
For further advice or information contact your
local distributor/stockist
With AGA’s policy of continuous product
improvement, the Company reserves the right to
change specifications and make modifications to
the appliance described at any time.
Manufactured by
AGA
Station Road
Ketley Telford
Shropshire TF1 5AQ
England
www.rayburn-web.co.uk
www.agacookshop.co.uk
www.agalinks.com
12