1
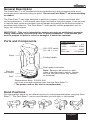
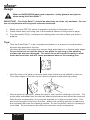
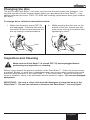
TM
Owner’s Manual • Guide d’utilisation • Manual del Propietario
Read all instructions and product labels.
When using electrical tools, follow all
precautions to reduce the risk of fire,
electric shock, and other personal injury.
Veuillez lire toutes les instructions et les
étiquettes du produit. Lorsque vous utilisez
des outils électriques, veuillez observer
toutes les précautions afin de réduire les
risques d’incendie, de choc électrique ou de
blessures.
Lea todas las instrucciones y las
etiquetas de los productos. Cuando utilice
herramientas eléctricas, observe todas
las precauciones para disminuir el riesgo
de incendio, descargas eléctricas y otras
lesiones físicas.
Need help? Call us first for answers fast.
Call Wagner toll-free if you have any comments
or problems with this Wagner Product.
1-800-727-4023
Wagner Technical Service
Register your product online at:
Enregistrement du produit en ligne sur le site :
Regístrelo del producto en línea en:
http://www.wagnerspraytech.com
U.S. Patent No. D530,172
Besoin d’aide? Appelez-nous
pour des réponses rapidas.
Téléphonez à Wagner sans
frais d’appel si vous avez des
commentaires ou des problèmes
avec l’appareil.
¿Necesita Ayuda? Llámenos
primero para obtener respuestas
rápidas. Llame a la línea gratuita
de Wagner si quiere hacer un
comentario o tiene problemas con
este producto de Wagner.
0412 • orm No 0282720J
Español Français English
WARNING! Read all safety warnings and all instructions. Fa ure to fo ow the
warn ngs and nstruct ons may resu t n e ectr c shock, fire and/or ser ous njury.
Save all warnings and instructions for future reference.
The Paint Eater™
for exterior use only
not for use with lead based paints!
WARNING! Removal of old paint by sanding, scraping or other means may generate
dust or fumes that contain lead. Exposure to lead dust or fumes may cause brain damage
or other adverse health effects, especially in children or pregnant women. Controlling
exposure to lead or other hazardous substances requires the use of proper protective
equipment, such as a properly fitted respirator (NIOSH approved) and proper containment
and cleanup. For more information, call the National Lead Information Center at
1-800-424-LEAD (in US) or contact your local health authority.
Read the booklet, “Protect Your Family From Lead In Your Home”, included with this
product, or obtain a copy from the U.S. Environment Protection Agency or the U.S.
Consumer Product Safety Commission.
Many paints contain toxic or harmful substances. Read the enclosed User’s Manual for
further precautions and instructions.
Table of Contents
General Safety Rules..................................................................... 3-4
Grounding Instructions..................................................................... 5
Safety Instructions and Warnings - Sanders................................. 5-6
General Description.......................................................................... 7
Parts and Components.................................................................... 7
Hand Positions................................................................................. 7
Usage............................................................................................... 8
Changing the Disc............................................................................ 9
Inspection and Cleaning................................................................... 9
Product Registration / Warranty..................................................... 26
2
English
WARNING! Read all safety warnings and all instructions. Fa ure to fo ow the
warn ngs and nstruct ons may resu t n e ectr c shock, fire and/or ser ous njury.
Save all warnings and instructions for future reference.
General Safety Rules
Read and understand all instructions. Failure to follow all instructions listed below
may result in electric shock, fire and/or serious personal injury.
Work Area Safety
• Keep your work area clean and well-lit. C uttered benches and dark areas nv te acc dents.
• Do not operate power tools in explosive atmospheres, such as in the presence of
flammable liquids, gases, or dust. Power too s create sparks wh ch may gn te the dust or
fumes.
• Keep children and bystanders away while operating a power tool. D stract ons can
cause you to ose contro .
Electrical Safety
• Power tool plugs must match the outlet. Never modify the plug in any way. Do not use
any adapter plugs with earth (grounded) power tools. Unmod fied p ugs and match ng
out ets w reduce r sk of e ectr c shock.
• Avoid body contact with earthed or grounded surfaces, such as pipes, radiators,
ranges and refrigerators. There s an ncreased r sk of e ectr c shock f your body s earthed
or grounded.
• Do not expose power tools to rain or wet conditions. Water entering a power
tool will increase the risk of electric shock.
• Do not abuse the cord. Never use the cord for carrying, pulling or unplugging the
power tool. Keep cord away from heat, oil, sharp edges or moving parts. Damaged or
entang ed cords ncrease the r sk of e ectr c shock.
• When operating a power tool outdoors, use an extension cord suitable for outdoor use.
Use of a cord su tab e for outdoor use reduces the r sk of e ectr c shock.
• If operating a power tool in a damp location is unavoidable, use a ground fault circuit
interrupter (GFCI) protected supply. Use of an GFCI reduces the r sk of e ectr c shock.
Personal Safety
• Stay alert, watch what your are doing and use common sense when operating a power
tool. Do not use tool while tired or under the influence of drugs, alcohol or medication.
A moment of nattent on wh e operat ng power too s may resu t n ser ous njury.
• Use personal protective equipment. Always wear eye protection. Protect ve equ pment
such as dust masks, non-sk d safety shoes, hard hat, or hear ng protect on used for
appropr ate cond t ons w reduce persona njur es.
• Prevent unintentional starting. Ensure the switch is in the off-position before
connecting to power source and/or battery pack, picking up or carrying the tool.
Carry ng power too s w th your finger on the sw tch or energ z ng power too s that have the
sw tch on nv tes acc dents.
• Remove any adjusting key or wrench before turning the power tool on. A wrench or a
key eft attached to a rotat ng part of the power too may resu t n persona njury.
• Do not overreach. Keep proper footing and balance at all times. Th s enab es better
contro of the power too n unexpected s tuat ons.
• Dress properly. Do not wear loose clothing or jewellery. Keep your hair, clothing and
gloves away from moving parts. Loose c othes, jewe ery or ong ha r can be caught n
mov ng parts.
• If devices are provided for the connection of dust extraction and collection facilities,
ensure these are connected and properly used. Use of dust co ect on can reduce dustre ated hazards.
English
3
WARNING! Read all safety warnings and all instructions. Fa ure to fo ow the
warn ngs and nstruct ons may resu t n e ectr c shock, fire and/or ser ous njury.
Save all warnings and instructions for future reference.
Power Tool Use and Care
• Do not force the power tool. Use the correct power tool for your application. The correct
power too w do the job better and safer at the rate for wh ch t was des gned.
•Do not use the power tool if the switch does not turn it of and off. Any power too that
cannot be contro ed w th the sw tch s dangerous and must be repa red.
•Disconnect the plug from the power source and/or the battery pack from the power tool
before making any adjustments, changing accessories, or storing power tools. Such
prevent ve safety measures reduce the r sk of start ng the power too acc denta y.
• Store idle power tools out of the reach of children and do not allow persons unfamiliar
with the power tool or these instructions to operate the power tool. Power too s are
dangerous n the hands of untra ned users.
• Maintain power tools. Check for misalignment or binding of moving parts, breakage of
parts and any other condition that may affect the power tool’s operation. If damaged,
have the power tool repaired before use. Many acc dents are caused by poor y ma nta ned
power too s.
• Keep cutting tools sharp and clean. Proper y ma nta ned cutt ng too s w th sharp cutt ng
edges are ess ke y to b nd and are eas er to contro .
•Use the power tool, accessories and tool bits, etc., in accordance with these
instructions, taking into account the working conditions and the work to be performed.
Use of the power too for operat ons d fferent from those ntended cou d resu t n a hazardous
s tuat on.
Service
• Have your power tool serviced by a qualified repair person using only identical
replacement parts. Th s w ensure that the safety of the power too s ma nta ned.
Some dust created by power sanding, sawing, grinding, drilling, and other
construction activities contains chemicals known to cause cancer, birth defects or
other reproductive harm. Some examples of these chemicals are:
• ead from ead-based pa nts
• crysta ne s ca from br cks and cement and other masonry products
• arsen c and chrom um from chem ca y-treated umber (CCA).
Your r sk from these exposures var es, depend ng upon how often you do th s type of work. To
reduce your exposure to these chem ca s: work n a we -vent ated area and work w th approved
safety equ pment, such as dust masks that are spec a y des gned to fi ter out m croscop c part c es.
• Avoid prolonged contact with dust from power sanding, sawing, grinding, drilling and
other contruction activities. Wear protective clothing and wash exposed areas with
soap and water. A ow ng dust to get nto your mouth, eyes, or ay on the sk n may promote
absorpt on of harmfu chem ca s.
Use of this tool can generate and/or disburse dust, which may cause serious and
permanent respiratory or other injury. Always use NIOSH/OSHA approved
respiratory protection appropriate for the dust exposure. Direct particles away from
face and body.
4
English
WARNING! Read all safety warnings and all instructions. Fa ure to fo ow the
warn ngs and nstruct ons may resu t n e ectr c shock, fire and/or ser ous njury.
Save all warnings and instructions for future reference.
Grounding Instructions
Th s product must be grounded. In the event of an e ectr ca short c rcu t, ground ng reduces the r sk
of e ectr c shock by prov d ng an escape w re for the e ectr c current. Th s product s equ pped w th a
cord hav ng a ground ng w re w th an appropr ate ground ng p ug. The p ug must be p ugged nto an
out et that s proper y nsta ed and grounded n accordance w th a oca codes and ord nances.
WARNING - Improper installation of the grounding plug can result in a risk of electric shock.
If repa r or rep acement of the cord or p ug s necessary, do not connect the green ground ng w re to
e ther flat b ade term na . The w re w th nsu at on hav ng a green outer surface w th or w thout ye ow
str pes s the ground ng w re and must be connected to the ground ng p n.
Check w th a qua fied e ectr c an or serv ceman f the ground ng nstruct ons are not comp ete y
understood, or f you are n doubt as to whether the product s proper y grounded. Do not mod fy
the p ug prov ded. If the p ug w not fit the out et, have the proper out et nsta ed by a qua fied
e ectr c an.
Th s product s for use on a nom na 120 vo t c rcu t and
has a ground ng p ug that ooks ke the p ug as ustrated.
Make sure that the product s connected to an out et hav ng
the same configurat on as the p ug. No adapter should be
used with this product.
Grounded outlet
Grounding pin
important - Use on y a 3-w re extens on cord that has
Cover for grounded outlet box
a 3-b ade ground ng p ug and a 3-s ot receptac e that w
accept the p ug on the product. Make sure your extens on cord s n good cond t on. When us ng
an extens on cord, be sure to use one heavy enough to carry the current your product w draw. For
engths ess than 50 feet, use a No. 18 AWG extens on cord. For engths more than 50 feet, use a
No. 14 or No. 16 AWG extens on cord. An unders zed cord w cause a drop n ne vo tage resu t ng
n oss of power and overheat ng.
Wagner Spray Tech accessory extens on cords
recommended:
P/N 0090241
20 foot extension cord
P/N 0090242
35 foot extension cord
Minimum gauge for extension cords
Ampere Voltage
rating
120V 25-50 100
range
3-4
18
16
Cord length (feet)
150
200
250
300
400
500
14
12
12
10
10
8
Safety Warnings and Instructions - Sanders
• This power tool is intended to function as a sander. Read all safety warnings,
instructions, illustrations and specifications provided with this power tool. Fa ure to
fo ow a nstruct ons sted be ow may resu t n e ectr c shock, fire and/or ser ous njury.
• Operations such as grinding, wire brushing, polishing or cutting-off are not
recommended to be performed with this power tool. Operat ons for wh ch the power too
was not des gned may create a hazard and cause persona njury.
• Do not use accessories which are not specifically designed and recommended by the
tool manufacturer. Just because the accessory can be attached to your power too , t does
not assure safe operat on.
• The rated speed of the accessory must be at least equal to the maximum speed marked
on the power tool. Accessor es runn ng faster than the r rated speed can break and fly apart.
• The outside diameter and the thickness of your accessory must be within the capacity
rating of your power tool. Incorrect y s zed accessor es cannot be adequate y guarded or
contro ed.
• The arbor size of wheels, flanges, backing pads, or any other accessory must properly
fit the spindle of the power tool. Accessor es w th arbor ho es that do not match the
mount ng hardware of the power too w run out of ba ance, v brate excess ve y and may
cause oss of contro .
• Do not use a damaged accessory. Before each use inspect the accessory such as
abrasive wheels for chips and cracks, backing pad for cracks, tear or excess wear,
wire brush for loose or cracked wires. If power tool or accessory is dropped, inspect
for damage or install an undamaged accessory. After inspecting and installing an
accessory and run the power tool at maximum no-load speed for one minute. Damaged
accessor es w norma y break apart dur ng th s test t me.
English
5
WARNING! Read all safety warnings and all instructions. Fa ure to fo ow the
warn ngs and nstruct ons may resu t n e ectr c shock, fire and/or ser ous njury.
Save all warnings and instructions for future reference.
6
• Wear personal protective equipment. Depending on application, use face shield, safety
goggles or safety glasses. As appropriate, wear dust mask, hearing protectors, gloves
and workshop apron capable of stopping small abrasive or workpiece fragments. The
eye protect on must be capab e of stopp ng fly ng debr s generated by var ous operat ons. The
dust mask or resp rator must be capab e of fi trat ng part c es generated by your operat on.
Pro onged exposure to h gh ntens ty no se may cause hear ng oss.
• Keep bystanders a safe distance away from work area. Anyone entering the work
area must wear personal protective equipment. Fragments of workp ece or of a broken
accessory may fly away and cause njury beyond mmed ate are of operat on.
• Hold power tool by insulated gripping surfaces only, when performing an operation
where the cutting accessory may contact hidden wiring or its own cord. Cutt ng
accessory contact ng a “ ve” w re may make exposed meta parts of the power too “ ve” and
shock the operator.
• Position the cord clear of the spinning accessory. If you ose contro , the cord may be cut
or snagged and your hand or arm may be pu ed nto the sp nn ng accessory.
• Never lay the power tool down until the accessory has come to a complete stop. The
sp nn ng accessory may grab the surface and pu the power too out of your contro .
• Do not run the power tool while carrying it at your side. Acc denta contact w th the
sp nn ng accessory cou d snag your c oth ng, pu ng the accessory nto your body.
• Regularly clean the power tool’s air vents. The motor’s fan w draw the dust ns de the
hous ng and excess ve accumu at on of the mater a or powdered meta may cause e ectr ca
hazards.
• Do not operate the power tool near flammable materials. Sparks cou d gn te these
mater a s.
• Do not use accessories that require liquid coolants. Us ng water or other qu d coo ants
may resu t n e ectrocut on or shock.
• Maintain a firm grip on the power tool and position your body and arm to allow you
to resist kickback forces. Always use auxiliary handle, if provided, for maximum
control over kickback or torque reaction during start-up. The operator can contro torque
react ons or k ckback forces, f proper precaut ons are taken.
• Never place your hand near the rotating accessory. Accessory may k ckback over your
hand.
• Do not position your body in the area where power tool will move if kickback occurs.
K ckback w prope the too n d rect on oppos te to the whee ’s movement at the po nt of
snagg ng.
• Use special care when working corners, sharp edges, etc. Avoid bouncing and
snagging the accessory. Corners, sharp edges or bounc ng have a tendency to snag the
rotat ng accessory and cause oss of contro or k ckback.
• Do not attach a saw chain woodcarving blade or toothed saw blade. Such b ades create
frequent k ckback and oss of contro .
•Do not use excessively oversized sanding discs. This tool is designed to use only the
sanding disc sold with the tool, or replacement purchased from the manufacturer or
manufacturer representative. Do not purchase or install any type of sanding disc that
uses paper, or any other accessory not purchased directly from the manufacturer or
manufacturers representative.
English
General Description
The Paint Eater™ is an excellent surface preparation tool when preparing solid wood,
wood siding and masonite siding for paint. Do not use Paint Eater™ on textured siding
or shakes.
The Paint Eater™ has been designed to perform a number of tasks associated with
surface preparation. It will remove paint chips and feather the paint edges; it can be used
to remove paint oxides and mildew; and will abrade the painting surface and provide for
excellent paint adhesion. The Paint Eater™ is the perfect surface preparation tool for
large, flat, solid surfaces.
important - This tool is intended for outdoor use only on solid wood, masonite
siding, wood siding, concrete and steel for paint preparation. If the surface you
want to prepare for paint is rotted or damaged, it should be replaced.
Parts and Components
ON / OFF switch
(O = off / l = on)
Strap
Red disc
lock button
Disc*
Specifications
Amps......................... 3.2
Volts....... 120VAC, 60Hz
r/min........................ 2600
Disc size.........4.5 inches
Folding handle
Red handle lock button
Note: Squeeze red buttons on both
sides of handle base to unlock. Handle
will lock into place when fully vertical
or horizontal.
* Replacement discs: P/N 0513041
(not to be used with anything other than the Paint Eater™)
** The power cord on this tool is not replaceable.
Hand Positions
See the graphics below for the different options for hand placement when using the Paint
Eater™. The Paint Eater™ can be used whether you are right- or left-handed.
English
7
Usage
Wear an NIOSH/OSHA approved respirator, safety glasses and gloves
when using the Paint Eater™.
important - The Paint Eater™ should be used only on clean, dry surfaces. Do not
use in conjunction with any paint removal chemicals.
1. Make sure the OFF (O) switch is pressed, and plug in the power cord.
2. Place hands onto unit using one of the methods shown on the previous page.
3. Turn the switch ON (l), and place the rotating disc onto the surface you want to
prepare.
Tips:
• Test the Paint Eater™ in an inconspicuous place or on a piece of scrap wood to
become accustomed to the tool.
• Hold the disk flat to the surface to remove large paint chips or to feather paint edges.
Do not force tool or hold the disc in one place for too long or the painting
surface can become damaged. Too much force will cause the motor to slow
down and overheat, and will cause premature wear on the sanding disc.
• Hold the disc on its edge to remove paint chips that are more difficult to remove.
The outer edges of the disc can be used to prepare underneath lap siding.
• After a period of operation, check the disc to see if paint is sticking to the disc. Too
much paint embedded into the disk will affect performance and should be removed.
Run the disc momentarily on a concrete sidewalk or a large concrete block. This
will knock the paint loose from the disc. Make sure cleaning surface is stable and
disc is placed flat onto the cleaning surface. Do not hold block used for cleaning in
your hand. Do not immerse the disc into a solvent, such as turpentine.
8
English
Changing the disc
The disc on the Paint Eater™ will wear out over time and will need to be changed. You
can find new discs at the original retailer where you purchased the Paint Eater™, or by
calling customer service at 1-800-727-4023 and ordering replacement discs (part number
0513041).
To change discs, follow the instructions below.
1. Make sure the unit is turned OFF (O)
and unplugged. Press the disc lock on
the bottom of the unit and unscrew the
disc by turning it counterclockwise.
2. While pressing the disc lock on the
bottom of the unit, thread new disc
onto unit by turning it clockwise and
tightening by hand.
Lock
Lock
Inspection and Cleaning
Make sure the Paint Eater™ is turned OFF (O) and unplugged before
performing any inspection or cleaning.
Before using, inspect the general condition of the Paint Eater™. Check for loose screws,
a cracked, broken, or worn disc, a damaged power cord or any other condition that could
affect the safe operation of the Paint Eater™. If the Paint Eater™ makes an abnormal
noise or vibration, take it to an authorized service center for repair. Do not use damaged
equipment.
important: Use only a clean cloth and mild detergent to clean the body of the
Paint Eater™. Do not use solvents or immerse the Paint Eater™ into any liquid.
English
9