1
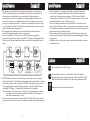
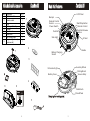
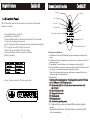
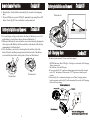
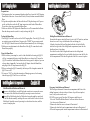
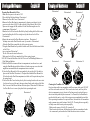
CleanMate 365
Model No. QQ-2L
CleanMate 365
Model No. QQ-2L
Intelligent Automatic Vacuum Cleaner
REV.:001010208
CleanMate 365
Safety Precautions
Table of Content
Safety Precautions
1
Safety Instructions
1
Special Features
2
Cautions
3
Main Unit and Accessories
4
Main Unit Features
5
Remote Control Functions
7
Battery Installation and Removal
8
Self Charging Home Base
9
Installing Basic Accessories
10
General Operation
12
Cleaning and Maintenance
13
QQ-2L Useful Tips
17
Specification
19
Troubleshooting
20
Warranty Policy
21
Before using this product, please read the following safety instructions and
keep this operation manual for future reference.
Before using this product, please follow all normal safety precautions to avoid
the occurrence of situations such as fire, short-circuit, and injury. Please make
sure that you observe all the following safety precautions:
Safety Instruction
1.Read this user manual thoroughly before using this product.
2.This product is not for use outdoors.
3.This product is an electronic device. Never get it wet or let it come in
contact with water. Do not use it in a moist or wet environment. This is to
prevent damage to the electronics in the unit.
4.Before using this product, please tidy up things on the floor. You must remove
all objects that could get caught in the rolling brush or in the air intake on the
bottom of the unit. Examples include, clothing, power cords, cable, telephone
cords, drapes or blinds, loose fringes of rugs. These items can get caught in
the unit, and either prevent it from moving, or the unit could pull over a lamp,
table, or chair (for examples) and cause damage to the unit, floor, object, or
person.
5.Please do not sit or stand on this product. Pay special attention to toddlers or
pets in the house to prevent harm to the unit or the child, pet or the unit.
6.Please do not use this product to clean a still-burning cigarette, a lit match or
burning embers.
7.Please do not use this product to clean flammable or highly volatile liquids
such as gasoline or white gasoline.
8.To prevent damage to the vacuum, make sure that nothing is obstructing the
air vents on the top of the unit.
9.When not in use for long periods of time, the power switch must be turned off.
10. When using rechargeable batteries, please use the correct voltage and
current listed on the product. If you are not sure about the standard voltage,
please ask your distributor or query the local electricity company.
11. Use the factory-provided batteries and charger.
12. When your hands are moist, do not touch the battery charger, plug or power
cord.
13. When you need to clean this product, stop charging, and remove the Battery.
1
CleanMate 365
Special Features
1. This product is a groundbreaking, revolutionary automatic vacuum cleaner.
It utilizes high vacuum suction, a rolling brush on the bottom, a side brush for
cleaning along walls and other objects, an ultraviolet light to help with
disinfection, and even has a compartment for adding fragrance to the air as it
cleans. All of these features make this unit perfect for cleaning a wide variety of
floor types, including ceramic tile, hardwood, vinyl and most carpets. As long
as you have the CleanMate 365 Intelligent Automatic Vacuum Cleaner, you have
the most helpful house cleaning mate.
2. The compact shape enables this unit to clean under beds, tables and other
furniture that standard upright vacuums cannot get to.
3. Once the CleanMate 365 is turned on, it will follow a five step repetitive
movement: Special bounce, Spiral, Along Wall, "S" shape, and Polygonal Spiral.
This wide variety of movement helps to ensure that the unit completely cleans a
room.
Special Bounce
Sp iral
Along a
W
ll
Sp iral
CleanMate 365
Special Features
6. The CleanMate 365 is equipped with a light sensor. When the battery
is low, or the cleaning time is completed, the unit will automatically
search for the docking station to recharge. If QQ-2L can not find the
docking station in 30 minutes, QQ-2L will stop and turn into "sleep" mode
automatically which is to prevent battery run out.
7. There is a transparent window on top of the dust bin. This allows you to
easily see how full the dust bin is, so you can clean it out when it is needed.
This window also doubles as a holder for the remote control to help prevent
misplacing or losing the remote control.
8. Photo sensors on the underside of the front of the unit detect stairs, and
other drop offs, to keep it from falling off the edge and damaging the unit or
anything else.
9. A handle is built-in to the unit to make it easy to pick up and move the unit
to a different room.
CleanMate 365
Cautions
Do not look directly at the UV light.
"S"Shap e
Sp iral
Polygonal Sp iral
Sp iral
4."MODE"button on the remote control allows you to select a specific cleaning
pattern for the QQ-2L. By default the unit operates in Automatic Mode (switching
between all 5 patterns), but by using the "MODE" button on the remote, you can
select a specific pattern in the following sequence: 1.Spiral 2.Special Bounce 3.
Along Wall 4.'S' Shape 5.Polygonal Spiral and back to A. Automatic.
Note: when mode 4 "S" shape is in use, if QQ-2L gets stuck in the corner, please
use remote control to switch it to another mode QQ-2L will change into
other mode automatically in 30 sec).
5. Sensors at the front and sides of the unit tell the CleanMate 365 when it comes in
contact with a wall or other obstacle, to back up, turn and clean around the object.
2
Do not attempt to remove or replace the UV light. This light is a
permanent fixture and cannot be replaced. Do not touch the UV light
bulb with bare hands. Natural skin oils will cause premature failure.
Make sure the battery is installed correctly.
3
CleanMate 365
Main Unit and Accessories
Item
1
Description
QQ-2L Main Unit
QTY
1
2
Remote control
1
3
4
5
6
7
8
Filter
Rechargeable battery
Charger
Usermanual
Hand brush
Self charging base
Fragrance (purchase by
customer self)
2
1
1
1
1
1
9
CleanMate 365
Main Unit Features
LCD Panel
Bumper
1
Remote Control
Sensor
Power Switch
Start/Stop Button
Remote Control
Dust Bin Release
Button
Dust Bin
Side Light
Air Vent
1
2
7
Handle
Battery Charging
Socket
3
Auxiliary Wheel
Ultraviolet Light
9
Rolling Brush
Vacuum Entry
Battery Cover
4
8
6
Side Brush
Clean MATE 365
Drive Wheel
Charging connecting point
5
4
5
CleanMate 365
Main Unit Features
CleanMate 365
Remote Control Function
Forward
Right
Left
The LCD control panel on the robot shows more clearly the functions
that are activiating
Reverse
Start
Stop
Timer Button
Mode
Power Button: Turn on QQ-2L
Start Button: Start QQ-2L
Time and Mode Indicator: Demonstrate the time left to clean and
thespecific cleaning pattern chosen
Auto: Light up when the cleaning patterns are repeated automatically
UV: Light up when the UV light is activated
Start: Light up when QQ-2L started working
Vacuum: Light up when the vacuum is activated
Battery indicator:
Error: Light up when QQ-2L flips or gets stuck
6
Ultraviolet Light On/Off
Power Off
Home
Vacuum Motor On/Off
Function of each Button:
1.Start Button: Press the Start Button to begin the automatic cleaning of the
room.
2.Stop Button: Press the Stop Button to stop the activity of the unit, and it will
emit a long sound.
3.Timer button: Use this button to set the cleaning time of the QQ-2L.
4.Directional Buttons: Forward: when pressed forward QQ-2L will move until
user presses forward button again or stopped by obstacle.
Right, left and backward button: use these buttons to manually drive the
unit to the right, left and backward.
5.Mode Button:
Select specific cleaning pattern. Cleaning pattern selected will show
on the LCD panel with following codes.
F1 Spiral mode (QQ-2L will stop when it comes in contact with
any objects)
F2 Special bounce mode
F3 Along wallside mode
F4 S shape mode
F5 Polygonal mode
FR Automatic repeating mode
6.UV button: Allows you to turn On and Off the ultraviolet light as
needed.
7.Vacuum Motor Off button: Press this button to control the On/Off
of the vacuum motor.
7
CleanMate 365
Remote Control Function
8. Home button: Use this Button to make QQ-2L go back to the charging
base.
9. Power off Button: to power Off QQ-2L manually by pressing Power Off
button. Note: QQ-2L Power-on button is on the main unit .
Battery Installation and Removal
CleanMate 365
Battery Installation and Removal
Illustration 3
2
CleanMate 365
1. Make sure that the power of the unit is turned 'OFF'.
2.Use your fingers to depress the tabs at the front of the battery cover. Lift
up the battery cover by these tabs as shown in Illustration 1.
3.Make sure the battery is inserted in the correct orientation by aligning the
silver strips on the Battery with the metal tabs on the inside of the battery
compartment. See Illustration 2.
4.Close the battery cover by first inserting the tabs into the slots at the
back of the unit, and then pressing down on the front side of the battery
cover until the plastic tabs click in place. Please see Illustration 3.
1
Self - Charging Base
QQ-1
Clean Mate 365
CleanMate
QQ-1 Clean
Mate 365 365
The battery needs around 3.5 hours to be fully charged.
Illustration 2
Illustration 1
1. POWER Indicator (Blue LED light): This light is on when the Self-Charging
Base is powered on.
2. GO Indicator (Green LED light):
A.If you want the QQ-2L to perform cleaning again after being fully charged,
press “GO” button once. Make sure the “GO” light in on to confirm your
setting.
B.After the QQ-2L is completely charged, you will hear 3 beeping and one
long beep sounds, and the QQ-2L will automatically leave the Self-Charging
Base to do the cleaning.
Self charge base panel
Power on LED
"
Go”button
Power
WALL O
S
CKET
“Go” LED indicator
Illustration 1
Note: the docking station
must be placed against the wall.
8
9
CleanMate 365
Self Charging Base
Installing Basic Accessories
CleanMate 365
Preparations
1.Find a proper place (we recommend a hard surface floor) to put the Self-Charging
Home Base in the room. Leave about 20 inch (50 cm) clearance around the Home
Base.
2.Align the metal plate under the Base with the wall. Plug the charger to AC power
outlet, and the other end to the DC input connector on the back of Home Base.
Do not leave loose wires around the Home Base.
3.Make sure the blue LED light on the Home Base is on. This means that the Home
Base has been powered on, and it is ready to charge the QQ-2L.
Testing the Home Base
1.Put the QQ-2L on the floor close to the Self-Charging Base. Turn the QQ-2L on by
pressing its power switch button. Now press the “HOME” key on remote control
unit. The QQ-2L should return to the Home Base automatically for self-charging.
2.Make necessary adjustment to the Home Base if the QQ-2L cannot dock on the
Home Base properly.
Using the Home Base
1.When its battery is running low, or after it has finished the cleaning job, QQ-2L
will try to automatically return to the Home Base to re-charge itself. In case the
QQ-2L is unable to find the Home Base before battery power is depleted, you can
always charge it manually. Just un-plug the AC adapter from the Home Base,
and plug it to the DC input connector on QQ-2L.
2.When you charge the QQ-2L manually, the battery will be charged no matter the
QQ-2L is on or off.
3.If you press “GO” key after the automatic self charging process, the cleaning
time setting on QQ-2L will be re-set to 40 min.
Installing Basic Accessories
CleanMate 365
Side Brush Installation and Removal
To remove the Side Brush, use a Philips head screwdriver to remove the screw
in the center of the Side Brush Assembly by turning it counter-clockwise.
To install the Side Brush, place the Philips head screw through the center hole
of the Side Brush assembly, and align the screw with the hole in the slot for the
Side Brush. Attach the screw by turning it in a clockwise direction, until the
screw is firmly in place.
10
Rolling Brush Installation and Removal
Ensure that the power switch of the unit is set to the 'Off' position, and turn
the unit over on it’s top, with the back of the unit facing you.
Align the slotted end of the rolling brush with the slot in the flexible
insert in the right side of the rolling brush compartment (near the side
brush) and press it into place.
Press the free end of the rolling brush down into the rolling brush
compartment, and align the free end with the plastic insert on the left side
of the compartment. Slide the rolling brush to the left to secure it in place.
Fragrance Installation and Removal
This Intelligent Automatic Vacuum has a compartment built into it for
adding fragrance to the air as the unit cleans. Any solid scent packet,
insert, or dryer sheet can be used.
DO NOT use any type of Liquid or Oil Fragrance with this unit.
1.Press the "Dust Bin Release Button" to release the dust bin cover.
See the arrow in Illustration 1.
2.Remove the dust bin cover as shown in Illustration 2.
3.Remove the dust bin from its compartment as shown in Illustration 3
4.Place the fragrance pack into the compartment as shown in Illustration 4.
11
Installing Basic Accessories
CleanMate 365
General Operation
CleanMate 365
4.When using the QQ-2L in a room for the first time, watch how it operates
in the room. Watch for areas that the unit has troubles operating in, and
either block these areas of the room or move objects around so that the
unit can clean effectively and not get stuck or hung up before it is able to
clean the entire room.
Illustration 1
Illustration 2
Illustration 3
Illustration 4
Starting Operation
1.Clean out the dust bin before use.
2.Place the QQ-2L on the floor in a relatively open space near the middle of the
room to be cleaned.
3.Press the power button on the main unit to turn it on.
4.Set the timer of the unit to the desired cleaning time by pressing the Timer
button on the control panel of the main unit or on the remote control.
For Reference: Use 10 minutes of cleaning time for Every 54-72 square feet
of floor space. Cleaning time may vary depending on the type of floor being
cleaned.
5.Press the Start button on the control panel or the remote control. After a
short delay, the QQ-2L will begin to automatically clean the floor.
6.At the end of the cleaning cycle, the QQ-2L will emit a long beep and will
turn off the vacuum moto and start to search for docking station.
If the low battery light on the unit is blinking, then the battery is low and
QQ-2L needs to be recharged before it can be used again.
Stopping Operation
CleanMate 365
General Operation
1.Make sure you have completely charged the unit before using it for the
first time.
2.Room preparation:
A.Pick up all large items off of the floor that could get stuck in the brushes
or the vacuum intake.
B.Pick up/hide all cords that could get tangled in the unit.
C.Move all items that could be easily knocked over.
D.Roll under loose edges of rugs with any type of stringy fringe.
3.DO NOT use the QQ-2L on plush or long pile carpet or rugs.
12
1.Press the Start/Stop button on the control panel of the unit.
2.Press the Stop button on the remote control.
Cleaning and Maintenance
CleanMate 365
Cleaning and Maintenance
The operation and maintenance of the QQ-2L is very simple, but to achieve
good performance of the unit, it is recommended that you follow a routine
cleaning and maintenance schedule.
1.Make sure to clean out the Dust Bin and to brush off the Air Filter after
every cleaning cycle.
2.Make sure that the vacuum intake is free of any obstructions.
3.Check to make sure that the bristles of the Side Brush are free and not tangled.
4.Make sure that there is not a lot of hair, string, etc caught up in the Rolling
Brush or the wheels.
5.Remove and clean out the Rolling Brush.
6.Make sure that there is nothing block the air ventilation slots on the
top of the unit.
13
Cleaning and Maintenance
CleanMate 365
Cleaning Dust Bin and Air Filter
1.Make sure the power to the unit is 'Off'.
2.Press the Dust Bin Open Button. Illustration 1
3.Remove the Dust Bin Cover. Illustration 2
4.Remove the Dust Bin from its compartment by placing your finger(s) in the
groove near the front of QQ-2L, and on the tab at the center of the air filter.
Squeeze to disengage the tab, and then lift the Dust Bin straight out of its
compartment. Illustration 3
5.Remove the Air Filter from the Dust Bin by firmly holding the Dust Bin in one
hand, and pulling the Air Filter straight out by the tabs on the Air Filter.
Illustration 4
6.Empty the contents of the Dust Bin into a trash can. Illustration 5
You may rinse out the Dust Bin with water if you need to. Illustration 6
Allow the Dust Bin to completely dry before using it again.
7.Using the Hand Brush that is provided with the unit, brush off the dirt and debris
on Air Filter
into a trash can. Illustration 7
The Air Filter can be rinsed with water.
Make sure the Air Filter is completely dry before using it again.
8.DO NOT clean the Dust Bin or the Air Filter in a Cloth Washing Machine or a
Dish Washing Machine.
9.While the Dust Bin is removed from its compartment, turn the unit over, and
using the Hand Brush provided with the unit, brush away any excess dust that
might have accumulated in the compartment into a trash can.
10.Once the Dust Bin and Air filter are completely dry, put the Air Filter back in
place on the Dust Bin. Illustration 8. Then put the assembled Dust Bin and Air
Filter back into the Dust Bin compartment, with the air filter pointed away from
the control panel.
11.Put the Dust Bin Cover back in place by first inserting the tabs on the cover into
the slots on the case of the unit, then press down firmly on the ridges of the Dust
Bin Cover until the Release Button clicks into place. Illustration 10. Make sure
the Dust Bin Cover is securely in place before operating the unit.
Illustration 2
Illustration 1
14
CleanMate 365
Cleaning and Maintenance
Illustration 3
Illustration 4
Illustration 5
Tab
Illustration 7
Illustration 6
Illustration 8
Illustration 9
Illustration 10
Cleaning the CleanMate 365
Over time dust and dirt can accumulate in different areas of the unit, DO NOT
use Water to clean the unit itself! This is an electrical unit, and if any of the
electric components get wet, the unit will no longer work, and could cause a
short circuit and potentially hurt someone. Use Canned Air, the Hand Brush
provided with the unit, or a dry cloth to wipe away accumulated dust and dirt.
After operating the machine for a period of time, dust and dirt will accumulate
on the vacuum entry on the bottom of the QQ-2L. Cleaning this area regularly
will help ensure that the unit performs properly.
1.Make sure the power of the QQ-2L is turned off.
2.Turn the unit upside-down, and brush any dust that has accumulated inside
the vacuum entry as shown below. Shake the dust out into a trash can.
15
Cleaning and Maintenance
CleanMate 365
CleanMate
365
QQ-1
Clean
Mate
365
Clean
Mate
365
QQ-2L Useful Tips
Tip#1: Clear the area where the QQ-2L is to clean of any items
can be easily knocked over or caught in the Rolling or Side
Brushes.
Side Brush
Vacuum Entry
Cleaning the Rolling Brush
Hair and other stringy items can get caught in the rolling brush over time.
1.Make sure the power to the unit is turned off.
2.Turn the QQ-2L upside-down and place it on a flat surface with the back of the
unit facing you.
3.Remove the Rolling Brush from its compartment by grasping the left side of the
Rolling Brush, and sliding it toward the right.
4.Lift the free end of the Rolling Brush out of the compartment, then slide the
Rolling Brush to the left, freeing it from the flexible insert.
5.Manually remove any hair, string or other objects from the rolling brush to
ensure proper performance of the unit.
6.With the Rolling Brush removed, loosen any dirt that has accumulated in the
Rolling Brush compartment with a brush, then dump the dirt into a trash can.
7.Re-install the rolling brush following the steps outlined in Rolling Brush
Installation and Removal
In the area where the QQ-2L operates, it
might knock over items such as vases,
glasses, or lamps.
In order to provide the QQ-2L a space
for fast and safe cleaning, please
remove small items from the area
before operating.
Tip#2 Adjust the distance between furniture, walls and other objects to be
at least 36 cm (14 in).
36cm
Tip#3 Do not let the loose edges of rugs, drapes, table cloths, etc to get caught
in the QQ-2L. Roll under the loose edges of rugs and make sure that any
table cloths, drapes, bedding etc do not hang down to the floor.
Remove plastic bags and leftover longshaped garbage
When the QQ-2L is cleaning rugs,
fold under the edges of the rug.
16
17
Remote control
Types of movement
Dimension
Weight
7
8
9
10
3kg
Moving speed of machine
6
36cm(Diameter)x 9cm (H) or 11.4inch (diameter) x 3.5 inch (H)
Capacity of dust bin
5
Infraed light with more than 3 meters controlling range,
can be embedded directly into upper cover
Life time of UV ray
4
LE
ER
AR
D
R IG
OP
SP
IR
AR
ST
6
HT
5te 3
TE
CK
RW
BA
FO
FT
ST
MU
Ma
T
AL
T
RI
GH
S PIR
AR
ST
ST
65
T
te 3
TE
OP
CK
ST
MU
BA
Ma
RDD
WAAR
ORRW
FFO
L EF
R
an
T
GH
LI
&
ME
UV
IC
TI
Cle
M US
T
AL
18
16.5 ~ 18.5 cm/sec
Battery
3
0.3 liter
Ni-MH 14.4V, 2.5Ah Rechargeable
Fast adapter/charger
T IM
an
T
GH
LI
&
UV
S IC
Cle
MU
2
Sensor
Battery type
Anything blocking the signal will affect the performance of the remote
control.
Item
Tip#6 Aim the remote control at the sensors on the front of the QQ-2L.
1
The space beneath some furniture is
just high enough for the QQ-2L to get
Use a potted plant to block the QQ-2L
stuck underneath.
and prevent it from going these places.
6000 hours continuously
Block areas where the QQ-2L could get stuck by placing objects in
the way so that the QQ-2L does not go into these areas.
Tip#5
20Vdc 1000mA switching
3.5 hours of charging time
Turn the Power switch
of the unit to OFF.
22Vdc 1000mA switching
3.5 hours of charging time
Clean the vacuum
entry.
Ni-MH 2500
Turn the QQ-2L upsidedown, and remove the
objects.
Description
When something is
jammed inside the QQ2L, It will emit a beeping
sound.
Ni-Cd 2500
Tip#4 Fixing jams: Objects can get caught in the Rolling Brush
and prevent it from working properly. Immediately turn the
unit off, clear the object causing the jam, and resume
normal use.
5 types: Spiral, Special Bounce, Along Wall, S shape, Polygonal Spiral
CleanMate 365
Specification
Ni-Cd 14.4V, 2.5Ah Rechargeable
CleanMate 365
QQ-2L Useful Tips
19
CleanMate 365
20
2. Stop charging and run out the battery power then recharge again
One year Product Warranty:
1. Take off the bumper's protecting sponge
3. Ensure the AC adapter is the original machine's adapter
2. Check whether the machine was stuck by obstacles
CleanMate 365
Warranty Policy
Please fill in your warranty card completely and submit it to your local
customer service center.
Infinuvo provides you, as the owner of this Infinuvo product, with the
following Limited Warranty Policy.
Bumper is not properly react
Used wrong AC adapter
Error signal appeared
Remote control no reaction
Machine is away from ground over 3 seconds 1. Put the machine on the ground
Please read "Remote control function" carefully on the user manual
3. Some of function only can work while the machine is powered on
2. Check whether the remote control's battery is properly installed and in
good condition
1. Power on the machine
1. Make sure the battery is properly installed and fully charged
No power
Can not power on
Trouble indication
Trou b les h oo t in g
Possible Cause
Suggested Remedy
Troubleshooting
Infinuvo warrants to the original purchaser of this Infinuvo product that the
product is free from defects in original materials and workmanship for a
period of up to one year from the date of initial purchase. This warranty is
only valid if the product has been properly installed and is used in the way
for which it is intended, and has received only factory-authorized repairs,
servicing or alterations.
Under-warranty products that meet these conditions and that function
improperly will be repaired or replaced, at the discretion of Infinuvo.
Six months Battery Warranty:
Infinuvo warrants to the original purchaser of this Infinuvo product that the
original batteries contained within this product will function for a period of
six months. This warranty is only valid if the product has been properly
installed and is used in the way of which it is intended, and has received only
factory-authorized repairs, servicing, or alterations. Under-warranty
batteries that meet these conditions and that function improperly will be
repaired or replaced, at the discretion of Infinuvo.
These warranties contain the sole express warranty of Infunuvo, which
makes no other warranties, expressed or implied. These warranties are made
in lieu of any implied warranties of merchantability or fitness for a particular
purpose. These warranties give you specific legal rights. You may also have
other rights, which vary from state to state.
WHEN YOU RETURN A CLEANMATE PRODUCT OR BATTERY UNDER
THIS WARRANTY, you must first obtain an RMA number by calling your
local customer service center. Infinuvo reserves the right to request that you
submit a letter describing the circumstances under which the problem
occurred and that you submit invoice and any other supporting evidence and
documentation.
21