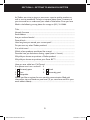
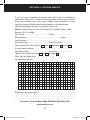
1
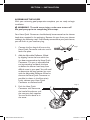
1905 pacerb3 manual rev2.indd 1 2012/09/13 12:10 PM A BETTER LIFE For over 100 years we have been motivated by innovation... and innovation has inspired our greatest successes. Every day we strive to supply the highest quality products... and constantly seek to develop INNOVATING products. Innovation, is what we create every day... for everyone... for a better life: Because the pool is a source of PLEASURE and JOY... a place to REUNITE FAMILIES... which CREATES RELATIONSHIPS and memories... a place where time stands still. That’s the magic of a pool! At Zodiac®, we manufacture more than just pool equipment... we create A BETTER LIFE. Zodiac® South Africa strives to offer world-class excellence in both products and service. Complemented by a team of dedicated staff throughout the country, we guarantee premium after sales service. Should you require assistance on your Zodiac® product, need to locate a dealer near you or just wish to find out more information, log onto our website or call our Customer Care Helpline. PLEASE SEND US YOUR WARRANTY CARD TO ENSURE YOUR WARRANTY IS REGISTERED AND RETAIN YOUR PROOF OF PURCHASE IN THE UNLIKELY EVENT OF FUTURE WARRANTY CLAIMS. 1905 pacerb3 manual rev2.indd 2 2012/09/13 12:10 PM INDEX IntRODUCTION 5 section 1 – installation Preparing your pool Assembling the Hoses Connecting to the Weir 6 6 7 8 section 2 – CORRECT SETTINGS Auto Weir Valve Correct Balancing Pool Coverage section 3 – Care and maintenance section 4 – parts Identification section 5 – troubleshooting 9 9 10 10 12 16 17-18 section 6 – Optional accessories 19 section 7 – The Perfect partner for your Pacer B3™ 20 section 8 – Getting to know you better 21 section 9 – At your service 22 3 1905 pacerb3 manual rev2.indd 3 2012/09/13 12:10 PM Important Information WARNING RISK OF SUCTION HAZARD, WHICH IF NOT AVOIDED, CAN RESULT IN SERIOUS INJURY OR DEATH. READ THIS MANUAL IN ITS ENTIRETY BEFORE INSTALLING AND OPERATING THE CLEANER. Do not block the suction fittings in the pool, the suction opening on the cleaner or the cleaner hoses with any part of your body. Do not expose your hair, loose clothing, jewellery, etc. to any suction outlet fittings in the pool/spa or on the cleaner. • • • Clean the weir basket, pump basket and pool filter before installing the cleaner and on a regular basis thereafter. Always disconnect the cleaner from the weir before cleaning or backwashing the pool filter. After cleaning or backwashing, let the filtration system run for at least five (5) minutes before re-connecting the cleaner. Remove the cleaner from the pool before chemical or shock treatments. Wait a minimum of four (4) hours after super chlorination before re-installing the cleaner. Read owner’s manual completely before operating the cleaner. Do not operate outside of the pool. Do not let children play with cleaner. 4 1905 pacerb3 manual rev2.indd 4 2012/09/13 12:10 PM Dear Customer, Thank you for purchasing a Pacer B3™. It is through customers such as you that our position as global market leader in pool care remains unchallenged. At Zodiac, we are constantly striving to bring the latest innovation and technology to your pool via our range of products. The Pacer B3™ is specifically designed for small pools but rapidly cleans large pools too. • In the event of requiring under-warranty repairs, please take your Pacer B3™ to your closest pool shop or please phone our Customer Care Helpline 0860 ZODIAC (0860 963 422) and we will either send out a technician or direct you to your nearest Zodiac repair centre. THE CONTENTS IN YOUR PACER B3™ BOX ARE AS FOLLOWS: • • • • • • • • One Pacer B3™ Pool Cleaner 6 x 1.2m of Long-Life Twist Lock Hose One Adjustable Deflector Wheel One C-Clip Hose Weight One Hose Quick Connector One Auto Weir Valve with 90˚ Twist Lock Elbow One Warranty Card One Quick Start Guide This Pool Cleaner has one registered patent 2009/07320 and additional patents pending. Pacer™ and B3™ are Trademarks of Zodiac Pool Care South Africa (PTY) Ltd. Specifications and equipment are subject to change without prior notice. 5 1905 pacerb3 manual rev2.indd 5 2012/09/13 12:10 PM section 1 – installation While the Pacer B3™ is designed for easy installation, some preliminary steps will assist the installation process. Where possible, assembly should take place as close to the weir as possible. Preparing your pool and filtration system 1) 2) 3) 4) Empty the weir basket. Clean the pump basket. Backwash and rinse the filter until the sight glass is clear. Adjust all return jets (whether your pool has one, two or more) to point downwards and towards the centre of the pool so that you DO NOT see a circular water flow or ripples on the surface of your pool. 5) Ensure your water chemistry is correct. See page 12 or below for more on this. Total Alkalinity Calcium (ppm) Hardness (ppm) Cyanuric Acid (ppm) Free Chlorine pH South African Standard 1 – 3 ppm 7.0 – 7.6 80 – 120 90 – 300 30 – 50 Ideal reading/range 1 – 3 ppm 7.2 80 – 120 150 – 175 50 * When using chemicals, always follow manufacturers’ directions and follow the advice of your pool professional. Always use protective clothing, gloves and glasses. Store and use chemicals out of the reach of children. 6 1905 pacerb3 manual rev2.indd 6 2012/09/13 12:10 PM section 1 – installation ASSEMBLING THE HOSEs With your swimming pool preparation complete, you are ready to begin installation. WARNING: To avoid severe injury, make sure to turn off the pool pump prior to completing these steps. Your Hose Quick Connector should already be connected to the cleaner head when received in the packaging. Remove this part from your cleaner and begin the following steps. If not already connected to your pool cleaner, you will find it in your accessory bag. 1. Connect the first length of hose to the Hose Quick Connector and twist until it locks into place. 2. Add the Adjustable Deflector Wheel by clipping it onto the hose which has just been connected to the Hose Quick Connector. This part is adjustable and can be moved up and down the hose to deflect the cleaner head away from difficult areas in your pool. You will need to determine the best position but start with the Adjustable Deflector Wheel as close to the Hose Quick Connector as possible (as shown in the illustration). Lastly, connect your Hose Quick Connector to the female cuff. Step 1 Step 2 Step 3 3. Push the Hose Quick Connector with hose onto the head of the cleaner until the two parts lock together. You can do this above or in the water. 7 1905 pacerb3 manual rev2.indd 7 2012/09/13 12:10 PM section 1 – installation 4. With your first hose now connected to the cleaner head, continue connecting the rest of your hose lengths to the first hose. In order to connect each hose length together, add the male end of one hose to the female end of another. Twist until the two parts securely lock together. Setting 2 on the ratchet system setting is advised, but use whichever setting you feel is best. Continue connecting your hose lengths together until your reach the farthest point of your pool (measured from weir) and then add one extra length. x6 Weir Weir Note: Ensure only genuine Zodiac Twist Lock Hoses are used for optimum performance. CONNECTING TO THE WEIR In your accessory bag, you will find an Auto Weir Valve connected to a 90º Twist Lock Elbow. This part connects to your weir as described below. The last hose in your line of hoses will then connect to the 90º Twist Lock Elbow. . To Automatic Pool Cleaner (APC) 8 1905 pacerb3 manual rev2.indd 8 2012/09/13 12:10 PM section 2 – Correct settings AUto weir valve The Zodiac Auto Weir Valve is preset at the factory to obtain maximum pool cleaning efficiency. Your Pacer B3™ is preset on setting 2. However, if you do experience difficulties, it can be manually adjusted to one of the three settings (high, medium or low - see adjustment settings below). Zodiac Zodiac You will only need to adjust the Auto Weir Valve if the following occurs: Your Pacer B3™ Pool Cleaner is performing too fast and/or climbing above the level of water. Your Pacer B3™ Pool Cleaner is performing slowly and/or not climbing the pool walls. 9 1905 pacerb3 manual rev2.indd 9 2012/09/13 12:10 PM section 2 – Correct settings Correct balancing The Pacer B3™ cycles on/off with the pool filtration pump, vacuuming and cleaning surfaces randomly throughout the pool. The coverage of the cleaner is dependent on the pool’s shape and available water flow. The main purpose of your Hose Weight is to adjust your cleaner’s balance which is vital for its performance. A properly balanced hose will create a 45º angle between the cleaner and the bottom of the pool. Make sure your disc is flat in the deepest part of the pool for correct balance. Incorrect (Move hose weight on first hose closer to machine head) Correct Balance (Hose weight in correct position) Incorrect (Move hose weight on first hose away from machine head) POOL COVERAGE While the return line water flow should not affect the natural movement of the hose, there are occasions where it can be beneficial. Return line pressure can be used to balance cleaning coverage and guide the cleaner away from steps and corners. A return line, located anywhere along the shaded area, can gently push the hose – allowing the unit to free itself from any in-pool obstacles. 10 1905 pacerb3 manual rev2.indd 10 2012/09/13 12:10 PM section 3 – CARE AND Maintenance Sunlight, water and pool chemicals create a harsh environment. With care and regular maintenance, your Pacer B3™ will remain in the best possible condition. To properly care for your unit: 1. Remove the Pacer B3™ from the pool before shock treatment and reinstall at least four hours later. 2. The weir basket, pump basket, cartridge or sand filter (whichever is applicable) should be thoroughly cleaned on a regular basis to ensure optimum pool cleaner efficiency. 3. Before backwashing your filter, always disconnect the hose from the weir. 4. Never “coil” the hose and always store the hose straight. Note: Your pool cleaner will discolour over time, but this will not change the performance of the unit. 5. Large foreign objects, such as toys and branches, should be removed manually from the pool cleaner. correct incorrect Zodiac recommends the following water chemistry readings for optimal performance of any pool equipment. Total Alkalinity Calcium (ppm) Hardness (ppm) Cyanuric Acid (ppm) Free Chlorine pH South African Standard 1 – 3 ppm 7.0 – 7.6 80 – 120 90 – 300 30 – 50 Ideal Reading/Range 1 – 3 ppm 7.2 80 – 120 150 – 175 50 * When using chemicals, always follow manufacturers’ directions and follow the advice of your pool professional. Always use protective clothing, gloves and glasses. Store and use chemicals out of the reach of children. 11 1905 pacerb3 manual rev2.indd 11 2012/09/13 12:10 PM section 3 – CARE AND MAINTeNaNCE WARNING: To avoid severe injury, make sure to turn off the pool pump prior to completing these steps. If the cleaner stops, remove the cleaner from the water and then check the Diaphragm for blockages. 1. Turn cleaner over (see Figure 1). 2. Inspect Diaphragm for blockages. If you find debris or obstacles, remove carefully. If not blocked, check the Diaphragm for wear or damage. Figure 1 3. Unthread the Handnut by turning it anti-clockwise (see Figure 2). 4. Set the Handnut aside. Remove Engine Assembly. Figure 2 5. Unthread the Outer Extension Pipe from the Cup Assembly and separate Outer Extension Pipe from Inner Extension Pipe. (see Figure 4). Figure 3 Outer Extension Pipe Cup Assembly 12 1905 pacerb3 manual rev2.indd 12 2012/09/13 12:10 PM section 3 – CARE AND MAINTeNaNCE 6. Use a breaking action to separate the Inner Extension Pipe from the Cup Assembly. Once separation is achieved, push the Diaphragm through the Cup Assembly (see Figure 4). Figure 4 7. Inspect the Diaphragm for wear and rinse it thoroughly with water. Replace it if necessary. Notch Tab To reinstall diaphragm: 1. Attach Diaphragm to Inner Extension Pipe. Figure 5 Cup Assembly 2. Insert Inner Extension Pipe and Diaphragm into Cup Assembly. Align Diaphragm tabs with notchesand pull straight through (do not twist) until the edge of the Diaphragm is visible (see Figures 5 and 6). Edge of Diaphragm Ensure the Diaphragm is flush with Cup Assembly Figure 6 3. Thread on the Outer Extension Pipe (see Figure 7). Outer Extension Pipe Engine Figure 7 13 1905 pacerb3 manual rev2.indd 13 2012/09/13 12:10 PM section 3 – CARE AND MAINTeNaNCE 4. Insert the engine into the body and thread the Handnut down until tight (see Figure 8). 5. Make sure the Outer Extension Pipe swivels freely by spinning it (see Figure 9). After several years of use, you may find that the Diaphragm is stretched and the cleaner works very slowly or not at all. This doesn’t mean you need to necessarily purchase a new Diaphragm. By just resetting it, you can prolong the life of your Diaphragm. In order to do this, follow these steps. If the Diaphragm is torn, a new Diaphragm needs to be purchased. Figure 8 Figure 9 Stretched Diaphragm 14 1905 pacerb3 manual rev2.indd 14 2012/09/13 12:10 PM section 3 – CARE AND MAINTeNaNCE Outer Cup Inner Cup 2 1. Follow the steps on page 9 on how to remove the Engine Assembly from your pool cleaner. Figure 10 2. Unthread the Outer Extension Pipe from the Cup Assembly. Inner Cup 2 1 3. On the inner cup of the Cup Assembly, you will see a number 2. The arrow on the outer cup will point to this. Grip both outer cup and inner cup tightly and turn inner cup anti-clockwise to unlock (see Figure 10). Outer Cup Figure 11 Outer Cup Inner Cup 2 1 4. Wiggle and pull inner cup slightly out until a new line appears with a number 1 on it (see Figure 11). Figure 12 5. Turn inner cup clockwise until it locks. Only when you hear a click, is the setting now locked on 1 (see Figure 12). Check Diaphragm gap has closed and reassemble Engine Assembly as done before. LABEL? 2 1 LABEL? 15 1905 pacerb3 manual rev2.indd 15 2012/09/13 12:10 PM section 4 – Parts Identification 14 12, 13 13 15 16 17 2 1 18 Zodiac 12 17 3 6 5 4 3 2 1 0 19 0 1 2 3 4 5 6 14 15 16 4 20 5 17 20 4 6 5 7 6 8 3 7 9 2 8 1 10 10 11 No. 1. 2. 3. 4. 5. 6. 7. 8. 9. 10. 11. 12. 13. 14. 15. 16. 17. 9 12 11 15 15 13 14 Description Qty Handnut 1 Compression Ring 1 Engine Assembly 1 Outer Extension Tube 1 Cup Assembly 1 Inner Extension Tube 1 Duralife Diaphragm 1 Float 1 Bumper 1 Body Housing 1 Disc 1 Auto Weir Valve 1 Hose Quick Connector 1 Twist Lock Hose (1.2m) 7 90 Degree Twist Lock Elbow 1 C-Clip Hose Weight 1 Adjustable Deflector Wheel 1 16 1905 pacerb3 manual rev2.indd 16 2012/09/13 12:11 PM section 5 – TROUBLESHOOTING PROBLEM Your Pacer B3™ works slowly, runs then stops, or not at all. Your Pacer B3™ is working slowly and air bubbles are noticeable at the return jet. CHecks Solutions Is the filter clean? Backwash and rinse the filter thoroughly. Are the baskets clean? Remove baskets, clean thoroughly (baskets must be in good condition). Is the vacuum lid sitting flush in the weir? Remove and re-install. Is the vacuum lid damaged? Replace vacuum lid. Are the Auto Weir Valve and the hose secure? Make sure that the connections are sealed. Is the diaphragm operational? Ensure the diaphragm is not twisted or broken. Is the diaphragm installed correctly? Make sure the edge of the diaphragm is pulled through the inside cup properly. (See pg13) Is the flow too low? Check for: 1) Broken hose section. 2) Debris stuck in hose or diaphragm. 3)A suction leak – leak in the system. 4)Plumbing valves not set correctly to give the cleaner enough flow. Is there a suction leak in the system? Possible problem areas: 1) Possible leak at pump lid. 2) Check the pump lid O-ring. 3) Possible leak in the hose. 4) Suction leak between weir and pump piping. Is the Auto Weir Valve below the water level? Check level of water. 17 1905 pacerb3 manual rev2.indd 17 2012/09/13 12:11 PM section 5 – TROUBLESHOOTING PROBLEM Your Pacer B3™ coverage is poor. For example, the cleaner does not reach parts of the pool and leaves large uncleaned patches. Or the cleaner moves in the same pattern, such as in the figure 8. Your Pacer B3™ falls on its side CHecks Solutions Is the hose affected by the return flow? Adjust the return outlet towards the bottom of the pool to make sure the jet of water does not influence the direction of the hose. Are the hoses long enough? Add more sections of hose. Hose weight location? Move the hose weight 15cm toward or away from the cleaner head to change the balance. If this doesn’t work, rather remove the hose weight. Is the float damaged? Return to your nearest pool store for checking. Is the Engine Assembly swivelling freely? Check the Diaphragm is flush with the motor housing (See pg 14). Remove Engine Assembly from main body and rinse both body and Engine Assembly with water to flush out debris. For additional assistance, contact our Customer Care Helpline on 0860 ZODIAC (0860 963 422) 18 1905 pacerb3 manual rev2.indd 18 2012/09/13 12:11 PM section 6 – Optional Accessories CYCLONIC LEAF CATCHER™ 19 1905 pacerb3 manual rev2.indd 19 2012/09/13 12:11 PM section 7 – The perfect partner for your Pacer B3™ A Salt Chlorinator from Zodiac. Installing a Zodiac Salt Chlorinator in conjunction with having a Pacer B3™, is the effortless way to having a crystal clear pool all the time. Salt Chlorinators offer both convenience and peace of mind. Zodiac technology means that you are assured of quality and product excellence. Zodiac is by far the most widely chosen brand of chlorinator available in South Africa today. Your purchase will ensure that you get the best of both worlds. Firstly, you will enjoy the convenience of a fully automatic product, which allows you to spend time relaxing at the poolside. – perfect for a modern-day lifestyle.You will also experience the fantastic soft feeling that only a salt chlorinated pool can offer. No more red eyes or itchy skin, just smiles all the way! A Heat Pump from Zodiac. Extend your swimming season and get even more pleasure from your pool by installing a Zodiac Heat Pump. The market-leading range of Heat Pumps from Zodiac utilises only the best components and materials, ensuring you total peace of mind and enjoyment of your pool. Not only does Zodiac offer the most energy efficient range of Heat Pumps available today, but also the most environmentally friendly. To find out which model and size fits your pool, contact your local Zodiac dealer, or call the Zodiac Customer Care Helpline 0860 ZODIAC (0860 963 422) or go to www.zodiac.co.za. 20 1905 pacerb3 manual rev2.indd 20 2012/09/13 12:11 PM section 8 – Getting to know you better At Zodiac, we strive to give our consumers superior quality products as well as service excellence. To help us improve, please spare a moment of your time and let us understand your needs a little better. Once you have filled in the following survey please fax a copy to (011) 314 3486. Title .................................................................................................................................. Name & Surname .......................................................................................................... Email Address ................................................................................................................. Are you male or female? ............................................................................................. Date of birth .................................................................................................................. How long have you owned your current pool? ..................................................... Do you own any other Zodiac products? ............................................................... If so, which ones? ........................................................................................................... Which of our products would you like to own? .................................................... Describe how you feel about owning a pool (love it / hate it) ......................... Why did you choose to purchase a Zodiac product? .......................................... Why did you choose to purchase your Pacer B3™? ........................................... ........................................................................................................................................... Have you ever called our Call Centre? .................................................................... If so, please rate it on a scale of 1 - 5 1. Extremely poor 4. Good 2. Poor 5. Extremely good 3. Acceptable Would you like to register for our monthly communication filled with information, tips and trends on pool care? (If yes, state here and fill in your email address above) ................................................................................................... 21 1905 pacerb3 manual rev2.indd 21 2012/09/13 12:11 PM section 9 – At your service If you are having a problem you cannot solve, mail or fax us the following information, along with a sketch of your pool shape, indicating the location of all weirs, vacuum lines, inlets, stairs, ladders, spas, waterfalls or other significant features. Briefly describe the problem in the space below. (Send a photocopy and retain this page for future use.) Mail to: Zodiac Pool Care SA, Private Bag X127, Halfway House, 1685 Fax to: (011) 314 3486 Your Name ........................................................ Tel No. ...................................... Postal Address ...............................................................................Code.............. Serial Number ........................................................................................................ Purchased from ................................................ Date of Purchase...../....../....... Pool Surface (Tick one): Plaster Vinyl Fibreglass Other If other, please stipulate ....................................................................................... Pool Size (Litres)................................................ Pump Size ............................... Type of Filter (Tick one): Sand D.E. Cartridge Filter Size (or Model No.).................................................................................... My pool looks like this Briefly describe the problem ...................................................................................... ........................................................................................................................................... ........................................................................................................................................... ........................................................................................................................................... Customer Care Helpline 0860 ZODIAC (0860 963 422) www.zodiac.co.za 22 1905 pacerb3 manual rev2.indd 22 2012/09/13 12:11 PM 1905 pacerb3 manual rev2.indd 23 2012/09/13 12:11 PM Zodiac Pool care South Africa (pty) ltd 1905 pacerb3 manual rev2.indd 24 2012/09/13 12:11 PM