1
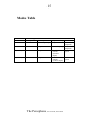
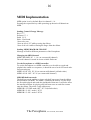
The Persephone
Analogue Fingerboard Synthesizer
User’s Manual
MESI MONSTERSYNTHS
-
2-
Table Of Contents
Cautions
Background
From the Idea to the First Steps
Connections
Synthesis Section
Control Section
Hierarchy Of Controls
Modes Table
MDI Implementation
Terms Of Warrant
CE & FCC
The Persephone, user’s manual, mesi©2006
4
5
8
10
11
12
14
15
16
17
19
-
3-
You’re now the owner of a Persephone, a wonderful new instrument
inspired by the first electronic non-keyboard instruments whilst featuring
the most advanced sensor technology. We hope you enjoy it and that it
brings a new dimension to your creativity. The Persephone is a handmade
instrument and therefore, individual units can differ from one another. For
any questions, please contact monstersynths at [email protected]
CAUTION!
Before using the Persephone,
make sure you have read the following instructions carefully,
as well as the instructions for use.
RISK OF ELECTRIC SHOCK,
DO NOT OPEN OR MODIFY THE PERSEPHONE
REFER SERVICING TO QUALIFIED SERVICE PERSONNEL.
TO REDUCE THE RISK OF ELECTRIC SHOCK,
DO NOT REMOVE COVER (OR BACK).
NON USER-SERVICEABLE PARTS INSIDE.
Do not try to repair the Persephone, its ribbon,
its expression key or its components inside.
Please contact Monstersynths for technical support.
Avoid all sharp object contact on the ribbon.
Do not use the Persephone or store it under extreme temperature conditions
or expose it to direct sunlight, damp or dusty areas,
areas prone to strong vibrations.
Before you plug in the Persephone, always check the voltage.
Protect the Persephone against violent shocks.
Before using the Persephone in a foreign country,
check if the voltage is compatible.
When the Persephone is not used, switch the unit off.
Never place heavy objects on the Persephone.
Never touch the Persephone with wet hands when it is plugged in.
Before moving the Persephone,
make sure the unit is disconnected from other devices.
Before cleaning the Persephone,
make sure the unit is switched off and not plugged in.
During lightning, unplug the Persephone.
The Persephone, user’s manual, mesi©2006
-
4-
Background:
The Idea Of the Persephone
Keyboards have become the prime user interface for controlling
synthesizers. But the supremacy of keyboard interfaces has not always been
so throughout synthesizer history… Let’s go back to these other concepts
which are now part of our cabinet of curiosities...
Since the dawn of electronics and the creation of the first electronic
oscillators, scientists have been aware of the potential of electronics for
generating sounds and many of them have tried to create electronic musical
instruments with more or less success. The introduction of filters and VCA
soon enabled to play tremolos and vibratos which could recreate the
musicality of classical instruments. And in an attempt to control these
parameters, these new instruments opened the field of the research for new
controls beyond the possibilities that a generic keyboard could offer. The
fact that most of the non-keyboard instruments with their new controllers
required a new playing technique explains why they remained unpopular
with musicians who had little time to practice on unusual keyboards, the
Telharmonium 36-note-per-octave keyboard designed by Cahill for
example. Some others, like Leon Theremin, set up classes where their new
instruments would be taught. The 1920s remain the most fertile years for the
evolution of electronic music instruments with the invention of new controls
like dial-operated non keyboard electronic instruments or ribbon controlled
instruments.
In Russia, Lev Sergeyevich Termen developed the Theremin using the body
capacitance as a control mechanism and thus freeing the performer from the
keyboard and fixed intonation. He also created the first fingerboard cellos.
In France and in Germany, a whole family of dial-operated non keyboard
electronic instruments was developed. Among them, René Bertrand and
Edgard Varèse’s Dynaphone or Jörg Mager's Electrophon and Sphärophon.
The Persephone, user’s manual, mesi©2006
-
5-
At the end of the 1920s, the fingerboards – or ribbon controllers - were to
appear with Les Ondes Martenot designed by the French Maurice Martenot
which included both a seven-octave keyboard and a ribbon controller that
allowed pitch inflections similar to a voice or string instrument. It allowed
for a wide glissando when the player moved a finger ring attached to the
metal ribbon that controlled frequency. Hundreds of symphonic works,
operas, ballets, and film scores were composed for this instrument by
Varèse, Honneger and Messiaen. Since that, ribbon controllers have had a
long and distinguished history in electronic musical instruments.
Peter Lertes, an electrical engineer in Leipzig and Bruno Helberger,
developed the Hellertion, also one of the first electronic instruments to use a
fingerboard continuous controller instead of a keyboard. The fingerboard
was a flat metal resistance strip covered in leather which when pressed
closed a circuit. Depending on where the strip was pressed, a different
resistance in the circuit was created altering the voltage sent to the oscillator
and thereby producing different pitches. The force of the pressure controlled
the volume of the output signal. The fingerboard was marked to help the
performer find the correct pitch on the strip and had a range of
approximately five octaves. The original instrument had just one
fingerboard strip which was gradually increased to four and then on the later
models, six aligned in parallel horizontally at the height of a piano
keyboard. The four and six strip models allowed four and six voice
polyphony when the strip could be played simultaneously with fingers and
thumbs.
The Trautonium was the first instrument to ally position and pressure
control. Created in 1931 by Friedrich Trautwein, the Trautonium used filters
to modify the timbre of the note and a keyboard, just like Les Ondes
Martenot. The Original Trautonium had a fingerboard consisting of a
resistance wire made of a tube of graphite stretched over a metal bar marked
with a chromatic scale and coupled to a neon tube oscillator. When the
performer was pressing the wire, it would touch the bar and close the circuit.
The oscillator was amplified via a loudspeaker. The position of the finger on
the wire determined the resistance controlling the frequency and therefore
controlled the pitch of the oscillator. The Trautonium had a three octave
range that could be transposed by means of a switch.
The Persephone, user’s manual, mesi©2006
-
6-
An additional series of circuits could be added to control the timbre of the
note by amplifying the harmonics of the fundamental note, non harmonic
partials could also be added by selective filtering. This unique form of
subtractive synthesis produced a tone that was distinctive and unusual when
compared to the usual heterodyning valve instruments of the 1920-30s. The
foot pedal of the machine controlled the overall volume. The "Sonar",
developed by N. Anan'yev in the USSR from 1930 also had a fingerboard
continuous controller to vary the pitch of the oscillator.
After the 40s, the general use of keyboards (and the war) slowed down the
research of new types of controls. Ribbon controllers were back in the 1960s
with Moog ribbon controllers which Keith Emerson was famous for
attaching to a pyrotechnics control. The Theremin-like sound in the Beach
Boys' song "Good Vibrations," was played by a ribbon-controlled
instrument called the Electro-Theremin which the Beach Boys have later
replaced by a Moog ribbon controller with a Moog synthesizer in live
performances.
Between the mid-1970s and mid-1980s, several different types of nonkeyboard synthesizer controllers were developed, in particular percussion,
guitar and wind. Only a few synthesizers from the 1980s had other types of
controls: the Yamaha CS80’s ribbon controller, which unlike pitch-bend
wheels and the Moog ribbon controller design, has no centre position.
Kurzweil also included ribbon control to their synths, the Korg Prophecy as
well. Some more controllers have been designed in the 1980s, but remained
very uncommon. Michel Waisvisz developed The Hands, during the early
1980s at STEIM in Amsterdam.
At the turn of the 21st century, new possibilities arose with the development
of sensor technology and new computer controls while the development of
powerful flexible sensor interfaces like the eobody developed by
eowave/Ircam was transcending the limits of traditional controls… And this
new taste for other sorts of control has entered the world of electronic music
with controllers like the Kaoss Pad or tactile surface controllers.
The Persephone, user’s manual, mesi©2006
-
7-
From the Idea to the First Steps:
A choice of technology
We decided to work on a contemporary version of a fingerboard
instrument, using the latest controls today’s technology would bring but
preserving the best of analogue sound generators. The Persephone reminds
us of the first electronic instruments. It is made of noble woods with its
wenge exotic wood expression key, its birch panel and its oak wooden
sides. Beyond this vintage look, the Persephone allies sensors technology
and digital controls to a pure analogue generation of sound.
With its analogue oscillator, the Persephone can generate notes with a range
of 10 octaves, which goes from a deep and resonant cello tone to a nearly
human voice. And on the highest pitches, it can reach very high
frequencies. The oscillator waveform can be set between triangle and
sawtooth for a more or less brilliant sound.
Its ribbon virtual control surface requires the most advanced sensor
technology and allows all kinds of glissando a Theremin or Les Ondes
Martenot would allow, though the sensored ribbon is much more precise
than the tube full of graphite used as a variable resistance in the
Trautonium. A scaling potentiometer allows scaling the Persephone’s
ribbon from 1, 2, 5 to 10 octaves.
The expression key, controlled by an optical sensor can transmit the
slightest vibrations on the key with an accuracy the mechanical systems
never had. All the controls are digital.
The four play modes - A, B, C and D - offer different hierarchy of control
between the pitch, the velocity, a filter modulation and an LFO.
The Persephone, user’s manual, mesi©2006
-
8-
The first prototype was presented in January 2004 at the Winter NAMM
Show in Los Angeles and in April 2004 at the Frankfurt Musik Messe. Two
years later, the final version has been released with many improvements and
new functions, like MIDI in & out, full tone and half tone modes… The
design has also been improved allowing a full accessibility to the control
panel. The buttons are on the left side of the control panel, directly
accessible with the left hand, while the right hand can keep playing.
Connections are located on the rear side of the control panel and protected
from dust and other sources of deterioration by the Persephone suitcase top
when closed. Two versions of the instrument have been released: a desktop
version and a suitcase version (classic or the colourful punk-rock version).
Just like on a Theremin, the way the Persephone is played will define the
instrument’s personality. The Persephone follows the traditional playing
style of the first non-keyboard electronic instruments with the right hand
controlling the pitch and the left hand controlling the velocity. The ribbon
zone size allows all kinds of playing technique. When scaled, the
Persephone can be played like a regular keyboard. Though there are no
fixed preset notes on the ribbon, keyboard players will easily find their way.
Nevertheless, it is possible to add some reference marks noted on a strip of
white tape. (In this case, only use alcohol to remove the glue of the tape).
Guitar and bass players will certainly play it like a chord instrument and get
sounds that are close to cello or violin, especially when using vibratos. Jazz
players will enjoy slapping the Persephone’s ribbon to get wonderful
sonorities.
The Persephone, user’s manual, mesi©2006
-
9-
Connections
Connections are located on the rear side of the control panel and protected
from dust and other sources of deterioration by the Persephone suitcase top
when closed. For the desktop version, we recommend to cover the unit with
a cloth when not used to avoid dust. To remove dust from the unit, make
sure the unit is turned off and clean it with a damp cloth only.
220V/110V
The Persephone has either a 220V or a 110V internal power supply. The
220V or 110V voltage is specified on the rear side. Always check the
voltage before plugging the unit in, especially if you are in a foreign
country. Never open the unit when it is switched on.
on/off
To turn the unit on, flick the on/off switch. When on, the LED on the front
panel is on.
Fuse
The Persephone has an internal fuse to avoid the risk of damages.
Pedal in
You may plug an expression pedal into the Pedal in jack 6,35 input. With
this pedal, you will be able to control the volume, but also the LFO
frequency in mode C (See Modulation section, Mode C).
out
out is the main audio out. Plug it to your amplifier audio in.
Beware! Plugging the audio out into the Pedal in will shut the
Persephone down and may be a cause of severe damages to the unit.
Recommended amplifier type
You may use all types of guitar amplifier. The Persephone sound generator
is 100% analogue, therefore, it can reach very high frequencies. Always turn
down the volume of your amplifier when you first play the Persephone to
avoid any damage to your loud speakers. If you add a little reverberation to
the sound it will sound great.
MIDI in/out
Connect to your MIDI devices to use the Persephone as a MIDI controller.
(See MIDI implementation).
The Persephone, user’s manual, mesi©2006
-
10
-
CV
Connect the CV out to the CV in of another analogue synthesizer to control
it with the Persephone. For a CV connection, the pitch is on the tip and the
velocity on the ring.
The Persephone, user’s manual, mesi©2006
-
11
-
Synthesis Section
The Persephone has all the functions of a synthesizer with signal processing
sections with an oscillator (and its common functions tune, finetune, wave,
velocity, volume), a low-pass filter which modulates the oscillator
(modulation, filter freq), an LFO. The synthesis section is 100% analogue.
Osc section
wave – tune – finetune - volume
The sound of the Persephone is generated by a 100% analogue oscillator.
Like all analogue oscillators, its sound can differ depending on temperature
conditions.
Wave: two waveforms from triangle to sawtooth.
Tune: tunes the oscillator
Finetune: adjusts the finetune of the oscillator
Volume: adjusts the main volume
Filter section
FilterFreq - modulation
Low-pass filter: The Persephone has an analogue 6dB low-pass filter which
modulates the sound source. You can set the filter frequency with the knobs
‘filterfreq’ and its modulation amount with the knob ‘mod’
Filter: The knob ‘filterfreq’ sets the frequency at which the filter opens and
closes.
Modulation: The knob ‘modulation’ sets the modulation amount the filter
has on the sound source.
LFO section
Mode C & D – volume
On Mode C and D, the sound source will be modulated by an LFO you may
control via an expression pedal connected to the Pedal In of the Persephone
to create tremolos and vibratos.
The Persephone, user’s manual, mesi©2006
-
12
-
Control Section
The Persephone controllers are 100% digital. The Persephone has four
control tools: the ribbon which allows pressure and position control, the
expression key and the volume pedal.
Ribbon
CAUTION! The ribbon is very fragile. Avoid sharp object contact with the
ribbon. Do not try to remove the ribbon from the panel. To clean the ribbon,
use a dry cloth.
The ribbon responds to changes in voltage or resistance caused by changing
the finger position along its surface. The Persephone ribbon controller is
also able to record pressure or velocity. The ribbon is a linear potentiometer
that generates different control voltages depending on where it is touched.
These changes in voltage are applied to the voltage-controlled oscillator and
the filter. The voltage fluctuations are also translated into binary data and
used to control digital modulation.
Scale: allows scaling the Persephone’s ribbon from 1, 2, 5 to 10 octaves.
The Persephone can generate sounds beyond the frequencies human beings
can hear. Your pets may be very sensitive to some high frequencies…
Position: the position of your finger will determine the pitch of the note
played.
Pressure: the pressure of your finger will control the velocity (mode A) or
the amplitude (mode B, C, D) of the note played.
In all the modes A, B, C and D, the position on the ribbon will always
determine the pitch. In mode A, the pressure on the ribbon will control the
velocity of the note, (the filter frequency being controlled by the pressure).
In all other modes, the pressure controls the amplitude of the note.
The Persephone, user’s manual, mesi©2006
-
13
-
Expression key
The wenge expression key controls the filter. Its optical sensor is able to
reproduce the slightest movement of the key. A great control tool for
tremolos.
In mode A, the expression key will control the amplitude of the note,
reminding us of Les Ondes Martenot expression key.
In mode B, the expression key will control the filter frequency for the
velocity.
In mode C, the expression key will control the modulation amount of the
LFO depth on the amplitude of the note to modulate a tremolo.
In mode D, the expression key will control the modulation amount of the
LFO depth on the pitch of the note to modulate a vibrato.
Expression pedal
An expression pedal can be connected to the Pedal in at the rear side of the
Persephone to control the volume (modes A and B) or the LFO speed
(modes C and D).
In modes A and B, the expression pedal will control the volume of the note.
In mode C, the expression pedal will control the modulation amount of the
LFO speed on the amplitude of the note to modulate a tremolo.
In mode D, the expression key will control the modulation amount of the
LFO speed on the pitch of the note to modulate a vibrato.
The Persephone, user’s manual, mesi©2006
-
14
-
Hierarchy Of Controls
Mode A, B, C & D
Mode A
In mode A, the Persephone will play the ‘classical way’ with the right hand
controlling the pitch via the position on the ribbon and the filter frequency
via the pressure on the ribbon. The left hand on the expression key plays on
the amplitude of the note while the pedal controls the volume.
Mode B
In mode B, the pitch is determined by the position of the fingers on the
ribbon, just like in the other modes. The pressure on the ribbon will
determine the amplitude of the note. The expression key will control the
filter frequency while the pedal controls the volume.
Mode C or tremolo mode
The particularity of mode C is the tremolo. The ribbon controls are the same
as in mode B with the position on the ribbon determining the pitch and the
pressure controlling the amplitude of the note. The tremolo is reproduced by
the action of the LFO on the amplitude of the note. The tremolo parameters
(depth and speed) will be controlled by the expression key (tremolo depth)
and the pedal (for the tremolo speed).
Mode D or vibrato mode
The particularity of mode D is the vibrato. The ribbon controls are the same
as in mode B and C with the position on the ribbon determining the pitch
and the pressure controlling the amplitude of the note. The vibrato is the
action of the LFO on the pitch of the note. The vibrato parameters (depth
and speed) will be controlled by the expression key (vibrato depth) and the
pedal (for the vibrato speed).
The Persephone, user’s manual, mesi©2006
-
15
-
Modes Table
Mode
A
Control types
Ribbon position
Pitch
Ribbon pressure
Filter frequency
Expression key
amplitude
B
Pitch
amplitude
Filter frequency
C (tremolo)
Pitch
amplitude
D (vibrato)
Pitch
amplitude
Modulation
amount
(Tremolo
depth)
Modulation
amount
(Vibrato depth)
The Persephone, user’s manual, mesi©2006
Pedal
Volume/
amplitude
Volume/
amplitude
Tremolo
speed
Vibrato
speed
-
16
-
MIDI Implementation
MIDI option is set by default. Receive channel 1- 16
Pressing the expression key while powering up the unit will disactivate
MIDI.
Sending Control Change Message
Key CC-7
Pressure CC-1
Pedal CC-2
Pitch – Pitch bend
Note to be sent
Note on 60/vel 127 while pressing the ribbon,
Note of 60/vel 0 while releasing the finger from the ribbon
Sending MIDI PROGRAM CHANGE
Message will affect different parameters of the Persephone
Changing the MIDI channel
MIDI CHANNEL PC 1 –16 (on current midi channel)
The midi channel is stored in an non volatile flash ram
Use the Persephone as a MIDI controller
To use the Persephone as a MIDI controller or to be able to record and
playback the sound on a sequencer, it should be set to local OFF mode after
each powering up.
MIDI LOCAL ON PC 20 (on current midi channel) (default value)
MIDI LOCAL OFF PC 21 (on current midi channel)
MIDI KB half tone mode
The half tone mode enables to trigger only half tone notes from the ribbon
and send them via MIDI. The mode 1 calculates the nearest 1/2 tone from
the first pitch played and sends the pitchbend of that note. It will also affect
the internal oscillator by playing only half tone notes at each first contact
onto the ribbon. The mode 2 only sends notes.
MIDI KB 1/2 TONE mode OFF PC 22 (default value)
MIDI KB 1/2 ON mode 1 PC 23
MIDI KB 1/2 ON mode 2 PC 24
The Persephone, user’s manual, mesi©2006
-
17
-
Terms of Warrant
The Persephone has a one year term warrant after the date of purchase.
Shipping the unit back to MESI will be at the charge of the owner. Any
damage resulting from misuse of the instrument is not covered by the
warrant.
MESI MONSTERSYNTHS Team
The Persephone has been designed and developed by Marc Sirguy,
MESI/eowave CEO.
Aesthetic design, manual, marketing and export: Emmanuelle Gallin.
German version of the manual: Robert M. Heininger.
Special thanks to Gabriel Zurini for his help with the first prototypes and for
his helpful hints. Thank you to all who have shown their interest since the
very beginning of this project.
Contact & Support
MESI
6, rue Marceau - 94200 Ivry-sur-Seine – France
Tel: +33/1 45 15 41 95 - Fax : +33/1 45 15 07 24
[email protected] – www.eowave.com - www.monstersynths.com
CE & FCC Information
1.
Important notice: do not modify this unit. This product, when installed as
indicated n the instructions contained in this manual, is compatible with the CE
norm & FCC requirements.
2.
Important! When connecting this product to accessories or/and to another
product, use only high quality shielded cables. Cables supplied with this product
must be used. Follow all installation instructions. Failure to follow instruction
could void your FCC authorization to use this product in the USA.
3.
Note: this product has been tested and found to comply with the
requirements listed in the FCC Regulations, Part 15 for Class B digital devices &
in The European Standart EN 50081-1 on Electromagnetic Compatibility –
Generic emission standart on residential, commercial and light industry.
Compliance with these requirements provides a reasonable level of assurance that
the use of this product in a residential environment will not result in harmful
interference with other electronic devices.
The Persephone, user’s manual, mesi©2006
-
18
-
MESI
MONSTERSYNTHS
6, Rue Marceau
94200 Ivry-sur-Seine
France
The Persephone, user’s manual, mesi©2006