1
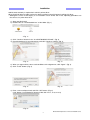
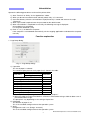
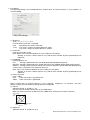
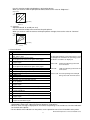
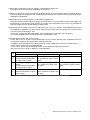
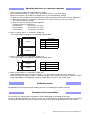
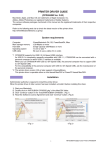
PRINTER DRIVER GUIDE
(For Macintosh® CP-D80DW series)
Macintosh, Apple, and Mac OS are trademarks of Apple Inc.
Adobe, Adobe Photoshop are registered trademarks of Adobe Systems.
The various software packages mentioned in this manual are the registered trademarks of their
respective companies.
Refer to the following web site to check the latest version of the printer driver.
http://www.MitsubishiElectric.co.jp/vcp/support/driver_en.html
You can not use different version of the driver at the same time.
When the driver has already installed, uninstall it and then install this driver.
System requirements
Computer
: PowerMacintosh G4, G5, PowerBookG4, iMac, Mac mini,
MacBook, MacBook Pro, Mac Pro
Main storage memory : 512 Mbytes or more
Hard disk
: Empty capacity 512 Mbytes or more
Operating system
: 10.5, 10.6, 10.7, 10.8, 10.9*2
*1
USB cable
: Be sure to use a cable 2m or shorter.
* Use the printer driver in an environment that your operating system works properly.
*1: CP-D80DW series printer supports USB 2.0 (Hi-Speed USB) interface. As USB 2.0 is fully upwardcompatible with USB 1.1, CP-D80DW series printer can be used with a personal computer that
supports USB 1.1 interface.
To use CP-D80DW series printer based on USB 2.0 (Hi-Speed USB), connect with a personal
computer that supports USB 2.0 (Hi-Speed USB). For USB 2.0 (Hi-Speed USB) compatibility of your
personal computer, contact the manufacturer of the personal computer.
*2: This printer driver supports UniversalBinary.
This printer driver is operable either on Intel-based Mac OS X or PowerPC-based Mac OS X.
1
MITSUBISHI Digital Color Printer CP-D80DW series
Installation
Administrator authority is required to install this printer driver.
When the printer driver of older version has been installed, uninstall it before installing this driver.
* Although the screen of the display is an installation screen of Mac OS X 10.6, operating procedures are
the same as any other Mac OS X.
1) Start your Macintosh.
2) Double-click on “CP80MacOSX10.5” of the folder. (Fig. 1)
<Fig. 1>
3) Click “Continue” button in the “Install MITSUBISHI CPD80D.” (Fig. 2)
4) Read the Software License Agreement and click “Continue” button. (Fig. 3)
<Fig. 2>
<Fig. 3>
5) When you agree with the terms and conditions of the Agreement, click “Agree.” (Fig. 4)
6) Click “Install” button. (Fig. 5)
<Fig. 4>
<Fig. 5>
7) Enter a name and password, and click “OK” button. (Fig. 6)
(“OK” button: “Install Software” button in Mac OS X 10.7, 10.8, or 10.9)
<Fig. 6>
2
MITSUBISHI Digital Color Printer CP-D80DW series
8) Click “Continue Installation.” (Fig. 7)
9) Click “Restart” to restart the personal computer. (Fig. 8)
<Fig. 7>
<Fig. 8>
10) Turn on the printer and connect it with the personal computer.
11) Click “System Preferences” to display “System Preferences” screen. (Fig. 9)
12) Click “Print & Fax” on “System Preferences screen.”
The installed printer is automatically added to the “Printers.” (Fig. 10)
(“Print & Fax”: “Print & Scan” in Mac OS X 10.7 or 10.8, and “Printers & Scanners” in Mac OS X 10.9)
* This printer is added in the name of “MITSUBISHI CPD80D.”
<Fig.9>
<Fig.10>
<Notes on installation on Mac OS X 10.8 or 10.9>
The following correspondence may be necessary at the time of installation to Mac OS X 10.8 or 10.9.
Please install according to follows.
1. When attempting to install the Mac OS X driver downloaded from web site
You may receive a message window that shows “ “CP80MacOSX10.5” can’t be opened becauce it is
from an unidentified developer.” during installation is displayed.
In this case, click “OK” button on this window and follow the steps below.
1) Click the installer package while holding Control key.
2) Click “Open” on the context menu.
3) Click “Open” button on the message window that shows “ “CP80MacOSX10.5” is from an
unidentified developer. Are you sure want to open it?.”
Installation will start.
2. About operation after the installation completion of the driver
After the installation completion of the driver, please operate follows.
1) After completion of the driver installation, open “System Preferences” and select “Print & Scan.”
2) Select the installed printer in the printer list and click “Open Print Queue…” button.
(“Print & Scan”: “Printers & Scanners” in Mac OS X 10.9)
3) Click “Repair” button (Fig.11).
The Printer becomes available.
<Fig. 11>
3
MITSUBISHI Digital Color Printer CP-D80DW series
Uninstallation
Operate the following procedures to uninstall the printer driver.
1) Start “Terminal” of “Utility” in the “Applications” folder.
2) When you do not have administrator authority, obtain it by “su” command.
3) Go to the directory where the uninstallation script (Rem80.sh) is stored and execute the script.
./Rem80.sh
4) When a password is required, enter the password for the administrator.
5) When uninstallation is completed successfully, the following message is displayed.
Uninstallation was completed.
Is a computer rebooted?” (Y/N):
6) Enter “Y” or “y” to reboot the computer.
If the computer is not rebooted automatically, exit the ongoing applications and reboot the computer
manually.
Function explanation
1. Page Setup dialog
<Fig. 12 Page Setup dialog>
1) Paper Size
The size of paper is selected.
The number of print pixels for each paper size is shown in the table.
Paper size
Print dots
10x15 (4x6”)
10x15 (4x6”)
1228x1864
5x15x2 Type1 (2x6”x2)*1
*2
10x15 (4x6") white border
1086x1676
10x15x2 Type1 (4x6”x2)
1864x2730
13x13 (5x5”)
1524x1568
13x18 (5x7”)
1568x2128
1380x1986
13x18 (5x7”) white border*2
15x15 (6x6”)
1820x1864
15x20 (6x8”)
1864x2422
1676x2280
15x20 (6x8”) white border*2
614x1864
5x15x2 Type2 (2x6”x2)*1
*1: For the print, see “Operating directions for customer’s purpose.”
*2: When the paper size with white border is selected, a white border having a width of about 5 mm is
printed around the image.
The print pixels vary depending on the setting of Paper Size.
2) Orientation
The direction of paper is set.
This is the standard setting function of the operation system.
3) Scale
Enlargement scale is set. (Range : 25-400%)
This is the standard setting function of the operation system.
4
MITSUBISHI Digital Color Printer CP-D80DW series
2. Print dialog
The following settings can be configured when “Feature Sets” of “Printer Features” is set to “Options” in
the Print dialog.
<Fig.13 Print dialog>
1) Sharpness
none / -3 / -2 / -1 / 0 / 1 / 2 / 3
Level of outline correction is changed.
none
:Not perform the outline correction.
-3 to 3 :The value is smaller, the outline becomes softer.
The value is larger, the outline becomes sharper.
2) PrintFinish
Printing is finished in matte.
Note: Matte is only recommended for an even number of 10x15 prints.
* Printing an uneven number of prints may lead to lower number of prints produced per ink
ribbon kit.
3) PrintSpeed
Printing speed is set.
Fine
: Printing is performed at the standard speed. (Standard quality picture)
SuperFine : Printing is performed at the speed slower than the standard speed. (High quality picture)
UltraFine : Printing is performed at the speed slower than the SuperFine speed. (Ultra high quality picture)
* When matte is selected, the Fine speed cannot be set.
Note: Fine is only recommended for an even number of 10x15 prints.
* Printing an uneven number of prints may lead to lower number of prints produced per ink
ribbon kit.
4) Color conversion
none / Table1
none
:Color conversion is not performed.
Table1 :Color conversion is performed.
When “Feature Sets” of “Printer Features” is set to “Gamma”, “Brightness”, or “Contrast”, the menu
display changes and the following settings become configurable.
5) Gamma
Adjusted value R, G, and B (-5 - +5)
Use this function to adjust the density of the middle tones.
When you want to increase the density of the middle tones, decrease the value of “Gamma”.
(Output data)
255
White Larger
Smaller
0
Black
255(Input data)
White
Gamma
6) Brightness
Adjusted value R, G, and B (-64-+64)
5
MITSUBISHI Digital Color Printer CP-D80DW series
Use this function to adjust the brightness of the print picture.
When you want to make the print picture darker, decrease the value of “Brightness”.
(Output data)
255
White Larger
Smaller
0
Black
Brightness
255(Input data)
White
7) Contrast
Adjusted value R, G, and B (-64-+64)
Use this function to adjust the contrast of the print picture.
When you want to make the contrast of the print picture stronger, increase the value of “Contrast”.
(Output data)
255
Larger
White
Smaller
0
Black
255(Input data)
White
Contrast
3. Error indication
No.
Error dialog message
1 Printer is not connected.
2 The printer does not respond. Turn the printer Off and then On
again, and try again.
3 Something is wrong with the printer.
Turn the printer Off and then On again, and try again.
4 Mechanical Error.
Set paper again.
5 Mechanical Error.
Turn the printer Off and then On again, and try again.
6 Printing unit is opened.
7 Printing unit is opened while printing.
8 Ink ribbon and paper type do not match.
9 Ink ribbon is not correctly installed.
10 Ink ribbon end.
11 Paper empty.
12 The ink ribbon is not standard.
13 The printer was turned off while printing.
Turn on a printer.
14 Paper jam.
Set paper again.
15 Paper size of printer driver and ink ribbon type do not match.
16 Ink ribbon empty.
Exchange ink ribbons.
17 Paper end.
18 It is not equipped with the paper strip bin.
19 Ink ribbon error.
Set paper again.
20 Ink ribbon error.
Set paper and ink ribbon again.
Operation
When the error is resolved, printing restarts.
The print job operations of the Print Queue screen
are equipped as standard in the operating system.
The buttons as follows are displayed.
Delete Job:
Deletes the job being selected in
the Print Queue.
Hold Job:
Holds the job being selected in the
Print Queue.
Resume Job: Resumes printing of the held job
being selected in the Print Queue.
* The error dialog messages are displayed in the Print Queue screen of “MITSUBISHI CPD80D” which is
displayed by clicking the “Open Print Queue” button in “Print & Fax.”
* When no error message is displayed on the monitor and printing is not carried out, check the indicators
on the front of the printer.
* For the details of the indicators on the printer, see the operation manual of CP-D80DW series printer.
6
MITSUBISHI Digital Color Printer CP-D80DW series
Notes
1) Secure of Hard disk for spool file
Secure the capacity of Hard disk for spool file enough for the printer operation and the number of
printing sheets.
The printing cannot be correctly carried out when the capacity is running short.
The drive for spool file is the same drive as the system drive usually.
2) Operation of the printer
Refer to the operation manual of the printer.
Do not turn off the power switch during data transfer or print.
If you turn off the power switch, restarting of a computer may be needed.
When deletion of a printing data cannot be performed, restarting of a computer is required.
3) About connection of a computer and a printer
Do not disconnect the interface cable during data transfer.
If the interface cable is disconnected, wait 1 minute or more after disconnecting the cable to connect
it again. If the cable is connected without leaving an enough interval, the printer driver may not work
correctly.
4) System requirements for USB interface
Use a personal computer that are USB-guaranteed by the manufacturer.
CP-D80DW series printer supports USB 2.0 (Hi-Speed USB) interface. As USB 2.0 is fully upwardcompatible with USB 1.1, CP-D80DW series printer can be used with a personal computer that supports
USB 1.1 interface.
To use CP-D80DW series printer based on USB 2.0 (Hi-Speed USB), connect with a personal computer
that supports USB 2.0 (Hi-Speed USB). For USB 2.0 (Hi-Speed USB) compatibility of your personal
computer, contact the manufacturer of the personal computer.
5) Connection of USB cable
When you take out and insert a USB cable after installation of a printer driver, wait 10 seconds or more
after extracting a cable.
If the cable is reinserted without leaving an interval, the printer may not operate normally.
6) Print job
Do not delete the print job in the spooler during data transfer. When deleting it, do not start printing until
the printer becomes to the initial status.
7) Number of prints
With some applications, the number of prints set by the printer driver does not work. Set the number of
prints from the print dialog box of the application.
8) Errors during printing
When an error occurs during printing, it may not be displayed on the monitor. Check the indicator on the
front of the printer and take the countermeasure, and then start printing procedure again. For the indication by the indicator of the printer and the countermeasure, see the operation manual of the printer.
9) When “Resume Job” is selected after “Hold Job” is performed in the Print Queue screen, an error may
not be displayed even if it occurs. In this case, select “Hold Job” and resolve the error, then click “Resume
Job” to resume printing.
10) “Add” of the “Printer List”
In some version of Mac OS X, you may not print images with the printer registered by the “Add” button.
Make the computer recognize the printer by the procedure described in “Installation.”
11) When the printer is turned off or a USB cable is not connected to the printer, the printer stauts may be
displayed as standby. However, it does not affect the further printing oprations.
12) In Mac OS X 10.6, when an error job is deleted without resolving the error, the error indication in the Print
Queue may not be cancelled even if the error is resolved. In this case, delete the printer from the printer
list, and then add it again to cancel the error indication.
7
MITSUBISHI Digital Color Printer CP-D80DW series
13) When the 5x15x2 (2x6”) (Type1 or Type2) is selected for the paper size
The paper cut position may shift depending on the printer.
14) When you pause or resume the printing or delete the job in the Print Queue while the printer driver is
communicating with the printer such as during the printer error, the communication may fail and the deleted job may be printed.
15) When the 10x15 or 5x15x2 Type2 is selected for the paper size
When the number of printed pictures (pages) or that of copies is set to an odd number, a blank page may
be printed in case of 5x15x2 Type2 and the last 1 page may be printed in case of 10x15, if you delete or
pause the job in the Print Queue during the printer error.
16) When the size mismatch error occurs in Mac OS X 10.7, 10.8, or 10.9 (See 3. Error indication No.15) and
the failed job is deleted in the Print Queue without resolving the error, the printing may not be started
even when the next print job is sent.
In this case, connect the USB cable again. The error indication is canceld in the Print Queue.
If you keep the USB cable connected, printing is started after a while.
17) Error indication in Mac OS X 10.8 or 10.9
In Mac OS X 10.8 or 10.9 the screen displaying the error and the printing state are different from the
conventional OS due to the specifications change of the OS.
In addition, when the original error dialog message is long, middle of the sentence is expressed as “…”,
and the whole sentence may not be displayed.
In such cases, please refer to followings for the screen display and the whole sentence.
(No. is the No. that is shown in Table of 3. Error indication)
No.
2
3
*1
5
Error dialog message
Whole sentence
Screen display (10.8)
Screen display (10.9)
The printer does not respond.
Turn the printer Off and then
On again, and try again.
The printer does not respond. Same as Mac OS X 10.8
T…and then On again, and try
again.
Something is wrong with the
printer.
Turn the printer Off and then
On again, and try again.
Something is wrong with the
pri…and then On again, and
try again.
Mechanical Error. Turn the
printer Off and then On again,
and try again.
Mechanical Error. Turn the
Same as Mac OS X 10.8
print…and then On again, and
try again.
Something is wrong with the
pri…nd then On again, and try
again.
*1: When No. 3 screen display clicks the [i] mark of the screen top, the whole sentence is displayed.
8
MITSUBISHI Digital Color Printer CP-D80DW series
Operating directions for customer’s purpose
1. When you want to adjust the color of the print image.
Set the following settings in “Feature Sets” of “Printer Features” in the Print dialog.
(Note that the effects are invalid on the display even if you make following setting.)
1) When you want the density of entire print picture to be thick (dark), decrease the value of “Brightness”.
2) When the print picture is out of focus (the contrast is weak), increase the value of “Contrast”.
The contrast becomes stronger.
3) When you want to change the color of printout.
Change the value of “Brightness”.
Increase Red
:Increase the “R” value.
Increase Green
:Increase the “G” value.
Increase Blue
:Increase the “B” value.
2. When “10x15x2 Type 1” is selected in “Paper size”
Lay out the image 1 and image 2 as following and print them.
x
z y
Image 2
y
Image 1
Y
Y
x
y
z
Print dots
2730
1864
1228
1266
3. When “5x15x2 Type 1” is selected in “Paper size”
Lay out the image 1 and image 2 as following and print them.
x
y
Image 2
y
Image 1
Y
Y
x
y
Print dots
1228
1864
614
4. When “5x15x2 Type 2” is selected in “Paper size”
When multiple images are selected in “Preview”, etc., the images are printed in 5x15 (2x6”) size.
When the number of pages or copies is odd, the last print of 5x15 (2x6”) size paper is output as a blank
page. Depending on the application software, a blank page may be set every other page.
Prohibition matter
We prohibit Reverse Engineering, decompiling or reverse assembling of this driver software.
Exemption from responsibility
Occasionally, this software does not operate normally depending on operating environment.
Moreover, Mitsubishi Electric Co. will not assume any responsibility for damage (including, but not limited
to, lost profit or damage caused from special circumstances etc.) occurring during the use of this driver.
9
MITSUBISHI Digital Color Printer CP-D80DW series