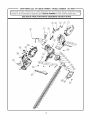
1
OPERATOR'S
MANUAL
MANUEL DEL OPERADOR
II:RR FTSHRN I
22" 4.0A ROTATING
HEDGE
TRIMMER
559 MM 4.0A CORTADORA DE ORILLAS ELI_CTRICA
Model No.
138.98977
NQmero de modelo
138.98977
A
Alt
WARNING:
To reduce the risk
of injury, the user must read and
understand
the operator's manual
before using this product.
A
411
ADVERTENCIA:
Para reducirel
riesgo de lesiones, el usuario debe Jeer
y comprender
el manual dei operador
antes de usar este producto.
Customer Help Line: 1-888-266-7096
Tel_fono de atenci6n al consumidor: 1-888-268-7096
Sears Brands Management
Corporation,
Hoffman
Estates, IL 60179 USA
Visit the Craftsman
web
page: www.craftsman.com
Visite et sitio web de Craftsman:
www.craftsman.com
Q
Save this manual for future reference
Guarde
este
manual
para
futuras
consulta
218549
ENGLISH
ESPANOL
• Warranty ...................................................................
• Garantia ...................................................................
2
• Introduction ...............................................................
• Introducci6n ..............................................................
2
• General Safety Rules ................................................
• Reglas de seguridad
generales ................................
3
• Specific Safety Rules ................................................
• Reglas de seguridad
especificas .............................
5-6 • Simboles ...............................................................
• Symbols ................................................................
• Electrical
..................................................................
• Aspectos electricos ..................................................
• Caracteristicas ..........................................................
• Features ....................................................................
8
9
• Armado ....................................................................
• Assembly ...................................................................
9-10 • Funcionamiento
• Operation .............................................................
• Maintenance ............................................................
11 • Mantenimiento
• Illustrated parts list .............................................
..................................................
9
10-11
........................................................
12
12-13 • Figura numeras (ilustracienes) ..................................
• Figure numbers (illustrations) ....................................
• Parts Ordering / Service ...........................
5
6-7
• Pedidos de piezas / Servicie ............... Pag. posterior
Back Page
CRAFTSMAN _°_
"I3NO YEAR FULL WARRANTY
FOR TWO YEARS from the date of purchase, this hedge trimmer is warranted against any defects in material or
workmanship. Defective product will be replaced free of charge.
For warranty
coverage
details to obtain free replacement,
visit the web site: www.craftsman.com.
This warranty is void if this product is ever used while providing commercial services or if rented to another person.
This warranty
gives
you specific
Sears Brands Management
GARANTiA
legal
rights,
Corporation,
and you may also have
Hoffman
other
rights
which
vary from
state
to state.
Estates, tL 60179
COMPLETA DE DOS AI_IOS CRAFTSMAN _°_
Este podadora de setos tiene garantia por cualquier defecto en material o mano de obra DURANTE
desde la fecha de compra. Los productos defectuosos se remplazaran sin cargo.
Para conocer los detalles
web: www.craftsman.com.
sobre la cobertura
de la garantia
para obtener un remplazo
gratuito,
DOS ANOS
visite el sitio
La garantia pierde validez si este producto se utiliza mientras se prestan servicios comerciales o si se alquila a otra
persona. Esta garantia le otorga derechos legales especificos yes posible que tambien tenga derechos que vadan
segt]n el estado.
Sears Brands Management
Corporation,
Hoffman
Estates, tL 60179
This tool has many features for making its use more pleasant and enjoyable. Safety, performance, and
dependability have been given top priority in the design of this product making it easy to maintain and operate.
Esta herramienta ofrece numerosas caracteristicas para hacer mas agradable y placentero su use. En el
diseSo de este producto se ha conferido prioridad a la seguridad, el desempeSo y la fiabilidad, per Io cual se
facilita su manejo y mantenimiento.
2 1 English
i
,_
WARNING!
Read and understand all
instructions. Failure to follow all instructions
listed below may result in electric shock, fire,
and/or serious personal injury.
READ ALL INSTRUCTIONS
• Know your hedge trimmer. Read and understand
the operator's manual and observe the warnings and
instruction labels affixed to the hedge trimmer.
• Stay alert -- watch what you are doing and use
common sense when operating a power hedge
trimmer. Do not use hedge trimmer while tired or
under the influence of drugs, alcohol, or medication.
A moment of inattention while operating power hedge
trimmers may result in serious personal injury.
• Do not allow children or untrained individuals to use
this unit.
• Use Safety Glasses -- always wear eye protection
with side shields marked to comply with ANSI Z87.1.
• Protect your lungs. Wear a face or dust mask if the
operation is dusty. Following this rule will reduce the
risk of serious personal injury.
• Dress Properly -- Do not wear loose clothing or
jewelry. Contain long hair. Loose clothes, jewelry, or
long hair can get caught in moving parts.
• Wear heavy long pants, long sleeves, boots, and
gloves. Do not wear loose fitting clothing, short pants,
sandals, or jewelry of any kind. Do not go barefoot.
• Secure long hair so it is above shoulder level to
prevent entanglement in any moving parts.
• Keep Children Away -- keep all bystanders,
children, and pets at least 50 feet away.
• Use Right Appliance - do not use appliance
job except that for which it is intended.
for any
• Don't Force Hedge Trimmer. It will do the job better
and less with likelihood of risk of injury at the rate for
which it was designed
• Disconnect Hedge Trimmer - disconnect hedge
trimmer from power cord when not in use, before
servicing, when changing accessories, such as blade
and the like.
• Do Not Overreach -- Keep proper footing and
balance at all times. Proper footing and balance
enables better control of the hedge trimmer in
unexpected situations. Do not use on a ladder or
unstable support.
• Do not use hedge trimmer if switch does not turn it
on or off. A hedge trimmer that cannot be controlled
with the switch is dangerous and must be repaired.
• Avoid Accidental Starting -- Be sure switch is
locked or off position before plugging into power
Carrying hedge trimmers with your finger on the
or plugging the power cord into a hedge trimmer
the switch on invites accidents.
in the
cord.
switch
with
• Avoid Dangerous Environments -- Do not use
the hedge trimmer in damp or wet locations. Do not
operate the hedge trimmer in rain.
• Maintain Hedge Trimmer with Care -- Follow
instructions for lubrication and changing accessories,
keep handles dry, clean and free from oil and grease.
Keep cutting blades sharp and clean. Properly
maintained hedge trimmers with sharp cutting edges
are less likely to bind and are easier to control and
reduce risk of injury.
• Check for misalignment or binding of moving parts,
breakage of parts, and any other condition that may
affect the hedge trimmer's operation. If damaged, have
the hedge trimmer serviced before using. A guard or
any other part that is damaged should be carefully
checked to determine that it will operate properly and
perform its intended function. Many accidents are
caused by poorly maintained hedge trimmers.
• Keep the hedge trimmer and its handle dry, clean
and free from oil and grease. Always use a clean
cloth when cleaning. Never use brake fluids, gasoline,
petroleum based products, or any strong solvents
to clean your hedge trimmer. Following this rule will
reduce the risk of loss of control and deterioration of
the enclosure plastic.
• To avoid the risk of electric shock, do not operate unit
in damp or wet locations.
• Use only accessories that are recommended by the
manufacturer for your model. Accessories that may be
suitable for one hedge trimmer may create a risk of
injury when used on another hedge trimmer.
• Hedge trimmer service must be performed only by
qualified repair personnel. Service or maintenance
performed by unqualified personnel may result in a risk
of injury.
• When servicing a hedge trimmer, use only
identical replacement parts. Follow instructions in
the Maintenance section of this manual. Use of
unauthorized parts or failure to follow Maintenance
instructions may create a risk of shock or injury.
• Do not operate in poor lighting.
• Keep hands, face, and feet at a safe distance from
moving parts. Do not touch or try to stop the cutting
blades when they are moving.
3 -- English
• Before
starting
thehedge
trimmer,
make
sure
the
blade
isnot
incontact
with
any
object.
• Stop
theunit,
remove
thepower
cord,
and
make
sure
the
blade
has
stopped
before
setting
the
unit
down.
•3/4
Never
any
material
with
adiameter
larger
than
in. cut
•Always
stop
themotor
when
cutting
isdelayed
orwhen
walking
from
one
cutting
location
toanother.
• Keep
unit
clean
ofgrass
clippings
and
other
materials.
They
may
become
lodged
inthecutting
blades.
• Store
Idle
Hedge
Trimmer
Indoors
--When
notinuse,
product
should
be
indoors
inadry,
locked
upplace-outofthe
reach
ofstored
children.
• DANGER!
Risk
ofcut.Keep
hands
away
from • Replace
scabbard
cover
when
unit
isnotinuse.
blades.
Donotattempt
toremove
cutmaterial
orhold Never
douse
orsquirt
theunit
with
water
orany
other
material
tobecut
when
blades
aremoving.
Keep •liquid.
Keep
handles
dry,
clean,
and
free
from
debris.
Clean
both
hands
onhandles
when
power
ison.Make
sure after
use;
see
storage
instructions.
power
cord
isremoved
and
thetrigger
isreleased each
when
clearing
jammed
material
from
blades.
Donot • Secure
theunit
while
transporting.
grasp
theexposed
cutting
blades
orcutting
edges
when
picking
uporholding
theunit,
• Blades
coast
after
unit
isturned
off.
CALIFORNIA
PROPOSITION
_,
WARNING?
65
This product and some dust created by power sanding, sawing, grinding, drilling, and
other construction activities may contain chemicals, including lead, known to cause cancer, birth defects or
other reproductive harm. Wash hands after handling. Some examples of these chemicals are:
• lead from lead-based
• crystalline
paints,
silica from bricks and cement and other masonry products,
• arsenic and chromium
from chemically-treated
and
lumber.
Your risk from these exposures varies, depending on how often you do this type of work. To reduce your
exposure to these chemicals: work in a well ventilated area, and work with approved safety equipment, such
as those dust masks that are specially designed to filter out microscopic particles.
SAVE THESE INSTRUCTIONS
4 -- English
The following
SYMBOL
signal words
and meanings
are intended
to explain
the levels of risk associated
SIGNAL
MEANING
_1=
DANGER:
Indicates
imminently
or serious an
injury.
,_
WARNING:
Indicates
potentially
or
serious ainjury.
hazardous
situation,
,_
CAUTION:
Indicates
moderate
hazardous
situation,
CAUTION
(Without
ainjury.
potentially
hazardous
Safety Alert Symbol)
5 --
situation,
Indicates
English
which,
which,
which,
a situation
with
if not avoided,
if not avoided,
if not avoided,
this product.
witl result in death
could
result
may result
that may result in property
in death
in minor
damage.
or
Some of the following symbols
interpretation
of these symbols
may be used on this product. Please study them and learn their meaning.
will allow you to operate the product better and safer.
SYMBOL
NAME
Safety
EX PLANATI
Alert Symbol
Indicates
V
Volts
Voltage
A
Amperes
Current
Hz
Hertz
Frequency
W
Watt
Power
hrs
Hours
Time
[]
Class
II Construction
Wet Conditions
Footwear
to rain or use in damp
eye protection
locations.
with
side shields,
which
is marked
to
level.
Wear non-slip
Away
safety footwear
Keep all bystanders
Hot Surface
Electric Shock
when
gloves
when
handling
using this equipment.
at least 50 ft. away.
To
the risk of injury
any reduce
hot surface.
or damage,
Failure
can
result
to use
in electric
in dry conditions
shock.
No Hands Symbol
t/_
hazard.
construction
Wear
non-slip,
heavy-duty
the hedge
trimmer
and the protective
blade.
Keep Bystanders
r_
injury
comply head
with protection
ANSI Z87.1
operating
this equipment.
Wear
when when
operating
this equipment
above
Protection
Gloves
Safety
per second)
ON
To reduce manual
the risk before
of injury,using
user this
must
read and understand
operator's
product.
Manual
shoulder
O
(cycles
Do not expose
Wear
Eye and Head
personal
Double-insulated
Alert
Read the Operator's
a potential
Proper
avoid
and to observe
contact
with
safe practices
Failure
in
seriousto keep
personal
your injury.
hands away from the blade will result
Operate
With Two Hands
Hold and
hands.
Moving
Parts
Keep
6I
operate
hands
English
away
the
from
hedge
trimmer
moving
parts.
properly
with
both
DOUBLE
INSULATION
Double insulation
is a concept in safety in electric
tools, which eliminates
the need for the usual
power
three-
It is possible to tie the extension
cord and power cord in a
knot to prevent them from becoming disconnected
during
use. Make the knot as shown
in figure
1, then connect
the
wire grounded
power cord. All exposed
metal parts are
isolated
from the internal
metal motor components
with
plug end of the power cord into the receptacle
end of the
extension
cord. This method can also be used to tie two
protecting
extension
insulation.
Double
insulated
tools
do not
need
to be grounded.
**Ampere
cords together.
rating
(on
product
0-2.0
_-
WARNING:The
double
insulated
to protect the user from shock
in the tool's internal insulation.
safety
precautions
to avoid
system
resulting
Observe
electrical
isintended
from a break
all normal
only by a qualified
service
technician.
For service,
pJate)
Length
3.5-5.0
Wire Size
5.1-7.0
7.1-12.0
12.1-16.0
14
(A.W.G.)
25'
16
16
16
16
14
50'
16
16
16
14
14
12
100'
16
16
14
12
10
--
shock.
NOTE: Servicing of a product with double insulation requires
extreme care and knowledge
of the system and should be
performed
Cord
data
2.1-3.4
**Used on 12 gauge - 20 amp circuit.
NOTE: AWG = American Wire Gauge
we suggest you return the product to your nearest authorized
service center for repair. Always use original factory replace ment parts when
_,
servicing.
WARNING:
working
ELECTRICAL
CONNECTION
This product
has a precision-built
be connected
(normal
product
to a power
supply
electric
motor.
that is 120 volts,
AC only
can result in serious
,_ll
will cause a loss of power and the motor will overheat.
If
the product does not operate when plugged into an outlet,
double-check
the power
EXTENSION
See
Figure
When
using
supply.
a power
undersized
overheating
tool at a considerable
distance
from
cord that has
will draw. An
cord will cause a drop in line voltage, resulting in
and loss of power. Use the chart to determine
the minimum wire size required in an extension
cord. Only
round jacketed cords listed by Underwriter's
Laboratories
(UL) should
When
be used.
working
outdoors
cord that is designed
designated
with
with
a product,
for outside
use an extension
use. This type of cord is
"WA" on the cord's jacket.
Before
using
any extension
posed
wires and cut or worn
A proper extension
center.
WARNING:Check
damaged area could
in serious injury.
i.
a power source, be sure to use an extension
the capacity to handle the current the product
cord, inspect
it for loose or ex -
insulation.
cord is available
at an authorized
service
71
cord clear of the
the cord so that it will not get
personal
injury.
extension
cords
use. If damaged replace
product with a damaged
CORDS
1, page
the extension
Position
caught on lumber, tools, or other obstructions
while
you are working with a power tool. Failure to do so
It should
household
current), 60
Hz. Do not operate this
on direct current (DC). A substantial
voltage drop
Keep
area.
English
before each
immediately.
Never
cord since touching
cause
electrical
shock
use the
the
resulting
PRODUCT
SPECIFICATIONS
Blade
Length
..........................................................
22in. Cutting
Speed
...............................................
1,600
cuts!rain
Cutting
Capacity
....................................................
3/4in. Weight
.......................................................
6.06
Ibs(2.75
Kg)
KNOW
YOUR
HEDGE
TRIMMER
TRIGGER SWITCH AND LOCK OFF BUTTON
See Figure 2, page L
The safe use of this product requires an understanding
of the information on the tool and in this operator's
manual as well as a knowledge of the project you
are attempting. Before use of this product, familiarize
yourself with all operating features and safety rules.
The trigger switch, located beneath the rear handle, and
the lock-off button, located behind the front handle, must
be depressed simultaneously to allow blade rotation.
Lock-off switch may be released once hedge trimmer is
running.
ROTATING HANDLE
CORD RETAINER
The handle of your hedge trimmer rotates 90 degrees to
the left or right for control and precision trimming.
A convenient cord retainer helps keep the extension
cord connection secure during trimmer operation.
GUARD
The guard helps to deflect chips or other debris away
from the operator's hands.
UNPACKING
,_WARNING!
• This product requires
• Carefully remove the product and any accessories
from the box. Make sure that all items listed in the
packing
If any parts are damaged or
missing, do not operate this product until the parts
are replaced. Failure to heed this warning could
result in serious personal injury.
no assembly.
,_
list are included.
• Inspect the product carefully to make sure no
breakage or damage occurred during shipping.
• Do not discard the packing material until you have
carefully inspected and satisfactorily operated the
product.
Do not connect to power supply
until assembly is complete. Failure to comply
could result in accidental starting and possible
serious personal injury.
PACKING LIST
hedge trimmer
• Operator's
manual
8 --
Do not attempt to modify this
product or create accessories not recommended
for use with this product. Any such alteration
or modification is misuse and could result in a
hazardous condition leading to possible serious
personal injury.
_LWARNING!
• If any parts are damaged or missing, please call
1-888- 266-7096 for assistance.
• Electric
WARNING!
English
,_ILWARNING!
Do not allow familiarity with this
product to make you careless. Remember that
a careless fraction of a second is sufficient to
STOPPING THE HEDGE TRIMMER
inflict serious injury.
1. Release the trigger switch (3).
_II, WARNING!
Always wear safety goggles or
safety glasses with side shields that comply
with ANSI Z87.1 when operating power tools.
Failure to do so could result in objects being
thrown into your eyes, resulting in possible
serious injury.
_I, WARNING!
Do not use any attachments
or accessories not recommended by the
manufacturer of this product. The use of
attachments or accessories not recommended
can result in serious personal injury.
CONNECTING
See Figure 3, page ii.
2. Allow at least 5 seconds for the cutting blade to stop
moving.
USING THE ROTATING REAR HANDLE
See Figure 4, page ii.
1. Place the hedge trimmer on a flat and even surface and
disconnect from the power supply.
2. Make sure that you released the triggers.
3. Press the lock button and begin turning the rear handle.
Release the lock button and turn the handle 90 degrees to
either side until it clicks into place and the button pops out.
TO POWER SUPPLY
4. To turn the handle back to center, press the lock button
again, turn the handle slightly, release the lock button and
continue turning the handle until it locks into place.
See Figure 3, page ii.
This product is designed with a cord retainer that
prevents the extension cord from being pulled loose
while using.
• Form a loop with the end of the extension cord.
• Insert loop portion of extension cord through
opening in the bottom of the rear handle and place
over cord retainer.
• Slowly pull loop against cord retainer until the slack
is removed. (Fig.3)
• Plug product into extension cord.
NOTE:
Failure
extension
from
cord
to remove
retainer
all excess
could
result
cord
slack
in plug
from
loosening
receptacle.
STARTING THE HEDGE TRIMMER
See Figure 3, page ii.
1. Attach an extension
cord to your hedger.
21 Place one hand on the trigger handle (1). Place
the other hand on the auxiliary handle (2).
3. Slide the lock switch (4) backwards you then
squeeze the trigger switch (3) to turn ON the hedge
trimmer. The trimmer will stay on as long as the
trigger switch is squeezed. Lock-off switch may be
released once hedge trimmer is running.
9 --
English
CUTTING
TIPS
,_WARNING!
_I_WARNING!
Always keep both hands on the
hedge trimmer handles. Never hold shrubs with
one hand and operate hedge trimmer with the
other. Failure to heed this warning can result in
serious injury.
WARNING!
Clear the area to be cut before
each use. Remove all objects such as cords,
lights, wire, or loose string which can become
entangled in the cutting blade and create a risk
of serious personal injury.
• When operating the hedge trimmer, keep the
extension cord behind the trimmer. Never drape it over
the hedge being trimmed.
• Do not force the hedge trimmer through heavy
shrubbery. This can cause the blades to bind and slow
down. If the blades slow down, reduce the pace.
• Do not attempt to cut stems or twigs that are larger
than 3/4 in., or those obviously too large to feed into the
cutting blade. Use a non-powered hand saw or pruning
saw to trim large stems.
Read the safety information for
safe operation using the blade. Extreme care
must be taken when using blades to ensure safe
operation. Refer to Important Safety Instructions
and Specific Safety Rules (See pages 3 - 5)
The unit is used for cutting in either direction
sweeping action from side to side.
• Stand so that you are stable and balanced on both
feet. Do not overreach.
• Inspect and clear the area of any hidden objects.
• Never use the hedge trimmer near power lines,
fencing, posts, buildings, or other immovable objects.
• Never use a blade after hitting a hard object without
first inspecting it for damage. Do not use if any
damage is detected.
• Never touch blades or service unit with the power
supply connected.
• If blades do become jammed, stop the motor, allow the
blades to stop, and disconnect the plug from the power
source before attempting to remove the obstruction.
• If desired, you can use a string to help cut your hedge
level. Decide how high you want the hedge. Stretch a
piece of string along the hedge at the desired height.
Trim the hedge just above the guide line of string. Trim
the side of a hedge so that it will be slightly narrower
at the top. More of the hedge will be exposed when
shaped this way, and it will be more uniform.
• Wear gloves when trimming thorny or prickly growth.
When trimming new growth, use a wide sweeping
action, so that the stems are fed directly into the cutting
blade. Older growth will have thicker stems and will be
trimmed easiest by using a sawing movement.
10 --
in a slow,
English
,_WARNING!
When servicing, use only
identical replacement parts. Use of any other
parts may create a hazard or cause product
damage.
_,WARNING!
Always wear safety goggles or
safety glasses with side shields that comply
with ANSI Z87.1 during product operation. If
operation is dusty, also wear a dust mask.
_I, WARNING!
Before inspecting,
cleaning,
CLEANING
NOTE: Do not use any strong detergents on the
plastic housing or the handle. They can be damaged
by certain aromatic oils such as pine and lemon, and
by solvents such as kerosene.
STORING THE TRIMMER
or servicing the machine, disconnect the plug
from power source and wait for all moving parts
to stop. Failure to follow these instructions can
result in serious personal injury or property
damage.
• Clean all foreign material from the product.
• Store it in a well-ventilated place that is inaccessible
to children.
• Keep away from corrosive
chemicals
,_I, WARNING!
Do not at any time let brake
fluids, gasoline, petroleum-based products,
penetrating oils, etc., come in contact with
plastic parts. Chemicals can damage, weaken,
or destroy plastic which may result in serious
personal injury. Only the parts shown on
the parts list are intended to be repaired or
replaced by the customer. All other parts should
be replaced at an authorized service center.
,_WARNING!
Blades are sharp, when
handling the blade assembly,
heavy-duty protective gloves.
your hand or fingers between
position where they could get
Never touch blades or service
power supply connected.
GENERAL
THE HEDGE TRIMMER
• Stop the motor and disconnect from power supply.
• Clean dirt and debris from the body of the hedge
trimmer, using a damp cloth with a mild detergent.
wear non-slip,
Do not place
blades or in any
pinched or cut.
unit with the
MAINTENANCE
Avoid using solvents when cleaning plastic parts.
Most plastics are susceptible to damage from various
types of commercial solvents and may be damaged
by their use. Use clean cloths to remove dirt, dust,
oil, grease, etc.
11 I
English
agents such as garden
and de-icing salts.
CRAFTSMAN
22in. 4A
HEDGE
TRIMER
- MODEL
NUMBER
138. 98977_
a
housing. Always
IThe
model
number
will be found
the motor or when ordering mention
the model J}
number
in all
correspondence
regardinglabel
yourattached
HEDGEto TRIMMER
repair parts.
on
i
SEE
BACK
PAGE
FOR
PARTS
12
ORDERING
INSTRUCTIONS
CRAFTSMAN
22in.
4A HEDGE
TRIMER
- MODEL
NUMBER
138. 98977_
on a
housing, Always
The
model
number
will be found
attached
the motor or when ordering mention
the model I]
number
in all
correspondence
regardinglabel
your
HEDGEtoTRIMMER
repair parts,
i
SEE
BACK
PAGE
FOR
PARTS
ORDERING
INSTRUCTIONS
PARTS LIST
ITEM NO.
PART NO.
DESCRIPTION
1
34102456-1
handle assembly
1
2
3
34118441
32201441
cord clamp
screw
1
2
4
34106456-1
switch trigger
1
5
6
33402161-1
34109453
spring
button
2
1
7
8
31101456
3340287
plug assembly
spring
1
1
9
10
36504161
3220345
wiring cap
screw
1
1
11
36303152
switch
1
12
13
34903161
3650201
sleeve
terminal
2
2
14
3250186
nut
2
15
3290186
washer
2
16
17
3290675
32201162
washer
screw
2
2
18
3220187
screw
2
19
33302161
washer
1
20
21
22
33203161
33208161
33302162
bearing HK061009
pin
eccentric block
1
1
2
23
24
25
33304161
31101456
33305161
isolating plate
blade assembly
washer
1
1
1
26
27
33203161
33203162
pin
liner
2
1
28
29
34103161
34902161
gear case cover
felt
1
1
30
31
3220313
36101162-1
screw
motor
4
1
32
33
31302162
3220905
auxiliary
screw
34
35
34103456
34105456-1
,quard
button for rotatinq the head
1
1
36
37
34101456-1
34104456-1
housing
decoration
1
1
handle assembly
13
board
QTY
1
10
See this section for all of the figures
operator's manual.
referenced
in the
Consulte esta secci6n para ver todas las figuras a las que se hace
referencia en el manual del operador.
Fig. 1
A- Cord (Cord6n)
B
A
B- Extension cord (Cord6nde
extensi6n)
Fig.2 A- Lockoff button (Botdnde bloqueo)
B - Lockbuttonfor rotatinghandle
(Bot6nde bloqueo para la manija giratoria.)
C- Auxiliaryhandle (Manijaauxiliar)
D- Guard(Protecci6n)
E- Blade support rod (Ranurade soporte de la
cuchilta)
F- Blade (Cuchilta)
G - Triggerswitch (Interruptorde gatitlo )
H- Cord retainer (Retenedordel cable)
D--
G
H
Fig.3
A
A -Cord retainer (Retenedordel cable)
B-Extensioncord (Extensi6n electrica)
Fig. 4
Lockbutton for rotating handle
(Bot6nde bloqueopara la manijagiratoria)
,_
iADVERTENClA! lea y comprenda todas
las instrucciones.
El incumplimiento de las
instrucciones seSaladas abajo puede causar
descargas electricas, incendios y lesiones
serias.
• Desconecte la recortadora de setos: desconecte
la recortadora de setos del paquete de cable de
alimentaci6n no la use y antes de proporcionarle
servicio cuando le cambie accesorios (pot ejemplo,
hoja y otros similares).
la
• Familiaricese con la podadora de setos. Lea y
comprenda el manual del operador y observe las
advertencias y etiquetas de instrucciones adheridas
a la podadora de
• No estire el cuerpo para alcanzar mayor distancia.
Mantenga una postura firme y buen equilibrio en
todo memento. La postura firme y el buen equilibrio
permiten un mejor control de la podadora de setos en
situaciones inesperadas. No utilice la unidad al estar
en una escalera o en un soporte inestable.
setos.
• No utilice este producto si no hay luz suficiente.
• Permanezca alerta -- preste atenci6n a Io que
este haciendo y aplique el sentido comt]n al utilizar
podadora de setoss electricas. No utilice la podadora
de setos siesta cansado o se encuentra bajo los
efectos de alguna droga, alcohol o medicamento.
Un memento de inatenci6n a! utilizar una podadora
de setos electrica puede causar lesiones corporales
serias.
• Mantenga las manos, cara y pies a una distancia
segura de toda pieza en movimiento. No toque ni
trate de detener las hojas de corte cuando esten
moviendose.
LEA TODAS
LAS INSTRUCClONES
• No permita que utilicen esta unidad nii]os ni
personas carentes de la debida instrucci6n para su
manejo.
• Use gafas de seguridad -- Use siempre protecci6n
ocular con la marca de cumplimiento de la norma
ANSI Z87.1.
• Protejase los pulmones. Use una careta o
mascarilla contra el polvo si la operaci6n genera
mucho polvo. Con el cumplimiento de esta regla se
reduce el riesgo de lesiones serias.
• Vistase adecuadamente -- No vista ropas
holgadas ni joyas. Rec6jase el cabello siesta largo.
Las ropas holgadas, las joyas y el cabello largo
pueden engancharse en las piezas m6viles.
• P6ngase pantalones, mangas largas, botas
y guantes gruesos. No se ponga ropa holgada,
pantalones,, sandales, cortos ni joyeria de ningt3n
ripe. No camine descalzo.
• Rec6jase el cabello si Io tiene largo, de manera
que le quede arriba de los hombres para evitar que
se enrede en las piezas en movimiento.
• Mantenga a todos los circunstantes, ni_os y
animales por Io menos a 15 metros (50 pies) de
distancia.
• Use el aparato adecuado -- no use el aparato para
ningQn otto fin que no sea el previsto.
• No utilice la podadora de setos si el interrupter no
enciende o no apaga. Una podadora de setos que
no puede controlarse con el interruptor es peligrosa y
debe repararse.
• Evite un arranque accidental de la unidad.
Asegflrese de que el interruptor este en la posici6n de
aseguramiento o de apagado antes deconectarlo al
cable de alimentaci6n. Llevar las podadora de setoss
con el dedo en el interrupter oplugging the cable de
alimentaci6n en la podadora de setos con el interruptor
puesto es causa comOn de accidentes.
• Evite los entornos de trabajo peligrosos. No use la
podadora de setos en lugares ht3medos o mojados. No
utilice en la Iluvia la podadora de setos.
• Cuide la recortadora de setos: siga las instrucciones
para lubricar y cambiar accesorios; mantenga los
mangos secos, limpios y libres de aceite y grasa.
Las podadora de setoss de corte bien cuidadas, con
bordes bien afilados, tienen menos probabilidad de
atascarse en la pieza de trabajo y son mas faciles de
controlar y reduzca el riesgo de lesiones.
• Revise para vet si hay desalineaci6n o atoramiento
de piezas m6viles, ruptura de piezas o toda otra
condici6n que pueda afectar el funcionamiento
de
la podadora de setos. Si se da_a la podadora de
setos, Ilevela a servicio antes de velvet a utilizarla. Es
necesario inspeccionar cuidadosamente la protecci6n
o cualquier parte da_ada para asegurarse de que
funcione y desempe_e correctamente la funci6n a
la que esta destinada. Numerosos accidentes son
causados pot podadora de setoss mal cuidadas.
• No fuerce la recortadora de setos. Funcionara
mejor y habra menos riesgo de lesiones si se usa a
la velocidad para la que fue dise_ada.
3--Espa_ol
continQan
moviendose
porinercia
despues
• Mantenga
lapodadora
desetos
yelmango
secos,• Lashojas
launidad.
limpios
ysinaceite
nigrasa.
Siempre
utilice
unpatiodeapagarse
limpio
para
lalimpieza
delaunidad.
Nunca
utilice • Siempre
el motor al retardar un corte o al
fluidos
para
frenos,
gasolina,
productos
abase
de caminar dedetenga
un lugar donde este cortando a otto.
petr61eo
nisolventes
fuertes
para
limpiar
lapodadora
• Mantenga la unidad libre de recortes de cesped
desetos.
Con
elcumplimiento
deesta
regla
sereduce
otros materiales. Pueden alojarse en las hojas de
elriesgo
deuna
perdida
decontrol
yeldeterioro
del ycorte.
alojamiento
deplastico
delaunidad.
• Para
evitar
elriesgo
deuna
descarga
electrica,
no • Guarde en el interior la recortadora de setos que no
utilice
launidad
enlugares
ht3medos
omojados. este usando - Cuando no esta en uso, la podadora
debe guardarse en el interior, en un lugar seco y
• $61o
utilice
accesorios
recomendados
porel
cerrado con Ilave, lejos del alcance de los nifios.
fabricante
para
cada
modelo
enparticular.
Accesorios
de nuevo la funda cuando no tenga en uso
que
pueden
seradecuados
para
una
podadora
de •la Coloque
unidad.
setos
pueden
significar
unriesgo
delesiones
sise
emplean
con
otra
podadora
desetos.
• Nunca moje ni rocie con agua ni con ning_n otro
• Elservicio
delapodadora
desetos
s61o
debe
ser liquido la unidad. Mantenga secos, limpios y sin basura
los mangos. Limpie la unidad despues de usarla; yea
efectuado
porpersonal
dereparaci6n
calificado.
Todo
servicio
omantenimiento
efectuado
porpersonal
no el apartado Instrucciones para guardar la unidad.
calificado
puede
significar
unriesgo
delesiones. • Mantenga asegurada la unidad mientras la
transporta.
•AIdarservicio
auna
podadora
desetos,
s61o
utilice
piezas
derepuesto
identicas.
Siga
lasinstrucciones
sefialadas
enlasecci6n
Mantenimiento
deeste
manual.
Elempleo
depiezas
noautorizadas
oel
incumplimiento
delasinstrucciones
demantenimiento
puede
significar
unriesgo
dedescarga
electrica
ode
lesiones.
•Antes
deencender
lapodadora
desetos,
asegt3rese
deque
lahoja
noeste
encontacto
con
ningQn
objeto.
•Apague
launidad,
retire
elpaquete
decable
de
alimentaci6n
deque
sehaya
detenido
lahoja
antes
de
poner
enreposo
launidad.
• Nunca
corte
ningQn
material
deundiametro
superior
a19mm(3/4
pulg.).
• Riesgo
decortadura.
Mantenga
lasmanos
lejos
de
lashojas.
Nointente
retirar
material
cortado
nisujetar
material
porcortar
mientras
esten
moviendose
las
hojas.
Cuando
este
encendida
launidad
mantenga
ambas
manos
enlosmangos.
AIretirar
material
atorado
enlashojas,
asegQrese
deque
elpaquete
de
cable
dealimentaci6n
delaunidad
yelgatillo
noeste
oprimido.
AIrecoger
osostener
launidad
nosujete
las
hojas
decorte
expuestas
nilosfilos
decorte.
4--Espafiol
CALIFORNIA
,_
- PROPUESTA
iADVERTENCIA!
DE LEY NUM.
65
Este producto y algunos polvos generados
al efectuarse operaciones
de lijado
electrico, aserrado, esmerilado y taladrado, y otras actividades de construcci6n, pueden contener sustancias
quimicas, incluido el plomo, que se conoce que causan cancer, defectos congenitos u otras afecciones
del aparato reproductor. Lavese las manos despues de manejar la unidad. Algunos ejemplos de estas
sustancias quimicas son:
• plomo de las pinturas a base de plomo,
• silicio cristalino
de los ladrillos, del cemento y de otros productos de mamposteria,
• arsenico y cromo de la madera quimicamente
y
tratada.
El riesgo de la exposici6n a estos compuestos varia, segL_n la frecuencia con que se realice este tipo de
trabajo. Para reducir la exposici6n personal a este tipo de compuestos: trabaje en areas bien ventiladas, y
con equipo de seguridad aprobado, tal como las caretas para el polvo especialmente diseSadas para filtrar
particulas microsc6picas.
GUARDAR
ESTAS INSTRUCCIONES
5--Espa_ol
Las
s_guientes
patabras
desefializacidn
ysus
significados
_enen
elobjeto
deexpticar
bsniveles
deriesgo
relacionados
con
este
producto.
SiMBOLOS
ENAL
SIGNIFICADO
,_
PELIGRO:
u_asituacidnpetigrosainminente,
boual, snoseevita,causarata
oIndica
lesiones
serias.
,_
ADVERTENCIA:
Indica una
s_tuaci6npeligrosa
posible, tacuat, si no se evita, podria causar ta
muerte
o lesiones
serias.
PRECAUCION:
Indica una
situaci6n
causar
lesiones
levespotenciatmente
o moderadas. peligrosa ta cual, si no se evita, puede
PRECAUCION:
(Sinet simbotode _tertade seguridad)lndicaunasituaci6nquepuedeproducir
da5os materiales.
6--EspaSol
rruerte
Es posible
significado
que se empleen en esta producto algunos de los siguientes
para mayor seguridad al manejar este producto.
SiMBOLO
Simbolo
de alerta
Indica un peligro posible
Volts
Voltaje
Amperes
Corriente
Hz
Hertz
Frecuencia
W
Watts
Potencia
hrs
Horas
Tiempo
[]
Fabricaci6n
II
de condiciones
Lea el manual
Protecci6n
cabeza
hOmedas
y aprender
su
los
ojos
comprender
Para reducir
producto.
y la
de lesiones
personales.
por segundo)
con doble aislamiento
No exponga
hOmedos.
del operador
para
(ciclos
Fabricaci6n
Guantes
la unidad
a la Iluvia
ni la use
en
de seguridad
equipo.
P6ngase P6ngase
protecci6n protecci6n
para los para
ojos ylala cabeza
cabeza alal utilizar
utilizar
equipo sobre el nivel de los hombros.
antideslizante.
Cuando utilice
de seguridad
Superficie
caliente
Para
el riesgo
lesiones caliente.
corporales
riales reducir
evite tocar
toda de
superficie
Descarga
el6ctrica
pr&cticas seguras de trabajo, puede producirse una descarga
Si no se usa la unidad en condiciones
secas y no se observan
el6ctrica.
las manos
Mantenga
a los circunstantes
15 m (50 pies).
calzado
guantes
alejadas
de no acercar
personas
este equipo p6ngase
este
este
Mantenga
presentes
Simbolo
alas
lugares
el manual
del operador
antes de usar este
el riesgo de lesiones,
el usuario
debe leer y
Cuando maneje
la sierra y para
la hojauso
de pesado.
corte, p6ngase
protectores
no deslizantes
Calzado
F_
de seguridad
V
Clase
estudiarlos
EXPLICACION
A
Alerta
O
Le suplicamos
NOMBRE
lb
Q
simbolos.
a una distancia
Si
no mantiene
causar_
serias
las manoscorporales.
alejadas
lesiones
Use las dos manos
Sujete
la podadora
Piezas
Mantenga
m6viles
7--Espafiol
y opere
las manos
de setos
lejos de piezas
minima
o dafios
mate-
de la hoja de corte,
con ambas
manos.
en movimiento.
de
se
DOBLE
AISLAM
Se puede
lENTO
El doble aislamiento
es una caf_cteristica
de seguridad
las herramientas
el_ctricas, la cual elimina la necesidad
usar el tipico
exi6n
a tierra.
cof_6n el_ctrico
Todas
de tt_s conductor.s
las partes
met_licas
de
de
con con
expuestas
-
est_n
aisladas de los componentes
met&licos internos del motor
por medio de aislamiento
de protecci6n.
No es necesario
conectar
a tierra las herramientas
con doble aislamiento.
hacer un nudo para atar el cord6n
luego conecte el extremo de la clavija del cordon el_ctrico
en el extremo del recept&culo
del cord6n de extensi6n.
Este
m_todo tambi6n
extensi6n.
**Ampere
rating
(on
0-2.0
,_ll
ADVERTENCIA:
El sistema
est& destinado a proteger al usuario contra las
descargas
el_ctricas
resultantes
de la ruptura del
aislamiento
interno de la herramienta.
Observe todas
NOTA:
de seguridad
El mantenimiento
aislamiento
requiere
de
sumo
una herramienta
con doble
y conocimiento
plate)
2.1-3.4
Length
3.5-5.0
Wire Size
5.1-7.0
7.1-12.0
12.1-16.0
(A,W,G,)
16
16
16
16
14
14
50'
16
16
16
14
14
12
100'
16
16
14
12
10
--
**Used on 12 gauge - 20 amp circuit.
NOTE: AWG = American Wire Gauge
del
Autorizado
ADVERTENClA:
Mantenga
el cord6n de extensi6n
fuera del &rea de trabajo. AI trabajar con una her=
de su preferencia
para que la reparen. Siempre utilice piezas de repuesto
la f_brica original al dar servicio a la unidad.
CONEXlON
data
de
para evitar descargas
cuidado
de Servicio
product
usar para atar dos cordones
25'
sistema, y 0nicamente
deben realizarlo t_cnicos de servicio
calificados. Para dar servicio a la herramienta,
le sugerimos
Ilevarla al Centro
se puede
de doble aislamiento
Cord
las precauciones
el6ctricas.
de extensi6n
y el cord6n el_ctrico para impedir que se desconecten
du rante el uso. Ate el nudo como se muestra en la figura 1,
de
ramienta
el_ctrica, coloque el cord6n de tal manera
que no pueda enredarse en la madera, herramientas
o ninguna obstrucci6n.
La inobservancia
de esta
advertencia
puede causar lesiones corporales
serias.
EL#CTRICA
Este producto dispone de un motor el_ctrico fabricado con
precisi6n.
Debe conectarse
0nicamente
a un suministro
de corriente
de 120 V, solo corr. air, (oorriente
normal
para uso domestico),
60 Hz. No utilice este producto con
ADVERTENCIA:
Inspeccione
los cordones de ex tensi6n antes de cada uso. Si est_n daiSados reem-
corriente continua (con: cont.). Una caida considerable
de
voltaje causa una p_rdida de potencia y el recalentamiento
pl&celos
del motor. Si el producto
no funciona
toma, vuelva a veriflcar el suministro
CORDONES
Vea la figura
DE
al conectarlo
de corriente.
en una
EXTENSION
1, p_gina
a,
i.
AI utilizar una herramienta
el_ctrica
a una distancia
consider-
able de la fuente de corriente, asegOrese de utilizar un cord6n
de extensi6n
con la suflciente
capacidad
para soportar la
corriente
de consumo
insuficiente
causa
a su vez produce
del producto.Un
cord6n
de un calibre
una caida en el voltaje de linea, la cual
recalentamiento
y p_rdida de potencia.
B&sese en la tabla suministrada
para determinar
el grueso
minimo requerido del cord6n de extensi6n.
Solamente
de ben utilizarse
Underwriter's
cordones con forro
Laboratories
(UL).
redondo
registrados
en
AI trabajar a la intemperie con un producto, utilice un cord6n
de extensi6n
fabricado para uso en el exterior. Este tipo de
cord6n Ileva las letras "WA" en el forro.
Antes
de utilizar un cord6n
ver si tiene conductores
cortado o gastado.
de extensi6n,
flojos
Hay un cord6n de extensi6n
centro de servicio autorizado.
inspecci6nelo
o expuestos
adecuado
para
y aislamiento
disponible
de inmediato.
Nunca
utilice el producto
con
un cord6n dar_ado, ya que si toca la parte dar_ada
puede producirse
una descarga el6ctrica, y las con secuentes
lesiones serias.
en un
8--Espafiol
ADVERTENClA:
El sistema
de doble aislamiento
est& destinado a proteger al usuario contra las
descargas
el_ctricas resultantes
de la ruptura del
aislamiento
interno de la herramienta.
Observe todas
las precauciones
el6ctricas.
de seguridad
para evitar descargas
ESPECIFICACIONES
Longitud
DEL
PRODUCTO
de la hoja .............................
Capacidad
459 mm (22 pulg.)
de corte ..............................
FAMILIAR[CESE
19 mm (3/4 pulg.)
CON LA PODADORA
DE SETOS
Vea la figura 2 pagina L
Para usar eete producto con la debida seguridad
se debe comprender la informaci6n indicada en la
podadora de setos miema yen este manual y se debe
comprender tambien el trabajo que intenta realizar.
Antes de usar este producto, familiaricese con todas
las caracteristicae de funcionamiento y normas de
seguridad del mismo.
RETENEDOR
DEL CABLE
Un practice retenedor del cable ayuda a mantener
segura la conexi6n de la extensi6n electrica durante la
utilizaci6n de la cortadora.
Velocidad
de corte .........................
Peson .....................................................
INTERRUPTOR
1 800 cortes
2.75
per minute
Kg (6,06
Ibs )
DE GATILLO Y BOTON DE BLOQUEO
El interruptor de gatillo, ubicado debajo de la manija
posterior, y el bot6n de bloqueo, ubicado detras de la
manija frontal, deben presionarse simultaneamente para
permitir la rotaci6n de las cuchillas. Se debe soltar el
interrupter de bloqueo una vez que la cortadora de orillas
este en funcionamiento.
MANIJA GIRATORIA
La manija de su cortadora de orillas gira 90 grades
hacia la izquierda o la derecha Io que permite un control
excelente y un recorte precise.
PROTECCION
La protecci6n ayuda a desviar esquirlas u otros residues
lejos de las manes del usuario.
DESEMBALAJE
_li
• Este producto
ensamblado.
• CRetire el producto y los accesorios de la caja
cuidadosamente.
AsegOrese de que esten
incluidos todos los articulos que aparecen en la
lista de embalaje.
• Inspeccione
cuidadosamente
el producto
• No se deshaga del material de embalaje
que haya inspeccionado
cuidadosamente
utilizado satisfactoriamente
el producto.
• Si hay partes dafiadas o faltantes,
266-7096 para solicitar ayuda.
CONTENIDO
• Cortadora
_I,
para
asegurarse de que no se produjo ninguna
ruptura o daffo durante el envio.
iADVERTENCIA!
Si hay partes dafiadas
o faltantes, no utilice el producto hasta que
las partes sean reemplazadas. No seguir esta
advertencia podria provocar graves lesiones
personales
ha side enviado completamente
_i,
iADVERTENCIA!
Nointente modificar
este producto o crear accesorios que no sean
recomendados para utilizar con este. Cualquier
alteraci6n o modificaci6n es considerada real
use y podria causar una condici6n peligrosa que
puede Ilevar a lesiones personales graves.
iADVERTENCIA! No conecte al suministro
de electricidad hasta haber completado el
ensamblaje. El incumplimiento de dicho paso
podria provocar el arranque automatico y
posibles lesiones personales graves.
hasta
y
Ilame al 1-888-
DE LA CAJA
de orillas electrica
• Manual del usuario
9 --
Espafiol
_
iADVERTENClA! No permita que la
familiaridad con este producto Io vuelva
descuidado. Recuerde que una fracci6n de
segundos de descuido es suficiente para
causar lesiones graves.
,_,
iADVERTENCIA!
ARRANCAR
1. Acople una extensi6n
No hacerlo podria causar que algunos objetos
sean arrojados hacia usted causando posibles
lesiones serias.
iADVERTENCIA!
No utilice ningQn
acoplamiento o accesorio que no este
recomendado per el fabricante de este
producto. El use de acoplamientos o accesorios
no recomendados puede resultar en lesiones
personales graves.
CONEXION AL SUMINISTRO
3. Deslice el interrupter de bloqueo (4) hacia usted
y luego apriete el interrupter de gatillo (3) para
ENCENDER la cortadora de orillas. La cortadora
permanecera encendida mientras el interruptor de
gatillo este apretado. Se debe soltar el interruptor de
bloqueo una vez que la cortadora de orillas este en
funcionamiento
DETENER LA CORTADORA
1. Suelte el interruptor
Vea la figura 3, pagina il.
de un retenedor del
electrica se afioje
• Forme una curva con el extremo
electrica.
de la extensi6n
• Inserte una porci6n de la curva de la extensi6n
electrica a traves de la abertura en la parte
inferior de la manija posterior y col6quela sobre el
retenedor del cable.
• Jale el lazo contra el retenedor
suavemente
hasta eliminar
• Enchufe el producto
del cable
la holgura.
a la extensi6n
electrica a su cortadora.
DE ORILLAS
de gatillo (3).
2. Permita al menos 5 segundos
se detenga.
ELI_CTRtCO
Este producto esta acompaSado
cable que evita que la extensi6n
mientras esta en funcionamiento.
DE ORILLAS
2. Coloque una mano sobre la manija de la cortadora
(1). Coloque la otra mano sobre la manija auxiliar (2).
Usesiempregafas
protectoras o de seguridad con protecciones
laterales cuando utilice herramientas electricas.
,_
LA CORTADORA
Vea la figura 3, p,_gina il.
(Fig. 3)
electrica.
NOTA: No retirar la holgura del cable excedente del
retenedor de la extensi6n electrica puede causar que
el enchufe se suelte del recept#cula. Retenedor del
cable.
10--Espa_ol
a la cuchilla para que
CUTTING
TIPS
_,
iADVERTENCIA!
_
iADVERTENCIA!
_bb iADVERTENClA!
Lea la informaci6n
de seguridad para utilizar la cuchilla de forma
segura. Se debe tener extremo cuidado al
utilizar las cuchillas para asegurar su utilizaci6n
segura. Consulte las instrucciones de seguridad
importantes y las normas de seguridad especificas.
Mantenga siempre ambas
manos en las manijas de la cortadora de orillas.
Nunca sostenga los arbustos con una mano y
opere la cortadora de orillas con la otra. No seguir
esta advertencia podda provocar graves lesiones
personales.
Despeje el area a
cortar antes de cada uso. Retire objetos como
cables, luces, clavos o hilos sueltos que puedan
enredarse en la cuchilla y provocar riesgo de
lesiones personales graves.
• Cuando utilice la cortadora de orillas, mantenga la
extensi6n electrica detras de esta. Nunca la ponga
sobre la orilla que esta cortando.
• No fuerce la cortadora de orillas con arbustos
frondosos. Esto puede causar que las cuchillas
se junten y disminuir su velocidad. Si las cuchillas
reducen su velocidad, disminuya el ritmo.
Sostenga la cortadora de orillas con ambas manes
cuando la utilice. Sujete las manijas con firmeza. La
unidad se utiliza Para cortar en cualquier direcci6n con
barridos lentos de lado a lado.
• Mantengase en una posici6n estable yen equilibrio
con ambos pies. No se extienda demasiado.
• Inspeccione
oculto.
y despeje el area de cualquier objeto
• Nunca utilice la cortadora de orillas cerca de lineas
electricas,
inm6viles.
cercas, postes, edificios u otros objetos
• Nunca utilice una cuchilla despues de golpear un
objeto duro sin antes inspeccionarlo para ver si tiene
aquellas que son evidentemente demasiado grandes
dafios. No utilice si detecta algt3n dafio.
para que la cuchilla las corte. Utilice una sierra
manual o una sierra de podar para cortar tallos
• No toque nunca las cuchillas o la unidad de servicio
grandes,
con la linea electrica conectada.
• No intente cortar tallos o varillas mayores a 19mm o
• Si las cuchillas se atascan, detenga el motor, deje
que las cuchillas se detengan y desconecte el
enchufe de la fuente de suministro antes de intentar
retirar la obstrucci6n.
• Si Io desea, puede utilizar una cuerda para ayudar a
cortar e! nivel de su orilla. Decida que tan alta desea
la orilla. Extienda un trozo de cuerda a Io largo de la
orilla a la altura deseada. Corte la orilla justo sobre
la linea de pauta de la cuerda. Corte el costado de
una orilla para que quede ligeramente mas angosta
en la parte superior. Se expondra mas de la orilla si
se le da esta forma y quedara mas uniforme.
• Utilice guantes cuando corte arbustos espinosos
o con pOas. Cuando corte cultivos nuevos, utilice
un barrido amplio de forma que los ta!los calcen
directamente en las cuchillas. Los cultivos mas
antiguos tiene tallos mas gruesos y podran cortarse
de manera mas facil si utiliza un movimiento de
serrucho.
11-- Espafiol
_L
_
_
iADVERTENClA!
Cuando repare, utilice
s61o partes de repuesto identicas alas de
fabricaci6n. El uso decualquier otra parte
podria causar peligro o dafios al producto.
Use siempre gafas
protectoras o de seguridad con protecciones
laterales cuando utiliceel producto. Si va a
utilizar en condiciones de polvo, utilice una
mascara.
iADVERTENCIA!
NOTA:
No permita nunca que
los liquidos de frenos, gasolina, productos
en base a petr61eo, aceites penetrantes, etc.,
entren en contacto con partes de plastico.
Los quimicos pueden dafiar, debilitar o
destruir el plastico Io que puede causar
lesiones personales graves. $61o las partes
mostradas en la lista de partes pueden ser
reparadas o reemplazadas per el cliente. Todas las demas partes deben ser reemplazadas en un Centro de servicio autorizado.
,_,
iADVERTENCIA!
del suministro
de
suave.
no utilice
detergentes
o la manija.
aceites
aromaticos
come el kerosene.
ALMACENAMIENTO
Se pueden
come
pino
fuertes
dadar
y limdn,
en el armazon
debido
y a solventes
DE LA CORTADORA
DE ORtL-
• Limpie todo el material extrafio del producto.
• Almacene en un sitio bien ventilado que no sea
accesible para los nifios.
• Mantenga alejado de agentes corrosivos como
quimicos de jardin y sales descongelantes.
quier posici6n en las que pueda sufrir cortes.
No toque NUNCA las cuchillas o la unidad de
servicio con la linea electrica conectada.
GENERAL
Evite el uso de solventes cuando limpie las partes de
plastico. La mayoria de los plasticos son susceptibles al dafio de numerosos tipos De solventes
comerciales y se pueden dafiar si se utilizan en ellos.
Utilice telas limpias para remover la suciedad, polvo,
aceite, grasa, etc.
12--Espafiol
de
a ciertos
LAS
Las cuchillas son
afiladas. Cuando manipule el ensamble de
las cuchillas, use guantes protectores de alta
resistencia anti-deslizantes.
No coloque sus
manos o dedos entre las cuchillas o en cual-
MANTENIMIENTO
DE ORtLLAS
• Limpie la suciedad y esquirlas del cuerpo de la
cortadora de orillas utilizando una tela ht3meda con
plastico
Antes de inspeccionar,
limpiar o reparar la maquina, desconecte
el enchufe de la fuente de alimentaci6n y
espere que todas las partes en movimiento
se detengan. No seguir estas instrucciones
puede causar lesiones personales graves o
Dafio a la propiedad.
iADVERTENCIA!
LA CORTADORA
• SDetenga el motor y desconecte
electricidad.
detergente
iADVERTENClA!
_,
LIMPIAR
Your
For troubleshooting,
Home
product manuals and expert advice:
o ana e :,ife
For repair - in your home - of all major brand appliances,
lawn and garden equipment, or heating and cooling systems,
no matter who made it, no matter who sold it!
For the replacement parts, accessories and
owner's manuals that you need to do-it-yourself.
For Sears professional installation of home appliances
and items like garage door openers and water heaters.
1-800-4-MY-HOME
®
(1-800469-4663)
Call anytime, day or night (U.S.A. and Canada)
www.sears.com
www.sears.ca
Our Home
For repair of carry-in items like vacuums, lawn equipment,
and electronics, call anytime for the location of your nearest
Sears Parts & Repair Service
1-800-488-1222
(U.S.A.)
1-800-469-4663
www,sears.com
To purchase
(U.S.A.)
on a product serviced by Sears:
1-800-361-6665
Para pedir servicio de reparaci6n
a domicilio, y para ordenar piezas:
1-888-SU-HOGAR ®
(1-888-784-6427)
(Canada)
www,sears,ca
a protection agreement
1-800-827-6655
Center
(Canada)
Au Canada pour service en frangais:
1-800-LE-FOYER Mc
(1-800-533-6937)
Sears
www.sears.ca
TM
® Registered
Trademark
/
Trademark
of KCD IP, LLC in the United States, or Sears Brands,
LLC in other countries
® Marca Registrada
/ TM Marca de Fabrica de KCD IP, LLC en Estades
Unidos, o Sears Brands,
LLC in otres paises
MC
Marque
de commerce
/
MD
Marque
d6posee
de Sears
Brands,
LLC