1
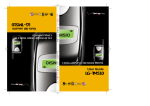
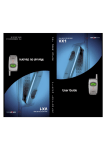
LG-TM510
L
G
T
M
5
1
0
d
e
l
CDMA/AMPS/PCS TRI MODE PHONE
G
u
í
a
User Guide
u
s
u
a
r
i
o
G
U
I
D
E
U
S
E
R
T
M
5
1
0
L
G
TELÉFONO DE MODO TRIPLE DE
CDMA/AMPS/PCS
Guía del usuario
LG-TM510
P/N: MMBB0027401 (1.4)
DATE: 2002. 03. 18
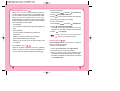
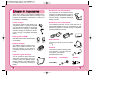
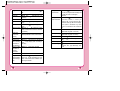
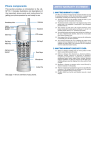
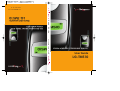
Phone components
LIMITED WARRANTY STATEMENT
The following shows the key components of your
mobile phone.
Cellcase
1. WHAT THIS WARRANTY COVERS:
LG offers you a limited warranty that the enclosed subscriber unit and
its enclosed accessories will be free from defects in material and
workmanship, according to the following terms and conditions:
The limited warranty for the product extends for ONE (1) year
beginning on the date of purchase of the product.
The limited warranty extends only to the original purchaser of the
product and is not assignable or transferable to any subsequent
purchaser/end user.
This warranty is valid only for the original purchaser of the product
during the warranty period as long as it is in the U.S., including
Alaska, Hawaii, U.S. Territories, and Canada.
The external housing and cosmetic parts are free of defects at the
time of shipment and, therefore, shall not be covered under these
limited warranty terms.
Upon request from LG, the consumer must provide information to
prove the date of purchase.
The customer shall bear the cost of shipping the product to the
Customer Service Department of LG. LG shall bear the cost of
shipping the product back to the consumer after completion of
service under this limited warranty.
Earpiece
LCD Screen
Antenna
Lamp
Soft Key1
Message Key
Soft Key2
Mouse Key
2. WHAT THIS WARRANTY DOES NOT COVER:
Defects or damages resulting from use of the product in other than
its normal and customary manner.
Defects or damages from abnormal use, abnormal conditions,
improper storage, exposure to moisture or dampness, unauthorized
modifications, unauthorized connections, unauthorized repair,
misuse, neglect, abuse, accident, alteration, improper installation,
or other acts which are not the fault of LG, including damage
caused by shipping, blown fuses, and spills of food or liquid.
Breakage or damage to antennas unless caused directly by defects
in material or workmanship.
That the Customer Service Department at LG was not notified by
consumer of the alleged defect or malfunction of the product
during the applicable limited warranty period.
Products which have had the serial number removed or made
illegible.
This limited warranty is in lieu of all other warranties, express or
implied either in fact or by operations of law, statutory or
Side Keys
Headset Jack
Alphanumeric
Keypad
Scroll Keys
Buzzer
Microphone
✂
Please refer to the overview descriptions of each
special feature on Page 9.
otherwise, including, but not limited to, any implied warranty of
marketability or fitness for a particular use.
Damage resulting from use of non-LG approved accessories.
All plastic surfaces and all other externally exposed parts that are
scratched or damaged due to normal customer use.
Products operated outside published maximum ratings.
Products used or obtained in a rental program.
Consumables (such as fuses.)
10 D r i v e r S a f e t y T i p s
Your wireless phone gives you the powerful ability to
communicate by voice almost anywhere, anytime. An important
responsibility accompanies the benefits of wireless phones, one
that every user must uphold.
3. STATE LAW RIGHTS:
When operating a car, driving is your first responsibility. When
using your wireless phone behind the wheel of a car, practice
good common sense and remember the following tips:
No other express warranty is applicable to this product. THE
DURATION OF ANY IMPLIED WARRANTIES, INCLUDING THE
IMPLIED WARRANTY OF MARKETABILITY, IS LIMITED TO
THE DURATION OF THE EXPRESS WARRANTY HEREIN. LG
INFOCOMM INC. SHALL NOT BE LIABLE FOR THE LOSS OF
USE OF THE PRODUCT, INCONVENIENCE, LOSS OR ANY
OTHER DAMAGES, DIRECT OR CONSEQUENTIAL, ARISING
OUT OF THE USE OF, OR INABILITY TO USE, THIS PRODUCT
OR FOR ANY BREACH OF ANY EXPRESS OR IMPLIED
WARRANTY, INCLUDING THE IMPLIED WARRANTY OF
MARKETABILITY APPLICABLE TO THIS PRODUCT.
1. Get to know your wireless phone and its features such as speed
dial and redial. Carefully read your instruction manual and
learn to take advantage of valuable features most phones offer,
including automatic redial and memory. Also, work to
memorize the phone keypad so you can use the speed dial
function without taking your attention off the road.
2. When available, use a hands-free device. A number of handsfree wireless phone accessories are readily available today.
Whether you choose an installed mounted device for your
wireless phone or a speaker phone accessory, take advantage of
these devices if available to you.
Some states do not allow the limitation of incidental or consequential
damages or limitations on how long an implied warranty lasts; so
these limitations or exclusions may not apply to you. This warranty
gives you specific legal rights and you may also have other rights
which vary from state to state.
4. HOW TO GET WARRANTY SERVICE:
3. Position your wireless phone within easy reach. Make sure you
place your wireless phone within easy reach and where you can
reach it without removing your eyes from the road. If you get
an incoming call at an inconvenient time, if possible, let your
voicemail answer it for you.
To obtain warranty service, please call the following telephone
number from anywhere in the continental United States:
Tel. 1-800-793-8896
www.lgeservice.com
Please call or write for the location of the LGE authorized service
center nearest you and to obtain warranty claim procedures.
4. Suspend conversations during hazardous driving conditions or
situations. Let the person you are speaking with know you are
driving; if necessary, suspend the call in heavy traffic or
hazardous weather conditions. Rain, sleet, snow and ice can be
hazardous, but so is heavy traffic. As a driver, your first
responsibility is to pay attention to the road.
Electronics Service
✂
201 JAMES RECORD ROAD, HUNTSVILLE, AL 35824
5. Do not take notes or look up phone numbers while driving. If
you are reading an address book or business card, or writing a
to-do list while driving a car, you are not watching where
you are going. It is common sense. Don t get caught in a
dangerous situation because you are reading or writing and not
paying attention to the road or nearby vehicles.
6.Dial sensibly and assess the traffic; if possible, place calls when
you are not moving or before pulling into traffic. Try to plan
your calls before you begin your trip or attempt to coincide
your calls with times you may be stopped at a stop sign, red
light or otherwise stationary. But if you need to dial while
driving, follow this simple tip -- dial only a few numbers,
check the road and your mirrors, then continue.
10. Call roadside assistance or a special wireless non-emergency
assistance number when necessary. Certain situations you
encounter while driving may require attention, but are not
urgent enough to merit a call for emergency services. But you
can still use your wireless phone to lend a hand. If you see a
broken-down vehicle posing no serious hazard, a broken
traffic signal, a minor traffic accident where no one appears
injured or a vehicle you know to be stolen, call roadside
assistance or other special non-emergency wireless number.
For more information, please call to 888-901-SAFE, or visit our
website www.wow-com.com
7. Do not engage in stressful or emotional conversations that may
be distracting. Stressful or emotional conversations and driving
do not mix; they are distracting and even dangerous when you
are behind the wheel of a car. Make people you are talking
with aware you are driving and if necessary, suspend
conversations which have the potential to divert your attention
from the road.
8. Use your wireless phone to call for help. Your wireless phone
is one of the greatest tools you can own to protect yourself and
your family in dangerous situations -- with your phone at your
side, help is only three numbers away. Dial 911 or other local
emergency number in the case of fire, traffic accident, road
hazard or medical emergency. Remember, it is a free call on
your wireless phone!
9. Use your wireless phone to help others in emergencies. Your
wireless phone provides you a perfect opportunity to be a
Good Samaritan in your community. If you see an auto
accident, crime in progress or other serious emergency where
lives are in danger, call 911 or other local emergency number,
as you would want others to do for you.
Provided by the Cellular Telecommunications Industry
Association
THIS PHONE MEETS THE GOVERNMENT’S
REQUIREMENTS FOR EXPOSURE TO RADIO
WAVES.
Your wireless phone is a radio transmitter and receiver. It
is designed and manufactured not to exceed the emission
limits for exposure to radio frequency (RF) energy set by
the Federal Communications Commission of the U.S.
Government. These limits are part of comprehensive
guidelines and establish permitted levels of RF energy for
the general population. The guidelines are based on
standards that were developed by independent scientific
organizations through periodic and thorough evaluation of
scientific studies. The standards include a substantial
safety margin designed to assure the safety of all persons,
regardless of age and health.
The exposure standard for wireless mobile phones
employs a unit of measurement known as the Specific
Absorption Rate, or SAR. The SAR limit set by the FCC is
1.6W/kg. Tests for SAR are conducted using standard
operating positions specified by the FCC with the phone
transmitting at its highest certified power level in all tested
frequency bands. Although the SAR is determined at the
highest certified power level, the actual SAR level of the
phone while operating can be well below the maximum
value. This is because the phone is designed to operate at
multiple power levels to use only the power required to
reach the network. In general, the closer you are to a
wireless base station antenna, the lower the power output.
Before a phone is available for sale to the public, it must
be tested and certified to the FCC that it does not exceed
the limit established by the government-adopted
requirement for safe exposure. The tests are performed in
positions and locations (e.g., at the ear and worn on the
body) as required by the FCC for each model. The highest
SAR value for this phone when tested for use at the ear is
1.42mW/g and when worn on the body, as described in
this user guide, is 1.33mW/g. (Body-worn measurements
differ among phone models, depending upon available
accessories and FCC requirements.) While there may be
differences between the SAR levels of various phones and
at various positions, they all meet the government
requirement for safe exposure.
The FCC has granted an Equipment Authorization for this
phone with all reported SAR levels evaluated as in compliance
with the FCC RF emission guidelines. SAR information on this
phone is on file with the FCC and can be found under the
Display Grant section of http://www.fcc.gov/oet/fccid after
searching on FCC ID BEJTM510.
Additional information on Specific Absorption Rates (SAR)
can be found on the Cellular Telecommunications Industry
Association (CTIA) website at http://www.wow-com.com
h
In the United States and Canada, the SAR limit for mobile
phones used by the public is 1.6 watts/kg (W/kg) averaged
over one gram of tissue. The standard incorporates a
substantial margin of safety to give additional protection for
the public and to account for any variations in
measurements.
SUBJECT
The LG-TM510 phone has been designed to operate
on the latest digital mobile communication technology,
Code Division Multiple Access (CDMA). CDMA digital
technology has greatly enhanced voice clarity and can
provide a variety of advanced features. Currently,
CDMA mobile communication technology has been
commercially used in Cellular and Personal
Communication Service (PCS).
The difference between them is the operating frequency
spectrum. Cellular uses 800 MHz and PCS uses 1.9
GHz. The LG-TM510 phone can operate on both
frequencies, so it is referred to as a dual-band phone.
Also, the LG-TM510 phone works on Advanced Mobile
Phone Service (AMPS). We call it a tri-mode phone. If
one of the Cellular, PCS, and AMPS base stations is
located nearby, the call fail rate of the tri-mode phone is
less than a dual-band phone or a single-band phone.
CDMA technology adopts DSSS (Direct Sequence
Spread Spectrum.) DSSS enables the phone to keep
communication discreet and allows one frequency
channel to be used by multiple users in the same
specific area, resulting in increased capacity 10 times
more compared to the analog mode currently used.
Soft/Softer Handoff, Hard Handoff, and Dynamic RF
power control technologies are combined into this
phone to reduce interruptions in a middle of a call.
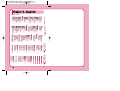
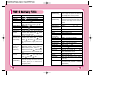
Cellular and PCS CDMA network consists of MSO
(Mobile Switching Office), BSC (Base Station Controller),
BTS (Base station Transmission System), and MS
(Mobile Station). The following table lists some major
CDMA Standards.
CDMA Standard
Designator
Description
TIA/EIA/IS-95-A
Protocol between MS and BTS for Cellular & AMPS
ANSI J-STD-008
Protocol between MS and BTS for PCS
TIA/EIA/IS-634
MAS-BS
TIA/EIA/IS/651
PCSC-RS
Basic air interface
Network
TIA/EIA/IS-41-C
Intersystem operations
TIA/EIA/IS-124
Nom-signaling data comm.
TIA/EIA/IS-96-B
Speech CODEC
TIA/EIA/IS-99
Assign data and fax
TIA/EIA/IS-637
Short message service
TIA/EIA/IS-657
Packet data
TIA/EIA/IS-97
Cellular base station
Service
Performance
TIA/EIA/IS-98
Cellular mobile station
ANSI J-STD-018
PCS personal station
ANSI J-STD-019
PCS base station
TIA/EIA/IS-125
Speech CODEC
Introduction
Highlights
Congratulations! Your new mobile phone will change your
way of communicating and is a compact, lightweight
personal communication system with added features for
the person on the go. Our advanced digital mobile
communication technology has the following features:
Large, easy-to-read, 5-Line, backlit LCD with status
icons.
Paging, messaging, voicemail, and caller ID.
18-key keypad.
Long battery standby and talk times.
Menu-driven interface with prompt for easy
operation and configuration.
Any key answer, auto redialing, one touch and
speed dialing with 199 memory locations.
Multi language (two languages: English and
Spanish.)
Optional accessories (see pages 72~73)
TSB -74: Protocol between an IS-95A system and
ANSI J-STD-008
1
Important Information
This user guide provides important information on the
use and operation of the phone. For best performance
and to prevent any unanticipated damage to, or misuse
of, the phone, please carefully read all of the information
in this manual prior to use. Any unapproved change or
modification will void your warranty.
Check Accessories
Your mobile phone comes with standard accessories of
a one-slot desktop charger and a rechargeable battery.
Please make sure that those accessories are included.
Before You Start
Safety Instructions
WARNING! To reduce the possibility of electric shock, do not
expose your phone to high humidity areas, such as the bathroom,
swimming pool, etc.
IMPORTANT! Please read the SAFETY AND GENERAL
INFORMATION on page 75 prior to using your phone.
FCC RF Exposure Information
WARNING! Read this information before operating the phone
In August 1996, the Federal Communications Committee
(FCC) of the United States with its action in Report and Order
FCC 96-326 adopted an updated safety standard for human
exposure to radio frequency (RF) electromagnetic energy
emitted by FCC regulated transmitters.
2
Those guidelines are consistent with the safety standard
previously set by both U.S. and international standards bodies.
The design of this phone complies with the FCC guidelines
and these international standards.
CAUTION
Use only the supplied and approved antenna. Use of
unauthorized antennas or modifications could impair call quality,
damage the phone, or result in violation of FCC regulations.
Do not use the phone with a damaged antenna. If the damaged
antenna comes into contact with skin, a minor burn may result.
Contact your local dealer for replacement of the antenna.
Body-worn Operation
This device was tested for typical body-worn operations with the
back of the phone kept
inch (2 ) from the body. To comply
with FCC RF exposure requirements, a minimum separation
distance of
inches (2 ) must be maintained between the
user’s body and the back of the phone, including the antenna,
whether extended or retracted. Third-party belt-clips, holsters,
and similar accessories containing metallic components should
not be used. Body-worn accessories that cannot maintain
inch (2 ) separation distance between the user’s body and the
back of the phone, and have not been tested for typical bodyworn operations may not comply with FCC RF exposure limits
and should be avoided.
Vehicle Mounted External Antenna
(optional, if available)
A minimum separation distance of 8 inches (20 ) must be
maintained between the user/bystander and the vehicle mounted
external antenna to satisfy FCC RF exposure requirements.
For more information about RF exposure, visit the FCC website
at www.fcc.gov
3
FCC Part 15 Class B Compliance
This device and its accessories comply with part 15 of
FCC rules. Operation is subject to the following two
conditions: (1) This device and its accessories may not
cause harmful interference, and (2) this device and its
accessories must accept any interference received,
including interference that cause undesired operation.
Caution For Battery Use
Do not disassemble.
Do not short-circuit.
Do not expose to high temperature: 60 C (140 F)
Do not incinerate.
Battery Disposal
Must be recycled or disposed of properly.
Caution For Adapter/Charger Use
Using the wrong battery adapter/charger may
damage your phone and void your warranty. The
battery may burst, causing injury and damage.
The adapter/charger is intended for indoor use only.
Do not expose the battery adapter/charger to direct
sunlight or use it in any place with high humidity, such
as the bathroom.
4
Contents
Introduction
1
Highlights
1
Important Information
2
Check Accessories
2
Before You Start
FCC RF Exposure Information
Chapter 1. Getting Started
2
2
8
Cautions
8
Phone Overview
9
Onscreen Icons
10
Entering Information Using T9 Text Input
11
Using the Battery
15
Chapter 2. Basic Functions
18
Turning the Phone On and Off
18
Making a Call
18
Correcting Dialing Mistakes
19
Receiving Calls
19
Using Quick Mode
20
Call Waiting
21
Mute
21
Redialing Calls
22
Adjusting the Volume
22
Power Save Mode
23
Signal Strength
23
5
Emergency Dialing
23
Old Text
61
Mini Display
24
Outbox
61
Speed Dialing
24
Erase Message
62
Caller ID
24
Setting
63
Phone Book Features
25
Browser Msg., Browser Set
63
Chapter 3. Menu Features
32
Chapter 6. Functions Used During a Call
64
General Guidelines to MENU Access and Settings 32
Mute
64
Sound
32
Memo
64
Display
35
Recording
64
System
36
Key Tone
64
Features
37
Voice Privacy
64
Utility
39
Security
40
Overview
65
Voice Service
42
Accessing the MiniBrowser
66
Browser Start
47
Chapter 8. Accessories
72
48
Chapter 9. Appendix
74
Call History
48
Chapter 10. Safety Guidelines
75
Chapter 4. Book Features
Phone Book
50
Scheduler
52
Scheduler Item Descriptions
53
Scheduler
53
Wake Up
54
My Phone#
55
Chapter 5. Message Features
65
Safety Information
75
FDA Consumer Update
78
Chapter 11. Frequently Asked Questions
84
56
Voice
57
Send Message
58
New Text
60
6
Chapter 7. MiniBrowser
7
Chapter 1. Getting Started
Cautions
Using the phone in proximity to receiving equipment
(i.e., TV or radio) may cause interference.
Phone Overview
Function
Lamp
Only authorized personnel should service the phone
and its accessories. Faulty installation or service may
result in an accident and may void your warranty.
Do not hold the antenna while the phone is in use.
Do not use the phone in designated No Cellular
Phone Use areas, such as near blasting areas or in
medical facilities.
Do not expose the phone to high temperature or
humidity.
Avoid getting your phone wet. If the phone gets wet,
turn the power off immediately and remove the
battery. If the phone malfunctions, return it to the
dealer for service.
Avoid shock or impact on the phone.
Use to place or answer calls.
Use to turn power on/off and to disconnect a call.
Use to return to the previous menu.
text and voicemail notification
Mouse Key Use to quickly access
messages.
calendar,
outgoing call log,
phonebook Find Name.
Cellcase
Soft Keys
,
Side Keys
Close the cellcase to end a call in progress.
Open the cellcase to answer an incoming call.
Soft Key 1 :
Use to display the function setting menu.
Soft Key 2
:
Use to go back one level in a menu.
Use to adjust key beep volume (in standby mode) and
earpiece volume (during a call).
Use to scroll through the memory locations and menu items.
- In standby mode, set the manner mode by pressing
.
Scroll Keys (for 2 seconds)
,
- In standby mode, set the lock mode by pressing
. (for
3 seconds)
AlphanuUse the keys to enter numbers, characters and choose menu
meric Keypad items.
Clear Key
8
The red light is illuminated when you turn the power on, when
you have incoming calls or messages.
LCD Screen Displays messages and indicator icons.
Keep your phone in a safe place when not in use.
Only use the batteries, antennas, and chargers
provided by LG. Using unauthorized accessories could
void your warranty.
Key Description
Use to backspace and delete a single space or character.
Press and hold to delete entire words.
When manual mode is selected from Voice Setup menu, if
you press
, your phone will prompt you to speak a
voice command. You can then access the programmed
phone number. (This feature is available only when voice
command is programmed.)
9
Onscreen Icons
Entering Information Using T9 Text Input
The phone screen displays several icons which appear
when the phone is powered on.
You can edit the Banner, Scheduler, Short Message
and Phone Book using T9 Text Input.
Key Functions
Icon
Description
Displays the current signal strength received
by the phone as indicated by the number of
bars on the screen.
No service
The phone is not receiving a system signal.
In use
A call is in progress.
No icon indicates the phone is in standby mode.
D
Digital indicator
Digital service is available.
Analog indicator
Analog service is available.
~
(Type Text): In T9 mode, press one key per
letter to enter text.
Indicates that a text message or voicemail has
been received.
~
(Type Numbers): In 123 (Numbers) mode, press
once to enter numbers.
Roaming
The phone is outside of its home service area.
Charge level
Indicates battery charge level.
10
(Up and Down): Press to scroll and select a mode
through menus.
(1) You can scroll through the modes using (Down)
key in the following order: T9En
Eng
123
Spc T9HLP T9En
(2) You can scroll through the modes using (Up) key
in the following order: T9En
T9HLP
Spc
123 Eng
T9En
- Within Phone book, you can change mode by pressing
Soft Key 2.
- SHIFT key (
): Used to change the letter case.
(Next): In T9 mode, press to display other matching
words.
(Punctuation): In T9 mode, press to insert punctuation
into a word and to complete a sentence.
(Shift): Press to change the letter case.
(Space): Press to complete a word or punctuation
and insert a space.
(Clear): Press to backspace and delete a single
space or character. Press and hold to delete entire
words.
11
Input mode
Initial Cap (T9En/Eng)
Text Input provides five modes for entering text,
numbers, special characters, and punctuation.
Only the first letter is capitalized.
T9En (T9) Mode
Type text using one keystroke per letter. The default is
T9 mode.
Eng (Multi-tap) Mode
Caps Lock (T9EN/ENG)
Press
to change letter case to Caps Lock.
All subsequent letters are capitalized.
Lowercase (T9en/eng)
Press
again to change letter case to lowercase.
Use ENG mode to add words to the T9 database.
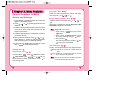
Examples Using T9 Text input
123 (Numbers) Mode
Typing In T9 Mode
Type numbers using one keystroke per number.
To change to 123 mode in a text entry field, press
until 123 mode is displayed.
To type a new message, follow these steps:
1. Press :
Spc (Special Characters) Mode
2
@3 /
1
4
1
5
?
6
,
4
7
’
8
&
9
-
7
(
~
2
)
3
\
1
5
”
6
#
4
]
8
{
9
}
7
=
2 ^
3
[
1
+
2
*
5
!
6
;
4
<
5
>6`
8
:
9$
7
8
9
T9HLP (T9Help) Mode
Display T9 Help Text.
Changing Letter Case
These are three options for selecting letter case:
12
.
3. Press :
You may use any of the 33 special characters. Enter
the number next to the character you want to insert. In
Spc mode press Mouse Key (
) to cycle through
the following characters:
.
to change letter case, if necessary.
2. Press :
Insert special characters and punctuation.
1
,
3
_
to complete the word and add a space.
4. Press :
.
5. Display : Call the office
Using the NEXT Key
After you have finished typing a word, if the word
displayed is not the word you want, press
to display
additional choices.
For example, follow these steps:
1. Press :
.
2. Display : Good
3. Press :
.
4. Display : Home, Gone, Hood......
13
Adding Words to the T9 Database
Using the Battery
If a word is not in the T9 database, add it using Eng
(Multi-tap) mode text entry. The word is automatically
added to the T9 database when you return to T9 mode.
For example, follow these steps:
Charge the battery fully before the initial use of
the phone.
1. Press :
mode
to change letter case to Eng (multi-tap)
2. Press :
.
3. Display : Imt
4. Press :
to change letter case to T9 mode and
then, the word of Imt will be added to the T9 database.
5. Press :
The phone comes with a rechargeable battery. Charge
the battery fully prior to using. Keep the battery
charged while not in use in order to maximize talk time
and standby time when using the phone.
Installing the Battery
To install the battery, insert the bottom of the battery
into the opening on the back of the phone. Then,
push the battery down until the latch clicks.
to erase the existing word of Imt
6. Press :
.
7. Display : got
8. Press :
.
9. Display : imt
Examples Using Eng (Multi-tap) Text Input
To type a new message in Eng (Multi-tap) Mode, follow
these steps:
1. Press :
to change letter case to Eng mode
2. Press :
to change to ENG Caps Lock mode
3. Press :
Removing the Battery
Turn the power off. (If power is on, a loss of stored
numbers and messages may occur.)
Lift the removal button to detach the battery.
.
4. Display : LG
14
15
Battery Charge Level
Red light indicates the battery is being charged.
The battery charge level is shown on the top right of
the LCD screen.
Green light indicates the battery is fully charged.
When the battery charge level becomes low, the low
battery sensor will alert you in three ways: Sounding
an audible tone, blinking the battery icon outline, and
displaying LOW BATTERY WARNING! If the battery
charge level becomes exceedingly low, the phone will
automatically power off and any function in progress
will not be saved.
Using the Desktop Charger
The desktop charger has a slot for recharging batteries.
The slot accommodates the phone and battery for
charging.
Warning! Use only the desktop charger provided with the
phone. Using the wrong charger may cause damage to
your phone or battery.
1. Plug the charger into a wall outlet.
The phone must be charged from a
110V power source only.
Charge time will vary, depending upon battery level.
Maximum charge time for a fully discharged battery
will not exceed 3 hours.
Caring for the Battery
1. To recharge the battery, you do not need to wait
until the battery is completely discharged.
2. Use only LG batteries and chargers. LG’s chargers
are designed to maximize battery life.
3. Do not disassemble or short-circuit the battery.
4. Keep the metal contacts of the battery clean.
5. Replace the battery when it no longer provides
acceptable performance. The battery may be recharged
five hundred times before it needs replacing.
6. Recharge the battery if it has not been used for a
long time to maximize the battery life.
7. Do not expose the battery charger to direct sunlight or
use it in high humidity areas, such as the bathroom.
8. Do not leave the battery in hot or cold places; this may
deteriorate the battery performance.
2. Insert the phone with an installed
battery, or a battery alone, into the slot
of the charger.
16
17
Chapter 2. Basic Functions
Turning the Phone On and Off
Turning the Phone On
1. Install a charged battery or connect the phone to an
external power source such as the cigarette lighter
adapter or hands-free kit.
2. Press
for a few seconds until the red light on
the middle of the phone flashes.
Fully extend the antenna for the best performance.
As with any other radio device, avoid any unnecessary
contact with the antenna while your phone is on.
Turning the Phone Off
1. Press and hold
until the display screen turns
off, then release the key.
2. Protect the antenna by pushing it back into the phone,
if extended.
Making a Call
When you make a call, follow these simple steps:
1. Make sure the phone is turned on.
If not, press
.
2. Enter the phone number, with area code, if needed.
3. Press
18
.
If the phone is locked, enter the lock code.
Call Failed indicates that the call did not go through.
This phone has been restricted on the display
screen means that outgoing call restricted mode
is turned on.
If you want to turn off this function, take the
following steps.
Menu
6 Security
No
Ok
Restrict
4. Press
Lock code insert
2
to disconnect the call.
Correcting Dialing Mistakes
If you make mistakes in dialing a number, press
once to erase the last entered digit or hold down
for at least two seconds to delete all digits, or simply
press Soft Key 2 Back to exit dialing state.
Receiving Calls
1. When the phone rings, open cellcase, or if cellcase
is open, press any key (except
,
,
) to
answer.
To mute the ringer during a call, press
or Side
Keys(
) once. The current call will stop ringing
or vibrating.
2. Press
to disconnect the call.
In call waiting mode, the present call is put on hold as
you answer another incoming call.
19
This service is provided by your service provider.
When the call waiting function is activated, your phone
will beep if you have an incoming call. Your phone may
also display the incoming caller’s identification.
To release Lock Mode
Press Soft Key 1 Unlock , then enter password
(4 digits).
Lock code (password) is commonly the last 4 digits of
your phone number.
Using Quick Mode
Manner Mode
Call Waiting
Use Manner Mode in a public place.
Your service provider may offer a call waiting function.
When using your phone, you may hear two beeps
indicating another incoming call. When call waiting is
enabled, you may put the active call on hold while you
answer the other incoming call. Check with your service
provider regarding this function.
1. Hold down
for 2 seconds and Manner Mode
will be activated.
When Manner Mode is set, Manner Mode is displayed
on the LCD screen.
When Manner Mode is set, the key tone does not
sound and the phone is automatically set to vibrate
mode for incoming calls.
To release Manner Mode, press
again until
Normal Mode Entered! is displayed.
Lock Mode
Use to prevent others from using your phone.
1. In standby mode, to activate Lock Mode, press
(for 3 seconds).
Lock Mode Setting! will be displayed.
20
1. Press
to receive a waiting call.
2. Press
again to switch between calls.
Mute
This function prevents your voice from being transmitted,
but you can still hear the other party.
1. Press Soft Key 1 Menu and
during a call.
2. To release Mute, press Soft Key 1 Menu and
again.
21
Redialing Calls
1. Press
to redial the last number in call history.
You can also redial any of the last 10 numbers
you have dialed. The last 10 numbers are stored
in the call history list. (See the Recent Call
History List on page 49.)
Adjusting the Volume
The volume key on the top of left side (Side Keys) of
the phone can be used to adjust earpiece, ringer, and
key beep volumes. The upper key is used to increase
and the lower key is used to decrease the volume.
You may adjust the earpiece volume during a call.
To adjust the ringer volume through the main
menu. Select Soft Key 1 Menu , select Sound,
then select Ring&Vib Vol. If you adjust the ringer
to a minimum the ringer will be muted and the
LCD displays -Ringer Off-.
The key beep volume is adjusted through Menu
feature.
Power Save Mode
When the phone is in an area without service for 15
minutes, it stops searching for service and enters into
Power Save Mode. When your phone activates this
feature, Power Save is displayed on the screen. The
phone automatically checks for service periodically or
you can check manually by pressing any key.
Signal Strength
The call quality depends on the signal strength in your
area. The current signal strength is displayed on LCD in
the upper left hand corner; the more bars, the better the
signal strength. If the signal quality is poor, move to an
open area. If you are in a building, the reception may be
better near a window. For maximum reception, make
sure that the antenna is fully extended.
Emergency Dialing
You can place calls to emergency number 911 - even
if your phone is locked or restricted.
1. Press
then
.
OR
1. Press and hold
22
(for more than 3 seconds).
23
Mini Display
The small LCD on the outside of the cellcase is called
the Caller ID LCD. It displays the latest of the following
information until the cellcase is open. Once the cellcase
is opened, the main LCD displays the event status.
Caller ID LCD will display the following information:
- Time and date.
- Caller’s information. (name or number)
If you have this feature, the phone number of the caller
will be displayed on the screen. If the screen reads,
Number is Unavailable then the caller has a call block
feature on his/her phone.
The name of the caller will appear on the screen
if the name and phone number of the person
calling is stored in the Personal Phone Directory
of your phone.
- Number of missed calls.
- Number of new messages.
Phone Book Features
- No service status and sleep mode.
You can store up to 198 entries in the phone book
with easy access to your most frequently dialed phone
numbers. (Entry 9 is reserved for emergency calls.)
Speed Dialing (see Dialing from Phone
Book on page 28)
Speed dialing is a convenient feature, allowing you to
make phone calls quickly and easily. Your phone
recalls the phone number from your personal directory,
displays it briefly, and then dials it.
1. Enter memory location number 1 to 199, except for
9. (Entry 9 is reserved for emergency calls.)
2. Press
. The phone will recall the number
from memory, display it, and then dial it.
Caller ID
You can only use this feature if your service provider
has this option available and has set up the feature on
your phone.
24
Personal Phone Book Memory
The phone has 198 personal phone book memory
locations where you can store up to 5 phone numbers
with 32-digit capacity on each phone number. (Entry 9
is reserved for emergency calls.)
Saving Numbers in Your Personal Phone Book
Memory locations 1 through 8 should be used for onetouch dialing for your most frequently used phone
numbers.
1. Enter phone number you want to save (up to 32
digits).
2. Press Soft Key 1Opt , then a sub-menu will appear.
3. Select Save on the sub-menu.
25
4. The phone prompts you for the memory location
where the number will be saved. Press Soft Key
1 Next to store the number automatically in the
first available memory location. You also have
the option to enter a specific three-digit memory
location number.
(Entry 9 is reserved for emergency calls.)
5. Select your desired label, such as Home, Office,
Mobile, Pager, Data / Fax using
.
6. Enter a name for the phone number (up to 16
characters). If you do not want to enter a name, go to
the next step.
7. Press Soft Key 1 Save . A confirmation prompt Saved!
Thanks! displays on the phone.
Retrieving Numbers
7. Press Soft Key 1 View to see specifics in that
memory location, or press
to place the call.
Retrieving Telephone Numbers
Retrieving Phone Numbers Using Memory Location.
Press Soft Key 2 Book on the initial display and select
Phone Book; Find Entry will be followed by an
inquiry of Entry #. Type in the Entry # of the desired
phone number.
To search telephone numbers, enter specific number(s)
in the initial display and press Soft Key 1 Ok . By
selecting Find on the sub-menu, the Entry List will
appear. Information linked to the entry will appear upon
selecting a telephone number for which details are
desired.
1. Press Soft Key 2 Book .
How do I add phone numbers, names, and email
address to a previously saved number in my
Personal Phone Book
2. Press Phone Book.
1. Press Soft Key 2 Book .
3. Press Find Name.
2. Press Phone Book, Find Entry.
4. Enter the character(s) that you want to search
for.
3. Enter the memory location number or press Soft Key
1 to View the entire phone book. Use the navigation
key to select entry and press Soft Key 1.
Retrieving by Name Search
5. Press Soft Key 1 Find .
The phone searches for names with that character
string. (Searches will ignore difference between
uppercase and lowercase letters.)
6. You will see a list of matches.
26
4. Highlight the desired Phone Number using the
navigation key to add or edit the location then press
Soft Key 1 View .
5. If you want to add the new number to the same
location, use
to highlight the label (Example
Home).
27
6. Use
then select another location such as Office,
Mobile, Pager, Data/Fax, E-Mail.
7. Use
, then enter the new number or email
address for the new location.
8. Press Soft Key 1 Save .
Three-Touch Dialing (Speed Dialing) This dialing
feature enables you to dial numbers in your phone
book through three keys (for locations 100 to 199).
1) Press the first and second digits.
2) Press and hold the key of the third digit.
Dialing from a Memory List
Dialing from Phone Book
You can place a call from any memory location either
by speed dialing or by pressing
while looking up
the memory location.
One-Touch Dialing One-touch dialing is a convenient
feature which enables you to dial frequently used
numbers in your personal Phone Book by pressing a
key (for memory locations 1 through 8).
For locations 1 to 8, you can use one-touch dialing (if
enabled, see One-Touch on page 39) by pressing and
holding down the key corresponding to the memory
location. (Entry 9 is reserved for emergency calls.)
OR
Press the corresponding key to the memory location,
then press
.
1) From a memory list, press the scroll keys to go to the
memory location you want.
2) Press
.
Dialing from a Memory Location
On viewing and checking the memory location to
call, press
.
Advanced Phone Book Features
You can edit existing phone numbers and add the
appropriate suffix. (For instance, calling an automated
answering machine or placing credit card calls.)
Enter the phone number and press Soft Key 1 Opt .
Then select from the following using
.
For Hard Pause (H)
The phone pauses until you press Soft Key 1
Resume to send the next number.
Two-Touch Dialing (Speed Dialing) This dialing
feature enables you to dial numbers in your phone
book through two keys (for locations 10 to 99).
For Time Pause (T)
1) Press the first digit.
2) Press and hold the key of the second digit.
The phone will pause for 2 seconds before sending
the next set of numbers.
OR
1) Press the first and second digits, then press
28
.
Most automated answering machines require
several timed pauses.
29
1. After you choose the type of pause, enter the
additional number(s) (e.g., your pin number or credit
card number.)
2. Select Soft Key 1 Opt . Then press Save to save this
number with pauses.
3. The phone prompts you for the memory location where
the number will be saved. Press Soft Key 1 Next to
automatically store the number in the first available
memory location. You also have the option to enter a
specific three-digit memory location number.
(Entry 9 is reserved for emergency calls.)
4. Select your desired label type, such as Home, Office,
Mobile, Pager, Data /Fax using
.
Adding an Area Code to a Number from the Call
History Log
Prepend can be used to add an area code to a phone
number in your call history log. To add the number and
make a call, select Soft Key 2 Book , press 1 for Call
History, select the phone number to be prepended,
press Soft Key 1 to select Opt , select View , type in the
area code and press send.
You cannot save the phone number from the
prepend stage. However, once you have made
your call, you can go to Call History and save
the number; the area code will be attached.
5. Enter a name for the phone number (up to 16
characters). If you do not want to enter a name, go to
the next step.
6. Press Save. A confirmation prompt Saved! Thanks!
displays on the phone.
30
31
Chapter 3. Menu Features
Ring Type
(Menu
)
Select one of four ring types (Ring, Vibrate, Vib+ Ring,
General Guidelines to MENU
Access and Settings
and Lamp) with
, or
,
Ring & Vibrate Volume
.
(Menu
)
1. Press Soft Key 1Menu . The three menu items will
appear on the display screen.
Adjust the volume of the ringer using
.
2. Press
,
features.
When lamp is selected, the message Ring Type is Not
Adjustable is displayed on the screen.
, or
to go through the list of menu
,
, or
3. Press the corresponding number to the menu item
you want to select. Then the sub-menu list will
appear on the screen.
1. Press Soft Key 1 Menu , then press number
4. Press the appropriate key to select the sub-menu
you want to access.
2. Press number
5. Select preferred settings, using
,
, or
.
Press Soft Key 2 Back to go one step backward
while accessing menu or selecting settings.
6. Press Soft Key 1 Ok to save the settings or Soft
Key 2 Back to cancel without saving.
Ringer Off on the screen
Sound.
Ring & Vib Vol. Increase
the volume of the ringer using the
button.
3. Press Soft Key 1 Ok .
Also make sure the Ring Type (Menu
then
) has not been set to Lamp.
Key Tone (Menu
)
Set Key Tone length and touch tone playback speed.
Sound (Menu
Ring Sound
)
(Menu
)
Press Soft Key 1 Menu . Press
Ring Sound. Press
,
Sound, then select
, or
until you
find the sound you desire. Then press Soft Key 1 Ok to
Normal: Sends out a tone for a fixed period of
time.
Long: Sends out a continuous tone for as long
as you keep the key pressed.
Use the volume buttons on the side of the phone
to increase and decrease the volume.
save the ring sound.
32
33
Dual-Tone Multi Frequency (DTMF). Signaling by
3. Service
(Menu
)
the simultaneous transmission of two tones, one
If on, alerts you when service changes.
from a group of low frequencies and another
When you enter a service area, the phone displays
Entering Service Area message.
When you leave a service area, the phone displays
Leaving Service Area message.
from a group of high frequencies. Each group of
frequencies consists of four frequencies. Setting
Key Beep length to Long will extend the DTMF
tone. Press MENU, then
Using
Key Volume
and press
.
select Long. Press Soft Key 1 Ok .
(Menu
)
Adjust the key beep volume (made when pressing the
key).
Earpiece Volume
(Menu
)
Adjust the earpiece volume during a call by pressing
the Side Keys.
4. Call Connect
(Menu
)
Alert tone notifies the user of the time when the call
is connected.
Display
Backlight
(Menu
)
(Menu
)
One of the four Alert options could be turned on.
Press Soft Key 1 Menu . Press
Sound. Press
Alerts.
Check each option and turn it off if desired.
Choose the settings of the LCD and keypad backlight.
10 seconds turns the backlight off 10 seconds after the
last key was pressed. 30 seconds turns the backlight
off 30 seconds after the last key was pressed. On
When Cellcase open means that the backlight is
always on while cellcase is open. Always off means
that the backlight is never on.
1. Fade
Banner
Alerts
(Menu
(Menu
)
)
Set an alert to inform you when you have lost a call or
lose services.
2. Minute
(Menu
)
Alerts you 10 seconds before the end of every minute
during a call.
34
(Menu
)
Press Soft Key 1 Menu .
Then press
Display. Press
Banner. Press Soft
Key 1 Opt . Select Edit. Then enter the string of characters
you want to be displayed (up to 16 characters). Then press
Soft Key 1 Save .
35
Theme
(Menu
)
Auto NAM
You can set up the screen displayed on the LCD screen
in standby mode. (Default, Star theme)
Language
(Menu
)
Set the Multi-language feature to your language
preference.
1. Press Soft Key 1 Menu .
Then
Display.
2. Press
Language.
Select the language then press Soft Key 1 Ok .
(English/Spanish)
Version
(Menu
)
(Menu
)
Allows the phone to automatically switch to one of the
programmed telephone numbers if it is operating in
the corresponding service provider area.
Force Call
(Menu
)
Makes next call in analog mode. You have 30 seconds
to place an analog call. This feature is typically used for
data applications.
Serving System
(Menu
)
You can identify the channel number of the system
which is served and SID Number.
This information is only for technical support.
View the software and PRL version.
Features
System
(Menu
System Select
Data/Fax
)
(Menu
)
Choose setting to control which cellular company your
phone uses. Leave this setting as default unless you
want to alter the system selection (as instructed by your
service provider).
Home is B (Automatic_B, Automatic_A, Home only)
is displayed.
Set NAM
(Menu
)
Select the phone’s NAM (Number Assignment Module)
if the phone is registered with multiple service providers.
(Menu
(Menu
)
)
In Data/Fax setting, data and faxes can be transmitted.
Wireless data communication services refer to utilization
of subscriber terminals for access to Internet with
personal computer or laptops at 8 Kbps or at maximum
of 13 Kbps.
Select Menu, then press
Features and then
Data/Fax.
Your service provider needs to activate your Data
Mode to be able to use the Data/Fax option. (Requires
Data Connection Kit)
Data In: This setting enables the subscriber terminal
to receive data calls.
Fax In: This setting enables the subscriber terminal to
receive fax transmittals.
36
37
The Data Connection Kit-your wireless connection
to the Internet and other dial-up networking
functions. This Kit lets you connect your PC,
Windows CE, or Palm OS device to your LG
wireless phone freeing you from having to locate a
telephone outlet. You can send or receive an email, a fax, or access the Internet any time, any
where.
Auto Answer
(Menu
Press Soft Key 1 Menu .
Then press
Features. Press
Auto Answer.
Select an option and press Soft Key 1 Ok .
Off
after 1 ring (or melody 5 seconds)
after 3 rings (or melody 10 seconds)
MACHINE Enable
When you have an incoming call, the phone automatically
responds with a pre-recorded voice message and records
the caller's message after 3 rings.
Auto Answer only works when the cellcase is
open.
(Menu
)
Set the length of time the phone waits before automatically
redialing a number when the attempted call fails.
off / every 10 seconds / every 30 seconds / every 60
seconds
38
(Menu
)
Enable/Disable one-touch dialing.
Voice Privacy
(Menu
)
Set the voice privacy feature for CDMA calls as Enhanced
or Standard CDMA offers inherent voice privacy. Check
with your service provider for availability of the enhanced
voice privacy mode.
)
Select the ring type before the phone automatically
answers a call. This feature is most commonly used with
the hands-free kit.
Auto Retry
One-Touch
Audio AGC
(Menu
)
Enable / Disable the function of Audio AGC system.
This feature provides a better audio experience by
enabling the Audio Gain Control (AGC) system to control
the dynamic range and volume of the sending and
receiving voice across different levels of speaker and
environments.
To enable / disable this function, Press Soft Key 1
Menu, then press
Features then press
Audio
AGC.
Utility
( Menu
Country Code
)
( Menu
)
You can search for the national code of all countries in
the world. (total 123 countries)
Calculator
(Menu
)
You can calculate simple mathematics.
(To the second decimal place)
For example: 25 100=2500
39
1) Press
and
2) Select
in order.
(multiplication) using
3) Press
,
4) Select
, and
.
, in order.
using Soft Key 1.
Then you will see the result of the calculation, 2500.
Security
(Menu
the call restriction to Yes or No (using
). Press Soft
Key 1 Ok .
If you set it to Yes you can only place calls to emergency
numbers and phone numbers stored in the memory
locations.
You can still receive calls in the restrict mode.
Clear Call
)
Press Soft Key 1 Menu and select
Security. Enter
your default lock code (last four digits of mobile phone
number or 0000). Select
New Lock Code. Enter the
new four-digit lock code of your choice. For confirmation,
the phone will prompt you to enter the New Lock Code
again.
(Menu
)
Helps you to protect your phone from unauthorized use
and once the phone is locked, the phone is restricted
from making most calls until the lock code is entered.
You can still receive phone calls and make emergency
calls while your phone is locked. Never means that the
phone is never locked. When locked, you can only
make emergency calls or receive incoming calls. On
power up means that the phone is locked when it is
turned on. Always means that the phone is always
locked.
Restrict
(Menu
)
Press Soft Key 1 Menu . Press
four-digit lock code. Then press
40
Security. Enter the
Restrict. Then set
)
Allows you to delete all the telephone numbers saved
in the Call History.
Press Soft Key 1 Menu . Press
Security. Then
enter the four-digit lock code. Press
Clear Call.
Select Yes using
. then press Soft Key 1 Ok .
Clear Data
Lock Mode
(Menu
(Menu
)
Deletes all information saved in memory locations (001199), schedule and message. (Entry 9 is reserved for
emergency calls.) Be careful since any deleted information
is not recoverable.
Emergency #
(Menu
)
Allows you to enter 3 emergency numbers (Edit
enter number
Save
). You can call these
numbers and 911 even when the phone is locked or
restricted.
New Lock Code
(Menu
)
New Lock Code allows you to enter a new four-digit lock
code number. For confirmation, it will ask you to enter
the new lock code twice. This is the same number as
the pin code.
41
Voice Service
(Menu
)
To record a message:
Allows you to use two voice-activated functions or
record conversations. By saying a programmed word,
you can make a call from your personal phone book.
When you have an incoming call, you can say a
programmed word to answer the call or send it directly
to your answering machine. Voice Service also enables
you to record phone conversations.
1. Press Soft Key 1 Menu , then press
- Voice Dialing
You can make a call by simply saying the programmed
word.
1. Press Soft Key 1 Menu , then press
- Voice Recording
You can recorde conversations over the phone.
- Voice Memo
Allows you to leave yourself a voice message.
- Auto Answering Machine (Voicemail)
Allows you to set your phone to direct incoming calls
to voicemail.
Voice Memo
(Menu
)
There are 2 options, playback or record. In playback
mode, you will have a list of recorded messages and
you can hear all recorded messages by pressing
.
42
2. Press
Voice Service.
Voice Memo, Record.
3. Press Ok to record voice and follow voice prompts.
4. Press any key to stop your recording.
To Play a Voice Memo:
Voice Service.
2. Press
Voice Memo, Playback.
The most recent voicemail appears on the top.
(Example: 01:17:00 000.1 V Voice or R Recorded.)
3. Select Opt then Replay.
From the main menu you can also hold down
until you get to playback Record.
Training
(Menu
)
Voice Command allows you to answer or send the
call to the answering machine.
To set up Voice Command:
1. Press
Voice Service, then
Training.
2. Practice the voice command (Yes/No).
3. When you receive a call, you say Yes, the call is
connected and say No the bell rings continuously.
This option is available only when phone is connected
to the hands-free kit.
43
Voice Service uses the pre-programmed message
and the caller can leave the message in voicemail
when you are not available to answer the phone.
You can play back the message later.
To activate this option:
Features.
2. Press
Auto Answer then use
Answer Machine.
and select
3. Press Soft Key 1 Ok .
(Menu
1. Enter the phone number that you want to save (up
to 32 digits).
2. Press Soft Key 1 Opt , then a sub-menu will appear.
3. Select Save on the sub-menu.
1. Press Soft Key 1 Menu. Then press
Undo Train
Saving Phone Numbers With Voice Dialing
)
4. The phone prompts you for the memory location
where the number will be saved. Press Soft Key 1
Next to automatically store the number in the first
available memory location. You also have the option
to enter a specific three-digit memory location
number. (Entry 9 is reserved for emergency calls.)
Allows you to delete the recorded voice command from
the practice.
5. Select your desired label type, such as Home,
Office, Mobile, Pager, or Data/Fax using
.
Voice Setup
6. Enter a name for the phone number (up to 16 characters).
If you do not want to enter a name, go to the next step.
(Menu
)
There are three options (Manual, Auto, and Disable)
for Voice Dialing. On manual mode, press
to
start this feature. On auto mode, this feature will be
available upon opening the cellcase. In Disable mode,
voice dialing is disabled when you press
,
disabled message will be displayed on the screen.
7. If you want the number with Voice Dialing, use
to highlight No Voice. Use
then select Voice
press Soft Key 1 Save .
8. Press Soft Key 1 Ok to enter Voice Training.
9. A prompt will announce Name Please. Say the
name and label associated with the phone number.
10. A second prompt is given. Again repeat the name
and label associated with the phone number. A
confirmation prompt is given Added, then Saved
successfully displays on the phone.
(You may store up to 20 phone numbers with Voice
Dialing.)
44
45
Adding the Voice Dialing Feature on a Previously
Saved Number
Using the Voice Dialing Feature When Making a
Call
1. Press Soft Key 1 Book .
1. Press Soft Key 1 Menu, then press number
Service.
2. Press number
Voice Set up.
2. Press Phone Book, Find Entry.
3. Phone will prompt you to select an entry by displaying
Enter Entry # on the display screen.
4. Enter the entry. If you press Soft Key 1 Ok without
selecting any entry, you may view the entire list saved
in your phone book.
5. Highlight the desired Phone Number using
to
add the Voice Dialing feature and then press Soft
Key 1 View .
6. If you want the number with Voice dialing, use
to highlight No Voice. Use the
then select Voice
press Soft Key 1 Save .
7. Press Soft Key 1 Ok to enter Voice Training.
8. A prompt will announce Name Please, say the name
and label associated with the phone number.
9. A second prompt is given. Again, repeat the name
and label associated with the phone number. A
confirmation prompt is given Added then Saved
successfully displays on the phone (You may store
up to 20 phone numbers with Voice Dialing.)
Voice
3. Use
then select one of the three options (Manual,
Auto, and Disable) for Voice Dialing.
On Manual Mode, press
to start this feature.
On Auto Mode, this feature will be available upon
opening the cellcase.
On Disable Mode, Voice Dialing is disabled when you
press
, the message will be displayed on the
screen.
To record the voice command, Press
while in
the hands-free kit and record the voice command
as per your preference.
When you hear Incoming call answer? in handsfree kit, if the user says yes the call is connected,
say no the bell rings.
Browser Start
(Menu
Press and hold down
Then press
)
or press Soft Key 1 Menu .
Browser Start.
See Chapter 7, MiniBrowser on page 65~71.
46
47
Chapter 4. Book Features
Call History (Book
)
Allows you to view the 30 most recently dialed phone
numbers. Once you exceed the 30-number storage
limit, the oldest call history record is overwritten. These
calls are divided into 3 types of calls.
Outgoing
(Book
)
Allows you to view list of the last 10 outgoing calls you
made. From the list you may place a call by pressing
.
Incoming
(Book
)
Allows you to view list of the last 10 incoming calls.
From the list you may place a call by pressing
.
Missed
(Book
3. Roam Calls
( Book
)
Allows you to keep a running count of the time you
spend making calls in non-service area. To reset the
call timer, press Soft Key 1 Opt , and then select Soft
Key 1 Sel after selecting Zero using
.
4. All Calls
( Book
)
Allows you to keep a running count of the time you
spend making all calls either in your service area or in
non-service area. Resetting the call timer is not possible.
Recent Call History List
Allows you to view the 30 most recent phone numbers.
Speed dialing for the phone numbers in Call History is
available.
1. Press Soft Key 2 Book .
2. Press Call History.
)
Allows you to view list of the last 10 missed calls. From
the list you may place a call to these numbers by pressing
.
3. Example: Press Outgoing.
Call Information
5. Press
to place a call or choose View of Soft
Key 1 Opt to see the details of the call. Press
Soft Key 1 Opt and select Save to save the
number in a memory location. (If you need further
information, please refer to pages 25~26.)
1. Last Call
(Book
( Book
)
)
Displays the time of last call made.
2. Home Calls
( Book
)
4. Press
, , or
to scroll through the last ten
calls and scroll to the number you want to call.
Allows you to keep a running count of the time you
spend making calls in your service area since last reset.
To reset the call timer, press Soft Key 1Opt , then select
Soft Key 1 Sel after selecting Zero using
.
48
49
Phone Book (Book
Find Entry
(Book
)
)
1. Press Soft Key 2 Book .
2. Press Phone Book, Find Entry.
3. Your phone will prompt you to enter an entry
number.
4. Enter an entry number. If you press Soft Key 1 Ok
without selecting an entry, you may view the entire
list saved in your phone book.
While you are viewing an entry, you may move to
another entry by pressing Up/Down(
)key. If
you press Soft Key 1 Opt , you can save or erase.
Find Name
(Book
)
1. Press Soft Key 2 Book .
2. Press number
Find Name.
Phone Book. Press number
3. Enter the letter(s) that you want to search for. (At
least three letters are required for a quick search.)
Then press Soft Key 1 Find . You will see a list of
matching names displayed on the screen. If the
name is found, the name will be displayed and if
the name is not found, Not Found message will
appear.
Add Entry
(Book
)
You can save telephone numbers, pager numbers,
and so on, up to 198 entries (Entry 9 is reserved for
emergency calls.)
1. Press Soft Key 2 Book .
2. Press Phone Book, Add Entry.
3. Enter the phone number, then press Soft Key 1
Next .
4. Select the memory location number.
5. Select the desired phone label using
.
6. Enter Name.
To enter an E-mail address, select E-mail from
label, press
to move to the available E-mail
addresses.
7. You may select the desired ID ring type, secret,
and voice recognition option using
.
8. Press Soft Key 1 Save when you are done.
Phone Type
Home
Entry of Home Phone Number
Office
Entry of Office Phone Number
Mobile
Entry of Mobile Phone Number
Pager
Entry of Pager Number
Data/Fax
Entry of Data/Fax Number
E-Mail
Entry of E-mail Address
On Find Name menu, you can change mode by
pressing
(T9En -> Eng -> 123 -> Spc -> T9HLP)
50
51
Find E-mail
(Book
Scheduler Item Descriptions
)
1. Press Soft Key 2 Book .
Scheduler (Book
2. Press Phone Book, Find E-mail.
Current date/year is displayed.
3. Enter the E-mail address you want to search for
and press Soft Key 1 Find . If the E-mail address
is found, the E-mail address will be displayed and
if the E-mail address is not found, Not Found
message will appear.
Select the item you want to view using
.
After selecting the required date, press Soft Key 1.
The selected schedule of date/year will appear on
the display screen (this function is available on Add
Event and View Daily menu only).
4. After selecting the E-mail address to edit from E-mail
list, press Soft Key 1 View , and the phone book
entry will be displayed.
5. After selecting E-mail label, press
the available entry to edit or delete.
to move to
6. To save, press Soft Key 1 Save .
To delete E-mail address: Move to the phone
book from either Find E-mail or Find Entry and
after selecting the E-mail label, press
to
move to the memory location, press and hold
for a while to delete E-mail address and
press Soft Key 1 Save to confirm.
Scheduler
Scheduler helps you to create and manage your agenda.
Your schedule is stored by date and your phone lets you
know when an agenda item comes due. You may also
take advantage of the Scheduler Wake up function.
52
)
Date/Time Edit - Time display is a 24-hour clock
setting (i.e., 6:30am = 06:30, 1:30pm = 13:30)
Using
, select the day.
Press Soft Key 1 (above the
key,) then select
Add Event. Change to the desired schedule time and
press Soft Key 1 Ok . Type the description, then press
Soft Key 1 Opt then Save.
This option is available in digital areas only. If you
are in an analog area, you will get an error
message No Time Info Is Available while you are
attempting to set up a schedule.
Add Event ( Book
(Soft Key 1)
)
Date/Time Edit.
After editing the date and time, press Soft Key 1
Ok .
Enter items for Scheduler.
Select Save in Soft Key 1 Opt .
53
View Daily
( Book
(Soft Key 1)
)
All events of the selected date are displayed.
You may select either Edit or Erase.
View All
( Book
(Soft Key 1)
This option is available in digital areas only. If you
are in an analog area, you will get an error message
Sys-Time Error Don’t Set Alert Time while you are
attempting to set up an Alarm.
Set Alarm ( Book
)
)
All stored entries are displayed.
Current time is displayed upon entering menu.
You may select either Edit or Erase.
Set time for alarm and press Soft Key 1 Save .
Erase All
( Book
(Soft Key 1)
At alarm time Wake Up is displayed and an alarm
will sound.
)
To delete information, scroll to Yes and press Soft
Key 1 Ok .
All items in Schedule will be deleted.
Erase Old
( Book
(Soft Key 1)
)
To delete information, scroll to Yes and press Soft
Key 1 Ok .
Past Scheduler items are deleted.
Wake Up
)
Set Alarm -Time display is a 24-hour clock setting
(i.e., 6:30am = 06:30, 1:30pm = 13:30).
)
Alarm will be deleted.
Wake up.
Set Alarm, then set time for alarm.
3. Press Soft Key 1 Save .
This option does not work if your Ring Type (Menu
Sound, then
Ring Type) has been set to Lamp.
54
Ring volume is controlled according to the setting
in reception mode. However, ringing (or vibration)
will not be heard when reception mode is set to
Lamp.
Erase Alarm ( Book
( Book
1. Press Soft Key 2 Book , then
2. Press
Ringing (or vibration) will stop when any key is
pressed or cellcase is opened.
My Phone# ( Book
)
To view your phone number:
Press Soft Key 2 Book and then press number
My Phone#. The number will be displayed on the
screen.
55
Chapter 5. Message Features
Text message, page, and voicemail box become available
as soon as the power is on. You can access these types
of messages using the Message Key
. In addition, you
can make a call to the callback number by pressing
during a message check.
The phone can store up to 30 messages (One voice
message, 29 text messages.) with 245 characters per
message. Your service provider may not provide the above
features.
Character limits: The LG-TM510 supports up to 245
characters per message including header information. Limits
to available characters per message may exist, please check
with your service provider for system capabilities.
The message information stored is determined by phone
mode and service capability. You can check types of
messages by pressing the Message Key
.
Types of Menu
Voice: Shows the number of messages in voicemail.
Send Msg
New Text: Newly received text messages.
Old Text: Opened but not erased text messages.
Outbox: Informs the status of the saved message.
Erase Msgs: Deletes all stored messages.
Setting: Selects alert type for new message(s).
Browser Msg
Browser Set
56
New Message Alert
There are four ways your phone alerts you of new
messages.
1. The phone displays the message on the screen.
2. One of four types is heard (if selected.)
3. The red light blinks.
4. The message icon is displayed on the display screen
. In the case of an urgent message, the icon will
flash and an asterisk mark will be displayed on both
sides of the message.
If you receive the same message twice, your
phone deletes the older one and the new one
is stored as DUPLICATE.
Voice (
)
Allows others to view the voice messages recorded in
the voicemail box.
If the callback number is available, press
a call to the callback number.
, to place
Checking of Voicemail Box
1. Press
(
).
2. Select
Voice.
3. Press
.
(If the callback number is available)
57
Out of Memory Warning
No more messages can be received until enough memory
space becomes available.
At this time, the message NOT ENOUGH MEMORY will
be displayed on the display screen and New Message is
rejected.
Send Message
(
)
Menu
Send To: This feature has a multiple address send
function, up to 10 different addresses.
There are four optional menus of Continue, Next Address,
Previous Address, and Phone Book.
Continue
Next address
Used to save the current address.
Allows you to enter the next sending
address.
Previous address Allows you to enter the previous
sending address.
Phone book
Allows you to refer to the address in
your phone book.
Msg: Allows you to enter the transmitted message.
There are four available optional menus of Send, Save,
Option, and Canned.
Canned Allows you to record up to 10 of the most
frequently used words.
10 texts: Yes, No, Call me, Need directions, Where
are you?, Will call later, Busy, On my way, Will arrive
15 minutes, Thank you.
Send
Used to send the message.
CB#
Used to enter the callback number.
Priority
Allows you to designate message priority,
Normal or Urgent.
Deferred Allows you to delay sending the message
until the programmed time frame.
Delaying time frame is as follows: Immediate, After 30
min., After 1 hour, After 2 hours, After 12 hours, After 1
day, and After 2 days.
Validity: Indicates the validity of the message delivered
to the Short Message Center (SMC) without being
transmitted to the sending address for certain period of
time. Those messages will be deleted within the
programmed time frame. Validity time frame is as
follows: 30 minutes, 1 hour, 2 hours, 12 hours, 1 day, 2
days, and Continue.
Delivery ACK: Allows you to be certain the message
transmission has gone through.
Send
Used to send the message.
When all fields are entered, press
message.
Save
Used to save sending address, callback
number, user data, current time.
Send, CB#, Priority, Deferred, Validity,
Delivery ACK are available options.
If you press
without a sending address, a warning
message is displayed on the display screen. When the
message has gone through, a confirmission message
is displayed on the screen. If the message has not
Option
58
to send the
59
gone through, the MSG not Delivered will be displayed
with one of the five failure reasons (Network Problem,
Not available, Invalid address, MSG too long, Not
support, or MSG failed).
New Text (
)
Reading Newly Received Text Messages
The latest message will be automatically displayed on
the screen. To scroll through the received messages,
use the
or
.
After reviewing a message, you can go to the next new
message by pressing
.
If you press Soft Key 1 Opt , then you can see 5 submenus:
Reply This function sends a reply to the SMS originating
address or E-mail address. If the SMS has both originating
address and E-mail address, the reply will be sent to the Email address only.
Forward Allows you to forward a message to a different
address or number.
Protect? Protects a message even when all the other
messages are deleted. There are two options of
disable and enable. When you select (protect?,) an
will be displayed in front of each message.
Auto Delete Function: If maximum storage capacity
is reached, old messages will be deleted when you
receive a new message. Messages that have been
protected will not be deleted.
Old Text (
)
1. Press
(
).
2. Select
Old Text.
1) Lists messages opened but not deleted by user.
2) The saved messages displayed on the screen
can be selected by pressing
.
Outbox
(
)
Displays the status of the messages recorded in the
voicemail box.
Status
Erase Deletes a message.
: Save
Save addr. Shows the phone number, E-mail list on
the LCD. You can save the phone number on the list
into phone book by pressing Soft Key 1 Save . If you
want to place a call to the number, press
.
: Send - Messages saved in Short Message Center
(SMC) have been transmitted.
You can see up to five E-mail addresses. The address
with @ is considered an E-mail address. On E-mail, if
you press Soft Key 1 Opt , you can save the E-mail
address into new or old entry.
60
: Fail
: Delivery - Message has been delivered.
: Cancel - Allows you to cancel sending a message.
: Multi - Sending address.
Option menu is available. Option menu includes View,
Erase, and Cancel.
61
Resend: Allows you to retransmit the selected message.
View: Shows the message saved currently.
The view menu has three sub-menus of Resend, Open,
and Erase.
Resend Allows you to retransmit the selected message.
Open
Used to copy the saved message.
Erase
Used to delete the recorded message.
Cancel Used when the message has not gone
through for some reason. If you press Soft Key 1 Save ,
the message you tried to transmit is erased.
Erase Message
Setting
)
All the voicemail box messages, text messages, and
pages are deleted when you select 6. Erase Message
from the Message Menu screen. Protected messages
will not be erased.
Erase Inbox (
)
)
There are many ways your phone alerts you of a new
voicemail message:
By displaying a message on the screen.
By sounding a beep or vibration.
By flashing a lamp.
Alert (
)
Allows you to select the alert type for a new message.
Alert types are 2 Alerts, 4 Alerts, Lamp, and Vibrate.
2Min Alert
(
(
(
)
User may select 2-min alert for reminder in case a new
message(s) is not opened.
Default CB#
(
)
Enables its own phone number to be verified on call back
menu.
Deletes all unprotected records in the inbox.
Auto Save
Erase Outbox
Setting menu to save sent messages in the outbox
automatically.
(
)
Allows you to delete all the information saved in the
outbox.
Erase All
(
)
Allows you to delete all the information saved in the
outbox and inbox.
(
Auto Delete
)
(
)
Setting menu to delete the messages automatically
when you exceed storage limit.
Browser Msg. (
)
Browser Set (
)
See Chapter 7. MiniBrowser on pages 65~71.
62
63
C h a p t er 6. F u n c t io n s Us ed Du r in g a C a ll
Mute (During a call: Menu
)
Sometimes it is necessary to mute a call so that the
caller does not hear you or certain background
noise. To use this function during a call, press Soft
Key 1 Menu and
.
To cancel mute, press Soft Key 1 Menu and
again.
Memo (During a call: Menu
)
Provides a place to take notes. You can use it like a
piece of paper to take a note during a meeting.
Recording (During a call: Menu
)
Allows you to record the conversation over the phone
by pressing
. This operation toggles between
Enable and Disable.
Key Tone (During a call: Menu
)
Set key beep length and touch tone playback speed.
Normal Sends out a tone for a fixed duration, no
matter how long you press the key.
Long Sends out a continuous tone, as long as
you keep the key pressed.
Voice Privacy (During a call: Menu
)
Set the voice privacy feature for CDMA calls as
Enhanced or Standard:
CDMA offers inherent voice privacy. Check with your
service provider for availability of the enhanced voice
privacy mode.
64
Chapter 7. MiniBrowser
The MiniBrowser feature allows you to view Internet
content specially designed for the mobile phone interface.
Access and selections within this feature are service
provider dependent.
For specific information on MiniBrowser access through
your phone, refer to your service provider.
Overview
The MiniBrowser allows the user to use a variety of
Internet services. Using the MiniBrowser on the phone
allows you to:
Send and receive E-mail.
Browse and search the World Wide Web via web
pages specially designed for cellular customers.
Set bookmarks to directly access your favorite sites.
Retrieve information such as stock quotes and flight
schedules from the Internet.
Quality of Browser
Browsing the web via the phone is not like using your
home computer. Site providers have selected only the
critical aspects of their site to present to wireless phone
users and have removed most graphics.
Billing
Each time you start the MiniBrowser, the phone will
connect to the Nationwide Network as necessary, the
phone icon (In Use Icon) will appear on the display
screen, and you will be billed accordingly. Rates will
vary according to your billing plan.
65
Each time you start the MiniBrowser you will view a
reminder that you will be billed for the connection time.
If you wish to disable this reminder, follow the steps
below:
1. Message Menu
Prompt
.
Browser Set
While using the MiniBrowser, you will find that on screen
items may be presented in one of the following ways:
numbered options (some options may not be
numbered).
links (embedded in content).
2. Disable the reminder by selecting None using
.
Accessing the MiniBrowser
You can access the MiniBrowser by pressing and
holding
in the initial screen or by selecting the
item from Main Menu screen.
Start MiniBrowser ( Menu
Navigating through the Browser
simple text.
You can act on the options or the links by making use
of Soft Keys. The Soft Keys are just below the display
screen.
Navigator Keys
Scrolling Up/Down by Item
)
1) From the Main Menu, highlight 8. Browser Start
and press Soft Key 1 Sel .
2) A reminder of the charge will appear; press Soft
Key 1 Yes to launch the MiniBrowser if required.
3) After a few seconds, you will see the Home Page.
You can use your
to scroll through the content if the
current page does not fit into one screen. The currently
selected item is indicated by a cursor on the screen,
and the
will also move the cursor.
Fast Scrolling Up/Down
By pressing and holding
through the menus.
Ending a MiniBrowser Session
You can end a MiniBrowser session by pressing
text or numeric input.
the cursor will scroll quickly
.
If the prompt To end or Both option is set in the
MiniBrowser Setup, you will be prompted whether you
want to end the browser call. (Message Menu
Browser Set
Prompt
.)
Scrolling Up/Down by Page
Press Side Keys to move screen page up and down.
Go to Home Page
To go back to the Home Page, press and hold
.
Ending Browser calls - Users should be able to end a
browser session by pressing
.
66
67
View Browser Menu
Soft Key 2
Press and hold
to use browser menu when the
MiniBrowser is being used.
The Soft Key 2 is used primarily for secondary options
or a menu of secondary options.
Clearing out text/number entered
Entering Text, Numbers, or Symbols
When entering text or numbers, press
to clear the
last number, letter, or symbol. Press and hold
to
completely clear the input field.
When you are prompted to enter text, the current text
entry method will appear under the Soft Key 2 as Alpha,
Smart, Number, or Symbol. (exact label depends on
implementation)
Selecting and activating items using Soft Keys and/ or
digits
To change the input mode, use Soft Key 2.
If the items on a page are numbered, you can use
your keypad (number) keys or
to select an item, or
you can select the items by moving the cursor and
selecting the appropriate Soft Keys.
Soft Keys
To navigate to different screens or select special
functions, use the Soft Keys. Soft Keys are just below
the display screen. Note that the function associated with
the Soft Keys can change on each page and depends
on each highlighted item.
Soft Key 1
The Soft Key 1 is used primarily for first options or selecting
item but its function may change, depending on the content
displayed.
68
To enter an uppercase character, in Alpha or Smart
mode only, press
before selecting the letter you
wish to capitalize.
Initiating a phone call from the MiniBrowser
You may initiate a phone call from the MiniBrowser if
the site you are using supports the feature, (the phone
number may be highlighted and Soft Key 1 will appear
as Call).
The browser connection will be terminated when you
initiate the call. After you end the call, your phone will
return to the screen from which you initiated the call.
Using Bookmarks
You can bookmark many individual pages for easy
access at a later time. Bookmarks save you time by
reducing the number of steps it takes to access a desired
page.
69
To create a bookmark:
Browser Setting (Message Menu
Go to the page that you want to mark. On the browser
menu, select Mark Site or press and hold
.
Type of Browser Setting Menu.
If the page has a title, it will be automatically used for the
name of the bookmark. When the bookmark is saved
you can change the bookmark name if you want.
Selecting Save will save the name and add the page to
your list of bookmarks.
A message will appear confirming that the bookmark
was added to the list. Select Soft Key 1 Ok to return to
the screen that you marked to resume navigation
within the MiniBrowser.
The new bookmark is added to the bottom of your
bookmark list.
Finding a Bookmark
From the Home Page or press and hold
the bookmark you want.
-> Browser Set
)
Prompt: A prompt will display on the LCD just prior to
launching the browser; this is to inform the user that this
call will incur a usage charge. This step is used to
prevent accidental activation of the browser since all
subscribers will be provided with browser capabilities
automatically.
A message is also available to inform the users whether
or not they want to exit the browser after they press
. Users can disable the extra step (or enable if it is
disabled) through a menu option. (To end, None, To start,
and Both.)
Alert Sound: There are 3 types of beeps that the user
can assign to a browser message alert; 2 Beeps, 4
Beeps, or Mute.
, then select
Or
From the Home Page, press and hold the number
associated with the bookmark in the bookmark list.
Browser Message (Message Menu
-> Browser Msg
)
This will display any browser messages or alerts.
70
71
Hands-Free Car Kit (Portable)
Chapter 8. Accessories
There are a variety of accessories available for the
phone. You can select these options according to your
personal communication requirements. Consult your
local dealer for availability.
The hands-free car kit, model PHF-30W,
enables you to attach the phone to the car
providing you with hands-free operation. It
will also charge a completely discharged
battery in 5 hours.
Travel Charger
Hands-Free Car kit (Installed)
This charger, model TC-10W, allows you to
charge the battery. It supports standard
U.S. 120 Volt 60 Hz outlets. An orange light
indicates that it is charging, a green light
indicates charging is complete. It takes 5
hours to charge a completely discharged
battery.
The installed hands-free car kit, model IHF-51W, is
permanently installed in your car, and provides you with
hands-free operation. It will also charge a completely
discharged battery as shown.
Battery (LGLi-AAEM)
Standard battery and Extended battery
are available.
Desktop Charger
The desktop charger, model DC-41W,
allows you to place the phone in the
stand for charging. It can charge a
completely discharged battery in 3
hours.
Cigarette Lighter Charger
You can operate the phone and trickle
charge the phone’s battery from your
vehicle by using the cigarette lighter
charger, model CLC-11W. It takes 5 hours
to charge a completely discharged
battery.
72
Data Cable Kit
Standard
battery
Extended
battery
Connects your phone to your PC. (Model
KW- )
Headset
Connects to your phone, allowing handsfree operation. Includes earpiece,
microphone, and mute key.
(Model Headset 1000)
Hand strap
AC Adaptor
Holster
73
Chapter 9. Appendix
Menu Tree
or
/
Scheduler
1. Prompt
2. Alert Sound
Browser Set
Browser Msg
1. Alert
2. 2 Min Alert
3. Default CB#
4. Auto Save
5. Auto Delete
Setting
1. Erase Inbox
2. Erase Outbox
3. Erase All
Erase Msgs
Outbox
OldText
NewText
Send Msg
Voice
Press Mouse Key
Press Soft Key 2 Book .
or
Press
or
to scroll. Press
/
/
1. Outgoing
2. Incoming
3. Missed
4. Call Info
Call History
Utility
Phone Book
Security
1. Lock mode
Never
On power up
Always
2. Restrict
3. Clear Call
4. Clear Data
5. Emergency #
6. New Lock Code
1. Set Alarm
2. Erase Alarm
1. Add Event
2. View Daily
3. View All
4. Erase All
5. Erase Old
1. Voice Memo
2. Training
3. Undo Train
4. Voice Setup
My Phone #
Wakeup
Browser Start
Voice Service
1. Find Entry
2. Find Name
3. Add Entry
4. Find Email
1. Country Code
2. Calculator
every 60 seconds
4. One-Touch
5. Voice Priv.
6. Audio AGC
to scroll.
1. Data/Fax
Off
Fax In
Data In
2. Auto Answer
Off
after 1 ring
after 3 rings
MACHINE Enable
3. Auto Retry
Off
every 10 seconds
every 30 seconds
Features
1. System Sel
Automatic_A
Automatic_B
Home only
2. Set NAM
3. Auto NAM
4. Force Call
5. Serving Sys
System
Star theme
4. Language
5. Version
Press Soft Key 1Menu . Press
Sound
1. Ring Sound
2. Ring Type
Ring
Vibrate
Vib +Ring
Lamp
3. Ring & Vib Vol.
4. Key Tone
Normal
Long
5. Key Volume
6. Ear Volume
7. Alerts
Fade
Minute
Service
Call Connect
Display
1. Backlight
10 seconds
30 seconds
On when
Cellcase open
Always off
2. Banner
3. Theme
Default
.
to scroll.
74
Chapter 10. Safety Guidelines
Safety Information
Exposure to Radio Frequency Signal
Your wireless handheld portable telephone is a low power radio
transmitter and receiver. When it is ON, it receives and also sends
out radio frequency (RF) signals.
European and international agencies have set standards and
recommendations for the protection of public exposure to RF
electromagnetic energy.
International Commission on Non-Ionizing Radiation Protection
(ICNIRP) 1996
Verband Deutscher Elektrotechnik (VDE) DIN-0848
Directives of the European Community, Directorate General V in
Matters of Radio Frequency Electromagnetic Energy
National Radiological Protection Board of the United Kingdom,
GS 11, 1988
American National Standards Institute (ANSI) IEEE C95.1-1992
National Council on Radiation Protection and Measurements
(NCRP), Report 86
Department of Health and Welfare Canada, Safety Code 6
Those standards were based on comprehensive and periodic
evaluations of the relevant scientific literature. Over 120 scientists,
engineers, and physicians from universities, government health
agencies, and industry reviewed the available body of research to
develop the ANSI Standard (C95.1).
The design of your phone complies with these standards when used
normally. Use only the supplied or an approved replacement
antenna. Unauthorized antennas, modifications, or attachments
could damage the phone and may violate FCC regulations.
Efficient Phone Operation
Normal Position
Hold the phone as you would any other telephone with the antenna
pointed up and over your shoulder.
Tips on Efficient Operation:
For your phone to operate most efficiently;
75
Extend your antenna fully
Do not touch the antenna unnecessarily when the phone is in
use. Contact with the antenna affects call quality and may cause
the phone to operate at a higher power level than otherwise
needed.
For Vehicles Equipped with an Air Bag
An air bag inflates with great force. DO NOT place objects, including
both installed or portable wireless equipment, in the area over the air
bag or in the air bag deployment area. If in-vehicle wireless equipment
is improperly installed and the air bag inflates, serious injury could
result.
Batteries
Caution: All batteries can cause property damage, injury, or burns if a
conductive material, such as jewelry, keys, or beaded chains, touches
exposed terminals. The material may complete an electrical circuit
and become quite hot. To protect against such unwanted current
drain, exercise care in handling any charged battery, particularly when
placing it inside your pocket, purse, or other container with metal
objects. Your batteries are packed with a protective battery cover.
When the battery is detached from the phone, please use this cover
for storing your batteries when not in use.
Check the laws and regulations on the use of wireless phones in the
areas where you drive. Always obey them.
Also, if using your phone while driving, please:
Give full attention to driving — driving safely is your first responsibility;
Use hands-free operation, if available;
Pull off the road and park before making or answering a call if
driving conditions so require.
Most modem electronic equipment is shielded from RF signals.
However, certain electronic equipment may not be shielded against
the RF signals from your wireless phone.
Pacemakers
The Health Industry Manufacturers Association recommends that a
minimum separation of six (6”) inches be maintained between a
handheld wireless phone and a pacemaker to avoid potential
interference with the pacemaker. These recommendations are
consistent with the independent research by and recommendations of
Wireless Technology Research.
76
Persons with pacemakers
Should ALWAYS keep the phone more than six inches from their
pacemaker when the phone is turned ON
Should not carry the phone in a breast pocket
Should use the ear opposite the pacemaker to minimize the
potential for interference
If you have any reason to suspect that interference is taking place,
turn your phone OFF immediately.
Hearing Aids
Some digital wireless phones may interfere with some hearing aids.
In the event of such interference, you may want to consult your
hearing aid manufacturer to discuss alternatives.
Other Medical Devices
If you use any personal medical device, consult the manufacturer of
your device to determine if they are adequately shielded from external
RF energy. Your physician may be able to assist you in obtaining this
information. Turn your phone OFF in health care facilities when any
regulations posted in these areas instruct you to do so. Hospitals or
health care facilities may be using equipment that could be sensitive
to external RF energy.
Vehicles
RF signals may affect improperly installed or inadequately shielded
electronic systems in motor vehicles. Check with the manufacturer or
its representative regarding your vehicle. You should also consult the
manufacturer of any equipment that has been added to your vehicle.
Posted Facilities
Turn your phone OFF in any facility where posted notices so require.
FCC regulations prohibit using your phone while in the air. Turn OFF
your phone before boarding an aircraft.
To avoid interfering with blasting operations, turn your phone OFF
when in a blasting area or in areas posted Turn off two-way radio.
Obey all signals and instructions.
77
Turn your phone OFF when in any area with a potentially explosive
atmosphere and obey all signs and instructions. Sparks in such areas
could cause an explosion or fire resulting in bodily injury or even
death.
Areas with a potentially explosive atmosphere are not always clearly
marked. They include fueling areas such as gasoline stations; below
deck on boats; fuel or chemical transfer or storage facilities; vehicles
using liquefied petroleum gas (such as propane or butane;) areas
where the air contains chemicals or particles, such as grain, dust, or
metal powders; and any other area where you would normally be
advised to turn off your vehicle engine.
FDA Consumer Update
The FDA has been receiving inquiries about the safety of mobile
phones, including cellular phones and PCS phones. The following
summarizes what is known — and what remains unknown — about
whether these products can pose a hazard to health, and what can be
done to minimize any potential risk. This information may be used to
respond to questions.
Why the concern?
Mobile phones emit low levels of radiofrequency energy (i.e.,
radiofrequency radiation) in the microwave range while being used.
They also emit very low levels of radiofrequency energy (RF),
considered non-significant, when in standby mode. It is well known
that high levels of RF can produce biological damage through heating
effects (this is how your microwave oven is able to cook food).
However, it is not known whether, to what extent, or through what
mechanism, lower levels of RF might cause adverse health effects as
well. Although some research has been done to address these
questions, no clear picture of the biological effects of this type of
radiation has emerged to date. Thus, the available science does not
allow us to conclude that mobile phones are absolutely safe, or that
they are unsafe. However, the available scientific evidence does not
demonstrate any adverse health effects associated with the use of
mobile phones.
What kinds of phones are in question?
Questions have been raised about handheld mobile phones,
especially the kind that have a built-in antenna that is positioned close
to the user’s head during normal telephone conversation. These
78
types of mobile phones are of concern because of the short distance
between the phone’s antenna — the primary source of the RF — and
the person’s head. The exposure to RF from mobile phones in which
the antenna is located at greater distances from the user (on the
outside of a car, for example) is drastically lower than that from
handheld phones, because a person’s RF exposure decreases rapidly
with distance from the source. The safety of so-called cordless
phones, which have a base unit connected to the telephone wiring in a
house and which operate at far lower power levels and frequencies,
has not been questioned.
How much evidence is there that handheld mobile phones might be
harmful?
Briefly, there is not enough evidence to know for sure, either way;
however, research efforts are ongoing.
The existing scientific evidence is conflicting and many of the studies
that have been done to date have suffered from flaws in their research
methods. Animal experiments investigating the effects of RF
exposures characteristic of mobile phones have yielded conflicting
results. A few animal studies, however, have suggested that low levels
of RF could accelerate the development of cancer in laboratory
animals. In one study, mice genetically altered to be predisposed to
developing one type of cancer developed more than twice as many
such cancers when they were exposed to RF energy compared to
controls. There is much uncertainty among scientists about whether
results obtained from animal studies apply to the use of mobile
phones. First, it is uncertain how to apply the results obtained in rats
and mice to humans. Second, many of the studies that showed
increased tumor development used animals that had already been
treated with cancer-causing chemicals, and other studies exposed the
animals to the RF virtually continuously — up to 22 hours per day.
For the past five years in the United States, the mobile phone industry
has supported research into the safety of mobile phones. This
research has resulted in two findings in particular that merit additional
study:
In a hospital-based, case-control study, researchers looked for an
association between mobile phone use and either glioma (a type of
brain cancer) or acoustic neuroma (a benign tumor of the nerve
sheath). No statistically significant association was found between
mobile phone use and acoustic neuroma. There was also no
association between mobile phone use and gliomas when all types of
types of gliomas were considered together. It should be noted that the
79
average length of mobile phone exposure in this study was less than
three years.
When 20 types of glioma were considered separately, however, an
association was found between mobile phone use and one rare type
of glioma, neuroepithelliomatous tumors. It is possible with multiple
comparisons of the same sample that this association occurred by
chance. Moreover, the risk did not increase with how often the
mobile phone was used, or the length of the calls. In fact, the risk
actually decreased with cumulative hours of mobile phone use. Most
cancer causing agents increase risk with increased exposure. An
ongoing study of brain cancers by the National Cancer Institute is
expected to bear on the accuracy and repeatability of these results.
1. Researchers conducted a large battery of laboratory tests to
assess the effects of exposure to mobile phone RF on genetic
material. These included tests for several kinds of abnormalities,
including mutations, chromosomal aberrations, DNA strand breaks,
and structural changes in the genetic material of blood cells called
lymphocytes. None of the tests showed any effect of the RF except
for the micronucleus assay, which detects structural effects on the
genetic material. The cells in this assay showed changes after
exposure to simulated cell phone radiation, but only after 24 hours of
exposure. It is possible that exposing the test cells to radiation for this
long resulted in heating. Since this assay is known to be sensitive to
heating, heat alone could have caused the abnormalities to occur.
The data already in the literature on the response of the micronucleus
assay to RF are conflicting. Thus, follow-up research is necessary.
2. The FDA is currently working with government, industry, and
academic groups to ensure the proper follow-up to these industryfunded research findings. Collaboration with the Cellular
Telecommunications Industry Association (CTIA) in particular is
expected to lead to FDA providing research recommendations and
scientific oversight of new CTIA-funded research based on such
recommendations.
Two other studies of interest have been reported recently in the
literature:
Two groups of 18 people were exposed to simulated mobile phone
signals under laboratory conditions while they performed cognitive
function tests. There were no changes in the subjects’ ability to recall
words, numbers, or pictures, or in their spatial memory, but they
were able to make choices more quickly in one visual test when they
were exposed to simulated mobile phone signals. This was the only
change noted among more than 20 variables compared.
80
3. In a study of 209 brain tumor cases and 425 matched controls,
there was no increased risk of brain tumors associated with mobile
phone use. When tumors did exist in certain locations, however, they
were more likely to be on the side of the head where the mobile phone
was used. Because this occurred in only a small number of cases, the
increased likelihood was too small to be statistically significant.
4. In summary, we do not have enough information at this point to
assure the public that there are, or are not, any low incident health
problems associated with use of mobile phones. The FDA continues to
work with all parties, including other federal agencies and industry, to
assure that research is undertaken to provide the necessary answers
to the outstanding questions about the safety of mobile phones.
What is known about cases of human cancer that have been reported
in users of handheld mobile phones?
Some people who have used mobile phones have been diagnosed
with brain cancer. But it is important to understand that this type of
cancer also occurs among people who have not used mobile phones.
In fact, brain cancer occurs in the U.S. population at a rate of about 6
new cases per 100,000 people each year. At that rate, assuming 80
million users of mobile phones (a number increasing at a rate of about
1 million per month), about 4800 cases of brain cancer would be
expected each year among those 80 million people, whether or not
they used their phones. Thus it is not possible to tell whether any
individual’s cancer arose because of the phone, or whether it would
have happened anyway. A key question is whether the risk of getting a
particular form of cancer is greater among people who use mobile
phones than among the rest of the population. One way to answer that
question is to compare the usage of mobile phones among people
with brain cancer with the use of mobile phones among appropriately
matched people without brain cancer. This is called a case-control
study. The current case-control study of brain cancers by the National
Cancer Institute, as well as the follow-up research to be sponsored by
industry, will begin to generate this type of information.
What is the FDA’s role concerning the safety of mobile phones?
Under the law, the FDA does not review the safety of radiationemitting consumer products such as mobile phones before marketing,
as it does with new drugs or medical devices. However, the agency
has authority to take action if mobile phones are shown to emit
radiation at a level that is hazardous to the user. In such a case, the
FDA could require the manufacturers of mobile phones to notify users
of the health hazard and to repair, replace, or recall the phones so that
the hazard no longer exists.
81
Although the existing scientific data do not justify FDA regulatory
actions at this time, the FDA has urged the mobile phone industry to
take a number of steps to assure public safety. The agency has
recommended that the industry support needed research into
possible biological effects of RF of the type emitted by mobile phones,
design mobile phones in a way that minimizes any RF exposure to
the user that is not necessary for device function, and cooperate in
providing mobile phone users with the best possible information on
what is known about possible effects of mobile phone use on human
health.
Again, the scientific data do not demonstrate that mobile phones are
harmful. But if people are concerned about the radiofrequency energy
from these products, taking the simple precautions outlined above
can reduce any possible risk.
At the same time, the FDA belongs to an interagency working group
of the federal agencies that have responsibility for different aspects
of mobile phone safety to ensure a coordinated effort at the federal
level. These agencies are:
World Health Organization (WHO) International Commission on NonIonizing Radiation Protection (select Q’s &A’s):
http://www.who.int/emf
National Institute for Occupational Safety and Health
Environmental Protection Agency
Federal Communications Commission
Occupational Safety and Health Administration
National Telecommunications and Information Administration
Where can I find additional information?
For additional information, see the following websites:
Federal Communications Commission (FCC) RF Safety Program
(select Information on Human Exposure to RF Fields from Cellular
and PCS Radio Transmitters): http://www.fcc.gov/oet/rfsafety
United Kingdom, National Radiological Protection Board:
http://www.nrpb.org.uk
Cellular Telecommunications Industry Association (CTIA): http://
www.wow-com.com
U.S. Food and Drug Administration (FDA) Center for Devices and
Radiological Health: http://www.fda.gov/cdrh/consumer/
The National Institutes of Health also participates in this group.
In the absence of conclusive information about any possible risk, what
can concerned individuals do?
If there is a risk from these products—and at this point we do not
know that there is—it is probably very small. But if people are
concerned about avoiding even potential risks, there are simple steps
they can take to minimize the risk. For example, time is a key factor in
how much exposure a person receives. Those persons who spend
long periods of time on their handheld mobile phones could consider
holding lengthy conversations on conventional phones and reserving
the handheld models for shorter conversations or for situations when
other types of phones are not available.
People who must conduct extended conversations in their cars every
day could switch to a type of mobile phone that places more distance
between their bodies and the source of the RF, since the exposure
level drops off dramatically with distance. For example, they could
switch to a mobile phone in which the antenna is located outside the
vehicle, a handheld phone with a built-in antenna connected to a
different antenna mounted on the outside of the car or built into a
separate package, or a headset with a remote antenna to a mobile
phone carried at the waist.
82
83
Chapter 11. Frequently Asked Questions
Q: How do I record conversation over the phone?
A: Hold down the
key while you are on a call.
Q: How many Voice Activated phone numbers can I
store in the phone book memory?
A: Total of 20 voice activated phone numbers.
Q: How much space do I have available for my Voicemail
machine and Voice memos?
A: Total of 2K.
Q: How do I view the outgoing calls, incoming calls
and missed calls?
A: Press Soft Key 2 Book then press number
Call History.
Q: How do I view all numbers stored in memory?
A: Press Soft Key 2 Book then press number
Phone Book.
Select number
Find Entry then press Ok .
Q: How do I clear the call timer (reset the time used
monthly)?
A: Press Soft Key 2 Book , press
, then select
.
Select
or
. Use Soft Key 1 Opt . Then select
Zero to reset the timer.
Q: How do I find out my lock code?
A: The lock code is normally the last four digits of your
mobile phone number or the manufacturer default
number 0000.
Please check with your service provider for further
details. Each service provider may program this
differently.
Q: What is my Pin Code?
A: Check with your service provider.
Q: How do I retrieve a new message or page?
A: Press
.
For voicemail: Press
VoiceMail.
Press
. Then you can check the voicemail box.
For text messages: Press
Text.
IMPORTANT NOTE: You can only receive messages
or pages if your service provider has activated and set
up this feature.
Q: How do I send a text message?
A: Press
then select
.
The 2-way SMS messaging needs to be set up by
your service provider.
Q: How many events can I add to the schedule?
A: Total of 47 events.
Q: How do I clear All Calls?
A: This cannot be reset.
84
85
TM510 Summary Table
FUNCTIONS
Power On
Power Off
Making a call
Receiving a call
STEPS
Hold
(for about 2 seconds)
Hold
(for about 2 seconds)
Phone Number,
Open the cellcase or if the cellcase is
open, Press any key except
.
Volume Adjust
Menu, 1, 3,
Ok
Ringing Sound
Menu, 1, 1,
Ok
Ringing Type
Menu, 1, 2,
Ok
Saving Phone
Phone number, Opt, Save, Memory
Numbers
Location, Next, Select Label,
, Enter
Name, Save (Max 198)
Saving Phone
Phone number, Opt, Save, Memory
Numbers with
Location, Next, Select Label,
, Enter
Voice Dialing
Name,
, No Voice,
, Voice, Save,
Ok, Say the Name, Again (Total of 2050)
Adding a Phone Book, 2, 1, Enter Location, or press Ok,
Select location, View, Select the
Number to a
default label (Home, Office...)
,
Previously
Select the new Label
, Select Empty
Saved Entry
, Enter Number, Save, Default#,Sel.
Deleting Phone Book, 2, 1, Enter Location, or press Ok,
Select location
, View, Opt, Erase
Numbers
Entry
, Sel, Yes
, Sel
After
Enable
One-Touch
(Menu, 4, 4)
One-Touch
Hold
the
last
digit
1-8
of
the memory
Speed Dialing
location (Entry 9 is reserved for
emergency calls.)
86
Two-Touch
Speed Dialing
Three-Touch
Speed Dialing
Redialing
Viewing Your
Phone Number
Call History
Mute
Memo
Recording
conversation
Last Call Time
Clear Home Calls
Clear Roam Calls
All Calls Time
Minute Alert
Backlight Setting
Lock
New Code
Restrict
Banner
Force Calls
Auto Answer
Enable One-Touch (Menu, 4, 4) Press
the first digit and press and hold the
second digit of the memory location
Enable One-Touch (Menu, 4, 4) Press
the first and second digit and press and
hold the third digit of the memory
location
At Connection Failure,
,
Book, 5
Book, 1
Menu, 1 while on line
Menu, 2 while on line
Menu, 3 while on line
Book, 1, 4, 1, Can’t be Erased
Book, 1, 4, 2, Opt, Zero
Book, 1, 4, 3, Opt, Zero
Book, 1, 4, 4, Can't be Erased
Menu, 1, 7, 2,
, Ok
Menu, 2, 1,
, Ok
Menu, 6, Lock Code, 1,
, Ok
Menu, 6, Lock Code, 6,
, New
Code, Re-Enter New Code
Menu, 6, Lock Code, 2,
, Ok
Menu, 2, 2, Opt, Edit
Menu, 3, 4, Ok (Used in some analog
areas only)
Menu, 4, 2,
, Ok (Works only when
connected to the portable or installed
hands-free kit)
87
Ringer Off
Clear Call List
Language
Version
System Select
Set NAM
Data/Fax Mode
Audio AGC
(Audio Gain
Control)
Calculator
Play Back Voice
Memo, Recording
Conversation or
Voice Messages
Erasing Play Back
Voice Memo or
Recording
Conversation
Start Browser
Using the Voice
Dialing Feature
When Making a
Call
88
Menu, 1, 3, Increase the Volume
,
Ok
Menu, 6, Lock Code, 3,
, Yes, Ok
Menu, 2, 4,
, Ok (English and
Spanish)
Menu, 2, 5
Menu, 3, 1,
, Ok (Set by provider
only)
Menu, 3, 2,
, Ok (Set by provider
only)
Menu, 4, 1,
, Ok (Requires a data
cable and data mode needs to be activated
by provider )
Menu, 4, 6,
, Ok (Provides better
audio experience in some environments)
Menu, 5, 2
Menu, 7, 1, 1, Opt, Replay or Hold Down
, 1, Opt, Replay (Max. recording 4
minutes.)
Menu, 7, 1, 1, Opt, Erase, Sel, Ok
Setting the
Menu, 4, 2,
, Answer Machine, Ok
(uses the pre-programmed message and
the caller can leave a message in
voicemail
Setting the
Menu, 7, 2,
, Practice the Voice
Voice Command Command, Yes/No, 3- When you
receive a call, you say Yes, the call is
connected and say No the bell Rings.
(This option is available only when
phone is connected to the hands-free
kit)
Scheduler
Book, 3 This option is available in
digital areas only (Max. 47 events)
Alarm (Wake Up) Book, 4 This option is available in
digital areas only (Max 47 events)
Manner Mode
Hold Down
Key for 2 Seconds
Voicemail
, 1,
(Works in digital areas
only)
Text Message
,3
Send Message
, 2, Type Phone Number, Opt,
Continue, Sel, Type Message, Opt,
Send
Voice service
Menu, 8 or Hold Down 0
Menu, 7, 4,
, Ok (In Manual Mode
Press
to start this feature or Auto
Mode. This feature will be available upon
opening the cellcase
89
Licensed by QUALCOMM Incorporated under one or more of the following Patents;
U.S. Patent No. 4,901,307 U.S. Patent No. 5,056,109 U.S. Patent No. 5,099,204
U.S. Patent No. 5,101,501 U.S. Patent No. 5,103,459 U.S. Patent No. 5,107,225
U.S. Patent No. 5,109,390
Product manufactured or sold in U.S.; “This product is covered by U.S. Pat.
5,818,437, U.S. Pat. 5,953,541, U.S. Pat. 6,011,554 and other patents pending.”