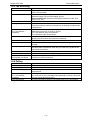
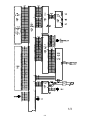
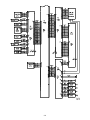
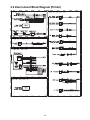
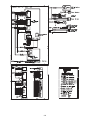
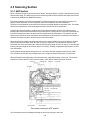
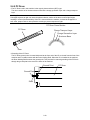
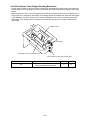
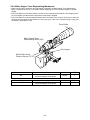
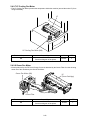
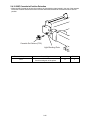
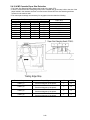
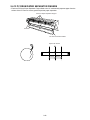
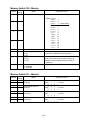
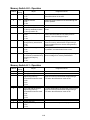
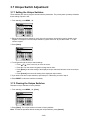
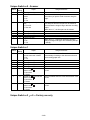
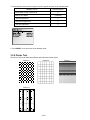
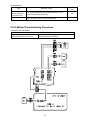
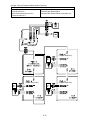
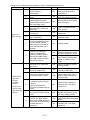
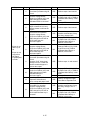
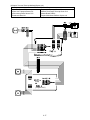
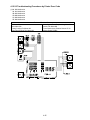
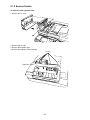
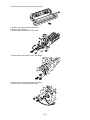
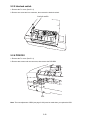
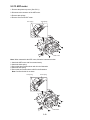
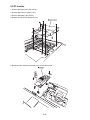
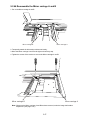
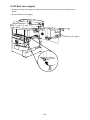
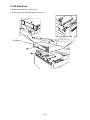
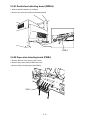
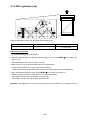
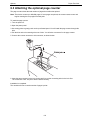
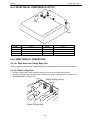
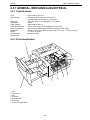
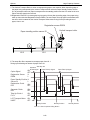
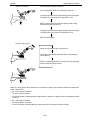
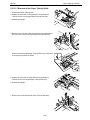
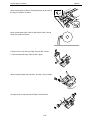
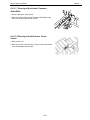
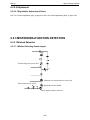
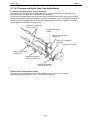
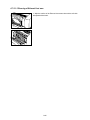
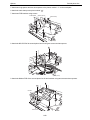
1
MFX-2500 FIELD ENGINEERING MANUAL North American version 1.0 (Febrary. 29 2000) MURATA MACHINERY, LTD COMMUNICATION EQUIPMENT DIV. Safety Information Laser Safety This is a digital machine which prints by means of a laser. There is no possibility of danger from the laser, provided the machine is operated according to the instructions in this manual. Since radiation emitted by the laser is completely confined within protective housing, the laser beam cannot escape from the machine during any phase of user operation. This machine is certified as a Class 1 product. This means the machine does not produce hazardous laser radiation. CAUTION: The use of controls, adjustments or performance of procedures other than those specified in this manual may result in hazardous radiation exposure. Because of this, Minolta strongly recommends that you operate your copy machine only as described in this documentation. Internal Laser Radiation Maximum Average Radiation Power: 36.7µW at laser aperture of the print head unit Wavelength: 770-810nm This product employs a Class IIIb Laser Diode that emits an invisible laser beam. The Laser Diode and Scanning Polygon Mirror are incorporated in the print head unit. The print head unit is NOT A FIELD SERVICE ITEM. Therefore, the print head unit should not be opened under any circumstances. Laser Aperture of the Print Head Unit This figure shows the view inside the Right Side Door with the Imaging Unit removed. For United States CDRH regulation This copier is certified as a Class 1 Laser product under the Radiation Performance Standard according to the Food, Drug and Cosmetic Act of 1990. Compliance is mandatory for Laser products marketed in the United States and is reported to the Center for Devices and Radiological Health (CDRH) of the U.S. Food and Drug Administration of the U.S. Department of Health and Human Services (DHHS). This means that the device does not produce hazardous laser radiation. 1 The label shown on next page indicates compliance with the CDRH regulations and must be attached to laser products marketed in the United States. CAUTION: Use of controls, adjustments or performance of procedures other than those specified in this manual may result in hazardous radiation exposure. This is a semiconductor laser. The maximum power of the laser diode is 5mW and the wavelength is 770-810nm. For Europe CAUTION: Use of controls, adjustments or performance of procedures other than those specified in this manual may result in hazardous radiation exposure. This is a semiconductor laser. The maximum power of the laser diode is 5mW and the wavelength is 770-810nm. For Denmark ADVARSEL Usynlig laserstråling ved åbning, når sikkerhedsafbrydere er ude af funktion. Undgå udsættelse for stråling. Klasse 1 laser produkt der opfylder IEC60825 sikkerheds kravene. For Finland LUOKAN 1 LASERLAITE VAROITUS Laitteen käyttäminen muulla kuin tässä käyttöohjeessa mainitulla tavalla saattaa altistaa käyttäjän turvallisuusluokan 1 ylittävälle näkymättömälle lasersäteilylle. VARO Avattaessa ja suojalukitus ohitettaessa olet alttiina näkymättomälle lasersäteilylle. Älä katso säteeseen. For Sweden KLASS 1 LASER APPARAT VARNING Om apparaten används på annat sätt än i denna bruksanvisning specificerats, kan användaren utsättas för osynlig laserstrålning, som överskrider gränsen för laserklass 1. VARNING Osynlig laserstråining när denna del är öppnad och spärren är urkopplad. Betrakta ej stråien. For Norway ADVERSEL Dersom apparatet brukes på annen måte enn spesifisert i denne bruksanvisning, kan brukeren utsettes för unsynlig laserstrålning, som overskrider grensen for laser klass 1. Dette en halveder laser. Maksimal effekt till laserdiode er 5mW og bφlgelengde er 770-810nm. 2 Muratec MFX-1500E General Description Laser Safety Label A laser safety label is attached to the outside of the machine as shown below. ID Label Laser safety label IC Label Label inside copy machine The following laser safety label will be attached inside the copy machine as shown below. Please read the following for your own protection. Caution Opening the cover indicated by the Caution label may expose you to harmful laser radiation which could cause damage or loss of eyesight. Do not open the cover when the power is on. 3 ALL Areas CAUTION Danger of explosion if battery is incorrectly replaced. Replace only with the same or equivalent type recommended by the manufacturer. Dispose of used batteries accordingto the manufacturer’s instructions. Muratec does not recommend the independent replacement of this battery. The battery is sold only as a component part of the main control PCB and cannot be purchased separately from Muratec. Il y a un danger d'explosion s'il y a un remplacement incorrect de la batterie. Remplacer uniquement avec une batterie du même type ou d'un type recommandé par le constructeur. Mettre au rebut les batteries usagées conformement aux instructions du fabricant. Germany only VORSICHT! Explosinsgefahr bei unsachgemäßen austausch der batterie. Ersatz nur durch denselben oder einen vom hersteller empfohlenen ähnlichen typ. Entsorgung gebrauchter batterien nach angaben des herstellers. Denmark only ADVARSEL! Lithiumbatteri - Eksplosionsfare ved fejlagtig håndtering Udskiftning må kun ske med batteri af samme fabrikat og type. Levér det brugte batteri tilbage til leverandøren. Norway only ADVARSEL Eksplosjonsfare ved feilaktig skifte av batteri. Benytt samme batteritype eller en tilsvarende type anbefalt av apparatfabrikanten. Brukte batterier kasseres i henhold til fabrikantens instruksjoner. Sweden only VARNING Explosionsfara vid felaktigt batteribyte. Använd samma batterityp eller en ekvivalent typ som rekommenderas av apparattillverkaren. Kassera använt batteri enligt fabrikantens instruktion. Finland only VAROlTUS Paristo voi räjähtää, los se on virheellisesti asennettu. Vaihda paristo ainoastaan laitevalmistajan suosittelemaan tyyppiin. Hävitä Käytetty paristo valmistajan ohjeiden mukaisesti. ALL Areas CAUTION “Replace only with the same or equivalent type recommended by the manufacturer. Dispose of used IC Package according to the manufacturer’s instructions.” Germany only VORSICHT! ⇒”Austausch nur durch denselben oder einen vom Hersteller empfohlenen, gleichwertigen typ. Entsorgung gebrauchter Batterien nach Angaben des Herstellers. 4 Table of Contents Section 1 General Description 1.1 Product Description ..............................................................................................................................1-1 1.2 General specifications ..........................................................................................................................1-2 1.3 Scanning specifications ........................................................................................................................1-5 1.4 Printer specifications.............................................................................................................................1-6 1.5 Memory specifications ..........................................................................................................................1-7 1.6 G3 modem section................................................................................................................................1-8 1.7 V.34 HDX modem section ....................................................................................................................1-8 1.8 Features and Functions ........................................................................................................................1-9 1.9 Supply Yields ......................................................................................................................................1-13 1.10 Option ...............................................................................................................................................1-14 Section2 Machine Composition 2.1 Interconnect Block Diagram (Scanner).................................................................................................2-1 2.2 Interconnect Block Diagram (Printer)....................................................................................................2-5 2.3 Scanning Section..................................................................................................................................2-9 2.4 Recording Section ..............................................................................................................................2-14 Section3 Software adjustment ................................................3-1 3.1 Field Service Program Modes ..............................................................................................................3-1 3.2 Machine Parameter Adjustment ...........................................................................................................3-2 3.3 Memory Switch Adjustment ................................................................................................................3-79 3.4 Clear Programmed Data / User Settings ............................................................................................3-96 3.5 All RAM Clear .....................................................................................................................................3-97 3.6 Setting Individual Autodialer Attributes ...............................................................................................3-97 3.7 Unique Switch Adjustment................................................................................................................3-100 3.8 Print Program Mode List ...................................................................................................................3-122 3.9 Test Modes .......................................................................................................................................3-122 3.10 Print Machine Parameters, Memory Switch and Unique Switch Settings.......................................3-125 3.11 Factory Functions ...........................................................................................................................3-125 3.12 Line Tests .......................................................................................................................................3-131 3.13 Mirror Carriage Transfer Mode .......................................................................................................3-135 3.14 Consumable order sheet ................................................................................................................3-136 3.15 DRAM Clear....................................................................................................................................3-139 3.16 Clear Life Monitor ...........................................................................................................................3-140 3.17 Set Service Code............................................................................................................................3-140 3.18 Printer Trouble Reset......................................................................................................................3-141 3.19 Clear Optional Data ........................................................................................................................3-141 3.20 JP1, JP2 Battery Backup ................................................................................................................3-141 3.21 Update the software........................................................................................................................3-142 Section4 Troubleshooting Procedures...................................4-1 4.1 Troubleshooting Outline........................................................................................................................4-1 4.2 Document Feeder Jam .........................................................................................................................4-2 4.3 Document Feeder Multi-feeding or Skew .............................................................................................4-2 4.4 Mirror Carriage Error.............................................................................................................................4-2 4.5 Transmit Error.......................................................................................................................................4-3 4.6 Transmit Black Lines ............................................................................................................................4-3 i 4.7 Cannot transmit ....................................................................................................................................4-3 4.8 Receive Errors ......................................................................................................................................4-3 4.9 Will not Auto-Answer ............................................................................................................................4-4 4.10 Recording paper misfeed....................................................................................................................4-5 4.11 Error Codes ......................................................................................................................................4-19 4.12 Service Call Error..............................................................................................................................4-22 4.13 Image Failure....................................................................................................................................4-35 Section5 Maintenance & Adjustment......................................5-1 5.1 Maintenance schedule..........................................................................................................................5-2 5.2 Re/Disassemble..................................................................................................................................5-18 5.3 Adjustment..........................................................................................................................................5-81 5.3.1 Printer registration (top)...............................................................................................................5-81 5.3.2 Printer registration (side) .............................................................................................................5-82 5.3.3 FBS registration (top) ..................................................................................................................5-83 5.3.4 FBS registration (side).................................................................................................................5-84 5.3.5 ADF registration (top) ..................................................................................................................5-85 5.3.6 ADF registration (side) ................................................................................................................5-86 5.3.7 FBS zoom adjustment (Vertical)..................................................................................................5-87 5.3.8 FBS zoom adjustment (Horizontal) .............................................................................................5-88 5.3.9 ADF zoom adjustment (Vertical) .................................................................................................5-89 5.3.10 ADF zoom adjustment (Horizontal) ...........................................................................................5-90 5.3.11 Adjust the image deformation caused by Mirror carriage A and B at the incorrect position......5-91 5.3.12 Adjustment of the position of Mirror carriage A and B ...............................................................5-93 5.3.13 Adjustment of height of ADF......................................................................................................5-94 5.3.14 Adjustment of the skew on the ADF ..........................................................................................5-95 5.3.15 Adjustment of the platen cover position.....................................................................................5-96 5.3.17 Adjustment of Retard roller pressure.........................................................................................5-97 Section6 Options ......................................................................6-1 6.1 Memory Upgrade ..................................................................................................................................6-2 6.2 Telephone Handset ..............................................................................................................................6-4 6.2.1 Attaching the optional handset ..........................................................................................................6-5 6.2.2 Adjusting handset ..............................................................................................................................6-5 6.3 Mechanical Page Counter ....................................................................................................................6-7 6.3 Attaching the optional page counter .....................................................................................................6-8 6.4 PAPER FEED UNIT..............................................................................................................................6-9 6.5 Large Capacity Cassette ....................................................................................................................6-25 6.6 2-Bin/Shift Tray Unit............................................................................................................................6-54 6.7 Duplex Unit .........................................................................................................................................6-74 6.8 Second phone line ..............................................................................................................................6-88 6.9 RS-232C Interface ..............................................................................................................................6-96 ii Section 1 General Description 1.1 Product Description The MFX-2500 is Multi-function product with flat bed scanner and Group 3 and V.34 HDX modem facsimile machine. Documents are printed on plain paper using dry electrophotographic printing. 3d right1 1-1 General Description Muratec MFX-2500 1.2 General specifications Item Type Telephone network Compatibility Coding method Communication method Modem Dual Access Display Scanning method Printing method Effective scanning width Printing margin Acceptable document size Specifications / Comments Multi-function product with flatbed scanner. Group 3 and V.34 HDX console type facsimile with high-speed facsimile transmitter and receiver. PSTN (Public Switched Telephone Network) or equivalent. ITU-T T.4 and T.30 ITU-T-standard JBIG, MH, MR and MMR, Murata-proprietary MSE. • Full-duplex per ITU-T V.34 (only for control channel) • Half-duplex per ITU-T V.34, V.17, V.29, V.27ter and V.21 • 33600, 31200, 28800, 26400, 24000, 21600, 19200, 16800, 14400, 12000, 9600, 7200, 4800 and 2400 bps per ITU-T V.34. Control signal speed is 1200 or 2400 bps. • 14400, 12000, 9600, 7200, 4800 and 2400 bps with automatic fallback per ITU-T, V.17, V.29, V.27ter and V21. Control signal speed is 300 bps. Allows up to four simultaneous operations LCD: 9 lines, 26 characters per line. Language: English/French/Spanish CCD Dry electrophotographic printer 214 mm (8.4″), 277 mm (10.9″) (User selectable) Upper: 4 mm, Lower: 4 mm, Right: 4 mm, Left: 4 mm ADF (Auto Document Feeder) section Document size (Width × Length) Single sheet Max: 300 mm(11.8″) × 900 mm(35.4″) (Tx) 300 mm(11.8″) × 450 mm(17.7″) (Copy) Min: 120 mm(4.7″) × 100 mm(3.9″) Two or more sheets Max: 279 mm(11.0″) × 432 mm(17.0″) Min: 216 mm(5.8″) × 139 mm(4.1″) Document thickness 2 Single sheet: 30.2g-104.7g/m 2 Two or more sheets: 52.3g-104.7g/ m FBS (Flatbed scanner) section (Width × Length) Max: 279 mm(11.0″) × 432 mm(17.0″) Min: No limit 1-2 Muratec MFX-2500 Item Acceptable recording paper size General Description Specifications / Comments 1st cassette (Multi purpose cassette): For fax reception: Letter(SEF/LEF), Legal(SEF), Ledger(SEF), Half-letter(SEF/LEF) For copying: Letter(SEF/LEF), Legal(SEF), Ledger(SEF), Half-letter(SEF/LEF), A3(SEF), B4(SEF), A4(SEF/LEF), B5(SEF/LEF), A5(SEF/LEF), A6(SEF), F4(SEF), Postcard(SEF), Customsized**, DL(SEF), COM10(SEF), Monarch(SEF), Executive(SEF/LEF) 2nd/3rd*/4th*/5th* cassette: For fax transmission: Letter(SEF/LEF), Legal(SEF), Ledger(SEF) For copying: Letter(SEF/LEF), Legal(SEF), Ledger(SEF), A3(SEF), B4(SEF), A4(SEF/LEF), F4(SEF) Large Capacity Cassette*: Letter(LEF) Bypass tray*: Acceptable recording paper type Document Memory Error Correction Mode (ECM) Operating environment Power requirements Power consumption Same paper sizes are available as 1st cassette for copying. 1st cassette: Plain paper, PasteBoard/Labels, Transparency, Envelope/Postcard 2nd/3rd*/4th*/5th* cassette: Plain paper Large Capacity Cassette*: Plain paper Bypass tray*: Same paper types are available as 1st cassette for copying. 2 Paper weight: 60-90g/m 16MB (1,330 pages) Transmit and receive Ambient temperature: 10 °C to 35 °C (50 °F to 95 °F) Relative humidity: 15 % to 85 % with no condensation 120 VAC ± 10 %; 50-60 Hz Standby: TBD W Memory Transmit:TBD W Receive: TBD W Copy: TBD W Maximum: TBD W (Simultaneous copying, communicating and scanning) *: Option **: Width: 140 mm(5.5″) to 432 mm(17.0″), Length: 90 mm(3.6″) to 297 mm(11.7″) 1-3 General Description Item Muratec MFX-2500 Specifications / Comments Dimensions: 603 (W) × 671 (D) × 751 (H) mm Weight 67.7 Kg (148.9 lb) Weight includes: a toner bottle, a drum cartridge, Multi purpose cassette, 2nd cassette Keypad layout TBD Body Color Muratec light gray (91-242) 1-4 Muratec MFX-2500 General Description 1.3 Scanning specifications Item Scanning method Acceptable document size Document feeding direction (ADF) Document size autodetection Scanning width Scanning resolution Specifications / Comments CCD ADF (Auto Document Feeder) section Document size (Width × Length) Single sheet Max: 300 mm(11.8″) × 900 mm(35.4″) (Tx) 300 mm(11.8″) × 450 mm(17.7″) (Copy) Min: 120 mm(4.7″) × 100 mm(3.9″) Two or more sheets Max: 279 mm(11.0″) × 432 mm(17.0″) Min: 216 mm(5.8″) × 139 mm(4.1″) Document thickness 2 Single sheet: 30.2g-104.7g/m 2 Two or more sheets: 52.3g-104.7g/ m FBS (Flatbed scanner) section (Width × Length) Max: 279 mm(11.0″) × 432 mm(17.0″) Min: No limit Face up ADF section: Yes (Letter(SEF/LEF), Legal(SEF), Ledger(SEF), Half-letter(SEF/LEF)) FBS section: Yes (Letter(SEF/LEF), Legal(SEF), Ledger(SEF), Half-letter(SEF/LEF)) 214 mm (8.4″), 277 mm (10.9″) (User selectable) Transmission: Normal: 8 dots/mm × 3.85 lines/mm (203 dpi × 98 lpi) Fine: 8 dots/mm × 7.7 lines/mm (203 dpi × 196 lpi) SuperFine: *16 dots/mm × 15.4 lines/mm (406 dpi × 392 lpi) Grayscale (Memory Tx): 8 dots/mm × 7.7 lines/mm (203 dpi × 196 lpi) Grayscale (Feeder Tx): *16 dots/mm × 15.4 lines/mm (406 dpi × 392 lpi) *: In the case that the remote fax has the ability of “16 dots/mm × 15.4 lines/mm”. If not, the super fine resolution is 8 dots/mm × 15.4 lines/mm, and the grayscale resolution in feeder transmission is 8 dots/mm × 7.7 lines/mm. Scanning contrast Grayscale Automatic document feeder (ADF) capacity Document scanning time Copy: Normal: N/A Fine: N/A SuperFine: 600 dpi × 600 lpi Grayscale: 600 dpi × 600 lpi Other: 400 dpi × 400 lpi (Selectable by user setting.) 5 levels (Auto/Manual adjustment) 256 levels Letter: 50 sheets / Legal: 50 sheets Ledger (11″×17″): 30 sheets Transmission: Normal: 0.8 sec/page Fine: 0.8 sec/page Super fine: 1.7 sec/page Grayscale(Memory Tx): 0.8 sec/page Grayscale(Feeder Tx): 1.7 sec/page Copy: Super fine: 2.6 sec/page Grayscale: 2.6 sec/page Other (400 dpi): 1.7 sec/page (Based on Letter(LEF) blank page) 1-5 General Description Muratec MFX-2500 1.4 Printer specifications Item Printing resolution Printing method Fusing method Printing margin Printing speed Acceptable recording paper size Specifications / Comments Laser diode beam scanning 600 dpi × 600 lpi Dry electrophotographic printer Heat roller Upper: 4 mm, Lower: 4 mm, Right: 4 mm, Left: 4 mm 25 ppm (Based on Letter(LEF) paper) 1st cassette (Multi purpose cassette): For fax reception: Letter(SEF/LEF), Legal(SEF), Ledger(SEF), Half-letter(SEF/LEF) For copying: Letter(SEF/LEF), Legal(SEF), Ledger(SEF), Half-letter(SEF/LEF), A3(SEF), B4(SEF), A4(SEF/LEF), B5(SEF/LEF), A5(SEF/LEF), A6(SEF), F4(SEF), Postcard(SEF), Customsized**, DL(SEF), COM10(SEF), Monarch(SEF), Executive(SEF/LEF) 2nd/3rd*/4th*/5th* cassette: For fax transmission: Letter(SEF/LEF), Legal(SEF), Ledger(SEF) For copying: Letter(SEF/LEF), Legal(SEF), Ledger(SEF), A3(SEF), B4(SEF), A4(SEF/LEF), F4(SEF) Large Capacity Cassette*: Letter(LEF) Bypass tray*: Acceptable recording paper type Recording paper capacity Output paper tray capacity Receive paper feeding direction Warm up time Same paper sizes are available as 1st cassette for copying. 1st cassette: Plain paper, PasteBoard/Labels, Transparency, Envelope/Postcard 2nd/3rd*/4th*/5th* cassette: Plain paper Large Capacity Cassette*: Plain paper Bypass tray*: Same paper types are available as 1st cassette for copying. 2 Paper weight: 60-90g/m 1st cassette: 250 sheets 2nd/3rd*/4th*/5th* cassette: 500 sheets Large Capacity Cassette*: 2,500 sheets Bypass tray*: 1 sheet 250 sheets Optional 2-Bin tray: Upper: 100 sheets, Lower: 250 sheets Face down Under 60 seconds *: Option **: Width: 140 mm(5.5″) to 432 mm(17.0″), Length: 90 mm(3.6″) to 297 mm(11.7″) 1-6 Muratec MFX-2500 General Description 1.5 Memory specifications Item Document memory Document stored capacity Document memory backup Memory usage indication Option memory upgrade Built-in Connector P5A 8 MB — 8 MB + 8 MB 8 MB + 8 MB 8 MB + 8 MB 8 MB + 24 MB Specifications / Comments 16 MB (Standard) Optional memory upgrade: See the table below. 1,330 pages (Total memory capacity : Backup time) 16 MB: 60 hours 24 MB: 36 hours 40 MB: 12 hours 56 MB: 5 hours The backup battery requires about 48 hours to reach full charge after power to the fax unit is restored. Shows on the LCD Connector P5B — — + 8 MB + 24 MB + 24 MB Total memory 8 MB (8192 KB) 16 MB (16384 KB) 24 MB (24576 KB) 40 MB (40960 KB) 56 MB (57644 KB) 1-7 ←Standard General Description Muratec MFX-2500 1.6 G3 modem section Transmission mode Modulation method Transmission speed (bit/s) Modulation speed (baud) Carrier frequency (Hz) Detection method Automatic equalizer Transmission mode Modulation method Transmission speed (bit/s) Modulation speed (baud) Carrier frequency (Hz) 128 Pt. TCM 14400 V.17 64 Pt. TCM 32 Pt. TCM 12000 9600 2400 2400 16 Pt. TCM 7200 2400 2400 1800 Synchronism Automatic adaptive equalizer V.29 16 Pt. QAM 8 Pt. QAM 9600 7200 2400 2400 V.27ter 8 Pt. PhM 4 Pt. PhM 4800 2400 1600 1700 Detection method Automatic equalizer V.21 FSK 300 1200 1800 300 f (0) = 1850 f (1) = 1650 FS None Synchronism Automatic adaptive equalizer 1.7 V.34 HDX modem section Transmission mode Modulation method Transmission speed (bit/s) Symbol rate (baud) 33600 31200 28800 V.34 TCM 26400 24000 None 3429 baud: 1959 high, 1959 low 3200 baud: 1920 high, 1829 low 3000 baud: 2000 high, 1800 low 2800 baud: 1867 high, 1680 low 2400 baud: 1800 high, 1600 low Synchronism Automatic adaptive equalizer Carrier frequency (Hz) Detection method Automatic equalizer Carrier frequency (Hz) Detection method Automatic equalizer 14400 12000 19200 3429 3200 3000 2800 None None None Transmission mode Modulation method Transmission speed (bit/s) Symbol rate (baud) 21600 V.34 TCM 9600 7200 4800 3429 3200 3000 2800 2400 3429 baud: 1959 high, 1959 low 3200 baud: 1920 high, 1829 low 3000 baud: 2000 high, 1800 low 2800 baud: 1867 high, 1680 low 2400 baud: 1800 high, 1600 low Synchronism Automatic adaptive equalizer 1-8 2400 None None None None 2400 16800 Muratec MFX-2500 General Description 1.8 Features and Functions 1.8.1 Dialer Item Autodialer Programmable one-touch. Soft key Macro key Telephone index Type of dialing Dialing pause time Redial PIN access On-hook dialing Dialing in the event of a power failure Specifications / Comments 300 total; 78 one-touch, 222 speed dial. (Up to 40 digits per location; 24 characters per location ID) 6 total The programmable one-touch keys simplify complex fax operation. The following multi-step operations can be programmed. Fax communication • Delayed transmission • Broadcasting • Regular polling • Batch transmission • F-code transmission • F-code polling 4 total Fax communication Set the following On/Off operation into the Soft keys. • Memory transmission on/off (Default setting) • Transmission confirmation stamp on/off (Default setting) • Confirmation report on/off (Default setting) • Hook/Call request (Default setting) • Cover page on/off • TTI on/off Copy Pressing the soft key, the following copy setting display will appear. • Combine • Repeat • Series copy • Erasing boarder • Erasing center • Binding margin • Directional magnification • Positive/negative copy • Duplex (with optional Duplex unit) • Booklet (with optional Duplex unit) 6 total The macro keys simplify multiple fax or copy operations. Up to 60 steps can be programmed in one macro key. Up to 130 characters can be entered in the title of the macro key. Select autodialer entries in LCD by Location ID name. Tone or pulse (10 pps) 2-10 seconds. (Initial setting: 2 seconds) Auto redial in fax mode, programmable for 2 to 15 attempts (default: 2) at 1 to 5 minutes intervals (default: 1); manual last-number redial. Available Available Works only if the handset is attached. The fax can receive a telephone call, but it cannot send or receive a fax message. 1-9 General Description Muratec MFX-2500 1.8.2 Fax Transmitting Item Transmit Terminal Identifier (TTI) Memory transmission Feeder transmission Quick memory transmission Rotate transmission Delayed transmission Broadcasting Relay broadcast / Relay broadcast initiation (ITU-T sub-address compatible) Group communication SecureMail transmission (ITU-T sub-address compatible)) Delayed commands Security transmission Batch transmission Numbering pages Cover page Department code Call request Specifications / Comments Alphanumeric or symbol, up to 22 characters. Subscriber ID: Numeric, up to 20 characters 3 patterns of TTI can be registered. Available. Available. Available. Available. (Letter only) Programmable up to 31 days in advance. Up to 330 locations.(78 one-touch, 222 speed dial and 30 normally dial). Specify up to 300 numbers for remote “hub” unit using a one-touch key, a speed-dial number or a call group number. When receiving a document via ITU-T sub-addressing from another machine to F-Code relay box, your fax machine will relay it to other machine you set up on your relay box. Also, you can send (relay broadcast initiation) the document to hub machine’s F-Code box with ITU-T sub-address and you get the hub machine relayed it to other machine. Allows multiple broadcasting or polling locations to be placed in up to 32 call groups. Up to 300 locations can be placed in a group. ITU-T sub-address: Up to 20 characters. ITU-T password: Up to 20 characters. Store up to 100 delayed commands. Compares the last 4 numbers of the dialed fax number to the last 4 digits of the subscriber ID. 5 boxes with a location ID of 24 characters. 40 files per box. Programmable up to 24 hours per box. Just before sending a fax, you can set your fax machine to number each page in order. This will help the recipient keep track of all the pages. Cover page shows date and time, sender’s name and fax number, and a 40-character user-programmable message. For tracking transmissions by department. Hold up to 100 department codes. During sending or receiving, a voice conversation can be initiated on the same call after each page is printed. (Works only if the optional handset is attached.) Note: Not available at V.34 communication. 1-10 Muratec MFX-2500 General Description 1.8.3 Fax Receiving Item Receive mode Receive reduction rate Rotate reception Half-page reception SecureMail reception (ITU-T sub-address compatible) Block junk fax Closed network Out of paper reception Security reception Distinctive Ring Detection Number of rings Remote reception upon second phone connection Specifications / Comments Tel ready, Fax ready, Fax/Tel ready, Tel/Fax ready and Ans/Fax ready mode; user selectable. Auto: Automatically reduces printouts from 100 % to 25 %. Reduction margin: 0-85 mm (Initial setting: 40 mm) Fixed reduction rate: Select the fixed reduction rates from 100%, 97%, 91%, 81% or 75%. Available. Available. (This feature tells the machine to combine two of half-page receptions onto a single sheet.) Up to 50 mailboxes for receiving, 4 digits passcode. Holds a document up to 31 days (or no limit). ITU-T sub-address: Up to 20 characters. ITU-T password: Up to 20 characters. Ability to reject “junk fax” receptions: user selectable three options. Specify up to 50 numbers in the blocked numbers list. Proprietary network option. Receives up to 250 communications to memory if recording paper or toner is empty. You can tell the machine to keep all received faxes in memory (but not print them) after a certain time; then, later, you instruct it to go ahead and print out the saved faxes. Ability to answer on specific ring patterns. User selectable Select 1 to 10 rings. (Initial setting: 2 rings.) Fax is activated upon termination of a call that is answered by a telephone connected to second phone jack. 1.8.4 Polling Item Regular polling Delayed polling Continuous polling Database polling (ITU-T sub-address compatible) Polled transmission Specifications / Comments Retrieves a document from the remote fax machine. Programmable up to 31 days in advance. Retrieves continuously a document from any remote fax machine for the designed time. Retrieves a document stored in a memory box in the remote fax machine. You must enter a ITU-T sub-address and password to retrieve a document from any remote fax’s memory box. A remote fax machine retrieves a document stored in your fax machine. 1-11 General Description Muratec MFX-2500 1.8.5 Copy Item FCOT (First Copy Out Time) Multiple copies Copy reduction and enlargement rate Directional magnification Copy protect Copy reservation Interrupt copy Rotate copy Shift sorting Editing the copy image Specifications / Comments TBD Up to 99 Manual: Reduces/enlarges copies by the 1 % ratio from 400 % to 25 %. Fixed: Select the fixed rates from 154, 129, 121, 77, 64, 50 % Reduces/enlarges copies at different ratios horizontally and vertically. From 25% to 400% From 0.1″ to 50.0″ Available. Available, up to 10 jobs. Available. Available. Available (with optional shift tray) Available the following copy image editing. • Binding margin: 0 mm to 30 mm (0″ to 1.0″) Default: 0 mm (0″) • Erasing center: 1 mm to 50 mm (0.1″ to 2.0″) Default: 1 mm (0.1″) • Erasing boarder: 4 mm to 50 mm (0.2″ to 2.0″) Default: 4 mm (0.2″) • Series copy • Combine: 2 in 1, 4 in 1, 8 in 1 • Repeat: 2, 4, 8 repeats • Separate line (for Combine and Repeat): 0.1 mm to 0.9 mm (0.01″ to 0.05″) Default: 0.3 mm (0.01″) • Booklet copy • Positive/negative copy • Duplex copy: Available with optional duplex unit. Single-sided two-sided, Bound documents(Book) two-sided Æ Æ 1.8.6 Other features Item Silent operation Operation protect Second telephone jack Daylight saving Distinctive Ring Detection Transmission confirmation stamp Specifications / Comments Available Not Available Available Available Available If you set, it will automatically place a small stamp mark on the front of each original document that it successfully scans. 1-12 Muratec MFX-2500 General Description 1.8.7 Reports Report One-touch dial list Speed dial list Programmable one-touch list Group number list User settings list Command list Confirmation report Activity journal Cover page Batch transmission box list Batch transmission file list Department time list F-code box list F-code box file list F-code reception message Blocked numbers list Function list Power failure report Check message Machine setting list Fax setting list Copy setting list Macros list Fax Forward list Description Prints numbers stored in the one-touch keys. Prints phone numbers stored in speed dial locations. Prints numbers stored in programmable one-touch keys. Prints groups stored in the autodialer. Prints current machine settings as programmed by the user. Prints the delayed commands. Transmit Confirmation Report (TCR) or Receive Confirmation Report (RCR); User selectable on/off. Prints a cumulative total of the last about 100 transmissions and/or receptions; user selectable as manual or automatic. Transmit cover page showing date, receiver’s and sender’s names, and a 40-character user-programmable message. Batch transmission boxes stored remote fax number and transmit starting time. Print the files number list of documents stored in the batch transmission box. Print the total communication time and quantity of pages printed for each department code. List of F-code boxes stored in fax machine. Print the box and files number list of documents stored in the F-code box. Notifies of F-code box receptions. List of the blocked number. Prints a program mode list showing user programming tree. Prints if any documents in memory were erased due to power failure. Prints if communication error occurs; accompanied by audible alarm. Prints current machine settings as programmed by user. Prints current fax settings as programmed by user. Prints current copy settings as programmed by user. Prints a list of Macro titles. Print the Fax Forward patterns. 1.9 Supply Yields Item Toner bottle Drum cartridge Image transfer roller Document separator roller Retard roller Paper pick up roller Paper dust remover Fuser unit Ozone filter Exposure lamp Stamp Specifications / Comments 11,000 pages (All yields based on letter-sized sheets, 6 % document coverage and three-page interval printing.) 67,000 pages 150,000 pages 100,000 pages 100,000 pages 120,000 pages 120,000 pages 300,000 pages 100,000 pages 1,000 hours (continuous lighting) 3,000 times 1-13 General Description Muratec MFX-2500 1.10 Option No. 1 2 3 4 5 6 7 8 9 10 11 12 13 Item Shift tray 2-Bin tray Handset Mechanical page counter Memory Paper feed unit Large capacity cassette Printer controller Kit Network printer Kit RS-232C interface Second phone line kit Bypass tray Duplex unit Specifications / Comments Yes Yes Mark-4 simple type (without numeric keypad) 6 digits 8 MB, 24 MB (See the table on page 1-6.) 500 sheets × 3 2,500 sheets × 1 Yes (OP-100) Yes (NP-200) Yes Yes (AL-250) Yes Yes 1 13 12 2 11 3 9 10 4 5 7 6 1-14 8 Section2 Machine Composition 2.1 Interconnect Block Diagram (Scanner) See next page. 2-1 1/3 2-2 2/3 2-3 3/3 2-4 2.2 Interconnect Block Diagram (Printer) 2-5 2-6 2-7 2-8 2.3 Scanning Section 2.3.1 ADF Section When a document is placed into the document feeder, Document Sensor 1 (DS1) is activated and you will hear the short beep. The width of document is detected by DB4 and DA3 sensors and length of document is detected by DADFA3 and DADFLEG sensors. Document separation is the process that allows a multi-page document to go through the scanner one page at a time. Separation occurs through the action of the separator roller and retard roller. As shows in the illustrations, documents in the feeder are pressed against the separator roller. The bottom document is separated from the remaining documents by the friction of the retard roller. Following document separation, the feed roller causes the document to advance. As it advances, the leading edge of the document activates the Document Sensor 2 (DS2) sensor. Once DS2 is activated, the feed roller continues to rotate until the document reaches the scan wait position. The machine uses the distance from DS2 to the scan wait position and the diameter of the feed roller to determine the number of rotations necessary to feed the document to the scan wait position. When the document reaches the scan wait position, the machine waits for the next command. It will start scanning the document when either the start or copy key is pressed. The light from the scanner lamp strikes the face of the document and is reflected into the lens through mirrors A, B, and C. In case the light intensity along the length of the scanner lamp is not uniform, shading compensation is provided to ensure even illumination. As the reflected image passes through the lens, it is focused onto the charged coupled device (CCD). The CCD then converts the dark and light areas of the image into electrical impulses, or image data. When DS2 detects the trailing edge of the document, the image signal output is turned off. The scanner continues to remain active for a few more seconds in case there is another document to follow. Document scanning in ADF section The scanned document is discharged through the document exit by the exit roller 2-9 2.3.2 FBS section • Light reflected from the original passes through three mirrors and a lens to form a reduced image on the CCD Sensor as the Scanner is moved by the Scanner Motor. The CCD sensor converts the light pattern (image data) into an electrical image signal. • The electrical image signal is then output to the Main Board. 1. Exposure Lamp 3. FBS Motor 5. CCD Board (CCD) and Lens 7. B4 sensor 9. Mirrors Carriage A 11. Scanner Home Position Sensor 13. Mirrors Carriage B 2. Original length detecting sensor (Multi Beam sensor) 4. Inverter Board 6. Scanner End Position Sensor 8. A4 sensor 10. Mirror A 12. Mirror B and C 2-10 2.3.2.1 Exposure Section: Construction and Function 1 Reflector Tape When a book or other bound original is copied, the paper in the area near the binding generally fails to come flush against the glass, so that the copy of these areas is generally too dark. The Reflector Tape reduces this problem by reflecting light from the Exposure Lamp onto these areas of the original. 2 Exposure Lamp A fluorescent lamp is used to illuminate the original. 3 Mirror A Directs the reflected light from the original to the Mirror B. 2.3.2.2 Original Size Detection • When the machine is in Auto Paper or Auto Size, the original length detecting sensor mounted in the FBS section receive light reflected off the original to allow the machine to determine the original length size. And the CCD detects original width by reflecting light from the Exposure Lamp. <Original Size Identification: Inch Areas> Multi Beam Sensor (Detect length of original) Original Size Control Signal MB2 MB1 MB0 Letter L – Letter C – Legal L – Half Letter L – Half Letter C – – 11×17 L : Detected by multi beam sensor or CCD, –: Not used; <Original Size Identification: Metric Areas> Original Size Beam Sensor (Detect length of original) A3L A4L A4C A5L A5C B4L B5L B5C CCD (Detect width of original) L: Lengthwise CCD (Detect width of original) : Detected by beam sensor or CCD; L: Lengthwise 2-11 ; C: Crosswise ; C: Crosswise 2.3.2.3 Original Size Detection Timing The copier CPU affirms and resets the readings of the original size at the following timings. • Takes size readings: When the BIS sensor is deactivated. • Affirms size readings: When the Start key is pressed with the BIS sensor activated or the APS sensor deactuated. • Resets size readings: When the APS sensor is deactuated. Magnet BIS sensor APS sensor 2-12 2.3.2.4 Mirror Carriage A and Mirror Carriage B Moving Mechanism <Mirror Carriage Ar> • During a scan, the Mirror Carriage A projects an even amount of light from the Exposure Lamp onto the entire surface of the original. The light is reflected from the original to the Mirror A of the Mirror Carriage A and then to the Mirror B and Mirror C of the Mirrors Carriage B. • The Mirror Carriage A is driven by the FBS Motor and front and rear Scanner Drive belts. • Scanner speed is determined by the set zoom ratio in reference to the full size mode. • The Mirror Carriage A is at home position when Scanner Home Position Sensor is blocked. This position serves as the reference for the scan motion. • The A4 sensor and B4 sensor restricts the movement of the Mirror carriage A according to the original document size. <Mirrors Carriage B> • The Mirror B and Mirror C are mounted to their holder at right angles to each other. They direct the light reflected off the Mirror A through the lens to the CCD. • The Mirror Carriage B is also moved by the Scanner Drive belts and pulleys driven by the FBS Motor. It travels at a speed half that of the Mirror Carriage A, thereby keeping constant the optical path length between the Original Glass and lens. Mirror carriage A Mirror carriage B Mirror carriage A End Position Sensor B4 Sensor A4 Sensor Mirror carriage A Home Position Sensor 2-13 2.4 Recording Section 2.4.1 Cross-sectional view 1 2 3 4 17 5 6 7 8 9 10 11 12 13 16 15 1. 2nd Mirror 3. Exposure Lamp 5. Lens 7. Paper Exit Roller 9. Fusing Roller Heater Lamp (H1) 11. Right Fusing Roller 13. Fusing Cooling Fan Motor (M3) 15. Synchronizing Roller 17. Manual Feed Paper Take-Up Sensor (PC8) 19. Vertical Transport Roller 21. Paper Take-Up Roll 23. PH Unit 2-14 14 2. 3rd Mirror 4. 1st Mirror 6. CCD Unit 8. Fusing Roller Thermostat (TS1) 10. Paper Exit Sensor (PC3) 12. Left Fusing Roller 14. Image Transfer Roller 16. Synchronizing Roller Sensor (PC2) 18. Manual Feed Paper Take-Up Roll 20. Paper Separator Pad 22. Imaging Cartridge (I/C) 2.4.2 Image Processing 1. PC Drum • The drum is an aluminum cylinder coated with photosensitive material on which an electrostatic latent image is produced. 2. Drum Charging • A scorotron charger employing a comb electrode generates a negative DC charged layer on the surface of the PC Drum. 3. Photoelectric Conversion Section • The Exposure Lamp directs light onto the original. The light reflected off the original is directed and resized by the mirrors and lens so as to produce a reduced-size image on the CCD Sensor. 4. HGB Board • Converts an electric signal into a corresponding 8-bit digital image signal (A/D conver-sion), makes various corrections, and outputs the results to the MFB Board. 5. MFB Board • Compresses the image data received from the HGB Board, stores it, and uncompresses it. 6. Laser Exposure • The laser beam emitted from the LD (laser diode) strikes the surface of the PC Drum, creating an electrostatic latent image. 7. Development • Negatively charged toner adheres to the latent image on the PC Drum surface, creating a visible image. 8. Paper Feed • Feeds sheets of paper from the appropriate paper source. 9. Image Transfer • An Image Transfer Roller is used. A positive charge applied to the roller causes the visible image on the surface of the PC Drum to transfer onto the front side of the paper. 10.Paper Separation • The PC Drum Separator Fingers remove paper from the surface of the PC Drum. 11.Cleaning • The Cleaning Blade scrapes residual toner off the surface of the PC Drum and the toner is recycled back to the Developing Unit. 12.Erase • The PC Drum is exposed to light, which effectively removes any residual charge from the drum surface. 13.Fusing • Heat and pressure applied by the Right and Left Fusing Rollers fuse toner on the paper. 14.Paper Exit • Feeds paper out of the machine. 2-15 2.4.3 Drive System B A A. I/C Motor (M1) Drives the I/C Unit (Drum cartridge). B. Main Motor (M2) Drives the Paper Take-Up Roll, Manual Feed Paper Take-Up Roll, Synchronizing Roller, Image Transfer Roller, and Fusing Unit. 2-16 2.4.4 Imaging Cartridge (I/C) • This machine employs an Imaging Cartridge (“I/C” in this manual) that contains a PC Drum, PC Drum Charge Corona, Developing Unit, and Cleaning Unit as one unit. Toner Supply Port ATDC Sensor (E1) 2-17 2.4.4.1 I/C Drive Mechanism • Drive from the I/C Motor is transmitted via a gear train to the PC Drum and Hopper. PC Drum Driver Gear I/C Motor (M1) Hopper Drive Gear Electrical Component M1 Control Signal PJ16A-3 See block diagram of the printer. ON OFF L H 2.4.4.2 Identification and Life of I/C • When the Start key is pressed or the Side Cover is opened and closed, the machine determines whether the I/C is new or one which has been used previously. • The machine monitors the I/C life by storing in memory the period of time during which the PC Drum has turned. The data is cleared when a new I/C is installed in the machine. 2-18 2.4.5 PC Drum • The PC Drum used in this machine is the organic photoconductor (OPC) type. The drum consists of an aluminum base coated with a charge generation layer and a charge transport layer. Handling Precautions Prolonged exposure to light can cause the photoconductor surface of the drum to suffer light fatigue, resulting in a loss of photosensitivity. If the I/C is removed from the machine, it should be wrapped in a soft, clean, opaque cloth or other protective covering to prevent exposure to light. PC Drum Cross-Section PC Drum Charge Transport Layer Charge Generation Layer Aluminum Base Gear • Grounding of the PC Drum The PC Drum ground point is located inside and at the front end of the I/C as viewed from the front of the machine and in constant contact with the Drum Holding Shaft. When the I/C is installed in the machine, the Drum Holding Shaft contacts the ground point. This provides for assured grounding of the PC Drum through the ground plate in the rear to the frame of the machine. Ground Point Ground Plate Shaft 2-19 PC Drum 2.4.6 Drum Charging • A scorotron charger system generates a negative DC corona discharge onto the PC Drum surface. The grid mesh ensures uniform charging. • The grid voltage (Vg) applied to the grid mesh is controlled by the constant voltage circuitry within the High Voltage Unit. It is varied through image stabilization control. • To restrict ozone production, the machine uses a PC Drum Charge Corona with a comb electrode. PC Drum Charge Corona PC Drum Comb Electrode Electrical Component Drum charging output Grid Mesh Control Signal PJ14A-3A See block diagram of the printer. 2-20 ON OFF L H 2.4.7 Erase Lamp • Any potential remaining on the surface of the PC Drum is neutralized by both light from the Erase Lamp and a DC negative voltage applied by the Charge Neutralizing Sheet. • The Charge Neutralizing Sheet applies a negative charge on the surface of the PC Drum which is positively charged by the Image Transfer Roller. A voltage of -820V is applied to the Charge Neutralizing Sheet from the High Voltage Unit. The Erase Lamp then illuminates the surface of the PC Drum to further neutralize it. • The Erase Lamp consists of ten tungsten lamps. Erase Lamp (LA1) I/C PC Drum Cleaning Blade Charge Neutralizing Sheet PC Drum Erase Lamp (LA1) PC Drum Charge Corona Sleeve/Magnet Roller Electrical Component LA1 Control Signal PJ11A-6A See block diagram of the printer. 2-21 All lamps ON Standby ON H L 2.4.8 PH Section • Based on the image data output from the MFB Board, the LD (laser diode) is activated and the corresponding light strikes the surface of the PC Drum. PH Unit 2-22 2.4.8.1 PH Components 5 4 6 3 2 1 7 1. Polygon Motor (M10) 3. SOS Mirror 5. Laser Diode Board (PWB-B) 7. f-θ Lens Electrical Component M10 2. Cylindrical Lens 4. Collimator Lens 6. SOS Sensor Control Signal PJ8A-3 See block diagram of the printer. 2-23 ON OFF L H 2.4.8.2 Laser Emission Timing (SOS Signal) • The signal output from the Master Board triggers the firing of the laser. The laser beam travels to the Polygon Mirror, lens, and SOS Mirror to eventually hit the SOS Sensor, which generates an SOS signal. • The SOS signal determines the laser emission timing for each line in the main scanning direction. SOS Mirror Laser Diode Board (PWB-B) Cylindrical Lens Polygon Motor (M10) Collimator Lens SOS Sensor Polygon Mirror PC Drum f- Lens PC Drum SOS Mirror SOS Sensor SOS Signal D C B A to B: LD activation B to C: LD OFF C to D: Laser beam exposure area according to the image data 2-24 A 2.4.9 DEVELOPING UNIT • The Toner Conveying Rollers mix the toner and carrier particles together and carry the toner/carrier mixture up to the Sleeve/Magnet Roller. The magnetic brush formed on the surface of the roller allows the toner to come into contact with the charges on the surface of the PC Drum, thus forming an electrostatic latent image. 1 2 3 4 5 6 14 7 8 9 13 1. Spent Toner Recycling Coil 3. Spent Toner Feed Roller 2 5. Spent Toner Feed Roller 1 7. PC Drum Protective Shutter 9. Sleeve/Magnet Roller 11. ATDC Sensor (E1) 13. 3rd Toner Conveying Roller 12 11 10 2. PC Drum Charge Corona 4. Cleaning Blade 6. PC Drum Paper Separator Finger 8. PC Drum 10. 1st Toner Conveying Roller 12. 2nd Toner Conveying Roller 14. Spent Toner Recycling Duct 2-25 2.4.9.1 Sleeve/Magnet Roller • This machine employs the MT-HG system with a Sleeve/Magnet Roller having the following magnetic characteristics. • Turning of the sleeve surrounding the Magnet Roller ensures that fresh developer from the Developer Mixing Chamber is always being conveyed to the point of development with respect to the PC Drum. N1 : The point of development with the maximum magnetic flux density which ensures that the carrier is firmly held onto the Sleeve Roller when toner is attracted to the latent image. S1, N2 : The magnetic flux density between these two poles is made low to ensure that the developer remaining on the surface of the Sleeve Roller is smoothly recycled. They also prevent developer from scattering. N3 : The developer brush is formed by this pole and its height is moderated before the brush is regulated by the Doctor Blade. S2a : This pole ensures that the developer is conveyed to the point of development over the wide interval between N3 and N1. S2b : If developer is compacted and clogs at the Doctor Blade and, as a result, part of the surface of the Sleeve/Magnet Roller is not covered with developer, the nearby developer around this pole with a weak magnetic force goes to those uncovered areas. This helps prevent white lines from occurring on the copy. PC Drum N1 S2b S1 S2a N3 N2 Sleece/Magnet Roller 1st Toner Conveying Roller 2-26 2.4.9.2 Developing Bias • The amount of toner attracted onto the surface of the PC Drum is controlled by varying the developing bias voltage. • As the PC Drum deteriorates and its photoconductive layer begins to wear, it becomes more sensitive to the increase in the amount of toner. As a countermeasure against this problem, the developing bias voltage is automatically switched according to the PC Drum temperature, thereby stabilizing the image quality level. PC Drum Sleeve/Magnet Roller Developing Bias Contact Terminal Electrical Component Vb Control Signal PJ14A-1A See block diagram of the printer. 2-27 ON OFF L H 2.4.9.3 ATDC Sensor • The ATDC Sensor automatic adjustment is made when a new I/C is installed in the machine. Toner replenishing control is thereafter controlled as detailed in the following. 1. ATDC Sensor Automatic Adjustment • The ATDC Sensor is automatically adjusted when a new I/C is loaded in the machine. During this sequence, the machine reads the sensor output value and sets it as the reference. This reference value is stored in memory and used until the I/C reaches its service life. 2. Toner Replenishing Control • While the I/C Motor is turning, the ATDC Sensor samples T/C and, according to the readings, the machine provides the following controls. T/C Ratio (%) More than 19 14 to 19 Sampling Data (V) Less than 1.41 2.32 to 1.41 Control Details Defective ATDC Sensor Toner replenished for 0 msec. Toner replenished for 54 msec. at intervals of approx. 13 to 14 2.50 to 2.32 1 sec. Toner replenished for 150 msec. at intervals of 12 to 13 2.68 to 2.50 approx. 1 sec. Toner replenished for 378 msec. at intervals of 10 to 12 3.10 to 2.68 approx. 500 msec. 7 to 10 3.92 to 3.10 Passed onto the T/C recovery mode. Less than 7 More than 3.92 Defective ATDC Sensor ✽ Toner replenishment represents the operation of the Sub Hopper Toner Replenishing Motor. 3. Toner Empty Control (T/C Recovery Mode) • When the control is passed onto the T/C recovery mode, the Sub Hopper Toner Replenishing Motor is energized to replenish the supply of toner into the Developing Unit and, if T/C is recovered to a level of 14% or higher (2.32V or less) within 150 sec., it resets the toner-empty condition. 2-28 2.4.9.4 Sub Hopper Toner Replenishing Mechanism • Toner is replenished from the Sub Hopper to the Developing Unit by turning the Sub Hopper Toner Replenishing Motor for the period of time controlled by the ATDC output voltage (T/C). Sub Hopper Sub Hopper Toner Replenishing Motor (M7) Electrical Component M7 Control Signal PJ11A-8A See block diagram of the printer. 2-29 ON OFF DC24V L 2.4.9.5 Sub Hopper Toner Empty Detecting Mechanism • A toner-empty condition in the Sub Hopper is detected by the Magnet Lever that moves up and down as the Sub Hopper Toner Agitating Lever turns and actuates and de-actuates the Sub Hopper Toner Empty Switch. • While the amount of toner in the Sub Hopper is more than the predetermined amount, the Magnet Lever rests on the toner, keeping the Sub Hopper Toner Empty Switch de-actuated even when the Sub Hopper Toner Agitating Lever turns. As toner is consumed, the Magnet Lever lowers to eventually actuate the Sub Hopper Toner Empty Switch, at which timing the machine detects a toner-empty condition in the Sub Hopper. Magnet Lever Magnet Sub Hopper Toner Agitating Lever Sub Hopper Toner Empty Switch (S4) Electrical Component S4 Control Signal PJ11A-7B See block diagram of the printer. 2-30 ON OFF L H 2.4.9.6 Main Hopper Toner Replenishing Mechanism • When a toner-empty condition in the Sub Hopper is detected, the Main Hopper Toner Replenishing Motor is energized to turn the Toner Bottle, thereby supplying toner from the Main Hopper to the Sub Hopper. • The Toner Bottle Home Position Sensor mounted on the coupling ensures that the Toner Supply Port in the Toner Bottle is positioned at the top whenever the bottle is stopped. • The Toner Bottle Cover Sensor detects whether the Toner Bottle Cover is open. If the cover is open, the machine does not authorize the initiation of a new copy cycle. If the cover is opened during a copy cycle, the machine interrupts the cycle. Toner Bottle Main Hopper Toner Replenishing Motor (M6) Sub Hopper Main Bottle Home Position Sensor (PC10) Electrical Component M6 Electrical Component PC10 Control Signal PJ11A-4A See block diagram of the printer. Control Signal PJ11A-2B See block diagram of the printer. 2-31 ON OFF DC24V L Unblocked Blocked L H 2.4.9.7 I/C Cooling Fan Motor • The I/C Cooling Fan Motor prevents the temperature inside the machine (around the entire I/C) from rising inordinately. IC I/C Cooling Fan Motor (M9) Electrical Component M9 Control Signal PJ18A-10 See block diagram of the printer. ON OFF DC24V L 2.4.9.8 Ozone Fan Motor • Ozone produced by the PC Drum Charge Corona is absorbed by the Ozone Filter from the air being drawn out of the machine by the Ozone Fan Motor. Ozone Fan Motor (M8) I/C (Drum Cartridge) Ozone Filter Electrical Component M8 Control Signal PJ11A-1A See block diagram of the printer. 2-32 ON OFF DC24V L 2.4.10 PAPER TAKE-UP/FEED SECTION Note: For the details of the paper feed cassette (500-Sheet Cassette), see the Section 6 on this service manual. • This machine employs the Multi-Purpose (MP) Cassette whose capacity is about 250 sheets (about 20 sheets for special paper). Paper Size Detecting Board (PWB-I) Paper Take-up Roll Tailing Edge Stop 2.4.10.1 MP Cassette Paper Lifting Plate • The Paper Lifting Plate installed in the MP Cassette is spring-loaded to push the paper stack upward. When the cassette is slid into the machine, the lever located on the bottom of the cassette and used to lock down the Paper Lifting Plate is pushed and unlocked, allowing the Paper Lifting Plate to push the paper stack upward. 2-33 2.4.10.2 MP Cassette-in-Position Detection • When the MP Cassette is slid into the machine, the light blocking plate located in the rear of the cassette blocks the Cassette Set Sensor and the machine determines that the MP Cassette has been slid into position. Cassette Set Sensor (PC6) Light Blocking Plate Electrical Component PC6 Control Signal PJ13A-5B See block diagram of the printer. 2-34 Unblocked Blocked H L 2.4.10.3 MP Cassette Paper Empty Detection • Two sensors are used in this machine: the Paper Empty Sensor detects a paper-empty condition, while the Paper Near-Empty Sensor detects a paper near-empty condition. Paper Near-Empty Detection: • A paper near-empty condition is detected as the paper is consumed and when the Near-Empty Lever lowers to eventually block the sensor (L). • At this time, the MP Cassette Paper Empty LED starts blinking. • A paper-empty condition results when about 50 more sheets of paper are used after the near-empty condition has been detected. Paper Empty Detection: • A paper-empty condition is detected as the paper is consumed and when the Empty Lever lowers to eventually block the sensor (L). • At this time, the MP Cassette Paper Empty LED lights up steadily. Electrical Component PC4 PC5 Control Signal PJ14A-13A See block diagram of the printer. PJ13A-2B See block diagram of the printer. 2-35 Unblocked Blocked H L H L 2.4.10.4 MP Cassette Paper Size Detection • The Paper Size Detecting Board detects the length of the paper (FD). • A lever is connected to the Trailing Edge Stop of the cassette and, as the stop is slid to the size of the paper loaded in the cassette, the lever is moved to turn ON and OFF the size detecting switches mounted on the machine side. • The control panel settings are necessary for any paper size other than the following. 1 ON OFF OFF ON ON ON OFF ON Paper Size Detecting Switches (PWB-I) 2 3 4 OFF OFF OFF OFF OFF OFF ON ON ON ON ON ON ON OFF OFF OFF OFF ON ON OFF OFF ON ON OFF Electrical Component PWB-I (1) PWB-I (2) PWB-I (3) PWB-I (4) Paper Size A3L, 11×17L B4L, 8.5×14L A4L B5L, 8.5×11L A4C/A5L B5C A5C 8.5×11C Control Signal PJ14A-1B See block diagram of the printer. PJ14A-2B See block diagram of the printer. PJ14A-3B See block diagram of the printer. PJ14A-4B See block diagram of the printer. 2-36 ON OFF L H L H L H L H 2.4.10.5 Paper Take-Up Mechanism • Drive from the Main Motor is transmitted to the Paper Take-Up Clutch (spring clutch) and, by energizing the Paper Take-Up Solenoid, the Paper Take-Up Roll is turned. • The paper separating mechanism employs a Paper Separator Pad. Paper Separator Pad 2.4.10.6 Manual Bypass Tray (Option) 1. Construction of the Manual Bypass Tray • Drive from the Main Motor is transmitted to the Manual Paper Feed Take-Up Clutch and, by energizing this clutch, the Manual Feed Paper Take-Up Roll is turned. Electrical Component M2 SL1 CL3 Control Signal PJ16A-1 See block diagram of printer. PJ13A-13B See block diagram of printer. PJ4A-9A See block diagram of printer. 2-37 ON OFF L H L H L H 2. Manual Feed Paper Take-Up Detection • The Manual Feed Paper Take-Up Sensor detects a sheet of paper that is fed via the Manual Bypass Tray. • The size and type of the paper for manual feed are set on the control panel. Electrical Component PC8 Control Signal PJ4A-7B Unblocked H Blocked L 2.4.10.7 Paper Take-Up Retry Mechanism • To minimize the occurrence of a paper misfeed due to a slippery Paper Take-Up Roll, the Paper TakeUp Solenoid is energized a second time if a sheet of paper fails to reach the Synchronizing Roller Sensor within a given period of time after the solenoid has been energized first. • A paper take-up misfeed results if the sheet of paper does not reach the Synchronizing Roller Sensor even after two paper take-up sequences. 2-38 2.4.11 SYNCHRONIZING ROLLERS • The Synchronizing Rollers of this machine are located inside the Right Door. They are easily accessible for misfeed clearing by just opening the Right Door. 2.4.11.1 Synchronizing Roller Drive Mechanism/Control • The Synchronizing Rollers are turned by the drive from the Main Motor transmitted to the Synchronizing Clutch. • The rollers are started when the Synchronizing Clutch is deenergized. Main Motor (M2) Synchronizing Clutch (CL1) Left Synchronizing Roller Right Synchronizing Roller Electrical Component M2 CL1 Control Signal PJ16A-1 See block diagram of the printer. PJ13A-2A See block diagram of the printer. 2-39 ON OFF L H L H 2.4.11.2 Paper Dust Remover • The Paper Dust Remover is installed so that it makes contact with the Left Synchronizing Roller. It is intended for preventing paper dust from sticking to the surface of the PC Drum. • As the roller turns in contact with the Paper Dust Remover, triboelectric charging occurs, which attracts paper dust from the paper that passes between the two rollers and the dust is, in turn, transferred onto the Paper Dust Remover. Synchronizing Roller Synchronizing Roller Sensor (PC2) Paper Dust Remover 2-40 2.4.12 IMAGE TRANSFER AND PAPER SEPARATION Image Transfer • This machine employs an Image Transfer Roller to transfer the image to the paper. The High Voltage Unit applies an image transfer current to this roller. To ensure that image transfer efficiency is stabilized, the image transfer current is automatically varied according to the paper size, paper type, and the B/W ratio of the original. • To prevent toner from sticking to the Image Transfer Roller, an image transfer voltage of -975V is applied to the roller for cleaning. Paper Separation • To neutralize any charge left on the paper, to which the image has been transferred, the High Voltage Unit applies a voltage of -1200V via a ground plate to the Charge Neutralizing Plate. Electrical Component Image transfer output Control Signal PJ14A-2A See block diagram of printer. 2-41 ON OFF L H 2.4.13 PC DRUM PAPER SEPARATOR FINGERS • The three PC Drum Paper Separator Fingers fitted to the I/C mechanically separate paper from the surface of the PC Drum to ensure good and positive paper separation. PC Drum Paper Separator Fingers PC Drum PC Drum Protective Shutter Paper Path Center 8.5 cm 2-42 8.5 cm 2.4.14 PC DRUM CLEANING • This machine employs a spent toner recycling mechanism. The Cleaning Blade which is held pressed against the surface of the PC Drum scrapes residual toner off the surface. The waste toner is conveyed by Spent Toner Feed Roller 1 and 2 to the Spent Toner Recycling Duct and eventually back to the Developer Mixing Chamber. Cleaning Blade PC Drum Toner Conveying Rollers Spent Toner Feed Roller 1 Spent Toner Feed Roller 2 Spent Toner Recycling Coil Recycling Duct 2-43 2.4.15 FUSING UNIT • The paper, to which the developed image is yet to be fixed, is fed through heated Left and Right Fusing Rollers. The heat and pressure applied at this time fixes the image permanently to the paper. 1. Paper Exit Roller 3. Paper Exit Sensor (PC3) 5. Right Fusing Roller 7. Left Fusing Roller 9. Fusing Paper Separator Finger 2. Fusing Misfeed Clearing Lever 4. Pressure Spring 6. Fusing Roller Heater Lamp (H1) 8. Fusing Roller Thermostat (TS1) 2-44 2.4.15.1 Drive Mechanism • Drive from the Main Motor is transmitted via a gear train to the Right Fusing Roller. Right Fusing Roller Paper Exit Roller Main Motor (M2) Electrical Component M2 Control Signal PJ16A-1 See block diagram of printer. ON OFF L H 2.4.15.2 Fusing Rollers Pressure Mechanism • To ensure that there is a certain width of area of contact between the Left and Right Fusing Rollers, pressure springs are installed. • The rollers are held pressed against each other at all times and they are released only when servicing the machine or replacing parts. • The pressure between the two rollers is approx. 12 kg. • The rollers can be released by moving the Fusing Misfeed Clearing Lever in the direction of the arrow. 2-45 2.4.15.3 Fusing Temperature Control • The Fusing Roller Heater Lamp inside the Left Fusing Roller provides the following temperature control. - Temperature Control During Standby State 200 185 Approx. 5 min. Warm-Up Completed (200˚C) Mode 1 Approx. 1 min. Mode 2 Mode 3 - Temperature Control During a Copy Cycle 210 200 Special paper Plain paper (1-sided) Plain paper (2-sided) Transparencies 190 180 175 Approx. 5 min. Approx. 1 min. Mode 1 Mode 2 Mode 3 <Temperature Control> • The Fusing Roller Thermistor detects the surface temperature of the Left Fusing Roller. It provides an analog voltage input to the Master Board allowing the machine to control the fusing temperature. Electrical Component H1 Electrical Component TH1 Control Signal PJ16A-8 See block diagram of the printer. Control Signal PJ16A-5 See block diagram of the printer. 2-46 ON OFF L H Low Temp. ↔ High Temp. Analog input <Temperature Control by Mode> • The mode that is initiated following the completion of a warm-up cycle varies as detailed below depending on the machine condition and the Fusing Roller temperature at the restart of temperature control. Machine Condition Power is turned ON. Temperature control is interrupted during warm-up. Temperature control is interrupted during mode 1. Temperature control is interrupted during mode 2. Temperature control is interrupted during mode 3. Fusing Roller Temperature Less than 100°C 100°C or higher Mode 2 Mode 1 Mode 1 Mode 2 2.4.15.4 CPM Control • As a measure to prevent the temperature on the edges of the Fusing Rollers (over which no part of paper passes) from rising in a multi-copy cycle using small size paper (width of 250 mm or less), the paper feed interval is made greater. <Control> • If a sheet of small size paper is taken up and fed in during mode 1, control is switched to mode 2. • The number of sheets of small size paper that are fed through is counted. <Timing> • The counter reaches 30. • The plain/special paper counter reaches N specified below: If the control is in mode 1 or mode 2 when the counter starts counting, N = 30. If the control is in mode 3 when the counter starts counting, N = 100. <Resetting> • If a period of 2 min. or more elapses, during which the counter does not count up after the counter has started counting, the counter is cleared resetting the CPM control. 2-47 2.4.16 PAPER EXIT UNIT • The Paper Exit Roller feeds the paper, to which the developed image has been fixed, out of the machine. The Charge Neutralizing Brush touches the surface of the sheet of paper being fed out of the Fusing Unit to neutralize any static charge left on it. This effectively prevents two sheets of paper fed out of the machine from sticking to each other due to static charge. 2-48 2.4.17 FUSING COOLING FAN MOTOR • The Fusing Cooling Fan Motor located in the Right Door prevents the temperature of the Fusing Unit Cover and the area above the I/C from rising inordinately. The motor also draws the paper after it has been separated from the PC Drum onto the transport guide to ensure that it is stably and smoothly fed into the Fusing Unit. Fusing Unit Fusing Cooling Fan Motor (M3) I/C (Drum Cartridge) Electrical Component Control Signal M3 PJ13A-3A See block diagram of the printer. During Copy Cycle Full speed In Standby Half speed Pulse output 2-49 During Warm-Up Stop L 2.4.18 POWER UNIT COOLING FAN MOTOR • The Power Unit Cooling Fan Motor prevents the temperature at the Power Supply Unit and the Polygon Motor in the PH from rising inordinately. Power Unit Cooling Fan Motor (M4) Power Supply Unit 1 (PS1) Master Board (PWB-A) Electrical Component Control Signal While Main Motor is Turning Full speed In Standby Half speed M4 PJ6A-2 See block diagram of the printer. DC24V DC10V 2-50 Section3 Software adjustment 3.1 Field Service Program Modes The machine feature maintenance modes for machine adjustment. Each mode is listed below along with the command used to activate the mode and a brief functional description. Set or Clear Machine Parameters..........................................................................................MENU, *, 0 Used to set or clear machine parameters. Set or Clear Memory Switches ..............................................................................................MENU, *, 1 Used to set or clear memory switches. Clear Programmed Data / User Settings...............................................................................MENU, *, 2 Erases user-programmed information (date, time, TTI, autodialer, etc.) and any documents stored in memory. All RAM Clear ..........................................................................................................................MENU, *, 3 Erases same information as “Clear Programmed Data / User Settings” function along with resetting all of the machine parameters, memory switches and unique switches to factory defaults. Set or Clear Unique Switches................................................................................................MENU, *, 4 Used to set or clear Unique switches. Print Program Mode List ........................................................................................................MENU, *, 8 Prints a list of the machine’s programming modes. Test Modes ..............................................................................................................................MENU, *, 9 Allows the technician to perform a series of diagnostic tests. Print Machine Parameters, Memory Switches and Unique Switches List............................................................................................................. MENU, *, A Prints a list of the machine switch settings showing the default settings and current settings. Factory Functions.................................................................................................................. MENU, *, B Allows the technician to perform a series of diagnostic tests. Telephone Circuit Test Modes ............................................................................................. MENU, *, C Allows the technician to perform a series of diagnostic tests. Mirror Carriage Transfer Mode ............................................................................................. MENU, *, E Perform it before installing the machine. Set and print the consumable order sheet.......................................................................... MENU, *, F Used to set and print the consumable order sheet. DRAM Clear ............................................................................................................................MENU, *, G Used to clear a DRAM. Clear Life Monitor .................................................................................................................. MENU, *, H Used to clear a Life monitor keeps a count of the pages scanned, etc. Set Service Code ....................................................................................................................MENU, *, J Used to protect to clear a Life monitor. Clear the consumable order sheet....................................................................................... MENU, *, L Used to clear the consumable order sheet. Reset Printer trouble .............................................................................................................MENU, *, M Used to reset the printer trouble indication. 3-1 3.2 Machine Parameter Adjustment 3.2.1 Setting the Machine Parameters These switches are used to program internal machine parameters. The primary back up battery maintains these settings if power is lost. 1. From standby, press MENU, *, 0. 2. Select the desired parameter by cursor key or by pressing a one-touch key plus a number on the keypad. For example, to access parameter B:1, press one-touch “B” plus the number “1” on the numeric keypad. 3. Press [Enter]. 4. To navigate through the machine parameter settings: • • • • Press or of the cursor key to move the cursor. Press 0 or 1 on the numeric keypad to change the bit value. Press [Enter] to save the setting of the displayed parameter and advance to the next parameter. Press [Cancel] not to save the setting of the displayed parameter. 5. If you want to set other parameters, repeat step 3-5. Otherwise, proceed to step 6. 6. Press RESET to return the machine to standby. 3.2.2 Clearing the Machine Parameters Resets the machine parameters to factory defaults. 1. From standby, press MENU, *, 0, [Clear]. 3. Press [Enter]. The machine parameters will reset to factory defaults. Note: To finish the operation without clearing the parameters, press [Cancel]. 3-2 Machine Parameter A:0 Switch 7 6 5 4 3 2 1 0 Initial Setting 0 0 0 0 0 0 0 0 Adjust Usage/Comments The country code enables the ROM to output the correct programming information for the respective country. Country code Machine Parameter A:1 Switch 7 6 5 4 3 2 1 0 Initial Setting 0 1 0 1 * * * * Adjust Usage/Comments Factory use only Factory use only Factory use only Factory use only Output attenuation See table below Note: The setting of this switch is available only when setting other than 0 dB (and this setting is used instead of Memory Switch B:1, bit 3-0.) Machine Parameter A:1…Output attenuation Switch 3 2 1 0 -15 dB 1 1 1 1 -14 dB 1 1 1 0 -13 dB 1 1 0 1 -12 dB 1 1 0 0 -11 dB 1 0 1 1 -10 dB 1 0 1 0 -9 dB 1 0 0 1 3-3 -8 dB 1 0 0 0 -7 dB 0 1 1 1 -6 dB 0 1 1 0 -5 dB 0 1 0 1 -4 dB 0 1 0 0 -3 dB 0 0 1 1 -2 dB 0 0 1 0 -1 dB 0 0 0 1 -0 dB 0 0 0 0 Machine Parameter A:2 Switch 7 6 5 4 3 2 1 0 Initial Setting 1 0 1 0 1 1 1 1 Adjust Usage/Comments Factory use only Factory use only Factory use only Factory use only DTMF output level attenuation See table below. Machine Parameter A:2 _ DTMF output level attenuation — (Factory default is -15 dB) Switch 3 0 0 0 0 0 0 0 0 1 1 1 1 1 1 1 1 Switch 2 0 0 0 0 1 1 1 1 0 0 0 0 1 1 1 1 Switch 1 0 0 1 1 0 0 1 1 0 0 1 1 0 0 1 1 Switch 0 0 1 0 1 0 1 0 1 0 1 0 1 0 1 0 1 Attenuation 0 dB 1 dB 2 dB 3 dB 4 dB 5 dB 6 dB 7 dB 8 dB 9 dB 10 dB 11 dB 12 dB 13 dB 14 dB 15 dB Machine Parameter A:3 ∼ A:6 --- Factory use only Machine Parameter A:7 7 Initial Setting 0 6 5 4 3 2 1 0 0 0 0 0 0 1 1 Switch Adjust DRAM capacity indication (Spare) DRAM capacity indication (Slot 2) P5B DRAM capacity indication (Slot 1) P5A DRAM capacity indication On Main PCB Usage/Comments This switch indicates the DRAM capacity. (This switch is read only, do not set any character.) You can see the memory capacity by how many “1” is indicated on the LCD. One “1” means 8MB. For example, if three “1” are indicated, i.e. “00000111”, the DRAM capacity is 8MB × 3 = 24MB. Machine Parameter A:8 ∼ A:9 --- Factory use only 3-4 Machine Parameter B:0 Switch 7 6 5 4 3 2 1 0 Initial Setting 0 0 0 0 0 0 1 1 Adjust Usage/Comments Switch 76543210 Leading edge document margin adjustment (ADF) Adjusts the leading edge margin from standby position to the start of the scanning position. 1 step = 5 / 600 dpi (0.2116 mm) Note: These values are factory set and should not be adjusted unless instructed by a Muratec technical representative. 25 steps 00011001 : 00100000 : 00010000 : 00001000 : 00000011 : 00000000 : 10001000 : 10010000 : -25 steps 10011001 Settings +5.29 mm +6.77 mm +3.39 mm +1.69 mm Å Initial setting 0 mm Å Standard +0.63 mm -1.69 mm -3.39 mm -5.29 mm Machine Parameter B:1 Switch 7 6 5 4 3 2 1 0 Initial Setting 0 0 0 0 0 0 0 0 Adjust Usage/Comments Switch 76543210 Adjustment of the scanning stretching and squeezing for ADF. (Horizontal) 00001111 : 00001000 : 00000100 : 00000010 00000010 00000000 00000010 00000010 : 10000100 : 10001000 : 10001111 The plus setting stretch the image data and the minus setting squeeze it. Each setting changes by 0.1% 3-5 Settings +1.5 % +0.8 % +0.4 % +0.2 % +0.1 % 0% -0.1 % -0.2 % -0.4 % -0.8 % -1.5 % Å Initial setting Machine Parameter B:2 Switch 7 6 5 4 3 2 1 0 Initial Setting 0 0 0 0 0 1 0 0 Adjust Usage/Comments Switch 76543210 Adjustment of the scanning stretching and squeezing for ADF. (Vertical) 00001111 : 00001000 : 00000100 : 00000010 00000010 00000000 00000010 00000010 : 10000100 : 10001000 : 10001111 The plus setting stretch the image data and the minus setting squeeze it. Each setting changes by 0.1% Settings +1.5 % +0.8 % +0.4 % Å Initial setting +0.2 % +0.1 % 0% -0.1 % -0.2 % Å Standard -0.4 % -0.8 % -1.5 % Machine Parameter B:3 Switch 7 6 5 4 3 2 1 0 Initial Setting 0 0 0 0 0 0 0 0 Adjust Usage/Comments Adjusts the number of the steps from DS2 ON to the start of the scanning position. (ADF) 1 step = 1 / 300 inches × 2 (0.084666 mm × 2) Note: These values are factory set and should not be adjusted unless instructed by a Muratec technical representative. Switch 76543210 63 steps 00111111 : 60 steps 00111100 : 50 steps 00110010 : 40 steps 00101000 : 30 steps 00011110 : 20 steps 00010100 : 10 steps 00001010 : 3steps 00000011 2steps 00000010 1 step 00000001 00000000 Settings +10.67 mm +10.16 mm +8.47 mm +6.77 mm +5.08 mm +3.39 mm +1.69 mm +0.51 mm +0.34 mm +0.17 mm 31 mm Å Initial setting When Switch 7 is “1”, it means “ - ”. For example, “10000001” means “-0.17 mm”. 3-6 Machine Parameter B:4 Switch 7 6 5 4 3 2 1 0 Initial Setting 0 0 0 0 0 0 0 0 Adjust Usage/Comments Adjusts the number of the steps from DS2 OFF to the start of the scanning position. (ADF) 1 step = 1 / 300 inches × 2 (0.084666 mm × 2) Note: These values are factory set and should not be adjusted unless instructed by a Muratec technical representative. Switch 76543210 63 steps 00111111 : 60 steps 00111100 : 50 steps 00110010 : 40 steps 00101000 : 30 steps 00011110 : 20 steps 00010100 : 10 steps 00001010 : 3steps 00000011 2steps 00000010 1 step 00000001 00000000 Settings +10.67 mm +10.16 mm +8.47 mm +6.77 mm +5.08 mm +3.39 mm +1.69 mm +0.51 mm +0.34 mm +0.17 mm 31 mm Å Initial setting When Switch 7 is “1”, it means “ - ”. For example, “10000001” means “-0.17 mm”. Machine Parameter B:5 Switch 7 6 5 4 3 2 1 0 Initial Setting 0 0 0 0 0 1 0 1 Adjust Leading edge document margin adjustment (FBS) Adjusts the leading edge margin from standby position to the start of the scanning position. 1 step = 5 / 600 dpi (0.2116 mm) Note: These values are factory set and should not be adjusted unless instructed by a Muratec technical representative. Usage/Comments Switch 76543210 25 steps 00011001 : 00100000 : 00010000 : 00001000 : 00000101 : 00000000 : 10001000 : 10010000 : -25 steps 10011001 3-7 Settings +5.29 mm +6.77 mm +3.39 mm +1.69 mm Å Initial setting 0 mm Å Standard +1.06 mm -1.69 mm -3.39 mm -5.29 mm Machine Parameter B:6 Switch 7 6 5 4 3 2 1 0 Initial Setting 0 0 0 0 0 0 0 0 Adjust Usage/Comments Switch 76543210 Adjustment of the scanning stretching and squeezing for FBS. (Horizontal) 00001111 : 00001000 : 00000100 : 00000010 00000010 00000000 00000010 00000010 : 10000100 : 10001000 : 10001111 The plus setting stretch the image data and the minus setting squeeze it. Each setting changes by 0.1% Settings +1.5 % +0.8 % +0.4 % +0.2 % +0.1 % 0% -0.1 % -0.2 % Å Initial setting -0.4 % -0.8 % -1.5 % Machine Parameter B:7 Switch 7 6 5 4 3 2 1 0 Initial Setting 0 0 0 0 0 0 0 0 Adjust Usage/Comments Switch 76543210 Adjustment of the scanning stretching and squeezing for FBS. (Vertical) 00001111 : 00001000 : 00000100 : 00000010 00000010 00000000 00000010 00000010 : 10000100 : 10001000 : 10001111 The plus setting stretch the image data and the minus setting squeeze it. Each setting changes by 0.1% 3-8 Settings +1.5 % +0.8 % +0.4 % +0.2 % +0.1 % 0% -0.1 % -0.2 % -0.4 % -0.8 % -1.5 % Å Initial setting Machine Parameter B:8 Switch 7 6 5 4 3 2 1 0 Initial Setting 0 0 0 0 0 0 0 0 Adjust Leading edge document margin adjustment (FBS) Adjusts the number of the steps from the home sensor of the mirror carriage ON to the start of the scanning position. 1 step = 0.140793616 mm Note: These values are factory set and should not be adjusted unless instructed by a Muratec technical representative. Usage/Comments Switch 76543210 31 steps 00011111 : 16 steps 00010000 : 8 steps 00001000 : 4 steps 00000100 : 2 step 00000010 : 1 step 00000001 00000000 -1 step 10000001 : -2 steps 10000010 : -4 steps 10000100 : -8 steps 10001000 : -16 steps 10010000 : -31 steps 10011111 Machine Parameter B:9 --- Factory use only 3-9 Settings +4.36 mm +2.25 mm +1.13 mm +0.56 mm +0.28 mm +0.14 mm 5 mm -0.14 mm -0.28 mm -0.56 mm -1.13 mm -2.25 mm -4.36 mm Å Initial setting Machine Parameter C:0 Switch 7 6 5 4 3 2 1 0 Initial Setting 0 0 0 0 0 0 0 0 Adjust Usage/Comments Switch 76543210 Mirror carriage standby position adjustment Adjusts the number of the steps from the home sensor of the mirror carriage OFF to the standby position. 1 step = 0.140793616 mm Note: These values are factory set and should not be adjusted unless instructed by a Muratec technical representative. 63 steps 00111111 : 60 steps 00111100 : 50 steps 00110010 : 40 steps 00101000 : 30 steps 00011110 : 20 steps 00010100 : 10 steps 00001010 : 3 steps 00000011 2 steps 00000010 1 step 00000001 00000000 Settings +8.87 mm +8.45 mm +7.04 mm +5.63 mm +4.22 mm +2.82 mm +1.41 mm +0.42 mm +0.28 mm +0.14 mm 36 mm Å Initial setting When Switch 7 is “1”, it means “ - ”. For example, “10000001” means “-0.17 mm”. Machine Parameter C:1 ∼ C:9 --- Factory use only Machine Parameter D:0 Switch 7 6 5 4 3 2 1 0 Initial Setting 0 0 0 0 0 0 0 0 Adjust Scanning contrast level adjustment in normal resolution. Usage/Comments Switch 76543210 01111111 : 00001000 : 00000000 : 10001000 : 11111111 3-10 Darkest setting Å Initial setting Lightest setting Machine Parameter D:1 Switch 7 6 5 4 3 2 1 0 Initial Setting 0 0 0 0 0 0 0 0 Adjust Usage/Comments Scanning contrast level adjustment in fine resolution. Switch 76543210 01111111 : 00001000 : 00000000 : 10001000 : 11111111 Darkest setting Å Initial setting Lightest setting Machine Parameter D:2 Switch 7 6 5 4 3 2 1 0 Initial Setting 0 0 0 0 0 0 0 0 Adjust Scanning contrast level adjustment in super-fine resolution. Usage/Comments Switch 76543210 01111111 : 00001000 : 00000000 : 10001000 : 11111111 Darkest setting Å Initial setting Lightest setting Machine Parameter D:3 Switch 7 6 5 4 3 2 1 0 Initial Setting 0 0 0 0 0 0 0 0 Adjust Scanning contrast level adjustment in hyper-fine resolution. Usage/Comments Switch 76543210 01111111 : 00001000 : 00000000 : 10001000 : 11111111 Darkest setting Å Initial setting Lightest setting Machine Parameter D:4 ∼ D:6 --- Factory use only 3-11 Machine Parameter D:7 Switch 7 6 5 4 3 2 1 0 Initial Setting 0 0 0 0 0 0 0 0 Adjust Usage/Comments Scanning contrast level adjustment for copy resolution. Switch 76543210 00111111 : 00000011 00000010 00000001 00000000 11111111 11111110 11111101 : 11000000 Copy mode: Photo Contrast: Auto, 600 dpi Darkest setting +3 +2 +1 Å Initial setting -1 -2 -3 Lightest setting Machine Parameter D:8 ∼ I:9 --- Factory use only Machine Parameter J:0 Switch 7 6 5 Initial Setting 0 0 0 4 0 3 0 2 0 1 0 0 0 Adjust Usage/Comments Factory use only Factory use only Able to use the 1st cassette in normal fax reception. 0: Yes 1: No Able to use the Large Capacity Cassette in normal fax reception. 0: Yes 1: No Able to use the 5th cassette in normal fax reception. 0: Yes 1: No Able to use the 4th cassette in normal fax reception. 0: Yes 1: No Able to use the 3rd cassette in normal fax reception. 0: Yes 1: No Able to use the 2nd cassette in normal fax reception. 0: Yes 1: No When set to “1”, the cassette is not available in fax reception. Note: This setting does not affect the rotate fax reception. See Machine Parameter J:1 for the rotate fax reception. 3-12 Machine Parameter J:1 Switch 7 6 5 Initial Setting 0 0 0 4 0 3 0 2 0 1 0 0 0 Adjust Usage/Comments Factory use only Factory use only Able to use the 1st cassette in rotate fax reception. 0: Yes 1: No Able to use the Large Capacity Cassette in rotate fax reception. 0: Yes 1: No Able to use the 5th cassette in rotate fax reception. 0: Yes 1: No Able to use the 4th cassette in rotate fax reception. 0: Yes 1: No Able to use the 3rd cassette in rotate fax reception. 0: Yes 1: No Able to use the 2nd cassette in rotate fax reception. 0: Yes 1: No When set to “1”, the cassette is not available in rotate fax reception. Note: This setting does not affect the normal fax reception. See Machine Parameter J:0 for the normal fax reception. Machine Parameter J:2 ∼ J:9 --- Factory use only 3-13 Machine Parameter K:0 Switch 7 6 5 4 3 2 1 0 Initial Setting 0 0 0 0 0 0 0 0 Adjust Usage/Comments Printer registration adjustment (Horizontal) at the 2nd cassette in normal printing. Switch 76543210 Settings 127 steps 01111111 : 00100000 : 00010000 : 00001000 : 00000000 : 11110111 : 11101111 : 10000000 +12.7 mm 32 steps Adjusts the start point to print. 16 steps The plus setting increase the left margin and the minus setting decrease it. 8 steps Each setting changes by 0.1 mm. -8 steps -16 steps Note: See Machine Parameter L:0 for the rotate printing. -128 steps +3.2 mm +1.6 mm +0.8 mm 0 mm Å Initial setting -0.8 mm -1.6 mm -12.8 mm Note: Set this switch after setting the margin to “0 mm” in Unique Switch F:2. Then, after setting this switch, set the margin to the initial setting (4 mm) in Unique Switch F:2. Machine Parameter K:1 Switch 7 6 5 4 3 2 1 0 Initial Setting 0 0 0 0 0 0 0 0 Adjust Usage/Comments Printer registration adjustment (Horizontal) at the 3rd cassette in normal printing. Switch 76543210 Settings 127 steps 01111111 : 00100000 : 00010000 : 00001000 : 00000000 : 11110111 : 11101111 : 10000000 +12.7 mm 32 steps Adjusts the start point to print. 16 steps The plus setting increase the left margin and the minus setting decrease it. 8 steps Each setting changes by 0.1 mm. -8 steps -16 steps Note: See Machine Parameter L:1 for the rotate printing. -128 steps +3.2 mm +1.6 mm +0.8 mm 0 mm Å Initial setting -0.8 mm -1.6 mm -12.8 mm Note: Set this switch after setting the margin to “0 mm” in Unique Switch F:2. Then, after setting this switch, set the margin to the initial setting (4 mm) in Unique Switch F:2. 3-14 Machine Parameter K:2 Switch 7 6 5 4 3 2 1 0 Initial Setting 0 0 0 0 0 0 0 0 Adjust Usage/Comments Printer registration adjustment (Horizontal) at the 4th cassette in normal printing. Switch 76543210 Settings 127 steps 01111111 : 00100000 : 00010000 : 00001000 : 00000000 : 11110111 : 11101111 : 10000000 +12.7 mm 32 steps Adjusts the start point to print. 16 steps The plus setting increase the left margin and the minus setting decrease it. 8 steps Each setting changes by 0.1 mm. -8 steps -16 steps Note: See Machine Parameter L:2 for the rotate printing. -128 steps +3.2 mm +1.6 mm +0.8 mm 0 mm Å Initial setting -0.8 mm -1.6 mm -12.8 mm Note: Set this switch after setting the margin to “0 mm” in Unique Switch F:2. Then, after setting this switch, set the margin to the initial setting (4 mm) in Unique Switch F:2. Machine Parameter K:3 Switch 7 6 5 4 3 2 1 0 Initial Setting 0 0 0 0 0 0 0 0 Adjust Usage/Comments Printer registration adjustment (Horizontal) at the 5th cassette in normal printing. Switch 76543210 Settings 127 steps 01111111 : 00100000 : 00010000 : 00001000 : 00000000 : 11110111 : 11101111 : 10000000 +12.7 mm 32 steps Adjusts the start point to print. 16 steps The plus setting increase the left margin and the minus setting decrease it. 8 steps Each setting changes by 0.1 mm. -8 steps -16 steps Note: See Machine Parameter L:3 for the rotate printing. -128 steps +3.2 mm +1.6 mm +0.8 mm 0 mm Å Initial setting -0.8 mm -1.6 mm -12.8 mm Note: Set this switch after setting the margin to “0 mm” in Unique Switch F:2. Then, after setting this switch, set the margin to the initial setting (4 mm) in Unique Switch F:2. 3-15 Machine Parameter K:4 Switch 7 6 5 4 3 2 1 0 Initial Setting 0 0 0 0 0 0 0 0 Adjust Usage/Comments Printer registration adjustment (Horizontal) at the LCC in normal printing. Switch 76543210 Settings 127 steps 01111111 : 00100000 : 00010000 : 00001000 : 00000000 : 11110111 : 11101111 : 10000000 +12.7 mm 32 steps Adjusts the start point to print. 16 steps The plus setting increase the left margin and the minus setting decrease it. Each setting changes by 0.1 mm. 8 steps -8 steps Note: See Machine Parameter L:4 for the rotate printing. -16 steps -128 steps +3.2 mm +1.6 mm +0.8 mm 0 mm Å Initial setting -0.8 mm -1.6 mm -12.8 mm Note: Set this switch after setting the margin to “0 mm” in Unique Switch F:2. Then, after setting this switch, set the margin to the initial setting (4 mm) in Unique Switch F:2. Machine Parameter K:5 Switch 7 6 5 4 3 2 1 0 Initial Setting 0 0 0 0 0 0 0 0 Adjust Usage/Comments Printer registration adjustment (Horizontal) at the 1st cassette in normal printing. Switch 76543210 Settings 127 steps 01111111 : 00100000 : 00010000 : 00001000 : 00000000 : 11110111 : 11101111 : 10000000 +12.7 mm 32 steps Adjusts the start point to print. 16 steps The plus setting increase the left margin and the minus setting decrease it. 8 steps Each setting changes by 0.1 mm. -8 steps -16 steps Note: See Machine Parameter L:5 for the rotate printing. -128 steps +3.2 mm +1.6 mm +0.8 mm 0 mm Å Initial setting -0.8 mm -1.6 mm -12.8 mm Note: Set this switch after setting the margin to “0 mm” in Unique Switch F:2. Then, after setting this switch, set the margin to the initial setting (4 mm) in Unique Switch F:2. 3-16 Machine Parameter K:6 Switch 7 6 5 4 3 2 1 0 Initial Setting 0 0 0 0 0 0 0 0 Adjust Usage/Comments Printer registration adjustment (Horizontal) at the Bypass tray in normal printing. Switch 76543210 Settings 127 steps 01111111 : 00100000 : 00010000 : 00001000 : 00000000 : 11110111 : 11101111 : 10000000 +12.7 mm 32 steps Adjusts the start point to print. 16 steps The plus setting increase the left margin and the minus setting decrease it. 8 steps Each setting changes by 0.1 mm. -8 steps -16 steps Note: See Machine Parameter L:6 for the rotate printing. -128 steps +3.2 mm +1.6 mm +0.8 mm 0 mm Å Initial setting -0.8 mm -1.6 mm -12.8 mm Note: Set this switch after setting the margin to “0 mm” in Unique Switch F:2. Then, after setting this switch, set the margin to the initial setting (4 mm) in Unique Switch F:2. Machine Parameter K:7 Switch 7 6 5 4 3 2 1 0 Initial Setting 0 0 0 0 0 0 0 0 Adjust Usage/Comments Printer registration adjustment (Horizontal) at the Duplex unit in normal printing. Switch 76543210 Settings 127 steps 01111111 : 00100000 : 00010000 : 00001000 : 00000000 : 11110111 : 11101111 : 10000000 +12.7 mm 32 steps Adjusts the start point to print. 16 steps The plus setting increase the left margin and the minus setting decrease it. 8 steps Each setting changes by 0.1 mm. -8 steps -16 steps Note: See Machine Parameter L:7 for the rotate printing. -128 steps +3.2 mm +1.6 mm +0.8 mm 0 mm Å Initial setting -0.8 mm -1.6 mm -12.8 mm Note: Set this switch after setting the margin to “0 mm” in Unique Switch F:2. Then, after setting this switch, set the margin to the initial setting (4 mm) in Unique Switch F:2. Machine Parameter K:8 ∼ K:9 --- Factory use only 3-17 Machine Parameter L:0 Switch 7 6 5 4 3 2 1 0 Initial Setting 0 0 0 0 0 0 0 0 Adjust Usage/Comments Printer registration adjustment (Horizontal) at the 2nd cassette in rotate printing. Switch 76543210 Settings 127 steps 01111111 : 00100000 : 00010000 : 00001000 : 00000000 : 11110111 : 11101111 : 10000000 +12.7 mm 32 steps Adjusts the start point to print. 16 steps The plus setting increase the left margin and the minus setting decrease it. 8 steps Each setting changes by 0.1 mm. -8 steps -16 steps Note: See Machine Parameter K:0 for the normal printing. -128 steps +3.2 mm +1.6 mm +0.8 mm 0 mm Å Initial setting -0.8 mm -1.6 mm -12.8 mm Note: Set this switch after setting the margin to “0 mm” in Unique Switch F:2. Then, after setting this switch, set the margin to the initial setting (4 mm) in Unique Switch F:2. Machine Parameter L:1 Switch 7 6 5 4 3 2 1 0 Initial Setting 0 0 0 0 0 0 0 0 Adjust Usage/Comments Printer registration adjustment (Horizontal) at the 3rd cassette in rotate printing. Switch 76543210 Settings 127 steps 01111111 : 00100000 : 00010000 : 00001000 : 00000000 : 11110111 : 11101111 : 10000000 +12.7 mm 32 steps Adjusts the start point to print. 16 steps The plus setting increase the left margin and the minus setting decrease it. Each setting changes by 0.1 mm. 8 steps -8 steps Note: See Machine Parameter K:1 for the normal printing. -16 steps -128 steps +3.2 mm +1.6 mm +0.8 mm 0 mm Å Initial setting -0.8 mm -1.6 mm -12.8 mm Note: Set this switch after setting the margin to “0 mm” in Unique Switch F:2. Then, after setting this switch, set the margin to the initial setting (4 mm) in Unique Switch F:2. 3-18 Machine Parameter L:2 Switch 7 6 5 4 3 2 1 0 Initial Setting 0 0 0 0 0 0 0 0 Adjust Usage/Comments Printer registration adjustment (Horizontal) at the 4th cassette in rotate printing. Switch 76543210 Settings 127 steps 01111111 : 00100000 : 00010000 : 00001000 : 00000000 : 11110111 : 11101111 : 10000000 +12.7 mm 32 steps Adjusts the start point to print. 16 steps The plus setting increase the left margin and the minus setting decrease it. Each setting changes by 0.1 mm. 8 steps -8 steps Note: See Machine Parameter K:2 for the normal printing. -16 steps -128 steps +3.2 mm +1.6 mm +0.8 mm 0 mm Å Initial setting -0.8 mm -1.6 mm -12.8 mm Note: Set this switch after setting the margin to “0 mm” in Unique Switch F:2. Then, after setting this switch, set the margin to the initial setting (4 mm) in Unique Switch F:2. Machine Parameter L:3 Switch 7 6 5 4 3 2 1 0 Initial Setting 0 0 0 0 0 0 0 0 Adjust Usage/Comments Printer registration adjustment (Horizontal) at the 5th cassette in rotate printing. Switch 76543210 Settings 127 steps 01111111 : 00100000 : 00010000 : 00001000 : 00000000 : 11110111 : 11101111 : 10000000 +12.7 mm 32 steps Adjusts the start point to print. 16 steps The plus setting increase the left margin and the minus setting decrease it. Each setting changes by 0.1 mm. 8 steps -8 steps Note: See Machine Parameter K:3 for the normal printing. -16 steps -128 steps +3.2 mm +1.6 mm +0.8 mm 0 mm Å Initial setting -0.8 mm -1.6 mm -12.8 mm Note: Set this switch after setting the margin to “0 mm” in Unique Switch F:2. Then, after setting this switch, set the margin to the initial setting (4 mm) in Unique Switch F:2. 3-19 Machine Parameter L:4 Switch 7 6 5 4 3 2 1 0 Initial Setting 0 0 0 0 0 0 0 0 Adjust Usage/Comments Printer registration adjustment (Horizontal) at the LCC in rotate printing. Switch 76543210 Settings 127 steps 01111111 : 00100000 : 00010000 : 00001000 : 00000000 : 11110111 : 11101111 : 10000000 +12.7 mm 32 steps Adjusts the start point to print. 16 steps The plus setting increase the left margin and the minus setting decrease it. Each setting changes by 0.1 mm. 8 steps -8 steps Note: See Machine Parameter K:4 for the normal printing. -16 steps -128 steps +3.2 mm +1.6 mm +0.8 mm 0 mm Å Initial setting -0.8 mm -1.6 mm -12.8 mm Note: Set this switch after setting the margin to “0 mm” in Unique Switch F:2. Then, after setting this switch, set the margin to the initial setting (4 mm) in Unique Switch F:2. Machine Parameter L:5 Switch 7 6 5 4 3 2 1 0 Initial Setting 0 0 0 0 0 0 0 0 Adjust Usage/Comments Printer registration adjustment (Horizontal) at the 1st cassette in rotate printing. Switch 76543210 Settings 127 steps 01111111 : 00100000 : 00010000 : 00001000 : 00000000 : 11110111 : 11101111 : 10000000 +12.7 mm 32 steps Adjusts the start point to print. 16 steps The plus setting increase the left margin and the minus setting decrease it. Each setting changes by 0.1 mm. 8 step -8 steps Note: See Machine Parameter K:5 for the normal printing. -16 steps -128 steps +3.2 mm +1.6 mm +0.8 mm 0 mm Å Initial setting -0.8 mm -1.6 mm -12.8 mm Note: Set this switch after setting the margin to “0 mm” in Unique Switch F:2. Then, after setting this switch, set the margin to the initial setting (4 mm) in Unique Switch F:2. 3-20 Machine Parameter L:6 Switch 7 6 5 4 3 2 1 0 Initial Setting 0 0 0 0 0 0 0 0 Adjust Usage/Comments Printer registration adjustment (Horizontal) at the Bypass tray in rotate printing. Switch 76543210 Settings 127 steps 01111111 : 00100000 : 00010000 : 00001000 : 00000000 : 11110111 : 11101111 : 10000000 +12.7 mm 32 steps Adjusts the start point to print. 16 steps The plus setting increase the left margin and the minus setting decrease it. Each setting changes by 0.1 mm. 8 steps -8 steps Note: See Machine Parameter K:6 for the normal printing. -16 steps -128 steps +3.2 mm +1.6 mm +0.8 mm 0 mm Å Initial setting -0.8 mm -1.6 mm -12.8 mm Note: Set this switch after setting the margin to “0 mm” in Unique Switch F:2. Then, after setting this switch, set the margin to the initial setting (4 mm) in Unique Switch F:2. Machine Parameter L:7 Switch 7 6 5 4 3 2 1 0 Initial Setting 0 0 0 0 0 0 0 0 Adjust Usage/Comments Printer registration adjustment (Horizontal) at the Duplex unit in rotate printing. Switch 76543210 Settings 127 steps 01111111 : 00100000 : 00010000 : 00001000 : 00000000 : 11110111 : 11101111 : 10000000 +12.7 mm 32 steps Adjusts the start point to print. 16 steps The plus setting increase the left margin and the minus setting decrease it. Each setting changes by 0.1 mm. 8 steps -8 steps Note: See Machine Parameter K:7 for the normal printing. -16 steps -128 steps +3.2 mm +1.6 mm +0.8 mm 0 mm Å Initial setting -0.8 mm -1.6 mm -12.8 mm Note: Set this switch after setting the margin to “0 mm” in Unique Switch F:2. Then, after setting this switch, set the margin to the initial setting (4 mm) in Unique Switch F:2. Machine Parameter L:8 ∼ L:9 --- Factory use only 3-21 Machine Parameter M:0 Switch 7 6 5 4 3 2 1 0 Initial Setting 0 0 0 0 0 0 0 0 Adjust Usage/Comments Printer registration adjustment (Horizontal) at the 2nd cassette in normal printing. Switch 76543210 Settings 127 steps 01111111 : 00100000 : 00010000 : 00001000 : 00000000 : 11110111 : 11101111 : 10000000 +12.7 mm 32 steps Adjusts the end point to print. 16 steps The plus setting increase the print range to the right and the minus setting decrease it. Each setting changes by 0.1 mm. 8 steps -8 steps Note: Adjust the right margin in Machine Parameter Q:0. -16 steps -128 steps Note: See Machine Parameter N:0 for the rotate printing. +3.2 mm +1.6 mm +0.8 mm 0 mm Å Initial setting -0.8 mm -1.6 mm -12.8 mm Note: Set this switch after setting the margin to “0 mm” in Unique Switch F:2. Then, after setting this switch, set the margin to the initial setting (4 mm) in Unique Switch F:2. Machine Parameter M:1 Switch 7 6 5 4 3 2 1 0 Initial Setting 0 0 0 0 0 0 0 0 Adjust Usage/Comments Printer registration adjustment (Horizontal) at the 3rd cassette in normal printing. Switch 76543210 Settings 127 steps 01111111 : 00100000 : 00010000 : 00001000 : 00000000 : 11110111 : 11101111 : 10000000 +12.7 mm 32 steps Adjusts the end point to print. 16 steps The plus setting increase the print range to the right and the minus setting decrease it. Each setting changes by 0.1 mm. 8 steps -8 steps Note: Adjust the right margin in Machine Parameter Q:1. -16 steps -128 steps Note: See Machine Parameter N:1 for the rotate printing. +3.2 mm +1.6 mm +0.8 mm 0 mm Å Initial setting -0.8 mm -1.6 mm -12.8 mm Note: Set this switch after setting the margin to “0 mm” in Unique Switch F:2. Then, after setting this switch, set the margin to the initial setting (4 mm) in Unique Switch F:2. 3-22 Machine Parameter M:2 Switch 7 6 5 4 3 2 1 0 Initial Setting 0 0 0 0 0 0 0 0 Adjust Usage/Comments Printer registration adjustment (Horizontal) at the 4th cassette in normal printing. Switch 76543210 Settings 127 steps 01111111 : 00100000 : 00010000 : 00001000 : 00000000 : 11110111 : 11101111 : 10000000 +12.7 mm 32 steps Adjusts the end point to print. 16 steps The plus setting increase the print range to the right and the minus setting decrease it. Each setting changes by 0.1 mm. 8 steps -8 steps Note: Adjust the right margin in Machine Parameter Q:2. -16 steps -128 steps Note: See Machine Parameter N:2 for the rotate printing. +3.2 mm +1.6 mm +0.8 mm 0 mm Å Initial setting -0.8 mm -1.6 mm -12.8 mm Note: Set this switch after setting the margin to “0 mm” in Unique Switch F:2. Then, after setting this switch, set the margin to the initial setting (4 mm) in Unique Switch F:2. Machine Parameter M:3 Switch 7 6 5 4 3 2 1 0 Initial Setting 0 0 0 0 0 0 0 0 Adjust Usage/Comments Printer registration adjustment (Horizontal) at the 5th cassette in normal printing. Switch 76543210 Settings 127 steps 01111111 : 00100000 : 00010000 : 00001000 : 00000000 : 11110111 : 11101111 : 10000000 +12.7 mm 32 steps Adjusts the end point to print. 16 steps The plus setting increase the print range to the right and the minus setting decrease it. Each setting changes by 0.1 mm. 8 steps -8 steps Note: Adjust the right margin in Machine Parameter Q:3. -16 steps -128 steps Note: See Machine Parameter N:3 for the rotate printing. +3.2 mm +1.6 mm +0.8 mm 0 mm Å Initial setting -0.8 mm -1.6 mm -12.8 mm Note: Set this switch after setting the margin to “0 mm” in Unique Switch F:2. Then, after setting this switch, set the margin to the initial setting (4 mm) in Unique Switch F:2. 3-23 Machine Parameter M:4 Switch 7 6 5 4 3 2 1 0 Initial Setting 0 0 0 0 0 0 0 0 Adjust Usage/Comments Printer registration adjustment (Horizontal) at the Large Capacity Cassette in normal printing. Switch 76543210 Settings 127 steps 01111111 : 00100000 : 00010000 : 00001000 : 00000000 : 11110111 : 11101111 : 10000000 +12.7 mm 32 steps Adjusts the end point to print. 16 steps The plus setting increase the print range to the right and the minus setting decrease it. Each setting changes by 0.1 mm. 8 steps -8 steps Note: Adjust the right margin in Machine Parameter Q:4. -16 steps -128 steps Note: See Machine Parameter N:4 for the rotate printing. +3.2 mm +1.6 mm +0.8 mm 0 mm Å Initial setting -0.8 mm -1.6 mm -12.8 mm Note: Set this switch after setting the margin to “0 mm” in Unique Switch F:2. Then, after setting this switch, set the margin to the initial setting (4 mm) in Unique Switch F:2. Machine Parameter M:5 Switch 7 6 5 4 3 2 1 0 Initial Setting 0 0 0 0 0 0 0 0 Adjust Usage/Comments Printer registration adjustment (Horizontal) at the 1st cassette in normal printing. Switch 76543210 Settings 127 steps 01111111 : 00100000 : 00010000 : 00001000 : 00000000 : 11110111 : 11101111 : 10000000 +12.7 mm 32 steps Adjusts the end point to print. 16 steps The plus setting increase the print range to the right and the minus setting decrease it. Each setting changes by 0.1 mm. 8 steps -8 steps Note: Adjust the right margin in Machine Parameter Q:5. -16 steps -128 steps Note: See Machine Parameter N:5 for the rotate printing. +3.2 mm +1.6 mm +0.8 mm 0 mm Å Initial setting -0.8 mm -1.6 mm -12.8 mm Note: Set this switch after setting the margin to “0 mm” in Unique Switch F:2. Then, after setting this switch, set the margin to the initial setting (4 mm) in Unique Switch F:2. 3-24 Machine Parameter M:6 Switch 7 6 5 4 3 2 1 0 Initial Setting 0 0 0 0 0 0 0 0 Adjust Usage/Comments Printer registration adjustment (Horizontal) at the Bypass tray in normal printing. Switch 76543210 Settings 127 steps 01111111 : 00100000 : 00010000 : 00001000 : 00000000 : 11110111 : 11101111 : 10000000 +12.7 mm 32 steps Adjusts the end point to print. 16 steps The plus setting increase the print range to the right and the minus setting decrease it. Each setting changes by 0.1 mm. 8 steps -8 steps Note: Adjust the right margin in Machine Parameter Q:6. -16 steps -128 steps Note: See Machine Parameter N:6 for the rotate printing. +3.2 mm +1.6 mm +0.8 mm 0 mm Å Initial setting -0.8 mm -1.6 mm -12.8 mm Note: Set this switch after setting the margin to “0 mm” in Unique Switch F:2. Then, after setting this switch, set the margin to the initial setting (4 mm) in Unique Switch F:2. Machine Parameter M:7 Switch 7 6 5 4 3 2 1 0 Initial Setting 0 0 0 0 0 0 0 0 Adjust Usage/Comments Printer registration adjustment (Horizontal) at the Duplex unit in normal printing. Switch 76543210 Settings 127 steps 01111111 : 00100000 : 00010000 : 00001000 : 00000000 : 11110111 : 11101111 : 10000000 +12.7 mm 32 steps Adjusts the end point to print. 16 steps The plus setting increase the print range to the right and the minus setting decrease it. Each setting changes by 0.1 mm. 8 steps -8 steps Note: Adjust the right margin in Machine Parameter Q:7. -16 steps -128 steps Note: See Machine Parameter N:7 for the rotate printing. +3.2 mm +1.6 mm +0.8 mm 0 mm Å Initial setting -0.8 mm -1.6 mm -12.8 mm Note: Set this switch after setting the margin to “0 mm” in Unique Switch F:2. Then, after setting this switch, set the margin to the initial setting (4 mm) in Unique Switch F:2. Machine Parameter M:8 ∼ M:9 --- Factory use only 3-25 Machine Parameter N:0 Switch 7 6 5 4 3 2 1 0 Initial Setting 0 0 0 0 0 0 0 0 Adjust Usage/Comments Printer registration adjustment (Horizontal) at the 2nd cassette in rotate printing. Switch 76543210 Settings 127 steps 01111111 : 00100000 : 00010000 : 00001000 : 00000000 : 11110111 : 11101111 : 10000000 +12.7 mm 32 steps Adjusts the end point to print. 16 steps The plus setting increase the print range to the right and the minus setting decrease it. Each setting changes by 0.1 mm. 8 steps -8 steps Note: Adjust the right margin in Machine Parameter R:0. -16 steps -128 steps Note: See Machine Parameter M:0 for the normal printing. +3.2 mm +1.6 mm +0.8 mm 0 mm Å Initial setting -0.8 mm -1.6 mm -12.8 mm Note: Set this switch after setting the margin to “0 mm” in Unique Switch F:2. Then, after setting this switch, set the margin to the initial setting (4 mm) in Unique Switch F:2. Machine Parameter N:1 Switch 7 6 5 4 3 2 1 0 Initial Setting 0 0 0 0 0 0 0 0 Adjust Usage/Comments Printer registration adjustment (Horizontal) at the 3rd cassette in rotate printing. Switch 76543210 Settings 127 steps +12.7 mm Adjusts the end point to print. 32 steps The plus setting increase the print range to the right and the minus setting decrease it. 16 steps 01111111 : 00100000 : 00010000 : 00001000 : 00000000 : 11110111 : 11101111 : 10000000 8 steps Each setting changes by 0.1 mm. -8 steps Note: Adjust the right margin in Machine Parameter R:1. Note: See Machine Parameter M:1 for the normal printing. -16 steps -128 steps +3.2 mm +1.6 mm +0.8 mm 0 mm Å Initial setting -0.8 mm -1.6 mm -12.8 mm Note: Set this switch after setting the margin to “0 mm” in Unique Switch F:2. Then, after setting this switch, set the margin to the initial setting (4 mm) in Unique Switch F:2. 3-26 Machine Parameter N:2 Switch 7 6 5 4 3 2 1 0 Initial Setting 0 0 0 0 0 0 0 0 Adjust Usage/Comments Printer registration adjustment (Horizontal) at the 4th cassette in rotate printing. Switch 76543210 Settings 127 steps +12.7 mm Adjusts the end point to print. 32 steps The plus setting increase the print range to the right and the minus setting decrease it. 16 steps 01111111 : 00100000 : 00010000 : 00001000 : 00000000 : 11110111 : 11101111 : 10000000 8 steps Each setting changes by 0.1 mm. -8 steps Note: Adjust the right margin in Machine Parameter R:2. Note: See Machine Parameter M:2 for the normal printing. -16 steps -128 steps +3.2 mm +1.6 mm +0.8 mm 0 mm Å Initial setting -0.8 mm -1.6 mm -12.8 mm Note: Set this switch after setting the margin to “0 mm” in Unique Switch F:2. Then, after setting this switch, set the margin to the initial setting (4 mm) in Unique Switch F:2. Machine Parameter N:3 Switch 7 6 5 4 3 2 1 0 Initial Setting 0 0 0 0 0 0 0 0 Adjust Usage/Comments Printer registration adjustment (Horizontal) at the 5th cassette in rotate printing. Switch 76543210 Settings 127 steps +12.7 mm Adjusts the end point to print. 32 steps The plus setting increase the print range to the right and the minus setting decrease it. 16 steps 01111111 : 00100000 : 00010000 : 00001000 : 00000000 : 11110111 : 11101111 : 10000000 8 steps Each setting changes by 0.1 mm. -8 steps Note: Adjust the right margin in Machine Parameter R:3. Note: See Machine Parameter M:3 for the normal printing. -16 steps -128 steps +3.2 mm +1.6 mm +0.8 mm 0 mm Å Initial setting -0.8 mm -1.6 mm -12.8 mm Note: Set this switch after setting the margin to “0 mm” in Unique Switch F:2. Then, after setting this switch, set the margin to the initial setting (4 mm) in Unique Switch F:2. 3-27 Machine Parameter N:4 Switch 7 6 5 4 3 2 1 0 Initial Setting 0 0 0 0 0 0 0 0 Adjust Usage/Comments Printer registration adjustment (Horizontal) at the Large Capacity Cassette in rotate printing. Switch 76543210 Settings 127 steps 01111111 : 00100000 : 00010000 : 00001000 : 00000000 : 11110111 : 11101111 : 10000000 +12.7 mm 32 steps Adjusts the end point to print. 16 steps The plus setting increase the print range to the right and the minus setting decrease it. Each setting changes by 0.1 mm. 8 steps -8 steps Note: Adjust the right margin in Machine Parameter R:4. -16 steps -128 steps Note: See Machine Parameter M:4 for the normal printing. +3.2 mm +1.6 mm +0.8 mm 0 mm Å Initial setting -0.8 mm -1.6 mm -12.8 mm Note: Set this switch after setting the margin to “0 mm” in Unique Switch F:2. Then, after setting this switch, set the margin to the initial setting (4 mm) in Unique Switch F:2. Machine Parameter N:5 Switch 7 6 5 4 3 2 1 0 Initial Setting 0 0 0 0 0 0 0 0 Adjust Usage/Comments Printer registration adjustment (Horizontal) at the 1st cassette in rotate printing. Switch 76543210 Settings 127 steps +12.7 mm Adjusts the end point to print. 32 steps The plus setting increase the print range to the right and the minus setting decrease it. 16 steps 01111111 : 00100000 : 00010000 : 00001000 : 00000000 : 11110111 : 11101111 : 10000000 8 steps Each setting changes by 0.1 mm. -8 steps Note: Adjust the right margin in Machine Parameter R:5. Note: See Machine Parameter M:5 for the normal printing. -16 steps -128 steps +3.2 mm +1.6 mm +0.8 mm 0 mm Å Initial setting -0.8 mm -1.6 mm -12.8 mm Note: Set this switch after setting the margin to “0 mm” in Unique Switch F:2. Then, after setting this switch, set the margin to the initial setting (4 mm) in Unique Switch F:2. 3-28 Machine Parameter N:6 Switch 7 6 5 4 3 2 1 0 Initial Setting 0 0 0 0 0 0 0 0 Adjust Usage/Comments Printer registration adjustment (Horizontal) at the Bypass tray in rotate printing. Switch 76543210 Settings 127 steps +12.7 mm Adjusts the end point to print. 32 steps The plus setting increase the print range to the right and the minus setting decrease it. 16 steps 01111111 : 00100000 : 00010000 : 00001000 : 00000000 : 11110111 : 11101111 : 10000000 8 steps Each setting changes by 0.1 mm. -8 steps Note: Adjust the right margin in Machine Parameter R:6. Note: See Machine Parameter M:6 for the normal printing. -16 steps -128 steps +3.2 mm +1.6 mm +0.8 mm 0 mm Å Initial setting -0.8 mm -1.6 mm -12.8 mm Note: Set this switch after setting the margin to “0 mm” in Unique Switch F:2. Then, after setting this switch, set the margin to the initial setting (4 mm) in Unique Switch F:2. Machine Parameter N:7 Switch 7 6 5 4 3 2 1 0 Initial Setting 0 0 0 0 0 0 0 0 Adjust Usage/Comments Printer registration adjustment (Horizontal) at the Duplex unit in rotate printing. Switch 76543210 Settings 127 steps +12.7 mm Adjusts the end point to print. 32 steps The plus setting increase the print range to the right and the minus setting decrease it. 16 steps 01111111 : 00100000 : 00010000 : 00001000 : 00000000 : 11110111 : 11101111 : 10000000 8 steps Each setting changes by 0.1 mm. -8 steps Note: Adjust the right margin in Machine Parameter R:7. Note: See Machine Parameter M:7 for the normal printing. -16 steps -128 steps +3.2 mm +1.6 mm +0.8 mm 0 mm Å Initial setting -0.8 mm -1.6 mm -12.8 mm Note: Set this switch after setting the margin to “0 mm” in Unique Switch F:2. Then, after setting this switch, set the margin to the initial setting (4 mm) in Unique Switch F:2. Machine Parameter N:8 ∼ N:9 --- Factory use only 3-29 Machine Parameter O:0 Switch 7 6 5 4 3 2 1 0 Initial Setting 0 0 0 0 0 0 0 0 Adjust Usage/Comments Switch 76543210 Settings 127 steps 01111111 : 00100000 : 00010000 : 00001000 : 00000000 : 11110111 : 11101111 : 10000000 +12.7 mm Printer registration adjustment. Adjusts the left margin at the 2nd cassette in normal printing. 32 steps 16 steps The plus setting increase the left margin and the minus setting decrease it. Each setting changes by 0.1 mm. 8 steps -8 steps Note: See Machine Parameter P:0 for the rotate printing. -16 steps -128 steps +3.2 mm +1.6 mm +0.8 mm 4 mm Å Initial setting -0.8 mm -1.6 mm -12.8 mm Note: The surrounding margin (right / left / top / bottom) is set in Unique Switch F:2. If you want to adjust only left margin, adjust it in this switch. Machine Parameter O:1 Switch 7 6 5 4 3 2 1 0 Initial Setting 0 0 0 0 0 0 0 0 Adjust Usage/Comments Switch 76543210 Settings 127 steps 01111111 : 00100000 : 00010000 : 00001000 : 00000000 : 11110111 : 11101111 : 10000000 +12.7 mm Printer registration adjustment. Adjusts the left margin at the 3rd cassette in normal printing. 32 steps 16 steps The plus setting increase the left margin and the minus setting decrease it. Each setting changes by 0.1 mm. Note: See Machine Parameter P:1 for the rotate printing. 8 steps -8 steps -16 steps -128 steps +3.2 mm +1.6 mm +0.8 mm 4 mm Å Initial setting -0.8 mm -1.6 mm -12.8 mm Note: The surrounding margin (right / left / top / bottom) is set in Unique Switch F:2. If you want to adjust only left margin, adjust it in this switch. 3-30 Machine Parameter O:2 Switch 7 6 5 4 3 2 1 0 Initial Setting 0 0 0 0 0 0 0 0 Adjust Usage/Comments Switch 76543210 Settings 127 steps 01111111 : 00100000 : 00010000 : 00001000 : 00000000 : 11110111 : 11101111 : 10000000 +12.7 mm Printer registration adjustment. Adjusts the left margin at the 4th cassette in normal printing. 32 steps 16 steps The plus setting increase the left margin and the minus setting decrease it. Each setting changes by 0.1 mm. 8 steps -8 steps Note: See Machine Parameter P:2 for the rotate printing. -16 steps -128 steps +3.2 mm +1.6 mm +0.8 mm 4 mm Å Initial setting -0.8 mm -1.6 mm -12.8 mm Note: The surrounding margin (right / left / top / bottom) is set in Unique Switch F:2. If you want to adjust only left margin, adjust it in this switch. Machine Parameter O:3 Switch 7 6 5 4 3 2 1 0 Initial Setting 0 0 0 0 0 0 0 0 Adjust Usage/Comments Switch 76543210 Settings 127 steps 01111111 : 00100000 : 00010000 : 00001000 : 00000000 : 11110111 : 11101111 : 10000000 +12.7 mm Printer registration adjustment. Adjusts the left margin at the 5th cassette in normal printing. 32 steps 16 steps The plus setting increase the left margin and the minus setting decrease it. Each setting changes by 0.1 mm. Note: See Machine Parameter P:3 for the rotate printing. 8 steps -8 steps -16 steps -128 steps +3.2 mm +1.6 mm +0.8 mm 4 mm Å Initial setting -0.8 mm -1.6 mm -12.8 mm Note: The surrounding margin (right / left / top / bottom) is set in Unique Switch F:2. If you want to adjust only left margin, adjust it in this switch. 3-31 Machine Parameter O:4 Switch 7 6 5 4 3 2 1 0 Initial Setting 0 0 0 0 0 0 0 0 Adjust Usage/Comments Switch 76543210 Settings 127 steps 01111111 : 00100000 : 00010000 : 00001000 : 00000000 : 11110111 : 11101111 : 10000000 +12.7 mm Printer registration adjustment. Adjusts the left margin at the Large Capacity Cassette in normal printing. 32 steps 16 steps The plus setting increase the left margin and the minus setting decrease it. Each setting changes by 0.1 mm. 8 steps -8 steps Note: See Machine Parameter P:4 for the rotate printing. -16 steps -128 steps +3.2 mm +1.6 mm +0.8 mm 4 mm Å Initial setting -0.8 mm -1.6 mm -12.8 mm Note: The surrounding margin (right / left / top / bottom) is set in Unique Switch F:2. If you want to adjust only left margin, adjust it in this switch. Machine Parameter O:5 Switch 7 6 5 4 3 2 1 0 Initial Setting 0 0 0 0 0 0 0 0 Adjust Usage/Comments Switch 76543210 Settings 127 steps 01111111 : 00100000 : 00010000 : 00001000 : 00000000 : 11110111 : 11101111 : 10000000 +12.7 mm Printer registration adjustment. Adjusts the left margin at the 1st cassette in normal printing. 32 steps 16 steps The plus setting increase the left margin and the minus setting decrease it. Each setting changes by 0.1 mm. Note: See Machine Parameter P:5 for the rotate printing. 8 steps -8 steps -16 steps -128 steps +3.2 mm +1.6 mm +0.8 mm 4 mm Å Initial setting -0.8 mm -1.6 mm -12.8 mm Note: The surrounding margin (right / left / top / bottom) is set in Unique Switch F:2. If you want to adjust only left margin, adjust it in this switch. 3-32 Machine Parameter O:6 Switch 7 6 5 4 3 2 1 0 Initial Setting 0 0 0 0 0 0 0 0 Adjust Usage/Comments Switch 76543210 Settings 127 steps 01111111 : 00100000 : 00010000 : 00001000 : 00000000 : 11110111 : 11101111 : 10000000 +12.7 mm Printer registration adjustment. Adjusts the left margin at the Bypass tray in normal printing. 32 steps 16 steps The plus setting increase the left margin and the minus setting decrease it. Each setting changes by 0.1 mm. 8 steps -8 steps Note: See Machine Parameter P:6 for the rotate printing. -16 steps -128 steps +3.2 mm +1.6 mm +0.8 mm 4 mm Å Initial setting -0.8 mm -1.6 mm -12.8 mm Note: The surrounding margin (right / left / top / bottom) is set in Unique Switch F:2. If you want to adjust only left margin, adjust it in this switch. Machine Parameter O:7 Switch 7 6 5 4 3 2 1 0 Initial Setting 0 0 0 0 0 0 0 0 Adjust Usage/Comments Switch 76543210 Settings 127 steps 01111111 : 00100000 : 00010000 : 00001000 : 00000000 : 11110111 : 11101111 : 10000000 +12.7 mm Printer registration adjustment. Adjusts the left margin at the Duplex unit in normal printing. 32 steps 16 steps The plus setting increase the left margin and the minus setting decrease it. Each setting changes by 0.1 mm. Note: See Machine Parameter P:7 for the rotate printing. 8 steps -8 steps -16 steps -128 steps +3.2 mm +1.6 mm +0.8 mm 4 mm Å Initial setting -0.8 mm -1.6 mm -12.8 mm Note: The surrounding margin (right / left / top / bottom) is set in Unique Switch F:2. If you want to adjust only left margin, adjust it in this switch. Machine Parameter O:8 ∼ O:9 --- Factory use only 3-33 Machine Parameter P:0 Switch 7 6 5 4 3 2 1 0 Initial Setting 0 0 0 0 0 0 0 0 Adjust Usage/Comments Switch 76543210 Settings 127 steps 01111111 : 00100000 : 00010000 : 00001000 : 00000000 : 11110111 : 11101111 : 10000000 +12.7 mm Printer registration adjustment. Adjusts the left margin at the 2nd cassette in rotate printing. 32 steps 16 steps The plus setting increase the left margin and the minus setting decrease it. Each setting changes by 0.1 mm. 8 steps -8 steps Note: See Machine Parameter O:0 for the normal printing. -16 steps -128 steps +3.2 mm +1.6 mm +0.8 mm 4 mm Å Initial setting -0.8 mm -1.6 mm -12.8 mm Note: The surrounding margin (right / left / top / bottom) is set in Unique Switch F:2. If you want to adjust only left margin, adjust it in this switch. Machine Parameter P:1 Switch 7 6 5 4 3 2 1 0 Initial Setting 0 0 0 0 0 0 0 0 Adjust Usage/Comments Switch 76543210 Settings 127 steps 01111111 : 00100000 : 00010000 : 00001000 : 00000000 : 11110111 : 11101111 : 10000000 +12.7 mm Printer registration adjustment. Adjusts the left margin at the 3rd cassette in rotate printing. The plus setting increase the left margin and the minus setting decrease it. 32 steps 16 steps 8 steps Each setting changes by 0.1 mm. -8 steps Note: See Machine Parameter O:1 for the normal printing. -16 steps -128 steps +3.2 mm +1.6 mm +0.8 mm 4 mm Å Initial setting -0.8 mm -1.6 mm -12.8 mm Note: The surrounding margin (right / left / top / bottom) is set in Unique Switch F:2. If you want to adjust only left margin, adjust it in this switch. 3-34 Machine Parameter P:2 Switch 7 6 5 4 3 2 1 0 Initial Setting 0 0 0 0 0 0 0 0 Adjust Usage/Comments Switch 76543210 Settings 127 steps 01111111 : 00100000 : 00010000 : 00001000 : 00000000 : 11110111 : 11101111 : 10000000 +12.7 mm Printer registration adjustment. Adjusts the left margin at the 4th cassette in rotate printing. The plus setting increase the left margin and the minus setting decrease it. 32 steps 16 steps 8 steps Each setting changes by 0.1 mm. -8 steps Note: See Machine Parameter O:2 for the normal printing. -16 steps -128 steps +3.2 mm +1.6 mm +0.8 mm 4 mm Å Initial setting -0.8 mm -1.6 mm -12.8 mm Note: The surrounding margin (right / left / top / bottom) is set in Unique Switch F:2. If you want to adjust only left margin, adjust it in this switch. Machine Parameter P:3 Switch 7 6 5 4 3 2 1 0 Initial Setting 0 0 0 0 0 0 0 0 Adjust Usage/Comments Switch 76543210 Settings 127 steps 01111111 : 00100000 : 00010000 : 00001000 : 00000000 : 11110111 : 11101111 : 10000000 +12.7 mm Printer registration adjustment. Adjusts the left margin at the 5th cassette in rotate printing. The plus setting increase the left margin and the minus setting decrease it. 32 steps 16 steps 8 steps Each setting changes by 0.1 mm. -8 steps Note: See Machine Parameter O:3 for the normal printing. -16 steps -128 steps +3.2 mm +1.6 mm +0.8 mm 4 mm Å Initial setting -0.8 mm -1.6 mm -12.8 mm Note: The surrounding margin (right / left / top / bottom) is set in Unique Switch F:2. If you want to adjust only left margin, adjust it in this switch. 3-35 Machine Parameter P:4 Switch 7 6 5 4 3 2 1 0 Initial Setting 0 0 0 0 0 0 0 0 Adjust Usage/Comments Switch 76543210 Settings 127 steps 01111111 : 00100000 : 00010000 : 00001000 : 00000000 : 11110111 : 11101111 : 10000000 +12.7 mm Printer registration adjustment. Adjusts the left margin at the Large Capacity Cassette in rotate printing. 32 steps 16 steps The plus setting increase the left margin and the minus setting decrease it. Each setting changes by 0.1 mm. 8 steps -8 steps Note: See Machine Parameter O:4 for the normal printing. -16 steps -128 steps +3.2 mm +1.6 mm +0.8 mm 4 mm Å Initial setting -0.8 mm -1.6 mm -12.8 mm Note: The surrounding margin (right / left / top / bottom) is set in Unique Switch F:2. If you want to adjust only left margin, adjust it in this switch. Machine Parameter P:5 Switch 7 6 5 4 3 2 1 0 Initial Setting 0 0 0 0 0 0 0 0 Adjust Usage/Comments Switch 76543210 Settings 127 steps 01111111 : 00100000 : 00010000 : 00001000 : 00000000 : 11110111 : 11101111 : 10000000 +12.7 mm Printer registration adjustment. Adjusts the left margin at the 1st cassette in rotate printing. The plus setting increase the left margin and the minus setting decrease it. 32 steps 16 steps 8 steps Each setting changes by 0.1 mm. -8 steps Note: See Machine Parameter O:5 for the normal printing. -16 steps -128 steps +3.2 mm +1.6 mm +0.8 mm 4 mm Å Initial setting -0.8 mm -1.6 mm -12.8 mm Note: The surrounding margin (right / left / top / bottom) is set in Unique Switch F:2. If you want to adjust only left margin, adjust it in this switch. 3-36 Machine Parameter P:6 Switch 7 6 5 4 3 2 1 0 Initial Setting 0 0 0 0 0 0 0 0 Adjust Usage/Comments Switch 76543210 Settings 127 steps 01111111 : 00100000 : 00010000 : 00001000 : 00000000 : 11110111 : 11101111 : 10000000 +12.7 mm Printer registration adjustment. Adjusts the left margin at the Bypass tray in rotate printing. The plus setting increase the left margin and the minus setting decrease it. 32 steps 16 steps 8 steps Each setting changes by 0.1 mm. -8 steps Note: See Machine Parameter O:6 for the normal printing. -16 steps -128 steps +3.2 mm +1.6 mm +0.8 mm 4 mm Å Initial setting -0.8 mm -1.6 mm -12.8 mm Note: The surrounding margin (right / left / top / bottom) is set in Unique Switch F:2. If you want to adjust only left margin, adjust it in this switch. Machine Parameter P:7 Switch 7 6 5 4 3 2 1 0 Initial Setting 0 0 0 0 0 0 0 0 Adjust Usage/Comments Switch 76543210 Settings 127 steps 01111111 : 00100000 : 00010000 : 00001000 : 00000000 : 11110111 : 11101111 : 10000000 +12.7 mm Printer registration adjustment. Adjusts the left margin at the Duplex unit in rotate printing. The plus setting increase the left margin and the minus setting decrease it. 32 steps 16 steps 8 steps Each setting changes by 0.1 mm. -8 steps Note: See Machine Parameter O:7 for the normal printing. -16 steps -128 steps +3.2 mm +1.6 mm +0.8 mm 4 mm Å Initial setting -0.8 mm -1.6 mm -12.8 mm Note: The surrounding margin (right / left / top / bottom) is set in Unique Switch F:2. If you want to adjust only left margin, adjust it in this switch. Machine Parameter P:8 ∼ P:9 --- Factory use only 3-37 Machine Parameter Q:0 Switch 7 6 5 4 3 2 1 0 Initial Setting 0 0 0 0 0 0 0 0 Adjust Usage/Comments Switch 76543210 Settings 127 steps 01111111 : 00100000 : 00010000 : 00001000 : 00000000 : 11110111 : 11101111 : 10000000 +12.7 mm Printer registration adjustment. Adjusts the right margin at the 2nd cassette in normal printing. 32 steps 16 steps The plus setting decrease the right margin and the minus setting increase it. Each setting changes by 0.1 mm. 8 steps -8 steps Note: See Machine Parameter R:0 for the rotate printing. -16 steps -128 steps +3.2 mm +1.6 mm +0.8 mm 4 mm Å Initial setting -0.8 mm -1.6 mm -12.8 mm Note: The surrounding margin (right / left / top / bottom) is set in Unique Switch F:2. If you want to adjust only right margin, adjust it in this switch. Machine Parameter Q:1 Switch 7 6 5 4 3 2 1 0 Initial Setting 0 0 0 0 0 0 0 0 Adjust Usage/Comments Switch 76543210 Settings 127 steps 01111111 : 00100000 : 00010000 : 00001000 : 00000000 : 11110111 : 11101111 : 10000000 +12.7 mm Printer registration adjustment. Adjusts the right margin at the 3rd cassette in normal printing. 32 steps 16 steps The plus setting decrease the right margin and the minus setting increase it. Each setting changes by 0.1 mm. Note: See Machine Parameter R:1 for the rotate printing. 8 steps -8 steps -16 steps -128 steps +3.2 mm +1.6 mm +0.8 mm 4 mm Å Initial setting -0.8 mm -1.6 mm -12.8 mm Note: The surrounding margin (right / left / top / bottom) is set in Unique Switch F:2. If you want to adjust only right margin, adjust it in this switch. 3-38 Machine Parameter Q:2 Switch 7 6 5 4 3 2 1 0 Initial Setting 0 0 0 0 0 0 0 0 Adjust Usage/Comments Switch 76543210 Settings 127 steps 01111111 : 00100000 : 00010000 : 00001000 : 00000000 : 11110111 : 11101111 : 10000000 +12.7 mm Printer registration adjustment. Adjusts the right margin at the 4th cassette in normal printing. 32 steps 16 steps The plus setting decrease the right margin and the minus setting increase it. Each setting changes by 0.1 mm. 8 steps -8 steps Note: See Machine Parameter R:2 for the rotate printing. -16 steps -128 steps +3.2 mm +1.6 mm +0.8 mm 4 mm Å Initial setting -0.8 mm -1.6 mm -12.8 mm Note: The surrounding margin (right / left / top / bottom) is set in Unique Switch F:2. If you want to adjust only right margin, adjust it in this switch. Machine Parameter Q:3 Switch 7 6 5 4 3 2 1 0 Initial Setting 0 0 0 0 0 0 0 0 Adjust Usage/Comments Switch 76543210 Settings 127 steps 01111111 : 00100000 : 00010000 : 00001000 : 00000000 : 11110111 : 11101111 : 10000000 +12.7 mm Printer registration adjustment. Adjusts the right margin at the 5th cassette in normal printing. 32 steps 16 steps The plus setting decrease the right margin and the minus setting increase it. Each setting changes by 0.1 mm. Note: See Machine Parameter R:3 for the rotate printing. 8 steps -8 steps -16 steps -128 steps +3.2 mm +1.6 mm +0.8 mm 4 mm Å Initial setting -0.8 mm -1.6 mm -12.8 mm Note: The surrounding margin (right / left / top / bottom) is set in Unique Switch F:2. If you want to adjust only right margin, adjust it in this switch. 3-39 Machine Parameter Q:4 Switch 7 6 5 4 3 2 1 0 Initial Setting 0 0 0 0 0 0 0 0 Adjust Usage/Comments Switch 76543210 Settings 127 steps 01111111 : 00100000 : 00010000 : 00001000 : 00000000 : 11110111 : 11101111 : 10000000 +12.7 mm Printer registration adjustment. Adjusts the right margin at the Large Capacity Cassette in normal printing. 32 steps 16 steps The plus setting decrease the right margin and the minus setting increase it. Each setting changes by 0.1 mm. 8 steps -8 steps Note: See Machine Parameter R:4 for the rotate printing. -16 steps -128 steps +3.2 mm +1.6 mm +0.8 mm 4 mm Å Initial setting -0.8 mm -1.6 mm -12.8 mm Note: The surrounding margin (right / left / top / bottom) is set in Unique Switch F:2. If you want to adjust only right margin, adjust it in this switch. Machine Parameter Q:5 Switch 7 6 5 4 3 2 1 0 Initial Setting 0 0 0 0 0 0 0 0 Adjust Usage/Comments Switch 76543210 Settings 127 steps 01111111 : 00100000 : 00010000 : 00001000 : 00000000 : 11110111 : 11101111 : 10000000 +12.7 mm Printer registration adjustment. Adjusts the right margin at the 1st cassette in normal printing. 32 steps 16 steps The plus setting decrease the right margin and the minus setting increase it. Each setting changes by 0.1 mm. Note: See Machine Parameter R:5 for the rotate printing. 8 steps -8 steps -16 steps -128 steps +3.2 mm +1.6 mm +0.8 mm 4 mm Å Initial setting -0.8 mm -1.6 mm -12.8 mm Note: The surrounding margin (right / left / top / bottom) is set in Unique Switch F:2. If you want to adjust only right margin, adjust it in this switch. 3-40 Machine Parameter Q:6 Switch 7 6 5 4 3 2 1 0 Initial Setting 0 0 0 0 0 0 0 0 Adjust Usage/Comments Switch 76543210 Settings 127 steps 01111111 : 00100000 : 00010000 : 00001000 : 00000000 : 11110111 : 11101111 : 10000000 +12.7 mm Printer registration adjustment. Adjusts the right margin at the Bypass tray in normal printing. 32 steps 16 steps The plus setting decrease the right margin and the minus setting increase it. Each setting changes by 0.1 mm. 8 steps -8 steps Note: See Machine Parameter R:6 for the rotate printing. -16 steps -128 steps +3.2 mm +1.6 mm +0.8 mm 4 mm Å Initial setting -0.8 mm -1.6 mm -12.8 mm Note: The surrounding margin (right / left / top / bottom) is set in Unique Switch F:2. If you want to adjust only right margin, adjust it in this switch. Machine Parameter Q:7 Switch 7 6 5 4 3 2 1 0 Initial Setting 0 0 0 0 0 0 0 0 Adjust Usage/Comments Switch 76543210 Settings 127 steps 01111111 : 00100000 : 00010000 : 00001000 : 00000000 : 11110111 : 11101111 : 10000000 +12.7 mm Printer registration adjustment. Adjusts the right margin at the Duplex unit in normal printing. 32 steps 16 steps The plus setting decrease the right margin and the minus setting increase it. Each setting changes by 0.1 mm. Note: See Machine Parameter R:7 for the rotate printing. 8 steps -8 steps -16 steps -128 steps +3.2 mm +1.6 mm +0.8 mm 4 mm Å Initial setting -0.8 mm -1.6 mm -12.8 mm Note: The surrounding margin (right / left / top / bottom) is set in Unique Switch F:2. If you want to adjust only right margin, adjust it in this switch. Machine Parameter Q:8 ∼ Q:9 --- Factory use only 3-41 Machine Parameter R:0 Switch 7 6 5 4 3 2 1 0 Initial Setting 0 0 0 0 0 0 0 0 Adjust Usage/Comments Switch 76543210 Settings 127 steps 01111111 : 00100000 : 00010000 : 00001000 : 00000000 : 11110111 : 11101111 : 10000000 +12.7 mm Printer registration adjustment. Adjusts the right margin at the 2nd cassette in rotate printing. 32 steps 16 steps The plus setting decrease the right margin and the minus setting increase it. Each setting changes by 0.1 mm. 8 steps -8 steps Note: See Machine Parameter Q:0 for the normal printing. -16 steps -128 steps +3.2 mm +1.6 mm +0.8 mm 4 mm Å Initial setting -0.8 mm -1.6 mm -12.8 mm Note: The surrounding margin (right / left / top / bottom) is set in Unique Switch F:2. If you want to adjust only right margin, adjust it in this switch. Machine Parameter R:1 Switch 7 6 5 4 3 2 1 0 Initial Setting 0 0 0 0 0 0 0 0 Adjust Usage/Comments Switch 76543210 Settings 127 steps 01111111 : 00100000 : 00010000 : 00001000 : 00000000 : 11110111 : 11101111 : 10000000 +12.7 mm Printer registration adjustment. Adjusts the right margin at the 3rd cassette in rotate printing. 32 steps 16 steps The plus setting decrease the right margin and the minus setting increase it. Each setting changes by 0.1 mm. 8 steps -8 steps Note: See Machine Parameter Q:1 for the normal printing. -16 steps -128 steps +3.2 mm +1.6 mm +0.8 mm 4 mm Å Initial setting -0.8 mm -1.6 mm -12.8 mm Note: The surrounding margin (right / left / top / bottom) is set in Unique Switch F:2. If you want to adjust only right margin, adjust it in this switch. 3-42 Machine Parameter R:2 Switch 7 6 5 4 3 2 1 0 Initial Setting 0 0 0 0 0 0 0 0 Adjust Usage/Comments Switch 76543210 Settings 127 steps 01111111 : 00100000 : 00010000 : 00001000 : 00000000 : 11110111 : 11101111 : 10000000 +12.7 mm Printer registration adjustment. Adjusts the right margin at the 4th cassette in rotate printing. 32 steps 16 steps The plus setting decrease the right margin and the minus setting increase it. Each setting changes by 0.1 mm. 8 steps -8 steps Note: See Machine Parameter Q:2 for the normal printing. -16 steps -128 steps +3.2 mm +1.6 mm +0.8 mm 4 mm Å Initial setting -0.8 mm -1.6 mm -12.8 mm Note: The surrounding margin (right / left / top / bottom) is set in Unique Switch F:2. If you want to adjust only right margin, adjust it in this switch. Machine Parameter R:3 Switch 7 6 5 4 3 2 1 0 Initial Setting 0 0 0 0 0 0 0 0 Adjust Usage/Comments Switch 76543210 Settings 127 steps 01111111 : 00100000 : 00010000 : 00001000 : 00000000 : 11110111 : 11101111 : 10000000 +12.7 mm Printer registration adjustment. Adjusts the right margin at the 5th cassette in rotate printing. 32 steps 16 steps The plus setting decrease the right margin and the minus setting increase it. Each setting changes by 0.1 mm. 8 steps -8 steps Note: See Machine Parameter Q:3 for the normal printing. -16 steps -128 steps +3.2 mm +1.6 mm +0.8 mm 4 mm Å Initial setting -0.8 mm -1.6 mm -12.8 mm Note: The surrounding margin (right / left / top / bottom) is set in Unique Switch F:2. If you want to adjust only right margin, adjust it in this switch. 3-43 Machine Parameter R:4 Switch 7 6 5 4 3 2 1 0 Initial Setting 0 0 0 0 0 0 0 0 Adjust Usage/Comments Switch 76543210 Settings 127 steps 01111111 : 00100000 : 00010000 : 00001000 : 00000000 : 11110111 : 11101111 : 10000000 +12.7 mm Printer registration adjustment. Adjusts the right margin at the Large Capacity Cassette in rotate printing. 32 steps 16 steps The plus setting decrease the right margin and the minus setting increase it. Each setting changes by 0.1 mm. 8 steps -8 steps Note: See Machine Parameter Q:4 for the normal printing. -16 steps -128 steps +3.2 mm +1.6 mm +0.8 mm 4 mm Å Initial setting -0.8 mm -1.6 mm -12.8 mm Note: The surrounding margin (right / left / top / bottom) is set in Unique Switch F:2. If you want to adjust only right margin, adjust it in this switch. Machine Parameter R:5 Switch 7 6 5 4 3 2 1 0 Initial Setting 0 0 0 0 0 0 0 0 Adjust Usage/Comments Switch 76543210 Settings 127 steps 01111111 : 00100000 : 00010000 : 00001000 : 00000000 : 11110111 : 11101111 : 10000000 +12.7 mm Printer registration adjustment. Adjusts the right margin at the 1st cassette in rotate printing. 32 steps 16 steps The plus setting decrease the right margin and the minus setting increase it. Each setting changes by 0.1 mm. 8 steps -8 steps Note: See Machine Parameter Q:5 for the normal printing. -16 steps -128 steps +3.2 mm +1.6 mm +0.8 mm 4 mm Å Initial setting -0.8 mm -1.6 mm -12.8 mm Note: The surrounding margin (right / left / top / bottom) is set in Unique Switch F:2. If you want to adjust only right margin, adjust it in this switch. 3-44 Machine Parameter R:6 Switch 7 6 5 4 3 2 1 0 Initial Setting 0 0 0 0 0 0 0 0 Adjust Usage/Comments Switch 76543210 Settings 127 steps 01111111 : 00100000 : 00010000 : 00001000 : 00000000 : 11110111 : 11101111 : 10000000 +12.7 mm Printer registration adjustment. Adjusts the right margin at the Bypass tray in rotate printing. 32 steps 16 steps The plus setting decrease the right margin and the minus setting increase it. Each setting changes by 0.1 mm. 8 steps -8 steps Note: See Machine Parameter Q:6 for the normal printing. -16 steps -128 steps +3.2 mm +1.6 mm +0.8 mm 4 mm Å Initial setting -0.8 mm -1.6 mm -12.8 mm Note: The surrounding margin (right / left / top / bottom) is set in Unique Switch F:2. If you want to adjust only right margin, adjust it in this switch. Machine Parameter R:7 Switch 7 6 5 4 3 2 1 0 Initial Setting 0 0 0 0 0 0 0 0 Adjust Usage/Comments Switch 76543210 Settings 127 steps 01111111 : 00100000 : 00010000 : 00001000 : 00000000 : 11110111 : 11101111 : 10000000 +12.7 mm Printer registration adjustment. Adjusts the right margin at the Duplex unit in rotate printing. 32 steps 16 steps The plus setting decrease the right margin and the minus setting increase it. Each setting changes by 0.1 mm. 8 steps -8 steps Note: See Machine Parameter Q:7 for the normal printing. -16 steps -128 steps +3.2 mm +1.6 mm +0.8 mm 4 mm Å Initial setting -0.8 mm -1.6 mm -12.8 mm Note: The surrounding margin (right / left / top / bottom) is set in Unique Switch F:2. If you want to adjust only right margin, adjust it in this switch. Machine Parameter R:8 ∼ R:9 --- Factory use only 3-45 Machine Parameter S:0 Switch 7 6 5 4 3 2 1 0 Initial Setting 0 0 0 0 0 0 0 0 Adjust Usage/Comments Printer registration adjustment (Vertical) at the 2nd cassette in normal printing. Switch 76543210 Settings 127 steps 01111111 : 00100000 : 00010000 : 00001000 : 00000000 : 11110111 : 11101111 : 10000000 +12.7 mm 32 steps Adjusts the start point to print. 16 steps The plus setting increase the top margin and the minus setting decrease it. 8 steps Each setting changes by 0.1 mm. -8 steps -16 steps Note: See Machine Parameter T:0 for the rotate printing. -128 steps +3.2 mm +1.6 mm +0.8 mm 0 mm Å Initial setting -0.8 mm -1.6 mm -12.8 mm Note: Set this switch after setting the margin to “0 mm” in Unique Switch F:2. Then, after setting this switch, set the margin to the initial setting (4 mm) in Unique Switch F:2. Machine Parameter S:1 Switch 7 6 5 4 3 2 1 0 Initial Setting 0 0 0 0 0 0 0 0 Adjust Usage/Comments Printer registration adjustment (Vertical) at the 3rd cassette in normal printing. Switch 76543210 Settings 127 steps 01111111 : 00100000 : 00010000 : 00001000 : 00000000 : 11110111 : 11101111 : 10000000 +12.7 mm 32 steps Adjusts the start point to print. 16 steps The plus setting increase the top margin and the minus setting decrease it. 8 steps Each setting changes by 0.1 mm. -8 steps -16 steps Note: See Machine Parameter T:1 for the rotate printing. -128 steps +3.2 mm +1.6 mm +0.8 mm 0 mm Å Initial setting -0.8 mm -1.6 mm -12.8 mm Note: Set this switch after setting the margin to “0 mm” in Unique Switch F:2. Then, after setting this switch, set the margin to the initial setting (4 mm) in Unique Switch F:2. 3-46 Machine Parameter S:2 Switch 7 6 5 4 3 2 1 0 Initial Setting 0 0 0 0 0 0 0 0 Adjust Usage/Comments Printer registration adjustment (Vertical) at the 4th cassette in normal printing. Switch 76543210 Settings 127 steps 01111111 : 00100000 : 00010000 : 00001000 : 00000000 : 11110111 : 11101111 : 10000000 +12.7 mm 32 steps Adjusts the start point to print. 16 steps The plus setting increase the top margin and the minus setting decrease it. 8 steps Each setting changes by 0.1 mm. -8 steps -16 steps Note: See Machine Parameter T:2 for the rotate printing. -128 steps +3.2 mm +1.6 mm +0.8 mm 0 mm Å Initial setting -0.8 mm -1.6 mm -12.8 mm Note: Set this switch after setting the margin to “0 mm” in Unique Switch F:2. Then, after setting this switch, set the margin to the initial setting (4 mm) in Unique Switch F:2. Machine Parameter S:3 Switch 7 6 5 4 3 2 1 0 Initial Setting 0 0 0 0 0 0 0 0 Adjust Usage/Comments Printer registration adjustment (Vertical) at the 5th cassette in normal printing. Switch 76543210 Settings 127 steps 01111111 : 00100000 : 00010000 : 00001000 : 00000000 : 11110111 : 11101111 : 10000000 +12.7 mm 32 steps Adjusts the start point to print. 16 steps The plus setting increase the top margin and the minus setting decrease it. 8 steps Each setting changes by 0.1 mm. -8 steps -16 steps Note: See Machine Parameter T:3 for the rotate printing. -128 steps +3.2 mm +1.6 mm +0.8 mm 0 mm Å Initial setting -0.8 mm -1.6 mm -12.8 mm Note: Set this switch after setting the margin to “0 mm” in Unique Switch F:2. Then, after setting this switch, set the margin to the initial setting (4 mm) in Unique Switch F:2. 3-47 Machine Parameter S:4 Switch 7 6 5 4 3 2 1 0 Initial Setting 0 0 0 0 0 0 0 0 Adjust Usage/Comments Printer registration adjustment (Vertical) at the LCC in normal printing. Switch 76543210 Settings 127 steps 01111111 : 00100000 : 00010000 : 00001000 : 00000000 : 11110111 : 11101111 : 10000000 +12.7 mm 32 steps Adjusts the start point to print. 16 steps The plus setting increase the top margin and the minus setting decrease it. Each setting changes by 0.1 mm. 8 steps -8 steps Note: See Machine Parameter T:4 for the rotate printing. -16 steps -128 steps +3.2 mm +1.6 mm +0.8 mm 0 mm Å Initial setting -0.8 mm -1.6 mm -12.8 mm Note: Set this switch after setting the margin to “0 mm” in Unique Switch F:2. Then, after setting this switch, set the margin to the initial setting (4 mm) in Unique Switch F:2. Machine Parameter S:5 Switch 7 6 5 4 3 2 1 0 Initial Setting 0 0 0 0 0 0 0 0 Adjust Usage/Comments Printer registration adjustment (Vertical) at the 1st cassette in normal printing. Switch 76543210 Settings 127 steps 01111111 : 00100000 : 00010000 : 00001000 : 00000000 : 11110111 : 11101111 : 10000000 +12.7 mm 32 steps Adjusts the start point to print. 16 steps The plus setting increase the top margin and the minus setting decrease it. 8 steps Each setting changes by 0.1 mm. -8 steps -16 steps Note: See Machine Parameter T:5 for the rotate printing. -128 steps +3.2 mm +1.6 mm +0.8 mm 0 mm Å Initial setting -0.8 mm -1.6 mm -12.8 mm Note: Set this switch after setting the margin to “0 mm” in Unique Switch F:2. Then, after setting this switch, set the margin to the initial setting (4 mm) in Unique Switch F:2. 3-48 Machine Parameter S:6 Switch 7 6 5 4 3 2 1 0 Initial Setting 0 0 0 0 0 0 0 0 Adjust Usage/Comments Printer registration adjustment (Vertical) at the Bypass tray in normal printing. Switch 76543210 Settings 127 steps 01111111 : 00100000 : 00010000 : 00001000 : 00000000 : 11110111 : 11101111 : 10000000 +12.7 mm 32 steps Adjusts the start point to print. 16 steps The plus setting increase the top margin and the minus setting decrease it. 8 steps Each setting changes by 0.1 mm. -8 steps -16 steps Note: See Machine Parameter T:6 for the rotate printing. -128 steps +3.2 mm +1.6 mm +0.8 mm 0 mm Å Initial setting -0.8 mm -1.6 mm -12.8 mm Note: Set this switch after setting the margin to “0 mm” in Unique Switch F:2. Then, after setting this switch, set the margin to the initial setting (4 mm) in Unique Switch F:2. Machine Parameter S:7 Switch 7 6 5 4 3 2 1 0 Initial Setting 0 0 0 0 0 0 0 0 Adjust Usage/Comments Printer registration adjustment (Vertical) at the Duplex unit in normal printing. Switch 76543210 Settings 127 steps 01111111 : 00100000 : 00010000 : 00001000 : 00000000 : 11110111 : 11101111 : 10000000 +12.7 mm 32 steps Adjusts the start point to print. 16 steps The plus setting increase the top margin and the minus setting decrease it. 8 steps Each setting changes by 0.1 mm. -8 steps -16 steps Note: See Machine Parameter T:7 for the rotate printing. -128 steps +3.2 mm +1.6 mm +0.8 mm 0 mm Å Initial setting -0.8 mm -1.6 mm -12.8 mm Note: Set this switch after setting the margin to “0 mm” in Unique Switch F:2. Then, after setting this switch, set the margin to the initial setting (4 mm) in Unique Switch F:2. Machine Parameter S:8 ∼ S:9 --- Factory use only 3-49 Machine Parameter T:0 Switch 7 6 5 4 3 2 1 0 Initial Setting 0 0 0 0 0 0 0 0 Adjust Usage/Comments Printer registration adjustment (Vertical) at the 2nd cassette in rotate printing. Switch 76543210 Settings 127 steps 01111111 : 00100000 : 00010000 : 00001000 : 00000000 : 11110111 : 11101111 : 10000000 +12.7 mm 32 steps Adjusts the start point to print. 16 steps The plus setting increase the top margin and the minus setting decrease it. 8 steps Each setting changes by 0.1 mm. -8 steps -16 steps Note: See Machine Parameter S:0 for the normal printing. -128 steps +3.2 mm +1.6 mm +0.8 mm 0 mm Å Initial setting -0.8 mm -1.6 mm -12.8 mm Note: Set this switch after setting the margin to “0 mm” in Unique Switch F:2. Then, after setting this switch, set the margin to the initial setting (4 mm) in Unique Switch F:2. Machine Parameter T:1 Switch 7 6 5 4 3 2 1 0 Initial Setting 0 0 0 0 0 0 0 0 Adjust Usage/Comments Printer registration adjustment (Vertical) at the 3rd cassette in rotate printing. Switch 76543210 Settings 127 steps 01111111 : 00100000 : 00010000 : 00001000 : 00000000 : 11110111 : 11101111 : 10000000 +12.7 mm 32 steps Adjusts the start point to print. 16 steps The plus setting increase the top margin and the minus setting decrease it. Each setting changes by 0.1 mm. 8 steps -8 steps Note: See Machine Parameter S:1 for the normal printing. -16 steps -128 steps +3.2 mm +1.6 mm +0.8 mm 0 mm Å Initial setting -0.8 mm -1.6 mm -12.8 mm Note: Set this switch after setting the margin to “0 mm” in Unique Switch F:2. Then, after setting this switch, set the margin to the initial setting (4 mm) in Unique Switch F:2. 3-50 Machine Parameter T:2 Switch 7 6 5 4 3 2 1 0 Initial Setting 0 0 0 0 0 0 0 0 Adjust Usage/Comments Printer registration adjustment (Vertical) at the 4th cassette in rotate printing. Switch 76543210 Settings 127 steps 01111111 : 00100000 : 00010000 : 00001000 : 00000000 : 11110111 : 11101111 : 10000000 +12.7 mm 32 steps Adjusts the start point to print. 16 steps The plus setting increase the top margin and the minus setting decrease it. Each setting changes by 0.1 mm. 8 steps -8 steps Note: See Machine Parameter S:2 for the normal printing. -16 steps -128 steps +3.2 mm +1.6 mm +0.8 mm 0 mm Å Initial setting -0.8 mm -1.6 mm -12.8 mm Note: Set this switch after setting the margin to “0 mm” in Unique Switch F:2. Then, after setting this switch, set the margin to the initial setting (4 mm) in Unique Switch F:2. Machine Parameter T:3 Switch 7 6 5 4 3 2 1 0 Initial Setting 0 0 0 0 0 0 0 0 Adjust Usage/Comments Printer registration adjustment (Vertical) at the 5th cassette in rotate printing. Switch 76543210 Settings 127 steps 01111111 : 00100000 : 00010000 : 00001000 : 00000000 : 11110111 : 11101111 : 10000000 +12.7 mm 32 steps Adjusts the start point to print. 16 steps The plus setting increase the top margin and the minus setting decrease it. Each setting changes by 0.1 mm. 8 steps -8 steps Note: See Machine Parameter S:3 for the normal printing. -16 steps -128 steps +3.2 mm +1.6 mm +0.8 mm 0 mm Å Initial setting -0.8 mm -1.6 mm -12.8 mm Note: Set this switch after setting the margin to “0 mm” in Unique Switch F:2. Then, after setting this switch, set the margin to the initial setting (4 mm) in Unique Switch F:2. 3-51 Machine Parameter T:4 Switch 7 6 5 4 3 2 1 0 Initial Setting 0 0 0 0 0 0 0 0 Adjust Usage/Comments Printer registration adjustment (Vertical) at the LCC in rotate printing. Switch 76543210 Settings 127 steps 01111111 : 00100000 : 00010000 : 00001000 : 00000000 : 11110111 : 11101111 : 10000000 +12.7 mm 32 steps Adjusts the start point to print. 16 steps The plus setting increase the top margin and the minus setting decrease it. Each setting changes by 0.1 mm. 8 steps -8 steps Note: See Machine Parameter S:4 for the normal printing. -16 steps -128 steps +3.2 mm +1.6 mm +0.8 mm 0 mm Å Initial setting -0.8 mm -1.6 mm -12.8 mm Note: Set this switch after setting the margin to “0 mm” in Unique Switch F:2. Then, after setting this switch, set the margin to the initial setting (4 mm) in Unique Switch F:2. Machine Parameter T:5 Switch 7 6 5 4 3 2 1 0 Initial Setting 0 0 0 0 0 0 0 0 Adjust Usage/Comments Printer registration adjustment (Vertical) at the 1st cassette in rotate printing. Switch 76543210 Settings 127 steps 01111111 : 00100000 : 00010000 : 00001000 : 00000000 : 11110111 : 11101111 : 10000000 +12.7 mm 32 steps Adjusts the start point to print. 16 steps The plus setting increase the top margin and the minus setting decrease it. Each setting changes by 0.1 mm. 8 step -8 steps Note: See Machine Parameter S:5 for the normal printing. -16 steps -128 steps +3.2 mm +1.6 mm +0.8 mm 0 mm Å Initial setting -0.8 mm -1.6 mm -12.8 mm Note: Set this switch after setting the margin to “0 mm” in Unique Switch F:2. Then, after setting this switch, set the margin to the initial setting (4 mm) in Unique Switch F:2. 3-52 Machine Parameter T:6 Switch 7 6 5 4 3 2 1 0 Initial Setting 0 0 0 0 0 0 0 0 Adjust Usage/Comments Printer registration adjustment (Vertical) at the Bypass tray in rotate printing. Switch 76543210 Settings 127 steps 01111111 : 00100000 : 00010000 : 00001000 : 00000000 : 11110111 : 11101111 : 10000000 +12.7 mm 32 steps Adjusts the start point to print. 16 steps The plus setting increase the top margin and the minus setting decrease it. Each setting changes by 0.1 mm. 8 steps -8 steps Note: See Machine Parameter S:6 for the normal printing. -16 steps -128 steps +3.2 mm +1.6 mm +0.8 mm 0 mm Å Initial setting -0.8 mm -1.6 mm -12.8 mm Note: Set this switch after setting the margin to “0 mm” in Unique Switch F:2. Then, after setting this switch, set the margin to the initial setting (4 mm) in Unique Switch F:2. Machine Parameter T:7 Switch 7 6 5 4 3 2 1 0 Initial Setting 0 0 0 0 0 0 0 0 Adjust Usage/Comments Printer registration adjustment (Vertical) at the Duplex unit in rotate printing. Switch 76543210 Settings 127 steps 01111111 : 00100000 : 00010000 : 00001000 : 00000000 : 11110111 : 11101111 : 10000000 +12.7 mm 32 steps Adjusts the start point to print. 16 steps The plus setting increase the top margin and the minus setting decrease it. Each setting changes by 0.1 mm. 8 steps -8 steps Note: See Machine Parameter S:7 for the normal printing. -16 steps -128 steps +3.2 mm +1.6 mm +0.8 mm 0 mm Å Initial setting -0.8 mm -1.6 mm -12.8 mm Note: Set this switch after setting the margin to “0 mm” in Unique Switch F:2. Then, after setting this switch, set the margin to the initial setting (4 mm) in Unique Switch F:2. Machine Parameter T:8 ∼ T:9 --- Factory use only 3-53 Machine Parameter U:0 Switch 7 6 5 4 3 2 1 0 Initial Setting 0 0 0 0 0 0 0 0 Adjust Usage/Comments Printer registration adjustment (Vertical) at the 2nd cassette in normal printing. Switch 76543210 Settings 127 steps 01111111 : 00100000 : 00010000 : 00001000 : 00000000 : 11110111 : 11101111 : 10000000 +12.7 mm 32 steps Adjusts the end point to print. 16 steps The plus setting increase the print range to the bottom and the minus setting decrease it. Each setting changes by 0.1 mm. 8 steps -8 steps +3.2 mm +1.6 mm +0.8 mm 0 mm Å Initial setting -0.8 mm Note: Adjust the bottom margin in Machine Parameter Y:0. -16 steps Note: See Machine Parameter V:0 for the rotate printing. Note: Set this switch after setting the margin to “0 mm” in Unique Switch F:2. Then, after setting this switch, set the margin to the initial setting (4 mm) in Unique Switch F:2. -128 steps -1.6 mm -12.8 mm Machine Parameter U:1 Switch 7 6 5 4 3 2 1 0 Initial Setting 0 0 0 0 0 0 0 0 Adjust Usage/Comments Printer registration adjustment (Vertical) at the 3rd cassette in normal printing. Switch 76543210 Settings 127 steps 01111111 : 00100000 : 00010000 : 00001000 : 00000000 : 11110111 : 11101111 : 10000000 +12.7 mm 32 steps Adjusts the end point to print. 16 steps The plus setting increase the print range to the bottom and the minus setting decrease it. Each setting changes by 0.1 mm. 8 steps -8 steps +3.2 mm +1.6 mm +0.8 mm 0 mm Å Initial setting -0.8 mm Note: Adjust the bottom margin in Machine Parameter Y:1. -16 steps Note: See Machine Parameter V:1 for the rotate printing. Note: Set this switch after setting the margin to “0 mm” in Unique Switch F:2. Then, after setting this switch, set the margin to the initial setting (4 mm) in Unique Switch F:2. -128 steps 3-54 -1.6 mm -12.8 mm Machine Parameter U:2 Switch 7 6 5 4 3 2 1 0 Initial Setting 0 0 0 0 0 0 0 0 Adjust Usage/Comments Printer registration adjustment (Vertical) at the 4th cassette in normal printing. Switch 76543210 Settings 127 steps 01111111 : 00100000 : 00010000 : 00001000 : 00000000 : 11110111 : 11101111 : 10000000 +12.7 mm 32 steps Adjusts the end point to print. 16 steps The plus setting increase the print range to the bottom and the minus setting decrease it. Each setting changes by 0.1 mm. 8 steps -8 steps +3.2 mm +1.6 mm +0.8 mm 0 mm Å Initial setting -0.8 mm Note: Adjust the bottom margin in Machine Parameter Y:2. -16 steps Note: See Machine Parameter V:2 for the rotate printing. Note: Set this switch after setting the margin to “0 mm” in Unique Switch F:2. Then, after setting this switch, set the margin to the initial setting (4 mm) in Unique Switch F:2. -128 steps -1.6 mm -12.8 mm Machine Parameter U:3 Switch 7 6 5 4 3 2 1 0 Initial Setting 0 0 0 0 0 0 0 0 Adjust Usage/Comments Printer registration adjustment (Vertical) at the 5th cassette in normal printing. Switch 76543210 Settings 127 steps 01111111 : 00100000 : 00010000 : 00001000 : 00000000 : 11110111 : 11101111 : 10000000 +12.7 mm 32 steps Adjusts the end point to print. 16 steps The plus setting increase the print range to the bottom and the minus setting decrease it. Each setting changes by 0.1 mm. 8 steps -8 steps +3.2 mm +1.6 mm +0.8 mm 0 mm Å Initial setting -0.8 mm Note: Adjust the bottom margin in Machine Parameter Y:3. -16 steps Note: See Machine Parameter V:3 for the rotate printing. Note: Set this switch after setting the margin to “0 mm” in Unique Switch F:2. Then, after setting this switch, set the margin to the initial setting (4 mm) in Unique Switch F:2. -128 steps 3-55 -1.6 mm -12.8 mm Machine Parameter U:4 Switch 7 6 5 4 3 2 1 0 Initial Setting 0 0 0 0 0 0 0 0 Adjust Usage/Comments Printer registration adjustment (Vertical) at the Large Capacity Cassette in normal printing. Switch 76543210 Settings 127 steps 01111111 : 00100000 : 00010000 : 00001000 : 00000000 : 11110111 : 11101111 : 10000000 +12.7 mm 32 steps Adjusts the end point to print. 16 steps The plus setting increase the print range to the bottom and the minus setting decrease it. Each setting changes by 0.1 mm. 8 steps -8 steps +3.2 mm +1.6 mm +0.8 mm 0 mm Å Initial setting -0.8 mm Note: Adjust the bottom margin in Machine Parameter Y:4. -16 steps Note: See Machine Parameter V:4 for the rotate printing. Note: Set this switch after setting the margin to “0 mm” in Unique Switch F:2. Then, after setting this switch, set the margin to the initial setting (4 mm) in Unique Switch F:2. -128 steps -1.6 mm -12.8 mm Machine Parameter U:5 Switch 7 6 5 4 3 2 1 0 Initial Setting 0 0 0 0 0 0 0 0 Adjust Usage/Comments Printer registration adjustment (Vertical) at the 1st cassette in normal printing. Switch 76543210 Settings 127 steps 01111111 : 00100000 : 00010000 : 00001000 : 00000000 : 11110111 : 11101111 : 10000000 +12.7 mm 32 steps Adjusts the end point to print. 16 steps The plus setting increase the print range to the bottom and the minus setting decrease it. Each setting changes by 0.1 mm. 8 steps -8 steps +3.2 mm +1.6 mm +0.8 mm 0 mm Å Initial setting -0.8 mm Note: Adjust the bottom margin in Machine Parameter Y:5. -16 steps Note: See Machine Parameter V:5 for the rotate printing. Note: Set this switch after setting the margin to “0 mm” in Unique Switch F:2. Then, after setting this switch, set the margin to the initial setting (4 mm) in Unique Switch F:2. -128 steps 3-56 -1.6 mm -12.8 mm Machine Parameter U:6 Switch 7 6 5 4 3 2 1 0 Initial Setting 0 0 0 0 0 0 0 0 Adjust Usage/Comments Printer registration adjustment (Vertical) at the Bypass tray in normal printing. Switch 76543210 Settings 127 steps 01111111 : 00100000 : 00010000 : 00001000 : 00000000 : 11110111 : 11101111 : 10000000 +12.7 mm 32 steps Adjusts the end point to print. 16 steps The plus setting increase the print range to the bottom and the minus setting decrease it. Each setting changes by 0.1 mm. 8 steps -8 steps +3.2 mm +1.6 mm +0.8 mm 0 mm Å Initial setting -0.8 mm Note: Adjust the bottom margin in Machine Parameter Y:6. -16 steps Note: See Machine Parameter V:6 for the rotate printing. Note: Set this switch after setting the margin to “0 mm” in Unique Switch F:2. Then, after setting this switch, set the margin to the initial setting (4 mm) in Unique Switch F:2. -128 steps -1.6 mm -12.8 mm Machine Parameter U:7 Switch 7 6 5 4 3 2 1 0 Initial Setting 0 0 0 0 0 0 0 0 Adjust Usage/Comments Printer registration adjustment (Vertical) at the Duplex unit in normal printing. Switch 76543210 Settings 127 steps 01111111 : 00100000 : 00010000 : 00001000 : 00000000 : 11110111 : 11101111 : 10000000 +12.7 mm 32 steps Adjusts the end point to print. 16 steps The plus setting increase the print range to the bottom and the minus setting decrease it. Each setting changes by 0.1 mm. 8 steps -8 steps +3.2 mm +1.6 mm +0.8 mm 0 mm Å Initial setting -0.8 mm Note: Adjust the bottom margin in Machine Parameter Y:7. -16 steps Note: See Machine Parameter V:7 for the rotate printing. Note: Set this switch after setting the margin to “0 mm” in Unique Switch F:2. Then, after setting this switch, set the margin to the initial setting (4 mm) in Unique Switch F:2. -128 steps Machine Parameter U:8 ∼ U:9 --- Factory use only 3-57 -1.6 mm -12.8 mm Machine Parameter V:0 Switch 7 6 5 4 3 2 1 0 Initial Setting 0 0 0 0 0 0 0 0 Adjust Usage/Comments Printer registration adjustment (Vertical) at the 2nd cassette in rotate printing. Switch 76543210 Settings 127 steps 01111111 : 00100000 : 00010000 : 00001000 : 00000000 : 11110111 : 11101111 : 10000000 +12.7 mm 32 steps Adjusts the end point to print. 16 steps The plus setting increase the print range to the bottom and the minus setting decrease it. Each setting changes by 0.1 mm. 8 steps -8 steps +3.2 mm +1.6 mm +0.8 mm 0 mm Å Initial setting -0.8 mm Note: Adjust the bottom margin in Machine Parameter Z:0. -16 steps Note: See Machine Parameter U:0 for the normal printing. Note: Set this switch after setting the margin to “0 mm” in Unique Switch F:2. Then, after setting this switch, set the margin to the initial setting (4 mm) in Unique Switch F:2. -128 steps -1.6 mm -12.8 mm Machine Parameter V:1 Switch 7 6 5 4 3 2 1 0 Initial Setting 0 0 0 0 0 0 0 0 Adjust Usage/Comments Printer registration adjustment (Vertical) at the 3rd cassette in rotate printing. Switch 76543210 Settings 127 steps +12.7 mm Adjusts the end point to print. 32 steps The plus setting increase the print range to the bottom and the minus setting decrease it. 16 steps 01111111 : 00100000 : 00010000 : 00001000 : 00000000 : 11110111 : 11101111 : 10000000 8 steps Each setting changes by 0.1 mm. -8 steps Note: Adjust the bottom margin in Machine Parameter Z:1. -16 steps -128 steps Note: See Machine Parameter U:1 for the normal printing. +3.2 mm +1.6 mm +0.8 mm 0 mm Å Initial setting -0.8 mm -1.6 mm -12.8 mm Note: Set this switch after setting the margin to “0 mm” in Unique Switch F:2. Then, after setting this switch, set the margin to the initial setting (4 mm) in Unique Switch F:2. 3-58 Machine Parameter V:2 Switch 7 6 5 4 3 2 1 0 Initial Setting 0 0 0 0 0 0 0 0 Adjust Usage/Comments Printer registration adjustment (Vertical) at the 4th cassette in rotate printing. Switch 76543210 Settings 127 steps +12.7 mm Adjusts the end point to print. 32 steps The plus setting increase the print range to the bottom and the minus setting decrease it. 16 steps 01111111 : 00100000 : 00010000 : 00001000 : 00000000 : 11110111 : 11101111 : 10000000 8 steps Each setting changes by 0.1 mm. -8 steps Note: Adjust the bottom margin in Machine Parameter Z:2. -16 steps -128 steps Note: See Machine Parameter U:2 for the normal printing. +3.2 mm +1.6 mm +0.8 mm 0 mm Å Initial setting -0.8 mm -1.6 mm -12.8 mm Note: Set this switch after setting the margin to “0 mm” in Unique Switch F:2. Then, after setting this switch, set the margin to the initial setting (4 mm) in Unique Switch F:2. Machine Parameter V:3 Switch 7 6 5 4 3 2 1 0 Initial Setting 0 0 0 0 0 0 0 0 Adjust Usage/Comments Printer registration adjustment (Vertical) at the 5th cassette in rotate printing. Switch 76543210 Settings 127 steps +12.7 mm Adjusts the end point to print. 32 steps The plus setting increase the print range to the bottom and the minus setting decrease it. 16 steps 01111111 : 00100000 : 00010000 : 00001000 : 00000000 : 11110111 : 11101111 : 10000000 8 steps Each setting changes by 0.1 mm. -8 steps Note: Adjust the bottom margin in Machine Parameter Z:3. -16 steps -128 steps Note: See Machine Parameter U:3 for the normal printing. +3.2 mm +1.6 mm +0.8 mm 0 mm Å Initial setting -0.8 mm -1.6 mm -12.8 mm Note: Set this switch after setting the margin to “0 mm” in Unique Switch F:2. Then, after setting this switch, set the margin to the initial setting (4 mm) in Unique Switch F:2. 3-59 Machine Parameter V:4 Switch 7 6 5 4 3 2 1 0 Initial Setting 0 0 0 0 0 0 0 0 Adjust Usage/Comments Printer registration adjustment (Vertical) at the Large Capacity Cassette in rotate printing. Switch 76543210 Settings 127 steps 01111111 : 00100000 : 00010000 : 00001000 : 00000000 : 11110111 : 11101111 : 10000000 +12.7 mm 32 steps Adjusts the end point to print. 16 steps The plus setting increase the print range to the bottom and the minus setting decrease it. Each setting changes by 0.1 mm. 8 steps -8 steps +3.2 mm +1.6 mm +0.8 mm 0 mm Å Initial setting -0.8 mm Note: Adjust the bottom margin in Machine Parameter Z:4. -16 steps Note: See Machine Parameter U:4 for the normal printing. Note: Set this switch after setting the margin to “0 mm” in Unique Switch F:2. Then, after setting this switch, set the margin to the initial setting (4 mm) in Unique Switch F:2. -128 steps -1.6 mm -12.8 mm Machine Parameter V:5 Switch 7 6 5 4 3 2 1 0 Initial Setting 0 0 0 0 0 0 0 0 Adjust Usage/Comments Printer registration adjustment (Vertical) at the 1st cassette in rotate printing. Switch 76543210 Settings 127 steps +12.7 mm Adjusts the end point to print. 32 steps The plus setting increase the print range to the bottom and the minus setting decrease it. 16 steps 01111111 : 00100000 : 00010000 : 00001000 : 00000000 : 11110111 : 11101111 : 10000000 8 steps Each setting changes by 0.1 mm. -8 steps Note: Adjust the bottom margin in Machine Parameter Z:5. -16 steps -128 steps Note: See Machine Parameter U:5 for the normal printing. +3.2 mm +1.6 mm +0.8 mm 0 mm Å Initial setting -0.8 mm -1.6 mm -12.8 mm Note: Set this switch after setting the margin to “0 mm” in Unique Switch F:2. Then, after setting this switch, set the margin to the initial setting (4 mm) in Unique Switch F:2. 3-60 Machine Parameter V:6 Switch 7 6 5 4 3 2 1 0 Initial Setting 0 0 0 0 0 0 0 0 Adjust Usage/Comments Printer registration adjustment (Vertical) at the Bypass tray in rotate printing. Switch 76543210 Settings 127 steps +12.7 mm Adjusts the end point to print. 32 steps The plus setting increase the print range to the bottom and the minus setting decrease it. 16 steps 01111111 : 00100000 : 00010000 : 00001000 : 00000000 : 11110111 : 11101111 : 10000000 8 steps Each setting changes by 0.1 mm. -8 steps Note: Adjust the bottom margin in Machine Parameter Z:6. -16 steps -128 steps Note: See Machine Parameter U:6 for the normal printing. +3.2 mm +1.6 mm +0.8 mm 0 mm Å Initial setting -0.8 mm -1.6 mm -12.8 mm Note: Set this switch after setting the margin to “0 mm” in Unique Switch F:2. Then, after setting this switch, set the margin to the initial setting (4 mm) in Unique Switch F:2. Machine Parameter V:7 Switch 7 6 5 4 3 2 1 0 Initial Setting 0 0 0 0 0 0 0 0 Adjust Usage/Comments Printer registration adjustment (Vertical) at the Duplex unit in rotate printing. Switch 76543210 Settings 127 steps +12.7 mm Adjusts the end point to print. 32 steps The plus setting increase the print range to the bottom and the minus setting decrease it. 16 steps 01111111 : 00100000 : 00010000 : 00001000 : 00000000 : 11110111 : 11101111 : 10000000 8 steps Each setting changes by 0.1 mm. -8 steps Note: Adjust the bottom margin in Machine Parameter Z:7. -16 steps -128 steps Note: See Machine Parameter U:7 for the normal printing. +3.2 mm +1.6 mm +0.8 mm 0 mm Å Initial setting -0.8 mm -1.6 mm -12.8 mm Note: Set this switch after setting the margin to “0 mm” in Unique Switch F:2. Then, after setting this switch, set the margin to the initial setting (4 mm) in Unique Switch F:2. Machine Parameter V:8 ∼ V:9 --- Factory use only 3-61 Machine Parameter W:0 Switch 7 6 5 4 3 2 1 0 Initial Setting 0 0 0 0 0 0 0 0 Adjust Usage/Comments Switch 76543210 Settings 127 steps 01111111 : 00100000 : 00010000 : 00001000 : 00000000 : 11110111 : 11101111 : 10000000 +12.7 mm Printer registration adjustment. Adjusts the top margin at the 2nd cassette in normal printing. 32 steps 16 steps The plus setting increase the top margin and the minus setting decrease it. Each setting changes by 0.1 mm. 8 steps -8 steps Note: See Machine Parameter X:0 for the rotate printing. -16 steps -128 steps +3.2 mm +1.6 mm +0.8 mm 4 mm Å Initial setting -0.8 mm -1.6 mm -12.8 mm Note: The surrounding margin (right / left / top / bottom) is set in Unique Switch F:2. If you want to adjust only top margin, adjust it in this switch. Machine Parameter W:1 Switch 7 6 5 4 3 2 1 0 Initial Setting 0 0 0 0 0 0 0 0 Adjust Usage/Comments Switch 76543210 Settings 127 steps 01111111 : 00100000 : 00010000 : 00001000 : 00000000 : 11110111 : 11101111 : 10000000 +12.7 mm Printer registration adjustment. Adjusts the top margin at the 3rd cassette in normal printing. 32 steps 16 steps The plus setting increase the top margin and the minus setting decrease it. Each setting changes by 0.1 mm. Note: See Machine Parameter X:1 for the rotate printing. 8 steps -8 steps -16 steps -128 steps +3.2 mm +1.6 mm +0.8 mm 4 mm Å Initial setting -0.8 mm -1.6 mm -12.8 mm Note: The surrounding margin (right / left / top / bottom) is set in Unique Switch F:2. If you want to adjust only top margin, adjust it in this switch. 3-62 Machine Parameter W:2 Switch 7 6 5 4 3 2 1 0 Initial Setting 0 0 0 0 0 0 0 0 Adjust Usage/Comments Switch 76543210 Settings 127 steps 01111111 : 00100000 : 00010000 : 00001000 : 00000000 : 11110111 : 11101111 : 10000000 +12.7 mm Printer registration adjustment. Adjusts the top margin at the 4th cassette in normal printing. 32 steps 16 steps The plus setting increase the top margin and the minus setting decrease it. Each setting changes by 0.1 mm. 8 steps -8 steps Note: See Machine Parameter X:2 for the rotate printing. -16 steps -128 steps +3.2 mm +1.6 mm +0.8 mm 4 mm Å Initial setting -0.8 mm -1.6 mm -12.8 mm Note: The surrounding margin (right / left / top / bottom) is set in Unique Switch F:2. If you want to adjust only top margin, adjust it in this switch. Machine Parameter W:3 Switch 7 6 5 4 3 2 1 0 Initial Setting 0 0 0 0 0 0 0 0 Adjust Usage/Comments Switch 76543210 Settings 127 steps 01111111 : 00100000 : 00010000 : 00001000 : 00000000 : 11110111 : 11101111 : 10000000 +12.7 mm Printer registration adjustment. Adjusts the top margin at the 5th cassette in normal printing. 32 steps 16 steps The plus setting increase the top margin and the minus setting decrease it. Each setting changes by 0.1 mm. Note: See Machine Parameter X:3 for the rotate printing. 8 steps -8 steps -16 steps -128 steps +3.2 mm +1.6 mm +0.8 mm 4 mm Å Initial setting -0.8 mm -1.6 mm -12.8 mm Note: The surrounding margin (right / left / top / bottom) is set in Unique Switch F:2. If you want to adjust only top margin, adjust it in this switch. 3-63 Machine Parameter W:4 Switch 7 6 5 4 3 2 1 0 Initial Setting 0 0 0 0 0 0 0 0 Adjust Usage/Comments Switch 76543210 Settings 127 steps 01111111 : 00100000 : 00010000 : 00001000 : 00000000 : 11110111 : 11101111 : 10000000 +12.7 mm Printer registration adjustment. Adjusts the top margin at the Large Capacity Cassette in normal printing. 32 steps 16 steps The plus setting increase the top margin and the minus setting decrease it. Each setting changes by 0.1 mm. 8 steps -8 steps Note: See Machine Parameter X:4 for the rotate printing. -16 steps -128 steps +3.2 mm +1.6 mm +0.8 mm 4 mm Å Initial setting -0.8 mm -1.6 mm -12.8 mm Note: The surrounding margin (right / left / top / bottom) is set in Unique Switch F:2. If you want to adjust only top margin, adjust it in this switch. Machine Parameter W:5 Switch 7 6 5 4 3 2 1 0 Initial Setting 0 0 0 0 0 0 0 0 Adjust Usage/Comments Switch 76543210 Settings 127 steps 01111111 : 00100000 : 00010000 : 00001000 : 00000000 : 11110111 : 11101111 : 10000000 +12.7 mm Printer registration adjustment. Adjusts the top margin at the 1st cassette in normal printing. 32 steps 16 steps The plus setting increase the top margin and the minus setting decrease it. Each setting changes by 0.1 mm. Note: See Machine Parameter X:5 for the rotate printing. 8 steps -8 steps -16 steps -128 steps +3.2 mm +1.6 mm +0.8 mm 4 mm Å Initial setting -0.8 mm -1.6 mm -12.8 mm Note: The surrounding margin (right / left / top / bottom) is set in Unique Switch F:2. If you want to adjust only top margin, adjust it in this switch. 3-64 Machine Parameter W:6 Switch 7 6 5 4 3 2 1 0 Initial Setting 0 0 0 0 0 0 0 0 Adjust Usage/Comments Switch 76543210 Settings 127 steps 01111111 : 00100000 : 00010000 : 00001000 : 00000000 : 11110111 : 11101111 : 10000000 +12.7 mm Printer registration adjustment. Adjusts the top margin at the Bypass tray in normal printing. 32 steps 16 steps The plus setting increase the top margin and the minus setting decrease it. Each setting changes by 0.1 mm. 8 steps -8 steps Note: See Machine Parameter X:6 for the rotate printing. -16 steps -128 steps +3.2 mm +1.6 mm +0.8 mm 4 mm Å Initial setting -0.8 mm -1.6 mm -12.8 mm Note: The surrounding margin (right / left / top / bottom) is set in Unique Switch F:2. If you want to adjust only top margin, adjust it in this switch. Machine Parameter W:7 Switch 7 6 5 4 3 2 1 0 Initial Setting 0 0 0 0 0 0 0 0 Adjust Usage/Comments Switch 76543210 Settings 127 steps 01111111 : 00100000 : 00010000 : 00001000 : 00000000 : 11110111 : 11101111 : 10000000 +12.7 mm Printer registration adjustment. Adjusts the top margin at the Duplex unit in normal printing. 32 steps 16 steps The plus setting increase the top margin and the minus setting decrease it. Each setting changes by 0.1 mm. Note: See Machine Parameter X:7 for the rotate printing. 8 steps -8 steps -16 steps -128 steps +3.2 mm +1.6 mm +0.8 mm 4 mm Å Initial setting -0.8 mm -1.6 mm -12.8 mm Note: The surrounding margin (right / left / top / bottom) is set in Unique Switch F:2. If you want to adjust only top margin, adjust it in this switch. Machine Parameter W:8 ∼ W:9 --- Factory use only 3-65 Machine Parameter X:0 Switch 7 6 5 4 3 2 1 0 Initial Setting 0 0 0 0 0 0 0 0 Adjust Usage/Comments Switch 76543210 Settings 127 steps 01111111 : 00100000 : 00010000 : 00001000 : 00000000 : 11110111 : 11101111 : 10000000 +12.7 mm Printer registration adjustment. Adjusts the top margin at the 2nd cassette in rotate printing. 32 steps 16 steps The plus setting increase the top margin and the minus setting decrease it. Each setting changes by 0.1 mm. 8 steps -8 steps Note: See Machine Parameter W:0 for the normal printing. -16 steps -128 steps +3.2 mm +1.6 mm +0.8 mm 4 mm Å Initial setting -0.8 mm -1.6 mm -12.8 mm Note: The surrounding margin (right / left / top / bottom) is set in Unique Switch F:2. If you want to adjust only top margin, adjust it in this switch. Machine Parameter X:1 Switch 7 6 5 4 3 2 1 0 Initial Setting 0 0 0 0 0 0 0 0 Adjust Usage/Comments Switch 76543210 Settings 127 steps 01111111 : 00100000 : 00010000 : 00001000 : 00000000 : 11110111 : 11101111 : 10000000 +12.7 mm Printer registration adjustment. Adjusts the top margin at the 3rd cassette in rotate printing. The plus setting increase the top margin and the minus setting decrease it. 32 steps 16 steps 8 steps Each setting changes by 0.1 mm. -8 steps Note: See Machine Parameter W:1 for the normal printing. -16 steps -128 steps +3.2 mm +1.6 mm +0.8 mm 4 mm Å Initial setting -0.8 mm -1.6 mm -12.8 mm Note: The surrounding margin (right / left / top / bottom) is set in Unique Switch F:2. If you want to adjust only top margin, adjust it in this switch. 3-66 Machine Parameter X:2 Switch 7 6 5 4 3 2 1 0 Initial Setting 0 0 0 0 0 0 0 0 Adjust Usage/Comments Switch 76543210 Settings 127 steps 01111111 : 00100000 : 00010000 : 00001000 : 00000000 : 11110111 : 11101111 : 10000000 +12.7 mm Printer registration adjustment. Adjusts the top margin at the 4th cassette in rotate printing. The plus setting increase the top margin and the minus setting decrease it. 32 steps 16 steps 8 steps Each setting changes by 0.1 mm. -8 steps Note: See Machine Parameter W:2 for the normal printing. -16 steps -128 steps +3.2 mm +1.6 mm +0.8 mm 4 mm Å Initial setting -0.8 mm -1.6 mm -12.8 mm Note: The surrounding margin (right / left / top / bottom) is set in Unique Switch F:2. If you want to adjust only top margin, adjust it in this switch. Machine Parameter X:3 Switch 7 6 5 4 3 2 1 0 Initial Setting 0 0 0 0 0 0 0 0 Adjust Usage/Comments Switch 76543210 Settings 127 steps 01111111 : 00100000 : 00010000 : 00001000 : 00000000 : 11110111 : 11101111 : 10000000 +12.7 mm Printer registration adjustment. Adjusts the top margin at the 5th cassette in rotate printing. The plus setting increase the top margin and the minus setting decrease it. 32 steps 16 steps 8 steps Each setting changes by 0.1 mm. -8 steps Note: See Machine Parameter W:3 for the normal printing. -16 steps -128 steps +3.2 mm +1.6 mm +0.8 mm 4 mm Å Initial setting -0.8 mm -1.6 mm -12.8 mm Note: The surrounding margin (right / left / top / bottom) is set in Unique Switch F:2. If you want to adjust only top margin, adjust it in this switch. 3-67 Machine Parameter X:4 Switch 7 6 5 4 3 2 1 0 Initial Setting 0 0 0 0 0 0 0 0 Adjust Usage/Comments Switch 76543210 Settings 127 steps 01111111 : 00100000 : 00010000 : 00001000 : 00000000 : 11110111 : 11101111 : 10000000 +12.7 mm Printer registration adjustment. Adjusts the top margin at the Large Capacity Cassette in rotate printing. 32 steps 16 steps The plus setting increase the top margin and the minus setting decrease it. Each setting changes by 0.1 mm. 8 steps -8 steps Note: See Machine Parameter W:4 for the normal printing. -16 steps -128 steps +3.2 mm +1.6 mm +0.8 mm 4 mm Å Initial setting -0.8 mm -1.6 mm -12.8 mm Note: The surrounding margin (right / left / top / bottom) is set in Unique Switch F:2. If you want to adjust only top margin, adjust it in this switch. Machine Parameter X:5 Switch 7 6 5 4 3 2 1 0 Initial Setting 0 0 0 0 0 0 0 0 Adjust Usage/Comments Switch 76543210 Settings 127 steps 01111111 : 00100000 : 00010000 : 00001000 : 00000000 : 11110111 : 11101111 : 10000000 +12.7 mm Printer registration adjustment. Adjusts the top margin at the 1st cassette in rotate printing. The plus setting increase the top margin and the minus setting decrease it. 32 steps 16 steps 8 steps Each setting changes by 0.1 mm. -8 steps Note: See Machine Parameter W:5 for the normal printing. -16 steps -128 steps +3.2 mm +1.6 mm +0.8 mm 4 mm Å Initial setting -0.8 mm -1.6 mm -12.8 mm Note: The surrounding margin (right / left / top / bottom) is set in Unique Switch F:2. If you want to adjust only top margin, adjust it in this switch. 3-68 Machine Parameter X:6 Switch 7 6 5 4 3 2 1 0 Initial Setting 0 0 0 0 0 0 0 0 Adjust Usage/Comments Switch 76543210 Settings 127 steps 01111111 : 00100000 : 00010000 : 00001000 : 00000000 : 11110111 : 11101111 : 10000000 +12.7 mm Printer registration adjustment. Adjusts the top margin at the Bypass tray in rotate printing. The plus setting increase the top margin and the minus setting decrease it. 32 steps 16 steps 8 steps Each setting changes by 0.1 mm. -8 steps Note: See Machine Parameter W:6 for the normal printing. -16 steps -128 steps +3.2 mm +1.6 mm +0.8 mm 4 mm Å Initial setting -0.8 mm -1.6 mm -12.8 mm Note: The surrounding margin (right / left / top / bottom) is set in Unique Switch F:2. If you want to adjust only top margin, adjust it in this switch. Machine Parameter X:7 Switch 7 6 5 4 3 2 1 0 Initial Setting 0 0 0 0 0 0 0 0 Adjust Usage/Comments Switch 76543210 Settings 127 steps 01111111 : 00100000 : 00010000 : 00001000 : 00000000 : 11110111 : 11101111 : 10000000 +12.7 mm Printer registration adjustment. Adjusts the top margin at the Duplex unit in rotate printing. The plus setting increase the top margin and the minus setting decrease it. 32 steps 16 steps 8 steps Each setting changes by 0.1 mm. -8 steps Note: See Machine Parameter W:7 for the normal printing. -16 steps -128 steps +3.2 mm +1.6 mm +0.8 mm 4 mm Å Initial setting -0.8 mm -1.6 mm -12.8 mm Note: The surrounding margin (right / left / top / bottom) is set in Unique Switch F:2. If you want to adjust only top margin, adjust it in this switch. Machine Parameter X:8 ∼ X:9 --- Factory use only 3-69 Machine Parameter Y:0 Switch 7 6 5 4 3 2 1 0 Initial Setting 0 0 0 0 0 0 0 0 Adjust Usage/Comments Switch 76543210 Settings 127 steps 01111111 : 00100000 : 00010000 : 00001000 : 00000000 : 11110111 : 11101111 : 10000000 +12.7 mm Printer registration adjustment. Adjusts the bottom margin at the 2nd cassette in normal printing. 32 steps 16 steps The plus setting decrease the bottom margin and the minus setting increase it. Each setting changes by 0.1 mm. 8 steps -8 steps Note: See Machine Parameter Z:0 for the rotate printing. -16 steps -128 steps +3.2 mm +1.6 mm +0.8 mm 4 mm Å Initial setting -0.8 mm -1.6 mm -12.8 mm Note: The surrounding margin (right / left / top / bottom) is set in Unique Switch F:2. If you want to adjust only bottom margin, adjust it in this switch. Machine Parameter Y:1 Switch 7 6 5 4 3 2 1 0 Initial Setting 0 0 0 0 0 0 0 0 Adjust Usage/Comments Switch 76543210 Settings 127 steps 01111111 : 00100000 : 00010000 : 00001000 : 00000000 : 11110111 : 11101111 : 10000000 +12.7 mm Printer registration adjustment. Adjusts the bottom margin at the 3rd cassette in normal printing. 32 steps 16 steps The plus setting decrease the bottom margin and the minus setting increase it. Each setting changes by 0.1 mm. Note: See Machine Parameter Z:1 for the rotate printing. 8 steps -8 steps -16 steps -128 steps +3.2 mm +1.6 mm +0.8 mm 4 mm Å Initial setting -0.8 mm -1.6 mm -12.8 mm Note: The surrounding margin (right / left / top / bottom) is set in Unique Switch F:2. If you want to adjust only bottom margin, adjust it in this switch. 3-70 Machine Parameter Y:2 Switch 7 6 5 4 3 2 1 0 Initial Setting 0 0 0 0 0 0 0 0 Adjust Usage/Comments Switch 76543210 Settings 127 steps 01111111 : 00100000 : 00010000 : 00001000 : 00000000 : 11110111 : 11101111 : 10000000 +12.7 mm Printer registration adjustment. Adjusts the bottom margin at the 4th cassette in normal printing. 32 steps 16 steps The plus setting decrease the bottom margin and the minus setting increase it. Each setting changes by 0.1 mm. 8 steps -8 steps Note: See Machine Parameter Z:2 for the rotate printing. -16 steps -128 steps +3.2 mm +1.6 mm +0.8 mm 4 mm Å Initial setting -0.8 mm -1.6 mm -12.8 mm Note: The surrounding margin (right / left / top / bottom) is set in Unique Switch F:2. If you want to adjust only bottom margin, adjust it in this switch. Machine Parameter Y:3 Switch 7 6 5 4 3 2 1 0 Initial Setting 0 0 0 0 0 0 0 0 Adjust Usage/Comments Switch 76543210 Settings 127 steps 01111111 : 00100000 : 00010000 : 00001000 : 00000000 : 11110111 : 11101111 : 10000000 +12.7 mm Printer registration adjustment. Adjusts the bottom margin at the 5th cassette in normal printing. 32 steps 16 steps The plus setting decrease the bottom margin and the minus setting increase it. Each setting changes by 0.1 mm. Note: See Machine Parameter Z:3 for the rotate printing. 8 steps -8 steps -16 steps -128 steps +3.2 mm +1.6 mm +0.8 mm 4 mm Å Initial setting -0.8 mm -1.6 mm -12.8 mm Note: The surrounding margin (right / left / top / bottom) is set in Unique Switch F:2. If you want to adjust only bottom margin, adjust it in this switch. 3-71 Machine Parameter Y:4 Switch 7 6 5 4 3 2 1 0 Initial Setting 0 0 0 0 0 0 0 0 Adjust Usage/Comments Switch 76543210 Settings 127 steps 01111111 : 00100000 : 00010000 : 00001000 : 00000000 : 11110111 : 11101111 : 10000000 +12.7 mm Printer registration adjustment. Adjusts the bottom margin at the Large Capacity Cassette in normal printing. 32 steps 16 steps The plus setting decrease the bottom margin and the minus setting increase it. Each setting changes by 0.1 mm. 8 steps -8 steps Note: See Machine Parameter Z:4 for the rotate printing. -16 steps -128 steps +3.2 mm +1.6 mm +0.8 mm 4 mm Å Initial setting -0.8 mm -1.6 mm -12.8 mm Note: The surrounding margin (right / left / top / bottom) is set in Unique Switch F:2. If you want to adjust only bottom margin, adjust it in this switch. Machine Parameter Y:5 Switch 7 6 5 4 3 2 1 0 Initial Setting 0 0 0 0 0 0 0 0 Adjust Usage/Comments Switch 76543210 Settings 127 steps 01111111 : 00100000 : 00010000 : 00001000 : 00000000 : 11110111 : 11101111 : 10000000 +12.7 mm Printer registration adjustment. Adjusts the bottom margin at the 1st cassette in normal printing. 32 steps 16 steps The plus setting decrease the bottom margin and the minus setting increase it. Each setting changes by 0.1 mm. Note: See Machine Parameter Z:5 for the rotate printing. 8 steps -8 steps -16 steps -128 steps +3.2 mm +1.6 mm +0.8 mm 4 mm Å Initial setting -0.8 mm -1.6 mm -12.8 mm Note: The surrounding margin (right / left / top / bottom) is set in Unique Switch F:2. If you want to adjust only bottom margin, adjust it in this switch. 3-72 Machine Parameter Y:6 Switch 7 6 5 4 3 2 1 0 Initial Setting 0 0 0 0 0 0 0 0 Adjust Usage/Comments Switch 76543210 Settings 127 steps 01111111 : 00100000 : 00010000 : 00001000 : 00000000 : 11110111 : 11101111 : 10000000 +12.7 mm Printer registration adjustment. Adjusts the bottom margin at the Bypass tray in normal printing. 32 steps 16 steps The plus setting decrease the bottom margin and the minus setting increase it. Each setting changes by 0.1 mm. 8 steps -8 steps Note: See Machine Parameter Z:6 for the rotate printing. -16 steps -128 steps +3.2 mm +1.6 mm +0.8 mm 4 mm Å Initial setting -0.8 mm -1.6 mm -12.8 mm Note: The surrounding margin (right / left / top / bottom) is set in Unique Switch F:2. If you want to adjust only bottom margin, adjust it in this switch. Machine Parameter Y:7 Switch 7 6 5 4 3 2 1 0 Initial Setting 0 0 0 0 0 0 0 0 Adjust Usage/Comments Switch 76543210 Settings 127 steps 01111111 : 00100000 : 00010000 : 00001000 : 00000000 : 11110111 : 11101111 : 10000000 +12.7 mm Printer registration adjustment. Adjusts the bottom margin at the Duplex unit in normal printing. 32 steps 16 steps The plus setting decrease the bottom margin and the minus setting increase it. Each setting changes by 0.1 mm. Note: See Machine Parameter Z:7 for the rotate printing. 8 steps -8 steps -16 steps -128 steps +3.2 mm +1.6 mm +0.8 mm 4 mm Å Initial setting -0.8 mm -1.6 mm -12.8 mm Note: The surrounding margin (right / left / top / bottom) is set in Unique Switch F:2. If you want to adjust only bottom margin, adjust it in this switch. Machine Parameter Y:8 ∼ Y:9 --- Factory use only 3-73 Machine Parameter Z:0 Switch 7 6 5 4 3 2 1 0 Initial Setting 0 0 0 0 0 0 0 0 Adjust Usage/Comments Switch 76543210 Settings 127 steps 01111111 : 00100000 : 00010000 : 00001000 : 00000000 : 11110111 : 11101111 : 10000000 +12.7 mm Printer registration adjustment. Adjusts the bottom margin at the 2nd cassette in rotate printing. 32 steps 16 steps The plus setting decrease the bottom margin and the minus setting increase it. Each setting changes by 0.1 mm. 8 steps -8 steps Note: See Machine Parameter Y:0 for the normal printing. -16 steps -128 steps +3.2 mm +1.6 mm +0.8 mm 4 mm Å Initial setting -0.8 mm -1.6 mm -12.8 mm Note: The surrounding margin (right / left / top / bottom) is set in Unique Switch F:2. If you want to adjust only bottom margin, adjust it in this switch. Machine Parameter Z:1 Switch 7 6 5 4 3 2 1 0 Initial Setting 0 0 0 0 0 0 0 0 Adjust Usage/Comments Switch 76543210 Settings 127 steps 01111111 : 00100000 : 00010000 : 00001000 : 00000000 : 11110111 : 11101111 : 10000000 +12.7 mm Printer registration adjustment. Adjusts the bottom margin at the 3rd cassette in rotate printing. 32 steps 16 steps The plus setting decrease the bottom margin and the minus setting increase it. Each setting changes by 0.1 mm. 8 steps -8 steps Note: See Machine Parameter Y:1 for the normal printing. -16 steps -128 steps +3.2 mm +1.6 mm +0.8 mm 4 mm Å Initial setting -0.8 mm -1.6 mm -12.8 mm Note: The surrounding margin (right / left / top / bottom) is set in Unique Switch F:2. If you want to adjust only bottom margin, adjust it in this switch. 3-74 Machine Parameter Z:2 Switch 7 6 5 4 3 2 1 0 Initial Setting 0 0 0 0 0 0 0 0 Adjust Usage/Comments Switch 76543210 Settings 127 steps 01111111 : 00100000 : 00010000 : 00001000 : 00000000 : 11110111 : 11101111 : 10000000 +12.7 mm Printer registration adjustment. Adjusts the bottom margin at the 4th cassette in rotate printing. 32 steps 16 steps The plus setting decrease the bottom margin and the minus setting increase it. Each setting changes by 0.1 mm. 8 steps -8 steps Note: See Machine Parameter Y:2 for the normal printing. -16 steps -128 steps +3.2 mm +1.6 mm +0.8 mm 4 mm Å Initial setting -0.8 mm -1.6 mm -12.8 mm Note: The surrounding margin (right / left / top / bottom) is set in Unique Switch F:2. If you want to adjust only bottom margin, adjust it in this switch. Machine Parameter Z:3 Switch 7 6 5 4 3 2 1 0 Initial Setting 0 0 0 0 0 0 0 0 Adjust Usage/Comments Switch 76543210 Settings 127 steps 01111111 : 00100000 : 00010000 : 00001000 : 00000000 : 11110111 : 11101111 : 10000000 +12.7 mm Printer registration adjustment. Adjusts the bottom margin at the 5th cassette in rotate printing. 32 steps 16 steps The plus setting decrease the bottom margin and the minus setting increase it. Each setting changes by 0.1 mm. 8 steps -8 steps Note: See Machine Parameter Y:3 for the normal printing. -16 steps -128 steps +3.2 mm +1.6 mm +0.8 mm 4 mm Å Initial setting -0.8 mm -1.6 mm -12.8 mm Note: The surrounding margin (right / left / top / bottom) is set in Unique Switch F:2. If you want to adjust only bottom margin, adjust it in this switch. 3-75 Machine Parameter Z:4 Switch 7 6 5 4 3 2 1 0 Initial Setting 0 0 0 0 0 0 0 0 Adjust Usage/Comments Switch 76543210 Settings 127 steps 01111111 : 00100000 : 00010000 : 00001000 : 00000000 : 11110111 : 11101111 : 10000000 +12.7 mm Printer registration adjustment. Adjusts the bottom margin at the Large Capacity Cassette in rotate printing. 32 steps 16 steps The plus setting decrease the bottom margin and the minus setting increase it. Each setting changes by 0.1 mm. 8 steps -8 steps Note: See Machine Parameter Y:4 for the normal printing. -16 steps -128 steps +3.2 mm +1.6 mm +0.8 mm 4 mm Å Initial setting -0.8 mm -1.6 mm -12.8 mm Note: The surrounding margin (right / left / top / bottom) is set in Unique Switch F:2. If you want to adjust only bottom margin, adjust it in this switch. Machine Parameter Z:5 Switch 7 6 5 4 3 2 1 0 Initial Setting 0 0 0 0 0 0 0 0 Adjust Usage/Comments Switch 76543210 Settings 127 steps 01111111 : 00100000 : 00010000 : 00001000 : 00000000 : 11110111 : 11101111 : 10000000 +12.7 mm Printer registration adjustment. Adjusts the bottom margin at the 1st cassette in rotate printing. 32 steps 16 steps The plus setting decrease the bottom margin and the minus setting increase it. Each setting changes by 0.1 mm. 8 steps -8 steps Note: See Machine Parameter Y:5 for the normal printing. -16 steps -128 steps +3.2 mm +1.6 mm +0.8 mm 4 mm Å Initial setting -0.8 mm -1.6 mm -12.8 mm Note: The surrounding margin (right / left / top / bottom) is set in Unique Switch F:2. If you want to adjust only bottom margin, adjust it in this switch. 3-76 Machine Parameter Z:6 Switch 7 6 5 4 3 2 1 0 Initial Setting 0 0 0 0 0 0 0 0 Adjust Usage/Comments Switch 76543210 Settings 127 steps 01111111 : 00100000 : 00010000 : 00001000 : 00000000 : 11110111 : 11101111 : 10000000 +12.7 mm Printer registration adjustment. Adjusts the bottom margin at the Bypass tray in rotate printing. 32 steps 16 steps The plus setting decrease the bottom margin and the minus setting increase it. Each setting changes by 0.1 mm. 8 steps -8 steps Note: See Machine Parameter Y:6 for the normal printing. -16 steps -128 steps +3.2 mm +1.6 mm +0.8 mm 4 mm Å Initial setting -0.8 mm -1.6 mm -12.8 mm Note: The surrounding margin (right / left / top / bottom) is set in Unique Switch F:2. If you want to adjust only bottom margin, adjust it in this switch. Machine Parameter Z:7 Switch 7 6 5 4 3 2 1 0 Initial Setting 0 0 0 0 0 0 0 0 Adjust Usage/Comments Switch 76543210 Settings 127 steps 01111111 : 00100000 : 00010000 : 00001000 : 00000000 : 11110111 : 11101111 : 10000000 +12.7 mm Printer registration adjustment. Adjusts the bottom margin at the Duplex unit in rotate printing. 32 steps 16 steps The plus setting decrease the bottom margin and the minus setting increase it. Each setting changes by 0.1 mm. 8 steps -8 steps Note: See Machine Parameter Y:7 for the normal printing. -16 steps -128 steps +3.2 mm +1.6 mm +0.8 mm 4 mm Å Initial setting -0.8 mm -1.6 mm -12.8 mm Note: The surrounding margin (right / left / top / bottom) is set in Unique Switch F:2. If you want to adjust only bottom margin, adjust it in this switch. Machine Parameter Z:8 ∼ Z:9 --- Factory use only 3-77 Scanner Adjustment 1. 2. 3. 4. 5. 6. 7. 8. 9. Set an A3-sized paper in the cassette. Set the printing margin to “0 mm” in Unique Switch F:2. Print the test pattern (Ladder pattern). Confirm that four black squares are printed without lacking. The square is 10 mm × 10 mm. If it is lacking, proceed to step 5. Otherwise, skip to step 6. Adjust the start and end point to print of the cassette you loaded the A3-sized paper in Machine Parameter K, M, S, U. Make a copy (100%) with an A3-sized paper. Compare the copy with the original document and confirm that the copy is printed correctly If it is not printed correctly, proceed to step8. Otherwise, skip to step 9. Adjust the scanning position in Machine Parameter B. After finishing the adjustment, set the printing margin to “4 mm” in Unique Switch F:2. Printing position Adjustment 1. 2. 3. 4. 5. 6. 7. 8. Adjust the scanner. Set the printing margin to “0 mm” in Unique Switch F:2. Make a copy with a cassette you want. Confirm that it is printed at center of the paper. If not, proceed to step 5. Otherwise, skip to step 6. Adjust the start and end point to print of the cassette you used in Machine Parameter K, M, S, U. In the case of the rotate printing, adjust it in Machine Parameter L, N, T, V. Set the printing margin to “4 mm” in Unique Switch F:2. Adjust the each margin to set the printing margin to “4 mm”, if necessary. In the case of the rotate printing, adjust it in Machine Parameter P, R, X, Z, if necessary. Repeat step 3 ∼ 7 for other cassettes. 3-78 3.3 Memory Switch Adjustment 3.3.1 Setting the Memory Switches These switches are used to program internal machine parameters. The primary back up battery maintains these settings if power is lost. 1. From standby, press MENU, *, 1. 2. Select the desired memory switch by cursor key or by pressing a one-touch key plus a number on the keypad. For example, to access memory switch B:1, press one-touch “B” plus the number “1” on the numeric keypad. 3. Press [Enter]. 4. To navigate through the memory switch settings: • Press or of the cursor key to move the cursor. • Press 0 or 1 on the numeric keypad to change the bit value. • Press [Enter] to save the setting of the displayed memory switch and advance to the next memory switch. • Press [Cancel] not to save the setting of the displayed memory switch. 5. If you want to set other memory switches, repeat step 3-5. Otherwise, proceed to step 6. 6. Press RESET to return the machine to standby. 3.3.2 Clearing the Memory Switches Resets the memory switches to factory defaults. 1. From standby, press MENU, *, 1, [Clear]. 3. Press [Enter]. The memory switches will reset to factory defaults. Note: To finish the operation without clearing the memory switches, press [Cancel]. 3-79 Memory Switch A:0 - Dialer 7 6 5 4 3 Initial Setting 0 0 0 0 0 2 1 1 1 0 0 Switch Adjust Factory use only Factory use only Factory use only Factory use only DIS detect time after dialing 0: 55 sec 1: 70 sec CED detection 0: No 1: Yes Dial tone detection 0: Do not dial 1: Dial Phone line type 0: PSTN 1: PBX Usage/Comments Sets the time DIS signal is detected after dialing a number. Can be use to ignore CED detection if noise on the telephone line is mistaken as a 2100 Hz CED signal. Determines if the machine proceeds with dialing or indicates an error if no dial tone is detected within five seconds of going off-hook. When set to PSTN, the machine checks for dial tone and acts according to the setting of memory switch A:0, bit 1. When set to PBX, the machine always dials a given number of seconds after going off-hook. Memory switch A:1 sets the number of seconds. Memory Switch A:1 - Dialer Switch 7 6 5 4 3 2 1 0 Initial Setting 0 0 0 0 0 0 1 1 Adjust Factory use only Factory use only Factory use only Factory use only PBX mode dial pause Usage/Comments Sets the number of seconds the machine waits before dialing when memory switch A:2, bit 0 is set to PBX mode. Switch 3 2 1 0 0000 0001 0010 0011 0100 0101 0110 0111 1000 1001 1010 1011 1100 1101 1110 1111 3-80 Pause time 0 sec 1 sec 2 sec 3 sec Initial setting 4 sec 5 sec 6 sec 7 sec 8 sec 9 sec 10 sec 11 sec 12 sec 13 sec 14 sec 15 sec Memory Switch A:2 - Dialer Switch 7 6 5 4 3 2 1 0 Initial Setting 0 0 0 0 0 0 0 0 Adjust Factory use only Factory use only Factory use only Factory use only Factory use only Factory use only Factory use only Phone line type for the second phone line? 0: PSTN 1: PBX Usage/Comments When set to PSTN, the machine checks for dial tone and acts according to the setting of memory switch A:0, bit 1. When set to PBX, the machine always dials a given number of seconds after going off-hook. Memory switch A:1 sets the number of seconds. Memory Switch A:3 ∼ A:4 --- Factory use only Memory Switch A:5 - Dialer 7 6 5 4 3 2 Initial Setting 0 1 1 0 0 0 1 0 0 1 Switch Adjust Factory use only Factory use only Factory use only Factory use only Factory use only Dual ring detection 0: No 1: Yes Long ring detection 0: No 1: Yes Ring frequency detection 0: No 1: Yes Usage/Comments When enabled, the machine is able to auto answer an incoming ring with an off time of 120 - 60 ms. Allows the machine to respond to an incoming ring if the ring on-time is longer than two seconds. When disabled, the machine will not check the ring frequency of incoming rings. Memory Switch A:6 ∼ A:9 --- Factory use only 3-81 Memory Switch B:0 - Transmission 7 Initial Setting 1 6 0 5 0 4 0 3 2 1 0 1 1 0 1 Switch Adjust Usage/Comments Busy tone detection Sets this switch to “0” if the ring tone of remote unit 0: No is mistaken for a busy signal. 1: Yes Fallback pattern (bps) 2400 4800 7200 9600 14400 Set at 0: 2 times 2 times 2 times 2 times 2 times Set at 1: 4 times 1 times 1 times 1 times 1 times Overseas mode Re-enables echo suppression that is disabled by 0: No the CED signal (2100 Hz). Also ignores the first DIS 1: Yes signal and transmits the DCS signal in response to the second DIS signal. V.29 Echo Protect tone International telephone lines equipped with echo 0: No suppression will cut the beginning portion of the 1: Yes transmitted information which may cause the receiver not to receive the training and data. To protect the received image from degrading, a 0.5 second Echo Protect tone is placed prior to the training using G3 high speed modem training (V.29). Maximum transmit speed (kbps) 2.4 4.8 7.2 9.6 12 14.4 16.8 19.2 21.6 24 26.4 28.8 31.2 33.6 0 0 0 0 0 0 0 0 1 1 1 1 1 1 0 0 0 0 1 1 1 1 0 0 0 0 1 1 0 0 1 1 0 0 1 1 0 0 1 1 0 0 0 1 0 1 0 1 0 1 0 1 0 1 0 1 3-82 Memory Switch B:1 - Transmission Switch 7 Initial Setting 0 Adjust Usage/Comments The time between reception of CFR and transmission of data When CFR and data overlap due to line echo, increase the interval between CFR and data transmission using this switch. 6 5 1 0 250 ms 500 ms 750 ms 1000 ms Switch 7 0 0 1 1 Switch 6 0 1 0 1 Interval between DCS and TCF When FTT is received after DCS and TCF signals due to line echo, increase the interval between DCS and TCF signals using this switch. 4 0 Switch 5 Switch 4 3 2 1 0 1 0 0 1 75 ms 300 ms 450 ms 600 ms 0 0 1 1 0 1 0 1 Output attenuation See table below Memory Switch B:1…Output attenuation Switch 3 2 1 0 -15 dB 1 1 1 1 -14 dB 1 1 1 0 -13 dB 1 1 0 1 -12 dB 1 1 0 0 -11 dB 1 0 1 1 -10 dB 1 0 1 0 -9 dB 1 0 0 1 3-83 -8 dB 1 0 0 0 -7 dB 0 1 1 1 -6 dB 0 1 1 0 -5 dB 0 1 0 1 -4 dB 0 1 0 0 -3 dB 0 0 1 1 -2 dB 0 0 1 0 -1 dB 0 0 0 1 -0 dB 0 0 0 0 Memory Switch B:2 - Transmission 7 Initial Setting 0 6 0 5 0 4 1 3 0 2 0 1 0 0 0 Switch Adjust Usage/Comments Data signaling rate (DCS) 0: V.17 1: V.33 Forced received print when transmitting from memory 0: No 1: Yes Changing the date format of the transmitted TTI 0: No 1: Yes TTI transmit 0: No 1: Yes ECM response time 0: 3 sec 1: 4.8 sec ECM error retransmit time 0: 200 ms 1: 400 ms Interval between DIS and DCS Switch 1 Switch 0 Determines communication protocol. Will force a remote Muratec machine with memory receive capabilities to print directly. This switch will prevent a memory overflow error at the remote unit. When set to “1”, the machine changes the date format of the transmitted TTI from MM:DD:YY, or vice versa. When set at “0”, transmission of the TTI is disabled. (Note: Turning TTI transmission off may violate local or federal regulations.) The time limit to receive the response signal for the ECM post message. The time limit before the ECM error is retransmitted. 0 ms 500 ms 1000 ms 1500 ms 0 0 1 1 0 1 0 1 Memory Switch B:3 - Transmission 7 Initial Setting 0 6 0 5 0 4 0 3 0 2 1 0 1 0 0 Switch Adjust ANSam detection 0: Yes 1: No V.34 transmission 0: Yes 1: No CSI/TSI/CIG transmit 0: Yes 1: No ECM mode 0: On 1: Off Retransmit automatically when receiving RTN/PIN signals 0: Yes 1: No Factory use only Factory use only Factory use only Usage/Comments During the V8 handshake, if some noise disturbs the handshake and an error occurs, set to “1”. Individual setting for V.34 transmission. When set at “1”, transmission of the CSI, TSI and CIG signals are disabled. Determines ECM mode. ECM mode reduces document memory and may lengthen transmission and reception times. When set to “1”, retransmission disables automatically if receiving RTN/PIN signals. Memory Switch B:4 --- Factory use only 3-84 Memory Switch B:5 - Transmission 7 Initial Setting 0 6 5 4 3 2 0 0 0 0 0 Factory use only Factory use only Factory use only Factory use only Sending RTC signal when transmission is canceled 0: Yes 1: No 1 1 0 0 Cancel redial if T.4.1 or T.4.4 error occurs 0: Yes 1: No Action after EOR signal 0: Continue 1: Discontinue Switch Adjust Usage/Comments Program individual autodialer attributes 0: No 1: Yes Allows individual setting of memory switches B:0 as attribute 1, B:1 as attribute 2, B:2 as attribute 3 and B:3 as attribute 4 when one-touch and speed dial locations are programmed. (Refer to page 3-97 for settings.) RTC signal is sent at the end of the transmission. When set at “0”, the machine will send the RTC if the transmission is canceled. No error will occur. When set at “1”, an error will occur because RTC will not be sent at the end of a canceled transmission. When set at “0”, if a T.4.1 or T.4.4 error occurs, the machine will not retry the transmission. Sets action after receiving PPR four times at 2400 bps. Memory Switch B:6 ∼ B:9 --- Factory use only Memory Switch C:0 - Reception 7 Initial Setting 0 6 0 5 4 3 2 1 0 0 0 1 1 0 1 Switch Adjust Data error rate 0: 10% 1: 20% Pause one second after sending CED 0: No (75 ms) 1: Yes (1 sec) Usage/Comments Determines the allowable number of erred lines out of total lines received in a document. A 2100 Hz CED signal disables echo suppression in some telephone equipment. When set to "1", the machine pauses one second after sending CED, which allows echo suppression to restart. This may help with problematic overseas reception. Factory use only Factory use only Receive speed (kbps) Maximum receive speed may be slowed to compensate for poor phone lines. 2.4 4.8 7.2 9.6 12 14.4 16.8 19.2 21.6 24 26.4 28.8 31.2 33.6 0 0 0 0 0 0 0 0 1 1 1 1 1 1 0 0 0 0 1 1 1 1 0 0 0 0 1 1 0 0 1 1 0 0 1 1 0 0 1 1 0 0 0 1 0 1 0 1 0 1 0 1 0 1 0 1 3-85 Memory Switch C:1 - Reception 7 6 5 Initial Setting 0 0 0 4 0 3 1 2 0 1 0 0 1 Switch Adjust Usage/Comments Factory use only Factory use only Received document length limit 0: No limit 1: 3 m (9.8 feet) T1 timer 0: 35 sec 1: 20 sec Set the limit of received document length. Print image data when post message is not received after receiving RTC signal 0: No 1: Yes Disable ITU-T superfine reception 0: Yes 1: No Adjusts the T1 time-out. After the machine dials the remote machine’s phone number, it begins sending CNG and waits this amount of time before disconnecting the line. If the received document includes the RTC, the machine prints the data even though the following protocol is not succeeded. Set to “1” if a compatibility error occurs because the transmitting machine does not understand the extended frame for ITU-T superfine resolution. (Note: Setting this switch to “1” will disable superfine mode.) G3 echo receive Adjusts the delay between detection of training/TCF and sending of CFR. Switch 1 Switch 0 100 ms 500 ms 800 ms 1200 ms 0 0 1 1 0 1 0 1 Memory Switch C:2 ∼ C:9 --- Factory use only 3-86 Memory Switch D:0 - Modem Switch 7 6 Initial Setting 0 Adjust Number of HDLC end flags Usage/Comments Defines the number of HDLC end flags. Switch 7 6 5 4 0000 0001 0010 0011 0100 0101 0110 0111 1000 1001 1010 1011 1100 1101 1110 1111 0 5 1 4 0 3 2 0 1 1 0 0 1 Factory use only Group delay compensation 0: No 1: Yes Digital cable equalizer 0: Free 1: Hold Carrier detection level 0: -43/48 dB 1: -47/52 dB 1 2 3 4 5 6 7 8 9 10 11 12 13 14 15 16 Initial setting As if two exchangers are selected to communicate each other, compensate the group delay. When set to “1”, become efficient for the line short break, but become weak for the line noise. It’s available only for communication at 14,400 or 12,000 bit/s. Setting this switch to “1” increases the sensitivity. Memory Switch D:1 - Modem 7 6 Initial Setting 1 0 EYE-Q check level at 7200 bps 5 4 1 0 EYE-Q check level at 9600 bps 3 2 1 0 EYE-Q check level at 12000 bps 1 0 1 0 EYE-Q check level at 14400 bps Switch Adjust Usage/Comments 0 0 1 1 Strict-- - - - - - - - - - - -Lenient 0 1 0 1 0 0 1 1 Strict - - - - - - - - - - - -Lenient 0 1 0 1 0 0 1 1 Strict - - - - - - - - - - - -Lenient 0 1 0 1 0 0 1 1 Strict - - - - - - - - - - - -Lenient 0 1 0 1 3-87 Memory Switch D:2 - Modem 7 Initial Setting 0 6 1 5 4 3 2 0 0 1 0 Factory use only Factory use only EYE-Q check level at 2400 bps 1 0 1 0 EYE-Q check level at 4800 bps Switch Adjust EYE-Q slice level 0: Disable 1: Enable Check EYE-Q 0: No 1: Yes Usage/Comments Setting this bit to “1” enables memory switch D:2, bits 0-3 and memory switch D:1, bits 0-7 and enables EYE-Q check adjustment. Set at 0: Line condition status (EYE-Q) is not checked after checking TCF. Set at 1: Line condition status (EYE-Q) is checked after checking TCF. 0 0 1 1 Strict - - - - - - - - - - - -Lenient 0 1 0 1 0 0 1 1 Strict - - - - - - - - - - - -Lenient 0 1 0 1 Memory Switch D:3 - Modem 7 6 5 4 3 2 1 Initial Setting 0 0 0 0 0 0 0 0 0 Switch Adjust Factory use only Factory use only Factory use only Factory use only Factory use only Factory use only Delete receive echo of CFR at the receiver side 0: No 1: Yes Expand FSK receive time after detecting flag 0: 3.3 seconds 1: 10 seconds Usage/Comments Modem will be opened only in high-speed mode. Sets this switch to “1” to resolve the problem caused of the echo of CFR. Setting this switch to “1” extend HDLC frame receive timer in FSK from 3.3 seconds to 10 seconds after detecting pre-amble. Memory Switch D:4 ∼ D:9 --- Factory use only 3-88 Memory Switch E:0 - Scanner Switch 7 6 5 4 3 2 1 0 Initial Setting 0 0 0 0 0 1 0 1 Adjust Factory use only Factory use only Factory use only Factory use only Factory use only Factory use only Factory use only Document TX length limit 0: 3.6 meters 1: 1 meter Usage/Comments Setting to unlimited will override document jam sensing. Memory Switch E:1 ∼ F:9 --- Factory use only Memory Switch G:0 - Remote reception 7 6 Initial Setting 0 1 5 0 4 3 2 0 0 0 1 0 0 0 Switch Adjust Factory use only CML relay off time after dialing 0: 1 sec 1: 200 ms DTMF tones heard through handset 0: No 1: Yes Factory use only Factory use only Switch to fax upon TAD disconnect 0: No 1: Yes Remote reception from the second phone 0: No 1: Yes Remote reception from fax handset 0: No 1: Yes Usage/Comments When dialing from the keypad, phone line noise may occur as the CML relay switches on and off. Set this switch to “0” to avoid this. Determines if DTMF tones are produced through the handset in off-hook dialing. In Ans/Fax Ready mode, if this switch is set to “1”, the machine will switch to fax when any device connected to the external telephone jack, such as a second phone or TAD, hangs up. Ability to perform remote reception (hook-flash transfer) from the second phone. Ability to perform remote reception (hook-flash transfer) from the fax handset. 3-89 Memory Switch G:1 - Remote reception 7 Initial Setting 0 6 0 5 1 4 1 3 0 2 1 1 0 0 0 Switch Adjust Usage/Comments Off-hook / on-hook detect time (remote reception) Sets the time interval between the off-hook/on-hook condition for remote reception. Switch 7 6 5 4 Time 0000 0 ms 0001 10 ms 0010 20 ms 0011 30 ms Initial setting 0100 40 ms 0101 50 ms 0110 60 ms 0111 70 ms 1000 80 ms 1001 90 ms 1 0 1 0 100 ms 1 0 1 1 110 ms 1 1 0 0 120 ms 1 1 0 1 130 ms 1 1 1 0 140 ms 1 1 1 1 150 ms Off-hook / on-hook detect time Sets the time interval between the on-hook and offhook(or off-hook/on-hook) condition. Switch 3 2 1 0 Time 0000 0 ms 0001 100 ms 0010 200 ms 0011 300 ms 0100 400 ms Initial setting 0101 500 ms 0110 600 ms 0111 700 ms 1000 800 ms 1001 900 ms 1 0 1 0 1000 ms 1 0 1 1 1100 ms 1 1 0 0 1200 ms 1 1 0 1 1300 ms 1 1 1 0 1400 ms 1 1 1 1 1500 ms 3-90 Memory Switch G:2 - Remote reception 7 6 5 4 3 Initial Setting 0 0 0 1 0 2 0 1 1 0 1 Switch Adjust Factory use only Factory use only Factory use only Factory use only Switch-hook time Usage/Comments If the switch hook is quickly depressed and released, switch-to-fax will occur. This setting adjusts how quickly the switch hook activation must be. Switch 3 2 1 0 Time 0000 0 ms 0001 100 ms 0010 200 ms 0011 300 ms Initial setting 0100 400 ms 0101 500 ms 0110 600 ms 0111 700 ms 1000 800 ms 1001 900 ms 1 0 1 0 1000 ms 1 0 1 1 1100 ms 1 1 0 0 1200 ms 1 1 0 1 1300 ms 1 1 1 0 1400 ms 1 1 1 1 1500 ms 3-91 Memory Switch G:3 - Remote reception and TAD interface 7 Initial Setting 0 6 1 5 0 4 1 3 0 2 1 1 1 0 0 Switch Adjust Usage/Comments Adjust silent detection time This switch adjusts the length of silence required for silent detection activation. Switch 7 6 5 4 Time 0000 0 sec 0001 1 sec 0010 2 sec 0011 3 sec 0100 4 sec 0101 5 sec Initial setting 0110 6 sec 0111 7 sec 1000 8 sec 1001 9 sec 1010 10 sec 1011 11 sec 1100 12 sec 1101 13 sec 1110 14 sec 1111 15 sec Number of seconds silent detection remains active This switch adjusts the length of time silence detection remains active. Switch 3 2 1 0 Time 0000 0 sec 0001 10 sec 0010 20 sec 0011 30 sec 0100 40 sec 0101 50 sec 0110 60 sec Initial setting 0111 70 sec 1000 80 sec 1001 90 sec 1 0 1 0 100 sec 1 0 1 1 110 sec 1 1 0 0 120 sec 1 1 0 1 130 sec 1 1 1 0 140 sec 1 1 1 1 150 sec 3-92 Memory Switch G:4 - Remote reception and TAD interface 7 Initial Setting 0 6 0 5 1 4 1 3 0 2 0 1 0 0 1 Switch Incoming rings Adjust Usage/Comments CNG detect period after TAD begins recording ICM Sets the period during which CNG is detected after the TAD begins recording incoming messge. Switch 7 6 5 4 Time 0000 0 sec 0001 10 sec 0010 20 sec 0011 30 sec Initial setting 0100 40 sec 0101 50 sec 0110 60 sec 0111 70 sec 1000 80 sec 1001 90 sec 1 0 1 0 100 sec 1 0 1 1 110 sec 1 1 0 0 120 sec 1 1 0 1 130 sec 1 1 1 0 140 sec 1 1 1 1 150 sec CNG detect period after TAD answers Sets the period during which CNG is detected after the TAD answers an incoming call. Switch 3 2 1 0 Time 0000 0 sec 0001 10 sec Initial setting 0010 20 sec 0011 30 sec 0100 40 sec 0101 50 sec 0110 60 sec 0111 70 sec 1000 80 sec 1001 90 sec 1 0 1 0 100 sec 1 0 1 1 110 sec 1 1 0 0 120 sec 1 1 0 1 130 sec 1 1 1 0 140 sec 1 1 1 1 150 sec TAD plays Outgoing message TAD records Incoming message CNG detection is active CNG detection is active (Adjusted by Memory switch G:4, bit 0-3) (Adjusted by Memory switch G:4, bit 4-7) Silent detection is active (Adjusted by Memory switch G:3, bit 0-3) Silent detection time (Adjusted by Memory switch G:3, bit 4-7) 3-93 Memory Switch G:5 - Remote reception Switch 7 6 5 4 3 2 1 0 Initial Setting 0 0 0 0 0 0 0 0 Adjust Usage/Comments Adjustment of CI detect time Sets the time added to or reduced from the CI detect time. Switch 7 6 5 4 3 11111 11110 : 10100 10011 10010 10001 00000 00001 00010 00011 00100 : 01110 01111 Factory use only Factory use only Beep if fax handset hang up 0: Yes 1: No Time 15 msec 14 msec : 4 msec 3 msec 2 msec 1 msec 0 msec -1 msec -2 msec -3 msec -4 msec : -14 msec -15 msec Initial setting Determines if your machine beeps when having left the fax’s handset hanging up after communication. Memory Switch G:6 - Remote reception and TAD interface 7 Initial Setting 0 6 0 5 0 4 0 3 0 2 0 1 0 0 0 Switch Adjust Off-hook / on-hook detect time for remote reception Usage/Comments Sets the time interval between the off-hook/on-hook condition for remote reception. Switch 7 6 5 4 3 2 1 0 00000000 00000001 00000010 00000011 00000100 Time 30 ms 20 ms 40 ms 60 ms 80 ms 11111110 11111111 5080 ms 5100 ms Note: Refer to Memory Switch G:1. Memory Switch G:7 ∼ G:9 --- Factory use only 3-94 Initial setting Memory Switch H:0 - Operation 7 Initial Setting 0 6 0 5 4 0 0 3 1 2 1 1 1 0 0 Switch Adjust Usage/Comments Display error line 0: No 1: Yes Total line monitor 0: No 1: Yes Factory use only Sort autodialer printout 0: Sort by autodialer location 1: Sort by location ID Print check message if power is lost 0: No 1: Yes Print page if error occurs during memory transmission 0: No 1: Yes Print check message 0: No 1: Yes Stop printing check message for a memory transmission by pressing the stop key 0: No 1: Yes The number of error lines contained in the received data will be shown in the LCD. Allows fax communication to be heard through the monitor speaker. Specifies how entries on autodialer printouts are sorted. In the event of two power losses in a 40 hour period, documents will be lost. When power is restored, a check message will print. For easy identification, the first page of a document stored for memory transmission will print along a check message if an error occurs during memory transmission. To notify the user of an error, a check message can be printed if a communication error occurs. Determines if pressing the stop key stop printing the check message for a memory transmission. Memory Switch H:1 - Operation 7 6 5 Initial Setting 0 0 1 4 3 0 1 2 1 0 0 0 0 Switch Adjust Usage/Comments Factory use only Factory use only Print TCR with the original page during memory transmission when the result is NG 0: No 1: Yes Factory use only Print TCR with the original page during memory transmission when the result is OK 0: No 1: Yes Factory use only Factory use only Display modem speed 0: No 1: Yes For easy identification, the first page of a document stored for memory transmission will print along a TCR when the transmission result is NG. For easy identification, the first page of a document stored for memory transmission will print along a TCR when the transmission result is OK. The transmit/receive speed is displayed in the LCD. 3-95 Memory Switch H:2 - Operation 7 6 5 4 3 2 1 Initial Setting 0 0 0 0 0 0 1 0 1 Switch Adjust Factory use only Factory use only Factory use only Factory use only Factory use only Factory use only Erase polled document 0: No 1: Yes Print TCR after the batch transmission 0: No 1: Yes Usage/Comments Determines if a document stored for polling is erased after being polled. Determines if printing the confirmation report after completing the batch transmission. Memory Switch H:3 ∼ J:9 --- Factory use only 3.4 Clear Programmed Data / User Settings User programmed information such as autodialer entries, date, time, Transmit Terminal Identifier (TTI), Subscriber ID, etc., are stored in the machine’s Random Access Memory (RAM). This information is held by a battery back up when the power is lost. This function does not clear the machine parameters, memory switches and unique switches. Therefore, this setting is useful to reset the user programmed information but leave specific parameters and switches configured for a particular telephone system, etc. To reset only each switch, see page 3-2, 3-79 and 3-100. Note: If desired, the All RAM Clear setting can be used to erase all user programmed information, all documents in memory, and reset the memory switches and machine parameters to factory defaults. For information on the All RAM Clear setting, see the next page. 1. To clear programmed data and user settings, from standby, press MENU, *, 2. 2. Press [Enter]. Note: To finish the operation without performing initialization, press [Cancel]. 3-96 3.5 All RAM Clear The All RAM Clear setting will erase all user programmed information, all documents in memory, and reset the memory switches and machine parameters to factory defaults. This feature may also be used to try and clear a machine malfunction or lock up. If possible, when the All RAM Clear is used to reset a malfunction or lock up, it is advisable to print the machine settings, onetouch and speed dial listings to help in reprogramming this information. Note: The All RAM Clear does not clear the machine parameters, life monitor and consumable order sheet. If you need to clear them, see “Clearing the machine parameters,” page 3-2 or “Clear Life Monitor,” page 3-140. 1. To perform an All RAM Clear, from standby, press MENU, *, 3. 2. Press [Enter]. Note: To finish the operation without performing RAM clear, press [Cancel]. 3.6 Setting Individual Autodialer Attributes This function allows the user to configure an individual one-touch or speed dial entry with the settings shown in Memory Switches B:0, B:1, B:2 and B:3. To set the individual attributes: 1. Change memory switch B:5, bit 7 to a “1”. (See setting 3.3.1 Setting the Memory Switches for more information on changing memory switch B:5.) 2. When the function is enabled, an “Attribute” option is added to the autodialer programming steps. As a one-touch or speed dial location is programmed, an extra step showing Attribute 1, Attribute 2, Attribute 3, and Attribute 4 are added as the last step. 3. Set the individual bit positions as shown in the following table. To change a setting, press or of the cursor key until the cursor is below the desired bit position; then press “1” or “0” to make the change. 4. Press [Enter] to save the setting and advance to the next attribute. 5. To set the other attribute, repeat steps 3-4. 3-97 6. If you want to set other autodialer’s attribute, press [Exit] and select desired autodialer, then repeat steps 3-4. If you want to finish this operation, press RESET to return to standby. Attribute 1 - Individual Autodialer Setting (Equivalent to Memory Switch B:0) 7 Initial Setting 1 6 0 5 0 4 0 3 2 1 0 1 1 0 1 Switch Adjust Usage/Comments Busy tone detection Sets this switch to “0” if the ring tone of remote unit 0: No is mistaken for a busy signal. 1: Yes Fallback pattern (bps) 2400 4800 7200 9600 14400 Set at 0: 2 times 2 times 2 times 2 times 2 times Set at 1: 4 times 1 times 1 times 1 times 1 times Overseas mode Re-enables echo suppression that is disabled by 0: No the CED signal (2100 Hz). Also ignores the first DIS 1: Yes signal and transmits the DCS signal in response to the second DIS signal. V.29 Echo Protect tone International telephone lines equipped with echo 0: No suppression will cut the beginning portion of the 1: Yes transmitted information which may cause the receiver not to receive the training and data. To protect the received image from degrading, a 0.5 second Echo Protect tone is placed prior to the training using G3 high speed modem training (V.29). Maximum transmit speed (kbps) 2.4 4.8 7.2 9.6 12 14.4 16.8 19.2 21.6 24 26.4 28.8 31.2 33.6 0 0 0 0 0 0 0 0 1 1 1 1 1 1 0 0 0 0 1 1 1 1 0 0 0 0 1 1 0 0 1 1 0 0 1 1 0 0 1 1 0 0 0 1 0 1 0 1 0 1 0 1 0 1 0 1 Attribute 2 - Individual Autodialer Setting (Equivalent to Memory Switch B:1) Switch 7 Initial Setting 0 Adjust Usage/Comments The time between reception of CFR and transmission of data When CFR and data overlap due to line echo, increase the interval between CFR and data transmission using this switch. 6 5 1 0 250 ms 500 ms 750 ms 1000 ms Switch 7 0 0 1 1 Switch 6 0 1 0 1 Interval between DCS and TCF When FTT is received after DCS and TCF signals due to line echo, increase the interval between DCS and TCF signals using this switch. 4 0 Switch 5 Switch 4 3 2 1 0 1 0 0 1 75 ms 300 ms 450 ms 600 ms 0 0 1 1 0 1 0 1 Output attenuation See table on next page 3-98 Output attenuation when individual autodialer attributes are set. Switch 3 2 1 0 -15 dB 1 1 1 1 -14 dB 1 1 1 0 -13 dB 1 1 0 1 -12 dB 1 1 0 0 -11 dB 1 0 1 1 -10 dB 1 0 1 0 -9 dB 1 0 0 1 -8 dB 1 0 0 0 -7 dB 0 1 1 1 -6 dB 0 1 1 0 -5 dB 0 1 0 1 -4 dB 0 1 0 0 -3 dB 0 0 1 1 -2 dB 0 0 1 0 -1 dB 0 0 0 1 -0 dB 0 0 0 0 Attribute 3 - Individual Autodialer Setting (Equivalent to Memory Switch B:2) 7 Initial Setting 0 6 0 5 0 4 1 3 0 2 0 1 0 0 0 Switch Adjust Usage/Comments Data signaling rate (DCS) 0: V.17 1: V.33 Forced received print when transmitting from memory 0: No 1: Yes Changing the date format of the transmitted TTI 0: No 1: Yes TTI transmit 0: No 1: Yes ECM response time 0: 3 sec 1: 4.8 sec ECM error retransmit time 0: 200 ms 1: 400 ms Interval between DIS and DCS Switch 1 Switch 0 Determines communication protocol. Will force a remote Muratec machine with memory receive capabilities to print directly. This switch will prevent a memory overflow error at the remote unit. When set to “1”, the machine changes the date format of the transmitted TTI from MM:DD:YY, or vice versa. When set at “0”, transmission of the TTI is disabled. (Note: Turning TTI transmission off may violate local or federal regulations.) The time limit to receive the response signal for the ECM post message. The time limit before the ECM error is retransmitted. 0 ms 500 ms 1000 ms 1500 ms 0 0 1 1 0 1 0 1 Attribute 4 - Individual Autodialer Setting (Equivalent to Memory Switch B:3) 7 6 5 4 3 Initial Setting 0 0 0 0 0 2 1 0 1 0 0 Switch Adjust Factory use only Factory use only Factory use only Factory use only Retransmit automatically when receiving RTN/PIN signals 0: Yes 1: No Factory use only Factory use only Factory use only Usage/Comments When set to “1”, retransmission disables automatically if receiving RTN/PIN signals. 3-99 3.7 Unique Switch Adjustment 3.7.1 Setting the Unique Switches These switches are used to program internal machine parameters. The primary back up battery maintains these settings if power is lost. 1. From standby, press MENU, *, 4. 2. Select the desired unique switch by cursor key or by pressing a one-touch key plus a number on the keypad. For example, to access unique switch B:1, press one-touch “B” plus the number “1” on the numeric keypad. 3. Press [Enter]. 4. To navigate through the unique switch settings: • Press or of the cursor key to move the cursor. • Press 0 or 1 on the numeric keypad to change the bit value. • Press [Enter] to save the setting of the displayed unique switch and advance to the next unique switch. • Press [Cancel] not to save the setting of the displayed unique switch. 5. If you want to set other unique switches, repeat step 3-5. Otherwise, proceed to step 6. 6. Press RESET to return the machine to standby. 3.7.2 Clearing the Unique Switches Resets the unique switches to factory defaults. 1. From standby, press MENU, *, 4, [Clear]. 3. Press [Enter]. The unique switches will reset to factory defaults. Note: To finish the operation without clearing the unique switches, press [Cancel]. 3-100 Unique Switch a:0 — Dialer 7 6 Initial Setting 0 1 5 0 4 0 3 2 1 0 0 0 0 1 Switch Adjust Usage/Comments Factory use only Congestion tone detection 0: No 1: Yes Ring back tone wait time (seconds) 3.0 3.3 3.6 3.9 Switch 5: 0 0 1 1 Switch 4: 0 1 0 1 Factory use only Factory use only Factory use only Factory use only Setting this switch to “0” ignores telephone line congestion tones. Sets the time until the ring back tone begins after answering an incoming call in the Fax/Tel Ready or Tel/Fax Ready mode. Unique Switch a:1 ∼ a:9 --- Factory use only Unique Switch b:0 - Transmission 7 6 5 4 3 2 1 Initial Setting 0 0 0 1 0 0 1 0 1 Switch Adjust Usage/Comments Factory use only Factory use only Factory use only Factory use only Factory use only Factory use only The number of times PPR is detected during ECM transmission 1 time 2 times 3 times 4 times 0 0 1 1 0 1 0 1 Unique Switch b:1 ∼ b:4 --- Factory use only 3-101 Unique Switch b:5 - Transmission 7 6 5 Initial Setting 0 0 0 4 0 3 2 1 0 0 0 0 0 Switch Adjust Usage/Comments Factory use only Factory use only The length of the communication failure report in Relay broadcast (unique) 0: A4 1: No limit Send the result of Relay broadcast (unique) to the sender unit when the communication failure occurred 0: No 1: Yes Factory use only Factory use only Factory use only Factory use only Determine the length of the communication failure report in Relay broadcast. Note: This is available only when you set Unique Switch i:3 bit 7 to “1”. Send the information of the unit which had a communication failure in Relay broadcast to the sender unit. Note: This is available only when you set Unique Switch i:3 bit 7 to “1”. Unique Switch b:6 - Transmission Switch 7 Initial Setting 1 6 1 5 0 4 1 3 0 2 1 0 0 0 1 Adjust Usage/Comments Available *, # and space upon F-code box registration 0: No 1: Yes Available *, # and space upon F-code communicating 0: No 1: Yes Ignore space in F-code ID 0: Yes 1: No F-code sub-frame off 0: Send 1: Not send Send F-code box’s TTI 0: No 1: Yes Factory use only Retrieve document 0: No 1: Yes Ignore F-code bit 0: No 1: Yes Determines if the * (asterisk), # (sharp) and space are available upon F-code box registration. Determines if the * (asterisk), # (sharp) and space are available upon F-code communicating. Determines if checking the space stored in the F-code ID. Do not send the sub-address and password of Fcode box when a point of sending DCS signal after EOM signal. Transmit the sub-address and box name of F-code box with F-code polling document. Retrieve the document received in F-code SecureMail box by polling transmission. Neglect SEP bit of DTC signal or SUB bit of DCS signal at F-code polled transmission. Note: The “F-code communication” is possible the SecureMail and Polling operation using the F-code (SUB/SEP/PWD/SID). However, it is not based on T.33 recommendation. 3-102 Unique Switch b:7 — Transmission 7 6 5 4 3 2 1 Initial Setting 0 0 0 0 0 0 1 0 0 Switch Adjust Usage/Comments Factory use only Factory use only Factory use only Factory use only Factory use only Factory use only JBIG transmission 0: No 1: Yes Factory use only Determines if the JBIG transmission is available. Unique Switch b:8 - Transmission Switch 7 6 5 4 3 2 1 0 Initial Setting 0 0 0 0 0 0 0 0 Adjust Usage/Comments Factory use only Factory use only Factory use only Factory use only Factory use only Factory use only Factory use only Transmission when disable to detect first NSF in feeder transmission. 0: Retry to detect NSF 1: Transmit with the standard protocol Determines the action when disable to detect first NSF in feeder transmission. Unique Switch b:9 --- Factory use only 3-103 Unique Switch c:0 - Reception 7 6 5 Initial Setting 0 0 1 4 1 3 1 2 0 1 1 0 1 Switch Adjust Usage/Comments Factory use only Factory use only MMR storage 0: No 1: Yes Transmit CED signal when manual/remote receive 0: No 1: Yes Pseudo-ring start time (seconds) 5 6 8 10 Switch 3: 0 0 1 1 Switch 2: 0 1 0 1 Print a page completed to receive during receiving into memory 0: No 1: Yes Avoid time out in ECM reception 0: No 1: Yes Determines if the MMR storage is available. Determines if sending CED signal at on-hook transfer. Sets the time the pseudo-ring begins after answering an incoming call. (Fax/Tel Ready or Tel/Fax Ready mode only.) Determines if printing a page which completed to receive the data during receiving it into fax’s memory. Disables 60 seconds RNR time out in ECM mode. 3-104 Unique Switch c:1 - Reception 7 Initial Setting 0 6 1 5 1 4 0 3 1 2 0 1 1 0 0 Switch Adjust T1 timer adjustment Usage/Comments When the machine switches to fax by on-hook transfer, the machine will seize the telephone line and attempt to handshake. Switch 7 5 6 4 0000 0001 0010 0011 0100 0101 0110 0111 1000 1001 1010 1011 1100 1101 1110 1111 TCF check time (in 100 ms units) Settings 0s 1s 2s 3s 4s 5s 6 s ← Initial setting 7s 8s 9s 10 s 11 s 12 s 13 s 14 s 15 s If the TCF time is such that poor image quality is the result, lengthen the TCF check time. Switch 3 2 1 0 0000 0001 0010 0011 0100 0101 0110 0111 1000 1001 1010 1011 1100 1101 1110 1111 3-105 Time 0 ms 100 ms 200 ms 300 ms 400 ms 500 ms 600 ms 700 ms 800 ms 900 ms 1000 ms ← Initial setting 1100 ms 1200 ms 1300 ms 1400 ms 1500 ms Unique Switch c:2 - Reception 7 6 5 4 3 Initial Setting 0 0 0 0 1 2 0 1 0 0 0 Switch Adjust Usage/Comments Factory use only Factory use only Factory use only Factory use only JBIG reception 0: No 1: Yes Receive the junk fax 0: Yes 1: No Determines how documents from the remote fax are received. Print the communication failure report with your unit in Relay broadcast 0: No 1: Yes Call request when remaining memory size is small 0:No 1:Yes When the block junk fax feature was set to Mode 2 and the fax does not receive the TSI signal from the remote fax, determines if receiving the fax other than the remote fax number set to the block junk dial list. When set to “1”, not only the sender unit but also your unit prints the communication failure report in Relay broadcast. Setting this switch to “1” prompt call request to transmitter when remaining memory size is small after receiving the document which not the last page. Unique Switch c:3 - Reception 7 6 5 4 3 2 1 Initial Setting 0 0 0 0 0 0 0 0 0 Switch Adjust Usage/Comments Factory use only Factory use only Factory use only Factory use only Factory use only Factory use only Number of seconds pseudoring rings (seconds) 30 40 50 60 Switch 1: 0 0 1 1 Switch 0: 0 1 0 1 Sets the length of time the pseudo-ring rings. Unique Switch c:4 ∼ c:9 --- Factory use only 3-106 Unique Switch d:0 - Modem 7 6 5 Initial Setting 0 0 1 4 1 3 1 2 1 1 0 0 1 Switch Adjust Usage/Comments Factory use only Factory use only 3429 baud symbol rate when communicating at V.34 0: No 1: Yes 3200 baud symbol rate when communicating at V.34 0: No 1: Yes 3000 baud symbol rate when communicating at V.34 0: No 1: Yes 2800 baud symbol rate when communicating at V.34 0: No 1: Yes Factory use only 2400 baud symbol rate when communicating at V.34 0: No 1: Yes If the error frame often occurs because of the symbol rate is too high, setting this switch to “1” mask that symbol rate and keep down the occurrence of error frame. See above (switch 5 to 2). Unique Switch d:1 - Modem Switch 7 6 5 4 3 2 1 0 Initial Setting 0 0 0 0 1 1 1 1 Adjust Forced 2400 symbol rate when probing SNR is adverse Usage/Comments SNR means that Signal Noise Ratio. If the SNR is less than the threshold you set, the modem overrides the bandwidth evaluation algorithm and forces the symbol rate to2400 baud. 3-107 Unique Switch d:2 - Modem 7 Initial Setting 1 6 5 4 3 2 0 0 1 0 1 1 0 0 1 Switch Adjust V8 handshake in feeder Tx 0: No 1: Yes Factory use only Factory use only Factory use only Factory use only ANSam output time 0: 3 sec 1: 4 sec Factory use only Factory use only Usage/Comments Determine if the handshaking will be done with V.8 recommendation in feeder transmission. The time limit to output the ANSam (A sinewave signal at 2100 Hz amplitude-modulated). Sets to “1” when the V.8 handshake is hard to achieve. Unique Switch d:3 ∼ d:6 --- Factory use only Unique Switch d:7 - Modem 7 6 5 4 Initial Setting 0 0 0 0 3 0 Switch Adjust Factory use only Factory use only Factory use only The delay before postmessage is transmitted Usage/Comments If retraining occurs due to the low reception signal level and few delay of the telephone line, it may overlap the second post-message. In this case, increase the delay before the post-message is transmitted. Switch 4: Switch 3: 2 1 0 0 0 0 0 ms 0 0 Factory use only Factory use only Factory use only Unique Switch d:8 ∼ d:9 --- Factory use only 3-108 100 ms 0 1 200 ms 1 0 300 ms 1 1 Unique Switch e:0 - Scanner 7 6 Initial Setting 0 1 5 0 4 3 2 1 0 0 0 0 0 1 Switch Adjust Usage/Comments Factory use only Transmit a small document at center 0: No 1: Yes Scanning standard point of ADF 0: Front left 1: Rear left Factory use only Factory use only Factory use only Factory use only Hyper fine resolution 0: No 1: Yes When set to “1”, the image will transmit at center even when you put the small document along the edge. When set to “0”, the document is scanned from the front left point and the rear part can be missed in the case that the image is larger than the recording paper. When set to “1”, the front part can be missed. When set to “1”, Super fine resolution (203 dpi × 392 lpi) changes into Hyper fine resolution (406 dpi × 392 lpi). Unique Switch e:1 7 Initial Setting 1 6 5 4 3 2 1 0 0 1 0 1 0 0 1 Switch Adjust Usage/Comments Set the fixed ratio for copy and the auto ratio in detail 0: No 1: Yes Factory use only Factory use only Factory use only Factory use only Rotate B5 document and store it as B5 0: Not rotate 1: Rotate Rotate A5 document and store it as A5 0: Not rotate 1: Rotate Rotate A4 document and store it as A4 0: Not rotate 1: Rotate When set to “1”, the ratio will be calculated in detail automatically according to the document size and the recording paper size. This is available when the rotate transmission is set to ON. This is available when the rotate transmission is set to ON. This is available when the rotate transmission is set to ON. Unique Switch e:2 ∼ e:5 --- Factory use only 3-109 Unique Switch e:6 - Scanner Switch 7 6 5 4 3 2 1 0 Initial Setting 0 0 0 0 0 0 0 0 Adjust Usage/Comments Factory use only Factory use only Left edge document margin adjustment upon scanning using FBS Adjusts the left edge margin when scanning document by FBS. Each setting changes by 0.4233 mm. Switch 5 4 3 2 1 0 000000 000001 000101 001010 001111 010100 011001 011111 100011 101000 101101 110010 110111 111100 111111 Settings 0 mm 0.42 mm 2.11 mm 4.23 mm 6.35 mm 8.42 mm 10.58 mm 12.70 mm 14.83 mm 16.93 mm 19.05 mm 21.17 mm 23.28 mm 25.40 mm 26.67 mm Unique Switch e:7 - Scanner Switch 7 6 5 4 3 2 1 0 Initial Setting 0 0 0 0 0 0 0 0 Adjust Usage/Comments Factory use only Factory use only Right edge document margin adjustment upon scanning using FBS Adjusts the right edge margin when scanning document by FBS. Each setting changes by 0.4233 mm. 3-110 Switch 5 4 3 2 1 0 000000 000001 000101 001010 001111 010100 011001 011111 100011 101000 101101 110010 110111 111100 111111 Settings 0 mm 0.42 mm 2.11 mm 4.23 mm 6.35 mm 8.42 mm 10.58 mm 12.70 mm 14.83 mm 16.93 mm 19.05 mm 21.17 mm 23.28 mm 25.40 mm 26.67 mm Unique Switch e:8 - Scanner Switch 7 6 5 4 3 2 1 0 Initial Setting 0 0 0 0 0 0 0 0 Adjust Usage/Comments Factory use only Factory use only Leading edge document margin adjustment upon scanning using FBS Switch 5 4 3 2 1 0 000000 000001 000010 000011 000100 000101 000110 000111 001000 001001 001010 001011 001100 001101 001110 001111 010000 010001 010010 010011 010100 010101 010110 010111 011000 011001 : : 111111 Adjusts the leading edge margin when scanning document by FBS. Each setting changes by 1 mm. 3-111 Settings 0 mm 1 mm 2 mm 3 mm 4 mm 5 mm 6 mm 7 mm 8 mm 9 mm 10 mm 11 mm 12 mm 13 mm 14 mm 15 mm 16 mm 17 mm 18 mm 19 mm 20 mm 21 mm 22 mm 23 mm 24 mm 25 mm 63 mm Unique Switch e:9 - Scanner Switch 7 6 5 4 3 2 1 0 Initial Setting 0 0 0 0 0 0 0 0 Adjust Usage/Comments Factory use only Factory use only Trailing edge document margin adjustment upon scanning using FBS Switch 5 4 3 2 1 0 000000 000001 000010 000011 000100 000101 000110 000111 001000 001001 001010 001011 001100 001101 001110 001111 010000 010001 010010 010011 010100 010101 010110 010111 011000 011001 : : 111111 Adjusts the trailing edge margin when scanning document by FBS. Each setting changes by 1 mm. 3-112 Settings 0 mm 1 mm 2 mm 3 mm 4 mm 5 mm 6 mm 7 mm 8 mm 9 mm 10 mm 11 mm 12 mm 13 mm 14 mm 15 mm 16 mm 17 mm 18 mm 19 mm 20 mm 21 mm 22 mm 23 mm 24 mm 25 mm 63 mm Unique Switch f:0 - Printer 7 6 Initial Setting 1 0 5 1 4 1 3 1 2 1 1 1 0 1 Switch Adjust Factory use only Smoothing of List print in normal printing 0: No 1: Yes Smoothing in S-Fine rotate printing 0: No 1: Yes Smoothing in Normal rotate printing 0: No 1: Yes Smoothing in H-Fine (400 x 400 dpi) mode 0: No 1: Yes Smoothing in S-Fine (200 x 400 dpi) mode 0: No 1: Yes Smoothing in Fine mode 0: No 1: Yes Smoothing in Normal mode 0: No 1: Yes Usage/Comments Smoothes the data scanned in each resolution mode. Unique Switch f:1 - Printer Switch 7 6 5 4 3 2 1 0 Initial Setting 0 0 0 0 0 1 1 0 Adjust Factory use only Factory use only Factory use only Factory use only Factory use only Factory use only Factory use only Print reduction 0: No 1: Yes Usage/Comments If the document size is different from the recording paper size in the paper cassette: When set to “0”, print the image at 100 % size on two or more pages. When set to “1”, reduce printout to fit on one sheet. 3-113 Unique Switch f:2 - Printer Switch 7 6 5 4 3 2 1 0 Initial Setting 0 0 1 0 1 0 0 0 Adjust Printing margin adjustment. Usage/Comments Switch 76543210 00000000 00000001 : 00101000 : 00110010 : 00111100 : 01000110 : 01010000 : 01011010 : 01100100 : 11001000 : 11111111 Each setting changes by 0.1 mm. Settings 0 mm 0.1 mm 4.0 mm Å Initial setting 5.0 mm 6.0 mm 7.0 mm 8.0 mm 9.0 mm 10.0 mm 20.0 mm 25.5 mm Unique Switch f:3 — Printer Switch 7 6 5 4 3 2 1 0 Initial Setting 0 0 0 0 0 1 0 0 Adjust Printer contrast adjustment. Usage/Comments Switch Unique Switch f:4 ∼ f:7 --- Factory use only 3-114 76543210 Settings 00000000 00000001 00000010 00000011 00000100 00000101 00000110 00000111 00001000 : Not available Lightest : : Normal Initial setting : : Darkest Not available ↓ Å Unique Switch f:8- Printer Switch 7 6 5 4 3 2 1 0 Initial Setting 0 1 1 0 0 1 0 0 Adjust Usage/Comments Number of the available pages to print after appearing the replace message of the toner or the drum. Switch 76543210 00000000 00000001 : 00110010 : 01100100 : 10010110 : 11001000 : 11111111 Settings 0 page 1 page 50 pages 100 pages Å Initial setting 150 pages 200 pages 255 pages Unique Switch f:9 --- Factory use only Unique Switch g:0 - Remote reception 7 6 5 4 3 2 Initial Setting 0 0 0 0 0 0 1 1 0 0 Switch Adjust Usage/Comments Factory use only Factory use only Factory use only Factory use only Factory use only Use numeric keypad on the fax using second phone 0: No 1: Yes Manual transmit/receive using Start key after off-hook of second phone 0: No 1: Yes Silent detection 0: No 1: Yes Determines if using the numeric keypad on the control panel of the fax using the second phone. Determines if transmitting or receiving manually using Start key after off-hook of the second phone. Enables or disables silent detection during Ans/Fax Ready mode. 3-115 Unique Switch g:1 - Remote reception 7 Initial Setting 0 6 0 5 0 4 1 3 1 2 1 1 1 0 0 Switch Adjust Flash key On/Off time Usage/Comments Sets the flash time when the Soft key that programmed flash function is pressed. Switch 7 6 5 4 3 2 1 0 Time 00000000 0 ms 00000001 10 ms 00000010 20 ms 00011110 300 ms 11111100 11111101 11111110 11111111 2520 ms 2530 ms 2540 ms 2550 ms Unique Switch g:2 --- Factory use only Unique Switch g:3 - Remote reception Switch 7 6 5 4 3 2 1 0 Initial Setting 0 0 0 0 0 0 0 1 Adjust Factory use only Factory use only Factory use only Factory use only Factory use only Factory use only Factory use only Expand the setting range of the number of the receiving rings to 15 times 0: No 1: Yes Usage/Comments When set to “1”, you can set the number of the receiving rings within 15 times. 3-116 Unique Switch g:4 - Remote reception 7 6 5 4 Initial Setting 0 0 0 0 3 2 1 0 0 0 0 0 Switch Adjust Usage/Comments Factory use only Factory use only Factory use only Load 24V to TEL 2 line 0: No 1: Yes When set to “1”, 24 V will be loaded to TEL 2 in communication. Note: Set to “1” in g:4 bit 0 when make this feature available. Factory use only Factory use only Factory use only Set the relay of TEL 2 in Silent receiving 0: On 1: Off When set to “1”, TEL 2 does not ring in the silent receiving. Unique Switch g:5 ∼ g:6 --- Factory use only Unique Switch g:7 – Remote reception and TAD interface 7 6 5 Initial Setting 0 0 0 4 0 3 0 Switch 2 0 1 1 0 1 Adjust Usage/Comments Factory use only Factory use only Strict condition of CNG detection after OGM output 0: No 1: Yes CNG detection during OGM output in ANS Ready 0: Yes 1: No Number of detection DTMF When set at “1”, the condition of CNG detection becomes strict. CNG should be detected 2times continuously and the OFF time should be 2∼4 sec. Sets the number of detection the DTMF during Ans/Fax Ready mode. Switch 3 2 1 0 0000 0001 0010 0011 0100 0101 0110 0111 1000 1001 1010 1111 Unique Switch g:8 ∼ g:9 --- Factory use only 3-117 Number of detection Not detect 1 2 3 Initial setting 4 5 6 7 8 9 10 15 Unique Switch h:0 - Operation 7 6 Initial Setting 0 0 5 1 4 0 3 2 1 0 1 0 0 0 Switch Adjust Usage/Comments Factory use only LCD error message After an error message has printed, the setting of 0: Remains in LCD this switch determines if the error message will 1: Returns to standby remain in the display. Buzzer/keypad volume OFF Low Medium Maximum 0 0 1 1 0 1 0 1 Factory use only Priority mode Determine if Copy mode or Fax mode appears 0: Copy mode when the machine returns to standby with auto 1: Fax mode reset. Note: It is also available when turn the machine on. Factory use only Factory use only Unique Switch h:1 - Operation 7 Initial Setting 0 6 5 4 3 2 0 1 0 0 0 1 0 0 0 Switch Adjust Line monitor in Quick memory transmission 0: On 1: Off Factory use only Factory use only Factory use only Factory use only Secure RX document to polling document 0: No 1: Yes RX document to polling document 0: No 1: Yes Factory use only Usage/Comments Retrieve the document received in the SecureMail box by polling transmission. Retrieve the document received in the memory by polling transmission. Unique Switch h:2 --- Factory use only 3-118 Unique Switch h:3 - Operation 7 6 Initial Setting 0 0 5 0 4 3 0 1 2 0 1 0 1 0 Switch Adjust Usage/Comments Factory use only Print consumable order sheet (drum) 0: No 1: Yes Print consumable order sheet (toner) 0: No 1: Yes Factory use only Continuous polling daily 0: One day 1: Every days F-code Rx message print 0: Yes 1: No Factory use only Factory use only When the drum cartridge has reached its design life, print the consumable order sheet out. When the toner cartridge is empty, print the consumable sheet out. Set a time limit for continuous polling. Print message when the document received in the F-code box. Unique Switch h:4 - Operation 7 6 5 Initial Setting 0 0 0 4 0 3 2 0 1 Switch 1 0 0 0 Adjust Usage/Comments Factory use only Factory use only When the Department code feature in ON, it affect to the manual reception 0: No 1: Yes When the Department code feature in ON, it affect to the manual transmission 0: No 1: Yes Factory use only Priority of consumable order sheet printing 0: Print after the current printing job completed 1: Print immediately Print the transmission time on TCR 0: Blank 1: Print the transmit time Factory use only When this switch set to “1”, the machine asks department code when one using the manual reception. When this switch set to “1”, the machine asks department code when one using the manual transmission. When the drum cartridge has reached its design life, or the toner cartridge is empty, the machine prints a consumable order sheet (see unique switch H:3). When this switch is set at “0”, the machine not print consumable order sheet until the current printing job is finished. When set to “1”, the transmission time will be printed on TCR. 3-119 Unique Switch h:5 - Operation Switch 7 6 5 4 3 2 1 0 Initial Setting 0 0 0 0 0 0 1 1 Adjust Usage/Comments The time for the Auto power off mode The machine will be in the Auto power off mode after keeping to press the Energy saving key for the time you set here. (0 sec. to 7 sec.) Switch 76543210 00000000 00000001 00000010 00000011 00000100 00000101 00000110 00000111 Settings 0 sec. 1 sec. 2 sec. 3 sec. Initial setting 4 sec. 5 sec. 6 sec. 7 sec. Å Note: When set it to 0 sec., the machine will be in the Auto power off mode immediately without being in the Sleep mode after pressing the Energy saving key. Unique Switch h:6 ∼ i:2 --- Factory use only Unique Switch i:3 - Miscellaneous 7 Initial Setting 0 6 0 5 0 4 3 2 1 0 0 0 0 0 0 Switch Adjust Usage/Comments Relay broadcast (Unique) 0: Not available 1: Available Database polling Unique) 0: Not available 1: Available SecureMail transmission (Unique) 0: Not available 1: Available Factory use only Factory use only Factory use only Factory use only Factory use only Unique Switch i:4 ∼ i:6 --- Factory use only 3-120 Unique Switch i:7 - Miscellaneous Switch 7 6 5 4 3 2 1 0 Initial Setting 0 0 0 0 0 0 0 0 Adjust Factory use only Factory use only Factory use only Factory use only Factory use only Factory use only Factory use only Print last 25-digit of remote number on TCR 0: No 1: Yes Usage/Comments Determines if printing the “• •”, followed by the last 25-digit of remote number on TCR, when the remote number exceeded the ability of its column on TCR. Unique Switch i:8 ∼ j:9 --- Factory use only 3-121 3.8 Print Program Mode List This mode causes the machine to print a summary list of the machine’s programming modes. To print the program mode list press MENU, *, 8. After printing, the machine will return to standby. 3.9 Test Modes This mode offers the ability to print a test pattern and monitor certain unit output functions. Included are followings. A. B. C. D. E. Life monitor Test pattern print Stamp test Port status (Factory use only) Background level 3.9.1 Life Monitor The life monitor displays the current software version and the total number of pages scanned, printed, and transmitted. Note: The All RAM Clear setting does not clear the life monitor. To clear, see next column. 1. From standby mode, press MENU, *, 9. 2. Select “A. Life Monitor”, then press [Enter]. The software version will be shown on the top line of the LCD. 3-122 3. Press optional board number using the numeric keypad as shown in the following table. Software version Numeric keypad • Flash ROM on Main control PCB 0 • Built-in CPU ROM * (asterisk) • The first optional kit 1 • The second optional kit 2 • The third optional kit 3 4. Press RESET to exit and return to the standby mode. 3.9.2 Printer Test The Printer Test mode offers three different test patterns as shown below. Pattern A Pattern B Pattern D 3-123 Pattern C 1. Press MENU, *, 9. 2. Select “B. Test Pattern Print” by cursor key, then press [Enter]. 3. Select the desired test pattern by cursor key, then press [Enter]. 4. Select the paper to print by cursor key. 5. Press [Enter]. The selected pattern will print continuously. Note: Press STOP to cancel the printing. 6. Press STOP to finish printing and return to standby. 3.9.3 Stamp Test This mode tests the operation of the stamp. 1. Insert one sheet of paper into the document feeder of the machine. 2. Press MENU, *, 9. 3. Select “C. Stamp Test” by cursor key, then press [Enter]. 4. Press [Start]. The page will be stamped while it is fed through the document feeder. Note: To finish the operation without performing the stamp test, press [Cancel]. 5. Press STOP to return to standby. 3-124 3.9.4 Port Status This test mode is not applicable to field service of this machine. 3.9.5 Set Background Level The background level is an established threshold used to help measure the reflective ability of a scanned document. This threshold can change if the scanner lamp, CCD, or the ballast is replaced; therefore this mode should be used to reset the threshold when these items are changed. The Set Background Level mode allows the level to be set without erasing memory contents. Note: The background seal at the inside of the scanner cover should be cleaned prior to setting the background level to ensure an accurate reading. 1. Press MENU, *, 9. 2. Select “E. Background Level” by cursor key, then press [Enter]. 3. Press [Start]. After setting, the machine will return to standby. Note: To finish the operation without setting the background level, press [Cancel]. 3.10 Print Machine Parameters, Memory Switch and Unique Switch Settings This function instructs the machine to print a list of the machine parameter, memory switch and unique switch settings. The list shows the default and current settings for each. To print it, press MENU, *, A. After printing, the machine will return to standby. 3.11 Factory Functions This factory functions provide several machine testes. Included are followings. A. B. C. D. E. F. G. H. I. J. Factory functions list LED test LCD test Panel test SRAM check DRAM check RTC test Adjustment of DS2 Page memory check RS-232C test (optional RS-232C port required) 3-125 3.11.1 Function List 1. Press MENU, *, B. 2. Select “A. Factory function List” by cursor key, then press [Enter]. A list of the Factory functions will be printed. After printing, the machine will return to standby. 3.11.2 LED Test 1. Press MENU, *, B. 2. Select “B. LED test” by cursor key, then press [Enter]. 3. Pressing MENU, toggle between All LEDs turn on and off. 4. Press RESET to return to standby. 3.11.3 LCD Test This mode displays two test patterns in LCD. 1. Press MENU, *, B. 2. Select “C. LCD test” by cursor key, then press [Enter]. 3. Pressing MENU, toggle between all dots on the LCD turn on and off. 4. Press RESET to return to standby. 3-126 3.11.4 Panel Test 1. Press MENU, *, B. 2. Select “D. Panel test” by cursor key, then press [Enter]. 3. As each button on the keypad is pressed, a representative name as show in the following table will be displayed. Key DOCUMENT RESOLUTION CONTRAST RESOLUTION REDUCE/ENLARGE Contrast Mode Ratio COPY Copy FAX Select function key (Left/Center/Right) Fax SoftKey L SoftKey C SoftKey R Next EcoMode Cursor U Cursor D Cursor L Cursor R Menu NEXT ENERGY SAVING Cursor key (Up/Down/Left/Right) MENU Indication in LCD Doc.Type Key Numeric keys (0 ~ 9, *, #) RESET STOP SPEED DIAL/ TEL INDEX REVIEW COMANDS INTERRUPT START MACRO PROGRAM M1 ~ M6 SOFT KEY One-touch keys (01 ~ 84) 4. Press RESET to return to standby. 3-127 Indication in LCD 0 ~ 9, *, # Reset Stop Speed Dial Review Interrupt Start Macro M01 ~ M06 SoftKey 1 ~ SoftKey 4 01 ~ 84 3.11.5 SRAM Check This mode is used to test the SRAM memory where user programmed parameters such as date, time, TTI, etc are stored. Note: When this test is executed, All RAM Clear will be performed by the machine. The All RAM Clear erases all user settings and resets all memory switches, machine parameters and unique switches to factory defaults. 1. Press MENU, *, B. 2. Select “E. SRAM Check” by cursor key, then press [Enter]. 3. Enter the HEX code (00 ~ FF), then press [Enter]. The HEX code is written to, then read from, memory. After that, the result (OK/NG) will be shown in the display. Then the machine will return to standby. 3.11.6 DRAM Check This mode is used to test the DRAM memory, or document memory. Note: When this test is performed, All DRAM Clear will be performed by the machine. The All RAM clear erases all user settings and resets all memory switches, machine parameters and unique switches to factory defaults. This is a read/write test that requires a few moments to complete. Note: Perform a DRAM test whenever a memory upgrade is added to the machine. 1. Press MENU, *, B. 2. Select “F. DRAM Check” by cursor key, then press [Enter]. 3. Enter the HEX code (00 ~ FF), then press [Enter]. 3-128 4. Enter the Check area (0 ~ 7). Note: Usually, enter “0”. Check area: 0: All DRAMs 1: The DRAM installed on the main PCB 2: The second DRAM 3: The third DRAM 4: The fourth DRAM 5: The fifth DRAM 6: The sixth DRAM 7: The seventh DRAM 5. Press [Enter]. The machine starts checking and the result(OK/NG) will be shown in the display. For example, if the check area is “0” and no additional memory, you will see: 6. If you want to check other DRAMs, press STOP and repeat steps 3-5. Otherwise, press RESET to return to standby. 3.11.7 RTC(real time clock) Test This test mode is not applicable to field service of this machine. 3.11.8 DS2 Self adjustment mode When you change the sensor of DS2, adjust the sensitivity of it here. Note: Close the ADF and remove the documents before performing this mode. 1. Press MENU, *, B. 2. Select “H. Adjustment of DS2” by cursor key, then press [Enter]. 3. Press [Enter]. The machine starts checking and the result(OK/NG) will be shown in the display. 4. If NG is shown in the display, check the sensor and the inside of the ADF. Otherwise, press RESET to return to standby. 3-129 3.11.9 Page memory check When the letters are not printed correctly, perform this test. 1. Press MENU, *, B. 2. Select “I. Page memory check” by cursor key, then press [Enter]. 3. Enter the Check area (0 - 6). Note: Usually, enter “0”. Check area: 0: All DRAMs 1: The Page memory installed on the main PCB 2: The second Page memory 3: The third Page memory 4: The fourth Page memory 5: The fifth Page memory 6: The sixth Page memory 5. Press [Enter]. The machine starts checking and the result(OK/NG) will be shown in the display. If NG is shown, perform the DRAM clear (page 3-139), and then go back to step 1. 6. If you want to check other Page memory, press STOP and repeat steps 3-5. Otherwise, press RESET to return to standby. 3.11.10 RS-232C Test This mode is used to return back test of the optional RS-232C port. 1. Connect a special return back test connector with RS-232C interface connector. 2. Press MENU, *, B. 3. Select “J. RS-232C Test” by cursor key, then press [Enter]. 3-130 4. Enter One-touch G, H, or I, depending on the kind of test. Please refer to the following table: G: return back test H: send from fax to PC I: receive from PC to fax The results are shown in the display. If the test is successful, the display will show “OK” If the test is failed, the display will show “NG”. 5. Press RESET to return to standby. 3.12 Line Tests This mode offers several internal tests and ability to monitor certain unit output functions. Included are relay tests, modem signal output monitoring, and DTMF output monitoring. 3.12.1 Relay Test This mode tests the on/off operation of various relays and switches. 1. Press MENU, *, C. 2. Press the numeric keypad 0 (zero) to select the optional board number for the machine. To select the optional board number for the second phone line, press 1 (one). Then press [Enter]. 3. Select “A. Relay” by cursor key, then press [Enter]. 3-131 4. Select the relay you want to set to ON by cursor key, then press [Enter]. When it is set to ON, it will be shaded. If you want to set it to OFF, press [Enter] again. 5. Press RESET to return to standby. 3.12.2 Tonal Signal Test The tonal signal test permits the machine’s output tones to be monitored. Note: To monitor the tones, an external monitoring device must be connected to the telephone line jack. 1. Press MENU, *, C. 2. Press the numeric keypad 0 (zero) to select the optional board number for the machine. To select the optional board number for the second phone line, press 1 (one). Then press [Enter]. 3-132 3. Select “B. Tonal” by cursor key, then press [Enter]. 4. Select the desired tonal signal by cursor key. Refer to the following table. No. Signal No. Signal 01 None (stop signal) 11 FSK black (all 1) 02 462 Hz tone 12 FSK White 1:Black 1 03 1080 Hz tone 13 V27_1200_2400 picture data 04 1300 Hz tone 14 V27_1600_4800 picture data 05 1650 Hz tone 15 V27_2400_7200 picture data 06 1700 Hz tone 16 V27_2400_9600 picture data 07 1800 Hz tone 17 V17_2400_7200 picture data 08 1850 Hz tone 18 V17_2400_9600 picture data 09 2100 Hz tone 19 V17_2400_12000 picture data 10 FSK white (all 0) 20 V27_2400_14400 picture data No. Signal 21 ~ 29 V34_2400_2400 ~ 21600 30 ~ 39 V34_2800_4800 ~ 26400 40 ~ 50 V34_3000_4800 ~ 28800 51 ~ 62 V34_3200_4800 ~ 31200 63 ~ 75 V34_34290_4800 ~ 33600 3-133 5. When you select No.01 ~ No.12, No.21 ~ No.76: Press [Enter]. The output signal will begin. To stop outputting the tonal signal, press STOP. When you select No.13 ~ No.20: Press [Enter]. Select the desired ratio of the white and black and press [Enter]. The output signal will begin. To stop outputting the tonal signal, press STOP. 6. To select another tonal signal, repeat steps 4-5. Otherwise, proceed to step 7. 7. Press RESET to return to standby. 3.12.3 DTMF Output Test The DTMF output test permits the machine’s DTMF tones to be monitored. Note: To monitor the tones, an external monitoring device must be connected to the telephone line jack. Signal Signal DTMF 0 (941 Hz + 1336 Hz) ROW 1 (697 Hz) DTMF 1 (697 Hz + 1209 Hz) ROW 2 (770 Hz) DTMF 2 (697 Hz + 1336 Hz) ROW 3 (852 Hz) DTMF 3 (697 Hz + 1477 Hz) ROW 4 (941 Hz) DTMF 4 (770 Hz + 1209 Hz) COL 1 (1209 Hz) DTMF 5 (770 Hz + 1336 Hz) COL 2 (1336 Hz) DTMF 6 (770 Hz + 1477 Hz) COL 3 (1477 Hz) DTMF 7 (852 Hz + 1209 Hz) COL 4 (1633 Hz) DTMF 8 (852 Hz + 1336 Hz) DTMF 9 (852 Hz + 1477 Hz) DTMF * (941 Hz + 1209 Hz) DTMF # (941 Hz + 1477 Hz) 1. Press MENU, *, C. 2. Press the numeric keypad 0 (zero) to select the optional board number for the machine. To select the optional board number for the second phone line, press 1 (one). Then press [Enter]. 3-134 3. Select “C. DTMF” by cursor key, then press [Enter]. 4. Select the desired DTMF tone by cursor key, then press [Enter]. The output signal will begin. To stop outputting the DTMF tone, press STOP. 5. To select another DTMF tone, repeat step 4. Otherwise, proceed to step 6. 6. Press RESET to return to standby. 3.13 Mirror Carriage Transfer Mode Important: The machine’s mirror carriage is fixed using the two screws at transferring. When installing the machine, remove the two mirror carriage mounting screws and turn the power on. Then perform this mode. 1. Press MENU, *, E. 2. Select “OFF” by cursor key. Then press [Enter] to turn off the transport mode. The mirror carriage will move to home position. Important: If reshipping, turn on this mode to move the mirror carriage to the transport position. Then power off and mount the mirror carriage using two transport screws. 3-135 3.14 Consumable order sheet When the drum cartridge has reached its design life or the toner cartridge is empty, the machine prints the consumable sheet. Note: This feature’s default setting is OFF (not print the consumable sheet). (See Unique Switch H:3 to set ON this feature.) 3.14.1 Set and Print consumable order sheet If using this feature, you should be enter following items: • Distributor’s code • Distributor’s name • Customer’s code • Customer’s name • Customer’s address • Customer’s phone number • Printer serial number • Scanner serial number Here’s how: 1. Clear the junk data, if necessary (see “Clear consumable order sheet,” next page). 2. Press MENU, *, F. 3. Enter the distributor’s name. The name may be up to 30 characters in length. Use the one-touch keys to enter letters and other non-numeric characters. The word “Upper case” means the machine will enter only upper-case letters. If you press R, the machine will see it as an R (not an r). To type a lower-case letter, press [Chara.] and select “Lower case” by using the cursor key, and then press [Enter]. This means pressing one-touch keys will enter lower-case letters: pressing R will produce an r (not an R) on the display. To switch back for upper-case entries, press [Chara.]. To enter spaces, punctuation and symbols, use the one-touch keys. Note: If you make a mistake, press [Clear] to erase the left. To change just one character, move the cursor by cursor key. Press [Clear] to erase the character. Then re-enter the character correctly. 3-136 4. Press [Enter] to save the distributor’s name and continue. The LCD will show: Enter the customer’s code. The customer’s code may be up to 10 characters in length. 5. Press [Enter] to save the customer’s code and continue. The LCD will show: Enter the customer’s name. The customer’s name may be up to 30 characters in length. 6. Press [Enter] to save the customer’s name and continue. The LCD will show: Enter the customer’s address for the upper row. The customer’s address may be up to 30 characters in length. 7. Press [Enter] to save the customer’s address for the upper row and continue. The LCD will show: Enter the customer’s address for the lower row. The customer’s address may be up to 30 characters in length. 3-137 8. Press [Enter] to save the customer’s address. The LCD will show: Enter the customer’s phone number. The phone number may be up to 20 characters in length. 9. Press [Enter] to save the customer’s phone number and continue. The LCD will show: Enter the printer’s serial number. The number may be up to 18 characters in length. 10. Press [Enter] to save the printer’s serial number and continue. The LCD will show: Enter the scanner’s serial number. The number may be up to 18 characters in length. 3-138 11. Press [Enter] to save the scanner’s serial number. The LCD will show: 13. Press [Enter] to print the consumable order sheet. To finish the operation without printing, press RESET. 3.14.2 Clear consumable order sheet The consumable order sheet keeps several items. These are not cleared with the all RAM clear function (MENU, *, 3). To clear the information of consumable order sheet: 1. Press MENU, *, L. 2. To clear the information of the consumable order sheet, press [Enter]. To finish the operation without clearing, press [Cancel]. 3.15 DRAM Clear Note: Perform a DRAM clear whenever a memory upgrade is installed to the machine or the DRAM is replaced. 1. Press MENU, *, G. 3-139 2. Press [Enter]. The DRAM will be cleared. Note: To finish the operation without performing initialization, press [Cancel]. 3. After clearing, turn the power OFF and ON. 3.16 Clear Life Monitor The life monitor keeps a count of the pages scanned, printed, and transmitted. This mode clears these counters. 1. Press MENU, *, H. 2. If the passcode is set, enter the passcode and press [Enter]. Otherwise, proceed to step 3. or 3. Press [Enter]. The counters will be reset and the machine will return to standby. Note: To finish the operation without performing initialization, press [Cancel]. 3.17 Set Service Code This is the code which, one can protect the life monitor clear operation. If it is not necessary to protect to the life monitor clear operation, abort this operation without entering the passcode. 1. Press MENU, *, J. or 2. If you will modify the passcode, enter the old passcode and press [Enter]. If you will set the passcode for the first time, proceed to step 3. 3. Enter the desired four-digit numbers for the new passcode. 4. Press [Enter]. Note: To set the passcode at off and return to normal life monitor clear (not protect), change the code to 0000 by repeating steps 1-4 and entering 0000 in step 3. 3-140 3.18 Printer Trouble Reset This mode clears the service call. Perform this operation after solved the trouble. 1. Press MENU, *, M. 2. Press [Enter]. The service call will be cleared and the machine will return to standby. Note: To finish the operation without performing clearing, press [Cancel]. 3.19 Clear Optional Data This mode clears all data and all activity journals for optional RS-232C, Printer controller and second phone line. 1. Press MENU, *, I. 2. Press [Enter]. The optional data will be cleared. Note: To finish the operation without performing initialization, press [Cancel]. 3.20 JP1, JP2 Battery Backup Jumper JP2 on the main control PCB is used for battery back-up of the DRAM. Any documents stored in DRAM. Removing JP2 will initialize the DRAM. If the power is turned off, the battery will provide up to 1 week of back-up when fully charged. Jumper JP1 on the main control PCB is used for battery back-up of the SRAM. All user programmed data and internal machine parameter, memory switch and unique switch settings are held in SRAM. Removing JP1 will initialize the SRAM. If the power is turned off, the battery will provide up to five years of back-up when fully charged. 3-141 3.21 Update the software Here’s instruction to update the software version of the Flash ROM. Important: To update the software, it needs the flash ROM writer and six (or four) of the latest versions of EP-ROMs — ROM0, ROM1, ROM2, ROM3, CGROM0 and CGROM1. 1. Turn off the power switch. 2. If you will update six ROMs (ROM0 – CGROM1), set JP1 to ON. If you will update only four ROMs (ROM0 - ROM3), set JP1 to OFF. And confirm the BOOTROM is set correctly. 3. If you will update CGROMs, set the six ROMs to the Flash ROM writer. If you will not update CGROMs, set the four ROMs (ROM0, ROM1, ROM2 and ROM3) to the Flash ROM writer. Note: Be careful of the direction of the ROMs when you attach them. 4. Remove the ROM cover and connect the cables as follows: Flash ROM writer Main control PCB P1 <---------------------> P6 P2 <---------------------> P7 5. Turn the power on. “0” will be indicated on the right ROM NO. and “1” will be on the left ROM NO. Dots will be lighted on the CHECK SUMs. 6. The Flash ROM writer erases the current program in the machine, then starts writing the new program to the machine. Note: The CGROM0 is indicated as “4” and the CGROM1 is “5”. 3-142 7. At the end of this operation (it takes a few minutes), the Flash ROM writer indicates the Check Sums of the last ROMs. 8. Pressing the SW1, confirm the Check Sums as follows: Check Sum of ROM0, Check Sum of ROM1 (Pressing SW1) Check Sum of ROM2, Check Sum of ROM3 (Pressing SW1) (Pressing SW1) Check Sum of ROM4(CGROM0), Check Sum of ROM5(CGROM1) If the Check Sum indicated on the Flash ROM writer and the one written on the ROM are not same, confirm the cable connection and the ROM attaching, then perform from step 1 again. 9. Turn off the power switch, then disconnect the cables. 10. (Re-attach the rear cover using the three screws.) Error code If the error occurred during writing, the following error code will be appeared: E.02: Maker code read error E.04: Sector erase error E.05: Writing error E.06: Sum check error E.07: Time out error When the above error occurred, turn off the power switch, confirm the cable connection and the ROM attaching, then perform from step 1 again. 3-143 Section4 Troubleshooting Procedures 4.1 Troubleshooting Outline Before troubleshooting a unit check the following: • • • • Is the power cord correctly connected to the machine? Is the telephone handset and the telephone line cord connected correctly? Is there paper in the paper cassette? Are all covers closed correctly? Before removing any portions of the machine or making any adjustments be sure the power cord is disconnected from the unit. Check the following: • The power source should be rated according to unit specifications. • The unit should not be connected to an electrical circuit with other equipment or where voltages may vary. • The unit should be installed on a flat, level surface. • The ambient temperature and relative humidity surrounding the unit should be 50°F to 95°F (10°C to 35 °C) at 15% to 85% humidity with no condensation. • The unit should be located in a well ventilated area. • The unit should receive necessary cleaning and maintenance. The unit should be installed: • • • • • Away from heat sources and heating or cooling vents. Away from water heaters, steam generators, humidifiers or other areas of high humidity. Away from dusty areas. Away from areas where chemical fumes or gasses are generated or may collect. Away from areas exposed to direct sunlight. Check the consumable: • Verify that the recording paper supply is adequate and that it is high- or standard-quality 20lb. • • xerographic bond. Verify that the recording paper has been stored away from moisture and damp areas. Verify that the recording paper has not been damaged in any way. 4-1 4.2 Document Feeder Jam 1. Verify the original documents conform to the specifications designed for use in the machine and that they are not damaged in any way. 2. Verify the number of documents placed into the feeder does not exceed its maximum capacity. 3. Verify the scanner cover is closed properly. 4. Remove any foreign substances from inside the scanner area. 5. Verify that all of the document feed rollers are clean and not damaged. Clean using a lint-free cotton cloth moistened with a cleaning solution designed for use on rubber rollers. Replace the rollers if worn or damaged. 6. Check the operation of DS1 at connector P122, pin 3-5, on the PCB connect ADF. 7. Check the operation of the separator roller, and the pick-up roller. 8. Verify the operation to the ADF Motor at connector P121, pins 1-6 on the PCB connect ADF. 9. Verify that the document feeds into the unit and stops. If the document does not stop, check the operation of DS2 at connector P123, pin 1-3, on the PCB connect ADF. 10. Check all connectors and cables. 11. Check the operation of the main control board. 4.3 Document Feeder Multi-feeding or Skew Symptom: Two or more pages of a multi-page document are fed at once. The document is fed on the skew. Slight skewing may sometimes occur. Suggested corrective action: 1. Verify that the original documents conform to the specifications designed for use in the machine and they are not damaged in any way. 2. Verify the pages of the document are not stuck together from glue, wet or damp correction fluid, tape, etc. 3. Verify the feed roller, separator roller and retard roller are clean and not damaged. Clean using a lintfree cotton cloth moistened with a cleaning solution designed for on rubber rollers. Replace these items if worn or damaged. 4.4 Mirror Carriage Error Symptom: The mirror carriage doesn’t move. Suggested corrective action: 1. Verify that the four transport screws have been removed. Remove four transport screws if they are not removed. Then press MENU, [, E to turn off the mirror carriage carry mode. 2. Verify that the timing belt doesn’t out of joint. 3. Check the operation of HOME sensor at connector P165, pin 1-3, on the PCB LCDBL. 4. Check the operation of END sensor at connector P164, pin 7-9, on the PCB connect LCDBL. 4-2 4.5 Transmit Error Symptom: Check message prints after attempting transmission. Suggested corrective action: 1. Reference the error code on the check massage or the journal to the error code list contained in this section. 4.6 Transmit Black Lines Symptom: A black line appears on all documents transmitted or copied. Suggested corrective action: 1. Print a document from memory (mode list, journal, etc.) to determine if the problem is in the scanner. If the black line in not on the memory print outs, the problem is not in the scanner. 2. Check for a foreign object in the feeder. 3. Clean the contact glass or FBS glass. 4. Check for wire or other foreign object obstructing the light path to the CCD. 4.7 Cannot transmit Symptom: The unit will not transmit Suggested corrective action: 1. Verify the telephone line cord is properly installed and plugged into the correct type of wall jack. 2. Check for dial tone at the unit and wall jack. If no dial tone is present at the unit, check the NCU PCB. 3. Verify that the correct telephone number has been dialed or that the correct telephone number is programmed in the autodialer. 4. Insure Security TX turned off. 5. Place a call through the monitor and check for excessive noise or interference on the telephone line. 6. Verify that the remote location is capable of receiving by checking the following: 6.1 Place a call to the remote machine and verify that if auto answers. 6.2 Insure that the remote machine does not have closed network or block junk fax turned on. 6.3 Transmit to another location. 7. Check the operation of NCU PCB and the main control PCB. 4.8 Receive Errors Symptom: Check message prints after attempting a reception. Suggested corrective action: 1. Reference the error code on the check message or the journal to the error code list contained in this section. 4-3 4.9 Will not Auto-Answer Symptom: The unit rights but will not auto-answer. Suggested corrective action: 1. Check the power cord and AC switch. 2. Verify the telephone line is properly installed. 3. Verify recording paper in the paper cassette. 4. Check the memory capacity. The unit will not answer incoming calls if memory full. 5. Check the number of rings is set to answer on. If set to a high number of rings, the transmitting unit may “time out”. 6. Insure the unit is in the Fax Ready mode. 7. Check the operation of the NCU PCB and the main control PCB. 4-4 4.10 Recording paper misfeed 4.10.1 Misfeed detection sensor layoput Paper Exit Sensor PC3 Synchonizing Roller Sensor PC2 Manual Feed Paper Take-up Sensor PC8 4-5 4.10.2 Types of Misfeed Detection and Detection Timings • The following are the types of misfeed detection and detection timings for different misfeed locations. Note: For misfeed detection types and detection timings of options, see the relevant option’s information in the Section 6 on this service manual. <Machine Take-Up Misfeed> Type Paper take-up failure detection Detection Timing • 1st Drawer paper take-up: Synchronizing Roller Sensor PC2 is not unblocked (H) even after the lapse of T sec. after Paper Take-Up Solenoid SL1 has been energized for the second paper take-up retry sequence. • 2nd Drawer paper take-up: PC2 is not unblocked (H) even after the lapse of T sec. after SL1 has been energized for the first paper take-up retry sequence. • 1st/2nd Drawer paper take-up: PC2 is unblocked (H) within T sec. after SL1 has been energized. Timer Value T (sec.) 1.28 2.27 0.20 <Optional Manual Bypass Take-Up Misfeed> Type Bypass paper takeup failure detection Detection Timing PC2 is not unblocked (H) even after T sec. after Manual Feed Paper Take-Up Clutch CL3 has been energized. PC2 is unblocked (H) within T sec. after CL3 has been energized. Paper left Manual Feed Paper Take-Up Sensor PC8 is blocked (L) when the Power Switch is turned ON, CPU is reset, or cover is opened and closed. Timer Value T (sec.) 0.89 0.20 ——— <Separator Misfeed> Type Leading edge detection by Paper Exit Sensor PC3 Trailing edge detection by Synchronizing Roller Sensor PC2 Detection Timing PC3 is not blocked (L) even after the lapse of T sec. after PC2 has been unblocked (H). Timer Value T (sec.) 1.92 ✽ PC2 is not blocked (L) even after the lapse of T sec. after 4.20 ✽ it has been unblocked (H). PC2 is blocked (L) within T sec. after it has been 1.05 unblocked (H). During a sequence of detecting a paper size based on the period of time between when Synchronizing Clutch CL1 is Paper is stationary energized and when PC2 is blocked (L), the paper size ——— detected is longer than the size data sent from the controller by +260 mm or more. The paper size detected based on the period of time between when CL1 is energized and when PC2 is blocked Size error detection ——— (L) is more than the size data sent from the controller by ±20 mm or more. PC2 is unblocked (H) when the Power Switch is turned Paper left ——— ON, CPU is reset, or cover is opened and closed. ✽ Excludes the period of time during which the paper is stationary before the Synchronizing Roller. 4-6 <Fusing Misfeed> Type Detection Timing Trailing edge detection by Paper Exit Sensor PC3 PC3 is not unblocked (H) even after the lapse of T sec. after PC2 has been blocked (L). Paper left PC3 is blocked (L) when the Power Switch is turned ON, CPU is reset, or cover is opened and closed. 4.10.3 Misfeed Troubleshooting Procedures (1) Machine Take-Up Misfeed Paper Take-Up Solenoid SL1 Synchronizing Roller Sensor PC2 Relevant Electrical Parts Master Board PWB-A Cassette Main Board PWB-A 4-7 Timer Value T (sec.) 1.96 ——— <Machine Take-Up Misfeed Troubleshooting Procedure> Symptom Step Check Item Does the paper being used 1 meet the product specifications? Is the paper curled, wavy, or 2 damp? Are the Edge Guide and Trailing Edge Stop (of the 3 drawer) positioned to the exact size of the paper used? Is the Paper Take-Up Roll 4 deformed, worn, or dirty with paper dust? If the Paper Lifting Plate dirty 5 or deformed? Has the misfeed been detected while the Multi 6 Purpose Cassette was being used? Is the Paper Separator Pad 7 deformed, worn, or dirty with Paper is not paper dust? taken up at all. Check SL1 for operation. Does the voltage across CN19-1 on the PWB-A side 8 and GND change from DC24V to DC0V when the Start key is pressed? Is the Paper Separator Finger 9 dirty or deformed? Check CL2 for operation. Does the voltage across CN91 on the PWB-A side and 10 GND change from DC24V to DC0V when the Start key is pressed? Check SL1 for operation. Does the voltage across PJ3A-1A on PWB-A (Cassette 11 Main Board) and GND change from LOW to HIGH when the Start key is pressed? Is the Vertical Transport Roller • Paper is at a 1 deformed, worn, or dirty with stop before paper dust? the vertical If the Vertical Transport Guide 2 transport Plate dirty or deformed? section. • Paper is at a stop near the Synchronizing Rollers. 3 Is PC2 fully operational? Check the input data using I/O Check. 4-8 Result NO YES Action Instruct the user to use the paper that meets product specifications. Change the paper. Instruct the user on the storage of paper. NO Slide the guides to the exact size of the paper. YES Clean or change the Paper Take-Up Roll. YES Clean or change the Paper Lifting Plate. Check steps 7 and 8. NO Check steps 9 and onward. YES Clean or change the Paper Separator Pad. YES Check various parts for possible overload and, if they are okay, change SL1. NO Change PWB-A. YES Clean or change the Paper Separator Finger. NO Change PWB-A. YES Check various parts for possible overload and, if they are okay, change SL1 or CL2. NO Change PWB-A (Cassette Main Board) or PWB-A. YES Clean or change the Vertical Transport Roller. YES YES YES NO Clean or change the Vertical Transport Guide Plate. Check various parts for possible overload and, if they are okay, change PWB-A. Check the PC2 actuator for operation and, if it is intact, change PC2. (2) Manual Bypass Take-Up Misfeed Relevant Electrical Parts Manual Feed Paper Take-Up Clutch CL3 Manual Feed Paper Take-Up Sensor PC8 Synchronizing Roller Sensor PC2 Master Board PWB-A <Manual Bypass Take-Up Misfeed Troubleshooting Procedure> Symptom Step Check Item Result Does the paper being used 1 meet the product NO specifications? Is the paper curled, wavy, or 2 YES damp? Is the Manual Feed Paper Take-Up Roller or Roll 3 YES deformed, worn, or dirty with Paper is not paper dust? taken up at all. Is PC8 fully operational? 4 Check the input data using I/O NO Check. Check CL3 for operation. YES Does the voltage across 5 CN14-2 and GND change from DC24V to DC0V when NO the misfeed condition is reset? Paper is at a stop near the Synchronizing Rollers. 1 Is PC2 fully operational? Check the input data using I/O Check. 4-9 YES NO Action Instruct the user to use the paper that meets product specifications. Change the paper. Instruct the user on the storage of paper. Clean or change the Manual Feed Paper Take-Up Roller or Roll. Check the PC8 actuator for operation and, if it is intact, change PC8. Check various parts for possible overload and, if they are okay, change CL3. Change PWB-A. Check various parts for possible overload and, if they are okay, change PWB-A. Check the PC2 actuator for operation and, if it is intact, change PC2. (3) Separator/Fusing Misfeed Paper Exit Sensor PC3 Synchronizing Roller Sensor PC2 Relevant Electrical Parts Synchronizing Clutch CL1 Master Board PWB-A 4-10 <Separator/Fusing Misfeed Troubleshooting Procedure> Symptom Step Check Item Are the Synchronizing Rollers 1 deformed, worn, or dirty with paper dust? 2 Paper is at a stop near the Synchronizing Rollers. 3 4 Paper is at a stop near the PC Drum. Paper is wedged at the PC Drum Paper Separator Fingers. Paper is at a stop before the Fusing Rollers. Paper is at a stop at the Fusing Rollers. 1 2 1 1 1 2 1 Paper is at a stop at the exit section. 2 Is a size error displayed when the misfeed display is reset? Is PC2 fully operational? Check the input data using I/O Check. Check CL1 for operation. Does the voltage across CN69 on the PWB-A side and GND change from DC24V to DC0V when the Start key is pressed? Is the Pre-Image Transfer Guide Plate dirty or deformed? Is the Image Transfer Roller deformed, worn, or dirty with paper dust? Are the PC Drum Paper Separator Fingers dirty or deformed? Is the Fusing Guide Plate dirty or deformed? Are the Fusing Rollers deformed, worn, or dirty with paper dust? Are the Fusing Separator Fingers dirty or deformed? Is the Paper Exit Roller deformed, worn, or dirty with paper dust? Is PC3 fully operational? Check the input data using I/O Check. 4-11 Result YES YES NO YES Action Clean or change the Synchronizing Rollers. Check that the size of the paper actually loaded in the current paper source matches the size set for it. Check the PC2 actuator for operation and, if it is intact, change PC2. Check various parts for possible overload and, if they are okay, change CL1. NO Change PWB-A. YES Clean or change the guide plate. YES Clean or change the Image Transfer Roller. YES NO Clean or change the separator fingers. Check the clearance between the PC Drum Paper Separator Fingers and PC Drum. YES Clean or change the Fusing Guide Plate. YES Clean or change the Fusing Rollers. YES Clean, correct, or change the Fusing Separator Fingers. YES Clean or change the Paper Exit Roller. YES NO Check various parts for possible overload and, if they are okay, change PWB-A. Check the PC3 actuator for operation and, if it is intact, change PC3. (4) Paper Take-Up/Transport Misfeed (Paper Feed Unit) Relevant Electrical Parts Master Board PWB-A Paper Take-Up Solenoid SL1 Cassette Main Board PWB-A Take-Up Sensor S3 Cassette Main Board PWB-A: Paper feed unit Synchronizing Roller Sensor PC2 Transport Clutch CL2 (Paper feed unit) (Paper feed unit) (Paper feed unit) 4-12 <Paper Take-Up/Transport Misfeed (Paper feed unit) Troubleshooting Procedure> Symptom Step Check Item Result Action Does the paper being used Instruct the user to use the 1 meet the product NO paper that meets product specifications? specifications. Is the paper curled, wavy, or Change the paper. Instruct the 2 YES damp? user on the storage of paper. Are the Edge Guide and Trailing Edge Stop (of the Slide the guides to the exact 3 NO drawer) positioned to the exact size of the paper. size of the paper used? Is the Paper Take-Up Roll Clean or change the Paper 4 deformed, worn, or dirty with YES Take-Up Roll. paper dust? Is the Paper Lifting Plate dirty Clean or change the Paper 5 YES or deformed? Lifting Plate. Paper is not Is the Paper Separator Finger Clean or change the Paper taken up at all. 6 YES dirty or deformed? Separator Finger. Check CL2 for operation. Does the voltage across CN91 on the PWB-A side and NO Change PWB-A. 7 GND change from DC24V to DC0V when the Start key is pressed? Check various parts for Check SL1 for operation. YES possible overload and, if they Does the voltage across are okay, change SL1 or CL2. PJ3A-1A on PWB-A (Paper 8 Change PWB-A (Paper feed feed unit) and GND change unit), PWB-A (Cassette Main from LOW to HIGH when the NO Board), or PWB-A, in that Start key is pressed? order. Is the Vertical Transport Roller Clean or change the Vertical 1 deformed, worn, or dirty with YES Transport Roller. paper dust? Is the Vertical Transport Guide Clean or change the Vertical 2 YES Plate dirty or deformed? Transport Guide Plate. Check that the size of the Is a size error displayed when paper loaded in the current 3 YES the misfeed display is reset? drawer matches the size set • Paper is at a for that drawer. stop at the ✽ A misfeed is detected at the vertical transport section of the 3rd transport Check the PC2 actuator for Drawer. section. 4 NO operation and, if it is intact, Is PC2 fully operational? change PC2. • Paper is at a Check the input data using I/O stop near the Check. Synchronizing Are all S3’s fully operational? Check various parts for Rollers. 5 Check the input data using I/O YES possible overload and, if they Check. are okay, change PWB-A. Change PWB-A (Paper feed Does the voltage across YES unit) or PWB-A (Cassette Main PJ3A-2B on PWB-A (Paper Board). feed unit) and GND change to 6 DC0V when S3 is blocked and Check the S3 actuator for to DC5V when S3 is NO operation and, if it is intact, unblocked? change S3. 4-13 (5) Paper Take-Up/Transport Misfeed (LCC) Relevant Electrical Parts Synchronizing Roller Sensor PC2 Take-Up Clutch 1 P1CL Transport Clutch CL2 Take-Up Clutch 2 P2CL Take-Up Sensor S3 Paper Empty Sensor 1 PPS1 LCC Main Board PWB-A: LCC Paper Standby Position Sensor S1 Cassette Main Board PWB-A: Paper feed unit Separator Clutch BCL Cassette Main Board PWB-A Registration Clutch RCL Master Board PWB-A Registration Sensor RSEN (LCC) (Paper feed unit) <Paper Take-Up/Transport Misfeed (LCC) Troubleshooting Procedure> Symptom Step Check Item Result Does the paper being used • Paper is not 1 meet the product NO taken up at specifications? all. Is the paper curled, wavy, or 2 YES • Paper is at a damp? stop before Is the Paper Take-Up Roll the Paper 3 deformed, worn, or dirty with YES Feed/Separat paper dust? or Rolls. 4-14 Action Instruct the user to use the paper that meets product specifications. Change the paper. Instruct the user on the storage of paper. Clean or change the Paper Take-Up Roll. Symptom Step 4 5 • Paper is not taken up at all. Check Item Is PPS1 fully operational? Check the input data using I/O Check. Does the voltage across CN3A-2 on PWB-A (LCC) and GND change from LOWto HIGHwhen PPS1 is blocked? 6 Is paper fed up to S1 when paper is loaded in Lift 2 only and the drawer is slid into the copier? 7 Check P2CL for operation. Does the voltage across CN7A-6 on PWB-A (LCC) and GND change from DC24V to DC0V when step 6 is performed again? 8 • Paper is at a stop before the Paper Feed/Separat or Rolls. 9 10 11 12 Check P1CL for operation. Does the voltage across CN7A-8 on PWB-A (LCC) and GND change from DC24V to DC0V when step 6 is performed again? Is S1 fully operational? Check the input data using I/O Check. Does the “S1S” input signal change from 0 to 1 when the drawer loaded with paper is slid into the copier? Does the voltage across CN3A-5 on PWB-A (LCC) and GND change from LOWto HIGHwhen step 9 is performed again? Is the Paper Feed Roll or Separator Roll deformed, worn, or dirty with paper dust? Check BCL for operation. Does the voltage across CN7A-2 on PWB-A (LCC) and GND change from DC24V to DC0V when the Start key is pressed? 4-15 Result YES Action Perform steps 6 and onward. NO Change PWB-A (LCC), PWBA (Paper feed unit), or PWB-A (Cassette Main Board), in that order. Change PPS1. YES Perform steps 8 and onward. YES YES NO Check various parts for possible overload and, if they are okay, change P2CL. Change PWB-A (LCC), PWBA (Paper feed unit), PWB-A (Cassette Main Board), or PWB-A, in that order. NO Change PWB-A (LCC), PWBA (aper feed unit), PWB-A (Cassette Main Board), or PWB-A, in that order. YES Perform steps 11 and onward. YES NO YES YES NO Change PWB-A (LCC), PWBA (Paper feed unit), or PWB-A (Cassette Main Board), in that order. Change S1. Clean or change the Paper Feed Roll or Separator Roll. Check various parts for possible overload and, if they are okay, change P1CL or BCL. Change PWB-A (LCC), PWBA (Paper feed unit), PWB-A (Cassette Main Board), or PWB-A, in that order. Symptom Step 1 2 3 4 • Paper is at a stop at the vertical transport section. 5 • Paper is at a stop near the Synchronizing Rollers. 6 Check Item Is the Vertical Transport Roller or Roll deformed, worn, or dirty with paper dust? Is RSEN fully operational? Check the input data using I/O Check. Does the voltage across CN4A-2 on PWB-A (LCC) and GND change from LOW to HIGH when RSEN is blocked? Check RCL for operation. Does the voltage across CN7A-4 on PWB-A (LCC) and GND change from DC24V to DC0V when the Start key is pressed? Check CL2 for operation. Does the voltage across CN91 on PWB-A and GND change from DC24V to DC0V when the Start key is pressed? Result YES Clean or change the Vertical Transport Roller or Roll. YES Check step 4 and onward. YES NO NO NO Change PWB-A. ✽If the 3rd Drawer is LCC YES Is PC2 fully operational? Check the input data using I/O Check. NO 8 Is S3 fully operational? Check the input data using I/O Check. Does the voltage across PJ3A-2B on PWB-A (Paper feed unit) and GND change to DC0V when S3 is blocked and to DC5V when S3 is unblocked? 4-16 Change PWB-A (LCC), PWBA (Paper feed unit), or PWB-A (Cassette Main Board), in that order. Change RSEN. Change PWB-A (LCC), PWBA (Paper feed unit), PWB-A (Cassette Main Board), or PWB-A, in that order. ✽If the 4th Drawer is LCC 7 Action YES YES NO Check various parts for possible overload and, if they are okay, change RCL, CL2, or PWB-A, in that order. Check the PC2 actuator for operation and, if it is intact, change PC2. Check various parts for possible overload and, if they are okay, change RCL, CL2, or PWB-A, in that order. Change PWB-A (Paper feed unit) or PWB-A (Cassette Main Board). Check the S3 actuator for operation and, if it is intact, change S3. (6) Duplex Turnover/Take-Up Misfeed (Duplex unit) Relevant Electrical Parts Duplex Unit Transport Motor M2 Paper Exit Sensor PC3 Manual Feed Paper Take-Up Clutch CL3 Duplex Unit Transport Sensor PI1 Master Board PWB-A Synchronizing Roller Sensor PC2 Duplex Main Board PWB-A: Duplex unit Switchback Motor M1 (Duplex unit) 4-17 <Duplex Turnover/Take-Up Misfeed (Duplex Unit) Troubleshooting Procedure> Symptom Step Check Item Result Action Is the Paper Exit Roller Clean or change the Paper 1 deformed, worn, or dirty with YES Exit Roller. paper dust? Is PC3 fully operational? Check the PC3 actuator for 2 Check the input data using I/O NO operation and, if it is intact, Check. change PC3. Check gears for proper Check M1 for operation. YES engagement. Paper is at a Does the voltage across stop near the PJ1A-7 on PWB-A (Duplex 3 exit section. Unit) and GND change from NO Change PWB-A. DC5V to DC0V during a 2sided copy cycle? Check various parts for Does the voltage across possible overload and, if they PJ1A-5 on PWB-A (Duplex YES are okay, change M1 or PWB4 Unit) and GND change from A (Duplex Unit). DC5V to DC0V during a 2sided copy cycle? NO Change PWB-A. Is the Duplex Unit Transport Clean or change the Duplex 1 Roller or Roll deformed, worn, YES Unit Transport Roller or Roll. or dirty with paper dust? Is a torn piece of paper Remove the torn piece of 2 present on the paper path YES paper. surface? Is the Manual Feed Take-Up Clean or change the Manual 3 Roller or Roll deformed, worn, YES Feed Take-Up Roller or Roll. or dirty with paper dust? Check gears for proper Check M2 for operation. YES engagement. Does the voltage across Paper is at a PJ1A-3 on PWB-A (Duplex stop inside the 4 Unit) and GND change from Duplex Unit. NO Change PWB-A. DC5V to DC0V during a 2sided copy cycle? Is PI1 fully operational? Check the PI1 actuator for 5 Check the input data using I/O NO operation and, if it is intact, Check. change PWB-A (Duplex Unit). Check CL3 for operation. Check various parts for Does the voltage across YES possible overload and, if they CN14-2 and GND change are okay, change CL3 or M2. 6 from DC24V to DC0V when paper is taken up from the NO Change PWB-A. Duplex Unit? Check various parts for YES possible overload and, if they Paper is at a Is PC2 fully operational? are okay, change PWB-A. stop near the 1 Check the input data using I/O Synchronizing Check the PC2 actuator for Check. Rollers. NO operation and, if it is intact, change PC2. 4-18 4.11 Error Codes If an error occurs during a communication, a check message will be printed. The following provides an explanation of the information found on check messages. • A possible solution to the problem • The date and time of the attempted communication • The sending location (if the remote fax has a Location ID) • The number of pages which got through before the error terminated the call • The error code • The sample document. You will also see a code listed in the Result column of the report. Result codes indicate the specific problem encountered: • “D” codes occur while dialing • “R” codes occur during reception • “T” codes occur during transmission Here is a list of error codes the fax machine may print. Dialing errors D.0.2 The remote unit is busy. Try the call again. D.0.3, D.0.8 The remote unit didn’t respond, the call couldn’t be completed or STOP was pressed during dialing. Re-try the call. If your machine repeats the message, call the remote fax unit’s operator and verify that unit is operating properly. D.0.6, D.0.7 Either the remote unit didn’t respond, the call somehow didn’t go through or STOP was pressed during dialing. Try the call again. Reception errors R.1.1 T1 time-out. The calling unit was not a fax machine or the transmitting unit is having difficulties. R.1.2 Compatibility error. The calling unit is attempting to poll a document that does not exist. R.1.4 The STOP button was pressed during reception. R.1.5 The fax machine didn’t detect the silence period for ending channel when receiving RCR. R.2.3 No response to FTT. Poor phone line conditions made fax communication impossible. Enable the one second pause after CED on Memory Switch C:0. Also try increasing the echo wait time on Memory Switch C:1 if echo is on the line. R.3.1 No response to CFR. DCN was received from the transmitter. Poor line conditions made communication impossible. Adjust the echo wait time on Memory Switch C:1. Try increasing the output levels via Machine Parameter A:1. R.3.3 Too many errors were detected during data reception. The carrier was interrupted. Increase the data error rate on Memory Switch C:0. R.3.4 DCN was received after FTT. Communication was not possible at 2400 bps. Poor phone line conditions prevented fax communication. Enable the Eye Quality Check on Memory Switch D:1 and D:2. R.4.2 MPS/EOM/EOP was not received. Either the line disconnected before reception was completed or too many errors were detected by the receiving unit. Adjust the data error rate on Memory Switch C:0. It may also be necessary to decrease the receive communication speed via Memory Switch C:0. 4-19 R.4.4 The receiving fax machine has reached its memory capacity. R.5.1 DCN was received instead of RR during ECM communication. R.5.2 Line noise or other problems prevented ECM reception. R.8.1 A compatibility error occurred. R.8.10 Line noise or other problems prevented line probing. R.8.11 The fax machine timed out while waiting for the retrain signal. Transmission errors T.1.1 T1 time-out. The remote fax machine didn’t respond to your machine. This usually occurs during a manual transmission or when an incorrect number was dialed. Call someone at the remote machine. T.1.2 The fax machine’s page counter detected a possible document feeder error. Carefully put the document back into the feeder and try the call again. T.2.1 CFR or FTT was not received from the remote machine. Either the phone line disconnected during fax communication or transmission became impossible due to bad phone line conditions. Try the call again. It may be necessary to increase the output levels on Machine Parameter A:1. The receive machine may also have closed network or block junk fax enabled. T.2.2 The two fax machines were incompatible. No mailbox at receiver or security transmission is enabled. T.2.3 FTT was received from the remote machine at 2400 bps. Bad phone line conditions made fax communication impossible. Conditions can change rapidly, so try the call later. Turn on the echo protect tone on Memory Switch B:0. Also adjust the interval between DCS and TCF on Memory Switch B:1. If the problem persists, try increasing the output levels on Machine Parameter A:1. T.3.1 The page counter in the fax machine detected a document feeder error during transmission. Carefully re-insert the document into the feeder and re-try the call. T.3.2 The fax machine didn’t detect the silence period for ending channel. T.4.1 No response to MPS/EOP/EOM. Poor phone lines caused the receiving unit to disconnect. Adjust the interval between CFR and data on Memory Switch B:1. Try increasing the output levels on Machine Parameter A:1. It may also be necessary to adjust the transmit speed on Memory Switch B:0. T.4.2 RTN was received from the remote machine. After transmission began, poor line conditions developed. Try the call again. Attempt the solutions described for the T.4.1 error. T.4.4 Poor line conditions prevented transmission. PIP was received. The transmission was interrupted by the call mode. The receiving unit may be experiencing problems. Try the call again. T.5.1 No response to RR from the remote machine. Line noise or other problems prevented ECM transmission. Increase the ECM response time on Memory Switch B:2. T.5.2 No response to CTC. Line noise or other problems prevented ECM transmission. Increase the ECM response time on Memory Switch B:2. T.5.3 EOR was received from the remote unit but further transmission was not possible. Adjust Memory Switch B:5 for this problem. T.8.1 A compatibility error occurred. T.8.10 Line noise or other problems prevented line probing. T.8.11 The remote fax machine didn’t complete the equalizer training phase. 4-20 Communication Error Messages The error messages on Check Message printouts indicate the following: Here’s a brief summary: Error Message Check condition of remote fax. Possible Meanings • Remote machine malfunctioned • No handshake signals from remote machine • Wrong phone number reached Repeat transmission. • Poor phone line conditions prevented communication • No handshake signals from remote machine • Document missfeed or miscount • Unable to reach remote machine after attempting specified number of redial Line is busy. • Remote machine was busy • Remote machine didn’t answer Check received documents. • Receive confirmation signal not received from remote machine • Poor line conditions caused a poor image Memory full. • Remote unit’s memory capacity has been exceeded Dialing number is not set. • An autodialer number is not stored programmed properly Stopped. • The STOP key was pressed at the remote fax during the handshake (Message area is blank) • Someone pressed STOP during communication • Printer error occurred during communication 4-21 4.12 Service Call Error When certain machine problems occur these message will appear in the LCD. 4.12.1 Call For Service Symptom: “Call For Service” is in the LCD. Suggested corrective action: 1. Verify the lamp turns on when the book cover open and close. 2. If the lamp turns on, check the back ground seal surface dirt. If dirty, clean the back ground seal. The back ground seal is attached on the inner guide B. 3. Verify the mirror carriage moves normally. (See “Mirror carriage error”, page 4-2) 4. If during step 1 the lamp did not turn on, check the following connection: • Lamp assembly to the Inverter PCB (CN2) • Inverter PCB (CN1) to the Harness to the main control PCB (P13) 5. Replace the lamp and/or the Inverter PCB. 4.12.2 Please Call Service This machine CPU has a function that self-diagnoses the printer conditions. On detection of a malfunction, the corresponding error code representing a particular malfunction name, location, and details as listed on next page is displayed on the LCD together with a “Please Call Service” message. (Such as “Please Call Service: 01”) • Perform the following steps to reset the printer trouble code. Malfunction Resetting Procedure This mode clears the service call. Perform this operation after solved the trouble. 1. Press MENU, [, M. 2. Press [Enter]. The service call will be cleared and the machine will return to standby. Note: To finish the operation without performing clearing, press [Cancel]. 4-22 4.12.2.1 Detection Timing by Printer Error Code Code 01 Description Engine connection error 03 Communications error (option I/F) Communications error (G/A) 08 Main Motor M2 malfunction 09 I/C Motor M1 malfunction 0A Polygon Motor M10 malfunction 0B Fusing Cooling Fan Motor M3 malfunction 0C Power Unit Cooling Fan Motor M4 10 HSYNC detection failure 18 Warming-up failure 19 Abnormally low fusing temperature 02 Detection Timing • The system fails in checking initial engine connection when Power Switch S1 is turned ON. • The system succeeded in checking initial connection when S1 was turned ON; then it fails in rechecking initial connection through the execution of a software reset when a communications error occurs during operation. ————————————————————————— ————————————————————————— The Lock signal remains HIGH for a continuous 1-sec. period or more while M2 remains energized. The Lock signal remains HIGH for a continuous 1-sec. period or more while M1 remains energized. <Resolution selection failure detection> • The Lock signal is not detected for a given period of time after the resolution has been selected. (The Lock signal is not, however, detected for 1 sec. after the start.) <Faulty Lock signal detection> • No Lock signals are detected for the 1 sec. period which starts 1 sec. after the first Lock. ✽First Lock: The first Lock signal following 1 sec. after the selection of start or half speed. <Out-of-timing Lock detection> • The Lock signal is not detected for a continuous 0.5 sec. period while M10 is in the stabilized turning state (after a Lock has been detected). <Abnormal Lock detection> • The Lock signal remains ON for a continuous 5sec. period while M10 remains deenergized. The Lock signal remains HIGH or LOW for a continuous 1-sec. period or more while M3 remains energized. The Lock signal (analog input voltage) remains 0.4V or less for a continuous 0.5-sec. period or more while M4 remains energized. • The SOS rising edge is not detected even after the lapse of 0.2 sec. after Polygon Motor M10 has started and laser output started. • No SOS rising edges are detected while VIA remains ON. The temperature of the Fusing Rollers do not reach the required level even after the lapse of a given period of time during a warming-up cycle. • From room temperature to 100°C: Within 65 sec. • From 100°C to 140°C: Within 25 sec. • From 140°C to 170°C: Within 20 sec. • From 170°C to the completion of warming-up: Within 22 sec. • The fusing temperature remains 130°C or less for a continuous 0.1-sec. period or more during the standby state or printing. • The fusing temperature remains 80°C or less for a continuous 2-min. period or more during the lowtemperature standby state. 4-23 Code 1B Description Abnormally high fusing temperature Faulty EEPROM 1E I/C initialization failure 20 LCC Transport Motor HMOT malfunction (LCC) 21 LCC Lift-Up Motor EMOT malfunction (LCC) 23 Lift 1 ascent motion failure (LCC) 24 Lift 2 ascent motion failure (LCC) 25 Communications error (LCC) 12 Faulty ATDC Sensor E1 11 ATDC adjustment failure 0D Ozone Fan Motor M8 malfunction 0E Main Hopper Toner Replenishing Motor M6 malfunction 28 Shift Tray shift motion failure 1A Detection Timing The fusing temperature remains 230°C or more for a continuous 0.1-sec. period or more. No initial data is written in EEPROM. After failing to blow the imaging cartridge fuse 2 consecutive times, 3.6V or more is detected and the I/C is determined to be new. The HMOT Lock signal is not input for a given period of time. The overcurrent detection circuit detects an overcurrent condition that lasts for a given period of time while EMOT remains energized. Lift-Up Sensor 1 LS1 is not blocked (H) within a given period of time after EMOT has been energized (Lift 1 has started moving up). Lift-Up Sensor 2 LS2 is not blocked (H) within a given period of time after EMOT has been energized (Lift 2 has started moving up). LCC becomes uncontrollable due to an error in communications between the LCC and copier. The value of data read by E1 is faulty. [E1 reading is 7% or less (3.92V or more) or 19% or more (1.41V or less).] • In an F8 (ATDC control voltage automatic adjustment) operation, the adjustment of ATDC control voltage is not completed within 1 min. after E1 sampling. • In an F8 operation, the control voltage falls outside the range of 5.39V to 8.15V. The Lock signal remains HIGH or LOW for a continuous 1-sec. period or more while M8 remains energized. • Toner Bottle Home Position Sensor PC10 remains blocked (L) for a continuous 2-sec. period or more while M6 remains energized. • PC10 remains unblocked (H) for a continuous 6-sec. period or more while M6 remains energized. (When moving from home to shift position) The Shift Home Sensor is blocked after a given period of time after the Shift Motor has been energized (at which timing the motor is deenergized). (When moving from shift to home position) The Shift Home Sensor is not blocked even after the lapse of a given period of time after the Shift Motor has been energized. 4-24 4.12.2.2 Troubleshooting Procedures by Printer Error Code (1) 08: M2 Malfunction 09: M1 Malfunction 0B: M3 Malfunction 0D: M8 Malfunction 0C: M4 Malfunction 0E: M6 Malfunction I/C Motor M1 Main Motor M2 Fusing Cooling Fan Motor M3 Power Unit Cooling Fan Motor M4 Relevant Electrical Parts Main Hopper Toner Replenishing Motor M6 Ozone Fan Motor M8 Toner Bottle Home Position Sensor PC10 Master Board PWB-A 4-25 08 Step 1 2 3 Check Item Does M2 turn after the malfunction has been reset? Check M2 for operation. Does the voltage across PJ1-3 of M2 and GND change from DC5V to DC0V after the malfunction has been reset? Does the voltage across PJ1-4 of M2 and GND change from DC5V to DC0V after the malfunction has been reset? Result Check Item Does M1 turn after the malfunction has been reset? Check M1 for operation. Does the voltage across PJ2-3 of M1 and GND change from DC5V to DC0V after the malfunction has been reset? Does the voltage across PJ2-4 of M1 and GND change from DC5V to DC0V after the malfunction has been reset? Result Check Item Does M3 turn after the malfunction has been reset? Check M3 for operation. Does the voltage across CN6-8 on the PWB-A side and GND change from DC0V to DC24V after the mal-function has been reset? Does the “0B” display persist even after M3 has been replaced with a new one? Result NO Action Check various parts for possible overload. NO Change PWB-A. YES Change PWB-A. NO Change M2. 09 Step 1 2 3 0B Step 1 2 3 NO Action Check various parts for possible overload. NO Change PWB-A. YES Change PWB-A. NO Change M14. NO Action Check the connector and harness between M3 and PWB-A. NO Change PWB-A. YES Change PWB-A. 4-26 0D Step 1 2 3 0C Step 1 2 0E Step 1 2 3 Check Item Does M8 turn after the malfunction has been reset? Check M8 for operation. Does the voltage across CN41-3 on the PWB-A side and GND change from DC0V to DC24V after the malfunction has been reset? Does the “0D” display persist even after M8 has been replaced with a new one? Result Check Item Does M4 turn after the malfunction has been reset? Does the “0C” display persist even after M4 has been replaced with a new one? Result Check Item After the malfunction has been reset, remove the Rear Lower Cover and block Toner Bottle Cover Sensor PC11. Then, unlocking the Toner Bottle Lock Lever, turn the Toner Bottle a half turn by hand. Does the Toner Bottle turn when PC11 is unblocked (H) with the Toner Bottle Lock Lever kept unlocked? Does the voltage across PJ8-2 of M6 and GND change from DC0V to DC24V when step 1 is performed again? Is PC10 fully operational? Check the input data using I/O Check. Does the input signal value for “Toner Bottle Set” change between “0” and “1” when the Toner Bottle is turned by hand? NO Action Check various parts for possible overload. NO Change PWB-A. YES Change PWB-A. Action YES Change PWB-A. YES Change PWB-A. Result YES Perform step 3. Action NO Check various parts for possible overload. YES Change M6. NO Change PWB-A. YES Change PWB-A. NO Change PC10. 4-27 (2) 18: Warming-up Failure 19: Abnormally Low Fusing Temperature 1A: Abnormally High Fusing Temperature Fusing Roller Heater Lamp H1 Fusing Roller Thermistor TH1 Fusing Roller Thermostat TS1 Relevant Electrical Parts Fusing Roller Heater Lamp Fuse TF1 Side Cover Interlock Switch 2 S3 Power Supply Unit 1 PU1 Master Board PWB-A 4-28 18, 19 Step 1 2 3 4 5 1A Step 1 2 3 Check Item Does H1 turn ON after the malfunction is reset? Is there continuity across CN3-1 and 2 on the Fusing Unit end with CN3 (2P) disconnected? Is there continuity across 1A and 1B, and across 2A and 2B, of S3 when S3 is turned ON? Is the resistance of TH1 (across CN52 and 3 on the Fusing Unit end) infinity? Is Fuse F2 on PU1 conducting? Check Item Is TH1 installed properly? Is TH1 dirty? Is the circuit across CN5-2 and 3 on the Fusing Unit end closed when CN5 (4P) is disconnected? Result YES Action Check TH1 for contamination or installation. NO Check H1, TS1, and TF1 for continuity. NO Change S3. YES Change TH1. YES NO Change PU1 or PWB-A. Change the fuse. Result NO YES YES NO 4-29 Action Install TH1 correctly. Clean or change TH1. Change TH1. Change PWB-A or PU1. (3) 20: 21: 23: 24: 25: HMOT Malfunction EMOT Malfunction Lift 1 Ascent Motion Failure Lift 2 Ascent Motion Failure Communications Error LCC Lift-Up Motor EMOT Lift-Up Sensor 1 LS1 Lift-Up Sensor 2 LS2 LCC Transport Motor HMOT Relevant Electrical Parts Large capacity cassette (LCC) Main Board PWB-A Paper Feed Unit Main Board PWB-A Cassette Main Board PWB-A Master Board PWB-A (Paper Feed Unit) (LCC) 4-30 20 Step 1 Check Item Does “20” reappear even after HMOT has been replaced with a new one? Result YES Action Change PWB-A (LCC), PWB-A (Paper Feed Unit), PWB-A (Cassette Main Board), or PWB-A, in that order. 21 Step 1 Check Item Does “21” reappear even after EMOT has been replaced with a new one? Result YES Action Change PWB-A (LCC), PWB-A (Paper Feed Unit), PWB-A (Cassette Main Board), or PWB-A, in that order. 23 Step 1 Check Item Is LS1 fully operational? Check the input data using I/O Check 2 Does the voltage across CN4A-6 on PWB-A (LCC) and GND change to DC5V when LS1 is blocked and to DC0V when LS1 is unblocked? 3 Does EMOT turn when a drawer loaded with paper is slid into the copier? 4 Does the voltage across CN5A-1 on PWB-A (LCC) and GND change from DC0V to DC24V when step 3 is performed again? Result YES YES NO YES YES NO Action Perform step 3 and onward. Change PWB-A (LCC), PWB-A (Paper Feed Unit), or PWB-A (Cassette Main Board), in that order. Change LS1. Check gears and couplings for proper engagement and, if they are okay, change PWB-A. Check various parts for possible overload and, if they are okay, change EMOT. Change PWB-A (LCC), PWB-A (Paper Feed Unit), PWB-A (Cassette Main Board), or PWB-A, in that order. 24 Step 1 2 3 4 Check Item Is LS2 fully operational? Check the input data using I/O Check. Does the voltage across CN4A-9 on PWB-A (LCC) and GND change to DC5V when LS2 is blocked and to DC0V when LS2 is unblocked? Does EMOT turn when a drawer loaded with paper is slid into the copier? Result Does the voltage across CN5A-1 on PWB-A (LCC) and GND change from DC0V to DC24V when step 3 is performed again? YES Check Item Does “25” reappear even after PWB-A (LCC) has been replaced with a new one? Result YES YES NO YES NO Action Perform step 3 and onward. Change PWB-A (LCC), PWB-A (Paper Feed Unit), or PWB-A (Cassette Main Board), in that order. Change LS2. Check gears and couplings for proper engagement and, if they are okay, change PWB-A. Check various parts for possible overload and, if they are okay, change EMOT. Change PWB-A (LCC), PWB-A (Paper Feed Unit), PWB-A (Cassette Main Board), or PWB-A, in that order. 25 Step 1 YES 4-31 Action Change PWB-A (Paper Feed Unit), PWB-A (Cassette Main Board), or PWB-A, in that order. (4) 12: Faulty E1 11: ATDC Adjustment Failure ATDC Sensor E1 11, 12 Step 1 2 3 4 Relevant Electrical Parts Master Board PWB-A Check Item Are PJ40, CN50, CN17, and PWB-A PJ15A connected properly? Is the CN50 connection dirty? Is “11” or “12” displayed even when an I/C with the same T/C as that of a new one has been installed? Is “11” or “12” displayed even when an I/C with the same T/C as that of a new one has been installed and an F8 operation run? (Be sure to record the ATDC control voltage setting value if an F8 operation is to be run.) Result Action NO Connect them properly. YES Clean. NO Change the I/C with a new one. YES Change PWB-A, install the old I/C, and return the ATDC control voltage setting to the value recorded. If “C0F32” or “C0F33” redisplayed, change the I/C with a new one. NO Change the I/C with a new one. 4-32 (5) 01, 02, 03, 10, 0A, 1B, 1E • These malfunctions are concerned with faulty symptoms as they relate to software, hardware, and communications. For remedial actions, change the board, check for cable connections, and turn the Power Switch OFF and ON. Code 01 02 03 10 0A 1B 1E Action 1. Check the connection between PWB-A and UN2, reset the malfunction, and turn OFF and ON the Power Switch. 2. If the same malfunction persists, change PWB-A or UN2. 1. Reset the malfunction and turn OFF and ON the Power Switch. 2. If the same malfunction persists, check the connection between the copier PWB-A and Finisher PWB-A. 3. If the connection is made properly, unplug the connector between the copier and Finisher and turn OFF and ON the Power Switch. → If the malfunction code display persists, change the copier PWB-A. → If the malfunction is no longer detected, check the connector and, if it is intact, change the Finisher PWB-A. 1. Reset the malfunction and turn OFF and ON the Power Switch. 2. If the same malfunction persists, check the connection between the copier PWB-A and A to E below: A. 2nd Drawer paper source unit B. 3rd Drawer paper source unit (Paper feed unit/LCC) C.4th Drawer paper source unit (Paper feed unit/LCC) D.5th Drawer paper source unit (Paper feed unit) E. 2-Bin Tray or shift Tray 3. If the connection is made properly, unplug the connector between the copier and A to E and turn OFF and ON the Power Switch. → If the malfunction code display persists, change the copier PWB-A. → If the malfunction is no longer detected, connect the connectors sequentially and turn OFF and ON the Power Switch. When “C133A” is detected, check the connector of the corresponding paper source unit and, if it is intact, change the PWB-A of the unit. 1. Reset the malfunction and turn OFF and ON the Power Switch. 2. If the same malfunction persists, check the harnesses and PJs between PH Unit and PWB-A and, if they are intact, change PH Unit or PWB-A, in that order. 1. Reset the malfunction and turn OFF and ON the Power Switch. 2. If the same malfunction persists, check the harnesses and PJs between PH Unit and PWB-A and, if they are intact, change PH Unit or PWB-A, in that order. 1. Reset the malfunction, turn OFF and ON the Power Switch, and unplug the power cord and plug it back in. 2. If the malfunction is detected again, check the connection between IC3 on PWB-A and the EEPROM and, if it is good, change PWB-A. 3. If the malfunction is still detected, change the EEPROM. ✽ For the precautions to be observed when replacing the EEPROM, see DIS/REASSEMBLY, ADJUSTMENT. 1. Reset the malfunction, turn OFF and ON the Power Switch, and reinstall the I/C. 2. If the malfunction is detected again, check the terminal block for the I/C fuse and HV1 and, if it is intact, change HV1 or PWB-A. 4-33 (6) 28 Shift Tray shift motion failure Step 1 2 3 4 5 Check Item Does the Shift Tray move in the initial operation? Does the Shift Tray slide smoothly when the gear is turned manually with the Shift Motor removed? Is an output signal being sent from the Main Board to Shift Motor? Are the Shift Home Sensor and its light blocking plate dirty? Is the Shift Home Sensor output signal properly applied to the Main Board? Result YES Action Check step 4. NO Check for contamination and improper installation. YES Check the wiring between the Main Board and Shift Motor and, if it is intact, change the motor. Change the Main Board. Remove foreign matter or clean. NO YES YES NO 4-34 Change the Main Board. Check the wiring between the Main Board and Shift Home Sensor and, if it is intact, change the sensor. 4.13 Image Failure 4.13.1 Image Failure Troubleshooting Image failures have many possible causes. For troubleshooting, it is necessary to deter-mine whether a failure is attributable to: 1. A basic cause or any other cause 2. The input system (Scanner) or output system (Printer engine). In this chapter, troubleshooting is divided into “initial checks” and “troubleshooting procedures classified by image failures.” If an image failure has occurred, first make the initial checks, then proceed to the corresponding image failure troubleshooting procedure. 4.13.2 Initial Checks 1. Place of installation • Is the source voltage normal? Does the voltage vary greatly? • Is the copier installed in a hot, humid place where temperature varies sharply? • Is the copier installed in a dusty place? • Is the copier subjected to direct sunlight? • Is the copier level? 2. Copy paper • Is the recommended paper used? • Is the paper damp? • Does the paper size set in the paper source match the size of the paper loaded in it? 3. Original • Is the original written in light pencil? → Use the test chart to check the image. • Is the original transparent, or are transparencies being used? → Place a blank sheet of paper over the original and make a copy. • Is the Original Glass dirty or scratched? → Clean a dirty glass, or replace a scratched one. 4. Supplies • Have the supplies, such as the PC Drum, Cleaning Blade, and other parts that affect image quality, reached the end of their cleaning or replacement cycle? • Are two or more imaging cartridges being used alternately? 5. Adjustment items • Among the adjustment items given in Machine parameter (see Section 3), is there any adjustment that may remedy the image failure? 4-35 6. Input system (scanner) or output system (printer engine)? • To print the test pattern, press MENU, [, 9. • If the test pattern output has the same problem as the copy image: → Check the output system. • If the test pattern output is normal: → Check the input system. • Make a copy at a different zoom ratio. Original Full size Reduction Check the input system. Original Full size Reduction Check the output system. 4-36 4.13.3 Troubleshooting Procedures by Image Failure <Image Failure Samples> 1. Blank copy 2. Black copy 3. Low image density 4. Foggy background 5. Black streaks or bands 6. Black spots 7. Blank streaks or bands 8. Void areas 9. Smear on back 10. Uneven image density 11. Gradation reproduction failure 13. Periodically uneven image 4-37 12. Rough image (1) Blank Copy Section Step 1 2 Printer engine 3 4 5 Result Is toner empty? YES Is the drive transmission mechanism to the Developing Unit in good condition? Is the image transfer current terminal intact? Does the laser shutter (the one located on the laser beam path between the PH Unit and PC Drum) open and close properly? Does the I/C Shutter open and close properly? 1 Is the Scanner drive transmission mechanism in good condition? 2 Do the connections from CCD Þ PCB AFE Þ PCB Scanner Þ PCB Main Þ PCB Connect Þ PWB-A remain intact? Scanner (2) Black Copy Section Step 1 2 Printer engine Check Item 3 4 1 2 Scanner 3 4 5 Check Item Is the PC Drum charge voltage terminal in good condition? Is the grid voltage terminal in good condition? Is the developing bias terminal in good condition? Does a black copy persist even after the I/C has been replaced with a new one? Does the Exposure Lamp turn ON when make a copy with open the platen cover? Does the voltage across P14 on pin 2 and pin 3 change from DC0V to DC24V when step 1 is performed again? Does the voltage across P14 on pin 1 and pin 3 change to DC0V when step 1 is performed again? Are the mirrors and lens installed properly? Are the mirrors and lens dirty? 4-38 Action Check Sub Hopper Toner Empty Switch S4 and change the Toner Bottle. NO Check and change as necessary. NO Check and change as necessary. NO Adjust so that the shutter opens and closes properly. YES NO NO YES NO Result NO NO NO Change HV1, PH Unit, or PWBA, in that order. Adjust so that the shutter opens and closes properly. Check and change as necessary. Change PCB AFE, PCB Scanner, PCB Main, PCB Connect or PWB-A, in that order. Reconnect. Action Check and change as necessary. Check and change as necessary. Check and change as necessary. YES Change HV1 or PWB-A. YES Perform steps 4 and onward. Check connectors and harnesses and perform steps 2 and 3. NO NO Change PCB Scanner. NO Change Inverter or exposure lamp, in that order. Change PCB Main. NO Install them properly. YES Clean or change. YES (3) Low Image Density Section Step Check Item Does the image get better when a 1 copy is made with new paper loaded? 2 Printer engine 3 4 5 6 1 Scanner 2 Is toner empty? Result YES YES Is the image transfer current terminal intact? Is the developing bias terminal intact? Does the image density remain low even after the I/C has been replaced with a new one? Does the image density become higher when adjust the “Image Density” by Unique Switch F:3? Is the Scanner drive transmission mechanism in good condition? Do the connections from CCD Þ PCB AFE Þ PCB Scanner Þ PCB Main Þ PCB Connect Þ PWB-A remain intact? (4) Foggy Background Section Step Check Item Is sunlight or any other —— 1 extraneous light entering the copier? Is the PC Drum dirty with foreign 1 matter? Is the PC Drum charge voltage 2 terminal in good condition? Is the grid voltage terminal in 3 good condition? Is the developing bias terminal in 4 good condition? Printer Is the Charge Neutralizing Sheet engine 5 voltage terminal in good condition? 6 Is Eraser Lamp dirty? Does foggy background persist 7 even after the I/C has been replaced with a new one? Does foggy background persist 8 when adjust the “Image Density” by Unique Switch F:3? 1 Are the mirrors and lens dirty? Is the Exposure Lamp dirty or 2 deteriorated? Do the connections between the Scanner 3 Exposure Lamp and INVERTER remain intact? Do the connections from 4 INVERTER to PCB Scanner remain intact? 4-39 NO NO Action Change the paper. Instruct the user on the storage of paper. Check Sub Hopper Toner Empty Switch S4 and change the Toner Bottle. Check and change as necessary. Check and change as necessary. NO This completes the procedure. YES This completes the procedure. NO YES NO Check and change as necessary. Change PCB AFE, PCB Scanner, PCB Main, PCB Connect or PWB-A, in that order. Reconnect. Result Action YES Protect the copier from extraneous light. YES Clean the PC Drum. NO NO NO Check and change as necessary. Check and change as necessary. Check and change as necessary. NO Check and change as necessary. YES Clean. NO This completes the procedure. NO This completes the procedure. YES Clean or change. YES Clean or change. NO Reconnect. NO Reconnect. Section Step 5 6 Scanner 7 Check Item Do the connections from PCB Scanner to PCB Main remain intact? Do the connections from PCB Main to PCB Connect remain intact? Do the connections from PCB Connect to PWB-A Connect remain intact? Result NO Reconnect. NO Reconnect. YES NO (5) Black Streaks or Bands Section Step Check Item 1 Is the PC Drum dirty? Has toner spilled from the I/C 2 inside of the copier? Is the PC Drum charge voltage 3 terminal in good condition? Printer engine Is the grid voltage terminal in 4 good condition? 5 Are the Fusing Rollers dirty with foreign matter? 1 Are the mirrors, lens, Contact glass or FBS glass dirty with foreign matter? 2 Do the connections from CCD Þ PCB AFE Þ PCB Scanner Þ PCB Main Þ PCB Connect Þ PWB-A remain intact? Scanner (6) Black Spots Section Step 1 Printer engine Result YES NO YES Clean. YES NO NO YES YES NO Result YES 5 Are the Fusing Rollers dirty with foreign matter? YES 1 Are the mirrors, lens, Contact glass or FBS glass dirty with foreign matter? 2 Do the connections from CCD Þ PCB AFE Þ PCB Scanner Þ PCB Main Þ PCB Connect Þ PWB-A remain intact? 3 4 Scanner 4-40 Change INVERTER, PCB Scanner, PCB Main, PCB Connect or PWB-A, in that order. Reconnect. Action Clean the PC Drum. Clean the interior and change I/C. Check and change as necessary. Check and change as necessary. Clean or change the Fusing Rollers. Change I/C. Check Item Is the PC Drum dirty? Has toner spilled from the I/C inside of the machine? Is the PC Drum charge voltage terminal in good condition? Is the grid voltage terminal in good condition? 2 Action Change PCB AFE, PCB Scanner, PCB Main, PCB Connect or PWB-A, in that order. Reconnect. NO Action Clean the PC Drum. Clean the interior and change I/C. Check and change as necessary. Check and change as necessary. Clean or change the Fusing Rollers. Change I/C. YES Clean. YES NO NO YES NO Change PCB AFE, PCB Scanner, PCB Main, PCB Connect or PWB-A, in that order. Reconnect. (7) Blank Streaks or Bands Section Step Check Item Is the PC Drum dirty with foreign 1 matter? Is the image transfer current 2 terminal intact? Is the Image Transfer Roller 3 dented or scratched? Printer Are the Fusing Rollers scratched engine 4 or dirty? 5 6 1 Scanner 2 (8) Void Areas Section Step 1 2 Printer engine 3 4 5 1 Scanner 2 Result YES YES YES YES Action Clean the PC Drum. Check and change as necessary. Change the Image Transfer Roller. Clean or change the Fusing Rollers. Is the PH Unit window glass dirty? YES Clean the window glass. Is the light path between PH and PC dirty with dust? Is the Shading Sheet under the Size cover dirty? YES NO Remove dust. Change the I/C. YES Clean or change. Do the connections from CCD Þ PCB AFE Þ PCB Scanner Þ PCB Main Þ PCB Connect Þ PWB-A remain intact? Check Item Does the image get better when a copy is made with new paper loaded? Is the Image Transfer Roller installed correctly? Is the Image Transfer Roller dented or scratched? Is the image transfer current terminal intact? Are the Fusing Rollers scratched or deformed? Is the Contact glass or FBS glass dirty? Do the connections from CCD Þ PCB AFE Þ PCB Scanner Þ PCB Main Þ PCB Connect Þ PWB-A remain intact? 4-41 YES NO Result Change PCB AFE, PCB Scanner, PCB Main, PCB Connect or PWB-A, in that order. Reconnect. Action YES Change the paper. Instruct the user on the storage of paper. NO Install correctly. YES NO Change the Image Transfer Roller. Check and change as necessary. Change the Fusing Rollers. Change the I/C. YES Clean or change. YES NO YES NO Change PCB AFE, PCB Scanner, PCB Main, PCB Connect or PWB-A, in that order. Reconnect. (9) Smear on Back Section Step 1 Printer engine 2 3 Check Item Is the Image Transfer Roller dirty? Has toner spilled from the I/C inside of the copier? Are the Fusing Rollers dirty? (10) Uneven Image Density Section Step Check Item Is the Image Transfer Roller dirty 1 or deteriorated? Printer Does the image get better when a engine 2 copy is made with new paper loaded? Are the mirrors, lens, Contact 1 glass or FBS glass dirty with foreign matter? Is the Shading Sheet under the 2 Size cover dirty? Is the Exposure Lamp dirty or Scanner 3 deteriorated? 4 Do the connections from CCD Þ PCB AFE Þ PCB Scanner Þ PCB Main Þ PCB Connect Þ PWB-A remain intact? (11) Gradation Reproduction Failure Section Step Check Item Does the image get better when a Printer 1 copy is made with new paper engine loaded? Is the Shading Sheet under the 1 Size cover dirty? Is the Contact glass or FBS glass 2 dirty? Scanner Do the connections from CCD Þ PCB AFE Þ PCB Scanner Þ 3 PCB Main Þ PCB Connect Þ PWB-A remain intact? 4-42 Result YES YES YES Result Action Clean or change. Clean the interior and change I/C. Clean or change the Fusing Rollers. NO Action Clean or change the Image Transfer Roller. Change the paper. Instruct the user on the storage of paper. Change the I/C or PWB-A. YES Clean or change. YES Clean or change. YES Clean or change. YES YES YES NO Result Change PCB AFE, PCB Scanner, PCB Main, PCB Connect or PWB-A, in that order. Reconnect. NO Action Change the paper. Instruct the user on the storage of paper. Change PWB-A. YES Clean or change. YES Clean or change. YES YES NO Change PCB AFE, PCB Scanner, PCB Main, PCB Connect or PWB-A, in that order. Reconnect. (12) Rough Image Section Step 1 Printer engine 2 Check Item Is the Image Transfer Roller dirty? Is the image transfer current terminal intact? 1 Is the Scanner drive transmission mechanism in good condition? 2 Do the connections from CCD Þ PCB AFE Þ PCB Scanner Þ PCB Main Þ PCB Connect Þ PWB-A remain intact? Scanner (13) Periodically Uneven Image Section Step Check Item Is the Developing Unit drive gear 1 cracked or dirty with foreign matter? Is the PC Drum drive gear 2 cracked or dirty with foreign matter? Is the Synchronizing Roller drive Printer 3 gear cracked or dirty with foreign engine matter? Is the Fusing Unit drive gear 4 cracked or dirty with foreign matter? 5 1 2 3 4 Scanner 5 6 7 Is the PH Assy secured properly? Is the FBS Motor drive gear cracked or dirty with foreign matter? Is the Scanner Motor secured properly? Are the FBS belts attached loose? Is the Mirror carriage A secured properly? Are the Mirror carriage drive belts wound properly? Are the Scanner rails damaged or dirty with foreign matter? Do the connections from CCD Þ PCB AFE Þ PCB Scanner Þ PCB Main Þ PCB Connect Þ PWB-A remain intact? 4-43 Result YES YES NO NO YES NO Result Action Clean or change. Change HV1, I/C, PH Unit, or PWB-A, in that order. Check and change as necessary. Check and change as necessary. Change PCB AFE, PCB Scanner, PCB Main, PCB Connect or PWB-A, in that order. Reconnect. Action YES Clean or change. YES Clean or change. YES Clean or change. YES Clean or change. YES NO Change the I/C or PWB-A. Secure properly. YES Clean or change. NO Secure properly. YES Adjust the belt tension. NO Secure properly. NO Wind the belts properly. YES Clean or change. YES NO Change PCB AFE, PCB Scanner, PCB Main, PCB Connect or PWB-A, in that order. Reconnect. Section5 Maintenance & Adjustment 5.1 Maintenance schedule......................................................................................................................5-2 5.1.1 Paper Take-Up/Transport Section ............................................................................................5-4 5.1.2 Scanner Section........................................................................................................................5-6 5.1.3 Image Transfer Section...........................................................................................................5-11 5.1.4 Developing Section .................................................................................................................5-13 5.1.5 Fusing Section ........................................................................................................................5-14 5.2 Re/Disassemble .............................................................................................................................5-18 5.3 Adjustment......................................................................................................................................5-81 5.3.1 Printer registration (top) ..........................................................................................................5-81 5.3.2 Printer registration (side).........................................................................................................5-82 5.3.3 FBS registration (top) ..............................................................................................................5-83 5.3.4 FBS registration (side) ............................................................................................................5-84 5.3.5 ADF registration (top)..............................................................................................................5-85 5.3.6 ADF registration (side) ............................................................................................................5-86 5.3.7 FBS zoom adjustment (Vertical) .............................................................................................5-87 5.3.8 FBS zoom adjustment (Horizontal) .........................................................................................5-88 5.3.9 ADF zoom adjustment (Vertical) .............................................................................................5-89 5.3.10 ADF zoom adjustment (Horizontal) .......................................................................................5-90 5.3.11 Adjust the image deformation caused by Mirror carriage A and B at the incorrect position .5-91 5.3.12 Adjustment of the position of Mirror carriage A and B...........................................................5-93 5.3.13 Adjustment of height of ADF .................................................................................................5-94 5.3.14 Adjustment of the skew on the ADF......................................................................................5-95 5.3.15 Adjustment of the platen cover position ................................................................................5-96 5.3.17 Adjustment of Retard roller pressure ....................................................................................5-97 5-1 5.1 Maintenance schedule Paper Take- Up/ Transport Section Parts Name Paper Take- Up Roll Paper Dust Remover Side Cover Maintenance Cycle (pages) Clean Replace — 120,000 60,000 120,000 60,000 — QTY 1 1 — Reference Page Page 5-4 Page 5-4 Page 5-5 Scanner Section Maintenance Cycle (pages) Reference QTY Page Clean Replace Separator Roller 1,000 100,000 Page 5-6 Retard roller 1,000 100,000 Page 5-7 Other rollers 1,000 — Page 5-8 Contact glass & FBS glass 1,000 — Page 5-9 White plate 1,000 — Page 5-9 Stamp ✽ — 3,000 1 Page 5-10 1,000 hours Exposure Lamp ✽ — (continuos 1 Page 5-52 lighting) ✽: It is not maintenance parts. However, please replace when it becomes not work. Parts Name Image Transfer Section Parts Name Image Transfer Roller Comb Electrode Pre-Image Transfer Guide Plate Developing Section Parts Name Maintenance Cycle (pages) Clean Replace — 150,000 60,000 — 60,000 — Maintenance Cycle (pages) Clean Replace QTY 1 1 1 Reference Page Page 5-11 Page 5-11 Page 5-12 QTY Reference Page Imaging Cartridge (Drum Cartridge) — 67,000 1 Page 5-13 Toner bottle — 11,000 1 See Operating Instructions Toner Hopper Unit Parts Name Ozone Filter Fusing Section Parts Name Fusing Unit Maintenance Cycle (pages) Clean Replace — 100,000 Maintenance Cycle (pages) Clean Replace — 300,000 5-2 QTY 1 QTY 1 Reference Page Page 5-12 Reference Page Page 5-14 <Options> Paper Feed Unit (2nd , 3rd, 4th, 5th cassette) Maintenance Cycle (pages) Reference QTY Page Clean Replace 120,000 2 Page 6-19 Paper Take-Up Roll Vertical Transport Roller — 1 Page 6-19 Vertical Transport Roll — 2 Page 6-19 Note: Replace the expansion cassette when the number of sheets of paper that have through it reaches 120,000. Parts Name Large Capacity Cassette (LCC) Maintenance Cycle (pages) Clean Replace Paper Take- Up Roll 1 300,000 Paper Take- Up Roll 2 300,000 Roll with torque limiter — Feed Roll ✽ 200,000 Separator Roll ✽ 200,000 Torque Limiter Assy.✽ 200,000 Vertical Transport Roller — Vertical Transport Roll — Note: Replace the parts marked with ✽ at the same time. Parts Name Duplex Unit Parts Name Duplex Unit Transport Roller 1 and 2 Duplex Unit Transport Roll 1 and 2 Exhaust Vent area 2-Bin/Shift Tray Unit Parts Name Exit Roller Maintenance Cycle (pages) Clean Replace 60,000 1 2 1 1 1 1 1 2 Reference Page Page 6-46 Page 6-46 Page 6-49 Page 6-48 Page 6-48 Page 6-48 Page 6-49 Page 6-49 QTY Reference Page — 2 Page 6-83 — 4 Page 6-83 — 1 Page 6-84 Maintenance Cycle (pages) Clean Replace 300,000 — QTY QTY 1 Reference Page Page 6-69 Note: “ ” means to clean the mechanism when a paper take-up or transport failure occurs. 5-3 5.1.1 Paper Take-Up/Transport Section (1) Replacement of the Paper Take-Up Roll 1. Slide out the MP Cassette. 2. Lock the Paper Lifting Plate. 3. Snap off one C-clip of the Paper Take-Up Roll Assy. 4. Slide the Paper Take-Up Roll Assy to the rear so that it can be pulled off the bushing at the front. 5. Snap off one C-clip and remove and replace the Paper Take-Up Roll. (2) Replacement of the Paper Dust Remover 1. Open the Side Cover. 2. Remove the Paper Dust Remover and replace it. 5-4 (3) Cleaning of the Paper Dust Remover 1. Open the Side Cover. 2. Remove the Paper Dust Remover. 3. Using a brush, whisk dust and dirt off the Paper Dust Remover. (4) Cleaning of the Side Cover Using a soft cloth dampened with alcohol, wipe the Side Cover. 5-5 5.1.2 Scanner Section (1) Removal of the separator roller 1. Remove the Tx cover. 2. Remove five KL-clips. 3. Remove the separator gear. 4. Remove the separator roller assembly. KL-clip Separator Gear 5-6 (2) Removal of the retard roller 1. Remove two screws and Inner guide C. 2. Remove Guide supporter A. Inner guide C Guide supporter A 3. Remove six screws and open the Inner guide A assembly. Inner guide A 4. Remove the Retard roller assembly. Retard roller assembly 5-7 (3) Cleaning of the Tx rollers 1. Open the Tx cover. 2. Using a soft cloth dampened with alcohol, wipe the face of the Tx rollers. Rotate the rollers by hand to allow cleaning of the entire roller surface. 3. Open the inner cover. Note: You must hold the cover open. It won’t stay open by itself. 4. Using a soft cloth dampened with alcohol, wipe the face of the Tx rollers. Rotate the rollers by hand to allow cleaning of the entire roller surface. 5-8 (4) Cleaning of the contact glass & FBS glass. Using a soft cloth dampened with alcohol, wipe the face of the contact glass, white plate, FBS glass and FBS pad. White plate Contact glass FBS pad FBS glass 5-9 (5) Removing the Stamp assembly 1. Open the Tx cover and Inner cover. Note: You must hold the Inner cover open. It won’t stay open by itself. 2. Remove one screw and stamp cover. 3. Remove one screw and connector, and then remove the stamp assembly. Stamp cover Stamp assembly (6) Changing the Stamp 1. Open the Tx cover and Inner cover. Note: You must hold the Inner cover open. It won’t stay open by itself. 2. Stick the stamp with a pin, then pull out the stamp as shown below. 3. Stick the new stamp with a pin and insert the stamp into its hole. Then remove the pin as shown. 1 2 5-10 5.1.3 Image Transfer Section (1) Removal of the Image Transfer Roller 1. Open the Side Cover. 2. Raise the Image Transfer Guide Plate. 3. Remove the Image Transfer Roller and replace it. Note: Do not touch the surface of the Image Transfer Roller directly with bare hands. (2) Cleaning of the Comb Electrode 1. Open the Side Cover. 5-11 2. Using a soft cloth dampened with alcohol, wipe the Comb Electrode. Notes: • Make sure the alcohol does not touch the surface of the Image Transfer Roller. • When wiping the Comb Electrode, make sure the cloth is not caught by the ends of the combs. (3) Cleaning of the Pre-Image Transfer Guide Plate 1. Open the Side Cover. 2. Using a soft cloth dampened with alcohol, wipe the Pre-Image Transfer Guide Plate. NOTE Make sure the alcohol does not touch the surface of the Image Transfer Roller. (4) Replacement of the Ozone Filter 1. Remove the Rear Lower Cover. 2. Pull out the Ozone Filter and replace it. 5-12 5.1.4 Developing Section (1) Removal of the Imaging Cartridge (Drum Cartridge) 1. Open the Side Cover. 2. Holding onto the green handles, slide the Imaging Cartridge part of the way out. 3. Then grasp the handle on top of the cartridge and pull the cartridge out. Note: When installing the Imaging Cartridge, push it all the way into the machine. If the cartridge is not properly installed, the PC Drum protective shutter of the cartridge may not be opened or may even be damaged. 5-13 5.1.5 Fusing Section (1) Removal of the Fusing Unit 1. Open the Side Cover. 2. Remove the Front Cover. 3. Unplug one connector at the front. 4. Open the Exit Cover and unplug two connectors in the rear. 5. Close the Exit Cover and remove two screws and the Fusing Unit. (2) Removal of the Fusing Roller Heater Lamp, Fusing Right Roller, Fusing Left Roller, Fusing Roller Thermistor, Fusing Roller Thermostat, and Fusing Roller Heater Lamp Fuse 1. Open the Exit Cover. 2. Remove one screw and the Fusing Front Cover. 5-14 3. Snap off one E-ring and remove the Exit Cover. 4. Unhook one spring to free the Idle Lever. 5. Remove two harnesses. 6. Remove two screws and the Rear Cover. 7. Remove two screws and the rear Lamp Holder. 8. Remove one screw and the front Lamp Holder. 9. Remove the Fusing Roller Heater Lamp. 5-15 10.Remove two screws and the Fusing Rear Guide Assy. 11.Remove two pressure springs. 12.Snap off one E-ring and remove the front Misfeed Clearing Lever Assy and bearing. 13.Remove the Fusing Right Roller. 14.Snap off two retaining rings. 15.Remove one gear and two bushings. 16.Remove the Fusing Left Roller. Note: When the Fusing Left Roller is removed, it can cause the spring to come off the Separator Finger. After the Fusing Left Roller has later been reinstalled, be sure to hook the spring onto the Separator Finger. 5-16 17.Remove one screw and the Fusing Roller Ther-mistor. 18.Remove two screws and the Fusing Roller Heater Lamp Fuse. 19.Remove two screws and the Fusing Roller Ther-mostat. 5-17 5.2 Re/Disassemble Before disassembling, disconnect the power cord and line cord. 5.2.1 Tx cover ..................................................................................................................................5-20 5.2.2 PCB DS1.................................................................................................................................5-20 5.2.3 PCB DSS ................................................................................................................................5-21 5.2.4 Release lever ..........................................................................................................................5-21 5.2.5 Interlock switch .......................................................................................................................5-22 5.2.6 PCB DS2.................................................................................................................................5-22 5.2.7 Press roller ..............................................................................................................................5-23 5.2.8 Exit roller .................................................................................................................................5-23 5.2.9 Platen top cover ......................................................................................................................5-25 5.2.10 Tx side cover.........................................................................................................................5-26 5.2.11 PCB Connect ADF ................................................................................................................5-26 5.2.12 BIS sensor.............................................................................................................................5-27 5.2.13 ADF motor.............................................................................................................................5-28 5.2.14 Gear of the ADF section .......................................................................................................5-29 5.2.15 Inner guide A assembly.........................................................................................................5-30 5.2.16 Feed roller assembly.............................................................................................................5-31 5.2.17 Platen cover assembly ..........................................................................................................5-32 5.2.18 Document mount assembly ..................................................................................................5-34 5.2.19 Feed roller assembly.............................................................................................................5-35 5.2.20 Press roller C ........................................................................................................................5-39 5.2.21 Lock lever assembly .............................................................................................................5-40 5.2.22 DADFA3, DADFLEG Sensor ................................................................................................5-42 5.2.23 Right cover, Left cover ..........................................................................................................5-42 5.2.24 Panel assembly.....................................................................................................................5-43 5.2.25 One-touch panel....................................................................................................................5-43 5.2.26 PCB Panel.............................................................................................................................5-44 5.2.27 PCB Panel.............................................................................................................................5-44 5.2.28 Speaker.................................................................................................................................5-45 5.2.29 PCB LCDBL ..........................................................................................................................5-45 5.2.30 Mirror carriage Home sensor / A4 sensor / B4 sensor / Mirror carriage End sensor ............5-46 5.2.31 APS sensor ...........................................................................................................................5-46 5.2.32 Panel lower cover..................................................................................................................5-47 5.2.33 FBS glass..............................................................................................................................5-47 5.2.34 FBS Pad................................................................................................................................5-48 5.2.35 Contact glass ........................................................................................................................5-48 5.2.36 Multi beam sensor.................................................................................................................5-49 5.2.37 Inverter ..................................................................................................................................5-50 5.2.38 PCB AFE...............................................................................................................................5-51 5.2.39 Exposure lamp ......................................................................................................................5-52 5.2.40 Mirror carriage A assembly ...................................................................................................5-53 5.2.41 Mirror A .................................................................................................................................5-54 5.2.42 Mirror carriage B assembly ...................................................................................................5-55 5.2.43 Mirror B and C.......................................................................................................................5-56 5.2.44 Reassemble the Mirror carriage A and B..............................................................................5-57 5.2.45 FBS motor .............................................................................................................................5-58 5.2.46 PCB Scanner ........................................................................................................................5-60 5.2.47 Rear cover (upper)................................................................................................................5-61 5.2.48 Rear cover (lower) ................................................................................................................5-62 5.2.49 Shield plate ...........................................................................................................................5-63 5.2.50 PCB NCU ..............................................................................................................................5-65 5.2.51 PCB Main ..............................................................................................................................5-64 5.2.52 Front cover ............................................................................................................................5-66 5.2.53 LED cover .............................................................................................................................5-67 5.2.54 Upper cover ..........................................................................................................................5-67 5.2.55 Shield box .............................................................................................................................5-68 5-18 5.2.56 Left cover ..............................................................................................................................5-69 5.2.57 PU1 .......................................................................................................................................5-69 5.2.58 PCB Modular.........................................................................................................................5-70 5.2.59 Main switch ...........................................................................................................................5-70 5.2.60 Master board (PWB-A)..........................................................................................................5-71 5.2.61 Double feed detecting board (PWB-H)..................................................................................5-73 5.2.62 Paper size detecting board (PWB-I) .....................................................................................5-73 5.2.63 PPM switching board (PWB-L)..............................................................................................5-74 5.2.64 Fuser frame register board (PWB-R) ....................................................................................5-74 5.2.65 Pre-transfer guide plate register board 1 (PWB-R)...............................................................5-75 5.2.66 Power supply board (PU1) ....................................................................................................5-76 5.2.67 High voltage unit (HV1) .........................................................................................................5-78 5.2.68 PH unit ..................................................................................................................................5-79 5-19 5.2.1 Tx cover 1. Open the ADF cover. 2. Remove the three Tx cover mounting screws and Tx cover. Tx cover 5.2.2 PCB DS1 1. Remove the Tx cover. (See 5.2.1) 2. Remove two screws and one connector, then remove the PCB DS1. DS1 5-20 5.2.3 PCB DSS 1. Remove the Tx cover. (See 5.2.1) 2. Remove two screws and one connector, then remove the PCB DSS. DSS 5.2.4 Release lever 1. Remove the Tx cover. (See 5.2.1) 2. Remove the release lever. Release lever 5-21 5.2.5 Interlock switch 1. Remove the Tx cover. (See 5.2.1) 2. Remove one screw and one connector, then remove the Interlock switch. Interlock switch 5.2.6 PCB DS2 1. Remove the Tx cover. (See 5.2.1) 2. Remove two screws and one connector, then remove the PCB DS2. DS2 Note: The auto adjustment of DS2 (see page 3-129) must be made when you replace the DS2. 5-22 5.2.7 Press roller 1. Remove the Tx cover. (See 5.2.1) 2. Remove four screws and stay A. 3. Remove E-rings and Press roller. Stay A Press roller 5.2.8 Exit roller 1. Remove two screws and Inner guide C. 2. Remove Guide supporter A. Inner guide C Guide supporter A 5-23 3. Remove six screws and Inner guide A assembly. (See 5.2.15.) 4. Remove the retard cap. 5. Remove one E-ring and Retard bracket. Retard bracket Spring Retard cap 6. Remove two E-rings and Exit roller. Exit roller 5-24 5.2.9 Platen top cover 1. Open the platen cover. 2. Remove one screw and then close the platen cover. 3. Open the ADF cover. 4. Remove four screws and platen top cover. Platen top cover 5-25 5.2.10 Tx side cover 1. Open the ADF cover. 2. Remove two screws and Tx side cover. Tx side cover 5.2.11 PCB Connect ADF 1. Remove the platen top cover. (See 5.2.9.) 2. Remove three screw and all connectors, then remove the PCB Connector ADF. PCB Connect ADF 5-26 5.2.12 BIS sensor 1. Remove the platen top cover. (See 5.2.9.) 2. Disconnect the connector (P124) from the PCB Connect ADF. 3. Remove two screws and Sensor plate. 4. Remove two screws and BIS sensor. BIS sensor Sensor plate PCB Connect ADF 5-27 5.2.13 ADF motor 1. Remove the platen top cover. (See 5.2.9.) 2. Disconnect the connector of the ADF motor. 3. Remove two springs. 4. Remove five screws ADF motor. Thin spring Thick spring ADF motor Note: When reassemble the ADF motor, follow the instructions below: 1. Attach the ADF motor with five screws loosely. 2. Attach the thick spring. 3. Secure the three screws shown with A in the illustration. 4. Attach the thin spring. 5. Secure the two screws shown with B in the illustration. Note: Confirm the belt is not loose. Thin spring Thick spring B A B A A 5-28 ADF motor 5.2.14 Gear of the ADF section 1. Remove the platen top cover. (See 5.2.9.) 2. Remove the ADF motor. (See 5.2.13.) 3. Remove the E-ring. 4. Remove seven screws and ADF Motor bracket. Thin spring Thick spring ADF motor bracket E-ring 5. Remove screws of the Feed pulley A and Gear 25. 6. Remove E-ring of the Gear 30 and Gear 18/30. 7. Remove Feed pulley, Gear 25, Gear 30 and Gear 18/30. Gear 30 Feed pulley A Gear 25 Gear 18/30 5-29 5.2.15 Inner guide A assembly 1. Remove the platen top cover. (See 5.2.9.) 2. Remove the ADF motor bracket. (See step 4 of 5.2.14.) 3. Remove the Feed pulley A, Gear 25 and Gear 30. (See step 5 to 7 of 5.2.14.) 4. Remove the Tx side cover. (See 5.2.10.) 5. Remove one screw and Tx stopper. 6. Remove two screws and inner guide C. (See step 1 of 5.2.8.) 7. Remove the guide supporter A. (See step 2 of 5.2.8.) 8. Remove E-ring of feed roller. 9. Remove the Inner guide A assembly. Inner guide A E-ring Tx stopper 5-30 5.2.16 Feed roller assembly 1. Remove the platen top cover. (See 5.2.9.) 2. Remove the ADF motor bracket. (See step 4 of 5.2.14.) 3. Remove the Feed pulley A, Gear 25 and Gear 30. (See step 5 to 7 of 5.2.14.) 4. Remove the Tx side cover. (See 5.2.10.) 5. Remove the Inner guide A assembly. (See 5.2.15) 6. Remove six screws and inner guide A. Inner guide A 7. Remove the retard roller assembly. (See page 5-7.) 8. Remove E-ring and Feed roller assembly. 5-31 5.2.17 Platen cover assembly Note: Before disassemble the platen cover assembly, you should write down the number (1, 2 or 3) on the hinge spacer (see next page). This number will be need when you reassemble the platen cover assembly. 1. Remove two screws and harness cover. 2. Disconnect the harness. Harness cover 3. Remove two screws and platen cover assembly. Note: You must hold the platen cover assembly. Platen cover assembly 3 2 1 5-32 Hinge spacer Reassemble the platen cover assembly: 1. Mount the platen cover assembly on the machine. 2. Insert the Hinge spacer into the right hole. Note: The number (1, 2 or 3) on the hinge spacer that you wrote down before disassemble the platen cover assembly should be shown. 3. Pull the left side of the platen cover assembly to frontward to hook the pin. And attach the screw loosely. 4. Push the right side of the platen cover assembly to backward to fix the position of platen cover assembly. And secure the right side of platen cover assembly with a screw. 5. Secure the left side of the platen cover assembly. Hinge spacer 2 1 3 Pin 5-33 5.2.18 Document mount assembly 1. Remove the platen top cover. (See 5.2.9.) 2. Remove the Tx side cover. (See 5.2.10.) 3. Remove one screw. Then remove the hinge bracket and spring lock washer. Spring lock washer Hinge bracket 4. Disconnect one connector and Document mount assembly. Document mount assembly 5-34 5.2.19 Feed roller assembly 1. Remove the platen cover assembly. (See 5.2.17.) 2. Remove the platen top cover. (See 5.2.9.) 3. Remove the Tx side cover. (See 5.2.10.) 4. Remove the document mount assembly (See 5.2.18.) 5. Remove the ADF motor bracket. (See step 4 of 5.2.14.) 6. Remove the Feed pulley A, Gear 25 and Gear 30. (See step 5 to 7 of 5.2.14.) 7. Remove the Inner guide A assembly. (See 5.2.15) 8. Remove one screw on the bottom side and 15 screws on the upper side of the platen cover assembly. Then separate the ADF section from the platen cover assembly. 5-35 9. Remove four screws and hinge bracket A. Hinge bracket A 10.Remove four screws and hinge assembly L. Hinge assembly L 5-36 11.Remove four screws and inner guide D. Inner guide D 12.Remove one spring and loose two screws, then remove the belt. 5-37 13.Remove one screw and then remove the pulley flange A and Pulley bracket. Pulley flange A Pulley bracket 14.Remove two E-rings and one pin, then remove the Feed roller assembly. Feed roller assembly 5-38 Pin 5.2.20 Press roller C 1. Remove the Inner guide C. (See step 11 of 5.2.19.) 2. Remove two screws and outer guide D. 3. Remove two screws of each Press roller assembly, then remove the Press roller assemblies. Outer guide D Press roller C assemblies 5-39 5.2.21 Lock lever assembly 1. Remove the platen cover assembly. (See 5.2.17.) 2. Remove the Tx side cover. (See 5.2.10.) 3. Remove the document mount assembly (See 5.2.18.) 4. Remove two screws and Stay C. Stay C 5. Remove spring and E-ring, then remove the Spring attachment. Spring attachment 5-40 6. Use 6 mm adjustable spanner (adjustable wrench) or long nose cutting pliers to remove one screw and lock lever assembly. Lock lever assembly 5-41 5.2.22 DADFA3, DADFLEG Sensor 1. Remove six screws and document hopper. 2. Disconnect the connector and then remove the DADFA3 and DADFLEG Sensor. 5.2.23 Right cover, Left cover 1. Open the platen cover. 2. Remove two screws of each covers, then remove the Right cover and Left cover. 5-42 5.2.24 Panel assembly 1. Remove the Right and Left cover. (See 5.2.26.) 2. Remove four screws and disconnect three connectors, then remove the Panel assembly. 5.2.25 One-touch panel 1. Remove the Right and Left cover. (See 5.2.26.) 2. Remove Panel assembly. (See 5.2.24.) 3. Remove the Panel hinge pin and One-touch panel. 5-43 5.2.26 PCB Panel 1. Remove the Right and Left cover. (See 5.2.26.) 2. Remove Panel assembly. (See 5.2.24.) 3. Remove the film harness and connector. 4. Remove the eight screws and 18 screws of the PCB Panel, then remove the PCB Panel. 5.2.27 PCB Panel 1. Remove the Right and Left cover. (See 5.2.26.) 2. Remove Panel assembly. (See 5.2.24.) 3. Remove PCB Panel. (See 5.2.26.) 4. Remove two screws and LCD. 5-44 5.2.28 Speaker 1. Remove the Right and Left cover. (See 5.2.26.) 2. Remove Panel assembly. (See 5.2.24.) 3. Remove one speaker connector and two mounting screws, and the remove the Speaker. 5.2.29 PCB LCDBL 1. Remove the Right and Left cover. (See 5.2.26.) 2. Remove Panel assembly. (See 5.2.24.) 3. Disconnect all connectors and remove two screws. Then remove the PCB LCDBL. 5-45 5.2.30 Mirror carriage Home sensor / A4 sensor / B4 sensor / Mirror carriage End sensor 1. Remove the Right and Left cover. (See 5.2.26.) 2. Remove Panel assembly. (See 5.2.24.) 3. Remove one of each sensors and then remove sensor. 5.2.31 APS sensor 1. Remove the Right and Left cover. (See 5.2.26.) 2. Remove Panel assembly. (See 5.2.24.) 3. Disconnect one connector and remove the APS sensor. 5-46 5.2.32 Panel lower cover 1. Remove the Right and Left cover. (See 5.2.26.) 2. Remove Panel assembly. (See 5.2.24.) 3. Remove Speaker. (See 5.2.28) 4. Remove six screws and Panel lower cover. 5.2.33 FBS glass 1. Remove the Right cover. (See 5.2.26.) 2. Remove three screws and Size cover H. 3. Remove FBS glass. 5-47 5.2.34 FBS Pad 1. Remove the old FBS pad. 2. Strip paper of adhesive tape. 3. Put on the new FBS pad (white face side down) on the FBS glass as shown. 1 mm 4. Close the platen cover to attach the FBS pad. Adhesive tape 1 mm FBS Pad 5.2.35 Contact glass 1. Remove the Left cover. (See 5.2.26.) 2. Remove Contact glass. 5-48 5.2.36 Multi beam sensor 1. Remove the Right cover. (See 5.2.26.) 2. Remove Size cover H. (See 5.2.33.) 3. Remove FBS glass. (See 5.2.33.) 4. Remove one screw and one connector. The remove the multi beam sensor. 5-49 5.2.37 Inverter 1. Remove the Right cover. (See 5.2.26.) 2. Remove Size cover H. (See 5.2.33.) 3. Remove FBS glass. (See 5.2.33.) 4. Remove six screws and Scanner cover. 5. Disconnect two connectors and tabs, then remove the Inverter. 5-50 5.2.38 PCB AFE 1. Remove the Right cover. (See 5.2.26.) 2. Remove Size cover H. (See 5.2.33.) 3. Remove FBS glass. (See 5.2.33.) 4. Remove six screws and Scanner cover. (See 5.2.37.) 5. Disconnect two film harness and two tabs, remove two screws. Then remove the PCB AFE. 5-51 5.2.39 Exposure lamp 1. Remove the Right and left cover. (See 5.2.26.) 2. Remove Size cover H. (See 5.2.33.) 3. Remove FBS glass. (See 5.2.33.) 4. Remove Panel assembly. (See 5.2.24.) 5. Remove the blind sheet and then remove a screw on the exposure lamp bracket. 6. Remove the connector cover, then disconnect the connector. 7. Remove the exposure lamp. Exposure Lamp 5-52 5.2.40 Mirror carriage A assembly 1. Remove the Right and Left cover. (See 5.2.26.) 2. Remove Size cover H. (See 5.2.33.) 3. Remove FBS glass. (See 5.2.33.) 4. Remove Panel assembly. (See 5.2.24.) 5. Move the Mirror carriage A to right end. Then remove the screws from the belt retainer. Mirror carriage A 6. Remove the blind sheet. 7. Move the Mirror carriage A assembly to the center. Then remove the belt retainers. 8. Remove one screw and FPC bracket. 9. Disconnect the connector of exposure lamp. Belt retainer Mirror carriage B 10.Remove the Mirror carriage A assembly. 5-53 5.2.41 Mirror A 1. Remove the Right and Left cover. (See 5.2.26.) 2. Remove Size cover H. (See 5.2.33.) 3. Remove FBS glass. (See 5.2.33.) 4. Remove Panel assembly. (See 5.2.24.) 5. Remove the Mirror carriage A assembly. (See 5.2.40.) 6. Remove the mirror clamp and Mirror A. Mirror clamp Mirror A 5-54 5.2.42 Mirror carriage B assembly 1. Remove the Right cover. (See 5.2.26.) 2. Remove Size cover H. (See 5.2.33.) 3. Remove FBS glass. (See 5.2.33.) 4. Remove FPC bracket. (See step 8 of 5.2.40.) 5. Disconnect the connector of exposure lamp. 6. Remove the FPC guide. 7. Through the FPC bracket to the hole of mirror carriage B. FPC guide FPC bracket 8. Remove the screws of belt retainers. 7. Remove the Mirror carriage B assembly. Belt retainer Mirror carriage B 5-55 5.2.43 Mirror B and C 1. Remove the Right cover. (See 5.2.26.) 2. Remove Size cover H. (See 5.2.33.) 3. Remove the FBS glass. (See 5.2.33.) 4. Remove Mirror carriage B assembly. (See 5.2.42.) 5. Remove the mirror clamp, and then remove the Mirror B and C. Mirror B Mirror clamp Mirror clamp Mirror C 5-56 5.2.44 Reassemble the Mirror carriage A and B 1. Put on the Mirror carriage A and B. Mirror carriage B Mirror carriage A 2. Temporarily attach the belt retainer with screw loosely. 3. Move the Mirror carriage A and B to the right end until they stop. 4. Tighten the screws of the retainer to secure the Mirror cartridge A and B. Mirror carriage B Mirror carriage A Note: Whenever the Mirror carriage A and B has been removed, make the image deformation adjustment. (See page 5-91.) 5-57 5.2.45 FBS motor 1. Remove the platen cover assembly. (See 5.2.17) 2. Remove the Size cover H. (See 5.2.33.) 3. Remove rear top cover. 4. Remove five screws and platen mount. Platen mount 5. Disconnect the connector P13 on the PCB Scanner. 6. Remove one spring and three screw, then remove FBS motor bracket. FBS motor FBS motor bracket Spring 5-58 7. Remove two screws and FBS motor. FBS motor FBS motor bracket Note: When reassemble the FBS motor, follow the instructions below: 1. Attach the FBS to the FBS bracket. 2. Attach the FBS motor bracket loosely. 3. Attach the spring and belt. 4. Secure the screws you attached loosely in step 2. 5-59 5.2.46 PCB Scanner 1. Remove the platen cover assembly. (See 5.2.17) 2. Remove the Size cover H. (See 5.2.33) 3. Remove the platen mount. 4. Remove five screws and all connectors, then remove the PCB Scanner. PCB scanner 5-60 5.2.47 Rear cover (upper) 1. Remove four Rear cover (upper) mounting screws and one Rear cover (lower) mounting screw as shown. 2. Remove the Rear cover (upper). Rear cover (upper) 5-61 5.2.48 Rear cover (lower) 1. Remove the one screw and wire cover. 2. Remove five Rear cover (lower) mounting screws. 2. Remove the Rear cover (lower). Rear cover (lower) Wire cover 5-62 5.2.49 Shield plate 1. Remove the Rear cover (upper). (See 5.2.47) 2. Disconnect the two cables from scanner unit as shown. 3. Remove the four screws and shield plate. Note: When reassemble the shield plate, do not forget attaching the F.G. wire. F.G. wire Shield plate 5-63 5.2.50 PCB Main 1. Remove the rear cover (upper). (See 5.2.47.) 2. Remove the shield plate. (See 5.2.49.) 3. Disconnect the all connectors on the PCB Main and remove the five screws, then remove the PCB Main. PCB Main Note: Before replace the Main board, it is advisable to print the machine settings, fax settings, copy settings, one-touch and speed dial listings to help in reprogramming these information. Note: Jumper JP2 on the main control PCB is used for battery back-up of the DRAM. Any documents stored in DRAM. Removing JP1 will initialize the DRAM. Jumper JP1 on the main control PCB is used for battery back-up of the SRAM. All user programmed data and internal machine parameter, memory switch and unique switch settings are held in SRAM. Removing JP2 will initialize the SRAM. Confirm the each Jumper is ON. 5-64 5.2.51 PCB NCU 1. Remove the rear cover (upper). (See 5.2.47.) 2. Remove the shield plate. (See 5.2.49.) 3. Remove the PCB Main. (See 5.2.50) 4. Disconnect the all connectors and remove three screws and one tab, then remove the PCB NCU. Insulator PCB NCU 5-65 5.2.52 Front cover 1. Slide out the multi paper cassette (1st cassette), and then remove the two front cover mounting screws. 2. Open the side cover, then remove the screw. 3. Remove two tabs, then remove front cover. 5-66 5.2.53 LED cover 1. Slide out the multi paper cassette (1st cassette). 2. Remove one screw and LED cover. LED cover 5.2.54 Upper cover 1. Remove two screws and upper cover. Upper cover 5-67 5.2.55 Shield box 1. Remove the upper cover. (See 5.2.54.) 2. Remove two screws and slide out the shield cover. Shield box 5-68 5.2.56 Left cover 1. Remove the upper cover. (See 5.2.54.) 2. Remove four screws and left cover. Left cover 5.2.57 PU1 1. Remove the upper cover. (See 5.2.54.) 2. Remove the shield box. (See 5.2.55.) 3. Remove two screws and PS shield box. 4. Remove four screws and disconnect the all connectors. Then remove the PU1 PS shield box 5-69 5.2.58 PCB Modular 1. Remove the upper cover. (See 5.2.54.) 2. Remove the shield box. (See 5.2.55.) 3. Disconnect the all connectors, remove one screw and two tabs. Then remove the PCB Modular. PCB modular 5.2.59 Main switch 1. Remove the front cover. (See 5.2.52.) 2. Disconnect the connector and remove the main switch. Main switch 5-70 5.2.60 Master board (PWB-A) 1. Remove the upper cover. (See 5.2.54.) 2. Remove the shield box. (See 5.2.55.) 3. Remove the two screws and MFB box. 4. Disconnect the all connectors and remove four screws, then remove the master board. MFB box PWB-A Remounting The EEPROM (IC3A) Notes: • If the Imaging Cartridge is not to be replaced after the Master Board has been replaced with a new one, be sure to remount the EEPROM (IC3A) from the old to new Master Board. • If the Master Board has been replaced with a new one and the EEPROM (IC3A) has not been remounted, be sure to replace the Imaging Cartridge with a new one. Because the EEPROM contains no data in this case, make settings and readjustments as necessary. 1. Remove the Master Board (PWB-A). 2. Demount the EEPROM (IC3A) from the new Master Board. 3. Demount the EEPROM (IC3A) from the old Master Board and remount it onto the new New EPROM OLD EPROM New Master board Old Master board 5-71 Note: Note the alignment notch on the EEPROM (IC3A) when mounting the IC. A A 5-72 5.2.61 Double feed detecting board (PWB-H) 1. Slide out the MP cassette (1st cassette). 2. Remove one screw and double feed detecting board. PWB-H 5.2.62 Paper size detecting board (PWB-I) 1. Remove the Rear cover (lower). (See 5.2.48.) 2. Remove two screws and the PWB board cover. 3. Remove Paper size detecting board (PWB-I). PWB-I 5-73 5.2.63 PPM switching board (PWB-L) 1. Remove the Rear cover (lower). (See 5.2.48.) 2. Remove one screw and the PWB-L mounting bracket assembly. 3. Remove PWB-L. PWB-L 5.2.64 Fuser frame register board (PWB-R) 1. Remove the Fuser unit. (See 5.1.5, page 5-14.) 2. Open the Exit Cover of the fusing unit. 3. Remove one screw and the Fusing Front Cover. 3. Snap off one E-ring and remove the Exit Cover. 5-74 4. Unhook one spring to free the Idle Lever. 5. Remove two harnesses. 6. Remove two screws and the Rear Cover. 7. Remove the PWB-R. 5.2.65 Pre-transfer guide plate register board 1 (PWB-R) 1. Open the side cover. 2. Remove the vertical transport unit. 3. Remove two screws and two ground plate. 4. Remove the PWB-R. PWB-R 5-75 5.2.66 Power supply board (PU1) 1. Remove the rear cover (lower). (See 5.2.48.) 2. Remove the left cover. 3. Remove five screws and Reinforcement bracket. Reinforcement bracket 4. Remove three screws and four connectors, then remove the PU1 mounting bracket assembly. PU1 mounting bracket aseembly 5-76 5. Remove eight screws and two tabs, then remove the PU1. PU1 5-77 5.2.67 High voltage unit (HV1) 1. Open the side cover. 2. Remove the Imaging cartridge (drum cartridge). 3. Remove two screws and the HV1 cover. HV1 cover 4. Remove two screws and the all connectors, then remove the HV1. HV1 5-78 5.2.68 PH unit Notes: • Do not place the PH Unit upside down or subject it to excessive shock. • Replace the PH Unit as one unit. • NEVER attempt to disassemble or adjust the PH Unit. 1. Remove the Upper Cover. (See 5.2.54.) 2. Remove Front Cover. (See 5.2.52.) 3. Remove Left Cover. (See 5.2.56.) 4. Remove Rear Cover (lower). (See 5.2.48) 5. Remove two screws and the shield box. 6. Remove two screws and MFB Box Cover. 7. Unplug five connectors of the MFB Board. 8. Remove two screws and the MFB Box Assy. 5. Remove five screws and the Reinforcement Bracket. 6. Remove four screws and the handle. 5-79 7. Unplug all connectors (13) from Master Board PWB-A. 8. Remove the harness from all cord clamps (12) on the PH Base Plate. 9. Remove four screws and the PH Unit. 5-80 5.3 Adjustment 5.3.1 Printer registration (top) A A Test pattern D Adjust so that width A on the test pattern D output falls within the following range. Specification 10 ± 1.5 (mm) Adjustment Tool Machine parameter S Machine parameter T Setting Range – 12.8 to 12.7 (mm) (0.1 mm step) Adjustment procedure 1. Load the A3-sized paper to the cassette. 2. Use the Unique Switch F:2 to adjust the printing margin to 0 mm. (Press MENU, [, 4. For detail, see page 3-114.) 3. Produce a test pattern D with the A3-sized paper. (Press MENU, [, 9, Test Pattern Print. For detail, see page 3-123.) 4. Check to see if width A on the test pattern D meets the specifications. If width A falls outside the specified range, perform following steps to make the adjustment. 5. Entry the Machine Parameter mode. (Press MENU, [, 0. For detail, see page 3-2.) 6. Adjust the setting of Machine Parameter S to meet the specification. If the width A is shorter than specification, increase value. If the width A is longer than specification, decrease value. Important: When you change the setting of Machine Parameter S, you must set the same value to Machine Parameter U. Ex.) If you set the “00000010” to the Machine Parameter S:5, you must set the “00000010” to the Machine Parameter U:5, too. When you change the setting of Machine Parameter T, you must set the same value to Machine Parameter V. Important: After adjustment, you must re-enter the setting of Unique Switch F:2, you changed in step 2. 5-81 5.3.2 Printer registration (side) A A Test pattern D Adjust so that width A on the test pattern D output falls within the following range. Specification 10 ± 2.0 (mm) Adjustment Tool Machine parameter K Machine parameter L Setting Range – 12.8 to 12.7 (mm) (0.1 mm step) Adjustment procedure 1. Load the A3-sized paper to the cassette. 2. Use the Unique Switch F:2 to adjust the printing margin to 0 mm. (Press MENU, [, 4. For detail, see page 3-114.) 3. Produce a test pattern D with the A3-sized paper. (Press MENU, [, 9, Test Pattern Print. For detail, see page 3-123.) 4. Check to see if width A on the test pattern D meets the specifications. If width A falls outside the specified range, perform following steps to make the adjustment. 5. Entry the Machine Parameter mode. (Press MENU, [, 0. For detail, see page 3-2.) 6. Adjust the setting of Machine Parameter K to meet the specification. If the width A is shorter than specification, increase value. If the width A is longer than specification, decrease value. Important: When you change the setting of Machine Parameter K, you must set the same value to Machine Parameter M. Ex.) If you set the “00000010” to the Machine Parameter K:5, you must set the “00000010” to the Machine Parameter M:5, too. When you change the setting of Machine Parameter L, you must set the same value to Machine Parameter N. Important: After adjustment, you must re-enter the setting of Unique Switch F:2, you changed in step 2. 5-82 5.3.3 FBS registration (top) A Test Chart No.99-1 Adjust so that width A on the copy falls within the following range. Specification Adjustment Tool 10 ± 0.7 (mm) Machine parameter B:8 Setting Range – 4.34 to 4.34 (mm) (0.14 mm step) Adjustment procedure 1. Load the A3-sized paper to the cassette. 2. Use the Unique Switch F:2 to adjust the printing margin to 0 mm. (Press MENU, [, 4. For detail, see page 3-114.) 3. Place the Muratec Test Chart No. 99-1 on the FBS glass. 4. Make a copy of it on the A3-sized paper with 100 % magnification. 5. Check to see if width A on the copy meets the specifications. If width A falls outside the specified range, perform the following steps to make the adjustment. 6. Entry the Machine Parameter mode. (Press MENU, [, 0. For detail, see page 3-2.) 7. Adjust the setting of Machine Parameter B:8 to meet the specification. If the width A is shorter than specification, increase value. If the width A is longer than specification, decrease value. Important: After adjustment, you must re-enter the setting of Unique Switch F:2, you changed in step 2. 5-83 5.3.4 FBS registration (side) A Test Chart No.99-1 Adjust so that width A on the copy falls within the following range. Specification Adjustment Tool 10 ± 0.7 (mm) Machine parameter B:5 Setting Range – 5.25 to 5.25 (mm) (0.21 mm step) Adjustment procedure 1. Load the A3-sized paper to the cassette. 2. Use the Unique Switch F:2 to adjust the printing margin to 0 mm. (Press MENU, [, 4. For detail, see page 3-114.) 3. Place the Muratec Test Chart No. 99-1 on the FBS glass. 4. Make a copy of it on the A3-sized paper with 100 % magnification. 5. Check to see if width A on the copy meets the specifications. If width A falls outside the specified range, perform the following steps to make the adjustment. 6. Entry the Machine Parameter mode. (Press MENU, [, 0. For detail, see page 3-2.) 7. Adjust the setting of Machine Parameter B:5 to meet the specification. If the width A is shorter than specification, increase value. If the width A is longer than specification, decrease value. Important: After adjustment, you must re-enter the setting of Unique Switch F:2, you changed in step 2. 5-84 5.3.5 ADF registration (top) A Test Chart No.99-2 Adjust so that width A on the copy falls within the following range. Specification Adjustment Tool 20 ± 1.3 (mm) Machine parameter B:3 Setting Range – 10.71 to 10.71 (mm) (0.17 mm step) Adjustment procedure 1. Load the A3-sized paper to the cassette. 2. Use the Unique Switch F:2 to adjust the printing margin to 0 mm. (Press MENU, [, 4. For detail, see page 3-114.) 3. Place the Muratec Test Chart No. 99-2 in the ADF. 4. Make a copy of it on the A3-sized paper with 100 % magnification. 5. Check to see if width A on the copy meets the specifications. If width A falls outside the specified range, perform the following steps to make the adjustment. 6. Entry the Machine Parameter mode. (Press MENU, [, 0. For detail, see page 3-2.) 7. Adjust the setting of Machine Parameter B:3 to meet the specification. If the width A is shorter than specification, increase value. If the width A is longer than specification, decrease value. Important: After adjustment, you must re-enter the setting of Unique Switch F:2, you changed in step 2. 5-85 5.3.6 ADF registration (side) A Test Chart No.99-2 Adjust so that width A on the copy falls within the following range. Specification Adjustment Tool 20 ± 1.3 (mm) Machine parameter B:0 Setting Range – 5.25 to 5.25 (mm) (0.21 mm step) Adjustment procedure 1. Load the A3-sized paper to the cassette. 2. Use the Unique Switch F:2 to adjust the printing margin to 0 mm. (Press MENU, [, 4. For detail, see page 3-114.) 3. Place the Muratec Test Chart No. 99-2 in the ADF. 4. Make a copy of it on the A3-sized paper with 100 % magnification. 5. Check to see if width A on the copy meets the specifications. If width A falls outside the specified range, perform the following steps to make the adjustment. 6. Entry the Machine Parameter mode. (Press MENU, [, 0. For detail, see page 3-2.) 7. Adjust the setting of Machine Parameter B:0 to meet the specification. If the width A is shorter than specification, increase value. If the width A is longer than specification, decrease value. Important: After adjustment, you must re-enter the setting of Unique Switch F:2, you changed in step 2. 5-86 5.3.7 FBS zoom adjustment (Vertical) The difference should be within ± 0.4% (1.6 mm) of the actual length of A on the test chart No.99-1. Adjust so that the following specifications are satisfied with the length of A (400 mm) on the test chart No.99-1. Zoom ratio Specification Adjustment Tool 100 % 400 ± 1.6 (mm) (400 ± 0.4%) Machine parameter B:7 Setting Range – 6.0 to 6.0 (mm) (– 1.5 to 1.5 %) (0.1 % (0.4 mm) step) Adjustment procedure 1. Load the A3-sized paper to the cassette. 2. Place the Muratec Test Chart No. 99-1 on the FBS. 3. Make two copies of it on the A3-sized paper with 100 % magnification. 4. Measure the length of A on the second copy to find the difference. If length A falls outside the specified range, perform the following steps to make the adjustment. 5. Entry the Machine Parameter mode. (Press MENU, [, 0. For detail, see page 3-2.) 6. Adjust the setting of Machine Parameter B:7 to meet the specification. If the length A is shorter than specification, increase value. If the length A is longer than specification, decrease value. 5-87 5.3.8 FBS zoom adjustment (Horizontal) The difference should be within ± 0.4% (1.1 mm) of the actual length of A on the test chart No.99-1. Adjust so that the following specifications are satisfied with the length of A (277 mm) on the test chart No.99-1. Zoom ratio Specification Adjustment Tool 100 % 277 ± 1.1 (mm) (277 ± 0.4%) Machine parameter B:6 Setting Range – 4.155 to 4.155 (mm) (– 1.5 to 1.5 %) (0.1 % (0.277 mm) step) Adjustment procedure 1. Load the A3-sized paper to the cassette. 2. Place the Muratec Test Chart No. 99-1 on the FBS. 3. Make two copies of it on the A3-sized paper with 100 % magnification. 4. Measure the length of A on the second copy to find the difference. If length A falls outside the specified range, perform the following steps to make the adjustment. 5. Entry the Machine Parameter mode. (Press MENU, [, 0. For detail, see page 3-2.) 6. Adjust the setting of Machine Parameter B:6 to meet the specification. If the length A is shorter than specification, increase value. If the length A is longer than specification, decrease value. 5-88 5.3.9 ADF zoom adjustment (Vertical) A3 A 99-2(B) 2000.1 The difference should be within ± 0.6% (2.0 mm) of the actual length of A on the test chart No.99-2. Adjust so that the following specifications are satisfied with the length of A (330 mm) on the test chart No.99-2. Zoom ratio Specification Adjustment Tool 100 % 330 ± 2.0 (mm) (330 ± 0.6%) Machine parameter B:2 Setting Range – 4.95 to 4.95 (mm) (– 1.5 to 1.5 %) (0.1 % (0.33 mm) step) Adjustment procedure 1. Load the A3-sized paper to the cassette. 2. Place the Muratec Test Chart No. 99-2 in the ADF. 3. Make two copies of it on the A3-sized paper with 100 % magnification. 4. Measure the length of A on the second copy to find the difference. If length A falls outside the specified range, perform the following steps to make the adjustment. 5. Entry the Machine Parameter mode. (Press MENU, [, 0. For detail, see page 3-2.) 6. Adjust the setting of Machine Parameter B:2 to meet the specification. If the length A is shorter than specification, increase value. If the length A is longer than specification, decrease value. 5-89 5.3.10 ADF zoom adjustment (Horizontal) A A3 99-2(B) 2000.1 The difference should be within ± 0.6% (1.5 mm) of the actual length of A on the test chart No.99-2. Adjust so that the following specifications are satisfied with the length of A (240 mm) on the test chart No.99-2. Zoom ratio Specification Adjustment Tool 100 % 240 ± 1.5 (mm) (240 ± 0.6%) Machine parameter B:1 Setting Range – 3.6 to 3.6 (mm) (– 1.5 to 1.5 %) (0.1 % (0.24 mm) step) Adjustment procedure 1. Load the A3-sized paper to the cassette. 2. Place the Muratec Test Chart No. 99-2 in the ADF. 3. Make two copies of it on the A3-sized paper with 100 % magnification. 4. Measure the length of A on the second copy to find the difference. If length A falls outside the specified range, perform the following steps to make the adjustment. 5. Entry the Machine Parameter mode. (Press MENU, [, 0. For detail, see page 3-2.) 6. Adjust the setting of Machine Parameter B:1 to meet the specification. If the length A is shorter than specification, increase value. If the length A is longer than specification, decrease value. 5-90 5.3.11 Adjust the image deformation caused by Mirror carriage A and B at the incorrect position 5.3.11.1 When the copy using the FBS is deformation as shown below, adjust the Mirror carriage position. Adjustment procedure 1. Load the A3-sized paper to the cassette. 2. Use the Unique Switch F:2 to adjust the printing margin to 0 mm. (Press MENU, [, 4. For detail, see page 3-114.) Important: After adjustment, you must re-enter the setting of Unique Switch F:2. 3. Place the Muratec Test Chart No. 99-1 on the FBS. 4. Make a copy of it on the A3-sized paper with 100 % magnification. 5. Measure the length of A and B on the copy to find the difference. 6. Subtract B from A. If the difference falls outside the specified range, perform the following steps to make the adjustment. Specification: The difference of A and B should be within ± 1.1 mm. A B If the A > B, move the front side of Mirror carriage A to the leftward. If the A < B, move the front side of Mirror carriage A to the rightward. Ex) If the difference is –2mm, move the front side of Mirror carriage A 2mm to the rightward. To move the front side of the mirror carriage: Ex.) If measured vertical length A is 10 mm, and B is 6 mm. Subtract B from A. (10-6= 4 mm) 1. Loosen a front side retainer screw of the Mirror carriage A. 2. Move the front side of the Mirror carriage A 4 mm to the leftward. 3. Secure the Mirror carriage A. 5-91 5.3.11.2 When the copy using the FBS is deformation as shown below, adjust the Mirror carriage position. Adjustment procedure 1. Load the A3-sized paper to the cassette. 2. Use the Unique Switch F:2 to adjust the printing margin to 0 mm. (Press MENU, [, 4. For detail, see page 3-114.) Important: After adjustment, you must re-enter the setting of Unique Switch F:2. 3. Place the Muratec Test Chart No. 99-1 on the FBS. 4. Make a copy of it on the A3-sized paper with 100 % magnification. 5. Measure the width of C and D on the copy to find the difference. 6. Subtract D from C. If the difference falls outside the specified range, perform the following steps to make the adjustment. Specification: The difference of C and D should be within ± 1.5 mm. If the C > D, move the front side of Mirror carriage B to the rightward. If the C < D, move the front side of Mirror carriage B to the leftward. Ex) If the difference is –2mm, move the front side of Mirror carriage B 2mm to the leftward. A To move the front side of the mirror carriage: Ex.) If measured vertical length C is 10 mm, and D is 6 mm. Subtract D from C. (10-6= 4 mm) 1. Loosen a front side retainer screw of the Mirror carriage B. 2. Move the front side of the Mirror carriage B 4 mm to the rightward. 3. Secure the Mirror carriage B. B 5-92 5.3.12 Adjustment of the position of Mirror carriage A and B 1. Temporarily loosen the screw of the belt retainer to move the mirror carriages. 2. Move the Mirror carriage A and B to the right end until they stop. Secure the carriages at this position. 3. Tighten the screw of the belt retainer. Mirror carriage B Mirror carriage A Note: After this adjustment, confirm the copy image quality and adjust the image deformation, if necessary. 5-93 5.3.13 Adjustment of height of ADF Adjust the height of the ADF (the clearance of the document pass) to pass the document properly. 1. Confirm that the tabs under the platen cover assembly (see the illustration below) touch the contact glass when the platen cover is closed. If not, adjust the height of ADF by following procedure. 2. Remove the platen top cover. (See page 5-25.) 3. Loosen the nut on the hinges R and L, and turn the hexagon socket set screw to adjust the height of the ADF and the skew of the platen cover assembly. If turn the hexagon socket set screw counter-clockwise, the front side will be up and rear side will be down. If turn the hexagon socket set screw clockwise, the front side will be down and rear side will be up. Note: Make sure to tighten the nuts after this adjustment. Note: If this adjustment for the height of the ADF is not enough, it can cause the skew or the image deformation. 5-94 5.3.14 Adjustment of the skew on the ADF 1. Turn the adjusting screw of the Press guide B to adjust the skew. If turn the adjustment screw clockwise, the copied image will be turned counter-clockwise. If turn the adjustment screw counter-clockwise, the copied image will be turned clockwise. 5-95 5.3.15 Adjustment of the platen cover position Adjust the platen cover to pass the document properly. 1. Confirm that the hinge L is set at the proper position. Also confirm the difference between platen cover and the left cover at front and at rear on the side. Platen cover assembly Left cover 2. Turn the hinge plate to set the platen cover and left cover to be parallel. Adjust the installation position on the side of the hinge R. If the front side of the platen cover shifts to the left, turn the hinge plate to set the large number at the front. If the front side of the platen cover shifts to the right, turn the hinge plate to set the smaller number at the front. Hinge spacer 2 1 3 Pin Note: Refer to the “Reassemble the platen cover assembly” on the page 5-33 for installing the platen cover assembly. 5-96 5.3.17 Adjustment of Retard roller pressure When the bad document transportation or document separation is occurs even if the rollers dose not wear or uncleanness, adjust the Retard roller pressure. Insert the precision screwdriver into the hole of the Inner guide A as illustration. Then turn the separation pressure adjustment screw with referring the following table. Rotate direction Counterclockwise Clockwise Retard roller pressure Up Down Document To be good To be bad 5-97 Document Separation To be bad To be good Section6 Options 1. Expansion Memory....................................................6-2 2. Telephone Handset ...................................................6-4 3. Mechanical page counter ..........................................6-7 4. Paper feed unit (500 sheets) .....................................6-9 5. Large capacity cassette (2500 sheets) ....................6-25 6. 2-Bin / Shift tray unit ................................................6-54 7. Duplex unit ..............................................................6-74 8. AL-250.....................................................................6-88 9. RS-232C Interface...................................................6-96 10.OP-100: PCL6 printer controller ..............................TBD 11.NP-200: Network printer controller ..........................TBD 6-1 Options Memory Upgrade 6.1 Memory Upgrade 6-2 Memory Upgrade Options 6.1.1 Memory Upgrade An optional 8 or 24 MB document memory upgrade is available for the MFX-2500. To install the memory upgrade PCB: 1. Turn the machine off and remove the power cord and line cord. 2. Remove the rear cover. 3. Remove the shielding plate. 4. Connect the connector on the memory upgrade PCB to the connector (P5A) or connector (P5B) on the machine’s main control PCB. Upgrade memory board The following table shows the combination of memory upgrade to be installed to each connector (P5A and/of P5B). Please install the memory upgrade PCB according to the following table. Built-in 8 MB 8 MB 8 MB 8 MB 8 MB 8 MB Connector P5A — + 8 MB + 8 MB + 24 MB + 8 MB + 24 MB Connector P5B — — + 8 MB — + 24 MB + 24 MB Total memory 8 MB (8192 KB) 16 MB (16384 KB) 24 MB (24576 KB) 32 MB (32768 KB) 40 MB (40960 KB) 56 MB (57644 KB) Storage capacity 650 pages 650+680 ⇐ Standard Spec. 650+680+680 650+2040 650+680+2040 650+2040+2040 5. Connect the connectors and plug the power cord and turn the machine on. 6. Clear the DRAM. (In Fax mode, press MENU, *, G, [Enter].) Important: The DRAM clear setting will erase all documents in memory. 7. Perform a DRAM test whenever an optional memory upgrade is added to the unit. (Press MENU, *, B, F, [Enter]. See page 3-128 for more detail of the DRAM test.) 8. Print the Fax Setting List. (In Fax mode, press MENU, J, [List]). Check the memory amount printed below the Name and confirm the amount. The memory amount of the standard memory (16 MB) is 16384 KB. 9. Turn the machine off and unplug the power cord. 11.Re-attach the shielding plate. 12.Re-attach the rear cover. 13.Plug the line cord and power cord. 6-3 6.2 Telephone Handset 6-4 Optional handset Options 6.2.1 Attaching the optional handset Here is how to attach the handset. 1. Remove the two screw caps. 2. Using a Phillips-head screwdriver, attach the cord holder and the handset cradle to the left side of your machine, with the screws included with the cradle. 3. Plug one end of the handset cord (it’s curled) into the PHONE1 jack on the rear of your machine. 4. Plug the other end of the handset cord into the jack on the handset. If connected to a phone line, your machine is now “off-hook.” 5. Place the telephone handset onto the handset cradle. The cradle will press the handset’s “flash” button, hanging up the handset. Note: Make the curled cord to be held with the cord holder as shown at right. 6.2.2 Adjusting handset The small switches on the side of your machine’s handset adjust the ringer volume and the receiver volume. Ringer Volume Hearing Volume Ringer Volume Control — Adjust the ringer volume to one of three settings: High, Medium, or Low. Hearing Volume Control — If you are hard to hear the remote person’s voice, adjust the receiver volume to one of three settings; High, Medium, or Low. 6-5 Options Paper Feed Unit Attaching a second phone If you attach a second phone, plug the phone cable from a second phone into the PHONE2 jack on the rear side of the machine. 6-6 6.3 Mechanical Page Counter 6-7 Options Paper Feed Unit 6.3 Attaching the optional page counter The page counter shows the total number of pages the machine has printed. Note: This device counts up to 999,999 pages. If more pages are printed, the counter resets to zero and begins counting the new pages from that point. To install the page counter: 1. Turn the power off. 2. Open the power panel. 3. Use cutting pliers to gently punch out the perforated panel. You will install the page counter through this hole. 4. Pull the blue and red connecting wires out of hole. You will take a connector for the page counter. 5. Connect the counter connector to this connector, as shown below: 6 Insert the page counter into the hole, being careful to put the connecting wires in the hole first. The counter will “click” into place when inserted correctly. Installation is completed. The machine will now count the number of pages it prints. 6-8 6.4 PAPER FEED UNIT 6.4 PAPER FEED UNIT ......................................................................................................................... 6-9 6.4.1 GENERAL, MECHANICAL/ELECTRICAL .................................................................................. 6-10 6.4.1.1 SPECIFICATIONS................................................................................................................ 6-10 6.4.1.2 PARTS IDENTIFICATION .................................................................................................... 6-10 6.4.1.3 CROSS-SECTIONAL VIEW ................................................................................................. 6-11 6.4.1.4 DRIVE SYSTEM................................................................................................................... 6-11 6.4.1.5 ELECTRICAL COMPONENTS LAYOUT ............................................................................. 6-12 6.4.1.6 MECHANICAL OPERATIONS ............................................................................................. 6-12 6.4.2 DIS/REASSEMBLE, ADJUSTMENT........................................................................................... 6-19 6.4.2.1 Disassembly ......................................................................................................................... 6-19 6.4.3 ADJUSTMENT ............................................................................................................................ 6-21 6.4.3.1 Paper Lifting Spring Adjustment ........................................................................................... 6-21 6.4.3.2 Paper Take-Up Rolls Adjustment ......................................................................................... 6-21 6.4.3.3 CD Registration Adjustment (Printer) ................................................................................... 6-22 6.4.4 MISFEED DETECTION .............................................................................................................. 6-22 6.4.4.1 Misfeed detection ................................................................................................................. 6-22 Block diagram ...................................................................................................................................... 6-17 6-9 Options Paper Feed Unit 6.4.1 GENERAL, MECHANICAL/ELECTRICAL 6.4.1.1 SPECIFICATIONS Type Installation Type of Paper Paper Size Registration Capacity Power Requirements Power Consumption Dimensions Weight Environmental Requirements : Add-on paper source unit : Mounted beneath upper cassette of machine : Plain paper (60 to 90 g/m² or 16 to 24 lbs.), recycled paper (60 to 90 g/m² or 16 to 24 lbs.) : B5L/C to A3L or 8.5” ×11”L/C to 11” × 17”L (L: Lengthwise; C: Crosswise) : Center : 500 sheets : DC24V ±10%, DC5V ±10% (supplied from main unit) : 10W or less : 535 (W) × 544.7 (D) × 127.5 (H) mm or 21 (W) × 21.5(D) × 5 (H) inches : 6.9 kg or 15 lbs. : Same as main unit 6.4.1.2 PARTS IDENTIFICATION 1 4 2 3 1. Edge Guide 2. Side Cover 3. Paper Lifting Plate 4. Trailing Edge Stop 6-10 Paper Feed Unit Options 6.4.1.3 CROSS-SECTIONAL VIEW 1 5 4 2 3 1. Paper Take-Up Roll 2. Vertical Transport Roller 3. Paper Lifting Spring 4. Paper Lifting Plate 5. Edge Guide 6.4.1.4 DRIVE SYSTEM Drive from the main drive motor of the main unit is transmitted to their paper take-up drive mechanisms via a gear train. Paper take-up drive mechanism 6-11 Options Paper Feed Unit 6.4.1.5 ELECTRICAL COMPONENTS LAYOUT S2 SL1 S5 S4 S1 S3 PWB-A PWB-S Symbol PWB-A PWB-S SL1 S1 Name Cassette Main Board Paper Size Detecting Board Take-Up Solenoid Cassette Set Switch Symbol S2 S3 S4 S5 Name Side Cover Set Sensor Take-Up Sensor Paper Empty Sensor Paper Near Empty Sensor 6.4.1.6 MECHANICAL OPERATIONS 6.4.1.6.1 Edge Guide and Trailing Edge Stop The fixed paper size cassette has the Edge Guide and Trailing Edge Stop screwed into fixed positions. 6.4.1.6.2 Paper Lifting Plate • The Paper Lifting Plate of each cassette is raised at all times by two Paper Lifting Springs. • The type of the Paper Lifting Springs must be changed according to the paper size. (For details, see “DIS/REASSEMBLY” on page 6-19.) Paper lifting spring Paper lifting plate 6-12 Paper Feed Unit Options 6.4.1.6.3 Cassette-in-Position Detection The machine detects that the cassette is slid into position as follows. • The rib on the cassette frame presses the Cassette Set Switch located on the back panel of the machine, allowing the machine to detect that the cassette is slid in. Cassette set switch S1 Rib 6.4.1.6.4 Paper Size Setting (1) Cassette Paper Size Setting • With the Fixed Paper Size Cassette, the paper size is set using the Tech. Rep. Choice function. (2) Paper Sizes That Can be Set Paper Size Name Inch Representation CD × FD(mm) A3 L — 297 × 420 B4 L — 257 × 364 A4 L — 210 × 297 A4 C — 297 × 210 B5 L — 182 × 257 B5 C — 257 × 182 A5 C 210 × 148 ISO B5 L 176 × 250 ISO B5 C 250 × 176 F4 L 210 × 330 Ledger L 279 × 432 11″×17″ Legal L 216 × 356 8.5″×14″ G. Legal L 216 × 330 8.5″×13″ Letter L 216 × 279 8.5″×11″ Letter C 279 × 216 11″×8.5″ G. Letter L 203 × 267 8″×10.5″ G. Letter C 267 × 203 10.5″×8″ Invoice C 216 × 140 8.5″×5.5″ Executive L 184 × 260 7.25″×10.5″ Executive C 260 × 184 10.5″×7.25″ — 297 × 430 — 280 × 420 — 220 × 330 — 216 × 297 — 297 × 216 — 220 × 280 Special size — 280 × 220 279 × 356 11″×14″ L 236 × 356 9.25″×14″ L 210 × 301 8.25″×11.75″ L 203 × 330 8″×13″ L : Paper size setting (panel input) z : Not supported by machine *L: Lengthwise; C: Crosswise) 6-13 z z — z z z z z — z z z z z z z z z z z z z Options Paper Feed Unit 6.4.1.6.5 Paper Near Empty Detection • A paper-near-empty condition is detected through the detection of the height of the Paper Lifting Plate. • As the paper stack is consumed during a copy cycle, the Paper Lifting Plate of the cassette is gradually raised by the tension of the Paper Lifting Springs. When the Paper Near Empty Sensor is then unblocked, the machine determines that it is a paper-near-empty condition (the number of sheets of 2 paper (80 g/m ) still available for use: 50 ±30). The LED then starts blinking. • Since the amount of paper still available for use varies while a paper take-up sequence is in progress, detection is made at a timing when the Paper Take-Up Roll is in the retracted position. Paper near empty sensor S5 Paper lifting plate Actuator LED 6-14 Paper Feed Unit Options 6.4.1.6.6 Paper Empty Detection • When the cassette runs out of paper, the actuator for the Paper Empty Sensor drops into the cutout in the Paper Lifting Plate. This unblocks the sensor and the machine detects that the cassette has run out of paper. • When a paper-empty condition is detected, the blinking LED lights up steadily. • As noted earlier, the Paper Lifting Plate is raised at all times by the tension of the Paper Lifting Springs. This causes the actuator for the Paper Empty Sensor to tend to be caught by the paper stack when the cassette is slid out of the machine. To prevent this, the actuator is slightly tilted. This, however, presents another problem of a smaller operating stroke of the actuator, which in turn increases the possibility of the actuator activating the sensor by the flexing of a sheet of paper as it is taken up and fed in. To prevent this false detection of a paper-empty condition, the paper empty detection is enabled only when the Paper Take-Up Roll is in the retracted position. Actuator Paper empty sensor S4 6-15 Options Paper Feed Unit 6.4.1.6.7 Paper Separating Mechanism • Each cassette has fingers that function to separate the top sheet of paper from the rest of the paper stack at paper take-up. The fingers are fitted to the right front and rear corners of the cassette. When the Paper Take-Up Roll starts turning to take up the top sheet of paper, its turning force is directly transmitted to the top sheet of paper as it is in direct contact with the Paper Take-Up Roll. That force overcomes the block of the fingers, causing the top sheet of paper to ride over the fingers and be fed out of the cassette into the machine. • The collars and mylars placed on both sides of the Paper Take-Up Roll restrict the length of the loops that form in the paper at the fingers, helping the paper edges to easily slip out of the fingers. • As to the second sheet of paper, the paper transport force obtained through friction with the top sheet of paper is weak and does not allow the second sheet of paper to ride over the block of the fingers. Hence, the second sheet of paper remains stationary with the rest of the paper stack in the cassette. • When there are only two sheets of paper left in the cassette, the bottom sheet can be fed with the top one if the friction of the Paper Lifting Plate is weak. The Friction Plate affixed to the Paper Lifting Plate prevents this from happening. Paper take-up roll Paper Separator finger Friction plate Paper lifting plate Mylar Separator finger Collar Paper take-up roll 6-16 Paper Feed Unit Options 6.4.1.6.8 Paper Take-Up Roll • Since the Paper Lifting Plate is raised at all times by the Paper Lifting Springs, paper is wedged in the mechanism when the cassette is slid out of the machine if the Paper Take-Up Roll is round in shape. So the roll is semicircular and the circular part of the roll is positioned on top at times other than take-up. For the purpose of explanation, we call this position of the Paper Take-Up Roll the “retracted” position. • The Paper Take-Up Roll is grooved to keep good friction under heavy loading. • In each of the Fixed Paper Size Cassette and Universal Cassette, there are two Paper Take-Up Rolls mounted. • When the Take-Up Solenoid is energized, it causes the spring tension to bring the drive gear into mesh with the clutch gear. This results in the drive being transmitted to the Paper Take-Up Rolls. Clutch gear Paper take-up roll Spring Take-up solenoid SL1 Drive gear Timing Chart (A4 crosswise, two sheets) * Transport Clutch CL2 may be deenergized temporarily (for temporary stop motion). 6-17 Options Paper Feed Unit 6.4.1.6.9 Paper Take-Up Retry Control To minimize the occurrence of paper misfeed due to a slippery Paper Take-Up Roll, the Take-Up Solenoid is energized a second time if a sheet of paper fails to reach the Take-Up Sensor within a given period of time after it has been deenergized. The control timing is as follows. A misfeed results if the sheet of paper does not reach the Take-Up Sensor even after three paper take-up sequences. 6-18 Paper Feed Unit Options 6.4.2 DIS/REASSEMBLE, ADJUSTMENT 6.4.2.1 Disassembly 6.4.2.1.1 Removal of the Paper Take-Up Rolls 1. Remove the upper cassette. 2. Unlock the Paper Take-Up Roll and slide it off its shaft. Note: When installing the roll, make sure it securely locks into place as illustrated. Lock point 6.4.2.1.2 Cleaning of the Paper Take-Up Rolls Wipe the surface of the Paper Take-Up Rolls clean with a soft cloth dampened with alcohol. 6.4.2.1.3 Cleaning of the Vertical Transport Roller/Rolls Wipe the surface of the Vertical Transport Roller/Rolls clean with a soft cloth dampened with alcohol. 6-19 Options Paper Feed Unit 6.4.2.1.4 Replacement of the Paper Lifting Springs The replacement springs are housed on the bottom of the cassette. 1. Remove the cassette. 2. Remove the two Edge Guide Assemblies (two screws each). 3. Replace the springs. (See ADJUSTMENT.) Note: When installing the springs, make sure both ends of the spring are properly secured as illustrated. 6-20 Paper Feed Unit Options 6.4.3 ADJUSTMENT 6.4.3.1 Paper Lifting Spring Adjustment Whenever the paper size has been changed, replace the Paper Lifting Springs by following the table given below. (For the replacement procedure, see “6.4.2 DISASSEMBLY”.) The replacement springs are housed on the bottom of the cassette. Paper Size Name A3 L B4 L A4 L A4 C B5 L B5 C F4 L 11×17 L Legal L Letter L Letter C Executive L Executive C L: Lengthwise; C: Crosswise Spring A : Silver Spring B : Black Spring — : Not supported CD × FD (mm) 297 × 420 257 × 364 210 × 297 297 × 210 182 × 257 257 × 182 210 × 330 279 × 432 216 × 356 216 × 279 279 × 216 184 × 267 267 × 184 Spring A A B B — — B A B B B — — 6.4.3.2 Paper Take-Up Rolls Adjustment Whenever the paper size has been changed, change the Paper Take-Up Rolls position by following the table given below. (For the removing procedure, see DISASSEMBLY.) B5L, Executive L A4L, Letter L, Legal L, Paper take-up roller shaft B4L, A4C, A3L, Letter C, F4L, 11×17 Initial setting Front side 6-21 Options Paper Feed Unit 6.4.3.3 Registration Adjustment (Printer) See “5.3.1 Printer Registration (top)” on page 5-81 and “5.3.2 Printer Registration (side)” on page 5-82. 6.4.4 MISFEED DETECTION 6.4.4.1 Misfeed detection 6.4.4.1.1 Misfeed Detecting Sensors Layout Synchronizing roller sensor PC2 Additional 1st cassette take-up sensor Additional 2nd cassette take-up sensor Additional 3rd cassette take-up sensor 6.4.4.1.2 Types of Misfeed and Misfeed Detection Timings Type Paper left in path Detection of paper stopped at Take-Up Sensor Paper take-up failure detection Detection Timing The output from Take-Up Sensor S3 is blocked (L) when the machine Power Switch is turned ON or a misfeed is reset. • Additional 1st to 3rd cassette The period of time is counted during which Take-Up Sensor S3 remains blocked (L). The detection result is equivalent to +260 mm longer than the recognized paper length. • Additional 1st to 3rd cassette Take-Up Sensor S3 is not blocked (L) within a given period of time after TakeUp Solenoid SL1 has been energized (after two paper take-up retry sequences). 6-22 Paper Feed Unit Type Vertical transport paper leading edge detection Options Detection Timing • Additional 1st cassette Synchronizing Roller Sensor PC2 is not unblocked (H) within a given period of time after Take-Up Sensor S3 of the Additional 1st drawer has been blocked (L). • Additional 2nd cassette 1. Take-Up Sensor S3 of the additional 1st drawer is not blocked (L) within a given period of time after Take-Up Sensor S3 of the 2nd drawer has been blocked (L). 2. PC2 is not unblocked (H) within a given period of time after S3 of the additional 1st drawer has been blocked (L). • Additional 3rd cassette Size error detection * The detection described on the right is also made during a 2-sided copy cycle. 1. Take-Up Sensor S3 of the additional 2nd drawer is not blocked (L) within a given period of time after Take-Up Sensor S3 of the 3rd drawer has been blocked (L). 2. S3 of the additional 1st drawer is not blocked within a given period of time after S3 of the additional 2nd drawer has been blocked (L). 3. PC2 is not unblocked within a given period of time after S3 of the additional 1st drawer has been blocked (L). • Additional 1st to 3rd cassette The period of time is counted from when Take-Up Sensor S3 is blocked (L) to when it is unblocked (H). The difference between the detected length and the paper size which has been recognized is more than ±20 mm. 6-23 From the machine Paper near empty sensor Take-up solenoid Side cover set door Paper size detection board Paper empty sensor Take-up sensor Cassette set switch 6-24 6.5 Large Capacity Cassette 6.5 Large Capacity Cassette................................................................................................................ 6-25 6.5.1 GENERAL, MECHANICAL/ELECTRICAL .................................................................................. 6-26 6.5.1.1 Specifications ....................................................................................................................... 6-26 6.5.1.2 Part Identification.................................................................................................................. 6-26 6.5.1.3 Cross-Sectional View ........................................................................................................... 6-27 6.5.1.4 Drive System ........................................................................................................................ 6-27 6.5.1.5 Electrical Components Layout.............................................................................................. 6-28 6.5.1.6 Mechanical Operations......................................................................................................... 6-29 6.5.2 DIS/REASSEMBLY, ADJUSTMENT........................................................................................... 6-44 6.5.2.1 Disassembly ......................................................................................................................... 6-44 6.5.2.2 Adjustment............................................................................................................................ 6-50 6.5.3 MISFEED/MALFUNCTION DETECTION ................................................................................... 6-50 6.5.3.1 Misfeed Detection................................................................................................................. 6-50 6.5.3.2 Malfunction Detection ........................................................................................................... 6-52 6-25 Options Large Capacity Cassette 6.5.1 GENERAL, MECHANICAL/ELECTRICAL 6.5.1.1 Specifications Type Type of Paper : Front Loading Type LCC : Plain paper (60 to 90 g/m² or 16 to 24 lbs.), recycled paper (60 to 90 g/m² or 16 to 24 lbs.) : A4C, B5C, Letter C (L: Lengthwise; C: Crosswise) : Center : 2500 sheets (1250 × 2) : DC24V ±10%, DC5V ±10% (supplied from main unit) : 45W (If Paper Dehumidifying Heaters are installed, Total: 75W.) : 535 (W) × 544.7 (D) × 284 (H) mm or 21 (W) × 21.5” (D) × 11.25” (H) inches : 16.7 kg or 36.75 lbs. : Same as machine Paper Size Registration Paper Capacity Power Requirements Power Consumption Dimensions Weight Environmental Requirements 6.5.1.2 Part Identification 1 7 5 7 3 2 1. Lift 2 2. Front Cover 3. Lift 1 4. Feed Roll 5. Separator Roll 6. Side Cover 7. Vertical Transport Rolls 6-26 4 6 Large Capacity Cassette Options 6.5.1.3 Cross-Sectional View 1 2 3 4 5 6 7 8 1. Lift 2 3. Lift 1 5. Vertical Transport Roller 7. Feed Roll 2. Paper Take-Up Roll 2 4. Paper Take-Up Roll 1 6. Vertical Transport Roll 8. Separator Roll 6.5.1.4 Drive System Paper take-up drive mechanism Vertical transport drive mechanism Lift drive mechanism 6-27 Options Large Capacity Cassette 6.5.1.5 Electrical Components Layout RCL SIDE BCL RS1 PWB-A RSEN FRONT LS1 S1 PPS0 LS2 HMOT RS2 P1CL PPS1 P2CL EMOT PPS2 Symbol PWB-A HMOT EMOT Name LCC Main Board LCC Transport Motor LCC Lift-Up Motor Symbol PPS2 RSEN S1 P1CL P2CL BCL RCL PPS0 PPS1 Take-Up Clutch 1 Take-Up Clutch 2 Separator Clutch Registration Clutch LCC Take-Up Sensor Paper Empty Sensor 1 SIDE FRONT RS1 RS2 LS1 LS2 6-28 Name Paper Empty Sensor 2 Registration Sensor Paper Standby Position Sensor Side Cover Set Sensor LCC Set Sensor Paper Near Empty Sensor 1 Paper Near Empty Sensor 2 Lift-Up Sensor 1 Lift-Up Sensor 2 Large Capacity Cassette Options 6.5.1.6 Mechanical Operations 6.5.1.6.1 Vertical Transport Drive Mechanism 1. Vertical Transport Drive Operation • The Vertical Transport Roller is driven by LCC Transport Motor HMOT. • The driving force of HMOT is transmitted via a gear train and Registration Clutch RCL to the Vertical Transport Roller which feeds the paper from Lift 1 or 2 to the machine. • Because of the long paper path from Lift 2 involved, skew tends to occur in the paper fed from Lift 2. Registration Clutch RCL forms a loop in the paper between the Separator Roll and Vertical Transport Roller, thereby correcting the skew. Registration clutch RCL LCC transport motor HMOT Vertical transport roller Vertical transport roller Separator roll Lift 1 2. Control of LCC Transport Motor HMOT A DC motor is used as HMOT which is energized and deenergized by the output signals fed through pins 7 to 10 and 12 of CN6 by way of LCC Main Board PWB-A by the Master Board of the machine. 6-29 Options Large Capacity Cassette 6.5.1.6.2 Paper Take-Up Mechanism • The paper take-up mechanism takes up a sheet of paper from the paper stack on each lift and feeds it to the Vertical Transport Roller. • A paper take-up sequence is performed when drive from LCC Transport Motor HMOT is transmitted via Take-Up Clutch 1/2 P1CL/P2CL to Paper Take-Up Roll 1/2. When Lift 1 runs out of paper, paper is then fed from Lift 2. • Mounted beneath Paper Take-Up Roll 1 of Lift 1 is a roll with a torque limiter that prevents a double feed of the last two sheets of paper. • Paper Take-Up Roll 1 is active when paper is fed from Lift 1. • When paper is fed from Lift 2, both Paper Take-Up Roll 1 and 2 are active to perform the paper take-up sequence. In that case, Paper Empty Sensor 1 PPS1 detects that a sheet of paper has been properly fed through Paper Take-Up Roll 1. • The sheet of paper taken up from Lift 1/2 is temporarily stopped at the Paper Standby Position Sensor to minimize variations in the position of the leading edge of the paper. When drive is transmitted by Separator Clutch BCL to the Separator Roll, the sheet of paper is then transported to the Vertical Transport Section. Separator clutch BCL Take-up clutch 1 P1CL LCC transport motor HMOT Take-up clutch 2 P2CL Paper empty sensor 1 PPS1 Paper take-up roll 2 LCC take-up sensor PPS0 Paper take-up roll 1 Separator roll Roll with a torque limiter 6-30 Large Capacity Cassette Options 1. Paper take-up from Lift 1 A. After Lift 1 has completed its lifting motion, Paper Take-Up Roll 1 is driven to take up and feed a sheet of paper until the paper blocks Paper Standby Position Sensor S1. This serves as the standby position of the paper. Registration sensor RSEN Vertical transport roller Paper standby position sensor S1 Paper take-up roll 1 Separator/Feed roll Lift 2 Lift 1 B. When a Paper Take-Up signal is received from the machine, the Separator/Feed Rolls and Paper TakeUp Roll 1 are driven to transport the paper up to Registration Sensor RSEN. After RSEN has been blocked, the paper is transported a little further to reach the Vertical Transport Roller, plus form a registration loop, before being brought to a stop. Paper standby position sensor S1 Paper take-up roll 1 Lift 2 Lift 1 6-31 Options Large Capacity Cassette C.The Vertical Transport Roller is driven to transport the paper to the machine. When the trailing edge of the paper being transported by the Vertical Transport Roller unblocks Paper Standby Position Sensor S1, the subsequent sheet of paper is transported to the standby position and the LCC waits for the next Paper Take-Up signal to be received. D.Registration Clutch RCL is deenergized a given period of time after the trailing edge of the paper being taken up has unblocked Registration Sensor RSEN. The next Paper Take-Up signal is transmitted after the timer, which is started as the Vertical Transport Roller starts moving for the preceding sheet of paper, has run out. Registration sensor RSEN Vertical transport roller Paper standby position sensor S1 Lift 2 Lift 1 E. The steps B to D are repeated to transport paper from Lift 1. Taking up and feeding two sheets of paper from Lift 1 Start Key ON Operation Enable Signal Paper Take-Up Signal Copier Signal Registration Sensor RSEN ON OFF H L Paper Take-Up Signal Paper Standby Position H Sensor S1 L Registration Clutch RCL ON OFF Separator Clutch BCL ON OFF Take-Up Clutch 1 P1CL ON OFF LCC Transport Motor HMOT ON OFF Standby Position Standby Position After Lift 1 Has Completed Lifting Motion 6-32 Standby Position Large Capacity Cassette Options 2. Paper take-up from Lift 2 A. When all sheets of paper have been taken up and fed in from Lift 1, Lift 1 is placed in the top level position to serve as part of the paper path for paper feeding from Lift 2. B. When the trailing edge of the last sheet of paper from Lift 1 unblocks Paper Empty Sen-sor 1 PPS1, both Paper Take-Up Roll 1 and 2 start turning. C.The sheet of paper is transported by driving both Paper Take-Up Roll 1 and 2 up to a point at which LCC Take-Up Sensor PPS0 is blocked. Paper empty sensor 1 PPS1 Paper take-up roll 2 LCC take-up sensor PPS0 Paper take-up roll 1 Lift 2 Lift 1 D.Paper Take-Up Roll 1 is driven to transport the paper located at PPS0 up to a point at which Paper Standby Position Sensor S1 is blocked. This serves as the standby posi-tion of the paper. Registration sensor RSEN Vertical transport roller Paper standby position sensor S1 Paper take-up roll 1 Separator/Feed roll Lift 2 Lift 1 6-33 Options Large Capacity Cassette E. When a Paper Take-Up signal is received from the machine, the Separator/Feed Rolls and Paper TakeUp Roll 1 are driven to transport the paper up to Registration Sensor RSEN. After RSEN has been blocked, the paper is transported a little further to reach the Vertical Transport Roller, plus form a registration loop, before being brought to a stop. F. The Vertical Transport Roller is driven to transport the paper to the machine. When the trailing edge of the paper being transported by the Vertical Transport Roller unblocks Paper Empty Sensor 1 PPS1, Paper Take-Up Roll 1 and 2 are driven to transport the subsequent sheet of paper to a position at which PPS1 is blocked. Registration sensor RSEN Paper empty sensor 1 PPS1 Paper standby position sensor S1 Vertical transport roller Separator/Feed roll Lift 2 Lift 1 G.A given period of time after the trailing edge of the preceding sheet of paper has unblocked LCC TakeUp Sensor PPS0, the subsequent sheet of paper located at PPS1 is transported to the standby position. LCC then waits for the next Paper Take-Up signal to be received. If no paper is present at the point at which the trailing edge of the preceding sheet of paper is supposed to block S1 when the subsequent sheet of paper blocks PPS1, the subsequent sheet of paper is transported to the standby position without being stopped and the LCC waits for the next Paper TakeUp signal. Registration sensor RSEN Paper empty sensor 1 PPS1 Paper standby position sensor S1 Vertical transport roller Separator/Feed roll Lift 2 Lift 1 6-34 Large Capacity Cassette Options H.Registration Clutch RCL is deenergized a given period of time after the trailing edge of the paper being taken up has unblocked Registration Sensor RSEN. The next Paper Take-Up signal is transmitted after the timer, which is started as the Vertical Transport Roller starts moving for the preceding sheet of paper, has run out. I. The steps E to H are repeated to transport paper from Lift 2. Taking up and feeding two sheets of paper from Lift 2 Copier Signal Registration Sensor RSEN ON OFF Start Key ON Paper Take-Up Signal Paper Take-Up Signal H L Paper Standby Position H Sensor S1 L LCC Take-Up Sensor PPS0 H L Paper Empty Sensor 1 PPS1 H L Registration Clutch RCL ON OFF Separator Clutch BCL ON OFF Take-Up Clutch 1 P1CL Take-Up Clutch 2 P2CL ON OFF ON OFF LCC Transport Motor HMOT ON OFF Standby Position 6-35 Standby Position Standby Position Options Large Capacity Cassette 6.5.1.6.3 Paper Take-Up Retry Control To minimize the occurrence of paper misfeed due to a slippery Paper Take-Up Roll, Separa-tor Clutch BCL is energized a second time if a sheet of paper fails to reach Registration Sensor RSEN within a given period of time after BCL has first been energized. The control timing is as follows. A paper misfeed results if the sheet of paper does not reach the Registration Sensor even after three paper take-up sequences. 6.5.1.6.4 Paper Separating Mechanism The paper separating mechanism employs a system with a torque limiter that is fitted to the Separator Roll shaft and stops the Separator Roll when there is a change in friction between the Feed and Separator Rolls. <Normal Feeding> Feed roll Paper Separator roll Driven or stationary When only one sheet of paper is fed, the friction coefficient on the top side of the paper is equal to that on the underside. Driven by the Feed Roll, the paper drives the Separator Roll. This causes the paper to be sent to the Vertical Transport Section. The friction coefficient varies for different ambient conditions and types of paper being used, which often causes the Separator Roll to be stationary. <Double Feeding> Feed roll 1st sheet of paper 2nd sheet of paper Separator roll Since the friction coefficient between the under-side of the second sheet of paper and Separator Roll is greater than that between the first and second sheets of paper, the Separator Roll is not driven and holds the second sheet of paper at the nip, allowing only the first sheet of paper to be fed to the Vertical Transport Section. Stationary 6-36 Large Capacity Cassette Options 6.5.1.6.5 Paper Pressure Releasing Mechanism • The LCC is provided with a mechanism that releases the pressure between the Feed and Separator Rolls and between the paper and Paper Take-Up Roll when the LCC is slid out of the machine. • The pressure between the Feed and Separator Rolls is released by the Separator Roll Assy and the Pressure Release Rail above the rail on the paper take-up end. When LCC is pulled out, the Pressure Release Rail pushes the Separator Roll Assy downward, thus releasing the pressure between the Feed and Separator Roll. Pressure release rail 6.5.1.6.6 Paper Take-Up Roll Retracting Mechanism The pressure between the paper and Paper Take-Up Roll is released by the projection on the back side of the Front Cover, Pressure Release Lever, and Paper Take-Up Roll Assy. When the LCC is slid out, it releases the Pressure Release Lever, which pushes the Paper Take-Up Roll upward to release pressure between the paper and Paper Take-Up Roll. Pressure release lever 6-37 Options Large Capacity Cassette 6.5.1.6.7 Edge Guides and Trailing Edge Stop The Trailing Edge Stop is screwed into position (not used for Letter crosswise). Edge Guides can be slid into any desired position. Whenever the positions of the Edge Guides and Trailing Edge Stop have been changed, be sure to perform the paper size setting procedure. (See “Paper Size Setting” that follows.) * The inch area LCC can be set for Letter crosswise only. Trailing edge stops Edge guides 6.5.1.6.8 Paper Size Setting The paper sizes that can be set are A4 crosswise, B5 crosswise, and Letter crosswise. After the positions of the Edge Guides and Trailing Edge Stop have been changed, place the DIP switch keys on LCC Main Board PWB-A in the corresponding positions according to the current paper size. SW1 ON OFF 1 2 3 4 PWB-A SW1 1 2 3 4 Letter Crosswise OFF OFF OFF OFF A4 Crosswise ON OFF OFF OFF 6-38 B5 Crosswise OFF ON OFF OFF Large Capacity Cassette Options 6.5.1.6.9 LCC-in-Position Detection The LCC is detected at its closed position when the light blocking plate provided on the rear end of the right rail blocks LCC Set Sensor FRONT. LCC set sensor FRONT 6.5.1.6.10 Lifting Mechanism When the LCC is slid into the machine, the couplings are engaged. When LCC Lift-Up Motor EMOT turns forward and backward, its drive is transmitted via a one-way gear and gear train to raise Lift 1 and Lift 2, in that order. A one-way gear is in each of the Lift 1 and 2 drive mechanisms. When EMOT turns for-ward, its drive is transmitted to Lift 1 and when the motor turns backward, its drive is trans-mitted to Lift 2. One-way gears Couplings LCC lift-up motor EMOT 6-39 Options Large Capacity Cassette When LCC is Slid in: LCC Set Sensor FRONT is blocked. LCC Lift-Up Motor EMOT turns forward to raise Lift 1. The paper stack causes the light blocking plate of the Paper Take-Up Roll 1 Assy to block Lift-Up Sensor 1 LS1. EMOT is deenergized and then energized to start turning backward, thereby raising Lift 2. The paper stack causes the light blocking plate of the Paper Take-Up Roll 2 Assy to block Lift-Up Sensor 2 LS2. EMOT is deenergized. During a Copy Cycle: Paper is consumed as copy cycles are run. The Paper Take-Up Roll gradually lowers, unblocking the Lift-Up Sensor. EMOT is energized and the Lift is raised. This lifts the paper stack to block the Lift-Up Sensor. Both Lift 1 and 2 perform these sequences of operations to keep a given pressure between the paper and Paper Take-Up Roll. 1. Lift 1 and 2 Ascent Conditions • The LCC is slid into position. • The Lift-Up Sensor is unblocked while a paper take-up sequence is being carried out with paper present on the Lift. 2. Lift 1 and 2 Stop Conditions • The Lift-Up Sensor is blocked. • The Lift-Up Sensor is blocked while the paper stack top level position is being corrected. 6-40 Large Capacity Cassette Options When LCC is Slid in: 3. LCC Lift-Up Motor EMOT Control LCC Lift-Up Motor EMOT is a DC motor. It is energized or deenergized and its direction of rotation is determined by the Motor Control signals applied from the machine’s Master Board to pins 1 and 2 of CN5 of LCC Main Board PWB-A. EMOT Energized (Forward Rotation) Energized (Backward Rotation) Deenergized Lift 1 Lift 2 Ascent CN5 1 2 Stop H L Stop Ascent L H Stop Stop L L 4. Descent Motion When the LCC is slid out of the machine, Lift 1 and 2 are lowered. To absorb shocks that would otherwise be applied during the descent motion, springs are loaded in the rear side of the LCC. Lift 1 Lift 2 Springs 6-41 Options Large Capacity Cassette 6.5.1.6.11 Paper Near Empty Detection A paper-near-empty condition is detected by sensing the height of Lift 1 or Lift 2. When paper is consumed during a copy cycle, Lift 1 or 2 gradually moves up. This eventually blocks the Paper Near Empty Sensor, at which timing the machine determines that the LCC will soon run out of paper (the 2 amount of paper (80 g/m ) still available for use is 100 ±50 sheets) and gives a corresponding message on the LCD. Since the amount of paper still available for use varies while a paper take-up sequence is in progress, detection is made at a timing when the Paper Take-Up Roll is in the retracted position. Paper near empty sensor 1/2 RS1/RS2 6.5.1.6.12 Paper Empty Detection A paper-empty condition is detected by a reflector type photosensor, Paper Empty Sensor 1 PPS1 and Paper Empty Sensor 2 PPS2, installed in the Paper Take-Up Unit. When a paper-empty condition is detected, the corresponding message is displayed on the LCD. • When Paper is Loaded The light from the LED of Paper Empty Sensor 1 PPS1 or Paper Empty Sensor 2 PPS2 is reflected, with which the machine determines that there is paper in LCC. • When No Paper is Loaded The light from the LED of Paper Empty Sensor 1 PPS1 or Paper Empty Sensor 2 PPS2 is not reflected, with which the machine determines that there is no paper loaded in the LCC. 6-42 Large Capacity Cassette Options Panel Display Lift 1 Paper-near-empty Lift 2 Paper-near-empty Paper-empty : Paper-near-empty display : Paper-empty display Paper-empty 6.5.1.6.13 Paper Dehumidifying Heaters (Option) To prevent paper passage performance from being degraded by damp paper under highly humid conditions, Paper Dehumidifier Heaters are mounted on both sides of the LCC. As long as the power cord is plugged in, these heaters are kept ON at all times. Paper dehumidifying heaters 6-43 Options Large Capacity Cassette 6.5.2 DIS/REASSEMBLY, ADJUSTMENT 6.5.2.1 Disassembly 6.5.2.1.1 Removal of Exterior Parts 1 2 6 3 4 No. 1 2 3 4 Part Name Left Cover Front Cover Side Panel Right Cover 5 Rear Cover 6 Maintenance Panel 5 Removal Steps Remove two screws. Slide out the LCC and remove three screws. Open the Side Panel. Remove two screws. After the Maintenance Panel has been removed, remove four screws. Remove one screw. 6-44 Large Capacity Cassette Options 6.5.2.1.2 Removal of the Paper Take-Up Unit 1. Remove the LCC. 2. Unplug three connectors and remove the har-ness from five cord clamps. 3. Remove two screws and the Right Cover. 4. Open the Side Panel. 5. Remove two screws and the Paper Take-Up Unit. 6-45 Options Large Capacity Cassette 6.5.2.1.3 Removal of the Paper Take-Up Rolls 1. Remove the Paper Take-Up Unit. 2. Unplug one connector of Lift-Up Sensor 1 and another of Take-Up Clutch 1 of the right Paper Take-Up Roll Assy. 3. Unhook two springs. 4. Remove one screw and, while removing the timing belt toward the clutch side, remove the right Paper Take-Up Roll Assy. When mounting the right Paper Take-Up Roll Assy, fit the ends of the assy into position as shown. 5. Unplug one connector of Lift-Up Sensor 2 and another of Take-Up Clutch 2 of the left Paper Take-Up Roll Assy. 6. Unhook two springs. 7. Remove one screw and the left Paper Take-Up Roll Assy. 6-46 Large Capacity Cassette Options When mounting the left Paper Take-Up Roll Assy, fit the ends of the assy into position as shown. When mounting the Paper Take-Up Roll Assys, fit the Take-Up Clutch into position as shown. 8. Snap off one C-clip from the Paper Take-Up Roll 1 shaft. 9. Take the shaft and Paper Take-Up Roll 1 apart. When mounting Paper Take-Up Roll 1, face the C-clip as shown. 10.Snap off two C-clips and take off Paper Take-Up Roll 2. 6-47 Options Large Capacity Cassette 6.5.2.1.4 Removal of the Feed Roll, Separator Roll and Torque Limiter Assy. 1. Open the Side Cover. 2. Snap off one C-clip from the Separator Roll shaft and remove the Separator Roll and Torque Limiter Assy. 3. Snap off one C-clip from the Feed Roll shaft and remove the Feed Roll. 6.5.2.1.5 Cleaning of the Paper Take-Up Roll 1. Remove the Paper Take-Up Unit. 2. Wipe the surface of Paper Take-Up Roll 1 & 2 clean with a soft cloth dampened with alcohol. 6.5.2.1.6 Cleaning of the Feed Roll and Separator Roll 1. Open the Side Panel. 2. Wipe the surface of the Feed/Separator Roll clean with a soft cloth dampened with alcohol. 6-48 Large Capacity Cassette Options 6.5.2.1.7 Cleaning of the Vertical Transport Roller/Rolls 1. Remove the Paper Take-Up Unit. 2. Wipe the surface of the Vertical Transport Roller/Rolls clean with a soft cloth dampened with alcohol. 6.5.2.1.8 Cleaning of the Roll with a Torque Limiter 1. Slide out the LCC. 2. Wipe the surface of the Roll with a Torque Limiter clean with a soft cloth dampened with alcohol. 6-49 Options Large Capacity Cassette 6.5.2.2 Adjustment 6.5.2.2.1 Registration Adjustment (Printer) See “5.3.1 Printer Registration (top)” on page 5-81 and “5.3.2 Printer Registration (side)” on page 5-82. 6.5.3 MISFEED/MALFUNCTION DETECTION 6.5.3.1 Misfeed Detection 6.5.3.1.1 Misfeed Detecting Sensor Layout Synchronizing roller sensor PC2 Additional 1st cassette take-up sensor (S3) Paper empty sensor 1 PPS1 Registration sensor RSEN Paper standby position sensor S1 6-50 Large Capacity Cassette Options 6.5.3.1.2 Types of Misfeed and Misfeed Detection Timings Type Paper left Lift 1 paper take-up failure detection Lift 2 paper take-up failure detection Registration Sensor paper leading edge detection Registration Sensor paper trailing edge detection Vertical transport paper leading edge detection Size error detection * The detection described on the right is also made during a 2-sided copy cycle. Detection Timing The output from Registration Sensor RSEN is blocked (H) when the machine Power Switch is turned ON or a misfeed is reset. Paper Standby Position Sensor S1 is not blocked (H) within a given period of time after Take-Up Clutch 1 P1CL has been energized. Paper Empty Sensor 1 PPS1 is not blocked (H) within a given period of time after Take-Up Clutch 2 P2CL has been energized. S1 is not blocked (H) within a given period of time after P1CL has been energized. RSEN is not blocked (H) within a given period of time after Separator Clutch BCL has been energized (after two paper take-up retry sequences). RSEN is not unblocked (L) within a given period of time after Registration Clutch RCL has been energized. • LCC only: Synchronizing Roller Sensor PC2 is not unblocked (H) within a given period of time after Registration Clutch RCL has been turned ON. • Additional 1st cassette + LCC: Take-Up Sensor S3 of the additional 1st drawer is not blocked (H) within a given period of time after Registration Clutch RCL has been turned ON. • LCC only: The period of time is counted from when Synchronizing Roller Clutch CL1 is energized to when Synchronizing Roller Sensor PC2 is blocked (L). The difference between the detected length and the paper size which has been recognized is more than ±20 mm. • Additional 1st cassette + LCC: The period of time is counted from when Take-Up Sensor S3 of the additional 1st drawer is blocked (L) to when it is unblocked (H). The difference between the detected length and the paper size which has been recognized is more than ±20 mm. 6-51 Options Large Capacity Cassette 6.5.3.2 Malfunction Detection Malfunction Code 21 Description LCC Lift-Up Motor EMOT failure to turn 23 Lift 1 ascent motion failure 20 24 LCC Transport Motor HMOT failure to turn Lift 2 ascent motion failure 25 Communications error Detection Timing The overcurrent detection circuit detects an overcurrent condition that lasts for a given period of time while EMOT remains energized. Lift-Up Sensor 1 LS1 is not blocked (H) within a given period of time after EMOT has been energized (Lift 1 has started moving up). The HMOT Lock signal is not input for a given period of time. Lift-Up Sensor 2 LS2 is not blocked (H) within a given period of time after EMOT has been energized (Lift 2 has started moving up). LCC becomes uncontrollable due to an error in communications between the LCC and machine. 6-52 Additional cassette section Take-up clutch 1 Take-up clutch 2 Registration clutch Separator clutch LCC take-up sensor Lift-up sensor 2 Lift-up sensor 1 Paper near empty sensor 1 PWB-A LCC main board Registration sensor LCC set sensor Side cover set sensor LCC transport motor Paper empty sensor 2 Paper standby position sensor Paper empty sensor 1 Paper near empty sensor 2 LCC lift-up motor 6-53 6.6 2-Bin/Shift Tray Unit 6.6 Shift/2-Bin Tray Unit ....................................................................................................................... 6-54 6.6.1 GENERAL, MECHANICAL/ELECTRICAL .................................................................................. 6-55 6.6.1.1 Specifications ....................................................................................................................... 6-55 6.6.1.2 Part Identification.................................................................................................................. 6-56 6.6.1.3 Cross-Sectional View ........................................................................................................... 6-57 6.6.1.4 Drive System ........................................................................................................................ 6-58 6.6.1.5 Electrical Components Layout.............................................................................................. 6-59 6.6.1.6 Operation Of Each Mechanism ............................................................................................ 6-61 6.6.2 DIS/REASSEMBLY, ADJUSTMENT........................................................................................... 6-68 6.6.2.1 Disassembly ......................................................................................................................... 6-68 6.6.2.2 Adjustment............................................................................................................................ 6-69 6.6.3 TROUBLESHOOTING ................................................................................................................ 6-70 6.6.3.1 Paper misfeed detection and trouble shooting procedures .................................................. 6-70 6.6.3.2 Malfunction detection and trouble shooting procedures ....................................................... 6-71 Note: Throughout the entire text of this manual, the following product codes are used to denote the products covered in this manual: • JS-200: Job Tray • OT-100: Shift Tray 6-54 2-Bin/Shift Tray Options 6.6.1 GENERAL, MECHANICAL/ELECTRICAL 6.6.1.1 Specifications Type : Job Tray: Straight ejection (Paper Path Switching Type Job Tray) Shift Tray: Straight ejection (Job Offset Tray) Installation : Desktop Copy Media : Plain paper weighing 60 to 90 g/m², OHP transparen-cies, heavy paper (91 to 163 g/m²), postcards, envelopes Size : Job Tray: A3 to A6L (11″×17″ to 4″×5.75″L) Shift Tray: A3 to A6L (11″×17″ to 4″×5.75″L) (in Non-Sort mode) A3 to A5C (11″×17″ to 5.5″×8.5″C) (in Sort or Group mode) Max. Capacity : Plain paper: Job Tray: 100 sheets (Upper Exit Tray) + 250 sheets (Lower Exit Tray) Shift Tray: 250 sheets (Exit Tray) Transparencies, thick paper, postcards, envelopes: Job Tray: 20 sheets (Lower Exit Tray) Shift Tray: 20 sheets (Exit Tray) Power Requirements : DC24V ±10%, DC5V ±5% (supplied from main unit) Max. Power Consumption : 26W or less Dimensions : 486 (W) × 500 (D) × 201 (H) mm (Job Tray) (19.25″ (W) × 19.75″ (D) × 8″ (H)) 490 (W) × 556 (D) × 201 (H) mm (Shift Tray) (19.25″ (W) × 22″ (D) × 8″ (H)) Weight : Job Tray: 4.7 kg (10.25 lbs) (including bracket) Shift Tray: 6.8 kg (15 lbs) (including bracket) Environmental Requirements : Same as machine 6-55 Options 2-Bin/Shift Tray 6.6.1.2 Part Identification <Job Tray> <Shift Tray> 1 1 3 2 7 3 2 7 6 6 5 4 5 1. Exit Tray 2. Top Cover 3. Rear Cover 4. Paper Misfeed Removal Door 5. Exit Path Switching Plate 6. Lower Front Cover 7. Front Cover 6-56 4 2-Bin/Shift Tray Options 6.6.1.3 Cross-Sectional View <Job Tray> <Shift Tray> 1. Transport Motor M1 2. Paper Exit Roller 3. Path Switching Solenoid SL1 4. Exit Path Switching Plate 5. Shift Motor M2 (Shift Tray only) 6-57 Options 2-Bin/Shift Tray 6.6.1.4 Drive System <2-Bin tray> Transport motor M1 <Shift tray> Transport motor M1 Shift motor M2 6-58 2-Bin/Shift Tray Options 6.6.1.5 Electrical Components Layout <2-Bin Tray> PWB-B1 PC2 PC1 PC3 PC5 M1 PWB-A SL1 Symbol PWB-A PWB-B1 PWB-C1 M1 SL1 Name PWB-C1 Symbol Main Board PC1 Upper Empty Sensor PQ Board Upper Empty Sensor LED Board Transport Motor Path Switching Solenoid PC2 PC3 PC5 6-59 Name Paper Misfeed Removal Door Set Sensor Upper Full Detecting Sensor Upper Exit Sensor Lower Full Detecting Sensor Options 2-Bin/Shift Tray <Shift Tray> PWB-C2 PWB-B1 PC1 M1 PWB-B2 PC3 PC4 PWB-A SL1 PWB-C1 M2 Symbol PWB-A PWB-B1 Name Main Board Upper Empty Sensor PQ Board Symbol M2 SL1 PWB-C1 Upper Empty Sensor LED Board PC1 PWB-B2 PWB-C2 M1 Upper Full Sensor PQ Board Upper Full Sensor LED Board Transport Motor PC3 PC4 6-60 Name Shift Motor Path Switching Solenoid Paper Misfeed Removal Door Set Sensor Upper Exit Sensor Shift Home Sensor 2-Bin/Shift Tray Options 6.6.1.6 Operation Of Each Mechanism 6.6.1.6.1 Paper Transport Mechanism (1) Paper Transport Path A sheet of paper fed out of the machine by the Paper Exit Roller/Rolls of the machine is fed through, and out of, this unit by the unit’s Paper Exit Roller onto the unit’s Exit Tray. Since this unit is mounted directly on top of the machine, Section over the machine Exit Tray, it serves as an upper exit tray. The tray into which paper is fed out is selected depending on the copying mode. (2) Paper Exit Roller Drive The Paper Exit Roller is driven by Transport Motor. Paper exit roller Transport motor M1 6-61 Options 2-Bin/Shift Tray (3) Control of Transport Motor A two-phase stepping motor is used as Transport Motor. The motor is turned as the pulse signals output from PJ8A-1 to 4 are applied to it. The direction of the motor rotation is switched by changing the output sequence of these pulse signals. PJ8A 1 2 3 4 Forward Rotation Step 1 L H L H 2 L H H L 3 H L H L 4 H L L H Transport Motor is energized when the paper fed through the machine during a copy cycle activates the Paper Exit Sensor of the machine if the Upper Exit Tray is selected as the exit port. It is deenergized if the Paper Exit Sensor of the machine is not activated even after the lapse of 1 sec. after Upper Exit Sensor has been deactivated. 6-62 2-Bin/Shift Tray Options 6.6.1.6.2 Full-of-Paper Detecting Mechanism (1) Job Tray • Paper is fed into the Upper Exit Tray or Lower Exit Tray depending on the copy mode. The paper being fed into the tray operates the actuator, which unblocks and blocks the Upper or Lower Full Detecting Sensor to allow the system to detect a full-of-paper condition. (Upper Exit Tray) A full-of-paper condition is detected when the Upper Full Detecting Sensor remains unblocked for a continuous, given period time. (Lower Exit Tray) A full-of-paper condition is detected when the Lower Full Detecting Sensor remains unblocked for a continuous, given period time. 6-63 Options 2-Bin/Shift Tray (2) Shift Tray In the Shift Tray, a photointerruptor (PWB-B2, -C2) is used. When light from the PWB-C2 LED is blocked by a sheet of paper being fed out onto the tray, a full-of-paper condition is detected. 6-64 2-Bin/Shift Tray Options 6.6.1.6.3 Exit Path Switching Mechanism The paper path is selected by energizing or deenergizing Path Switching Solenoid SL1, which results in the Exit Path Switching Plate being swung down or up. (1) Job Tray The paper exit tray (Upper or Lower Exit Tray) is selected according to the setting made on the machine. When the Lower Exit Tray is selected, the Path Switching Solenoid is deenergized a given period of time after the Paper Exit Sensor of the machine has been blocked, thereby feeding the paper into the Lower Exit Tray. In the 2-sided copy mode, the paper fed into this unit is reversed (switchback) and fed back towards the Duplex Unit. (The Path Switching Solenoid is deenergized if the Paper Exit Sensor of the machine is not blocked within a given period of time after the switchback operation has been started.) (2) Shift Tray In the 2-sided copy mode, if the length of the paper being fed into this unit exceeds 150 mm, the Path Switching Solenoid is energized after a given period of time after the Paper Exit Sensor of the machine has been blocked to reverse the paper under the Exit Tray and feed it back into the Duplex Unit. If the length of the paper being fed into the unit is 150 mm or less, the Path Switching Solenoid is deenergized after a given period of time after the Paper Exit Sensor of the machine has been blocked to transport the paper into the Exit Tray. Job Tray Shift Tray SL1 SL1 Energized Paper fed into the Upper Exit Tray For switchback to Duplex Unit Control Signal PJ6A-2 SL1 Deenergized Paper fed into the Lower Exit Tray When feeding paper out ON L 6-65 OFF H Options 2-Bin/Shift Tray 6.6.1.6.4 Initial Operation The Transport Motor is energized at the same time when predrive of the machine is started (Job Tray/Shift Tray). The unit carries out the Shift Tray home position detection sequence when the Power Switch of the machine is turned ON or when the Paper Misfeed Removal Door is opened and closed after a paper misfeed has been cleared (Shift Tray only). (1) Shift Tray Home Position Detection The unit determines that the Shift Tray is at its home position when the Shift Home Sensor is blocked by the light blocking plate. (If the Shift Tray is at its home position) The Shift Motor is energized (forward or backward rotation) so that the Shift Home Sensor is unblocked, then blocked again. (If the Shift Tray is out of its home position) The Shift Motor is energized until the Shift Home Sensor is blocked. 6-66 2-Bin/Shift Tray Options 6.6.1.6.5 Paper Misfeed Removal Door Set Detection The Paper Misfeed Removal Door is detected at its closed position by the Paper Misfeed Removal Door Set Sensor. The unit determines that the door is left open if the sensor remains unblocked for a given period of time and that it is closed if the sensor remains blocked for a given period of time. If the sensor is unblocked, a closure failure warning is given on the machine control panel and the machine inhibits the initiation of a new copy cycle. 6-67 Options 2-Bin/Shift Tray 6.6.2 DIS/REASSEMBLY, ADJUSTMENT Precautions for Disassembly, Reassembly, and Adjustment • Before attempting to disassemble the unit, always make sure that no power is being supplied from the machine (by unplugging the power connector from the machine). • While power is being supplied to the unit, do not attempt to remove/install the print jacks from/to the PWBs or unplug/plug in the connectors. • If the unit is run with its covers removed, use care not to allow your clothing to be caught in revolving parts. • The basic rule is do not run the unit with any of its parts removed. • A toothed washer is used with the screw that secures the ground wire to ensure positive conduction. Do not forget to include this washer at re-assembly. • To reassemble the unit, reverse the order of disassembly unless otherwise specified. • Do not attempt to remove or loosen the screws to which red paint has been applied. 6.6.2.1 Disassembly 6.6.2.1.1 Removal of the Exterior Covers <2-Bin Tray> 1. Rear Cover: Loosen four screws and slide the cover toward to the rear. 2. Top Cover: Remove the Front and Rear Covers and lift the cover upward. 3. Front Cover: Remove the Lower Front Cover, loosen four screws, and slide the cover to the front. 4. Lower Front Cover: Unlock the tabs and slide the cover to the front. 6-68 2-Bin/Shift Tray Options <Shift Tray> 1. Rear Cover: Loosen four screws and slide the cover toward to the rear. 2. Top Cover: Remove the Front and Rear Covers and lift the cover upward. 3. Front Cover: Remove the Lower Front Cover, loosen four screws, and slide the cover to the front. 4. Lower Front Cover: Unlock the tabs and slide the cover to the front. 6.6.2.1.2 Cleaning of the Paper Exit Roller Wipe the surface of the Paper Exit Roller clean of dirt with a cloth dampened with alcohol. 6.6.2.2 Adjustment Path Switching Solenoid Stroke Adjustment 1. Remove the Main Board. 2. Loosen the two screws that secure the solenoid and adjust its position so that dimension A measures 5.2 to 4.7 mm (Job Tray) or 4.4 to 3.9 mm (Shift Tray). 6-69 Options 2-Bin/Shift Tray 6.6.3 TROUBLESHOOTING 6.6.3.1 Paper misfeed detection and trouble shooting procedures 6.6.3.1.1 Misfeed Detection A paper misfeed is detected under any of the following conditions, causing a misfeed display to be given on the machine control panel. Type Transport misfeed Paper left Exit misfeed Detection Timing The Upper Exit Sensor is not blocked within a given period of time after the Paper Exit Sensor of the machine has been blocked. The Upper Exit Sensor is blocked when the Power Switch is turned ON or a paper misfeed is reset. The Upper Exit Sensor is not unblocked within a given period of time after the Paper Exit Sensor of the machine has been unblocked. 6.6.3.1.2 Misfeed Troubleshooting Procedures Step 1 2 Check Item Does the paper being used meet product specifications? Is the paper curled, waved, or damp? 3 Is the Transport Guide Plate dirty? YES 4 Is the Transport Roller deformed or worn? Does the Transport Motor operate properly? YES 6 Does the actuator of the Upper Exit Sensor operate properly? NO 7 Is the Upper Exit Sensor output signal properly applied to the Main Board? YES NO 5 Result NO YES NO 6-70 Action Instruct the user to use paper that meets product specifications. Change the paper. Instruct the user in how to store the paper. Remove foreign matter and clean the guide plate. Change the Transport Roller. Check the wiring between the Main Board and Transport Motor and, if it is intact, change the motor. Check the position of the Upper Exit Sensor installation and check the actuator for deformation and contamination. Change the Main Board. Check the wiring between the Main Board and Upper Exit Sensor and, if it is intact, change the sensor. 2-Bin/Shift Tray Options 6.6.3.2 Malfunction detection and trouble shooting procedures 6.6.3.2.1 Malfunction Detection (Shift Tray only) A malfunction is detected under the following condition, causing the corresponding malfunction code to be displayed on the machine control panel. (See “Service call error,” page 4-22.) Malfunction Code 28 Malfunction Detail Shift Tray shift motion failure Detection Timing (When moving from home to shift position) The Shift Home Sensor is blocked after a given period of time after the Shift Motor has been energized (at which timing the motor is deenergized). (When moving from shift to home position) The Shift Home Sensor is not blocked even after the lapse of a given period of time after the Shift Motor has been energized. 6.6.3.2.2 Malfunction Troubleshooting Procedures Step 1 2 3 4 5 Check Item Does the Shift Tray move in the initial operation? Does the Shift Tray slide smoothly when the gear is turned manually with the Shift Motor removed? Is an output signal being sent from the Main Board to Shift Motor? Are the Shift Home Sensor and its light blocking plate dirty? Is the Shift Home Sensor output signal properly applied to the Main Board? Result YES Action Check step 4. NO Check for contamination and improper installation. YES Check the wiring between the Main Board and Shift Motor and, if it is intact, change the motor. Change the Main Board. Remove foreign matter or clean. NO YES YES NO 6-71 Change the Main Board. Check the wiring between the Main Board and Shift Home Sensor and, if it is intact, change the sensor. <2-Bin Tray> PWB-A Control board Transport motor Lower full detecting sensor Paper misfeed removal door set sensor Bin shift solenoid Upper exit sensor Upper empty sensor LED board Upper empty sensor PQ board Upper full detecting sensor From the machine 6-72 <Shift Tray> From the machine Shift home sensor Upper empty sensor PQ board Upper empty sensor LED board Upper exit sensor Bin shift solenoid PWB-A Control board Transport motor Paper misfeed removal door set sensor Lower full sensor LED board Lower full sensor PQ board Shift motor 6-73 6.7 Duplex Unit 6.7 Duplex Unit..................................................................................................................................... 6-74 6.7.1 GENERAL, MECHANICAL/ELECTRICAL .................................................................................. 6-75 6.7.1.1 Specifications ....................................................................................................................... 6-75 6.7.1.2 Parts Identification ................................................................................................................ 6-76 6.7.1.3 Cross-Sectional View ........................................................................................................... 6-76 6.7.1.4 Drive System ........................................................................................................................ 6-77 6.7.1.5 Electrical Components Layout.............................................................................................. 6-77 6.7.1.6 Mechanical Operations......................................................................................................... 6-78 6.7.2 DIS/REASSEMBLY, ADJUSTMENT........................................................................................... 6-83 6.7.2.1 Disassembly ......................................................................................................................... 6-83 6.7.2.2 ADJUSTMENT ..................................................................................................................... 6-85 6.7.3 MISFEED DETECTION .............................................................................................................. 6-86 6.7.3.1 Misfeed Detection................................................................................................................. 6-86 6-74 Duplex Unit Options 6.7.1 GENERAL, MECHANICAL/ELECTRICAL 6.7.1.1 Specifications Type Installation Type of Paper Paper Size Registration Power Requirements Power Consumption Dimensions Weight Environmental Requirements : Switchback and Circulating Duplex Unit : Mounted on the right side door of the machine : Plain paper (60 to 90 g/m² or 16 to 24 lbs.), recycled paper (60 to 90 g/m² or 16 to 24 lbs.) : A5L/C to A3L or 5.5″ × 8.5″L/C to 11″ × 17″L (L: Lengthwise; C: Crosswise) : Center : DC24V ±10%, DC5V ±10% (supplied from main unit) : 21W or less : 55 (W) × 415 (D) × 255 (H) or 2.25″ (W) × 16.25″ (D) × 10″ (H) : 1.8 kg or 4 lbs. : Same as machine 6-75 6.7.1.2 Parts Identification 1 1. Duplex Unit Door 6.7.1.3 Cross-Sectional View 1 2 3 4 1. Duplex Unit Transport Roller 1 2. Duplex Unit Transport Roll 1 3. Duplex Unit Transport Roller 2 4. Duplex Unit Transport Roll 2 6-76 Duplex Unit Options 6.7.1.4 Drive System Switchback drive mechanism Duplex unit transport drive mechanism 6.7.1.5 Electrical Components Layout M1 PI1 PWB-A M2 S2 Symbol PWB-A M1 M2 Name Duplex Main Board Switchback Motor Duplex Unit Transport Motor Symbol S2 PI1 6-77 Name Duplex Unit Door Set Sensor Duplex Unit Transport Sensor (in PWB-A) 6.7.1.6 Mechanical Operations 6.7.1.6.1 Switchback Mechanism (1) Switchback Operation The Paper Exit Roller reverses the direction of feeding the 1-sided copy into the Duplex Unit (switchback operation). This switchback operation by the Paper Exit Roller is accomplished by changing the direction of rotation of the Switchback Motor whose drive is transmitted via a gear train. When the motor is turned forward, the paper is fed out of the machine. When the motor is turned backward, the paper is fed into the Duplex Unit. Feeding the paper into duplex unit Paper exit sensor PC3 Paper exit roller (2) Paper Exit Roller Drive Coupling Mechanism When the Duplex Unit is mounted, the tip of the Duplex Unit Lever raises the Idle Lever to disconnect the drive from the machine (Fusing Roller) and, instead, provides the Paper Exit Roller with the drive from the Switchback Motor. Idle lever Paper exit roller Switchback motor M1 Duplex unit lever (3) Switchback Motor Control The Switchback Motor is a two-phase stepping motor. Its direction of rotation and speed are controlled by applying pulse signals output from pins 1 to 4 of PJ3A to the motor. 6-78 Duplex Unit Options 6.7.1.6.2 Transport and Duplex Paper Take-Up Mechanism (1) Transport and Duplex Paper Take-Up Operation The paper fed into the Duplex Unit is transported through, and eventually fed out of, the Duplex Unit before being fed to the paper take-up mechanism of the machine. The transport and Duplex paper take-up operations are performed by two pairs of Duplex Unit Transport Rollers/Rolls and the Manual Feed Paper Take-Up Roll of the machine. The use of the latter contributes to smaller floor space requirements. The drive for these operations comes from the Duplex Unit Transport Motor and Manual Feed Paper Take-Up Clutch. Duplex unit transport roller 1 and 2 Duplex main board PWB-A Duplex unit transport sensor PI1 Duplex unit transport motor M2 Transport motor M2 Manual feed paper take-up roll Manual feed paper take-up sensor PC8 Manual feed paper take-up clutch CL3 (2) Duplex Unit Transport Motor Control The Duplex Unit Transport Motor is a two-phase stepping motor. Its speed is controlled by applying pulse signals output from pins 1 to 4 of PJ2A to the motor. 6-79 6.7.1.6.3 2-Sided Copying Schemes The following two 2-sided copying schemes are available. Note, however, that the paper size (in the feeding direction) that is applicable to double-sheet 2-sided copying is Letter crosswise (215.9 mm) or smaller. Single-sheet 2-sided copying 2-Sided Copying Schemes Double-sheet 2-sided copying (1) Operation of Single-Sheet 2-Sided Copying 1. A sheet of paper is taken up and fed in and the image of the second page is printed. 2. Just before the 1-sided copy moves past the Paper Exit Roller, the direction of rotation of the Paper Exit Roller is reversed and the 1-sided copy is transported towards the Duplex Unit. 3. The 1-sided copy being transported through the Duplex Unit is fed into the machine with-out being stopped. 4. The image of the first page is printed on the 1-sided copy fed out of the Duplex Unit and the resultant 2sided copy is fed towards the paper exit section of the machine. 5. As the 2-sided copy is being fed out of the machine, the next sheet of paper is taken up and fed in for the printing of the image of the fourth page. (Steps 2 through 5 are then repeated.) Paper exit roller PC drum Step 1 Step 2 Step 4 Step 5 6-80 Step 3 Duplex Unit Options Switchback Motor M1 ON OFF Duplex Unit Transport Motor M2 Manual Feed Paper Take-Up Clutch CL3 ON OFF Forward Backward Rotation Rotation (Paper Length + 30 mm) Forward Rotation ON OFF Paper Exit Sensor PC3 H L Synchronizing Roller Sensor PC2 H L Duplex Unit Transport Sensor PI1 H L * When the paper moves a distance of about 20 mm after it has unblocked (H) the Synchronizing Roller Sensor, both Duplex Unit Transport Motor M2 and Manual Feed Paper Take-Up Clutch CL3 are temporarily deenergized. (The period of time during which M2 and CL3 are kept deenergized varies depending on the Image Synchronizing signal out-put timing. 6-81 (2) Operation of Double-Sheet 2-Sided Copying 1. The first sheet of paper is taken up and fed in and the image of the second page is printed. 2. Just before the 1-sided copy moves past the Paper Exit Roller, the direction of rotation of the Paper Exit Roller is reversed and the 1-sided copy is transported towards the Duplex Unit. At the same time, the second sheet of paper is taken up and fed in. 3. At the same time when the image of the fourth page is printed on the second sheet of paper, the first 1sided copy is transported through the Duplex Unit. Because of the Duplex paper take-up timing involved, the first 1-sided copy is temporarily stopped at a point 20 mm before the Manual Feed TakeUp Roll; but it is soon fed out of the Duplex Unit. 4. The image of the first page is printed on the first 1-sided copy fed out of the Duplex Unit. At the same time, the second 1-sided copy is reversed at the paper exit section of the machine and transported towards the Duplex Unit. It is then fed out of the Duplex Unit without being stopped. 5. The image of the third page is printed on the second 1-sided copy. 6. As the second 2-sided copy is fed towards the paper exit section of the machine and as it is being fed out of the machine, the third sheet of paper is taken up and fed in for the printing of the image of the sixth page. (Steps 2 through 6 are then repeated.) Paper exit roller PC drum Step 1 Step 2 Step 4 Step 5 6-82 Step 3 Step 6 Duplex Unit Options 6.7.2 DIS/REASSEMBLY, ADJUSTMENT 6.7.2.1 Disassembly 6.7.2.1.1 Removal of the Duplex Unit 1. Remove the wiring cover (one screw). 2. Unplug the connectors (two). 3. Remove the Duplex Unit (two screws). 6.7.2.1.2 Cleaning of Duplex Unit Transport Roller 1 and 2 and Duplex Unit Transport Roll 1 and 2 Wipe the surfaces of Duplex Unit Transport Roller 1 and 2 and Duplex Unit Transport Roll 1 and 2 clean with a soft cloth dampened with alcohol. 6-83 6.7.2.1.3 Cleaning of Exhaust Vent area 1. Wipe the surface of the Exhaust Vent areas clean with a soft cloth dampened with alcohol. 6-84 Duplex Unit Options 6.7.2.2 ADJUSTMENT 6.7.2.2.1 Adjustment of Printer Registration (side) Requirement: First perform the adjustments listed below: 1. Printer registration (top) and Printer registration (side) for all paper sources. (See page 5-81 and 5-82.) 2. ADF registration (top and side) and FBS registration (top and side). (See page 5-83 and 5-84.) A A Test pattern D Dimension A on the 2-sided copy should be adjusted to meet specifications. Specification 10 ± 2.0 (mm) Adjustment Tool Machine parameter K:7 Machine parameter L:7 Setting Range – 12.8 to 12.7 (mm) (0.1 mm step) Adjustment procedure 1. Load the A3-sized paper to the cassette. 2. Produce a test pattern D with the A3-sized paper and make a 2-sided copy of it. (To produce a test pattern D, press MENU, [, 9, Test Pattern Print. For detail, see page 3-123.) 3. Check to see if width A meets the specifications. If width A falls outside the specified range, perform following steps to make the adjustment. 4. Entry the Machine Parameter mode. (Press MENU, [, 0. For detail, see page 3-2.) 5. Adjust the setting of Machine Parameter K:7 to meet the specification. If the width A is shorter than specification, increase value. If the width A is longer than specification, decrease value. 6-85 6.7.3 MISFEED DETECTION 6.7.3.1 Misfeed Detection 6.7.3.1.1 Misfeed Detecting Sensors Layout Paper exit sensor PC3 Duplex unit transport sensor PI1 Synchronizing roller sensor PC2 6.7.3.1.2 Types of Misfeed and Misfeed Detection Timings Type Paper left Paper take-up failure Paper leading edge detection during transport through Duplex Unit Detection Timing The output from Duplex Unit Transport Sensor PI1 is blocked (L) when the machine Power Switch is turned ON or a misfeed is reset. 1. Synchronizing Roller Sensor PC2 is unblocked (H) at a shorter than normal tim7e after a Duplex paper take-up sequence has started. 2. Synchronizing Roller Sensor PC2 is not unblocked (H) within a given period of time after a Duplex paper take-up sequence has started. Duplex Unit Transport Sensor PI1 is not blocked (H) within a given period of time after Paper Exit Sensor PC3 has been unblocked (H). 6-86 Duplex Unit Options Duplex unit transport motor From the machine PWB-A Duplex main board Duplex unit door set sensor Switchback motor 6-87 6.8 Second phone line 6.8 Second phone line ......................................................................................................................... 6-88 6.8.1 Attaching the second phone line ................................................................................................. 6-89 6.8.1.1 Unpacking............................................................................................................................. 6-89 6.8.1.2 Installing the Second phone line module.............................................................................. 6-89 6.8.2 Display of the Software Version .................................................................................................. 6-92 6.8.3 Adjustment .................................................................................................................................. 6-93 6.8.3.1 Memory Switches Adjustment .............................................................................................. 6-93 6.8.3.2 Unique Switches Adjustment................................................................................................ 6-94 6-88 Second phone line Options 6.8.1 Attaching the second phone line 6.8.1.1 Unpacking Included in the second phone line kit’s carton box: NCU PCB ........................................................................... 1 Modem PCB ....................................................................... 1 Connection cable (60P: with ferrite core) ........................... 1 Connection harness 1 (13P: orange).................................. 1 Connection harness 2 (14P: yellow)................................... 1 Spacers (long) .................................................................... 2 Spacers (short) ................................................................... 2 PCB brackets...................................................................... 2 Cable clamp........................................................................ 1 Insulator.............................................................................. 1 Screws................................................................................ 7 Operating instructions (includes setting-up instructions).... 1 6.8.1.2 Installing the Second phone line module 1. Turn the machine off and unplug the power cord and telephone line cord. 2. Remove the rear cover (upper). 3. Remove the upper cover, and then remove the shield box. Shield box Upper cover 4. Use cutting pliers to gently punch out the perforated panel of the “EXTENSION LINE” and “EXTENSION PHONE” on the panel sheet. 6-89 Options Second phone line 5. Attach two long spacers and two short spacers to the places marked “ 2 ” on the metal plate. 6. Attach the cable clamp to the place marked “ ”. 7. Attach two PCB brackets using screws. PCB bracket Spacer (short) Cable clamp Spacer (long) 8 Attach the NCU PCB of the second phone line kit using two screws and two spacers. Spacer (short) 9 Attach the Modem PCB of the second phone line kit and Insulator using two screws and two spacers. Insulator Spacer (long) PCB bracket 6-90 Second phone line Options 10 Connect P30A and P3A, P30B and P3B using the harnesses. Pass the harnesses through the clamp attached in step 6, and let them be under the NCU PCB. NCU PCB Cable clamp Modem PCB 11 Connect P6 on the Main PCB of the main unit and IN on the Modem PCB using the harness as shown: 12 Attach the FG line on the Modem PCB to the place marked “FG” on the metal plate. Connector P6 F.G. wire IN OUT 13 Reinstall the covers. 14.Connect second phone line cable into the EXTENSION LINE. 15.Register the line settings. Refer to the “EasyStart” on the operating instructions. 6-91 Options Second phone line 6.8.2 Display of the Software Version You can see the current software version using the life monitor. 1. From standby mode, press MENU, *, 9. 2. Select “A. Life Monitor”. 3. Press [Enter]. The software version will be shown on the top line of the LCD. 4. Press optional board number using the numeric keypad as shown in the following table. Software version Numeric keypad • Flash ROM on Main control PCB 0 • Built-in CPU ROM * (asterisk) • The first optional kit 1 • The second optional kit 2 • The third optional kit 3 5. Press RESET to exit and return to the standby mode. 6-92 Second phone line Options 6.8.3 Adjustment Important: These memory switches and unique switches only for AL-250 are shown in this section. 6.8.3.1 Memory Switches Adjustment If necessary, you must set the following switches. 1. From Fax standby mode, press MENU, *, 1. 2. Select the desired memory switch by pressing a one-touch key plus a number on the keypad. 3. Press [Enter]. Memory Switch B:0 – Transmission 7 Initial Setting 1 6 0 5 0 4 0 3 1 2 1 0 1 0 1 Switch Adjust Usage/Comments Refer to Section 3 of this FEM Refer to Section 3 of this FEM Refer to Section 3 of this FEM Refer to Section 3 of this FEM Maximum transmit speed, kbps 2.4 4.8 7.2 9.6 12 14.4 16.8 19.2 21.6 24 26.4 28.8 31.2 33.6 0 0 0 0 0 0 0 0 1 1 1 1 1 1 0 0 0 0 1 1 1 1 0 0 0 0 1 1 0 0 1 1 0 0 1 1 0 0 1 1 0 0 0 1 0 1 0 1 0 1 0 1 0 1 0 1 Note: This setting effect for both phone line 1 and 2. Memory Switch C:0 – Reception 7 Initial Setting 0 6 0 5 4 3 0 0 1 2 1 1 0 0 1 Switch Adjust Usage/Comments Refer to Section 3 of this FEM Refer to Section 3 of this FEM Factory use only Factory use only Receive speed (kbps) Maximum receive speed may be slowed to compensate for poor phone lines. 2.4 4.8 7.2 9.6 12 14.4 16.8 19.2 21.6 24 26.4 28.8 31.2 33.6 0 0 0 0 0 0 0 0 1 1 1 1 1 1 0 0 0 0 1 1 1 1 0 0 0 0 1 1 0 0 1 1 0 0 1 1 0 0 1 1 0 0 0 1 0 1 0 1 0 1 0 1 0 1 0 1 Note: This setting effect for both phone line 1 and 2. 6-93 Options Second phone line 6.8.3.2 Unique Switches Adjustment Setting the Unique Switches If necessary, you must set the following switches. 1. From Fax standby mode, press MENU, *, 4. 2. Select the desired memory switch by pressing a one-touch key plus a number on the keypad. 3. Press [Enter]. Unique Switch d:0 – Modem 7 6 5 Initial Setting 0 0 1 4 1 Switch 3 1 2 1 1 0 0 1 Adjust Factory use only Factory use only 3429 baud symbol rate when communicating at V.34 0: No 1: Yes 3200 baud symbol rate when communicating at V.34 0: No 1: Yes 3000 baud symbol rate when communicating at V.34 0: No 1: Yes 2800 baud symbol rate when communicating at V.34 0: No 1: Yes Factory use only 2400 baud symbol rate when communicating at V.34 0: No 1: Yes Usage/Comments If the error frame often occurs because of the symbol rate is too high, setting this switch to “1” mask that symbol rate and keep down the occurrence of error frame. If the error frame often occurs because of the symbol rate is too high, setting this switch to “1” mask that symbol rate and keep down the occurrence of error frame. Unique Switch d:1 – Modem Switch 7 6 5 4 3 2 1 0 Initial Setting 0 0 0 0 1 1 1 1 Adjust Forced 2400 symbol rate when probing SNR is adverse Usage/Comments SNR means that Signal Noise Ratio. If the SNR is less than the threshold you set, the data pump overrides the bandwidth evaluation algorithm and forced the symbol rate to 2400 baud. 6-94 Second phone line Options Unique Switch d:2 – Modem 7 6 5 4 3 2 Initial Setting 0 0 0 1 0 1 1 0 0 1 Switch Adjust Factory use only Factory use only Factory use only Factory use only Factory use only ANSam output time 0: 3 sec 1: 4 sec Factory use only Factory use only Usage/Comments The time limit to output the ANSam (A sinwave signal at 2100 Hz amplitude-modulated). Sets to “1” when the V.8 handshake is hard to achieve. Unique Switch d:7 – Modem 7 6 5 4 Initial Setting 0 0 0 0 3 0 Switch Adjust Usage/Comments Factory use only Factory use only Factory use only The delay before postmessage is transmitted If retraining occurs due to the low reception signal level and few delay of the telephone line, it may overlap the second post-message. In this case, increase the delay before the post-message is transmitted. Switch 4: Switch 3: 2 1 0 0 0 0 0 ms 100 ms 200 ms 300 ms 0 0 1 1 0 1 0 1 Factory use only Factory use only Factory use only Unique Switch i:4 – Miscellaneous 7 6 5 Initial Setting 0 0 0 4 0 3 0 2 1 1 0 0 1 Switch Adjust Usage/Comments Time to change the display between the first and second phone lines. (sec) Set the time to change the display between the first and second phone lines during the second phone line is communicating. When set to “0”, show only the line during communication. Switch 76543210 Time 11111111 2550 sec 11111110 2540 sec 11111101 2530 sec : 00000101 50 sec : 00000011 30 sec 00000010 20 sec 00000001 10 sec 6-95 6.9 RS-232C Interface 6-96 RS-232C Interface Options 6.9.1 Attaching the RS-232C Interface 6.9.1.1 Unpacking Included in the RS-232C Interface kit’s carton box: RS-232C Interface board.................................................... 1 Ferrite core ......................................................................... 1 Screw.................................................................................. 2 Operating instructions (includes setting-up instructions).... 1 Software disk ...................................................................... 1 Software operating instructions .......................................... 1 Be sure to save the module and packing materials for reshipment. To connect between the fax machine and the computer, you need an extra RS-232C interface cable (see the below). 6.9.1.2 RS-232C interface cable The RS-232C interface port on the newly installed RS-232C interface has a DB-25 (standard 25-pin serial) female receptacle which accepts a male DB-25 cable plug. The computer’s port may have either a DB-25 or DB-9 (9-pin) receptacle. Please consult the interface’s pin assignment on the below. Note: Please see the computer’s operating instructions about the serial interface port of the computer. Pin assignment Pin No. Signal code Signal name Contents 2 TXD Transmitted data 3 RXD Received data 4 RTS Request to send 5 CTS Clear to send 6 DSR DCE ready Turning on always. 7 SG Signal ground Ground for signal. 20 DTR DTE ready Data signal sent from computer to the fax. The data sent to computer by the fax. Signal for request to send data. Data Enable signal for data transmission from the fax to the computer. Data Terminal Enable — ready to communicate Signal direction 25-pin type The fax 2 TXD 3 RXD 4 RTS 5 CTS 6 DSR 7 SG 20 DTR The computer 2 TXD 3 RXD 4 RTS 5 CTS 6 DSR 7 SG 20 DTR 9-pin type The fax 2 TXD 3 RXD 4 RTS 5 CTS 6 DSR 7 SG 20 DTR 6-97 The computer 2 RXD 3 TXD 4 DTR 5 SG 6 DSR 7 RTS 8 CTS Options RS-232C Interface 6.9.1.3 Attaching the RS-232C Interface 1. Turn the machine off and unplug the power cord and phone line cord. 2. Remove the rear cover (upper). 3. Use cutting pliers to gently punch out the rectangular connector space located on the rear cover. 4. Connect the RS-232C Interface board into the P4 connector on the main control PCB until the connector is firmly seated. 5. Re-attach the rear cover. 6. Attach the ferrite core to the RS-232C cable. 7. Connect one end of the RS-232C interface cable to the RS-232C interface port on the machine. 8. Connect the other end of the RS-232C cable to your computer’s RS-232C port. 9. Plug the power cord and turn the machine on. 6-98 RS-232C Interface Options 6.9.2 RS-232C Test This mode is for return back test of the RS-232C port. Please refer to the Section 3 for the procedure. 9.6.3 Adjustment Note: The unique switches only for RS-232C interface are shown in this section. 6.9.3.1 Unique Switch Adjustment If necessary, you must set the following switches. 1. From standby, press MENU, *, 4. 2. Select the desired unique switch by pressing a one-touch key plus a number on the keypad. 3. Press [Enter]. Unique Switch j:4 – RS-232C 7 Initial Setting 0 6 0 Switch 5 0 4 0 Adjust Adjusts CI counter Usage/Comments If the remote fax machine disconnects the phone line before the PC responses the CI signal, the fax regards that the PC is off and then it will receive from the next call. In this case, increase the CI counter to be more than the number of rings the PC receives. Switch 3210 CI counter 0000 0 time ← Initial setting 0001 1 time 0010 2 times : 0101 5 times : 1110 14 times 1111 15 times To reset this status, first initialize the PC’s fax software and then the fax machine. To reset the PC’s fax software: See operating instructions of PC’s fax software. To reset the fax machine: 1. Press MENU, Q, [Enter]. 2. Select “Reset” 3. Press [Enter]. 3 2 1 0 0 0 0 0 Factory use only Factory use only Fax reception while scanning or printing through the RS-232C 0: No 1: Yes Factory use only Determines if reject the fax reception or receiving it instead of the PC, while the PC scans or prints through the RS-232C. 6-99