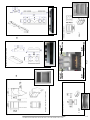
1
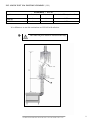
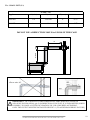
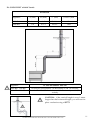
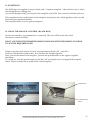
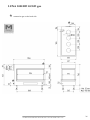
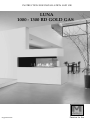
INSTRUCTION FOR INSTALLATION AND USE
LUNA
1000 - 1300 RD GOLD GAS
English 06-2012
Passion for fire 1
V E RY I M P O R TA N T
I N S T A L L A T I O N
INSTRUCTIONS FOR THE M - D E S I G N GAS FIREPLACES
T H E S U P P L I E R TA K E S N O
RESPONSBILITY FOR ANY
POSSIBLE DAMAGE, POOR WORKING
APPLIANCES AND ACCIDENT AS A
R E S U LT O F I N C O R R E C T I N S TA L L AT I O N
INSTRUCTION FOR INSTALLATION AND USE - LUNA 1000-1300 RD GOLD - GAS
2
SUMMARY
1. GENERAL REMARKS............................................................... 5
2. CONNECTION........................................................................... 5
3. INSTALLING THE FIREPLACE.............................................. 3.1.1 Positioning the fireplace................................................... 3.1.2 Gas connection................................................................... 3.1.3 Electrical connection . ....................................................... 6
6
7
7
4. INSTALLING THE CHIMNEY ............................................... 8-11
5. INSULATION AND FINISHING............................................ 12
6. CONVECTION CURRENT...................................................... 13-14-15
7. MOUNTING A 3 SIDED FRAME........................................... 16
8. POSITIONING THE LOGS, DIAMOND, SAPPHIRE AND WHITE PEBBLES
1000RD.......................................................................................... 1150RD.......................................................................................... 17
18-19
20-21
9. FIRST-TIME USE........................................................................ 22
10. SAFETY, ADVICE AND MAINTENANCE......................... 22
11. STARTPILOT............................................................................. 23
12. USIGN THE MANUAL CONTROL..................................... 23
13. SPECIFICATION SHEET........................................................ DRAWINGS............................................................................... 24-25
26-27
14. GUARANTEE............................................................................ 28
INSTRUCTION FOR INSTALLATION AND USE - LUNA 1000-1300 RD GOLD - GAS
3
OPEN AND CLOSE THE DOOR
CLOSING
OPEN
KEY
IF SOME DUST OR WASTE IS SEEN ON THE WINDOW
( INSIDE AND OUTSIDE ), CLEAN THIS BEFORE THE
FIRST USE OF THE FIREPLACE. CLEANING THE WINDOW IS THE ONLY MAINTENANCE ACTION THAT CAN
BE DONE BY THE CONSUMER
INSTRUCTION FOR INSTALLATION AND USE - LUNA 1000-1300 RD GOLD - GAS
4
1. GENERAL REMARKS
This is a moulding of the closed combustion system, designed for the atmosphere and comfort of
your living-room. It constitutes an efficient source of heat and gives the impression of a real chimney fire.
The gas with air-vent furnaces are based on the principle of natural extraction from the furnace,
which eliminates flue gas outside and brings in air (oxygen) from outside the house which is necessary for combustion of the gas. It uses to this effect two concentric pipes. The internal pipe ensures
the elimination of burned gases and the external pipe brings in combustion air. The advantage of
this principle is that the equipment works independently of the atmosphere which predominates
in the house.
2. CONNECTION
This appliance must be connected by an approved installer in accordance with the most recent
regulations in force. On the basis of your order specifications, this appliance is designed for natural
or propane gas.
Read the instructions before installing and using this appliance. Before installing the furnace, please
check the local regulations about this type of furnace (identification of the type of gas, etc.) and
check that the furnace is adapted to your means of installation.
CAUTION: The furnace must be connected to the type of gas mentioned on the appliance. Never
connect a propane burner to natural gas or vice versa!
It is imperative that the installer sees to the following:
• The appliance must be subject to a water tightness test of the gas and elimination of flue
gases.
• The concentric pipe, if already available, must be working correctly.
• The running of the control valve, lighting of the pilot light, the main burner and the
thermocouple must all be checked.
This appliance has been programmed and factory sealed. The sealed parts cannot be modified. The
appliance may therefore also be installed in watertight accommodation and accommodation equipped with mechanical ventilation. It constitutes ambient heating even in accommodation equipped
with a closed ventilation system.
INSTRUCTION FOR INSTALLATION AND USE - LUNA 1000-1300 RD GOLD - GAS
5
3. INSTALLING THE FIREPLACE
After having checked the appliance, you ready to install your appliance.
This is done as follows
3.1.1 POSITIONING THE FIREPLACE
Place the fireplace on a stable surface using the adjustable feet. Adjust the height of the fireplace
by turning the bolt ( pic 1 )
The stove may not be placed direct ont the floor to allow natural convection.
The appertures for the air supply ( IN ) is situated underneath the appliances.
Regulating the height of the appliance :
The minimal height as from ground to the 4th side frame is 3,5 cm ( A min ).
The minimal height “C min” will be 18 cm, measured as from the ground to 4th side frame.
The maximal height as from the ground to the 4th side frame is 45 cm.
pic 1
A min = 3,5 cm
B = 14,5 cm
C min = 18 cm
INSTRUCTION FOR INSTALLATION AND USE - LUNA 1000-1300 RD GOLD - GAS
6
3.1.2 GAS CONNECTION
The appliances are standard delivered with a 1/2” gas solded connection ( pic. 1 ). It is always
located at the back side of the appliance. Make sure nothing remains in the gas lines,
since this may easely lead to blockage. An approved gas valve should always be connected to
the appliance, wich must be accesible at all time .
For this you can use a acces door ( pic. 1 next page ). This access door is also used to have
access at the potentiometer (manual controller) and electrical supply.
Ø12mm
valve
pic.1
Ø18mm
(3/4”)
pic.1
3.1.3 ELECTRICAL CONNECTION
These appliances are equiped with a radiographic remote control, making an earthened 220V
socket necessary. You should bear in mind that the appliance must be connectes from all
electrical supply for thurpose of service.
ITS OBLIGATORY TO CONNECT AN EARTH CURRENT.
4. INSTALLING THE CHIMNEY
Install the concentric flue duct as indicated by ONTOP - METALOTERM. The only authorised pipes
are ONTOP Metaloterm™.
ONTOP-METALOTERM tested our fireplace with their conduct and we only garantee a good
working of the fireplace with those.
Between the external wall of the pipe and the wall or the ceiling, you should anticipate for an
interstice of at least 50mm and protection that is suitable against temperatures of around 130°C.
The passage of the front panel cowl in the external wall must be filled in using silicone mastic.
INSTRUCTION FOR INSTALLATION AND USE - LUNA 1000-1300 RD GOLD - GAS
7
PIC. 1 ROOF EXIT ( C31 )
Ø 200 / 130
C (min)
C (max)
Restriction
1000 RD
2m
10m
Ø 75
1300 RD
2m
10m
Ø 75
C
Appliance
Ø 150/100 after elbow 90° Ø 200/130
Appliance
C (min)
C (max)
Restriction
1000 RD
2m
10m
Ø 75
1300 RD
3m
10m
Ø 75
Reduction
200/130 --> 150/100
INSTRUCTION FOR INSTALLATION AND USE - LUNA 1000-1300 RD GOLD - GAS
8
PIC. 2 ROOF EXIT VIA EXISTING CHIMNEY (C91)
Ø200(min) / Ø 130
Appliance
C (min)
C (max)
Restriction HR+ (as from 2 m)
1000 RD
1300 RD
2m
2m
10m
10m
Ø 75
Ø 75
It is obligatory to use the sanitation set USSAN with placing.
*
This USSAN piece must be saeled at the roof.
*
INSTRUCTION FOR INSTALLATION AND USE - LUNA 1000-1300 RD GOLD - GAS
9
Pic. 3 WALL EXIT (C11)
Ø 200 / 130
Appliance
A (min)
B (min)
B (max)
Restriction
1000 RD
1m
wall exit
A
Ø 75
1300 RD
1m
wall exit
wall exit
Ø 75
DO NOT USE A REDUCTION 200/130 to 150/100 IN THIS CASE
A= MIN. 1m
255
B
elbow min. 90°
3°
IMPORTANT : BE CAREFULL EVERY HORIZONTAL PART DOES NOT HAVE AN
NEGATIVE INCLINATION (pic.5) IN DIRECTION OF OUTLET. IT IS EVEN BETTER, WHEN
POSSIBLE, TO HAVE A LITTLE INCLINATION OF 2 OR 3 DEGREES ASCENDING.
ONLY THE OUTLET MUST BE INSTALLED LIKE PIC. 6 ( TO AVOID RAIN DROPS IN TUBE )
INSTRUCTION FOR INSTALLATION AND USE - LUNA 1000-1300 RD GOLD - GAS
10
Pic. 5 ROOF EXIT with 90° bends
Ø 200/130
Appliance
A (min)
B (max)
C (min)
(A+B+C )max
1000 Rd
1300 RD
1m
1m
A+C
A+C-1
B-A-9m
B-A+1
12 m
10 m
FIG. 5
Ø 150/100 and Ø 200/130
Appliance
1000 RD / 1300 RD
1000 RD / 1300 RD
for each 90° bend substract 1 m horizontaly or add 1 m verticaly.
for each 45° / 30° / 15° bend substract 0,5 m horizontaly or add 0,5 m
verticaly.
CAUTION : if the vertical lenght is over 3 meter
longer than the horizontal lenght, you will need to
place a reduction ring of Ø 75.
INSTRUCTION FOR INSTALLATION AND USE - LUNA 1000-1300 RD GOLD - GAS
11
5. INSULATION AND FINISHING
Please , follow this instruction. The appliance can overheat if you not apply those instructions.
Errorcode F02 will appear !
Once installation is complete, the appliance can be fitted. Before doing so, check the tightness of the
gas pipe one more time. Light the appliance and check that it is working: check the tightness of the
gas pipe and the smoke pipe. Once you have checked everything, you can perform the final insulating and finishing operations.
The built-in part of the furnace tends to be very warm. Please check that the furnace is not too narrowly fitted and that there is adequate space for the elimination of hot air. For insulation of the
furnace, we advise you to use M Design insulating plates. You are advised against using any other
insulation product. Inflammable materials as well may not be used for the finishing.
The masonry must be raised around the furnace. Because of the expansion of the furnace
during combustion, an interstice of at least 5 mm must be provided on frontside and 4cm on
each side of the appliance. The masonry must not lean against the furnace.
THE APPLIANCE MUST BE SET FREE .
Please pay attention to leave approx. 2 mm inbetween the finishing frame and maconry
( see p.17 , mounting a 3-sided frame, and see page 37,38 and 39 for further information about
installation
REFERENTIAL DISTANCES IN REGARDS TO FINISHING THE MANTLEPIECE
A very essential point when setting up the Luna Gold is that the distance has to be respected inbetween fireplace and the finishing material for the mantlepiece such as marble, gipsum,...
For this, a small bended metal sheet that is provided ont the fireplace ( pic.1 ) , is to be used as the
minimal reference for the distance. The finishing can only ga oas far as this meteal sheet ( pic.2 ).
Don’t remove this ( pic.3 ) ! This allows you to take out the 4th side frame and to let the airflow in
the mantelpiece for natural convection.
min. 5 mm
pic. 1
pic. 2
pic. 3
See page 37,38 and 39 for further
information about installation
INSTRUCTION FOR INSTALLATION AND USE - LUNA 1000-1300 RD GOLD - GAS
12
6. CONVECTION CURRENT
Please , follow this instruction. The appliance can overheat if you not apply those instructions. Errorcode F02 will appear !
The enclosure of the furnace must be provided with ventilation grills or openings allowing for the
elimination of heat by convection. It is possible to have a convection kit fitted with the furnace. This
system directs the heat inside the room by means of flexible tubes ( dia. 150 mm).
It is obligatory to open at least 2 hot air vents ( for the LUNA 1600 you must open 4) at the top of the
appliance.
For the purposes of the installation of these ducts it is best to go vertically upwards first for at least 1m
and then to change direction, making a rather wide bend and avoid using a flue terminal grid with
a small clearance because the speed loss that this causes reduces the efficiency of the hot air vents.
Place all the fittings that you use at the same lengths and angles if possible, otherwise it is possible
that some grids give off more heat than others and, seeing that a hot air pipe functions in a manner
similar to a chimney, the one that is hot first has the most draught and therefore becomes hot even
more quickly.
Note: a circulation of hot air requires that no under-pressure be created in the room. A grid that is
near the floor (pic 2) sees to it that cold air can be drawn in.
M-design has developed its ideal hot air grids which have many advantages (pic. 1 & 2) and for the
elimination of hot air and the entry of warm air we advise you to use those Design grills made by
M-Design.
The appertures for the air supply “IN” (pic.2) is situated underneath the appliances. The stove may
not be placed direct ont the floor to allow natural convection.
To simplify the mounting of the grids you can use the corner profile (a) wich is furnished with the
grid. This profile is can be mounted on the side of the grid (two little wholes en screws are provided).
.
(a)
pic. 1
OUT
pic. 2
INLET
INSTRUCTION FOR INSTALLATION AND USE - LUNA 1000-1300 RD GOLD - GAS
13
INSTRUCTION FOR INSTALLATION AND USE - LUNA 1000-1300 RD GOLD - GAS
14
2 dm²
Inlet Grid convection air
Design Grid ( outlet ) with 2 connections
INLET
CONVECTION
OUTLET
CONVECTION
OR
Pic.3
INLET
CONVECTION
OUTLET
CONVECTION
Design Grid ( outlet ) with 2 connections
4 dm²
Inlet Grid convection air
OR
Design Grid ( outlet ) with 4 connections
YOU HAVE TO CONNECT AT LEAST THE TWO APPERTURES SITUATED AT THE TOP OF THE
APPLIANCE FOLLOWING PIC. 1
THE STOVE MAY NOT BE PLACED DIRECT ON THE STOVE MAY NOT BE PLACED DIRECT ON THE
FLOOR, WTHOUT THE FEETS. THIS TO ALLOW NATURAL CONVECTION. THE APPERTURES FOR
THE AIR SUPPLY ARE SITUATED UNDERNEATH THE APLLIANCE.
EVERY OPENING YOU MAKE MUST BE CONNECTED WITH A FLEXIBLE TUBE dia.150MM (see pic.
below). THIS WILL AVOID THE HEATING OF THE ELECTRONIC PART OF THEAPPLIANCE.
IN OTHER CASE YOU WILL HAVE ERRORCODE F02.
OUTLET CONVECTION
PIC.1
INLET CONVECTION
INSTRUCTION FOR INSTALLATION AND USE - LUNA 1000-1300 RD GOLD - GAS
15
7. MOUNTING A 3-SIDED FRAME
3-sided frame
pic 1
upper frame
sideframe
2,25cm
4 sided frame
(lower piece)
pic 2
Fireplace is delivered standard with 4sided frame 3,5cm, an upper and 2
sideframes ( see pic. 2 )
Before mounting the 3 sided frame, remove 4 sided frame ( lower piece ) by lift it carefully up. Pull out the
upper frame and in second way the left and right sideframes. Take the left and right side of the 3 sided frame
( 3,5 - 7 or 10 cm ) and slide them in the notches ( see pic 4 ). When those are placed in a good way, you can
adjust the position to the left en to the right and from the the front to the rear. At this way you can make the
frame good surrounding. Mount the upper frame ( pic 5 ) and at last the 4 sided frame ( pic 6 )
pic 3
pic 4
pic 5
pic 6
PLEASE PAY ATTENTION TO LEAVE APPROX 2 MM INBETWEEN THE FRAME AND
THE FINISHING MATERIAL ( HEAT = EXPANSION)
INSTRUCTION FOR INSTALLATION AND USE - LUNA 1000-1300 RD GOLD - GAS
16
8. PUTTING IN PLACE THE LOGS, DIAMOND, SAPPHIRE AND WHITE STONES
•
Please check that the pilot light is switched off and that the furnace has cooled down.
•
Move the window to the front by pulling it. The window tips open at 45°.
•
Arrange the materials supplied. In accordance with your order you will have either a set of
logs, diamond, sapphire or white pebbles. There is an adequate supply of materials . Our appliance
is approved with these materials, so please do not use other products. Other decorative products
are prohibited in our appliances. Please do not change the delivered quantities.
ARRANGING THE SET OF LOGS
Caution: do not put anything on the pilot light. To arrange the logs respect the order as follows.
Put the big imitation coal pieces around the burner.
Put the little imitation coal peices on the burner and here and there between the big coal pieces.
INSTRUCTION FOR INSTALLATION AND USE - LUNA 1000-1300 RD GOLD - GAS
17
9
6
4
7
5
3
4
3
7
2
1
LUNA 1000 RD GAS
9
8
1
8
2
5
6
INSTRUCTION FOR INSTALLATION AND USE - LUNA 1000-1300 RD GOLD - GAS
18
LUNA 1000 RD GAS
INSTRUCTION FOR INSTALLATION AND USE - LUNA 1000-1300 RD GOLD - GAS
19
7
10
6
9
12
5
8
7
12
2
9
6
3
4
10
5
8
1
4
2
3
1
11
11
LUNA 1300 RD GAS
INSTRUCTION FOR INSTALLATION AND USE - LUNA 1000-1300 RD GOLD - GAS
20
LUNA 1300 RD GAS
INSTRUCTION FOR INSTALLATION AND USE - LUNA 1000-1300 RD GOLD - GAS
21
9. FIRST-TIME USE
The masonry and plaster surrounding a recently installed furnace hold a great deal of moisture, which must first evaporate before commissioning the appliance. If not, the plaster may
crack or split. Ask your installer about the timescale to follow. The first time you use it, only
make a moderate-sized fire.
The first few times the furnace is used, an unpleasant odour may be apparent. It comes from
the protective paintwork. These emissions are totally harmless. To quickly get rid of these
odours, all you need to do is ventilate the room for a while.
After the first few fires, a light deposit may appear on the window. It comes from the paintwork. Once the furnace is cold you can get rid of this deposit by using M Design’s Bio-Clean
cleaning product. This product may be used later on for cleaning the window.
The appliance must not be used if the door no longer has a window or with the door open. If
the window is broken or cracked, the appliance must not be used until the window has been
replaced. Contact your M Design reseller.
10. SAFETY, ADVICE AND MAINTENANCE
Have your furnace inspected once a year by a qualified technician.
Please observe the following points:
•
Closed appliances produce intense heat, which means that all the surfaces of the external walls (metal, door frames and windows) become very hot once a certain temperature is
reached. Make sure that young children do not touch the window; this could result in severe
burns.
•
The logs, ceramic pebbles, a Diamond set and a Sapphire set are delivered with the
furnace. Never put other objects in the flames!
•
Keep inflammable materials a suitable distance from the furnace (min. 1m)!
•
Never modify the settings yourself! The furnace warranty will then be considered as
invalid, null and void.
•
Never let children use the remote control without supervision.
•
Always leave the pilot light on. The appliance is designed in order that the pilot light
goes out automatically every 24 hours and lights instantly. This enables the electronic system
to run down from static electricity.
•
In the case where the burner goes out for any reason, wait for 3 minutes before relighting the furnace.
INSTRUCTION FOR INSTALLATION AND USE - LUNA 1000-1300 RD GOLD - GAS
22
11. STARTPILOT
The M-Design Gas appliance are provided with “Constant startpilot”. After the first use or when
the winterperiod is coming and
you use the fireplace daily, you must let the startpilot switch ON. Don’t switch it off after each use.
This startpilot avoids condensation in the fireplace and protects the whole appliance and even the
electronic parts against humidity.
This startpilot has a very low gasconsumption.
12. USING THE MANUAL CONTROL ( BLACK BOX )
On the user interface, a potentiometer is connected. This one will be used only when
the remote control is broken.
DON’T USE THE POTENTIOMETER SIMULTANIOUSLY WITH THE REMOTE CONTROL
TO SET THE REQUIRED LOAD.
When no ignition with remote control, set potentiometer knob “off” ( turn left ).
Push once on the black push button. You will hear the starpilot ignition.
Once you see the flame on the starpilot , just turn the potentiometer to the right to regulate
the flames.
To switch off , turn the potentiometer to the left “off” and push once to extinguish the starpilot
flame. Push a second time to swith off the whole fireplace.
LED
push button
potentiometer
knob
INSTRUCTION FOR INSTALLATION AND USE - LUNA 1000-1300 RD GOLD - GAS
23
INSTRUCTION FOR INSTALLATION AND USE - LUNA 1000-1300 RD GOLD - GAS
24
5
1
Cat. Rendement CE /
C91
I2L
G20
1
5
6x0.85
38/33A
20
19,3
C11 , C31 ,
I2E+
C91
I2E
2
5
6x0.6
0.20P3
30
29,4
LUNA 1000 RD GOLD gas/gaz
NATURAL GAZ
6x0.85
38/33A
25
24,2
C11 , C31 ,
G25
I2H
Nominal Charge (KW)
Charge (KW)
NOX-emmission classe
Rendement (%)
Consumption (m3/h)
Injector burner
Injector startpilot
Inlet pressure (mbar)
Burner pressure (mbar)
Type /Type
Categorie
Categorie
Type of Gaz
13. SPECIFICATION SHEET
2
5
6x0.6
0.20P3
37
36,2
C11 , C31 ,
G31
50
36,2
I3B/P
2
5
6x0.6
0.20P3
C91
I3+
PROPAN / LPG
2
5
6x0.6
0.20P3
28-30
28,4
C11 , C31 ,
G30
C91
INSTRUCTION FOR INSTALLATION AND USE - LUNA 1000-1300 RD GOLD - GAS
25
5
1
Cat. Rendement CE /
6x1.1
38/33A
25
C11 , C31 ,
G25
I2H
C91
I2L
G20
1
5
C91
I2E
6x1.1
38/33A
20
C11 , C31 ,
I2E+
NATURAL GAZ
30
2
5
6x0.65
0.20P3
LUNA 1300 RD GOLD gas/gaz
Nominal Charge (KW)
Charge (KW)
NOX-emmission classe
Rendement (%)
Consumption (m3/h)
Injector burner
Injector startpilot
Inlet pressure (mbar)
Burner pressure (mbar)
Type /Type
Categorie
Categorie
Type of Gaz
13. SPECIFICATION SHEET
2
5
6x0.65
0.20P3
37
C11 , C31 ,
G31
50
I3B/P
2
5
6x0.65
0.20P3
C91
I3+
PROPAN / LPG
2
5
6x0.65
0.20P3
28-30
C11 , C31 ,
G30
C91
LUNA 1000 RD GOLD gas
*
connection gas on the back side
*
*
*
INSTRUCTION FOR INSTALLATION AND USE - LUNA 1000-1300 RD GOLD - GAS
26
LUNA 1300 RD GOLD gas
*
connection gas on the left side
*
*
INSTRUCTION FOR INSTALLATION AND USE - LUNA 1000-1300 RD GOLD - GAS
27
14. GUARANTEE
This page is your warranty card.
The guarantee is only valid for faults caused by construction defects or defects in the parts used to
build the furnace.
M-Design offers a 12 month guarantee on all electronic parts and a 8 year guarantee on the furnace
construction.
Caution: The following items are always excluded from the guarantee:
-
The glass, door, joints and internal decor.
-
The defects which occur are fully or partially a consequence of
•
Non respect of the order, installation and maintenance instructions
•
Assembly, installation or repair by a third-party, including the buyer
•
Heat cracks which normally occur in the mantel
•
In cases where changes have been made to the furnace without our consent
•
In cases where the buyer cannot show his/her warranty card with the purchase invoice. Likewise where the guarantee and/or the invoice show(s) signs of tampering or forgery (crossed out
date, illegible, modifications).
In the case you would like to make use of the manufacturer’s warranty, you should contact your
reseller in the first instance. Please take good care of your purchase invoice and warranty card and
store them in a safe place.
INDENTIFICATION BOARD
SERIAL NUMBER
SERIAL NUMBER
Open the window. You’ll find the number aobove in
left corner, engraved in metalsheet
this is situated at the left side of the appliance.
Your serial number :
......................................................
8
M-DESIGN BENELUX BVBA
TORHOUTSESTEENWEG 222A
8210 ZEDELGEM
INSTRUCTION FOR INSTALLATION AND USE - LUNA 1000-1300 RD GOLD - GAS
28