1
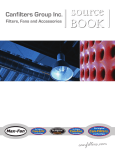
Yours Exclusively Through
2150 W. 6th Ave. / Suite L / Broomfield, CO / 80020
1.877.543.7500
email: [email protected]
ULW-1 0
Your Rocket ULW-10 Subwoofer
Enjoyment Guide
Your Rocket ULW-10 Subwoofer Enjoyment Guide
A Suggestion
Your Rocket ULW-10 Subwoofer is carefully hand-packaged utilizing molded foam inserts to protect its
fine furniture-grade finish. Please use care when unpacking your new subwoofer. When removing it
from the box, hold the wood sides of the cabinet, while taking care not to exert pressure on the front
cloth grille.
We strongly recommend that you save the foam inserts and shipping cartons to protect your speakers,
should you ever need to move or ship them to a new location.
Thank you and congratulations!
Our thanks for buying a Rocket Series subwoofer from AV123. We sincerely appreciate your confidence
in us and our products.
Although we know these speakers represent extraordinary value, we also know that the real test is how
you feel about your speakers several months from now. That’s why AV123 will continue to work hard to
earn your respect with technical advice and customer service that is second to none in our industry.
You can visit the AV123 website (www.av123.com) at any time for up-to-date product
information, answers to FAQ’s, or to seek advice from the AV123 community at our
online forum (forum.av123.com).
Should you require that personal touch, please don’t hesitate to contact our support department,
toll-free, at (877) 543-7500 option 2. You’ll find our knowledgeable Technical Services Department
eager and willing to help.
We ask you read this owner’s manual first. It contains many tips on getting your new subwoofer set up,
connected, configured, and performing its absolute best in your unique environment.
We hope you find it clear, concise, and useful.
Again, thank you for your support.
U LW- 10
Introduction to AV123
At AV123, our absolute highest priority begins and ends with you, the customer. You can rest assured
that if you’re not 100% satisfied with your purchase within 30 days from original date, you may return
your product(s) for a prompt refund in full (excluding shipping charges), no questions asked. There is
simply not a safer way to buy. At AV123, misleading and high-pressure sales tactics are a thing of the
past. Not only do we offer you the tools and resources necessary to fully evaluate your purchase before
the order is placed, we’ll back each and every sale after the fact with our in-home trial period.
We’ve done our best to provide you with products and services that exceed your expectations. However,
as good as our products are, they do not match our dedication to each and every sale. Should you need
any further assistance in the future with your A/V system, you can bet that AV123 will be there supporting and assisting you as you make your way to your next level of audio/visual enjoyment.
Your new Rocket ULW-10 Subwoofer
The Onix Rocket ULW-10 (Ultra Linear Woofer) is a very potent and agile subwoofer.
Special care and attention was given to the ULW to ensure clean, accurate, and extremely detailed
low-end performance in both music and home theater systems. Features include a 350-watt amplifier,
single band Subwoofer Optimization System, adjustable crossover, and infinite phase adjustment for
easy in-room placement. This flexibility will result in a seamless blend with all Onix loudspeakers, as
well as those from other manufacturers.
1.
Your Rocket ULW-10 Subwoofer Enjoyment Guide
Table of Contents
Introduction
Section 1—Product Overview
• 1.1 Control Panel Features
• 1.2 Brass Feet, Discs, and Rubber Feet
Section 2—Subwoofer Placement and Location
• 2.1 Subwoofer Placement
• 2.2 Subwoofer Location
Section 3—Connecting Your ULW-10 Subwoofer
Section 4—Setting Up Your Surround Processor or Receiver
• 4.1 Small or Large?
• 4.2 Simple Calibration
• 4.3 Crossover Settings
• 4.4 ULW-10 Phase Adjustmen
SOS (Subwoofer Optimizer System) SOS insert section
• Technology
• User Instructions
• Calibration Procedure
• Final System Balance
Section 5—Proper Care and Feeding
U LW-10
• 5.1 Warranty Policy and Terms
• 5.2 Stay in Touch!
• 5.3 ULW-10 Specifications
Included in box:
• Subwoofer
• Powercord
• Microphone
• Brass spikes
• Brass discs
2.
Section 1—Product Overview
1.1 Control Panel Features
PRT
POWER
LFE
INPUT
LEVEL
0db
MIN
+15db
PHASE
O
P
E
R
A
T
E
100Hz
0
180
I
CROSSOVER
30Hz
C
A
L
B
Y
P
A
S
S
N
O
R
M
A
L
F
I
L
T
E
R
T
E
S
T
MIC
INPUT
CAL’D
TEST
BYPASS
G
E
F
H
POWER
MODEL
ON
B
OFF
A
ULW-10
SERIAL NUMBER:
Designed and Engineered in the USA
Meticulously Handcrafted with Pride in the PRC
Distributed Worldwide Exclusively by AV123.com
C
120VAC~ 60Hz 300W (T4AL fuse)
230 VAC~ 50Hz 300W (T2AL fuse)
CAUTION
ATTENTION
RISQUE DE CHOC ELECTRIQUE
NE PAS OUVRIR
ULW- 10
WARNING
RISK OF HAZARDOUS ENERGY!
MAKE PROPER SPEAKER
CONNECTIONS. SEE OPERATING
MANUAL BEFORE USING.
figure 1.1
3.
AVERTISSEMENT
ENERGIE ELECTRIQUE
DANGEREUSE.
VOIR LA INOTICE DE
FONCTIONNEMENT
D
Section 1—Product Overview
1.1 Control Panel Features (see figure 1.1)
A. Power switch
B. Power On Indicator – Glows brightly when the unit is on. Glows dimly when unit is in standby.
The unit will automatically turn on in the presence of an audio signal. Approximately 15 minutes
of signal absence will cause the subwoofer to go into standby mode. To fully turn off the unit, please
unplug it from the wall.
C. Line Fuse – The ULW-10 is equipped with a 4-amp fast blow fuse. Note that for 230V operation,
flip fuse holder over and replace fuse with 2amp rating. Always replace with the same rating.
D. Power Cord Inlet – A standard IEC socket allows removal of the power cord.
E. Audio Input – Standard RCA (unbalanced) type cables will work here.
F. Crossover Adjustment – This controls the high-frequency cut off. Generally this is should be set to 80Hz
if used, or bypass if not. We will cover this in detail later in the manual.
G. Phase – This controls the phase of your subwoofer relative to the rest of your speakers. Rotate this dial
in small amounts while you listen at your listening position for the most bass.
H. Level – This control allows you to match the output of your main/satellite speakers to the sub.
Set this to the lowest level when powering your system for the first time. When calibrating your system,
do not exceed 75% gain. You will want to allow for adjustment. Avoid setting gain levels near maximum
either in your receiver's channel-trim menus or on your subwoofer's amplifier. Avoiding doing so will
also minimize the potential for a distorted input signal.
EQ - SOS automatic parametric EQ. SOS is covered in detail in section 4.
1.2 Brass Feet, Discs, and Rubber Feet
Spike Feet
Included with your Rocket ULW-10 Subwoofer are the same high quality
threaded spike feet used on all Rocket Loudspeakers. For carpeted floors,
simply screw the spikes into the threaded inserts located on the bottom
of your ULW-10 Subwoofer. On uneven surfaces, use these feet to
help compensate.
Brass Discs
To protect your hard flooring surface, we have also included metal discs to
provide a contact point between your speaker spikes and the floor. To use,
simply place the disc under the spike such that the small indentation is
aligned with the point of each foot.
Rubber Feet
As an alternative to both methods above we’ve also included soft selfadhesive rubber bumpers with your ULW-10 Subwoofer. These provide a
safe alternative to the metal spikes, and will also absorb any vibrations
between the subwoofer and underlying surface. The choice is yours for
preference and practicality, but you'll find the results to be very good either way.
4.
U LW- 1 0
I.
Section 2—Subwoofer Placement and Location
2.1 Subwoofer Placement
Unlike regular loudspeakers, subwoofers will often work best when placed in a corner, even
if located a few feet to the side and/or behind the closest main speaker. Typically the front right
and left corners sound the most natural, though rear corner placement is also an acceptable option.
The driver can be facing you or be pointed along either wall. The low frequency sound waves emitted
by the ULW-10 are quite long and will therefore interact greatly with the walls of your room. As a result,
even small placement adjustments can have a significant impact on the sound you hear. A room corner
will provide maximum output at a given power level, and the maximum number of room modes will be
excited, translating to a flatter response in most rooms. Often, one rather large peak in the subwoofer’s
operational frequency range will stand out with corner placement. For this, we've also provided the
ULW-10 with the ability to alter its response for your new environment with an onboard one band
parametric equalizer (SOS). As “boomy” bass is often the result of the largest untamed peak, we're
confident that you will find this feature an indispensable tool for shaping your subwoofer into the way
you'd like to hear it: flat, clean, and powerful. More on this in section 5...
ULW- 10
Figure 2.1
2.2 Subwoofer Location
The low frequencies played by your ULW-10 subwoofer tend to be non-directional due the extraordinarily long wavelengths involved. As a result, regardless of where your subwoofer is placed, it should
not be easily localized, but should instead produce a balanced and enveloping response. Factors that
can affect performance in this regard are rattles from shelves, walls, or other nearby objects, as well as
distorted output. If you are having issues with subwoofer localization, try to isolate any rattling or
buzzing objects, or place the sub in another corner of your room. If the sub's output is distorted, check
to see that you are not at the maximum sub level setting on your receiver or pre/pro. An overdriven
output can induce audible distortion. To resolve this problem, you may need to turn down the
subwoofer level on your processor and turn the gain level up on the subwoofer itself to compensate.
5.
Section 3—Connecting Your ULW-10 Subwoofer
NOTE: Please be sure your subwoofer is not plugged in and the rest of your system is turned off.
When making your connections, be sure to use a high quality and reliable interconnect cable. It should
be shielded and long enough to do the job, but not excessively long. Your subwoofer cable is likely to
be the longest interconnect in your system.
The simplest connection between a home theater receiver or processor and your ULW-10 Subwoofer is
directly from the pre-amp output to the LFE input on the ULW-10. See figure 3.1.
If used with a 2-channel integrated amplifier, or any source without a dedicated sub/LFE output, you
will need to use a Y-splitter to join the L and R low-level output from your preamplifier or receiver.
Often, Tape or Monitor outputs will provide an appropriate low-level stereo signal if the dedicated
output does not exist. Note: you may use the tape out as a last resort as the volume level is fixed and
you need to adjust the level control on the back of the subwoofer anytime you change the main
volume control. See figure 3.2 below…
LFE Output
PRT
POWER
LFE
INPUT
LEVEL
0db
MIN
+15db
PHASE
0
180
RCA Interconnect
Figure 3.1
U LW-10
!
Stereo R and L Output
PRT
POWER
Splitter
Stereo pair RCA Interconnects
Figure 3.2
6.
LFE
INPUT
LEVEL
0db
MIN
+15db
PHASE
0
180
Section 4—Setting Up Your Surround Processor or Receiver
4.1 Small or Large?
Many of today’s surround processors and home theater receivers will allow you to set all 5 speakers in
your room to either small or large, thus changing the way your ULW-10 interacts with your system.
Like almost all things audio, which setting to use is somewhat subjective, though it’s also a function
of your room. By a good majority, most rooms will obtain their best sound with all speakers set to small
and crossed over to the ULW-10 at 80Hz. (small speakers might require a higher crossover) Of course
this is assuming the use of a high performance subwoofer such as the ULW-10. A strong sub ideally
placed will handle sub-80Hz information better than most loudspeakers in most rooms. This is mainly
due to the tendency for competing sources of information below 80Hz to result in destructive bass wave
cancellation, thus eliminating the very frequencies your subwoofer was designed to play. In addition,
when crossed over with your ULW-10, the other loudspeakers in your system will play with greater ease
and less distortion, free from the demands of deep and complex sub-80Hz waveform reproduction.
Your speaker system amplifier will be less taxed as well, since much of the stress of producing deep
bass will be eliminated. Consequentially your loudspeakers should sound cleaner and more controlled.
U LW- 10
An easy and user friendly way to test different methods and frequencies for crossing over your
subwoofer is to use low frequency sweeps recorded on special program material. One of our favorites is
the AVIA Guide To Home Theater DVD. Specifically, the tones that descend in frequency from the
individual satellite speakers to the subwoofer are quite useful and effective. Using your SPL meter
(explained in the following sections), watch for the smallest amount of overall needle fluctuation while
you direct and descend the tones from speaker to subwoofer as you go around your system. In other
words, the point at which the signal transitions between your satellites and subwoofer should be
completely seamless and without definition.
7.
4.2 Simple Calibration
To begin configuring your subwoofer for optimum performance (a) in your room and
(b) in combination with your other loudspeakers, you’ll first need a Sound Pressure
Level (SPL) meter. Radio Shack sells an analog SPL meter (shown to the left) that
works very well for this purpose. Set the meter to Slow with a C weighting. The
dial should be set at either 70 or 80 depending on your pre/pro or receiver’s test
tone level. Consult your owner’s manual to determine what reference point your unit
uses. Most use 75dB, so the 70 setting on the meter would be appropriate for
them.
Let's start by setting the level of your sub to match the rest of your speakers.
• From the receiver or pre/pro's speaker calibration menu, set the subwoofer level to 0dB. Start with
the gain on the subwoofer around 1/4 to 1/2 of the way up from the -15 mark.
• In the speaker configuration menu, be sure all your speakers are set to small with subwoofer to
yes. For this exercise, the crossover should be set to 80Hz.
• Set the volume control on your pre/pro or receiver to the 00 dB level. See the note below if your
unit uses a positive number scale for volume instead of a minus-to-plus scale.
• Ensure that all main, center, and rear channels are calibrated to the reference point using your test
tones, then direct the tone to the subwoofer. Adjust it's level using the gain control on the subwoofer
itself until it reaches the sound pressure level used for the other speakers.
An assistant is very helpful in this process. Some like to run their sub a bit louder (hot) for movies by
increasing the sub level (in the receiver’s control panel) by 5dB or so above the main channel level.
This can be very effective at lower listening levels, but be sure to use care when watching that big
action movie for the first time...especially at or near reference levels!
Note: If your unit does not use a minus/plus volume scale, activate the test tones and increase the
volume of your pre/pro or receiver until it reaches 75dB or 85dB on your SPL meter. Remember this
number as this will be reference level*.” Remember to check with your unit’s manual to determine if
they use a 75dB or 85dB test tone.
* What is reference level? Reference level allows for peaks of 105dB from the speakers and 115dB for
the LFE channel. When calibrated as above, the correct relative volume of each speaker will be as the
director/sound engineer of the film intended.
8.
U LW- 10
Once the subwoofer is calibrated, small adjustments can be made easily using the subwoofer level
control in your processor. If you find the need to go much above +2 or +3 consistently, we recommend
adjusting the gain control on the sub’s amplifier upward rather than using the receiver’s volume
control—this will eliminate the possibility of the subwoofer receiving a distorted input signal.
Conversely, using too low of a value for the subwoofer level on the processor may result in difficulty
keeping the subwoofer's auto-on feature awake during quiet passages.
4.3 Crossover Settings
Your ULW-10 Subwoofer features a continuously variable crossover that allows you to set a low-pass
filter at any point between 40Hz and 150Hz. In addition, many popular receivers and surround processors also feature built-in electronic crossovers (please consult your receiver’s instruction manual).
If present, we recommend using your receiver’s crossover and rotating the crossover dial to ‘bypass’ on
the subwoofer, thus disabling it.
After setup is completed, during which an 80Hz crossover is recommended, you can adjust your
crossover accordingly either in the subwoofer itself or as recommended in your receiver’s setup menu.
Typically, the smaller your speaker OR the louder the system will be played, the higher the crossover
point. Conversely, larger speakers OR lower volumes allow for lower crossover settings. The THX
standard, what AV123 recommends is using an 80Hz crossover.
4.4 ULW-10 Phase Adjustment
U LW- 10
The phase dial (see “I” on figure 1.1) controls the relative phase of the subwoofer to best reinforce
the other loudspeakers in your system. Adjustments to this control will change your ULW-10’s
interaction with the rest of your speaker system, providing the least cancellation, and thus the best
response in any room. With SPL meter in hand (or, better yet, on a tripod), play an 80Hz tone (for
this exercise the crossover point must be set to 80Hz) and slowly rotate the phase control from 0
towards 180. Watching your SPL meter, find the point that results in the biggest peaks in sound
pressure levels (i.e. reads highest on the meter). This setting indicates the least amount of bass
wave cancellation, and should be held constant until the subwoofer or other speakers in your room
are moved, or placement is altered in any way. With typical front corner placement in most rooms,
you may very well find the 0 setting to be optimum.
9.
SOS
SOS (Subwoofer Optimizer System)
Introduction
The Automated Controlled Environments, Inc. Subwoofer Optimizer System (SOS) is an automatically
calibrating, subwoofer optimization component that acts to attenuate an audio system's major room
mode resonance to provide significant improvement in measured and subjective bass system performance. After installation and calibration, your system will have a more linear frequency response, bass
evenness, tightness, extension, and improved sound clarity.
Technology
The Subwoofer Optimizer System makes use of a unique process which combines processor controlled
digital operation with Analog Signal Processing (ASP) technology. The digital circuitry is used to set the
calibration level, generate test tones, identify room resonances, and set filter parameters. The unit
performs this procedure automatically using the special calibration microphone, which is included with
the system. When the calibration procedure is complete, the digital portion of the unit’s circuitry is
turned off. This way, it won’t interfere with the analog signals passing through the unit.
ULW- 10
The following graph from a spectrum analyzer output plot demonstrates the effect of the SOS’s ASP
technology on an actual subwoofer in a large room. The upper line represents the subwoofer’s response
from 20 to 80 hertz with a constant input. The curve shows a broad hump (major room mode resonance)
between 30 and 80Hz.
10.
SOS
!
Section 4—Setting Up Your Surround Processor or Receiver
Note: Do not attempt to replace the included microphone with one of your own. The calibration microphone is a
special model specifically designed for subwoofer frequencies. Use of alternate microphones may damage SOS.
Getting Started
Do not perform the Subwoofer Optimization System calibration and adjustment procedure on your
system with any of the bass, treble, or loudness (contour) controls in operation. Defeat these controls
or adjust them to their minimum (zero) positions prior to the start of the procedure.
Once the system has been properly calibrated, these controls can be used to 'fine tune' the system.
!
Note: When calibrating two or more subs, run only one sub/SOS calibration at a time.
Set the gain control to a mid-point (50 to 65%) prior to the start of the calibration procedure. Operating
the amplifier at high volumes will place undue strain on the electronics and speaker drivers, and could
damage them.
If your subwoofer amplifier has a Crossover Frequency Control, you have two options. Option one:
Defeat the control or set the control maximum (highest frequency) setting prior to the start of the
calibration procedure.
Option two: Set the crossover 10-20Hz higher than your planed final crossover setting (on your
processor or the sub itself). The reason for this is if your room causes a peak at 120Hz for example but
you plan on utilizing an 80Hz crossover, SOS will remove the peak at 120Hz but this will be of no
benefit to you. Option one is easiest and will work for most rooms.
Following SOS calibration, the control should be reset as part of the final system balance procedure.
If your receiver or processor has a subwoofer volume (level or gain) setting, set that control to a
mid-value prior to the start of the calibration procedure. Once the system has been properly calibrated,
this control can be used to set the subwoofer level to best integrate with the rest of the system. Failure
to do so may affect the calibration procedure, may limit the ability to adjust the system following the
calibration procedure, or may damage the components.
Whenever changing components, cables, plugs, or wires, be sure to first turn off all equipment. This
prevents signal transients from passing through your system, which can damage components.
U LW-10
Connections
1. Turn off your receiver or processor and amplifier(s), including the ULW-10 amplifier, and all
source equipment such as CD, DVD, and VCR players, TVs, Tuners, etc.
2. Connect the line level input (RCA) cable from your receiver or processor and the other end to the
LFE connector on the ULW-10.
3. Plug in the supplied microphone into the mic input port on the ULW-10.
4. Turn on the subwoofer amplifier, and set the volume and crossover frequency controls as
mentioned in the Getting Started Section.
The Subwoofer Optimization System is now ready for calibration and use. Proceed to the
CALIBRATION PROCEDURE Section to perform this operation.
11.
SOS
Calibration Procedure
Suggestions
While the Subwoofer Optimization System calibration process is automatic, following these suggestions
will help insure the maximum benefit from the unit for your system's performance.
Configure the listening environment as closely as possible to how it is arranged during normal operation. Furniture should be located where itis normally positioned during system use and heating and
cooling systems should be operating. This includes anything that is normally in operation during the
use of the system, such as projectors, lowered screens, draperies, and doors.
Set-up
1. Check that your receiver/processor and all amplifiers, except the subwoofer amplifier, are powered off.
Also check that all sound source components (e.g., CD, DVD, TV, Tuners, VCR, etc.) are off.
2. Unwrap the microphone and cable that came with the unit. The system provides a twenty-foot cable,
which should be sufficient to reach from the Subwoofer Optimizer System unit to the primary listening
position. In situations where the cable will not reach, do not attempt to add an extension to the cable.
Either select a listening position as close to the primary position as is possible. The object is for the
microphone to be in a position as close to where you would normally be located within the listening
environment as possible. The microphone should be oriented such that it is at your seated ear level
with the large, cartridge end pointing toward the ceiling. The microphone can be held (good), attached
to a support (better), or fixed to a stand (best). Be sure to not cover the cartridge end of the microphone
and that the unit is several inches away from any other body or surface. Refer to the Microphone
Placement Section (see below) for additional information. Insert the plug from the microphone into the
MIC connector on the ULW-10.
3. Set the switches on the ULW-10 to OPERATE – FILTER – NORMAL.
5. Set the switches on the ULW-10 to CAL – FILTER – NORMAL. After approximately 5 seconds a series of
low frequency tones should be audible from the subwoofer. These tones will repeat with increasing
volume.
a. If the tones stop after 1 cycle and the green CAL’D light flashes slowly (approximately once per
second), this indicates that either the microphone or subwoofer is not properly connected, or that the
subwoofer amplifier level control is set too low. If this is the case, set the unit switches to OPERATE –
FILTER – NORMAL, check all connections, and increase the subwoofer amplifier level slightly. Set the
unit’s switches to CAL – FILTER – NORMAL. The repeating series of tones should again start.
b. If the tones stop after 1 cycle and the green CAL’D light flashes quickly (approximately three times
per second), this indicates that the subwoofer amplifier level control is set too high. If this is the case,
set the unit switches to OPERATE – FILTER – NORMAL and decrease the subwoofer amplifier level
slightly. Set the unit’s switches to CAL – FILTER – NORMAL. The repeating series of tones should again
start.
c. This procedure may need to be repeated by the user until the subwoofers output level is optimized
to support filter calibration.
6. Once levels are properly set, the calibration tones will repeat, the response measurement procedure
and filter settings will be made, and the green CAL’D light will light continuously. This indicates a
successful calibration.
12.
ULW- 10
4. The green indicator light (labeled CAL’D) on the ULW-10 (the same end as the function switches) should
not be lit [first time use only].
SOS
Set-up cont.
7.
Set the switches on the ULW-10 to OPERATE – FILTER – NORMAL. The SOS will remain calibrated
regardless of power interruptions.
8.
Disconnect the microphone plug from the ULW-10, gather up the microphone and cable, and store
for later use.
9.
Apply power to your system equipment and adjust the subwoofer amplifier level to properly integrate
with the rest of the system (refer to the FINAL SYSTEM BALANCE Section). Because the SOS filter acts
to reduce room resonance modes, the average subwoofer level after calibration may be lower than
previously set and will most often need to be adjusted higher to match previous levels.
10. The optimized system is now ready for use.
11. To recalibrate the system, return to step 1 of the Set-up Section. It is not necessary to disconnect any of
the connection cables in the system.
Final System Balance
After correctly performing the calibration procedure with the microphone connected to the system and
verifying that the subwoofer is operating correctly with the rest of your system, it is time to perform a
final system balance. Due to the nature of the analog filter being used by the Subwoofer Optimizer
System to optimize your system for its room resonance, you may need to increase the level of the
subwoofer amplifier. Use your systems internal test tone generator, external test tone signal sources,
or your ear to adjust the level to provide the best possible integration with the rest of your system's
speakers. Under normal conditions only a slight level increase to the original setting should be needed.
You are now ready to enjoy the benefits of an optimized subwoofer as part of your system.
Of course, you may fine-tune the subwoofer gain control to your listening preference or to allow for
source material differences.
U LW- 1 0
By-Pass Test
Before listening through your optimized system, you may want to compare the new system configuration with the original configuration. To enable the by-pass mode of the Subwoofer Optimizer System,
set the switches on the ULW-10 to OPERATE – BYPASS - NORMAL. To re-engage the filter settings, set the
switches on the ULW-10 to OPERATE – FILTER – NORMAL. The room resonance filter settings will remain
stored within the unit and you will not need to repeat the calibration procedure.
In the situation where two ULW-10s have been used, set the switches on both ULW-10s to
OPERATE – BYPASS – NORMAL. To re-engage the filter settings, set the switches on both ULW-10 to
OPERATE – FILTER – NORMAL. The room resonance filter settings will remain stored within the units and
you will not need to repeat the calibration procedures.
13.
Calibration Procedure
Test Tones
The effect of the optimized filter on your system will depend in large part on the system source
material and may not be easily discernable. In order to better detect the differences between filtered
and non-filtered operation, a test tone generator has been designed into the system. The generator
provides a repeating 20 to 80 hertz frequency sweep and is engaged by setting the unit TEST switch.
Setting the switches on the ULW-10 to OPERATE – FILTER – TEST provides test tones with the filter
engaged. Setting the switches on the ULW-10 to OPERATE – BYPASS – TEST provides test tones with
the filter removed.
To return to normal SOS operation, set the switches on the ULW-10 to OPERATE – FILTER – NORMAL.
The room resonance filter settings will remain stored within the unit and you will not need to repeat
the calibration procedure.
In the situation where two ULW-10s have been used, set the switches on ULW-10 B to OPERATE –
BYPASS – NORMAL and the switches on ULW-10 A to OPERATE – BYPASS – TEST to provide test
tones with the filters removed. Set the switches on ULW-10 B to OPERATE – FILTER – NORMAL and
the switches on ULW-10 A to OPERATE – FILTER – TEST to provide test tones with the filter engaged.
To return to normal SOS operation, set the switches on both ULW-10s to
OPERATE – FILTER – NORMAL. The room resonance filter settings will remain stored within the unit
and you will not need to repeat the calibration procedure.
Microphone Placement
The optimum location for the microphone during the calibration procedure is in the room where
you are most likely to sit when using the system. This is where you will want to place or hold the
microphone during the measurements. The microphone should be oriented such that it is at your
seated ear level with the cartridge (large end) pointing up toward the ceiling.
Room response nulls can occur at any frequency within the listening environment. These nulls are
caused by the destructive wave interference of the sounds within the listening environment and
are a factor of the size, shape, and configuration of the environment. Response nulls occur in
fixed locations within the environment and may affect the calibration process of the Subwoofer
Optimizer System. If after running the calibration process and listening to the system performance,
the system does not appear to have a noticeably smoother response, repeat the process with the
microphone relocated to a different location. Usually you will only need to move the microphone a
few inches horizontally to correct the problem. Do not move the microphone more than 12 inches
away (in any direction) from your preferred location.
This concludes the SOS section.
14.
ULW- 10
SOS
Section 5—Proper Care and Feeding
Your Rocket ULW series subwoofer does not need much exterior maintenance other than an
occasional dusting. The painted surface or wood veneer features a durable matte finish that
requires only some dusting, or can be wiped off with a water dampened soft cloth.
Above all, listen and enjoy!
5.1 Warranty Policy and Terms
All AV123 products carry a limited manufacturer’s parts and labor warranty. All ULW series
subwoofers are guaranteed to be free from manufacturer’s defects for a period of one year from
the date of purchase.
Get an extra two years of warranty coverage free!
When you register your product online at www.av123.com, we will extend the warranty an additional
two years on the cabinet and driver, and an additional 1 year on the amplifier and electronics.
This extended warranty is free simply by registering within 60 days of your purchase. We urge you
to take advantage of this offer.
Warranties apply to the original owner and are non-transferable. AV123 will exchange all defective
merchandise, including shipping charges, to the original shipment destination, at no charge for up to
60 days after the date of purchase. After 60 days the product must be returned to AV123 for repair only
and return shipping costs are the responsibility of the customer. All questions should be directed to
customer service.
5.2 Stay in Touch
Remember that personalized tech support is only a phone call away. in the USA call toll-free
877.543.7500 or worldwide at 303.543.7500. Whether you need technical assistance, have a suggestion to make your ULW-10 even better, or simply want to let us know how much you enjoy your new
subwoofer, please feel free to contact us at any time!
For the latest information on the entire Rocket line or to register your product, please visit us online
at www.av123.com
5.3 ULW-10 Specifications
U LW- 10
Type: Acoustic suspension, single-driver system
Driver: 10" black-anodized alloy cone woofer
Frequency Response: 26Hz - 150Hz +/- 3dB
Size: (W x D x H): 12.25" x 11.75" x 13.00"
Weight: 39lbs / 47lbs shipped
Other Features:
• SOS Automatic Parametric Equalizer
• Continuously (infinitely) variable phase, gain, and crossover adjustments (40Hz - 150Hz)
• Crossover disable option
• LFE summed R/L RCA input
• Auto-on / standby mode
15.
ULW- 10
Thank you for supporting AV123
16.