1
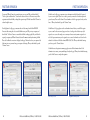
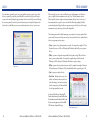
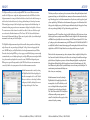
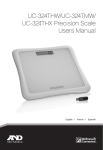
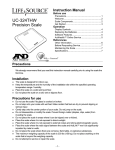
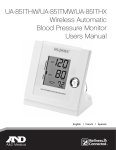
Wellness Connected Software Instruction Manual
English
Computer Requirements
☞
☞
☞
☞
☞
Processor: Intel x86, 1GHz or better
OS: Windows XP, Windows Vista, Windows 2000, Mac OSX 10.4, Mac OSX 10.5
Memory: 512MBytes
Disk: 1GByte available
Network: Internet connectivity (required if using ActiHealth online service)
Installation
To install the Wellness Connected™ software, download the most recent version by visiting
www.LifeSourceOnline.com/getstarted and choosing the appropriate download link.
Download the program installer to your computer, then run the installer by doubleclicking on the downloaded file. Proceed through the installation wizard to install Wellness
Connected on your computer.
Note: This program requires Adobe® Air™ and will automatically install Adobe Air if it is not
already installed. You must accept the Adobe Air License Agreement when you first launch
the Wellness Connected program.
When the installation is complete, click “Finish” to exit the installer and launch Wellness
Connected.
LifeSource Health Line (Toll-Free): 1-888-726-9966
1
First Time Operation
First Time Operation
To start using Wellness Connected, you must first create a user account. Click on the button labeled
“Need to register an additional user?” located near the bottom of the screen. This starts an easy-to-follow
registration wizard that will walk you through the registration steps. Click the button labeled “Continue” to
advance through the screens.
On the Account Set Up page, you must enter in your information into the fields provided. A password
for your account is optional. If you choose to have a password, you must select a verification question for
password recovery. Please read the Terms of Use and remember to check the appropriate box after you have
done so. When you have finished, press the “Continue” button.
On the Application Set Up page, you must enter the serial code stamped on the ActiLinkTM USB
Transceiver. After entering the code, insert the ActiLink into an open USB port in your computer, and
then click the “Test Device” button to ensure that the ActiLink is working properly. Only one ActiLink is
required per computer, any Wellness Connected device will communicate with any functioning ActiLink.
Please also check that the correct time is displayed on this page. This time is based on your computer clock;
if the time is incorrect, you must change your computer clock settings. When you have finished, press the
“Continue” button.
On the Devices Set Up page, please enter the serial number from each device you would like to register
to your account. Each account can only support one device of each type and each device may only be
registered to one account. For example, one account may not have two activity monitors registered to it
and a blood pressure monitor may not be registered to two accounts. Serial numbers can be found on the
underside of each device and follow the format: ABCD-12345-76890. When you have finished entering
your devices, press the “Continue” button.
On the final screen, the registration summary page, please review all the information shown. If the
information is not accurate, you may make changes directly on the page. When you have finished reviewing,
press the “finish” button to complete the registration.
Account Set Up screen
2
Add Device screen
LifeSource Health Line (Toll-Free): 1-888-726-9966
Device Set Up screen
Registration Summary screen
LifeSource Health Line (Toll-Free): 1-888-726-9966
3
Log In
Trend Summary
To use the software, you must first create a user account, and then select your account to log in to. If you
did not set a password for yourself, the password field will be inaccessible at the Log In screen. New user
accounts can be created by clicking the appropriate button at the bottom of the Log In screen and following
the account setup wizard. If you selected a password but have forgotten it, selecting the help button at the
bottom of the screen will allow you to answer your verification question in order to access your account.
When you first log in to your account, you will be taken to your Trends Summary screen. This screen
gives you a quick look at your measurements over the past 7 days. The Trends Summary screen has
fields to display blood pressure, weight, and activity data simultaneously, but if you do not have one of
these measurement devices registered to your account, the field will not display anything. Daily blood
pressure and weight values displayed on this screen represent averages for the day. If you took four weight
measurements in one day, the average of the four will be displayed here.
The information presented in the Trends Summary gives you a snapshot of your activity, weight and blood
pressure results. Data is presented for the past seven days, and uses symbols and colors to quickly show how
well you are progressing toward your targets.
• [Green] - represents a day-to-day improvement in your results. For example, if your weight is 187 lbs. on
Tuesday and it decreases to 185 lbs. on Wednesday, then Wednesday's symbol will be green to represent
the loss.
• [White] - represents no change when compared with the last day with a reading. White is also shown
when no previous reading is available. For example, if your weight readings on both Tuesday and
Wednesday are 183 lbs, the symbol on Wednesday will be white to represent no change.
• [Yellow] - represents a day-to-day deterioration in your results. For example, if your weight on Tuesday was
185 lbs and it increases on Wednesday to 187 lbs, the symbol will be yellow to represent the gain of 2 lbs.
Log In screen
• [Gray] - represents no reading for the day.
• [Circle / Star] - Readings are shown as one of two
symbols: a circle means you have not reached your
goal for that reading yet, and a star means you have
reached or surpassed your goal. Either symbol will
be colored appropriately based on trend.
Special note on Blood Pressure: if the systolic OR
diastolic reading deteriorates, the symbol will be yellow.
If both numbers remain stable the symbol will be white.
If at least one reading improves and the other DOES
NOT deteriorate, the symbol will be green.
4
LifeSource Health Line (Toll-Free): 1-888-726-9966
Trends Summary screen
LifeSource Health Line (Toll-Free): 1-888-726-9966
5
Blood Pressure
Blood Pressure
The Blood Pressure screen allows you to track systolic and diastolic measurements and compare them to
standards set by the National Institutes of Health (NIH). The Blood Pressure screen displays readings
numerically as systolic/diastolic, for example 120/80 for 120 systolic over 80 diastolic. The systolic
measurement represents the maximum pressure exerted when the heart pumps while the diastolic
measurement is the pressure when the heart is relaxed. Each blood pressure measurement made with your
Wellness Connected device will record both of these values.
There are several different content items viewable in the Blood Pressure screen: a blood pressure chart, blood
pressure measurement details, and a pulse chart. Each chart displays measurements for a time period defined
in the data boxes located above the chart. Date ranges can either be selected via calendar selection or by
selecting a predefined time period from a drop down menu. When viewing longer time periods, the chart
displays average readings instead of individual readings. An information box listing averages is displayed on
the right side of the screen. These averages are for the selected time period and display the total average as
well as the averages for readings taken in the AM and in the PM. The content items are selected via buttons
located in the lower left side of the screen. On the lower right area are buttons for additional information
and a “Print” button. The “Print” button will only function when viewing the measurement details page.
Charts cannot be printed, only lists of your individual blood pressure readings over the time period selected
will print.
The blood pressure chart displays measurements with color coded circles. Systolic measurements are always
located above their corresponding diastolic measurements and linked together with a vertical line. A green
reading is considered “normal” as defined by the NIH, less than or equal to 120 mmHg for systolic or
80 mmHg for diastolic. A yellow reading is “borderline,” or slightly above the normal range and between
120/80 and 140/90. An orange reading is known as “Stage 1 Hypertension” and is defined as 140/90 or
greater, but less than 160/100. A red reading is known as “Stage 2 Hypertension” and is defined as any
reading of 160/100 or greater. The pulse chart tracks your heart rate, which is automatically captured each
time you take a blood pressure measurement. Since target heart rates vary substantially based on age, sex,
and health condition, there are no personal targets to set for this chart.
Individual measurement data is viewed by selecting the Blood Pressure Details table. Each reading displayed
in the table is time stamped and color coded like the points in the blood pressure chart. The table also
displays if a measurement recorded an irregular heartbeat (IHB) and allows you to add notes to each
reading. In addition, readings may be deleted by checking the box next to the reading and selecting the
“delete” button.
Blood Pressure Chart screen
6
LifeSource Health Line (Toll-Free): 1-888-726-9966
LifeSource Health Line (Toll-Free): 1-888-726-9966
7
Weight
Activity
The Weight screen allows you to track your weight and BMI. There are several different content items
viewable in the Weight screen: a weight chart, weight measurement details, and a BMI chart. Each chart
displays measurements for a time period defined in the data boxes located above the chart. Date ranges can
either be selected via calendar selection or by selecting a predefined time period from a drop down menu.
When viewing longer time periods, the chart displays average readings instead of individual readings. An
information box listing averages and most recent measurements is displayed on the right side of the screen.
The content items are selected via buttons located in the lower left side of the screen. On the lower right
area are buttons for additional information and a “Print” button. The “Print” button will only function
when viewing the Measurement Details page. Charts cannot be printed, only lists of your individual weight
measurements over the time period selected will print.
The Weight Chart displays measurements along with a horizontal line that represents the user-defined target
weight. You may select a new personal target by clicking the “Set Targets” button in the upper right of the
screen. The BMI chart plots your Body Mass Index based on the weight measurements from your Wellness
Connected scale and your height. BMI is a good way to gauge your overall health by using your current weight
to estimate whether you are in a healthy weight range for your height. BMI requires accurate weight and health
data – please ensure that your height in the account tab is accurate. The BMI chart background separates
BMI ranges into categories following standards set by the NIH. On each chart, successive measurements are
connected by a blue line for easy interpretation of the order in which measurements were taken.
Individual measurement data is viewed by selecting
the Weight Details table. Each reading displayed in
the table is time stamped and color coded. The table
allows you to add notes to each reading. In addition,
readings may be deleted by checking the box next to
the reading and selecting the “delete” button.
Weight Chart screen
8
The Activity screen allows you to track your steps, calories, active time, and distance. Selecting the Activity button from the
program menu bar brings you to the Activity Details screen, a summary view of these measurements over the selected date
range. Horizontal progress bars for each of these measurements show red if you have not yet reached your goal, and green if
you have completed the goal. The Details screen also indicates numerically your progress so far in bold numbers to the left
of the progress bars and displays your set goals for the date range in small numbers to the right of the progress bar. You may
select a new personal target by clicking the “Set Targets” button in the upper right of the screen.
Information about your XL-20 Activity Monitor is located to the left of the Details screen. The Last Sync time, or the time
of the latest update between your activity monitor and Wellness Connected, is displayed here. The activity monitor updates
with Wellness Connected periodically when it is active and in range of the USB Transceiver. Anytime the XL-20 is “woken
up” by taking a step and it is within communication range of the USB Transceiver, the XL-20 will offload data. If the XL-20
successfully offloads, it will wait 10 minutes before attempting again. The remaining battery level at the time of the last sync
is displayed here as well. The XL-20 Activity Monitor has no serviceable parts and the battery cannot be replaced.
Charts for each of the activity measurements (steps, calories, activity time, and distance) are displayed by clicking the “view
charts” button in the bottom left of the Activity screen. Each chart can be viewed using the four small buttons in the upper
right of the chart area. Moving the mouse pointer over each button will temporarily display the corresponding chart and
clicking the button will change the display. On the lower right area are buttons for additional information and a “Print”
button. Charts cannot be printed, only lists of your individual activity sessions over the time period selected will print. The
same information is printed no matter which Activity screen
details or chart you are currently viewing.
Individual measurement data is viewed by selecting the
Weight Details table. Each reading displayed in the table is
time stamped and color coded. The table allows you to add
notes to each reading. In addition, readings may be deleted
by checking the box next to the reading and selecting the
“delete” button. Please note that the XL-20 Activity Monitor
will only measure walking or running components of
activities. The Activity Monitor will not properly record other
activities such as bicycling or swimming.
Activity Details screen
LifeSource Health Line (Toll-Free): 1-888-726-9966
LifeSource Health Line (Toll-Free): 1-888-726-9966
9
Account
Support
On the Account screen you may edit your personal information or manage the devices you have registered
to your account. You can switch between your personal account information and your device information
by selecting the “Account” tab or the “Devices” tab in the upper part of the screen. To make changes to your
personal information, click in the appropriate text field and change the text or make a selection from the
appropriate drop down box. The password verification question and answer fields will only be editable if you
do not leave the password field blank. After making changes, be sure to click the “Save Changes” button at
the bottom of the screen to save and apply your modifications.
In the “Devices” tab of the account screen, you can review the devices you have already added to your
account, remove devices, or add new devices. To add a new device, enter in the serial number located on the
underside of the device to the fields in the upper panel of the screen and click the “Add Device” button. The
serial numbers follow the format: ABCD-12345-76890. All devices currently registered to your account are
visible as small icons in the middle of the screen. The ActiLink USB Transceiver is a shared device between
all accounts and will not show up on this screen.
The Support screen contains many useful resources to help you use the Wellness Connected system and
keep your software up to date. Wellness Connected automatically checks for new versions every time the
software is started. If a new version is found, you can update your software from this screen. Click on the
“Update” button in the lower left side of the screen to be directed to our software download page. Download
the software and run the installer package. The installation wizard will give you the option to either repair/
update the program, or to uninstall it Select “Repair/Update” in the installation wizard to update Wellness
Connected. Uninstalling the program will remove all existing accounts and data and will not be recoverable!
To check your current software version at anytime, go to the Support tab in the program and click the
system environment link.
Also on the support screen are links to online resources and contact information for customer service. If you
encounter problems with your Wellness Connected devices or software, please read the online resources first.
Electronic versions of the device manuals and answers to frequently asked questions can be opened using the
buttons at the bottom of the page. These buttons will open your web browser and require an active Internet
connection to function.
Each icon will have a corresponding label indicating the type of device it represents and the serial number of the
device. If you would like to unregister a device from your account, click the “Remove” button underneath the
device icon. Removing a device will allow you to register the device to another Wellness Connected account or use
the device with an Actihealth account. It is recommended that you write down the device serial number before you
remove it from any account so that you can easily enter it into the new account. After adding or removing devices,
be sure to click the “Save Changes” button at the bottom of the screen to save and apply your modifications.
Support screen
Account Information screen
10
LifeSource Health Line (Toll-Free): 1-888-726-9966
LifeSource Health Line (Toll-Free): 1-888-726-9966
11
Switching to Actihealth
Information for using ActiHealth,™ an online activity and health tracking service, can be found on the Web
screen. ActiHealth provides an enhanced user experience accessible from any Internet-enabled computer
offering a customizable interface and numerous additional features above what is available through the
basic Wellness Connected software. In order to use your devices with ActiHealth, you must first remove
the devices you have registered to your account. During the registration process with ActiHealth, you will
download and install ActiHealth's software program. Wellness Connected and ActiHealth are separate
applications and cannot be run simultaneously.
This instruction manual is only distributed with Wellness Connected software that includes an end user agreement.
This manual, as well as the software, are furnished under license and may be used or copied only in accordance
with the terms of such license. The content of this guide is for informational use only and is subject to change
without notice. A&D Medical assumes no responsibility or liability for any errors or inaccuracies that may appear.
A division of A&D Engineering, Inc.
1756 Automation Parkway
San Jose, CA 95131
www.LifeSourceOnline.com
© 2008 A&D Medical. All rights reserved.
LifeSource, the LifeSource logo, Wellness Connected, and the Wellness Connected logo are trademarks of A&D Medical registered in the U.S.
FitLinxx, the FitLinxx logo, FitSense, the FitSense logo, ActiLink, ActiHealth, and the ActiHealth logo are trademarks of FitLinxx, Inc. and are used under
license. FitLinxx and FitSense are registered trademarks of FitLinxx, Inc.
The UC-324THW Precision Scale, XL-20 Acitivity Monitor, UA-851THW and ActiLink USB Transceiver are covered by one or more of U.S. patent
numbers 6336365, 6018705, 6052654, 6493652, 6298314, 6560903, 6611789, 6536139, 6876947, 6882955, 7187924 and patents pending.
Specifications subject to change without notice.