1
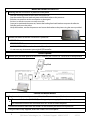
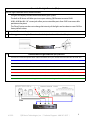
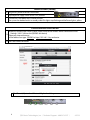
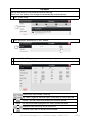
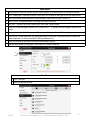
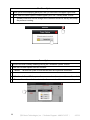
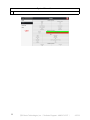
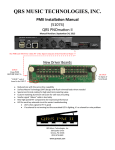
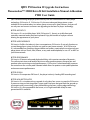
QRS PNOmation II Upgrade Instructions
Pianomation™ MIDI Retrofit Kit Installation Manual Addendum
PMII User Guide
QRS is revolutionizing the player-piano industry with the introduction of its latest player
technology, PNOmation II . PNOmation II is the most advanced player-piano system
available on the market today. Just take a glance at some of its great features, and you will
see why new and current customers are upgrading to the latest in player technology.
BETTER AESTHETICS
PNOmation II is an invisible player. With PNOmation II , there is no visible front-end
controller mounted under the piano keyboard. Enjoy the benefits of a player without
altering the appearance of your piano.
BETTER USER EXPERIENCE
PNOmation II offers the industry’s best user experience. PNOmation II not only functions as
a stand-along player system, but also as a node on your home network. With PNOmation
II’s web-enabled user interface, the possibilities are endless: create playlists and control your
player piano with an iTouch, iPod, iPhone, or any web-enabled phone; or use a PC or MAC on
your home network.
BETTER PERFORMANCE
PNOmation II features enhanced playback abilities with superior execution of dynamics.
The softest pianissimos and loudest fortissimos offer greater extremes of expression and
produce more convincing musical performances. PNOmation II also dramatically improves
the control over the sustain pedal solenoid which allows for quieter sustain pedal operation
and more accurate performance.
BETTER DESIGN
PNOmation II incorporates PNOscan II , the player industry’s leading MIDI recording tool.
BETTER NOW, BETTER LATER
PNOmation II is a simple and easy upgrade. It only takes four screws to swap the PNOmation
II processor into your existing player system, and it has been designed from the ground up
to integrate with your existing system while offering the latest, cutting-edge technology.
PNOmation II is also prepared for the future, as it is high-bandwidth ready for nextgeneration MIDI standards.
Table of Contents
Table of Contents
Package Contents
2
Play Piano
Upgrade and Installation Instructions for Technicians
Remove the Existing Pianomation Processor
3
4
Connect Speaker
Mount Pin-Light Extension [PLx]
Connect Pin-Light Extension [PLx] to PMII
5
6
Pin-Light Extension [PLx] Features
7
Key Adjust
8
Pedal Adjust
Test Files
Create a Playlist
Shut Down Options
12
Power Options
Network Settings
13
System Information
14
Update Information
15
9
PMII Package Contents
80108
80103
PNOmation II Processor
Two Mounting brackets with four screws
79226
SD Card with the QRS Music Library
Pin-Light Port Extender [PLx] [Six Indicator Lights; IR Sensor; Stereo & USB Ports; Microphone;
Reset Button]
2 Cable: Audio [1/8” Male to 1/8” Male]
Cable: USB Male A to USB Male A
Cable: USB A Male to USB 5-Pin Mini B
Cable: Six-Pin Ribbon
Portable Wireless
Universal power adapter (5V/1A, 100V~240V)
Cable: USB A to wireless power jack
Cable: RJ45 Ethernet
Velcro Strip [Use to attach ASUS to beam or back post]
Cable: Speaker [1/8” stereo plug to two RCA]
Screw Driver [Small Phillips to remove old processor]
80124
50128
50131
50126
790185
79224
990026
16
10
11
Play a Playlist
Connect and Mount Wireless
Connect to Wireless and Power ON
Playback Controls [ Volume Levels / Mute]
External Inputs
Mount and Connect PNOmation II
Connect to Power [STANDBY]
User Quick-Guide
QRS Music Technologies, Inc. / Technical Support - 800-247-6557 /
81525i
PMII Upgrade - Remove the Existing Pianomation Processor
1 Turn OFF the player system and unplug the AC power cord from the wall outlet.
2
Locate the Pianomation processor. It’s within a foot of the QRS power supply.
The power supply is a black box the size of a loaf of bread.
or
On a GRAND piano the processor is mounted to a beam under the soundboard area.
On an UPRIGHT, remove the lower panel to gain access to the power supply.
3 Flip the ON/OFF switch on the power supply to the “OFF” position.
Disconnect all of the cables from the old Pianomation processor.
Some older processors have different type connectors and use different cables, you may need to replace
4 cables “A” and “C” below.
Go to http://www.qrsmusic.com/support_hardware.asp “Upgrading Your QRS Pianomation MNIDI System”
for details.
- “TO SOLENOID RAIL” This ribbon cable may be held-in by two small screws.
- “TO POWER SUPPLY”
- “TO CD/USER INTERFACE”
5
Remove the old Pianomation processor and mounting brackets from the piano by removing the 4
screws.
Type A
Type B
Lower
The Power Supply [Type A or B above] and
the Processor are located in these areas.
81525i
QRS Music Technologies, Inc. / Technical Support - 800-247-6557 /
Mount and Connect PNOmation II
6 Mounting the new PNOmation II processor to the piano.
Slide the mounting bracket over the ends of the processor.
Snap the retainer clips over each end piece to hold the brackets to the processor.
Place the new processor in the same location as the original.
Position it so that the connectors are easily accessible.
Once you’ve positioned the processor, remove the backing from both brackets to expose the adhesive.
Stick the processor to the piano.
Unclip the brackets, remove the processor and secure the brackets to the piano using the screws provided.
7 Connect the cables to the new PNOmation II processor.
- “DRIVER A”
- “POWER SUPPLY”
-
“USER CONTROLLER” located on the side of the chassis.
It is not necessary to reconnect your original QRS controller.
Connect Speaker
8 Connect your powered speaker to the PMII’s Audio #3 jack. Use the 1/8” stereo-to-RCA cable provided.
Amplified
Wirele
Connect and Mount Wireless
9 Plug the wireless power adapter into an AC outlet. There are two possible locations:
The un-switched outlet [UNSW OUT] on the type A power supply, if it’s not being used.
or
The extension cord from the wall outlet that runs inside or under the piano.
Connect the Ethernet cable from the wireless to the Ethernet port on the PMII processor.
Using the Velcro strip supplied, attach the wireless unit to the piano .
2
QRS Music Technologies, Inc. / Technical Support - 800-247-6557 /
81525i
Mount the Pin-Light Extension [PLx]
The Pin-Light Extension serves several functions:
Six lights will display valuable information about your system.
The built-in IR Sensor will allow you to use your existing QRS Remote to control PMII.
USB A, USB Mini B & 1/8” stereo jacks allow you to extend the ports from PMII to an accessible
position on the piano.
The “Reset” button can be use to change the intensity of the lights and to reboot or reset PMII to
factory default values.
10 Mount the PLx unit to the piano.
We suggest mounting the PLx unit under the keybed at the treble side of the piano.
11
Connect the Pin-Light Extension [PLx] to PMII
Connect one end of the 6-pin flat ribbon cable to the PMII’s “ALT” port. The blue side of the cable faces the word “ALT”
Connect the other end of the 6-pin flat ribbon cable to the PLx connector. Connect so the blue side faces the ceiling.
Connect the two USB Male A cables to the USB Host sockets on the PMII.
Connect the other end of the cables to back of the PLx. USBA Male & USB 5-Pin Mini B
Connect one end of a 1/8” audio cable to the PMII’s Audio #1 socket. This is the External Line In [AUX] port.
Connect the other end to the last 1/8” socket of the PLx. See the red line below.
Connect one end of a 1/8” audio cable to the PMII’s Audio #4 socket. This will be used for Headphones.
Connect the other end to the remaining 1/8” socket of the PLx. See the green line below.
Make
81525i
QRS Music Technologies, Inc. / Technical Support - 800-247-6557 /
3
Connect to Power [Standby]
12 Plug the AC power cord into a wall outlet.
Flip the power supply switch to the “ON” position.
PNOmation II will power on in several minutes.
The system has booted and is in standby when PLx lights stop flashing and the Power light is yellow.
Connect to Wireless and Power ON
Wirelessly connect your iTouch, iPad or Smart Phone to the wireless device connected to PMII.
[Settings / Wi-Fi / click on the QRSPNO ### device]
13
Open your internet browser.
In the address box type: QRSPNO or http://192.168.1.1/qrs and enter.
14 Press the Power ON button
http://192.168.1.1/qrs
The “Power”, “System” and “Network” lights should be green.
Power
4
System
Network
Mode
MIDI
AMI
QRS Music Technologies, Inc. / Technical Support - 800-247-6557 /
81525i
Pin-Light Extension [PLx] Features
Steady: HI power LED is ON
Green
Winking: Data to Driver Boards
Yellow
STANDBY
Red
Steady: Short Circuit or Low Current State
Green
Steady: LO power LED is ON
Yellow
Flash: Remote Control Activity
Red
Green
Steady: Stand-Alone Mode for Access Point connection
Yellow
Steady: Network Mode
Red
No Connection
Power
HI power LED
System
LO power LED
Network
Mode
SD Card [Source & 3]
USB 1 & 2 [Source & 8-9]
Test Files [Source & 12]
Internal Demo [Source & 2]
QRS Controller [Source & 1]
AUX In [Source & 4]
MIDI In [Source & 5]
MIDI
MIDI Traffic to Solenoids
AMI IN
Reset/Light Intensity Button
Steady
Steady - should not be same as SD card
Green
3 Blinks then Pause
1 Blink per Second
Steady
1 Blink per Second
Yellow
3 Blinks then Pause check, QRS remote vs GUI
Steady: 10-pin PNOscan
Green
Winking: MIDI traffic
Red
Winking: 5-pin MIDI traffic
Green
Steady: Decoding MIDI Data
Steady Carrier Present
Yellow
Winking: Audio pass-thru
Press and hold for 10 seconds to reset system.
Tap and then press and hold to increase/decrease light intensity.
Power
81525i
System
Network
Mode
MIDI
AMI
QRS Music Technologies, Inc. / Technical Support - 800-247-6557 /
5
Key Adjust
The key adjustment sets the minimum force for each key.
There is no “save” button. Your changes are automatically saved to memory.
Press “System Setup”
Press “Key Adjust” and then the “START” button.
Piano key #5 should begin to repeat.
You must set the Legato AND Staccato Force level for each key.
Previous Key / Key Number / Next Key
Key “Force”: Legato & Staccato. Adjust so key plays as softly as possible.
“Extend”: Sets the Force value displayed to all notes upscale.
Global
Sets the Force value displayed to ALL notes upscale and down.
Chromatic Scale: Down/Up. Use as a final test.
You MUST press the EXIT button when finished.
6
QRS Music Technologies, Inc. / Technical Support - 800-247-6557 /
81525i
Pedal Adjust
This procedure is not necessary on systems, usually uprights, that do not have a sustain pedal solenoid.
Press “Pedal Adjust” and then slide the “Start/Stop Test” button to the right to start the adjustment.
The sustain pedal solenoid and the sustain dampers should start to cycle ON and OFF.
Turn OFF the “Thump Reduction” by sliding the button to the left.
Press the “-” buttons to set the “Initial Drive” and “Hold” values to zero.
Watch the sustain dampers and press the “Initial Drive’s” “+” button until the dampers move off the
strings.
Then, press the “Hold’s” “+” button until the dampers lift up and hold off of the strings.
Turn ON the “Thump Reduction” by sliding the button to the right. Thump reduction will pulse the
pedal solenoid as it’s release to break it’s fall and reduce noise.
Adjust the release up and down until the solenoid drops quietly.
Stop the adjustment by sliding the “Start/Stop Test” button to the left.
Test Files
Press “Test Files”
Select the desired test file.
81525i
QRS Music Technologies, Inc. / Technical Support - 800-247-6557 /
7
Play Piano
Scroll through the music and press your selection.
Playback Controls
To adjust volume levels, press the “Speaker” icon to open the “Playback Settings” page.
External Inputs
Press External Input to play from one of the three external source options.
AUX Line In: Connect your MP3 or CD player to the Audio jack #1.
QRS Controller: Connect your Ancho or Petine to the “QRS Controller” socket on the PMII chassis.
MIDI In: Connect your MIDI device to the MIDI In port of PMII.
8
QRS Music Technologies, Inc. / Technical Support - 800-247-6557 /
81525i
Create a Playlist
To create a playlist just touch the black box next to the song title.
You may continue to select songs for the playlist or...
1 Press “Save Playlist x” to save you current selections with the default name.
2 Press “Save As...” to save your playlist with the name you choose.
3 Press the “Clear” button, before saving, to remove all of your current selections.
To Play a Playlist
Press “Playlist” at the left or at the bottom of the page.
Open a playlist by touching the playlist name.
Your playlist will open where you can...
Play a song from the list.
Add more songs to your playlist
81525i
QRS Music Technologies, Inc. / Technical Support - 800-247-6557 /
9
Shut Down Options
When you’re finished playing piano press the QRS PWR icon in the upper right corner.
Then, when the Power Options window appears press the “Standby Mode” button.
Standby mode shuts off the voltage to the solenoids that drives the keys but, keeps
the processor running.
Power Options
You can also enter standby mode by pressing the “Shutdown Options” button.
There are two other options from this window:
“Reboot” - Restarts the system in case the unit does not respond to commands.
“Shutdown” - Shuts OFF the system for a move or when the unit won’t be used for a while.
To restart from this mode the unit must be disconnected and then reconnected to power.
10
QRS Music Technologies, Inc. / Technical Support - 800-247-6557 /
81525i
Network Settings
81525i
QRS Music Technologies, Inc. / Technical Support - 800-247-6557 /
11
System Information
12
QRS Music Technologies, Inc. / Technical Support - 800-247-6557 /
81525i
Update Information
To update your PMII software.
The current version is shown as the Driver number in the System Information page.
Download the latest “system_patch_2011-xx-xx.zip from the QRS website.
Copy the zipped folder to a USB memory stick.
Plug the USB memory stick in the USB port of the PLx box.
The update procedure is automatic.
Your system will reboot when the update is complete.
81525i
QRS Music Technologies, Inc. / Technical Support - 800-247-6557 /
13
Link to PMII upgrade instructions
Get the free mobile app at: http://gettag.mobi
QRSPNO [http://192.168.1.1/qrs] Stand Alone Mode