1
YAMAHA
®
AUTHORIZED
PRODUCT MANUAL
DIGITAL RHYTHM PROGRAMMER
YAMAHA
DIGITAL RHYTHM PROGRAMMER
OWNER’S MANUAL
INTRODUCTION
Congratulations on your purchase of the Yamaha RX7 Digital Rhythm Programmer!
You now own one of the most sophisticated musical accompaniment systems available - for that is what the RX7
really is. Much more than a mere drum machine, this microcomputer-controlled marvel lets you create complex
and convincing accompaniment arrangements consisting not only of percussion sounds, but superbly realistic bass,
guitar, brass and even “rap screams” as well. One hundred (!) digitally recorded voices are yours for the choosing.
We wish you years of enjoyment with your new RX7, the ultimate rhythm ( + bass + backing + melody) programmer.
About this Manual
Despite its large variety of features, the RX7 is very easy to use. Reading this manual thoroughly while actually
operating the RX7 will enable you to take full advantage of its many functions in no time.
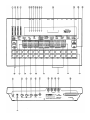
Unfold the convenient back cover fold-out page. Its illustrations will help you quickly locate the controls and
connection terminals.
After you know about which PRECAUTIONS to take, GETTING ACQUAINTED will introduce you to some of the
fantastic sounds available on the RX7 and show you how to program a simple rhythm right away.
BASIC CONCEPTS AND FEATURES then gives you all the information you need in order to understand the functional
structure of the RX7, so you can use it most effectively - and some hints on how to approach programming. This
section will also help you make the most of the detailed explanations of each and every function that follow.
PRECAUTIONS
Your new RX7 is a fine musical instrument - and should be treated as such. Though it is ruggedly constructed and
offers the reliability of solid-state circuitry, handle it with care and common sense. Keep the following points in
mind, and your RX7 will give you years of reliable service.
•
Location
Avoid exposure to direct sunlight or other sources of heat. Vibration, excessive dust, cold, low or high humidity
can also cause malfunction.
•
Relocation
When moving the RX7, unplug the AC adapter and all other connecting cables to prevent damage to cords and
jacks.
•
Handling
Avoid rough handling. Don’t drop the RX7 as this can damage the internal circuitry. Applying excessive force to
terminals or controls may lead to malfunctions. Always remove plugs from jacks or other terminals by gripping
them directly, not by pulling the cord.
•
AC Power Connection
Connect only to a power supply conforming to the specifications shown on the AC adapter.
Disconnect the RX7 from the AC outlet when not using it for an extended period of time. Electrical storms (lightning)
can give rise to power surges, damaging digital circuitry even if power is turned off.
•
Cleaning
Clean the exterior with a soft, dry cloth. Using chemical solvents will damage the finish.
• Interference Through Electromagnetic Fields
Do not use your RX7 close to television sets, radio receivers or other equipment generating electromagnetic fields.
This could cause both malfunctions of the RX7 digital circuitry as well as interference noise in the other appliance.
•
Service and Modifications
The RX7 contains no user serviceable parts. Opening it or tampering with it in any way can lead to electrical shock
as well as damage and will void the product warranty. Refer all servicing to qualified YAMAHA personnel.
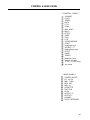
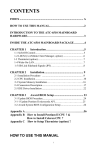
CONTENTS
GETTING ACQUAINTED WITH THE RX7 ... 1
BASIC CONNECTIONS ............................ 1
POWER ................................................. 1
AUDIO .................................................. 1
• Stereo Sound System ........................... 1
• Mono Sound System ............................ 1
• Headphones ...................................... 1
REAL TIME WRITE .................................. 10
TIME SIGNATURE AND
PATTERN LENGTH .................................
WRITING A PATTERN............................
• Writing with the Instrument Keys ..........
• Writing with a MIDI Keyboard .............
DAMP ...................................................
QUANTIZE EXAMPLE ............................
10
10
10
11
11
11
POWER UP................................................
1
STEP WRITE............................................... 12
VOLUME ....................................................
1
SWING ........................................................ 13
DEMONSTRATION PERFORMANCES... 1
PATTERN/VOICE CLEAR ........................ 13
BASIC RHYTHM PROGRAMMING............ 1
CLICK (METRONOME) ........................ 1
RECORDING ........................................ 1
PATTERN COPY/APPEND ........................ 14
EDIT PATTERN ........................................... 15
BASIC CONCEPTS AND FEATURES ....... 3
SONGS ......................................................... 16
VOICES AND SEQUENCES ......................
VOICES .................................................
SEQUENCES-PATTERNS,
SONGS AND CHAINS ..........................
CONTROLS - FUNCTIONAL GROUPS ....
WRITING ON THE RX7 ......................
• Real Time vs. Step Write .......................
• Instrument Keys vs. MIDI Keyboard ......
.
EDITING ...............................................
AN EFFECTIVE APPROACH TO
PROGRAMMING .................................
• How to Use This Manual .....................
• Create Your Own Drum Set .................
• Write Patterns and Songs ....................
• Add Finishing Touches: Editing ...........
• Save Your Sequences ........................
3
3
SONG SELECTION .................................... 16
4
4
5
5
5
5
REPEAT PLAYBACK ................................ 17
SONG PLAYBACK .................................... 16
EDIT SONG ................................................ 17
INSERT....................................................... 17
DELETE ...................................................... 17
REPEAT COMMANDS .............................. 18
6
6
6
6
6
6
TEMPO CHANGE COMMANDS................ 19
SOUND DATA AND MEMORY
CONFIGURATION ...................................... 7
SONG CLEAR ............................................. 20
PATTERNS ......................................................
8
PATTERN SELECTION ............................. 8
PATTERN PLAYBACK .............................. 8
T E M P O ......................................................
9
C L I C K ......................................................... 9
QUANTIZE ................................................ 9
REAL TIME WRITE ................................ 9
STEP WRITE .......................................... 10
PART COPY ............................................... 18
VOLUME CHANGE COMMANDS ............ 19
SONG COPY............................................. 20
JOBS ............................................................ 20
JOB#01: MARK/PART SEARCH.............. 20
JOB#02: MARK SET ................................ 21
JOB#03: SONG NAME .............................. 21
JOB#04: INITIAL TEMPO.......................... 21
CHAINS .............................................................
23
JOB#02: RECEIVE CHANNEL................. 34
JOB#01: CHAIN PLAYBACK..................... 23
JOB#03: TRANSMIT CHANNEL .............. 35
JOB#02: CHAIN EDIT ................................
23
JOB#04: NOTE NUMBER ASSIGN ......... 35
JOB#03: CHAIN NAME .............................. 23
JOB#05: NOTE INITIALIZE ....................... 36
JOB#04: CHAIN CLEAR ............................ 24
JOB#06: PITCH BEND RANGE ............... 36
EDIT VOICE .................................................... 25
JOB#07: DEVICE NUMBER..................... 36
JOB#01: VOICE SELECT .......................... 25
JOB#08: BULK REQUEST ....................... 36
JOB#02: PITCH ...........................................
26
JOB#09: BULK TRANSMIT....................... 36
JOB#03: DECAY ......................................... 26
SYNC ............................................................. 38
JOB#04: BEND ............................................
26
UTILITY ......................................................... 39
JOB#05: VOICE LEVEL ............................. 26
JOB#01: REMAINING PATTERN
MEMORY ................................................... 39
JOB#06: PAN .............................................. 27
JOB#07: VOICE STORE ........................... 27
JOB#08: VOICE INITIALIZE....................... 27
JOB#09: EDIT RECALL ............................. 27
JOB#10: L F O ............................................. 28
JOB#11: POLY .......................................... 28
JOB#12: EFFECT....................................... 28
KEY ASSIGN .................................................. 30
JOB#01: VOICE ASSIGN............................ 30
JOB#02: PARAMETER ASSIGN .............. 30
JOB#03: MULTI VOICE.............................. 31
JOB#04: MULTI STEP ............................... 31
JOB#02: REMAINING SONG
MEMORY..................................................... 39
JOB#03: MEMORY PROTECT ................ 39
JOB#04: VOICE CHANGE......................... 39
JOB#05: ALL PATTERNS CLEAR ........... 39
JOB#06: ALL SONGS CLEAR .................. 40
JOB#07: DEMO DATA LOAD .................. 40
CASSETTE/CARTRIDGE .............................. 41
JOB#01-05: SAVE DATA ......................... 42
JOB#11-15: LOAD DATA....................... 43
JOB#21-25: VERIFY DATA..................... 44
JOB#30: FORMAT CARTRIDGE ............. 45
JOB#05: ACCENT LEVEL........................ 32
ERROR MESSAGES ......................................
JOB#06: FOOT SWITCH ASSIGN........... 32
SPECIFICATIONS ........................................ 48
JOB#07: KEY DATA SAVE ....................... 33
JOB#08: KEY DATA LOAD ....................... 33
M I D I ..................................................................34
JOB#01: CHANNEL MESSAGE ............... 34
46
MIDI IMPLEMENTATION C H A R T ........... 49
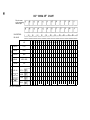
“DRUM SET” CHART ................................... 50
CONTROL & REAR PANEL ....................... 51
GETTING ACQUAINTED WITH THE RX7
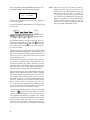
Several demonstration songs are factory-programmed to give you an impression of the amazing accompaniment possibilities now
at your disposal. But first you have to make a few simple connections.
BASIC CONNECTIONS
VOLUME
NOTE: Connections should be made with the power of all
equipment turned off.
You are now ready to hear an RX7 demonstration performance - but be sure to adjust the volume first. While
tapping any of the instrument keys
slide the master
VOLUME fader
up or down until you get an acceptable
listening level.
n
POWER
Connect the supplied Yamaha PA-1210 Power Supply Unit
to the DC 12 V IN terminal on the rear panel, but do not
turn power on yet.
n
DEMONSTRATION
PERFORMANCES
Press the PATTERN/SONG key (on the upper left in the
PATTERN/SONG key group
The display will change
to
AUDIO
• Stereo Sound System
Since the RX7 allows you to adjust the stereo position of
each instrument and offers various pan effects, we strongly
recommend using a stereo amplification setup to obtain the
best possible sound. Connect the RX7 OUTPUT jacks
and
to your mixer, amplifier etc., taking care that the left
(L) and right (R) channels are plugged in correctly.
• Mono Sound System
If you only have a mono amplification system available, be
sure to connect it to the RX7 L/MONO OUTPUT
• Headphones
informing you that the Song No. 00, “Get Funky” is now
ready to be played. Press the START key
sit back, and
listen!
To get an idea of how versatile the RX7 is, next call up demonstration Song No. 01, “TROPICAL”, which has a totally
different atmosphere. Press 0 in the numeric key pad
then
1, and START the RX7 as before.
Stereo headphones can be connected to the rear panel
PHONES jack
POWER UP
When all connections have been made correctly, turn on the
RX7 by pushing the rear panel POWER button
then power
up your sound system.
NOTE: A brief output pulse appears at the RX7 outputs
when power is turned on. To avoid possible damage
to your speakers, always power up your sound
system AFTER the RX7.
As soon as the RX7 is turned on, the following message
appears on the LCD (Liquid Crystal Display) for a few
moments:
BASIC RHYTHM PROGRAMMING
Impressed? Amazing though such complex accompaniment
arrangements may be, programming them is not as complicated as you might think. Just to show you how easy the basics
are, the following instructions will help you program a simple
16-beat Pattern often heard in disco and heavy rock music.
n
n
It is soon replaced by
Flashing cursor
CLICK (METRONOME)
Programming in “real time” is similar to recording each instrument live on a multi-track tape recorder -you can actually
hear the Pattern being built up in layers as you play the individual instruments. To help you stay in time, the RX7
outputs a precise metronome sound from the CLICK jack
which you should connect to an input of your mixer.
This click guide can also be heard in the headphones.
RECORDING
Since the RX7 is still set to SONG mode, shown by the SONG
indicator
being lit, switch it to Pattern Mode to enable
recording. Simply press the PATTERN/SONG key mentioned above twice, and confirm that the PTN (Pattern Mode)
indicator
is lit. (If it is not, press the same key again.)
1
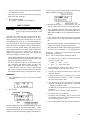
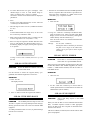
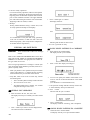
Next, tap the REAL TIME WRITE/EDIT SONG key next
to PATTERN/SONG. The following display appears,
Real Write PTN00
04 / 4 :bar01
showing you that Real (Time) Write (recording) of Pattern
No. 00 is now possible.
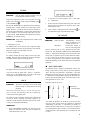
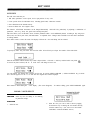
In musical notation, the rhythm Pattern you are going to input
looks like this:
Accent
Hi Hat
SD (Snare Drum)
BD (Bass Drum)
Press START and listen to the metronome click, whose volume you can adjust with the CLICK fader Reduce the
speed with the TEMPO slider until it is slow enough for
you to follow easily, then listen to it for a while until you
get a feel for the beat.
When you’re ready, input the bass drum sound first by tapping
the BD instrument key (marked M) in time with the metronome beat, one tap for each click. Stop after four beats and
notice how you can now hear the BD sound in time (we hope!)
with the metronome click.
Now for the snare drum. This time, tap the SD key (marked
N) only every second beat (click), paying attention to the
beginning of the Pattern (bar), which is indicated by the high
metronome sound. Let the Pattern repeat a few times until
you feel the tempo again, and input the first SD sound on
a beginning (high) click, the other one on the third beat.
Next, the fast hi-hat part. This would normally be the most
difficult, except that the RX7 Quantize feature (explained
later) makes sure that it is actually the easiest to record. For
now, remember that the default Quantize setting is 1/16. This
means that up to 16 notes can be recorded per measure for
each voice. Therefore, you can’t make a mistake with the
hi-hat part (which consists of 16 sixteenth notes) even if you
try. To prove this, tap the HI HAT key (marked T) as fast
as you can, totally out of time, then listen. The result will
always be hi-hat sounds with ultra-precise timing!
As a finishing touch, add the hi-hat accents. To do so, keep
ACCENT 2
depressed while tapping HI HAT in the same
rhythm as you first did the BD, i.e. on every metronome beat.
This completes programming of a popular, basic 16-beat
rhythm Pattern. Press STOP/CONTINUE to exit from the
Real Time Write mode, then listen to your new Pattern
without the metronome click by pressing START. Basically,
that’s all there is to creating your own rhythms with the RX7!
2
NOTE: Since this was the very first time you tried programming the RX7, you may have made a few
mistakes. Due to the default quantize setting your
bass drum may be out of time, or the snare in a
wrong position - but don’t worry. The RX7 offers
you a whole host of possibilities for correcting such
mistakes, one example of which you already noticed
when writing the hi-hat part. Even if you are not
at all sure of your sense of rhythm, the RX7 will
help you program sophisticated patterns.
BASIC CONCEPTS AND FEATURES
The RX7 has so many features, it may seem a bit intimidating at first. On the other hand, when you hear the demonstration programs,
you will no doubt want to learn how to create complex accompaniment arrangements like that for your own music.
As with any instrument, a certain amount of practice (and theoretical knowledge) is necessary to enable freedom of expression.
However, once you understand the basic ideas, you will find it very easy to write sophisticated and highly realistic rhythm arrangements with the RX7.
This section first introduces the major features, functions and possibilities of the RX7. The final chapter, AN EFFECTIVE APPROACH TO WRITING, then tells you how to make use of them while referring to the appropriate sections in this Manual.
VOICES AND SEQUENCES
than any conventional drum machine, letting you add realism
and excitement.
The most basic distinction to make is between functions relating to “voices” (= the instrument sounds themselves) and
those dealing with “sequences” (= rhythmical combinations
of notes).
At the same time. the RX7 gives you complete freedom in
combining these voices to form sequences. Even the finest
nuances of each single note in a rhythm pattern can be individually adjusted.
The RX7 was conceived not only as a rhythm programmer,
but also as an advanced MIDI sound source which can be
played/programmed via MIDI keyboards and/or sequencers
as well as with its own keys. As such, it offers you much
more sound control over a far greater variety of instruments
n
VOICES
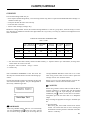
In the tradition of Yamaha’s DX7 synthesizers, the 100 individual RX7 sounds are referred to as “voices” (used synonymously with “instruments” in this manual). Each voice
has a number for easy access.
VOICE LIST
Voice No.
00 - 08
09 - 18
19-20
21-37
38 - 40
41-44
45 - 48
49 - 52
53 - 56
57 - 59
60
61
62
63
64
65
66 - 68
69 - 70
Type
Bass Drums
Snare Drums
Rim Shots
Toms
FM Percussion
Hi hats (open/closed)
Cymbals
Basses
Guitars*
DX7 Voices
Brass
Hand Claps
Timpani
Cowbell
Tambourine
Shaker
Congas
Bongos
The following abbreviations are used for voice names on the
LCD:
BD = Bass Drum, E. = Electric, F. = Fusion, H = High,
H. = Heavy, HH = Hi hat, HO = High Open, HM =
High Mute, J. = Jazz, L = Low, P. = Processed, prc =
percussion, Rvs = Reverse, SD = Snare Drum
Ex.: H. BD 1 = Heavy Bass Drum
*: D.GtrS = Distorted Guitar Single Note
D.Gtr5 = Distorted Guitar Open Fifths
GtrCutD = Guitar Cut/Downstroke
GtrCutU = Guitar Cut/Upstroke
Voice No.
71 -72
73 - 74
75
76
77
78
79
80
81
82
83
84
85
86
87
88 - 93
94 - 99
Type
Timbales
Agogos
Cuica
Castanet
Whistle
Claves
Bell Tree
Vibra Slap
Steel Drum
Glass Crash
Gunshot
Door Slam
Camera Shutter
Punch
Car Door Shutting
Human voices
Reversed sounds
You have total control over the level (volume), pitch, pan
(stereo position) and decay (length) of each voice, as well
as over effects including delay, detune, distortion, pitch bend,
vibrato, panned stereo echoes, etc..
Any voice can be assigned to and played by any Instrument
key on the RX7. You can create your own key layouts (“drum
sets”) and have the RX7 memorize up to five of them.
Initially, the following voices are assigned to the Instrument
keys 15:
(Four other preset layouts are available.)
3
INITIAL INSTRUMENT KEY VOICE LAYOUT
BASS DRUM 2
SNARE
DRUM 2
RIMSHOT 2
ELECTRIC
TOM 1
ELECTRIC
TOM 2
ELECTRIC
TOM 3
BASS DRUM 1
SNARE
DRUM 1
RIMSHOT 1
TOM 1
TOM 2
TOM 3
NOTE: Pressing the DAMP Key
n
ELECTRIC
TOM 4
TOM 4
to switch on the DAMP LED
SEQUENCES - PATTERNS, SONGS
AND CHAINS
A Pattern is a rhythmic combination of instrument (voice)
sounds. It forms the basic unit of Songs, which are complete
accompaniment arrangements. (A variety of popular drum
patterns are permanently stored in the internal ROM. See
UTILITY Job #07.)
A Pattern consists of one or more bars (measures), and can
be input (programmed) either in real time, i.e. live, or step
by step.
Songs are put together by determining the order in which
Patterns are played by the RX7. Chains are simply further
combinations of Songs.
HI HAT
(OPEN)
RIDE
(EDGE)
CHINESE
CYMBAL
HI HAT
(CLOSED)
RIDE
(CUP)
CRASH
TAMBOURINE SHAKER
CLAPS
COWBELL
mutes the Instrument keys in any mode.
Each time a voice is played in a Pattern, it can have a different
pitch, level, decay, stereo placement, etc. This “Edit Voice”
feature allows the creation of arrangements which are vibrantly alive.
Songs can be made more expressive by adding tempo and
volume changes.
n
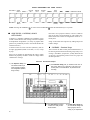
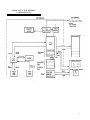
CONTROLS - Functional Groups
Take a look at the RX7 control panel illustrated below. It
has been organized into four functional groups of keys concerning 1) instrument, 2) sequences, 3) utility functions and
4) data entry. Distinguishing between these four groups will
facilitate operation.
Controls: Functional Groups
2) The Sequence Group controls functions that let you
create and play accompaniment arrangements (Patterns,
Songs, Chains).
1) The Instrument Group gives you individual control over all
RX7 voices, allowing you to alter them or play them, from
the RX7 panel or via a MIDI device, for performance and
recording.
3) The Utility Group comprises
controls for a variety of additional functions.
4
4) The Data Entry Group lets
you check all RX7 settings and
adjust (program) them according to your requirements.
To keep the front panel compact, most keys have been given
more than one function, so the order in which they are pressed
is important. Always watch the messages on the LCD display
for guidance. In many cases, dialog-type programming is
possible, with the LCD asking you questions you can answer
by pressing YES, NO or numeric keys.
You can exit from a function mode by pressing a different
function key (or in some cases, STOP/CONTINUE).
1) Instrument Group
Consists of the assignable Instrument keys used for
playing and programming, KEY ASSIGN which determines the voice layout, and EDIT VOICE with which
you can adjust a large number of voice parameters according to your requirements.
The MIDI key is used to access important functions
when controlling RX7 voices from external MIDI
equipment.
2) Sequence Group
The nine keys grouped together on the upper left all have
two distinct functions, depending on whether Pattern
or Song mode is selected. Pattern functions are written
on the top part of the key, Song functions on the lower
one.
3) Utility Group
UTILITY functions let you check remaining Pattern and
Song memory space, clear all Patterns or Songs, turn
Memory protection on and off, and exchange voices in
existing Patterns. Saving data to (or loading it from)
RAM cartridges and tape cassettes and controlling MIDI
communication with external equipment is accomplished
with the other three keys in this group.
* Except for SYNC and JOB itself, all keys in the group
numbered
on the fold-out illustration of the control
panel access functions in conjunction with the JOB key
(as do SONG and EDIT SONG for certain operations).
All Jobs and their numbers are listed on the control panel
Job Menu
for easy reference.
4) Data Entry Group
Actual programming, i.e. parameter selection and value
input, is performed mainly with these keys and the DATA
entry slider
Values that can currently be input are
indicated by a flashing cursor.
The - l/NO and + l/YES keys answer questions and
shift to lower/higher values. Keeping them depressed
usually speeds up this shift.
In general, the numeric keys select Job numbers or parameters and input values. Also note the fractions printed
on them. These refer to musical time.
ACCENT 2 moves the cursor between multiple parameters during data entry displays. Certain inputs are finalized by pressing ENTER.
Depending on the current function, SHIFT/COMPARE
lets you compare altered data with the previous setting
or input lower case letters for Song and Mark names.
n
WRITING ON THE RX7
Three distinct ways of writing (= programming, recording)
Patterns are possible on the RX7: 1) in real time with the
Instrument keys, 2) in real time using a MIDI keyboard, and
3) step by step with the Instrument keys. All three programming methods have their advantages for different applications, and you will soon discover your personal preferences.
• Real Time Write vs. Step Write
In general, the Real Time Write mode is ideal for creating
Patterns according to hearing and rhythmic feeling, for you
can listen the Pattern being built up layer by layer as you
add the notes of different instruments.
On the other hand, Step Write mode is suitable for users
with less confidence in their sense of rhythm, when inputting
data from Pattern books or for difficult (fast, complex,
off-beat) sections.
Of course, you can use both modes in combination, for instance creating the basic rhythm with Real Time Write and
adding finishing touches with Step Write.
• Instrument Keys vs. MIDI Keyboard
During Real Time Write, you also have the choice of writing
with the RX7 Instrument keys or a connected MIDI keyboard. Particularly for bass lines, melodic sequences (toms,
bongos, guitar, brass) or passages calling for the expressive
use of different volumes (dynamics), playing voices from a
velocity-sensitive MIDI keyboard can make writing much
faster and easier.
Basic rhythm programming is usually simpler with a suitable
Instrument key layout. Dynamics, for instance, can be added
later with Edit Pattern.
n
EDITING
With the RX7, it is very easy to correct or alter Patterns in
almost any conceivable way AFTER they have been written.
Such operations are referred to as “editing”. Possibilities
include:
a)
Overdubbing - addition of new notes/instruments to
an existing Pattern.
b)
Clear - deletion of single notes or entire voices from a
Pattern.
c)
Voice Change - exchanging of any voice with another
in existing Patterns.
d) Edit Voice - overall alteration of voice parameters
(pitch, pan, level, etc.) and effects.
e)
Edit Pattern - alteration of voice parameters for individual notes in a Pattern.
5
n AN EFFECTIVE APPROACH TO
PROGRAMMING
How to Use This Manual
The following sections of this Manual provide a detailed,
systematic guide to all RX7 operations. You can locate the
desired function by first having a look at the CONTENTS,
then reading the relevant OVERVIEW (at the beginning of
each section) and finally the FUNCTION explanation.
To help you get started, a possible approach to programming
is shown here together with references to the necessary operations. It is also a good idea to study the demonstration
Songs, using the EDIT PATTERN function, to see how these
professional arrangements are structured.
• Create Your Own Drum Set
The first thing to decide on is which of the 100 voices you
want to use for your accompaniment arrangement.
You can listen to various voices using KEY ASSIGN Job
#01, hitting any desired Instrument key while selecting voices
with Data Entry Group keys or the DATA slider. In the
process, you can create your own drum set with the most
suitable layout.
If you want to record bass lines, chords or other patterns
necessitating several pitches/versions of the same instrument,
use KEY ASSIGN Job #03 to assign a single voice to the
upper row of Instrument keys (A ~ L). Then access Job #04
(plus, if necessary, Job #02) to alter the pitch/level/pan/etc.
settings of each upper row key, thus obtaining an extra
“keyboard” dedicated to a single voice.
You can save all such key assignment data with KEY ASSIGN
Job #07.
If you have a MIDI synthesizer etc. at your disposal, you
may prefer to play single voices from a keyboard, assigning
them with MIDI Job #02.
Even if you should decide after writing that you want to use
different instruments after all, UTILITY Job #04 lets you
exchange voices in completed Patterns.
• Write Patterns and Songs
With your new “drum set”, you can start recording your first
Patterns in real time or step by step. In many cases, you will
want to combine several, often very similar, versions of the
same basic Pattern for a Song. Instead of programming each
one separately, it saves a lot of time to COPY the basic Pattern
and then add new instruments/notes, use CLEAR to delete
unnecessary notes or voices, exchange instruments with
UTILITY job #04, and so on.
After you have written some Patterns, you can begin combining them to form a Song with EDIT SONG. With INSERT
and DELETE, you can add or erase Patterns any time, making
it is very easy to correct the Song configuration as you go
along. REPEAT saves entering the same Patterns over and
over again.
6
Songs become much more expressive with TEMPO
CHANGE S (accelerando/ritardando) and VOLUME
CHANGES (crescendo/ decrescendo), which are best input
when the Song is more or less complete.
• Add Finishing Touches: Editing
Once you have written a Song (or some Patterns), you can
often enhance the musical impression by changing the overall
setting of one instrument or the other with EDIT VOICE,
for instance raising/lowering levels or adding exciting special
effects.
For alterations of single notes within the musical context of
a Pattern, use EDIT PATTERN. This allows you to, for
example, lengthen the decay of a voice or to create stereo
movement, giving you limitless expressive possibilities.
Intelligent use of these two functions will let you achieve
perfectly balanced arrangements (and many effects) that were
previously possible only through professional-quality mixing
of multiple instrument outputs.
• Save Your Sequences
When you satisfied with your Patterns/Songs (or when you
want to postpone editing to the next session), you can save
both sequence and/or voice data either to an optional RAM4
CARTRIDGE, a CASSETTE tape, or to MIDI devices which
provide bulk data storage via disk, such as the Yamaha MIDI
Data Filer MDF1 or a DX7 II FD synthesizer (using MIDI
Job #09).
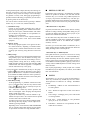
SOUND DATA AND MEMORY
CONFIGURATION
7
PATTERNS
OVERVIEW
In the Pattern mode, you can
* Select any Pattern and play it (or a specified succession of Patterns) at the desired tempo.
* Record (write) up to 100 Patterns and store them in the RX7’s internal memory.
* Erase (clear) a Pattern, or a single voice within a Pattern.
* Copy or append Patterns.
* Edit Patterns by adjusting the pitch, level, pan, decay and effect on/off settings for each note.
* Check which voices/parameters were used in any Pattern.
When power is turned on, the RX7 is automatically set for Pattern Selection, i.e. it is in Pattern Mode.
* To use Pattern functions, always enter Pattern Mode first.
The PATTERN/SONG key switches the RX7 between Pattern and Song Mode, indicated by the LEDs PTN
To enter Pattern Mode from any other mode, press this key until the PTN LED lights.
PATTERN SELECTION
FUNCTION
Enter the two-digit Pattern number directly with the numeric
keys. Numbers below 10 must be preceded by a zero. For
example, to select Pattern 2, enter “0” then “2”.
Selects a Pattern for playback, writing, overdubbing, clearing or editing.
Currently selected Pattern number
and SONG
PATTERN PLAYBACK
Cursor
FUNCTION Continuous playback of selected Patterns until
stopped.
Time signature
Bar count
OPERATION
1.
The RX7 can store up to 100 Patterns in memory locations
numbered 00 through 99. (The remaining Pattern memory
space can be checked with UTILITY Job #01.) A “w” on
the display next to the cursor indicates a Pattern location
already containing data. Such Patterns can be played, overdubbed (additional notes recorded “on top” of them), copied
or deleted (cleared).
Pattern locations without the w-mark are empty, i.e. they
contain no data yet. Select such numbers when you want to
create (write) a new Pattern.
Next Pattern number or
prompt to enter one
Current Pattern number
Current time signature
The prompt mark “**” means you can specify the next
Pattern to be played right after the present one, using
either of the methods described under Pattern Selection.
As long as the prompt is displayed, the current Pattern
will be repeated.
3.
To stop playback, press STOP/CONTINUE. The RUN
LED will go out.
4.
To restart playback from where it was stopped, press
STOP/CONTINUE again. Pressing START instead recommences playback from the beginning of the Pattern.
5.
After having stopped playback, you can revert to the
Program Selection display directly by pressing - l/NO.
+ l/YES or a numeric key.
and + 1/YES keys or the numeric key pad.
- 1/NO and + 1/YES KEYS
Convenient for selecting Patterns adjacent or nearby to the
one currently displayed, or to locate empty patterns.
- 1/NO selects the next lower, + 1/YES the next higher
Pattern number. Holding down either key rapidly scrolls
through the numbers in the respective direction.
2. NUMERIC KEYS
Convenient for selecting Patterns with far higher or lower
numbers than the present one.
8
Current bar
2.
OPERATION Patterns can be selected using the - 1/NO
1.
After selecting the desired Pattern, press START
or
STOP/CONTINUE
The RUN LED
will light,
and the display will change to
TEMPO
FUNCTION
Sets the tempo (speed) of Pattern, Song or
Chain playback or Pattern writing.
Tempo can be adjusted any time in the range from 40 to 250
quarter-notes per minute, either using the TEMPO slider
or the TEMPO key
Pressing the TEMPO key for adjustment has the advantage
of being able to visually confirm the current tempo on the
display. However, in order to continue with any function in
use before tempo adjustment, you must press that function’s
key. For example, if you were writing in Real Time, you have
to press REAL TIME WRITE after adjustment with the
TEMPO key to continue writing.
OPERATION Tempo can be adjusted with or without visual
confirmation.
2.
To turn Click on or off for playback, press - 1/NO (OFF)
or + 1/YES (ON).
3.
Set the Click rate with the numeric key pad. (The Click
rates are shown as fractions on the keys next to their
usual numeric value.)
4.
Click volume is adjusted with the CLICK fader
is independent of the VOLUME fader setting.
QUANTIZE
FUNCTION
Real Time Write:
1. Adjustment by Ear
The TEMPO slider can be used any time to adjust the tempo
without interfering with the current operation. Note that the
tempo may “jump” when the slider is moved.
2. Visual Adjustment
To visually confirm the tempo setting on the LCD, press
TEMPO. The lower line of the display will show the tempo
in number of beats (quarter notes) per minute:
Step Write:
You can now alter the tempo with - l/NO or + l/YES, the
numeric keys or the TEMPO slider. The display will change
accordingly, showing the new tempo value.
CLICK
Automatically corrects
timing according to the
selected quantize rate.
Determines length of
notes or rests being input.
From a technical point of view, Quantize has the same
function for both the REAL TIME and the STEP WRITE
modes, i.e. it determines the length of the shortest notes that
can be input. A Quantize rate of 1/4 thus means that whole,
1/2 or 1/4 notes can be written, but not 1/8 or 1/16 notes,
etc. Since the applications of the Quantize function differ
somewhat depending on the Write mode, they are explained
separately.
n
The upper LCD line still shows the current mode.
It
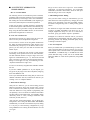
REAL TIME WRITE
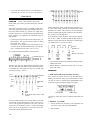
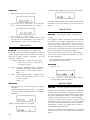
As illustrated below, Quantize automatically corrects the
timing of input notes by moving them to the nearest Quantize
“beat”. This can be set between 1/2 and OFF (= 1/96) and
determines the shortest note you can write. (Remember how
in GETTING ACQUAINTED, tapping the HI HAT key
as fast as possible recorded precise 1/16 notes. This was because Quantize was set to 1/16.)
Example: Quantize set to 1/4
FUNCTION
Provides a metronome click sound during
Pattern writing or during Pattern and Song
playback.
Click can be set to sound every 1/2, 1/4, 1/6, 1/8, 1/12, 1/16,
1/24 or 1/32 note. The beginning of each bar is indicated by
a Click sound with a higher pitch.
The Click rate can be adjusted, and the Click sound turned
on and off, before or during any Pattern operation. To
continue with that operation, press the respective key. Click
is always on during Real Time Write.
OPERATION
1 . Press CLICK/TEMPO CHANGE. The lower line of the
display will show the current Click rate and whether the
Click metronome is on or off.
Performance
- - inaccurate timing
BD
Playback
- - perfect timing
The smaller the Quantize rate (fraction), the shorter the notes
that can be input, and the greater the possibility for intentional
“humanizing” of the beat - or inaccuracies you hadn’t intended. The most subtle nuances of timing can be captured
by turning Quantize OFF. (Actually, even when this function
is OFF, the RX7 is still quantizing to an extremely fine rate
of 1/96.)
9
WRITE. If the location is empty, the following display
will appear:
The ideal Quantize rate for Real Time Write will depend on
your ability to keep precise time. If you are very confident
of your sense of rhythm, you might want to keep Quantize
OFF all the time. On the other hand, Quantize will allow
greater precision if you are not such a sharp “drummer” yet.
A concrete example for Real Time Write Quantize is given
in the Real Time Write chapter below.
n
STEP WRITE
In the Step Write mode, Quantize determines the “step
length”, that is to say the length of notes or rests being input.
Since Quantize settings are an integral part of the Step Write
process, they are explained together with other Step Write
operations.
OPERATION Quantize can be set/adjusted before or during
Pattern writing.
1.
Press QUANTIZE/DELETE to display
Quantize rate
Quantize=
1/16
Swing
off
(See SWING chapter)
2.
3.
Time signature
The Quantize rate is set with the numeric keys, similar
to setting Click: The fractions on these keys indicate the
respective Quantize rate, which covers the range from
1/2 to 1/48. Pressing numeric key 9/OFF turns Quantize
off.
As with Tempo and Click, Quantize can be set at any
time, and it is necessary to revert to a previous function
after Quantize rate adjustment by pressing the corresponding key.
Pattern length
This shows the “default” setting: time signature = 4/4,
pattern length = 1 bar. The cursor indicates that you
can change these values as required.
NOTE: Should the LCD show the message “Memory
Protected”, you must first turn off the Memory
Protect function with UTILITY JOB #03.
* If an existing Pattern was selected, the cursor will not
appear, and you can start to write over (overdub) or alter
the Pattern immediately by pressing START.
2. Should you not want to use the default setting of common
time and one-bar length, set the time signature numerator
by entering a two-digit number (ex: 3 --> 03) in the range
from 01 to 99.
3. To set the denominator, move the cursor to the right
using ACCENT 2 and enter a value with the numeric
keys. The fractions from 1/2 to 1/32 printed on the keys
are valid. (1/48 can NOT be used.)
4.
Finally, input Pattern length by again moving the cursor
to the right and entering a two-digit number in the range
from 01 to 99.
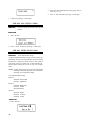
Example: Time signature 6/8, Pattern length 4 bars
Real Write PTN00
06 / 8 :bar04
REAL TIME WRITE
FUNCTION
Create, overdub or alter a Pattern by playing
the voices live (in real time).
To create a new Pattern from scratch, you must first specify
the time signature and length of the Pattern in bars.
This is not possible with existing Patterns you want to overdub
or change, since their time signature and length are already
fixed. (However, you can append Patterns to each other using
COPY, thus creating longer ones.)
* You can exit from Real Time Write mode any time by
pressing STOP/CONTINUE.
OPERATION
n
TIME SIGNATURE AND PATTERN LENGTH
1 . Making sure the PTN LED is lit and the Pattern location
you wish to write to is selected, press REAL TIME
10
* These settings are not memorized until you actually record
(write) sounds. You can therefore alter them, moving the
cursor with ACCENT 2, until you have input the first
note.
n
WRITING A PATTERN
• Writing with the Instrument Keys
Assuming that Quantize (see example further below), time
signature and Pattern length have been set accordingly,
1. Press START.
The RUN LED will light up, and you will hear the
metronome Click guide. If the Pattern is longer than
one bar, the LCD will indicate the current bar number
as the RX7 cycles through the Pattern.
2.
Adjust Tempo and Click if necessary. Once you get the
feeling for the tempo and beat, you can begin writing
any time (usually on the first beat of the first bar).
3.
a)
Input (write) the desired voices by tapping the Instrument
keys with the correct timing. Notes/instruments can be
added as the Pattern recycles, thus building up the Pattern
in layers.
You can input one instrument at a time or several simultaneously.
* If you want to use voices currently not assigned to any
instrument keys, use KEY ASSIGN JOB #0l prior to
writing.
b)
Adjust the Quantize rate depending on the instrument
part if this makes precise writing easier.
c)
To accent beats, hold down one of the green ACCENT
keys while tapping an Instrument key.
d)
Mistakes can be erased as you go along by holding the
CLEAR key and tapping the respective Instrument key
in time with the note you want to delete.
* The chapter below on PATTERN/VOICE CLEAR tells
you how to erase whole instrument passages or Patterns.
damp any recorded voice by pressing its Instrument key exactly when you want the sound to STOP.
If you have a MIDI keyboard available, damping is possible
DURING the initial Real Time programming of Patterns.
Just press DAMP, causing the DAMP LED to light. Any
sounds played on the MIDI keyboard will now sound only
as long as the key is pressed. As soon as you release the key,
the sound will be damped immediately.
* As long as the DAMP LED is lit, all RX7 Instrument keys
are damped and cannot be used to play any voices.
* Since the damping point is always moved to the nearest
Quantize division, the effect of the Damp function is influenced by the Quantize rate. (In some cases, there will
be no damping effect at all.) Quantize is therefore best
turned off when using the Damp function.
n
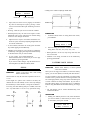
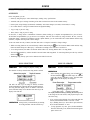
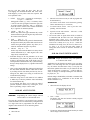
Try programming the following popular rock pattern in Real
Time Write with Quantize set to 1/16.
e) As already shown in GETTING ACQUAINTED, accents can be overdubbed.
4.
To stop recording, press STOP/CONTINUE.
The RUN LED will go out, Pattern Selection mode is
entered and you can now play your Pattern by pressing
START. To add or delete notes, stop playback and
re-enter Real Time Write (or Step Write) mode.
• Writing with a MIDI Keyboard
Programming is basically the same, with the added advantages
of being able to input
a ) subtle dynamics (expressive volume changes) in real time
(if the keyboard is velocity sensitive),
b) a larger variety of voices than is possible with a single
Instrument key layout
c) melodic lines and chords more easily than with the RX7
Instrument keys.
Accent
Hi Hat
SD (Snare Drum)
BD (Bass Drum)
If the result is satisfactory, there is no need to use any other
Quantize rate, but if you find writing too difficult, try the
following method.
1. Set Quantize to 1/16 and input the closed hi-hat notes,
ignoring the accents for the time being.
As in our first writing example in GETTING ACQUAINTED, there is NO WAY you can make a mistake
(except by leaving out notes, which can be input the next
time around).
2.
When all hi-hat notes have been written, set Quantize
to 1/4 and input the hi-hat accents on each Click beat
(by holding down ACCENT 2 and tapping the HI HAT
Instrument key). Again, there is NO WAY you can go
wrong. Due to the 1/4 Quantize rate, the accents will
be precisely in time, no matter when you tap the HI
HAT key.
3.
Leaving the Quantize rate as it is, tap the snare drum
(SD) Instrument key on every second Click. This is the
first time you can make a mistake. If you do and write
too many SD notes, delete the unnecessary ones by
holding down the CLEAR button while tapping SD.
4.
Finally for the most difficult part - the bass drum (BD)
line. Set the Quantize rate back to 1/16 and perhaps lower
the tempo even further. If you don’t trust your sense
of rhythm (or can’t imagine what the Pattern should
sound like by looking at the notation), try counting the
hi-hat notes to know when to tap the BD key (namely
on the lst, 4th, 7th, 9th and 16th hi-hat notes).
First, you must use MIDI Jobs #02 and #04 to assign the
RX7 voices to the connected MIDI keyboard as desired.
Then all you have to do is play during Real Time Write.
* Both the RX7 Instrument keys and several MIDI keyboards can be used simultaneously for programming and
playing.
n
DAMP
Using this key during Real Time Write can add particular
realism by damping sustained sounds such as cymbals. This
function is especially easy to operate from a MIDI keyboard.
When writing with the Instrument keys, DAMP can only
be used AFTER a Pattern has been programmed. Select the
respective Pattern, then enter Real Time Write mode and
press DAMP. (The DAMP LED
lights up.) You can now
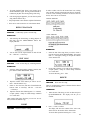
QUANTIZE EXAMPLE
11
5.
If even this fails and you still can’t write the BD line in
Real Time, all is not lost - you can do it with Step Write.
beat
HI-HAT
QUANTIZE
1/16
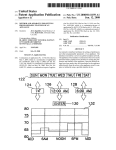
SD
STEPWRITE
BD
FUNCTION
Create or alter a Pattern step by step.
In this mode, you can take your time entering one note after
the other.
The length of each step or beat (= the length of input notes
and rests) is adjusted by pressing QUANTIZE and then selecting the desired fraction (e.g. quarter note, eighth note)
with the numeric keys. As shown by the example illustrated
below, intelligent use of Quantize can substantially speed up
Step Writing.
* To input notes longer than the current Quantize rate, you
must combine a note with the necessary number of “blank”
steps, input with + l/YES.
For instance, to input quarter notes when Quantize is 1/16,
you must tap the desired Instrument key once and then
press + l/YES three times (since 1/4 = 4 x 1/16).
On the other hand, setting a high Quantize rate allows you
to create subtle timing variations for added realism. Rock
drummers, for instance, often achieve an exciting feeling of
tension by slightly delaying their off-beat on the snare drum.
This is easy to do with Step Write.
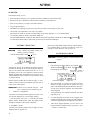
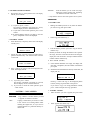
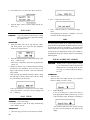
In the following example, the SD is entered using a Quantize
rate of 1/96 (= OFF). To obtain the desired delay, input the
SD notes one step later than the 2nd (beat 25) and 4th (beat
73) quarter notes, i.e. on beats 26 and 74.
Hi-HAT
Quantize 1/8
Ex.: Program the following Pattern with Step Write
SD
Quantize 1/96 (OFF)
Hi Hat-Quantize 1/16
SD-Quantize 1/8
BD-Quantize 1/4
* You can exit from Step Write mode any time by pressing
STOP/CONTINUE.
Written in the form of a rhythm diagram, the Pattern looks
like this. (The white dots indicate notes, entered by tapping
an Instrument key, while black dots show rests or blank steps,
entered by pressing + l/YES.)
beat
HI-HAT
beat
SD
beat
BD
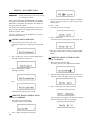
OPERATION
• TIME SIGNATURE AND PATTERN LENGTH
QUANTIZE
1/16
QUANTIZE
1/8
These settings are basically the same as for Real Time Write.
Making sure the PTN LED is lit and the Pattern location
you wish to write to is selected, press STEP WRITE. If the
location is empty, the following display will appear:
QUANTIZE
1/4
– Rests
– Notes
– Hi-Hat OPEN (other HI-HAT notes
CLOSED)
The most suitable Quantize rates for Step Write are indicated
on the right of each instrument part. Just to show how selection of the appropriate Quantize rate saves time, look how
many times you would have to press + l/YES to enter blank
steps (rests) if you left Quantize at 1/16 for input of the snare
drum (SD) and bass drum (BD) as well.
12
* Memory Protection (UTILITY Job #03) must be off when
using Step Write.
Time signature
Pattern length
If necessary, adjust these values as explained under Real Time
Write.
• WRITING A PATTERN
1.
Set the Quantize rate according to the instrument part
you want to enter, then press STEP WRITE.
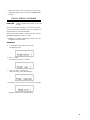
2 . Press START.
A setting of 67% creates a triplet-type shuffle effect.
Step Write PTN10
bar01
Current bar
3.
:
beat001
Current beat (step)
Input (write) the desired voice by tapping its Instrument
key. Rests or blank steps are input by pressing + l/YES.
Voices can be heard when input and during successive
cycles.
SWING=67%
* Pressing - l/NO lets you revert to lower bar numbers.
* With Step Write, only one note can be input at a time.
Additional notes on the same beat are entered during
successive runs through the Pattern.
4.
OPERATION
1.
In Pattern Mode, before or during Real Time Write,
press SWING.
Input successive “layers” of sounds as the Pattern continues its cycles, if necessary adjusting the Quantize rate
for various instruments.
* To accent beats, hold down one of the green ACCENT
keys while tapping an Instrument key.
* Mistakes can be erased as you go along by holding the
CLEAR key and tapping the respective Instrument key
on the beat of the note you want to delete.
5. To stop writing, press STOP/CONTINUE.
Pattern Selection mode is entered and you can now play
your Pattern by pressing START.
If you want to make changes, stop the Pattern and reenter Step Write (or Real Time Write) mode.
Creates a jazz swing “feel” when writing
Patterns in Real Time.
This function can only be used with a Quantize rate of 1/8
or 1/16.
If the length of a quarter note is taken to be l00%, the
off-beats of a bar will normally occur at 50%. By delaying
this off-beat by a certain amount, a swing feel is obtained.
Five swing rates with differing delays are available, from 54%
for a very subtle effect to 71% for a very pronounced swing.
ON
BEAT
SWING: OFF
SWING=71%
OFF
BEAT
2. Select the swing rate with the + l/YES and - l/NO keys.
Swing Rates: off, 54%, 58%, 63%, 67%, 71%.
* When Quantize is set to l/16, only swing rates 58% and
67% can be used.
* Whether or not Swing is turned on can be checked by
pressing QUANTIZE.
PATTERN/VOICE CLEAR
FUNCTION
SWING
FUNCTION
Swing Rate = off
ON
BEAT
Deletes entire Patterns, or erases specified
voices from a Pattern.
When you are not happy with a Pattern (or need more memory
space), you can clear (delete) it instantly with this function.
It is also possible to erase any instrument voice from within
a Pattern. This is practical both for correcting mistakes and
for re-arranging Patterns, using only certain instrument parts
to create variations or totally new Patterns. (If you want to
keep the existing pattern, you must first copy it to a different
location using PATTERN COPY before starting to arrange
it.)
* All 100 Patterns can be cleared simultaneously with
UTILITY JOB #05.
OPERATION
1.
Making sure Memory Protect is off, select the Pattern
you want to delete (or from which you want to erase
an instrument), then press CLEAR.
Clear
PTN
07
1:PTN, 2:Voice ?
13
• CLEARING ENTIRE PATTERNS
APPEND:
2 . Press numeric key 1 to specify Pattern Clear. The display
will ask you to confirm:
With this function, you can create new, larger
Patterns by joining existing ones, appending
one Pattern to the end of the other.
* Only Patterns with the same time signature can be joined.
OPERATION
Are you sure?
3.
*
a) If you are, press + l/YES.
The message “completed!” will appear for a second,
then the display reverts to Pattern Selection.
b) If you want to cancel Clear operation, press - l/NO
instead.
If the selected Pattern location was empty in the first
place, “completed!” will not be displayed.
• CLEARING VOICES
2.
1. Making sure Memory Protect is off, select the Pattern
you want to copy, then press COPY.
Copy PTN 27
l:Copy, 2:Append?
2.
Select Copy with numeric key 1.
3.
Enter the memory location you want to copy to with the
numeric keys.
Press numeric key 2 to specify Voice Clear. The display
will ask you to
Select
3.
• PATTERN COPY
Voice
Specify the voice you want to erase by tapping the respective Instrument key. The selected voice is shown
on the LCD.
Clear
clear
PTN 07
47-Crash
4. Press +/YES if you want to erase the displayed instrument. The display will ask
* Should you decide to change the Pattern to be copied at
this stage, move the cursor between the lower and upper
display lines with ACCENT 2 and input a different Pattern
number with the numeric keys.
4. Press ENTER (START).
a)
If the selected destination was empty, the display will
first show “completed”, then the number of the Pattern
just copied.
b)
Should the selected destination already contain data, the
display will ask:
Are you sure?
Rewrite PTN 78 ?
3 . a)
If you are, press + l/YES.
The message “completed!” will appear for a second,
then the display reverts to Pattern Selection.
b) If you want to cancel the Clear operation, press
- l/NO instead.
PATTERN COPY/APPEND
FUNCTION
COPY:
14
Pressing + l/YES will copy to the displayed pattern
location, erasing its present data in the process.
If you want to copy to an empty destination instead,
press - l/NO and repeat the Copy procedure.
• PATTERN APPEND
1.
Copy a Pattern to another memory location,
or append one Pattern to another.
Copying is useful when you want to to create
a new version of an existing Pattern while
retaining the original one, or if you want to
organize Patterns in a particular memory location order.
Select the Pattern you want to append, then press COPY.
Copy PTN 78
1:Copy,
2.
2:Append?
Select Append with numeric key 2.
3.
Enter the Pattern you want to append the selected Pattern
to, using the numeric keys.
(You can always revert to All Instruments mode by pressing
EDIT PATTERN). The display will change to
* The cursor can be moved between the lower and upper
display lines with ACCENT 2.
4.
Press ENTER (START).
The message "completed!" will be displayed.
EDIT PATTERN
FUNCTION
To check Pattern contents and/or alter the
pitch, level, decay and pan parameters of each
note.
One of the most versatile and creative functions of the RX7,
Edit Pattern lets you step through a Pattern note by note,
altering parameter settings and turning Effect on or off for
each individual note as you go. You can check/change the
notes of all instruments, or just of a selected single instrument.
Subtle alterations in the parameter settings can add "human"
nuances for uncanny realism, making RX7 Patterns practically indistinguishable from live drum sounds. Besides, Edit
Pattern can be used e.g. for effects such as fade-out (by
gradually decreasing levels) or automatic stereo panning (by
altering pan settings of successive notes).
* The parameter adjustments made in the Edit Pattern mode
affect individual NOTES of a specific Pattern ONLY, and
not the corresponding VOICE as a whole.
The basic parameter settings are all determined by Edit
Voice. Therefore, Edit Pattern settings are always displayed as RELATIVE values (offsets, indicated by + or
-). These displayed values are relative to the basic Edit
Voice values. Alterations made with Edit Voice therefore
affect all Edit Pattern settings for that instrument equally.
OPERATION
1.
Select the Pattern you wish to edit, then press EDIT
PATTERN.
2. Press START.
* Should the display show "—" as the parameter value, this
indicates that the selected voice is not used in this Pattern.
* "dmp" displayed as parameter value means that the corresponding Instrument key was pressed during Real Time
Write while DAMP was on. No sound will be heard for
this note.
* If you want to select an instrument currently not played
by the Instrument keys, assign it using KEY ASSIGN Job
#01.
* The clock number indicates on which l/96th beat the note
sounds (1/96 being the the highest Quantize rate).
* The instrument note number shows which note within the
voice's part (first, second, third,...) is currently displayed.
Pressing the + 1/YES key to shift to the next note sounds
the note that was displayed.
Press - 1/NO to step backwards through the Pattern.
3. Use the numeric keys as follows to select the parameter
you want to check or edit.
1: pitch
4: decay
2: level
3: pan
5: effect (on/off only)
* For an explanation of "decay" and "effect", see the corresponding chapters in the Edit Voice section.
4. You have two options concerning how to adjust the
displayed parameter:
a) Leaving the cursor where it is (allowing you to switch
between notes with + 1/YES and - 1/NO), you can alter
the value with the DATA slider.
b) You can move the cursor to the lower line by pressing
ACCENT 2 and adjust the value with the + 1/YES and
- 1/NO keys and DATA slider.
(In either case, pressing numeric keys switches between
parameters.)
As soon as a value is altered, it will start to blink.
5.
To input the value, press ENTER.
The display will stop blinking, and you can now hear
the alteration when cycling through the Pattern again
(or after backing up with - 1/NO).
6. To exit Edit Pattern any time, press STOP/CONTINUE.
The above display shows the All Instruments mode, in which
you can step through all notes in the Pattern using + 1/YES.
Single Instrument mode lets you limit display to notes of a
certain voice, which is selected by tapping its Instrument key.
15
SONGS
OVERVIEW
In the Song Mode, you can
* Select any Song and play it at the desired tempo, starting at any specified Part.
* Assemble (edit) up to 20 Songs consisting of 999 Parts each and store them in the internal memory.
* Insert repeats, tempo changes (accelerando, ritardando), and volume changes (crescendo, decrescendo) in a Song.
* Set a search mark in a Song for instant location and playback/editing.
* Copy a Song or part of a Song.
* Erase (clear) a Song or part of a Song.
On the RX7, a "Song" means a combination of Patterns ("Parts") making up a complete accompaniment for a piece of music.
In GETTING ACQUAINTED, you got to know two examples, and more can be heard by using UTILITY Job #07, "load demonstration Songs". After having created the necessary rhythm Patterns, you can connect them in a natural manner with the Song
functions, complete with tempo and volume changes.
A Part can contain not only a Pattern, but other data such as a Repeat Command or Tempo Change.
* While most Song functions are accessed directly with the Pattem/Song keys , the four functions Mark Search and Set, Song
Name and Initial Tempo are called up by a Job number according to the menu above ACCENT 1.
* To use Song functions, first make sure that the SONG LED is lit, showing that the RX7 is in Song Mode.
* The PATTERN/SONG key switches the RX7 between Pattern and Song Mode. To enter Song Mode press this key until the
SONG LED lights.
* Remaining Song memory space can be checked with UTILITY Job #02.
SONG SELECTION
FUNCTION
Selects a Song for playback, editing, etc.
This function is always selected when Song mode is entered.
SONG PLAYBACK
FUNCTION
Playback of selected Song.
OPERATION
1.
or
After selecting the desired Song, press START
(The initial tempo set with Job
STOP/CONTINUE
#04 is only effective if START is used.) The RUN LED
will light, and the display will change to
The RX7 can store up to 20 Songs in memory locations
numbered 00 through 19. Besides the Song number and name,
the Song Selection display shows its number of measures
(bars) and initial tempo. If no data has been entered yet, the
display looks like this:
The display continues to change, showing the current position
in the Song and its Part content, until playback stops at the
end of the Song.
OPERATION A Song is always selected directly by entering
its two-digit number with the numeric keys.
* If you wish to begin playback from a Part other than the
first one, select that Part with the - 1/NO and + 1/YES
keys. (Holding these keys down allows rapid selection.)
Press STOP/CONTINUE to start.
2.
16
To stop playback any time, press STOP/CONTINUE.
The RUN LED will go out, and the first measure appears
again on the LCD.
3.
To restart playback from where it was stopped, press
STOP/CONTINUE again. Pressing START instead recommences playback from the beginning of the Song.
4.
After having stopped playback, you can select any other
Song with the numeric keys.
In order to make room for the inserted Part in an existing
song, the RX7 shifts all subsequent Parts forward. Example:
To insert a Part consisting of Pattern 99 between Parts 02
and 03, select Part 03 for insertion.
BEFORE INSERTING
* Tempo adjustments can be made as explained for Patterns.
* Click can be used but must be set in the Pattern Mode.
REPEAT PLAYBACK
FUNCTION
Continuously repeat a selected Song.
AFTER INSERTING
OPERATION
1.
After selecting the desired Song, or during playback of
that Song, press the SWING/REPEAT button. The
display will show
OPERATION
2.
You can now turn the repeat function on and off with
the - 1/NO and + 1/YES keys.
1.
Select the Part of the Song where you wish to insert a
new Part and press STEP WRITE/INSERT. The prompt
mark “**” will appear, asking you to input the contents
of the inserted Part.
2.
Input either a Pattern or any other of the possibilities a repeat symbol, a tempo or volume change command
or a search mark.
To cancel data entry, press - 1/NO.
EDIT SONG
FUNCTION
Create or alter Songs by combining Patterns.
OPERATION
1.
Select the desired Song number (memory location) and
press REAL TIME WRITE/EDIT SONG.
DELETE
2.
Input the number of the Pattern you want to use for
Part 1 with the numeric keys.
3.
Switch to the next Part (and then forward/backward
between Parts as necessary) with the - 1/NO and
+ 1/YES keys.
Delete is complementary to Insert - all Parts after the deleted
Part are moved backwards.
4.
Input the contents of the following Parts - i.e. a Pattern,
a repeat symbol, a tempo or volume change command
or a search mark.
1.
Select the Part of the Song you wish to delete and press
QUANTIZE/DELETE. The display will ask you to
confirm:
2.
Press + 1/YES to confirm.
The display will show the contents of the "next" Part,
which now has the number of the deleted Part.
To cancel delete operation instead, press - 1/NO.
FUNCTION
Erase Parts of a Song.
OPERATION
Other practical Edit Song functions you can now use are
Insert, Delete and Pattern Copy.
INSERT
FUNCTION
Insert new Parts in a Song.
17
REPEAT COMMANDS
FUNCTION
5.
You can now input the desired number of repetitions
with the numeric keys and then continue editing.
Enters Repeat commands in a Song for repetition of specified Parts.
Instead of entering the same Pattern numbers over and over
again in a Song, you can use Repeat commands. Specified
Parts or groups of Parts can be repeated up to 99 times, and
“nesting” (repetitions within repetitions) on up to ten levels
is also possible.
There are two Repeat commands, Begin Repeat and End
Repeat, which are input at the beginning and end of the Part(s)
to be repeated.
PART COPY
FUNCTION
Copy a specified number of consecutive Parts
to any subsequent location in a Song.
NOTE: Any Parts following the copy destination point will
be erased. In effect, this means you can copy only
to the end of a Song.
• COPYING TO END OF SONG
The number of repetitions can be specified within the End
Repeat command. Remember that this number is always
ONE LESS than the actual number of times you hear the
specified section (which = 1 playback + N repetitions).
BEFORE COPYING
AFTER COPYING
ACTUAL-PLAYING SEQUENCE
• COPYING TO DESTINATION BEFORE END OF
SONG
* Input of the Repeat commands is often easiest when done
in combination with Insert, after having programmed the
Song without repetitions.
BEFORE COPYING
OPERATION
1.
Select the Part of the Song from which you want repetition to commence, and press SWING/REPEAT. The
display will ask you to select the Begin or End Repeat
command.
AFTER COPYING
2. Press numeric key 1 to input a Begin Repeat command,
then continue editing (entering Parts) until your reach
the location for the End Repeat command.
3.
Press SWING/REPEAT. The display will again ask you
to select the Begin or End Repeat command.
4.
Press numeric key 2 to input an End Repeat command.
18
Original Parts following copy destination are cleared.
OPERATION
1.
Select the Part of the Song to which you wish to copy
to (= copy destination) and press COPY. The upper line
of the LCD will ask you to specify the first and final
Parts of the section you want to copy:
2.
Enter the three-digit numbers of the first and final Parts
of the section to be copied, then press + 1/YES or ENTER to complete data input.
Copying is completed, and the LCD will display the
number of the empty Part location now following the
end of the copied section.
* Should you make a mistake in specifying the section to
be copied, one of the following error messages will appear
and copying will be canceled.
a)
2. Press numeric key 1 to select accelerando, key 2 for ritardando.
Accelerando:
If the number of the first copied Part is larger than that
of the final one, or a copy section is specified that includes
the destination Part, the LCD will show:
Ritardando:
b) Should you specify a Part for copying that does not exist,
the LCD will show:
3.
TEMPO CHANGE COMMANDS
FUNCTION
Enters Tempo Change commands in a Song
to make it gradually slower or faster.
Natural, gradual changes in tempo - accelerando (increase)
or ritardando (decrease) - can be created with these commands. Both the value (in quarter notes/minute) and the
duration (in quarter notes) of the tempo change can be specified.
By entering a Tempo Change command within a repeated
section, you can cause accelerando or ritardando over longer
passages than the 99 quarter notes which normally is the limit
for a single tempo change.
* It is generally easiest to input tempo changes after having
completed a song, by using Insert.
NOTE: Unless you balance accelerandi with ritardandi, your
Song will end in a different tempo than it started
with. If you have not set an initial tempo for the
Song and start to play it again immediately, it will
commence at this previous final tempo. It is therefore recommended that you use Job #04 to specify
an initial tempo.
OPERATION
1.
Select the Part of the Song from which you want the
tempo to start changing, and press CLICK/TEMPO
CHANGE. The display will ask you to select
Accel(erando) or Rit(ardando).
Input the value of the tempo change (i.e. by how much
you want the tempo to increase/decrease) as the numerator and the duration of the tempo change as the
denominator of the fraction shown on the LCD, using
ACCENT 2 to switch between the two.
Say you want the tempo to increase by 15 quarter notes
per minute over 4 measures. This means you have to set
tempo change (accelerando) to +15/16, because 4
measures correspond to 16 quarter notes.
Instantaneous tempo changes can be achieved by setting
the denominator to 0.
VOLUME CHANGE COMMANDS
FUNCTION
Enters Volume Change commands at any location in a Song, to raise or lower level.
Any volume change within the voice level limits (0 ~ 63) is
possible. By entering several Volume Change commands in
subsequent Parts or using them in repeated sections, gradual
volume changes can be achieved (e.g. for climaxes, fade-in
or fade-out).
OPERATION
1.
Select the Part of the Song where you want the volume
to change, and press EDIT PATTERN/VOLUME
CHANGE. The display will ask you to select Up(ward)
or Down(ward) change.
19
2.
Press numeric key 1 to select Up or key 2 for Down.
2. Press + 1/YES. The LCD will ask
3.
Input the degree (value) of volume change with the numeric keys.
SONG COPY
FUNCTION
Copy entire Songs to another location. Useful
when you want to alter a Song while retaining
the original version.
3. Press + 1/YES to confirm (or - 1/NO to cancel Song
Clear).
After displaying the message “completed!”, the LCD
will show the cleared Song location.
JOBS
OPERATION
1.
Select the SONG you want to copy and press COPY.
The LCD will ask you to input the copy destination
number (new Song location).
The Song functions listed on the extreme left of the front
panel Job Menu under SONG and EDIT SONG are selected
by entering the respective Job number, i.e. by pressing JOB
and then inputting a two-digit number with the numeric keys.
Except for Job #01, Mark Search, which is also available in
Song Selection mode, these Jobs can only be accessed during
Edit Song mode.
2.
Enter the destination number with the numeric keys, then
press + 1/YES to copy.
The message “completed!” shows that copying has been
carried out.
JOB #01: MARK/PART SEARCH
FUNCTION
* Should you decide to copy a different Song after having
specified the copy destination, move the cursor to the
upper LCD line with ACCENT 2 and enter a different
Song number.
* If the specified copy destination already contains a Song,
this Song will be erased to make room for the new Song.
To avoid mistakes, the LCD asks
if the copy destination is occupied. You can now cancel
Song Copy with the - 1/NO key or execute copying with
the + 1/YES key.
SONG CLEAR
FUNCTION
OPERATION
20
OPERATION
1.
Select Job #01.
The lower line of the display will ask you to input the
Pattern or Mark you want to locate.
2.
a:
PART SEARCH
If you are looking for a certain Part, enter its
three-digit number with the numeric keys. As soon
as the first digit is input, the display will change to
Erase entire Songs.
* It is also possible to clear all 20 Songs simultaneously
with UTILITY Job #06.
1.
Instantly locate a specified point in a Song.
A very useful feature both for playback and
editing, this lets you instantly locate any Part
in a Song or a location marked according to
Job #02.
Select the Song you want to erase and press CLEAR.
After all three digits have been entered correctly,
the Part you were looking for will appear on the
display.
Should you make a mistake during number entry
(for instance forgetting to start with a zero for
numbers under 100), the display will show
Lower case letters can be input by holding down
SHIFT/COMPARE while pressing a letter key.
The cursor is moved backward and forward with the - 1/NO
and +1/YES keys.
* Note that Mark names can not begin with a numeral.
3.
If this occurs, select Job #01 again and carefully
enter the right number.
2.
b:
MARK SEARCH
If you are looking for a certain Mark previously
input with Job #02, enter the Mark's name using
the alphabet keys (= Instrument keys) and numeric
keys as explained for Job #02 below.
After the entire Mark name has been entered correctly, the marked location you were looking for
will appear on the display.
If you have made a mistake during Mark name entry,
the LCD will show
When you have completed name input, press ENTER.
The display will change to
indicating that a Marker with the displayed name has
been entered in the indicated Part location.
JOB #03: SONG NAME
FUNCTION
Name or rename a Song.
OPERATION
1.
Making sure that the Song you want to name is selected
and Edit Song mode entered, access Job #03.
The lower line of the display will ask you to input the
Song name.
2.
Input a Song name of up to eight characters as explained
above for Mark name entry.
If this happens, select Job #01 again and carefully
enter the correct Mark name.
JOB #02: MARK SET
FUNCTION
Name a specific point in a Song for later instantaneous location.
Any point in a Song can be given a name consisting of up
to six characters (letters and numerals). This “Mark” is useful
both for making the structure of the Song clearer (by entering
names such as “INTRO” or “1.MELO”) as well as for later
instant location at any time using Job #01 explained above.
A Mark is also counted as a Part.
OPERATION
1.
Making sure that the Edit Song mode is entered, select
Job #02.
The lower line of the display will ask you to input the
Mark you want to name.
* Unlike Mark names, Song names may begin with a numeral.
3.
When you have completed input of the Song name, press
ENTER.
The LCD will revert to normal Edit Song display, indicating that the Song name has been entered.
* This function can also be used to rename Songs, i.e. alter
their present name.
The Song's current name will be displayed when the Song
Name Job is called up, and can then be changed in the
same way as entering a new name.
JOB #04: INITIAL TEMPO
FUNCTION
2.
Input a name of up to six characters using the Instrument
keys and numeric keys.
* In addition to the Instrument keys, ACCENT 1 and 2 are
used to input Y and Z. EFFECT
enters a space, and
DAMP
a period.
Set the initial tempo of a Song.
Allows you to determine the tempo with which a Song will
always start during playback. (Tempo changes within the
Song remain valid).
Tempo can still be altered manually at any time.
21
OPERATION
1. Select the Song whose initial tempo you want to set, enter
Edit Song mode and select Job #04.
The lower line of the display will show whether the Initial
Tempo setting is on or off.
2.
If necessary, turn Initial Tempo on with + 1/YES.
(Initial Tempo can be turned off by pressing - 1/NO,
then ENTER.)
3.
Press ENTER to display the current Initial Tempo value.
4. Alter the initial tempo setting with the - 1/NO and
+ 1/YES keys or by entering the new value directly with
the numeric keys.
5. Press ENTER to input the new value.
The LCD will change to the Edit Song display.
22
CHAINS
OVERVIEW
The Chain Mode lets you
* Create a maximum of 3 Chains consisting of up to 90 Songs (Steps).
* Select a Chain and play it at the desired tempo.
* Erase (clear ) a Chain. On the RX7, the word “Chain” refers to a combination of Songs, ordered as “Steps ” within the Chain.
You can thus create accompaniment sequence s for whole groups of Songs, either for live performance or recording.
* To use Chain functions, always enter Chain Playback Mode first by pressin g CHAIN. Select other Jobs by then pressing Job
and entering the Job number.
JOB 01: CHAIN PLAYBACK
FUNCTION
Playback of selected Chain.
OPERATION
1.
After pressing CHAIN, select the desired Chain with
numeric keys 0, 1 or 2.
JOB #02: CHAIN EDIT
FUNCTION
Combining Songs to form a new Chain, or
altering existing Chains.
Creating a Chain from Songs (Steps) is basically the same
as creating a Song out of Patterns and other Parts. Maximum
Step number is 90.
OPERATION
1.
2.
After pressing CHAIN, select the desired Chain with
numeric keys 0, 1 or 2, then access Job #02.
Pres s START
or STOP/CONTINUE
The RUN
LED will light, and the display will change to
(If you are altering an existing Chain, the first Song
number will appear in place of the prompt marks “**”.)
2.
Select the Song to be used for Step 1 by entering its
location with the numeric keys.
3.
Pres s + 1/YES to input the selected Song and switch to
the next Step.
(The - 1/NO and + 1/YES keys can be used to switch
between existing Steps.)
Continue this process until you have programmed the
entire Chain.
The display continues to change, showing the current
position in the Chain and the current Song (Step) until
playback stops at th e end of the Chain.
3.
4.
5.
To stop playback at any time, press STOP/CONTINUE.
The RUN LED will go out, and the first measure appears
again on the LCD.
* The INSERT and DELETE keys can be used as during
Edit Song.
To restart playback from where it was stopped, press
STOP/CONTINUE again. Pressing START instead recommences playback from the beginning of the Chain.
After having stopped playback, you can select another
Chain with numeric keys 0 to 2.
JOB #03: CHAIN NAME
FUNCTION
* Tempo adjustments can be made as explained for Patterns.
OPERATION
* Click can be used but must be set in th e Pattern Mode.
1.
Naming or renaming Chains.
Either call up the Chain Playback display or select Job
#03.
23
2.
Input a Chain name of up to eight characters as explained
above for Mark name entry.
Pressing ENTER afte r writing the Chain name returns
you to the Chain Playback display .
JOB #04: CHAIN CLEAR
FUNCTION
Erasing entire Chains .
OPERATION
1.
Select the Chain you want to eras e and enter Job #04.
2. Press + 1/YES. The LCD will ask
3.
24
Press + 1/YES to confirm (or - 1/NO to cancel Chain
Clear).
After displaying the message “completed!”, the LCD
will show the cleared Chain location.
EDIT VOICE
OVERVIEW
The Edit Voice mode lets you:
* Edit (alter) parameters such as pitch, level or pan position for any voice.
* Create special effects for individual voices, including pitch bends, vibrato and tremolo.
* Store edited data in the internal memory.
* Reset an edited voice to its original values.
The character of individual instruments can be changed dramatically with Edit Voice, particularly by adjusting a combination of
parameters, such as e.g. decay rate, pitch bend rate/range and pitch.
Edit Voice allows you to set the basic values of certain parameters which can be additionally altered according to Key Assign (see
below) and, on a note by note basis, with Edit Pattern as explained above. Changes made with Edit Voice also affect instruments
in existing Patterns.
Press EDIT VOICE to enter this mode. The display will show the voice and editing Job last selected.
To specify any other Job, press JOB. The lower line of the LCD will ask you to input the numbe r of th e desired Job:
Enter the Job number with the numeric keys. Data is input with the - 1/NO and + 1/YES keys and the DATA entry slider
As soon as any data is altered, the “E” in “Edit Voice” will change to lower case.
You can compare this altered value with the previous one by pressing SHIFT/COMPARE (= STOP/CONTINUE key), in which
case a bar will appear over the “e” in “edit” and the original value will be displayed.
Data cannot be altered during the “e-bar” display. (The cursor disappears). To continue editing, press SHIFT/COMPARE again.
JOB #01: VOICE SELECT
FUNCTION
Select any voice for editing or for checking
its parameter settings.
OPERATION
1.
Select Job #01.
2.
Select the voice you wan t to edit or check by tapping
its Instrumen t key or entering the voice numbe r directly
with the numeric keys. (See Voice List in th e BASIC
CONCEPTS AND FEATURES section.)
25
* Selecting a voice currently not assigned to any Instrument
key displays “key-” on the upper right. Such voices may
be edited, bu t you can only hear the results if you play
the corresponding key on a connected and appropriately
assigned MIDI keyboard.
3.
Continue by selecting one of the following editing Jobs.
NOTE: Edited values have to be stored (Job #07) to become
permanent. If you have edited a voice but do not
perform Voice Store, the first “e” of “edit Voice”
will remain lower case, and all edited values will
by lost if a different voice is selected (or the same
one specified again) with Job #01.
Therefore, pay attention if you enter Voice Select
mode and the first “e” of “edit Voice” is lower case.
(Lost data can be retrieved from the edit recall buffe r
with Job #09.)
JOB #02: PITCH
2. To lengthe n or shorte n th e decay (= lower or raise th e
Decay Rat e value) , use the - 1/NO and + 1/YES keys
or DATA slider.
JOB #04: BEND
FUNCTION
Sets bend parameters of selected voice.
• Range:
Bend Rat e = 0 ~ 60
Bend Range = -60 ~ +60
The expression “bend ” as used for th e RX7 r efers to linear
pitch bend effects which automatically raise or lower the pitch
of a note while it is being played.
FUNCTION
Sets basic pitch of selected voice.
Two parameters can be adjusted - Bend Rate, which determines th e speed of th e pitch bend, and Bend Range, which
determines how great the change in pitch will be.
• Range:
-3600 ~ +2400 cent (in 10-cent steps)
(= -3 to +2 octaves)
(100 cent = 1 semitone)
OPERATION
OPERATION
1.
Select Job #02. The lower display line will show
2.
To adjust the pitch upward or downward in semitone
(100 cent) steps, use the DATA slider or -1/NO and
+ 1/YES keys.
For finer adjustments in 10-cent steps, hold down the
numeric key 0 and press - 1/NO or + 1/YES.
JOB #03: DECAY
FUNCTION
Sets basic decay rate of selected voice.
• Range :
Decay Rate = 01 ~ 31
Think of the “decay” of a sound as the speed with which it
dies out. The faster the decay (= the HIGHER the Decay
Rate value), the SHORTER the sound. The slower the decay
( = the lower the Decay Rate value), the longer the sound.
Try changing the Decay Rates of various voices to get a feeling
for the influence of this setting on the sound characteristics .
* The Decay Rate setting has no effect on “reverse” voices.
OPERATION
1. Select Job #03. The lower display line will show
26
1. Select Job #04. The lower display line will show either
of the following display types. To switch between them.
press numeric key 1 (
Rate) or 2 (
Range).
1:
The Bend Rate can be set between 0 and 60 (unit: 10 cent
per 10 microseconds). Increasing this value speeds up the
pitch bend effect.
2:
The Bend Range can be set between - 60 and + 60 (unit:
100 cent = 1 semitone). Raising this value increases th e pitch
difference between the beginning and the end of the bend
effect.
JOB #05: VOICE LEVEL
FUNCTION
Sets basic volume of selected voice.
• Range:
Voice Level = 0 ~ 63
OPERATION
1. Select Job #05. The lower display line will show
2.
Adjust the volume (= level) with the DATA slider or
- 1/NO and + 1/YES keys.
3. Confirm by pressing + 1/YES, or press - 1/NO to cancel.
4.
If you chose YES, the message
JOB #06: PAN
FUNCTION
• Range:
Sets basic pan position of selected voice.
will appear, and the “e” in “edit Voice” on the upper
LCD line will change to a capital “E”, indicating that
another voice can now be selected for editing.
0 (full left) to 15 (full right)
OPERATION
1.
Select Job #06. The lower display line shows
JOB #08: VOICE INITIALIZE
FUNCTION
The basic pan position of the selected voice can be confirmed
visually with the above graphic display.
2.
Restores edited voices to their original parameter settings.
OPERATION
1.
Select Job #08. The lower display line asks you
Adjust the pan position with the - 1/NO and + 1/YES
keys or DATA slider.
* The pan position affects the maximum polyphonic number
that can be set with Job #011. Higher polyphonic numbers
can be set when pan is full left, full right or exactly centered,
than with other stereo positions.
2. If you do not want to initialize, press - 1/NO. Otherwise
press + 1/YES. The display will ask you to confirm:
JOB #07: VOICE STORE
FUNCTION
Saves all edited data of currently selected voice
in the internal memory.
Unless the edited data of a voice is stored with this function,
it will be cleared as soon as a different voice is selected for
editing.
Storing Edit Voice settings with this function makes them
permanent. However, voices can be restored to their original
(factory) settings with Job #08, Voice Initialize.
OPERATION
1.
3.
Press + 1/YES (or - 1/NO to cancel).
The message “completed!” is displayed.
* Though the voice has now been initialized, the initial values
are still not saved - indicated by the “e” in “edit Voice”
remaining lower case. Unless you store these initial values
with Job “07”, the settings will revert to the altered ones
prior to Voice Initialize as soon as you select another voice
for editing.
JOB #09: EDIT RECALL
Select Job #07. The lower display line asks you
FUNCTION
2.
If you made a mistake and do not want to store, press
- 1/NO. Otherwise press + 1/YES. The display will ask
Recalls edited parameter settings that have
been mistakenly erased.
As explained under Voice Store, the edited data of a voice
is lost as soon as a different voice is selected with Job #01,
unless it has been stored. Should you forget this and switch
to a different voice before saving data you are currently editing, the data of the last voice edited can be recalled with
this function.
27
OPERATION
0 indicates no effect. Higher values increase vibrato intensity.
1.
3:
Select Job #09. The lower display line asks
0 indicates no effect. Higher values increase tremolo intensity.
2.
If you do not want to recall, press - 1/NO. Otherwise
press + 1/YES. The display will ask you to confirm:
Experiment with various settings to get an idea of the possibilities.
JOB #11: POLY
3.
Pres s + 1/YES (or - 1/NO to cancel).
The previously edited data is recalled, and the LCD
switches to the Voice Select display. You can now continu e editing that voice or store the recalled data.
JOB #10: LFO
FUNCTION
Set LFO parameters for selected voice.
On th e RX7, LFOs (Low Frequency Oscillators) can be used
to alte r th e pitch and/or volume of voices for a variety of
effects such as vibrato, tremolo or “distortion”. The LFO
parameters available are
1:
FUNCTION
Sets polyphonic number of selected voice.
• Range:
1 ~ 8
The “polyphonic number ” determines the maximum number
of notes that can be output simultaneously by one voice.
Usually, it is left at 1. Since only one note can sound at a
time with this setting, hitting the same Instrument key consecutively will damp the previous output of that voice. During
fast drum rolls, for instance, this leads to an unnatural effect,
which can be avoided by raising the poly number.
The poly number value is also set to over 1 with instruments
such as Brass or DX7-Orchestra when these are to be used
for chords (harmonies).
* The maximum polyphonic number that can be set for a
voice depends on its pan setting.
Frequency - determines th e speed of the LFO effect.
Values: 2.4, 5.6, 6.0, 6.4, 6.9, 9.8, 48.8, 78.1
Hz (cycles per second)
OPERATION
2:
AMD
(Amplitude Modulation Depth) - determines
the intensity of the effect on the amplitude (=
volume level) of a voice (“tremolo” depth).
Range: 0 ~ 3
1.
Select Job #11.
3:
PMD
(Pitch Modulation Depth) - determines the intensity of the effect on the pitch of a voice
(“vibrato” depth).
Range: 0 ~ 7
2.
Use the - 1/NO and + 1/YES keys or DATA slider to
input the desired polyphonic number.
OPERATION
1.
Select Job #10. One of the following types of display
will appear.
Switch between them with numeric keys 1, 2, 3 according
to the menu written immediately above the PATTERN
SONG key.
1:
Raising th e valu e increases the cycle speed.
2.
JOB #12: EFFECT
FUNCTION
Sets effect parameters for selected voice.
Basically, this Job functions somewhat like a combination
of digital delay and pitch shifter: it repeats the sound 2, 3
or 4 times, depending on the Simul Number setting. (If the
delay time is 0 and the poly number is set accordingly, these
“repeats” sound simultaneously to form a “chord” depending
on th e pitch settings.) Since each of these repeats can have
a different pitch, level or pan setting, you can, for instance,
have the the sound bounce between left and right channels
while playing a “melody”, or gradually recede towards the
left background with a rising pitch.
With a bit of imagination and experimentation, the following
parameters allow you to create a whole host of interesting
effects.
28
Parameter
Range
Function
1: Simul number
2~4
Determines number of “repeats”.
2: Delay time
0~50
Time between repeats (in units of 10 milliseconds).
3: Pitch
-600 ~ +600
Pitch difference between the individual repeat
sounds and the original sound (in units of 10 cent).
4: Level
-63 ~ +63
Volume difference between the individual repeat
sounds and the original sound.
5: Pan
-14 ~ +14
Difference between the pan positions of the individual repeat sounds and the original sound.
The parameters are selected with the corresponding numeric
keys 1 through 5. To switch between parameter value displays
for the individual repeat sounds (2nd, 3rd and 4th
pitch/level/pan), press the corresponding numeric keys 3
through 5.
* Effects can be switched on and off for all voices with the
EFFECT key
lights up when
The EFFECT LED
Effect is on.
However, the EFFECT key does not turn off effects for
voices that are already programmed in Patterns.
* Effects can be turned on and off within programmed
Patterns using Edit Pattern.
OPERATION
1.
Select Job #12, then the desired effect parameter using
numeric key
1:
2:
3:
4:
5:
To switch between, say, 4th and 2nd pitch, press numeric
key 3. Use the - 1/NO and + 1/YES keys or DATA slider
to input data.
29
KEY ASSIGN
OVERVIEW
The Key Assign mode lets you:
*
*
*
*
*
*
*
Assign any voice to any Instrument key.
Assign one voice to the whole upper row of Instrument keys.
Alter the pitch, level, pan and decay of voices for each Instrument key.
Adjust the accent levels for each Voice.
Assign a function to a connected foot switch.
Save all Key Assign data to one of four internal memory locations.
Load Key Assign data from memories.
NOTE: The “Drum Set” Chart at the end of this manual will help you remember your Key Assign settings. Copy it and enter
the data for your individual “drum sets”.
Press KEY ASSIGN to enter this mode. The display will show the Job selected last. To specify any other Job, press JOB. The
lower line of the LCD will ask you to input the number of the desired Job:
Enter the Job number with the numeric keys.
Data is input via the - 1/NO and + 1/YES keys and the DATA entry slider
JOB #01: VOICE ASSIGN
FUNCTION
To assign any voice to any Instrument keys.
OPERATION
1.
Select Job #01.
2.
Select the desired Instrument key by tapping it. (This
also lets you check which voices are currently assigned
to which keys.)
3.
FUNCTION
To alter the pitch, level, pan and/or decay
of voices assigned to specific Instrument keys.
Note the difference to alterations made with EDIT VOICE:
The Parameter Assign changes ONLY affect the voice as it
is played by the selected Instrument key, while the Edit Voice
changes affect that voice in all cases (i.e. also in existing
patterns or as played by external MIDI devices). Therefore,
similar to Edit Pattern, the values set with Parameter Assign
are displayed for each Instrument key as offsets relative to
the basic Edit Voice value.
OPERATION
1.
Select Job #02.
The upper line of the LCD displays the previously selected key and its assigned voice.
2.
Select the desired Instrument key by tapping it.
Use the - 1/NO and + 1/YES keys and/or the DATA
entry slider to select the voice you want to assign to the
key, or input the voice number directly, referring to the
Voice List in the BASIC CONCEPTS AND FEATURES
section.
* The voice is assigned as soon as it appears on the LCD.
Note that all data settings previously made for the selected
Instrument key according to the following Job #02 are
thereby erased.
30
JOB #02: PARAMETER ASSIGN
3. The lower line of the LCD will show any one of the four
parameters listed further below, its key value and offset
to the basic Edit Voice value. Parameters are selected
with numeric keys 1 through 4 according to the menu
marked “*”, printed immediately above numeric key 7.
Example:
The MULTI LED lights up, and you can now continue
immediately with Multi Step setting as described below.
JOB #04: MULTI STEP
The above display means that the decay value of 16 for the
selected key is 5 units larger (+) than the basic Edit Voice
value of 11. (An offset of 00 thus indicates that the key value
is currently identical with the basic value.)
* Note that the Edit Voice value can only be offset up to
its own minimum or maximum. Once this is reached, input
of greater offsets will be ignored.
Offset Ranges:
1:
2:
PITCH
LEVEL
3: PAN
4: DECAY
Offset
Offset
Offset
Offset
-600 ~ + 600 cents (in 10-cent steps)
-63 ~ +63
-14 ~ +14
-30 ~ +30
See EDIT VOICE for details of the above parameters.
JOB #03: MULTI VOICE
FUNCTION
To assign a single voice to the upper row of
Instrument keys (A through L).
FUNCTION
The Multi Step function can only be accessed if a Multi Voice
is currently assigned to the top-row Instrument keys. (See
previous Job #03.)
With Multi Step, the basic Edit Voice parameter values are
offset in equal steps for each key from B to L (from left to
right), with key A retaining the original Edit Voice value.
For instance, if you choose pitch steps of +100 cents ( = 1
semitone), each upper-row key will sound one semitone higher
than the one to its left, starting from the original Edit Voice
pitch of key A. This means you can then play melodic lines
(and, depending on the Edit Voice poly number, even harmonies) on the upper row of instrument keys like on a keyboard.
OPERATION
1.
1.
2.
As with Parameter Assign explained above, the lower
line of the LCD will show any one of the parameters
pitch, level, pan or decay, along with its offset step per
key.
Parameters are again selected with numeric keys 1
through 4.
3.
The offset step is adjusted with the - 1/NO and + 1/YES
keys or DATA slider. The new value does not become
effective until you press ENTER (= START key). Doing
so momentarily displays the message “set!”.
Select Job #03.
2.
You can now select the voice you wish to assign to keys
A through L by tapping its Instrument key, or else turn
the Multi Voice function off by pressing - 1/NO.
3.
As soon as you assign a Multi Voice, the Multi Step
mode is entered and the LCD shows a Multi Step display,
such as:
If you have just used Job #03, Multi Voice, this Job will
already be selected.
Otherwise, select Job #04.
Multi Voice assignment makes all Instrument keys in the
upper row produce the same voice, letting you create a special
“keyboard” dedicated to a single voice for easier Pattern
writing, etc.. Generally, it is meaningful only in conjunction
with the next Job, Multi Step, or the preceding one, Parameter
Assign. Both may be used to adjust the level, pitch, pan or
decay for each upper row Instrument key.
OPERATION
To change the pitch, level, pan and/or decay
of the Multi Voice for each upper-row Instrument key.
• Step Ranges
The step ranges given below are again offsets relative to the
the Edit Voice value, which is always retained by key A.
Similar to what was said for Parameter Assign, this value
can only be offset up to its own minimum or maximum, and
all further offsets are ignored.
In other words, depending on the current Edit Voice parameter values of the selected Multi Voice, certain Multi Step
settings may cause minimum/maximum to be reached by one
of the upper-row Instrument keys. All keys to the right of
31
that key will then sound the same, since they are
“overstepping” the minimum/maximum Edit Voice value.
If this happens, you may want to alter the respective Edit
Voice parameter value.
1:
2:
PITCH
Step - 2 0 0 ~ + 2 0 0 cents (in 10-cent steps),
i.e. up to +/- 1 whole tone.
Setting positive values, e.g. +100 (= 1 semitone), creates
a scale of notes that get higher towards the right, like
on a piano. Negative values like - 200 (= 1 whole tone)
cause the notes to become lower towards Instrument
key L (opposite of a normal keyboard).
LEVEL
Step -10 ~ +10
Positive step values make upper Instrument keys sound
louder towards the right, while negative step values lower
the volume in that direction.
3:
PAN
Step -5 ~ +5
The further the Instrument key pressed is located towards
the right, the more the pan position of the sound is moved
towards the right channel (positive step values) or towards the left channel (negative step values).
4:
DECAY
Step -10 ~ +10
Positive step values make the Multi Voice decay shorter
towards Instrument key L, while negative ones cause
longer decay in that direction.
* Individual settings for all four parameters can be used
simultaneously. Note, however, that you will no longer
be able to check the Step value on the display once you
switch parameters with the numeric keys. (After switching,
the step is always displayed as “0”, regardless of the actual
setting.)
* Once you have made Multi Step settings and exited from
this Job, further alterations of these values must be made
by accessing this Job #04 directly and NOT by first selecting Job #03, Multi Voice. Doing so would erase all
current Multi Step settings.
* Parameter Assign can be used instead of or in addition
to Multi Step to alter the parameter values individually
for each Instrument key.
As an example, this allows you to create any kind of
personal “keyboard” with the keys A through L, for instance representing a major or minor scale.
2.
Select the voice whose Accent you wish to program with
its Instrument key.
(All current Accent levels can be checked by pressing
various Instrument keys in succession.)
3.
To switch between Accent 1 and 2, press the corresponding ACCENT button.
4.
Input the Accent value with the - 1/NO and + 1/YES
keys or the DATA slider.
* The Accent values are again offsets which are added to
or subtracted from the Edit Voice level. Though their
theoretical range is from -63 to +63, Accents are also
limited by the maximum/minimum voice level value. If a
voice's level is already set to, say, 60 (i.e. 3 below the
maximum level setting of 63), all Accent 2 values over 3
(i.e. from +3 to +63) give the same effect, namely of
raising that voice's level to 63 when the ACCENT 2 is
pressed.
JOB #06: FOOT SWITCH ASSIGN
FUNCTION Assigns the function of any front panel key
to a connected foot switch.
Applications for this function are entirely up to your imagination. You could assign the voice of a specific Instrument
key, for instance the Bass Drum of key A, and “play” the
BD with an optional foot switch. Or you could use the foot
switch to add Accents, or assign it to + 1/YES to shift up a
variety of settings, for example selecting the next Pattern to
be played, etc., etc..
Default setting is START/STOP, with which a connected foot
switch functions as a combination of the START and
STOP/CONTINUE keys.
OPERATION
1.
Select Job #06. The display will ask
2.
Press + 1/YES.
The display will show the function currently assigned
to the foot switch.
3.
Tap any key on the front panel whose function you would
like to assign to the foot switch.
JOB #05: ACCENT LEVEL
FUNCTION
Programming the volume changes achieved
with ACCENT 1/2 for individual voices.
The green keys ACCENT 1 and ACCENT 2 are generally
used to accentuate voices on certain beats by raising their level
to a degree that can be programmed with this function.
Negative values can also be set for interesting effects.
OPERATION
1.
32
Select Job #05.
The name of the function/key will show on the LCD (if
a key has several functions, only one is displayed). The
cursor disappears, indicating that assignment is completed.
3.
The message
Example:
shows that the Key Data has been loaded.
* If + 1/YES is pressed again, the Instrument keys are reset
to the voices prior to Key Data load.
JOB #07: KEY DATA SAVE
FUNCTION Saves the current Instrument key layout and
other Key Assign settings to the internal
memory of the RX7.
OPERATION
1. Select Job #07. The display will show
2. You can now choose to which Key Data number from
1 to 4 you want to save the current Instrument key assignment (layout) data.
Hit the respective numeric key and then press + 1/YES.
3. The message
will appear, showing that the layout data has been saved
to the specified number.
JOB #08: KEY DATA LOAD
FUNCTION
Loads Key Data (voice layouts etc.) to the
Instrument keys.
OPERATION
1. Select Job #08. The display will show
2.
Input the desired Key Data parameter number with the
respective numeric key and and press + 1/YES.
* Data numbers 1 through 4 correspond to the Key Data
saved with Job #07, while numbers 5 through 9 call up
layouts that are permanently stored in the RX7 memory.
33
MIDI
OVERVIEW
The variety of applications for these functions is enormous, letting you use the RX7 as a state-of-the-art MIDI sound source and
controller. For examples, they allow you to:
* Play any or all RX7 voices from up to 16 external keyboards and/or sequencers by assigning MIDI note numbers to each RX7
instrument and MIDI channels to as many as 16 of them.
* Use single RX7 voices as sound sources for external keyboards or sequencers, allowing you e.g. to play scales and chords with
these voices from synthesizer keyboards.
* Instantly and remotely select up to 16 different RX7 voices for playing from an external keyboard simply by switching MIDI
channels.
* Use a synthesizer's pitch bend wheel to control pitch bend effects for RX7 voices.
* Play external MIDI sources from the RX7 Instrument keys according MIDI note data output by the RX7 on up to 16 MIDI
channels.
* Use the RX7 as a sequencer.
* Transmit or receive bulk data.
To be able to make full use of the information given in this section, you will have to have a basic understanding of the MIDI standard.
A guide called “The MIDI Book” is available from your Yamaha dealer. Consult this or other publications for more details on
MIDI.
The rear panel MIDI IN
terminal must be connected to the external device's MIDI OUT for external MIDI control of the
RX7. If you want to control other MIDI equipment from the RX7, connect MIDI OUT to the other device's MIDI IN terminal.
To use the MIDI functions, press MIDI. The upper line of the LCD will display
JOB #01: CHANNEL MESSAGE
FUNCTION
Enables or disables reception/transmission
of MIDI Channel Messages.
Unless this function is ON, no communication is possible
between the RX7 and connected MIDI devices (i.e. the RX7
can neither control, nor be controlled by, external MIDI
equipment).
* Even if this function is ON, communication is not possible
unless the RX7 MIDI channels and those of the connected
devices are set to match. (See Jobs #02 and #03 below.)
OPERATION
1.
34
Making sure that “MIDI Information” is displayed,
select Job #01.
The lower line of the display will show whether MIDI
Channel Message transmission/reception is currently
possible or not.
2.
Switch this function on or off using the - 1/NO and
+ 1/YES keys or the DATA slider.
JOB #02: RECEIVE CHANNEL
FUNCTION Allows selection of channels for MIDI data
reception and the type of note number control
for that channel.
With this function, any individual MIDI channel can be
turned on or off for reception.
In addition, you can specify the type of note number control
for each channel:
Pitch assignment (p)
“p” indicates that note numbers
received on this MIDI channel
control the pitch of the RX7 voice
assigned to that channel. In other
words, that single voice can then
be played with varying pitch by
an external keyboard or sequencer.
Voice assignment (v) . . . . . . . . .“v” indicates that note numbers
received on this MIDI channel
control the individual RX7 voices
according to their note number
assignment. A keyboard, for instance, can be used to play a
different RX7 voice from each
key.
* Any or all channels can be set to “p” for pitch control,
but only one channel can be used for voice control “v”.
How to assign MIDI channels and note numbers to voices
is explained under Job #04, Note Number Assignment.
2.
Using the -1/NO and +1/YES keys and DATA slider.
input the desired voice names and their MIDI channel.
(Voices can also be selected by entering their number
directly with the numeric keys.)
Move the cursor between voice and channel parameters
with ACCENT 2.
JOB #04: NOTE NUMBER ASSIGN
FUNCTION 1.
Assign a MIDI note number to each RX7
voice.
2 . Assign a RX7 voice to each MIDI reception channel.
OPERATION
1. Making sure that “MIDI Information” is displayed,
select Job #02.
The LCD will show the following type of display:
2.
Using the -1/NO and +1/YES keys to move the cursor
between channels, select the type of note number control
as follows:
“v” . . . . . . . . . . . . . . Repeatedly pressing numeric key 1 switches
the respective channel between “v” and OFF
(“-”).
“p”. . . . . . . . . . . . . .Repeatedly pressing numeric key 2 switches
the respective channel between “p” and OFF
(“-”).
* Attempting to specify “v” for more than one channel turns
data reception off (“-”) for the previously selected “v”channel.
JOB #03: TRANSMIT CHANNEL
Each RX7 voice can be assigned a certain MIDI note number.
When this note number is received, the corresponding voice
(or voices, if the same note number is assigned to several)
will sound. These settings determine which keys of external
MIDI keyboards will play which RX7 voices on the MIDI
channel set to “v” with Job #02.
By the same token, playing a voice on the RX7 will transmit
the corresponding MIDI note number to other MIDI
equipment on the channel set for that voice with Job #03.
This lets you control external MIDI equipment from the
RX7 as with a sequencer (if all other settings are correct).
In addition, each MIDI reception channel can be assigned
a single RX7 voice, allowing you to control the pitch of that
voice from an external MIDI keyboard or sequencer.
Switching MIDI transmission channels on a connected synthesizer would then allow you to select the corresponding
RX7 voice as a sound source (if that channel is set to “p”
with Job #02).
* Also read the information concerning Jobs #02 and #03.
OPERATION
1. Select Job #04.
The display will show either
FUNCTION
Selection of channels for MIDI data transmission according to voice.
This function lets you specify a MIDI transmission channel
for each individual RX7 voice. During data transmission from
the RX7 to other MIDI equipment, the note number assigned
to that voice with Job #04 will be output on the selected
MIDI channel. This allows you to use the RX7 as a sequencer.
OPERATION
1. Select Job #03.
The LCD will show
35
2. To switch between the two types of displays. “Note
number assign to voice” or “Note number assign to
pitch”, use numeric key 1 (Voice) or 2 (Pitch).
ACCENT 2 switches cursor between the two displayed
parameters.
a. Voice
To select voices and assigned notes, use the -1/NO and
+1/YES keys and DATA slider.
* The RX7 can not memorize this kind of MIDI pitch bend
data as a sequence data. This function is provided to enhance the RX7's usefulness as a MIDI sound source
controlled e.g. by a sequence recorder.
OPERATION
1. Select Job #06.
* The note range is from C-2 to G8 (= MIDI note number
0 to 127)
b. Pitch
To select MIDI channels and assign voices, use the -1/NO
and +1/YES keys and DATA slider.
* Pitch control of the assigned voices is possible over the
5-octave range from C1 to C6 (Center C = C4).
* Voices can only be assigned to channels that have been
set to “p” with Job #02. If a channel is OFF or set to “v”,
the following display will appear, showing that assignment
is not possible.
2. Using the -1/NO and +1/YES keys and DATA slider,
input the desired voice names and their Pitch Bend
Range. (Voices can also be selected by entering their
number directly with the numeric keys.)
Move the cursor between voice and Pitch Bend Parameter
with ACCENT 2.
l
0 to 12 (units: 1 semitone)
Setting this value to 02 means you can bend
the pitch over a range of one whole tone,
setting it to 12 gives you an octave of pitch
bend range.
Range:
JOB #07: DEVICE NUMBER
To assign a voice to such a channel, first set it to “p” with
Job #02.
JOB #05: NOTE INITIALIZE
FUNCTION
Resets the MIDI note numbers of all voices
to their initial values.
Use this function to restore the original (factory- programmed) note number assignments to each voice.
FUNCTION
Set the RX7 to receive/transmit System Exclusive data on a specified MIDI channel.
When receiving or transmitting System Exclusive data (such
as bulk data) from/to other Yamaha equipment, the “device
number” (= MIDI channel number) must be the same on
both MIDI devices.
OPERATION
1 . Select Job #07.
OPERATION
1. Select Job #05.
The display will ask
2. Use the -1/NO and +1/YES keys or DATA slider to
enable System Exclusive communication and select the
MIDI channel (device number).
2 . Press +1/YES to restore the original note numbers.
JOB #06: PITCH BEND RANGE
FUNCTION
Sets the MIDI pitch bend range for each voice.
JOB #08: BULK REQUEST
FUNCTION
Send a bulk dump request to other MIDI
equipment.
The RX7 is capable of receiving MIDI pitch bend messages,
allowing pitch bend control of all voices from external MIDI
equipment.
When you want the RX7 to receive bulk data from another
RX7, a Yamaha sequence recorder or other appropriate
device, the RX7 must send a request for bulk data transmission to that device.
To enable pitch bend control of a voice, its pitch bend range
must be set to at least 01.
The device number (see Job #07) has to be the same on both
pieces of equipment.
36
* Reception of bulk data will erase the corresponding data
in the RX7.
OPERATION
1 . Select Job #08.
The display will ask
2 . You can now select the type of bulk data you wish to
receive from among the following with the -1/NO and
+1/YES keys.
1. Seq&Voice
2. Pattern 00 (single Pattern)
3. Voice 00 (single Voice)
4. Setup
4. Setup
3. (If you select data type 2. or 3., you must also enter the
Pattern or Voice number using the numeric keys.)
4.
Transmit the selected bulk data to the connected MIDI
device by pressing ENTER. During data transmission,
the LCD will show
If transmission has been successful, the LCD will revert to
the previous display.
* If the device number has been set to OFF with Job #07,
the error message
3 . (If you select data type 2. or 3., you must also enter the
Pattern or Voice number using the numeric keys.)
4. Transmit a dump request to the connected MIDI device
by pressing ENTER.
* If the device number has been set to OFF with Job #07,
the error message
will appear. Set the correct device number and repeat bulk
transmission.
* Except during playback, recording (writing) or execution
of cassette/cartridge jobs, the RX7 will respond to a dump
request from a connected MIDI device by transmitting
bulk data if the device number has been set accordingly.
will appear. Set the correct device number and repeat the
bulk dump request.
JOB #09: BULK TRANSMIT
FUNCTION
Transmit bulk data to other MIDI equipment.
To be able to use this function, the external MIDI device
must be set to receive bulk data. Make sure that the same
device number is selected on both the RX7 and the other
MIDI device.
OPERATION
1. Select Job #09.
The display will ask
2. You can now select the type of bulk data you wish to
transmit from among the following with the -1/NO and
+l/YES keys.
1. Seq&Voice
2. Pattern 00 (single Pattern)
3. Voice 00 (single Voice)
37
SYNC
OVERVIEW
Sync (short for synchronization) is used to control the Clock rate (playback/recording speed) and Start/Stop functions via external
MIDI devices or MTRs (multi-track tape recorders).
Normally, the RX7 Clock is set to Internal, meaning that playback and recording (Real Time Write) speed are controlled by the
RX7's Internal Clock, whose speed can be adjusted with the Tempo functions.
With Sync set to Internal, you can also use the RX7 to control the Clock rate of external MIDI devices such as sequencers or
other drum machines from the RX7 MIDI OUT terminal.
When Sync is set to MIDI, the RX7 Clock rate is controlled by the MIDI signal received at the MIDI IN terminal from other
MIDI equipment. Start/Stop and Tempo then depend on the external “master” device, with the RX7 acting as “slave”.
By using the optional Yamaha MIDI Converter YMC10 (which converts MIDI sync signals to tape sync signals (FSK) and vice
versa), FSK signals can be recorded onto tape from the RX7 via its MIDI OUT terminal to synchronize a tape recording to the
RX7’s Internal Clock. By the same token, playback of taped FSK signals can be used to control RX7 Tempo and Start/Stop functions
via MIDI IN.
* Whenever the RX7 is set for control by external MIDI signals, the MIDI SYNC LED
will light up.
OPERATION
1. Press SYNC.
2. Use the -1/NO and +1/YES keys to switch between Internal and MIDI synchronization.
38
UTILITY
OVERVIEW
The UTILITY KEY accesses a number of different functions which let you
* Display remaining Pattern and Song memory.
* Turn Memory Protection on and off.
* Change voices in existing Patterns.
* Clear all Songs or Patterns.
* Load internal ROM demonstration data.
JOB #01: REMAINING PATTERN MEMORY
FUNCTION
Displays remaining Pattern memory in %.
OPERATION
Select Job #01.
2.
Input your choice of single or all Patterns with numeric
key 1 or 2.
3.
Switching between the upper and lower display line with
ACCENT 2, select the instruments you want to exchange
with the numeric keys or -1/NO and +1/YES.
JOB #02: REMAINING SONG MEMORY
FUNCTION
Displays remaining Song memory in %.
OPERATION
Select Job #02.
JOB #03: MEMORY PROTECT
4. Press ENTER.
FUNCTION
Turns Memory Protection on or off. Unless
editing data, leave Memory Protection on to
avoid inadvertent erasure of previous settings.
OPERATION
1. Select Job #03.
2. Turn Memory Protect off with -1/NO and on with
+1/YES.
JOB #04: VOICE CHANGE
5.
Confirm by pressing +1/YES.
* Memory Protection must be off for this function.
FUNCTION
Exchanges voices in one or all Patterns.
This is a very helpful function when you want to try out
different voice combinations for Patterns after having programmed them.
JOB #05: ALL PATTERNS CLEAR
FUNCTION
Erases all Patterns from the RX7 memory.
* If you only want to change voices in a single Pattern, it
must be selected before using this Job.
OPERATION
OPERATION
1. Select Job #05.
1. Select Job #04.
The display will ask:
2. Press +l/YES.
39
3.
Confirm by pressing +1/YES again.
JOB #06: ALL SONGS CLEAR
FUNCTION
Erases all Songs and Chains from the RX7
memory.
OPERATION
1. Select Job #06.
2.
Press +1/YES. Confirm by pressing +1/YES again.
JOB #07: DEMO DATA LOAD
FUNCTION
Load demonstration Songs.
A total of eight demonstration Songs (in three groups) are
permanently stored in the internal ROM. (You have already
heard the two contained in demo group #l.) The Songs in
group three consist of popular rock, 16-beat and latin percussion patterns which you can use for your own arrangements.
NOTE: Loading demo Songs will erase all present Patterns
and Songs. Therefore, make sure your own Patterns
and Songs are saved before loading.
List of Demonstration Songs:
Demo #l
SONG00: GET FUNK
SONG01: TROPICAL
Demo #2
SONG00: DOO WAP
SONG01: NOISE
SONG02: ROCK
Demo #3
SONG00: ROCK
SONG01: 16 BEAT
SONG02: LATIN
OPERATION
1. Select Job #07.
40
2.
Select the desired demonstration Song group with numeric key 1, 2 or 3.
3.
Press +1/YES. Confirm by pressing +1/YES again.
CASSETTE/CARTRIDGE
OVERVIEW
The Cassette/Cartridge Mode lets you
* Save sequence (Pattern/Song/Chain), voice and setup (cassette only) data to an optional Yamaha RAM4 Data Cartridge or a
standard cassette tape.
* Verify that the data has been saved correctly.
* Load such data to the RX7.
* Format a data cartridge (cartridge only).
Besides the cartridge Format Job #30, the Cassette/Cartridge Mode has 15 Jobs in 3 groups (Save, Load and Verify) of 5 Jobs
each. The Jobs are numbered so that their first digit indicates Save (0), Load (1) or Verify (2), and their second digit the kind of
data to be handled.
TABLE OF CASSETTE/CARTRIDGE JOBS
DATA TYPE
ALL* SEQUENCE**
AND VOICE DATA
ALL SEQUENCE
DATA
SINGLE
PATTERN
ALL VOICE
DATA
SETUP
DATA***
SAVE
#01
#02
#03
#04
#05
LOAD
#11
#12
#13
#14
#15
VERIFY
#21
#22
#23
#24
#25
FORMAT
#30 (Format new RAM 4 cartridges for use in RX7.)
* “All” means the entire data currently stored in the RX7 memory, i.e. sequence data for up to 100 Patterns, 20 Songs and 3
Chains and/or all current voice data.
** “Sequence” refers to Patterns + Songs + Chains.
*** Cassette only.
Press CASSETTE/CARTRIDGE to enter this mode. The
same key also switches between Cassette and Cartridge operations.
cartridge MEMORY PROTECT switch must be set to OFF.
After saving, set this switch to ON in order to protect the
cartridge contents from accidental erasure.
Cassette and Cartridge operations are basically the same and
will be discussed here together. They are distinguished on
the LCD by a different upper line:
Before you can use a new RAM cartridge, it must be formatted. Refer to Job #30 at the end of this section.
CASSETTES
Before using Cassette Control, make sure that the RX7 is
correctly connected to a cassette deck with the supplied
cassette cable. Insert the 8-pin DIN-plug into the RX7
CASSETTE jack , connect the red cable to the deck’s
microphone input and the white cable to its headphone
output.
Keep recording and playback levels high to minimize tape
hiss.
CARTRIDGES
When using a RAM4 cartridge, make sure it is inserted firmly
into the CARTRIDGE slot on the rear panel, with the
list of contents facing upward. If you are saving data, the
* Save Operations
Before saving data, insert a blank cassette into the cassette
recorder. The cassette deck must be set for recording and
started before executing the Save command on the RX7
with the +1/YES key.
41
* Load and Verify Operations
For Load and Verify operations, make sure the required
data cassette is inserted into the deck and rewound to the
beginning of the recorded data. Playback must be started
prior to RX7 command execution. The upper left-hand
part of the LCD will begin to blink as soon as the header
(beginning of data on cassette) is found.
3.
Press +1/YES again to confirm.
The display will show
* Interrupt
Pressing STOP/CONTINUE during a Cassette Save, Load
or Verify operation interrupts it and displays
then
It is recommended to Verify data after saving, particularly
in the case of cassettes, to make sure that it has been
memorized properly. (The Verify function compares the
saved data with the original data.)
indicating that the data has been saved.
* It is now a good idea to verify.
JOBS #01 - #05: SAVE DATA
SAVING SINGLE PATTERNS TO A CARTRIDGE
FUNCTION
Saves various kinds of data onto cartridge/
cassette.
1. Select Job #03 in Cartridge Mode.
The display will ask you to confirm:
Refer to the CASSETTE/CARTRIDGE Menu on the RX7
front panel and the TABLE OF CASSETTE/CARTRIDGE
JOBS above to determine the appropriate Job number for
the type of data to be saved.
Since saving single Patterns to a cartridge or cassette (Job
#03) necessitates slightly different procedures, these are explained separately below.
2.
Press +1/YES. The display will change to
3.
You can now specify the number of the Pattern to be
saved as well as the desired destination in the RAM
cartridge.
(Use ACCENT 2 to switch between them.)
* When you perform a Save operation for any kind of data
except single Patterns to a cartridge already containing
that kind of data, the previous data will be erased.
* Setup data, which can be saved on cassette only, includes
the following data:
* The 5 sets of Key Data currently stored in the RX7
*
*
The accent levels of all voices
The MIDI transmit/receive channels, note numbers
and pitch bend ranges of all voices.
GENERAL SAVE OPERATION
* If the specified cartridge destination already contains data,
it will be erased by when you execute Save.
4. Press +1/YES.
The LCD will ask you to confirm.
1 . Select the desired Job #01, #02, #04 or #05.
The display will ask you to confirm your choice of data
type.
5 . Press +1/YES again.
The display will show “executing”, then “completed”.
2.
42
Press +1/YES if you want to save the displayed data.
The LCD will ask for confirmation:
SAVING SINGLE PATTERNS TO A CASSETTE
1 . Select Job #03 in Cassette Mode.
The display will ask you to input the PTN number.
LOADING SINGLE PATTERNS FROM
A CARTRIDGE
1 . Select Job #13 in Cartridge Mode.
The display will ask you to confirm:
2.
Enter the Pattern number directly with the numeric keys.
3.
Press +1/YES. The display will show “executing”, then
“completed”.
JOBS #11 - #15: LOAD DATA
FUNCTION
2.
Press +1/YES. The display will change to
3.
You can now specify the cartridge location you wish to
load from as well as the Pattern number you want to load
it to. (Use ACCENT 2 to switch between them.)
Loads various kinds of data from a cartridge
or cassette.
Refer to the CASSETTE/CARTRIDGE Menu on the RX7
front panel and the TABLE OF CASSETTE/CARTRIDGE
JOBS above to determine the appropriate Job number for
the type of data to be loaded.
Since loading single Patterns from a cartridge or cassette (Job
#13) necessitates slightly different procedures, these are explained separately below.
The Load operations correspond to the Save operations explained above.
* If the specified Pattern number already contains data, it
will be erased when you execute Load.
4. Press +1/YES.
The LCD will ask you to confirm.
GENERAL LOAD OPERATION
1. Select the desired Job #11, #12, #14 or #15.
The display will ask you to confirm your choice of data
type.
5.
Press +1/YES again.
The display will show “executing”, then “completed”.
LOADING SINGLE PATTERNS FROM
A CASSETTE
2.
3.
Press +1/YES if you want to load the displayed data.
The LCD will ask for confirmation:
1. First select the Pattern location you wish to load cassette
data to (in Pattern Select mode).
2.
Select Job #13 in Cassette Mode.
The display will ask you to input the PTN number.
3.
Enter the Pattern number directly with the numeric keys,
then press +1/YES. The display will ask you to confirm:
4.
Press +1/YES again. The display will show “executing”,
then “completed”.
Press +1/YES again to confirm.
The display will show
then
indicating that the data has been loaded to the RX7.
43
JOBS #21 - #25: VERIFY DATA
FUNCTION
Verifies whether data has been saved correctly
to a cartridge or cassette.
Refer to the CASSETTE/CARTRIDGE Menu on the RX7
front panel and the TABLE OF CASSETTE/CARTRIDGE
JOBS above to determine the appropriate Job number for
the type of data to be verified.
The operations for verifying single Patterns saved to a cartridge or cassette (Job #13) are slightly different and therefore
explained separately below.
3.
You can now specify the Pattern number and cartridge
location you want to verify. (Use ACCENT 2 to switch
between them.)
4. Press +1/YES.
The LCD will ask you to confirm.
The Verify operations are exactly complementary to the Save
operations explained above.
5.
GENERAL VERIFY OPERATION
Press +1/YES again.
If the data has been saved properly, the display will show
1 . Select the desired Job #21, #22, #24 or #25.
The display will ask you to confirm your choice of data
type.
* If data has not been saved correctly, an error message
will appear instead. Refer to the section ERROR MESSAGES.
2.
Press +1/YES if you want to verify the displayed data.
The LCD will ask for confirmation:
VERIFYING SINGLE PATTERNS SAVED
TO A CASSETTE
1. Select Job #23 in Cassette Mode.
The display will ask you to input the PTN number.
3.
Press +1/YES again to confirm.
The display will show
2.
Enter the Pattern number directly with the numeric keys,
then press +1/YES. The display will ask you to confirm:
then
3. Press +1/YES again. The display will show
indicating that the data has been verified.
VERIFYING SINGLE PATTERNS SAVED
TO A CARTRIDGE
1. Select Job #23 in Cartridge Mode.
The display will ask you to confirm:
2.
44
Press +1/YES. The display will change to
After verification, the display will show the following
message if the data has been saved properly:
* If data has not been saved correctly, an error message
will appear instead. Refer to the section ERROR MESSAGES.
JOB #30: FORMAT CARTRIDGE
FUNCTION
Formats a RAM4 Data Cartridge for use with
the RX7.
Any new RAM4 Data Cartridge (or one that has been previously used with other equipment) has to be formatted with
this Job before it can used with the RX7.
Make sure that the cartridge is inserted correctly, with the
MEMORY PROTECT switch set to OFF.
* Formatting a cartridge which already contains data will
completely erase all such data.
OPERATION
1. In Cartridge Control mode, select Job #30.
The display will ask
2. Press +1/YES.
The display will ask you to confirm:
3.
If you are, press +1/YES again.
After “executing”, the LCD will display
* If formatting was not carried out successfully, the message
will appear. In this case, repeat formatting.
45
ERROR MESSAGES
You have probably already encountered some of the error messages mentioned in preceding sections. In general, the RX7 will
display an error message if:
* An operating mistake has been made.
* Memory or other limits have been reached.
* Malfunctions have occurred (due to faulty connections, etc.)
Error messages always appear on the lower line of the LCD. The following list is for your reference.
GENERAL ERROR MESSAGES
MESSAGE
CAUSE
REMEDY
checksum error !
During a Receive Bulk operation (MIDI JOB #09),
there was a break in transmission, due to faulty cable
or electrical interference.
Check that the MIDI cable is not faulty, and repeat
the operation. Also read the PRECAUTIONS section
of this manual for advice on electrical interference.
Enter correct Part numbers.
illegal
Using the Part Copy function (Edit Song Mode) you
entered a part number that does not appear in the
Song, or the second Part number you entered was
lower than the first Part number.
The sequence memory (Pattern, Song or Chain) is
full.
Save the data presently in the RX7 to cartridge or
cassette, and clear (erase) data to make room in the
memory. Patterns, Songs and Chains can be cleared
individually, or you can clear all Patterns or all Songs
(UTILITY MODE JOBS #05 and #06 respectively).
Memory Protected
You have tried to clear or rewrite voice or sequence
data (by entering or loading new data) and the
Memory Protect function is turned on.
Turn the RX7’s Memory Protect OFF using UTILITY
JOB #03. Then carry out the data operation again.
Press any key to clear the LCD. Send less dense data,
or send at a slower tempo.
MIDI BUFFER FULL
The RX7’s MIDI Buffer is full, because too much
data has been sent too rapidly from an external device.
The MIDI Buffer is a kind of “waiting room” for
MIDI data, where data is held for minute periods
of time (of the order of .0003 seconds for one Byte)
while it is being processed by the RX7.
MIDI DATA ERROR!
You have turned on power to a connected MIDI
device, which sends a non-standard signal to the
RX7. Technically, this is called a “framing” error
or an “overrun” error.
Press any key to clear the LCD, and continue normal
operation.
no data!
You have tried to use the Edit Pattern function to
edit a Pattern that does not contain data.
1. Enter the correct Mark name.
2. Enter the correct Part number.
not found!
1. You have used the Search Mark function and
entered the name of a Mark that has not been
set in the Song.
2. You have used the Search Part or Copy Part
function and entered a Part number that is higher
than the total number of Parts in the Song.
too large PART!
1. You have tried to insert a Part in a Song that
already contains 999 Parts.
2. You are trying to use the Copy Part function with
the result that the new Song will have more than
999 Parts.
Edit two or more Songs, each of which forms a
section of the long Song you were trying to create.
Then use the Chain Edit Mode to combine these
Songs into a continuous sequence.
input!
memory full!!
46
MESSAGE
too large PTN!
CAUSE
REMEDY
1. A Pattern contains the maximum amount of data,
and you are trying to write more data into it.
2. You are trying to append a Pattern to another
Pattern, and the two Patterns combined contain
more than the maximum amount of data.
Write two or more shorter Patterns, each of which
forms a section of the long Pattern you were trying
to create. Then use the Edit Song Mode to combine
these Patterns into a continuous sequence.
1. You have tried to append two Patterns which
have different time signatures.
2. You have tried to append two Patterns which,
when combined, total more than 100 bars in
length.
1. Write a new Pattern which will have a time signature equivalent to the two original Patterns
combined. For example, if you had wanted to
append a 4/4 Pattern with a 3/4 Pattern, write
a new 7/4 Pattern (3/4 + 4/4 = 7/4).
2. Rewrite the same two Patterns using longer bars,
then append them. For example, if the two
Patterns each contained 52 bars of 4/4 time (total
104 bars), rewrite them as Patterns containing
26 bars of 8/4 time (total 52 bars), which can
then be appended.
wrong signature!
CARTRIDGE MODE ERROR MESSAGES
MESSAGE
CAUSE
REMEDY
Cartrg not ready
You have entered the Cartridge Mode, but you have
not inserted a RAM4 Cartridge into the RX7.
Insert a RAM4 Cartridge, then enter the Cartridge
Mode again.
Cartrg other type
You have entered the Cartridge Mode, but the RX7’s
Sequence Data Cartridge slot contains the wrong
type of cartridge.
Remove the wrong cartridge, then insert a RAM4
Cartridge, then enter the Cartridge Mode again.
You have tried to save data, or execute the Format
operation, with the Memory Protect turned ON on
your RAM4 Cartridge.
Remove the RAM4 Cartridge and turn its Memory
Protect OFF by flicking the switch on the underside
of the cartridge. Then insert the cartridge and enter
the required Job number once more.
You have entered the Cartridge Mode, but the RX7’s
Sequence Data Cartridge slot contains a cartridge
with a different format.
1. Remove the cartridge and insert a RAM4 cartridge that has been formatted for use with the
RX7.
2. Remove the cartridge and insert a RAM4 Cartridge that has not been formatted, then enter
the Cartridge and execute the Format operation
(JOB #30).
3. If the data contained in the cartridge is not
needed, make sure its Memory Protect is OFF,
and format it for use with the RX7. (CARTRIDGE
JOB #30).
Cartrg protected
Format conflict!
no data!
You have tried to save, load or verify a Pattern
containing no data.
Verify error!
You have tried to verify cartridge data, but the RX7
contains different data than that contained in the
RAM4 cartridge.
1. Save the data again, then execute the Verify
operation once more.
2. In the case of verifying a single Pattern, execute
the verify operation again, making sure you have
entered the correct Pattern numbers.
Format error!
Formatting was not successful.
Repeat formatting
47
CASSETTE MODE ERROR MESSAGES
CAUSE
REMEDY
You have tried to verify cassette data. The type of
data is correct (e.g., Single Pattern data) but the
RX7 contains different data to that contained on the
cassette.
Save the data again, then execute the Verify operation once more.
There is a checksum data error in data that you have
tried to verify or load from cassette.
Repeat the Load or Verify operation, making sure
that the playback level is high. Also, check that the
connections between the RX7 and the cassette recorder are correctly made, with cables that are
functioning properly. If necessary, clean and demagnetize the tape heads.
You have tried to load or verify data from cassette,
using an incorrect Job number. For example, you
used the Load Single Pattern operation (Job #13)
when trying to load Voice data.
EITHER: Use the correct Job number.
OR: Use the correct cassette data.
MESSAGE
data error
Sum error
type error
SPECIFICATIONS
SOUND SOURCE
CONNECTIONS
l
PCM sampled sounds, 12-bit resolution, 100
voices
l
l
Maximum polyphonic number: 8~16
l
MIDI: In, Out, Thru
l
INTERFACE: Cassette (In/Out, DIN connector),
Data Cartridge port
CONTROL: Foot Switch
POWER: DC 12V In
MEM0RY CAPACITY
l
l
l
l
l
100 Patterns (Max. length: 99 measures)
20 Songs (Max. length: 999 parts)
3 Chains (Max. length: 90 steps)
10 Sets of Key Data (incl. 5 user-programmable
sets)
CONTROLLERS
l
l
l
SLIDERS: Master Volume, Click Volume, Tempo,
Data Entry
Accent
1,
Accent
2,
BUTTONS:
Stop/Continue/Shift/Compare, Start/Enter, Instrument Keys A through X (24)
KEYS: PATTERN AND SONG OPERATION KEYS
(Pattern/Song, Real Time Write/Song Edit, Step
Write/Insert, Quantize/Delete, Swing/Repeat,
Click/Tempo Change, Pattern Edit/Volume
Chagne, Clear, Copy), Effect, Damp, Tempo,
MODE AND JOB KEYS (Voice Edit, Key Assign,
Chain, Cassette/Cartridge, Sync, MIDI, Utility,
Job), Numeric Key Panel, -1/NO, +1/YES
DISPLAY
l
l
48
LCD: 16 Characters x 2 Lines
LEDs: Pattern, Song, MIDI, Sync, Multi, Effect,
Damp, Run
l
AUDIO OUTPUTS: Phones, Left/Mono, Right,
Click
DIMENSIONS (W x D x H)
l
439 x 270 x 78 mm(17 1/4” x 10 5/8” x 3”)
WEIGHT
l
2.95 kg. (6 1/2 Ibs.)
POWER REQUIREMENTS (WITH PA-1210 12 V
VOLTAGE CONVERTOR)
l
l
U.S. and Canadian model: 120 V, 50/60 Hz
European model: 220-240 V, 50 Hz
* Specifications are subject to change without notice.
[ Digital Rythm Programmer ]
Date : 9 / 1 8 , 1 9 8 7
Model
RX7
MIDI Implementation Chart
Version : 1.0
+----------------------------------------------------------------------+
:
:
: Transmitted
Recognized
Remarks
:
:
Function . . . :
:-------------------+----------------+----------------+----------------:
:
:Basic
Default
: 1 - 16
: memorized
: 1 - 16
:
:Channel
Changed
: 1 - 16
:
: 1 - 16
:-------------------+----------------+----------------+----------------:
:
Default
: 3
: 3
:
: x
:
:Mode
Messages
: x
:
Altered
:************** : x
:
:-------------------+----------------+----------------+----------------:
:Note
: 0 - 127
:
: 0-127/36-96
: *1
:
:Number : T r u e v o i c e : * * * * * * * * * * * * * * :
:
x
:-------------------+----------------+----------------+----------------:
:
:Velocity Note ON : o
9nH,v=1-127
: o v=1-127
:
:
Note OFF
: x
9nH,v=0
: x
:-------------------+----------------+----------------+----------------:
:After
:
Key’s
: x
: x
:Touch
:
: x
Ch’s
: x
:-------------------+----------------+----------------+----------------:
:Pitch Bender
: x
: o
:Note# asgn:pitch:
:-------------------+----------------+----------------+----------------:
:
:
10 : x
: o
:Pan
:
:Note# asgn:pitch:
:
:
:Control
:
:
:
:Change
:
:
:
:
:
:
:
:
:
:
:
:
:
:
:
:-------------------+----------------+----------------+----------------:
x
:Prog
Note# asgn:pitch:
o
**************
: C h a n g e : True #
:
:-------------------+----------------+----------------+----------------:
o
: o
:
:System Exclusive
:-------------------+----------------+----------------+----------------:
x
:
:System : Song Pos
: o
: Song Sel
:
:
o 0 - 1 9
: o
0 - 19
:Common : Tune
x
: x
:
:-------------------+----------------+----------------+----------------:
o
:
:System
:Clock
: o
:
: o
o
:Real Time :Commands
:-------------------+----------------+----------------+----------------:
:
: x
:Aux
:Local ON/OFF : x
:
:
:AlI Notes OFF: x
: x
:
:Mes- : A c t i v e S e n s e : o
: o
: x
:sages:Reset
:
: x
:-------------------+----------------+----------------+----------------:
:Notes:
:
*1 = When Note number assign switch is set to VOICE, each
:
voice sounds by each note. ( Note # range : 0 - 127 )
:
W
h
e
n
N
o
t
e
n
u
m
b
e
r
a
s
s
i
g
n
s
w
i
t
c
h
i
s
s
e
t
t
o
P
I
T
C
H
,
e
a
c
h
:
:
v o i c e s o u n d s b y e a c h c h a n n e l . ( Note # range : 36 - 96 ) :
:
:
:
+----------------------------------------------------------------------+
Mode 1
: OMNI ON,
POLY
Mode 2 : O M N I O N , MONO
o : Yes
Mode 3 : O M N I O F F , P O L Y
x : No
M o d e 4 : OMNI OFF, MONO
RX7 “DRUM SET” CHART
Write voice names
on the corresponding
instrument keys
PAN POSITIONS
PAN VALUE
KEY
JOB #02
PITCH
JOB #03
DECAY
JOB #04
BEND
JOB #05
VOICE LEVEL
JOB #06
PAN
JOB #02
PITCH
write offset values
LEVEL
OR
combined values
PAN
DECAY
See p.33 for reference.
A
B
C
D
E
F
G
H
I
J
K
L
M
N
O
P
Q
R
S
T
U
V
W
X
CONTROL & REAR PANEL
***CONTROL PANEL***
VOLUME
CLICK
TEMPO
DATA
PTN
SONG
MIDI SYNC
MULTI
EFFECT
DAMP
RUN
LCD
STOP/CONTINUE
START
Instrument keys
ACCENT 1, 2
Pattern/Song keys
EFFECT
DAMP
TEMPO
Mode/Job keys
Numeric key pad
-1 NO / +1 YES keys
Job Menu
***REAR PANEL***
POWER ON/OFF
DC 12V IN
MIDI THRU
MIDI OUT
MIDI IN
CASSETTE
FOOT SW
CLICK
OUTPUT R
OUTPUT L
PHONES
DATA CARTRIDGE
51
FCC INFORMATION
While the following statements are provided to comply with FCC Regulations in the United States,
the corrective measures listed below are applicable worldwide.
This series of Yamaha professional music equipment uses frequencies that appear in the radio frequency range and if installed in the immediate proximity of some types of audio or video devices
(within three meters), interference may occur. This series of Yamaha combo equipment have been
type tested and found to comply with the specifications set for a class B computing device in accordance with those specifications listed in subpart J of part 15 of the FCC rules. These rules are
designed to provide a reasonable measure of protection against such interference. However, this
does not guarantee that interference will not occur. If your professional music equipment should
be suspected of causing interference with other electronic devices, verification can be made by turning
your combo equipment off and on. If the interference continues when your equipment is off, the
equipment is not the source of interference. If your equipment does appear to be the source of the
interference, you should try to correct the situation by using one or more of the following measures:
Relocate either the equipment or the electronic device that is being affected by the interference.
Utilize power outlets for the professional music equipment and the device being affected that are
on different branch (circuit breaker or fuse) circuits, or install AC line filters.
In the case of radio or TV interference, relocate the antenna or, if the antenna lead-in is 300 ohm
ribbon lead, change the lead-in the co-axial type cable.
If these corrective measures do not produce satisfactory results, please contact your authorized
Yamaha professional products dealer for suggestions and/or corrective measures.
If you cannot locate a franchised Yamaha professional products dealer in your general area contact
the professional products Service Department, Yamaha Music Corporation, 6600 Orangethorpe Ave.,
Buena Park, CA 90620, U.S.A.
If for any reason, you should need additional information relating to radio or TV interference, you
may find a booklet prepared by the Federal Communications Commission helpful:
“How to Identify and Resolve Radio -- TV Interference Problems”. This booklet is available from
the U.S. Government Printing Office, Washington D.C. 20402 -- Stock No. 004-000-00345-4.
YAMAHA
YAMAHA CORPORATION
P.O. Box 1, Hamamatsu, Japan
VE17510
88 04 1.0 R3
®
YAMAHA
RX7 OM
Yamaha Corporation of America
6600 Orangethorpe Avenue, P.O. Box 6600, Buena Park, CA 90622-6600
11/17/98 98109
Recyclable
Recycled