1
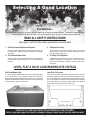
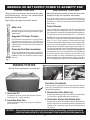
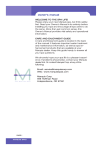
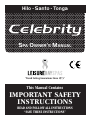
Hilo - Santo - Tonga
SPA OWNER’S MANUAL
“Trend Setting Innovations Since 1973”
This Manual Contains
IMPORTANT SAFETY
INSTRUCTIONS
READ AND FOLLOW ALL INSTRUCTIONS
“SAVE THESE INSTRUCTIONS”
TABLE OF CONTENTS
SAFETY
IMPORTANT SPA SAFETY INSTRUCTIONS ................. 1
Important Safety Precautions .......................................... 2
SPA LOCATION
Selecting A Good Site ...................................................... 3
Site Load Bearing Requirements ..................................... 3
Site Surface Requirements .............................................. 3
SPA WATER LEVELS
Filling Your Spa ................................................................ 4
Draining Your Spa ............................................................ 4
Winterizing Your Spa ....................................................... 4
CABINET PANELS
Cabinet Panel Removal ................................................... 5
P5S3 HILO & SANTO EQUIPMENT
All Electrical Wiring Must be Installed By A Certified
Licensed Electrician
P5S3 Wiring Diagram ...................................................... 6
Control Console ............................................................... 8
Dip Switch Configuration ................................................. 7
Additional Features ........................................................ 10
Display Messages .......................................................... 11
P9G3 TONGA EQUIPMENT
All Electrical Wiring Must be Installed By A Certified
Licensed Electrician
P9G3 Wiring Diagram ...................................................... 6
P9G3 Control Console ..................................................... 9
P9G3 Control Panel Display .......................................... 12
Dip Switch Configuration ................................................. 7
Additional Features ........................................................ 10
Display Messages .......................................................... 11
FILTERS
Skim Filter ...................................................................... 13
WATER PURIFICATION and MAINTENANCE
Recommended Schedule .............................................. 13
pH ..................................................................................13
Total Alkalinity ................................................................ 14
Calcium Hardness .........................................................14
Cleaning The Spa ..........................................................14
Water Marks On Spa Shell ............................................ 14
Cleaning The Spa Cabinet ............................................. 14
WARNING SIGN MUST BE POSTED
An important WARNING sign (part Number 601030 or PL601035 Rev. A) is packed with
your Leisure Bay Spa. This sign must be posted in a prominent place in close
proximity to the spa installation site immediately upon completion of spa installation.
THIS WARNING SIGN MUST BE POSTED BEFORE THE SPA IS USED!
THIS SPA IS FOR RESIDENTIAL USE ONLY!
IMPORTANT SAFETY INSTRUCTIONS
When installing and using this electrical equipment, basic safety precautions should always be followed, including the following:
1. READ AND FOLLOW ALL INSTRUCTIONS
8. Danger
Risk of Electric Shock. Do not permit any electric appliance, such as light,
telephone, radio, or television, within 1.5m (5 feet) of a spa.
2. Warning
To reduce the risk of injury, do not permit children to use this product unless
they are closely supervised at all times.
3.
9. Warning To reduce risk of injury:
A. The water in a spa should never exceed 40°C (104°F). Water
temperatures between 38°C (100°F) and 40°C (104°F) are considered safe
for a healthy adult. Lower water temperatures are recommended for your
children and when spa use exceeds 10 minutes.
A wire connector is provided on this unit to connect a minimum No. 8.4mm
(8AWG) solid copper conductor between this unit and any metal equipment,
metal enclosures of electrical equipment, metal water pipe, or conduit within
1.5m (5 feet) of the unit.
B. Since excessive water temperatures have high potential for fetal damage
during the early months of pregnancy, pregnant or possibly pregnant women
should limit spa water temperatures to 38°C (100°F).
4. Warning
C. Before entering spa, the user should measure the water temperature
with an accurate thermometer since the tolerance of water temperatureregulating devices vary.
(For permanently installed units)
All Electrical Connections Must Be Performed By A Certified Licensed
Electrician The electrical supply for this product must include a suitable
rated switch or circuit breaker to open all ungrounded supply conductors to
comply with all local electric codes. In addition, all 230 volt installations
must be protected by a 230 volt 3ma maximum rated Recidual Current
Detector (RCD). The main disconnect device must have a 3mm contact
gap separation and also provide all pole disconnection.
D. The use of alcohol, drugs, or medication before or during spa use may
lead to unconsciousness with the possibility of drowning.
E. Persons suffering from obesity or with a medical history of heart disease,
low or high blood pressure, circulatory system problems, or diabetes should
consult a physician before using a spa.
F. Persons using medication should consult a physician before using a
spa since some medication may induce drowsiness while other medication
may affect heart rate, blood pressure, and circulation.
5. Danger
Risk of Accidental Drowning. Extreme caution must be exercised to prevent
unauthorized access by children. To avoid accidents, ensure that children
cannot use this spa unless they are supervised at all times. For additional
protection, select a cover which is classified by the Underwriters Laboratories
Meeting ASTM F1346-91 requirements.
10. Warning Sign
Included with this spa is a warning sign. It is extremely important that this
sign be permanently placed in clear view of any persons using the spa.
Occasional spa users may not be aware of some of the dangers hot water
poses to pregnant women, small children, and people under the influence
of alcohol, drugs, or medication. If you did not receive a warning sign or
your sign has become damaged, please contact your spa dealer and ask
for sign number PL601035 Rev A.
6. Danger
Risk of Injury. The suction fittings in this spa are sized to match the specific
water flow created by the pump. Should the need arise to replace the suction
fittings or the pump, be sure that the flow rates are compatible.
Never operate spa if suction fittings are broken or missing. Never replace a
suction fitting with one less than the flow rate marked on the original suction
fitting.
7. Danger
Risk of Electric Shock. Install at least 1.5m (5 feet) from all metal surfaces.
As an alternative, a spa may be installed within 1.5m (5 feet) of metal
surfaces if each metal surface is permanently connected by a minimum
No. 8.4mm (8AWG) solid copper conductor to the wire connector on the
terminal box that is provided for this purpose.
SAVE THESE INSTRUCTIONS
1
IMPORTANT SAFETY PRECAUTIONS
Your spa can be a source of great pleasure. It offers healthful stimulating recreation and is a delightful fun
center for you, your family and friends. However, it contains large quantities of water and is deep enough to
present inherent dangers to life and health unless the following safety rules are strictly observed.
1. Never permit the spa to be used unless it is attended
by at least one person other than the bather.
6. Prolonged immersion in hot water may induce
hyperthermia.
Someone should be present to lend assistance if the bather should be in
trouble due to injuries, cramps, drowning especially in case of children, etc.
Hyperthermia occurs when internal body temperature reaches a level several
degrees above the normal body temperature of 36.6°C (98.6°F). The
symptoms of hyperthermia include: (1) dizziness, (2) fainting, (3) drowsiness,
(4) lethargy, (5) increases in the internal body temperature. The effects of
hyperthermia include: (1) unawareness of impending hazard, (2) failure to
perceive heat, (3) failure to recognize the need to exit spa, (4) physical
inability to exit spa, (5) unconsciousness resulting in danger of drowning.
2. Always use care in and around your spa.
The spa has many rigid, unyielding parts and many areas that become wet
and slippery; these are all potentially dangerous when rough play is permitted
or if care is not used particularly when entering or leaving the spa.
3. Keep the water sanitary and healthful at all times.
7. WARNING-The use of alcohol, drugs, or medication
can greatly increase the risk of fatal hyperthermia in
hot tubs or spas.
Your filter system will remove suspended particles from the water. Regular
application of spa chemicals in proper quantities will destroy harmful bacteria
and prevent formation of algae. Your surface skimmer will remove insects,
leaves, and other debris from the water surface. Unsanitary water is a serious
health hazard.
Despite the popular image of people in spas drinking wine or other alcoholic
beverages, DO NOT use alcoholic beverages before or during spa use.
Alcohol is a depressant which causes slowed reflexes and drowsiness,
especially in conjunction with the relaxed soaking in hot water. This can
lead to sleep or unconsciousness and possibly result in drowning. Using
your spa with other people who are also drinking is not a preventative
measure since they are likely to become similarly affected by the
combinations of alcohol and hot water soaking.
4. The water in your spa should NOT be warmer than
38° - 40°C (100° - 104°F).
Always keep an accurate thermometer in the water because your spa’s
thermostat may be in error. Use a high quality, shatterproof thermometer
with increments of one degree or less.
Soaking in hot water causes changes in the circulatory system, such as
enlargement of blood vessels near the skin. Therefore, people with a medical
history of heart disease, circulatory problems, diabetes, high or low blood
pressure should check with their physician before using spas. Additionally,
people taking medications causing drowsiness, such as tranquilizers,
narcotics, antihistamines, or anticoagulants should not use spas without
asking their physician.
The National Spa and Pool Institute considers a temperature of 38°C (100°F)
safe and comfortable for a healthy adult. Most healthy adults can enjoy this
water temperature for as long as desired, although it may raise the body
temperature to the water temperature and eventually become uncomfortable
(like a fever). At higher water temperatures the soaking time should be
shorter; never soak for more than 20 minutes when the water temperature
is 39°C (102°F) or higher. If you are planning a long rest in the spa, lower
the water temperature closer to normal body temperature, about 37.2°C
(99°F). Some people find even lower water temperatures relaxing and
pleasing. Try different water temperatures in the 36.6°-39°C (98°-102°F)
range until you find what temperatures suit you best.
8. Broken or missing drain covers should be replaced
immediately.
Accidents can occur when long hair or a body part is trapped by suction
from a drain or outlet whose cover is broken or removed. Children are
particularly vulnerable, and they should be warned against danger.
5. Hot water can raise the body temperature high
enough to cause heat stroke.
This can be fatal even to healthy adults. If you have any questions about
your own fitness or whether you should soak in the spa, check with your
physician.
DO NOT :
Do not use electrical appliances in or around your spa. Do not use glass or other breakable items in or around your
spa. Do not remove spa cabinet panels and attempt to make repairs. Do not attempt electrical repairs. Retain a
certified licensed electrician.
SAVE THESE INSTRUCTIONS
2
Selecting A Good Location
Site Selection...
Your new spa will provide you and yours with hour upon hour of healthy, relaxing enjoyment. The following suggestions and
recommendations will help you select a safe and compatible site for your spa, maximizing your enjoyment.
READ ALL SAFETY INSTRUCTIONS!
See pages 1 and 2 for other safety requirements and instructions
1. Certified Licensed Electrician Required
3. Childproof Your Spa
Electrical installation, (approval of and connection to power source) must
be completed by a qualified certified licensed electrician in compliance
with all codes.
Plan for limiting access of children. Precautions such as self closing and
locking gates or access doors, fencing and other child barriers, as dictated
by the site would be recommended.
2. No Overhead Power Lines
4. UL Safety Cover Required
Do not locate your spa under overhead power lines or in near proximity to
existing buried or exposed electrical circuits. See your certified licensed
electrician.
In addition to its insulating factors, a good cover also provides a measure
of additional protection from unwanted access. Select a cover which is
classified by the Underwriters Laboratories meeting ASTM F1346-91
requirements.
LEVEL, FLAT & SOLID LOAD BEARING SITE CRITICAL
Solid Load Bearing Site
Level Site, Flat Surface
The site must provide a solid foundation with a minimum load bearing capacity
of 61.23 kgr per 929.03 sq. cm (135 pounds per square foot). Concrete slabs
and decks must be designed to support this weight. Do not select a site composed
of individual unsupported bricks, blocks or other materials which will shift unevenly
and cause damage to your spa’s internal frame.
A level site is critical to both the performance and enjoyment of your spa. Water
is unforgiving and will always settle level. A flat and level site provides the surface
necessary to properly disperse weight between the footwell which bears most of
the spa’s weight and the structural frame which primarily provides stabilization
and secondary support. The importance of proper support for the footwell in
conjunction with the spa cabinet cannot be over stressed.
15%
WEIGHT
LOAD
70% OF THE SPA’S WEIGHT LOAD
15%
WEIGHT
LOAD
THE BULK OF YOUR SPA’S WEIGHT IS SUPPORTED BY THE FOOTWELL
Failure to provide support will result in damage to the spa’s shell and will void the shell warranty!
3
WARNING: DO NOT SUPPLY POWER TO AN EMPTY SPA!
FILLING YOUR SPA
WINTERIZING YOUR SPA
Warning: Allowing the spa water to freeze will cause severe
damage to the spa shell, equipment, and plumbing.
Filling your spa is the first step in maintaining water quality
and chemical balance. Use only clear, uncontaminated
potable water when filling the spa.
When Filling the spa open all jets and air controls.
A spa can be a great asset to your health and relaxation during the
winter months. However, for those who will be using a spa in freezing
cold weather it is critical that a water temperature be maintained well
above freezing.
Freeze Protection
Water Level
Your Leisure Bay spa is equipped with a special feature called freeze
protection. If the high limit sensor detects 40°F (4°C) at the heater, then
all the equipment is automatically activated to provide freeze protection.
This equipment stays on until the sensor detects 45°F (7°C) at the heater.
The correct water fill level varies with each individual
installation. Every person entering a spa displaces a given
volume of water.
Suggested “Fill Range” Provided
WARNING: We strongly recommend that you inspect and test your spa
and controls on a daily basis during periods when temperatures are
below 0°C (32°F). Every installation is different and many factors
contribute to possible freeze damage situations; rate of temperature drop,
thermal cover insulating properties, thermal cover installation, spa
installation location, wind exposure, power outage, spa water temp., etc.
The spa’s freeze protection system is designed to protect your spa from
unforeseen freeze situations. However, in severe freeze conditions or if
you do not plan to use your spa for a period of time, it may be impossible
for the freeze protect system to fully protect your spa. When severe
conditions threaten, we strongly recommend that you have the unit
drained and winterized by a “Spa Professional.” Properly winterizing a
spa is a complicated process and should not be attempted by an amateur.
A fill range label has been placed on the surface skimmer
face plate at the factory (see fig. 1). This label has a
suggested minimum and maximum fill level that will provide
a starting point for selecting a water level that meets your
individual needs.
Chemically Treat Water Immediately
To assure the maintenance of water quality, it is imperative
that you chemically threat the spa water immediately upon
completion of filling. See the treatment sections on pages
13 and 14.
fig. 1
DRAINING YOUR SPA
(Warning: Do not supply power to an empty spa!)
PUSH
PULL
TURN
TURN
TO OPEN
TO CLOSE
Figure 1
Figure 2
Drain Every Three Months
Draining your spa on a regular basis rids the spa of dissolved solids and
protects your spa equipment from the effects of residual calcium hardness
and total alkalinity problems.
3. Remove Drain Valve Safety Cap
1. Turn Power Off
Remove safety drain cap (see figure 1) and store for use when refilling
your spa. Attach a standard garden hose to the drain valve.
Turn power off at the spa consoles and deactivate disconnect
switches at the G.F.C.I. plug or load center.
4. Attach Hose & Select Safe Suitable Drain
2. Locate Spa Drain Valve
Route the hose to a sewer drain capable of safely assimilating 300 plus
gallons of water which may contain both unsanitary contaminants and
chemical residue. To open drain valve twist counter clockwise and pull
(see figure 2).
Located under the lower corner of the spa as you are facing the
console. See arrow.
CAUTION: Drain waste water may contain chemical residue and unsanitary contaminants which
could be a hazard to health or the environment. Drain to specified sanitary sewer only.
4
Cabinet Panel Removal & Installation Instructions
(For Use By Qualified Professionals Only)
1. Remove and save
fastener from
corners.
2. Remove corner.
3. Locate bottom
center screw.
4. Place a small
mark on the base
board below the
screw. This will
serve as a
reference point
during installation
5. Remove side
bottom screws
leaving the center
one for last.
Remove center
screw while
supporting panel
in place
6. After the center
screw is removed,
the panel will slide
down, then
remove panel.
7. When Installing
the panel, ensure
that it is
completely
inserted in the top
channel. Then
follow the removal
steps in reverse
order.
WARNING: Shock Hazard!
Spa Cabinet panels should be removed by qualified spa service professionals only!
5
ELECTRICAL DATA FOR THE USE OF CERTIFIED LICENSED ELECTRICIAN
WARNING: Shock Hazard! Under No Circumstances Should This Spa Be Installed By Anyone
Other Than A Certified Licensed Electrician!
All wiring MUST be in accordance with the National Electrical Code and all local codes.
P5S3 & P9G3 WIRING DIAGRAM
W A R N I N G : U S E C O P P E R C O N D U C T O R S O N LY !
6
ELECTRICAL DATA FOR THE USE OF CERTIFIED LICENSED ELECTRICIAN
WARNING: Shock Hazard! Under No Circumstances Should This Spa Be Installed By Anyone
Other Than A Certified Licensed Electrician!
All wiring MUST be in accordance with the National Electrical Code and all local codes.
P5S3 AND P9G3 SERIES DIP SWITCH CONFIGURATION
P5S3 Factory Set
P9G3 Factory Set
DIP SWITCH KEY
7 Mode Changes (must be OFF)
In “ON” position, standard mode only
In “OFF” position, enables standard/economy/sleep
8 Temperature Display
In “ON” position, temperature is displayed in degrees Celsius
In “OFF” position, temperature is displayed in degrees Fahrenheit
9 Blower / Pump 2 Enable
In “ON” position, enables pump 2
In “OFF” position, disables pump 2
10 Amperage Setting
In “ON” position, for low current
In “OFF” position, for high current
1 Test Mode (normally off)
2 Pump Time Out
In “ON” position, Pump turns off after 30 minutes
In “OFF” position, Pump turns off after 15 minutes
3 Panel Option (must be OFF)
In “ON” position, enables mini panel
In “OFF” position, enables current panel
4 Aux Freeze (must be OFF)
5 Panel Button Layout (must be OFF)
In “ON” position, enables J/L/-/+/w/BLW/AUX
In “OFF” position, enables B/J/T/L or J/T/L
6 Frequency (must be ON)
In “ON” position, 50Hz operation
In “OFF” position, 60Hz operation
A grounding lug has been provided on the exterior of the control box to allow connection of a ground wire to a local
grounding point in compliance with the National Electric Code (NEC) and all local codes.
7
Personal Comfort Control Console
The Leisure Bay Personal Comfort Control Console is your direct link to the most sophisticated solid state spa control center available. With a simple
touch of the finger you can select any spa’s functions from turning on the lights to powering up the jets. This state of the art control console allows
you to program the spa’s various operating functions to suit your individual needs by following the user friendly directions which follow. Should you
have any questions regarding operations please contact your local Leisure Bay dealer.
P1 Hilo & Santo Control
MODE
TEMP DISPLAY
TEMP UP & DOWN
LIGHT
PUMP
Initial Start-Up
Standby Mode
When your spa is first activated, it will perform a self diagnostics test
showing a series of numbers followed by Pr, then by – along with the
low speed pump. Also the internal clock that keeps track of the
filtration cycles every 12 hours will start at that point. The system is
preset to heart up to 38°C (100°F) and it is also preset to run on low
speed for two hours. (F2)
The spa can be disabled when the filter needs to be replaced. To place
Temperature Adjustment 21°C (70°F) - 40°C (104°F)
Spa Water Maintenance
When the temp pad
the system in standby mode, press the
pad
and the display will show “SY”. All spa functions are disabled except
for freeze control. Press any panel button to resume spa operation.
This function enables you to program the amount of water filtration
and (ozone purification “optional”) time.
is touched once, the LCD will flash and
display the temperature which has been set. While flashing, press
the temp pad again to increase or decrease the temperature. For the
opposite temp. setting wait until LCD stops flashing, then press the
temp pad again to change. The temperature will change in 1°F
increments. After 5 seconds, the LCD automatically display the current
spa temperature.
Press the
then the
to enter the programing mode. Once in
the programing mode press
selected, press the
to select the filtration time. Once
button to exit the programing.
(F2) In this mode the water will be filtered for 2 hours every 12 hours.
Jets
Press the
pad then the
(F4) In this mode the water will be filtered for 4 hours every 12 hours.
pad to turn the pump on and off. If left running, the
(F6) In this mode the water will be filtered for 6 hours every 12 hours.
pump will automatically turn off after 30 minutes, (Factory preset).
For 15 minutes, see page 11 for dip switch settings.
(FC) In this mode the water will be filtered continuously.
Light
Press the
FOR ADDITIONAL FEATURES (see page 10)
pad to turn the spa light on and off. If the light is left
on, it will automatically turn off in 4 hours.
Display Messages (see page 11)
Freeze Protection
If the high-limit sensor detects 6°C (44°F) at the heater, then the
equipment is automatically activated to provide freeze protection. This
is a normal spa function; no corrective action is necessary. The
equipment stays on until the sensor detects 7°C (45°F) at the heater.
Freeze protection is enabled regardless of the spa’s status.
WARNING: SHOCK HAZARD! NO USER SERVICEABLE PARTS. Do not attempt service of this control. Contact your dealer or service center
for assistance. Follow all owner’s manual power connection instructions. Installation must be performed by a certified licensed
electrician and all grounding connections must be properly installed.
8
Personal Comfort Control Console
The Leisure Bay Personal Comfort Control Console is your direct link to the most sophisticated solid state spa control center available. With a simple
touch of the finger you can select any spa’s functions from turning on the lights to powering up the jets. This state of the art control console allows you
to program the spa’s various operating functions to suit your individual needs by following the user friendly directions which follow. Should you have any
questions regarding operations please contact your local Leisure Bay dealer.
P2 Tonga Control
PUMP 2 / MODE
TEMP DISPLAY
TEMP UP & DOWN
LIGHT
PUMP 1
Initial Start-Up
Standby Mode
When your spa is first activated, it will perform a self diagnostics test
showing a series of numbers followed by Pr, then by – along with the
low speed pump. Also the internal clock that keeps track of the
filtration cycles every 12 hours will start at that point. The system is
preset to heart up to 38°C (100°F) and it is also preset to run on low
speed for two hours. (F2)
The spa can be disabled when the filter needs to be replaced. To place
Temperature Adjustment 21°C (70°F) - 40°C (104°F)
Spa Water Maintenance
When the temp pad
the system in standby mode, press the
pad
and the display will show “SY”. All spa functions are disabled except
for freeze control. Press any panel button to resume spa operation.
This function enables you to program the amount of water filtration
and (ozone purification “optional”) time.
is touched once, the LCD will flash and
display the temperature which has been set. While flashing, press
the temp pad again to increase or decrease the temperature. For the
opposite temp. setting wait until LCD stops flashing, then press the
temp pad again to change. The temperature will change in 1°F
increments. After 5 seconds, the LCD automatically display the current
spa temperature.
Press the
then the
to enter the programing mode. Once in
the programing mode press
selected, press the
to select the filtration time. Once
button to exit the programing.
(F2) In this mode the water will be filtered for 2 hours every 12 hours.
Jets
Press the
pad then the
(F4) In this mode the water will be filtered for 4 hours every 12 hours.
pad to turn pump 1 on press
pad to turn pump 2
on and off. If left running, the pump will automatically turn off after 30
minutes, (Factory preset). For 15 minutes, see page 12 for dip switch
settings.
(F6) In this mode the water will be filtered for 6 hours every 12 hours.
Light
FOR ADDITIONAL FEATURES (see page 10)
Press the
(FC) In this mode the water will be filtered continuously.
pad to turn the spa light on and off. If the light is left
Display Messages (see page 11)
on, it will automatically turn off in 4 hours.
Freeze Protection
If the high-limit sensor detects 6°C (44°F) at the heater, then the
equipment is automatically activated to provide freeze protection. This
is a normal spa function; no corrective action is necessary. The
equipment stays on until the sensor detects 7°C (45°F) at the heater.
Freeze protection is enabled regardless of the spa’s status.
WARNING: SHOCK HAZARD! NO USER SERVICEABLE PARTS. Do not attempt service of this control. Contact your dealer or service
center for assistance. Follow all owner’s manual power connection instructions. Installation must be performed by a certified licensed
electrician and all grounding connections must be properly installed.
9
Additional Features for P1, P2
Spa Heating Modes
The Heating Mode offers the ability to control your heater in special circumstances. Your spa is preset at the factory to
Standard Mode. However, the Heating Mode can be changed to Economy or Sleep by pressing the
then
button. With each press of the buttons, the display will cycle through the three different modes described below:
1. Standard Mode (ST): Your spa is preset to this mode. This mode operates the heater whenever needed to maintain
the programmed spa water temperature. (See Temperature Adjustment).
2. Economy Mode (EC): This mode operates the heater only during programmed Heating Cycles (See “Setting Heating
Cycles” below). This mode is ideal for areas that charge a premium for electricity during peak
hours. This mode will maintain the thermostat setting. If it does not reach the thermostat
setting, you may have to allow for more heating time by increasing the Heating Cycles.
3. Sleep Mode (SL):
This mode works in the same manner as the Economy Mode except the thermostat setting is
automatically lowered by 20 degrees. This mode is best suited for extended leaves from home
when it is not important to maintain constant water temperature, such as vacations or business
trips.
Summer Set Temperature
In hot weather, it is possible for water temperature to exceed the temperature setting. This is especially common when
your temperature setting is lower than air temperature. If the water temperature exceeds the temperature setting more
than 3°, an automatic safety circuit will turn off all of the electrical systems. The systems will remain off until either the water
temperature cools to below the setting, or the setting is increased above the water temperature.
10
P5S3 and P9G3 Display Messages
MEANING
ACTION REQUIRED
No message on display.
Power has been cut off to the spa.
The control panel will be disabled until power returns. Spa settings
will be preserved until next power up.
--
Temperature unknown.
After the pump has been running for 2 minutes, the temperature will
be displayed.
HH
"Overheat" - The spa has shut down. One of the sensors
has detected 47°C (118°F) at the heater.
DO NOT ENTER THE WATER. Remove the spa cover and allow water
to cool. Once the heater has cooled, reset by pushing any button. If
spa does not reset, shut off the power to the spa and call your dealer
or service organization.
OH
"Overheat" - The spa has shut down. One of the sensors
has detected that the spa water is 43°C (110°F).
DO NOT ENTER THE WATER. Remove the spa cover and allow water
to cool. At 107°F, the spa should automatically reset. If spa does not
reset, shut off the power to the spa and call your dealer or service
organization.
"Ice" - Potential freeze condition detected.
No action required. The pump and blower automatically will activate
regardless of spa status.
SA
Spa is shut down. The sensor that is plugged into the
Sensor "A" jack is not working.
If the problem persists, contact your dealer or service organization.
(May appear temporarily in an overheat situation and disappear when
the heater cools.)
Sb
Spa is shut down. The sensor that is plugged into the
Sensor "B" jack is not working.
If the problem persists, contact your dealer or service organization.
(May appear temporarily in an overheat situation and disappear when
the heater cools.)
Sn
Sensors are out of balance. If alternating with spa
temperature, it may just be a temporary condition. If
flashing by itself, spa is shut down.
If the problem persists, contact your dealer or service organization.
HL
A significant difference between temperature sensors has
been detected. This could indicate a flow problem.
Check water level in spa. Refill if necessary. If the water level is okay,
make sure the pumps have been primed. If problem persists, contact
your dealer or service organization.
LF
Persistent low flow problems. (Displays on the fifth
occurrence of "HL" message within 24 hours.) Heater is
shut down, but other spa functions continue to run
normally.
Follow action required for "HL" message. Heating capability of the
spa will not reset automatically; you may press any button to reset.
dr
Possible inadequate water, poor flow, or air bubbles in
detected in the heater. Spa is shut down for 15 minutes.
Check water level in spa. Refill if necessary. If water level is okay,
make sure the pumps have been primed. Press any button to reset,
or this message automatically will reset within 15 minutes. If problem
persists, contact your dealer or service organization.
dY
Inadequate water detected in heater. (Displays on third
occurrence of "dr" message.) Spa is shut down.
Follow action required for "dr" message. Spa will not automatically
reset. Press any button to reset.
MESSAGE
IC
11
Skim Filter
CLEANING YOUR SPA FILTER
Proper care and cleaning of your spa filter is very important
to the enjoyment of your spa. The filter is designed to remove
emerged debris and contaminants, providing clear clean
water for the bather. The most important maintenance step
is to establish a cleaning routine to fit your use pattern. Heavy
use and introduction of contaminants such as oily body lotions
could mean cleaning on a weekly basis while average use
might require only monthly cleaning.
1. Activate the standby mode or turn off electrical power. Remove
filter cover and set aside.
2. To remove floating weir and basket rotate it a 1/4 turn counter
clockwise.
3. Remove the floating weir and basket.
4. Remove filter cartridge and wash it with a garden hose inside and
out until the cartridge is clean. Reinsert the filter and follow the
steps in the reverse sequence.
NOTE:
1. Body oils, algae, and suntan oil can form a coating on the spa filter cartridge pleats which may not be thoroughly removed by the garden hose. To
remove such substances, soak the filter in a solution of filter cleaner. Various brands of such cleaners are readily available at your local dealer.
2. Improper spa filter maintenance will alter the spa sensing device on your spa. This will lead to faulty heater and or pump operation. But generally,
cleaning or replacing the filter cartridge regularly will remedy this situation.
12
Water Purification & Maintenance
You Deserve Pure, Crystal Clear Water
Pure, crystal clear water is part of the reward you receive for owning your very own spa. Maintaining water quality is a simple matter when a
Use/Maintenance Routine is established early on in ownership.
Use/Maintenance Routine
The tasks required to maintain superior water quality are divided into two categories, Regular and Special. “Regular” tasks include those that should be
routinely performed regardless of use pattern. For example, the spa filter should be cleaned at a minimum monthly, even if the spa is used only
occasionally. “Special” tasks are those performed to compensate for increased spa use. For example, the filter on a spa that has experienced a heavy
bather load resulting from vacation time and visiting friends or relatives might need cleaning on a weekly basis or more. Planning and establishing a
routine of Regular and Special maintenance as required by time and bather load will significantly simplify your spa maintenance.
Starting Point For Developing A Use/Maintenance Routine
No hard set rules can be established for creation of a spa maintenance program since each individual spa has its own unique location conditions and
bather patterns. The following chart of regular and special maintenance tasks is meant to provide a starting point. Water testing and experience will be
the final indicators of what your routine should be.
LIGHT USAGE
AVERAGE USAGE
ABOVE AVG. USAGE
HEAVY USAGE
Test & Adjust pH (7.2-7.8 Range)
Weekly
Twice Weekly
Thrice Weekly
Daily
Test & Maintain Bromine (3.0-5.0 ppm)
Weekly
Twice Weekly
Daily
Daily
Vacuum Spa
Monthly
Twice Monthly
Thrice Monthly
Weekly
Clean Spa Shell Water Line
Weekly
Weekly
Twice Weekly
Daily
Clean Spa Filter
Monthly
Twice Monthly
Twice Monthly
Weekly
Test & Maintain Alkalinity
Bi-Weekly
Weekly
Twice Weekly
Twice Weekly
Weekly
As Required
Add “Non Chlorine Shock”
Test & Maintain Calcium Hardness
Weekly
Weekly
Weekly
Weekly
Clean Cartridge with Chemical Cleaner
Quarterly
Monthly
Twice Monthly
As Required
ALWAYS FOLLOW THE MANUFACTURERS DIRECTIONS & INSTRUCTIONS ON THE CHEMICAL CONTAINER’S LABEL
IMPROPER WATER BALANCE WILL DAMAGE YOUR SPA’S SHELL & EQUIPMENT
13
Water Balance Is Critical
Unlike ordinary drinking water, spa water is held captive in your spa and is used over and over. All water contains minerals, metals and other dissolved
solids. In the case of spa water, these materials tend to concentrate due to normal usage and evaporation. Therefore, it is critical that you test and treat
your spa water to maintain proper balance.
pH SCALE
pH
0
1
2
3
4
5
6
7
8
9
10
11
12
13
pH is the measure of the degree of pH acidity or alkalinity of pool water.
Practically speaking, it tells if water is neutral or how far away from neutral.
pH is a measure on a scale, to which numbers have been assigned,
from 1 to 14. Seven is the middle of the scale and is considered exactly
neutral. Readings below 7 are increasingly acidic, above 7 are
increasingly basic or alkaline. Under normal conditions, it has been found
that the proper pH for spa water is approximately 7.5 with pH 7.2-7.7
being an acceptable range. The chart to the right indicates different
tendencies at assigned pH readings and what chemical to add.
ACIDIC
pH Too Low corrosive
Chlorine Lost
Irritating
7.2
ADD pH+
ALKALINE
NEUTRAL
pH Too High
pH ideal
Scale Forming
Non-corrosive, Max.
Chlorine Ineffective
Chlorine Efficiency 7.8
Irritating
COMFORT ZONE
ADD pH-
Calcium Hardness
Total Alkalinity
Total Hardness is used to describe the total amount of dissolved calcium
and magnesium bicarbonates, as well as smaller quantities of other
minerals in water. Unbalanced water, high in hardness, can cause water
to become cloudy. Scale can form inside pipes restricting water flow and
reducing their efficiency. Scale can also discolor a spa's interior. On the
other hand, low hardness and unbalanced water can contribute to corrosive
water conditions. Therefore, a certain amount of hardness is desirable.
The desired range is between 100-200 ppm. Once again, your water
should be tested periodically for hardness.
Alkalinity represents the amount of alkaline minerals in water. It is the
measure of the buffering capacity or resistance to a change in pH of water.
It minimizes changes in pH, making pH easier to control. Alkalinity and pH
are sometimes confused. pH is a measure of DEGREE of acidity of water.
Alkalinity is a QUANTITATIVE measure, telling you the total amount or
quantity of alkaline minerals present. The proper alkalinity range is 80-120
ppm. If alkalinity is allowed to drift, corrosion or scaling may result. Have
your spa water tested periodically for alkalinity by a qualified dealer.
CLEANING THE SPA
From time to time it will be necessary to clean the exposed surface areas of your spa shell and cabinet. Do not use cleaners or compounds
that contain harsh abrasives or caustic chemicals. Avoid using rubbing or buffing compounds.
Water Marks On Spa Shell
Water marks on the spa shell are best removed by applying a commercially available alcohol based window
washing compound such as plain Windex to a soft rag or paper towel and wiping the surface in a circular motion.
Removing Tub Ring
Tub ring is best removed with a specialized commercially available cleaner such as Sun Surface Cleaner. Ask your
local dealer for recommendations. Always apply with a soft wet sponge or paper towel.
Cleaning The Spa Cabinet
Use a mild dish detergent diluted with tap water and applied with a soft wet sponge or paper towel to clean the spa cabinet. Never use abrasive or caustic compounds.
Do not use cleaners or compounds that contain harsh abrasives or caustic chemicals.
Avoid using rubbing or buffing compounds.
14
MAINTENANCE NOTES
15
0007103(11/06)