1
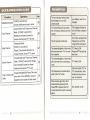
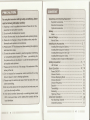
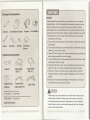
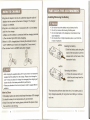
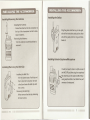
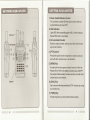
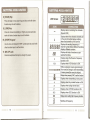
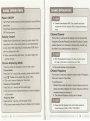
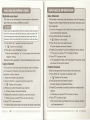
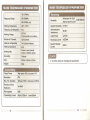
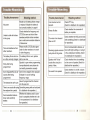
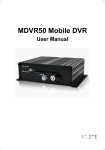
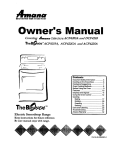
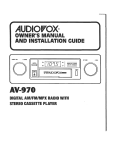
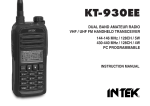
~T~ZONTON
999
Professional
FM Transceiver
THE USER'S MANUAL
We are grateful for your purchase of this transceiver.
We believe this easy-to-use transceiver will provide you
with dependable and reliable communications.
We adopt advanced technology & workmanship
for this
transceiver, we trust our aborative design will make it better
& quicker service for you. For correct use, please read this
manual before use.
MODELS COVERED
BY THIS MANUAL
ST-618: VHF FM Transceiver
ST-618: UHF FM Transceiver
136-174MHz
350-390MHz
400-470MHz
etc.
The transceiver apply for the software of QXPG-78D
NOTE: For avoiding mistakes, should read the data
first, then program.
. QUICK-OPERATION
Page
Operation
Function
Channel Mode
[DIAL](1 second)+[LOW]
Frequency+Channel
[DIAL](1 second)+[DIAL]
Mode
Frequency Mode
[DIAL](1 second)+[SCAN]
Adjust Squelch
[FUNC](1 second)+[LOW]
High/Low Power
12
12
12
14
16
Press [LOW]
Function
Press[LOW] to choose
Press [SCAN]
Manually Dialing
Press [PTT] + Digits Key
Dial Saved DTMF Numbers
[DIAL]+memory
Redial DTMF Numbers
units(1-9)
[DIAL]+[O]
[FUNC](1 second)+[1].
Rotate [Circumrotate Encoder]
VOX
[FUNC] (1 second)+ [A).Press
[LOW] to choose CTCSS/DCS/
17
19
19
19
Adjust Receiving
CTCSS/DCS
Decode
units(1-9)
Delete Saved DTMF Numbers
[DIAL]+[D]+memory
units(1-9)
Key Locked
[FUNC](1 second)+[*]
[LOW] to choose CTCSS/DC
20
20
21
CTCSS/DCS
Encode
Rotate[Circumrotate
to choose background
Reverse Frequency
[FUNC](1 second)+[3]
StOFF in circle,when in DCS,
press [DIAL] to choose Normal
[Circumrotate Encoder] to
Frequency Mode.
Encoder]
Slip Frequency
choose +/- slip frequency
Rotate[Circumrotate
22
[FUNC] (1
second) + OPress[SCAN] to
21
lights
24
or Inverted code.Rotate
choose code.
[FUNC](1 second)+[2].
Lightening
24
[Circumrotate Encoder] to
Adjust Transmitting
[DIAL]+[*]+memory
press [DIAL] to choose Normal
or Inverted code.Rotate
[FUNC] (1 second)+[B]. Press
memory units(1-9)
Confirm Saved DTMF Numbers
OFF in circle, when in DCS,
choose code.
20
(16 digits max.)[DIAL]+
23
to choose gain level
[DIAL]+[#J, input the digits
Save DTMF Numbers
22
stepping level in circle
[FUNC](1 second)+[SCAN]
Scan ON
Page
[FUNC](1 second)+[#)
Stepping
17
+Channel Mode.
Operation
Frequency Mode
Channel Mode and Frequency
Add Channel Scan
liUIDE
Encoder]
to choose slip frequency value.
25
PROMPTION
QUICK-OPERATION GUIDE
Operation
Function
Wide/Narrow
Band
Page
[FUNC](1 second)+[4]
Choose wide/narrow
26
band in circle
Mode.
[FUNC](1 second)+[C]
Rotate[Circumrotate
communicate
The transmitting will stop when
the red indicator flashes and "Du"
Channel Mode and Frequency+Channe
Copy Channel
The red indicator flashes when
transmitting but it can still
26
Encoder] to
sounds
Out of lock, programmed
frequency is out of the
range of the transceiver.
Save Channel
The transmitting(last a little while)
will stop when hear "Du" sounds
from speaker.
TOT alert is ON.
Release PIT to stop the
alert tone.
Mode.
[FUNC] (1 second)+[C].
Rotate [ Circumrotate
27
Encoder]
to
choose channel, press PTT to save.
Channel Mode and Frequency+Channel
Delete Channel
Mode. [FUNC](1 second)+[D]. Rotate
[Circumrotate
The transmitting(last
27
Encoder] to choose
a little while)
will stop when hear a prompting
voice.
delete channel, press PIT to exit.
Press[lOW]+[MONI]+Power
Copy Function with
Cable
ON at the
same time. Press [MONI] to transmit
data,then exit to power off and reboot.
28
The voltage of battery is
too low. Please charge at
once!
"Da da" sounds at intervals.
choose channel, press PIT to save.
Frequency
low battery, need to be
charged
The transceiver transmits after a
while of the TOT alerts.
TOT alert is ON.
Set Interval after TOT or
TOT resume time. After
limited time the transceiver can transmit.
When receive signal from other
transceiver,the green light ON.
Press PIT to transmit and "Du"
sounds heard,then retum to receive
signal.
BCl function is ON.
CONTENT
PRECAUTION
For using this transceiver with high safety and efficiency, please
read the following information
1. Repairing is only for qualified technicians. Please do not disassemble the transceiver
causally.
2. Do not modify the transceiver
causally.
and explosive circumstances.
and detonators areas.
6. To avoid the problem caused by electromagnetism
power OFF when
interfering
you entering into
to use the transceiver,such
7. Please put the device out of the range of the extension of the
airbag in the car.
3
How to Charge
How to Store
- ....
- - - - - - - - - - - - - - - -. - - - - _. - - - -. - - - - - - -
4
- -- -- -- - -- - - -- --- •- -•- •- -- -- - - --- --- - - .4
5. 7
. -. - - - - - - - - - - - -. - - - - - - - ....
Installing/Removing
the Battery - - - - -. - - - •• - - - -. -. -. - -. 5
Installing/Removing
Installing/Removing
the Antenna - •• -. -. - - -. - - - - -. - - - - - 6
the Belt Clip - - - - - - - •••• - - - •••••• _. 6
Installing/Removing
the Gallus
- - - - - - - - - - - - - •••• - - - - - - 7
Installing Exterior Earphone/Microphone
LED Screen
- - - - - - - - - - - - - -·7
- - - - - - - ... - ... - - - - - - -. -. - - - -. - . -
8. 11
• -. - - - - - - - - - - - - - - • -. - - - - - - - - •• _. - - - - -
11
Basic Operation - - - - - - - - - - - - - - - - - .• _. - •. - - - - - - - - -. 12, 16
Power ON/OFF - - - • - - ••• -. - •• - - - - - - - - -. - - - - - - - •• -. - 12
the transceiver
under sunshine
for a long
power
Volume Control-· - ••••• - - - - - - - - - - - - - - -. _. -. - _••• - - Choose Displaying Mode - - _••• - - - - - - -. - - - - - - - - - - - Choose Channel - - - - - _•• - -. - - - - - - - - - - - - - - - - - - - _. - Choose Frequency -----------••• - ••• ------------Squelch - - - - - - • -. - - - - •••• -. _•• - - - - - - -. - ••• - • -. - - - Transmitting'
- - - - - -- - - - - - - - - - - - -. -. - --- - - -- -. - - - - Receiving - - - - - - - - - - - - -. - - _•••• - - - - - -. - - - - - - - - - - - High/Low Power - - - _. - - - - - - - - - - - - - - - - -. - • - _•• _. - - -
take out the battery, then contact with the
Advanced Operation - - - - - - - - - - - - - - - - - - - - - - - - - - - - - 17
time,nor place it close to heating appliances.
9. Please keep the antenna at least 2.5cm far away from you
when transmitting.
10.00 not put the device into the dusty,humid and wet areas, nor
put it into the rough surface.
11.lf the device smelled abnormally
OFF at once,and
local distributor.
- -. - - - - - - 2
•••• - •••• - ••• - •• - - - - -. - - - - - -. - _. - _•• _•• -. -. - - 3
Getting Acquainted
as hospitals and airplanes.
8. Do not expose
• - - - - - - - - - - - - - - - ••• -. - - •• - - -. - - 2
• - - - - - - - - - - - - - - - - •••••
Installing the Accessories
5. Please power OFF the transceiver before entering the explosive
or compatibility,please
Standard Accessories
Optional Accessories
Notes
4. Please do not change or charge the battery when under the
the places where is not allowed
• - -. - ••• - - - - - - - -. - - - - - - - -. - - - - - 1
Battery - - - - - - - - - - - .. - - - - .. - - - - .. - - - - - - - - . - - - - - - . - . - ... -
3. Power off when enter into the flammable and explosive places.
flammable
1
Unpacking and Checking Equipment·····--------------Supplied Accessories
carefully:
or smoking,please
Add Scanning Channel··
12
12
13
13
14
15
15
16
28
- - _•• - - - - - - - - -. - - - - - - - -. - • .' 17
Channel Scanning _. -. _. - - - - - -. - - - - - -. _•• - - -. - •• - -.
17
.CONTENT
Frequency Scanning -. - - - - - - - - - - - - - - - - -. - - - - - - -. - DTMF Calling ---- •• -------.-----•••• -----.-.19,
Key Locked - - • - - - - - - • - • - - - - - - •• - - - - - - - • - - - - - - - •• Lightening - - - - - - - - •• - - - - - •• - - - - - ••••• - - - - - - •• - - - Reverse Frequency - - - - • -. - • - - - - - ••• - - •• - - •• - - - - - -.
18
21
21
21
22
Carefully unpack the transceiver.
We suggest that you confirm the
items listed in the following table before discarding the packing
material. If any items are missing or have been damaged during
shipment, contact with the dealer immediately.
Stepping .-.-----••• ------.-----•• --------.----22
VOX - -. - - - - - ••• -. - - - - - - •• - -- - - ••• -- - -. -.-. -- - - - - 23
CTCSS/DCS
- •• - - - - -. -. - - -. -. -. -. - - - - -. - - - - - -. 23,
25
Slip Frequency. - - - - -. - - - - - •• - -. - - - - ••• - - - - - - •• - - -. 25
Wide/Narrow Band - - -. - •• -. - - - - -. - - - - - - - •• - - - - - - •• 26
Copy Channel - - - - - -. - - - - - -. -. - - - - - - - •• - - - - - -. - - - - 26
Save Channel - - ••• -. - - - -. - - - - - - -. -. - - - - - - - - - - - - - -. 27
Delete Channel -. -. - - • - •• - - - - - - -. - - - - - - - -. - - - - •• -. 27
Copy Function with Cable - -. - - - - - - •• - - - - - - ••• - - - - - - 28
Auxiliary Operation - - -. - - - - - - - •. - - - - - - -. - - - - - - -. 29,
31
Time-out Timer - - - - - - •• - - -. - -. - ••• - - - - - •• - - - -. -. - •. 29
TOT Pre-caution
Time - - - - - - - - - - - - - -. -. - - - -. -. - - - - -.
Interval after TOT - - - - • - - -. - - •••••
TOT Resume Time··
- - - - - -. - - - - -. - - - -
- - - - - -. -. - - - - - - - - - - - •• - •• - - - -.
MONI Key Setting ------.-.-------.-----
•• -------.-
Busy Channel Lokced • - - - - - - - _. - - - - - - -. - - - - - -. - - - Battery Save - - - ••••• - - - - - • - - - - - - - - - - - - - - - •• - - - • - -.
Prompting Voice - - - - ••• - - - - - - - ••• - - - - - -. - - - - - • -. - -.
Low Battery Warning -. - - - - - - ••• - - - - -. - •• - - - - - •• - - - PTT 10 -. - - - -- --. -- - --- --- - .-- -- .:- - - --.-. -. -- --. Input Information - - - - -. - - - - - ••• -. - - - - •• - - - - - - -. - - - -.
Main Technology Parameter··------·-------·--32,
Trouble Shooting - •.•• ----- •.• ---- •. - .• --- .• --- 34,
29
29
ITEM
136-174MHz
350-390MHz
400-470MHz etc.
Antenna
Li·ion
Battery
Charger
Adaptor
QUA!JTiiY?0) l;h
1
1
1
Li-ion Battery
(7.4V 1100mAh)
Gallus
1
1
29
Belt Clip
1
29
Screws
1
30
30
30
30
Instruction
31
31
33
35
Manual
1
BATTERY
Please charge the battery before you use it,because it was uncharged
against delivery. The first charging after purchasing or keeping for more
than 2 months without using cannot achieve normal battery capacity.
After repeating the charge/discharge for 2 or 3 times, the battery can get
to the best performance Please change or charge the battery if low power.
o
Instruction
Manual
1. Please use the specific charger, other models may cause explosion
and lead to hurt the body.
2. Do not short circuit the battery or put it into fire,nor remove the housing
of the battery.
3. The ambient temperature should between 5"C and 40"C
while charging.
Otherwise, it may not fUlly charge.
4. Power OFF the transceiver with battery while charging. Using the devic
while charging would affect normal charging.
5. To avoid interfering the charging, please do not cut off the power or take
out the battery during charging.
~
~
Headset
~
Speaker/Mic
Speaker/Mic
(QME-01)
(QME-02)
~
Programming
Programming
\
8. Please do not charge when the battery or the transceiver is damped.
~
Do it before wipe it up to avoid the hazard.
Copy Cable
Alwarningl
ST-8.5-400V-1
Whenjewelry, keys or ornamental chain and other electric metals contact
~
ST-8.5-150V-2
.'/
Cable (QXPL-01)
~
ST-6.5-150V-1
though it is fully and correctly charged. Please replace the battery.
7. Please do not take out the battery and recharge it after it was fully
charged,otherwise the battery would be damaged or the life would be
shorten.
®~
~ ,~
Software
6. The battery life will over soon when its operating time decreases even
ST-10-400V-2
with the battery terminal, the battery may cause damage or hurt bodies.
If the battery terminal short circuit it wi! generate a lot of heat, Please be
careful when you bring or use the battery, especially put it into the pocket,
purse or other metal container.
INSTALLIN THE ACCESSORIES
HOW TO CHARGE
1.Plug the AC adaptor into the AC outlet,then plug the cable of
adaptor into the socket at the back of charger. The charger
indicator on GREEN.
2.Plug the Li-ion battery pack or transceiver wifh a Li-ion battery
pack into the charger.
a.Make sure the battery is connected with the charging terminal.
b.The indicator lights RED while charging.
3.When it is 90% charged(about
4 hours),the indicator turns to
•
Do not shori circuit the battery and put battery into fire.
•
Do not try to remove the housing of battery pack.
•
Do not install battery in the dangerous
circumstance,;t
•
cause explosion.
Do not place them in high temperature
place or put it into fire,
may
in case of explosion.
LIGHT GREEN (and need to be charged for 2 hours more) ..
4.The indicator turns to GREEN while fully charged.
Removing the Battery:
• After charging the supplied battery for 6 hours,remove
equipped
it or transceiver
2. Press the release latch and
with the battery from the charger. Please do not charge for
over 10 hours,nor place it in charger for recharging. Over-charging
slide the pack away from the
will
transceiver.
shorten the life of the battery and affect its performance .
• Please pay attention to the local net power,in order to supply different
adaptors.
The transceiver
How to Store
1.lf the battery needs to be stored,it should keep in the status of 50% charged.
2.lt should be keep in low temperature,dry
environment.
3.Keep it far away from heating places,included
the sunshine is too strong.
the place where
performs best when the Li-ion battery pack is
fully charged,especially
usly use.
for long-time transmitting
or continuo-
INSTALLING THE ACCESSORIES
INSTALLING THE ACCESSORIES
Installing the Antenna:
Screw the antenna into the connector on
the top of the transceiver
Plug the gallus into the ring on the right
and turn clock-
side of the transceiver,and
wise to fasten it.
put the other
side of the gallus into the ring, and then
Removing the Antenna:
Turn the antenna counterclockwise
fasten it.
to
remove it.
CD mtlDt::r:D
CD ••••
em
•••• _a:t
CD
_cu:>cm
Unveil(not need to take it out)the cover of
Installing the Belt Clip:
Aim the screw eyes of belt clip and
the AI. shell of transceiver
at each
other,then fasten the belt clip with
the screws.
Removing the Belt Clip:
When remove the belt c1ip,fastening
its fixed screws.
J
the MIC-SP jack,then
"Mic
iO
~@
plug the earphonel
into the jack of earphone/MicWhen
.
uSing earphone/Mic,it
ormance of waterproof.
will affect the perf-
GETTING ACQUAINTED
GETTING ACQUAINTED
1. Power SwitchNolume
Control
Turn clockwise to power ON and adjust volume while turn
counterclockwise
to power OFF.
2. LED Indicator
Lights RED while transmitting,lights
KELLY while receiving,
flashes RED while in low battery.
3. Circumrotate
Encoder
Rotate to select channels, and also work with other function
keys to set functions.
4. [PTT] Switch
Press,then speak into the microphone to transmit, and also
work with other function keys to set functions.
5. [MONI] Key
According to how to program auxiliary functions of this key.
Please refer to P30 of the details instruction,press
the programmable
auxiliary function,and
ON/OFF
also work with other
function keys to set functions.
6. [DIAL] Key
Use to store/confirm/transmitldelete
DTMF number,also
as a function key.
7. [FUNC] Key
Function key,press to unlock other functions setting.
using
GETTING ACQUAINTED
GETTING ACQUAINTED
8. [SCAN] Key
75
DCS C,
" C,
" C•.O
" " O.C'·
" i, ~gl!.I!!
100
+
ACT
-l!!llil
••••
vox~
13
Press to begin or stop scanning,and
also work with other
R
function keys to set functions.
ICON
9. [LOW] Key
Press to choose transmitting
in High/Low power,and also
-
work with other function keys to set functions.
Use to store and transmit DTMF number,and also work with
other function keys to set functions.
11. MIC-SP Jack
Connect earphone/microphone
bought by users.
CI CI CI
(Squelch ON)
Dsiplays when the selected channels are
in the scan list while displays nothing
when the channelis out of scan list.
A
10. [DTMF] Keypad
INSTRUCTION
Displays when monitoring the channels
C' CI CI
tI !.I LU" Lf.!.I
IBB
R
VOX
..... _---
Displays the working frequency or
channel number. Select different functions
displays different numbers.
Displays all kinds of numbers as per
selected functions.
Displays when the Reverse Frequency
function is ON
Displays when VOX function is ON.
While receiving, it means signal strength
(the more,the stronger), while transmitting,
it means power(the more,the higher).
[i
II!]
+
Displays when Key Locked function is ON.
A
Displays when using narrow band.
CT
Displayswhen pressingFUNC to set the functions
Displays when transmitting
in low power.
Displays when CTCSS function is ON.
DCS
Displays when DCS function is ON.
a
Displays when selling Slip Frequency function.
75
50
.25
Mantissa of frequency.
BA!iIC OPERATION
BA!iIC OPERATION
Power ON/OFF
Turn [Power SwitchNolume
Control] clockwise to power ON the
•
transceiver.
Turn [Power SwitchNolume
Control] counterclockwise
to power
OFF the transceiver.
This function is valid under the display mode of Channel and
Rotate [Power SwitchNolume
Control] to adjust volume.Turn
clockwise to turn up the volume while turn counterclockwise
to turn down. When adjusting the volume, press MaN I to monitor the background
Frequency+ChanneI.Rotate[Circumrotate
needed channel.Turn
ber while turn counterclockwise
to decrease it.
with others, you need to adjust the
volume correctly.
•
There are 3 kinds of displaying
When the programmed
frequency
the range of transceiver,
Choose Displaying Mode
modes for free choice.
Channel Mode
of chose channel is out of
it will alert you out of lock.
• The screen displays chose channels.
Choose Frequency
Press DIAL for 1 second (the prompting voice would be heard
on the screen,then
press Law.
• The current channel displays on the screen.
This function is valid only under the display mode of Frequency.
There are 2 ways for free choice.
1. Input frequency
Frequency+ChannelMode
Press DIAL for 1 second,and
• The current communicating
Rotate [Circumrotate
then press again.
Encoder] to choose frequency,turn
frequency and channel displays
counterclockwise to decrease it.
• The selected frequency displays on the screen.
Mode
Press DIAL for 1 second, and then press SCAN.
• The current communicating
frequency displays on the screen.
clo-
ckwise according "stepping" to increase frequency while turn
on the screen.
Frequency
Encoder] to choose
clockwise to increase the channel num-
noise.
• When communicating
Iii "flashes
You can only press DIAL to change to frequency
mode.
Choose Channel
Volume Control
if set),"
Channel mode displays UNPG if any channel hasn't been
programmed.
•
Please select the stepping before circumrotate
choose frequency
encoder to
(Refer to P22 of "STEPPING'?
BA!iIC OPERATION
BA!iIC OPERATION
2. Turn the encoder from O(open) to 9(tightest) to select the
2. Input frequency on Keypad
•
Press [DTMF],then
squelch level.
input the frequency directly.
E.g. linput 4,0,3,0,5,0 when communicating
• Turn clockwise to increase the squelch level,turn counter-
in 403,050MHz,
clockwise to decrease the squelch level.
he screen displays 403,050, that means you can communi-
3. Press any key to end the setting.
cate in 403,050MHz.
NOTE: Input frequency
Circumrotate
• Return to normal operation.
on keypad is related to stepping,use
Transmitting
Encoder to select and adjust frequency.
According to different settings for the monitor function,press
• The input frequency displays on the screen.
MaN I to monitor the loudspeaker
there is no broadcasting
•
When inputting wrong frequency,press
•
Frequency
restrict the frequency
you inputPlease
of transceiver
1. Please keep the microphone
would
pay more attention
your mouth,and speak
about the stepping you set.
best performance.
function can mute loudspeaker.
When squelch function is ON,you will hear the background
from the loudspeaker,
noise
while the squelch is OFF you will not hear
noise. The squelch level you choose will decide
when your squelch is ON/OFF. If the level is too high,you cannot
the background
3-4cm from
3. Release PTT to receive.
When there is no signal,squelch
get weak signal,
approximately
in normal speaking voice to ensure
2. When pressing PTT, LED lights RED.
Squelch
the background
confirm
on the selected
channel. Press PTT, and then speak into the microphone.
[MON/} to cancel.
range and stepping frequency
for a moment,and
station is transmitting
Receiving
If the working channel is called, LED lights Green,you can
receive the call.
•
if the level is too low, the signal will appears in
noise.
If the signal is weak and you have set the higher squelch
level,you may miss the call.
•
Local dealer may program the CTCSS/DCS.You
could only
How to Adjust Squelch
receive calling from the station that selected the same
1. Press FUNC for 1 second, then press Law.
CTCSS/DCS
• The screen displays"_SqL"
and the current squelch level.
as yours. Other callings cannot be heard.
ADVANCED OPERATION
BA§IC OPERATION
High/Low
Add Scanning
Power
For tansmitting
in high power,large waste in battery, thus it dose
not need high power in short distance communication,
we can
choose low power to save battery, while we use high power
when in long distance communication.
Press LOW to choose
High/Low power.
• Low power,displays
displays nothing.
Channel
This function is valid only under the display mode of Channel
and Frequency+Channel.You
1. Rotate [Circumrotate
can choose channels for scanning.
Encoder] to choose add scanning cha-
nnels.
2. Press FUNC for 1 second to set the function ON.
• "F" flashes on the screen .
"LO" on the screen while high power
3. Press SCAN to add/cancel the added scanning channels.
• The channel displays "A" on the screen while it is added
to scan.
• The channel displays nothing while it is not added to scan.
Repeat the above operation,channel
will alternate between
scan and non-scan.
Channel Scanning
This function is valid only under the display mode of Channel
and Frequency+Channel,
which is used to monitor every added
scanning channel of the transceiver. When scanning,
the trans-
ceiver will check every channel and only stop in the channel
with signal.
ADVANCED OPERATION
ADVANCED OPERATION
DTMF Calling
1. Press SCAN to begin scanning.
• Scan starts from current channel,and
channel number
increases gradually. Screen displays "SCAN".
• The transceiver
will stay in the communicating
the signal disappears.
Manually Dialing
Press PTT, and then enter the needed numbers.
channel until
Scan will return after signal disapp-
ears for 4 seconds, unless there is new signal appears
within these 4 seconds.
• Press PIT,then
enter the first digit you input,release
and then release the digits keypad,the transceiver
transmitting
within 2 seconds,you
PIT,
will keep
need not keep pressing
PTTto dial.
2. Press any key except MONI to end scanning.
• When transmitting
Frequency Scanning
DTMF, microphone
monitor the double-audio-frequency
This function is valid only under the display mode of Frequency.
It is used to monitor the signal in every frequency of the stepping.When scanning,transceiver
will check the increased step-
ping and only stop in the frequency with signal.
Dialing
Dial Saved DTMF Numbers
Dial saved DTMF number of the memory number units.
1. Press DIAL to enter the dial-up mode.
1. Press SCAN to begin scanning.
• Scan starts from current frequency,and
Automatically
will be muted,you can
through loudspeaker.
increases according
• Screen displays "__
d"
2. Input the dialed memory number units (1-9)
to the stepping.
• Screen displays and scrolls the calling numbers
• Screen displays "SCAN"
and
sounds DTMF.
3. Return to the former display automatically.
When the increased
frequency
range is out of transceiver
it will turn to the lowest frequency
frequency,
to increase as per "stepping".
Redial DTMF Numbers
Redial the last transmitted
The transceiver
will stay in the communicating
the signal disappears.
frequency until
Scan will return after signal disappears
for 4 seconds, unless there is new signal appears within these
4 seconds.
• When scan quit in a specific frequency, the screen displays
frequency rate, the dot between frequency will flash on the
screen.
2. Press any key except MONI to end scanning.
DTMF number (16 digits max.)
1. Press DIAL to enter the dial-up mode.
• Screen displays "__
d"
2. Press [0] to dial the last transmitted
number.
• Screen displays and scrolls the calling numbers and
sounds DTMF.
3. Return to the former display autimatically.
ADVAI\ICED OPERATION
3. Input the needed delete DTMF numbers (1-9).
Save DTMF Numbers
1. Press DIAL to enter the dial-up mode.
• Screen displays "__
ADVANCED OPERATION
• The selected DTMF numbers were deleted.
4. Return to the former display automatically.
d"
2. Press [#] to enter the store mode.
3. Enter the numbers in the DTMF keypad.
• If you input incorrect number, press -MaN I to clear it and
enter the correct one.
Key Locked
This function is to avoid operating transceiver
memory channel numbers (0-9).
• Return to the former display.
• "Iii " flashes
• When key locked function
Check the memory channel number units.
1. Press DIAL to dial-up mode.
Lightening
2. Press [*] to enter confirmed saved mode.
3. Enter the needed memory number units (1-9)
• Screen displays and scrolls the saved DTMF numbers
DTMF.
4. Return to the former display automatically.
Delete Saved DTMF Numbers
Delete the memory channel number units.
You can set the lightening function to be automatism,
1. Press FUNC for 1 second, the function is ON.
• "Iii" flashes
• Screen displays "c1r_d"
Press any key except digit keys from 1 to 9 to cancel the
on the screen.
2. Press [2] to select lightening function.
3. Rotate [Circumrotate
•
Encoder] to select the needed setting.
Displays "A" for automatism.
The light on screen will light
for 5 seconds when press any key except PTT and MONI,
d"
2. Press [0] to enter the delete mode .
connec-
tion or off.
1. Press DIAL to enter the dial-up mode .
operation.
is ON, all the keys are invalid
except PTT,MONI,FUNC.
To unlock keypad of the transceiver, please repeat the above operation.
d"
and sounds correspongding
on the screen.
2. Press [*] to enter Key Locked.
• "+" displays on the screen.
Confirm Saved DTMF Numbers
• Screen displays "__
lock
1. Press FUNC for 1 second, the function is ON.
4. Press DIAL after input the digits, and then enter digits of the
• Screen displays "__
incorrectly,to
keypad of the transceiver.
and then put out automatically.
•
Displays "ON" for connection. The light on screen will light
when the transceiver
is power ON.
• Displays "OFF" for cutting off. The light on screen will not work.
4. Press any key to end setting,and return to the former display.
ADVAI\ICED OPERATION
ADVANCED ,OPERATION
Reverse Frequency
Transmitting
VOX
and receiving frequency will reverse when using
This transmitting function can communicate
hands-freely. When
the reverse frequency function. It means to transmit with receiv-
using VOX, if microphone's gain is higher than VOX gain,
ing frequency, to receive with transmitting
the transceiver will turn to transmitting mode automatically while
SIDCS function,encoding
frequency. If set CTCS
and decoding signal will also reverse.
return to receiving mode after 2 secends if microphone's gain is
lower than VOX gain. Owing to switching between transmitting
1. Press FUNC for 1 second, the function is ON.
and receiving, we suggest not transmit when setting VOX gain if
• "F" flashes on the screen.
the surrounding is too noisy.
2. Press [3] to set reverse frequency function ON.
1. Press FUNC for 1 second, the function is ON.
• Screen displays "R"
While changing channel/frequency
or scanning, the reverse
• "F" flashes on the screen.
2. Press [1] to enter VOX function.
frequency function is OFF.
3. Repeat the above operation,the
channel will alternate
between ON/OFF reverse frequency.
• "VOX" flashes on the screen,at the same time the top right
corner of the screen displays the current VOX transmitting
gain.
Stepping
3. Rotate [Circumrotate Encoder] to select the VOX transmitting
This function is valid only under the mode of full range of Fre-
gain from "OF" to "3".
quency. Setting setpping would restrict the transceiver
• Turn clockwise to increase VOX transmitting gain while turn
choos-
ing frequency and frequency scanning.
1. Press FUNC for 1 second, the function is ON.
• "[ii " flashes
on the screen.
2. Press [#] to select stepping frequency.
• Screen displays the current stepping frequency.
3. Press LOW to choose stepping frequency in circle.
5
6.25
12.50
25
50
1.000
10.000
means
means
means
means
means
means
means
stepping
stepping
stepping
stepping
stepping
stepping
stepping
is
is
is
is
is
is
is
5KHz
6025KHz
12.50KHz
25KHz
50KHz
1.000KHz
10.000KHz
4. Press other key to end setting,and return to the former display.
counterclockwise
to decrease it.
• Screen displays "OF" when VOX is OFF. "1" means low gain,
"2" means middle gain, "3" means high gain.
4. Press any key to end setting.
• Screen displays "VOX" when select the gain from 1 to 3 and
displays nothing when VOX function is OFF.
CTCSS/DCS
When the channel setting CTCSS/DCS
tion ON only received the corresponding
And, the transceiver
code,the squelch funcCTCSS/DCS
code.
which has the same CTCSS/DCS
code
can receive the signal you transmit.
ADVAI\ICED OPERATIOI\I
ADVAI\ICED OPERATIOI\I
• Program CTCSS/DCS
code in your transceiver
you to ignore (not hear)some unnecessary
can help
callings from
3. Press LOW to select the mode of CTCSS/DCS/OFF
displays "d" before the digits when select DCS code, select
ther transceiver. But that not means your calling is privacy.
Adjust
Receiving
"OFF" to delete.
CTCSS/DCS Decode
• When select DCS code, press DIAL to choose Normal or
1. Press FUNC for 1 second,the function is ON.
Inverted code. Inverted code displays"
• "F" flashes on the screen.
2. Press [A) to adjust receiving CTCSS/DCS
decode.
3. Press LOW to select the mode of CTCSS/DCS/OFF
4. Rotate [Circumrotate Encoder) to select new CTCSS/DCS code.
in circle.
• Displays "q" before the digits when select CTCSS code,
displays "d" before the digits when select DCS code, select
5. Press any key except PTT and MONI to exit and store the
adjusted code.
•
Encoder] to select new CTCSS/DCS
5. Press any key except PTT and MONI to exit and store the
it.
Set CTCSS decode,screen
displays "CT" while receiving.
Set DCS decode, screen displays "DCS" while receiving.
"~"
flashes on the screen.
Transmitting
CTCSS/DCS Encode
1. Press FUNC for 1 second, the function is ON.
• Screen displays the current code.
Screen displays the current slip frequency
status.
ency, while + slip frequency displays nothing.
4. Rotate [Circum rotate Encoder) to increase/decrease
frequency as per the stepping.
on the screen.
2. Press [B) to adjust receiving CTCSS/DCS
•
3. Press SCAN to select +/- slip frequency.
• " 13 " displays before the frequency when it is - slip frequ-
Set OFF,screen displays nothing.
"flashes
•
2. Press [0) to set slip frequency.
adjusted code.
• "~
setting the slip frequency of receiving and transmitting
1. Press FUNC for 1 second, the function is ON.
code.
Adjust
Slip Frequency
This function is valid only under the display mode of Frequency,
code displays nothing.
•
displays "DCS" while transmitting.
Set OFF,screen displays nothing.
• When select DCS code, press DIAL to choose Normal or
- " while Normal
Set CTCSS decode,screen displays "CT" while transmitting.
Set DCS decode,screen
"OFF" to delete.
4. Rotate [Circumrotate
- " while Normal
code displays nothing.
• Screen displays the current code.
Inverted code. Inverted code displays"
in circle.
• Displays "q" before the digits when select CTCSS code,
encode.
• Screen displays slip frequency.
5. Press other key to exit and store the setting.
slip
ADVANCED
Wide/Narrow
ADVANCED
OPERATION
OPERATION
Save Channel
Band
The user can set transceiver
to communicate
in wide/narrow
band freely according to different countries.
This function is valid only under the display mode of Frequency.
Program receiver channel when the transceiver without any exterior equipment.
High volume but big distortion
talk to the transceiver
when the transceiver
with narrow band,and
with wide band
squelch switches
OFF
as the increasing of volume. Low volume but large noise when the
transceiver
with narrow band talk to the transceiver
with wide band.
1. Press FUNC for 1 second to set the function ON.
• "1:iI
"flashes
• Narrow band displays"
band.
.•. " on the screen while wide band
This function is valid only under the display mode of Channel
and Frequency+Channel.
Copy one channel data of the
tranceiver to other channel.
1. Select the needed copy channel.
2. Press FUNC for 1 second to set the function ON.
on the screen.
3. Press [C] to select the saved copy channel.
Screen displays the saved channel.
4. Rotate [Circumrotate
•
2. Press FUNC to set the function ON.
• "1:iI
"flashes
on the screen.
3. Press [C] to select the saved channel.
4. Rotate [Circumrotate
Encoder] to select the saved channel.
• Press any key except PTT to exit but not store .
• The programmed
data under full range of Frequency mode
was stored in the saved channel.
Copy Channel
•
freque-
signal,etc.
5. Press PTT to store and exit.
displays nothing.
Repeat the above operation to choose Wide/Narrow band in circle.
• " I:iI "flashes
ncy,encode/decode
• Screen displays the saved channel.
on the screen.
2. Press [4] to select Wide/Narrow
1. Enter the Frequency mode. Select the frequency,slip
Encoder] to select the channel.
Press any key except [PTT] to exit but not store.
5. Press PTT to store and exit.
• Now the initial channel data is the same with saved channel data
Delete Channel
Delete the programmed
channel data of the transceiver.
1. Press FUNC for 1 second, the function is ON.
• "1:iI " flashes
on the screen.
2. Press [0] to select the deleted channel.
• Screen displays the deleted channel.
3. Rotate [Circumrotate
Encoder] to select the needed delete
channel.
• Press any key except PTT to exit but not store.
4. Press PTT to store and exit.
• This channel data was deleted and never displays besides
you reprogrammed
it.
ADVANCED OPERATION
AUXILIARY OPERATION
Copy Function with Cable
Adopt OXPG-78D(Software)
Copy function with cable is that copying the data from a transceiver to another transceiver
without any exterior equipment.
and OXPG-01
(Program cable) to program.
Time-Out Timer
The purpose of the Time-out timer is to prevent any single
•
This function is ON only when the local distributor set
person from using a channel for an extended period of time. If
you continuously
it for you.
transmit more than limited time, the transceiver
will stop transmitting
1.Power off the main transceiver.
Press [LOW] and [MONI] at
the same time to power on and enter into the copying status.
• Pre-caution
The screen displays "COPY".
3.Connect
too.
•
Interval after TOT: It is interval after limited TOT time you
have set. You cannot transmit during this interval.
the two transceivers
with specified
4.Press [FUNC] of the main transceiver
screen displays
before TOT: The alert tone sounds before the
limited TOT time of the transceiver.
2.Repeat STEP 1 for the target transceiver. The screen displays
"COpy"
and an alert tone will sound. To stop the
tone, release PIT.
"COPY-t",
sending
copying cable.
to begin to copy. The
its data to the target
• TOT resume time: Pre-set TOT resume time,when this
function is on,you can not transmit before TOT resume time.
Only when resume time arrives,then
can transmit again.
transceiver.
S.The two transceivers
display
"COpy"
when finishing
the
[MONI] Key Setting
copying and back to copying stand-by status. If it is needed
MONI key can be set as the following auxiliary functions.
to copy to another target transceiver, the target transceiver
• Squelch OFF(Default
setting)
should enter into copying status first, and then repeat STEP
Press to hear the background
3 and STEP 4. Repeat the operations for multi-transceivers.
normal operation. It is used to get the weak signal which you
6.Restart
the power again when finishing
copying,
machine will back to normal working status.
• When in stand-by
status, displays COPY.
• When in receiving status, displays COPY-r.
• When in transmitting
status, displays COPY-I.
and the
noise,release
to return the
can't get even operated correctly.
• None( No function)
No operation if press.
• Activate Monitor
Press to set CTCSS/DCS
. operation.
OFF, press again to return normal
AUXILIARY
OPERATION
AUXILIARY
• Monitor Momentary
tone sounds,stop
Press to set CTCSS/OCS
OFF, release to return normal
OPERATION
transmitting
and the indicator flashes.Please
change or charge the battery.
operation.
Busy Channel Locked
PTT 10 is used to continue or stop some repeaters and telephone
When this function is ON, it can avoid interfering other stations
system. Press PIT to transmit 10 signal if set begin transmitting.
of the same channel using with yours.When
Release PIT to transmit 10 signal if set stop transmitting.Press
press PIT, if the
channel is being used,your transceiver will alert, and return to
PIT then release it to transmit 10 signal if set begin and stop
the receiving status.
transmitting signal.
Battery Save
Input Information
The battery save function is ON when a signal is not being
You can write your own information(64
received and no operations are being performed(no
in the transceiver.
being pressed,and
no switches are being turned).And
keys are
it can
decrease the amount of power used.While the channel is not
busy and no operation is performed for 5 seconds this function
is ON,and while a signal is received or an operation is performed this function is OFF.
Prompting Voice
You can choose prompting voice ON/OFF. This covers all
prompting voice of the transceiver.
Low Battery Warning
Low battery warning alerts you when the battery needs to be
charged or changed. If low power, when transmitting,
the ind-
icator flashes and it can transmit continuously. If the voltage is
too low, when transmitting,
the indicator flashes and an alert
characters max.) storing
MAIN TECHNOLOGY PARAMETER
Receiving
136-174MHz
Frequency
Range
MAIN TECHNOLOGY PARAMETER
350-390MHz
400-470MHz
-
Sensitivity
Wide band <0.18JN
Narrow band<0.25jlV
etc.
Working Temperature
-20'C -+55'c
Squelch Sensitivity
0.18jlV
Frequency Synthesization
PLL
Intermodulation
Interference
60 dB
Working Voltage
DC7.4V
(2 Rechargeable Li-ion battery)
Audio Power
;;'0.5W
Number of Channels
128 Channels
Receiving Current
..;;200mA
Antenna Configuration
Coil Loaded Antenna
Antenna Impedance
Squelch Standby
Current
20mA
500
Simplex in same channel
Simplex in different channel
Working Way
Grounding
Cathode
Size
1OOmm x 52mm
Weight
230g
Output Power
High power 4W, Low power 1 W
Modulation
FM
Max. Fre. Deviation
Wide..;;
Residual
x 27mm
± 5KHz
Narrow";;
± 2.5KHz
Wave
Radiation
Pre-emphasis
Transmitting
6dB
Current
High";; 1200mA
Low..;;600mA
(12dB SINAD)
Trouble !ihOO1:ing
Trouble phenomenon
Shooting method
Maybe out of battery, please charge
or replace it.Maybe the battery is
No power
Trouble phenomenon
It can receive but not
transmit.
not correctly installed, try again!
Unable to talk with others
in the group
There is disturbance
from
other members.
Check whether the frequency and
Power off often
CTCSS is same as that of other
members,whether other members
are in valid communication distance
of transceiver.
The voice is too low,and
often cut off.
Please modify CTCSS,also signal
order of other members or to work
in other frequency.
The battery life is short ev-
The battery's life is over, replace
en after correctly charged.
with a new one.
Squelch is open when programming
non-professional users please do
not modify parameters causally
Noisy after being
programmed
Some regulated"Da
sounds after being
da da"
frequency range.
programmed
The transceiver
Some errors happen when program
it.Maybe it is out of working
can't scan
Haven't programmed
the channel
into the scan list
There is no sound after using Something wrong with ear bud (send
the earphone for a period.
it to distributor for reparation.)
Communication distance
closer and sensitivity
weaker.
Whether the antenna and its connector is complete,whether set to be
in low power(send
for reparation)
it to distributor
Receiving signal unconsciously,and with big noise.
Shooting method
Check PTT key.
(Send it to distributor for reparation)
Check whether the connector of
battery is complete.
Check whether the MIC jack is block
with something.(Send
for reparation)
it to distributo
Out of communication distance, or
block with high buildings, or using it
in the underground building. (Send
it to distributor for reparation.)
Speaker with "Ka ka"
sound after using for a
period of time.
No sound from speaker
Check whether there is something
on the cover of speaker.(Send it to
distributor for reparation.)
Check whether it is in Min. volume.
(Send it to distributor for reparation.)