1
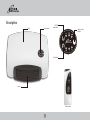
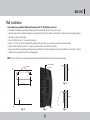
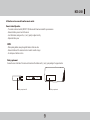
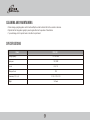
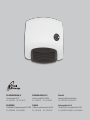
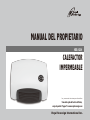
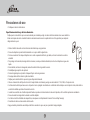
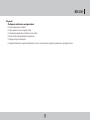
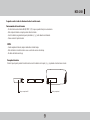
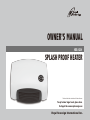
Owner’s Manual
HCE-1201
Splash Proof Heater
Read and retain these instructions for future reference
For any Customer Support needs, please choose
the Support tab on www.royalsovereign.com
Royal Sovereign International Inc.
Splash Proof Heater
Model HCE-1201 Series
INTRODUCTION
Thank you for choosing Royal Sovereign to provide you and your family with all of the “Home Comfort” requirements for your home, apartment,
or office. This Heater can be set-up in just minutes and can be easily moved from room to room. It is a multi-functional room air comfort system
that offers you Heating and Fan Only modes. This manual will provide you with valuable information necessary for the proper care and
maintenance for your new heater. Please take a few moments and read the instructions thoroughly. If properly maintained, your heater will give
you many years of trouble free operation.
CONTENTS
Page
Precautions∙∙∙∙∙∙∙∙∙∙∙∙∙∙∙∙∙∙∙∙∙∙∙∙∙∙∙∙∙∙∙∙∙∙∙∙∙∙∙∙∙∙∙∙∙∙∙∙∙∙∙∙∙∙∙∙∙∙∙∙∙∙∙∙∙∙∙∙∙∙∙∙∙∙∙∙∙∙∙∙∙∙∙∙∙∙∙∙∙∙∙∙∙∙∙∙∙∙∙∙∙∙∙∙∙∙∙∙∙∙∙∙∙∙∙∙∙∙∙∙∙∙∙∙∙∙∙∙∙∙∙∙∙∙∙∙∙∙∙∙∙∙∙∙ 4~5
Description∙∙∙∙∙∙∙∙∙∙∙∙∙∙∙∙∙∙∙∙∙∙∙∙∙∙∙∙∙∙∙∙∙∙∙∙∙∙∙∙∙∙∙∙∙∙∙∙∙∙∙∙∙∙∙∙∙∙∙∙∙∙∙∙∙∙∙∙∙∙∙∙∙∙∙∙∙∙∙∙∙∙∙∙∙∙∙∙∙∙∙∙∙∙∙∙∙∙∙∙∙∙∙∙∙∙∙∙∙∙∙∙∙∙∙∙∙∙∙∙∙∙∙∙∙∙∙∙∙∙∙∙∙∙∙∙∙∙∙∙∙∙∙∙∙∙∙∙∙ 6
Wall Installation∙∙∙∙∙∙∙∙∙∙∙∙∙∙∙∙∙∙∙∙∙∙∙∙∙∙∙∙∙∙∙∙∙∙∙∙∙∙∙∙∙∙∙∙∙∙∙∙∙∙∙∙∙∙∙∙∙∙∙∙∙∙∙∙∙∙∙∙∙∙∙∙∙∙∙∙∙∙∙∙∙∙∙∙∙∙∙∙∙∙∙∙∙∙∙∙∙∙∙∙∙∙∙∙∙∙∙∙∙∙∙∙∙∙∙∙∙∙∙∙∙∙∙∙∙∙∙∙∙∙∙∙∙∙∙∙∙∙∙∙∙∙∙ 7
Operation∙∙∙∙∙∙∙∙∙∙∙∙∙∙∙∙∙∙∙∙∙∙∙∙∙∙∙∙∙∙∙∙∙∙∙∙∙∙∙∙∙∙∙∙∙∙∙∙∙∙∙∙∙∙∙∙∙∙∙∙∙∙∙∙∙∙∙∙∙∙∙∙∙∙∙∙∙∙∙∙∙∙∙∙∙∙∙∙∙∙∙∙∙∙∙∙∙∙∙∙∙∙∙∙∙∙∙∙∙∙∙∙∙∙∙∙∙∙∙∙∙∙∙∙∙∙∙∙∙∙∙∙∙∙∙∙∙∙∙∙∙∙∙∙∙∙∙ 8~9
Cleaning and Maintaining∙∙∙∙∙∙∙∙∙∙∙∙∙∙∙∙∙∙∙∙∙∙∙∙∙∙∙∙∙∙∙∙∙∙∙∙∙∙∙∙∙∙∙∙∙∙∙∙∙∙∙∙∙∙∙∙∙∙∙∙∙∙∙∙∙∙∙∙∙∙∙∙∙∙∙∙∙∙∙∙∙∙∙∙∙∙∙∙∙∙∙∙∙∙∙∙∙∙∙∙∙∙∙∙∙∙∙∙∙∙∙∙∙∙∙∙∙∙∙∙∙∙∙∙∙∙∙ 10
Specification∙∙∙∙∙∙∙∙∙∙∙∙∙∙∙∙∙∙∙∙∙∙∙∙∙∙∙∙∙∙∙∙∙∙∙∙∙∙∙∙∙∙∙∙∙∙∙∙∙∙∙∙∙∙∙∙∙∙∙∙∙∙∙∙∙∙∙∙∙∙∙∙∙∙∙∙∙∙∙∙∙∙∙∙∙∙∙∙∙∙∙∙∙∙∙∙∙∙∙∙∙∙∙∙∙∙∙∙∙∙∙∙∙∙∙∙∙∙∙∙∙∙∙∙∙∙∙∙∙∙∙∙∙∙∙∙∙∙∙∙∙∙∙∙∙ 10
Warranty∙∙∙∙∙∙∙∙∙∙∙∙∙∙∙∙∙∙∙∙∙∙∙∙∙∙∙∙∙∙∙∙∙∙∙∙∙∙∙∙∙∙∙∙∙∙∙∙∙∙∙∙∙∙∙∙∙∙∙∙∙∙∙∙∙∙∙∙∙∙∙∙∙∙∙∙∙∙∙∙∙∙∙∙∙∙∙∙∙∙∙∙∙∙∙∙∙∙∙∙∙∙∙∙∙∙∙∙∙∙∙∙∙∙∙∙∙∙∙∙∙∙∙∙∙∙∙∙∙∙∙∙∙∙∙∙∙∙∙∙∙∙∙∙∙∙∙∙∙∙∙ 11
Exclusions∙∙∙∙∙∙∙∙∙∙∙∙∙∙∙∙∙∙∙∙∙∙∙∙∙∙∙∙∙∙∙∙∙∙∙∙∙∙∙∙∙∙∙∙∙∙∙∙∙∙∙∙∙∙∙∙∙∙∙∙∙∙∙∙∙∙∙∙∙∙∙∙∙∙∙∙∙∙∙∙∙∙∙∙∙∙∙∙∙∙∙∙∙∙∙∙∙∙∙∙∙∙∙∙∙∙∙∙∙∙∙∙∙∙∙∙∙∙∙∙∙∙∙∙∙∙∙∙∙∙∙∙∙∙∙∙∙∙∙∙∙∙∙∙∙∙∙∙ 11
Precautions for use
• Do not block or cover air outlets.
Electrical Specifications and Power Cord
Check to ensure that the electrical service being used is adequate for the model you’ve chosen. The electrical rating of your new heater is defined
on the serial sticker on the unit. Please refer to the rating when checking electrical requirements to ensure they meet the electrical codes of your
location.
• Install the heater according to the installation instructions supplied.
• Do not use this appliance if it malfunctions or is dropped or damaged in any manner.
• Do not use outdoors. Do not place on or near a hot gas, electric burner, a microwave, or a heated oven.
• To protect against fire, electric shock or injury, do not place cord, plug, or appliance in water or other liquid.
• The wrong use conflicting with the safeguards voids the customer of the right for warranty service.
• Do not modify any part of this product.
• Do not insert any objects into the product or block the airflow in any way.
• Do not hang electrical cord over the louvers.
• Ensure that the power supply you use has an appropriate voltage rating.
• Only use a properly installed 3 pin, grounded AC socket that is rated 115V, 60Hz, 15 amps or more.
• If the electrical outlet you intend to use is not adequately grounded or protected by a time delay fuse or circuit breaker, you should have a qualified electrician install the proper
outlet.
• This unit uses a plug with a built-in fuse. Conduct a Power Plug Check before use to confirm normal operation.
• Do not use this unit with any extension cords or adapter plugs.
• If the cord or plug is damaged in any way, please call the Royal Sovereign Service Department • Do not plug this cord into a loose electrical outlet.
• Turn the unit off and unplug, when cleaning the heater or when the heater will not be used for an extended time period.
4
HCE-1201
General Use
• Do not block air outlets with any obstacles.
• Do not insert any objects into the heater.
• Do not pour water on the housing or control panel.
• Do not place heavy items or sit on the heater.
• Never pull or damage the power cord in any way.
• Don’t let your children use the appliance.
• The repair of the appliance must be performed by a professional. Mistakes in repair are dangerous and can bring great hazard to the user.
5
Description
Body
Control panel
ON / OFF
mode button
Remote control
indicator
Timer button
Louvers
Remote control
6
HCE-1201
Wall Installation
Tools needed for easy installation: Philips Head Screwdriver, Drill, 1/8” drill bit, Ruler, and a Level
• For installation of the wall heater you will need the following parts that are included with the heater: 2 anchors and 2 screws
• The location must be situated safely above running water and approximately 1 foot to the left or right of an electrical outlet. For safety reasons, never mount any appliance
directly above or below an electrical outlet.
• Using a 1/8 drill bit, drill a hole 1 ½ ” deep and insert one anchor. • Measure 11 1/8 ” from the center of the installed anchor mark the spot for your 2nd hole. Use a Level to make sure the holes are the same height. • Using the 1/8 drill bit, drill your second hole 1 ½ ” deep on your mark and insert the other anchor in the 2nd hole. • Hang your heater from the screws by lining up the large openings on the bottom of the heater and pushing the heater to the right and then down in one motion. The heater
should now be securely against the wall and is ready to be plugged in. Note: If the top of the heater is not secure against the wall, take the heater off the wall, tighten the screws a few turns and mount it again. hole for fastening
to the wall
2 fixing holes
Screw
Wall
Fig. 4
11 1/8˝
hang up
Floor
Fig. 2
Fig. 3
7
Body base
Fig. 5
Operation
Mode Button
Press the "ON/OFF Mode" button one time to the start fan from the off position. The light above the fan setting will turn red and you will feel a stream of air from the appliance.
When the "ON/OFF Mode" button is pressed a second time, the heater will switch to low heat and the 750w light will turn red.
When the "ON/OFF Mode" button is pressed for a third time, the heater will be on high heat and the 1500W light will turn red.
To turn the heater off, press the "ON/OFF Mode" button a fourth time. The fan light will blink and it will run in auto cool mode for 30 seconds. This will cool the heating coil and turn
the heater off once the time has elapsed.
Note: Each time you press "Mode" button, the unit will make a sound to alert you the mode has been changed.
Using the Timer:
Your heater has three timer settings. you can choose to have your heater turn off automatically after 30 minutes, 1 hour, or 2 hours of use.
Press the "Timer" button to activate this feature while the heater is on. When the Timer button is pressed one time, the light will illuminate above the .5 on the LED display and the
heater will turn off in 30 minutes. Press this button a total of two times for 1 hour and 3 times to set for 2 hours.
0
. 0 5
1
8
2
HCE-1201
All functins can be accessed from the remote control.
Remote Control Operation
- The remote control uses two AAA (IEC RO# 1.5V) batteries which have been included for your convenience.
- Remove the battery cover on back of the remote.
- Insert the batteries, making sure the (+) and (-) polarity is aligned correctly.
- Replace the battery cover.
Notes:
- When replacing batteries, always change both batteries at the same time.
- Remove the batteries if the remote control is not used for a month or longer.
- Do not dispose of batteries in a fire.
Battery replacement
Remove the cover on the back of the remote control and insert the batteries with (+) and (-) poles pointing in the proper direction.
1.5V
1.5V
Battery compartment lid
Battery compartment
9
Cleaning and maintaining
• Before cleaning, unplug the appliance and let it cool down. Wipe the unit with a soft wet cloth. Don’t use solvents or abrasives.
• Wipe the dust from the appliance regularly to prevent negative effects on the operation of the wall heater.
• To prevent damage, don’t scrape the heater or coils with a sharp instrument SPECIFICATIONS
Model
HCE-1201
Voltage/Frequency
AC 115V~60Hz
Input power
750/1500W
Current
6.5A / 13A
Water-proof Level
IP24
Dimension (w) X (h) x (d)
16 1/8 × 9 7/8 ×5 1/8
Weight
5.6 Pounds
10
HCE-1201
WARRANTY
Royal Sovereign warrants each heater to be free from defects in material and workmanship. Our obligation under this warranty is limited to the repair or replacement, free of
charge, when delivered to an authorized Royal Sovereign service center, of any defective part(s) thereof, other than parts damaged in transit. This warranty is in effect to the
original purchaser, for a period of one year from the date of purchase and is not transferable. This warranty shall apply only if the heater is used in accordance with the factory
provided instructions which accompany it.
Exclusions
This warranty excludes and does not cover defects, malfunctions or failures of your Royal Sovereign Heater, caused by repairs by unauthorized persons or service centers,
mishandling, improper installation, modification or unreasonable use including incorrect voltage, acts of God, or failure to provide reasonable and necessary maintenance. This
warranty is in lieu of any and all expressed warranties. In no event shall Royal Sovereign be liable for consequential or incidental damages. This limitation would not apply if you live
in a location that does not permit the exclusion of limitation of incidental or consequential damages. This warranty gives you specific legal rights and you may also have other rights
which vary from state to state.
11
ROYAL SOVEREIGN INTERNATIONAL, INC.
2 Volvo Drive Rockleigh, NJ 07647 USA
TEL : +1) 800-397-1025 FAX : +1) 201-750-1022
RS INTERNATIONAL AUSTRALIA PTY. LTD.
30 Prime Drive, Seven Hills, NSW 2147, AUSTRALIA
TEL : +61) 2-9674-2127
FAX : +61) 2-9674-2027
RS Holland B.V.
Industrieweg 6K, 4104AR, Culemborg, The Netherlands
Tel: +31 (0)345 473 097 Fax: 31 (0)345 519 811
ROYAL SOVEREIGN INC.
1001, World Meridian II, 426-5, Gasan-dong, Geumcheon-gu, Seoul, 153-759, KOREA
TEL : +82)2-2025-8800 FAX : +82)2-2025-8830
RS CANADA INC.
1025 Westport Crescent, Mississauga, Ontario, Canada L5T1E8
TEL : +1) 905-461-1095
FAX : +1) 905-461-1096
Royal Sovereign Mexico, S.A. de C.V.
24 de Abril de 1860 No. 8 Col. Leyes de Reforma Mexico D.F. C.P. 09310
Tel.: +52) 55-5600-0757, 55-5600-7848 Fax: +52) 55-5600-0748
Manual del propietario
HCE-1201
Calefactor
impermeable
Lea y conserve estas instrucciones para referencia futura
Si necesita ayuda de Servicio al Cliente,
escoja la pestaña “Support” en www.royalsovereign.com
Royal Sovereign International Inc.
Calefactor impermeable
Modelo HCE-1201 Serie
INTRODUCCIÓN
Gracias por elegir a Royal Sovereign para proporcionarle a usted y a su familia todos los requisitos de “comodidad hogareña” para su casa,
departamento u oficina. Este calefactor se puede instalar en cuestión de minutos y se puede mover fácilmente de una habitación a otra. Es un
sistema de confort de aire multifuncional para habitaciones que le ofrece los modos de calefacción y sólo ventilador. Este manual le
proporcionará información valiosa, necesaria para el cuidado y el mantenimiento correcto de su nuevo calefactor. Tómese algunos momentos y
lea completamente las instrucciones. Si se le realiza el mantenimiento adecuado, el calefactor funcionará muchos años sin problemas.
Contenido
Página
Precauciones∙∙∙∙∙∙∙∙∙∙∙∙∙∙∙∙∙∙∙∙∙∙∙∙∙∙∙∙∙∙∙∙∙∙∙∙∙∙∙∙∙∙∙∙∙∙∙∙∙∙∙∙∙∙∙∙∙∙∙∙∙∙∙∙∙∙∙∙∙∙∙∙∙∙∙∙∙∙∙∙∙∙∙∙∙∙∙∙∙∙∙∙∙∙∙∙∙∙∙∙∙∙∙∙∙∙∙∙∙∙∙∙∙∙∙∙∙∙∙∙∙∙∙∙∙∙∙∙∙∙∙∙∙∙∙∙∙∙ 16~17
Descripción∙∙∙∙∙∙∙∙∙∙∙∙∙∙∙∙∙∙∙∙∙∙∙∙∙∙∙∙∙∙∙∙∙∙∙∙∙∙∙∙∙∙∙∙∙∙∙∙∙∙∙∙∙∙∙∙∙∙∙∙∙∙∙∙∙∙∙∙∙∙∙∙∙∙∙∙∙∙∙∙∙∙∙∙∙∙∙∙∙∙∙∙∙∙∙∙∙∙∙∙∙∙∙∙∙∙∙∙∙∙∙∙∙∙∙∙∙∙∙∙∙∙∙∙∙∙∙∙∙∙∙∙∙∙∙∙∙∙∙∙∙∙∙∙∙∙∙ 18
Instalación en la pared∙∙∙∙∙∙∙∙∙∙∙∙∙∙∙∙∙∙∙∙∙∙∙∙∙∙∙∙∙∙∙∙∙∙∙∙∙∙∙∙∙∙∙∙∙∙∙∙∙∙∙∙∙∙∙∙∙∙∙∙∙∙∙∙∙∙∙∙∙∙∙∙∙∙∙∙∙∙∙∙∙∙∙∙∙∙∙∙∙∙∙∙∙∙∙∙∙∙∙∙∙∙∙∙∙∙∙∙∙∙∙∙∙∙∙∙∙∙∙∙∙∙∙∙∙∙∙∙∙∙ 19
Funcionamiento∙∙∙∙∙∙∙∙∙∙∙∙∙∙∙∙∙∙∙∙∙∙∙∙∙∙∙∙∙∙∙∙∙∙∙∙∙∙∙∙∙∙∙∙∙∙∙∙∙∙∙∙∙∙∙∙∙∙∙∙∙∙∙∙∙∙∙∙∙∙∙∙∙∙∙∙∙∙∙∙∙∙∙∙∙∙∙∙∙∙∙∙∙∙∙∙∙∙∙∙∙∙∙∙∙∙∙∙∙∙∙∙∙∙∙∙∙∙∙∙∙∙∙∙∙∙∙∙∙∙∙∙∙∙ 20~21
Limpieza y mantenimiento∙∙∙∙∙∙∙∙∙∙∙∙∙∙∙∙∙∙∙∙∙∙∙∙∙∙∙∙∙∙∙∙∙∙∙∙∙∙∙∙∙∙∙∙∙∙∙∙∙∙∙∙∙∙∙∙∙∙∙∙∙∙∙∙∙∙∙∙∙∙∙∙∙∙∙∙∙∙∙∙∙∙∙∙∙∙∙∙∙∙∙∙∙∙∙∙∙∙∙∙∙∙∙∙∙∙∙∙∙∙∙∙∙∙∙∙∙∙∙∙∙∙∙∙∙∙ 22
Especificaciones∙∙∙∙∙∙∙∙∙∙∙∙∙∙∙∙∙∙∙∙∙∙∙∙∙∙∙∙∙∙∙∙∙∙∙∙∙∙∙∙∙∙∙∙∙∙∙∙∙∙∙∙∙∙∙∙∙∙∙∙∙∙∙∙∙∙∙∙∙∙∙∙∙∙∙∙∙∙∙∙∙∙∙∙∙∙∙∙∙∙∙∙∙∙∙∙∙∙∙∙∙∙∙∙∙∙∙∙∙∙∙∙∙∙∙∙∙∙∙∙∙∙∙∙∙∙∙∙∙∙∙∙∙∙∙∙∙∙∙∙ 22
Garantía∙∙∙∙∙∙∙∙∙∙∙∙∙∙∙∙∙∙∙∙∙∙∙∙∙∙∙∙∙∙∙∙∙∙∙∙∙∙∙∙∙∙∙∙∙∙∙∙∙∙∙∙∙∙∙∙∙∙∙∙∙∙∙∙∙∙∙∙∙∙∙∙∙∙∙∙∙∙∙∙∙∙∙∙∙∙∙∙∙∙∙∙∙∙∙∙∙∙∙∙∙∙∙∙∙∙∙∙∙∙∙∙∙∙∙∙∙∙∙∙∙∙∙∙∙∙∙∙∙∙∙∙∙∙∙∙∙∙∙∙∙∙∙∙∙∙∙∙∙∙∙ 23
Exclusiones∙∙∙∙∙∙∙∙∙∙∙∙∙∙∙∙∙∙∙∙∙∙∙∙∙∙∙∙∙∙∙∙∙∙∙∙∙∙∙∙∙∙∙∙∙∙∙∙∙∙∙∙∙∙∙∙∙∙∙∙∙∙∙∙∙∙∙∙∙∙∙∙∙∙∙∙∙∙∙∙∙∙∙∙∙∙∙∙∙∙∙∙∙∙∙∙∙∙∙∙∙∙∙∙∙∙∙∙∙∙∙∙∙∙∙∙∙∙∙∙∙∙∙∙∙∙∙∙∙∙∙∙∙∙∙∙∙∙∙∙∙∙∙∙∙∙∙ 23
Precauciones de uso
• No bloquee ni cubra las salidas de aire.
Especificaciones eléctricas y cable de alimentación
Verifique que el servicio eléctrico que se usa sea el adecuado para el modelo que eligió. Los valores eléctricos nominales de su nuevo calefactor se
definen en la etiqueta de serie de la unidad. Consulte el valor nominal cuando revise los requisitos eléctricos a fin de garantizar que cumplan los
códigos locales de su país.
• Instale el calefactor de acuerdo con las instrucciones de instalación que se proporcionan.
• No use este dispositivo si presenta mal funcionamiento o si se cayó o dañó de alguna forma.
• No lo use en exteriores. No coloque el dispositivo cerca o sobre un quemador eléctrico de gas caliente, un horno de microondas o un horno
encendido.
• Para proteger contra incendios, descargas eléctricas o lesiones, no coloque el cable de alimentación, el enchufe o el dispositivo en agua u otro
líquido.
• El uso indebido, contrario a las salvaguardas, anula el derecho del cliente a la garantía de servicio.
• No modifique ninguna parte de este producto.
• No inserte ningún objeto en el producto ni bloquee el flujo de aire de ninguna manera.
• No cuelgue cables eléctricos sobre las rejillas de ventilación.
• Verifique que el suministro eléctrico que usa tenga un voltaje nominal adecuado.
• Sólo use un tomacorriente de CA puesto a tierra de 3 clavijas instalado correctamente, que tenga un valor nominal de 115 V, 60 Hz, de 15 amperios o más.
• Si el tomacorriente eléctrico que desea usar no está puesto a tierra o protegido correctamente con un fusible de retardo de tiempo o un interruptor de circuito, debe solicitar a
un electricista calificado que instale el tomacorriente correcto.
• La unidad usa un enchufe con un fusible incorporado. Realice una prueba en el tomacorriente antes de usar el dispositivo, a fin de confirmar que funciona normalmente.
• No use esta unidad con ningún cable de extensión o enchufe adaptador.
• Si el cable o el enchufe está dañado de cualquier forma, comuníquese con el Departamento de Servicio Técnico de Royal Sovereign
• No enchufe este cable en un tomacorriente eléctrico suelto.
• Apague la unidad y desconéctela cuando limpie el calefactor o cuando no lo vaya a usar por un período de tiempo prolongado.
16
HCE-1201
Uso general
• No bloquee las salidas de aire con ningún obstáculo.
• No inserte ningún objeto en el calefactor.
• No vierta agua en la carcasa o en el panel de control.
• No coloque objetos pesados sobre el calefactor ni se siente sobre él.
• Nunca tire ni dañe el cable de alimentación de ninguna forma.
• No deje que sus hijos usen el dispositivo.
• Un profesional debe realizar las reparaciones del dispositivo. Los errores en las reparaciones son peligrosos y pueden poner en gran peligro al usuario.
17
Descripción
Body
Control panel
ON / OFF
mode button
Remote control
indicator
Timer button
Louvers
Remote control
18
HCE-1201
Instalación en la pared
Herramientas necesarias para una instalación fácil: destornillador Phillips, taladro, broca de taladro de 1/8’’ (4,57 cm), regla y nivel
• Para instalar el calefactor de pared necesitará las siguientes piezas que se incluyen con el calefactor: 2 tarugos y 2 tornillos
• El dispositivo debe estar ubicado de forma segura por encima del agua de la llave y aproximadamente 1 pie (30,48 cm) a la izquierda o derecha de un tomacorriente eléctrico. Por
razones de seguridad, nunca monte ningún dispositivo directamente encima o debajo de un tomacorriente eléctrico.
• Con una broca de taladro de 1/8, taladre un orificio de 3,81 cm (1 ½ pulgada) de profundidad e inserte un tarugo. • Mida 11 1/8 pulgadas (28,26 cm) desde el centro del tarugo instalado y marque el lugar para hacer el 2º orificio. Use un nivel para verificar que los orificios estén a la misma altura. • Con una broca de taladro de 1/8’’, taladre el segundo orificio a 1 ½ pulgada (3,81 cm) de profundidad en la marca e inserte el otro tarugo. • Utilice el destornillador para insertar los tornillos de montaje en cada tarugo y deje la cabeza de éstos a ¼ de pulgada (0,64 cm) de la pared. • Cuelgue el calefactor en los tornillos, alineando las aberturas grandes de la parte inferior del calefactor y empujándolo hacia la derecha y luego hacia abajo en un solo movimiento. Ahora
el calefactor está fijo contra la pared y está listo para conectarlo.
NotA: la parte superior del calefactor no está fija contra la pared, retire el calefactor de la pared, apriete los tornillos un par de vueltas y móntelo nuevamente. hole for fastening
to the wall
2 fixing holes
Screw
Wall
Fig. 4
11 1/8˝
hang up
Floor
Fig. 2
Fig. 3
19
Body base
Fig. 5
Operación
Botón Mode (modo)
Presione una vez el botón ON/OFF Mode (Modo encendido/apagado) para encender el ventilador. La luz sobre el ajuste del ventilador estará de color rojo y usted sentirá una
corriente de aire que sale del dispositivo.
Cuando presione el botón ON/OFF Mode una segunda vez, el calefactor cambiará a una temperatura baja de calor y la luz de 750 W se encenderá de color rojo.
Cuando presione el botón ON/OFF Mode una tercera vez, el calefactor estará a una temperatura alta de calor y la luz de 1500 W se encenderá de color rojo.
Para apagar el calefactor, presione el botón ON/OFF Mode una cuarta vez. La luz del ventilador parpadeará y funcionará en modo de enfriamiento automático durante 30
segundos. Esto enfriará la bobina del calefactor y lo apagará luego de que termine.
Nota: Cada vez que presione el botón Mode, la unidad emitirá un sonido para avisarle que se cambió el modo.
Uso del temporizador:
El calefactor tiene tres ajustes de temporizador. Puede programarlo para que se apague automáticamente después de 30 minutos, 1 hora o 2 horas de uso.
Presione el botón “Timer” (Temporizador) para activar esta característica mientras esté encendido el calefactor. Cuando presione el botón Timer una vez, la luz se encenderá por
sobre los 0,5 en la pantalla LED y el calefactor se apagará en 30 minutos. Presione dos veces este botón para ajustarlo a 1 hora y 3 veces para 2 horas.
0
. 0 5
1
8
20
2
HCE-1201
Se puede acceder a todas las funciones desde el control remoto.
Funcionamiento del control remoto
- El control remoto usa dos baterías AAA (IEC RO# 1,5 V), las que se pueden incluir para su conveniencia.
- Retire la tapa de la batería en la parte posterior del control remoto.
- Inserte las baterías, asegurándose de que las polaridades (+) y (-) estén alineadas correctamente.
- Vuelva a colocar la tapa de la batería.
Notas:
- Cuando reemplace las baterías, siempre cambie ambas al mismo tiempo.
- Retire las baterías si el control remoto no se va a usar durante un mes o más tiempo.
- No elimine las baterías en el fuego.
Reemplazo de baterías
Retire la tapa en la parte posterior del control remoto e inserte las baterías con los polos (+) y (-) apuntando en las direcciones correctas.
1.5V
1.5V
Battery compartment lid
Battery compartment
9
21
Limpieza y mantenimiento
• Antes de limpiar, desconecte el dispositivo y deje que se enfríe. Limpie la unidad con un paño suave y húmedo. No use solventes ni abrasivos.
• Limpie el polvo del dispositivo regularmente para evitar efectos negativos en el funcionamiento del calefactor de pared.
• Para evitar daños, no raye el calefactor ni las bobinas con un instrumento afilado
ESPECIFICACIONES
Modelo
HCE-1201
Voltaje/Frecuencia
AC 115V~60Hz
Potencia de entrada
750/1500W
Corriente
6.5A / 13A
Nivel de impermeabilidad
Dimensiones (a) X (a) x (p)
IP24
16 1/8 × 9 7/8 ×5 1/8 pulgadas (40,96 × 25,08 × 13,02 cm)
Peso
5,6 libras (2,09 kg)
22
HCE-1201
GARANTÍA
Royal Sovereign garantiza que los calefactores no presentan defectos en el material ni en la mano de obra. Nuestra obligación, según lo que se establece en esta garantía, se
limita a la reparación o al reemplazo, sin cargo, de cualquier pieza defectuosa que no sea una pieza que se dañe durante su traslado, cuando se entregue a un centro de servicios
autorizado de Royal Sovereign. Esta garantía tiene vigencia para el comprador original durante un período de un año a partir de la fecha de compra y no es transferible. Esta
garantía se aplicará sólo si el calefactor se usa de acuerdo con las instrucciones que acompañan la unidad y que proporciona el fabricante.
Exclusiones
Esta garantía excluye y no cubre defectos, mal funcionamiento o fallas de su calefactor Royal Sovereign causados por reparaciones realizadas por personas o centros de servicio
no autorizados, uso indebido, instalación inadecuada, modificación o uso irrazonable, lo que incluye el voltaje incorrecto, daños fortuitos o falta de un mantenimiento necesario y
razonable. Esta garantía reemplaza cualquier garantía expresa. En ningún caso, Royal Sovereign será responsable de cualquier daño incidental o indirecto. Esta limitación no se
aplica si usted vive en un lugar que no permite la exclusión o limitación de daños incidentales o indirectos. Esta garantía le otorga derechos legales específicos y usted también
puede gozar de otros derechos que varían según el estado.
23
ROYAL SOVEREIGN INTERNATIONAL, INC.
2 Volvo Drive Rockleigh, NJ 07647 USA
TEL : +1) 800-397-1025 FAX : +1) 201-750-1022
RS INTERNATIONAL AUSTRALIA PTY. LTD.
30 Prime Drive, Seven Hills, NSW 2147, AUSTRALIA
TEL : +61) 2-9674-2127
FAX : +61) 2-9674-2027
RS Holland B.V.
Industrieweg 6K, 4104AR, Culemborg, The Netherlands
Tel: +31 (0)345 473 097 Fax: 31 (0)345 519 811
ROYAL SOVEREIGN INC.
1001, World Meridian II, 426-5, Gasan-dong, Geumcheon-gu, Seoul, 153-759, KOREA
TEL : +82)2-2025-8800 FAX : +82)2-2025-8830
RS CANADA INC.
1025 Westport Crescent, Mississauga, Ontario, Canada L5T1E8
TEL : +1) 905-461-1095
FAX : +1) 905-461-1096
Royal Sovereign Mexico, S.A. de C.V.
24 de Abril de 1860 No. 8 Col. Leyes de Reforma Mexico D.F. C.P. 09310
Tel.: +52) 55-5600-0757, 55-5600-7848 Fax: +52) 55-5600-0748