1
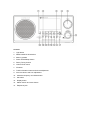
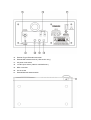
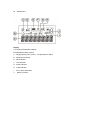
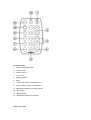
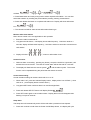
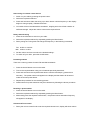
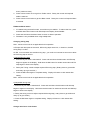
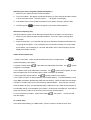
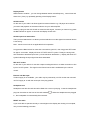
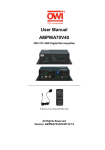
WR-2 Instruction manual
Important Safety Instructions
1. Read these instructions .
2. Keep these instructions .
3. Heed all warnings .
4. Follow all instructions .
5. Do not use this apparatus near water .
6. Clean only with dry cloth .
7. Do not block any ventilation openings . Install in accordance with the manufacturer s
instruction .
8. Do not install near any heat sources such as radiators , heat registers , stoves, or other
apparatus ( including amplifiers ) that produce heat .
9. Do not defect the safety purpose of the polarized or grounding-type plug . A polarized plug
has two blades with one wider than the other . A grounding type plug has two blades and a
third grounding prong . The wide blade or the third prong are provided for your safety . If
the provided plus does not fit into your outlet , consult an electrician for replacement of the
obsolete outlet .
10. Protect the power cord from being walked on or pinches particularly at plugs ,
convenience receptacles , and the point where they exit from the apparatus .
11. Only use attachments/accessories specified by the manufacturer .
12. Use only with the cart , stand , tripod , bracket , or table specified by the manufacturer , or
sold with the apparatus . When a cart is used , use caution when moving the
cart/apparatus combination to avoid injury from tip-over .
13. Unplug this apparatus during lightning storms or when unused for long period of time .
14. Refer all servicing to qualified service person . Servicing is required when the apparatus
has been damaged in anyway , such as power-supply cord or plug is damaged , liquid has
been spoiled or objects have been fallen into the apparatus , the apparatus has been
exposed to rain or moisture , does not operate normally or has been dropped .
15. To reduce the Risk of Fire or Electric Shock , do not expose this appliance to rain or
moisture .
16. The Shock Hazard Marking and Associated Graphical Symbol is provided on the rear
panel of unit .
17. Apparatus shall not be exposed to dripping or splashing and no objects filled with liquids ,
shall not be placed on the apparatus .
Controls
1. Light button
2. Radio band/AUX IN selection
3. Memory presets
4. Power On/Off/Sleep button
5. Rotary Tuning Control
6. Volume/Tone control
7. IR sensor
8. Traffic information button and minute adjustment
9. Auto time button and hour adjustment
10. Alterative frequency and Select button
11. Set button
12. Display button
13. Station search and mono button
14. Earphones jack
15. External F-type FM antenna terminal
16. External AM antenna terminal ( USA version only )
17. AC power cord socket
18. 12V DC input socket ( ideal for vehicles/boats )
19. REC out socket
20. Aux in socket
21. External/Internal antenna switch
22. Reset button
Display
A. Frequency/Time/Station display
B. Radio/Buzzer alarm symbol
C. Daylight Saving Time ( DST ) , not applicable for WR-2
D. Sleep/Snooze status
E. RDS indicator
F. Time indicator
G. Stereo indicator
H. Traffic indicator
I.
J.
Aux In level attenuation
Memory presets
Remote Control
1. Power on/off/Sleep button
2. Tuning control
3. Volume control
4. Tone control
5. Memory presets
6. Mute
7. Traffic button and minute adjustment
8. Auto time button and hour adjustment
9. Alternative Frequency and Select button
10. Set button
11. Display button
12. Radio band and Aux in selection
Power your radio
AC operation
Before you plug the AC cord into the radio , be sure the AC voltage is correct . Insert the plug
on the end of the supplied power cord into the AC power socket on the back of the radio .
DC operation
For outdoors use , you can power the radio by using 12V DC input socket from a DC power
supply ( example , from the power supply of vehicles or boats ) . An AC power adaptor with 1
Ampere and center positive in polarity can also power the radio in house .
Operating your radio
initialize radio setting and clock setting
1. The radio display will scroll RDS Setting when the radio is connected to the mains
supply or DC power supply .
2. The RDS (Radio Data System) setting requires approximate one minute to search
required RDS data from radio stations for easier data read out .
3. You can skip the RDS setting by pressing and releasing the power button once
( recommended for non-RDS broadcasting area ) . Display will show -- -- :-- -- for clock
setting .
Clock Setting
1. When radio power is off , long press SET button until display flashes AM 12:00 or 0:00
depending on the sales areas .
2. Press and release Hour and Minute button or rotary tuning control button to set the
required clock time .
3. Press SET button again to complete clock setting . Display stops flashing .
Note : when radio power is on , press Display button to clock mode and follow same
procedures as above for clock setting .
4. Same procedures can be done via supplied remote control unit .
Auto clock set
The RDS equips with auto clock set function , turn on the radio and search for radio stations
with RDS transmitting service , within one minute the clock will show correct time along with
RDS symbol indicating the clock time is RDS time from radio station with RDS service .
Note : RDS service is mainly available in Europe ( including UK ) and part of Northern America
plus some of Asian countries only .
Alarm setting
Note : Alarm setting can be done only when time setting is completed .
Alarm can be operated when radio is on or off . Setting via remote control is the same .
Wake to buzzer alarm
A beep tone will sound when using the buzzer alarm . The alarm beep will increase in volume
every 15 seconds for one minute followed by one minute silence before repeating the cycle .
The buzzer alarm will sound for one hour unless turned off by pressing the On/Off button .
Pressing the On/Off button whilst the alarm is sounding will cancel the alarm for 24 hours .
1. When the radio is off , press and release Display button , LCD display will flash alarm icon
with a beep and previous alarm time .
Note : when the radio is on , press and release Display button until display flashes alarm status
.
2. During the flash , long press SET button until hour and minute digits also alarm mode flash
in the display .
3. Press Hour and Minute button separately or rotary tuning control to set required alarm time .
4. Press and release Select button to select buzzer alarm , display will flash
.
5.. Press and release SET button to complete alarm time setting .
Display will be back to real time after alarm setting with alarm buzzer icon on the display
indicating buzzer alarm is set .
You can monitor the alarm time by pressing Display button .
Wake to radio alarm
When the radio alarm is selected , the radio will turn on and play the selected radio station .
The radio alarm will sound for one hour unless turned off by pressing the On/Off button .
Pressing the on/off button whilst the alarm is sounding will cancel the alarm for 24 hours .
1. When radio is off , press and release Display button will beep and flash alarm icon
and previous alarm time .
Note : when the radio is on , press and release Display button until display flashes alarm
status .
2. During the flash , long press SET button until hour and minute digits also alarm model flash
in the display .
3. Press Hour and Minute button separately or rotary tuning control to set required alarm time .
4. Press and release Select button to select radio alarm or radio alarm + buzzer alarm , display
will flash
or
.
5. Press Band button and rotary tuning knob to select required radio station . You can also
select alarm station by recalling the preset stations pressing memory presets button .
6. Press and release Set button to complete radio alarm set . Display will show radio alarm
icon
.
7. The volume level will be same as last radio station listening to .
Monitor radio alarm station
Note: remote control unit is not applicable for this operation
1. Ensure the radio is switched off .
2. Long press the M1 button , until display shows radio frequency . Hold down another 3
seconds, display will flash radio frequency , hold down another 3 seconds to cancel the set
radio station .
3. Display will show
, when no radio station is set .
Snooze function
1. Whilst an alarm is sounding , pressing any button ( except the On/Off or Light button ) will
activate the snooze function . The radio or buzzer alarm will be silenced for 5 minutes .
2. The display will flash both the snooze symbol
and the alarm symbol . The snooze
function can be repeated during the period that the alarms are active .
Cancel alarm setting
Cancel the alarm setting can be done both radio is on or off .
1. When radio is off , press and release Display button , display alarm icon will flash . ( when
radio is on , press Display button to alarm status )
2. Long press SET button until both alarm icon and time digits flash .
3. Press and release SELECT button until display flashes
.
4. Press SET button again to cancel alarm status . Display alarm icon will disappear after
flashing a couple of seconds .
Sleep timer
The sleep timer will automatically switch off the radio after a preset time has elapsed .
1. Press and continue to hold down the Power On/Off/Sleep button , the display will cycle
through the available sleep times in the order 60-45-30-15-120-90-60 . Release the button
when the required sleep time appears in the display and the radio will play the last station
selected .
2. To cancel the sleep function , press On/Off button , the
symbol will disappear .
Display backlight
To turn on display illumination , press and release Light button . By pressing and releasing
Light button , you may also adjust display brightness or turn off the illumination completely .
Operating your radio
Operating your radio FM
Connect the antenna
The radio comes with Built-in AM/FM antenna . To improve FM reception , insert the end of the
supplied FM wire antenna into the F-type antenna terminal and adjust the wire for best
reception . A 75 ohm coaxial cable of outdoor antenna may also be attached to the terminal .
Be sure to switch external/internal antenna switch to External position while using the supplied
wire antenna or connect the outdoor antenna . In some European countries , you may have to
connect the supplied antenna terminal adaptor to connect with the outdoor antenna .
Operating your radio AM
Connecting the antenna
The radio comes with built-in AM antenna which should be enough for normal listening . To
improve the AM reception , you may connect the outdoor AM antenna with AM antenna
terminal ( USA version only ) .
Tuning your radio
Your radio is equipped with three tuning methods
Scan tuning , Rotary manual tuning and
Memory preset tuning . When switch on your radio will display the waveband and frequency in
use .
Scan tuning
1. Press the power On/Off button .
2. Select the required waveband by repeatedly pressing the band button .
3. Press and release Scan button , your radio will scan the selected waveband and stop
automatically when it finds a station of sufficient strength .
4. Set volume control and tone control to the desired setting ( described later on volume and
tone control )
5. To switch off your radio , press Power On/Off button .
Scan tuning via remote control device
1. Switch on your radio by pressing the power button .
2. Select the required waveband .
3. Press and hold down either the tuning up or down button until the frequency in the display
begins to change rapidly . Release the button .
4. Your radio will scan the selected the waveband , stopping each time it finds a station of
sufficient strength . Adjust the volume control to the required level .
Rotary manual tuning
1. Press the on/off button to switch on your radio .
2. Select the required waveband by repeatedly pressing the Band button .
3. Rotary tuning the Tuning knob will change the frequency in the following increments ,
FM 50 kHz or 100 kHz
MW 9 kHz or 10 kHz
4. Set the volume and tone controls to the desired settings .
5. To switch off your radio , press the On/Off button .
Presetting stations
There are 5 memory presets for each FM and MW wavebands .
1. Press the On/Off button to turn on the radio .
2. Tune to the required station using one of methods previously described .
3. Press and hold down the required Preset button until the radio beeps ( greater than 2
seconds ) . The preset number will appear in the display and the station will be stored
under the chosen preset button .
4. Repeat this procedure for the remaining presets .
5. Stations stored in preset memories may be overwritten by following the above procedure .
Recalling a preset station
1. Press the On/Off button to turn on the radio .
2. Select the required waveband by repeatedly pressing the Band button .
3. Momentarily press the required Preset button , the preset number and station frequency
will appear in the display .
Volume and Tone control
1. Rotary the volume control knob to set the required volume level , display will show volume
level ( maximum to 60 )
2. Press Volume control once to get into Treble control . Rotary the control until required
treble is reached .
3. Press Volume control twice to get into Bass control . Rotary the control until required bass
is reached .
FM Stereo/Mono button
1. If a station being received is weak , some hiss may be audible . To reduce the hiss , press
and hold down Mono button until radio beeps and display shows MONO .
2. Press and hold down the Mono button to return to Stereo operation .
3. FM stereo is only available when using headphones .
Changing tuning step
Note : remote control unit is not applicable for this operation .
In Europe and other parts of the world , MW tuning steps are 9 kHz , in America , the MW
tuning step is 10 kHz .
On FM , most countries use 100 kHz tuning step , your radio can however be set so as to allow
an FM tuning step of 50 kHz .
1) Adjust FM tuning step
1. Ensure that your radio is switched off . Press and hold down the M5 button until FM step
begins to appear in the display . Hold down the M5 button for another 8 seconds until FM
step begins to flash in the display .
2. Rotary the Tuning control to adjust required FM tuning step ( Rotary down to get 50 kHz
and rotary up to get 100 kHz ) .
3. Press the M5 button again to complete setting . Display will return to clock status after
setting .
Note : remote control unit is not applicable for this operation .
2) Adjust MW tuning step
1. Ensure that your radio is switched off . Press and hold down the M4 button until AM step
begins to appear in the display . Hold down the M4 button for another 8 seconds until AM step
begins to flash in the display .
2. Rotary the tuning control to adjust required AM tuning step ( rotary down to get 9 kHz and
rotary up to get 10 kHz ) .
3. Press the M4 button again to complete setting . Display will return to clock status after
setting .
Change 12/24 hour clock format
1. Ensure that your radio is switched off . Press and hold down the M3 button until current
clock format begins to appear in the display . Hold down the M3 button for another 8
seconds until clock format begins to flash in the display .
2. Rotary the tuning control to adjust required clock format ( rotary up to get 24 hours format
and rotary down to get 12 hours format ) .
3. Press the M4 button again to complete setting . Display will return to clock status after
setting .
Note : remote control is not applicable for this operation .
Radio Data System ( RDS )
The Radio Data System ( RDS ) is a system in which inaudible digital information is
transmitted in addition to the normal FM radio program . RDS offers several useful features ,
the followings are available on your radio .
Program Service (PS) name
The Program Service name is a text usually consisting of not more than eight alphanumeric
characters . It indicates information about the program being broadcast . A station name or an
abbreviation is shown in the display instead of the tuned frequency ( Example : BBC R4 ) .
Enhanced Other Network (EON)
Additional information about other programs within the same network is transmitted when your
broadcasting station is using an Enhanced Other Network . You will hear traffic flashes of other
programs within the network automatically if the Traffic Announcement function is switched
on .
Traffic Information System
The Traffic Program identification (TP) indicates which RDS stations provide Traffic
information . The Traffic Announcement identification (TA) indicates Traffic information is being
broadcast . When TA is received , the
symbol will flash in the display .
Clock Time (CT) automatic adjustment
The Clock Time information transmitted from the broadcasting station can be used for setting
and synchronizing the clock of your radio automatically . The Auto-Time function can be
enabled or disabled by the user .
Alternative Frequencies (AF)
This feature provides a list of Alternative Frequencies for the station being received . You can
switch to those frequencies directly if desired .
Operating your radio using RDS ( Radio Data System )
1. Switch on your radio and select the FM waveband .
2. Tune into a station , the display will indicate frequency for a few seconds and then change
to show the station name . The RDS symbol
will appear in the display .
3. If the station does not carry RDS information only the station frequency will be shown .
4. The RDS symbol
will flash if the signal is too weak for RDS operation .
Alternative Frequency (AF)
The RDS system provides a list of alternative frequencies for the station you are tuned to .
1. Switch on your radio and select the FM waveband . Tune into a station carrying RDS
information .
2. Press the AF button , your radio will scan the list of alternative frequencies and select the
one giving best reception . If AF information has not yet been received or is not provided
by the station you are listening to , the radio will remain at the current frequency and the
display will indicate NO AF .
Traffic Announcement (TA)
1. Switch on the radio , select the FM waveband and tune to an RDS station . The
symbol will appear in the display .
2. Press the Traffic button
will appear in the display .
, if the station provides traffic information , the
symbol
3. If the station does not provide traffic information , the
symbol will not appear and the
radio will display NO TP/TA indicating that no traffic information is available .
4. During the traffic announcement , the
symbol will flash in the display .
5. If the radio is tuned to a national stations such as BBC Radio 4 , it will automatically re-tune
to any BBC local station broadcasting traffic announcements . When the traffic announcement
is finished , the radio will re-tune to the previously selected station . There may be occasions
when the station to which you are listening tells the radio re-tune to a traffic announcement on
a local station that is not receivable at your location . Under these circumstances , there will be
some hiss before the radio re-tunes back to the previously selected station .
6. To turn off traffic information , press Traffic button
from the display .
, the symbol
will be removed
CT ( Clock Time )
In the status while listening to a RDS station , press CT button to renew the clock time .
Display button
Whilst tuned to a station , you can change between station name/frequency , normal time and
alarm time ( if set ) by repeatedly pressing of the Display button .
AUX IN socket
On the rear of your radio is to allow signal from external device e.g. CD player to be fed into
your radio and playback of the external device via your radio amplifier .
Inserting a plug into the AUX IN will not mute the radio signal , however you have to long press
the Band button for approx. 2 seconds until display shows AUX .
AUX IN input level attenuation
The input level attenuation is to allow input level reduction once the signal from external device
is too strong .
Note : remote control unit is not applicable for this operation .
Long press the Band switch for more than 2 seconds to get AUX , then long press SET button
for approx. 2 seconds , display will show ATT OFF and ATT symbol . Rotary the tuning knob
anti-clockwise to attenuate input level ( 3 is the maximum attenuation ) . Display will show ATT
symbol indicating the input signal has been attenuated .
REC OUT socket
On the rear of your radio is for use with a tape recording/mini disc or to allow connection to line
input of a Hi-Fi system . The signal on the Record out socket is unaffected by the volume
control .
External 12V DC Input
If mains supply is not available , your radio may be powered by 12V DC via the rear mounted
12V DC supply at 1A with the center pin of the plug positive .
Headphone use
Headphone use with this radio should be fitted with a 3.5 mm jack plug . Insert the headphones
plug into the socket on the front of the radio marked
. When the headphones are plugged
in , the loudspeaker is automatically disconnected .
RESET the radio
If your radio fails to operate correctly or some digits on the display are missing or incomplete ,
carry out the following procedure .
1. Switch off the radio .
2. With the aid of a suitable implement ( the end of a paper clip ) , press the RESET button
located on the underside of your radio for at least 2 seconds , this will reset the
microprocessor , clock time and clear all stations stored in the preset memory .
Mute the radio
Press MUTE button on the remote control to mute the radio . Press MUTE button again or
power on/off or volume control to release the muting .
Power failure
The clock will continue to run 6 minutes during power failure while preset stations can last for
approx. an hour . After that , you should reset the radio and preset stations .
Specifications
Frequency Coverage
FM 87.50
108 MHz
AM 520 -1710 kHz ( 10 kHz version ) or
MW 522
1629 kHz ( 9 kHz version )
Powered : AC 120V/60Hz/24W or AC 230V/50Hz 24W
Internal Antenna system
AM built-in ferrite antenna
FM built-in wire antenna
External antenna terminal
AM antenna terminal ( USA version only )
FM F-type antenna terminal
Output power : 7 W 10% T.H.D.@100 Hz
Headphones socket
3.5 mm diameter stereo jack monaural output
Output : 5 mW + 5 mW
Aux In socket :
3.5 mm diameter stereo jack .
Input sensitivity : In 160 mV , Output 7W @ 100 Hz
Input impedance : 47 Kohm
REC out : Output impedance : 2.2 Kohm
DC IN : 12V/1A center pin positive ( operational voltage 9-14V)
Accessories :
FM F-terminal wire antenna
AC power cord
F-PAL terminal adaptor ( European version only )
Dimension : W x H x D in mm : 240 x 115 x 183 .
Weight : 2.6 kgs .