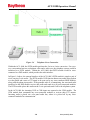
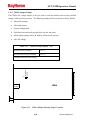
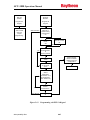
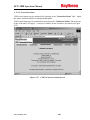
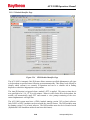
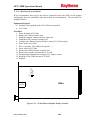
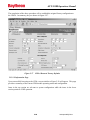
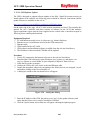
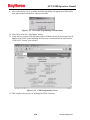
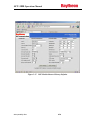
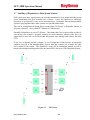
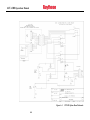
1
INTEROPERABILITY NOW Installation and Operation Manual ACU-1000 Intelligent Interconnect System Designed and Manufactured by: Raytheon Company 5800 Departure Drive Raleigh, NC 27616 Email: [email protected] 24/7 Technical Support For support, call 1-800-498-3137 P/N 5961-200200 Revision 4.4 July, 2010 ACU-1000 Operations Manual FEDERAL COMMUNICATIONS COMMISSION (FCC) COMPLIANCE NOTICE: RADIO FREQUENCY INTERFERENCE NOTICE This equipment has been tested and found to comply with the limits for a Class A digital device, pursuant to Part 15 of the FCC Rules. These limits are designed to provide reasonable protection against harmful interference when the equipment is operated in a commercial environment. This equipment generates, uses, and can radiate radio frequency energy and, if not installed and used in accordance with the instruction manual, may cause harmful interference to radio communications. Operation of this equipment in a residential area is likely to cause harmful interference in which case users will be required to correct the interference at their own expense. CAUTION Changes or modifications to this equipment not expressly approved by Raytheon could void the user’s authority to operate this equipment. NOTICE Raytheon reserves the right to make changes to the equipment and specifications without prior notice. PROPRIETARY STATEMENT The information contained in this manual is the property of Raytheon and is intended for the purchaser’s use only. It may not be reproduced without the expressed written consent of Raytheon. © 2010 Raytheon Company. Raytheon Company Phone: (919) 790-1011 Fax: (919) 790-1456 E-mail: [email protected] 5800 Departure Drive Raleigh, NC 27616 2 Interoperability Now ACU-1000 Operations Manual Table of Contents 1 GENERAL INFORMATION ...................................................................................................................... 1-1 1.1 1.2 1.3 1.4 1.4.1 1.5 1.6 1.6.1 1.6.2 1.6.3 1.6.4 1.6.5 1.6.6 1.6.7 1.6.8 1.7 1.7.1 1.7.2 1.7.3 1.7.4 1.7.5 2 Scope.................................................................................................................................................... 1-1 What Is Interoperability? ..................................................................................................................... 1-1 Local and Wide Area Interoperability.................................................................................................. 1-1 Local Interoperability Via The ACU-1000 .......................................................................................... 1-2 Cross-Connection Basic Explanation .............................................................................................. 1-4 Wide Area Interoperability .................................................................................................................. 1-9 Module Descriptions ............................................................................................................................ 1-9 General ............................................................................................................................................ 1-9 Card Cage ...................................................................................................................................... 1-10 PSM1-A Power Supply Module .................................................................................................... 1-10 HSP-2A ......................................................................................................................................... 1-10 CPM-4 ........................................................................................................................................... 1-11 DSP-2 Module ............................................................................................................................... 1-11 PSTN-2 Module ............................................................................................................................ 1-11 LP-2 Module ................................................................................................................................. 1-12 Related Equipment ............................................................................................................................. 1-12 ACU Controller ............................................................................................................................. 1-12 The WAIS Controller .................................................................................................................... 1-15 NXU-2A ........................................................................................................................................ 1-17 Local Extensions: LE-10 and LE-20 ............................................................................................. 1-18 ACU-T .......................................................................................................................................... 1-19 INSTALLATION .......................................................................................................................................... 2-1 2.1 General ................................................................................................................................................. 2-1 2.2 Unpacking and Inspection .................................................................................................................... 2-1 2.3 Reshipment of Equipment .................................................................................................................... 2-1 2.4 Installation Overview ........................................................................................................................... 2-2 2.5 Installation Considerations ................................................................................................................... 2-3 2.5.1 Mounting ......................................................................................................................................... 2-3 2.5.2 Cooling ............................................................................................................................................ 2-3 2.6 AC Power Requirements ...................................................................................................................... 2-6 2.6.1 AC Line Voltage Selection ............................................................................................................. 2-6 2.7 DC Power Requirements ...................................................................................................................... 2-7 2.7.1 DC Voltage Operation ..................................................................................................................... 2-7 2.7.2 Battery Power for the ACU-1000.................................................................................................... 2-7 2.7.3 External Chargers ............................................................................................................................ 2-9 2.7.4 Charge Switch ................................................................................................................................. 2-9 2.7.5 Fuse Information ............................................................................................................................. 2-9 2.8 Installation Checklist ......................................................................................................................... 2-12 2.9 External Interconnect Information ..................................................................................................... 2-12 2.9.1 DC Input Connector ...................................................................................................................... 2-14 2.9.2 HSP-2A Module Connections ....................................................................................................... 2-14 2.9.3 DSP Module Connections – P1 through P12 ................................................................................ 2-15 2.9.4 PSTN-2 Module Connections ....................................................................................................... 2-15 2.9.5 LP-2 Module Connections ............................................................................................................ 2-16 2.9.6 Serial Remote Connector .............................................................................................................. 2-16 2.9.7 Expansion Connector .................................................................................................................... 2-17 2.10 Local Radio Interface & Optimization ............................................................................................... 2-18 2.10.1 Interface Cables for Radios and Other Communications Devices ................................................ 2-18 2.10.2 Radio Device Set Up Using Applications Notes and Radio Templates ........................................ 2-19 2.10.3 Request for Creation of New Cable Designs ................................................................................. 2-23 2.10.4 Optimization of Individual ACU-1000 Extensions ....................................................................... 2-24 Interoperability Now 3 ACU-1000 Operations Manual 2.11 PSTN Simplified Setup Procedure ..................................................................................................... 2-36 2.12 Hardware Configuration Settings ....................................................................................................... 2-38 2.12.1 Power Supply Charger Switch ....................................................................................................... 2-40 2.12.2 HSP-2A Jumper Settings ............................................................................................................... 2-41 2.12.3 CPM-4 Jumper Settings ................................................................................................................. 2-42 2.12.4 DSP-2 Jumper Settings .................................................................................................................. 2-43 2.12.5 DSP-3 Settings .............................................................................................................................. 2-44 2.12.6 LP-2 Jumper Settings .................................................................................................................... 2-45 2.12.7 Modules Configurable Via the ACU Controller or the WAIS Controller ..................................... 2-46 2.12.8 Modules Configurable Via Browsing to its Front Panel Ethernet Port.......................................... 2-46 2.12.9 Modules Configurable via the HSP-2A Keypad............................................................................ 2-46 2.12.10 Modules Configurable Via Hardware Switches Only ................................................................... 2-46 2.13 Configuration Programming Via the ACU Controller ....................................................................... 2-48 2.14 Configuration Programming Via the WAIS Controller...................................................................... 2-49 2.14.1 DSP-2 Configuration Change via WAIS Controller...................................................................... 2-50 2.14.2 PSTN-2 Configuration Change via WAIS Controller ................................................................... 2-51 2.14.3 LP-2 Configuration Change via WAIS Controller ........................................................................ 2-52 2.15 Configuration Programming Via A Browser ..................................................................................... 2-53 2.15.1 CPM-4 Configuration Programming via Browser ......................................................................... 2-53 2.15.2 DSP Configuration Programming via Browser ............................................................................. 2-69 2.15.3 DSP-3 Configuration Programming via Browser .......................................................................... 2-81 2.16 Programming Configuration Settings via the HSP-2A Keypad ......................................................... 2-82 2.16.1 Keypad Programming Instructions: ............................................................................................... 2-82 2.16.2 System Programming Items........................................................................................................... 2-84 2.16.3 Enter Programming Mode ............................................................................................................. 2-84 2.17 Description of Configuration Items .................................................................................................... 2-90 2.17.1 HSP-2A Configuration Items ........................................................................................................ 2-90 2.17.2 DSP-2 and Legacy Module DSP-1 and RDI-1 Configuration Items ............................................. 2-90 2.17.3 PSTN-2 Configuration items ....................................................................................................... 2-101 2.17.4 LP-2 Configuration items ............................................................................................................ 2-106 2.17.5 Remote Control Setup ................................................................................................................. 2-109 3 OPERATION ................................................................................................................................................. 3-1 3.1 General ................................................................................................................................................. 3-1 3.2 Operation Via ACU Controller ............................................................................................................ 3-2 3.3 Operation Via WAIS Controller........................................................................................................... 3-4 3.4 Local Operation Considerations ........................................................................................................... 3-5 3.4.1 Unit Power-Up ................................................................................................................................ 3-5 3.4.2 Removal and Replacement of Modules ........................................................................................... 3-5 3.4.3 Front Panel Controls and Indicators ................................................................................................ 3-5 3.5 Local Operation Via HSP-2A............................................................................................................... 3-7 3.5.1 HSP-2A Local Operation................................................................................................................. 3-7 3.6 Operation Via Remote DTMF ............................................................................................................ 3-11 3.6.2 PIN Security .................................................................................................................................. 3-14 3.6.3 Basic Local HSP-2A & Remote DTMF Operation Scenarios ....................................................... 3-17 3.6.4 Serial Control ................................................................................................................................ 3-21 Changing the Serial Port Baud Rate via the Serial Port ................................................................................ 3-22 Changing the Chassis Configuration Setting ................................................................................................. 3-23 4 SYSTEM TROUBLESHOOTING .............................................................................................................. 4-1 4.1 4.2 4.2.1 4.3 4.4 4.5 System Troubleshooting Overview ...................................................................................................... 4-1 Missed First Syllables .......................................................................................................................... 4-1 Trunked Channel Acquisition Delay ............................................................................................... 4-2 Missed Syllables Mid-Conversation..................................................................................................... 4-5 Stuck Channel ...................................................................................................................................... 4-5 Ping Pong ............................................................................................................................................. 4-6 4 Interoperability Now ACU-1000 Operations Manual 4.6 4.7 4.8 4.8.1 4.8.2 4.8.3 4.9 4.9.1 5 ACU-1000 TECHNICAL INFORMATION ............................................................................................... 5-1 5.1 5.2 5.3 5.4 5.5 5.6 5.6.1 5.6.2 5.6.3 5.6.4 5.7 5.7.1 5.7.2 5.7.3 5.8 5.8.1 5.8.2 5.9 5.9.1 5.9.2 6 False Keying ........................................................................................................................................ 4-6 Inability of Dispatcher to Gain System Control ................................................................................... 4-7 Poor Audio Quality .............................................................................................................................. 4-9 Incompatible Audio Levels ............................................................................................................. 4-9 Noisy Received Signals ................................................................................................................. 4-11 Audio Equalization ........................................................................................................................ 4-12 Unintended Consequences ................................................................................................................. 4-13 Unwanted Connections ................................................................................................................. 4-13 Scope.................................................................................................................................................... 5-1 General Description ............................................................................................................................. 5-1 Card Cage and Backplane .................................................................................................................... 5-1 Power Supply Module .......................................................................................................................... 5-1 CPM-4 Control Processor Module ....................................................................................................... 5-2 HSP-2A Handset/Speaker Module ....................................................................................................... 5-2 General Description HSP-2A .......................................................................................................... 5-2 Block Diagram Description HSP-2A .............................................................................................. 5-2 HSP-2A New Features and Enhancements from the HSP-2 ........................................................... 5-4 HSP-2A Specifications .................................................................................................................... 5-5 DSP-2 Module ..................................................................................................................................... 5-6 General Description DSP-2 ............................................................................................................. 5-6 Block Diagram Description DSP-2 ................................................................................................. 5-6 DSP-2 Specifications....................................................................................................................... 5-8 PSTN-2 Module ................................................................................................................................... 5-9 General Description PSTN-2........................................................................................................... 5-9 PSTN-2 Specifications .................................................................................................................. 5-10 LP-2 Module ...................................................................................................................................... 5-11 General Description LP-2 .............................................................................................................. 5-11 LP-2 Specifications ....................................................................................................................... 5-11 OPTIONS....................................................................................................................................................... 6-1 6.1 STU-3 Option....................................................................................................................................... 6-1 6.1.1 Equipment Required........................................................................................................................ 6-1 6.1.2 Required Applications ..................................................................................................................... 6-1 6.1.3 Installation ....................................................................................................................................... 6-2 6.1.4 Operation: Cross Connecting a STU-III phone .............................................................................. 6-4 6.2 LE-10/20/30/40 .................................................................................................................................. 6-11 6.2.1 Dip Switch Setting for LE-10/20/30 ............................................................................................. 6-11 7 LEGACY MODULE INFORMATION ...................................................................................................... 7-1 7.1 7.2 7.3 7.4 7.4.1 7.4.2 7.4.3 7.4.4 7.4.5 7.5 7.5.1 7.6 7.7 7.8 8 Legacy Module Overview .................................................................................................................... 7-1 PSM-1A replaces PSM-1 ..................................................................................................................... 7-2 HSP-2A replaces HSP-2 ...................................................................................................................... 7-2 HSP-2/HSP-2A Compatibility Details ................................................................................................. 7-3 Handset Microphone ....................................................................................................................... 7-3 Line Input ........................................................................................................................................ 7-3 PTT Circuit...................................................................................................................................... 7-4 HSP-2A DB-15 Connector Interface ............................................................................................... 7-4 External Speaker ............................................................................................................................. 7-4 CPM-4 replaces CPM-2 ....................................................................................................................... 7-5 CPM-2 Switch Settings ................................................................................................................... 7-5 DSP-2 Replaces DSP-1 ........................................................................................................................ 7-8 DSP-2 Replaces the RDI-1 Module ..................................................................................................... 7-9 PSTN-2 Replaces the PSTN-1 Module ................................................................................................ 7-9 INDEX ............................................................................................................................................................ 8-1 Interoperability Now 5 ACU-1000 Operations Manual List of Figures FIGURE 1-1 FIGURE 1-2 FIGURE 1-3 FIGURE 1-4 FIGURE 1-5 FIGURE 1-6 FIGURE 1-7 FIGURE 1-8 FIGURE 1-9 FIGURE 1-10 FIGURE 1-11 FIGURE 1-12 FIGURE 1-13 FIGURE 2-1 FIGURE 2-2 FIGURE 2-3 FIGURE 2-4 FIGURE 2-5 FIGURE 2-6 FIGURE 2-7 FIGURE 2-8 FIGURE 2-9 FIGURE 2-10 FIGURE 2-11 FIGURE 2-12 FIGURE 2-13 FIGURE 2-14 FIGURE 2-15 FIGURE 2-16 FIGURE 2-17 FIGURE 2-18 FIGURE 2-19 FIGURE 2-20 FIGURE 2-21 FIGURE 2-22 FIGURE 2-23 FIGURE 2-24 FIGURE 2-25 FIGURE 2-26 FIGURE 2-27 FIGURE 2-28 FIGURE 2-29 FIGURE 2-30 FIGURE 2-31 FIGURE 2-32 FIGURE 2-33 FIGURE 2-34 FIGURE 2-35 FIGURE 2-36 FIGURE 2-37 FIGURE 2-38 FIGURE 3-1 ACU-1000 PLUG-IN MODULES ........................................................................................................ 1-3 PICTORIAL OVERVIEW – CROSS-CONNECTIONS USING THE ACU-1000 ........................................... 1-5 BASIC PHONE PATCH........................................................................................................................ 1-7 TELEPHONE CROSS-CONNECTION .................................................................................................... 1-8 ACU CONTROLLER MAIN SCREEN ................................................................................................. 1-13 INTERFACE SETTINGS SCREEN ....................................................................................................... 1-14 WAIS CONTROLLER OVERVIEW SCREEN ....................................................................................... 1-15 WAIS CONTROLLER 2 DISPATCH SCREEN ..................................................................................... 1-16 NXU-2A AS CABLE EXTENDER ..................................................................................................... 1-17 NXU-2A AS ACU-1000 DSP MODULE NETWORK INTERFACE ................................................. 1-17 NXU-2A APPLICATIONS ........................................................................................................... 1-18 LE-10 ........................................................................................................................................ 1-19 LE-20 ........................................................................................................................................ 1-19 OUTLINE DIMENSIONS...................................................................................................................... 2-4 CONTROL AND CONNECTOR LOCATIONS .......................................................................................... 2-5 BATTERY SIZING CHART .................................................................................................................. 2-8 FUSE TROUBLESHOOTING CHART .................................................................................................. 2-10 SIDE VIEW OF PSM-1A .................................................................................................................. 2-11 SETUP FLOWCHART, OVERALL INSTRUCTIONS............................................................................... 2-25 SETUP FLOWCHART, BASIC INITIAL SETUP .................................................................................... 2-30 SETUP FLOWCHART, TRUNKED SYSTEM AUDIO DELAY ADJUSTMENT........................................... 2-33 POWER SUPPLY MODULE SHOWING CHARGER SWITCH LOCATION................................................ 2-40 HSP-2A MODULE SHOWING JUMPER LOCATION....................................................................... 2-41 CPM-4 MODULE SHOWING JUMPER LOCATION ........................................................................ 2-42 DSP-2 MODULE SHOWING JUMPER LOCATIONS ........................................................................ 2-43 LP MODULE SHOWING JUMPER LOCATIONS .............................................................................. 2-45 PROGRAMMING VIA HSP-2A KEYPAD....................................................................................... 2-47 PROGRAMMING VIA ACU CONTROLLER PROGRAM ................................................................... 2-48 PROGRAMMING VIA WAIS CONTROLLER PROGRAM ................................................................. 2-49 DSP CONFIGURATION CHANGE VIA WAIS CONTROLLER PROGRAM ........................................ 2-50 PSTN-2 CONFIGURATION CHANGE VIA WAIS CONTROLLER ................................................... 2-51 LP-2 CONFIGURATION CHANGE VIA WAIS CONTROLLER ........................................................ 2-52 CPM-4 INFORMATION SCREEN .................................................................................................. 2-54 CPM-4 CONFIGURATION SCREEN.............................................................................................. 2-55 CPM-4 VOIP CONNECTION MANAGEMENT SCREEN ................................................................. 2-60 CPM-4 CONNECTION STATUS SCREEN ...................................................................................... 2-61 CPM MODULE IDENTIFIER PAGE............................................................................................... 2-62 CPM-4 MODULE NAMES SCREEN ............................................................................................. 2-64 CPM-4 RESTORE DEFAULTS JUMPER LOCATION ....................................................................... 2-65 CPM-4 RESTORED FACTORY DEFAULTS ................................................................................... 2-66 AUTOUPDATE DIALOG .............................................................................................................. 2-67 SUCCESSFUL PROGRAMMING ANNOUNCEMENT ........................................................................ 2-68 CPM-4 INFORMATION SCREEN .................................................................................................. 2-68 DSP INFORMATION PAGE .......................................................................................................... 2-71 DSP CONFIGURATION PAGE ...................................................................................................... 2-72 DSP CONNECTION MANAGEMENT PAGE ................................................................................... 2-76 DSP CONNECTION STATUS PAGE .............................................................................................. 2-77 DSP MODULE RESTORED FACTORY DEFAULTS ........................................................................ 2-79 DSP MODULE SOFTWARE UPDATE DIALOG .............................................................................. 2-80 SUCCESSFUL PROGRAMMING ANNOUNCEMENT ........................................................................ 2-81 DSP MODULE INFORMATION PAGE ........................................................................................... 2-81 ACU CONTROLLER MAIN SCREEN ................................................................................................... 3-3 6 Interoperability Now ACU-1000 Operations Manual FIGURE 3-2 FIGURE 3-3 FIGURE 3-4 FIGURE 3-5 FIGURE 4-1 FIGURE 4-2 FIGURE 4-3 FIGURE 4-4 FIGURE 4-5 FIGURE 5-1 FIGURE 5-2 FIGURE 5-3 FIGURE 6-1 FIGURE 6-2 FIGURE 6-3 FIGURE 6-4 WAIS CONTROLLER OVERVIEW SCREEN ........................................................................................ 3-4 PICTORIAL LAYOUT FOR OPERATING SCENARIOS .......................................................................... 3-17 RECONFIGURING THE ACU SERIAL PORT BAUD RATE .................................................................. 3-22 CHASSIS CONFIGURATION SETUP................................................................................................... 3-23 “SHOOT” VERSUS “DON’T SHOOT” .................................................................................................. 4-3 WHY AUDIO DELAY IS CRUCIAL ..................................................................................................... 4-4 TX PRIORITY ................................................................................................................................... 4-7 DISPATCHER PRIORITY..................................................................................................................... 4-8 AUDIO LEVELS INVOLVED WITH EACH CROSS-CONNECTION .......................................................... 4-9 HSP-2A BLOCK DIAGRAM............................................................................................................. 5-13 DSP-2 BLOCK DIAGRAM ............................................................................................................... 5-15 PSM-1A BLOCK DIAGRAM ............................................................................................................ 5-17 STU-3 BASIC SYSTEM ..................................................................................................................... 6-1 ACU-1000 TO STU-III CABLE SCHEMATIC ..................................................................................... 6-5 STU-III INTERNAL WIRING DIAGRAM ............................................................................................. 6-7 STU-III OPTION BOARD SCHEMATIC ............................................................................................... 6-9 Interoperability Now 7 ACU-1000 Operations Manual List of Tables TABLE 1-1 ACU-1000 SPECIFICATIONS ........................................................................................................... 1-20 TABLE 1-2 EQUIPMENT AND ACCESSORIES SUPPLIED ...................................................................................... 1-21 TABLE 1-3 OPTIONAL EQUIPMENT - NOT SUPPLIED ......................................................................................... 1-22 TABLE 2-1 ACU-1000 FUSES .......................................................................................................................... 2-11 TABLE 2-2 INSTALLATION CHECKLIST ............................................................................................................. 2-12 TABLE 2-3 CHASSIS SLOTS, EXTENSIONS, CONNECTORS, AND MODULES........................................................ 2-13 TABLE 2-4 HSP-2A MODULE CONNECTIONS- P13 .......................................................................................... 2-14 TABLE 2-5 DSP-2 OR DSP-3 MODULE CONNECTIONS- P1 THROUGH P12 ...................................................... 2-15 TABLE 2-6 PSTN-2 MODULE CONNECTIONS- P1 THROUGH P12 ..................................................................... 2-15 TABLE 2-7 LP-2 MODULE CONNECTIONS- P1 THROUGH P12........................................................................... 2-16 TABLE 2-8 SERIAL REMOTE CONNECTIONS- P15 ............................................................................................. 2-16 TABLE 2-9 EXPANSION CONNECTOR- P14 ....................................................................................................... 2-17 TABLE 2-10 ACU-1000 HARDWARE CONFIGURATION SETTINGS ...................................................................... 2-39 TABLE 2-11 HSP-2A JUMPERS .......................................................................................................................... 2-41 TABLE 2-12 RESTORE FACTORY DEFAULT – J16 ............................................................................................... 2-42 TABLE 2-13 RX AUDIO INPUT CONFIGURATION JUMPERS ................................................................................. 2-43 TABLE 2-14 RX AUDIO INPUT CONFIGURATION – J23, J15................................................................................ 2-44 TABLE 2-15 RESTORE FACTORY DEFAULT – J22 ............................................................................................... 2-44 TABLE 2-16 JUMPER SETTINGS LP-2 ................................................................................................................. 2-45 TABLE 2-17 ACU-1000 SYSTEM PROGRAMMING ITEMS .................................................................................... 2-83 TABLE 2-18 CONFIGURATION ITEMS .................................................................................................................. 2-87 TABLE 2-19 REMOTE SWITCH SETTINGS .......................................................................................................... 2-109 TABLE 3-1 HSP-2A OPERATIONAL COMMAND ITEMS ....................................................................................... 3-8 TABLE 3-2 OPERATIONAL COMMANDS VIA REMOTE DTMF ........................................................................... 3-11 TABLE 3-3 CPM-2, CPM-4 FACTORY DEFAULTS ............................................................................................ 3-21 TABLE 5-1 HSP-2A SPECIFICATIONS ................................................................................................................. 5-5 TABLE 5-2 DSP-2 SPECIFICATIONS .................................................................................................................... 5-8 TABLE 5-3 PSTN-2 SPECIFICATIONS ...................................................................................................................... 5-10 TABLE 5-4 LP-2 SPECIFICATIONS .................................................................................................................... 5-11 TABLE 6-1 LE10/20/30/40 SWITCH SETTINGS ................................................................................................. 6-11 TABLE 7-1 MODULE UPGRADES ........................................................................................................................ 7-1 TABLE 7-2 HSP-2A MODULE CONNECTIONS- P13 ............................................................................................ 7-3 TABLE 7-3 COR JUMPERS.................................................................................................................................. 7-4 TABLE 7-4 CPM-2 HARDWARE CONFIGURATION SETTINGS ............................................................................. 7-5 TABLE 7-5 BAUD RATE ...................................................................................................................................... 7-6 TABLE 7-6 REMOTE CONTROL ENABLE ............................................................................................................. 7-6 TABLE 7-7 SERIAL SYNC CHARACTER ............................................................................................................... 7-6 TABLE 7-8 EXPANDED SYSTEM CONFIGURATION .............................................................................................. 7-7 TABLE 7-9 MANUFACTURING TEST ................................................................................................................... 7-7 8 Interoperability Now ACU-1000 Operations Manual Glossary ACU Controller AP-1 CSAP COR COS CPM-2 CPM-4 CrossConnection CTCSS DIP Switch DTMF DSP DSP-1 DSP-2 EIA Extension Hangtime HSP-2A Key LED LMR LP-2 LP-2 Mute Network Talkpath PCB Port PSTN-1 PSTN-2 PTT RDI-1 RoIPTM Intuitive, icon based control program for operating an ACU-1000 interoperability system, either locally or over an IP connection. Provides full control & configuration capabilities. Audio Processor Module; applies a variety of functions to other ACU-1000 module inputs or outputs, mainly used for additional digital delay. Obsolete. Communications System Access Point – Any entry into the Interoperability System (UHF radio, telephone line, 8000 MHz trunked talk group, Nextel radio, audio console, etc.) Carrier Operated Relay - A receiver signal that gives a positive indication a carrier or signal is being received and the receiver is unsquelched. Same as COS. Carrier Operated Squelch - See COR. Original Control Processor Module, replaced by the CPM-4 Control Processor Module - This ACU module controls all aspects of system operation. A link made between two communications systems interfaced to a single ACU-1000 chassis, or between systems interfaced over a network to two or more ACU-1000 systems. Continuous Tone Controlled Squelch System. A squelch system using EIA Standardized subaudible tones in the 67Hz to 250Hz frequency range. An FM squelch, which opens only when the proper sub-audible tone is present. Dual In-Line Package Switch (“dipswitch”) - A multi-unit switch that fits into a standard DIP integrated circuit footprint. It usually contains eight or ten individual switches. Dual Tone Multi Frequency - The standard touch-tone telephone dialing method sends DTMF characters over the PSTN line. Digital Signal Processing (or Processor). Original Digital Signal Processor Module, replaced by the DSP-2. The Digital Signal Processor Module, the main radio interface of the ACU-1000 system. DSP algorithms provided include VOX, VMR, Audio Delay, Noise Reduction, and Tone Keying. The DSP-2 also provides an Ethernet interface. Electronic Industries Association. Each ACU-1000 interface module is given an extension number. It’s used to define and track cross-connections between communications systems interfaced to the ACU-1000. A system with hangtime will remain in the transmit mode for the duration of the set hangtime beyond the time indicated by any keying inputs. The hangtime prevents transmitter unkey during brief pauses in the transmission. The ACU-1000 Handset/Speaker/Prompt Module. It provides a local operator interface via a keypad, handset & speaker. System voice prompt circuitry also resides on this module. To key a transmitter means to cause it to transmit. Light Emitting Diode. Land Mobile Radio. Replaced by the LP-2 The Local Phone Module that interfaces a standard telephone set to the ACU-1000 system. To quiet or inhibit audio. A RoIP/VoIP link creating a cross-connection over an IP-based network. Printed Circuit Board. The ACU rear panel connectors P1 through P12 provide Communications Ports to interface with other communications equipment. Replaced by the PSTN-2 Public Switched Telephone Network Module; interfaces a telephone system to the ACU-1000. Push-to-Talk. An active PTT signal causes a transmitter to key. An ACU module to interface with radios and other 4-wire devices; it does not contain the DSP algorithms of the DSP-1 or DSP-2 modules, but includes an RS-232 port. Obsolete. Radio over Internet Protocol. Raytheon proprietary protocol which sends voice plus radio Interoperability Now 9 ACU-1000 Operations Manual Glossary RX Slot SNR Squelch TX VMR VOX WAIS Controller control signals over an IP-based network, Receiver or Receiving. A physical location in the ACU-1000 chassis where a module can be inserted. Signal-to-Noise Ratio. A means of detecting audio and causing some action when it is present, such as keying a transmitter or unmuting an audio path. Transmit or Transmitter. Voice Modulation Recognition. A type of squelch, which is activated only by spoken words and not by tones, noise, or other audio information. Voice Operated Xmit (Transmit). A circuit or algorithm, which causes a transmitter to key or some other action when voice is present. This squelch type is activated by any audio signal, and is not restricted to voice only. Intuitive, icon based control program for operating a Wide Area Interoperability System, with multiple JPS ACU and NXU devices interfaced by an IP Network. Provides full control & configuration capabilities. Compare with ACU Controller. 10 Interoperability Now ACU-1000 Operations Manual 1 General Information 1.1 Scope This instruction manual provides the information necessary to install, configure and operate the ACU-1000 Intelligent Interconnect System. 1.2 What Is Interoperability? The ACU-1000 allows existing, disparate communications systems to cross-connect with each other. For example, within an Interoperability System, a conventional VHF radio system can communicate with an 800 MHz trunked system, an APCO 25 radio user can talk with a PSTN or SATCOM user, etc., or any number of these users can be conferenced together. These communications assets are called CSAPs, for “Communications System Access Points”. Interoperability: The ability of disparate communication systems users to communicate with each other (for example, a patrolman can use his UHF radio to talk to a firefighter who is using her 800 MHz radio). CSAP: Communications System Access Point. Any entry point into the Interoperability System. For example, a conventional VHF radio channel, an 800 MHz trunked talkgroup, a satellite phone system, Nextel handset, or other type of communications system. Another definition of interoperability is: The ability of any public service official to talk to whomever they need to, whenever they need to, when properly authorized. The purpose of the ACU-1000 and the related Raytheon products is to help make this happen in an efficient manner. The Raytheon Interoperability Solution ties together existing communications systems with minimal additional equipment and minimal disruption to ongoing communications. 1.3 Local and Wide Area Interoperability The need for interoperability usually arises during a disaster or other unusual event (as existing systems are set up to handle normal communications without interoperability). The majority of cross-connections are required between CSAPs located where the incident has occurred. Accordingly, the Raytheon Wide Area Interoperability Solution consists of a network of ACU1000 systems coupled with the ability to cross-connect together one or more CSAPs from different local systems. The local connections mainly take place with an ACU-1000 system, while the “Wide Area” connections take place over an IP-based network using Raytheon’s RoIP/VoIP technology. The area covered by an individual LIS typically encompasses a political region such as a city, county or group of counties. This simplifies jurisdictional concerns that could otherwise impede the quick decision-making and actions required during a disaster or other emergency situation. Interoperability Now 1-1 ACU-1000 Operations Manual Any individual LIS (as well as the entire wide area system) can be controlled and monitored from any location on the network by a dispatcher using the Raytheon ACU Controller or WAIS Controller software. The Windows-based ACU WAIS Controller provides full system control, from the local level to statewide, or across any distance connected by an IP-based network, allowing interoperability connections to be made between any two (or more) CSAPs by a simple point & click procedure. LIS – Local Interoperability System: An Interoperability System intended to service a single political or geographical region. The basic means of connecting the communications systems that an LIS services are ACU-1000 audio links. WAIS – Wide Area Interoperability System: An Interoperability System that uses an IP-based network to provide interoperable communications among Local Interoperability Systems and with any number of individual users (such as system dispatchers or isolated radio systems). Network Talkpath – An RoIP/VoIP communications link between elements of a Wide Area Interoperability System. RoIPTM – Radio over Internet Protocol: A Raytheon proprietary protocol that uses a standard IP-based network to transfer a VoIP channel and accompanying radio control signals including PTT, COR, and RS-232. 1.4 Local Interoperability Via The ACU-1000 The ACU-1000 is the main building block of the Raytheon Interoperability Solution, so a basic understanding of its operation is necessary for an overall understanding of the system. The ACU-1000 consists of a chassis with a number of plug-in modules. The essential modules reside at the left side of each chassis. The PSM Module is the unit’s power supply. The HSP Module provides a local interface to the system (via a keypad, handset and speaker). It also allows local setup and control, and houses the unit’s voice prompting circuitry. The CPM Module controls the unit and relays status and control messages between the ACU-1000 and either of the system control programs, the ACU Controller or the WAIS Controller. The rest of the unit is occupied by a number of interface modules (up to 12 in a single chassis). These modules interface the unit to the various CSAPs of the Local Interoperability System, or provide network talkpaths to the WAIS. Different modules may be installed, depending on the type of CSAP being interfaced. The main types are the DSP Module, which interfaces radio systems, network talkpaths, and some types of satellite phones, and IDEN systems; next is the PSTN Module, which interfaces telephone lines and some satellite phones or cellular phones. Another module that may be used is the LP-2; it allows a standard telephone set to be interfaced to the ACU-1000 so that a nearby user can communicate with the rest of the system, wired to the LP-2 by a standard telephone cable with RJ-11 connectors. 1-2 Interoperability Now ACU-1000 Operations Manual Each interface module takes the audio and control signals of its associated CSAP and converts them to signals that can be understood by the rest of the system. Telephone Set LP-1 To Phone System or Cellular PSTN-1 Radio A Radio A Radio B Radio B CAT-5 Wall Outlet DSP-1 OR DSP-2 A DSP-1 OR DSP-2 B DSP-2 C Switch CAT-5 CPM-4 Router HSP-2A Local Handset Network ACU-1000 Figure 1-1 ACU-1000 Plug-In Modules Figure 1-1 illustrates the communications capabilities of the ACU-1000 plug-in modules. (Not shown: the PSM-1A Power Supply Module.) • HSP-2A Module: The keypad, handset and speaker on this module allow a local operator to communicate with other system users. For example, if the HSP-2A module is cross-connected to DSP module “A”, the person holding the handset could converse with the person operating the portable labeled “Radio A.” Interoperability Now 1-3 ACU-1000 Operations Manual • CPM-4 Module: The Control Processor Module receives control commands from the unit’s operator. The commands may be entered via the HSP-2A’s keypad, or (more efficiently) by either the ACU Controller or WAIS Controller programs. The ACU Controller may be connected directly to an individual ACU-1000 or it can monitor and control the unit over an Ethernet network. The WAIS Controller is intended to monitor and control multiple ACU-1000s and other communications assets that make up a Wide Area Interoperability System, all connected to an IP-based network. Earlier version CPM modules (the CPM-2) do not provide any network functionality. • DSP Module: This module interfaces radios and other 4-wire devices to the ACU-1000 via a rear panel D-15 connector. The DSP-2 also has a front panel RJ-45 connector that allows it to create a network VoIP link. The DSP modules labeled “A” and “B” are interfacing radios to the system, while the module labeled “C” is connected to the network. Each DSP-2 can create either a radio interface or a talkpath to the network, but not both at the same time. See Figure 1-1. • PSTN-2 Module: Interfaces the ACU-1000 to telephone or satellite systems. • LP-2 Module: The LP-2 allows a standard telephone set to be interfaced to the system using a standard phone cord. Note the difference between the LP-2 and the PSTN-2. While the LP-2 interfaces an individual telephone set, the PSTN-2 interfaces an entire system such as a landline with service or a cellular system. Connections to each are made with standard phone cords with RJ-11 connectors. The phone cord of the LP-2 is plugged into a telephone set, while the PSTN-2 phone cord plugs into the telephone wall outlet. The PSTN module can also be used to interface cellular phones and some satellite phones. Radios, audio consoles, and similar equipment are 4-wire devices and interface to the ACU1000 via the DSP module. 2-wire telephone systems equipment that provide loop current and ringer voltage such as a PABX or telephone central office interface via the PSTN module. 2-wire devices that require loop current and ringer voltage to operate, such as a telephone deskset, interface via the LP-2 module. The LP-2, in effect, simulates the telephone system to the target 2-wire device by providing loop current and ringer voltage. A 4-wire device is one that has separate lines for transmit and receive audio signals. One pair for TX, and another for RX, totaling four wires. A 2-wire device carries both the transmit signal and the receive signal on the same pair of wires. 1.4.1 Cross-Connection Basic Explanation When an operator uses the ACU Controller or the WAIS Controller to cross-connect two CSAPs at an ACU-1000, a command is issued to the associated ACU-1000 CPM module. The command instructs the CPM to tie the appropriate interface modules together as in the figures that follow. Only after the command is successfully completed (and a status message returned 1-4 Interoperability Now ACU-1000 Operations Manual to any active control programs) does the Controller screen show the change in cross-connection configuration. 1.4.1.1 Radio-to-Radio Cross-connection Figure 1-2 shows two different types of radios patched together. Normally a Type A radio can communicate with any other Type A radio that’s “in range, or with a repeater” but the signals from the Type A radios are completely ignored by the Type B radios, and vice-versa. The ACU-1000’s DSP modules take the Type A radio’s audio and control signals, translate the control signals into a PTT for the Type B radio, and sends the Type B radio this control signal along with the audio. The cross-connections between DSP module “A” and DSP module “B” Radio A Radio A RX Audio & COR DSP Module A Radio B TX Audio & PTT DSP Module Radio B B RX Audio: What is being spoken into Radio A COR: This signal is active while the talking is occuring TX Audio: This same audio from A being sent back out B PTT: This signal is active when COR is active Figure 1-2 Interoperability Now Pictorial Overview – Cross-Connections Using the ACU-1000 1-5 ACU-1000 Operations Manual Essentially, the information required to create a cross-connection can be broken down into the following: The equipment interfaced to the person talking provides the following information to the ACU-1000: o The person’s speech. (The RX Audio in the figure.) o A control signal that indicates when this person is talking. (The COR signal in the figure.) The ACU-1000 provides the following information to the equipment interfaced to the person listening: o The speech signals of the person talking. (The TX Audio in the figure.) o A control signal that tells when that person is talking. (The PTT Signal in the figure.) During a conversation, these roles switch back and forth as each person moves between being the talker and being the listener. Most radio systems are either simplex or half duplex; the important aspect to remember is that only one person can be heard at a time. With full duplex systems, all parties to a conversation may be heard simultaneously. A telephone system is a good example of a full duplex system. The ACU-1000 can accommodate both types of systems, but both parties of a conversation must be using full duplex equipment for either party to be able to simultaneously talk and listen. COR: A signal that tells when a radio (or other communications device) is receiving a valid signal. PTT: A signal that tells a radio (or other communications device) that a valid signal is being sent to be transmitted. Full Duplex: System Users can simultaneously talk to and listen to other parties of the cross-connection. Simplex or Half Duplex: Only one system user can be heard at a time. This scenario can be a bit more complicated for some communications devices other than radios, but the job of the ACU-1000 is the same: to take the incoming audio and control signals from one communications medium, translate these signals into the proper outgoing control signals for another communications medium, and send out these signals along with the original received audio. 1-6 Interoperability Now ACU-1000 Operations Manual 1.4.1.2 Radio-to-Telephone Cross-connections Figure 1-3 Basic Phone Patch Figure 1-3 shows a basic connection between a 4-wire device (such as a radio) and a 2-wire device (such as a telephone line). 2-wire devices carry audio in both directions, simultaneously, on a single pair of wires. An interface (commonly referred to as Phone Patch) is required between these two disparate devices. In actuality, the phone patch 2-wire connection does not interface directly to a telephone, but instead to the telephone system. The phone patch would most likely be connected to a phone jack on the wall by a standard telephone cable with RJ-11 connectors. To talk over the radio via the phone patch, you would use your telephone to call the number associated with that phone jack on the wall. With most standard 2-wire devices (such as a telephone), there are no accompanying control signals such as PTT or COR. Because of its ability to carry both send & receive audio at the same time, these control signals do not benefit the telephone system. Therefore a 2-wire to 4wire radio connection requires that a VOX function be provided to derive the COR signal from the incoming phone line audio and supply the associated PTT output signal to the radio. The VOX (Voice Operated Xmit) triggers the PTT when a large enough signal is detected coming from the telephone system to indicate that the end-user is talking. A VOX output is activated by the detection of audio that exceeds the set VOX threshold. A Phone Patch interfaces the 2-wire telephone system to a 4-wire radio. Interoperability Now 1-7 ACU-1000 Operations Manual Figure 1-4 Telephone Cross-Connection Within the ACU-1000, the PSTN module performs the 2-wire to 4-wire conversion. For a twoway conversation between a telephone caller and a radio user, the telephone system would be interfaced to a PSTN module. Within the ACU-1000, that PSTN module would be crossconnected to a DSP module, which provides the radio interface. In Figure 1-4 above, the external interface of the ACU-1000’s PSTN module is simple a pair of wires carrying 2-wire audio. The PSTN module VOX function detects any audio being spoken over the phone and causes a PTT signal to be sent out by any cross-connected DSP modules, along with the phone input audio. If the portable radio A is transmitting, the associated radio interfaced to the DSP module receives this audio and sends it to all cross-connected modules. The PSTN module places this audio on the 2-wire pair and sends if off to the telephone system. In the ACU-1000, the incoming VOX or COR inputs are reported to the CPM module. The CPM module then commands any cross-connected modules to activate their PTT outputs. Incoming audio is placed on a rear panel audio bus, where it is picked off by any crossconnected modules for retransmission. 1-8 Interoperability Now ACU-1000 Operations Manual 1.4.1.3 Multiple Cross-Connections The ACU-1000 is not limited to one-to-one conversations. Cross-connections can be made that create a large conference call with multiple users. This could include several different radio systems, a caller on a telephone line, a satphone or IDEN user, and a system operator using a dispatch console. All of these different users will be able to converse with each other. These multiple cross-connections can take place either at the local level (up to 8 simultaneous two-way conversations within any ACU-1000) or over the wide area network (where the only limit is practical… how many people can engage in an effective conversation at the same time). 1.4.1.4 Monitor Connections Any ACU-1000 module can be set to monitor any other module in that ACU-1000. When module A monitors module B, it hears any receive audio coming into module B from an outside source. However, module A does not send any audio to module B or otherwise affect its operation. 1.5 Wide Area Interoperability It is possible to connect individual ACU-1000’s together to form a “wide area” system that might typically be a regional or statewide system. These systems are useful for coordinating communications during a “moving” event such as a car chase or ambulance transport that crosses through multiple jurisdictions and/or communications systems. Hurricanes, floods, and tornados typically can produce widespread damage over multi-county areas. A wide area regional or statewide system can be beneficial in coordinating all of the different agencies that are typically involved in managing disasters of this magnitude. Wide area interoperability is made simple thru the use of WAIS Controller software running on a PC at each desired control point and an IP infrastructure that allows all the ACU-1000 and other system components to be interconnected in a logical and controlled manner. It is important to keep in mind that during a disaster, IP infrastructure could be affected and backup connectivity and routing methods should be considered. The WAIS Controller software manages the IP network talkpaths that allow the most efficient use of resources in creating the necessary area-to-area talkpaths. 1.6 Module Descriptions 1.6.1 General The ACU-1000 system is a modular interface/interconnect system packaged in a Eurocard chassis. With this product, an intelligent interconnect system can be configured to meet almost any interface application involving telephones and radios of any sort. The ACU-1000 system is suitable for HF, LMR, Satcom systems, IDEN systems, Landline PSTN systems, and Cellular Telephone systems and offers essentially unlimited applications and expandability. An ACU1000 Local Interoperability System consists of a chassis, backplane and modules, module software, and system control software. Interoperability Now 1-9 ACU-1000 Operations Manual 1.6.2 Card Cage The chassis is a 19" wide EIA standard rack-mounted Eurocard card cage equipped with a backplane board into which the modules are plugged. The module PC Boards are 100 x 220 mm. The card cage height is 5.25" (3U) tall, 19” wide, with a depth of 11". An AC input module and power transformer assembly is located on a metal panel that is mounted to the backplane. The AC module is a combination AC line filter, power cable connector, input voltage selector, and fuse holder. The backplane interfaces the outside world via Dsubminiature connectors, and internally to the plug-in modules via 60-pin card edge connectors. No active or passive electrical components reside on the backplane board. 1.6.3 PSM1-A Power Supply Module The PSM-1A plugs into the left-most slot in the backplane. The power supply's backplane connector is offset relative to the connectors for the other boards to prevent improper insertion of the Power Supply Module in the slots reserved for the other cards. In turn, these other modules cannot be plugged into the Power Supply slot. The power supply incorporates a dualprimary line transformer with a bridge rectifier and filter capacitors to provide a +15V unregulated DC bus. (The power transformer is mounted on the chassis, not the PSM-1A.) The bus feeds a linear regulator that supplies all modules with +12VDC, and the bus feeds a switching regulator that provides -12VDC. Each individual module contains a switching +5V regulator operating from the +15V bus. . This is a 60W-output power supply, which furnishes +12V, -12V, and +Bus (unregulated) voltage to the modules. This module will operate from 115/230 VAC as well as +12 VDC and Battery. A 1-Ampere capacity battery charger for a lead-acid backup battery is built in. 1.6.4 HSP-2A The HSP Module provides a means to locally monitor, configure and control an ACU-1000 system. The user can monitor audio via an internal speaker (or plug in an external speaker), or use the handset provided. This handset includes a PTT switch to allow the user to key a crossconnected radio via the HSP. Module control and configuration is made via a 3x4 keypad (standard telephone layout). This keypad can be used to select a system module, either to communicate with that module, or to set the module’s configuration parameters (input and output levels, for example). For example, if the system contains a PSTN-2 module, the user may place telephone calls manually using the HSP keypad and handset. In addition to the front-panel handset jack, the HSP has input and output audio lines (0 dBm nominal) and an external speaker output. All system voice prompt circuitry resides within the HSP module. 1-10 Interoperability Now ACU-1000 Operations Manual 1.6.5 CPM-4 The ACU-1000 Control Processor Module controls the entire chassis via an internal high-speed serial bus; it requests and receives status and information from each module and sends commands to each module. It instructs modules to output their audio to one of the system audio buses. The CPM-4 has a front panel RJ-45 Ethernet port that allows connection to a single PC (running the ACU Controller Program) or to an IP-based network (for control by either the ACU Controller or the WAIS Controller. Alternatively, rear panel RS-232 serial port allows the same connectivity, either directly to a single PC via that computer’s serial port, or (in conjunction with an ETS-1 unit) to a network. A PC interfaced to the CPM-4’s RJ-45 connector can browse to the CPM-4’s IP address to check or modify the module’s configuration parameters. The front panel of the CPM-4 Module also contains a Fault LED, along with Master and Expansion LEDs that indicate the unit's status in an expanded system. 1.6.6 DSP-2 Module This module is the main 4-wire interface and Ethernet RoIP module. It is used to interface radios and other 4-wire devices to the ACU-1000 or to interface a Network Talkpath (VoIP link with control signals) to the unit. It provides important DSP-based interface functions such as three types of COR (hardwired signal, VMR, and VOX), DSP noise reduction, DTMF decoder/generator, audio level adjustments, audio shaping, etc. The VMR and Noise Reduction capability make it ideal for an HF radio interface. The DSP-2 has a front panel RJ-45 Ethernet port and associated circuitry to create a network connection to the ACU-1000. The DSP-2 may create a network talkpath to another DSP-2 in a second ACU-1000 system or to an NXU-2A unit that’s interfaced to the same IP-based network. A PC cabled to the RJ-45 Ethernet port can browse to the DSP-2’s IP address to configure the DSP-2. 1.6.7 PSTN-2 Module The PSTN Module is the 2-wire interface between the ACU system and a telephone system (as opposed to a telephone set). A telephone system is an entity that accepts dialing information and processes calls, such as a PSTN line, PABX line, terminal, or cellular phone. (A telephone set is a device that generates dialing information. It is interfaced to the ACU system via the LP-2 Module.) The PSTN-2 contains one 2-wire front-panel RJ-11C jack for interfacing with PSTN lines or satellite equipment. The module contains ring detect circuitry for automated system operation. The module has a DSP hybrid and VOX with configurable sensitivity and hangtime. It has a DTMF receiver/generator for control and call progress recognition. There are two uncommitted auxiliary parallel inputs and two uncommitted auxiliary parallel outputs. Interoperability Now 1-11 ACU-1000 Operations Manual 1.6.8 LP-2 Module The Local Phone Module is the interface to the ACU system for 2-wire devices (such as a telephone set), which generate dialing information. This module contains a loop current generator, ring voltage generator, dial and busy tone generators, a DSP hybrid with VOX and a DTMF generator/receiver. The LP-2 is typically used to create a local interface to the system that is located nearby but not directly at the ACU-1000. A system operator alongside the ACU1000 would use the HSP-2A handset and keypad. A system operator a short distance away could use the handset and keypad of a telephone set cabled to an LP-2 module by a standard telephone cord. In addition to interfacing a telephone set into the ACU system, this module can be used as a telephone "line card" in a mini-PBX system. 1.7 Related Equipment This section introduces other equipment that can be used in conjunction with the ACU-1000 to monitor and control the unit, or to extend its range to an IP based network. Also described is the ACU-T, a version of the ACU-1000 in a Tactical Package. 1.7.1 ACU Controller The ACU-Controller provides an intuitive Graphical User Interface for easy control of an ACU-1000 or ACU-T. The main screen, shown in Figure 1-5, provides a clear overview of current system status with icons to identify the various system components. Cross-connections are made and dissolved by simple point-and-click procedures. Other features include the ability to store specific system configurations for later recall, a log file of system activity, and the ability for both local and remote (via an IP-based network) control. 1-12 Interoperability Now ACU-1000 Operations Manual Figure 1-5 ACU Controller Main Screen The figure above shows two cross-connections (nets); the first is made up of the radios interfaced to modules 2 & 7. The second is a three-way conversation between the radios interfaced to modules 4, 6, & 9. Interoperability Now 1-13 ACU-1000 Operations Manual Readily available help instructions Currently loaded Radio template Settings options grouped with pull-down menus Figure 1-6 Interface Settings Screen The ACU Controller Interface Settings Screens (one for each port, customized per the type of interface module installed) allow quick and easy adjustments of all of the interface setup and optimization parameters discussed in this manual. Optimization of a radio interfaced to an ACU-1000 or ACU-T is simplified further by the availability of stored radio templates. These radio templates allow instant application of any of the program’s extensive library of setups for commonly used radio models. The ACU Controller is provided free of charge with every ACU-1000; the ACU Controller manual is supplied within the ACU-1000 manual tucked into the front inside pocket. Additional copies of both the ACU Controller and its Installation and Operation Manual can be downloaded free of charge from the Raytheon website as listed below. On the right side of the page all related downloads are listed. This includes this manual, the ACU Controller, and latest versions of software for the ACU-1000 modules. Export regulations require that the form supplied on the website after a download request be filled out prior to enabling the download. http://www.raytheon.com/capabilities/products/acu1000/ Please refer to the ACU Controller manual for more complete information. 1-14 Interoperability Now ACU-1000 Operations Manual 1.7.2 The WAIS Controller The WAIS Controller software provides an icon-based GUI interface to facilitate the control and monitoring of Wide Area Interoperability Systems. The WAIS Controller has a variety of views that allow its operators to create and dissolve cross-connections that take place within an individual Local Interoperability System as well between local systems over a network. Multiple operators can simultaneously control or monitor a system. Each operator has a set of permissions that may limit the types of operations that the operator is allowed to perform, or the system components that the operator is allowed to control. Figure 1-7 below shows the Overview for a wide area system that has eight different WAIS nodes (identified in the Site List at the left). The system depicted has many current crossconnections, identified by Network Group Letters, Local Group Numbers, and Module Icons. See the WAIS Controller Manual for further information. Figure 1-7 Interoperability Now WAIS Controller Overview Screen 1-15 ACU-1000 Operations Manual 1.7.2.1 WAIS Controller Dispatch Capabilities with DSP-3 The new WAIS Controller 2 has an additional capability that uses the PC's sound card to let an operator communicate with system end-users via DSP-3 modules. Any radio interfaced with a DSP-3 is available for direct communication with the Controller and appears, along with any interconnected modules, in a special screen called the Dispatch View (see Figure 1-8 below). The operator can either monitor or select (form a two-way conversation with) a DSP-3 and in either case has the option of including any other modules that are connected to the DSP-3. Multiple DSP-3s can be monitored and/or selected simultaneously, the number limited only by network bandwidth. When talking to dispatch modules, the operator has several choices for activating TX mode, including a footswitch. Figure 1-8 WAIS Controller 2 Dispatch Screen 1-16 Interoperability Now ACU-1000 Operations Manual 1.7.3 NXU-2A The NXU-2A Network Extension Unit is a separate product. It interfaces many types of communications devices (such as radios or dispatch terminals) to an IP-based network. The NXU-2A provides a RoIP link, which includes radio control signals (PTT, COR, RS-232) along with a VoIP audio path. A variety of vocoders can be configured; this allows the VoIP linked to be optimized based on its purpose and the bandwidth available. The NXU-2A is designed to operate over TCP/IP networks in conjunction with standard networking equipmentswitches, hubs, routers etc. Figure 1-9 shows a simple NXU-2A application were the unit is basically acting as a “cable extender” allowing the audio console to operate the radio with the radio located anywhere on the network. The audio console sends TX audio and a PTT signal to the radio, and the radio sends a COR (unsquelched indication) as well as RX audio back to the console. The NXU-2As can also pass RS-232 to control radio functions such as frequency or power level. Once the network connection between the NXU-2As is created, it remains in place until intentionally dissolved. When the console & radio are both idle (no audio being streamed across the network) the connection uses minimal bandwidth (an occasional “keep alive” data packet is exchanged to maintain the connection). NXU Network NXU RADIO Four Wire Audio Console Figure 1-9 NXU-2A As Cable Extender A similar use for the NXU-2A is to remotely connect a radio or other device (such as a fourwire audio console) to the ACU system as shown in Figure 1-10. Both configurations can be set up as a permanent connection, or the network connections can be controlled using the WAIS Controller software. ACU-1000 `DSP NXU Network Figure 1-10 Interoperability Now NXU-2A as ACU-1000 DSP Module Network Interface 1-17 RADIO ACU-1000 Operations Manual Figure 1-11 shows a range of NXU-2A applications, all interfacing the same network. In the type of system depicted, the WAIS Controller would normally be used to dynamically make and break connections between the various elements. For example, in some situations, the radio in the lower right of the diagram can be connected to the 4-wire console; at other times to any one of the ACU-1000s. Note that an ACU-1000 can have multiple links to the network. ACU-1000 DSP DSP ACU-1000 DSP DSP Network ACU-1000 DSP NXU NXU Four Wire Audio Console RADIO PC With WAIS Controller Figure 1-11 NXU-2A Applications 1.7.4 Local Extensions: LE-10 and LE-20 The LE-10 and LE-20 local control extensions are designed to provide a stylish, desktop console that can be used for communicating with anyone connected to an ACU-1000. They come equipped with a 15’ cable that can plug directly into the connectors on the back of the ACU-1000 or an NXU-2 using a crossover adapter. The consoles can be connected to the DSP-2 or an NXU-2 and used as a network control point in conjunction with a WAIS Controller. The LE-10 is equipped with a handset with PTT, DTMF pad, monitor speaker, parallel console indicator and is configured as a 4-wire audio device. The LE-20 has similar features, but is equipped with a desk microphone. Pictures of each are shown below. 1-18 Interoperability Now ACU-1000 Operations Manual Figure 1-12 LE-10 Figure 1-13 LE-20 1.7.5 ACU-T The ACU-T is a tactical version of the ACU-1000. It provides the features of the ACU-1000 in a smaller, rugged case designed for quick on-scene deployment. To provide the tactical capability, the unit has a modified version of the HSP-2A module (named the HSP-4A), and does not use the PSM-1A power supply. The ACU-T uses the same control and interface modules as the ACU-T. See more information about the ACU-T on the Raytheon website. http://www.raytheon.com/capabilities/products/acu_t/index.html Interoperability Now 1-19 ACU-1000 Operations Manual Table 1-1 ACU-1000 Specifications See Section 5 for individual module specifications General/Environmental RS-232 Serial Port P-15 PSM-1A Power Supply Front Panel HSP-2A Front Panel CPM-4 Front Panel DSP-2 Front Panel PSTN-2 Front Panel LP-2 Front Panel Rear Panel AC Input Power DC Input Power Size Operating Temperature Storage Temperature Humidity Shock Vibration DB-9 Female DCE connector. Baud Rates: 1200, 2400, 4800, and 9600. POWER On/Off Switch; AC On, DC On, +12VDC, -12VDC LEDs. Speaker, Speaker On/Off Switch, Volume Control, Signal, PTT, and FAULT LEDs. RJ-45 Ethernet Connector; Master, Expansion, and Fault LEDs. RJ-45 Ethernet Connector; Link Active, COR, Signal, PTT, and Fault LEDs. RJ-11 Telephone Line Connector (L1), Monitor, Ring, Connect, VOX and Fault LEDs. RJ-11 Telephone Set Connector (P1), Monitor, Ring, Off Hook, VOX and Fault LEDs DC Fuse holder, DC Input Terminal Strip, AC Filter Module, DB-15 Connectors to Interface 13 Modules, DB-9 Serial Remote Connector, and DB-37 Expansion Connector. 115 or 230 VAC +/- 15%, 47-63 Hz, 100 VA typical, 130 VA max. +11 to +15 VDC @ 5A, nom. 5.25” H x 19” W x 11” D (13.3 x 48.3 x 28 cm). -20 to +60 degrees C. -40 to +85 degrees C. Up to 95% @ 55 degrees C. MIL-STD-810D, Method 516.3, Procedure VI. MIL-STD-810D, Method 514.3, Category I. 1-20 Interoperability Now ACU-1000 Operations Manual Table 1-2 Equipment and Accessories Supplied ACU-1000 System Bundle Quantity Item Raytheon P/N 1 ACU-1000 Required Equipment Bundle 5961-220000 A single chassis ACU-1000 system consists of a chassis, PSM-1A, HSP2A, and CPM-4 modules (the Required Equipment Bundle), plus up to 12 interface modules in any combination. Expanded systems are made of two single-chassis systems connected by an Expansion cable (See Table 1-3). All items below are included within P/N 5961-220000 Items included in Bundle Chassis: 1 Chassis, 19” rack mount, 3U (5.25”) high 5961-200000 1 PSM-1A Power Supply Module 5951-813000 1 HSP-2A Handset/Speaker Module 5040-602200 1 CPM-4 Control Processor Module 5961-213000 1 ACU Controller (Control Software for PCs) 5961-298100 1 Operation & Maintenance Manual 5961-200200 1 Accessory Kit- Consisting of: 5961-200150 Qty Part Number Description 1 0313-037770 Line Cord 1 0360-009100 Conn, cable, DB-9 plug 13 0360-015100 Conn, cable, DB-15 plug 1 0360-037100 Conn, cable, DB-37 plug 2 0650-010250 Fuse, 3AG, 10A, 250V, fast-acting, fuses low voltage DC bus (F1) 2 0640-016100 Fuse, 5x20mm, 1.6A, 250V, time delay, for 230 VAC operation (F2) 2 0640-030100 Fuse, 5x20mm, 3A, 250V, time delay, for 115 VAC operation (F2) 2 0650-200200 Fuse, 3AG, 20A, 32V, fast-acting, for DC operation (F3) 1 0827-000001 Cable clamp for DB-9 connectors 1 0827-000003 Cable clamp for DB-37 connectors 13 0827-000004 Cable clamp for DB-15 connector 17 0853-044001 Screwlock, female, 4-40 x 5/16” 5 0837-103200 Truss head screw, 10-32, 3/8” for rack mounting 5 0848-100001 Nylon washer, #10 for rack mounting 1 2010-200350 Screwdriver, pocket 1 5951-707000 Extender card assembly 1 0150-200000 Handset 1 0313-060000 Handset coil cord 1 5961-295300 External Speaker with DB-15 cable 1 0313-070000 Cable, CAT-5, Standard, 6’, RJ-45 1 0314-000024 Cable, CAT-5, Crossover, Red, 6’, RJ-45 1 5951-708150 ID Plate - 00 1 5951-708150 ID Plate - 01 1 5951-708150 ID Plate - 02 1 5951-708150 ID Plate - 03 1 5951-708150 ID Plate - 04 1 5951-708150 ID Plate - 05 1 5951-708150 ID Plate - 06 1 5951-708150 ID Plate - 07 1 5951-708150 ID Plate - 08 1 5951-708150 ID Plate - 09 1 5951-708150 ID Plate - 10 1 5951-708150 ID Plate - 11 1 5951-708150 ID Plate - 12 Interoperability Now 1-21 ACU-1000 Operations Manual Table 1-2 Equipment and Accessories Supplied Interface Modules Quantity Item Raytheon P/N As Required A/R DSP-2 Module Main Interface module for connecting radios and other 4-wire devices. PSTN-2 Module Interface module for connecting to the PSTN, SATCOM Terminal, Cellular Phone or other similar 2-wire systems. LP-2 Module Interface module for connecting to 2-wire devices such as a local telephone set or FAX machine. 5961-818000 A/R Table 1-3 5050-300000 5070-400000 Optional Equipment - Not Supplied Item Raytheon P/N STU-III Phone Option (use with DSP-2 for STU-III interface) ACU-Terminal Block, 1.75" (19" rack panel for multiple STU-III Option Power) ACU-Terminal Block, 3.50" (19" rack panel for multiple STU-III Option Power) Battery Backup Option Expansion Option Cable and number kit LE-10 4-Wire Audio Remote with Handset & Speaker LE-20 4-Wire Audio Remote with Desktop Mic and Speaker LE-30 Remote Station LE-40 Remote Speaker Microphone Assy Extended Rear Back Panel Panel & cables to bring ACU-1000 rear panel connectors to front or rear of 19” rack. Null Modem Cable-6 ft. Pelican Case Option Kit Foam Lined with internal rack to hold ACU-1000 above foam lining for operation when case is open. Handset Holder Kit with Positive Retention (Recommended for Mobile Applications) 5961-295000 5960-708000 5960-707000 5961-296000 5961-200160 5961-299000 5961-299001 5961-299002 5961-299005 5050-120000 0313-080100 5970-800010 0827-080805 End of Section One. 1-22 Interoperability Now ACU-1000 Operations Manual 2 Installation 2.1 General This section provides the instructions for unpacking, inspection, installation and set-up. Included are directions for reshipment of damaged parts or equipment. 2.2 Unpacking and Inspection After unpacking the unit, retain the carton and packing materials until the contents have been inspected and checked against the packing list. If there is a shortage or any evidence of damage, do not attempt to use the equipment. Contact the carrier and file a shipment damage claim. A full report of the damage should be reported to the Raytheon Customer Service Department. The following information should be included in the report: 1. Order Number 2. Equipment Model and Serial Numbers 3. Shipping Agency 4. Date(s) of Shipment The Raytheon Customer Service Department can be reached by phone during normal East Coast business hours at (919) 790-1011, or by FAX at (919) 790-1456. Upon receipt of this information, Raytheon will arrange for repair or replacement of the equipment. 2.3 Reshipment of Equipment If it is necessary to return the equipment to the manufacturer, a Returned Material Authorization (RMA) number must first be obtained from Raytheon. This number must be noted on the outside of the packing carton and on all accompanying documents. When packing the unit for reshipment, it is best to use the original packaging for the unit; if this is not possible, special attention should be given to providing adequate packing material around connectors and other protrusions, such as front panel controls. Rigid cardboard should be placed at the corners of the unit to protect against corner damage during shipment. Failure to protect the corners of the front panel causes the most common type of shipping damage experienced on returned equipment. Interoperability Now 2-1 ACU-1000 Operations Manual Shipment should be made prepaid consigned to: Raytheon Customer Service Department 5800 Departure Drive Raleigh, North Carolina 27616 USA Plainly, mark with indelible ink all mailing documents as follows: U.S. GOODS RETURNED FOR REPAIR Mark all sides of the package: FRAGILE - ELECTRONIC EQUIPMENT Inspect the package prior to shipment to be sure it is properly marked and securely wrapped. 2.4 Installation Overview Four steps are needed to properly install the ACU-1000. These steps are: 1. Provide mechanical mounting for the unit. See Section 2.5 for instructions regarding air circulation requirements and other mechanical mounting considerations. 2. Provide the proper primary power for the unit. See Section 2.6 and 2.7. 3. Interconnect the unit with the communications system via the unit's rear panel connectors. See Sections 2.7.5 and Figure 2-2. 4. Check all internal set-ups and adjustments per Sections 2.10 through 2.17. 2-2 Interoperability Now ACU-1000 Operations Manual 2.5 Installation Considerations Careful attention to the following installation suggestions should result in the best unit/system performance. Figure 2-1 provides overall unit dimensions. The ACU-1000 must be installed in a structure, which provides both protection from the weather and assurance of ambient temperatures between -20 and +60 degrees C. Since the unit is neither splash proof, nor corrosion resistant, it must be protected from exposure to salt spray. When the unit is mounted in a cabinet with other heat-generating equipment, the use of a rack blower is suggested to keep the cabinet interior temperature rise to a minimum. 2.5.1 Mounting For applications such as mobile command centers or transportable cases or any other application where some degree of shock and vibration is expected, the ACU-1000 must be mounted with rear support brackets in addition to the front mounting screws. The rear support brackets must not block airflow to the unit. For fixed applications such as floor mounted cabinets or racks in a fixed equipment room, rear supports are recommended, but not required. Screws are provided in the accessory kit for securing the unit to a rack via the front panel. 2.5.2 Cooling The ACU-1000 depends on natural convection for its cooling, therefore it must be mounted in a way that allows for sufficient air circulation or unacceptably high internal temperatures may result. There must be at least one inch of air space above and below the ACU-1000 to allow air to flow through the perforated metal top and bottom covers. It may not be set on a flat surface without provisions made for air to flow through the unit. A fully loaded ACU-1000 (with twelve modules installed) dissipates approximately 100 watts. Consider other heat sources installed along with the ACU-1000 in a 19" rack or other type of cabinet. Do not install other heat generating devices below the ACU-1000. Use forced aircooling in the cabinet if necessary. NOTE: When the ACU-1000 is installed in a high RF environment such as repeater site, it is recommended cable assemblies to each module should be individually shielded. The cable shields should be connected to the connector shells so they make contact with the grounded D-subminiature connector shells or Pin1 of P1-P13 on the backplane board, and not grounded at the opposite end of the cable. Interoperability Now 2-3 ACU-1000 Operations Manual Figure 2-1 2-4 Outline Dimensions Interoperability Now ACU-1000 Operations Manual Figure 2-2 Control and Connector Locations Interoperability Now 2-5 ACU-1000 Operations Manual 2.6 AC Power Requirements The ACU-1000 is designed to operate from 115V or 230V, 47 to 63 Hz, single phase AC power source. The unit will meet all of its specifications over a voltage range of +/- 15% from nominal. The AC power consumption is 80 VA typical, 100 VA maximum. The ACU-1000 is a microprocessor-controlled device. As with any such equipment, a very short loss of AC Power can cause operational problems and/or cause the unit to reset. Raytheon recommends that the ACU-1000 be connected to an AC power source that utilizes an uninterruptible power system (UPS). If the overall site does not have UPS protection, the unit should be plugged into a smaller UPS, such as those used for personal computer systems 2.6.1 AC Line Voltage Selection CAUTION: To prevent damage to the unit, check the AC power line voltage selection before applying power. Also be certain that the unit is connected to a grounded outlet. As shipped from the factory, the ACU-1000 is normally set for the 115 VAC, but if stipulated on the Purchase order, the unit will instead be configured for 230 VAC. However, the voltage selection should always be checked before initial operation. The number visible at the bottom of the AC Power Input Module (located on the rear panel – See Figure 2-2 Control and Connector Locations) indicates the nominal line voltage range in the following manner: 110 position: nominal 115V Operation 220 position: nominal 230V operation Note that if the AC Voltage selection is changed, the AC fuse must also be changed. To change the voltage selection, first remove the line power cord, and then use a small flat blade screwdriver to slide the fuse assembly out. A tab on the fuse assembly prevents its removal unless the power cord is disconnected, and the slot that’s used when sliding the assembly out is only accessible when the cord is disconnected. Remove the fuse from the base of the assembly and replace with the correct fuse. Now use the screwdriver to push open the drawer in the fuse assembly and replace the spare fuse with a spare that corresponds with the AC line voltage. Slide the fuse assembly back into the AC Power Input Module, making sure that it is fully seated. Finally, use the screwdriver to switch the line voltage selection to the correct position and reconnect the AC power cord. Nominal 115V Operation- Use 250V, 3 amp, T (time delay) Nominal 230V Operation- Use 250V, 1.6 amp, T (time delay) To replace a blown fuse, follow the same procedure using the spare fuse in the drawer. 2-6 Interoperability Now ACU-1000 Operations Manual 2.7 DC Power Requirements The ACU-1000 will operate on +11 to +15 VDC, and the power supplies will automatically switch over to DC operation if the AC input voltage sags too low. Actual power consumption will depend on the number of interface modules installed. The DC power input characteristic of the unit is essentially constant power, i.e., the input power requirement is constant so the input current varies with the input voltage and number of modules installed. A fully loaded chassis consumes 56 Watts when run at a nominal 12V DC. To find the input current given the input voltage, divide the input power by the voltage: 56W / 12V = 4.66A at 12V input. To find the power consumption for less than a fully-loaded unit, use the following formula: Power Consumption (W) = 7.5W + (3.85W times number of modules). 2.7.1 DC Voltage Operation The PSM-1A will automatically switch over to DC operation if AC line voltages drop too low. The PSM-1A operates with a nominal +12 VDC input only; it does not contain any provisions for +24 VDC. CAUTION: Always disconnect both the AC and DC input power cabling from the ACU-1000 prior to servicing the unit. NOTE: Any DC power supply connected to the ACU-1000 DC input must be Safety Extra Low Voltage (SELV) certified. 2.7.2 Battery Power for the ACU-1000 The ACU-1000 may also be connected to a 12V battery to provide back-up power if the AC mains fail. When powered by a +12V battery at the DC input, the ACU-1000 current consumption is the following: 0.623A + (0.32A * # interface modules). In other words, the basic chassis with PSM-1A, CPM-4, and HSP-2A modules draws 0.623 Amps, and each interface module draws an additional 0.32 Amp. So the current consumption would be shown as Load Current in Figure 2-3 below. The actual Amp-hours (AH) at a 20 hour rate are also shown for reference. Interoperability Now 2-7 ACU-1000 Operations Manual Basic Chassis Nominal Load Current Nominal Nominal Battery Capacity Required 20 Hour # of Modules 2 Amps 1.26 AH Rating 25 3 1.58 32 4 1.9 38 5 2.22 44 6 2.54 51 7 2.86 57 8 3.18 64 9 3.5 70 10 3.82 76 11 4.14 83 12 4.46 89 2 Hrs Nominal Standby Time Desired 5 Hrs 10 Hrs 20 Hrs 7.2 AH Min@ 2.5 A Discharge Rate (STD option) 17 AH Min @ 2.5 A Discharge Rate 30 AH Min @ 2.5 A Discharge Rate 55 AH Min @ 2.5 A Discharge Rate 17 AH Min @ 4.5 A Discharge Rate 33 AH Min @ 4.5 A Discharge Rate 55 AH Min @ 4.5 A Discharge Rate 100 AH Min @ 4.5 A Discharge Rate Figure 2-3 Battery Sizing Chart To select a properly sized Sealed Lead Acid (SLA) or GEL type battery, determine the number of modules in the shelf, and select the AH capacity with the specified discharge rate. The numbers are based on nominal discharge rates and generally available vendor sizes. Vendors that typically have product available to meet these needs are as follows: Enersys Panasonic Universal Power Group Yuasa Please note that, for a battery back-up system intended to provide extended backup time, external chargers may have to be provided, as the charger built into the ACU-1000 can only supply 1A for the standard option battery backup. For most of the examples above, this would amount to a trickle charge and would not be sufficient to effectively charge a discharged battery. 2-8 Interoperability Now ACU-1000 Operations Manual 2.7.3 External Chargers If an external charger is required, it is recommended that a 2 step constant-voltage constantcurrent type charger be used as it is the fastest, and most efficient, and does not overcharge the battery. Many chargers allow adjustment to optimize for cyclic use or float use. It is not recommended that series or parallel batteries be used as there are significant charging problems that can occur. If more standby time is required, simply getting a larger battery is the preferred solution. 2.7.4 Charge Switch The Charge Switch, SW3, should be set to CHARGE only if the Raytheon battery back-up kit is being used. (See Table 1-3 Optional Equipment - Not Supplied). The charge current drain must not exceed 1 ampere. 2.7.5 Fuse Information There are 3 fuses used in the ACU-1000 chassis. They are as follows: F1 Common, unfiltered DC bus voltage F2 AC input fuse F3 DC input fuse F1 fuses the unfiltered low level DC bus voltage from the PSM-1A that powers the +5V DC switching supplies on each of the other chassis modules. F1 prevents damage to the PSM-1A if a short circuit or other unusual load is applied to this bus. F1 can only be replaced if the PSM-1A is removed from the chassis. Be sure to remove all AC & DC input cabling prior to removing or servicing the PSM-1A. See Figure 2-4 below for a fuse troubleshooting chart. Interoperability Now 2-9 ACU-1000 Operations Manual Apply AC Power Apply DC Power Turn Power Switch ON Turn Power Switch ON Y AC LED Lit? N Replace Fuse F2 Y Problem Fixed? N Y Problem Fixed? Replace Fuse F3 N N DC LED Lit? Y Repair Fault Repair Fault Y +12V, -12V LED Lit? N Replace Fuse F1 Problem Fixed? N Y Fuses and Power OK Repair Fault Figure 2-4 Fuse Troubleshooting Chart 2-10 Interoperability Now ACU-1000 Operations Manual Table 2-1 ACU-1000 Fuses F1 10AF 250V, 3AG DC Bus Low voltage DC to each ACU-1000 module F2 3AT 250V, 5x20mm AC Input AC Line fuse (115 VAC nominal) 1.6AT 250V, 5x20mm AC Input AC Line Fuse (230 VAC nominal) 20AF 32V, 3AG DC Input DC Power Input Fuse (12 VDC nominal) F3 Figure 2-5 Side View of PSM-1A This is a simplified side view of the PSM-1A. To replace Bus Voltage Fuse F1, first turn off the Main Power pushbutton and remove main power cabling from the unit. Loosen the four captive front panel screws and carefully slide the PSM-1A from the chassis. To completely remove the PSM-1A, the attached cable assembly must be disconnected (though this is not necessary to replace the fuse). Fuse F1 is installed behind the heatsink panel as indicated above. Simply snap out the blown fuse and snap in a new one. Reverse disassembly procedures to reinstall the PSM-1A. Interoperability Now 2-11 ACU-1000 Operations Manual 2.8 Installation Checklist Table 2-2 Provide suitable Mounting and Cooling. Check AC Line voltage selection. DC Operation needed? Battery Backup needed? Make Interconnections. Any Remote Control setup required? Are radio interfaces properly configured? Are radio interfaces optimized? Set Telephone Line Level if necessary. Installation Checklist See Section 2.5. See Section 2.6. See Section 2.7. See Section 2.7.2 and 2.7.4. See Section 2.9 for External Interconnect Information. See Section 2.17.5 See Configuration items for the DSP-2 in Table 2-10. See Configuration items for the DSP-2 in Table 2-10. See Section 2.17.3 Numerous other configuration options available but not included in this checklist. See Sections 2.10 to 2.16. 2.9 External Interconnect Information This section details the type and pin-out information for the ACU-1000 external connectors. Up to 15 modules may be plugged into the ACU-1000 chassis. The left-most slot is reserved for the PSM-1A Power Supply Module. The HSP Handset/Speaker/Prompt Module resides next to it, and the third slot is reserved for the CPM Control Processor Module. The 12 remaining slots may be occupied by any of the various ACU-1000 interface modules. Each of the interface module slots (and the HSP-2A slot) has an associated DB-15 connector on the backplane. The pin connections for each module depend on the type of interface module installed in the slot. The connectors for the 12 interface module slots are labeled P1-P12 on the backplane. P1 is associated with the module plugged into the slot adjacent to the CPM-4 Module, and the P12 is the connector for the module plugged into the right-most slot. Pin 1 is at the bottom of each connector. The connector for the HSP-2A slot is labeled P13. The main function of the ACU-1000 is to establish a communication link between different media. For example, the ACU-1000 allows a conversation to take place between a telephone user connected to the PSTN module installed in one slot, and a VHF radio operator interfaced to the DSP module installed in a different slot. A local operator may use the HSP-2A handset and keypad to establish communications with other users connected via any of the interface modules installed. To reference the modules and system users, the 12 slots the interface modules plug into are called “extensions”. Extensions 01 through 12 are associated with backplane connectors P1 through P12. The HSP-2A module is identified by the extension “00” (think of this as similar to “O” for “Operator”). In an Expanded System where two chassis are connected together to provide more extensions, P1-P12 in the Master Chassis are still associated with extensions 01 to 12, and extensions 13 to 24 are associated with P1-P12 in the Expansion Chassis. The HSP 2A slot in the Expansion Chassis is extension 25. The HSP and Interface Modules are 2-12 Interoperability Now ACU-1000 Operations Manual identified by these extension numbers in both the ACU Controller and WAIS Controller programs. System users who employ the front panel keypad or DTMF from a telephone handset or radio keypad to initiate cross-connections also use these extension numbers to identify the connections they want to create. The extension numbers are part of the DTMF signal input entered by the remote user. See Sections 3.5 and 3.6 for full instructions for front panel and remote DTMF operation. System operators who use the ACU Controller or WAIS Controller programs to monitor and control an Interoperability System will also note that the ACU-1000 interface modules are denoted by their extension numbers. Table 2-3 Chassis Slots, Extensions, Connectors, and Modules (“Expansion” refers to the second chassis of a dual-chassis system) Chassis Slot PSM HSP CPM 1 2 3 4 5 6 7 8 9 10 11 12 Extension Master Expansion None 00 None 01 02 03 04 05 06 07 08 09 10 11 12 None 25 None 13 14 15 16 17 18 19 20 21 22 23 24 Rear Panel Connector Module Type None P13 None P1 P2 P3 P4 P5 P6 P7 P8 P9 P10 P11 P12 PSM-1A HSP-2A CPM-4 Various Various Various Various Various Various Various Various Various Various Various Various Note that in the second chassis of a dual-chassis Master/Expansion system, the HSP module has extension #25, and the interface modules are assigned extensions 13 through 24. Interoperability Now 2-13 ACU-1000 Operations Manual 2.9.1 DC Input Connector This two-pin terminal block is mounted on the rear panel. The terminals for the ground (GND) and positive DC input voltage (+V) are clearly marked. 2.9.2 HSP-2A Module Connections The HSP-2A module must be plugged into the first slot to the right of the PSM module; this is extension 00 in the card cage, and connects it to P13 on the backplane. The HSP-2A has improvements over the HSP-2 module that it replaced. On that affected P13 was an improved interface with devices that had a COR output. To maintain backwards compatibility, a jumper was added (J10) to allow the HSP-2A to function like the HSP-2. For this reason, some of the pin signal names and description vary based on the location of the J10 jumper (as described within the table). Table 2-4 HSP-2A Module Connections- P13 PIN Signal Description 1 2 3 4 5 6 Ground N/C /AUX Out 1 /AUX In 1 Ground External Speaker – or – Ground for single ended TX audio- TX Out B Audio Ground RXA Audio Line In N/C /AUX Out 2 /AUX In 2 /PTT Out COR IN (/AUX In 3) Ground connection. No connection. Auxiliary Output 1- Active low; used for special functions only. Auxiliary Input 1- Active low; used for special functions only. Ground connection. External Speaker output- Use JP1 to enable. Configure via JP10; pins 1-2 for Ext Spkr, pins 2-3 for TX audio ground. Ground used to allow use of standard Raytheon radio and NXU-2A interface cables. Ground connection for audio input. 0 dBm line level audio input; 22k-100K ohm impedance via gain select jumpers JP7-JP9. (RXA) No connection. Auxiliary Output 2- Active low; used for special functions only. Auxiliary Input 2- Active low; used for special functions only. Active Low PTT output to a transmitter. COR Input from a receiver; active low. May also be configured as Auxiliary Input 3- Active low; used for special functions only. Same audio as fed to the speaker except at 0 dBm line level from a 600 ohm source. Level is not affected by the front panel volume control. Ground connection for Line In (RXB) 7 8 9 10 11 12 13 14 TX Out A (unbalanced) 15 Ground for single-ended RX Audio - RXB 2-14 Interoperability Now ACU-1000 Operations Manual 2.9.3 DSP Module Connections – P1 through P12 A DSP-2 or DSP-3 module may be plugged into slots 1 through 12 in an ACU-1000 chassis. Table 2-5 PIN Signal DSP-2 or DSP-3 Module Connections- P1 through P12 Description 1 Ground Ground connection. 2 RXD RX Data; used for special functions only. 3 /AUX Out 1 Auxiliary Output 1- Active low; used for special functions only. 4 /AUX In 1 Auxiliary Input 1- Active low; used for special functions only. 5 Ground Ground connection. 6 TX Out B Balanced transmit audio output. 7 Audio Ground Audio ground connection for unbalanced inputs/outputs. 8 RX In A Balanced receive audio input. 9 TXD TX Data; used for special functions only. 10 /AUX Out 2 Auxiliary Output 2- Active low; used for special functions only. 11 /AUX In 2 Auxiliary Input 2- Active low; used for special functions only. 12 /PTT Out Active low PTT output to a transmitter. 13 /COR In COR input from a receiver, active low. 14 TX Out A Balanced transmit audio output. 15 RX In B Balanced receive audio input. Note: For unbalanced TX audio, ground “B” pin of audio pair; connect unbalanced audio to “A” pin. The DSP modules also have a front panel RJ-45 Ethernet connector. 2.9.4 PSTN-2 Module Connections A PSTN-2 module may be plugged into slots 1 through 12 in an ACU-1000 chassis. Table 2-6 PSTN-2 Module Connections- P1 through P12 PIN Signal Description 1 2 3 4 5 6 7 8 9 10 11 12 13 14 15 Ground Ground /AUX In 2 /AUX Out 2 Ground NC Audio Ground NC Ground NC /AUX In 1 /AUX Out 1 NC NC NC Ground connection. Ground connection. Auxiliary Input 2- Active low; used for special functions only. Auxiliary Output 2- Active low; used for special functions only. Ground connection. No Connection Audio ground connection for unbalanced inputs/outputs. No Connection Ground connection. No Connection Auxiliary Input 1- Active low; used for special functions only. Auxiliary Output 1- Active low; used for special functions only. No Connection No Connection No Connection Interoperability Now 2-15 ACU-1000 Operations Manual 2.9.5 LP-2 Module Connections An LP-2 module may be plugged into slots 1 through 12 in an ACU-1000 chassis. Table 2-7 LP-2 Module Connections- P1 through P12 PIN Signal Description 1 2 3 4 5 6 7 8 9 10 11 12 13 14 15 Ground NC /AUX In 2 /AUX Out 2 Ground Tel Line 1 Tip Audio Ground NC NC /VOX /AUX In 1 /AUX Out 1 /PTT In Tel Line 1 Ring NC Ground connection. No Connection Auxiliary Input 2- Active low; used for special functions only. Auxiliary Output 2- Active low; used for special functions only. Ground connection. Telephone Line 1 Tip Connection. Audio ground connection for unbalanced inputs/outputs. No Connection No Connection VOX Output- Active low; used for special functions only Auxiliary Input 1- Active low; used for special functions only. Auxiliary Output 1- Active low; used for special functions only. Input - Active low; used for special functions only Telephone Line 1 Ring Connection. No Connection 2.9.6 Serial Remote Connector This female 9-pin D-sub connector provides a serial RS-232 interface with the CPM-4 module. The connector is labeled P15 on the backplane. Standard DCE pinout is used. This connector should not be used simultaneously with the RJ-45 Ethernet connector on the CPM-4 front panel. Table 2-8 Serial Remote Connections- P15 PIN Signal 2 3 5 TX Data RX Data Ground 2-16 Interoperability Now ACU-1000 Operations Manual 2.9.7 Expansion Connector This connector carries parallel control signals and audio between the Expansion Connectors of the two ACU-1000 chassis of a dual-chassis system. An expansion cable may be purchased from Raytheon; see Table 1-3. These connections are not intended (and must not be used) for any other purpose. Connection information is given here for convenience in troubleshooting. This 37 pin Female D-sub connector is labeled P14. Table 2-9 Expansion Connector- P14 PIN Signal Description 1 2 3 4 5 6 7 8 9 10 11 12 13 14 15 16 17 18 19 20 21 22 23 24 25 26 27 28 29 30 31 32 33 34 35 36 37 D Bus 7 D Bus 5 D Bus 3 D Bus 1 Ground J14-2 J14-6 J14-10 Strobe AD1 Ground A Bus 15 A Bus 13 A Bus 11 A Bus 9 A Bus 7 A Bus 5 A Bus 3 A Bus 1 D Bus 6 D Bus 4 D Bus 2 D Bus 0 Sel 14 J14-4 J14-8 Data Ground AD0 AD2 A Bus 16 A Bus 14 A Bus 12 A Bus 10 A Bus 8 A Bus 6 A Bus 4 A Bus 2 Data Bus 7 Data Bus 5. Data Bus 3. Data Bus 1. Ground connection. Expansion I/O Expansion I/O Expansion I/O Register Strobe Register Address Bit 1 Ground connection. Audio Bus 15. Audio Bus 13. Audio Bus 11. Audio Bus 9. Audio Bus 7. Audio Bus 5. Audio Bus 3. Audio Bus 1. Data Bus 6. Data Bus 4. Data Bus 2. Data Bus 0. Select 14. Expansion I/O Expansion I/O Data Ground connection. Register Address Bit 0 Register Address Bit 2 Audio Bus 16. Audio Bus 14. Audio Bus 12. Audio Bus 10. Audio Bus 8. Audio Bus 6. Audio Bus 4. Audio Bus 2. Interoperability Now 2-17 ACU-1000 Operations Manual 2.10 Local Radio Interface & Optimization There are three major steps to interfacing radios and other four-wire devices to a DSP module: • Connect the communications devices to ACU-1000 rear panel D15 connectors using properly designed interface cables (either purchased from Raytheon JPS or designed/built by the customer). • Optimize each individual interface/ACU extension. • Optimize the operation of each extension when cross-connected with the other extensions in the system. This section explains how best to perform these steps. Acceptable communications links are possible without following all of the steps described, but following the procedures outlined will provide seamless communications in a wide variety of difficult communications environments. These procedures may appear more complicated than those required for less sophisticated interoperability devices. This is largely because this other equipment does not provide many of the features that the ACU-1000 employs to resolve complex interoperability problems. Raytheon JPS has simplified the interface process by: • Proper design of interface cables • Coordination of the use of these cables with the ACU Controller software • Applications Notes describing communications devices • Use of templates to load settings that have been optimized for each individual device • Flow charts to guide the installer through the final optimization steps the peculiarities associated with individual All of these are explained in the following sub-sections, using the Universal Unterminated Cable Application Notes as a guideline. 2.10.1 Interface Cables for Radios and Other Communications Devices The systems engineers at Raytheon JPS Communications have created interface cables and accompanying Application Notes for a large number of radios and other communications devices. Many of these Application Notes are included on the Resource CD that’s included with the ACU-1000. 2-18 Interoperability Now ACU-1000 Operations Manual 2.10.2 Radio Device Set Up Using Applications Notes and Radio Templates The details of interfacing a radio to the ACU-1000 are contained in Application Notes that are specific for each radio or other device. These notes are available on the ACU-1000 Resource CD that is shipped with each ACU-1000; they are also available by downloading the latest ACU Controller Software from the Raytheon Website at: http://www.raytheon.com/capabilities/products/acu1000/index.html Click on Software Downloads on the right side of the webpage, fill out the form and select ACU Controller Software for download. Newly created notes may be found there. These notes are also available via the ACU Controller configuration page. In addition to radio specific cable Application Notes, there is also a generic cable Application Note that helps an installer design a radio cables and optimize the interface. Note: The cable designed for any particular radio will work with the 15pin D-sub interface connector any of these JPS Communications Interoperability Devices: ACU-2000IP, ACU-1000, ACU-M, NXU-2A, ARA-1, and ACU-T. The ACU-T requires a short adapter cable. The following sub-sections give additional information to further explain the interfacing information presented in the Application Notes documents. 2.10.2.1 Drawing Number and Revision: Important entries in the document header include the Drawing Number and the Revision. The radio model number is not used as the drawing name because some Application Notes apply to several different radio models. The drawing number corresponds to the P/N of the interface cable. Both the P/N and revision are marked on each cable. It’s important that the revision number of Application Notes document matches that of the cable itself. The revision letters and numbers denote the following: Letter change (A to B or B to C): A change has been made that will materially affect the use of the Application Notes by the customer. Example: Change in attenuation network or change in recommended DSP module programming settings. Number change (B to B1 or B1 to B2) Denotes a documentation-only change has been made that will not affect use of the Application Notes by the customer. Example: Correcting a misspelling or adding to (but not materially changing) an explanation. The cable information on the Raytheon Website lists the current revisions of the Application Notes and the cable drawings. If you are in possession of an Application Note of a previous revision, download the newer revision if there has been a Revision Letter change; this isn’t necessary if only the number has changed or appended. Interoperability Now 2-19 ACU-1000 Operations Manual 2.10.2.2 APPLIES TO: Make sure that the Applications Note is the correct one for the radio being interfaced. If you are not sure, recheck the cable list on the Raytheon web site or contact Raytheon Customer Service. If a cable does not exist for a particular radio, then either use the universal cable to make a cable, or request that a new cable be made by contacting Raytheon Customer Service. 2-20 Interoperability Now ACU-1000 Operations Manual 2.10.2.3 RADIO MODIFICATIONS: Sometimes it’s necessary to make a physical modification to the radio. Usually this is required because needed signals (such as a PTT input or a TX Audio input (MIC Audio) are not available without the change. Sometimes these signals can be made accessible through radio programming changes rather than hardware modifications. The Application Notes always endeavor to provide the easiest possible interface method. 2.10.2.4 RADIO PROGRAMMING: Al necessary or recommended changes to the radio programming are listed. Raytheon JPS recommends that radios interfaced to the ACU-1000 rear panel be set for low transmit power. The reason is that many Local Interoperability Systems have a number of radios operating in close proximity, this increases the chance of radio front-end desensitization and other problems likely a complex RF environment. Higher power exacerbates these problems. This is particularly true of Tactical, Transportable, and Mobile Applications where quick set up or a quickly changing RF environment is likely. If careful attention is paid to antenna placement, the TX and RX frequencies used, as well as proper grounding and shielding practices, it’s certainly possible to operate radios at a higher power setting, but stay aware of the potential for problems. Radio Programming functions that may be required are: • Make signals accessible at the radio I/O (PTT, Mic In, COR, etc.) • Set Channel Frequency • Set power output for lowest reliable level • Set CTCSS or DCS • Squelch/COR pinout • COR output: Active Hi or Active Low • Program Squelch/COR output for carrier plus tone • Set Minimum audio level • Disable any off-hook setting • Enable cable ignition sense 2.10.2.5 RADIO CONTROLS: Any necessary or recommended radio control adjustments are provided. Many radios do not have a constant volume Line Out, and the RX audio provided to the ACU-1000 varies with the volume setting. If so, the proper setting is listed. Interoperability Now 2-21 ACU-1000 Operations Manual 2.10.2.6 CABLE CONNECTIONS: The various cables covered by the Application Notes are listed, as well as the type of RF connector found on the associated radio. 2.10.2.7 DSP JUMPERS: The proper DSP module audio input configuration jumper settings are listed. See 2.12.4 for more information regarding the DSP module audio input configuration. 2.10.2.8 RADIO INTERFACE OPTIMIZATION: This section lists all of the relevant DSP module options settings. These are the same settings that are automatically configured when the corresponding radio template is loaded via the ACU Controller. Note that the DSP module has a variety of features that are either not directly related to the interface cabling or are dependent on the particular system. Some of these features are covered by the Individual Extension Optimization Procedures explained in Section 2.10.4. The settings listed in the Application Notes are optimum starting points based on actual radio tests performed by Raytheon JPS Systems Engineering. Because of radio-to-radio variations and different operational situations, these are starting points only. Be sure to follow through with the optimization procedures that follow. The ACU Controller and WAIS Controller also allow on-the-fly changes of an individual radio interface when dynamic communications environments require it. For Example: • Trunked system channel acquisition delays increase dramatically due to stepped up system usage. • A poorly-performing radio in the field must be communicated with, necessitating a change in RX audio levels or the introduction of Noise Reduction. • Providing Dispatch Priority to an important system user. 2.10.2.9 NOTES: Any special notes related to this radio are provided, as well as any setup hints pertaining to some likely operational scenarios. 2-22 Interoperability Now ACU-1000 Operations Manual 2.10.3 Request for Creation of New Cable Designs If a customer would like to request that Raytheon create a new cable design, below is a list of the basic steps in the process. • Contact Customer Service (919) 790-1011 with a request for a new cable design. • Be prepared to furnish the target radio and one other radio (portable or mobile) that can communicate with it. • The target radios must be set up and tuned so that they communicate out of the box. • All accessories, a full service manual, programming instructions, and a programming box with proper cables must be supplied. • If target radio is a satellite phone, the phone must be commissioned, tested, and ready for use. • Type of cable required (ACU-2000IP, ACU-1000, ACU-T, or Radio Tray) and application. • Permission to open the radio to modify or program as required. • Technical customer contact person with phone numbers. • List of materials and equipment supplied. • Contact Customer Service at (919) 790-1011 for an RMA# prior to shipping any material or radios. • Raytheon will do the following: o Design the interface cable o Determine any radio and programming changes. o Optimize the Interface module setup. o Draw a cable schematic. o Prepare a detailed Application Note that describes the optimal settings. o Add the new cable and Application Note to the Interface Cable Database. Interoperability Now 2-23 ACU-1000 Operations Manual 2.10.4 Optimization of Individual ACU-1000 Extensions Once the radio, satellite phone, or other communications device is connected to the ACU-1000 using the proper interface cable, the interface must be optimized to fit the individual communications device (usually a radio) and the circumstances of its use. A flow chart is provided to assist with this task. This flowchart assumes that the ACU Controller is being used to adjust the DSP configuration, but the same steps may be performed using the WAIS Controller or the HSP-2A keypad. The detail notes that follow each flow chart provide additional explanations when necessary. If the installer has had some experience setting up an ACU-1000 interface it may prove sufficient to simply follow the flow chart. The notes are tagged by the number of each question posed in the flow chart (e.g. QA3 is the third question in flow chart A, and “QA3” is noted at the top of the question diamond). This allows the user to reference the notes only for specific segments of the flow charts. Flow Chart A is the Overall Setup procedure. Charts B & C are used only if certain conditions exist: • Use Flow Chart B only if Application Notes are not available • Use Flow Chart C only if the radio being interfaced is part of a trunked system Flow Chart B guides the installer through a simplified version of the steps taken by Raytheon Systems Engineering when a new radio interface cable is designed. Flow Chart C provides a systematic procedure for determining the proper amount of TX Audio Delay to compensate for the Trunked System’s channel acquisition delay. After an individual extension has been optimized, that port’s operation with the other parts of the ACU-1000 system must be checked and optimized if necessary. Following the flow charts and explanations is a description of a procedure for operational testing and final adjustment. See Section 2.10.4.4. 2-24 Interoperability Now ACU-1000 Operations Manual START QA1 TEMPLATES AVAILABLE? Y PERFORM INITIAL SETUP USING RADIO TEMPLATE N QA2 APP NOTES AVAILABLE? Y CONFIGURE DSP PER APPLICATION NOTES N BASIC SETUP PROCEDURE NEW RADIOS FLOW CHART B QA3 FALSE KEYING ON NOISE? Y SET SQUELCH TYPE TO VMR AND ADJUST N QA4 TRUNKING SYSTEM? N SET TX AUDIO DELAY FLOW CHART C Y ADJUST COR INHIBIT TIMER Y ADJUST NOISE REDUCTION Y QA5 PING PONG PROBLEMS? N QA6 NOISE Y REDUCTION REQUIRED? N S OPERATIONAL TEST & FINAL ADJUSTMENTS END Figure 2-6 Interoperability Now Setup Flowchart, Overall Instructions 2-25 ACU-1000 Operations Manual 2.10.4.1 Flow Chart A Details – DSP Setup Procedure QA1 Are Templates Available? To determine if there is a Template for the radio model being interfaced, double-click on any DSP module icon to bring up its setting screen. Next, click on the ‘Load’ button to bring up the list of radio templates. (QA1 Yes) Initial Set Up Using Radio Template If you are not sure if the radio and cable are configured per the Raytheon Application Notes, do not click on the Template file to load it. Cancel and click on the ‘Open App Notes” button to pull up the proper Application Notes. If the provisions of the Application Notes can’t be followed, jump ahead to the Basic Setup Procedure (Flow Chart B). • Click on the Template file that has the same name as the model of radio being interfaced. All of the DSP settings will change to those listed on the Application Notes. The Last Loaded / Saved field will list the name of the Template File. Jump to QA3. (QA1 No) Jump to QA2 QA2 Are Application Notes Available? Application Notes are provided with radio interface cables purchased from Raytheon or may be obtained from the Customer Service Department. If you do not currently have the proper radio Template file, but do have Application Notes, proceed to step QA2 Yes. Otherwise jump to flowchart B (QA2 Yes) Application Notes but no Template File • Ensure that the radio and cable are configured per the Application Notes. • Set the DSP module to its default settings: • If each ACU Controller setting is marked [default], no action is necessary. Otherwise, use the ACU Controller to set all to the Default position. Alternatively, all settings can be quickly set to their default settings by loading the DSP Default Template. • Use the ACU Controller to change all DSP settings to those listed on the Application Notes. • Click “Apply” to save the settings and stay in the Settings Mode. Jump to Q3 (QA2 No) Jump to Flow Chart B QA3 False Keying on Noise? 2-26 Interoperability Now ACU-1000 Operations Manual If the radio Squelch Type is either COR or VOX, and the channel is noisy, the radio may unsquelch inappropriately due to this RF noise. When the radio is cross-connected to another radio via the ACU-1000 or ACU-T, the cross-connected radio will transmit every time the noisy radio unsquelches. If a radio has a tendency to key on noise, change the Squelch Type to VMR (Voice Modulation Recognition). The DSP Module will unsquelch only when human speech is detected in the receive signal. [Inappropriate unsquelch of the radio can’t be resolved by changing the VOX Threshold of the DSP Module] (QA3 Yes) Set Squelch Type To VMR Mode • On the DSP Module Settings Screen, select VMR from the Squelch Type options. • Next determine the proper threshold. Listen while the radio receives a speech signal. The default setting is Med1. If the radio does not break squelch for all received speech, the threshold is too high; adjust to Low. If the radio breaks squelch on all speech signals and also on some noise input, increase the threshold to the Med 2 setting, and if necessary to High. (Note, for extremely noisy signals it may not be possible to find a threshold setting that will unsquelch for all speech signals and also always stay squelched during periods of high noise). • Now adjust the hang time. The intent of VMR hang time is to keep the system unsquelched during pauses in speech. The default (and minimum) setting is 775 milliseconds. If the radio squelches inappropriately during the reception of speech, raise the hang time in one step increments until proper operation is reached. • Click “Apply” to save the settings. Jump to QA4 (QA3 No) Jump to QA4 QA4 Is The Radio Part of a Trunking System? Trunked radio systems allow efficient use of multiple channel systems. When a user requests access, the system automatically switches the user’s radio to a free (unused) channel. Trunked systems users, when keying their radios, must wait for a tone that signals that a free channel has been acquired before beginning a conversation, while conventional (non-trunked) system users can begin talking as soon as they key their radios. The “Channel Acquired Tone” that signals trunked radio users that they may begin speaking is not available to system users on cross-connected radios, so the trunked radio’s TX audio must be delayed, following assertion of PTT, until the normal channel acquisition time has passed. (QA4 Yes) Jump to Flow Chart C (QA4 No) Jump to QA5 Interoperability Now 2-27 ACU-1000 Operations Manual QA5 Ping-Pong Problems? Some radios have a tendency to unsquelch momentarily at the end of each transmission. In an ACU system, when two radios are cross-connected, whenever one radio is unsquelched, the other is keyed. If a cross-connected radio exhibits the momentary unsquelch after TX behavior, the cross-connected radio will inappropriately transmit. If both radios unsquelch at the end of each transmission, the system will “ping-pong”, with first one radio keyed momentarily and then the other. This effect can be experienced with the DSP module set to either the COR or VOX Squelch Types. To ensure that a radio being interfaced will not create a “ping-pong” behavior, key the radio and check for signs of a momentary unsquelch at the end of the transmission. This can be done by cross-connecting the HSP module with the radio. Key the HSP handset and see if the HSP’s PTT LED comes on momentarily after the transmission is ended. If the PTT LED comes on, the ACU should be set to ignore this inappropriate COR signal by enabling the COR Inhibit after PTT feature. NOTE: While the COR Inhibit Timer will prevent ping-pong and inappropriate keying of cross-connected radios; it will also prevent the radio from receiving a legitimate signal until the timer expires. This is not usually a problem because the radio is normally producing a burst of noise during this time. If system performance with the COR Inhibit Timer enabled is unsatisfactory, switch to VMR mode. See “(QA3 Yes) Set Squelch Type to VMR Mode”. (QA5 Yes) Adjust COR Inhibit Timer • The default setting for the COR Inhibit Time after PTT is 100 ms... If this does not prevent the DSP front panel COR indicator from lighting momentarily at the end of a transmission, set to the next highest time and repeat the test. (Note: The Signal LED may still light.) • Note: The Signal LED may still light. • Continue to raise the time setting one step higher than the time required to prevent the inappropriate COR indication. • It may be necessary to check system performance with two radios cross-connected (rather than using the HSP) to ensure the optimum COR Inhibit Timer Setting. • Click “Apply” to save the setting. (QA5 No) Jump to QA6 2-28 Interoperability Now ACU-1000 Operations Manual QA6 Is Noise Reduction Required? [Affects RX Audio Only] The DSP module has a Digital Noise Reduction Mode that can be used to clean up noisy received signal input. This affects noise that is mixed with the speech signals, not RF noise that unsquelches a radio, creating a loud noise burst. The only method to find the correct amount of Noise Reduction to apply is to listen to the received signal as the level is changed; this is best done using the HSP Handset so that you can be sure that all noise heard is from the radio’s received signal. Do not use the HSP speaker or a cross-connected radio. A little Noise Reduction goes a long way, and too much will give the received signal a fuzzy, artificial sound. It may be advantageous to attempt to improve the signal quality by other means (such as improving antenna placement) before adding Noise Reduction. (QA6 Yes) Adjust Noise Reduction • The default setting for Noise Reduction is Off (no reduction). While listening to the received signal, increase the Noise Reduction setting one step at a time until the best signal quality is reached. • If possible, listen to the receive signal from several different sources and determine the Noise Reduction setting that works for most. • If the signal quality is later improved, revisit the Noise Reduction setting. • Click “Apply” to save the setting. Jump to “Operational Test & Final Adjustments”. (QA6 No) Jump to “Operational Test & Final Adjustments” Interoperability Now 2-29 ACU-1000 Operations Manual FLOW CHART B Basic Setup For New Radios When No Template or Application Notes Are Available START QB1 IS COR AVAILABLE? Y SET SQUELCH TYPE TO COR N ACTIVE HI OR ACTIVE LOW? HI SET TO ACTIVE HIGH COR LOW SET TO ACTIVE LOW COR SET SQUELCH TYPE TO VOX AND ADJUST SET RX LEVEL SET TX LEVEL QB2 IS EQUALIZATION REQUIRED? Y ADJUST EQUALIZATION N FLOW CHART B COMPLETE RETURN TO QA3 (FLOW CHART A) Figure 2-7 Setup Flowchart, Basic Initial Setup 2-30 Interoperability Now ACU-1000 Operations Manual 2.10.4.2 Flow Chart B Details – Basic Setup DSP Setup With No Templates & No Application Notes QB1 Is a COR Signal Available? The default Squelch Type is VOX because it will function with all radios. However, if a COR (unsquelched) signal line is available, this is usually a better choice. Determine if the radio has an output that will go either high when the radio unsquelches (Active High COR), or low (Active Low COR). It may be necessary to change the radio programming to enable the COR output signal. (QB1 Yes) Set COR Squelch Type & COR Polarity • On the DSP Settings Screen, change the Squelch Type To COR. • The default COR Polarity is Active Low. If the COR signal is actually Active High, change the COR Polarity setting to Active High. Note: A radio with active high COR, when connected to a DSP Module set for Active Low, will keep the DSP’s COR LED on except when the radio unsquelches. • Click Apply to save the settings. Jump to Set RX Level (QB1 No) Jump to Set RX Level Set RX Level The RX (Receive) level must be optimized to allow best system operation. First of all, conversations, especially conference calls, will be more intelligible if all voices are at the same volume level. Second, VOX and VMR work best at the proper RX level. • Monitor the front panel of the DSP module while the radio is receiving a voice signal at a normal speaking volume level. • Watch the DSP front panel SIGNAL light. It should flicker with the incoming speech. If the level is too high, the LED will be on constantly during received speech. If too low, the LED will never come on, or will flicker only occasionally. • Adjust the RX Level until the Signal LED flickers with incoming speech. • Click Apply to save the setting. Note: If the interface is using speaker audio from the radio, the level will vary depending on the radio’s volume control setting. Set the RX level in the DSP to 0 dBm, and then vary the radio volume level until the proper Signal LED indication is achieved. Note the setting, and keep the volume control at this setting. Interoperability Now 2-31 ACU-1000 Operations Manual Set TX Level The proper TX level is required to fully modulate the transmitter, but not over modulate it. Most radios have an audio limiter prior to the transmitter to prevent over modulation. Even with the limiter, some radios will still over modulate and some even shut off the TX signal when the input is too high. When the level is set too low the audio of the radio receiving the signal will be lower than normal, requiring that its volume control be turned up to an abnormal position. When the audio is too hot the audio will sound squashed or forced, and if the radio does not have a TX audio limiter the audio will sound distorted and over modulated. • Cross-connect the HSP Module to the DSP Module being adjusted, and use the HSP Handset to key the radio while speaking at a normal volume level. • Monitor to the TX audio of the interfaced radio on a receiver set to the radio’s TX frequency. • The quickest way to set the TX audio level is to use the ACU Controller to set the DSP Module’s TX level to its lowest setting. Increase the TX level until the audio in the monitoring radio stops increasing in level. This is the threshold point where the limiter is preventing the TX level from going any higher. Leave the DSP Module’s TX level at this threshold value. • You may also follow the radio’s recommended TX input audio setting procedure. • Click Apply to save the TX Level setting. QB2 Is Equalization Required? High Frequency Equalization either boosts or rolls off the high end of the RX audio spectrum. This adjustment compensates for poor RX audio quality. The best way to determine the proper High Frequency Equalization Setting is to listen to the received audio in the HSP handset (not the HSP speaker, unless a high-quality external speaker is connected). (QB2 Yes) Adjust Equalization • Monitor the RX Audio in the HSP handset. • If the audio sounds like it is lacking treble, the high frequencies can be increased (boost). • If the signal sounds too bright or harsh, the high frequencies can be attenuated (cut). • When the best-sounding audio is attained, click Apply to save the setting. Note: Most Motorola mobiles and portables sound best with a boost of at least 3.5 dB. (QB2 No) Flow Chart B Complete - Jump to QA3 2-32 Interoperability Now ACU-1000 Operations Manual FLOW CHART C Trunked Radio TX Audio DSP-2 Delay Adjustment START QC1 Y ACQUISITION TIME KNOWN? N DETERMINE TX AUDIO DELAY REQUIREMENT QC2 DELAY NEEDED GREATER THAN 800 ms? N SET TX DELAY TO KNOWN AMOUNT Y CONTACT FACTORY QC3 DID FACTORY SOLUTION WORK? Y SET TX DELAY TO KNOWN AMOUNT N QC4 CAN OPERATIONAL PROCEDURES BE IMPLEMENTED? Y N CONTACT FACTORY FLOW CHART C COMPLETE RETURN TO QA5 (FLOW CHART A) Figure 2-8 Interoperability Now Setup Flowchart, Trunked System Audio Delay Adjustment 2-33 ACU-1000 Operations Manual 2.10.4.3 Flow Chart C Details - Trunked Radio TX Audio Delay Adjustment Procedure QC1 Is Acquisition Time Known? Trunked Systems require TX audio delay that matches the normal channel acquisition time. This delay holds up the RX audio from cross-connected radios until the trunked radio is ready to begin transmitting. If the Channel Acquisition Time is known, the task is simply to add this amount of TX audio delay. If it is not known, a procedure must be followed to determine the proper TX Audio Delay Setting. (QC1 No) Determine TX Audio Delay Requirement • Set the TX Audio Delay to its maximum setting of 800 ms. • Cross-connect the HSP Module to the DSP associated with the trunked radio. • Transmit via the HSP while monitoring the signal via a receiver that is part of the trunked system. • If the first syllable of the transmissions is being cut, more than 800 ms delay is needed. Contact Systems and Applications Engineering at the Raytheon factory for recommendations. • If the first syllable is not being cut, lower the delay setting until it is, then raise the setting up one step. • Click “Apply” to save the TX Audio Delay setting. Jump to QA5. Flow Chart C Complete. The TX Audio Delay Setting may be a compromise between comfortable conversation and safety. When it is imperative that absolutely no first syllables are ever lost, the TX audio delay must be at least as long as the longest channel acquisition time (normally longest during times of heaviest system use). This may result in longer than needed delays during periods of low or normal system traffic. If not sure, leave at max TX Audio Delay. (QC1 Yes) Jump to QC2 QC2 More Than 800 ms Delay Needed? The DSP-2 module can provide up to 800ms TX audio delay. Contact Systems and Applications Engineering at the Raytheon factory for recommendations if delay requirement exceeds 800 ms. 2-34 Interoperability Now ACU-1000 Operations Manual (QC2 No) Set Known Delay • Set the TX Audio Delay to the setting equal to (or just above) the known channel acquisition time. • Click on “Apply” to save the TX Audio Delay setting. Jump to QA5. Flow Chart C Complete. (QC2 Yes) Contact Systems and Applications Engineering at the Raytheon factory for recommendations. QC3 Did Factory Solution Work? (QC3 Yes) Implement Factory Solution Recommendation • Set TX Audio Delay Jump to QA5. Flow Chart C is Complete. (QC3 No) Jump to QC4 QC4 Can Operational Procedures be Implemented? (QC4 Yes) Implement Operational Procedures When long channel acquisition times cannot be completely compensated for by adding TX Audio Delay, system users must follow proper procedures to ensure that the entire message is being heard. This can mean simply waiting for the necessary time after keying their microphones before beginning to speak, repeating important communications, or getting a response from the listener. Alternatively, there may be adjustments or modifications that can be made to the trunked radio system to decrease the channel acquisition times. Contact the system supplier to inquire about reducing acquisition times. (QC4 No) Contact Systems and Applications Engineering at the Raytheon factory for further recommendations. Flow Chart C Complete - Jump to QA5 Interoperability Now 2-35 ACU-1000 Operations Manual 2.10.4.4 Operational Test and Final Adjustment This procedure accounts for radio-to radio variations and verifies proper cross-connection operation of the system. It will be necessary to create separate cross-connections of the radio being interfaced with every other radio in the ACU-1000 or ACU-T system, and perform each of the following checks. The associated DSP settings can be varied during the operational test to check for the optimum level. Use the ACU Controller to move the setting up or down by one level while communicating to check whether overall operation is degraded or improved, except for correcting TX & RX levels. If these settings need modification, jump back to QB1 and perform the entire settings procedure. If necessary, refer to relevant sections of the flow charts for more information regarding these quick checks. • Verify proper TX and RX levels. If problems are noted jump back to QB1 of the flow chart. Do not modify individual module levels, or you may raise an RX level when what is really needed is a lower TX level. • Check for ping-pong problems. • Listen for noise problems. • Listen to RX signal quality to determine if equalization is required. • Verify that the proper Squelch Type has been set. • For Trunked radios, listen for audio delay issues (missed first syllables or too much delay before first syllable is heard). • Repeat the above steps as necessary. When completed, there are two options: If a template already exists for the radio being interfaced, click “OK” to save the settings and exit the DSP settings screen. If you are interfacing a radio that does not already have a stored template and you want to create one to apply to other radios in the system (or to save these exact settings for later recall), click “Save” and store the settings under the Template name of your choice. 2.11 PSTN Simplified Setup Procedure These instructions assist in the basic setup of a PSTN module to the phone system it’s connected to. This step-by-step process lists the steps in the best order to quickly achieve the optimal results. Note that the phone line send and receive level settings work inversely proportionate to one another. Setting the PSTN to -9 dBm means the incoming audio in boosted nine decibels before it is put on the ACU backplane and the outgoing is attenuated 9 decibels before it hits the phone line. Since the audio level within the ACU chassis is 0 dBm, this will present a -9 dBm signal to the phone system. 2-36 Interoperability Now ACU-1000 Operations Manual Note the default setting of -9 dBm is the maximum allowed into most U.S. and foreign telephone networks at the subscriber end. Some PBXs may only allow -12 dBm. Ensure that the line levels are correct for the network being used and do not exceed maximum allowed levels. • Cross-connect the HSP handset to the PSTN and place a call from the PSTN to the phone number of an associate who will help with the setup. Refer to Section 2.17.3.1, Telephone Line Level. Within the guidelines presented, the line level may be adjusted in 3 dB steps to present the proper level to your associate at the remote telephone. • Now listen as the associate speaks and verify that the VOX LED illuminates on the PSTN even for softly spoken speech. If the VOX doesn’t always trip, raise the telephone RX Level Boost setting until it does, but no higher. 6 dB of boost is the default setting and a good place to start. • Continue the conversation while monitoring the VOX LED. If problems persist with failure to VOX or if false VOXing due to background noise at the distant phone occurs, adjust the VOX threshold. There are only two settings, Low & High. The default setting is Low threshold. If the VOX does not always trip, and the setting is currently at High, lower the threshold to the Low setting. If the threshold is already set to Low the VOX cannot be made more sensitive, so instead increase the RX Level Boost. If the VOX sometimes falses on background noise and the threshold is set to low, move the threshold to the high setting. Note: The VOX is expected to trip on loud background noises; lower the threshold only if the VOX is activated for background sounds that are below the volume of normal speech. • Now have your associate on the distant phone count from one to twenty at a slow, conversational rate. The VOX should remain active throughout. If the VOX drops in and out, raise the VOX hangtime just until this no longer occurs. The default setting is one second; if the VOX continually drops out between words, increase it to 1.5 seconds or, if necessary, to two seconds. • With the HSP handset, talk with a normal conversation level and have your associate verify that you are being received at an acceptable level. If not, and you are outputting the maximum legal level to the line contact JPS for further suggestions. • Interconnecting multiple active PSTNs together on the same net can sometimes cause hybrid unbalance issues. Please contact JPS for further suggestions and guidance if this is required as there are complex tradeoffs required. JPS 24/7 Technical Assistance Phone Number is 1-800-498-3137. Press 1 for ACU Help. Interoperability Now 2-37 ACU-1000 Operations Manual 2.12 Hardware Configuration Settings In the ACU-1000, there are two types of system and module configuration settings: Hardware and Programming. Changing physical pots, jumpers, and switches on each module adjust hardware settings. Programming the configuration items of each module can be set via the HSP-2A Keypad or, more easily, through the use of the ACU Controller or WAIS Controller Module Settings Screens. In general, the hardware settings are done once at installation and need not be changed unless the system configuration changes (for example, if a different radio is interfaced to the ACU1000 rear panel), while the configuration items are more likely to be changed after installation to optimize system performance. This section explains all hardware configuration switch and jumper settings for each of the modules in a system. See Sections 0 and 2.16 for a full explanation of Programming Configuration Settings. To access the potentiometers, jumpers and switches, use the Extender Card found in the Accessory Kit. Remove the module needing adjustment and install the Extender Card in its place. Insert the Extender Card with its connector on the right side of the card (the Extender Card connector must be on the same side of the extender card as the module components are). The Extender Card can’t be plugged into the Power Supply Module slot. All modules except the power supply module can be "hot-plugged" (removed and re-inserted with the unit's power on) without damage, but interruptions to unit operation may occur. 2-38 Interoperability Now ACU-1000 Operations Manual Table 2-10 ACU-1000 Hardware Configuration Settings Main Chassis Rear Panel Designator Factory Setting AC Line Voltage 110V/220V AC nominal AC Line Input Module Normally 110; Set for 220V if specified on Purchase Order, Power Supply Module Designator Factory Setting Charger On/Off SW3 Off HSP-2A Module Configuration Designator Factory Setting Internal/External Speaker Selection VOX Hangtime (not used with ACU-1000) VOX Sensitivity (not used with ACU-1000) Microphone In level Line In level P13 Pin 6 configured for Speaker Out or Ground JP1 JP3 R123 JP4 to JP6 JP7 to JP9 JP10 Internal Speaker Enabled N/A N/A Hi- JP6 Normal-JP8 Speaker Out CPM-4 Module Configuration Designator Factory Setting Reset module to Factory Default Configuration J23 Do not reset unless needed DSP-2 & DSP-3 Module Configuration Designator Factory Setting RX Input. Low or High Impedance JP1 Low (600 ohms) RX Input: Balanced or Single-Ended JP2 Balanced RX Input: Balanced 600 ohm or unbalanced high Z* J23* Balanced 600 Ohms RX Input: AC Coupled or DC Blocked* J15* AC Coupled * Note: If the DSP-2 module has a JP1 and JP2 installed, there will be no J15 and JP23 does not affect input impedance; its purpose is reserved for future use. Reset module to Factory Default Configuration J22 Do not reset LP-2 Module Configuration Designator Factory Setting Handset Speaker Volume Microphone Input Level Loop Current JP1 JP3 JP5 Norm -6 dBm Norm – 0dBm 20 mA pins 1&2 PSTN-2 Module Configuration Designator Factory Setting Ringer Volume Line Hold Voltage – DO NOT CHANGE R61 R107 Mid-Range Factory Test – NO CHANGE Interoperability Now 2-39 ACU-1000 Operations Manual 2.12.1 Power Supply Charger Switch S3 F1 250V: 10A FB +BUS VOLTAGE TO MODULES FUSE HOLDER LOCATED ON OPPOSITE SIDE OF THIS PANEL CHARGE OFF ON R22 CHARGE VOLTAGE ADJUST R28 15.5V ADJUST R17 R17,R28,R22 FACTORY ADJUSTED SHOULD NOT REQUIRE READJUSTMENT Figure 2-9 -12V ADJUST Power Supply Module Showing Charger Switch Location The PSM module has only one user-configurable setting, S3, which turns the back-up battery charge circuitry off and on. The voltage adjustments are performed in the factory and should not require any field readjustments. Improper adjustment could cause faulty operation or damage the equipment. The charge switch should be left off unless a back-up battery is attached to the rear panel DC power input and charging of this battery is required 2-40 Interoperability Now ACU-1000 Operations Manual 2.12.2 HSP-2A Jumper Settings The HSP-2A has a variety of jumpers performing the functions detailed in. Default Settings are marked with *. Table 2-11 JUMPER (As labeled) JP1- SPKR JP3- VOX Hangtime MIC Level Line Level JP-10 - P13 Configuration HSP-2A Jumpers POSITION 1-2 [Internal] * 1-2 [Short] * Not used with ACU-1000 JP4 [-6dB gain] JP7 [-6dB gain] 1-2 [External Speaker on pin 6 of P13] * POSITION POSITION 2-3 [External] 2-3 [Long] N/A N/A JP5 [0dB gain] * JP8 [0dB gain] * 2-3 [TXB/GND on pin 6 of P13] JP6 [+6dB gain] JP9 [+6dB gain] N/A Notes: To use the external speaker, the SPKR jumper must be set to “External” and JP-10 must also be set to position 1-2 to bring this signal to rear panel connector P13. MIC Level jumpers JP4, JP5, and JP6 set the gain of the MIC input. When using the supplied handset, the MIC level jumper should be set to JP5. The Line Level jumpers JP7, JP8, and JP9 set the gain of the audio input available at the P13 RXA terminal. VOX SENS SPKR SW1 HANDSET P6 HSP-2A Module Figure 2-10 Interoperability Now HSP-2A Module Showing Jumper Location 2-41 J7 JP8 J9 SPKR EXT JP1 123 JP10 LO NO HI R72 VOLUME HANGTIME 1 SHORT 2 LONG 3 JP3 LO NO HI R123 JP4 JP5 JP6 JP3 and R123 (VOX hangtime & sensitivity) not used with ACU-1000. SPKR GND ACU-1000 Operations Manual 2.12.3 CPM-4 Jumper Settings The CPM-4 has a single jumper; it may be used to reset the module back to factory default settings if this becomes necessary. The following settings will be reset back to factory default. • All module settings • All module names • Chassis configuration • Serial baud rate and serial port data bits, stop bit, and parity • All IP related settings such as IP address, subnet mask, gateway • All VoIP settings Table 2-12 Restore Factory Default – J16 Restore Factory Defaults J16 1-2 Do not restore Factory Defaults J16 2-3 * RESTORE NORM * denotes factory default setting J16 .. . 321 Ethernet Connector CPM-4 Figure 2-11 CPM-4 Module Showing Jumper Location 2-42 Interoperability Now ACU-1000 Operations Manual 2.12.4 DSP-2 Jumper Settings Figure 2-12 shows the locations of jumpers on the DSP-2 module that set the configuration of the Receive Audio Input and another jumper that allows the VoIP features of the module configuration to be quickly reset to factory default settings. Table 2-13 RX Audio Input Configuration Jumpers RX Input Configuration JP1 JP2 Balanced 600 ohms Lo Bal Balanced High Hi Bal Unbalanced 600 ohms Not Available Not Available Unbalanced High Hi UnBal The DSP-2 JP1 and JP2 jumpers set the audio input configuration for either 600 ohms balanced; 600 ohms high impedance, or single-ended (unbalanced) high impedance as listed in Table 2-13. Some early version DSP-2 modules had a different audio input configuration circuit. These modules are configured by jumpers labeled J23 and J15. If the DSP-2 module has JP1 & JP2 installed, there is no J15 and JP23 does not affect the audio input configuration, but may have another purpose. If there is no JP1 & JP2, J15 and J23 configure the audio input as shown in Table 2-14. JP1 JP2 LO HI UNBAL BAL ... ... JP23 Figure 2-12 Interoperability Now Normal Restore Defaults Ethernet Connector UNBAL, High Z BAL, 600 ohms If Board has JP1 & JP2, JP23 does not affect input 123 321 .. . . . . DSP-2 JP22 DSP-2 Module Showing Jumper Locations 2-43 ACU-1000 Operations Manual Table 2-14 RX Audio Input Configuration – J23, J15 These jumpers affect RX Audio configuration only if the module is an older version that does not have JP1 and JP2. See text. Balanced/600 ohms J23 1-2 * Unbalanced/High impedance J23 2-3 AC Coupled J15 1-2 * DC Blocked J15 2-3 * denotes factory default setting Jumper J22 applies only to the VoIP “Extended Features” of the DSP-2. It has no affect on the DSP-2 radio interface configuration items. It does not affect the jumper-selectable RX Input configuration. See Figure 2-32. Table 2-15 Restore Factory Default – J22 Restore Factory Defaults J22 1-2 Do not restore Factory Defaults J22 2-3 * * denotes factory default setting 2.12.5 DSP-3 Settings Identical to those of the DSP-2. 2-44 Interoperability Now ACU-1000 Operations Manual 2.12.6 LP-2 Jumper Settings The LP-2 module has several jumper settings. The factory defaults should work well for the majority of standard telephone sets. Table 2-16 Input/Output Jumper Settings LP-2 Definition Setting Level High -6 dBm Norm -9dBm * Low -12 dBm High -3 dBm Handset Speaker 2 Wire Output Norm -6 dBm * Low -9 dBm Loop Current Pins 2-3 50 mA Pins 1-2 20 mA * * denotes factory default setting – Should work well for most telephone sets Microphone In 2 Wire Input 2W INPUT .. .. .. .. .. .. LOW NORM HIGH JP1 JP3 LOW NORM HIGH 2W OUTPUT Ethernet Connector LP-2 U3 50 mA . . . JP5 K2 20 mA LOOP CURRENT Figure 2-13 Interoperability Now LP Module Showing Jumper Locations 2-45 Jumper JP3 JP3 JP3 JP1 JP1 JP1 JP5 JP5 ACU-1000 Operations Manual Programmable Configuration Overview There are a variety of ways to configure the individual ACU-1000 modules (beyond the Hardware Configuration information covered in Section 2.11). These configuration options are called configuration items and provide the ACU-1000 with its great flexibility to create optimized interfaces with a wide range of communications systems for simple and seamless cross-connections. Each type of module has specific programmable configuration items that relate to the type of communications media that the module is designed to interface with. 2.12.7 Modules Configurable Via the ACU Controller or the WAIS Controller The optimum method for programming the configuration items of the ACU-1000 interface modules (the HSP, DSP, LP and PSTN) is via the ACU Controller program (though they can also be programmed by the WAIS Controller or HSP-2A keypad). Section 2.13 describes the ACU Controller configuration procedure. Refer also to Section 2.17 for an explanation of each configuration item. See Section 2.14 and the WAIS Controller manual for the configuration procedure using this program. 2.12.8 Modules Configurable Via Browsing to its Front Panel Ethernet Port All of the features of the CPM-4 can be configured via a browser. See Section Figure 2-21. Some can also be configured via the HSP-2A keypad. The DSP-2 module’s VoIP features may be configured via a browser. See Section Figure 2-32. The DSP-2s other features (related to radio interfacing, etc.) currently can’t be configured via a browser and are instead configured via the HSP-2A keypad or the ACU or WAIS Controller programs. 2.12.9 Modules Configurable via the HSP-2A Keypad The ACU-1000 interface modules (the HSP, DSP, LP and PSTN) can be configured via the HSP-2A keypad as well as via the ACU Controller or the WAIS Controller. See Figure 2-14 Programming via HSP-2A Keypad, for a flowchart, and Section 2.16 which explains the procedure for programming via the HSP-2A keypad. Refer also to Section 2.17 for an explanation of each configuration item. 2.12.10 Modules Configurable Via Hardware Switches Only As explained in Legacy Section 7.5.1, the obsolete CPM-2 module is hardware configurable only. The delay functions of the obsolete AP-1 have been incorporated into the DSP-2. 2-46 Interoperability Now ACU-1000 Operations Manual HSP-2A Module All Other Modules Program via Keypad Program via Keypad This module does not require programming. Select Module Crossconnect HSP-2A to module being programmed *nn Enter Setup Mode *99 Disable Remote Control *37 Invalid Entry No Reset ALL Shelf Modules to Factory Default Yes ACU Controller WAIS Controller Retrieve Current Configuration Reset ALL *9999 Select Module # To Program *01nn Finished Select Parameters See Section 2.17 for explanation. (See Table 2-22) Not Good Test Each Module Performance Good Next Module Figure 2-14 Interoperability Now Save Setup *# Programming via HSP-2A Keypad 2-47 ACU-1000 Operations Manual 2.13 Configuration Programming Via the ACU Controller The ACU-1000 modules may be individually programmed via the ACU Controller, the WAIS Controller, or using the HSP-2A Keypad. This ACU Controller is the recommended method and this section covers its use. See Figure 2-15 Programming via ACU Controller Program, for a flowchart of the process. Section 2.17 provides further detail on each of the configurable items. HSP-2A Module DSP-2 or RDI-1 Module Program via ACU Controller Program via ACU Controller PSTN-1 LP-1 Module Program via ACU Controller Program via ACU Controller Connect PC to ACU-1000 Connect PC to ACU-1000 Start ACU Controller Program Start ACU Controller Program Click on center of each HSP2A Module Icon Click on center of each Module Icon Select Default Parameters for Items Shown No Load Template Yes Click APPLY Click APPLY Click OK Click OK Click OK Good File Save New Configuration Test Channel File Save New Configuration Not Good Customize Reload New Configuration Finished Reload New Configuration Select DSP-2 Parameters See Section 2.18.2 for explanation. (See Table 2-22) Select PSTN-1 Parameters See Section 2.18.3 for explanation. (See Table 2-22) Select LP-1 Parameters See Section 2.18.4 for explanation. (See Table 2-22) Finished Click Save Figure 2-15 Programming via ACU Controller Program 2-48 Interoperability Now ACU-1000 Operations Manual 2.14 Configuration Programming Via the WAIS Controller The WAIS controller may be used to configure some or all of each module’s features except for the HSP-2A and CPM-4 as they have no configurable features. If a system contains multiple WAIS Controllers, this should be done with caution as each of the other WAIS controller sites has no indication of change and also has the ability to initiate change. It is strongly advised that change control be password limited to properly trained personnel. See Figure 2-16 for a flow chart of the process. The configurable items for each module are shown in the subsequent sections. HSP-2A Module Program via WAIS Controller DSP-2 Module PSTN-1 LP-1 Module Program via WAIS Controller Program via WAIS Controller Program via WAIS Controller Connect ACU-1000 & WAIS Controller PC to LAN/WAN There are No WAIS Controller Programmable Items Start WAIS Controller Program Select Local View of Selected ACU-1000 Click Module Icon Button Select DSP-2 Parameters See Section 2.18.2 for explanation. (See Table 2-22) Select PSTN-1 Parameters See Section 2.18.3 for explanation. (See Table 2-22) Select LP-1 Parameters See Section 2.18.4 for explanation. (See Table 2-22) Not Good Test Channel Click Set Good Finished Figure 2-16 Interoperability Now Programming via WAIS Controller Program 2-49 ACU-1000 Operations Manual 2.14.1 DSP-2 Configuration Change via WAIS Controller Figure 2-17 DSP Configuration Change via WAIS Controller Program 2-50 Interoperability Now ACU-1000 Operations Manual 2.14.2 PSTN-2 Configuration Change via WAIS Controller Figure 2-18 Interoperability Now PSTN-2 Configuration Change via WAIS Controller 2-51 ACU-1000 Operations Manual 2.14.3 LP-2 Configuration Change via WAIS Controller Figure 2-19 LP-2 Configuration Change via WAIS Controller 2-52 Interoperability Now ACU-1000 Operations Manual 2.15 Configuration Programming Via A Browser The CPM-4 and DSP-2 modules have front panel Ethernet ports that may be used for basic IP and VOIP configuration. Browse to the IP address of the module and view or change configuration settings as described in the sections that follow. DSP modules used in standalone mode may be configured via the Ethernet port, but if the DSP is being used in any other mode, either the ACU Controller or WAIS Controller tools must be used to make adjustments that affect audio levels, VOX functions, COR functions, noise reduction, equalizer, and audio delay functions which affect the performance of the external 4-wire audio device connected to the DB-15 backplane connector for each module. 2.15.1 CPM-4 Configuration Programming via Browser The CPM module’s Ethernet port allows the ACU-1000 to be connected directly to an IP-Based network for remote control by the ACU Controller program, the WAIS Controller, or to be configured by a web browser program as explained in this section. To change the CPM system configuration settings, the user must connect the CPM to the user’s Ethernet LAN via the front panel RJ-45 Ethernet connector, via a standard “straight” Ethernet CAT5 cable to a switch or router which is also connected to a PC with network access to the same switch or router. Alternatively the user may connect the Ethernet port of the CPM module directly to the computer’s Ethernet port via an Ethernet “crossover” cable. The user must browse (using a web browser such as the Internet Explorer) to the IP address of the CPM. The default address of the CPM as shipped from the factory is 192.168.1.200. This IP address may be changed to comply with the user’s network requirements. Interoperability Now 2-53 ACU-1000 Operations Manual 2.15.1.1 Information Screen Upon successfully browsing to the CPM-4, a screen similar to Figure 2-20 will appear. This page contains a summary of the current CPM-4 operating status and configuration. Items in the top section are relevant to system configuration while the items in the lower section pertain to VOIP operation. This addendum will address all configuration options other than those related to the CPM-4’s VoIP capability. Figure 2-20 CPM-4 Information Screen To modify any of the CPM-4 operating parameters, select the “Configuration” link that appears at the top of the page. The Configuration Screen will appear; see Figure 2-21 on the next page. 2-54 Interoperability Now ACU-1000 Operations Manual 2.15.1.2 Configuration Screen Figure 2-21 CPM-4 Configuration Screen Configuration changes to the CPM-4 are made either by selecting a field and entering text, or by making a selection from pull down boxes. Each of these fields and its options are described in the next section. Note: For any operational changes to take effect, you must SAVE CHANGES via the “Save Changes” button. This button may be viewed by scrolling down to the bottom of the screen. Interoperability Now 2-55 ACU-1000 Operations Manual 2.15.1.2.1 Configuration Screen Field Descriptions: My IP Address: The user may enter numeric text (0-255 decimal) into each of the four fields that define the unique Internet Protocol address of the unit. Note: upon saving the changes, the user will need to browse to the new address to continue configuration. Subnet Mask: The user may enter numeric text (0-255 decimal) into each of the four fields that define the unique Internet Protocol mask of the unit. Note: upon saving the changes, the user will need to browse to the new address to continue configuration. IP Gateway: The user may enter numeric text (0-255 decimal) into each of the four fields that define the gateway address that the unit will use for resolving external network accesses. Remote IP: The user may enter numeric text (0-255 decimal) into each of the four fields that define the unique Internet Protocol address of the remote VoIP unit that is paired with this unit. When the CPM-4 is set up as a client, this is where the server’s IP address is entered. [This option relates to the VoIP capability of the CPM-4 module.] Baud Rate: The pull down menu allows the user to configure the baud rate for the RS-232 serial port located on the rear panel of the ACU-1000. Nine baud rates are available: 300, 1200, 2400, 4800, 9600, 19200, 38400, 57600, and 115200. Serial Port Data Bits: The pull down menu allows the user to configure the number of data bits for the serial port. Two choices are available: 7 or 8 bits. The ACU Controller serial mode uses 8 bits. Stop Bits: The pull down menu allows the user to configure the number of stop bits for the serial port. Two choices are available: 1 or 2 bits. The ACU Controller serial mode uses 1 bit. Parity: The pull down menu allows the user to configure the parity for the serial port. Three choices are available: even, odd, or none. The ACU Controller serial mode uses “none”. 2-56 Interoperability Now ACU-1000 Operations Manual Chassis Configuration: The pull down menu allows the ACU-1000 chassis configuration to be set to one of the following: • Single, for a single chassis. • Master, for a multiple chassis system where this is the main chassis. • Expanded, for a multiple chassis system where this is the Expansion chassis. Connection Configuration: The ACU-1000 can be configured to automatically restore the module connections to the user programmed preset configuration upon power-up. • Auto Restore, puts the module connections in the user programmed configuration on power-up. • No Restore, leaves all modules unconnected on power-up. Remote Control: This pull down menu allows the ACU-1000 RS-232 serial port on the rear panel to be Enabled or Disabled. CPM-4 Name: The user may enter text in this field that identifies this CPM-4. The name should uniquely identify this unit, from all others on the network. This name will appear on the WAIS Controller to identify this site. Serial Sync. Char: This pull down menu is used to Enable or Disable the RS-232 remote control synchronizing character feature. The ACU Controller serial mode uses disable. Chassis Reset Data: The user may enter a 2-digit number in this field that will be used by the chassis reset (system reset) command that is available to remote DTMF users. The System Reset Feature allows users in the field with DTMF capability (and the proper code) to reset the ACU-1000 to its initial power-up state. This means all current connections will be lost, and the unit will return to any connections stored last by the * 3 6 command. In order to prevent any inadvertent or unauthorized use of this powerful feature, the System Reset Feature can only be used after first being enabled by entering a code other than 00 as the Chassis reset data field of the CPM-4 Configuration Screen (or via the HSP-2 keypad). DSP-2 or PSTN-2 users must then enter this code in order to implement this feature. Interoperability Now 2-57 ACU-1000 Operations Manual The ACU-1000 factory default for this feature is disabled. To enable System Reset capability, enter any number other than 0 0 in the Chassis Reset Data Field. The feature is now enabled, and “n n” is the system reset code. If a DSP-2, RDI-1, or PSTN-2 user (who is currently connected to the system) enters the DTMF command * 9 0 n n, the system will be reset. If * 9 0 and any digits other than the system reset code are entered, the system will not be reset. To disable this feature, enter 0 0 in this field. This feature may also be enabled or disabled by the HSP-2 keypad. See the ACU-1000 Operations Manual for details. VoIP Port: The user may enter numeric text in this field (1-65535) defining which port to use for the VoIP traffic. Unit is a: The pull down menu allows the user to choose either “server” or “client” mode. operation requires pairing of clients and servers. VOIP Command Port: The user may enter numeric text in this field (1-65535) defining which port to use for the remote control traffic. Remote Port: The user may enter numeric text in this field (1-65535) defining which port to use when connecting to its paired unit for VOIP traffic. Voice Compression: The pull down menu allows the user to configure the voice compression (vocoder) that is used for VoIP audio traffic. Five choices are available: GSM at 13Kbps, ADPCM at 16Kbps, ADPCM at 24Kbps, ADPCM at 32Kbps, and PCM at 64Kbps. If the unit is a server, adaptation to the incoming client vocoder is automatically selected to match the client request. VOX Hang Time: The pull down menu allows the user to configure the VOX hangtime in milliseconds. Five hangtimes are available: 500ms, 1000ms, 2000ms, 3000ms, and 4000ms. COR Inhibit Time: The pull down menu allows the user to configure the COR inhibit time. Six options are available: 0ms, 500ms, 1000ms, 2000ms, 3000ms, 4000ms. COR Sense: The pull down menu allows the user to configure the COR sense. Three options are available: active low, active high, and VOX. 2-58 Interoperability Now ACU-1000 Operations Manual Duplex: The pull down menu allows the user to configure the VoIP channel for either full or half duplex operation. Communications Mode: The pull down menu allows the user to configure for either “normal”, “broadcast”, “connectionless”, or “multicast” modes of VoIP communications. Except for special applications this setting should be left as “normal.” Client Autoconnect: The CPM-4 can be configured to automatically attempt to establish connection with a given Server if the CPM-4 is configured as a Client and a valid IP address has been entered for the Server. Interoperability Now 2-59 ACU-1000 Operations Manual 2.15.1.3 VoIP Connection Management: Client VOIP sessions may be managed by browsing to the “VoIP Connection Management” link at the top of any of the CPM-4’s web pages. Figure 2-22 shows the “VoIP Connection Management” screen. Management may be used for forcing a new “server” to be used, or for connecting or disconnecting an existing link to a server. Server IP: The user may enter numeric text (0-255 decimal) into each of the four fields that define the unique Internet Protocol address of the server unit that is paired with this unit. Connect / Disconnect: The user may request that a connection to the server be established by activating the “CONNECT” button. The user may request that the connection to the server be broken by activating the “DISCONNECT” button. Note: Requests will be processed only after activating the “Perform Selected Action” button. Figure 2-22 CPM-4 VoIP Connection Management Screen 2-60 Interoperability Now ACU-1000 Operations Manual 2.15.1.4 Connection Status: VOIP session status may be monitored by browsing to the “Connection Status” link. Again, this feature will be detailed in a subsequent addendum. VOIP session status may be monitored by browsing to the “Connection Status” link at the top of any of the unit’s web pages. A variety of statistics for the session are presented (see Figure 2-12). Figure 2-23 Interoperability Now CPM-4 Connection Status Screen 2-61 ACU-1000 Operations Manual 2.15.1.5 Module Identifier Page Figure 2-24 CPM Module Identifier Page The ACU-1000’s Automatic Unit ID feature allows customer-specified alphanumeric call signs to be broadcast at specified times following system transmissions. This allows local officials to identify which system(s) are currently in operation and can be a valuable aid in finding duplicate or otherwise inappropriate cross-patches. The Auto-ID function is triggered when a module’s PTT is applied. This starts a timer that is user specified to be 5, 10, 15, 30, or 60 minutes. When it is time for the ID to be broadcast, the module will automatically apply PTT and transmit a voice prompt consisting of the userentered alphanumeric call-sign data. The ACU-1000 system must have a CPM-4 module running version 3.05 (or later) software. Only DSP-2 or DSP-3 modules can be used with the Auto-ID feature. The DSP modules must be running version 3.03 (or later) software. The DSP modules must also be in Standard mode (Hybrid and VoIP Standalone modes do not have this feature). 2-62 Interoperability Now ACU-1000 Operations Manual The Auto-ID feature is set up by first browsing to the CPM-4. This is usually done by entering the IP address of the module in the browser’s URL window. The user then selects the Module Identifiers link. The Module Identifier page shows a list of 24 modules, one for each possible slot in an ACU system. Any slot where a DSP module is not installed or otherwise cannot be used to generate Auto-ID will have a grayed-out Preview button. In the CPM Module Identifier Page screen shot only modules 1, 7 and 12 are “active.” Modules 1 and 12 also have call signs already configured. Each module has a text entry window for the user to enter alphanumeric text for the call sign. Only letters A through Z and digits 0 through 9 are accepted as call-sign text. After the user has entered the call-sign information for each applicable module, the Save Changes button is used to commit the data to permanent memory. There is also a Clear Changes button that will automatically clear out any pending user changes to call-sign data. Each module has a Preview button. This is used to preview the call-sign announcement on the ACU HSP module speaker. This does not play the call-sign prompt over the air. The Auto Ident Rate pull-down selection allows the user to select Auto-ID times of 5, 10, 15, 30, or 60 minutes. Selecting OFF will disable the Auto-ID feature. The Auto Ident Rate is the time the system will wait, following the activation of PTT, before it will automatically broadcast the call-sign announcement. There are two mutually exclusive selections titled ID with PTT and ID when Idle. Assume the Auto Ident Rate is set for 5 minutes. When the DSP module first asserts its PTT output, the timer begins. After 5 minutes, the module is eligible to transmit the call-sign announcement. If the ID when Idle option is selected, the ACU will announce the call sign when the timer elapses as long as there are no COR or PTT conditions currently present on the module (the module is not receiving or transmitting). The prompt is transmitted once, and the timer does not start counting again until the next active PTT session for the module. If an active PTT or COR condition is present when the timer elapses, the call sign prompt is transmitted as soon as the condition ends. If ID with PTT is selected, the feature never creates a PTT condition on its own, but instead sends out the call sign only at the end of a transmission that’s caused elsewhere within the ACU system. That is, the unit will not send out the call sign as soon as the timer elapses but will wait until the next PTT occurs following the elapsed time, and transmit the call-sign prompt as soon as PTT is deactivated. The timer is restarted and the prompt will be transmitted again following the first PTT after the timer again expires. There is a Broadcast ID to Net Members box on the Module Identifiers screen. Typically, callsign announcements are only transmitted to the radio connected to the DSP-2 module. When Broadcast to Net Members is selected, the call-sign announcement is instead transmitted by all modules currently in the same “interoperability net” as the DSP-2 or DSP-3. Interoperability Now 2-63 ACU-1000 Operations Manual 2.15.1.6 Module Names Screen The CPM-4 has the ability to store and retrieve user-defined names for each of the modules installed in the chassis. The module names may be programmed by browsing to the “Module Names” link at the top of the web pages, and then typing in the name alongside the associated module extension number. Note: These module names are only needed when using the ACU1000 in a WAIS (Wide Area Interoperability System.) See the WAIS Controller manual for details. These names will show up on the WAIS Controller screen. Note: Module 0 corresponds with the ACU-1000 of a dual chassis system. interface module extension numbers. Chassis HSP module, while numbers extensions (see Figure 2-25). Figure 2-25 HSP module of a single Chassis ACU-1000 or Master Numbers 1 through 12 are associated with the unit’s For dual chassis systems, Module 25 is the Expansion 13 through 24 correspond with this chassis’ interface CPM-4 Module Names Screen 2-64 Interoperability Now ACU-1000 Operations Manual 2.15.1.7 Restoring Factory Defaults: In rare circumstances, there may be the need to completely restore the CPM-4 to the original configuration that was established when the module was manufactured. The procedure for doing this follows. Equipment Required: • Extender Card (supplied in the ACU-1000 Accessory Kit). • ACU-1000 RESTORE NORM Procedure: 1. Power down the ACU-1000. 2. Remove the CPM-4 from the rack. 3. Install the extender card into the now empty slot. 4. Install the CPM-4 into the extender card. 5. Configure the “Restore Factory Defaults” jumper J16 [left to center] 6. Power up the ACU-1000. 7. Wait 15 seconds. (The LEDs will sequence…) 8. Power off the ACU-1000. 9. Remove the CPM-4 from the extender card. 10. Remove the extender card from the ACU-1000. 11. Re-install the bridging block on jumper J16- [right to center]. 12. Install the CPM-4 back into the ACU-1000. 13. Finished. J16 .. . 321 Ethernet Connector CPM-4 Figure 2-26 Interoperability Now CPM-4 Restore Defaults Jumper Location 2-65 ACU-1000 Operations Manual The completion of the above procedure will re-establish the original factory configuration to the CPM-4. In summary, they are shown in Figure 2-27. Figure 2-27 CPM-4 Restored Factory Defaults 2.15.1.8 Information Page Upon successfully browsing to the CPM, a screen similar to Figure 2-30 will appear. This page provides a summary of the current CPM module operating status and configuration. Items in the top section are relevant to system configuration while the items in the lower section pertain to VOIP operation. 2-66 Interoperability Now ACU-1000 Operations Manual 2.15.1.9 CPM Software Updates The CPM is designed to support software updates in the field. Should it become necessary to install updates to the software, the following process should be followed. Instructions and the update software are available on the web at: http://www.raytheon.com/capabilities/products/acu1000/index.html On the right side of the page, all ACU-1000 related downloads are listed. This includes this manual, the ACU Controller, and latest versions of software for the ACU-1000 modules. Export regulations require that the form supplied on the website after a download request be filled out prior to enabling the download. Equipment Required: 1. PC with Internet network access via a browser (e.g. Internet Explorer). 2. Ethernet access via an Ethernet switch (for the CPM connection). 3. Ethernet cable. 4. CPM installed in the ACU-1000. 5. CPM software and installation software (available from the web site listed above). 6. The IP address of the networked CPM that will be updated. Procedure: 1. Use the PC connected to the Internet to browse to the web site listed above. 2. Download the CPM software by right clicking on cpm4_update.zip, and choose save target as. Browse to a local folder on your computer to deposit it, then click save. 3. Unzip the files in the zip archive. 4. Connect the CPM to the LAN via the switch and Ethernet cable. 5. Launch the autoupdate software by navigating to the folder where it was unzipped / saved, and double clicking on the file autoupdate.exe. 6. A dialog box similar to the one shown below will appear: Figure 2-28 AutoUpdate Dialog 7. Enter the IP address of the CPM, the path to cpm4_app.s19 (the update software), and insure that the Reboot when complete checkbox is checked. 8. Click the Update button, and a status bar will appear, showing the update progress. Interoperability Now 2-67 ACU-1000 Operations Manual 9. After a short delay (10-15 seconds), the following dialog will appear: the CPM will be reset and restarted with the new software activated. Figure 2-29 Successful Programming Announcement 10. Click OK to close the “AutoUpdate” dialog. 11. Verify the new version of the software has been loaded correctly by browsing to the IP address of the CPM-4, and validating the Firmware version matches the latest release “CPM-4 SW Version” (per website). Figure 2-30 CPM-4 Information Screen 12. This completes the process for updating the CPM-4 software. 2-68 Interoperability Now ACU-1000 Operations Manual 2.15.2 DSP Configuration Programming via Browser This section addresses the configuration of the features enabled by the module’s Ethernet port. Either of three operating modes may be selected. The DSP module can use any two of its three interfaces, and the interface selection determines the operating mode. The interfaces are: • Front panel RJ45 Ethernet connector • Rear panel four-wire interface (15-pin D-sub connector to radios or other devices) • Chassis backplane for CPM control and for connections with other modules The operating modes are that these interfaces can produce are • Standard Mode: Rear panel four-wire & chassis backplane • VoIP Standalone Mode: Front panel RJ45 and rear panel four-wire connector • VoIP Hybrid Mode: Front panel RJ45 and chassis backplane The VoIP features of the two VoIP modes are configured by browsing to the front panel RJ45 connector. The non-VoIP features of all modes are set either by browsing to the RJ45 or via the ACU Controller. Please note that once a unit is configured by a browser to VoIP Standalone Mode, it can no longer communicate with the CPM module or the ACU Controller. The ACU Controller includes various features (such as a library of stored radio configuration templates) that assist with optimizing the four-wire interface, so the ACU Controller is the recommended setup method for this interface. See 2.15.3 for minor variations in programming the DSP-3 module, which allows VoIP communications with a WAIS Controller 2 operator in conjunction with the Standard Mode operation. 2.15.2.1 Standard Mode When in the Standard mode, the DSP module cross-connects audio and control signals from radios to other modules in the local ACU system via the chassis backplane. It’s still possible to browse to the module via its front panel RJ-45 Ethernet port, but there is no VoIP capability. A more precise explanation includes the facts that: • The local ACU system includes any modules of an Expansion Chassis • Besides its primary function as a radio interface, the DSP module will interface any type of four-wire device 2.15.2.2 VoIP Standalone Mode This mode allows the DSP module to act as an independent, standalone, network-to-radio interface. The ACU chassis provide a rear panel radio connector and power & ground signals to the module but has no other interactions with it. In this mode, the DSP will be ignored by the ACU Controller and WAIS Controller programs, as well as by the CPM module and any other modules in the ACU chassis. The module’s Ethernet connector allows VOIP connections to other network-capable devices on the network that use the JPS RoIP protocol. These devices include other DSP modules, CPM modules, NXU-2A units, as well as PCs running the PCNXU Interoperability Now 2-69 ACU-1000 Operations Manual software. The DSP in Standalone Mode functions exactly like an NXU unit, and multiple NXU-2 units may be replaced by multiple DPSs in Standalone Mode. Note: If you are unfamiliar with the capabilities and functionality of the NXU-2A, information and free downloads (including the full NXU-2A manual), are available at: http://raytheon.com/capabilities/products/nxu_2a/index.html 2.15.2.3 VoIP Hybrid Mode This mode allows the DSP to function as an RoIP interface to the ACU backplane, allowing remote cross-connection to take place over an IP network. In this mode, the DSP is visible to the ACU’s CPM module and the ACU Controller and WAIS Controller software. There is no connection to the associated rear panel D15 four-wire connector, as the DSP module’s two operating interfaces in this mode are the front panel RJ-45 and the chassis backplane. 2.15.2.4 Provisioning As shipped from the factory, the default configuration of the DSP is Standard mode, and no network provisioning is required. When used in either the VoIP Standalone or VoIP Hybrid modes, the DSP must be configured for VOIP operations. Configuration is accomplished via PC / Browser / Ethernet web access. Configuration is best done using the ACU Controller Software; most of the DSP module’s configuration options in the Standard mode are not accessible via the browser interface. To activate either of the two VoIP modes, first connect the DSP to an Ethernet LAN via the front panel RJ-45 Ethernet connector. Use a “straight-through” CAT5 Ethernet cable to a switch or router which is also connected to a PC with network access to the same switch or router. The user must browse (using a web browser such as Internet Explorer) to the DSP module’s IP address. The default address as shipped from the factory is 192.168.1.200. (After provisioning, this IP address may be changed to suit user requirements). A direct connection between a PC and the module may be used when: • A CAT 5 crossover cable is used rather than a straight-through cable • The PC is preconfigured with a static IP address 2-70 Interoperability Now ACU-1000 Operations Manual 2.15.2.5 Information Page Upon successfully browsing to the DSP module, a page similar to Figure 2-31 will appear. This page contains a summary of the module’s current operating status and configuration. Items on the left side are relevant to VoIP / networking issues, while items listed on the right side mainly report other operational options. Figure 2-31 Interoperability Now DSP Information page 2-71 ACU-1000 Operations Manual 2.15.2.6 Configuration Page To provision the DSP module for VoIP operation, select the Configuration link that appears at the top of the page (see Figure 2-31). Figure 2-32 DSP Configuration Page Configuration changes to the DSP module are made either by selecting a field and entering text, or by making a selection from pull-down boxes. Descriptions of each of these fields, and the options each contains, are presented in the next section. Note: For any operational changes to take effect, you must save changes via the Save Changes button. 2-72 Interoperability Now ACU-1000 Operations Manual 2.15.2.6.1 Configuration Page Field Descriptions: Name: The user may enter text in this field that identifies this DSP module. The name should uniquely identify this unit, differentiating it from all other units on the network. Unit is a: The pull-down menu allows the user to choose either server or client mode. VoIP operation requires pairing of clients and servers. Communications Mode: The pull-down menu allows the user to configure for either normal, broadcast, connectionless, or multicast modes of VoIP communications. VOIP Port: The user may enter numeric text in this field (1-65535 decimal) defining which port to use for the VoIP traffic. Command Port: The user may enter numeric text in this field (1-65535 decimal) defining which port to use for network command traffic. Serial Port Baud Rate: The pull-down menu allows the user to configure the baud rate for the serial communication channel on the DB-15 connector of the ACU-1000 slot. Nine baud rates are available: 300, 1200, 2400, 4800, 9600, 19200, 38400, 57600, and 115200. Serial Port Data Bits: The pull-down menu allows the user to configure the number of data bits for the serial communication channel on the DB-15 connector of the ACU-1000 slot. Two choices are available: 7 or 8 bits. Serial Port Stop Bits: The pull-down menu allows the user to configure the number of stop bits for the serial communication channel on the DB-15 connector of the ACU-1000 slot. Two choices are available: 1 or 2 bits. Serial Port Parity: The pull-down menu allows the user to configure the parity for the serial communication channel on the associated rear-panel DB-15 connector. Three choices are available: even, odd, or none. Interoperability Now 2-73 ACU-1000 Operations Manual Note: Configuration options that affect the ACU rear panel D15 connector four-wire interface (for radios or other four-wire devices) are best set by the ACU Controller, unless this isn’t possible, for example, when the DSP module is in the Standalone mode and therefore has no communications with a CPM module and hence the ACU Controller. VOX Hangtime (ms): The pull-down menu allows the user to configure the VOX hangtime in milliseconds. Five hangtimes are available: 500ms, 1000ms, 2000ms, 3000ms, and 4000ms. VoIP or 4W interface? IP Address: The user may enter numeric text (0-255 decimal) into each of the four fields that define the unique Internet Protocol address of the unit. Note: Upon saving the changes, the user will need to browse to the new address to continue configuration. Subnet Mask: The user may enter numeric text (0-255 decimal) into each of the four fields that define the unique Internet Protocol mask of the unit. Note: Upon saving the changes, the user will need to browse to the new address to continue configuration. Gateway IP: The user may enter numeric text (0-255 decimal) into each of the four fields that define the gateway address that the unit will use for resolving external network accesses. Remote IP: The user may enter numeric text (0-255 decimal) into each of the four fields that define the unique Internet Protocol address of the remote VoIP unit that is paired with this unit. Remote Port: The user may enter numeric text in this field (1-65535 decimal) defining which port to use when connecting to its paired unit for VoIP traffic. Voice Compression: The pull-down menu allows the user to configure the voice compression (vocoder) that is used for VOIP audio traffic. Five choices are available: GSM at 13Kbps, ADPCM at 16Kbps, ADPCM at 24Kbps, ADPCM at 32Kbps, and PCM at 64Kbps. If the unit is a server, adaptation to the incoming client vocoder is automatically selected to match the client request. 2-74 Interoperability Now ACU-1000 Operations Manual Duplex: The pull-down menu allows the user to configure the VOIP channel for either full or half duplex operation. OR Inhibit Time (ms): The pull-down menu allows the user to configure the COR inhibit time. Six options are available: 0ms, 500ms, 1000ms, 2000ms, 3000ms and 4000ms; 4W interface. This setting applies to the unit’s four-wire audio interface and is included for adjustment when the module is being used in the standalone mode. For Hybrid Mode (see the DSP Mode option setting) the ACU Controller is the preferred method for DSP module audio interface adjustments. COR Sense: The pull-down menu allows the user to configure the COR sense. Three options are available: active low, active high, and VOX. This setting applies to the unit’s four-wire audio interface and is included for adjustment when the module is being used in the standalone mode. For Hybrid Mode (see the DSP Mode option setting) the ACU Controller is the preferred method for DSP module audio interface adjustments. DSP Mode: The pull-down menu allows the user to configure the operating mode of the DSP. Four modes are supported (see the beginning of Section 2.15.2 for an explanation of the modes): 1. 2. 3. 4. Mode Standard Mode: VoIP Standalone Mode: VoIP Hybrid Mode: Test: Interfaces Used Rear panel four-wire & chassis backplane Front panel RJ45 and rear panel four-wire connector Front panel RJ45 and chassis backplane test mode: for factory use only with loopback fixture. RX Input Level: The pull-down menu allows the user to adjust the receive input level for receive audio. Five levels are supported: +12db, +4db, 0db, -4db, and –12db; 4W interface. This setting applies to the unit’s four-wire audio interface and is included for adjustment when the module is being used in the standalone mode. For Hybrid Mode (see the DSP Mode option setting) the ACU Controller is the preferred method for DSP module audio interface adjustments. TX Output Level: The pull-down menu allows the user to adjust the transmit output level for transmit audio. Five levels are supported: +12db, +4db, 0db, -4db, and –12db; 4W interface. This setting applies to the unit’s four-wire audio interface and is included for adjustment when the module is being used in the standalone mode. For Hybrid Mode (see the DSP Mode option setting) the ACU Controller is the preferred method for DSP module audio interface adjustments. Interoperability Now 2-75 ACU-1000 Operations Manual 2.15.2.7 Connection Management Page Client VOIP sessions may be managed by browsing to the Connection Management link at the top of any of the unit’s web pages. Figure 2-33 shows the Connection Management page. This page may be used force the use of a different server, or for connecting or disconnecting an existing link to a server. Server IP: The user may enter numeric text (0-255 decimal) into each of the four fields that define the unique Internet Protocol address of the server unit that is paired with this unit. Connect / Disconnect: The user may request that a connection to the server be established by activating the CONNECT button. The user may request that the connection to the server be broken by activating the DISCONNECT button. Note: Requests will be processed only after activating the Perform Selected Action button. Figure 2-33 DSP Connection Management Page 2-76 Interoperability Now ACU-1000 Operations Manual 2.15.2.8 Connection Status Page VOIP session status may be monitored by browsing to the Connection Status link. A variety of statistics for the session are presented (see Figure 2-34). Figure 2-34 Interoperability Now DSP Connection Status Page 2-77 ACU-1000 Operations Manual 2.15.2.9 Manual Page A subset of the ACU-1000 manual regarding DSP configuration issues may be viewed online by browsing to a module’s IP address and clicking on the Manual link at the top of any of the module’s web pages. Full ACU-1000 related documentation is available for download by clicking on the ACU-1000 Manual on the right side of the web page at: http://www.raytheon.com/capabilities/products/acu1000/index.html 2.15.2.10 Restoring Factory Defaults In rare circumstances, there may be the need to completely restore the DSP to the original configuration that was set when the module was manufactured. The procedure for doing this follows. (Does not apply to four-wire interface configuration options). Note: Jumper locations are shown in Figure 2-12 Procedure: 1. Power down the ACU-1000. 2. Remove the DSP from the rack. 3. Install the extender car d (supplied in the Accessory Kit) into the now empty slot. 4. Install the DSP into the extender card. 5. Configure the Restore Factory Defaults jumper JP22 [center to right]. 6. Power up the ACU-1000. 7. Wait 10 seconds. (The LEDs will repeatedly sequence…) 8. Remove the bridging block from JP22 [while powered]. 9. Wait 15 seconds. (The DSP will complete the reset sequence) 10. Power off the ACU-1000. 11. Remove the DSP and extender card from the ACU-1000. 12. Re-install the bridging block on jumper JP22 [left to center]. 13. Install the DSP back into the vacant slot in the ACU-1000. 14. Power up the ACU-1000. 15. Finished Results: The completion of the above procedure will re-establish the original factory configuration to the DSP. The factory defaults as of the release of this manual are shown in Figure 2-35. 2-78 Interoperability Now ACU-1000 Operations Manual Figure 2-35 Interoperability Now DSP Module Restored Factory Defaults 2-79 ACU-1000 Operations Manual 2.15.2.11 Software Updates The DSP is designed to support software updates in the field. Should it become necessary to install updates to the software, the following process should be followed. Instructions and the update software are available on the web at: http://www.raytheon.com/capabilities/products/acu1000/index.html On the right side of the page, all ACU-1000 related downloads are listed. This includes this manual, the ACU Controller, and latest versions of software for the ACU-1000 modules. Export regulations require that the form supplied on the website after a download request be filled out prior to enabling the download. Equipment Required: • PC with Internet network access via a browser (e.g. Internet Explorer). • Ethernet access via an Ethernet switch (for the connection to the DSP module’s front panel Ethernet connector). • Ethernet cable. • DSP installed in the ACU-1000. • DSP software and installation software available from the web site listed above. • The IP address of the networked DSP that will be updated. Procedure: 1. Use the PC connected to the Internet to browse to the web site listed above 2. Download the DSP software by right clicking on dsp2_update.zip, and choose save target as. Browse to a local folder on your computer to deposit it, then click save. 3. Unzip the files in the zip archive. 4. Connect the DSP to the LAN via the switch and Ethernet cable. 5. Launch the autoupdate software by navigating to the folder where it was unzipped / saved, and double clicking on the file autoupdate.exe. 6. A dialog box similar to the one shown below will appear: Figure 2-36 DSP Module Software Update Dialog 7. Enter the IP address of the DSP, the path to dsp2_app.s19 (the update software), and insure that the Reboot when complete checkbox is checked. 8. Click the Update button, and a status bar will appear, showing the update progress. 2-80 Interoperability Now ACU-1000 Operations Manual 9. After a short delay (10-15 seconds), the following dialog will appear: the DSP will be reset and restarted with the new software activated. Figure 2-37 Successful Programming Announcement 10. Click OK to close the AutoUpdate dialog. 11. Verify the new version of the software has been loaded correctly by browsing to the IP address of the DSP, and validating the Firmware version matches the latest release (per the website). Figure 2-38 DSP Module Information Page 12. This completes the process for updating the DSP Module software. 2.15.3 DSP-3 Configuration Programming via Browser The DSP-3 configuration is the same as for the DSP-2. Interoperability Now 2-81 ACU-1000 Operations Manual 2.16 Programming Configuration Settings via the HSP-2A Keypad Section 2.16.1 provides a quick step-by-step introduction into the use of the system programming items and configuration items to configure a module via the HSP-2A keypad. Refer to Table 2-17 for full list of these system programming items and also to Section 2.16.2 for an explanation of each item. Section 2.17 gives full explanations for each of the system configuration options that may be programmed. Each type of module has a unique set of configuration options that are used to optimize that module’s interface to the type of communications medium it was designed for (for example, the DSP-2 module interfaces radios and other 4-wire devices while the PSTN-2 interfaces 2-wire telephone systems). The various configuration options are listed in Table 2-18. 2.16.1 Keypad Programming Instructions: 1. Enter the programming mode by pressing * 9 9 on the HSP keypad. The ACU-1000 responds with the voice prompt "Setup Mode". Each time a user successfully enters one of the programming commands the ACU responds with “Ready”. The ACU-1000 stays in programming mode until the user exits this mode by entering the * # (star pound) sequence. The user does not have to enter * # until all programming is complete. The configuration changes are not entered into non-volatile memory until the * # sequence is entered. All programming configuration changes are then automatically stored in non-volatile memory. These settings are retained unless new settings stored or a “Reset to Factory Settings” command is entered. Note: If the ACU-1000 is currently operating under remote control via either the Raytheon ACU Controller or WAIS Controller programs, programming via the HSP-2A is disabled and the “Invalid Entry” voice prompt will be heard. To override console control, enter * 3 7 and wait for the “Ready” prompt. Programming via the HSP-2A can then begin. Any configuration changes made will not be seen via either controller program until it executes the “Retrieve Current Configuration” command from the “File” pulldown menu, or until it is terminated and restarted. 2. When in the programming mode, select the individual module you wish to program by entering * 0 1 n n, where “n n” is the two-digit extension number of the module to be programmed. The extension numbers will be from 01 through 12 in a single chassis system and 01 through 24 in an expanded system, as the Master Unit in an expanded system contains the programming configuration for the Expansion Unit. For example, to set a parameter on a DSP module that is installed in extension 05, the user first enters the “Select Module to Program” command * 0 1 0 5. Once this command is given user may then enter as many configuration items as desired for the selected module. If the user mistakenly selects an extension that is empty, or there is another reason why the selected module is not valid for programming, the ACU-1000 will respond with an error message. There are no configuration items for the HSP-2A module. 2-82 Interoperability Now ACU-1000 Operations Manual Note: The System Programming Items at the start of Table 2-17 are system-wide programming commands that do not require the selection of a module. To execute these items, enter the programming mode, but do not select a particular module. 3. Now that a module is selected, begin actual programming. Enter the desired programming command, following the format described in Table 2-18. Continuing the example from step #2 above: To set the receive level to 0 dBm on a DSP module located in extension 05, the user first selects this module by entering * 0 1 0 5, the ACU then responds with “05 Ready”, the user then sets the receive level to 0 dBm by entering * 0 2 3. The ACU responds with “Ready”. 4. When all parameters for a selected module are complete, another module can be chosen for programming as in step #2 above, or the user can exit the programming mode at this time, which will store all settings. This is accomplished by entering * #. The ACU responds with “Saving configuration” followed by “Configuration has been saved”. Note: If the programming mode is not exited by pressing * # before the power to the ACU is turned off, none of the new configuration settings made will be saved. Table 2-17 ACU-1000 System Programming items System Programming Item Enter Programming Mode Console Override Select Module to Program Exit Programming Mode Reset Modules to Factory Settings Enable System PIN numbers Command *99 *37 *01nn *# *9999 N = Selection None None n n = slot extension (two digits must be entered) None None Factory N/A N/A N/A N/A N/A *29n Disabled Program PIN numbers * 3 0 nnnnx Delete PIN numbers Set CPM-4 RS-232 Baud Rate Stored Connections Auto Restore at Power-up * 3 1 nnnn *54n 0 = Disable PIN numbers, 1 = Enable PIN numbers in Priority operation, 2 = Enable PIN numbers in Exclusive operation nnnn is the four digit PIN, x is the security level from 0 to 9, 0 = not secure (PIN not required), 1=least secure, 9 = most secure. nnnn is the four digit PIN n signifies the Baud Rate (see text) 0 = Feature is disabled 1 = Auto Restore is enabled. Disabled Interoperability Now *55n 2-83 PIN Database Cleared N/A 115200 ACU-1000 Operations Manual 2.16.2 System Programming Items This section explains system programming items; they are used only to assist in the configuration of other modules via the HSP-2A keypad. 2.16.3 Enter Programming Mode Use the command * 9 9 to enter the programming mode. Once in this mode, the programming of each individual module’s configuration items is possible. Unless otherwise specified, none of the programming items listed in Table 2-17 or this section can be entered unless the ACU1000 is in the Programming Mode. 2.16.3.1 Controller Override If the ACU-1000 is currently under remote control using the ACU Controller software, programming via the HSP-2A is disabled. To override the console software and re-enable programming via the HSP-2A, enter * 3 7 at the HSP-2A keypad. Configuration changes made during console override will not be available at the console screen until the “Retrieve Current Configuration” option is selected from the “File” pulldown menu. 2.16.3.2 Select a Module to Program After entering the programming mode, use the command * 0 1 n n to select the slot number of the module you wish to program, where nn is the two-digit slot number. For example, to program the module in slot 5, enter * 0 1 0 5. After all programming commands are complete for one module; the programming of another module may begin after using this command to select that module. It is not necessary to exit and re-enter the programming mode each time a new module is programmed. 2.16.3.3 Exit Programming Mode When programming is complete, use the command * # to exit the programming mode and store the configuration in non-volatile memory. 2.16.3.4 Reset Modules to Factory Settings The command * 9 9 9 9 causes all modules in the ACU-1000 chassis to be reset to the factory settings. Be careful, as using this command will erase all custom configuration programming. This command can only be issued from programming mode. 2-84 Interoperability Now ACU-1000 Operations Manual 2.16.3.5 PIN Numbers This command configures PIN operation for the ACU-1000. PIN numbers (Personal Identification Numbers) are used to control access to the ACU-1000 network, See Section 3.6.2 for full details. Enable PIN numbers in the Priority Mode by entering * 2 9 1, or in the Exclusive Mode by entering * 2 9 2. To Disable PIN numbers enter * 2 9 0. When either PIN mode is enabled, users attempting to access the system will be prompted by the ACU-1000 to enter their PIN. When in the Priority PIN Mode the user’s password security level must be equal to or higher than the security level of the module to gain access. Exclusive PIN Mode operation requires the user’s password security level is identical to the security level of the extension the user is attempting to access. Extension security levels are set for all types of interface modules using the * 3 2 n configuration item. Instructions included with each module’s list of configuration items. 2.16.3.6 Program PIN Numbers The security level of each PIN is entered into the ACU-1000 database by this command. Up to 20 different PIN numbers may be entered. To enter a PIN into the database and/or set the level for the PIN, enter * 3 0 n n n n x, where n n n n is the four digit PIN and x is the security level to be associated with this PIN. There are 9 available security levels, ranging from 1 = least secure to 9 = most secure. The security level “0” is essentially meaningless as an extension set to security level 0 does not require a PIN to gain access. PIN programming is a global command, meaning it’s not necessary to select a module to program when entering PIN numbers or setting PIN security levels. 2.16.3.7 Delete PIN Numbers To delete a particular PIN, enter * 3 1 n n n n, where n n n n is the four digit PIN. This is a global command. Note it is not necessary to input the security level when deleting a PIN. 2.16.3.8 Module Security Level Selection This command sets a module’s security level. Enter * 3 2 n, where n is the security level, with 0 = not secure (no PIN required), 1 = least secure, up to 9 = most secure. This is not a global command, each module’s security level must be separately set. To set the security level for a particular module, first use the “Select Module to Program” command. Interoperability Now 2-85 ACU-1000 Operations Manual 2.16.3.9 Chassis Baud Rate The *54 command allows the Baud rate of the CPM-4 RS-232 serial interface to be set using the HSP-2 keypad. The Baud rate can also be set using a web browser; this keypad method has been added for instances where an Ethernet Connection is inconvenient. Once the setup mode has been entered, simply enter *54n to set the Baud rate, with n defined as: *540 300 Baud *541 1200 Baud *542 2400 Baud *543 4800 Baud *544 9600 Baud *545 19200 Baud *546 38400 Baud *547 57600 Baud *548 115200 Baud (factory default Baud rate). 2.16.3.10 Auto-Restore of Stored Connections at Power Up Enable/Disable Whenever the Stored Connections Auto-Restore feature is enabled, the ACU-1000 will automatically restore the cross-connection status of all modules to a user-programmed default setting whenever the ACU power is cycled. These Stored Connections are saved by using the “*36” HSP command. See Section 3.5.1.7 for more information about the Store Connections feature. The *55 programming item allows the user to program the ACU-1000 to Enable or Disable the Stored Connections feature via the HSP keypad. The user has two options: *550 Auto-restore is disabled (factory default setting). *551 Auto-restore is enabled. The default stored connection status is “no cross-connections,” so unless a set of stored crossconnections has been entered using the “*36” command, *550 and *551 will have no effect. 2-86 Interoperability Now ACU-1000 Operations Manual Table 2-18 DSP-2 Configuration Item Receive Audio Level Command *02n Transmit Audio Level *03n COR Polarity Full/Half Duplex DTMF Mute Timer Value *04n *08n *09n Audio Delay H/W COR Mode Audio Delay VOX Mode Audio Delay VMR Mode VMR/VOX Threshold *10n VOX Hang Time *12n VMR Hang Time *12n COR (squelch) Type COR Sampling On/Off COR Sampling Initial Delay Time *14n *18n *19n COR Sampling Interval *20n COR Sampling Window Width *21n Noise Reduction Value (Peaker Value) Audio Muted when Squelched Transmit Keying Tones COR Inhibit Time after PTT *26n PTT or COR Priority (Half Duplex only) Keying Tone Amplitude *27n Module security level DTMF Enable *32n *38n Interoperability Now Configuration Items Factory 0dBm *22n N = Selection 0 = 12dBm, 1 = 8dBm, 2 = 4dBm, 3 = 0dBm 4 = -4dBm, 5 = -8dBm, 6 = -12dBm, 7 = -16dBm, 8 = -20dBm, 9 = -26dBm 0 = -26dBm, 1 = -20dBm, 2 = -16dBm, 3 = -12dBm, 4 = -8dBm, 5 = -4dBm, 6 = 0dBm, 7 = 4dBm, 8 = 8dBm, 9 = 12dBm 0 = Active Low, 1 = Active High 0 = Full, 1 = Half 0 = Off, 1 = 0.5 Sec, 2 = 1 Sec, 3 = 1.5 sec, 4 = 2 sec, 5 = 2.5 sec, 6 = 3 sec, 7 = 3.5 s, 8 = 4 s, 9 = 4.5 sec 0 = 20 ms, 1 = 60 ms, 2 = 100 ms, 3 = 140 ms, 4 = 180 ms, 5 = 220 ms, 6 = 260 ms, 7 = 300 ms 0 = 20 ms, 1 = 60 ms, 2 = 100 ms, 3 = 140 ms, 4 = 180 ms, 5 = 220 ms, 6 = 260 ms, 7 = 300 ms Less than 220 msec not allowed. 0,1,2,3,4,5 = 220 ms, 6 = 260 ms, 7 = 300 ms 0 = Low (Highest Sensitivity), 1 = Med1, 2 = Med2, 3 = High (Lowest Sensitivity), 4-9 = Reserved for special applications – do not use 0 = 175 ms, 1 = 375 ms, 2 = 575 ms, 3 = 775 ms, 4 = 975 ms, 5 = 1.175 sec, 6 = 1.375 s, 7 = 1.575 s Less than 775 not allowed, 1, 2, 3 = 775 ms, 4 = 975 ms, 5 = 1.175 sec, 6 = 1.375 sec, 7 = 1.575 sec 0 = COR, 1 = VMR, 2 = Reserved, 3 = VOX 0 = Disabled, 1 = Enabled 0 = 2 sec, 1 = 4 sec, 2 = 6 sec, 3 = 8 sec, 4 = 10 sec, 5 = 12 sec, 6 = 14 sec, 7 = 16 sec, 8 = 18 sec, 9 = 20 sec 0 = 1 sec, 1 = 2 sec, 2 = 3 sec, 3 = 4 sec, 4 = 5 sec, 5 = 6 sec, 6 = 7 sec, 7 = 8 sec, 8 = 9 sec, 9 = 10 sec 0 = 50 ms, 1 = 100 ms, 2 = 150 ms, 3 = 200 ms, 4 = 250 ms, 5 = 300 ms, 6 = 350 ms, 7 = 400 ms, 8 = 450 ms, 9 = 500 ms 0 = Off, 1 = Minimum… 9 = Maximum *23n 0 = Muted, 1 = Not Muted Muted *25n 0 = None, 1 = 1950 Hz Continuous, 2 = EIA Sequence (F1 function tone, 1950 Hz) 0 = None, 1 = 100 ms, 2 = 200 ms, 3 = 400 ms, 4 = 800 ms, 5 = 1 sec, 6 = 2 sec, 7 = 3 sec, 8 = 4 sec, 9 = 5 sec 0 = COR Priority, 1 = PTT Priority. None *10n *10n *11n *28n 0 = -6 dB, 1 = -9 dB, 2 = -12 dB, 3 = -15 dB Does not apply to EIA Keying 0 = Not Secure, 1 =Least Secure, 9 = Most Secure 0 = Disabled, 1 = Enabled 2-87 0dBm Active Low Half Off 20 ms 60 ms 220 ms Med1 775 ms 775 ms VOX Disabled 10 sec 5 sec 150 ms Off 100 ms PTT Priority -9 dB Not Secure Enabled ACU-1000 Operations Manual DSP-2 Configuration Item (continued) Command N = Selection Factory High Frequency Equalizer *39n Flat DTMF Pre-emphasis (HSP-2A keypad only) Auxiliary Output Control *40n TX Audio Delay (was “Radio Type Selection”) Voice Prompt Initiation Delay *43n 0 = Reserved, 1 = 5 dB cut, 2 = 3.5 dB cut, 3 = 2 dB cut, 4 = Flat, 5 = 2 dB boost, 6 = 3.5 dB boost, 7 = 5 dB boost, 8 and 9 = Reserved. 0 = DTMF Pre-emphasized 1 = DTMF Not Pre-emphasized 0 = Future option 1 = Local control by the module 0 = No Delay, 1 = 200 ms, 2 = 400 ms, 3 = 600 ms, 4 = 800 ms 5 through 9 reserved for future use 0 = No Delay, 1 = 50 ms, 2 = 100 ms, 3 = 500 ms, 4 = 750 ms, 5 = 1 sec, 6 = 2 sec, 7 = 3 sec, 8 = 4 sec, 9 = 5 seconds PSTN-2 Configuration Item Telephone Line Levels Command n = Selection Factory *02n -9dBm Telephone RX Level Boost *03n PSTN Type PSTN Dialing Mode DTMF Mute Timer *05n *06n *09n Audio delay Time *10n VOX Threshold VOX Hang Time Two Wire Operation Module security level Outgoing Ring Time DTMF Enable Auxiliary Output Control *11n *12n *24n *32n *37n *38n *41n Inactivity Disconnect Timer *42n Voice Prompt Initiation Delay *44n 0 = 0dBm, 1 = -3dBm, 2 = -6dBm, 3 = -9dBm, 4 = -12dBm, 5 = -15dBm, 6 = -18dBm, 7 = -21dBm, 8 = -24dBm 0 = 0 dB, 1 = 2.5 dB, 2 = 4.5 dB, 3 = 6 dB, 4= 7.4 dB, 5= 8.5 dB, 6= 9.5 dB, 7 = 10. 5 dB, 8= 11.3 dB, 9 = 12 dB 0 = Normal, 1 = Satcom 0 = DTMF, 1 = Pulse 0 = Off, 1 = 0.5 sec, 2 = 1 sec, 3 = 1.5 sec, 4 = 2 sec, 5 = 2.5 sec, 6 = 3 sec, 7 = 3.5 s, 8 = 4 s, 9 = 4.5 s 0 = 10 ms, 1 = 22 ms, 2 = 35 ms, 3 = 47 ms, 4 = 60 ms, 5 = 72 ms, 6 = 85 ms, 7 = 97 ms 0 = VOX Off, 1 & 2 = Low, 3 = High, 9 = VOX Off 0 = 500 ms, 1 = 1 sec, S, 2 = 1.5 sec, 3 = 2.0 sec 0=2-Wire 0 = Not Secure, 1 =Least Secure, 9 = Most Secure 0 = No ring, 1 = 30 sec, 2 = 60 sec, 3 = Continuous 0 = Disabled, 1 = Enabled 0 = Future option 1 = Local control by the module 0 = None, 1 = 30 sec, 2 = 1 min, 3 = 2 min, 4 = 5 min, 5 = 10 min, 6, 7, 8 & 9 = Reserved 0 = No Delay, 1 = 50 ms, 2 = 100 ms, 3 = 500 ms, 4 = 750 ms, 5 = 1 sec, 6 = 2 sec, 7 = 3 sec, 8 = 4 sec, 9 = 5 seconds LP-2 Configuration Item DTMF Mute Timer Command *09n Factory 1 second Audio Delay Time *10n VOX Threshold *11n n = Selection 0 = Off, 1 = 0.5 sec, 2 = 1 sec, 3 = 1.5 sec, 4 = 2 sec, 5 = 2.5 sec, 6 = 3 sec, 7 = 3.5 s, 8 = 4 s, 9 = 5 s 0 = 10 ms, 1 = 35 ms, 2 = 60 ms, 3 = 85 ms, 4 = 110 ms, 5 = 135 ms, 6 = 160 ms, 7 = 185 ms 0 = VOX Off, 1 = Low, 2 = Med, 3 = High, 9 = Off *41n *44n 2-88 Preemphasis Local Control No Delay 100 ms 6 dB Normal DTMF 1 sec 35 ms Low 1 sec 2-Wire Not Secure 30 seconds Enabled Local Control 2 Minutes No Delay 60 ms Med Interoperability Now ACU-1000 Operations Manual VOX Hang Time Module security level Dial and Busy Tone Style Ring Cadence Dial Tone Enable Ringback Enable Outgoing Ring Time DTMF Enable Auxiliary Output Control *12n *32n *33n *34n *35n *36n *37n *38n *41n Voice Prompt Initiation Delay *44n Interoperability Now 0 = 10 ms, 1 = 750 ms, 2 = 1.5 sec, 3 = 2.25 sec 0 = Not Secure, 1 =Least Secure, 9 = Most Secure 0 = USA Style, 1 – 9 = Reserved 0 = USA Style, 1 = European Style, 2 – 9 = Reserved 0 = Dial Tone Disabled, 1 = Dial Tone Enabled 0 = Ringback Disabled, 1 = Ringback Enabled 0 = No ring, 1 = 30 sec, 2 = 60 sec, 3 = Continuous 0 = DTMF Disabled, 1 = DTMF Enabled 0 = Future option 1 = Local control by the module 0 = No Delay, 1 = 50 ms, 2 = 100 ms, 3 = 500 ms, 4 = 750 ms, 5 = 1 sec, 6 = 2 sec, 7 = 3 sec, 8 = 4 sec, 9 = 5 seconds 2-89 750 ms Not Secure USA USA Enabled Enabled 30 seconds Enabled Local Control No Delay ACU-1000 Operations Manual 2.17 Description of Configuration Items 2.17.1 HSP-2A Configuration Items There are no configuration items for the HSP-2A module. 2.17.2 DSP-2 and Legacy Module DSP-1 and RDI-1 Configuration Items 2.17.2.1 Receive Audio Level (DSP and Legacy Module RDI-1) This configuration item adjusts the audio receive level for a selected DSP-2 or RDI-1. A correct receive level setting is required to ensure proper operation. Too high a level may cause flat-topping and distortion, while too low a level won’t provide adequate audio volume. The front panel SIGNAL LED is provided as a guide to setting the level; raise the receive volume until the SIGNAL LED flashes momentarily on voice peaks. If the LED never lights, the level is too low; if the LED is on nearly continuously, the level is set too high. The following procedure is suggested: • Connect the normal audio source to the module, and place the module in the program mode. • Set the module at its least-sensitive setting. If the SIGNAL LED is flashing on voice peaks, this setting is correct. If the LED is now on continuously, the incoming audio level is higher than can be accommodated by the DSP-2 or RDI-1 module, and must be attenuated before reaching the module. If the SIGNAL LED is not flashing at this lowest setting, the module’s gain must be increased; proceed to the next step. • Raise the module’s receive gain one step at a time until the SIGNAL LED is flashing on voice peaks (until the LED is flashing during voice peaks but is not lit continuously). • Among the DSP-2 module’s algorithms is a Peak Limiter to prevent clipping of loud audio peaks. This limiter has a fast attack time and slow recovery rate. 2.17.2.2 Transmit Audio Level (DSP-2 and RDI-1) This configuration item allows a module’s transmit (output) audio level to be programmed. The transmit level must be set correctly to insure proper operation of radios or other equipment connected to this output. Too high a level may cause flat topping, distortion, or overmodulation of a connected radio, while too low a level won’t provide adequate audio volume or modulation level. If the actual audio level requirement of the radio or other connected equipment is known, select this level from the Transmit Audio Level row of Table 2-18. These levels assume a 600-ohm termination. If the required level is not known, the following procedure is suggested: • An input audio source for the module is required (so this audio can be sent back out through the transmit audio port). Use the Connect command to create a connection between the module to be programmed with second module (which is providing audio), and then place the first module into the programming mode. 2-90 Interoperability Now ACU-1000 Operations Manual • Determine the proper input level to the connected equipment (output level from the module). It may be necessary to monitor the module’s output audio level at the connected equipment’s input port with an audio voltmeter or other means. • Start with the TX output at its lowest level. • Raise the output level one step at a time until the proper level is reached. 2.17.2.3 COR Polarity (DSP and RDI-1) This configuration item allows the module’s hardwired COR input to work with either an active low or an active high COR input. If the radio’s COR output goes low when a signal is being received, set the input to active low; if the radio’s COR output goes high when a signal is being received, set the input to active high. This configuration parameter does not need to be programmed unless the hardwire COR input will be used. 2.17.2.4 Full/Half Duplex (DSP and RDI-1) This configuration item configures the module for either full duplex or half-duplex operation. Set to full duplex if the connected radios or equipment can transmit and receive at the same time. Set to half duplex otherwise. 2.17.2.5 DTMF Mute Timer (DSP and RDI-1) When a module is not in the Data Mode (See Section 3.5.1.9), all DTMF signals detected in the receive audio are interpreted as commands meant for the receiving module. When the DTMF Mute Timer is enabled, the DTMF signals are “Muted”; that is, they are not passed on to the ACU-1000 internal audio bus to be routed to another module, nor are they sent back out in any module’s TX audio. A module cannot instantaneously mute a DTMF signal; some time is required to detect its presence. Therefore, when a DTMF signal first becomes present in the receive audio, a short burst is passed through. The DTMF mute timer ensures, if a long string of DTMF characters are present in the receive input, a short burst of only the first DTMF character is passed through. This is accomplished by muting the audio as soon as the first character is detected, and then keeping the audio muted until the first character is complete, and until enough of the next character has been received so it is detected. Each time a new DTMF character is detected, the timer is reset. When the timer expires (because no new DTMF character is detected in the receive input), the audio is no longer muted. The factory default is DTMF Mute Timer Disabled, as the majority of ACU-1000 systems do not employ DTMF control. This setting allows the DTMF signals to be passed through the system like all other audio. It also prevents inevitable occasional “falsing” on voice signals that are similar to a DTMF character; this falsing would momentarily mute throughput audio. If DTMF control is used, it may be desirable to mute the DTMF characters as they may be annoying to other system users, and a timer setting 1 second works well in most cases. If the setting is too low (because some system users transmit DTMF characters slowly), a short burst of DTMF will be passed through at the start of each DTMF character. The timer should be set to a value that is longer than the maximum time elapsed between the end of one DTMF character and the start of the next. Interoperability Now 2-91 ACU-1000 Operations Manual There are some circumstances when it’s important that incoming DTMF not be interpreted by the ACU-1000 as control input, but instead must be passed to other equipment. The settings used are different depending on whether the module that’s passing on the DTMF is a PSTN-2 module (which regenerates DTMF) or any other type of module (which do not). 2.17.2.5.1 Transmitting DTMF via a PSTN Module If the system will be used, for example, to allow a radio user to control a telephone answering machine via DTMF, the following will occur: A radio with a DTMF keypad will transmit to a radio wired to a DSP-2 module. This DSP-2 will be cross-connected to a PSTN-2 module that is hooked to a phone line. If the radio user creates the cross-connection using the DTMF keypad, the DSP-2 module must be in the Command Mode when he does so. He must then use the keypad to put the DSP-2 module into the Data Mode. When in the Command mode, DTMF coming into the DSP-2 module is interpreted as system command input. When in the Data Mode, the incoming DTMF is interpreted as control characters intended for other equipment and all DTMF (other than the DTMF sequence that signals the module to return to the command mode) is not interpreted as control commands. See Section 3.5.1.9 for more information about the Command and Data Modes. While in the Data Mode, the DTMF from the radio is detected by the DSP-2 module and relayed via the CPM-4 module to the cross-connected PSTN-2 module as serial data. The PSTN-2 regenerates and transmits the DTMF characters into the phone line. This Data Mode regeneration cleans up the DTMF, so any noise or frequency-response related distortion of the DTMF characters (caused by radio transmission of the DTMF) is not passed on to the phone line. When the system is used in this way, the DSP-2 module should have its DTMF Mute Timer turned on, so that only the regenerated DTMF will be sent via the phone line. 2.17.2.5.2 Transmitting DTMF via a Module other than the PSTN-2 If it is desired that DTMF characters be passed through the system, being sent out by a module other than a PSTN-2, the DTMF mute timer must be turned off. This is required because only the PSTN-2 regenerates DTMF; the others will just pass it through like any other program audio. The DTMF mute timer must be set to off on the module that receives the DTMF or it cannot be passed on to the cross-connected module or modules. Please note that it is possible, but not advisable, to retransmit DTMF, bringing DTMF into the ACU-1000 on one radio via a DSP-2 module and then retransmitting the DTMF on a second radio via a cross-connected DSP-2 module. The normal FM noise that will accompany the DTMF, along with frequency response related distortion (caused by pre-emphasis & deemphasis in the radio audio circuits) may have an adverse affect on DTMF signal quality and detection. Since the majority of systems do not use DTMF signaling, the factory default sets the module with the DTMF Mute timer turned off. 2-92 Interoperability Now ACU-1000 Operations Manual 2.17.2.6 COR Type, VOX/VMR Threshold, Hangtime, and Audio Delay (DSP Only) The DSP-2 and RDI-1 modules must have positive knowledge an input audio signal is present so they know when to key an associated transmitter. A signal that provides this information is called COR (for Carrier Operated Relay, sometimes referred to as COS Carrier Operated Squelch). The RDI-1 can handle hardwire COR signals only, but the DSP-2 module can use an external hardwire COR line, an internal VMR (Voice Modulation Recognition) algorithm, or a VOX Squelch. In a full duplex connection, it may be desirable to ignore COR activity altogether and never mute the incoming audio. The correct selections depend on the type of radio or other equipment that is connected to the DSP-2 receive audio input. • FM Radios- For best reliability, use a hardwire COR signal, if one is available from the radio’s own squelch circuit. If no hardwire COR signal is available, and the radio has a squelch circuit, use the radio’s squelch in conjunction with VOX mode. VMR should be used for FM radios that must be operated with an open squelch (receiver noise is present when there is no signal). The VOX cannot be used in this condition because it will open on receiver noise, but the VMR opens only on speech, not on receiver noise. When used in this mode, the VMR threshold must be set to Med2 or High to avoid falsing on white noise from the FM discriminator. • AM Aircraft Radios- Again, the best choice is a hardwire COR line from the radio, if one is available. If this isn’t an option, VMR should be used. VMR thresholds of Low or Med1 may be most appropriate for this application. • HF SSB Radios- The only reliable choice for HF radios is VMR. VMR thresholds of Low or Med1 may be most appropriate for this application. • Non-Radio Applications- The choice for these applications is hardwire COR, if this signal is available. If not, use VOX if the audio is relatively noise-free; use VMR for noisy signals. Whenever VMR or VOX are selected, the DSP-2 will switch to default audio delay and hangtime settings that work well for each of these COR types. These default settings are recommended, but not mandatory except as explained below. When VMR or VOX is selected, the defaults are set. The user may then make a change in these settings if any are necessary. The Audio Muted When Squelched configuration item may be turned off so the module ignores COR and does not mute incoming audio when COR is active. This may be desirable for fullduplex setups. Disable muting when using the HSP-2A to monitor a module or group of modules. To set up the DSP-2 for best operation with each of the COR choices: • Hardwire COR- The only parameter that needs to be set is the COR polarity. If the radio’s COR output goes low when a signal is being received, set the input to active low; if the radio’s COR output goes high when a signal is being received, set the input to active high. • VOX- The VOX algorithm will signal COR present whenever the incoming audio exceeds a set threshold. The signal can be tones, voice or noise. The VOX algorithm is looking for any audio signal above the set threshold. Three parameters determine how the VOX Interoperability Now 2-93 ACU-1000 Operations Manual algorithm functions: threshold, hangtime, and delay (See definitions below). VOX and VMR use the same programming commands to set hangtime and threshold. Note: When VOX is selected, the DSP-2 will default to an audio delay setting of 60 msec and a hangtime setting of 775 msec. Other times may then be set. • VMR- The VMR algorithm is designed to detect speech in a wide range of input audio SNRs. Three parameters determine the performance of the VMR algorithm: threshold, hangtime, and delay. Note: VMR and VOX use the same programming commands to set hangtime and threshold. About default settings: when VMR is selected, the DSP-2 will default to an audio delay setting of 220 msec and a hangtime setting of 775 msec. It’s possible to rest these parameters to different values, but audio delay cannot be set below 220 msec, and hangtime cannot be set below 775 msec. These minimum settings are required to ensure proper VMR operation Threshold: The VOX threshold is signal amplitude related: the higher the threshold, the louder the input must be to trip the VOX and open the squelch. However, the VMR threshold is not amplitude related; instead, it specifies how stringent the VMR algorithm is when deciding whether a signal contains speech or noise. Because of the statistical nature of speech and noise, the VMR algorithm is not perfect and a performance tradeoff occurs at different threshold settings: at Low threshold, the unit is least likely to fail to detect speech, but most likely to false on noise. When the Threshold is set to the High setting, the unit is least likely to false on noise, but will fail to detect some speech. The correct setting will depend on aspects of the incoming signal and the requirements of the system. A lower threshold should be used if the input noise is not excessive, such as from an AM or HF SSB radio. A higher threshold is necessary for use with an open-squelch FM radio, where full noise is present when no signal is present. The standard factory setting of Med2 should be suitable for most situations and signal types. The threshold configuration programming command varies the threshold for both VOX and VMR. One settings option disables VOX/VMR entirely, so no level of input audio will cause the VOX or VMR to be tripped. This setting is useful only for system testing. Hangtime: Hangtime keeps the audio path enabled for an adjustable duration after the moment when speech is no longer detected, preventing the audio from being muted between syllables or during pauses in speech. This configuration item sets the hangtime for both VOX and VMR: Delay The DSP-2 can add an adjustable delay to the module’s input audio, output audio, or both. 2.17.2.6.1 Receive (Input) Audio Delay When speech first appears at the audio input, some time passes before it can be detected. The adjustable audio delay prevents the loss of the audio that is received before the detection takes place and audio gates can be opened to send this audio on to other modules. The amount of delay needed depends on the type of COR in use, as the different COR methods require different processing times. When hardwire COR is used, the default delay is 20 msec, because an external COR signal normally arrives before its associated audio, so only minimum delay is needed. The VMR has a minimum speech detection time of about 100 msec, so its default delay is 220 msec, which allows time for speech to be 2-94 Interoperability Now ACU-1000 Operations Manual reliably detected under most conditions. The VOX detection time is normally just a few tens of milliseconds, so its default delay time is 60 msec. The delays should be kept at the default values unless some system requirement dictates a change, such as the use of slowto-key radios. Be advised of the following important characteristics of the RX audio delay: • There can never be a true “zero delay” for receive audio passing through the DSP-2 module; an inherent processing delay is always present. • The RX audio delay does not delay the handling of the COR signal. This means that if two radios are cross-connected through a pair of DSP modules, an active COR at one module will immediately key the other module. The incoming RX audio will then be delayed from being retransmitted at the connected module by the set RX audio delay time. The duration of the COR signal (and corresponding PTT signal) will be extended by the set RX audio delay time. • Keep the delay set as low as possible for clarity of conversation. If the first syllable or part of the first syllable is lost after a message is passed through the unit, most likely the audio delay should be increased. • Due to the longer processing time required for VMR mode, multiple keypad settings (settings of 0 through 5) all set the delay to 220 ms. The longer input audio delays of 260 and 300 ms can be set with inputs of 6 or 7, respectively. 2.17.2.6.2 Transmit (Output) Audio Delay The DSP-2 can also add delay to the audio output of the module. (See also Section 2.10.4.3. and Section 4.2) Transmit Audio Delay is mainly used when the 4-wire device associated with the DSP-2 is a trunked radio. When a user makes a trunked system transmission, there is a delay between when the radio’s PTT is activated and when a channel is assigned so that communication may begin. Most trunking systems signal this ready status by a confirmation tone. There is no means to transfer this tone to ACU-1000 system users who are cross-connected to the trunked system. Instead, the DSP-2 Output Audio Delay should be set to a duration that holds the TX audio until the channel has been selected so that the first syllable is not clipped. Note that when two radios are cross-connected by a pair of DSP-2 modules, the RX (input) audio delay of the receiving module is added to the TX (output) audio delay of the transmitting module (assume to be a trunked radio). This occurs because, while the RX audio is delayed by the set amount, the COR input takes effect immediately (see above). This undelayed COR will immediately send an active PTT (via the cross-connected DSP-2 module), to the trunked radio. The audio from the receiving module is then sent to the trunked radio delayed by the sum of the receiving module’s RX audio delay and the transmitting (trunked) module’s TX Audio Delay. This provides a maximum total delay of 1100 milliseconds. If additional TX Audio Delay is required, contact the Raytheon factory for recommendations. Interoperability Now 2-95 ACU-1000 Operations Manual NOTE: TX Audio Delay is available for all DSP-2 modules, but only for DSP-1 modules with revision 2.08 or higher firmware installed. To verify the revision on a DSP-1 module, remove the module and examine the label on the EPROM. The label reads “DSP-1 1096-201XXX” where XXX is the revision number. TX audio delay is available for part numbers 1096-201208 or higher. 2.17.2.7 COR Sampling (DSP and RDI-1) When a radio connected to the DSP-2 or RDI-1 is operating in half-duplex mode, it cannot receive while it is transmitting. This means as long as the radio is in the TX mode, the remote radio user who’s communicating to the ACU-1000 system through this radio will be locked out and unable to send any commands to the system. To make sure this condition does not last for extended periods, the module will drop PTT momentarily to allow it to check for an active COR input, which would indicate the remote user is trying to communicate with the system. If COR is detected during this “sampling” window, the module will hold the local radio unkeyed for at least five seconds so the remote user has time to enter a DTMF command. There are three variable parameters plus ON/OFF functions associated with COR sampling: initial delay time, sampling interval, and sampling window width. In general, it is desirable to keep the sampling interval as long as is feasible and the window width as short as is feasible because each time a sample is taken, a “hole” is put in the transmit audio, and syllables or words can be missed. • COR Sampling ON/OFF- The factory default setting for COR Sampling is OFF (disabled), so no COR sampling will occur unless it’s enabled(ON). • Initial Delay Time- This configuration item sets how long after the start of the userinitiated PTT that the first sample window occurs. If the PTT goes inactive before the initial delay time expires, the initial delay time is reset, and starts running again at the onset of PTT. Note this time is set separately from the sampling interval, allowing it to be set longer than the sampling interval. The factory default for the initial delay is 10 seconds. • Sampling Interval- The first COR sample takes place when the initial delay expires. The module momentarily ignores the system input holding it in the transmit mode, drops PTT and samples for an incoming COR. If COR is not detected, and the system PTT input remains active, the module re-asserts PTT and maintains it for a time less than or equal to the sampling interval. While PTT is continuously active, samples will continue to be taken at this interval. The factory default setting is 5 seconds. A shorter interval will allow quicker take-over of the system by the radio user, but will disrupt transmit audio more often. • Sampling Window Width- This sets how long the local radio stays unkeyed while looking for COR from the local radio. The correct value depends on how fast the local radio can switch from transmit to receive and how fast COR can be detected. For Hardwire COR this depends on how fast the local radio’s squelch circuit can respond to a received signal. For DSP-2 modules using VOX or VMR based COR, it depends on 2-96 Interoperability Now ACU-1000 Operations Manual how long it takes the module to detect a valid signal in receive audio inputs, plus the time the radio requires to switch into the RX mode. Keep the sampling window width as short as possible, because a gap is put into the transmit audio during this time; but not too short or COR sampling will be ineffective because the system does not have sufficient time to respond. The factory set value of 150 msec is about the minimum practical value for most radios, while some radios require a window of 250 msec or more. 2.17.2.8 Noise Reduction Value (DSP only) The DSP-2 uses time domain mode noise reduction, designed to peak up any correlated information (such as speech), in the audio passband. It reduces noise by forming dynamic bandpass filters around correlated information, thus automatically reducing the bandwidth to the minimum necessary to pass the information. This type of noise reduction is most effective on purely random noise, such as white or pink noise, and less effective on impulse noises. The noise reduction value allows the amount of noise reduction to be set in ten steps from off to maximum. Increasing the level provides more actual noise reduction, but may give a “surging” quality to the recovered audio depending on its frequency content. Reducing the level lowers the noise reduction but may provide the best sounding audio in some cases. The best setting in a particular application depends on the noise level and represents a balance between noise reduction amount and ultimate audio quality. The factory default is Off. 2.17.2.9 Audio Muted when Squelched (DSP only) This selection determines whether the module’s audio output to the ACU-1000 internal bus (and therefore, to other modules in the system) is muted when the module is not detecting COR. The default setting mutes the audio when squelched, but sometimes other system requirements (such as the need for full-time monitoring of an input signal) may dictate the audio be not muted. Default setting is muted. 2.17.2.10 Transmit Keying Tones/Keying Tone Amplitudes (DSP Only) The DSP-2 can mix keying tones with it’s transmit audio output. This allows the DSP-2 to signal a connected transmitter to key using only the audio output lines, eliminating the need for an extra wire to carry the PTT output. Keying tone types include a 1950 Hz continuous tone and the EIA Keying Sequence (see below). Factory default is No Keying Tones. The Keying Tone Amplitude configuration item command pertains only to the amplitude of the 1950 Hz continuous keying tone relative to the transmit audio output. The selections are 0= -6 dB, 1= -9 dB, 2= -12dB, and 3= -15dB. The default setting is –9 dB. The DSP-2 can produce the EIA tone keying sequence using function tone F1. The EIA tone keying sequence has three tones, produced in succession: • High level Alert Tone, 2175 Hz tone for 125 msec @ +10dB (also called “High Guard Tone”). Interoperability Now 2-97 ACU-1000 Operations Manual • F1 Function Tone, 1950 Hz for 40 msec @ 0dB. • Hold Tone, 2175 Hz @ -20dB, mixed with the TX program audio as long as PTT is enabled (also called the “Low Guard Tone”). The levels of the EIA keying tones are expressed relative to the normal TX program audio. When the DSP-2 is set for default TX audio (0 dBm) into a terminated 600 Ohm load, the levels are +10 dBm for the High Guard Tone, 0 dBm for the Function Tone, and –20 dBm for the Low Guard Tone. Since the maximum output of the DSP-2 is +10 dBm, and the High Guard Tone level is 10 dB above the program audio, the program audio must not be set higher than 0 dBm if EIA Tone Keying is used. The Keying Tone Amplitude configuration item does not affect the EIA keying sequence tone amplitudes. 2.17.2.11 COR Inhibit Time after PTT Some types of radios produce momentary, unwanted COR outputs just after their PTT inputs are de-activated. If a radio connected to the ACU-1000 exhibits this behavior, the COR inhibit causes this COR to be ignored. If the COR inhibit time is not correctly set, this COR signal can cause connected extensions to momentarily key. The factory default is 100 ms. 2.17.2.12 PTT or COR Priority (Half Duplex Only) For most applications, the standard setting is PTT priority, the factory default. PTT Priority indicates if a system operation calls for the radio to begin transmitting, it will always do so, unless a previous PTT is in active use for this net. For example, if two DSP modules (modules 1 and 2) are connected in a net, with neither module receiving a signal and module 1 begins receiving a COR (valid signal), module 2 will key. If at this point, module 2 begins to receive a COR, it will not switch to receive because the module is set to PTT Priority. Only when the existing COR and PTT scenario goes away, will module two generate a COR, and then key module one. PTT or COR priority only matter if the radio or other equipment connected to the DSP-2 or RDI-1 is half duplex (can not transmit and receive simultaneously). If a full duplex radio is used, PTT and COR can occur simultaneously, so there is no reason to set to COR priority, and the module should be left in the PTT priority default. In some requirements, it is necessary for COR to have priority over PTT. This indicates as long as a radio is receiving a valid signal (as indicated by the detection of COR), the DSP-2 or RDI-1 module will not put the radio into the transmit mode. One example is when a PSTN-2 module and DSP-2 module cross-connect a phone line and radio together. If the PSTN line has high background noise, COR Priority will probably be useful. PTT priority is the factory default setting. 2-98 Interoperability Now ACU-1000 Operations Manual 2.17.2.13 Module Security Level Selection This command sets a module’s security level. Where n is the security level, with the security level set by n defined as: 0 = not secure (no PIN required), 1 = least secure, up to 9 = most secure. 2.17.2.14 DTMF Commands Enable/Disable This configuration item determines whether an ACU-1000 module considers any DTMF characters present in its input audio to be commands meant for that module. When DTMF commands are disabled, they are not considered as commands to the receiving module blocked from passing through the module. If the DTMF Mute Timer is enabled, the DTMF characters are detected and muted. If the DTMF Mute Timer is disabled, any incoming DTMF is simply passed through along with the rest of the program audio. A likely reason for setting the module to the DTMF Command Disable mode would be to prevent any outside users from connecting to the ACU-1000 system via DTMF. This is especially likely if an operator using the ACU Controller software normally controls the system, and authorized system users do not have DTMF keypads on their radios. The default factory setting is DTMF Commands enabled. In this mode, the receiving module assumes that all incoming DTMF characters are commands and responds accordingly. See Section 2.17.2.5 for proper DTMF Mute Timer adjustment, and Section 3.5.1.9, which explains the Data and Command modes, which can be used to temporarily (and remotely) control the use of DTMF input, without having to enter the programming mode. 2.17.2.15 High Frequency Equalizer (DSP Only) The DSP-2 module can reshape the high frequency response of it’s receive audio input. Equalization can have two effects: 1. Improved DTMF detection when using radios with a nonlinear response, and, 2. Better-sounding audio for some radios. The high frequency response can be either cut or boosted by up to 5 dB. A flat frequency response is the factory default setting. 2.17.2.16 DTMF Pre-emphasis (DSP Only) FM radios (VHF, UHF, 800 MHz) use pre-emphasis in the transmitted audio and de-emphasis in the received audio. Pre-emphasis and de-emphasis alter, and then restore, the audio frequency response in order to improve the quality of the received signal with respect to high frequency noise. In most FM transmitters that have built-in DTMF signaling, the DTMF characters are added after the pre-emphasis circuitry. When detected in an FM receiver, the DTMF characters are taken from the discriminator audio, prior to the de-emphasis circuitry. Interoperability Now 2-99 ACU-1000 Operations Manual In the ACU-1000, DTMF detection is performed by the DSP-2 module rather than by the associated receiver. When the DSP-2 receives line audio or speaker audio from an FM receiver (rather than discriminator audio), any received DTMF characters have been inappropriately deemphasized. This incorrect shaping of the frequency response of the DTMF characters impedes proper DTMF detection. The DSP-2 can add pre-emphasis to the DTMF detection algorithm (leaving the received audio flat) for improved detection. Note that these settings do not affect the audio that is passed on by the DSP-2 to be crossconnected via another module in the system. The factory default adds pre-emphasis and should be used any time the DSP-2 audio input source is the line audio or speaker audio output of an FM receiver. The no pre-emphasis selection should be used if the audio source is the discriminator output of an FM receiver or from a source other than an FM receiver. 2.17.2.17 Auxiliary Output Control The standard configuration for DSP-2 is that the AUX-1 output changes logic state when the module is cross-connected. Contact the factory if other configurations are required. 2.17.2.18 Voice Prompt Initiation Delay A delay can be added to the onset of system voice prompts. Different delays can be added to any of the interface modules. This variable delay is mainly used to compensate for slow-toreact equipment associated with a module. For example, if a local radio associated with a DSP2 module has a long settling time after its PTT is activated, it may be necessary to delay all voice prompts transmitted via the DSP-2. When additional delay is required, the distant radio user will not hear the beginnings of system voice prompts. The factory default for and DSP-2 modules is 100 ms; for PSTN-2, and LP-2 modules, the default is no delay. 2-100 Interoperability Now ACU-1000 Operations Manual 2.17.3 PSTN-2 Configuration items 2.17.3.1 Telephone Line Level This configuration item programs the PSTN-2 for different telephone line levels. The selections for n are 0=0 dBm, 1=-3 dBm, 2=-6 dBm, 3=-9 dBm (default), 4=-12 dBm, 5=-15 dBm, 6=-18 dBm, 7=-21 dBm, 8, 9 both= -24 dBm. This command simultaneously sets the telephone send and receive levels. The default setting is -9 dBm, which is the maximum level allowed into U.S. (and most foreign) telephone networks at the subscriber end. Many PABX units require a level of -12 dBm. Higher levels should only be selected for use into field wire or private networks that are known to accommodate higher levels. Do not use this command if the telephone receive audio volume is too low; use the Telephone Receive Level Boost command instead (next paragraph). 2.17.3.2 Telephone Receive Level Boost This configuration item provides additional volume to the PSTN module’s receive input. The Telephone Line Level item explained above sets the correct audio levels for proper hybrid operation and correct levels on the PSTN line. This configuration item is used to boost the PSTN receive audio at the output of the hybrid. When necessary, use this command to increase the volume of audio coming into the PSTN so it matches the volume level of other audio signals in the ACU-1000 system. The factory default of a 6 dB boost works for most systems, but if a different level is required, the options for range from 0 to 12 dB. Refer to Section 2.17.3.15 for a PSTN Simplified Setup Procedure. 2.17.3.3 PSTN Type This configuration item allows the PSTN module to be programmed for either a normal telephone system or an Inmarsat M SATCOM terminal. The only difference is the Satcom terminal requires a "#" be appended to the entered telephone number. When the PSTN-2 is programmed for Satcom operation, this is done automatically, so the “#” need not be entered by the user. The factory default is for a regular telephone line; the only other selection is for SATCOM use. 2.17.3.4 Dial Mode The PSTN module can use either DTMF (Dual Tone Multi Frequency, otherwise known as "Touch-Tones") or Pulse Dialing. In most systems, DTMF is used, but some older systems may still require the use of Pulse Dialing. This configuration item sets the unit for DTMF Dialing (default setting) or for pulse dialing. When in the Pulse Dialing mode, all digits after the initial telephone number are sent not as pulses, but as DTMF. This allows the use of an answering machine, etc., which require DTMF command input after a connection is made on the pulse dial system. It will be necessary to put the module into the Data Mode. See Section 3.5.1.9. Interoperability Now 2-101 ACU-1000 Operations Manual 2.17.3.5 DTMF Mute Timer When a module is not in the Data Mode (See Section 3.5.1.9), all DTMF signals detected in the receive audio are interpreted as commands meant for the receiving module. When the DTMF Mute Timer is enabled, these DTMF command signals are “Muted”; that is, they are not passed on to the ACU-1000 internal audio bus to be routed to another module, nor are they sent back out in any module’s TX audio. A module cannot instantaneously mute a DTMF signal; some time is required to detect its presence. Therefore, when a DTMF signal first becomes present in the receive audio, a short burst is passed through. The DTMF mute timer ensures, if a long string of DTMF characters are present in the receive input, a short burst of only the first DTMF character is passed through. This is accomplished by muting the audio as soon as the first character is detected, and then keeping the audio muted until the first character is complete, and until enough of the next character has been received so it is detected while the audio is still being muted. Each time a new DTMF character is detected, the timer is reset. When the timer expires (because no new DTMF character is detected in the receive input), the audio is no longer muted. The factory default is DTMF Mute Timer Disabled, as the majority of ACU-1000 systems do not employ DTMF control. This setting allows the DTMF signals to be passed through the system like all other audio. It also prevents inevitable occasional “falsing” on voice signals that are similar to a DTMF character; this falsing would momentarily mute throughput audio. If DTMF control is used, it may be desirable to mute the DTMF characters as they may be annoying to other system users, and a timer setting 1 second works well in most cases. If the setting is too low (because some system users transmit DTMF characters slowly), a short burst of DTMF will be passed through at the start of each DTMF character. The timer should be set to a value that is longer than the maximum time elapsed between the end of one DTMF character and the start of the next. There are some circumstances when it’s important that incoming DTMF not be interpreted by the ACU-1000 as control input, but instead must be passed to other equipment. The settings used are different depending on whether the module that’s passing on the DTMF is a PSTN module (which regenerates DTMF) or any other type of module (which do not). The factory default for the PSTN-2 disables the mute delay timer. 2.17.3.6 RX Audio Delay An adjustable delay can be added to the PSTN-2’s input audio. When speech first appears in the input audio, some time passes before it can be detected by the VOX algorithm. The adjustable audio delay prevents the loss of the audio that is received before the detection takes place and audio gates can be opened to send this audio on to other modules. The factory default is 35 ms. 2-102 Interoperability Now ACU-1000 Operations Manual 2.17.3.7 VOX Threshold This command setting determines the sensitivity of the PSTN module VOX. To be sure to avoid missing speech, the factory default setting is Low Threshold, which provides maximum sensitivity. There may be instances where less sensitivity is desired (for example if excessive if background noise is present). The factory default setting is for Low Threshold. 2.17.3.8 VOX Hang Time VOX hang time determines how long the VOX stays active after speech disappears. This keeps radios that are communicating with the PSTN module from unkeying between words spoken by the telephone caller. If too short a hangtime is set, the radios will unkey frequently and syllables may be missed during the time it takes the transmitter to key again. Too long a hangtime causes the party at the other end to wait unnecessarily long for the VOX to unkey before beginning their response during the conversation. The factory default is 1 second. 2.17.3.9 2-Wire The PSTN module can only be configured for standard 2-Wire hybrid operation. 2.17.3.10 Module Security Level Selection This command sets a module’s security level number, with 0 = not secure (no PIN required), 1 = least secure, up to 9 = most secure. Interoperability Now 2-103 ACU-1000 Operations Manual 2.17.3.11 Outgoing Ring Timer The length of time the PSTN module allows the phone being called to ring is set by this configuration item. The selection options are: no ring, a 30 second ring (factory default), a 1 minute ring, or a continuous ring. When set for 30 seconds or one minute, the call will timeout if not answered before the ringing time elapses. If Outgoing Ring is set to “no ring,” no outgoing calls are allowed. This feature is useful, for example, if the PSTN is connected to a satellite terminal and, while it’s important to receive incoming calls, the system operator does not want to pay for outgoing calls. If set for continuous ring, the incoming call does not time out and the phone will continue to ring until the call is terminated by the originator. 2.17.3.12 DTMF Command Enable This configuration item determines whether an ACU-1000 module considers any DTMF characters present in its input audio to be commands meant for the module. When DTMF commands are disabled, they’re blocked from passing through the module. Instead, the DTMF characters are detected and muted, but are not considered as commands to the receiving module. The default factory setting is DTMF Commands enabled. In this mode, the DTMF characters are still detected and muted, but the receiving module assumes they are incoming commands and responds accordingly. See Section 2.17.2.5 for proper DTMF Mute Timer adjustment, and Section 3.5.1.9, which explains the Data and Normal modes, which can be used to temporarily control the use of DTMF input, without having to enter the programming mode. 2.17.3.13 Inactivity Disconnect Timer The Inactivity Disconnect Timer disconnects a PSTN module user from the ACU-1000 system if no activity is detected on the line. This prevents the connection from being tied up if a telephone user forgets to give the “Disconnect” command or the connection is otherwise lost without notification to the system. This timer measures how long there is no speech or DTMF characters present in audio sent to the PSTN receive audio input. If there’s insufficient activity so the VOX is not tripped before this timer expires, the connection is terminated by the ACU. This timer is reset whenever the VOX is tripped. When using the PSTN-2 to monitor audio from another module for an extended time, set timer to off. Selections available are: None (the connection will not be terminated due to inactivity no matter how long), 30 seconds, 1 minute, 2 minutes (factory default), 5 minutes, and 10 minutes. 2.17.3.14 Voice Prompt Initiation Delay A delay can be added to the onset of system voice prompts. Different delays can be added to any of the interface modules. This variable delay is mainly used to compensate for slow-toreact equipment associated with a module. For example, if a local radio associated with a DSP2 module has a long settling time after its PTT is activated, it may be necessary to delay all voice prompts transmitted via the DSP-2. When additional delay is required, the distant radio user will not hear the beginnings of system voice prompts. The default is no delay. 2-104 Interoperability Now ACU-1000 Operations Manual 2.17.3.15 PSTN-2 Simplified Setup Procedure This is a set of hints to assist in the basic setup of a PSTN module to the phone system it’s connected to. It gives a step-by-step process that lists the steps in the best order to quickly achieve the best results. • Crossconnect the HSP-2A handset to the PSTN and place a call from the PSTN-2 to the phone number of an associate who will help with the setup. Refer to Section 2.17.3.1, Telephone Line Level. Ensure that the line levels are correct for the network being used and do not exceed maximum allowed levels. Within the guidelines presented, the line level may be adjusted in 3 dB steps to present the proper level to your associate at the remote telephone. The phone line levels works inversely proportionate to one another. Setting the PSTN to -9 dBm means the incoming audio in boosted nine decibels before it is put on the ACU backplane and the outgoing is attenuated 9 decibels before it hits the phone line. Following this procedure will ensure the distant user and the item connected to the ACU will have ample audio levels. Note the default setting of -9 dBm is the maximum allowed into most U.S. and foreign telephone networks at the subscriber end. Some PABX’s may only allow -12 dBm • Now listen as the associate speaks and verify that the VOX LED illuminates on the PSTN even for softly spoken speech. If the VOX doesn’t always trip, raise the telephone RX Level Boost setting until it does, but no higher. 6 dB of boost is the typical default setting to start with. • Continue to have a conversation while monitoring the VOX LED. If problems persist with failure to VOX or if false VOXing due to background noise on the distant phone occurs, adjust the VOX threshold as needed. There are only two settings, Low & High. The default setting is Low threshold. If the VOX does not always trip, and the setting is currently at High, lower the threshold to the Low setting. If the threshold is already set to Low, the VOX cannot be made more sensitive, so the RX Level Boost must be increased. If the VOX sometimes falses on background noise, and the threshold is set to low, move the threshold to the high setting. Note: The VOX is expected to trip on loud background noises; lower the threshold only if the VOX is activated for background sounds that are below the volume of normal speech. • Now have your associate on the distant phone count from one to twenty at a slow, conversational rate. The VOX should remain active throughout. If the VOX drops in and out, raise the VOX hangtime just until this no longer occurs. The default setting is one second; if the VOX continually drops out between words, increase it to 1.5 seconds or, if necessary, to two seconds. Change the VOX Hangtime with the ACU Controller or by the HSP keypad. • With the HSP handset, talk with a normal conversation level and have your associate verify that you are being received at an acceptable level. If not, and you are outputting the maximum legal level to the line, then contact the Raytheon factory for further suggestions. Interoperability Now 2-105 ACU-1000 Operations Manual • Interconnecting multiple active PSTNs together on the same net can sometimes cause hybrid unbalance issues. Please contact the Raytheon factory for further suggestions and guidance if this is required as there are complex tradeoffs required. 2.17.4 LP-2 Configuration items 2.17.4.1 DTMF Mute Timer When a module is not in the Data Mode (See Section 3.5.1.9), all DTMF signals detected in the receive audio are interpreted as commands meant for the receiving module. When the DTMF Mute Timer is enabled, the DTMF command signals are “Muted”; that is, they are not passed on to the ACU-1000 internal audio bus to be routed to another module, nor are they sent back out in any module’s TX audio. A module cannot instantaneously mute a DTMF signal; some time is required to detect its presence. Therefore, when a DTMF signal first becomes present in the receive audio, a short burst is passed through. The DTMF mute timer ensures, if a long string of DTMF characters are present in the receive input, a short burst of only the first DTMF character is passed through. This is accomplished by muting the audio as soon as the first character is detected, and then keeping the audio muted until the first character is complete, and until enough of the next character has been received so it is detected. Each time a new DTMF character is detected, the timer is reset. When the timer expires (because no new DTMF character is detected in the receive input), the audio is no longer muted. The factory default is DTMF Mute Timer Disabled, as the majority of ACU-1000 systems do not employ DTMF control. This setting allows the DTMF signals to be passed through the system like all other audio. It also prevents inevitable occasional “falsing” on voice signals that are similar to a DTMF character; this falsing would momentarily mute throughput audio. If DTMF control is used, it may be desirable to mute the DTMF characters as they may be annoying to other system users, and a timer setting 1 second works well in most cases. If the setting is too low (because some system users transmit DTMF characters slowly), a short burst of DTMF will be passed through at the start of each DTMF character. The timer should be set to a value that is longer than the maximum time elapsed between the end of one DTMF character and the start of the next. There are some circumstances when it’s important that incoming DTMF not be interpreted by the ACU-1000 as control input, but instead must be passed to other equipment. The settings used are different depending on whether the module that’s passing on the DTMF is a PSTN-2 module (which regenerates DTMF) or any other type of module (which do not). 2.17.4.1.1 Transmitting DTMF via a PSTN Module If the system will be used, for example, to allow a local phone user to control a telephone answering machine via DTMF, the following will occur: A local phone with a DTMF keypad will send DTMF characters to an associated LP module. This LP module will be cross-connected to a PSTN module that is hooked to a phone line. If the local phone user creates the cross-connection using the DTMF keypad, the LP module must be in the Command Mode when he does so. He must then use the keypad to put the LP module into the Data Mode. When in the Command mode, DTMF coming into the LP module is interpreted as system command input. When in the Data Mode, the incoming DTMF is 2-106 Interoperability Now ACU-1000 Operations Manual interpreted as control characters intended for other equipment and all DTMF (other than the DTMF sequence that signals the module to return to the command mode) is not interpreted as control commands. See Section 3.5.1.9 for more information about the Command and Data Modes. While in the Data Mode, the DTMF from the local phone is detected by the LP module and relayed via the CPM-4 module to the cross-connected PSTN-2 module as parallel data. The PSTN-2 regenerates and transmits the DTMF characters into the phone line. When the system is used in this way, the DSP-2 module should have its DTMF Mute Timer turned on, so that only the regenerated DTMF will be sent via the phone line. 2.17.4.1.2 Transmitting DTMF via a Module other than the PSTN-2 If it is desired that DTMF characters be passed through the system, being sent out by a module other than a PSTN module, the DTMF mute timer must be turned off. This is required because only the PSTN regenerates DTMF; the others will just pass it through like any other program audio. The DTMF mute timer must be set to off on the module that receives the DTMF or it cannot be passed on to the cross-connected module or modules. 2.17.4.2 RX Audio Delay An adjustable delay can be added to the LP-2’s input audio. When speech first appears in the input audio, some time passes before the VOX algorithm can detect it. The adjustable audio delay prevents the loss of the audio that is received before the detection takes place and audio gates can be opened to send this audio on to other modules. 2.17.4.3 VOX Threshold This command setting determines the sensitivity of the LP-2 VOX. There are three levels (Low, Med. High) and Off. 2.17.4.4 VOX Hang Time VOX hang time determines how long the VOX stays active after speech disappears. This keeps radios that are communicating with the LP module from unkeying between words spoken by the LP user. If too short a hangtime is set, the radios will unkey frequently and syllables may be missed during the time it takes the transmitter to key. Too long a hangtime causes the party at the other end to wait unnecessarily long for the VOX to unkey before beginning their response during the conversation. 2.17.4.5 Module Security Level Selection This command sets a module’s security level number. 0 = not secure (no PIN required), 1 = least secure, up to 9 = most secure. 2.17.4.6 Dial & Busy Tone Style The Local Phone Module generates the dial tone and busy tone sent to the phone that is plugged into it. When the handset of the local phone is picked up, this dial tone is heard in the earpiece. After a request to make a connection is made, the user will hear the ring cadence as Interoperability Now 2-107 ACU-1000 Operations Manual set in Section 2.17.4.7 as the ACU-1000 attempts to make the connection. If the extension is busy, a busy tone will be heard. The factory default generates the standard US tones, which is currently the only style offered 2.17.4.7 Ring Cadence The cadence of the ring the LP module sends to the associated telephone set is selected by this configuration item. Two styles are offered; the standard US style (factory default), and European style. This ring cadence applies both to the tone heard in the LP-2’s earpiece when a call is being made and to the ring that is produced when a call is placed to the local phone (ringback). 2.17.4.8 Dial Tone Enable The LP module can generate a dial tone whenever a caller picks up the handset of the associated telephone set in order to place a call. If desired, this dial tone can be disabled. 2.17.4.9 Ringback Enable When a call is placed to the extension occupied by the LP module, the module can signal that this call has been made via its ringback signal. For example, if an ACU-1000 user attempts to make a connection with his UHF radio to an extension occupied by an LP, he will hear this ringback signal as he waits for the handset at the LP to be picked up. It’s possible to disable this ringback signal; in this case the UHF radio user will not hear anything as he waits for his call to go through. See Section 2.17.4.7 Ring Cadence, and Section 2.17.4.10, Ringing Time. 2.17.4.10 Outgoing Ring Timer The length of time the LP module causes its associated phone set to ring when a call is received is adjusted by this configuration item. The selection options are: no ring, a 30 second ring (factory default), and a 1 minute ring; or alternatively a continuous ring. When set for either 30 seconds or one minute, the call will time-out if the call is not answered before the Ringing Time elapses. When set to “no ring,” no outgoing calls are allowed. If set for continuous ring, the incoming call does not time out and the phone will continue to ring until the call is answered or terminated by the originator. 2.17.4.11 DTMF Command Enable This command determines whether an ACU-1000 module considers any DTMF characters present in its input audio to be commands meant for that module. When DTMF commands are disabled, they’re blocked from passing through the module. Instead, the DTMF characters are detected and muted, but are not considered as commands to the receiving module. The default factory setting is DTMF Commands enabled. In this mode, the DTMF characters are still detected and muted, but the receiving module assumes they are incoming commands and responds accordingly. See Section 2.17.4.1 for proper DTMF Mute Timer adjustment, and Section 3.5.1.9, which explains the Data and Command modes, which can be used to temporarily control the use of DTMF input, without having to enter the programming mode. 2-108 Interoperability Now ACU-1000 Operations Manual 2.17.4.12 Aux Output Control The standard configuration for the LP module’s AUX-1 output is to change logic state when cross connected. Contact the factory if other configurations are required. 2.17.4.13 Voice Prompt Initiation Delay A delay can be added to the onset of system voice prompts. Different delays can be added to any of the interface modules and to the HSP module. This variable delay is mainly used to compensate for slow-to-react equipment associated with a module. For example, if a local radio associated with a DSP-2 module has a long settling time after its PTT is activated, it may be necessary to delay all voice prompts transmitted via the DSP-2. When additional delay is required, the distant radio user will not hear the beginnings of system voice prompts. The factory default for and DSP-2 modules is 100 ms; for HSP-2A, PSTN-2, and LP-2 modules, the default is no delay. 2.17.5 Remote Control Setup The LE-10, 20, 30, & 40 are essentially the same as far as the external interface is concerned. They are terminated with a DB-15 cable that may be directly plugged into the connectors on the back of the ACU-1000. The audio TX and RX levels should be left at their factory default settings and any adjustments will be made on the ACu-1000 module side. Below is a list of the settings of the default dipswitch settings on the bottom of the remote. Most of them should not need adjustment. Switch # ON OFF 1 Low impedance load to radio RX out. High impedance load to radio RX out. 2 OPTION – Latched F1/F2 output OPTION – Momentary F1/F2 output. 3 Monitor on front panel PTT Do not monitor on front panel PTT 4 Speaker mute on any PTT Depends on setting of JP15 5 Boosts level of parallel TX audio received Normal 6 Low impedance radio mic input High impedance radio mic input 7 High level RX audio from radio Low level RX audio from radio 8 For ground referenced RX audio from radio For non-ground referenced RX audio from radio Table 2-19 Remote Switch Settings Note: Underlined items represent the default setting. Interoperability Now 2-109 ACU-1000 Operations Manual DSP-2 4-wire interface modules should be set with the following changes to default: COR – Set for hardwired (COR) active low and no VOX or VMR RX Level – Set for -16 dBm to start TX level – Set for +4 dBm to start. In general, there could be different types of remote interfaces such as microwave, private wire, LE-xx remotes, or large scale communications consoles. Each one of these may have their own line level preferences in order to keep the overall system levels within the design range. For the adjustment of the ACU-1000 DSP-2 modules that may be used for the console interface, the process is as follows. 1. Produce as standard level signal on the RX input of the DSP-2 module selected from the selected console device. 2. Adjust the RX level for that module either up or down in order to make the signal level LED blink on and off during speech. 3. To set the module TX level, crossconnect the HSP-2A to the selected module and speak normally into the handset mic. Adjust the TX level up or down in order to either produce the proper level of modulation in the radio connected to the module or a proper level of audio in the remote control RX channel, as appropriate. End Of Section Two. 2-110 Interoperability Now ACU-1000 Operations Manual 3 Operation 3.1 General Just as the ACU-1000 is capable of many different applications, from local, tactical uses to Wide Area Interoperability Systems, the ACU-1000 also has a corresponding variety of available control methods, including: • Local Control via a PC with the ACU Controller cabled directly to the ACU-1000. [Serial or Ethernet control] • Remote Control via ACU Controller (or multiple ACU Controllers) connected via a network. [Ethernet control] • Remote control via the WAIS Controller – For Wide Area Interoperability Systems capable of connecting multiple ACU-1000 systems together over a network. [Ethernet control] • Local manual control via the HSP module handset, keypad, and speaker. • Remote manual control via DTMF. Interoperability Now 3-1 ACU-1000 Operations Manual 3.2 Operation Via ACU Controller The ACU Controller program for PCs running Windows is the primary method to control a single ACU-1000. The PC can be connected directly to the ACU-1000 by either a CAT5 crossover network cable plugged into the CPM-4 front panel Ethernet Jack, or by an RS-232 cable attached to the ACU-1000 rear panel DB-9 serial port. Alternatively, the ACU Controller can run the ACU-1000 over any Ethernet (IP-based) network that is connected to both the computer and the ACU-1000. This allows control of an ACU-1000 by multiple operators at different computers on the network. The CPM-4 (and ETS-1 if a CPM-2/ETS-1 combination is used) arbitrates the incoming commands, giving priority to the first received, and provides status messages so that all ACU Controllers on the network are kept up-to-date. For optimum operation of multiple ACU-1000 systems that can be cross-connected to each other over a network (forming a Wide Area Interoperability System) the WAIS Controller program is the best choice for system control and monitoring. See Section 1.7.2. Note: Only a broad overview of ACU Controller operation is presented here. See the ACU Controller Manual for full details regarding system setup & operation via the ACU Controller. An ACU Controller CD and manual are included with every ACU-1000 chassis. Consult Raytheon for program downloads; the current manual revision is available in PDF format on the Raytheon website: http://www.raytheon.com/capabilities/products/acu1000/index.html The ACU Controller Main Screen (see Figure 3-1 ACU Controller Main Screen) shows all modules in the ACU-1000 chassis in the form of individual icons that may be customized to depict the type of communications system they are interfaced to. The top row of the Main Screen shows all of the ACU-1000’s idle modules. These icons represent all communications systems not currently engaged in cross-connections. The rest of the screen displays ongoing cross-connections (nets). A cross-connection between any two communications systems is created by a simple point and click procedure with the cursor placed over each of the desired module icons. The ACU Controller commands the ACU-1000 to make the cross-connection, and after it has done so, it reports back to the ACU Controller and the ACU Controller then displays the net. In this example two nets are ongoing: Net 1 is made up of modules 2 & 7, and Net 2 includes modules 4, 6, & 9. 3-2 Interoperability Now ACU-1000 Operations Manual Figure 3-1 ACU Controller Main Screen Note that if several ACU Controllers are controlling an ACU-1000 via a network, all operators will see, on their Main Screens, the changes made by each of the other operators. The Main Screen changes based on the ACU-1000’s response to a request from the ACU Controller, and all ACU Controllers linked to this ACU-1000 over the network receive these responses. A number of special connection modes can be performed, including temporarily tying Net 1 and Net 2 together. See the ACU Controller manual for details. Two message areas at the bottom of the Main Screen help guide the operator in controlling the system and understanding its status. The ACU Controller is also an excellent tool for system setup and configuration. See Section 2.13 of this manual and the ACU Controller Manual for details. See also Section 3.6.4 for initial configuration assistance when only serial control is available. Interoperability Now 3-3 ACU-1000 Operations Manual 3.3 Operation Via WAIS Controller The purpose of the WAIS Controller is to present, in a clear and simple format, the enormous amount of information inherent in a Wide Area Interoperability System and provide the program operator the means to control the system. Wide Area Interoperability (WAIS) Systems tie multiple ACU-1000 systems, as well as other communication assets, together over an IP-based network. The WAIS Controller has different views that provide the operator a close-up look at an individual ACU-1000 system or a broad overview of the entire wide area system. Figure 3-2 WAIS Controller Overview Screen Note: A description of WAIS Controller operation is beyond the scope of this manual. See the WAIS Controller Manual for full detail. Full information, including a simulator program available by free download, is available on the website: http://raytheon.com/capabilities/products/wais/index.html 3-4 Interoperability Now ACU-1000 Operations Manual 3.4 Local Operation Considerations 3.4.1 Unit Power-Up Prior to initial power-up, ensure the ACU-1000 is correctly configured for the AC or DC power source being used. If using 220 VAC, make sure the unit is not configured for 110 VAC, or damage may result. Depress the Main Power Switch on the PSM-1A module. Either the AC or the DC LED below the power switch should light and the green +12V and -12V LEDs should light. The ACU-1000 will run internal start-up tests, and then begin operation. 3.4.2 Removal and Replacement of Modules The ACU-1000 Modules, with the exception of the power supply, can be "Hot-Swapped"; they can be removed and inserted while the unit's main power is on without resulting in damage. If a module that is presently communicating with a second module is removed, that link will be lost. If the CPM-4 module is removed, all system operation ceases. The CPM-4 will not be damaged by Hot-Swapping; however, it is advised to turn the power off when replacing the CPM-4. CAUTION: Turn Power OFF and disconnect the ACU-1000 from its AC and DC power sources before removing or replacing the PSM-1A Power Supply Module. 3.4.3 Front Panel Controls and Indicators All front panel controls and indicator LEDs are explained below, starting at the left side of the unit. The module that contains the control or indicator is listed in parenthesis. Refer to for Front and Rear panel views 3.4.3.1 Power Switch (PSM-1A) The Power switch controls the AC line and DC power to the unit. 3.4.3.2 +12V and -12V Indicators (PSM-1A) These green LEDs are driven from the corresponding power supply output voltages and are illuminated whenever the unit's main power is on. An unlit -12V or +12V LED when the AC or DC indicators are on could indicate a failed power supply voltage. 3.4.3.3 AC and DC Indicators (PSM-1A) One of these yellow LEDs, situated below the Power Switch, will be illuminated whenever the unit's main power is on and the power supply circuitry is functioning correctly. If the unit is operating on AC input voltage, the AC LED will be on, if it's operating on DC input, the DC LED will be illuminated. 3.4.3.4 Speaker Switch (HSP-2A) This switch turns the front panel speaker on and off. It does not affect the headphone audio or the external speaker driver audio signal available at the rear panel. Interoperability Now 3-5 ACU-1000 Operations Manual 3.4.3.5 Headphones Output Jack (HSP-2A) This stereo jack accepts a stereo or mono 3.5-mm (called 1/8") headphone jack. The monaural headphone audio signal is supplied to both sections of a stereo jack. Headphone volume, along with the volume of the speaker and handset earpiece, is controlled by the front panel volume potentiometer. 3.4.3.6 Volume Control (HSP-2A) This potentiometer adjusts the volume to the speaker, handset, and headphones. 3.4.3.7 Fault LEDs (HSP-2A, DSP-2, RDI-1, PSTN-2, LP-2) The red FAULT LEDs will be illuminated whenever the associated module's built-in-test circuitry detects a fault condition for that module. 3.4.3.8 Master/Expansion LEDs (CPM-4) The Master and Expansion LEDs are illuminated only when a pair of ACU-1000’s are daisychained together to create an Expanded System. These LEDs indicate the status of each unit in the configuration. The Master chassis contains modules corresponding to extensions 0 through 12, and the Expansion chassis houses extensions 13 through 25. 3.4.3.9 Mon (Monitor) LED (RDI-1, DSP-2, PSTN21, LP-2) The Monitor LED of any module is lit whenever that module is being monitored by another module. 3.4.3.10 Signal LED (RDI-1, DSP-2) The signal LED gives an indication of the proper audio level entering the module from the outside world. This LED lights when the audio level is correct for the module. The input audio level should be adjusted so the signal LED just flashes on voice peaks. If the LED never lights, the audio level is too low; if the LED stays lit nearly continuously, the audio level is too high for best system operation. See Section 2 for installation and setup instructions. 3.4.3.11 PTT LED (RDI-1, DSP-2), VOX LED (PSTN-2, LP-2) The PTT or VOX LED lights whenever the associated module’s VOX or squelch has been activated and the module is causing an associated transmitter to transmit. 3.4.3.12 COR LED (RDI-1, DSP-2) The green LED provides an indication showing squelch has been broken on the associated input audio channel. This indication will depend on the method of COR in use. In systems which use external COR inputs this occurs when the receiver is Unsquelched, driving the receiver’s COR output low. In the DSP-2 module, when squelched receivers are used and no external COR line is available, signal is declared present (squelch broken) when VMR or VOX is activated, depending on which one of these is enabled. 3-6 Interoperability Now ACU-1000 Operations Manual 3.4.3.13 Ring LED (PSTN-2, LP-2) The PSTN-2 Ring LED lights while the module is receiving a ring signal from the telephone line. The LP-2 Ring LED is lit whenever it is causing the associated telephone set to ring. 3.4.3.14 Connect LED (PSTN-2) The Connect LED lights when the PSTN module is actually connected to a telephone line, either in response to automatic answer of an incoming ring, or while dialing out. 3.4.3.15 Off Hook LED (LP-2) This LED lights whenever the local phone set is taken off hook. 3.5 Local Operation Via HSP-2A This section explains how the ACU-1000 may be locally controlled using the HSP-2A module’s handset, keypad and speaker. Local operation via the HSP-2A may take place in conjunction with operation via the ACU Controller or the WAIS Controller. When connections are made or broken by the Local Operator using the HSP-2A, the changes are reported to any control programs by the ACU-1000 and show up immediately. Note that when the ACU-1000 is being controlled remotely via either the WAIS Controller or the ACU Controller, these programs will prevent HSP-2A configuration programming. It’s possible to override this lockout feature, see the “Regain Control” Operational Command Item. 3.5.1 HSP-2A Local Operation The HSP-2A Module provides a means to locally monitor, control and configure an ACU-1000 system. The user can monitor audio via the handset or an internal speaker, or plug in external headphones or an external speaker. The handset includes a PTT switch, which must be depressed for the user’s voice to be transmitted. Control is via a 3x4 keypad (standard telephone layout), which enables the user to select a module and enter control/configuration data. If the system contains a PSTN-2 module, the user may place telephone calls manually using the HSP-2A keypad and handset. The module also has an external connector for connection of 4 wire devices. The HSP-2A module houses the system voice prompt generator. These voice prompts allow the ACU system to respond with English messages (optionally, other languages) that make it easier to configure and operate the system. Section 2 included instructions for configuring system modules via the HSP-2A keypad. Table 3-1 and the subsequent text explain how to use the HSP-2A as an operational control for the ACU-1000 system. The HSP-2A can make a communications link with any one of the system’s interface modules, or with a number of them simultaneously in a conference call. A local operator can use the HSP-2A to perform operations that remote users are unable to perform via DTMF input. These include storing the current state of connections for later recall, and removing a user other than oneself from a current cross-connection. A system user at the HSP-2A is considered the “local operator” of the system, and has the extension number “0 0”. In an Expanded System, if there is an HSP-2A in the expansion chassis, it has the extension number “2 5”. Interoperability Now 3-7 ACU-1000 Operations Manual Table 3-1 HSP-2A Operational Command Items Command Item Command Description Factory Default Make A Connection Break the Current Connections Attention Command *nn *# N/A N/A Report Connections Disconnect Another Extension Monitor Function *30 *33nn Store Connections *36 Regain Control *37 Data/Command Mode *80 Connect HSP-2A to extension nn. Terminate all connections the HSP-2A is currently participating in. ACU-1000 responds by identifying the extension number of the HSP-2A module being queried. Voice Prompts list all current connections. Terminate all connections extension nn is currently participating in. n = Extension to be monitored. * 3 4 n toggles between Monitor On and Monitor Off. Store the current connection configuration for automatic recall at power-up. Regain system configuration programming control from a connected Controller Program. Toggles between Data Mode and Command Mode. System Reset *90nn *** *34n If nn is any series of digits other than 00, the System Reset feature is enabled, and “nn” is the system reset code. If nn is 00, the feature is disabled. N/A N/A N/A Monitor Off None Stored N/A Command Mode Disabled 3.5.1.1 HSP-2A Keypad – Make a Connection When the command * n n is entered at the HSP-2A keypad, a connection is made between the local operator at the HSP-2A and the communications medium at extension n n. For example, if a VHF radio is wired to a DSP-2 module installed at extension #5, the command * 0 5 will connect the local operator to the VHF radio. The local operator will hear the distant radio user’s transmit audio via the radio attached to the DSP-2 module. When the PTT switch on the HSP-2A handset is depressed, the local operator’s speech will be transmitted to the radio user. If a PSTN module is installed at extension #8, the command * 0 8 will connect the local operator to the telephone line wired to that PSTN module. Voice prompts guide the local operator at the HSP-2A to enter the telephone number to be dialed, and provide other useful information, such as informing the user if a module is busy or otherwise unavailable. To make a conference call among several modules, add a second connection after the first is made. For example, to make a conference call between the local operator at the HSP-2A, the VHF radio at extension 05, and to a PSTN subscriber via the PSTN module at extension 08, first connect to the VHF radio as described above, then at any time add the PSTN subscriber by entering * 0 8 and following the voice prompt instructions provided. To make a connection between a pair of modules, neither of which is the HSP-2A, the local operator must first make a connection between the HSP-2A and one of these other modules, then create a conference call with the remaining module, and finally enter the disconnect command * # to remove the HSP-2A from the call. If for some reason the two modules still engaged in the link can not break the connection themselves (for instance, if both are HF radios so neither can reliably transmit DTMF commands), the local operator must use the HSP-2A to 3-8 Interoperability Now ACU-1000 Operations Manual break the connection. He may use the Monitor Function command to listen to the conversation between the two HF radio users, and enter the “Disconnect Other Extensions” command to terminate the link when the conversation is complete. 3.5.1.2 HSP-2A Keypad – Break a Connection To disconnect the HSP-2A from any connection, enter the disconnect command * # (star – pound). If the HSP-2A is currently engaged in a conference call between the HSP-2A, the VHF radio at extension 5 and a PSTN subscriber using the PSTN-2 at extension 8, the * # sequence entered at the HSP-2A keypad will remove the HSP-2A from the call, but leave the VHF radio user and the PSTN subscriber connected. 3.5.1.3 HSP-2A Keypad – Attention Command When the Attention Command, * * *, is entered through the HSP-2A, a voice prompt will be returned identifying the extension number of the HSP-2A module receiving the command. In most systems, this will result in the voice prompt “EXTENSION 00”. The Attention Command can be given whether or not the HSP-2A module is currently connected to another module. This allows quick system operation verification without having to make a connection. 3.5.1.4 HSP-2A Keypad – Report Connections Whenever the Report Command, * 3 0, is entered at the HSP-2A keypad, the ACU will list all existing connections. They can be heard at the front panel speaker or the HSP-2A handset. This command cannot be made via any of the interface modules; it’s valid only when entered by the HSP-2A keypad. 3.5.1.5 HSP-2A Keypad – Disconnect Another Extension This command allows the local operator to use the HSP-2A keypad to select any system module and remove that extension from any cross-connections that it’s currently participating in. When the operational command * 3 3 nn, is entered, extension nn immediately removed from all existing cross-connections. Note that this command cannot be made via any of the interface modules; it’s valid only when entered by the HSP-2A keypad. 3.5.1.6 HSP-2A Keypad – Monitor Function This command enables the HSP-2A to monitor the receive audio being sent to any other module or group of modules. Enter * 3 4 n, where n is the extension to be monitored. To discontinue monitoring, re-enter * 3 4 n, where n is the extension currently being monitored. This command toggles the selected module, first turning the module function on, and then cutting it off. When the monitor function is enabled, the local HSP-2A operator will only hear the receive audio of the module being monitored; the Monitor Function does not give the HSP2A operator any control over the monitored module, and it will not receive any audio from the HSP-2A handset. The monitoring module will still be capable of making connections and perform other functions if desired. The voice prompts; “MONITORING XX” and “XX DISCONNECTING,” inform the user of the monitoring module (initiator) of the operational changes made. Interoperability Now 3-9 ACU-1000 Operations Manual 3.5.1.7 HSP-2A Keypad – Store Connection Table in Memory Use the command * 3 6 to store a table of all current module connections in non-volatile memory. After this has been done, every time power is re-applied to the ACU-1000, these connections will be automatically restored. Note: the ACU-1000 must not be in programming mode when this command is used. The factory default connectivity state is “no connections”, so until the first time the Store Connection Table command is used, the ACU-1000 will be initialized upon the re-application of power with no connections made. To change the stored connections, make all the desired connections, then enter * 3 6. To clear stored connections, terminate all connections, then enter * 3 6. This command cannot be made via any of the interface modules; it’s valid only when entered by the HSP-2A keypad. 3.5.1.8 HSP-2A Keypad – Regain Control from Controller Program The HSP-2A is normally not allowed to enter configuration commands while either the WAIS or ACU Controller program is remotely controlling the ACU-1000, as the console program can set configuration much easier. If it is ever necessary to pull back the configuration control from one of these console programs (for example, if the computer is remotely located and locks up), enter the command * 3 7 to return control to the HSP-2A. 3.5.1.9 HSP-2A Keypad – Data / Command Modes The HSP-2A module receives its input audio from the handset, so it does not have a DTMF detector. Its keypad functions as its DTMF input. If the HSP-2A is in the Command Mode, the keypad entries are interpreted as commands to the system. If the HSP-2A is in the Data Mode, keypad entries are not interpreted as commands, but instead the keypad entries are sent as parallel data to a cross-connected PSTN-2 module. The PSTN-2 regenerates the DTMF and sends it out on the phone line. The * 8 0 command toggles a module in and out of the Data Mode. All modules begin operation in the default Command Mode. When Data/Command Mode command is received, the module switches to the Data mode and returns the prompt “Data Mode”. Whenever the * 8 0 command is again received, the module responds with the “Command Mode” prompt and reverts to normal operation. A simple example of the use of this command assumes the local operator at the ACU-1000 wants to call home and check the messages on his answering machine. The HSP-2A starts out in the Command Mode. The local operator connects to a PSTN-2 module. Following the voice prompts provided, he then enters his home telephone number. If he continues to press the HSP2A keypad after the call is answered, no DTMF will be transmitted until he enters the * 8 0 command. Once he does, he may enter the password to gain access to his answering machine. All subsequent keypad entries will result in the transmission of the DTMF characters until he either toggles out of the Data Mode with another * 8 0 entry or disconnects with a * # entry. It is important to note that only the PSTN-2 module regenerates DTMF in this way. This mode was created mainly to allow an ACU-1000 user to make a connection to a PSTN-2 module and be able to control equipment that is connected to the phone line and uses DTMF signaling (voice mail systems, answering machines, etc. 3-10 Interoperability Now ACU-1000 Operations Manual 3.5.1.10 HSP-2A Keypad – System Reset Feature The System Reset Feature allows the local operator to reset the ACU-1000 to its initial powerup state. This means all current connections will be lost, and the unit will return to any connections stored last by the * 3 6 command. In order to prevent any inadvertent or unauthorized use of this powerful feature, the System Reset Feature can only be used after first being enabled at the HSP-2A keypad. In addition, a “system reset code” is entered, and DSP-2 or PSTN-2 users must then enter this code in order to implement this feature. The ACU-1000 factory default for this feature is disabled. To enable System Reset capability, enter * 9 0 n n, where “nn” is any pair of digits other than 00. The feature is now enabled, and “nn” is the system reset code. If a DSP-2, RDI-1, or PSTN-2 user (who is currently connected to the system) enters the DTMF command * 9 0 n n, the system will be reset. If * 9 0 and any digits other than the system reset code are entered, the system will not be reset. To disable this feature, enter * 9 0 0 0 at the HSP-2A keypad. To re-enable, once again enter * 9 0 n n , where “nn” can be either the previous system reset code or an entirely new code. 3.6 Operation Via Remote DTMF An ACU-1000 may be controlled via DTMF from the field. This may be from the DTMF keypads of radios or other 4-wire devices, remote telephones connected via PSTN, or local telephone sets interfaced to an LP-2 module. Operation is similar to what can be done by a local operator via the HSP-2A keypad, though the command set is more limited. Operation via DTMF may take place in conjunction with operation via the ACU Controller or the WAIS Controller. When connections are made or broken by DTMF, the changes are reported to any control programs by the ACU-1000 and show up immediately. Note that a module must have DTMF enabled or it will ignore DTMF input. It may also have PIN Security enabled. If so, DTMF will be ignored unless the proper PIN is entered. Table 3-2 Operational Commands Via Remote DTMF Command Item Command Description Factory Default Make A Connection Break the Current Connections Attention Command *nn *# No Connections N/A Monitor Function *34n Data /Command Mode *80 System Reset *90nn Connect the module to extension nn Terminate all connections the module is currently participating in. ACU responds with the extension number of the module being queried. n = Extension to be monitored. * 3 4 n toggles between Monitor Mode and Normal (nonmonitoring) Mode. Toggles between Data Mode and Command Modes. Performs system reset. “nn” is system reset code set via HSP-2A keypad. (See Section 3.5.1.10) Interoperability Now *** 3-11 N/A Disabled (Normal Mode) Command Mode Feature Disabled ACU-1000 Operations Manual 3.6.1.1 Remote DTMF – Make a Connection When the command * n n is detected in the audio input of any interface module, a connection is made between that module and the communications medium at extension n n. For example, if a VHF radio is wired to a DSP-2 module installed at extension #5, the command * 0 5, entered into the keypad of a telephone set associated with an LP-2 module at extension #11, will cross-connect the local phone set to the VHF radio system. If a PSTN module is installed at extension #8, the command * 0 8 will cross-connect the LP-2 user to the telephone line wired to that PSTN module. Voice prompts guide the LP-2 operator to enter the telephone number that will be called, and provide other useful information, such as informing the user if the line is busy. To make a conference call among several modules, add a second connection after the first is made. For example, make a conference call between the LP-2 user at extension 11, the VHF radio at extension 05, and to a PSTN subscriber via the PSTN module at extension 08. First make a connection between the LP-2 and the VHF radio as described above, then add the PSTN subscriber by entering * 0 8 and following the voice prompt instructions provided. 3.6.1.2 Remote DTMF – Break a Connection To disconnect an interface module from any connection, enter the DTMF disconnect command * # (star - pound). If the interface module is currently engaged in a conference call between several different modules, the * # sequence entered at the keypad of a radio associated with extension #8 will remove extension #8 from the call, but leave the remaining connections intact. Because of the way a telephone set is directly wired to the ACU-1000 chassis, it’s possible to terminate an LP-2 connection by hanging up the LP-2 telephone handset. The only local means for any other modules to terminate their connection is the * # entry. 3.6.1.3 Remote DTMF – Attention Command When the DTMF Attention Command * * * is sent to any module, a voice prompt will be returned identifying the extension number of the module receiving the Attention Command. This can be done whether or not the module being queried is currently connected, so it can be used to check if the system is operational without having to make a connection. 3.6.1.4 Remote DTMF – Monitor Function This command enables any module to monitor all audio from any other module. Enter * 3 4 n, where n is the extension to be monitored. To discontinue monitoring, re-enter * 3 4 n, where again n is the extension that is currently being monitored. This command toggles the selected module, turning the monitor function on, and then cutting it off. When the monitor function is enabled, the monitoring module will hear only the receive audio of the module being monitored. The Monitor Function does not allow the monitoring module to assert any control over the monitored module, nor can it send TX audio to the monitored module. Both the monitoring and the monitored module will still be capable of making connections and perform other functions if desired. 3-12 Interoperability Now ACU-1000 Operations Manual 3.6.1.5 Remote DTMF – Data / Command Modes When an ACU-1000 interface module detects DTMF in its receive audio, it can either interpret the DTMF tone as a command input (Command Mode) or transmit DTMF via a connected PSTN-2 module so this DTMF can control other equipment (Data Mode). When in the Data mode, the DTMF input is detected and interpreted. This information is passed to the connected PSTN-2 module, which then regenerates the DTMF and inserts it into the PSTN-2 audio output. This regenerated DTMF is free of any FM noise or the frequency response related distortion that often results from the pre-emphasis and de-emphasis of FM audio circuits. The * 8 0 command toggles a module in and out of the Data Mode. All modules begin operation in the default Command Mode. When the Data/Command operational command is received, the module switches to the Data mode and returns the prompt “Data Mode”. Whenever the * 8 0 command is again received, the module responds with the “Command Mode” prompt and reverts to normal operation. A simple example of the use of this command assumes the radio user wants to call home and check the messages on his answering machine. The user makes a connection from the DSP-2 module associated with his radio to the PSTN module at extension 01. Following the voice prompts provided, he then enters the telephone number at his home. After the call is successfully made, the user then enters the * 8 0 command. Once he does so, he may enter the password to gain access to his home answering machine. All subsequent DTMF entries will result in the regeneration of the DTMF characters until he either toggles back out of the Data Mode with another * 8 0 entry or disconnects with a * # entry. The module that’s receiving the DTMF should also have its DTMF Mute timer enabled (see the DTMF Mute Timer explanations in Section 2.16). It is important to note only the PSTN-2 module regenerates DTMF in this way. The Data Mode was created mainly to allow an ACU-1000 user to gain access to the system through any type of module, make a connection to a PSTN-2 module and be able to control equipment that commonly uses DTMF signaling (voice mail systems, answering machines, etc). It is possible to use the Data Mode (with the DTMF Mute Timer disabled) to cause input DTMF to be repeated through the ACU-1000. This is not advisable because of the FM noise that will be mixed with the DTMF, along with the frequency response related distortion that will be compounded by the fact that the DTMF will be repeated through two radios. 3.6.1.6 Remote DTMF – System Reset Feature The System Reset Feature allows a user who is interfaced with the system via a DSP-2, RDI-1, or PSTN-2 module to reset the ACU-1000 to its initial power-up state. This means all current connections will be lost, and the unit will return to any connections stored by the * 3 6 command (See Table 3-1 and Section 3.5.1.10). In order to prevent any inadvertent or unauthorized use of this powerful feature, the System Reset Feature can only be used after first being enabled at the HSP-2A keypad. In addition, a “system reset code” is entered via the HSP-2A, and remote users accessing the system via DTMF users must enter this code in order to implement the System Reset feature. Interoperability Now 3-13 ACU-1000 Operations Manual The ACU-1000 factory default for this feature is disabled. To enable System Reset capability, use the HSP-2A to enter * 9 0 n n, where “n n” is any pair of digits other than 00. The feature is then enabled, and “n n” is the system reset code. If a DSP-2, RDI-1, or PSTN-2 user (who is currently connected to the system) enters the DTMF command * 9 0 n n, the system will be reset. If * 9 0 and any digits other than the system reset code are entered, the system will not be reset. To disable this feature, enter * 9 0 0 0 at the HSP-2A front panel. To re-enable, once again enter * 9 0 n n, where “n n” can be either the previous system reset code or an entirely new code. 3.6.2 PIN Security It’s possible to enable ACU-1000 access security features that require a correct PIN (Personal Identification Number) to be entered before a user can make a connection and thereby gain access to the system. This section explains the two different PIN security modes (Priority Operation and Exclusive Operation) and lists how to set-up and use both of these modes. 3.6.2.1 How PIN Security Works • When PIN numbers are enabled, the ACU-1000 extensions may be programmed for various security levels, from 0 to 9. An extension set to security level 0 is available to all system users, without regard to PIN numbers. The ACU-1000 will not ask the user to input a PIN when a connection is requested to an extension set to security level 0. • When PIN numbers are entered into the ACU-1000 database, they are assigned a security level. This security level corresponds to the extension security levels and identifies which extensions can be accessed via the PIN number. • When a user tries to connect to a secure extension (an extension that has a security level above 0) he will be prompted “ENTER ID”. The user must enter his PIN at this time. If the security level of the PIN is not correct to provide access, the “SECURITY VIOLATION” voice prompt will be heard, and the connection will not be made. If the security level is correct, the connection will be allowed and the ACU-1000 will make the requested connection; when successful, the normal prompt will be heard: “n CONNECTED”, where n is the requested extension number. 3.6.2.2 PIN Security Modes There are two modes of security operation, Priority and Exclusive. The two modes are independent of each other; the ACU-1000 is in either the Priority mode, or the Exclusive mode. It is not allowed to have some modules in the ACU-1000 set to Priority, and some set to Exclusive. 3.6.2.2.1 Priority Operation Mode Access is granted if the PIN security level is equal to or higher than the security level of the extension. Higher security levels are more secure; a PIN at security level 6 can access any extension set to level 6 and lower, but may not access extensions set at security levels 7, 8, or 9. 3-14 Interoperability Now ACU-1000 Operations Manual 3.6.2.2.2 Exclusive Operation Mode Access is granted only if the PIN security level is equal to the security level of the extension the user is requesting to be connected. A PIN at security level 6 will allow the user to make a connection with an extension set to level 6, but not to any extension with security levels from 1 to 5 or 7 to 9. Access to extensions set to security level 0 does not require PIN numbers. 3.6.2.3 How to Enable PIN Security • Enter “SETUP MODE” * 9 9 . • To enable Priority Mode PIN numbers enter * 2 9 1, and listen for the “READY” prompt. To instead enable Exclusive Mode PIN numbers enter * 2 9 2. • To disable PIN numbers (either mode) enter * 2 9 0, and listen for the “READY” prompt. • To save the configuration enter * #, and listen for prompt “SAVING CONFIGURATION”, followed by “CONFIGURATION HAS BEEN SAVED” after the ACU-1000 has completed storing all system parameters. 3.6.2.4 How to Set ACU-1000 Extension Security Levels • Enter “SETUP MODE” * 9 9. • Select the extension to be programmed. For example, to program the module at extension 05 enter * 0 1 0 5, and listen for the “READY” prompt. • Now enter the security level * 3 2 n, where n is the level from 0 to 9. The higher the number the more secure. Listen for the “READY” prompt. For example: To set a security level of five, enter the command * 3 2 5. • Repeat the two previous steps as often as necessary to assign security levels to remaining extensions that should have a security level higher than the default level 0. • To save the configuration enter * # and listen for prompt “SAVING CONFIGURATION”, followed by “CONFIGURATION HAS BEEN SAVED”. 3.6.2.5 How to Input PIN Numbers into the ACU-1000 Database • Enter the “SETUP MODE” by entering * 9 9. • PIN numbers are entered into a database for the ACU-1000 globally; therefore, it is not necessary to select a particular extension. • Enter the “Program PIN” command * 3 0 n n n n x, where n n n n is the four digit pin and x is the desired security level of the PIN from 0 to 9. Example: If the PIN chosen is 1234 and the associated security level desired is 8, enter the command * 3 0 1234 8 and listen for the “READY” prompt. • Repeat the previous step as necessary to input all PIN numbers to be used by the system. Interoperability Now 3-15 ACU-1000 Operations Manual • To save the configuration enter * #, and listen for prompt “SAVING CONFIGURATION’, followed by “CONFIGURATION HAS BEEN SAVED”. 3.6.2.6 How to Delete PIN Numbers from the Database • Enter “SETUP MODE” * 9 9. • Enter the DELETE PIN command * 3 1 n n n n, where n n n n is the four digit number of the PIN to be deleted. • To save configuration enter * #, listen for prompt “SAVING CONFIGURATION”, followed by “CONFIGURATION HAS BEEN SAVED”. 3.6.2.7 How To Use The Pin Security Feature • Input security levels for each of the ACU-1000 extensions. If a security level is not entered, that extension will have the factory default of 0. (See step 3.6.2.4 above). • Input PIN numbers into the database. (See step 3.6.2.5 above). • Enable PIN security in either the Exclusive or the Priority mode. (See step 3.6.2.2 above). • PIN security will now be functioning. Users without correct PIN numbers will not be able to access any extension that has a security level above 0. 3-16 Interoperability Now ACU-1000 Operations Manual 3.6.3 Basic Local HSP-2A & Remote DTMF Operation Scenarios Examples of the operation of the ACU-1000 without using the ACU Controller or WAIS Controller are discussed in the following paragraphs. This means operation through the use of commands entered either via the HSP-2A keypad or the DTMF tones received by a communications system connected to the ACU-1000. The DTMF tones can be generated by a user of this same communications system provided they have a DTMF keypad. These examples and instructions assume the ACU-1000 has already been correctly configured. Scenarios assume most configuration options are at default settings with DTMF enabled. Otherwise, some changes in descriptions of scenario progress will result. Refer to Figure 3-3 below when studying the operational scenarios. Figure 3-3 Pictorial Layout for Operating Scenarios 3.6.3.1 Radio to Radio 3.6.3.1.1 Conditions: 1) User A (with hand held radio on band 1) wants to talk to hand-held radio user B who is operating on band 2. 2) User B’s radio is not busy. The radio cabled to Extension 04 is not currently in use. 3.6.3.1.2 Operation Steps: 1) User of hand-held radio A enters * 0 4 to establish a connection with the User B’s radio which is associated to the DSP-2 module at extension 04. Interoperability Now 3-17 ACU-1000 Operations Manual 2) The ACU-1000 enables the connection between the two radios and issues a voice prompt indicating the connection has been successfully completed. 3) Users A and B are now free to talk. At the end of conversation, either user can terminate the link by entering * #. 4) Note: For nets involving two modules, when either is removed from the net, the net is terminated. For nets involving more than two modules, removal of one user removes only that user. To dissolve the full net, all parties must terminate the link by using * # 3.6.3.2 PSTN to Radio 3.6.3.2.1 Conditions: 1) PSTN user wants to talk to hand-held radio User A. 2) User A’s radio is not busy. 3.6.3.2.2 Operation Steps: 1) PSTN user calling from distant phone via the public telephone network dials the phone number associated with the ACU-1000's PSTN-2 module. 2) ACU-1000 greets the PSTN caller and prompts him to enter the “star” and two-digit number of the extension that caller would like to converse with. In our example, User A resides at extension 03, so PSTN caller enters * 0 3. 3) The ACU-1000 enables the connection to the radio and issues the voice prompt “03 CONNECTED” to the PSTN caller indicating the connection has been successfully completed. 4) PSTN caller and User A talk. At the end of conversation, either user can terminate the link by entering * #. In links involving more than two modules, all users should terminate the link by using * #. 3.6.3.3 Local Operator to Radio 3.6.3.3.1 Conditions: 1) Local operator wants to talk over band 1 to hand-held radio User A. 2) User A’s radio is not busy. 3.6.3.3.2 Operation Steps: 1) The Local Operator (using HSP-2A handset and keypad) enters * 0 3 to link with User A. 2) The ACU-1000 makes the connection between the local operator and the band 1 radio, then issues the voice prompt “03 CONNECTED”. 3-18 Interoperability Now ACU-1000 Operations Manual 3) Local operator and User A talk. At the end of conversation, either user can terminate the link by entering * #. In links involving more than two modules, all users should terminate the link by using * #. 3.6.3.4 Radio to Local Operator 3.6.3.4.1 Conditions: 1) Hand-held radio User A wants to talk to local operator at the ACU-1000. 3.6.3.4.2 Operation Steps: 1) The Local Operator Extension number is '00', so hand-held radio User A enters * 0 0 on his DTMF keypad. 2) The ACU-1000 enables the connection between the radio the local operator and issues the “00 CONNECTED” voice prompt to User A indicating the connection has been successfully completed. 3) User A can be heard at the HSP-2A speaker and handset. User A and local operator talk. At the end of conversation, either user can terminate the link by entering * #. In links involving more than two modules, all users should terminate the link by using * # to make sure all parties are removed from the net.. 3.6.3.5 Radio to PSTN 3.6.3.5.1 Conditions: 1) Hand-held radio User A wants to be connected to PSTN and make a call to 5551234. 2) PSTN module is not busy, and phone at 555-1234 is not busy. 3.6.3.5.2 Operation Steps: 1) PSTN-2 Module Extension number is '06', so User A enters * 0 6 on keypad. 2) The ACU-1000 prompts the user A to “ENTER PHONE NUMBER”. Note: All phone number entries must be terminated by the # key, so the ACU-1000 can determine the end of the number. 3) User enters 5 5 5 1 2 1 2 #, and the ACU-1000 PSTN-2 module initiates the call. Prompts advise User A of the progress in making the call. When the link is established, the phone at 555-1212 rings. 4) User A and the person he's called on telephone now talk. At the end of conversation, either user can terminate the link by entering * #. In links involving more than two modules, all users should terminate the link by using * #. Interoperability Now 3-19 ACU-1000 Operations Manual Note: If no one answers the telephone, the attempt to connect will be terminated when the set Ringing time expires (Factory default setting is 30 seconds). 3.6.3.6 Local Phone to Radio 3.6.3.6.1 Conditions: 1) Local Phone user wants to talk to hand-held radio User A. 2) User A’s radio is not busy. 3.6.3.6.2 Operation Steps: 1) Local Phone user picks up handset and hears dial tone. User A resides at extension 03, so Local Phone user enters * 0 3. 2) The ACU-1000 enables the connection to the radio and issues the “03 CONNECTED” voice prompt to the Local Phone user. 3) Local Phone User and User A talk. At the end of the conversation, either user can terminate the link by entering * #. In links involving more than two modules, all users should terminate the link by using * #. 3.6.3.7 Conference Call 3.6.3.7.1 Conditions: 1) Local Operator has already established a conversation with hand-held radio user A (See Figure 3-3). He now wants to turn the conversation into a conference call with a third party located at telephone number 555-1234. 2) PSTN module is not busy, and phone at 555-1234 is not busy. 3.6.3.7.2 Operation Steps: 1) PSTN Module Extension is '06', so local operator enters * 0 6 on the HSP-2A keypad. 2) The ACU-1000 then prompts user A to “ENTER PHONE NUMBER”. Note: All phone number entries must be terminated by the # key, so the ACU-1000 can determine the end of the number. 3) User enters 5 5 5 1 2 3 4 #, and the ACU-1000 PSTN-2 module initiates the call. Prompts are given to User A advising him of the progress in making the call. (For example if the line is busy or there is no answer, the caller is informed.) When the link is established, ACU-1000 sends ringback audio to Local Operator and User A until the phone is answered. 4) All users can talk. 3-20 Interoperability Now ACU-1000 Operations Manual 5) Additional parties can be added to the call if required. 6) Any user can terminate his connection to the link by entering * #; all other connections will be maintained. When only two parties remain in the conference call, and either of these users enter * #, the link will be terminated. 3.6.4 Serial Control Though operation of the CPM-4 via its Ethernet Port is recommended, the unit may also be operated by Serial Control (as was the earlier CPM-2 module) and the ACU Controller. There are some initial configuration options that may require the use of a terminal program if serial control is used with the CPM-4. (These configuration options were set by dipswitches in the CPM-2, and can also be set via a browser, the following applies only if there is no control capability except serial.) One is the need to set the CPM-4 Baud Rate to match that of the controlling computer; the other is to specify that units Chassis Configuration. That is, whether the chassis is used alone, or if connected to another chassis via an expansion cable, whether it is the Master Chassis or the Expansion Chassis. These configuration items are explained in the following paragraphs. 3.6.4.1 Factory Default Settings For the most part the CPM-4 factory default settings match those of the CPM-2. CPM-4 modules that are installed in a system at the factory are set to match the requirements of that particular system. For example, if the ACU-1000 chassis is sold as part of an expanded (dual chassis) system, the CPM-4 will be pre-configured to either “Master” or “Expansion” mode. Table 3-3 CPM-2 Dipswitch SW1 Position(s) 1,2 3 4 6,7 8 CPM-2, CPM-4 Factory Defaults CPM-2 Default Switch Setting On, On On Off Off, Off Off CPM-2 Default Operation 9600 Baud Remote Enabled No Serial Sync Char. Single Chassis Normal Operation CPM-4 Default Operation 115.2 K Baud Remote Enabled No Serial Sync Char. Single Chassis Normal Operation 3.6.4.2 RS-232 Serial Port Baud Rate In most cases the factory defaults for the CPM-4 are the same as the CPM-2. The exception is the ACU-1000 RS-232 serial port baud rate. The default for the CPM-4 is 115.2K Baud. Note: if ACU Controller software version 4.0 or later is being used there is no need to change the CPM-4 baud rate. The ACU Controller software can be set to 115.2K baud, which is the default for the CPM-4. But if an earlier version of ACU Controller software is being used then the user must change the baud rate of the CPM-4 to 9600 as outlined here. Interoperability Now 3-21 ACU-1000 Operations Manual In systems where only the RS-232 serial port on the rear panel of the ACU-1000 is being used it may be necessary to change the Baud rate. This can be done directly from the ACU-1000 serial port without having to connect the CPM-4 to a network via Ethernet. Changing the Serial Port Baud Rate via the Serial Port If it is necessary to change the CPM-4 serial port baud rate to something other than 115.2K baud, then the user must use a computer with a terminal program such as MTTY (available for download from the website) or Hyperterminal (included with Windows) to change the serial port configuration. These examples show the use of MTTY. 1. Connect to the ACU-1000 serial port at 115200 baud. 2. Enter the command *CONFIG* and press Enter. 3. The ACU should return with “OK”. 4. Enter the desired baud rate using the BAUD command. The example below changes the baud rate to 9600. Valid baud rates are 300, 1200,2400, 4800, 9600, 19200, 38400, 57600, and 115200. To set the baud rate to 9600 type BAUD 9600 and press Enter. 5. The ACU will show the new baud rate setting. 6. Enter the command SAVE and press Enter. 7. The ACU will reboot at the new baud rate. Figure 3-4 Reconfiguring the ACU Serial Port Baud Rate 3-22 Interoperability Now ACU-1000 Operations Manual Changing the Chassis Configuration Setting If the CPM-4 is being installed in an Expanded system (a system with more than one chassis) it may be necessary to change the CPM-4 chassis configuration. The CPM-4 chassis configuration may be changed by using a computer with a terminal program such as MTTY or Hyperterminal. The chassis configuration will either be Single (a single chassis), Master (the Master chassis in a two chassis system) or Expanded (the Expansion chassis in a two chassis system). 1. Connect to the ACU-1000 serial port using a terminal program. 2. Enter the command *CONFIG* . 3. The ACU should return with “OK”. 4. Enter the desired configuration using the CHASSIS command. The example below changes the chassis configuration to “Single”. Valid configurations are SINGLE, MASTER and EXPANSION. 5. The ACU will show the new chassis configuration setting. 6. Enter the command SAVE 7. The ACU will reboot. Figure 3-5 Interoperability Now Chassis Configuration Setup 3-23 ACU-1000 Operations Manual End of Section 3 3-24 Interoperability Now ACU-1000 Operations Manual 4 System Troubleshooting 4.1 System Troubleshooting Overview This section provides some hints to optimization of ACU-1000 setup based on system operation symptoms. These symptoms include: • Missed First Syllables • Missed Syllables in Mid-Conversation • Stuck Channel (system is locked up by one transmitter) • Ping-Pong (cross-connected radios key & unkey repeatedly after end of intended transmission) • False Keying (inappropriate keying due to RFI) • Inability Of Dispatcher To Gain System Control • Poor Audio Quality o Incompatible Volume Levels o Noisy Received Signals o Audio Shaping To Improve Sound Quality • Unintended Consequences (symptoms resulting from inappropriate settings) 4.2 Missed First Syllables There are several possible causes for the initial syllables of system messages being missed. To narrow down the source of the problem, first determine if one of the ACU-1000 extensions is missing initial syllables from messages from all other extensions, or more likely, that all extensions are missing the first syllables of messages from a particular extension. The first example is rare and points to a slow to respond link at the one extension reporting the problem. This could be caused by a slow-to-key transmitter. This is best resolved by adding transmit audio delay on that extension to buffer the audio until the transmitter is fully active. Note: If audio is lost during a transmission as well as at the beginning of a transmission, first consider the remedies explained in Section 4.3, “Missed Syllables in Mid-Conversation” Interoperability Now 4-1 ACU-1000 Operations Manual If the users of one of the radio systems connected to the ACU-1000 regularly miss the initial syllables of messages from all other radio systems (or other interoperability system members, such as dispatchers or telephone users), the DSP-2 associated with the system missing the initial syllables needs to have its TX Audio delay setting increased. A trunked radio system is the most common and most obvious example of this condition because of the time it takes a trunked radio to acquire an open channel. 4.2.1 Trunked Channel Acquisition Delay 800 MHz Trunked Radio Systems (and other trunked systems) are a very common public safety communications format. When trunked system users begin a transmission, their radios must first communicate with the Trunking Controller. The Trunking Controller has ultimate control of each radio’s TX function. When a trunked system radio PTT input is activated, the Trunking Controller first ensures that the user’s radio is on an open channel, and then provides a tone to the user. This tone signals that it’s now OK to begin speaking. This is an incomplete overview of Trunked Radio operation, but the concept essential to interoperability is the time gap between when a user activates a radio’s PTT switch and when that user may begin speaking. This gap poses a problem to any Interoperability System. When the trunked radio system is cross-connected to another radio, the operator of the other radio does not hear the “Channel Ready” acknowledgement tone (also called the “go ahead” tone), and may not even be aware that he is cross-connected to a trunked system. If this radio operator simply begins talking, the first syllables or words will be lost while the trunked radio is silent and waiting to acquire a free channel. This is simply not acceptable in the circumstance when interoperability is most frequently needed- during a disaster or other unusual event when clear communication is crucial. The solution is to add delay to the audio that’s being patched from other radios into the trunked system by increasing the TX Audio Delay setting of the associated DSP-2 module. This TX audio delay should match or exceed the channel acquisition time. This holds up the RX audio from cross-connected radios until the trunked radio is ready to begin transmitting. Be sure to take into account the fact that channel acquisition times are increased when the Trunked System is exceptionally busy. Since any type of incident that requires interoperability is likely to be very busy for all communications, the Interoperability System must have the ability to add sufficient audio delay to compensate. Keep in mind that the ACU-1000 allows quick “on-the-fly” adjustment of the delay time either at the incident scene, or remotely using the ACU Controller or the WAIS Controller. Refer to Figure 4-1 and Figure 4-2 on the following pages for an illustration of the problem and how it can be resolved. 4-2 Interoperability Now ACU-1000 Operations Manual Figure 4-1 “Shoot” Versus “Don’t Shoot” A: The audio being sent into the Interoperability System by radio #1. Radio #1 is crossconnected to radio #2. B: Radio #2 is an 800 MHz trunked radio with a Channel Acquisition Delay of 350 milliseconds. Therefore, radio #2 won’t start transmitting the audio from radio #1 until 350 ms have past, and the first word of the message is clipped. C: If the Interoperability System delays the audio to radio #2 by at least as long as the channel acquisition delay, the entire message gets through. Interoperability Now 4-3 ACU-1000 Operations Manual Figure 4-2 shows the potential communication problems that can occur when the necessary delay is not provided, with messages clipped or lost entirely. The vertical lines signify various channel acquisition delays. Without corresponding TX Audio delays, all speech up until the channel is acquired will be clipped off of the beginning of the transmission (which could be an entire short, but vital, message). If the proper TX audio delay is present, no speech is lost. Figure 4-2 Why Audio Delay Is Crucial 4-4 Interoperability Now ACU-1000 Operations Manual 4.3 Missed Syllables Mid-Conversation The most likely causes of missed syllables in mid-conversation are VOX/VMR dropout or COR sampling. If the VOX/VMR hangtime is incorrectly adjusted, the VOX/VMR will momentarily unkey the transmitter and then quickly rekey. The solution is to increase the hangtime to be slightly longer than the speech inter-word time. This is discussed in Section 2.17.2.6. COR sampling requires that PTT be dropped for a period of time every so many seconds. When PTT is dropped, there will be a hole in the audio. See Section 2.17.2.7 for a detailed explanation of COR sampling. This problem might be recognized by a regular pattern of interruptions on a long speech sample. Turning this function off temporarily would help identify if it was the cause of the problem. 4.4 Stuck Channel Consider again the basic concept of radio-to-radio cross-connections. When one of the radios cabled to the ACU-1000 is unsquelched, all cross-connected system radios are transmitting. To the system users, this means that if a single radio operator keys his radio, all other radios in the cross-connected systems will be listening, and unable to access the system until the first user unkeys. Now consider what happens if an ACU-1000 system radio is inappropriately unsquelched and stays unsquelched for an extended period. Possible causes are a problem with the radio, interference on its frequency, or a radio in the field that’s stuck in the key-down mode, etc. It could simply be someone who is terribly long-winded and won’t let the other system users break in. Whatever the reason, any system radios cross-connected to the problem radio will be stuck in the transmit mode, and the associated system users will not be able to access the Interoperability System. Refer to Figure 4-3 and consider what happens to the system if the #4 portable fails to unkey. This problem is also referred to as “stuck mic”. The best solution is called “COR Sampling” (also referred to as “COR Sniffing”). With COR Sampling, the COR inputs of other radios in the connection will be occasionally sampled, and if one is active, it will be given control of the system. This provides an opportunity for another user to break in and take over the control of the system. This may give that user a chance to alert the system’s operator that there is a problem (if there is an operator monitoring ongoing voice traffic), or if DTMF control is available, this user can disconnect his radio from the system. An effective COR Sampling function should have the ability to set how long any channel is “Stuck” before the sampling begins. This is important because the “stuck channel’” radio must be cut off momentarily for the function to operate, and it’s important that this does not happen inappropriately. Interoperability Now 4-5 ACU-1000 Operations Manual Another way to deal with a stuck channel is for a system operator to constantly monitor all system activity and disconnect any offending radios. In practice, this is too much to ask of a busy operator who most likely can only monitor each ongoing cross-connection for short time periods. 4.5 Ping Pong Some radios have a tendency to unsquelch momentarily at the end of each transmission. Remember that for any pair of cross-connected radios, whenever one radio is unsquelched, the other is keyed. If a radio in an Interoperability System exhibits the “momentary unsquelch” behavior, any cross-connected radio will momentarily (and inappropriately) transmit. If both radios unsquelch momentarily at the end of each transmission, the system will repeatedly “ping-pong”, with first one radio keyed momentarily and then the other. This effect can be experienced when the PTT inputs are activated by either a COR input or a by VOX. There are two ways to prevent this. First, turn on the adjustable “COR (unsquelch) Inhibit Timer after PTT”. This function instructs the module to ignore any unsquelch detection (COR) that occurs immediately following the cessation of a transmit sequence. The duration of the timer is adjustable to optimize for different radios, which may exhibit the inappropriate unsquelch indication for times as short as 100 milliseconds, and as long as several seconds. Invoke the feature for each DSP-2 module that shows a short burst of COR just after a keying sequence; this can best be seen by observing the DSP-2 module front panel LEDs. Another way to prevent this is to use neither COR nor VOX, but instead use VMR. Since Voice Modulation Recognition will not trip unless human speech is actually present, these momentary (and inappropriate) unsquelch conditions will simply be ignored by the system. 4.6 False Keying When a radio is installed in an environment with lots of RF emissions near the receiver’s frequency, these emissions may cause the radio to unsquelch inappropriately. Some radios have a greater tendency for this problem than others. When the inappropriate unsquelch occurs, any radios cross-connected with the offending radio will momentarily transmit a loud burst of noise. If any radio has a tendency to key on noise (and it’s not possible to rectify by reducing the RFI or altering antenna placement), the best solution is to change that radio’s system interface to VMR Mode rather than to use either COR or VOX. In VMR Mode, the Interoperability System will ignore these inappropriate noise bursts because the VMR will trip only when human speech is detected in the receive signal. Any incident scene is likely to be a volatile RF environment because of the wide range of communications devices being deployed. This makes the “on-the-fly optimization” capability of the ACU-1000 very beneficial. A quick switchover to VMR mode can easily be made by the ACU Controller or WAIS Controller when changing conditions warrant it. 4-6 Interoperability Now ACU-1000 Operations Manual 4.7 Inability of Dispatcher to Gain System Control If all system users have equal priority, the user that transmits first is in control until this person ceases transmitting and gives someone else a chance. It may be beneficial (or absolutely necessary) to give priority to one or two important users. Remember that an Interoperability System is tying together entire radio systems, not just individual radios. This can be accomplished by being able to assign either TX Priority or Dispatcher Priority to all system interfaces. (Also called PTT Priority or COR Priority). Normally all interfaces are set to TX Priority. This means that if two or more radios or other 4wire devices (for example, a dispatch console) are cross-connected, whoever talks first is in control and no one else can be heard until this person stops talking (and releases the radio PTT). If one user (a dispatch console, perhaps), is set to Dispatcher (COR) Priority, an unsquelch condition received at the Interoperability System from this console will override the other user’s control of the system. The dispatcher’s audio will be transmitted instead, or will be mixed with existing incoming audio from any other DSP-2 also set to COR (Dispatch) Priority. Figure 4-3 Interoperability Now TX Priority 4-7 ACU-1000 Operations Manual In Figure 4-3 above, a cross-connection has been made to link radios #1, #3, and #4. At the moment depicted, a portable of the #4 radio system has keyed (TX) first, so its audio is being retransmitted to the #1 and #3 radio systems. The stoplights signify that, until the #4 portable unkeys, only the audio from the #4 radio will be allowed. If the #1 or #3 portables transmit before #4 stops transmitting, their active COR signals will be ignored by the system. Figure 4-4 Dispatcher Priority Figure 4-4 shows a dispatch center interfaced to the #1 extension of the sample Interoperability System. The #1 extension has been configured for Dispatcher Priority, and an active COR signal at this extension will not be blocked and will instead cause the dispatcher’s audio to be retransmitted, even if the #4 portable stays in the TX mode. The dispatcher’s audio will be transmitted instead, or will be mixed with existing incoming audio from any other DSP-2 also set to COR (Dispatch) Priority. 4-8 Interoperability Now ACU-1000 Operations Manual 4.8 Poor Audio Quality Clear communication is vital during an emergency. This section describes ways to optimize the clarity of spoken messages so that Interoperability System users are heard, heard correctly, and heard the first time, and not asked to repeat themselves. The ACU-1000 has a variety of options to improve audio quality. 4.8.1 Incompatible Audio Levels When a conversation is taking place, especially a conference call between three or more people, clear communication is enhanced when all parties are heard at the same volume. The ACU Controller’s module settings screens provide a quick and simple means to set proper audio levels for each extension. It is preferable to adjust all extensions during initial setup rather than to try to modify individual interfaces later. This is because an interoperability cross-connection involves a variety of audio levels and it may be difficult to determine which level is at fault when not following a systematic process. Radio A Radio A RX Audio & COR DSP Module A Radio B TX Audio & PTT DSP Module Radio B B RX Audio: What is being spoken into Radio A COR: This signal is active while the talking is going on TX Audio: This same audio being sent back out PTT: This signal is active when COR is active Figure 4-5 Interoperability Now Audio Levels Involved With Each Cross-Connection 4-9 ACU-1000 Operations Manual In the simple cross-connection depicted in Figure 4-5 the various volume levels to contend with are: • How loud the person using Portable Radio A is talking • The modulation limiting level of the Portable Radio A transmitter • The RX audio output level of System Radio A (less problematic if a line level out is used; more so if the level is controlled by the speaker volume knob) • DSP-2 Module A’s RX audio level setting • DSP-2 Module B’s TX audio level setting • The modulation limiting level of the System Radio B transmitter • Portable Radio B’s volume control The above list is just for when the user of portable radio A is doing the talking. When the user of portable radio B replies, a second set of volume levels comes into play. This procedure will focus on what is under the control of the ACU-1000 operator: the RX and TX audio levels of the DSP modules, and secondarily, the RX audio output level of the system radios. For the cross-connect audio levels to be optimal, the internal audio levels on the audio busses are maintained at 0 dBm for both input and output. In general, each of the different types of modules has the means to adjust its respective input or output so that the module is interfacing the audio bus at a constant level of 0 dBm. For incoming, external audio, the SIGNAL LED on the front panel is the best indicator of the proper level for optimal performance. For outgoing transmit audio, the ACU-1000 operator only has control of the signal level presented to the transmitter and usually does not have the ability to make technical adjustments to the modulation controls. Set RX Level Procedure The RX (Receive) level must be optimized to allow best system operation. First of all, conversations, especially conference calls, will be more intelligible if all voices are at the same volume level. Second, VOX and VMR work best at the proper RX level. • Cross-connect the HSP module to the DSP module being adjusted. • Monitor the front panel of the DSP module while the radio is receiving a voice signal at a normal speaking volume level. Listen to the RX audio of the interfaced radio using the HSP handset. • Watch the DSP front panel SIGNAL light. It should flicker with the incoming speech. If the level is too high, the LED will be on constantly during received speech. If too low, the LED will never come on, or will flicker only occasionally. • Adjust the RX Level until the Signal LED flickers with incoming speech. 4-10 Interoperability Now ACU-1000 Operations Manual • Click “Apply” to save the setting. • Is equalization or frequency shaping required? See Section 2.17.2.15. [Note: If the interface is using speaker audio from the radio, the level will vary depending on the radio’s volume control setting. Set the RX level in the DSP to 0 dBm, and then vary the radio volume level until the proper Signal LED indication is achieved. Note the setting, and keep the volume control at this setting.] Set TX Level Procedure The proper TX level is required to fully modulate the transmitter, but not over modulate it. Most radios have an audio limiter prior to the transmitter to prevent over modulation. Even with the limiter, some radios will still over modulate and some even shut off the TX signal when the input is too high. When the level is set too low the audio of the radio receiving the signal will be lower than normal, requiring that its volume control be turned up to an abnormal position. When the audio is too hot, the audio will sound squashed, or forced, and if the radio does not have a TX audio limiter, the audio will sound distorted and over-modulated. • Cross-connect the HSP Module to the DSP Module being adjusted, and use the HSP Handset to key the radio while speaking at a normal volume level. • Monitor to the TX audio of the interfaced radio on a receiver set to the radio’s TX frequency. • The quickest way to set the TX audio level is to use the ACU Controller to set the DSP Module’s TX level to its lowest setting. Increase the TX level until the audio in the monitoring radio stops increasing in level. This is the threshold point where the limiter is preventing the TX level from going any higher. Leave the DSP Module’s TX level at this threshold value. • You may also follow the radio’s recommended TX input audio setting procedure. • Click “Apply” to save the TX Level setting. 4.8.1.1 Telephone Connection Audio Levels If telephone audio levels do not seem to be optimum, perform the PSTN-2 Simplified Setup Procedure carefully as described in Section 2.17.3.15. Verify that the telephone line losses and impedance are within standard limits. If problems still persist, please contact the Raytheon factory for assistance. 4.8.2 Noisy Received Signals Certain types of radios such as HF, and AM typically contain a lot of noise in the demodulated signal. Even FM radios operating near their sensitivity limit will contain noise in the signal. The DSP-2 includes a noise reduction feature that should be considered if a particular channel is inherently noisy on a continuous basis. The DSP-2 uses time domain mode noise reduction, designed to peak up any correlated information (such as speech), in the audio passband. It reduces noise by forming dynamic bandpass filters around correlated information, thus automatically reducing the bandwidth to Interoperability Now 4-11 ACU-1000 Operations Manual the minimum necessary to pass the information. This type of noise reduction is most effective on purely random noise, such as white or pink noise, and less effective on impulse noises. The noise reduction value allows the amount of noise reduction to be set in ten steps from off to maximum. Increasing the level provides more actual noise reduction, but may give a “surging” quality to the recovered audio depending on its frequency content. Reducing the level lowers the noise reduction but may provide the best sounding audio in some cases. The best setting in a particular application depends on the noise level and represents a balance between noise reduction amount and ultimate audio quality. The only method to find the correct amount of Noise Reduction to apply is to listen to the received signal as the level is changed; this is best done using the HSP Handset so that you can be sure that all noise heard is from the radio’s received signal. Do not use the HSP speaker or a cross-connected radio. A little Noise Reduction goes a long way, and too much will give the received signal a fuzzy, artificial sound. It may be advantageous to attempt to improve the signal quality by other means (such as improving antenna placement) before adding Noise Reduction. Noise Reduction Procedure • The default setting for Noise Reduction is Off (no reduction). While listening to the received signal, increase the Noise Reduction setting one step at a time until the best signal quality is reached. • If possible, listen to the receive signal from several different sources and determine the Noise Reduction setting that works for most. • If the signal quality is later improved, revisit the Noise Reduction setting. • Click “Apply” to save the setting. 4.8.3 Audio Equalization In most communications links, audio frequency shaping takes place in multiple places. Typically the microphone, associated amplifiers, modulation filters such as bandpass and preemphasis, receive deemphasis, receive audio amplifiers, and finally, the speaker or handset device. In general, the communications channel tries to optimize the 300 to 3000Hz range as this is where most of speech information is contained. In FM radios, in order to reduce noise, the higher frequencies are preemphasized (boosted) prior to transmission and then deemphasized (rolled off) after the discriminator audio output. The deemphasis not only brings the frequency shaping back to normal, but it has the advantage of rolling off any high frequency noise picked up during transmission. Typically, the audio takeoff point for interface of an FM type receiver into a DSP module would either be at the discriminator output or the speaker output. If taken off at the discriminator output, it will still have the high frequency preemphasis which will give it a very tinny sound. Conversely, if taken off at the speaker, the audio shaping of a particular brand of radio may produce a more muffled sound that is hard to understand because it is lacking in high frequency information. 4-12 Interoperability Now ACU-1000 Operations Manual The DSP-2 module includes an Audio Equalization feature that can either boost or roll off the high end of the RX audio spectrum. This adjustment can compensate for poor RX audio quality. Follow the procedure below to determine the proper Audio Equalization Setting. Audio Equalization Procedure The best way is to listen to the received audio in the HSP handset (not the HSP speaker, unless a high-quality external speaker is connected). • Monitor the RX Audio in the HSP handset. • If the audio sounds like it lacks treble, the high frequencies can be increased (boost). • If the signal sounds too bright or harsh, the high frequencies can be attenuated (cut). • There are 3 steps of boost and 3 steps of cut plus the default flat setting. Move the adjustment 1 step at a time and recheck for best sound. 4.9 Unintended Consequences 4.9.1 Unwanted Connections The primary cause of unwanted connections that were not initiated by the operator or authorized user is DTMF received via the radio channels connected to the ACU-1000. It is possible that legitimate users are using DTMF for selective call, paging, or other functions within their own system and the sequence of numbers accidentally corresponds to an ACU1000 command. DTMF can also be received as a result of intermodulation or other co-channel interference. In many cases, legitimate users of the system will be unaware that the use of their DTMF keypads are causing problems in the ACU-1000 system. It is strongly recommended that all of the modules in the ACU-1000 that have a DTMF decoder function be set to “DTMF disable.” If it is essential for field personnel to have the ability to control the system via DTMF over radio, then careful use and assignment of security levels and passwords should provide a measure of protection. Interoperability Now 4-13 ACU-1000 Operations Manual End of Section Four 4-14 Interoperability Now ACU-1000 Operations Manual 5 ACU-1000 Technical Information 5.1 Scope This section contains technical information for the ACU-1000 system and its various plug-in modules. Specifications and block diagrams are provided for each of the interface modules. This information is intended to provide a basic understanding of each module to allow troubleshooting to the module level and to allow the development of applications for the ACU1000. 5.2 General Description The ACU-1000 system is a modular interface/interconnect system packaged in a Eurocard chassis. With this product, an intelligent interconnect system can be configured to meet almost any interface application involving telephones and radios of any sort. The ACU-1000 system is suitable for HF, LMR, Nextel, and Inmarsat Satcom systems and offers essentially unlimited applications and expandability. A system consists of a chassis, backplane and modules, module software and system control software. 5.3 Card Cage and Backplane The Card Cage is a 19” wide EIA standard rack-mounted Eurocard cage equipped with a backplane board into which the modules are plugged. The modules PC Boards are 100 x 220 mm. The card cage height is 5.25” (3U) tall, 19” wide, with a depth of 11”. An AC input module and power transformer assembly is located on a metal panel that is mounted to the backplane. The AC module is a combination AC line filter, power cable connector, input voltage selector and fuse holder. The backplane interfaces the outside world via Dsubminiature connectors, and internally to the plug-in modules via 60-pin card edge connectors. No active or passive electrical components reside on the backplane board. 5.4 Power Supply Module The Power Supply is a single-board module that plugs into the left-most slot in the backplane. The power supply’s backplane connector is offset relative to the connectors for the other boards to prevent improper insertion of the Power Supply Module in the slots reserved for the other cards. In turn, these other modules cannot be plugged into the Power Supply slot. The power supply incorporates a dual-primary line transformer with a bridge rectifier and filter capacitors to provide a +15V unregulated DC bus. The bus feeds a linear regulator that supplies all modules with +12VDC, and the bus feeds a switching regulator that provides -12VDC. Each individual module contains a switching +5V regulator operating from the +15V bus. Interoperability Now 5-1 ACU-1000 Operations Manual 5.5 CPM-4 Control Processor Module The ACU-1000 Control Processor Module has an MCF5272 Coldfire processor with 1 MB of flash EPROM that stores the operating software for the ACU and controls the entire chassis via an internal high-speed serial bus. It requests and receives status and information from each module and sends commands to each module, and instructs modules to connect to one or more of the sixteen audio buses on the ACU backplane. The CPM-4 provides both an Ethernet port and a RS-232 serial port allowing programming and monitoring of all ACU-1000 functions via the Ethernet, or a serially interfaced console. The front panel of the CPM-4 Module contains a Handset jack, an Ethernet jack, a Fault LED, along with Master and Expansion LEDs that indicate the unit’s status in an expanded system. The CPM-4 with Ethernet port allows remote programming and configuration access plus full compatibility with the WAIS controller. The CPM-2 was the predecessor to the CPM-4 and is no longer in production. CPM-2 was equipped with only a serial control and configuration port and had no network capabilities. 5.6 HSP-2A Handset/Speaker Module 5.6.1 General Description HSP-2A The HSP-2A Module provides a means to locally monitor, configure and control an ACU-1000 system. The user can monitor audio via an internal speaker, or plug in external headphones or use the handset that comes with the HSP-2A. The handset includes a PTT switch so the user can key an associated radio from the HSP-2A. Module control and configuration is via a 3x4 keypad (standard telephone layout), which enables the user to select a module in the system and enter control/configuration data. For example, if the system contains a PSTN-2 module, the user may place telephone calls manually using the HSP-2A keypad and handset. In addition to the front-panel handset and phones jacks, the HSP-2A has an audio line (0 dBm nominal) input and output, and external microphone input and external speaker output. There are three uncommitted auxiliary parallel inputs and three uncommitted auxiliary parallel outputs. 5.6.2 Block Diagram Description HSP-2A (Refer to Figure 5-1 HSP-2A Block Diagram) The HSP-2A contains its own microprocessor (U30) that does all of the local control of the module. It communicates with the system’s CPM-4 module over the control and data buses on the main chassis backplane via I/O latches and drivers U16 through U18. The microprocessor referred to in this description is the local one on the HSP-2A module. 5-2 Interoperability Now ACU-1000 Operations Manual The HSP-2A includes voice prompt generator circuitry (U67, U24). The voice prompt generator routes its prompt audio over one of the system audio buses via audio gates U59 through U62. The main function of the HSP-2A module is to connect 4-wire speaker and microphone audio to the 16-line audio bus structure on the ACU main chassis backplane board. Microphone audio is routed to the audio buses by audio gates U1 through U4, and speaker audio is brought in from the audio buses by audio gates U5-U7, and U15. These audio gates are controlled directly by audio bus latches U19 through U22, which receive their instructions directly from the microprocessor on the HSP-2A. The microprocessor, in turn, receives its instructions from the CPM-4 module in the system via I/O latches and drivers U16 through U18. Thus, the connections to and from any audio bus are controlled ultimately by the CPM-4 module, which decides which buses to assign to the HSP2A module depending on a number of system parameters. The CPM-4 passes connect information to the microprocessor, which controls the audio gates. Audio from an audio bus is routed to the speaker output through amplifier U10A, then through speaker driver U11, where the output volume is set by pot R72. Monitor output audio is routed to the back panel connector via amplifier U10B at a fixed zero dBm level. Microphone audio is routed through preamp U12A, onto an audio bus through audio gates U1 through U4. A linelevel audio input is mixed into the input of U12A. The /AuxO1, /AuxO2, and /AuxO3 digital outputs are generated by transistors Q1, Q2, and Q3 which are driven by the microprocessor. Digital inputs /AuxI1, /AuxI2, and /AuxI3 are routed to gates U44C, U44D, and U44E, which are read by the microprocessor. A keypad is interfaced to the microprocessor so the user can enter system commands and programming parameters. The microprocessor then formats the keypad data and sends it to the system’s CPM-4 for action. Interoperability Now 5-3 ACU-1000 Operations Manual 5.6.3 HSP-2A New Features and Enhancements from the HSP-2 The new HSP-2A provides these new features and enhancements: • System operation improved for the local operator with: o Higher power Speaker Driver circuitry o New forward-facing speaker o An external speaker is now included in the ACU-1000 Accessory Kit, allowing operation at higher volume or easy installation of external speaker at operator station. • Handset connector pin-out changed to a more universal configuration to allow easier interfacing of custom handsets or headsets (still works with the standard handset supplied with the ACU-1000). • Rear panel pin-out modified to allow the local operator’s audio and keying functions to be remoted by cable to a 4-wire audio console or over a network through the use of the Raytheon NXU. The pin-out changes allow these devices to be connected to P13 using the same cables as have been created to interface them to an ACU-1000 DSP-2 module at P1 through P12. This new pin-out is optional; all relevant connections to the HSP-2A can be configured for same pin-out as the HSP-2, allowing full backwards compatibility. • Voice Prompt capacity doubled to allow future expansion. • Signal Level LED added for easier level setting 5-4 Interoperability Now ACU-1000 Operations Manual 5.6.4 HSP-2A Specifications Table 5-1 HSP-2A Specifications Telephone Handset Microphone/Handset Interface Handset Headphone Interface Dialing and Programming K eypad Input level configurable by internal jumpers; -3 to +3 dBm. E lectret microphone, dynamic receiver, PT T switch. Drives high, medium, or low impedance headphones. Delivers NLT 10mW into 600-Ohm headphones. 3x4, Standard T elephone L ayout. Audio Line Input/Output Input Impedance Input Level Output Impedance Output Level Unbalanced 15k Ω. 0 dB m nominal (not adjustable). Unbalanced 600 Ω. 0 dB m fixed into 600 Ω, nominal. Digital Inputs (/AUX In 1-2, COR) Standard Polarity Threshold Input Impedance Protection Active Low. 2.5V nominal. 47kΩ to +5V. +100V. Digital Outputs (/AUX Out 1-2, /PTT) Standard Polarity Type Maximum Voltage On Resistance Maximum Current Sink Voice Prompts Active Low. Open Drain, weak pull-up 47kΩ to +5V. +60V. 5 Ω nominal. 50 mA. Capable of up to 255 voice prompts, as needed. General Distortion Noise Floor Frequency Response Speaker Driver Power Internal Speaker Front Panel Controls Front Panel Indicators Front Panel Connectors Handset Connections Audio Line Connections Rear Input Power Size Weight Interoperability Now Less than 0.5%. -65 dBm. 100 to 3200 Hz, +/- 2 dB. 2.5W min @ 10% Distortion. 2.0W Volume, Speaker On/Off, 3x4 Keypad. Signal, PTT, and Fault LEDs. Phones: 1/8” stereo jack, Handset: RJ-12C Jack. RJ12C Connectors on the front panel. Rear Panel. 60 Pin PC edge connector for backplane. +/- 12V, +Bus Voltage supplied by the backplane. Eurocard Module: 5’’H x 3.6’’W x 9’’D Nominal 1.0 lb. (0.5kg). 5-5 ACU-1000 Operations Manual 5.7 DSP-2 Module 5.7.1 General Description DSP-2 The DSP-2 module is another type of 4-wire interface module. It is like the RDI-1 module in that it is used to interface radios and other 4-wire devices, but it contains functions the RDI-1 does not, such as three types of COR sensing: hardwired signal, VMR, and VOX. It offers a DSP noise reduction mode. Its VMR and noise reduction capability make it an ideal interface for HF radios. In addition, it also contains an Ethernet port for network connectivity functions similar to the NXU-2. 5.7.2 Block Diagram Description DSP-2 (Refer to Figure 5-2 DSP-2 Block Diagram) The DSP-2 module has been redesigned for single board construction to include the DSP functions on a single printed board instead of a plug on DSP subassembly. In addition, network functions have been added to allow the DSP-2 to function as either a standalone NXU-2 type device for network connectivity, or as a hybrid device to allow a network interface device to have access to the backplane audio buses. An Ethernet connector is included on the front panel for connection to a TCP/IP type network. A Link Active LED on the front panel turns ON when a network connection has been established. The function of the DSP-2 module is to connect four wire transmit and receive audio to the 16line audio bus structure on the ACU main chassis backplane board. Receive audio is routed to the audio buses by audio gates U17 through U26, and send audio is brought in from the audio buses by audio gates U17 through U25. These audio gates are controlled directly by a Programmable Logic Device (PLD), U7, which receives instructions directly from the DSP processor, U10. The DSP processor, U10, in turn, receives its instructions from the CPM-4 module in the system via I/O latches and drivers located in PLD, U7. Thus, the connections to and from any audio bus are controlled ultimately by the CPM-4 module, which decides which buses to assign to the DSP-2 module depending on a number of system parameters. The CPM4 passes connect information to the DSP processor on the DSP-2 module, which controls the audio gates. Audio from an audio bus is routed to the transmit output through amplifier U16A, then through amplifier U12B. The course output level is set via gain select switches which are controlled by the DSP processor. Fine level set is done via the DSP software controls. Receive audio in is routed through amplifier U15A,B, then through amplifier U16B, which is gain-controlled by DSP switches, and then into the A/D input on U8. The DSP processor processes the audio and outputs its signal onto an audio bus through audio gates U17 through U26. The DSP software module runs a DTMF receiver, which decodes the DTMF digits that may come in from a receiver and passes them digitally on to the system’s CPM-4 for processing. Under instructions from the CPM-4, the DSP-2 module generates DTMF signals, which are routed to the transmit output through amplifier U12B. 5-6 Interoperability Now ACU-1000 Operations Manual The /PTT, /AuxO1, and /AuxO2 digital outputs are generated by transistors Q11, Q12, and Q13 which are driven by the CPU IC, U4. Digital inputs /COR, /AuxI1, and /AuxI2 are routed to input gates on CPU, U4. An RS-232 interface chip, U27, changes RS-232 voltage levels into TTL voltage levels for processing by the DSP module. Similarly, an Ethernet transceiver chip, U6 provides the network interface logic between the RJ-45 network connector and the CPU, U4. Interoperability Now 5-7 ACU-1000 Operations Manual 5.7.3 DSP-2 Specifications Table 5-2 DSP-2 Specifications RX Audio Input Balanced /Unbalanced 600 Ω; Unbalanced 47kΩ. -26 to +12 dBm, programmable. 100 Hz to 3200 Hz + 2 dB. Input Impedance Input Level Frequency Response TX Audio Output Output Impedance Output Level Frequency Response Distortion Noise Floor TX Audio Delay Balanced or Unbalanced 600Ω -26 to +12 dBm, programmable. 100 Hz to 3200 Hz + 2dB. Less than 0.5% -65 dBm. 0, 200, 400, 600, 800 ms VOX/VMR VOX/VMR Thresholds VOX Hang Time VMR Hang Time Audio Delay, VOX and COR Modes Audio Delay, VMR Mode Transmit Key Tones Low, MED1, MED2, High; Programmable. 175 ms to 1.575 S, Programmable in 200 ms steps. 775 ms to 1.575 S, Programmable in 200 ms steps. 20 ms to 300 ms Programmable in 40 ms steps 220, 260, or 300 ms, Programmable. None, 1950 Hz, or 2175 Hz, Programmable. Equalizer Cut Settings at 3 kHz Boost Settings at 3 kHz Time Domain DSP Noise Reduction 5 dB, 3.5 dB, 2dB, 0 dB; Programmable. 5 dB, 3.5 dB, 2 dB, 0 dB; Programmable. 9 programmable levels. Digital Inputs COR Input Polarity AUX Inputs Polarity Threshold Input Impedance Protection Active Low or Active High, Programmable. Active Low. 2.5V nominal. 47kΩ to +5V. +100V. Digital Outputs Standard Polarity Type Maximum Voltage On Resistance Maximum Current Sink Active Low. Open Drain, weak pull-up 47kΩ to +5V. +60V. 5 Ω nominal. 50 mA. General Front Panel Link Active, COR, Signal, PTT, and Fault LEDs + Ethernet connector 60 Pin PC edge connector for backplane. +12V, +Bus Voltage supplied by the backplane. Eurocard Module: 5’’H x 0.8’’W x 9’’D Nominal 1lb. (0.5kg). Rear Input Power Size Weight 5-8 Interoperability Now ACU-1000 Operations Manual 5.8 PSTN-2 Module 5.8.1 General Description PSTN-2 The PSTN Module is the 2-wire interface between the ACU system and a telephone system (as opposed to a telephone set). A telephone system is an entity that accepts dialing information and processes calls, such as a PSTN line, PABX line, Inmarsat Terminal, or cellular phone. (A telephone set is a device that generates dialing information. It is interfaced to the ACU system via the LP-2 Module.) The PSTN-2 contains one 2-wire jack with front-panel RJ-11C jack for interfacing with PSTN lines or satellite equipment. The module contains ring detect circuitry. The interface signal levels are programmable via the HSP-2A module or via the ACU Controller or WAIS Controller. The module has a DSP hybrid and VOX with programmable sensitivity and hangtime. It has a DTMF receiver/generator for control and call progress recognition. There are two uncommitted auxiliary parallel inputs and two uncommitted auxiliary parallel outputs. Interoperability Now 5-9 ACU-1000 Operations Manual 5.8.2 PSTN-2 Specifications Table 5-3 PSTN-2 Specifications Telephone Line Interface 2-Wire Audio Interface Phone line Input/Output Levels Input/Output Impedance to Phone Line Distortion Noise Floor VOX Thresholds -24 to 0 dBm Programmable in 3 dB steps. 600 Ω Nominal. Less than 0.5%. -65 dBm. Four selectable VOX thresholds of 19, 16, 13, and 10 dB below input level setting. The default setting is -16 dB (-25 dBm @ -9 dBm level setting, for example) 0.5, 1.0, 1.5, or 2.0 Seconds; Programmable. -30 dB over 300 to 3200 Hz BW within 1.25 seconds; measured with white noise source into 600 Ohms. -50 dB typical over 300 to 3200 Hz BW; measured with a single tone into 600 Ohms. 0 to infinite ohm complex impedance. VOX Hang Time Hybrid Balance/Adaptation Speed Ultimate Hybrid Balance Hybrid Impedance Matching Capability Digital Inputs (/AUXI1, /AUXI 2) Standard Polarity Threshold Input Impedance Protection Active Low. 2.5V nominal. 47kΩto +5V. +100V. Digital Outputs (/AUXO1, /AUXO2) Standard Polarity Type Maximum Voltage On Resistance Maximum Current Sink Active Low. Open Drain, weak pull-up 47kΩ to +5V. +60V. 5 Ω nominal. 50 mA. General Front Panel Rear Input Power Size Weight Monitor, Ring, Connect, VOX, and Fault LEDs. 60 Pin PC edge connector for backplane. +12V, +Bus Voltage supplied by the backplane. 4HP-Wide Eurocard Module: 5’’H x 0.8’’W x 9’’D. 1.0 lb. (0.5kg). 5-10 Interoperability Now ACU-1000 Operations Manual 5.9 LP-2 Module 5.9.1 General Description LP-2 The Local Phone Module is the interface to the ACU system for 2-wire devices, which generate dialing information such as a telephone set. This module contains a loop current generator, ring voltage generator, dial and busy tone generators, a DSP hybrid with VOX and a DTMF generator/receiver. 5.9.2 LP-2 Specifications Table 5-4 LP-2 Specifications 2-Wire Telephone Set Interface Telephone Set Input/Output Levels Input/Output Impedance to Telephone Set Loop Current Loop Voltage Ring Voltage Jumper-selectable to –9, -12, or-15 dBm. 600 Ω Nominal. Jumper-selectable 20 mA or 50 mA. -12V standard. 20 Hz, 80V p-p square wave. 2-Wire Distortion Noise Floor VOX Thresholds VOX Hang Time Hybrid Balance/Adaptation Speed Ultimate Hybrid Balance Less than 0.5%. -65 dBm. Off, Low, Medium, High; Programmable. 0.5, 1.0, 1.5, 2.0 seconds, Programmable. -30 dB over 300 to 3200 Hz BW within 1.25 seconds; measured with white noise source into 600 Ohms. -50 dB typical over 300 to 3200 Hz BW; measured with a single tone into 600 Ohms. Digital Inputs (/AUXI1, /AUXI 2, /PTT) Standard Polarity Threshold Input Impedance Protection Active Low. 2.5V nominal. 47kΩto +5V. +100V. Digital Outputs (/AUXO1, /AUXO2, /VOX) Standard Polarity Type Maximum Voltage On Resistance Maximum Current Sink Active Low. Open Drain, weak pull-up 47kΩ to +5V. +60V. 5 Ω nominal. 50 mA. General Front Panel Rear Input Power Size Weight Interoperability Now Monitor, Ring, Off Hook, VOX, and Fault LEDs. 60 Pin PC edge connector for backplane. +12V, +Bus Voltage supplied by the backplane. 4HP-Wide Eurocard Module: 5’’H x 0.8’’W x 9’’D. 1.0 lb. (0.5kg). 5-11 ACU-1000 Operations Manual This Page Intentionally Left Blank 5-12 Interoperability Now ACU-1000 Operations Manual HSP-2A MODULE U5-U7, U15 16 Audio Gates Monitor Out U10A U10B 560 JP1 1 2 3 Speaker Volume Speaker Driver On/Off 22K MIC Level JP10 1 2 3 1 2 3 4 5 MIC In N U1-U4 16 Audio Gates U12A P13 8 15 7 14 6 Handset H 13 5 Jumpers 100K 47K N 12 PTT L MIC Preamp TXB/GND 6 4.7K 0 dBm SPKR/ TXB GND P6 Earpiece Driver L 10K INT/EXT Speaker U12B CONTROL BUS DATA BUS 1 TO 8 AUDIO BUS 1 TO 16 U11 INTERNAL SPEAKER Head Phones 560 4 11 3 Line In 10 2 9 22K 1 H AUDIO BUS CONTROL LATCHES U19 - U22 Line Level 68HC11 PROCESSOR U30 AUDIO BUS CONTROL LATCHES U52-U53 DIGITAL OUTPUTS Q1, Q2, Q3 A DIGITAL INPUTS U44-C,D,E BACKPLANE I/O LATCHES & DRIVERS U16 - U18 U59-U62 16 Audio Gates AUDIO INTERFACE U24 A/D D/A DSP PROCESSOR U67 Figure 5-1 Interoperability Now 5-13 HSP-2A Block Diagram ACU-1000 Operations Manual This Page Intentionally Left Blank. 5-14 Interoperability Now ACU-1000 Operations Manual DSP-2 MODULE U17-U25 16 Audio Gates T1 TXA 0 dBm U12B U16A TXB 1:1 JP1 UNBAL BAL U17-U26 16 Audio Gates 1 RXA 2 3 T2 0 dBm U12A U16B U15B U15A 1:1 JP1 1 2 3 P13 RXB 8 R16 560 AN IN DIG OUT A/D, D/A #1 U8 AN OUT DIG IN CONTROL BUS DATA BUS 1 TO 8 AUDIO BUS 1 TO 16 Balanced Input Impedance 14 6 CPU U4 13 5 12 4 3 2 AN IN DIG OUT A/D, D/A #2 U8 AN OUT DIG IN DSP MODULE 15 7 DSP PROCESSOR U10 1 11 10 9 A DIGITAL OUTPUTS Q11, Q12, Q13 /AUX 1 /AUX 2 /PTT /AUX 1 IN BACKPLANE I/O LATCHES & DRIVERS U7 DIGITAL INPUTS U4 RS-232 INTERFACE U27 /AUX 2 IN /COR IN RXD TXD J1 ETHERNET XCVR U6 Figure 5-2 Interoperability Now 5-15 8 RJ-45 CONNECTOR DSP-2 Block Diagram ACU-1000 Operations Manual This Page Intentionally Left Blank. 5-16 Interoperability Now ACU-1000 Operations Manual Figure 5-3 Interoperability Now 5-17 PSM-1A Block Diagram ACU-1000 Operations Manual 6 Options 6.1 STU-3 Option Interfacing a STU-III encrypted phone to the ACU-1000 is accomplished by performing the following procedures. 6.1.1 Equipment Required The equipment required is the STU-III Phone Interface, Raytheon P/N 5961-295000, along with an ACU-1000 that has a DSP module available for connection to the STU-III interface. 6.1.2 Required Applications The STU-III interface, when used with the ACU-1000, allows a STU-III user to access any ACU-1000 net. Please reference Figure 6-1 for an example of a standard system utilizing a STU-III phone. Figure 6-1 STU-3 Basic System 6-1 ACU-1000 Operations Manual 6.1.3 Installation Note: STU-3 Option interfaces only with DSP modules, not the PSTN 6.1.3.1 Connections Connecting the STU-III phone to the ACU-1000: 1.) Plug the STU-III phone into the telephone jack in the wall. 2.) Remove the handset cord from the STU-III phone. 3.) Find the supplied telephone cables with an RJ-9 connector on one end and RJ-11 on the other. Note: The RJ-9 is the connector used with the handset, the RJ-11 is the connector used with the STU-III interface boxes. 4.) Plug in the supplied cables between the STU-III interface box and the STU-III phone. a.) Plug one of the RJ-11s into the “HAND-SET” jack located on the STU-III interface box; plug the other end of the cable (RJ-9) into the handset of the STU-III phone. b.) Plug in the other RJ-11 into the “PHONE” jack located on the STU-III interface box and plug the other end of the cable (RJ-9) into the base of the STU-III phone where the handset cable would normally be connected. Note: Step 5 does not apply for turnkey systems having the DB-15 cables already mounted. 5.) Find the supplied ACU/STU-III cable having one DB-15 terminated on each end of the cable. a.) Plug the end of the cable identified STU-III END into the “INPUT” connector on the STU-III interface box. This DB-15 will have a cable and two separate conductors terminated within the shell. The two conductors (one red and one black) are used to power the STU-III boxes. Connect the other end of the red and black conductors to the back of the ACU-1000 DC-INPUT terminals. If more than one STUIII is being used, plug these conductors into the supplied power terminal bus (red to positive and black to negative). The terminal bus will receive power from the ACU1000’s DC-INPUT terminals or any other 12 VDC power source. When using the ACU-1000 as the power source the PSM-1A module must be in the “charge” and “12 VOLT” mode. b.) To place the PSM-1A in these modes the user must first UNPLUG the power cable from the wall. Loosen the retaining screws on the top and bottom of the PSM-1A module. 6-2 ACU-1000 Operations Manual c.) Pull the module from the ACU-1000 chassis and slide the “charge” switch into the “ON” position. Additionally, place the “DC-INPUT” switch into the “12 VDC” position. d.) Reinstall the PSM-1A module, tighten the retaining screws and plug the ACU1000 power cable into the wall. e.) Located on the rear panel of the ACU-1000 are DB-15 receptacles, which correspond to the modules mounted in the front of the chassis. Receptacle P1 on the ACU-1000 is used for extension 1, which is the first module after the CPM-4 card. The same principle is true for the remaining 11 extensions. Plug in the other end of the cable coming from the STU-III box into the extension (P1-P12) the user wants to use with the STU-III phone. If the other end of the cable is plugged into P1 on the ACU1000, then the STU-III phone will work with the DSP-2 module in extension 01. 6.1.3.2 ACU-1000 Alignment for STU-3 1) Make a call from the local STU-III telephone; establish a voice link with the party on the distant STU-III phone. Place the STU-III phones into the secure mode and pause for the phone to report it is in the secure mode. For this example, it will be assumed the STU-III phone is connected to P1, which means it will work with the DSP-2 in extension 01. Connect the supplied handset into the HSP-2A module. Connect the HSP-2A module to the DSP-2 connected to the STU-III phone, in this example it would be extension 01. This connection can be made via the ACU Controller software program or via the HSP-2A keypad. When the HSP-2A is connected to the DSP-2 associated with the STU-III phone, the STU-III handset will no longer work, and the ACU-1000 will now be the handset. The user can now talk to the party on the distant phone via the handset plugged into the HSP-2A module. The user must push the PTT button on the handset to send audio to the distant user. Note: If no audio is heard from the distant listener it may be necessary to open the STU-III interface box and move the polarity switch to the reverse position. Some manufacturers such as Motorola use a different MIC polarity contrasting ATT and others. Remove the two screws on the top of the box to remove the cover. When the boxes are mounted three wide, it may be necessary to remove all three boxes to open the boxes. Newer versions of the boxes have a slot cut through the box to access the switch. 2) The user may now set up the DSP-2 levels to match the STU-III phone. The TX and RX levels of the DSP-2 modules may be adjusted via either the ACU Controller software program or the HSP-2A module. a) The user should talk to the party at the distant phone and find out how the levels are at the distant end. If the levels need to be adjusted, the user should adjust the DSP-2 TX level. If the user finds the levels coming from the distant phone are too loud or soft the user may adjust the RX level in the DSP-2 module. Once the levels are set for each phone, they should not need to be adjusted again unless the phone changes. 6-3 ACU-1000 Operations Manual Note: The volume knob on the STU-III phone also controls the output to the ACU-1000. 3) The COR type for the DSP-2 module should be in VOX mode for use with a STU-III phone. VOX mode is the factory default. 6.1.4 Operation: Cross Connecting a STU-III phone 1) Once the STU-III has gone secure the user may cross connect it to another STU-III phone, a local phone, radio, sound card in computer, or any other audio device. To cross connect, the user would connect the DSP-2 module being used to the other extension he/she wants to connect with. The process may be done via the ACU Controller software program or the HSP-2A module. The procedure for cross connecting is defined in Section 3.2 and Section 3.5.1.1. a) EXAMPLE: To connect extension one with extension eight via the control console, the user will click on the Connect ICON on the top of the screen. The user will put the cursor on DSP-2 number one and click the left button and then on DSP-2 number eight and click on the left button. The screen will show the two connected together. b) To disconnect the two extensions, the user should left mouse click the disconnect icon located on the top of the screen. The user will place the cursor on one of the extensions connected together and click on the DSP2 icon. This will disconnect the two DSP-2 modules and the cross connection will be broken. . 6-4 ACU-1000 Operations Manual Figure 6-2 6-5 ACU-1000 to STU-III Cable Schematic ACU-1000 Operations Manual This Page Intentionally Left Blank 6-6 ACU-1000 Operations Manual Figure 6-3 6-7 STU-III Internal Wiring Diagram ACU-1000 Operations Manual This Page Intentionally Left Blank. 6-8 ACU-1000 Operations Manual Figure 6-4 6-9 STU-III Option Board Schematic ACU-1000 Operations Manual This Page Intentionally Left Blank. 6-10 ACU-1000 Operations Manual 6.2 LE-10/20/30/40 The LE series local extensions are designed to provide remote control of transmit and receive audio including PTT from a distance of up to 1000 feet. They are available in four configuration housings as follows: LE10: Telephone style unit with handset. LE20: Desktop Console with desk microphone. LE30: Desktop Console with built in electret condenser microphone. LE40: Desktop Console with gooseneck microphone. 6.2.1 Dip Switch Setting for LE-10/20/30 This dipswitch is located on the rear of the unit. Jumpers are located internally. See remote control manual. Table 6-1 LE10/20/30/40 Switch Settings Switch # ON OFF 1 Low impedance load to radio RX out. OPTION-Latched F1/F2 output. Monitor on front panel PTT. * Speaker mute on any PTT. Boosts level of parallel TX audio received. Low impedance radio mic input. * High-level RX audio from radio. * For ground referenced RX audio from radio. * High impedance load to radio RX out. * 2 3 4 5 6 7 8 OPTION-Latched F1/F2 output. * Do not monitor on front panel PTT. Depends on setting of JP15. See below. Normal Low impedance radio mic input. High-level RX audio from radio. For non-ground referenced RX audio from radio. NOTES: * Indicates default position. SW4 ON ON OFF OFF JP15 IN OUT* IN OUT* Mute on any PTT Mute on any PTT Mute on local PTT No mute on any PTT 6-11 ACU-1000 Operations Manual Note: It is recommended dipswitch 4 be set to the ON position. If the user does not want RX audio to be heard when the volume is turned fully counter clock wise, add jumper, JP2, internally. End of Section Six 6-12 ACU-1000 Operations Manual 7 Legacy Module Information 7.1 Legacy Module Overview This section explains how to use legacy modules in new systems and how the newer version modules may be used in existing ACU-1000 systems. Raytheon makes every reasonable effort to keep all modules as fully backward and forward compatible as possible. However, as new features and capabilities are added, and components (and entire logic families) become obsolete, it is inevitable that some incompatibilities will result. Table 7-1 Module Upgrades Legacy Module Replacement Module PSM-1 PSM-1A HSP-2 HSP-2A LP-1 LP-2 PSTN-1 PSTN-2 CPM-2 CPM-4 DSP-1 DSP-2 RDI-1 DSP-2 AP-1 Delay Functions included in DSP-2 7-1 ACU-1000 Operations Manual 7.2 PSM-1A replaces PSM-1 The PSM-1A was created to comply with changes to US and European Safety certification requirements related to terminal and PCB trace spacings. Main compatibility notes: • The PSM-1A can be plugged into previous versions of the ACU-1000 chassis (those shipped with a PSM-1), and will function properly. • The PSM-1 cannot be plugged into a newer chassis (those shipped with a PSM-1A). The PSM-1 will not function properly in the newer chassis, and to prevent confusion, the newer chassis were designed to prevent the module from being inserted fully in the chassis. • The PSM-1A allowed unit operation from a +24 VDC (nominal) power supply. This feature was removed from the PSM-1A due to lack of space. 7.3 HSP-2A replaces HSP-2 The HSP-2A was created to add new features (mainly to improve the ability to interface the HSP-2 to other parts of a Wide Area Interoperability System) and also to deal with component obsolescence. The HSP-2A also combines all circuitry onto a single PCB, making voice prompt memory IC changes much easier. Main compatibility notes: • The HSP-2 did not have microphone input level adjustment jumpers. • The PTT input circuit of the HSP-2A is more “standardized” for operation with a wider range of headsets. It is an active low input on the HSP-2A, while the HSP-2 was active high. • The associated rear panel D15 connector (P13) pinout in the HSP-2A can be configured to mimic the P1 through P12 pinout, allowing radios and NXU-2A units to be connected to P13 using standard interface cables. o Internal jumper JP10 of the HSP-2A allows the External Speaker output to be configured instead as a ground connection, the same as P1 through P12 for a single-ended audio ground connection. o With the HSP-2A, pin 13 is normally configured as a COR input (like P1-P12), but may be configured as /AUX In 3 as it is in all HSP-2 modules. 7-2 ACU-1000 Operations Manual Table 7-2 HSP-2A Module Connections- P13 PIN Signal Description 1 2 3 4 5 6 7 8 Ground N/C /AUX Out 1 /AUX In 1 Ground External Speaker –or – Ground for single ended audio Audio Ground Audio Line In 9 10 11 12 13 N/C /AUX Out 2 /AUX In 2 /PTT Out (/AUX Out 3) COR IN (/AUX In 3) 14 Monitor Out 15 N/C Ground connection. No connection. Auxiliary Output 1- Active low; used for special functions only. Auxiliary Input 1- Active low; used for special functions only. Ground connection. External Speaker output- Use JP1 to enable. Configure via JP10. Ground used to allow use of standard Raytheon radio and NXU-2A interface cables. Ground connection for Mic audio input. 0 dBm line level audio input; 22k-100K ohm impedance via gain select jumpers JP7-JP9. Alternant COR in HSP-2A. Auxiliary Output 2- Active low; used for special functions only. Auxiliary Input 2- Active low; used for special functions only. Active Low PTT output to a transmitter. COR Input from a receiver; active low. May also be configured as Auxiliary Input 3- Active low; used for special functions only. Same audio as fed to the speaker except at 0 dBm line level from a 600 ohm source. Level is not affected by the front panel volume control. No connection; not used in the HSP-2A. 7.4 HSP-2/HSP-2A Compatibility Details 7.4.1 Handset Microphone The HSP-2A handset mic level is now adjustable in three steps using jumpers as detailed below. JP4 JP5 JP6 -6dB 0dB +6dB The mic circuit no longer has an ALC circuit. 7.4.2 Line Input The line inputs (pin 8 of the DB-15) are also adjustable with jumpers which was not possible before, see below. JP7 JP8 JP9 -6dB 0dB +6dB 7-3 ACU-1000 Operations Manual 7.4.3 PTT Circuit The PTT circuit is now active low. This means that many popular types of headsets can be used without having to modify the headset circuit as was previously required. 7.4.4 HSP-2A DB-15 Connector Interface The DB-15 on the rear panel for the HSP-2A can be configured to have the same pinout as a DSP module. • Jumper JP10 changes DB-15 pin 6 from either being speaker output as it was before, or GND (TX B) so that the HSP will work with a radio or more likely an NXU-2A. • The old HSP-2 was wired such that pin 9 could be used for an active high COR; it is now Active low in HSP-2A. COR input can now go to pin 13 (which is the same as the DSP modules), or it can go to pin 9 for any legacy HSP issues. COR on the HSP-2A is supplied standard with active low input on Pin 13 which is the same as a DSP connector. For legacy applications, COR input can be connected to Pin 9 by installing a zero Ohm jumper R146. In addition, pin 13 on the old HSP was /AUXI3, so jumper options are available to give the user an option to make pin 13 be either COR or /AUXI3 as shown in the chart below. Pin # 13 13 9 9 Function COR /AUXI3 COR COR R144 IN OUT IN OUT Table 7-3 R145 OUT IN OUT IN R146 OUT NO EFFECT IN IN(For Pin 13 to be /AUXI3 concurrently COR Jumpers From the factory, R145 and R146 are not installed in the HSP-2A 7.4.5 External Speaker The HSP-2A is supplied standard with a large, high efficiency, outboard speaker. 7-4 ACU-1000 Operations Manual 7.5 CPM-4 replaces CPM-2 The CPM-4 was created to add new features (including on-board networking capability) and deal with component obsolescence. Main compatibility notes: • A CPM-4 may be installed in any chassis without any special considerations. • A CPM-2 may be installed in a newer chassis (shipped with CPM-4 and/or DSP-2 modules as long as the CPM-2 software is upgraded to revision 1.18 or higher. Consult Raytheon for upgrade information. Operation with the CPM-2 in a newer version ACU-1000 will support all features that were supported with the CPM-2 in a legacy chassis; however, some of the new features cannot be supported. • The CPM-2 is configured by dipswitches on the module rather than via a front panel Ethernet port (as is the CPM-4). The CPM-2 dipswitch settings are explained below. Table 7-4 CPM-2 Hardware Configuration Settings CPM-2 Module Configuration Designator Factory Setting Serial Port Baud Rate RS-232 Serial Remote Control Enable/Disable Serial Sync Character Requirement Reserved for future use. Chassis Configuration (Single Chassis or place in Expanded System) Manufacturing Test Enable/Disable Allow *36 command at HSP to be saved Reserved for future use. SW1-1, 2 SW1-3 SW1-4 SW1-5 SW1-6, 7 9600 Enabled Not required Off Single Chassis SW1-8 SW2-1 All of SW-2-2 thru SW2-8 All of SW-3 Disabled On Off Unused Off 7.5.1 CPM-2 Switch Settings The dipswitches on the CPM-2 module configure the chassis for proper operation in its customer-specific application. There are three eight-position dipswitches on this module. SW1 sets remote control parameters, configures the chassis for use in an expanded system, and includes a dipswitch used only in the factory for testing purposes. All of the eight dipswitches of SW2 are reserved for future use and should be kept OFF except for SW2-1 which shall remain ON to enable *36 SAVE command. The dipswitches are only read by the ACU-1000 at unit power-up, so to change unit configuration, shut main power off, pull out the CPM-2 module, change dipswitch settings as required, reinstall the module and turn main power back on. If using the CPM-2 on an extender card, it will still be necessary to turn power off/on in order to get the unit to read the switches and change configuration accordingly. In the tables below, the default settings are marked with an asterisk. 7-5 ACU-1000 Operations Manual 7.5.1.1 Baud Rate SW1-1 and SW1-2 These switches set the external serial port baud rate. The serial port uses 8 data bits, 1 stop bit, and no parity. Table 7-5 Baud Rate SW1-1 SW1-2 Baud Rate Off On Off On Off Off On On 300 Baud 1200 2400 9600 * 7.5.1.2 Remote Control Enable SW1-3 This switch enables remote control via RS-232 and the external serial port. The default is Enabled; setting to Disabled does not change operation in any way except incoming RS-232 commands will be ignored. Table 7-6 Remote Control Enable SW1-3 Remote Control On Off Enabled * Disabled 7.5.1.3 Serial Sync Character SW1-4 This switch adds the requirement that all remote control commands are preceded by the synchronizing character ^ (ASCII character 0x5E). The default setting is OFF, as this is not normally required. The sync character may improve remote control operation under electrically “noisy” conditions, such as the presence of high levels of RF energy. Table 7-7 Serial Sync Character SW1-4 Sync Character On Off Required Not Required * NOTE: The ACU Controller Program Does Not Use The Serial Sync Character And Will Not Function If This Switch Is Turned On 7-6 ACU-1000 Operations Manual 7.5.1.4 Reserved SW1-5 SW1-5 is reserved for future use and should be kept in the OFF position. 7.5.1.5 Expanded System Configuration SW1-6 and SW1-7 These switches configure each chassis when used in an expanded system consisting of two chassis connected together as a Master Chassis and an Expansion Chassis to provide additional extensions. The factory default is for single unit operation, but if the system was purchased as a dual-chassis system from the factory, these switches will be configured accordingly when shipped. Table 7-8 Expanded System Configuration SW1-6 SW1-7 Chassis Configuration Off On Off On Off Off On On Single Chassis * Expanded System, Master Reserved Expanded System, Expansion 7.5.1.6 Manufacturing Test SW1-8 This switch is used by the factory for manufacturing test purposes only, and must be kept off. Table 7-9 Manufacturing Test SW1-8 Manufacturing Test On Off Enabled Disabled * 7.5.1.7 Reserved SW2 These switches are all reserved for future use and must set for OFF except for SW2-1 which must be set to ON to enable *36 SAVE command. 7.5.1.8 Reserved SW3 These switches are all reserved for future use and must be kept OFF to ensure proper operation. 7-7 ACU-1000 Operations Manual 7.6 DSP-2 Replaces DSP-1 The DSP-2 was created to add new features (including on-board networking capability and a more powerful digital signal processor) and deal with component obsolescence. Main compatibility notes: • DSP-1 and DSP-2 modules may be used alongside each other in an ACU-1000 chassis. • DSP-1 modules may be plugged into a newer version chassis (shipped with DSP-2 modules) with no special considerations. • DSP-2 modules may be plugged into older version chassis (shipped with CPM-2 modules) as long the CPM-2 software revision is 1.18 or higher. Consult Raytheon for CPM-2 software upgrade information. 7-8 ACU-1000 Operations Manual 7.7 DSP-2 Replaces the RDI-1 Module The RDI Radio Interface Module is another type of 4-wire interface module for the ACU system and can be used to interface radios, remote control heads, or other 4-wire audio devices. It does not contain a Digital Signal Processor, so it is lacking the DSP features of the DSP-2. The RDI does contain a serial port (while the DSP-1 did not). This made the RDI-1 useful for some special applications. The DSP-2 also has an RS-232 serial port. This fact, along with component obsolescence, makes the DSP-2 an ideal replacement for the RDI-1. Please contact Raytheon for any applications that require a serial port for control of radios or other communications devices. 7.8 PSTN-2 Replaces the PSTN-1 Module The PSTN-2 Phone Interface Module is functionally equivalent to the PSTN-1 with the exception that the Line 2 RJ-11C jack on the front panel has been removed and all 4-wire interface functions have been deleted. The PSTN-1 and PSTN-2 both have the identical module identification code and the CPM module treats them the same. The 4-wire setup options in the configuration screen, while applicable to the PSTN-1, will be ignored by the PSTN-2 which will remain in the default 2-wire mode. Please contact Raytheon for any applications that require a 4 wire interface. 7-9 ACU-1000 Operations Manual End of Section Seven 7-10 ACU-1000 Operations Manual 8 Index Operation, 3-20 Configuration, 2-53 Configuration Programming Items, 2-83 Connect LED (PSTN-2), 3-7 Control and Connector Locations, 2-5 Cooling, 2-3 COR, 1-6 COR LED (RDI-1, DSP-1), 3-6 CPM Module Software Updates, 2-67 CPM Module Configuration Programming via Browser, 2-53 Information Page, 2-66 CPM-2, 1-4 Baud Rate, 7-18 Expanded System Configuration, 7-19 Manufacturing Test SW1-8, 7-19 Remote Control Baud Rate, 7-18 Serial Sync Character, 7-18 SW1-5, 7-19 SW1-8-8, 7-19 SW2-1 through SW2-8, 7-19 Switch Settings, 7-17 CPM-2 Control Processor Module Technical Information, 5-2 CPM-2 Hardware Configuration Settings, 7-17 CPM-4 Jumper Settings, 2-42 CPM-4 replaces CPM-2, 7-17 Cross-Connection, 1-4 Monitor, 1-9 Multiple, 1-9 CSAP, 1-1 Data / Command Modes HSP-2, 3-10 Interface Module Operational Commands, 3-13 Data /Command Mode Interface Module Operational Commands, 3-11 Data/Command Mode HSP-2 Operational Command Items, 3-8 DC Input Connector, 2-14 DC Power Requirements, 2-7 Delete PIN Numbers from the Database, 3-16 Description of Programming Items, 2-90 Disconnect Another Extension HSP-2, 3-9 HSP-2 Operational Command Items, 3-8 Dispatcher Priority, 4-8 DSP Module +12V and -12V Indicators (PSM-1), 3-5 2-wire device, 1-4 4-wire device, 1-4 AC and DC Indicators (PSM-1), 3-5 AC Line Voltage Selection, 2-6 AC Power Requirements, 2-6 ACU Controller, 3-2 ACU-1000 Card Cage, 1-10 Charge Switch, 2-9 CPM-4, 1-11 DSP-2 Module, 1-11 General, 1-9 HSP-2A, 1-10 LP-2 Module, 1-12 Power Supply Module, 1-10 PSTN-2 Module, 1-11 RDI-1 Module, 7-21 Specifications, 1-20 ACU-1000 Hardware Configuration Settings, 2-39 ACU-1000 Technical Information, 5-1 ACU-Controller, 1-12 ACU-T, 1-19 Attention Command HSP-2, 3-9 HSP-2 Operational Command Items, 3-8 Interface Module Operational Commands, 3-11, 3-12 Audio Equalization, 4-12 Auto-Restore, 2-86 Basic Operation Scenarios Operation, 3-17 Battery Power for the ACU-1000, 2-7 Baud Rate, 2-86 Break a Connection HSP-2, 3-9 Interface Module Operational Commands, 3-12 Break the Current Connections HSP-2 Operational Command Items, 3-8 Interface Module Operational Commands, 3-11 Browser, 2-53 Card Cage and Backplane Technical Information, 5-1 Chassis Slots, Extensions, Connectors, and Modules, 2-13 Common Problems/Solutions Delays, 4-3 Conference Call 8-1 ACU-1000 Operations Manual Configuration Page, 2-72 Configuration Programming via Browser, 2-69 Connection Management Page, 2-76 Information Page, 2-71 Manual Page, 2-78 Restoring Factory Defaults, 2-78 Software Update, 2-80 DSP-1, 1-4 DSP-1 and RDI-1 Programming Audio Muted When Squelched, 2-97 Auxiliary Output Control, 2-100 COR Inhibit Time After PTT, 2-98 COR Polarity, 2-91 COR Sampling, 2-96 COR Type, VOX/VMR Threshold, Hangtime, and Audio Delay, 2-93 DTMF Command Enable, 2-99 DTMF Mute Timer, 2-91 DTMF Pre-emphasis, 2-99 Full/Half Duplex, 2-91 High Frequency Equalizer, 2-99 Module Security Level Selection, 2-99 Noise Reduction Value, 2-97 PTT or COR Priority, 2-98 Receive Level, 2-90 Transmit Keying Tones/Keying Tone Amplitude, 2-97 Transmit Level, 2-90 Voice Prompt Initiation Delay, 2-100 DSP-1 and RDI-1 Programming Items, 2-90 DSP-1 Programming Item, 2-87, 2-88 DSP-2 Block Diagram, 5-15 Block Diagram Description, 5-6 General Description, 5-6 DSP-2 Jumper Settings, 2-43 DSP-2 Module Technical Information, 5-6 DSP-2 Module Connections, 2-15 DSP-2 Replaces the RDI-1 Module, 7-21 DSP-2 Specifications, 5-8 Enable PIN Security, 3-15 Equipment and Accessories Supplied, 1-21 Exclusive Operation Mode, 3-15 Expansion Connector, 2-17 Expansion Connector- P14, 2-17 External Interconnect Information, 2-12 False Keying, 4-1, 4-6 Fault LEDs (HSP-2, DSP-1, RDI-1, PSTN-2, LP2), 3-6 Front Panel Controls and Indicators, 3-5 Full-Duplex, 1-6 General Operation, 3-1 General Description Technical Information, 5-1 General Information ACU-1000, 1-1 Glossary, 9 COR, 9 COS, 9 CPM-2, 9 CTCSS, 9 DTMF, 9 Extension, 9 Hangtime, 9 HSP-2, 9 LP-2, 9 Slot, 10 SNR, 10 Squelch, 10 VMR, 10 VOX, 10 Half Duplex, 1-6 Hardware Configuration Settings, 2-38 Headphones Output Jack (HSP-2), 3-6 High Frequency Equalization Procedure, 4-13 How PIN Security Works, 3-14 How to Delete PIN Numbers from the Database, 316 How to Enable PIN Security, 3-15 How to Input PIN Numbers into the ACU-1000 Database, 3-15 How to Set ACU-1000 Extension Security Levels, 3-15 HSP-2, 1-3 Block Diagram Description, 5-2 Functions and Operation, 3-7 General Description, 5-2 HSP-2 Module Connections, 2-14 HSP-2 Operational Command Items, 3-8 HSP-2 Programming Items, 2-90 Voice Prompt Initiation Delay, 2-90 HSP-2 Specifications, 5-5 Technical Information, 5-5 HSP-2A Block Diagram, 5-13 HSP-2A replaces HSP-2, 7-14 Inability Of Dispatcher To Gain System Control, 41 Input PIN Numbers into the ACU-1000 Database, 3-15 Installation, 2-1 Installation Checklist, 2-12 Installation Considerations, 2-3 Installation Overview, 2-2 Interface & Optimization, 2-18 Interface Cables, 2-18 Interface Module Operational Commands, 3-11 Interoperability, 1-1 ACU-1000, 1-2 Modules, 1-3 8-2 ACU-1000 Operations Manual Interface Module Operational Commands, 3-11, 3-12 Mounting, 2-3 noise reduction, 4-11 Noisy Received Signals, 4-11 NXU-2A, 1-17 Off Hook LED (LP-2), 3-7 Operation, 3-1 Optimization, 2-18, 2-24 Optional Equipment - Not Supplied, 1-22 Options, 6-1 Phone Patch, 1-7 Pictorial Layout for Operating Scenarios, 3-17 PIN Security, 3-14, 3-16 PIN Security-How to Use, 3-16 Ping Pong, 4-6 Ping-Pong, 4-1 Poor Audio Quality, 4-1, 4-9 Power Supply Module Technical Information, 5-1 Power Switch (PSM-1), 3-5 Priority Operation Mode, 3-14 Programming Configuration Settings, 2-49, 2-82 PSM-1A, 1-3 PSM-1A replaces PSM-1, 7-14 PSTN to Radio Operation, 3-18 PSTN-2, 1-4 General Description, 5-9 PSTN-2 Module Technical Information, 5-9 PSTN-2 Module Connections, 2-15 PSTN-2 Programming Item, 2-88 PSTN-2 Programming Items, 2-101 2-Wire/4-Wire Operation, 2-103 Audio Delay, 2-102 Dial Mode, 2-101 DTMF Command Enable, 2-104 DTMF Mute Timer, 2-102 Inactivity Disconnect Timer, 2-104 Module Security Level Selection, 2-103 PSTN Type, 2-101 Ringing Time, 2-104 Telephone Line Level, 2-101 Telephone Receive Level Boost, 2-101 Voice Prompt Initiation Delay, 2-104 VOX Hang Time, 2-103 VOX Threshold, 2-103 PSTN-2 Specifications, 5-10 PTT, 1-6 PTT LED (RDI-1, DSP-1), VOX LED (PSTN-2, LP-2), 3-6 Radio to Local Operator Operation, 3-19 Radio to PSTN Operation, 3-19 LE-10, 1-18 LE-20, 1-18 Legacy Module, 7-13 LIS, 1-2 List of Figures, 6 List of Tables, 8 Local Operator to Radio Operation, 3-18 Local Phone to Radio Operation, 3-20 LP-2, 1-4 4.10.1 General Description, 5-11 Jumper Settings, 2-45 LP-2 Module Technical Information, 5-11 LP-2 Module Connections, 2-16 LP-2 Programming Item, 2-88 LP-2 Programming Items, 2-106 Audio Delay, 2-107 Aux Output Control, 2-109 Dial and Busy Tone Style, 2-107 Dial Tone Enable, 2-108 DTMF Command Enable, 2-108 DTMF Mute Timer, 2-106 Module Security Level Selection, 2-107 Ring Cadence, 2-108 Ringback Enable, 2-108 Ringing Time, 2-108 Voice Prompt Initiation Delay, 2-109 VOX Hang Time, 2-107 VOX Threshold, 2-107 LP-2 Specifications, 5-11 Make a Connection HSP-2, 3-8 Interface Module Operational Commands, 3-12 Make A Connection HSP-2 Operational Command Items, 3-8 Interface Module Operational Commands, 3-11 Master/Slave LEDs (CPM-2), 3-6 Missed First Syllables, 4-1 Missed Syllables in Mid-Conversation, 4-1 Missed Syllables Mid-Conversation, 4-5 Module Connections- P13, 2-14, 7-15 Modules CPM-2, 1-4 DSP-1, 1-4 HSP-2, 1-3 LP-2, 1-4 PSM-1A, 1-3 PSTN-2, 1-4 Mon (Monitor) LED (RDI-1, DSP-1, PSTN-2, LP2), 3-6 Monitor Function HSP-2, 3-9 HSP-2 Operational Command Items, 3-8 8-3 ACU-1000 Operations Manual Required Applications, 6-1 STU-3 Option, 6-1 Stuck Channel, 4-1, 4-5 System Programming and Operating Items, 2-84 Console Override, 2-84 Delete Pin's, 2-85 Enter Programming Mode, 2-84 Exit Programming Mode, 2-84 Module Security Level Selection, 2-85 Pin's, 2-85 Program Pin's, 2-85 Reset Modules to Factory Settings, 2-84 Select a Module to Program, 2-84 System Programming Item, 2-83 System Reset, 3-11 HSP-2 Operational Command Items, 3-8 Interface Module Operational Commands, 3-11 System Reset Feature HSP-2, 3-11 Interface Module Operational Commands, 3-13 Table of Contents, 3 Troubleshooting, 4-1 Trunked Channel Acquisition Delay, 4-2 Two Different PIN Security Modes, 3-14 TX Priority, 4-7 Unit Power-Up Operation, 3-5 Unpacking and Inspection, 2-1 Unwanted Connections, 4-13 VMR, 2-94 Volume Control (HSP-2), 3-6 VOX, 1-7, 2-93 WAIS, 1-2 Cross-Connection Pictorial Overview, 1-5 WAIS Controller, 1-15, 2-49, 3-4 Radio to Radio Operation, 3-17 Regain Control HSP-2 Operational Command Items, 3-8 Regain Control from Console Program HSP-2, 3-10 Related Equipment, 1-12 Removal and Replacement of Modules, 3-5 Report Connections HSP-2, 3-9 HSP-2 Operational Command Items, 3-8 Reshipment of Equipment, 2-1 Ring LED (PSTN-2, LP-2), 3-7 SCM-2 Configuration Programming via Browser, 2-81 Serial Remote Connections- P15, 2-16 Serial Remote Connector, 2-16 Set ACU-1000 Extension Security Levels, 3-15 Set RX Level Procedure, 4-10 Set TX Level Procedure, 4-11 Signal LED (RDI-1, DSP-1), 3-6 Simplex, 1-6 Speaker Switch (HSP-2), 3-5 Store Connection Table in Memory HSP-2, 3-10 Store Connections HSP-2 Operational Command Items, 3-8 Stored Connections, 2-86 STU-3 Alignment, 6-3 Basic System, 6-1 Cable Schematic, 6-5 Cross Connecting, 6-4 Equipment Required, 6-1 Installation, 6-2 Internal Wiring Diagram, 6-7 8-4