1
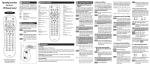
HDD-200
High Definition Decoder
HDD200 Series
High Definition Decoder
This manual is for use with the HDD200 High Definition Decoder.
Publication #485037-001
Rev B
General Instrument Corporation doing business as the
Broadband Communications Sector of Motorola, Inc. (Motorola BCS)
6450 Sequence Dr.
San Diego, California 92121
DOCUMENTATION NOTICE
The information contained in this document is subject to change without notice and should not
be construed as a commitment by Motorola BCS.
Motorola BCS assumes no responsibility for any errors that may appear in this document nor
does it make an express or implied warranty of any kind with regard to this material, including,
but not limited to, the implied warranties of merchantability and fitness for a particular purpose.
Motorola BCS shall not be liable for incidental or consequential damages in connection with,
or arising out of the furnishing, performance, or use of this document and the program material
which it describes.
HDD200 Series
High Definition Decoder
User Guide
Motorola Broadband Communications Sector
HDD200 Decoder
Welcome to the world of high definition television! You're about to change the
way you experience video entertainment as the picture you watch becomes so real,
so sharp, so detailed, that you'll be drawn into the scene like never before. Your
decision to use Motorola BCS equipment has placed you on the forefront of this
new technology. As a pioneer and leader in the field of digital high definition
signal transmission, we have worked to bring you the finest in home equipment by
using some of the same technology imbedded in our professional broadcast
systems.
Your new HDD200 decoder is an easy-to-use, easy to set up decoder that will
accept a high-speed data stream from your digital satellite or cable receiver and
convert it to the appropriate format for your high definition monitor or television.
It has been designed to integrate well with your existing home theater equipment
and provide many years of service. The instructions that follow will walk you
through the steps needed to install the product and begin enjoying the excitement
and sheer beauty of high definition television.
We have designed your HDD200 decoder to work with a number of Motorola
BCS set-top devices. These devices include satellite receivers and cable set-top
boxes. In this guide we will refer to all of these devices as “set-top boxes.”
HDD200 User Guide
1
Regulatory Information
Federal Communications Commission Radio and Television Interference Statement for a Class B Device
This equipment has been tested and found to comply with the limits for a Class B
digital device, pursuant to Part 15 of the FCC Rules. These limits are designed to
provide reasonable protection against harmful interference in a residential
installation. This equipment generates, uses, and can radiate radio frequency
energy. If not installed and used in accordance with the instructions, the equipment
may cause harmful interference to radio communications. However, there is no
guarantee that interference will not occur in a particular installation.
User Instructions
If this equipment causes interference to radio or television reception (which can be
determined by turning the equipment off and then on) the user is encouraged to try
to correct the interference by one or more of the following measures:
-
Reorient or relocate the receiving antenna.
-
Increase the separation between the equipment and receiver.
-
Connect the equipment into a different outlet so that the equipment and
receiver are on different branch circuits.
-
Consult a dealer or an experienced radio/TV technician for help.
Changes or modifications not expressly approved by Motorola BCS
could void the user’s warranty.
Operation Precautions
WARNING: To reduce the risk of fire or electric shock, do not expose this unit to
rain or moisture. Do not open the unit. Refer servicing to qualified personnel only.
CAUTION: To prevent electric shock, do not use the (polarized) plug with an
extension cord receptacle or other outlet unless the plug can be fully inserted,
preventing blade exposure.
Lightning Flash Icon. The lightning flash with arrowhead
symbol within an equilateral triangle is intended to alert the
user to the presence of un-insulated “dangerous voltage”
within the product’s housing which may be strong enough to
constitute a risk of electric shock to persons.
2
HDD200 Decoder
Exclamation Point Icon. The exclamation point within an
equilateral triangle is intended to alert the user to the
presence of important operating and maintenance (servicing)
instructions in the literature accompanying the appliance.
This digital apparatus does not exceed the Class B limits for
radio noise emissions from digital apparatus as set out in the
Radio Interference Regulations of the Canadian Department
of Communications.
Important Safeguards
Read, Follow and Keep Instructions. Before you operate the
unit, read and follow all safety and operating instructions. Keep
the safety and operating instructions for future reference.
Heed Warning. Pay attention to all warnings on the equipment
and in the operating instructions.
Cleaning. Do not use liquid or aerosol cleaners. Use a damp
cloth to clean the outside of the unit. Do not open the unit for
cleaning or any other reason.
Power Cord Protection. Place the power supply cords so that
they are not walked on or pinched by items placed on or against
them. Pay particular attention to the cords where they join the
plug, near convenience receptacles, and where they exit from
the equipment.
Power Sources/Grounding. Operate the equipment from the
type of power source indicated on the marking label.
This product has a polarized alternating-current line plug as a
safety feature. This plug fits into the power outlet only one way.
If the plug does not fit, contact your electrician to replace your
obsolete outlet. Do not try to change the plug or defeat its safety
purpose.
Ventilation. Do not block or cover the slots and openings of the
unit. They provide ventilation and protect it from overheating.
Never place the unit on carpeting; it may block ventilation
through the bottom slots. Never place the unit near a source of
heat or in a built-in installation rack unless there is proper
ventilation.
HDD200 User Guide
3
Do Not Operate Near Water. Do not use this product near
water. For example; a bath tub, wash bowl, kitchen sink,
swimming pool, laundry tub, in a wet basement, or in similar
situations.
Objects or Liquid in the Unit. Never push any object into this
unit through any of its openings because they may touch
dangerous voltage points or short out the parts. This could cause
a fire or an electrical shock. Do not spill liquid of any kind onto
the unit.
Overloading. Do not overload power outlets or extension
cords. This can result in a risk of fire or electrical shock.
Damage Requiring Service. Unplug this equipment from the
power source and contact a qualified service provider if any of
the following situations occur:
- If the power supply cord or plug is damaged.
- If liquid or objects have fallen into the unit.
- If the unit became wet from rain or water.
- If the unit was dropped or damaged.
- If the unit’s performance changes.
Service. Do not try to service this product yourself. If you open
or remove the cover, you may be exposed to dangerous voltage
or other hazards and may void the unit’s warranty. Contact a
qualified service provider for all service.
&+
0(18
.
*2%$&
(17(5
3
2
:
(
5
&+
Mounting and Placement. Do not place this product on an
unstable surface such as a cart, stand, tripod, bracket, or table. It
may fall and cause serious injury to a child, adult, or to the unit
itself. The unit should be placed on a flat, secure surface. Do not
place this product directly on wood or simulated wood surfaces
because these surfaces may become damaged.
Replacement Parts. If your decoder requires repairs, contact
your dealer or vendor from which you purchased the unit for
assistance. See page 15 for more information.
Safety Check. After the unit is serviced or repaired, ask the
service technician to perform safety checks to find out if the unit
is in proper operating condition.
4
HDD200 Decoder
Lightning. To protect the product from damage caused by
lightning and power line surges, unplug it from the wall outlet
and disconnect it before a lightning storm. Also disconnect the
unit if it will be left unattended or unused for a long period of
time. Once a storm passes, reconnect the unit. If you live in an
area that has frequent lightning storms, buy polarized surge
protectors for the power line to protect your system from
damage. Never attempt to connect or disconnect any wires
during a thunderstorm or lightning storm.
HDD200 User Guide
5
Connecting the HDD200
Front Panel
The following items are located on the front panel of the HDD200 decoder.
Power Button. A green button in the upper left hand corner turns the power on
and off.
On/Off Indicator. When the HDD200 decoder is on, a green light will be visible
on the front panel.
Closed Caption Button. A button to activate the Closed Caption feature is
located to the right of the Power button on the front panel display. Can also be
used with the Power button to access Menu options.
Front Panel Display. The front panel has light-emitting diodes (LEDs) that are
shaped like icons.
®
+'' 6'
CC
Dolby Digital® - The Dolby Digital LED, located on the left of the
Power button, indicates that the unit is receiving a signal using
Dolby® brand, AC-3® Digital encoding.
HDD / SD - The next two LEDs indicate whether the unit is
receiving standard input or high definition input. “SD” indicates
Standard input and “HDD” indicates High Definition input.
Closed Caption - The Closed Caption icon (the LED located on the
far right) indicates that Closed Caption decoding is activated.
NOTE: A protective film covers the lens cover on the front panel. This
MUST be removed before plugging the unit into the electrical outlet. Otherwise the unit will repeatedly turn itself on and off.
6
HDD200 Decoder
Back Panel Connections
The following connections are located on the back panel of the decoder.
1. High Speed Data Input
2. Video Format Selector Switch
3. Dolby Digital Input
4. Dolby Digital Output
5. Analog Audio Input
6. Analog Audio Output
7. Composite Video Input
8. S-Video Input
9. Sync Outputs
10. Component Video Outputs
11. GBR HV / Y PB PR Select
HDD200 User Guide
7
Input Connections
Using the appropriate cables (additional A/V cables may be required, depending
on your specific installation), connect the following input terminals from your
cable or satellite set-top box or VCR equipment to the HDD200. See page 12 for
connection diagrams.
High Speed Data Input (1). The HDD200 decoder converts the HD data on the
High Speed Interface (HSI) to HD video and audio. Use the High Speed Data
cable (provided) to connect your set-top box to the HDD High Speed Data Input
port. Some satellite receivers require an adapter (provided) between the High
Speed Data cable and the satellite receiver.
Standard Video Input (7, 8). Composite Video and S-Video. The HDD converts
standard NTSC video to an HD format so that your High Definition Television
(HDTV) can display NTSC video. The standard video can be from your set-top
box, VCR, or other video equipment. The HDD accepts both NTSC composite
and S-Video.
In the simplest configuration, connect the video from your set-top box directly to
the HDD.
However, if you have a VCR connected to the output of your set-top box, then
connect the output of your VCR to the HDD standard video input.
If you have a more sophisticated entertainment system (that is, you use an A/V
receiver or other video switching equipment), take the video that was previously
connected to your NTSC television and connect it to the HDD.
Analog Audio Input (5). Along with the standard video source (set-top box,
VCR, or A/V receiver) that you just connected, is a pair of analog audio Left/Right
outputs. Connect these analog L/R outputs to the HDD200 decoder analog audio
input.
The HDD200 decoder will automatically route the analog audio input to the
analog audio output when HD video is not available. If HD is available, the
HDD200 decoder will output the HD service analog audio.
Dolby Digital Audio Input (3). Along with the standard video source (set-top
box, VCR, or A/V receiver) that you just connected, there may be a digital audio
(S/PDIF) output. If so, connect the digital audio output to the HDD200 decoder
digital audio input.
The HDD200 decoder will automatically route the digital audio input to the digital
audio output when HD video is not available. If HD is available, the HDD200
decoder will output the HD service digital audio.
8
HDD200 Decoder
Output Connections
Using the appropriate cables (additional A/V cables may be required, depending
on your specific installation), connect the following output terminals from your
HDD200 decoder to your HDTV or audio equipment. See page 12 for connection
diagrams.
Output Video Switches
Video Format (2). Set this selector based on the capability of your HD
compatible TV. Select the input format that your HD supports (480p, 720p, 1080i,
or native). You should use “Native” mode if your HDTV has the ability to display
and detect all HD formats. “Native” mode allows the HD decoder to display video
in its original format.
YPBPR / Select (11). Select the component video form used by your HDTV.
NOTE: The HDD200 supports four output modes: 480p, 720p, 1080i and
native. Select an output mode that is compatible with your HDTV. (Refer to
your HDTV user’s manual for mode options. The manual is provided by the
HDTV manufacturer.) For proper operation, select the output mode before
plugging in your HDD200.
NOTE: The HDD200 supports closed captions in 480p, 720p, and 1080i
modes. The unit does not support closed captions in the native output
mode on high definition channels.
Output Video Connections
YPBPR (10). If you have selected YPBPR Video component output, connect the
HDD’s three YPRPB connectors to your HDTV.
GBRHV (9,10). If you have selected the Video component output, connect the
HDD’s five connectors to your HDTV.
Output Audio Connections
Audio Outputs R, L (6). These audio outputs connect to your TV or your Dolby
brand Pro-Logic® 3 (4-channel) surround sound device if your unit is equipped
with this capability. Connect the right and left output ports to the right and left
input ports on your equipment.
Dolby Digital Output (4). If your entertainment center is enabled for Dolby
Digital AC-3 Version 5.1 (six channel) surround sound, connect one end of the
cable to this port and the other end of the cable to the device that hosts the
processor (ie. A/V receiver, DVD player, etc.).
HDD200 User Guide
9
DCT HSI Connection
A washer is enclosed with your unit that is designed to be used with the DCT settop box HSI connection. Refer to the following for connection.
Assemble washer onto one end of the connector.
Fully insert connector into HSI (High Speed Data) port on the DCT set-top box.
10
HDD200 Decoder
Installation Instructions
Included with your HDD200 are the following components:
- 1 ea. HDD200 high definition decoder
- 1 ea. User Guide and 1 ea. warranty card
- 1 ea. 1/8" mini-stereo phone cable for use with the Motorola BCS digital
cable terminal (DCT2000)
- 1 ea. 1/8" mini-stereo phone to DB-9 (9-pin HSI connector) for use with
Motorola BCS digital satellite receiver DSR400 series satellite receivers
Installation
To install your HDD200 to your digital satellite receiver (either series) use the 9pin HSI connector.
1. Connect the 9-pin side of the HSI connector to the MMAP port (Multi
Media Access Port) on your satellite receiver.
2. Connect the 1/8" stereo phone side of the HSI connector to the
HDD200 using the High Speed digital satellite receiver via the
corresponding colored connectors on the HDD200. There is an
optional S-Video port (N/A on the DSR410 series) that can be used for
analog video passthrough, instead of using the RCA connectors.
3. To connect audio outputs, you need a second set of RCA cables. Use
this set to connect the second row of audio outputs on your HDD200
to the corresponding ports on your television set or stereo.
4. Using either the RGB/HV ports (with a red/green/blue/yellow/white
cable) or the YPBPR ports on the back of your HDTV. The HDD200
has both RGB/HV and YPBPR connectors to work with various
different HDTV’s. Use the button on the rear panel of the HDD200 to
select the output.
5. Once you have made all of your audio and video connections to the
HDD200, the digital satellite receiver, the HDTV and stereo, plug in
your HDD200.
6. Turn the power on for all connected components; satellite receiver,
HDD200, HDTV and stereo (if connected).
7. Since HDTV’s have different output formats, use the switch on the
back of the HDD200 to adjust the output to your specific HDTV’s
format. The HDD200 supports 480p, 720p, 1080i, or native mode
formats.
HDD200 User Guide
11
Connection Diagrams
The following diagrams show the most common types of connections.
Satellite Receiver or
Cable Set Top Box
Audio
Video/S-Video
VCR
High Speed
Data/
MMAP
R
R
L
L
1080i 720p 480p Native
i
G
Y
H
B
PB
V
R
PR
G
B
R
Y
PR
PB
Stereo or TV
HD
Compatible
TV
Satellite Receiver or
Cable Set Top Box
High Speed
Data/
MMAP
R
R
L
L
1080i 720p 480p Native
i
G
Y
H
B
PB
V
R
PR
G
B
R
Stereo or TV
HD
Compatible
TV
12
Y
PR
PB
HDD200 Decoder
Using Your HDD200
A protective film covers the lens cover on the front panel (upper left corner). This
MUST be removed before plugging the unit into the electrical outlet.
After plugging in your HDD200, let it "warm up" for 30 seconds.
When tuned to a high definition channel, the HDD200 decoder will first display a
program or other banners and will then display HD video. Press EXIT or VIEW
on your television remote control to remove a banner and display video more
quickly.
HDD200 Menu Options
There are three menus available from the front panel of the HDD200. These menu
options allow the user to change the viewing and language settings, the video
position and the aspect ratio of the viewing screen. To access these menus, the
HDD200 must be powered off (the television must be on).While pressing the CC
button on the front panel, also press the POWER button. The HD System Settings
menu will appear on your TV.
HD System Settings Menu
To scroll through the list of options, use the POWER button on the front panel. To
make a selection or change an item, press the CC button. For example, if you wish
to change the language setting to French, press Power once, then press the CC
button to select the French language option. Press POWER to move to "Save &
Exit" which will exit the menu and return to television viewing.
HDD200 User Guide
13
Video Position
On the Video Position menu there are four video adjustment options available.
Each allow adjustments to the picture on the television screen. Press POWER to
scroll through the items, then press the CC button to move the video screen right,
left, up or down.
Press POWER to scroll through the options available and press CC to select or
change the item. Select Save & Exit to return to television viewing.
Aspect Ratio
The Aspect Ratio menu options allow the user to choose the screen size. The
choices are 16 x 9 (letterbox), 4 x 3 Normal and 4 x 3 Stretch.
Press POWER to scroll through the options available and press CC to select or
change the item. Select Save & Exit to return to television viewing.
14
HDD200 Decoder
LIMITED WARRANTY AND OBTAINING SERVICES
Motorola BCS Home Satellite
Television Systems and Components
To Original Consumer Purchaser at Retail
General Instrument Corporation, doing business as the Broadband
Communications Sector of Motorola, Inc. (“Motorola BCS”), warrants only to the
original consumer purchaser at retail each Motorola BCS satellite television
system and component which it sells under this limited warranty to be free from
defects in materials and workmanship under conditions of normal home use. This
limited warranty is for one (1) year on all electrical and mechanical components.
This limited warranty runs from the date of original purchase for consumer use.
Responsibilities for You and Motorola BCS. You must retain your sales receipt
or provide other proof-of-purchase date. Promptly completing and mailing in the
warranty registration card is one way of providing proof-of-purchase date. If you
have no such proof, then the warranty will run from the date of shipment by
Motorola BCS. You should also keep this warranty for your records.
If you desire warranty service you must notify Motorola BCS within the
applicable warranty period. See “How to Obtain Warranty Service” below.
Within a reasonable period after proper notification, Motorola BCS or an
authorized Motorola BCS Response Center shall, at its option, repair or replace
the defective part(s) or the affected component. Replacement may be with factory
refurbished parts or components. You are responsible for any packing, shipping
and insurance charges associated with sending the component to any authorized
service center for repair or replacement.
This warranty does not cover charges for any assembly, installation, setup or
removal, or adjustment of controls.
This warranty shall be void if any product marking or label has been altered,
defaced, or removed, or if any product components has been altered, modified,
used improperly, or had its housing opened.
MOTOROLA BCS IS NOT RESPONSIBLE FOR DAMAGES CAUSED BY
LIGHTNING, IMPROPER ASSEMBLY, INSTALLATION, SETUP, OR
REMOVAL, DAMAGES OR INOPERABILITY CAUSED BY ASSEMBLY OR
USE WITH INCOMPATIBLE PRODUCTS, RECEPTION PROBLEMS
CAUSED BY INADEQUATE ANTENNA SYSTEMS, OR DAMAGES
CAUSED BY MISUSE, ALTERATION, IMPROPER MAINTENANCE,
SHIPMENT, ACCIDENT, OR ABUSE. AS TO ANY OUTDOOR
COMPONENT, THIS WARRANTY DOES NOT COVER THE PAINTING OR
PLATING.
HDD200 User Guide
15
Limitations
MOTOROLA BCS MAKES NO OTHER EXPRESS WARRANTIES ON HOME
SATELLITE TELEVISION SYSTEMS AND COMPONENTS. TO THE
EXTENT ALLOWED BY LAW, ANY WARRANTY BY MOTOROLA BCS ON
A SYSTEM OR COMPONENT (INCLUDING ANY IMPLIED WARRANTY
OF MERCHANTABILITY OR FITNESS) IS LIMITED TO THE WARRANTY
PERIOD APPLICABLE TO THE AFFECTED COMPONENT UNDER THIS
EXPRESS LIMITED WARRANTY. Some states do not allow limitations on how
long an implied warranty lasts, so the above limitation may not apply to you.
IN NO EVENT SHALL MOTOROLA BCS BE LIABLE FOR INDIRECT,
EXEMPLARY, INCIDENTAL, SPECIAL OR CONSEQUENTIAL DAMAGES
(INCLUDING LOST PROFITS AND LOSS OF USE OR PAID TV TIME)
BASED UPON BREACH OF WARRANTY OR CONTRACT, NEGLIGENCE,
STRICT LIABILITY, OR ANY OTHER LEGAL THEORY. Some states do not
allow the exclusion or limitation of incidental or consequential damages, so the
above limitation may not apply to you.
NO AGENT, DEALER, DISTRIBUTOR, SERVICE CENTER, COMPANY, OR
OTHER PERSON IS AUTHORIZED TO CHANGE, MODIFY OR EXTEND
THE TERMS OF THIS WARRANTY IN ANY MANNER WHATSOEVER.
This warranty gives you specific legal rights, and you may have other rights,
which vary from state to state.
Calling for Service
Before you call for service:
16
•
Unplug your receiver from the AC outlet, wait one minute, plug the receiver
back in, and try to use it again.
•
Do not open the cover (enclosure) or attempt to repair the receiver. This will
void the warranty.
•
Call our Technical Response Center: 1-888-944-HELP between 8am-5pm,
Mon - Fri, Pacific Standard Time (PST) and choose the Satellite Products
option.
HDD200 Decoder
How to Obtain Warranty Service
How to Obtain Warranty Service. To obtain warranty service, you must call or
write Motorola BCS Technical Assistance Center within the applicable warranty
period at Motorola BCS, Technical Assistance Center, 6450 Sequence Drive, San
Diego, CA 92121, and (858) 535-1717.
When you call or write, explain the problem. Ask whether the component should
be returned for service or retained by you for servicing in place. Ask for a Return
Service Authorization (RSA) number and for the address to send the component if
the component is to be returned. If you write, be sure to include a copy of your
sales receipt or other proof of purchase date, a copy of your warranty, your phone
number, and return address.
If the Motorola BCS Technical Assistance Center requests you to return the
component, pack it safely and securely, preferably in the original shipping carton.
Put the RSA number on the outside of the shipping carton. Enclose a letter
explaining the problem. Be sure to include a copy of your sales receipt or other
proof of purchase date, a copy of your warranty, and your phone number and
return address. Ship it insured to the authorized service center specified by
Motorola BCS. All packing, shipping and insurance charges to return the
component to Motorola BCS must be prepaid by you. A qualified technician may
be required to remove or install a component, and any charges for such work are
your responsibility.
NOTE: If the Warranty on your component is expired, voided or inapplicable,
Motorola BCS will not repair the component until you agree to pay for quoted
charges. If you do not agree within 30 days, the component will be returned
unrepaired. You are responsible for transportation charges both ways on
components that are not under warranty. Out of warranty product shall be subject
to additional service and repair charges if it is determined that any product label,
marking or serial number has been altered, defaced or removed, and/or if a product
or component has been altered, modified, used improperly, or had its housing
opened.
HDD200 User Guide
17
MOTOROLA, the Stylized "M" Logo and all other trademarks indicated as such
herein are trademarks of Motorola, Inc. ®Registered U.S. Patent & Trademark
Office. Dolby, the double "D" symbol, Pro-Logic and AC-3 are registered
trademarks of Dolby Laboratories Licensing Corporation. All other product or
service names are the property of their respective owners.
©2001-2002 Motorola, Inc. All rights reserved.
Covered under one or more U.S. patents: 4,577,216; 4,631,603; 4698672;
4,790,016; 4,819,098; 4908859; 4,914,701; 5068724; 5091782; 5093720;
5,109,417; 5,142,656; 5,230,038; 5345408; 5517250; 5565922; 5566089;
5598415; 5638128; 5675387; 5699120; 5703877; 571746; 5742623; 5771239.
Macrovision patent numbers 4,631,603; 4,577,216; 4,819,098 are licensed for
limited Pay-Per-View purpose only.
This device incorporates a copyright protection technology that is protected by
U.S. patents and other intellectual property rights. Use of the copyright protection
technology is granted by Macrovision for home and other limited Pay-Per-View
uses only, unless otherwise authorized by Macrovision, reverse engineering or
disassembly is prohibited.
Dolby digital audio system manufactured under license from Dolby Laboratories
Licensing Corporation.
18
1
1
Motorola Broadband Communications Sector
6450 Sequence Dr.
San Diego, CA 92121
Publication #485037-001 Rev. B