1
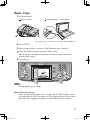
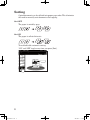
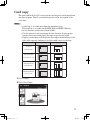
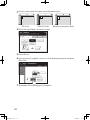
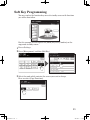
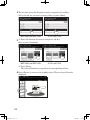
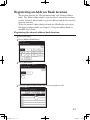
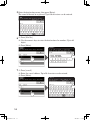
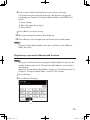
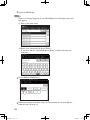
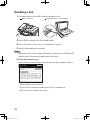
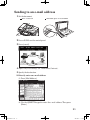
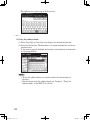
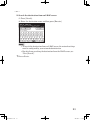
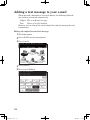
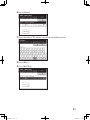
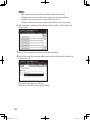
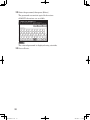
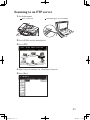
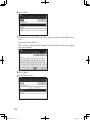
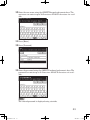
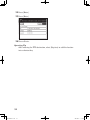
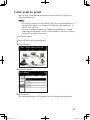
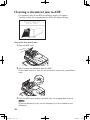
Quick Reference DA7-909K0-60.indb 1 2007/04/27 13:41:17 Contents Basic Copy.........................................................................................1 Duplex Copying.................................................................................2 Sorting...............................................................................................8 Card copy...........................................................................................9 Soft Key Programming...................................................................11 Registering an Address Book location...........................................13 Sending a fax...................................................................................18 Sending to an e-mail address.........................................................21 Adding a text message to your e-mail............................................24 Scanning to a network folder.........................................................27 Scanning to an FTP server.............................................................31 Color scan to print...........................................................................35 Clearing a document jam in ADF...................................................36 DA7-909K0-60.indb 1 2007/04/27 13:41:17 Basic Copy 1 Set the document. ADF � Face UP Document glass � Face DOWN The document glass is available only for the MFX-2050 and MFX-1450. 2 Press <COPY>. 3 Set each copy setting as necessary. (Ex. Document type, Contrast.) 4 Enter the number of copies using the numeric keys. 5 Press <Start>. You can set up to 99 copies. If you make an incorrect entry, overwrite it with the correct entry. NOTE To stop copying, press <Stop>. Mixed Original Copying Letter and legal-sized paper can be inserted into the ADF and the scanner will automatically detect the paper size. The output will match the original paper size if the appropriate paper has been loaded into the cassettes. DA7-909K0-60.indb 1 2007/04/27 13:41:18 Duplex Copying One-sided copying of a duplex document (2 -->1 sided) 1 Scan the front side. 2 Turn over the document 3 The scanned data temporarily and scan the backside. 1 1 1 3 5 5 6 4 1 Set the front side of the duplex document in the ADF. 2 Press <COPY>. 3 Press [Others], [DuplexCopy]. Then press [2 -> 1 sided]. 6 To ADF ADF � Face UP 1 1 2 4 4 3 6 2 2 To ADF 4 1 5 6 1 5 saved in the memory will be sorted and printed. Document glass � Face DOWN DA7-909K0-60.indb 2 2007/04/27 13:41:18 NOTE If the duplex printing unit is not installed, press [Others], [DuplexScan]. Then press [ON]. 4 Press [Enter] twice to return to the standby display. 5 Press <Start>. 6 When the following display is shown, place the backside of the duplex The front side of the duplex document will be scanned. document in the same direction as the front side and press <Start>. Duplex copying of a duplex document (2 --> 2 sided) This mode will convert two-sided originals into two-sided documents. NOTE •The duplex printing unit is required. •For details of duplex copy, please see Chapter 2, “Copy Functions” in the MFP User’s Guide. 1 Press <Copy> 2 Set the front side of the duplex document in the ADF. 3 Press [Others], [DuplexCopy]. DA7-909K0-60.indb 3 2007/04/27 13:41:19 4 Press [2 -> 2 sided]. •If you set any advanced functions, proceed to step 5. •If you do not set any advanced functions, proceed to step 7. 5 Press [Advance]. 6 (1) Press [Bind] to set document bind position. • Press [DuplexCopy] to return to the duplex copy display. (2) Press [Right&Left] or [Top]. (3) Press [Enter]. 7 Press [Enter] twice to return to the standby mode. 8 Press <Start>. Press <Reset> to cancel the duplex copy settings. Scan the front side of the duplex document. DA7-909K0-60.indb 4 2007/04/27 13:41:19 9 When the following display is shown, set the document in the correct direc- tion and press <Start>. •Be sure to set the document in the correct direction. (See the table on page 2-17 in the MFP User’s Guide.) Duplex copying of a one-sided document (1 --> 2 sided) NOTE •The duplex printing unit is required. •For details of duplex copy, please see Chapter 2, “Copy Functions” in the MFP User’s Guide. 1 Press <COPY>. 2 Set the document. 3 Press [Others], [DuplexCopy]. 4 Press [1 -> 2 sided]. •If you set any advanced functions, proceed to step 5. •If you do not set any advanced functions, proceed to step 7. 5 Press [Advance]. DA7-909K0-60.indb 5 2007/04/27 13:41:19 6 (1) Press [Bind] to set the binding position. • Press [DuplexCopy] to return to the duplex copy display. (2) Press [Right&Left] or [Top]. (3) Press [Enter]. 7 Press [Enter] twice to return to the standby mode. 8 Press <Start>. 9 Press [Yes] while the document is being scanned. Selecting [No] will cause one-sided document output. 10 After the document has been scanned, set the next document. DA7-909K0-60.indb 6 2007/04/27 13:41:19 11 Press [Next Doc]. •The Next Doc setting can be deleted by pressing [Complete]. •To scan another document, press [Yes] while the document is being scanned. DA7-909K0-60.indb 7 2007/04/27 13:41:19 Sorting Copied documents can be collated into proper page order. This eliminates the need to manually sort documents after copying. Sort OFF The paper is sorted by page. Sort ON The paper is collated into sets. To enable/disable automatic sorting: “ON” and “OFF” toggle every time you press [Sort]. DA7-909K0-60.indb 8 2007/04/27 13:41:20 Card copy The front and back of an ID card or check-sized original can be copied onto one sheet of paper. Two ID card-sized originals can be also copied at the same time. NOTE •Card Copy is available only from the document glass. This function is available on the MFX-2050 and MFX-1450 only. •In this function, zoom ratio is fixed to 100%. •Use the letter or legal-sized paper for this function. If using paper smaller than letter-sized paper, the copy image may be lacked. •Copying can be done with the platen cover open. Avoid looking at the light while copying. Looking at the light could cause eye damage. Document orientation Copy result ID Card (3.4 × 2.2 in.) Two ID Cards (3.4 × 2.2 in.) × 2 Personal Check (6.2 × 2.8 in.) Business Check (8.5 × 3.5 in.) 1 Press <Copy>. 2 Press [Card Copy]. DA7-909K0-60.indb 9 2007/04/27 13:41:21 3 Set the card or check face-down on the document glass. (ID Card) (Two ID Cards) (Business or personal check) 4 Select the type of object you want to copy. 5 Press <Start>. 6 Once scanning is complete, turn over all of the placed originals and press 7 To complete the scanning, press [Complete]. [Next Doc]. 10 DA7-909K0-60.indb 10 2007/04/27 13:41:21 Soft Key Programming You may replace the function keys on each standby screen with functions you utilize most often. For this example we will replace the [Zoom] key with [Combine] on the copy mode standby screen. 1 Press <Setting>. 2 Press [Management] and then [Soft Key]. 3 Select the mode which contains the screen you want to change. Here we select [Copy Functions]. 11 DA7-909K0-60.indb 11 2007/04/27 13:41:21 4 The machine shows the function currently assigned to the soft key. Select the soft key you want to change. Here we select [Zoom]. (MFX-2050 and MFX-1450) (F-565 and F-525) 5 (1) Select the function you want to assign to a soft key. Here we select [Combine]. (MFX-2050 and MFX-1450) (F-565 and F-525) (2) Press [Enter]. The selected function is assigned to the corresponding soft key. 6 Press <Reset> to return to the standby screen. The new key will now be displayed. 12 DA7-909K0-60.indb 12 2007/04/27 13:41:22 Registering an Address Book location The machine provides the “Shared address book” and “Personal address book”. The “Shared address book” can be used by all users of the machine, and the “Personal address book” is a private address book for the currently logged-in user only. To use the personal address book, you need the OfficeBridge user setting. For details of address book, see Chapter 3, “Using the Address Book,” in the MFP User’s Guide. Registering the shared address book location 1 Press <Setting>. 2 Press [Address Book Entry]. 3 Press [Enter/Edit]. 4 Press the address book number you want to register or edit. 13 DA7-909K0-60.indb 13 2007/04/27 13:41:22 5 Enter the destinations name, then press [Enter]. 6 (1) Press [Fax No.]. The name field must be registered. Up to 30 characters can be entered. (2) Use the numeric keys to enter the destinations fax number. (Up to 40 digits) (3) Press [Enter]. 7 (1) Press [e-mail]. (2) Enter the e-mail address. Up to 50 characters can be entered. (3) Press [Enter]. 14 DA7-909K0-60.indb 14 2007/04/27 13:41:22 8 If you want to add this destination to a pre-existing call group: Call groups must be registered in advance. (For details on registering call groups, see Chapter 3, “Using the Address Book,” in the MFP User’s Guide.) (1) Press [Group]. (2) Select the applicable group(s). (3) Press [Enter]. 9 Press [Enter] to save the setting. 10 The registration destinations will be displayed. 11 Press <Reset> to exit the operation and return to the standby mode. NOTE To print a list of address book entries, press <Setting>, [List], [Address Book], then [Yes]. Registering a personal address book location NOTE To register a destination into the personal address book, you must set the number of destination in the “Personal Available Address” setting from a web browser. About the “Personal Available Address” setting, see “User Registration” in Chapter 4, “Using the Admin Tools,” in the PC User’s Guide. 1 Press <Setting>. 2 Press [Personal Settings]. 15 DA7-909K0-60.indb 15 2007/04/27 13:41:23 3 Login to OfficeBridge. NOTE If you are already logged-in as an OfficeBridge user, the login screen will not appear. (1) Select your user name. (2) Enter your password and press [Enter]. If you have not set a password, press [Enter] without entering any character. 4 Press [Address Book Entry]. 5 Following the operation from step 3 in “Registering the shared address book location” on page 13. 16 DA7-909K0-60.indb 16 2007/04/27 13:41:23 For more information of address book entry, see Chapter 3, “Using the Address Book,” in the MFP User’s Guide. 6 After you finish the setting changes, press [Enter] 7 Press <Reset> to return to the standby mode. 17 DA7-909K0-60.indb 17 2007/04/27 13:41:23 Sending a fax 1 Set the document in the ADF or on the document glass. ADF � Face UP Document glass � Face DOWN 2 Press <FAX> to display the Fax standby mode. 3 Set each function as necessary. (ex. Resolution, Contrast). 4 Specify the destination fax number. NOTE When you enter the fax number, [Location] is displayed on the display. To check or delete the entered number, press [Location]. Using the numeric keys Enter the destination number using the numeric keys and press [Enter]. • Up to 40 digits can be entered. • If you enter an incorrect number, press [Clear] and delete it. • You can enter the dialing characters. 18 DA7-909K0-60.indb 18 2007/04/27 13:41:23 — or — Using the address book (1) Press [Page Up] or [Page Down] to display the desired destination. (2) Press the destination. The document is scanned immediately and transmission starts. If you want to specify multiple destinations, use broadcast transmission or call group dialing. NOTE • To use the address book, you should register the destinations in advance. • For details on using the address book, see Chapter 3, “Using the address book,” in the MFP User’s Guide. — or — Search the destination from an LDAP server (1) Press [Search]. (2) Enter the destination name and then press [Execute]. NOTE • To search the destination from an LDAP server, the network settings must be configured by your network administrator. • For details on searching the destination from the LDAP server, see “Using [Search]” in Chapter 3, “Using the Address Book,” in the MFP User’s Guide. 19 DA7-909K0-60.indb 19 2007/04/27 13:41:23 5 Press <Start>. The document is scanned and transmission starts. NOTE • If you want to cancel a transmission while the document is scanning, press <Stop>. If you want to cancel a transmission that is in progress, use the Review Commands feature. See “Reviewing or canceling commands” in Chapter 4, “Basic Fax Functions,” in the MFP User’s Guide. 20 DA7-909K0-60.indb 20 2007/04/27 13:41:23 Sending to an e-mail address 1 Set the document. ADF � Face UP Document glass � Face DOWN 2 Press <SCAN> on the control panel. 3 Press [e-mail]. 4 Adjust any scan settings. (ex. 5 Specify the destination. Resolution, Contrast). Directly enter an e-mail address (1) Press [Mail Address]. (2) Use the QWERTY keypad to enter the e-mail address. Then press [Enter]. 21 DA7-909K0-60.indb 21 2007/04/27 13:41:23 The address may contain up to 50 characters. — or — Using the address book (1) Press [Page Up] or [Page Down] to display the desired destination. (2) Press the destination. The document is scanned immediately and transmission starts. If you want to specify multiple destinations, use broadcast transmission or call group dialing. NOTE • To use the address book, you should register the destinations in advance. • For details on using the address book, see Chapter 3, “Using the address book,” in the MFP User’s Guide. 22 DA7-909K0-60.indb 22 2007/04/27 13:41:24 — or — Search the destination from an LDAP server (1) Press [Search]. (2) Enter the destination name and then press [Execute]. NOTE • To search the destination from an LDAP server, the network settings must be configured by your network administrator. • For details on searching the destination from the LDAP server, see “User [Search]”. 7 Press <Start>. 23 DA7-909K0-60.indb 23 2007/04/27 13:41:24 Adding a text message to your e-mail When you send a document to an e-mail address, the following fixed subject and text are entered automatically. Subject: This is an E-mail message. Please see the file attached. Text: However you can change the e-mail subject line and text message for each transmission. Editing the subject line and text message 1 Set the document. 2 Press <SCAN> on the control panel. 3 Press [e-mail]. 4 Press [Others]. 5 Press [e-mail Subject]. 24 DA7-909K0-60.indb 24 2007/04/27 13:41:24 6 Press [Subject]. 7 Enter the subject. The subject can contain up to 80 characters. 8 Press [Enter]. 9 Press [Mail Text]. 25 DA7-909K0-60.indb 25 2007/04/27 13:41:24 10 Enter the text message. NOTE The mail text can contain up to 1024 characters. (Return) is counted as two characters and can be used twice. 11 To view the entire text message, press [View Text]. Use the arrows to view 12 Press [Enter] until address book appears. 13 Select a destination(s). 14 Press <Start>. all the text. Press [Enter] to close to return to the QWERTY keypad. 26 DA7-909K0-60.indb 26 2007/04/27 13:41:24 Scanning to a network folder NOTE To save a scanned document to a folder, you should have a shared folder in your computer. Create a shared folder in advance, referring to your PC manual if necessary. 1 Set the document. ADF � Face UP Document glass � Face DOWN 2 Press <SCAN> on the control panel. 3 Press [Folder]. 4 Adjust any scan settings. (ex. 5 Press [Browse]. The “Network Navigation” screen will be displayed. Resolution, Contrast). 27 DA7-909K0-60.indb 27 2007/04/27 13:41:24 NOTE You cannot browse the following folders from the machine: •Folders that are not in the same segment with your machine. •Folders that name contain 13 or more characters. •Folders whose link contains more than 100 characters in length. 6 All accessible networks will be displayed. To scroll, use [Page Up] and 7 Select the network that contains your desired folder. 8 Search through the network folders until you find the specific folder you [Page Down]. wish to scan to. To go back one step, press [Back]. To return to the first screen, press [Root]. 28 DA7-909K0-60.indb 28 2007/04/27 13:41:24 9 If the user name and password are required to login to the file server, press [UserName]. Otherwise skip to step 13. Enter the user name, then press [Enter]. 10����������������������������������������� If your machine is on a windows domain controlled network, add the domain name after the user name with an “@”, like “sam@dom_muratec”. The user name can contain up to 50 characters. All ASCII characters are available. 11 Press [Password]. 29 DA7-909K0-60.indb 29 2007/04/27 13:41:25 12 Enter the password, then press [Enter]. The password can contain up to 32 characters. All ASCII characters are available. NOTE The entered password is displayed using asterisks. 13 Press <Start>. 30 DA7-909K0-60.indb 30 2007/04/27 13:41:25 Scanning to an FTP server 1 Set the document. ADF � Face UP Document glass � Face DOWN 2 Press <SCAN> on the control panel. 3 Press [FTP]. 4 Adjust any scan settings. (ex. 5 Press [Host]. Resolution, Contrast). 31 DA7-909K0-60.indb 31 2007/04/27 13:41:25 6 Press [Link]. 7 Enter the link to the FTP server. The entry can contain up to 100 characters. Begin your entry with “//”. The “/(slash)” in found in the [Symbol] menu. To switch back to the alphabet, press [Alpha]. 8 Press [Enter]. 9 Press [User name]. 32 DA7-909K0-60.indb 32 2007/04/27 13:41:25 10 Enter the user name using the QWERTY keypad and numeric keys. The 11 Press [Enter]. 12 Press [Password]. 13 Enter the password using the QWERTY keyboard and numeric keys. The user name can contain up to 50 characters. All ASCII characters are available. password can contain up to 32 characters. All ASCII characters are available. NOTE The entered password is displayed using asterisks. 33 DA7-909K0-60.indb 33 2007/04/27 13:41:25 14 Press [Enter]. 15 Press [Enter]. 16 Press <Start>. Operating Tip After entering the FTP destination, select [Register] to add this location into a shortcut key. 34 DA7-909K0-60.indb 34 2007/04/27 13:41:25 Color scan to print You can scan a color document on your machine and have it print on a color network printer. NOTE •To use this function, set the printer using “Scan to Print Monitor” in advance. For details, see Chapter 5, “Using the utility programs,” in the PC User’s Guide. •To save a scanned document to a folder, you should have a shared folder on your computer. Create a shared folder in advance, referring to your PC manual if necessary. 1 Set the document. 2 Press <SCAN> on the control panel. 3 Press [Printer]. 4 Select the printer. 5 Press <Start>. The scanned document will be printed on the selected network printer. 35 DA7-909K0-60.indb 35 2007/04/27 13:41:25 Clearing a document jam in ADF If a document jams in the ADF, the following display will appear. Carefully remove the jammed paper by follow the displayed steps. Jam in the document feeder 1 Open the ADF cover. 2 Gently remove the document from the ADF. 3 Close the ADF cover, making sure both sides are snapped down securely. If you cannot remove it, turn the release knob to remove the jammed document. NOTE To prevent document jams, use the document glass for wrinkled or torn documents. 36 DA7-909K0-60.indb 36 2007/04/27 13:41:26 DA7-909K0-60.indb 1 2007/04/27 13:41:26 http://www.muratec.com Muratec America, Inc. 3301 East Plano Parkway, Suite 100 Plano, Texas 75074 DA7-909K0-60.indb 1 0 31981 92727 7 Murata Machinery, Ltd. 2007 Printed in Chine 2007-05 Part Number: DA7-909K0-60 MAI order number: OMF525QRG 2007/04/27 13:41:26