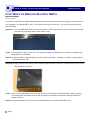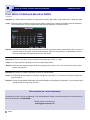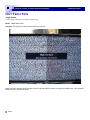
1
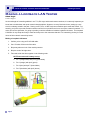
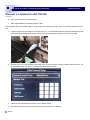
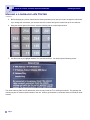
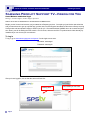
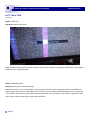
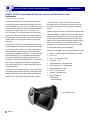
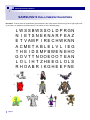
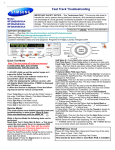
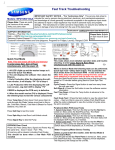
Volume 4, Issue 10 Consumer Electronics Newsletter October 2010 Samsung Electronics America Samsung Tech Talk Your source for service information Announcing GSPN Changes Inside this issue: Announcing GSPN 1 Changes Making a Loopback LAN Tester 2 Samsung Product 5 Support TV: Videos for You Joe Ramos RSE East Hello Samsung Service Network! December will soon be upon us and volume is about to pick up. As part of Samsung’s continuous efforts to provide a user friendly web portal, we are announcing the following changes to GSPN: Five Ways to Reduce Blu-ray NDF’s 7 GSPN’s Pending categories will be modified to more accurately represent the situation with the file. Hot Tech Tips 9 Waiting for repair will now be Waiting for Part Arrival. Waiting to be rescheduled will now be Action Required! HMX-T10 HD Cam- 13 corder Features Innovative Slanted Plasma TV Repair Made Simple 14 2010 TV Training Schedule 16 Samsung’s Halloween Haunters 17 Action required is when a ticket is removed from a prior pending status and has an update from Samsung, with notes on how to resolve your current pending tickets issue. We have also changed our KPI to meet our customers’ expectations better: Tickets must be ACKNOWLEDGED within 2 days of receipt of the service order. Ticket must be confirmed or placed in a pending status within 2 days of ticket acknowledgment. If the ticket is not completed within 2 days after the confirmed date, you must update the ticket for the proper reason. EX: complete, pending parts, etc. Please keep in mind our goal for LTR is less than 5%. This new process will help meet this goal. Remember this is a function of all the tickets you have claimed to have a TAT over 7 days. Do not confirm a schedule date unless you are sure that you will visit the customer on that date. If you input a false date, your TAT will start improperly. If you have any questions, please contact your RSE. Volume 4, Issue 10 Consumer Electronics Newsletter Samsung Tech Talk Making a Loopback LAN Tester Adam Vogel Product Support As the onslaught of networking abilities in our TV’s, Blu-rays, and home theaters continues, it is extremely important you know how to troubleshoot and repair network related problems. However, as many first timers know, setting up a network is not always a walk in the park. Sorting out IP’s, ID’s, or WEP keys can sometimes prove a tall task in itself. Fortunately, your job is to provide excellent customer service on our products and not to set up the customer’s network. To make your service job easier, I’m going to provide you with a valuable tool called a loopback LAN tester. This loopback LAN tester is very cheap and easy to make and will prove to the customers that their TVs’ networking circuitry is not the cause of their network connectivity issues. Making a Loopback LAN tester 1. Confirm you’re using an RJ-45 LAN cable. 2. Cut 4-5 inches off the end of the cable. 3. Strip away about an inch of the outside protector. 4. Strip the ends of all eight wires. 5. Twist and solder the wires together in the following order: NOTE-connector tab is always on top a. Pin 1 (orange/white) with pin 3 (green/white) b. Pin 2 (orange) with pin 6 (green) c. Pin 4 (blue) with pin 7 (brown/white) d. Pin 5 (blue/white) with pin 8 (brown) Page 2 Volume 4, Issue 10 Consumer Electronics Newsletter Samsung Tech Talk Making a Loopback LAN Tester continued 6. Tape each connection to prevent shorts. 7. Make it presentable for customers (tape the end). Now equipped with your loopback tester, you can confirm the networking circuitry of the TV is working correctly. Here’s how: 1. Insert the tester into the LAN jack on the rear of the TV. You should see both the yellow (transmit/receive) and green (link) LEDs flash simultaneously. This is your first check that the circuitry is working as it should. 2. Enter the user menu and navigate to the setup menu. In the setup menu, find the network setup sub-menu. Enter the network setup sub-menu. You should see the following screen: 3. Make sure the Internet Protocol Setup is set to Manual Setup. 4. Use the arrows on the remote to move down to the first box in the IP Address. Page 3 Volume 4, Issue 10 Consumer Electronics Newsletter Samsung Tech Talk Making a Loopback LAN Tester continued 5. Before changing any values, write down the existing numbers just in case you need to change the main board. If you change the main board, you can then enter the numbers and get the network set up for the customer. 6. Using the number pad on the remote, enter the following values in each respected box. 7. Use the arrow key to highlight Network Test, and then hit Enter. You should get the following screen: The check marks by MAC and IP address tell us the circuitry inside the TV is working as it should. The gateway and domain ping are for network checks outside of the unit. When a good network is connected, these too would be check marked. Page 4 Volume 4, Issue 10 Consumer Electronics Newsletter Samsung Tech Talk Samsung Product Support TV—Videos for You Scott Whitman and Adam Vogel Manager—Product Support, Product Support Specialist Want to know how to disassemble or troubleshoot the UN9000 LED? Maybe you don’t know how because you just started as a Samsung servicer. Or maybe you just hired a new technician and you want the tech to get up to speed fast. In either case, Product Support has started a video how-to library covering 2010 product and has uploaded videos to SPSTV just for you. We started with the UN9000 due to its unusual configuration. Shortly, we will be adding the PDP models. And of course, there are the 2010 TV product basic videos already uploaded that you can view at your convenience. To Log In To log in, go to www.samsungsupport.com/spsntv/. On the login screen enter: Username: samsungvd Password: samsung83 After you have logged in, this is what the screen will look like: Viewing Area Page 5 Past shows you can view. Volume 4, Issue 10 Consumer Electronics Newsletter Samsung Tech Talk Samsung Product Support TV—Videos for You continued If you scroll down, you will see a list of videos that we have recently posted: We created this library of service and repair videos for you. Log in and view them. They are chock full of information you can use right now. Check out the videos today. Also, if there is a Samsung product or a repair issue you would like to see a video on, send us an e-mail at [email protected] or [email protected]. Note: SPSTV is fully compatible with Internet Explorer only. It is not fully compatible with Firefox. If you use Firefox, some portions of SPSTV will not work correctly. Customer Access to SPSTV Your customers can also access SPSTV for how-to video guides, weekly live-shows, and interactive chat sessions, all oriented to customer needs and concerns. In fact, SPSTV offers over 150 how-to videos covering topics from setting up a Samsung TV to syncing a Samsung mobile phone with a laptop. New videos are added weekly. Customers can access SPSTV at www.samsung.com/spstv. Important: Do not give customers the samsungsupport address, Username, or Password. These are for technicians only. Page 6 Volume 4, Issue 10 Consumer Electronics Newsletter Samsung Tech Talk Five Ways to Reduce Blu-Ray NDFs Michael Vigliotti Product Support This month, we will focus on recognizing potential No Defect Found (NDF) tickets on Blu-ray players. Here are five common symptoms—all potential NDFs - that 1.) you should not set up for service and 2.) you can be fix with a little customer education. Symptom 1: The front LED works when you turn on the player, but after a set amount of time (5-15 seconds), the LED turns off until you press a button on the remote or unit. Cause: The energy saver option is set to On. The energy saver option is designed to save power by not showing the display when it is not needed. Solution: If customer does not like this option, you can go to the Home Menu -> Settings -> General -> Energy Saving, and turn the feature OFF. Symptom 2: Many customers are calling in and complaining that their brand new unit is scratched on the top cover and they are asking for service. Cause: There is a very clear plastic cover on the top of all of our new players to prevent scratches. Many customers are not taking this clear plastic cover off and any bubbles or scratches in the plastic are being confused for damage to the set. Solution: Remove the plastic cover on the unit and educate customer to prevent further NDF cases. Page 7 Volume 4, Issue 10 Consumer Electronics Newsletter Samsung Tech Talk Five Ways to Reduce Blu-Ray NDFs continued Symptom 3: Cannot connect to network on these specific models: BD-C6900, 7900, 8000 and HT-C6930, and 9950. Cause: The main cause for network issues on these specific models is the customer incorrectly inputs the password. These models have a unique keyboard and the keyboard defaults to all Capital Letters. Solution: First ask the customer if their network password has any uppercase letters (most of them have 1 or none). If customer says no, then when they input that password, make sure they press the “A” Red button on the remote control to switch the keyboard to all lower case letters. Symptom 4: The Disc Tray does not open and the front Display says “initial” or “setup”. Cause: You cannot open the tray when you are in the initial setup screen. Solution: Finish the initial setup and wait until the front display says “no disc”. Then, you will be able to open the tray without any problems. Symptom 5: Customer is unable to play back 3D video on the BD-C8000. Cause: The BD-C8000 is only capable of sending a 3D signal to a 3D ready TV. The built in LCD screen will NOT display 3D content. Solution: Connect a High-Speed HDMI cable from the BD-C8000 to any Samsung 3D capable TV, put on Samsung Active 3D glasses, and enjoy the 3D movie. Please Send Us Your Comments! Something you’d like to see in the Samsung Tech Talk Newsletter? If there a topic/issue we haven’t covered that you’d like us to write about, LET US KNOW! Please send your comments to: [email protected] Page 8 Volume 4, Issue 10 Consumer Electronics Newsletter Samsung Tech Talk Hot Tech Tips Jorge Tavora Product Support Manager/Tech Support Hotline/Triage Model: LN40C550J1FXZA Symptom: The right side of the screen is darker then the left. Cure: Call the customer before running the service call and ask the customer to bring up the OSD menu. If the symptom affects the menu, replace the panel. Page 9 Volume 4, Issue 10 Consumer Electronics Newsletter Samsung Tech Talk Hot Tech Tips Continued Model: PN50B450B1DXZA Symptom: There’s a thin vertical line. Cure: Call the customer before running the service call and ask the customer to disconnect all signal sources and/or change the P.SIZE (Aspect Ratio). If the line doesn’t move, change the panel. Page 10 Volume 4, Issue 10 Consumer Electronics Newsletter Samsung Tech Talk Hot Tech Tips Continued Model: UN32C6500VFXZA Symptom: Circles in several areas of the screen. Cure: Call the customer before running the service call and ask the customer to bring up the OSD menu. If the symptom affects the menu, replace the panel. Samsung Electronics America 85 Challenger Road Ridgefield Park, NJ 07660 The information in this newsletter is published for experienced repair technicians only and is not intended for use by the public. It does not contain warnings to advise non-technical individuals of possible dangers in attempting to service a product. Only experienced professional technicians should repair Phone: 201-229-4251 products powered by electricity. Any attempt to service or repair the product or products dealt with in this information by anyone else could result in serious injury or death. Information provided in this bulletin is subject to change or update without notice. Page 11 Volume 4, Issue 10 Consumer Electronics Newsletter Samsung Tech Talk Hot Tech Tips Continued Model: LNT5271FX Symptom: Vertical colored bars. Cure: Call the customer before running the service call and ask the customer to bring up the OSD menu. If the symptom affects the menu, replace the panel. Model: LN46A550P3FXZA Symptom: Unit cycles on/off during startup Cure: If the unit tries to turn on but begins to cycle on and off before any video is displayed, and all of the SMPS voltages are good, disconnect the LVDS cable at the T-Con board. If the set starts and the backlights come on, replace the T-Con board. If the set does not start, disconnect the LVDS cable at the main board. If the set starts, replace the LVDS cable. If the set still does not startup, replace the main board. Page 12 Volume 4, Issue 10 Consumer Electronics Newsletter Samsung Tech Talk HMX-T10 HD Camcorder Features Innovative Slanted Lens Jeff Brutman Assistant Publications Manager Samsung’s new HMX-T10 full HD camcorder features an innovative upward slanting lens that aligns the camera naturally with the curve of your wrist line and lets you record HD video and high resolution photos without discomfort to your wrist or arm. Just 2.13” by 2.22” by 4.53”, the HMX-T10 is small enough to be carried anywhere, yet it can capture images in full 1920x1080 60i HD, giving you videos with rich, natural color and deep, dynamic detail you’ll be proud to show to your friends and family. Internally, the T10 has an improved Smart OIS (Optical Image Stabilizer) that ensures the steadiness and stability of every moment. Minute lens shifts compensate for shaky hands and body movement, guaranteeing that every image is captured to perfection. The T10 also features an advanced 1/4.1" 5 Megapixel BSI (Back Side Illuminated) CMOS Sensor which provides twice the sensitivity of conventional CMOS Sensors. This dramatically reduces image noise and distortion and delivers clear, crisp video and pure, precise still photos even in low light conditions. Externally, the T10 boasts a large, 2.7 inch Touch Panel LCD display that leverages the latest LCD display technology and delivers clean, crisp images saturated with natural color in any external lighting condition. What’s more, the large 2.7 inch screen lets you control the many features of the camcorder and browse through your photos and videos easily by simply touching the screen. Stylishly designed in black or silver with a brushed metal finish, the HMX-T10 comes with the Smart Auto function which automatically selects the correct shooting mode and settings for capturing video and still images. Even better, the T10 comes with Intelli-studio software built-in so you can upload, play, edit, and share files on any Windows PC. Just connect the T10 to your PC’s USB jack and Intelli-studio runs automatically. For more on the HMX-T10, see the specifications below: Sensor - 5.1Mpixel BSI CMOS (Effective : 2.07M) Lens - 10x LCD - 2.7-inch 230K Touch F Number - F1.8 Video Resolution - 1920x1080 60i Photo Resolution - 4.7 Megapixels Image Stabilization - OIS Size - 2.13”x2.22”x4.53” Storage - SD/SDHC Slot Special Features: - BSI CMOS - Compact Design Left: The HMX-T10 Page 13 Volume 4, Issue 10 Consumer Electronics Newsletter Samsung Tech Talk Plasma TV Repair Made Simple Charles Russo Trainer—RTSC In this issue and next month’s issue, we examine basic troubleshooting for Samsung Plasma TVs. First, Take the VITAL SIGNS: Vs, Va, Vsc, and Ve (on most models) When you walk into a doctor’s office, the first thing they do is check your vital signs. You should do the same when troubleshooting Plasma TVs. You can take a Plasma TV’s vital signs - the Vs, Va, Vsc, and Ve voltages - in less than 5 minutes. Not only will this help you make the immediate repair diagnosis, but will also prevent failures in the future. (Redos!) Look for the Label These “vital sign” voltages are so important that their values are printed on a sticker inside the back of each panel. The values are specifically set for each panel. A label example is below: NTSC Va 55 NTSC/PAL Vsc Vs Ve -190 212 100 Rev. 2.0 Note that the new 2010 models have additional failsafe circuitry that shuts down the start up sequence in approximately 3 seconds if there is an over voltage or an under voltage/high current condition (a short). However, you still have plenty of time to check the readings. Simply hook up your volt meter before you turn on the TV, and be ready to take your readings. Let’s look at some of these voltages and what they do. Vs – The Sustain Voltage Operating at approx 200 volts (sticker example, 212V), the sustain voltage is generated by the SMPS (Switching Mode Power Supply) and is used by both the Y-Main and X-Main assemblies to help produce the sustain drive signal to the plasma cells of the panel. Without the Vs voltage, the drive signal cannot exist and the cells cannot light. Repair Scenario 1 Symptom: No Video, dark screen. TV shuts off after 3 seconds. Troubleshooting: Measuring Vs reveals no voltage. Repair: Remove all power and isolate the Y-Main and X-Main from the Power Supply Vs by removing their associated connectors, and then check for a short condition with an ohm meter. (Note that the Vs is fed to the X-Main via the Y-Main in the new models). Replace the shorted Assembly. Also check the operation of Vs at the SMPS by powering the TV on with the connectors still removed to determine if the power supply is operational. In most cases, a switching mode power supply will not be damaged even by a shorted Vs. Page 14 Volume 4, Issue 10 Consumer Electronics Newsletter Samsung Tech Talk Plasma TV Repair Made Simple continued Repair Scenario 2 Symptom: Specks or dots appear sporadically on the screen (Diffusion). Troubleshooting: Measuring Vs reveals a low or high voltage. Repair: First, allow the TV to warm up for a minimum of 20 minutes. Adjust Vs to the setting listed on the label. Observe the Diffusion test pattern found in the TV’s Burn In or Service Mode menu. If diffusion still occurs, adjust Vs until diffusion disappears. Check that this new setting is within plus or minus 10V of the Vs value on the label. Va — The Address Voltage The address voltage is generated from the SMPS and supplies approximately 60 Volts (55V on the example label) to the Logic Buffer Boards, commonly known as the Address Boards, located in 2010 models on the bottom of the panel. If this voltage is missing or too low or high, the Address Boards will not operate properly. The Address Boards are responsible for addressing each cell via control from the Logic Board and determine which cells light in vertical columns/sections. Errors such as vertical bars or missing or noisy video can occur. Most new models have two Address Boards located at the bottom of the panel. Each Board is responsible for the left half and right half of the video respectively. Repair Scenario 1 Symptom: Noisy Video on full Screen. Cell misfiring throughout entire video. Troubleshooting: Measuring Va reveals a very low voltage. When you remove the Va feed from SMPS to both Lower Address Boards, the Va voltage remains low. Repair: Replace the defective Power Supply. Scenario 2 Symptom: Video on full Screen. Cell misfiring throughout entire video. Troubleshooting: Measuring Va reveals a very low voltage. When you remove Va from the Lower Address Boards one at a time, the voltage returns to normal. Found the bottom left Address Board was loading down Va. Repair: Replace the defective Address Board by replacing the Panel Assembly. You must replace the Panel assembly because the Address Boards are part of the panel Assembly and cannot be replaced separately. Next month: Vsc and Ve as Plasma Repair Made Simple continues. Page 15 Volume 4, Issue 10 Consumer Electronics Newsletter Samsung Tech Talk 2010 TV Training Samsung Training Tour 2010 Coming to a city near you! Samsung has introduced a new concept in training and service: A mobile training facility. The mobile training facility will travel around the country providing hands-on training on new products, and troubleshooting and repair procedures. Local authorized service centers will receive an invitation by email automatically. Please keep your ASC profile up to date so you can receive the most up to date training details. Be advised that we invite all ASCs within a 50 mile zip code radius of the training location. You may be invited to more than one training city. You can reserve your seat in training by emailing [email protected]. You can always obtain the most up to date training list by sending an email to [email protected]. Additionally, TV training is available on-demand 24/7 at https://my.plus1solutions.net/clientPortals/samsung/ Date City October 5, 2010 Fort Lauderdale, FL October 7, 2010 Brandon, FL (Tampa area) Tallahassee, FL October 12, 2010 October 14, 2010 October 19, 2010 Trussville, AL (Birmingham area) Mobile, AL October 21, 2010 Baton Rogue, LA October 26, 2010 Memphis, TN October 28, 2010 Mt. Juliet, TN (Nashville area) Page 16 Samsu ng El ect ronics Am eric a Samsung Electronics America SAMSUNG’S Halloween Haunters Directions: Find the name of the Haunters pictured below in the letter square. Names can go left to right, right to left, up and down, or diagonally and share letters. The solution is on the following page. L W S S B W S SO L D P RGN N I ETS N EKNA R F EAZ E T V AM P I R E C HWK NN A C ME T A B L E L V L I EG T H E I D S MF BWE N E HO G O V T T N OO E O O T E A N L O L I H T ZHE EG L OL S R H OA B R I KGH E E F NE 7 Page 17 1. 2. 3. 4. 5. 6. 8. 9. 10. Samsu ng El ect ronics Am eric a Samsung Electronics America SAMSUNG’S Halloween Haunters: Solution L W S S B W S S O L D P RGN N I E TS N E K N A RFEAZ E T V A M P I R E C HWK N N A C M E T A B L E L V L I EG T H E I D S M F B W E N E HO GO V T T N OO E O OT EAN LO L I H T Z H E E GLOLS RH O AB R I K G H EE FNE Page 18 1.Skeleton 6.Werewolf 2.Vampire 7.Zombie 3.Bat 8.Ghost 4.Devil 9.Witch 5.Frankenstein 10.Goblin