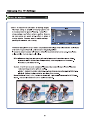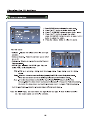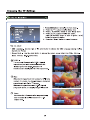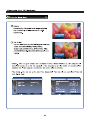
1
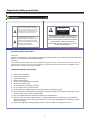
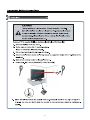
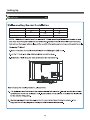
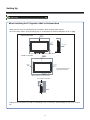
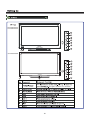
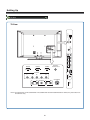
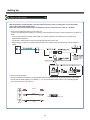
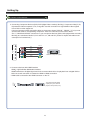
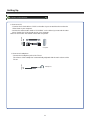
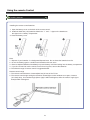
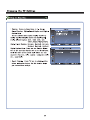
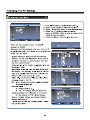
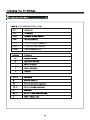
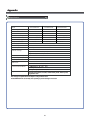
LCD FULL HD TV
USER'S MANUAL
42LC55S240V87
47LC55S240V87
55LC55S240V69
Part No.:IES091015
English
English
Français
Français
Español
Español
Important to user
FCC Statement
NOTE:
The manufacturer is not responsible for any radio or TV interference caused by unauthorized
modifications to this equipment. Such modifications could void the user's authority.
NOTE:
This equipment has been tested and found to comply with the limits for a class B digital
Device, pursuant to part 15 of the FCC Rules. These limits are designed to provide reasonable protection
against harmful interference in a residential installation. This equipment generates, uses and can radiate
radio frequency energy and, if not installed and used in accordance with the instructions, may cause harmful
interference to radio Communications. However, there is no guarantee that interference will not occur in a
particular installation. If this equipment does cause harmful interference to radio or television reception,
which can be determined by turning the equipment off and on, the user is encouraged to try to correct the
interference by one or more of the following measures:
1. Reorient or relocate the receiving antenna.
2. Increase the separation between the equipment and the receiver.
3. Connect the equipment into an outlet on a circuit different from that to which the
receiver is connected.
4. Consult the dealer or an experienced radio/TV technician for help.
Important safety precautions
Safeguards
The lightning flash with arrowhead symbol,
within an equilateral triangle, is intended to
alert the user to the presence of un-insulated
“dangerous voltage” within the product’s
enclosure that may be of sufficient magnitude
to constitute a risk of electric to persons.
&$87,21
RISK OF ELECTRIC SHOCK
DO NOT OPEN!
TO REDUCE THE RISK OF AN ELECTRIC
SHOCK, DO NOT REMOVE THE COVER (OR
BACK). THERE ARE NO USER SERVICEABLE
PARTS INSIDE. FOR ANY REQUIRED
SERVICING, PLEASE CONTACT QUALIFIED
SERVICE PERSONNEL.
The exclamation point within an
equilateral triangle is intended to alert
the user to the presence of important
operating and maintenance (servicing)
instructions in the literature
accompanying the appliance.
Important safety instructions
CAUTION:
USE OF ANY CONTROLS, ADJUSTMENTS, OR PROCEDURES OTHER THAN THOSE SPECIFIED HEREIN MAY
RESULT IN HAZARDOUS RADIATION EXPOSURE.
CAUTION:
These servicing instructions are for use by qualified service personnel only. To reduce the risk of electric shock, do
not perform any servicing other than that contained in the operating instructions unless you are qualified to do so.
Refer to service manual for servicing instructions.
Important safety instructions
1. Read these instructions
2. Keep these instructions
3. Heed all warnings
4. Follow all instructions
5. Do not use this apparatus near water
6. Clean only with dry cloth
7. Do not block any ventilation openings
8. Do not install near any heat sources
9. Do not defeat the safety purpose of the polarized or grounding-type plug
10. Protect the power cord from being damaged particularly at plugs, convenience receptacles, and at
points in which they exit from the apparatus.
11. Only use attachments/accessories specified by the manufacturer.
12. Use only with cart, stand, tripod, bracket, or table specified by the manufacturer or sold with the
apparatus. When a cart is used, use caution when moving the cart/apparatus combination to avoid
injury from tip-over.
13. Unplug this apparatus during lightning storms or when unused for long periods of time.
Important safety precautions
Safeguards
14. Refer all servicing to qualified service personnel. Servicing is required when the
apparatus has been damaged in any way, such as when the
power-supply cord or plug is damaged, when liquid has been
spilled or when objects have fallen into the apparatus, or when
the apparatus has been exposed to rain or moisture, does not
operate normally, or has been dropped.
15. POWER SOURCE: This TV should be operated only from the type of
S3126A
power source indicated on the marking label. If you are not sure of the type of power
supply to your home, consult your appliance dealer or local power company . For TVs
intended to operate from battery power, or other sources, refer to the operating
instructions.
16. POWER CORD PROTECTION: Power-supply cords should be routed so that they are
not likely to be walked on or pinched by items placed upon or against them, paying
particular attention to cords at plugs, convenience receptacles, and the point where
they exit from the appliance.
17. OUTDOOR ANTENNA GROUNDING : If an outside antenna or cable system is
connected to the TV, be sure the antenna or cable system is
grounded to provide some protection against
FIGURE A
voltage surges and built-up static charges.
EXAMPLE OF ANTENNA GROUNDING AS PER
ANTENNA LEAD
Section 810 of the National Electrical Code,
NATIONAL ELECTRICAL CODE
IN WIRE
ANSI/NFPA NO.70, provides information
GR OU N D
with respect to proper grounding of the
C LA M P
mast and supporting structure, grounding
ANTENNA
DISCHARGE UNIT
of the lead-in wire to an antenna discharge
unit , size of grounding conductors, location
ELECTRIC
SERVICE
of antenna discharge unit, connection to
EQUIPMENT
GROUNDING WIRES
grounding electrodes, and requirements for
GROUND CLAMPS
the grounding electrode. (Fig.A)
POWER SERVICE GROUNDING
S2898A
ELECTRODE SYSTEM
18. LIGHTNING: For added protection for this TV receiver during a lightning storm, or
when it is left unattended and unused for long periods of time, unplug it from the wall
outlet and disconnect the antenna or cable system. This will prevent damage to the
TV due to lightning and power line surges.
19. POWER LINES: An outside antenna system should not be located in the vicinity of
overhead power lines, or other electric light or power circuits, or where it can fall into
such power lines or circuits. When installing an outside antenna system, extreme care
should be taken to keep from touching such power lines or circuits as contact with
them might be fatal.
Important safety precautions
Safeguards
20. OVERLOADING: Do not overload wall outlets and extension cords as this can result
in a risk of fire or electric shock.
21. OUTDOOR USE: Do not install this TV outdoor. If the TV is exposed to rain, it may
result in a fire or an electric shock. If the TV is exposed to direct sunlight, the TV may
heat up and cause damage to the TV.
22. VEHICLE: Do not install the TV in a vehicle. Bumping of the vehicle may cause the
TV to fall down and cause injury.
23. SHIP AND VESSEL: Do not install this TV in a ship or vessel. If the TV is exposed to
seawater, it may cause a fire or damage the TV.
24. OBJECT AND LIQUID ENTRY: Never push objects of any kind into this TV through
openings as they may touch dangerous voltage points or short out parts that could
result in fire or electric shock. Never spill liquid of any kind into the TV.
25. SERVICING: Do not attempt to service this TV yourself as opening or removing
covers may expose you to dangerous voltage or other hazards. Refer all servicing to
qualified service personnel.
26. REPLACEMENT PARTS: When replacement parts are required, be sure that the
service technician uses replacement parts with the same characteristics as the
original parts specified by the manufacturer. Unauthorized substitutions may result in
fire, electric shock, injury to persons or other hazards.
27. SAFETY CHECK: Upon completion of any service or repairs to this TV, ask the
service technician to perform routine safety checks to determine that the TV is in
proper operating condition.
28. The apparatus should not be exposed to any dripping or splashing, and no objects
filled with liquids (such as a vase) should be placed on the apparatus.
29. WARNING: Plug the power cord into a power outlet where access to the power cord
connector is readily accessible, in case if the power needs to be immediately
disconnected.
30. ATTENTION: This device complies with Part 15 of the FCC Rules. Operation is
subject to the following two conditions: (1) this device may not cause harmful
interference, and (2) this device must accept any interference received, including
interference that may cause undesired operation.
a). Disposal of packaging:The packaging of this product is intended to be recycled. Apply
to the local authorities for correct disposal.
b). Disposal of batteries: The batteries supplied do not contain the heavy metals mercury
and cadmium. Please check on how to dispose exhausted batteries according to local
regulations.
c). Note Specifications and information are subject to change without notice. If you need
further assistance, please call the customer support service in your country.
31.POWER-CORD INSERT CHECK:When connecting the power cord to the connector of the
TV, make sure the power cord is fully inserted in the place. Bad contact may cause high
temperature of the connector and the risk of fire or other damages.
Table of Contents
Table of Contents
1.Important to user...................................................................................... 1
2.Important safety precautions.................................................................... 2
Safeguards....................................................................................... 2
Safety Strap....................................................................................... 5
3.Table of Contents..................................................................................... 6
4.Setting Up................................................................................................. 7
Installing the Stand...................................................................... 7
Wall mount specifications...................................................................... 7
Wall mount.......................................................................................... 8
TV Front........................................................................................... 10
TV Rear............................................................................................ 11
Connect to other devices................................................................. 12
5.Using the Remote Control.......................................................................
Installing the remote control batteries...............................................
Learning about the Remote Control Panel.......................................
Quick starts......................................................................................
15
15
16
17
6.Changing the TV Settings.......................................................................
Using the Menu.................................................................
Using the Video Menu.....................................................................
Using the Audio Menu.....................................................................
Using the Setup menu.....................................................................
Using the Parental menu.................................................................
19
19
20
2
2
2
7.Appendix................................................................................................. 2
Trouble shooting.............................................................................. Specifications...................................................................................
Setting Up
Installing the Stand/Wall mount specifications
Installing the Stand
42LC55S240V87/47LC55S240V87
55LC55S240V69
1. Lay a cloth or another soft material on a flat surface to avoid damage to the LCD screen.
2. Put the TV back upward and the LCD screen downward and keep it flat on the table-board.
3. Take out the stand and insert the stand into the installing slot in the lower part of the TV, then put the
stand to relevant position of the TV set until all the holes match each other completely.
4. Fasten the stand and the TV set together with the 4 (or 6) screws provided. Erect the TV set, and put
it on the proper position for watching.
Note:
The above figures are for reference only, please refer to the actual units to determine the appearances.
Every hole of the stand must be fastened with screws!
Wall mount specifications
Install your wall mount on a solid wall perpendicular to the floor. When attaching to other building
materials, please contact your nearest dealer. If installed on a ceiling or slanted wall, it may fall and
result in severe personal injury.
• Dimensions for wall mount kits and wall-mount screws pattern please refer specifications table.
• Do not use screws longer than the standard dimension, as they may cause damage to the inside of
the TV set.
• For wall mounts that do not comply with the VESA standard screw specifications, the length of the
screws may differ depending on their specifications.
• Do not use screws that do not comply with the VESA standard screw specifications.
• Do not fasten the screws too strongly, this may damage the product or cause the product to fall,
leading to personal injury.
• Proscan is not liable for product damage or personal injury when a non-VESA or non-specified wall
mount is used or the consumer fails to follow the product installation instructions.
• Do not exceed 15 degrees tilt when mounting this TV.
Setting Up
Wall mount
47LC55S240V87
42LC55S240V87
Unit Dimension(Unit:mm)
400 200
400
400
55LC55S240V69
400
400
M6
M6
M8
Screw Length(Unit:mm)
12
12
12
400mm(200mm)
Screw Diameter
400mm
Setting Up
Wall mount
Wall
Wall mount
mount
When Installing the TV Against a Wall or Enclosed Area
Make sure that your TV has adequate air circulation. Allow enough space around
the TV as shown below. Avoid operating the TV at temperatures below Inadequate air 45° F (5 )
Instand with stand
12 inches
30cm
4 inches
10cm
2.375 inches
6cm
Leave at least this much space around the set.
Install on the wall
12 inches
30cm
4 inches
10cm
4 inches
10cm
Leave at least this much
space around the set.
4 inches 10cm
Never install the TV set as follows:
Air circulation is blocked.
wall
Inadequate air circulation can lead to overheating of the TV and may cause damage to your TV or cause a
fire.
42LC55S240V87
47LC55S240V87
INPUT
55LC55S240V69
5
4
3
1 2
Blue
The light is off when TV is turned on.
10
Setting Up
TV Rear
PB
PR
L
R
L
R
VIDEO
L
AUDIO OUT
AV2
R
R
PR
PB
Y
COMP1
S-VIDEO
HDMI1
Y
AUDIO IN
COMP2
VGA
DIGITAL
AUDIO OUT
HDMI2
PC
HDMI3
HDMI4
AV1
VIDEO
L
R
L
ANT/CABLE
IN
HEADPHONE
SERVICE
TV Rear
Note: The appearance of 42LC55S240V87 47LC55S240V87
ǃ
and 55LC55S240V69 are similar, the picture above is
for reference only.
11
Setting Up
Connect to other devices
Warning: Before connecting the TV to any other electronic device, unplug the TV and electronic
device AC cords from the AC input.
Note: Not all following terminals are included on your TV. The actual one refer to "TV Rear".
ANT/CABLE
1. Connect to broadcast antenna or the cable TV
To have an optimal picture quality, it is strongly recommended to have an external antenna or a cable TV.
Note:
- It is recommended that coaxial cable (75Ω ) be used to eliminate the interference caused by the
mismatched impedance.
- The antenna cable should not be bound together with the power cord.
- When using the cable TV, please insert the plug of the coaxial cable (75 Ω) directly into the antenna
outlet.
A
Audio R
L
R
2. Connect to AV devices
- Connect a Video RCA cable to an appropriate external A/V device such as a VCR, DVD or Camcorder.
- Connect RCA audio cables to “R -AUDIO - L” on your set and the other ends to corresponding audio
out connectors on the A/V device.
AV1
VIDEO
Audio L
VCD, DVD, set-top boxes, etc.
Video
Setting Up
Connect to other devices
R
3. Connecting Component Devices (DVD, DVR (digital video recorder), Blu-Ray) Component video(Y, Pb,
Pr)transmits video as separate Y, Pb, Pr signals. Use this connection for high-definition video signals
from a DVD or other equipment.
- Connect Component video and audio cables to Component inputs (“PR/CR”, “PB/CB”, “Y”) of your set
and the other ends to corresponding component video out connectors on the PVR or DVD.
- The "Y, PB/CB and PR/CR” connectors on your component devices ((DVD, DVR (digital video recorder),
Blu-Ray) are sometimes labeled Y, B-Y and R-Y or Y, CB and CR. (Colors for inputs and cables must
correspond on both devices.)
PR
White
Audio R
Audio L
Red
PR/CR
Blue
PB/CB
PB
C O M P 2(1)
L
Red
DVD With Component jacks
Y
Y
Green
4. Connect to devices with HDMI interface
HDMI High Definition Multimedia Interface
HDMI transmits an all-digital signal and is the recommended choice for playback from a digital DVD or
DVR. No sound connection is needed for HDMI to HDMI connection.
- HDMI cable connected to the HDMI connector on the TV.
HDMI
The equipment with HDMI
output jack ( such as DVD
players, set-top boxes, etc.).
Setting Up
Connect to other devices
VGA
AUDIO IN
5. Connect to PC
- Connect the D- Sub cable to “VGA” on the side of your set and the other end to the
Video Card of your computer.
- Connect the stereo audio cable to “PC AUDIO ” on the side of your set and the other
end to “Audio Out” of the sound card on your computer.
Note: For some sets "PC AUDIO" share with component.
Computer
HEADPHONE
6. Connect to headphone
- Connect the headphone jack of the TV set.
The volume of the headphone is automatically adjusted with the main volume of the
TV set.
Headphone
Using the remote Control
Installing batteries
Installing the remote control batteries
1. Open the battery cover on the back of the remote control.
2. Install two AAA size(1.5V) batteries. Match the “+” and “-” signs on the batteries to
the signs on the battery compartment.
3. Close the battery cover.
Note:
1. Dispose of your batteries in a designated disposal area. Do not throw the batteries into fire.
2. Do not mix battery types or combine used batteries with new ones.
3. Remove depleted batteries immediately to prevent battery acid from leaking into the battery compartment.
4. If you do not intend to use the remote control for a long time, remove the batteries.
5. The effective range of remote control is suggested below.
Remote control range
1. The remote control distance: 8 meters(26.2 feet) in front of the TV set.
2. The remote control angle: taking the television infrared light receiver window as an apex, 6 meters
(19.7 feet) away, its controlled angle (left to right) is within 30 degrees, while the vertical angle (up to
down)is within 30 degrees.
Using the Remote Control
Learning about the remote control panel
Remote Control Panel
Buttons instructions
2
1
(1) Power On/Off.
(2) Power indicator.
(3) INPUT: Switch among TV, Video, Component, HDMI and
VGA.
(4) 0-9 Numbers: For direct channel access.
(5) Last: Return to previous channel.
(6) — : Select digital channels.
(7) PICTURE: Picture Mode selecting.
(8) SOUND: Sound Mode selecting.
(9) DISPLAY: Display current status information.
(10) MUTE: Mute the sound.
(11) VOLΛ /V: Volume increase/Volume decrease.
(12) CHΛ /V: Next channel/Previous channel.
(13) MENU: Display the main menu/Back menu display.
(14) EXIT: On screen display (OSD) menu exit.
(15) ENTER: Enter or confirm the operation/return to the previous menu.
▲/▼/◄/ ►: Up/Down/Left/Right operation.
(16) MTS/SAP: !"
#!$%&.
(17) ASPECT: Select screen mode.
(18) CCD: Closed caption decoder function.
(19) GUIDE: ATSC tuners feature the Electronic Program Guide
(EPG) function.
(20) Sleep: Set the sleep timer.
(21) TIME: Display the current timer.
(22) Electronic Program Guide(EPG) function: After pressing the
"GUIDE" button in the digital TV channel option, the 4 same color
buttons will appear with explanations in the OSD. Follow the steps
illustrated in the OSD.
(23) NOT supported in this TV. These buttons are for DVD Combo TV.
Note:The design of the remote control is subject to change and may be
different from the actual one. Those buttons without comment have no
relations with this TV.
Using the Remote Control
Quick starts
Basic Operation
Connecting power cord to the TV
1. Connect the power cord to the connector on the back of the TV, if the power cord in accessories.
Note:When connecting the power cord to the connector of the TV, make sure the power cord is fully
inserted in the place. Bad contact may cause high temperature of the connector and the risk of fire or
other damages.
2. Connect the power cord to the AC power outlet.
Power ON/OFF
1. Connect the TV to a power outlet. If the power indicator is blue, it means that the TV is STANDBY. Press
the Standby button on the front control or on the remote control to turn the TV on. Once the TV is turn on,
the power indicator will be turned off. Several seconds later, the TV picture will be displayed on
the screen.
2. Press the Standby button on the front control or on the remote control to turn the TV off temporarily.
3. Always remove the AC power plug from the outlet when not using this TV for a long period of time.
Signal source selection
Press the [INPUT] button to select TV, AV, Component, VGA and HDMI inputs. There are two
ways to select the source: One is to press the [INPUT] button continuously, while the other is to use the
ARROW and [ENTER] buttons to confirm the source.
Select channels
Please use [CHΛ / CHV] button on the remote panel to select channels. [CHΛ] indicates channel number up;
[CHV] indicates channel number down. Press [CHΛ / ChV] button on the side panel of the TV to select the
channels. If you want to choose any of the skipped channels, press the number directly.
Use [Mute] button
Press the [Mute] button to mute the sound. Press the [Mute] button again to resume the sound.
Select picture modes
Press the [PICTURE] button to select the picture mode from four options: Standard, Cinema, User or Vivid.
You can adjust the picture mode based upon your personal preference.
Select sound modes
Press the [AUDIO] button to select sound modes from Standard, Speech, User or Music.
Select screen modes
Press the [ASPECT] button to select from six zoom modes: Wide, Normal, Zoom, Cinema , Dot-to-Dot or Auto.
Use [GUIDE] button
Press the [GUIDE] button to display features of the ATSC program and the EPG function.
Use [DISPLAY] button
Press the [DISPLAY] button to view current source information.
Using the Remote Control
Quick starts
Use [EXIT] button
Press the [EXIT] button to exit the OSD menu.
Select channels by numbers
To select a channel: Press the channel number you would like to go to. For example, to select channel number
120, press buttons 1, 2 and 0, respectively and then press [ENTER] to confirm.
Use [MENU] button
Press the [MENU] button to display the TV OSD menu.
Use [LAST] button
Press the [LAST] button to return to the previous channel.
Use [ENTER] button
Press the [ENTER] button to select a particular item.
Adjust Volume
Press [VOLΛ / VOLV] button to adjust the volume.
Use [CCD] button
Press the [CCD] button to change the CCD mode. Using this button will set the Closed Caption mode when
viewing a DTV or TV channel.
Note: Set the default Closed Caption setting for all channels in the Menu. For ATV the options are CC1, CC2,
CC3, CC4, TEXT1, TEXT2, TEXT3, TEXT4 or Off. For DTV, the options are from Service1 to Service6 or Off.
Use [MTS/SAP] button
Press the [MTS/SAP] button to change the sound mode (Mono, Stereo, SAP). This button will select the MTS
options of Stereo, SAP, or Mono in TV mode, alternate audio channels, and when available, in DTV mode.
Use [SLEEP] button
Press the [SLEEP] button repeatedly to set the sleep time, which can be set to: 10 Mins, 20 Mins, 30 Mins, 40
Mins, 50 Mins, 60 Mins, 90 Mins, 120 Mins or Off.
Use [TIME] button
Press the [TIME] button to display the current time.
'
Appendix
Trouble shooting
Appendix
Specifications
Model
Screen Diagonal Size
Screen Resolution
Power Consumption
42LC55S240V87
47LC55S240V87
42 inches
55LC55S240V69
47 inches
1920X1080 Pixels
1920X1080 Pixels
205W
55 inches
1920X1080 Pixels
250W
350W
Wall-mount screws pattern
M6X12mm (4 pcs)
M6X12mm (4 pcs)
M8X12mm (4 pcs)
Wall-mount dimension(VESA)
400mm X 200mm
400mm X 400mm
400mm X 400mm
Size with base(inch)(L X WX H)
40.2×11.9×27.2
44.7×13.3×30
52.7×16.1×35.1
Weight with base(lbs)
48.5 lbs
60.7 lbs
Power Supply
AC 60Hz 120V
Television System
American TV standard NTSC / ATSC system
Audio multiplex
BTSC system
Channel coverage
Digital Terrestrial Broadcast (8VSB): 2~69
VHF: 2~13
UHF: 14~69
99 lbs
CATV: 1~125
Digital Cable(64/256 QAM): 1~135
Sound Output Power (RMS)
10W+10W
Component (Y/Pb/Pr) mode
480I/60Hz, 480P/60Hz, 720P/60Hz, 1080I/60Hz
PC (VGA) mode
640X480/60Hz, 800X600/60Hz,1024X768/60Hz
HDMI mode
480I/60Hz, 480P/60Hz, 720P/60Hz, 1080I/60Hz, 1080P/60Hz
640X480/60Hz, 800X600/60Hz,1024X768/60Hz
Environmental Conditions
Humidity : 20%-80%RH
Atmospheric pressure: 86kPa-106kPa
Supplied accessories
Remote control, Batteries, User Manual, Quick Start Guide,
Remote Control Guide, AC Cable, Children Safety Guide, Warranty Card,
Registration Card
Note: Design and specifications are subject to change without notice.
CUSTOMER NOTICE: Use carefully when operating to prevent damage to the screen.