1
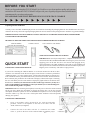
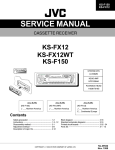
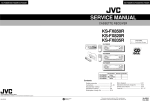
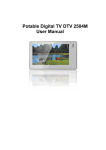
OWNER’S MANUAL
CDG X-3 Mark II
DIGITAL CDG AND CASSETTE
KARAOKE PLAYER
IMPORTANT INFORMATION: Thank
you for purchasing the CDG X-3 Mark II
To make full and effective use of this unit,
please read this Owner ’s Manual
carefully before operating.
GENERAL WARNING
CAUTION
RISK OF ELECTRIC SHOCK
DO NOT OPEN
CAUTION: TO REDUCE RISK OF ELECTRIC
SHOCK, DO NOT REMOVE COVER
(OR BACK). NO USER-SERVICEABLE
PARTS INSIDE. REFER SERVICING TO
QUALIFIED SERVICE PERSONNEL
The lightning flash with arrowhead symbol, within an equilateral
triangle is intended to alert the user to the presence of uninsulated-insulated
“dangerous voltage” within the product’s enclosure that may be of sufficient
magnitude to constitute a risk of electric shock to persons.
The exclamation point within an equilateral triangle, is intended to alert
the user to the presence of important operating and maintenance
(servicing) instructions in the literature accompanying the appliance.
GENERAL SAFETY
PRECAUTIONS
1. READ INSTRUCTIONS - ALL THE SAFETY AND OPERATION INSTRUCTIONS
SHOULD BE READ BEFORE THE CDG X-3 MARK II IS OPERATED.
2. RETAIN INSTRUCTIONS AND PACKAGING - THE SAFETY AND OPERATING INSTRUCTIONS SHOULD BE KEPT FOR FUTURE REFERENCE. ALSO KEEP THE BOX IN
CASE THE UNIT NEEDS TO BE RETURNED FOR SERVICE.
3. HEED WARNINGS - ALL WARNINGS ON THE CDG X-3 MARK II AND IN THESE
OPERATING INSTRUCTIONS SHOULD BE FOLLOWED.
4. FOLLOW INSTRUCTIONS - ALL OPERATING AND OTHER INSTRUCTIONS SHOULD
BE FOLLOWED.
5. WATER AND MOISTURE - THE CDG X-3 MARK II SHOULD NOT BE USED NEAR
WATER - FOR EXAMPLE, NEAR A BATHTUB, WASHBOWL, KITCHEN SINK, LAUNDRY
TUB, IN A WET BASEMENT, OR SWIMMING POOL.
6. HEAT - THE CDG X-3 MARK II SHOULD BE SITUATED AWAY FROM HEAT SOURCES
SUCH AS RADIATORS, OR OTHER DEVICES WHICH PRODUCE HEAT.
7. READ INSTRUCTIONS - ALL THE SAFETY AND OPERATION INSTRUCTIONS
SHOULD BE READ BEFORE THE CDG X-3 MARK II IS OPERATED.
8. POWER CORD PROTECTION - POWER SUPPLY CORDS SHOULD BE ROUTED SO
THAT THEY ARE NOT LIKELY TO BE WALKED UPON OR PINCHED BY ITEMS PLACED
UPON OR AGAINST THEM, PAYING PARTICULAR ATTENTION TO CORDS AT PLUGS,
CONVENIENCE RECEPTACLES, AND THE POINT WHERE THEY EXIT THE CDG X-3
MARK II.
8. OBJECT AND LIQUID ENTRY - CARE SHOULD BE TAKEN SO THAT OBJECTS DO
NOT FALL INTO AND LIQUIDS ARE NOT SPILLED INTO THE INSIDE OF THE CDG X-3
MARK II.
9. SERVICE - THE CDG X-3 MARK II SHOULD BE SERVICED BY QUALIFIED SERVICE
PERSONNEL. THE USER SHOULD NOT ATTEMPT TO SERVICE CDG-X3 MARK II.
DOING SO MAY VOID THE WARRANTY.
CDG X-3 MARK II
FEATURES
•
•
•
•
•
•
•
•
•
•
•
•
•
19 STEP DIGITAL KEY CONTROLLER
BUILT-IN CASSETTE PLAYER FOR PLAYBACK AND RECORDING
BUILT-IN SHOCK RESISTANT CD/CDG PLAYER
3 MICROPHONE JACKS WITH INDIVIDUAL VOLUME CONTROLS
(TWO FOR VOCALS, ONE DRY FOR KJ/DJ ANNOUNCEMENTS)
KEY CONTROL JACK
REMOTE CONTROL
ECHO VOLUME CONTROL
3 AUDIO INPUTS WITH PRE-OUT AND RECORD-OUT
TWO VIDEO INPUTS AND ONE VIDEO OUTPUT
BASS AND TREBLE CONTROLS
110/220 SWITCHABLE
PAL/NTSC SWITCHABLE
DIMENSIONS (WxDxH): 17” x 15 1/2” x 6”
NOTE: IT IS NECESSARY FOR THIS UNIT TO BE USED WITH AN
EXTERNAL AMPLIFIER
TABLE OF CONTENTS
Congratulations! And thank you for purchasing the VocoPro CDG X-3 Mark
II. With proper care and handling, this unit will continue to provide you with
years of entertainment and fun for friends and family. Please read this manual
carefully before getting started.
Table of Contents .............................................................
Before You Start ..............................................................
Quick Start ......................................................................
Using Effects and Changing the Key ...............................
Changing the Key (Cont.) ................................................
Using the Cassette Deck ..................................................
Using the Cassette Deck (Cont.) ......................................
listen to your recording... ...........................................
Other Parts of the CDG-X3 Mark II ....................................
Connecting Other Components ........................................
Connecting Other Component (Cont..) ...........................
Parts And Functions of The Remote Control ....................
Trouble Shooting Guide ...................................................
Parts and Functions (front panel) ....................................
Parts and Functions (rear panel) .....................................
Parts and Functions (rear panel cont.) ............................
Connection A Television Monitor (diagram) ......................
Connection Diagram for other components ......................
Specifications ..................................................................
1
1
2
3
4
5
5
6
7
7
8
9
10
11
12, 14
15
16
17
18
19
BEFORE YOU START
Thank you for purchasing the CDG-X3 Mark II. At VocoPro we care about product quality and customer
satisfaction. We know the CDG-X3 Mark II will provide years of quality enjoyment and reliable music
entertainment for you when used properly.
PLEASE READ CAREFULLY BEFORE USING YOU NEW CDG X-3 MARK II
Unpacking the CDG-X3 Mark II
Carefully remove the CDG-X3 Mark II player from its carton before discarding the packaging materials. If it should become necessary to
return the unit for any reason the original packaging materials are best suited for transporting the unit to minimize any potential damage.
IMPORTANT NOTE!: YOU WILL NEED TO CONNECT THIS UNIT TO AN AMPLIFICATION SOURCE, WITH SPEAKERS
CONNECTED TO THE AMPLIFIER.
BE SURE YOU HAVE THE PARTS AND COMPONENTS INCLUDED WITH THE CDG-X3 Mark II.
1 CDG-X3 Mark II
CD/CDG & Cassette Player
1 Remote Control
1 RCA cable for video hookup
SUPPLYING POWER TO THE CDG-X3 Mark II
QUICK START
CONNECTING A TELEVISION MONITOR
IMPORTANT! Be sure all your components i.e., amplifier, TV monitor, etc.., are
connected to the CDG-X3 Mark II BEFORE connecting to a power source and
supplying power to the unit. Be sure to use caution when plugging in any
electrical appliance. The CDG-X3 Mark II comes with it’s own standard wall
outlet power cord. It is attached to the back of the CDG-X3 Mark II player unit.
Plug the power cord into any wall outlet or surge protector.
If you will be connecting the CDG-X3 Mark II to a television monitor use the RCA video
connector wire included. On the back of the player, locate the RCA connector jack labeled
“VIDEO OUTPUT”, it is color coded in yellow. Connect either end of the RCA connector wire
to the “VIDEO OUTPUT” jack and the other end to your television monitor. There should be an
RCA connector jack, just like the one on the back of the player, labeled video input. Connecting
this wire will enable your television monitor to display the graphics that are encoded on CDG
Karaoke discs. NOTE: If your television does not have an RCA type connector you may use a
VCR or an RF Modulator (not included) to connect your monitor. (See “Connection Diagram”
and “Trouble Shooting Guide” for options.)
IMPORTANT! Before connecting a microphone, be sure the power is off or the volume is turned
all the way down. When the microphone is plugged in and the unit is on do not point the
microphone toward the speakers or leave an unattended microphone too close to the speakers
when the volume is up. This can create a loud squeal called “feedback” and could possibly
damage your speakers.
CONNECTING A MICROPHONE
1.
2.
Using a microphone cable, designed for use with most Karaoke
products, connect a microphone to the end of the cable with the
“XLR” connector (see diagram).
Connect the end of the cable with the ¼” connector into either
of the ¼” jacks on the front of the CDG-X3 Mark II amplifier player.
2
¼” jack
“XLR”
connector
QUICK START
USING THE CDG PLAYER
TURN ON THE CDG-X3 MARK II
1.
2.
3.
4.
Locate the power switch on the front of the CDG-X3 Mark II player. Press the power switch once to turn
on the machine.
Locate the “CDG” button below the CDG tray. This selects the mode you will use the player in.
Carefully increase the volume by turning the large volume knob clockwise until the desired volume is reached.
Carefully increase the microphone volume (see “Parts and Functions” diagram #21) until desired volume is reached.
PLAYING CD/CDG’s
1.
2.
3.
Locate the “OPEN/CLOSE” button on the front of the CDG-X3 Mark II player.
Press once to open the CD tray. The tray will open automatically after the button is pressed.
Lay the CD/CDG on the open tray and press the “OPEN/CLOSE” button again. The tray will close automatically
after the button is pushed. IMPORTANT: DO NOT PUSH THE TRAY CLOSED MANUALLY, THIS COULD
DAMAGE THE UNIT.
STARTING THE CD PLAYER
1.
2.
Locate the “PLAY/PAUSE” button above the CD tray.
Press once to start the CD. Pressing the “PLAY/PAUSE” button will play song selection #1 on the CD/CDG disc.
The song will automatically begin playing after a few seconds.
TO PLAY A DIFFERENT SELECTION
1.
Locate the “NEXT” button above the CD tray. Press the button until the number of the desired song selection appears
in the LCD display window. Note: You may hold down the button continually to advance the song selection or press
consecutively. The song you stop on will automatically begin playing after a few seconds.
FAST FORWARD AND REVERSE
1.
To advance your selection while it is playing, for example to the next verse or chorus, locate the “F-SCAN” key
above the CDG player and press until you find the desired location.
2.
To rewind your selection whiled it is playing, locate the “B-SCAN” key above the CDG player and press until you
find the desired location. PLEASE NOTE: When using this feature the words may become jumbled on your TV monitor.
In this scenario, digital graphics information does not process as rapidly as audio signals. Therefore the video signal will
have to “catch up” to the audio signal. The screen will “refresh” on it’s own.
BALANCING YOUR MIX
1.
It is best to begin by first setting the music volume at a comfortable level for the room in which you are using your
CDG X-3 Mark II. The number of people in a room will generally have an effect on the acoustics of a room and how much
volume you will need.
2.
Once the desired music volume is achieved, test each microphone volume individually by speaking or singing into the
microphone, holding it approximately two inches away from your mouth.
3.
Adjust the volume control(s) for each microphone until an equal mix of music and vocals can be heard. Remember to
allow for vocal variances in each song where it may be necessary to sing louder or softer.
3
USING EFFECTS
AND CHANGING THE KEY
ADDING BASS OR TREBLE TO THE MUSIC
1.
Locate the small “BASS” and “TREBLE” control knobs on the front of the CDG-X3 Mark II underneath the large
“MUSIC VOL” knob.
2.
To add bass tones to the music, turn the “BASS” knob clockwise until you have added the desired amount of bass
tone to the music. Likewise to remove bass tone turn the knob counter clockwise.
3.
To add treble tone to the music, turn the “TREBLE” knob clockwise until you have added the desired amount of
treble tone to the music.
Note: A bass tone is a “low” “warm” tone. A treble tone is a “higher” and “brighter” sounding tone than a bass tone. How much is added
or taken out is a matter of personal preference to the listener(s).
ADDING BASS OR TREBLE TO THE VOCALS
Located in the back of the unit to the left of the “ECHO” control knob, there are “BASS” and “TREBLE” control knobs. These
are used to add more bass or treble tones to the vocal signal.
1.
the
2.
To increase the bass tone on the vocal signal turn the “BASS” control knob in a clockwise motion until the desired
amount of bass is achieved. Increasing the bass tones will give the vocal signal more “warmth”. Likewise to decrease
amount of bass on the vocal signal, turn in a counterclockwise motion.
To increase the treble tones on the vocal signal turn the “TREBLE” control knob in a clockwise motion until the
desired amount of treble is achieved. Increasing treble tones will give the vocal signal a “brighter” sound. Likewise to
decrease the amount of treble on the vocal signal, turn in a counterclockwise motion.
ADDING EFFECTS (DELAY/ECHO) TO THE VOCAL SIGNAL
1.
The “ECHO” control knob is located on the back of the CDG-X3 Mark II player. (See diagram). Turn the knob in a
clockwise motion until the desired amount of echo is achieved on the vocal signal. This is usually a preference by the
singer. The more echo that is used the “thinner” the voice sounds.
CHANGING THE KEY OF THE MUSIC
Sometimes a singer would like to sing a particular song but will find it may not be written within a key or range comfortable
for the singer. In this case you can raise or lower the pitch or key of the music to make it easier to sing, both on a CD/CDG or
cassette. NOTE: When raising or lowering the key of the music the tempo will remain the same.
1.
First locate the Key Control buttons on the front of the CDG-X3 Mark II player. You will find them below the
“POWER” button on the face of the machine. (See diagram). There are three buttons under which are the words “KEY
CONTROL”. There is a button for each of the following three functions.
a.
b.
c.
Sharp
Natural
Flat
Used to raise the pitch or key of the music.
Used to return the music to it’s “natural” or “original” pitch or key.
Used to lower the pitch or key of the music.
4
CHANGING THE KEY (Cont.)
USING THE CASSETTE DECK
RAISING OR LOWERING THE PITCH (OR KEY) OF THE MUSIC
1.
To raise the pitch or key of the music press the “sharp” (#) sign once for each ½ step you would like the music raised.
2.
To lower the pitch or key of the music press the “flat” (b) sign once for each ½ step you would like the music
lowered.
3.
To return the music to its “natural” or “original” key, simply press the “natural” key button once.
NOTE: The digital display will show how many half steps a song is raised or lowered by indicating a (+) or (-) before a number to
indicate raised (+) or lowered (-). It will display (+0) if the current song selection is being played in the natural key.
USING THE CASSETTE DECK TO PLAY OR PLAYBACK
1.
Locate the “CASSETTE” button under the CD tray on the front of the unit (See diagram) NOTE: When recording,
this button should be set to “CDG”.
2.
Press once to change to cassette mode for playing and recording cassette tapes.
3.
Locate the “ST/EJ” button on the front of the cassette deck and press to open cassette door.
4.
Insert the cassette tape with the side you want to play facing you and carefully close the cassette door, never force.
5.
To rewind the cassette press the ”REW’ button until the tape rewinds to the desired location.
6.
To advance the cassette press the “F-FWD” button until the tape advances to the desired location.
7.
To stop either function locate the “STOP” button and press once. This will stop advancing, rewinding or playing the
cassette tape.
8.
To play the desire selection locate the “PLAY” button and press once.
NOTE: The graphics function will not work with cassette tapes.
CHANGING THE KEY OF THE MUSIC USING THE CASSETTE DECK
Follow the same instructions for changing the key or pitch with the cassette deck as for changing the key for the CD/CDG player.
See: RAISING OR LOWERING THE PITCH (OR KEY) OF THE MUSIC. (ABOVE)
5
USING THE CASSETTE DECK
(Cont.)
TO RECORD WITH THE CASSETTE DECK
You can record you voice on the cassette deck while singing with a Karaoke CD/CDG.
1.
NOTE: Be sure to select the “CDG” button located under the CDG tray before you start. Follow the instructions
for playing a CD/CDG and select the desired “track” (song), but do not start your song selection yet. Press the “PLAY
PAUSE” key until the word “PAUSE” appears in the display window.
2.
Be sure the blank cassette tape is placed in the cassette deck and the cassette door closed.
TAPE COUNTER
3.
Note:
Note:
Set the Tape counter to zero by pushing the “RESET” button located next to the “COUNTER” on the front of the
unit. This will help you keep track of your place on the tape if you are recording multiple songs but not starting from
the beginning of the tape.
If you have rewound the cassette tape all the way to the beginning note that there are a few seconds of “leader” tape at each end
of the cassette on which you can not record.
4.
Locate the “REC” and “PLAY” keys of the cassette deck and press them simultaneously until they stay in the down
position. Note: The “REC” key has a red line on the top instead of a white line.
5.
View the advancing cassette through the cassette door window and let tape run until it has passed the “leader” tape.
If it is not visible, allow approximately 10 seconds to let the tape “roll” then locate and press the “PAUSE” key. This
will stop the cassette from advancing but it will still be in the “record” mode. Leave the “PAUSE” button pressed.
6.
Begin your CD/CDG song selection making sure your volume and echo controls are adjusted to your liking.
7.
At the same time, release the “PAUSE” key and the tape will start “rolling”. Your selection and voice is now being
recorded.
Be careful not to “thump” the microphone while holding it or while singing. This will create noise that will be noticeable on your
recording. Tip: When recording be careful not to “pop” the microphone. This means when singing be aware of the “plosive”
consonants like “P” and “T”. Excessive breath on these consonants will create an undesirable “pop” sound on your recording.
TO RECORD ANOTHER SONG
When you have finished recording you can record another selection without repeating step 3 in “TO RECORD WITH THE
CASSETTE DECK” or “wasting” tape between songs.
1.
When your song has finished recording press the “PAUSE” key on the cassette deck. This will stop the tape from
recording but it will still be in record mode.
2.
When you are ready to begin your next song selection release the “PAUSE” key and the tape will begin recording.
3.
Press “ST/EJ” OR “PAUSE” when finished recording, depending on whether you want stop or record again.
6
listen to your recording...
OTHER PARTS OF THE CDG X-3 MARK II
TO LISTEN TO YOUR RECORDING
1.
When you have finished recording stop the tape by pressing the “ST/EJ” key.
2.
Rewind the tape by pressing the “REW” key until the tape stops at the desired location.
3.
Select the “CASSETTE” button located below the CDG player to switch to cassette mode.
Note: This button should be set to CDG when recording from CDG to cassette.
4.
Start the tape playback by pressing the “PLAY” key on the cassette deck.
5.
Adjust the master volume control to the desired listening level. (See diagram)
Reminder: If you set the tape counter to zero before you start recording you can more easily keep track of you location on the tape.
OTHER PARTS OF THE CDG X-3 MARK II
DJ MICROPHONE INPUT JACK
There is a third microphone input jack located on the back of the CDG-X3 Mark II amplifier next to the speaker jacks. This jack is best used
for “dry” announcements as it “bypasses” the echo feature. For example the Karaoke “Host or Hostess” may use this microphone input
to “announce” the next singer and song selection without having to readjust the settings on the microphones already in use by the
singer(s).
The volume control for the third microphone input jack located just to the right of the jack itself.
VOLTAGE SELECT
This is used to select the voltage according to the country. In Europe select 220-224v, in USA select 110v.
VIDEO SYSTEM (NTSC/PAL)
This is used to select the video system according to country. In Europe select PAL, in USA select NTSC.
AC OUTLET
The AC outlet can be used to connect an additional component up to 200W maximum.
FUSE:
IMPORTANT! IF THE FUSE BLOWS OUT IT IS AN IMPORTANT INDICATION THERE MAY BE A SHORT SOMEWHERE IN THE
SYSTEM. DO NOT REPLACE THE FUSE! TAKE YOUR CDG X-3 MARK II TO AN AUTHORIZED REPAIR FACILITY. REPLACING
THE FUSE COULD POSSIBLY CAUSE ADDITIONAL DAMAGE THAT MAY NOT BE COVERED BY THE WARRANTY.
7
CONNECTING OTHER
COMPONENTS TO THE CDG X-3 MARK II
The CDG X-3 Mark II is designed so you can connect other components to it and use the Karaoke features that are built-in to the CDG
X-3 Mark II in conjunction with those components.
EXPANDING YOUR SYSTEM - USING THE CDG X-3 MARK II FEATURES WITH OTHER COMPONENTS
You may use the Karaoke features (echo, delay, key changer) that are built into the CDG X-3 Mark II with other components just by
connecting the components as described in this section. The Karaoke features will automatically be functional when additonal components are properly connected. (Also see REAR PANEL PARTS AND FUNCTIONS for additional connection information)
CONNECTING AN AMPLIFIER (for sound)
An amplifier should be connected to the CDG X-3 Mark II through the “L” and “R” “PRE” OUTPUT jacks located in the back of the CDG
X-3 Mark II (See manufacturer’s instructions with your amplifier)
“L” and “R” “PRE” OUTPUT jacks
CONNECTING A DVD PLAYER OR MINI-DISC PLAYER
Using and RCA connector cable, connect the “L” and “R” “DVD” INPUT jacks to the “L” and “R” “AUDIO OUTPUT” jacks on the
DVD player (check manufacturer’s instructions). BE SURE TO SET THE INPUT SELECTOR ON THE FRONT OF THE CDG X-3 MARK
II TO “DVD”, OTHERWISE THERE WILL BE NO SOUND. Play the DVD player as usual. Music from the DVD player will be audible
from your speakers and the Karaoke features will be functional.
CONNECTING A LASER DISC PLAYER
Using and RCA connector cable, connect the “L” and “R” “LD” INPUT jacks to the “L” and “R” “AUDIO OUTPUT” jacks on the LD player
(check manufacturer’s instructions). BE SURE TO SET THE INPUT SELECTOR ON THE FRONT OF THE CDG X-3 MARK II TO “LD”,
OTHERWISE THERE WILL BE NO SOUND. Play the LD player as usual. Music from the LD player will be audible from your speakers and
the Karaoke features will be functional.
8
CONNECTING OTHER
COMPONENTS TO THE CDG X-3 MARK II
CONNECTING AN ADDITIONAL TAPE DECK TO PLAY OR RECORD ON THE CDG X-3 MARK II
TO PLAY MUSIC FROM AN ADDITIONAL TAPE DECK THROUGH THE CDG X-3 MARK II: Using and RCA connector cable,
connect the “L” and “R” “AUX” INPUT jacks on the CDG X-3 Mark II to the “L” and “R” “AUDIO OUTPUT OR PLAY OUT” jacks on the
tape deck (check manufacturer’s instructions). BE SURE TO SET THE INPUT SELECTOR ON THE FRONT OF THE CDG X-3 MARK II
TO “AUX”, OTHERWISE THERE WILL BE NO SOUND. Play the tape deck as usual. Music from the tape deck will be audible
from your speakers. All the Karaoke features will be functional except video. TO RECORD TO THE CDG X-3 MARK II FROM AN
ADDITIONAL TAPE DECK: To record music from the additional tape deck to the CDG X-3 Mark II tape deck, play the additional tape
deck and follow the directions for recording on the CDG X-3 Mark II tape deck under “USING THE CASSETTE DECK, To Record
With The Cassette Deck”.
CONNECTING AN ADDITIONAL RECORDING DEVICE TO RECORD FROM THE CDG X-3 MARK
II (Tape Deck, Mini Disc or DAT)
TO RECORD MUSIC ONLY FROM THE CDG X-3 MARK II ONTO AN ADDITIONAL RECORDING DEVICE: Using and RCA
connector cable, connect the “L” and “R” “REC” OUTPUT jacks on the CDG X-3 Mark II to the “L” and “R” “AUDIO INPUT OR REC IN”
jacks on the recording device (Check manufacturer’s instructions). BE SURE TO SET THE INPUT SELECTOR ON THE FRONT OF THE
CDG X-3 MARK II TO WHICHEVER PLAYER YOU ARE USING, OTHERWISE THERE WILL BE NO SOUND. Se up your additional
recording device to record then play your selection. The karaoke features will be functional from the CDG X-3 Mark II. Music ONLY will be
recorded onto the additional tape deck.
TO RECORD MUSIC AND VOCALS FROM THE CDG X-3 MARK II ONTO AN ADDITIONAL RECORDING DEVICE: Using and
RCA connector cable, connect the “L” and “R” “PRE” OUTPUT jacks on the CDG X-3 Mark II to the “L” and “R” “AUDIO INPUT OR
REC IN” jacks on the recording device (check manufacturer’s instructions). BE SURE TO SET THE INPUT SELECTOR ON THE FRONT
OF THE CDG X-3 MARK II TO WHICHEVER PLAYER YOU ARE USING, OTHERWISE THERE WILL BE NO SOUND. Set up your
additional recording device to record then play your selection. The karaoke features will be functional from the CDG X-3 Mark II. Music
AND vocals will be recorded onto the additional recording device.
CONNECTING THE CDG X-3 MARK II TO YOU HOME STEREO
TO PLAY MUSIC FROM THE TWISTER II ON YOUR HOME STEREO: Using and RCA connector cable, connect the
“L” and “R” “PRE” OUTPUT jacks on the CDG X-3 Mark II to any of the “L” and “R” “AUDIO INPUT” channels i.e.,
“CD” or “AUX” on your stereo. DO NOT CONNECT TO THE PHONO JACKS. (Check manufacturer’s instructions). BE SURE
TO SET THE INPUT SELECTOR ON YOUR STEREO TO THE CORRESPONDING INPUT JACKS YOU HAVE SELECTED TO CONNECT
THE CDG X-3 MARK II, OTHERWISE THERE WILL BE NO SOUND. Play the CDG X-3 Mark II as usual. Music from the CDG X-3 Mark
II will be audible from the stereo speakers. All the Karaoke features will be functional.
USING THE REMOTE CONTROL
The CDG X-3 Mark II comes with a handy remote control to allow the user to operate the Karaoke functions from up to twenty-five feet from
the unit. The remote control offers the user fast forward, rewind, skip, search, programmable memory, play/pause, open/close for the CD/
CDG tray and stop. The memory function can be used with the remote control to program specific song selections when using the CD/CDG
player. The remote control will not work with the tape deck. Be sure not to block the infrared eye on the CDG X-3 Mark II (See #15 FRONT
PANEL diagram) or the sensor on the hand held remote control (#1 REMOTE CONTROL diagram). If either of these parts are covered while
attempting to use the remote control it will not function. (Also see PARTS AND FUNCTIONS, FRONT PANEL, #8 for detailed instructions
about programming the CDG X-3 Mark II). All the parts on the remote control correspond to the same parts on the front panel of the CDG
X-3 Mark II.
9
PARTS AND FUNCTIONS
OF THE REMOTE CONTROL
1
2
3
4
5
6
7
8
9
INFRARED REMOTE SENSOR: The sensor on the top of the
hand held remote control communicates with the infrared
sensor on the front panel of the CDG X-3 Mark II and should
not be covered or the remote control will not work properly.
10
BATTERY COMPARTMENT: On the back of the hand
held remote control there is a cover that slides off to
expose the battery compartment. Push cover down with
thumb and slide off. The hand held remote control
uses two “AAA” size batteries.
OPEN/CLOSE: The OPEN/CLOSE button on the hand held
remote control operates the CD/CDG tray. Press once to
open the CDG tray and again to close the tray.
1
DISPLAY: The display button when pressed once will show
the user the remaining number of played-played song
selections on the CD/CDG disc and the amount of time
left to play them. It serves the same function as the
“DISPLAY” button on the front panel of the CDG X-3 Mark II.
(See PARTS AND FUNCTIONS, #5)
MEMORY: The MEMORY button allows the user to program
song selections from the hand held remote control.
To program the CDG X-3 MARK II player with the remote
control the steps are the same as to program the player
from the front panel of the CDG X-3 Mark II. (See PARTS
AND FUNCTIONS, FRONT PANEL diagram, #8). When
programming song selections, instead of pressing the
memory button on the CDG X-3 Mark II, press the memory
button on the remote control.
REPEAT: The REPEAT button on the hand held remote
control allows the user to repeat one song selection or all
song selections. (See PARTS AND FUNCTIONS, FRONT
PANEL diagram, #6)
2
3
4
5
6
7
8
9
SKIP: The SKIP button on the hand held remote control
allows the user to “skip” back to the previous song. When a
song is playing it serves as a “rewind” button and will “SCAN”
the song selection in reverse. On the front panel of the
CDG X-3 Mark II it is the same as the ”B-SCAN” and “PREV”
buttons combined. (See PARTS AND FUNCTIONS, FRONT
PANEL diagram, #9, #12)
SEARCH: The SEARCH button on the hand held remote
control allows the user to”skip” ahead to the next song. When
a song is playing it serves as a “fast-forward” button and will
“SCAN” the song selection. On the front panel of the
CDG X-3 Mark II it is the same as the ”F-SCAN” and “NEXT”
buttons combined. (See PARTS AND FUNCTIONS, FRONT
PANEL diagram, #11, #13)
STOP: Stops the CD/CDG player.
PLAY: Starts and pauses the CD/CDG player. Press once to
start song selection and once to pause. Press again top
resume playing song selection.
10
10
(ON BACK)
TROUBLE SHOOTING GUIDE
PROBLEM
POSSIBLE CAUSE(S)
SOLUTION(S)
No video signal. Words don’t
appear on the TV monitor.
The television may not be
switched to the proper video
input channel.
Be sure the television is set
to the “VIDEO” mode (see your
television’s owners manual).
Be sure the “VIDEO OUTPUT”
jack (See PARTS AND FUNCTIONS diagram) on the rear
panel of the CDG X-3 Mark II is
connected to the “VIDEO INPUT”
section of the TV monitor.
Unable to connect the CDG X-3
Mark II to my television monitor
with the “RCA” cable provided.
Not all televisions/monitors have
“RCA” connector jacks.
You will need an “RF Modulator”, or VCR. (See PARTS
AND FUNCTIONS, #17 and
diagram for “CONNECTING A
TELEVISION MONITOR “. There
are three options for connecting
televisions without video input
jacks.
There is a loud “squealing” noise
coming from speakers.
This noise is called “feedback”.
Feedback occurs for various
reasons. For example, feedback can occur if the microphone is held too closely to, or
pointed directly at, the speakers . Feedback can also occur
if the microphone volume is
too high or there is too much
treble frequency being used.
Turn down the microphone
volume.
11
Turn down the treble control.
Hold the microphone away
from the speakers.
PARTS AND FUNCTIONS
(FRONT PANEL)
5
3
4
2
42
40
41
1
38
39
36
37
6
34
1
35
7
8
32
31
33
POWER BUTTON: Turns on the power to the CDG X-3 Mark II.
TAPE COUNTER: Use the tape counter when playing or
recording cassettes to keep track of your location on the tape.
3
OPEN/CLOSE BUTTON: To open/close CD/CDG tray.
4
RESET BUTTON: Push the reset button to reset the tape
counter to zero when using the cassette deck.
6
7
11
10
30
2
5
9
DISPLAY BUTTON: When playing a CD/CDG disc and pressed
once this button displays the remaining number of songs to
play on the disc, and time remaining in minutes and seconds
to play them, in the CDG Display Window (#10). This feature
works only with the CD/CDG player. When pressed again
the window displays the song selection number and the
elapsed time in minutes and seconds.
29
8
13
15
17
12
14
16
28
26
24
27
25
23
18
19
22
20
21
MEMORY BUTTON: The memory function is used to
program specific song selections in any order. First, you’ll
need to clear the memory. If there is a CD/CDG in the player
press stop. Press the “OPEN/CLOSE’ button once until
the tray opens and again to close it. Doing this will clear
out any previously stored program(s) from the memory.
Next, press the “MEMORY” button once. There will be a “P:01”
with the word “PROGRAM” above it and two dashes (- -) to
the left, shown in the display window . Press the “NEXT”
button the desired amount of times to display the song
selection number you wish to program first in your program
order. The song selection number will be displayed where the
two dashes were (- -). Proceed to program the next song
selection by pressing the “MEMORY” button again. Doing
so will store your first song selection and display a “P:02” and
two dashes (- -) to the left. Repeat the process as above
to program up to twenty song selections. When finished, press
“PLAY/PAUSE” to begin playing your selections. The program
order will be stored until the “OPEN/CLOSE” button is
pressed again.
REPEAT BUTTON: When using the CD/CGD player and
pressed once, this feature allows the user to repeat the
current song selection. When pressed twice all the songs on
the disc will repeat once each. Songs will repeat until the
button is pressed a third time. The display window will show
which function you have selected, “REPEAT” (repeats
current song selection) or “ALL” (repeats all songs).
9 PREVIOUS SELECTION BUTTON: Press this button to
KEY CONTROL DISPLAY: Displays the number of half-steps
up (+) or down ( - ) you have chosen. When the
display reads zero “0” you are in the song’s “natural” key.
10 CDG DISPLAY WINDOW: This window displays the
12
select the previous song on the CDG disc being played.
Press once for each song you want to skip back to, or hold the
button down to skip back continually. The selection
number will be displayed in the display window (#10).
current song selection playing on the CDG disc.
PARTS AND FUNCTIONS
(FRONT PANEL CONT.)
11
NEXT SELECTION CONTROL BUTTON: Press this 25 AUX: Auxiliary input selector key. Pressing this key will
button to advance the CDG to the next song selection
select the component that is connected to the auxiliary input.
Press once for each song you want to advance to, or hold the
For example, if an additional tape deck or CD player is used
button down to advance continually. The selection
with the CDG X-3 Mark II, and it is connected to the “AUX” input
number will be displayed in the display window (#10).
jacks, this key will need to be selected before the
component can be used.
12 B-SCAN: Press this button to “scan” the song selection in
reverse. This feature works the same as the “rewind” key on a 26 DVD: Digital video disc input selector key. Pressing this key
cassette deck. The difference between this feature and the
will select the component that is connected to the DVD input
“PREV” selection control button is this feature
jacks. For example, if a DVD player is used with the CDG X-3
reverses the CDG within the song selection and the
Mark II and it is connected to the “DVD” input jacks, this key
“PREV” button skips back to the previous song.
will need to be selected before the component can be used.
13 F-SCAN: Press this button to forward “scan” the song
selection. This feature works the same as the
“fast-forward” key on a cassette deck. The difference
between this feature and the “NEXT” selection control
button is this feature advances the CDG within the
song selection and the “NEXT” button skips forward to the
next song.
14 STOP: This button stops the CDG disc from playing.
select the component that is connected to the
“LD” input jacks. For example, if a DVD player is used with the
CDG X-3 Mark II, and it is properly connected to the “LD”
input jacks, this key will need to be selected before the
component can be used.
28 CDG: CDG selector key. This key must be pressed when
15 REMOTE SENSOR: This window allows the CDG X-3 Mark II to
communicate with the hand held remote control. Do not block
the window or the remote control will not work properly.
16 PLAY/PAUSE: Use this button to start playing the song selection and/or to pause the selection at any time during play. Press
once to play, press again to pause. If paused, press once to
resume playing song selection.
17 BASS CONTROL: This controls the amount of bass tone in
the music being played. (See “Using Effects”)
18 MUSIC VOLUME:
27 LD: Laser disc input selector key. Pressing this key will
This controls the volume of the
music being played.
19 TREBLE CONTROL: This controls the amount of treble tone in
the music being played. (See “Using Effects”)
20 MIC VOLUME 2: This controls the volume for the 2nd
microphone input.
21 MIC 2: Microphone input jack for a 2nd microphone.
22 KEY CONT.: This is used to connect the optional “key control”
microphone. (Not included)
playing a CD or CDG disc in the CDG X-3 Mark II. NOTE: This
key must be pressed if you are recording from the CDG player
in the CDG X-3 Mark II onto the cassette deck otherwise
you will not be able to hear the CDG disc that is playing.
29 CASSETTE: Cassette selector key. This key must be
pressed when playing a cassette in the CDG X-3 Mark II cassette deck. NOTE: DO NOT press the cassette key if you are
recording from the CDG player in the CDG X-3 Mark II onto the
cassette deck, otherwise you will not be able to hear the CDG
disc that is being played. (The “CDG” key must be pressed
when recording from the CDG player to the cassette deck.
30 VOC/P: Vocal Partner key. This feature is designed to work
only with “multiplex” karaoke discs. By pressing this key
the “guide” or “lead” vocal on the multiplex disc will
be removed when you are singing. When you stop singing
the “guide/lead” vocal will again become audible, so it’s
like having a “vocal partner”. For example, if you want
to sing every other verse in a song you may do so when
using this feature. The “guide/lead” vocal will
automatically begin a second after you stop singing and
become inaudible when you resume singing until the
VOC/P key is pressed again.
31 VOC/C: Vocal Cancel key. This feature is designed to work
23 MIC 1: Microphone input jack.
24 MIC VOLUME 1: This controls the volume for the
microphone input.
13
only with “multiplex” karaoke discs. By pressing this
key the “guide” or “lead” vocal on the multiplex disc will
be removed throughout the entire song. To hear the
guide/lead vocal press the key again.
PARTS AND FUNCTIONS
(FRONT PANEL CONT.)
32 SHARP KEY: Press this key to RAISE the pitch of the
39 REW: “REWIND” When playing a cassette, this key can
song selection being played. This feature raises the pitch
of the song one half-step for each time it is pressed,
up to nine half-steps. The sharp key is part of the “key control”
feature and will work with the CDG player and cassette
deck. The key control feature will also work with external
players when properly connected to the CDG X-3 Mark II. (See
“Using Effects and Changing the Key” and “Connecting
Other Components to the Twister”) Note: The key control
feature will not change the tempo of the song being played.
be used to rewind the cassette to the previous location.
To advance the tape, press the “ST/EJ” (STOP) key first
to stop the tape, then press “F. FWD”.
33 NATURAL KEY:
Press the natural key once to RETURN the
pitch of the song selection being played to it’s
“natural key” or pitch . The natural key is part of the “key
control” feature and will work with the CDG player and
cassette deck. The key control feature will also work with
external players when properly connected. (See “Using
Effects and Changing the Key” and “Connecting Other Components to the CDG X-3 Mark II”) Note: The key control feature will not change the tempo of the song being played.
34 FLAT KEY: Press this key to LOWER the pitch of the
song selection being played. This feature lowers the pitch
of the song one half-step for each time it is pressed,
to as many as nine half-steps. The flat key is part of the
“key control” feature and will work with the CDG player
and cassette deck. The key control feature will also work
with external players when properly connected to the
CDG X-3 Mark II. (See “Using Effects and Changing the Key”
and Connecting Other Components to the CDG X-3 Mark
II”) Note: The key control feature will not change the tempo
of the song being played.
35 CD/CGD TRAY: Press the “OPEN/CLOSE” button (See #3 on
diagram) to open the CD/CDG tray. Carefully set your CD/CDG
disc onto the tray and press the OPEN/CLOSE button again to
close tray. Never push or force tray closed manually.
CASSETTE DECK PARTS AND FUNCTIONS
36 PAUSE: Press the “PAUSE” key once to momentarily stop
the cassette tape from playing or recording. Press again
to continue playing or recording.
37 ST/EJ: “STOP/EJECT” Press this key once to stop a cassette
from playing or recording,
press again to eject.
When the cassette door opens insert or remove a tape.
38 F-FWD: “FAST FORWARD” When playing a cassette, this key
can be used to advance the cassette to the next
desired location. To advance the tape, press the “ST/EJ”
(STOP) key first to stop the tape, then press “F-FWD”.
14
40 PLAY: After a cassette tape has been inserted into the
cassette player, press this key to begin playing. When
recording, press this key together with the “REC”
(RECORD) key to begin recording. (See “USING THE
CASSETTE DECK”, “To Record With The Cassette Deck”)
41 REC: “RECORD” To record press the “PLAY” key and the
“REC” key together and the cassette will begin recording. For
detailed instructions: (See “USING THE CASSETTE DECK”
under “To Record With The Cassette Deck”)
42 CASSETTE DOOR: This compartment holds a cassette
tape for playing or recording. To open the cassette door,
press “ST/EJ” (STOP/EJECT). After inserting or removing
a cassette tape gently push the cassette door closed. Never
force the door closed.
PARTS AND FUNCTIONS
(REAR PANEL)
3
1
4
5
2
6
7
8
9
10
13 12
11
10
16 15 14
PARTS AND FUNCTIONS REAR PANEL
1
3RD MICROPHONE/DJ/KJ INPUT JACK: This microphone
input “bypasses” the echo feature and the bass
and treble tones are “preset”. Therefore it is considered
to produce a “dry” signal and there are no separate bass
or treble controls. It is best used for announcements by
the host or hostess. The volume control for the 3rd
microphone input is located just to the right of the input jack.
(See #5, of the “REAR PANEL” diagram).
2
3RD MICROPHONE INPUT VOLUME CONTROL: This
controls the volume for the 3rd microphone input. Turn
clockwise to increase volume, counterclockwise to decrease.
3
BASS CONTROL FOR MIC-1 AND MIC-2: This
controls the amount BASS tone microphones 1 and 2 will
receive. Turn clockwise to increase bass tone and counterclockwise to decrease the bass tone. (See “USING EFFECTS
AND CHANGING THE KEY”, Adding Bass or Treble To The
Vocals)
5
ECHO CONTROL FOR MIC-1 AND MIC-2: This
controls the amount ECHO microphones 1 and 2 will
receive. Turn clockwise to increase echo and counterclockwise to decrease echo. (See “USING EFFECTS AND
CHANGING THE KEY”, Adding Effects (Delay/Echo)
To The Vocal Signal )
6
NTSC/PAL SELECTOR SWITCH: This switch is used to
select the NTSC/PAL setting according to country. For U.S.
televisions systems it should be set to NTSC and for
European television systems the selector should be set to
PAL.
VOLTAGE SELECTOR SWITCH: This switch is used to
select the voltage setting according to country. For use in the
U.S. the voltage selector should be set to 110v-120v and
220v-240v in Europe.
7
4
8
9
TREBLE CONTROL FOR MIC-1 AND MIC-2: This
controls the amount TREBLE tone microphones 1 and 2 will
receive. Turn clockwise to increase TREBLE tone and counterclockwise to decrease the treble tone. (See “USING EFFECTS AND CHANGING THE KEY”, Adding Bass or
Treble To The Vocals)
15
200W AC OUTLET: This outlet can be used to connect
another component providing it does not exceed 200 watts
maximum power consumption.
FUSE: IMPORTANT! If the fuse blows out it’s a good
indication that there may be a short in the system.
DO NOT REPLACE THE FUSE! Doing so could possibly
cause additional damage to the unit. Take your
CDG X-3 Mark II to an authorized repair facility.
PARTS AND FUNCTIONS
(REAR PANEL CONT.)
10
AC POWER CORD: Plugs into any AC wall outlet.
11
LEFT AND RIGHT CHANNEL RECORD (“REC”) OUTPUT
JACKS: These two outputs jacks can be used to connect an
additional tape deck. Connect the left (“L”) and right (“R”)
record (REC) output jacks to the respective left (“L”) and right
(“R”) record (REC) input jacks on the back of your external
tape deck. Only the music being played on the CDG X-3
Mark II will record onto your external tape deck. (Follow instructions for using either player on the CDG X-3 Mark II) Play
the desired CD/CDG or cassette on the CDG X-3 Mark II and
record it on your external tape deck. Vocals from the CDG X3 Mark II will not be recorded using these jacks. To record
music and vocals from the CDG X-3 Mark II to an external
tape deck connect your external tape deck to the “L” AND
“R” “PRE” output jacks of the “AUDIO OUTPUT” section.
(See #16 on REAR PANEL diagram. Also see “CONNECTING OTHER COMPONENTS TO THE CDG X-3 MARK II ”,
“Expanding Your System”)
12
LEFT AND RIGHT CHANNEL “PRE” OUTPUT JACKS: These
two output jacks can be used to connect an external tape
deck on which to record music AND vocals, being played
on the CDG X-3 Mark II. Connect the left “L” and right “R”
“PRE” output jacks of the CDG X-3 Mark II to the respective
left “L” and right “R” input jacks (usually “REC IN” on most
tape decks) on the back of your external tape deck. (Follow
instructions for using either player on the CDG X-3 Mark II)
Play the desired CD/CDG or cassette on the CDG X-3 Mark II
and record it on your external tape deck.
13
VIDEO OUTPUT JACK: The video output jack is used to
connect the CDG X-3 Mark II to a television monitor. When
properly connected, the television monitor will display lyrics
and graphics from CDG discs being played on the CDG X-3
Mark II. There are three ways to connect a television monitor
to the CDG X-3 Mark II. 1) Connect the “VIDEO OUTPUT”
jack to the “VIDEO IN” on the back of the television monitor.
There is an RCA connector cord provided with the CDG X-3
Mark II for this type of connection. BE SURE TO SWITCH YOUR
TELEVISION MONITOR TO “VIDEO” MODE, OTHERWISE LYRICS AND GRAPHICS WILL NOT APPEAR. 2) If your television
monitor does not have and RCA type connector and only has
a coaxial connector, you can use a VCR to connect the CDG
X-3 Mark II to your television monitor. To do this, connect the
“VIDEO OUTPUT” jack on the back of the CDG X-3 to the
“VIDEO IN” on the VCR. (See diagram on opposite page). BE
SURE THE TELEVISION MONITOR IS SET TO “ VIDEO” MODE
AND THE VCR SETTING CORRESPONDS TO THE JACKS YOU
HAVE CONNECTED THE PLAYER TO, OTHERWISE LYRICS
AND GRAPHICS WILL NOT APPEAR. If you are unsure of
which setting on the VCR should be used, see manufacturer’s
instructions provided with the VCR. 3) If you do not have a
VCR, or RCA connectors on the back of your television monitor. You will need an “RF” modulator.
To use an “RF” modulator, connect the “VIDEO OUTPUT”
jack on the back of the CDG X-3 Mark II to the “VIDEO IN” jack
on the “RF” modulator. Next, Connect the “OUTPUT” of the
“RF” modulator, with a coaxial cable (not provided) , to the
“ANTENNA INPUT” of the television monitor. BE SURE
TO SET THE TELEVISION MONITOR TO “CHANNEL 3”,
OTHERWISE LYRICS AND GRAPHICS WILL NOT APPEAR.
(Refer to diagram on opposite page)
14
VIDEO INPUT JACKS: There are two video input jacks on the
back of the CDG X-3 Mark II. They both serve the same purpose and can be used to connect two external players at a
time. They are labeled separately, “DVD” (digital video disc)
and “LD” (laser disc), to allow you to easily identify which jack
you have connected to which player. When a DVD or LD player
has been properly connected, (See “CONNECTING OTHER
COMPONENTS TO THE CDG X-3 MARK II”), the television
monitor connected to the CDG X-3 Mark II will display lyrics
and graphics from the discs being played on the external
player(s). To connect an external player use an RCA connector cable. Connect either the DVD or LD VIDEO INPUT jack
on the back of the CDG X-3 Mark II to the “VIDEO OUTPUT”
jack on the external respective player. The basic rule is “INPUT” connected to OUTPUT”. WHEN PLAYING AND EXTERNAL DVD OR LD PLAYER, BE SURE TO SELECT THE DVD OR
LD SETTING ON THE FRONT OF THE CDG X-3 MARK II, OTHERWISE THERE WILL BE NO AUDIO OR VIDEO. (See FRONT
PANEL diagram, #26, #27)
15
RIGHT AND LEFT AUDIO INPUT JACKS TO CONNECT
EXTERNAL LASER DISC (LD) PLAYER: The “R” and “L”
“AUDIO INPUT” jacks are used to connect an external laser
disc player to the CDG X-3 Mark II. When properly connected,
the CDG X-3 Mark II will play the music being played on the
laser disc player through the CDG X-3 Mark II speakers.
Connect the “R” and “L” “AUDIO INPUT” jacks on the CDG X3 Mark II to the “L” and “R” “AUDIO OUTPUT” jacks on the
laser disc player, using an RCA type connector cable. WHEN
PLAYING AND EXTERNAL LD PLAYER, BE SURE TO SELECT
LD SETTING ON THE FRONT OF THE CDG X-3 MARK II,
OTHERWISE THERE WILL BE NO AUDIO OR VIDEO.
16
RIGHT AND LEFT AUDIO INPUT JACKS TO CONNECT
AN EXTERNAL DIGITAL VIDEO DISC (DVD) PLAYER: The “R”
and “L” “AUDIO INPUT” jacks are used to connect an external laser disc player to the CDG X-3 Mark II. When properly
connected, the CDG X-3 Mark II will play the music being
played on the laser disc player through the CDG X-3 Mark II
speakers. Connect the “R” and “L” “AUDIO INPUT” jacks on
the CDG X-3 Mark II to the “L” and “R” “AUDIO OUTPUT” jacks
on the laser disc player, using an RCA type connector cable.
WHEN PLAYING AND EXTERNAL LD PLAYER, BE SURE TO
SELECT LD SETTING ON THE FRONT OF THE CDG X-3 MARK
II, OTHERWISE THERE WILL BE NO AUDIO OR VIDEO.
16
CONNECTING A
TELEVISION MONITOR
17
CONNECTION DIAGRAM
for other components
18
SPECIFICATIONS
AUDIO INPUT (AT1KHZ)
MICROPHONE ....................................................... 2.5mv/10k Ohms
AUX/DVD/LD/CDG/CASSETTE.............................. 150MV/50 Ohms
AUDIO OUTPUT...................................................... 500MV
VIDEO INPUT
CDG/LD/DVD.......................................................... 1V P-P/75 Ohms
FREQUENCY RESPONSE
AUX/DVD/LD/CDG/CASSETTE.............................. 20HZ-20KHZ+3db
TONE CONTROL (MUSIC)
BASS....................................................................... +9db(100HZ)+2
TREBLE .................................................................. +9db(10KHZ)+2
ECHO TIME DELAY................................................. 100MSEC-200 MSEC
KEY CONTROL RANGE ........................................ +9/-9MUSIC INTERVALS
(19 POSITIONS)
SIGNAL TO NOISE RATIO................................................ >75db
CASSETTE MOTOR SPEED (ATT-111N 3KHZ) .............. 2940HZ-3090HZ
CASSETTE WOW-FILTER ATT-111N 3KHZ) .................. <0.3%
POWER SUPPLY, OTHERS
POWER REQUIREMENTS..................................... AC 110V/220V SWITCHABLE
POWER CONSUMPTION ...................................... 18 WATTS
VIDEO
VIDEO SYSTEMS (CDG ONLY) ............................ PAL/NTSC SWITCHABLE
AC OUTLETS
UNSWITCHED ....................................................... 1 (TOTAL 200W)
DIMENSIONS:................................................................... (W X D X H) : 17” X 15 1/2” X 6”
19