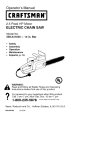
1
Operator's
Manual
2.0 HP Motor
ELECTRIC CHAIN SAW
CRAFTSMAN
_
Model No.
358.341000
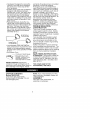
g
a
a
- 14 in. Bar
®
WARNING:
Read and follow all Safety Rules and Operating
Instructions
before first use of this product.
For answers
Call 7 am-7
to your questions about this product:
pm, Mon-Sat;
Sun, 10 am-7 pm
1-800-235-5878
Sears, Roebuck
530084337
and Co., Hoffman
09/12/97
Estates,
IL 60179 USA
0
g
Warranty
Safety Rules
Assembiy
Operation
Maintenance
Service and Adiustments
2
2
6
7
12
13
Customer ServiceaMe
Storage
Troubie Shooting
Spanish
Parts Ordering
Parts
14
15
15
18
Back
FULL ONE YEAR WARRANTY ON CRAFTSMAN
ELECTRIC CHAIN
SAW.
If this Craftsman Electric Chain Saw faiIs to perform properly due to a
defect in material or workmanship within (1) year from the date of purchase, Sears wilt repair or replace it, free of charge.
This warranty excludes the bar and chain, which are expendable parts
and become worn during normal use.
If this Craftsman Electric Chain Saw is used for commercial purposes,
this warranty applies for onty 90 days from the date of purchase. If this
Craftsman Electric Chain Saw is used for rentaI purposes, this warranty
applies for only 30 days from the date of purchase. This warranty applies only while this product is in use in the United States.
WARRANTY SERVICE iS AVAILABLE BY RETURNING THE CRAFTSMAN ELECTRIC CHAIN SAW TO THE NEAREST SEARS SERVICE
CENTER tN THE UNITED STATES.
This warranty gives you specific legal rights, and you may also have other rights which vary from state to state.
Sears, Roebuck and Co., D/817 WA, Hoffrnan Estates, IL 60179
WARNING:
When using an electric
chain saw, basic safety precautions
shoutd always be foIIowed to reduce
the risk of fire, etectric shock, and injury
to persons, including the following.
Read a_linstructions.
WARNING:
Always disconnect power
source when making repairs. Because
a chain saw is a high-speed woodcutting toot, careless or improper use of
this tool can cause serious injury.
PLAN AHEAD
• Restrict the use of your saw to adult
users who understand and can foltow
the safety ruies, precautions, and operating instructions found in this
manual.
• Keep children away. Do not let visitors contact chain saw or extension
cord. AIt visitors shoutd be kept at
teast 30 feet (10 meters) away from
work area,
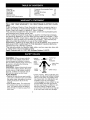
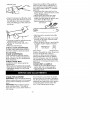
Hearing
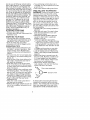
Protection"_
_
inr
,_-
Fitting _
•
Clothing
Snug
Safety Hat
Eye
Heavy Duty
_/Gloves
_ ,__rotection
Safety
_ _
_Jl
Safety Chaps
Ilhn
• Dress properly. Wear protective gear.
Always use steel-toed safety footwear
with non-slip soles; snug-fitting clothing; heavy-duty, non-slip gloves; eye
protection such as non-fogging,
vented goggles or face screen; an approved safety hard hat; and sound
barriers (ear plugs or mufflers) to protect your hearing. Regular users
should have hearing checked regularly as chain saw noise can damage
hearing,
Secure
hairabove
shoulder cause the tender material may catch
length.
Donotwearloose
clothing
or the saw chain and be whipped toward
jewelry.
Theycangetcaught
inmov- you or pull you off balance.
• When cutting a limb that is under teningparts.
• Keep
allparts
ofyourbody
away
from sion be alert for spring back so that
thechain
when
thesawisrunning. you will not be struck when the ten• Donothandle
oroperate
achainsaw sion in the wood fibers is released.
when
youarefatigued,
ill,orupset,
or MAINTAIN YOUR SAW IN GOOD
ifyouhave
taken
alcohol,
drugs,
or WORKING
ORDER
medication.
Youmust
beingood
all chain saw service performed
physical
condition
andmentally
alert. • Have
a qualified service dealer except
Ifyouhave
anycondition
thatmight by
the items listed in the maintenance
beaggravated
bystrenuous
work,
of this manual,
check
withdoctor
before
operating. section certain
the saw chain stops
Watch
whatyouaredoing.Usecom-• Make
moving when the trigger switch is remonsense.
• Donotstartcutting
untilyouhave
a • leased,
the handles dry and clean and
clear
workarea,
secure
footing,
and Keepfrom
oil and grease.
especially
ifyouarefelling
atree,a • free
oil cap and fasteners securely
retreat
path,Keep
workareaclean. Keep
tightened.
Cluttered
areas
invite
injuries.
• Use only Craftsman accessories and
OPERATE
YOUR SAW SAFELY
• Do not operate with one hand, Serious injury to the operator, helpers, or
bystanders may result from onehanded operation. A chain saw is intended for two-handed use.
• Do not operate saw from a ladder or
in a tree unless you are specifically
trained to do so.
• Make sure the chain will not make
contact with any object while starting
the saw. Never try to start the saw
when the guide bar is in a cut.
• Do not put pressure on the saw, especially at the end of the cut. Doing
so can cause you to tose control
when the cut is completed.
Allow the
chain to cut for you. Exert only light
downward pressure.
• Stop the saw before setting it down.
• Hand carry saw only when motor is
stopped. Carry the chain saw by the
front handle with the saw stopped, finger off the switch, the guide bar and
saw chain to the rear.
• Keep all parts ofthe body away fiom
the saw chain when the motor is operating.
• Don't force chainsaw,
tt will do the job
better and safer at the rate for which it
was intended.
• Use the right tool, cut wood only.
Don't use chain saw for purpose not
intended - for example - don't use
chain saw for cutting plastic, masonry,
non-wood building materials.
• Use extreme caution when cutting
small size brush and saplings be-
•
•
•
•
•
•
•
•
•
replacement parts as recommended.
Never modify your saw.
Maintain chain saw with care.
Keep tools sharp and clean for better
and safer performance.
Follow instructions for lubricating and
changing accessories.
Disconnect chain saw when not in
use, before servicing and when
changing accessories and attachments, such as saw chain and guard,
Check damaged parts. Before further
use of the chain saw, a guard or other
part that is damaged should be carefully checked to determine that it will
operate properly and perform its intended function. Check for alignment
of moving parts, binding of moving
parts, breakage of parts, mounting
and any other conditions that may affect its operation.
A guard or other
part that is damaged should be properly repaired or replaced by an authorized service center unless otherwise
indicated elsewhere in the instruction
manual.
Do not operate a chain saw that is
damaged, improperly adjusted, or is
not completely and securely assembled.
When not in use, chain saws should
be stored in a dry, and high or
locked-up
place - out of the reach of
children.
Store idle chain saw.
When storing saw, unplug and use a
scabbard or carrying case.
ELECTRICAL
SAFETY
• Toavoid
thepossibility
ofelectric
• Useavoltage
supply
asshown
on
shock,
avoid
body
contact
withany
unit.
grounded
conductor,
suchasmetal
• Avoid
dangerous
environments.
Don't fences
orpipes.
useappliances
indamp
orwetloca- • Ground
Fault
Circuit
Interrupter
tions.Don't
useinrain.
(GFCI)
protection
should
beprovided
• Avoid
dangerous
situations.
Donot oncircuit
oroutlet
tobeused.Recepuseinthepresence
offlammable
liq- tacles
areavailable
having
built-in
uidsorgases
toavoid
creating
afire GPCI
protection
andmaybeused
for
orexplosion
and/or
causing
damage thismeasure
ofsafety,
tnspect
chain
tounit.
sawcords
periodically
andifdam• Toreduce
theriskofelectrical
shock, aged,
haverepaired
byauthorized
thisequipment
hasapolarized
plug service
facility.
AGAINST
KICKBACK
(one
blade
iswider
thantheother). GUARD
ThisplugwitIfitonlyonewayinapo- Follow ali safety rules to help avoid
larized
outlet
oftheextension
cord. kickback and other forces which can
Ensure
youhave
apolarized
exten- result in serious injury.
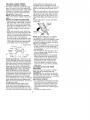
i,
, Kickback Path
sioncord.
Theplugofthepolarized
extension
cordwiltfitintotheoutlet
onlyoneway.Iftheplugdoesnotfit
fullyintheoutlet,
reverse
theplug.
Ifitstilldoesnotfit,contact
aqualified
Avoid Obstructions
electrician
toinstall
proper
outlet.
Do
notchange
thepluginanyway.
• Toreduce
riskofelectrical
shock,
use
extension
cords
specifically
marked
assuitabte
foroutdoor
appliances
having
electrical
rating
notlessthan
Clear The Working Area
therating
ofunit.Cordmust
be
marked
withsuffix
"W-A"(inCanadaWARNING: Rotational Kickback can
"W").
Make
sureyourextension
cord
when the moving chain contacts
isingoodcondition,
inspect
exten- occur
an object at the upper portion of the tip
sioncordbefore
useandreplace
if of the guide bar. Contact at the upper
damaged.
Anundersized
extension portion of the tip of the guide bar can
cordwiltcause
adropinlinevoltage cause the chain to dig into the object,
resulting
inlossofpower
andover- which stops the chain for an instant.
heating,
tfindoubt,
usethenext
The result is a lightning fast, reverse
heavier
gauge.
Thelower
thegauge reaction which kicks the guide bar up
number,
theheavier
thecord.(See and back toward the operator.
"Selecting
anextension
cord")
• Donotabuse
cord.Never
carrythe Pinch-Kickback and Pulldn occur when
unitbytheextension
cordoryankex- the chain is suddenly stopped by being
pinched, caught, or by contacting a fortension
cordtodisconnect
unit.
object in the wood. This sudden
• Secure
extension
cordtopowercordeign
of the chain results in a revertoprevent
disconnection
fromunit. stopping
• Donotusetheunitiftheswitch
does sal of the chain force used to cut wood
the saw to move in the opnotturntheunitonandoffproperly,
or and causes
direction of the chain rotation.
ifthelockout
doesnotwork.
Repairsposite
Pinch-Kickback
drives the saw straight
totheswitch
must
bemade
byyour back
toward the operator. Pultdn pulls
authorized
dealer.
• Keep
theextension
cordclearofop- the saw away from the operator.
erator
andobstacles
atalltimes.
KICKBACK
WARNING:
Position
cordsothatitwillnotbe
Kickback can occur when the moving
caughton
branches,
Donotexpose chain contacts an object at the upper
cords
toheat,oil,water,
orsharp portion of the tip of the guide bar or
edges.
when the wood closes in and pinches
thesawchaininthecut.TheCom- Avoid Pinch-Kickback:
puted
Kickback
Angle(CKA)
listed
on • Be
extremely aware of situations or
obstructions that can cause material
yoursawandlisted
inthefollowing
the top of or otherwise stop
CKATabie
represents
theangle
ofkick- tothepinch
chain.
backyourbarandchaincombinations
not cut more than one log at a
wiiIhave
whentested
inaccordanced• Do
withCSAandANSI
standards.
Com- • time.
not twist the saw as the bar is
puted
angles
represented
intheCKA Do
from an undercut when
cotumn
indicate
totalenergy
andangle withdrawn
bucking.
associated
without
achainbrake.
Avoid Pull-In:
When
purchasing
replacements,
con- • Atways begin cutting with the saw at
siderations
should
begiven
tothelower full speed and the saw housing
CKAvalues.
Inallcases,
lower
CKA against wood.
values
represent
asaferoperating
envi-• Use wedges made of piastic or wood.
ronment
fortheuser:
Never use metal to hoM the cut open.
Donotretyexclusively
uponthesafetyMAINTAIN CONTROL:
devices
builtintoyoursaw.
following precautions should be fol• Either
ofthese
reactions
maycause The
lowed to minimize kickback.
youtolosecontrol
ofthesawwhich Never Revers_
Keep a firm grip
couldresutt
inserious
injury.
Hand Position_
with both hands
left thumb under
• Pinching
thesawchainalong
thetip
handle
oftheguide
barmaypush
theguide
barrapidly
backtowards
theoperator.
• Tipcontact
insome
cases
maycause
alightning
fastREACTION,
kicking
theguide
barupandback
toward
the
operator.
Correct Position
Correct Grip Incorlect Gdp
CKA
TABLE
REDUCE
THE CHANCE
OF
KICKBACK
The following precautions shouM be followed to minimize kickback:
• Grip saw firmly.
Hotd the chain saw firmly with both
hands when the motor is running. Use a
firm grip with thumbs and fingers encircling the chain saw handles.
• Do not over reach.
• Keep proper footing and balance at
att times.
• Don't let the nose of the guide bar
contact a tog, branch, ground or other
obstruction.
• Don't cut above shoulder height.
• Use devices such as low kickback
chain, guide bar nose guards, chain
brakes, and special guide bars that
reduce the risks associated with kickback.
• Onty use replacement bars and
chains specified by the manufacturer
or the equivalent.
• A good, firm grip on the saw with both
hands will help you maintain control.
Don't let go. Grip the rear handle with
your right hand whether you are right
or left handed. Wrap the fingers of
your teft hand over and around the
front handlebar, and your left thumb
under the front handlebar. Keep your
left arm straight with the elbow locked.
• When making bucking cuts, position
your left hand on the front handlebar
so it is in a straight line with your right
hand on the rear handle. Stand
slightly to the left side of the saw to
keep your body from being in a direct
line with the cutting chain.
• Stand with your weight evenly balanced on both feet.
• Do not overreach. You could be
drawn or thrown off balance and lose
control.
• Do not cut above shoulder height, tt
is difficult to maintain control of saw
above shoulder height,
KICKBACK
SAFETY
FEATURES
WARNING:
The following features are
included on your saw to help reduce
hazard of kickback; however, such features will not totally eliminate this danger. Do not rely only on safety devices.
• Handguard:
designed
toreduce
the and joints of people prone to circulation
chance
ofyourlefthandcontacting disorders or abnormal swelling.
thechain
ifyourhandslipsoffthe
Prolonged use in cold weather has
fronthandlebar.
been linked to blood vessel damage in
• Position
offrontandrearhandlebars:
otherwise healthy people. If symptoms
designed
withdistance
between occur such as numbness, pain, loss of
handles
and"in-line"
witheach
other. strength, change in skin color or
Thespread
and"in-line"
position
of texture, or loss of feeling in the fingers,
thehands
provided
bythisdesign hands, or joints, discontinue the use of
worktogether
togivebalance
andre- this tool and seek medical attention. An
sistance
incontrolling
thepivot
ofthe anti-vibration system does not
sawbacktoward
theoperator
ifkick- guarantee the avoidance of these
backoccurs.
Users who operate power
• Reduced-Kickback
Guide
Bar:de- problems.
tools on a continual and regular basis
signed
withasmaIt
radius
tipwhich must closely monitor their physical
reduces
thesizeofthekickback
dan- condition and the condition of this tool.
gerzone.
Thistypebarhasbeen DOUBLE INSULATION
demonstrated
tosignificantly
reduce CONSTRUCTION
thenumber
andseriousness
ofkickunit is Double Insulated to help
backs
when
tested
inaccordance This
protect against electric shock. Double
withANSI
B175.t.
insulation construction consists of two
separate "layers" of electrical insulation
instead of grounding.
Tools built with this insulation system
are not intended to be grounded. No
grounding means is provided on this
unit, nor should a means of grounding
be added to this unit.
precautions must be observed
• LowKickback
Chain
hasmetkick- Safety
operating any electrical tool. The
backperformance
requirements
whenwhen
insulation system only provides
tested
ontherepresentative
sample double
ofthese
chain
sawsspecified
inANSIadded protection against injury resulting
B175.1.
from an internal etectricaI insulation
Low-Kickback
Chain
failure.
._
Contoured Depth Gauge
Deflects Kickback Force
And AllowsGuard
Wood Link
To
/Elongated
Gradually Ride into Cutter
SAFETY NOTICE: Exposure to
vibrations through protonged use of
hand tools could cause blood vessel or
nerve damage in the fingers, hands,
CARTON
CONTENTS
Model8 358.341000
Chain Saw (fully assembled)
Examine parts for damage. Do not
use damaged parts.
SAVE THESE
INSTRUCTIONS
STANDARDS:
This product is listed by
Underwriters Laboratories, Inc. in accordance with UL Standard 1662 and
CSA Standards Z62.t and Z62.3 and
ANSI Bt75.1.
THIS CHAIN SAW IS FOR
OCCASIONAL
USE ONLY
NOTE: If you need assistance or find
parts missing or damaged, piease call
1-800-235-5878
ASSEMBLY
Your saw is futty assembled; no
assembly is necessary,
KNOW YOUR SAW
READ THIS OPERATOR'S MANUAL AND SAFETY RULES BEFORE OPERATING YOUR CHAIN SAW. Compare the illustrations with your unit to familiarize
yoursetf with the tocation of the various controls and adjustments. Save this
manual for future reference,
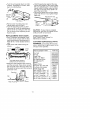
Oiler Actuator/
Bar Oil Cap
Chain Adjustment Screw
Lockout
Button
Chain
Bar
Trigger Switch
i_......
Recessed
TRIGGER BWtTCH
The trigger switch is used to turn on the
unit. Squeeze the trigger switch to operate the unit after lockout button has
been pushed in, Release the trigger to
turn the unit off,
LOCKOUT BUTTON
The Lockout Button is a control feature
designed to prevent the motor from being accidentIy started. When the rear
handle is gripped in a normal cutting
position, the lockout button can be
pushed in by the thumb, permitting the
index finger to squeeze the trigger. It is
not necessary to maintain pressure on
the lockout button once the trigger has
been engaged.
BAR OIL CAP/OILER
ACTUATOR
The oil cap is used to access the bar oil
tank and pressed to supply oil to chain.
CHAIN ADJUSTMENT
SCREW
The chain adjustment screw is used to
adjust the chain tension.
RECESSED PLUG
The recessed plug is used to connect
the chain saw to an approved extension
cord.
CHAIN TENBION
It is normal for a new chain to stretch
during first 30 minutes of operation. You
should check your chain tension frequently. Readjust chain after every 15
minutes of operation.See Chain Tension under the Service and Adjustments section.
Piug
OPERATING
INSTRUCTIONS
Use only a voltage supply as specified
on your unit.
Extension cords are available for this unit.
Secure extension cord to power cord to
prevent disconnection from unit.
SELECT
AN
EXTENSION
CORD
MINIMUM WiRE GAUGE
RECOMMENDATIONS
Volts
100 ft. or less
120
*American
14
AWG*
Wire
100 ft. to t50 ft.
12
A.WG*
Gauge
BEFORE
STARTING
SAW
WARNING:
Be sure to read the electrical safety information in the safety
rules section of this manual before you
begin. If you do not understand the
electrical safety information do not attempt to use your unit. Seek hetp from
someone that does understand the information or call the customer assistance help line at 1-800-235-5878,
GUIDE BAR AND CHAIN OIL
The manualty operated chain citer provides lubrication to the chain and guide
bar,Besuretofillthebaroiltankbefore • To avoid losing control when cut is
each
cutting
session.
Theoileractivator/ complete, do not put pressure on saw
baroilcapmust
beused
regularly
and at end of cut,
often
enough
tomaintain
athinfilmofoil • Stop motor before setting saw down,
onthebarandchain
while
sawiscutting.TREE FELLING TECHNIQUES
Itisrecommended
thattheoileractuator/
baroilcapbeoperated
six(6)times
per WARNING: Check for broken or dead
minute
andheldforapproximately
three branches which can falI while cutting
(3)seconds
each
timeitispressed,
For causing serious injury. Do not cut near
maximum
guide
barandchain
life,we buildings or electrical wires if you do not
recommend
useCraftsman
the direction of tree fall, nor cut at
sawbaroil.Iyou
fCraftsman
baroilichain
snot know
night since you wilt not be able to see
available,
youmayuseagood
grade
nor during bad weather such as
SAE30oituntityouareabletoobtain well,
rain, snow, or strong winds, etc. If the
Craftsman
brand,
Theoiloutput
ismanu- does make contact with any utility
allymetered
during
operation.
Useafun- tree
the utility comptany should be notinettofillthetank.Replace
oilcapse- line,
fied immediately.
curely,
Check
oillevel
after
every
15
• Carefully plan your sawing operation in
minutes
ofoperation.
advance.
STOPPING
YOUR SAW
• Clear the work area. You need a clear
• Release the trigger switch.
• If motor does not stop, disconnect
extension cord.
the
•
STARTING
YOUR SAW
• Connect the saw to a power source
using the proper size extension cord;
see SELECT AN EXTENSION CORD.
• Push in switch Iock out button.
• Squeeze and hold the trigger switch.
OPERATING
TIPS
• Check chain tension before first use
and after 1 minute of operation. See
Chain Tension in the Maintenance
section and Service and Adjustment
section,
• Cut wood only. Do not cut metal, plastics, masonry, non-wood buiIding materials, etc,
• Stop the saw if the chain strikes a foreign object, inspect the saw and repair parts as necessary.
• Keep the chain out of dirt and sand.
Even a small amount of dirt will quickly dull a chain and increase the possibility of kickback.
• Practice cutting a few small logs using
the following steps. This will help you
get the "feel" of using your saw before
you begin a major sawing operation,
• Squeeze the trigger switch and atlow
unit to reach full speed before cutting.
• Begin cutting with the saw frame
against the log,
• Keep the motor at full speed the entire time you are cutting.
• Release the trigger switch as soon as
the cut is completed, allowing the motor to stop.
•
•
•
area all around the tree so you can
have secure footing.
Study the natural conditions that can
cause the tree to fall in a particular
direction, such as:
• The wind direction and speed.
• The lean of the tree. The lean of a tree
might not be apparent due to uneven
or sloping terrain. Use a plumb or level to determine the direction of tree
lean.
• Weight and branches on one side,
• Surrounding trees and obstacles,
Look for decay and rot. tf the trunk is
rotted, it can snap and fail toward the
operator,
Make sure there is enough room for
the tree to fail, Maintain a distance of
2-t/2 tree lengths from the nearest
person or other objects, Motor noise
can drown out a warning call.
Remove dirt, stones, loose bark,
nails, staples, and wire from the tree
where cuts are to be made,
t
_- - -U"
PEana c_earretreat path
._m._-
Direction of Fall
A retreat path should be planned and
cleared as necessary before cuts are
started, The retreat path should extend
back and diagonally to the rear of the
expected line of fall as illustrated above.
FELLING
LARGE
TREES
cutting before the felling back cut is
complete and use wedges of wood,
_6inches
indiameter
orlarger)
enotch
method
isusedtofeIttarge plastic or aluminum to open the cut and
trees.
Anotch
iscutonthesideofthe drop the tree along the desired line of
treeinthedesired
direction
offailAfter fail.
afelling
cutismade
ontheopposite When the tree begins to fall remove the
sideoftree,thetreewilltendtofallin chain saw from the cut, stop the motor,
thedirection
ofthenotch.
put the chain saw down, then use the
NOTE:
tfthetreehaslargebuttress retreat path planned. Be alert for overroots,
remove
thembefore
making
the head limbs falling and watch your footnotch.
NOTCH
CUTANDFELLING
TREE ing.
Hinge holds tree on stump and helps
• Make
notch
cutbycutting
thetopof control fail.
thenotch
first.Cutthrough
t/3ofthe
Opening
diameter
ofthetree.Nextcomplete
of felling
thenotch
bycutting
thebottom.
See
illustration,
Once
thenotch
iscut,remove
thewedge
ofwood
fromthe
tree.
• Afterremoving
thewood,
make
the Closing of
felling
cutontheopposite
sideofthe notch
notch.
Thisisdonebymaking
acut
about
twoinches
higher
thanthecenterofthenotch.
Thiswillleave
NOTE: Before felling cut is complete,
wedges to open the cut when
enough
uncut
wood
between
thefell- use
to control the direction of fall.
ingcutandthenotch
toforma hinge.necessary
avoid kickback and chain damage,
Thishinge
wilthetpprevent
thetree To
wood or plastic wedges, but never
fromfailing
inthewronc
direction. use
steel or iron wedges.
FinaI
cuthere • Be alert to signs that the tree is ready
to falt: cracking sounds, widening of
First
cut 2,' /
the felling cut, or movement in the upDireotion"
cut
......
ge
Notching Undercut
- Make the notch
1/3 the diameter of the tree, perpendicular to the direction of faIt as illustrated.
Make the lower horizontal notching cut
first. This wi{t hetp to avoid pinching of
either the saw chain or the guide bar
when the second notch is being made.
Felling Back Cut - Make the felling
back cut at least 2 inches (50.8ram)
higher than the horizontal notching cut
as illustrated. Keep the felling back cut
parallel to the horizontal notching cut.
Make the felling back cut so enough
wood is left to act as a hinge. The hinge
wood heIps the tree from twisting and
falling in the wrong direction. Do not cut
through the hinge.
As the feeling cut gets close ot the
hinge the tree should begin to fall. If
there is any chance that the tree may
not fall in the desired direction or it may
rock back and bind the saw chain, stop
per branches.
• As tree starts to fatl, stop saw, put it
down, and get away quickly on your
£1anned retreat path.
• De extremely cautious with partially
fallen trees that may be poorly supported. When a tree doesn't falt completely, set the saw aside and pull
down the tree with a cable winch,
block and tackle, or tractor. Do not
use your saw to cut down a partially
fallen tree.
CUTTING
A FALLEN
TREE
(BUCKING)
Bucking is the term used for cutting a
fallen tree to the desired log size.
WARNING:
Do not stand on the log
being cut. Any portion can roll causing
toss of footing and control. Do not stand
downhill of the log being cut.
IMPORTANT POINTS
• tt is important to make sure your footing is firm and your weight is evenly
distributed on both feet. When possible, the tog should be raised and
supported by the use of limbs, logs or
blocks.
• Cut only one log at a time.
• Cutshattered
wood
verycarefully; your saw when it is pinched or hung in
sharp
pieces
ofwood
couldbeflung a Iog.
toward
operator.
Use a wedge to remove pinched saw
• Useasawhorse
tocutsmalllogs.
Never
allow
another
person
tohold
thetogwhile
cutting
andnever
hold
thetogwithyourlegorfoot.
• Donotcutinanarea
where
togs,
saw OFF and use a plastic or
limbs,
androots
aretangled.
Draglogs Turn
wooden wedge to force cut open.
intoaclear
areabefore
cutting
them.
• When
"cutting
through",
tomaintain Overcutting begins on the top side of
complete
control,
release
thecutting the log with the bottom of the saw
pressure
near
theendofthecutwith- against the log. When overcutting use
outloosening
yourgriponthechain light downward pressure.
sawhandles.
Overcutting
Undercutting
• Don'ttetthechaincontact
theground.
• Aftercompleting
thecut,waitforthe
sawchain
tostopbefore
youmove
thechain
saw.
• Always
stopthemotor
before
moving
fromtreetotree.
Undercutting
involves cutting on the
of the log with top of saw
Stand
onuphill
side underside
when
cutting
becauseagainst the log. When undercutting use
light upward pressure. Hold saw firmly
"*_ _
logmay
roll
and maintain control. The saw will tend
to push back toward you.
WARNING:
Never turn saw upside
down to undercut. The saw cannot be
controlled in this position.
When the log is supported along its entire tength as illustrated below, it is cut
from the top (overbuck).
The chain saw operator should keep on
the uphill side of the terrain as the tree
is likely to roll or slide downhill after it is
felled,
When bucking on a slope always stand
on the uphill side of the log, as illustrated above. When "cutting through", to
maintain complete control release the
cutting pressure near the end of the cut
without relaxing your grip on the chain
saw handles. Don't let the chain contact
the ground. After completing the cut,
wait for the saw chain to stop before
you move the chain saw. Always stop
the motor before moving from the tree
to tree.
BUCKING TECHNIQUES
WARNING:
If saw becomes pinched
or hung in a log, don't try to force it out,
You can tose control of the saw resulting in injury and/or damage to the saw,
Stop the saw, drive a wedge of plastic
or wood into the cut untit the saw can
be removed easily. Restart the saw and
carefully reenter the cut, Do not use a
metal wedge, Do not attempt to restart
Always make your first cut on the compression side of the tog.
First cut on com_[ession side of log
Second cut
_-Second
cut
First cut on compression side of log
BUCKING WITHOUT A SUPPORT
• Overcut through 1/3 of the diameter of
the tog.
• RolI the log over and finish with a second overcut.
t0
• Watch
fortogswithacompression• Frequently clear branches
side.Seeillustration
above
forcutting way to avoid tripping over
togswithacompression
side.
LIMBING
Using a log for support
2r<dCut
out of the
them.
Remove Smatl Limbs With One Cut
t Cut
1stCut
BUCKING USING A LOG OR
SUPPORT STAND
• Remember your first cut is always on
the compression side of the log.
(Refer to the illustration below for your
first and second cut)
• Your first cut should extend t/3 of the
diameter of the log<
• Finish with your second cut.
Using a support stand
2nd Cut
1st Cut
LIMBING
AND PRUNING
WARNING:
Never climb into a tree to
limb or prune. Do not stand on ladders,
platforms, a log, or in any position
which can cause you to lose your balance or control of the saw<
IMPORTANT
POINTS
• Watch out for springpoles.
Springpoles are smalI size limbs
which can whip toward you or pull you
off balance.
Use extreme caution
when cutting smatl size timbs.
• Be alert for springback. Watch out for
branches that are bent or under pressure. Avoid being struck by the
branch or the saw when the tension in
the wood fibers is released.
Limbing is removing the branches from
a fallen tree. When limbing, leave larger lower limbs to support the log off the
ground. Remove the small limbs in one
cut as illustrated in the figure above.
Branches under tension should be cut
from the bottom up to avoid binding the
chain saw.
• Limb a tree only after it is cut down.
• Leave the targer limbs underneath the
felled tree to support the tree as you
work.
• Start at the base of the felted tree and
work toward the top, cutting branches
and timbs. Remove smalt limbs with
one cut.
• Keep the tree between you and the
chain.
• Remove larger, supporting branches
with the 1/3, 2/3 cutting techniques described in the bucking section.
• Always use an overcut to cut small
and freely hanging limbs. Undercutting could cause timbs to fall and
pinch the saw.
PRUNING
WARNING:
Limit pruning to limbs
shoutder height or below. Do not cut if
branches are higher than your shoulder. Get a professional to do the job<
• Make your first cut t/3 of the way
through the bottom of the limb.
• Next make a second cut all the way
• through the limb.
Finish the pruning operation by using
an overcut so that the stump of the
limb protrudes 1 to 2 inches from the
trunk of the tree.
fi!_First
cut
t/3 of way
_
11
3rd cut
1 toof2tree
in.
from
trunk
CUSTOMER
RESPONSIBILITIES
Filtindates
asyoucomplete Before
fterEveryEvery
regular
service
Use A
Uset5rain.
5hrs.YearlyService
Dates
Check
fordamaged/worn
parts
,.,
Check for loose fasteners/parts
_.
_.,
Check chain tension
_I
_.
Check chain sharpness
/-."
_"
Check guide bar
/-."
_"
_,
Clean unit & labels
._,
WARNING:
Disconnect
source before performing
LUBRICATION
Bar
Sprocket
_'
or leaks.
• Extension Cord - Discontinue use if
chain saw extension cord shows
signs of damage or wear.
GENERAL
RECOMMENDATIONS
The warranty on this unit does not cover items that have been subjected to
operator abuse or negligence. To receive futt vaiue from the warranty, the
operator must maintain unit as instructed in this manual Various adjustments
wiit need to be made periodically to
propedy maintain your unit.
• Once a year, check guide bar and
chain for wear.
I
_,
CHECK FOR LOOSE
FASTENERS
AND PARTS
• Bar Clamp Nut
• Chain
• Bar Adjusting Screw
CHECK
CHAIN TENSION
• Chain tension is correct when the
chain can be lifted about 1/8" from the
guide bar at a point near the middle of
the bar,
• With your unit unplugged, check
your chain to make sure it is
properly tensioned,
• When your chain needs tensioning,
use the following procedure:
NOTE: It is recommended that the saw
be turned upside down for chain
tensioning.
• Unplug unit from the power source.
• Loosen bar nuts untit they are only
finger tight.
• Turn the adjusting screw clockwise
until the drive links on the chain enter
the guide bar groove.
Drive Links
the power
maintenance.
2 Bar Oil
FilI Cap
2 Use Craftsman chain saw bar oil
CHECK
FOR DAMAGED
OR
WORN
PARTS
Replacement of damaged/worn
parts
shoutd be referred to your Sears Service Center.
NOTE: tt is normal for a smatt amount
of oil to appear under the saw after motor stops. Do not confuse this with a
leaking oil tank.
• Trigger Switch - Ensure the trigger
switch functions properly by squeezing and holding the trigger switch.
Make sure motor starts and stops.
• Oil Tank - Discontinue use of chain
saw if oil tank shows signs of damage
NOTE: To tighten the chain, turn the
adjusting screw clockwise; to loosen
the chain, turn the adjusting screw
counterclockwise.
t2
Adjusting
Check the condition of the guide bar
each time the chain is sharpened. A
worn guide bar wiit damage the chain
and make cutting difficult. To maintain
guide bar:
• Disconnect the chain saw from the
Screw
power source. See instructions under
"Chain Replacement".
• Remove bar and chain from saw.
• Clean all sawdust and any other
debris from the guide bar groove and
sprocket hote after each use.
Remove Sawdust From Guide
Bar Groove
• Check the tension by lifting the chain
from the guide bar. Remove some of
the stiffness in the chain by pulling
down and letting go of the chain several times.
Sprocket
Hole
• Add lubricant to sprocket hole after
each use.
• Burring of guide bar rails is a normal
process of rail wear. Remove these
burrs with a fiat file.
• When rail top is uneven, use a fiat file
to restore square edges and sides.
• Continue turning the adjusting screw
until the tension is correct.
• Tighten bar mounting nuts with a
wrench.
• Recheck chain tension.
CHECK
CHAIN SHARPNESS
A sharp chain makes wood chips. A
dull chain makes a sawdust powder
and cuts sIowty.
CHAIN
SHARPENING
Chain sharpening requires speciaI
tools. You can purchase sharpening
tools at Sears or go to a professional
chain sharpener.
CHECK
GUIDE
BAR
Conditions which require guide bar
maintenance:
Saw cuts to one side or at an angle.
Saw has to be forced through the cut.
Inadequate supply of oil to the bar
and chain.
sides
Square
File
Edges
and
Worn Groove
[HI
Correct Groove
Replace the guide bar when the groove
is worn, the guide bar is bent or
cracked, or when excess heating or
burring of the rails occurs, tf replacement is necessary, use only the guide
bar specified for your saw in the repair
parts list or on the decal located on the
chain saw.
CLEAN
UNIT & LABELS
• Clean the unit and labels using a
• damp cloth with a mild detergent.
Wipe off the unit and labels with a
clean dry cloth.
It is normal for a new chain to stretch
during the first 30 minutes of operation.
You should recheck your chain tension
frequently and adjust the chain tension
as required. See "Check Chain Tension" in the Maintenance section.
CHAIN
REPLACEMENT
WARNING:
Avoid accidental starting.
Always unptug the saw from the power
source before instaIting a bar and/or
chain.
CAUTION:
Wear protective gloves
when handling chain. The chain is
sharp and can cut you even when it is
not moving,
t3
• Turntheunitupside
downonaflat
surface.
Straighten
outchain,
then
tayitonafiatsurface,
• Hold the guide bar against the saw
frame and instatt the bar clamp plate.
Be sure adjusting pin is in the adjusting pin hole in the bar; also, be sure
the tab on the bar clamp plate is toward the rear of bar.
• Secure the guide bar and bar clamp
plate with the bar nuts; tighten finger
tight only.
Adjusting Pin Shot
Tab
Screw
Bar Nuts
• Remove bar mounting nuts, bar
clamp ptate, and otd chain.
• Turn the adjusting screw counterclockwise to move the adjusting pin
almost as far as it wilt go to the rear.
Do not remove the adjusting screw
from the unit.
Clamp
Plate /'J
I__
CHAIN ADJUSTMENT
See "Check Chain Tension" in
Maintenance section.
CUSTOMER
saw.
SERVICEABLE
PARTS
WARNING:
Use of any other accessory or attachment might present a risk
of injury to the operator.
• Hold chain with cutters facing as
shown.
REPLACEMENT
CUTTERS MUST FACE iN
DiRECTiON OF ROTATION
• Slide the chain between the housing
and the sprocket. Place chain around
the sprocket and fit the drive links into
the guide bar groove and then around
guide bar nose.
_
.
CAUTION:
If saw chain is installed
backwards, the saw wilt vibrate excessively and wilt not cut wood.
REPLACEMENT
SAW CHAIN
• See "Customer ServiceaMe Parts".
A chain must compIy with the kickback performance requirements of
ANSi B175.1 when tested with this
__Sprocket
ar Nuts
PART
PART NO.
He)<Nuts
530015303
Oil Cap
Guide Plate
530029282
530029285
Safety Lock Button
Bar Adjusting Screw
Bar Adjusting Pin
Spacer
Spacer Screw
File (5/32" dia.) Twin Pak
File Guide (File Holder)
Depth Gauge Tool
Xtra GUARD _ Chain -14"
Xtra GUARD ® Chain -16"
Lo-Kick o Guide Bar - 14"
Lo-Kick ® Guide Bar - 16"
530025873
530015514
530023492
530015832
530015835
7t 36524
7136565
7t 36557
713617
713629
7136365
7136366
Bar & Chain Lubricant -1 qt
7136556
Bar & Chain Lubricant -1 ga_ 7136554
.....
Right Housing
t4
SURFACES
Prepare
yourunitforstorage
attheend EXTERNAL
oftheseason
orifitwillnotbeused
for Ifyourchain
sawistobestored
fora
30daysormore.
period of time, dean it thoroughly
WARNING:
before storage. Store in a clean dry area.
• Altow
themotor
tocoolthensecure • Lightly oil external metat surfaces and
theunitbefore
storing
ortransporting.guide bar.
• Store
chain
sawandextension
cord • Oil the chain and wrap it in heavy
inaweltventilated
area
paper or cloth.
• Store
chain
sawwithattguards
in
To prevent chain oil seepage during
placeandposition
chain
sawsothat storage, store the saw as follows:
• upside down if stored on a shelf, or
anysharp
object
cannot
accidentally
• hung on a hook or nail through the
cause
injury.
• Store
chain
sawunplugged,
weIIout hole in the bar
ofthereach
ofchildren.
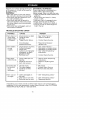
TROUBLE
SHOOTING
TROUBLE
Chain does not
move when
trigger switch
is engaged.
CHART
CAUSE
REMEDY
• Chain tension too tight.
• Guide bar rails
pinched.
• Trigger Switch failure.
•
•
See"Chain Tension."
Repair or repIace.
•
Contact Sears Service.
• Circuit breaker
tripped/fuse blown,
•
Reset circuit breaker/
replace fuse.
•
•
•
•
Chain tension incorrect.
Cutters damaged.
Chain worn.
Cutters dull, improperly
sharpened, or depth
gauges too high.
• Sprocketworn.
•
•
•
•
See"Chain
Resharpen
Resharpen
See"Chain
instructions.
•
Contact Sears Service.
• Chain cutter tops not
filed fiat.
•
See the chain sharpening
instructions.
• Guide bar burred or
bent; rails uneven,
•
Repairor
bar.
Oil inadequate
for bar and
chain
Iubrication.
• Oil tank empty.
• Oil outlet clogged.
• Guide bar oil hole
blocked.
• Fill oiltank.
• Contact Sears Service.
• Remove bar and clean.
Chain cuts at
an angle,
• Cutters damaged on
one side.
• Chain dull on one side.
• Guidebarbentorworn.
•
See"Sharpening
•
•
See "Sharpening Chain."
Replace guide bar.
Chain clatters
or cuts
roughly.
Chain stops
within the cut.
Tension."
or replace chain.
or replace chain.
Sharpening"
replace
guide
Chain."
tf situations occur which are not covered in this manual, use care and good
judgement, tf you need assistance, contact Sears Service or the CUSTOMER
ASSISTANCE
HELPLINE at 1-800-235-5878.
t5
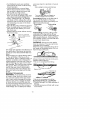
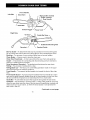
Front Handle
Left Side
Saw Chain
Manual Oiler Control
Switch Lockout
Rear Handle
Guide Bar
Switch Trk
Power Cord
Right Side
Guide
Bar No_e
Guide Bar Mounting
Sprocket
-/
Pad
Spocket Guide
Bar Tip Guide - An attachment that may be provided on the end of the guide
bar to prevent the chain at the end of the guide bar from contacting the wood.
Bucking
- The process of cross cutting a felled tree or log into lengths.
Chain Brake
- A device used to stop the chain saw.
Chain Saw Powerhead
- A chain saw without the saw chain and guide bar.
Clutch - A mechanism for connecting
and from a rotating source of power.
and disconnecting
a driven member to
Drive Sprocket or Sprocket - The toothed part that drives the saw chain.
Felling - The process of cutting down a tree.
Felling Back Cut - The finat cut in a tree fe$ting operation
site of the tree from the notching undercut.
Front Handle
Saw.
made on the oppo-
- The support handle located at or toward the front of the chain
Front Handle Guard
- A structural
barrier between
the front hand+e of a chain
saw and the guide, typically located close to the hand position on the front handle and sometimes emp+oyed as an activating lever for a chain brake.
Guide
Bar - A solid railed structure that supports
and guides the saw chain.
Kickback
- The backward or upward motion, or both of the guide bar occurring
when the saw chain near the nose of the top area of the guide bar contacts any
object such as a +og or branch, or when the wood closes in and pinches the
saw chain in the cut.
Continued
46
on next page
Kickback,
Pinch - The rapid pushback of the saw which can occur when the
wood closes in and pinches the moving saw chain in the cut along the top of the
guide bar.
Kickback,
Rotational
- The rapid upward and backward motion of the saw
which can occur when the moving saw chain near the upper portion of the tip of
the guide bar contacts an object, such as a log or branch.
Low-Kickback
Chain - A chain that complies with the kickback performance
requirements of ANSI B175.1-1991 when tested on a representative
sample of
chain saws.
Normal Cutting Poeition
ing and felling cuts.
Notching
Undercut
- Those positions
assumed
in performing
the buck-
- A notch cut in a tree that directs the tree's fall.
Oiler Control
- A system for oiling the guide bar and saw chain.
Rear Handle
- The support handle tocated at or toward the rear of the saw.
Reduced Kickback
Guide Bar - A guide bar which has been demonstrated
reduce kickback significantly.
to
Replacement
Saw Chain - A chain that complies with the kickback performance requirements of ANSi B175.1-1991
when tested with specific chain
saws. tt may not meet the ANSI performance requirements when used with other"saws.
Saw Chain - A toop of chain having cutting teeth, that cut the wood, and that is
driven by the motor and is supported by the guide bar.
Spiked Bumper (Spike) - The pointed tooth or teeth for use when felling or
bucking to pivot the saw and maintain position while sawing.
Switch - A device that when operated wilt complete
power circuit to the motor of the chain saw.
Switch
switch.
Linkage
- The mechanism
that transmits
Switch Lockout - A movable stop that prevents
the switch until manually actuated.
t7
or interrupt an electrical
motion from the trigger to the
the unintentional
operation
of