1
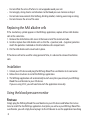
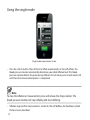
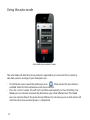
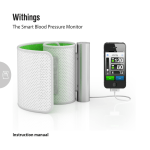
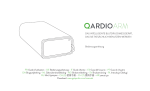
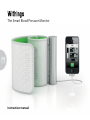
The Smart Blood Pressure Monitor
Instruction manual
The Smart Blood Pressure Monitor
Read this manual before use. Keep it for future reference.
Thank you for purchasing the Withings Blood Pressure Monitor.
The Withings Blood Pressure Monitor is a fully automatic blood pressure monitor, operating on
the oscillometric principle. It measures your blood pressure and pulse rate simply and quickly.
The monitor stores measurements results within your iPhone, iPad or iPod Touch and transmit
it to the Withings website for an easy access from your internet browser.
4
Contents
Requirements. . . . . . . . . . . . . . . . . . . . . . . . . . . . . . . . . . . . . . . . . . . . . . . . . . . . . . . . . . . . . . . . . . . . . . . . . . . . . 6
Package Contents. . . . . . . . . . . . . . . . . . . . . . . . . . . . . . . . . . . . . . . . . . . . . . . . . . . . . . . . . . . . . . . . . . . . . . . . . 6
Important Safety Information . . . . . . . . . . . . . . . . . . . . . . . . . . . . . . . . . . . . . . . . . . . . . . . . . . . . . . . . . . . . . 6
Warning. . . . . . . . . . . . . . . . . . . . . . . . . . . . . . . . . . . . . . . . . . . . . . . . . . . . . . . . . . . . . . . . . . . . . . . . . . . . . . . . . . 6
Intended use . . . . . . . . . . . . . . . . . . . . . . . . . . . . . . . . . . . . . . . . . . . . . . . . . . . . . . . . . . . . . . . . . . . . . . . . . . . . . 7
General safety and precautions. . . . . . . . . . . . . . . . . . . . . . . . . . . . . . . . . . . . . . . . . . . . . . . . . . . . . . . . . . . . 7
Replacing the AAA alkaline cells. . . . . . . . . . . . . . . . . . . . . . . . . . . . . . . . . . . . . . . . . . . . . . . . . . . . . . . . . . . 8
Installation . . . . . . . . . . . . . . . . . . . . . . . . . . . . . . . . . . . . . . . . . . . . . . . . . . . . . . . . . . . . . . . . . . . . . . . . . . . . . . . 8
Using the blood pressure monitor. . . . . . . . . . . . . . . . . . . . . . . . . . . . . . . . . . . . . . . . . . . . . . . . . . . . . . . . . 8
Applying the arm cuff. . . . . . . . . . . . . . . . . . . . . . . . . . . . . . . . . . . . . . . . . . . . . . . . . . . . . . . . . . . . . . . . . . . . 10
Taking a reading. . . . . . . . . . . . . . . . . . . . . . . . . . . . . . . . . . . . . . . . . . . . . . . . . . . . . . . . . . . . . . . . . . . . . . . . . 11
Selecting the user. . . . . . . . . . . . . . . . . . . . . . . . . . . . . . . . . . . . . . . . . . . . . . . . . . . . . . . . . . . . . . . . . . . . . . . . 11
Using the single mode. . . . . . . . . . . . . . . . . . . . . . . . . . . . . . . . . . . . . . . . . . . . . . . . . . . . . . . . . . . . . . . . . . . 12
Using the auto mode. . . . . . . . . . . . . . . . . . . . . . . . . . . . . . . . . . . . . . . . . . . . . . . . . . . . . . . . . . . . . . . . . . . . . 14
Access your historical datas and graphs. . . . . . . . . . . . . . . . . . . . . . . . . . . . . . . . . . . . . . . . . . . . . . . . . . . 16
Maintenance. . . . . . . . . . . . . . . . . . . . . . . . . . . . . . . . . . . . . . . . . . . . . . . . . . . . . . . . . . . . . . . . . . . . . . . . . . . . . 18
Troubleshooting. . . . . . . . . . . . . . . . . . . . . . . . . . . . . . . . . . . . . . . . . . . . . . . . . . . . . . . . . . . . . . . . . . . . . . . . . 19
Technical data . . . . . . . . . . . . . . . . . . . . . . . . . . . . . . . . . . . . . . . . . . . . . . . . . . . . . . . . . . . . . . . . . . . . . . . . . . . 21
Guarantee. . . . . . . . . . . . . . . . . . . . . . . . . . . . . . . . . . . . . . . . . . . . . . . . . . . . . . . . . . . . . . . . . . . . . . . . . . . . . . . 22
EU representative. . . . . . . . . . . . . . . . . . . . . . . . . . . . . . . . . . . . . . . . . . . . . . . . . . . . . . . . . . . . . . . . . . . . . . . . 23
Manufacturer. . . . . . . . . . . . . . . . . . . . . . . . . . . . . . . . . . . . . . . . . . . . . . . . . . . . . . . . . . . . . . . . . . . . . . . . . . . . 23
EU Distributor. . . . . . . . . . . . . . . . . . . . . . . . . . . . . . . . . . . . . . . . . . . . . . . . . . . . . . . . . . . . . . . . . . . . . . . . . . . . 23
US Agent. . . . . . . . . . . . . . . . . . . . . . . . . . . . . . . . . . . . . . . . . . . . . . . . . . . . . . . . . . . . . . . . . . . . . . . . . . . . . . . . 23
5
Requirements
In order to use your Withings Blood Pressure monitor, you need to plug it to an iPhone, iPad or
iPod Touch (updated to iOS 3 or higher).
Package Contents
• Withings Blood Pressure Monitor
• Four AAA alkaline (LR3) cells (already inserted)
Important Safety Information
Consult your doctor during pregnancy, arrhythmia and arteriosclerosis. Please read this section carefully before using the blood pressure monitor.
Warning
General usage
• Always consult your doctor. Self-diagnosis of measurement results and self treatment are
dangerous
• People with severe blood flow problems, or blood disorders, should consult a doctor before using the blood pressure monitor. Cuff inflation can cause internal bleeding.
• Operational factors such as common arrhythmias, ventricular premature beats, atrial
fibrillation, arterial sclerosis, poor perfusion, diabetes, age, pregnancy, pre-eclampsia or
renal disease can affect the performance of the automated sphygmomanometer and/or its
blood pressure reading.
AAA Alkaline cells usage
• If AAA alkaline cells fluid should get in your eyes, immediately rinse with plenty of clean
water. Consult a doctor immediately.
6
Intended use
The device is a digital monitor intended for use in measuring blood pressure and pulse rate in
adult patient population with arm circumference ranging from 9 inches to 17 inches (22cm42cm).
This device is not intended to be a diagnostic device. Contact your physician if hypertensive
values are indicated.
Caution
General usage
• Do not leave the blood pressure monitor unattended with infants or persons who cannot
express their consent.
• Do not use the blood pressure monitor for any purpose other than measuring blood pressure.
• Do not disassemble the blood pressure monitor.
• Do not operate the blood pressure monitor in a moving vehicle (car, airplane).
AAA alkaline cells usage
• If AAA alkaline cells fluid should get on your skin or clothing, immediately rinse with plenty
of clean water.
• Use only four AAA alkaline cells with this blood pressure monitor. Do not use any other
types of AAA alkaline cells.
• Do not insert AAA alkaline cells with their polarities incorrectly aligned.
• Replace old AAA alkaline cells with new ones immediately. Replace all four AAA alkaline
cells at the same time.
• Do not use new and used AAA alkaline cells together
General safety and precautions
• Do not forcibly bend the arm cuff
7
•
•
•
•
Do not inflate the arm cuff when it is not wrapped around your arm
Do not apply strong shocks and vibrations to the blood pressure monitor or drop it
Do not take measurement after bathing, drinking alcohol, smoking, exercising or eating.
Do not immerse the arm cuff in water
Replacing the AAA alkaline cells
If the low battery symbol appears in the Withings application, replace all four AAA alkaline
cells at the same time.
1. Remove the AAA alkaline cells cover at the lower end of the aluminum tube.
2. Install or replace four AAA alkaline cells so that the + (positive) and – (negative) polarities
match the polarities indicated on the AAA alkaline cells compartment.
3. Put the AAA alkaline cells cover back in place.
If the device will not be used for a long period of time, it is advised to remove the alkaline
cells.
Installation
1. Unlock your iOS device and plug the Withings Blood Pressure Monitor to its connector.
2. Follow the instructions to install the Withings application.
3. The Withings application will automatically launch everytime you connect your Withings
Blood Pressure Monitor to your iOS device.
If you are using iOS 3, you will need to launch the application manually.
Using the blood pressure monitor
First use
Simply plug the Withings Blood Pressure Monitor to your iOS device and follow the instructions to install the free Withings application. Everytime you will use your Withings Blood Pressure Monitor, you will simply have to plug it to the iOS device to see the application launching
8
automatically.
If you are using an iOS device running iOS 3, you will have to launch the application manually.
How to sit correctly when taking a measurement
You can take a measurement on either your left or right arm.
Notes
• Measurement should be taken in a quiet place and you should be in a relaxed, seated
position. Your back and arm should be supporter. Make sure that the room is not too hot or
cold.
• Avoid eating, smoking or exercising for at least 30 minutes before taking a measurement.
• Sit upright with your back straight. Do not cross your legs. Your feet must be flat on the
floor.
• Remove tight fitting clothing from your upper arm, and any thick clothing such as a sweater. Do not place the cuff over thick clothes and do not roll up your sleeve if it is too tight.
• Place your arm on a table so that the cuff will be at the same level as your heart.
• The gap between the chair and the top of the table should be between 25 cm to 30 cm (9.8
to11.8 inches).
• Relax as much as possible and avoid talking during the measurement procedure.
• 5 minutes should elapse before the first reading is taken.
Correct posture during measurement is necessary to get accurate results. You should also try
to measure your blood pressure at the same time each day (Within 1 hour after waking up is
recommended.)
Incorrect posture :
• Arched back (leaning forwards)
• Sitting cross-legged
• Sitting on a sofa or at a low table so that you tend to lean forward.
These situations could lead to a higher blood pressure values due to a strain or the arm cuff
being lower than the heart.
If the arm cuff is at a lower position than your heart, use cushions to adjust the height of your arm.
9
Applying the arm cuff
You can wrap the cuff either on your right or left arm.
• Remove tight fitting clothing from your upper arm.
• Do not place the cuff over thick clothes and do not roll up your sleeve if it is too tight.
• The cuff must be fully deflate
• Sit on a chair with your feet flat on the floor and place your arm on a table so that the cuff
will be at the same level as your heart.
• Turn the palm of your hand upside
• Apply the cuff to your upper arm so that the tube is aligned with your upper arm. The bottom of the cuff (cable side) should be approximatively 1 to 2cm above the elbow.
• When the cuff is positioned correctly, close the fabric fastener firmly.
10
Notes
• Make certain the cuff fits snuggly around your arm.
• The cuff should make good contact with your skin. You shouldn’t be able to fit your index
finger between the cuff and your arm easily, so you can pull the cuff off and on.
The blood pressure can differ between the right arm and the left arm and therefore
also the measured blood pressure values can be different. Withings recommends to
always use the same arm for measurement. If the values between the two arms differ
substantially, please check with your physician which arm to use for your measurement.
Taking a reading
The blood pressure monitor is designed to take measurements and store the measurement
values in the memory of the device (iPhone, iPad or iPod Touch).
The blood pressure monitor can also be used to take a single measurement for other persons
using the guest mode. “Anonymous measurement” has to be chosen in the user list before
measurement is taken.
Selecting the user
On the measurement screen, touching the «user» icon
user ID in the list by touching it.
opens the user list. Select your
11
Using the single mode
Single mode measurement screen
• Press the «Start» button. The cuff starts to inflate automatically. As the cuff inflates, the
blood pressure monitor automatically determines your ideal inflation level. This blood
pressure monitor detects the pulse during inflation. Do not move your arm and remain still
until the entire measurement process is completed.
Note
To stop the inflation or measurement, press and release the «Stop» button. The
blood pressure monitor will stop inflating and start deflating.
• Inflation stops and the measurement is started. As the cuff deflates, the heartbeat symbol
flashes at every heartbeat.
12
• When the measurement is complete, the arm cuff completely deflates. Your blood pressure
and pulse rate are displayed.
• Unplug the blood pressure monitor from your iPhone, iPad or iPod Touch to see your
results in advanced mode. Rotate your device to display your graphs.
Notes
Self-diagnosis of measured results and treatment are dangerous. Please follow the instructions of your doctor.
Wait 2-3 minutes before taking another blood pressure measurement. Waiting
between readings allows the arteries to return to the condition prior to taking the
blood pressure measurement.
13
Using the auto mode
Auto mode measurement screen
The auto mode will take three measurements separated by an interval of time in order to
calculate a precise average of your blood pressure.
. Make certain the auto mode is
• On the home screen, touch the preferences icon
enabled. Select the interval,between each measurement. • Press the « Start » button. The cuff starts to inflate automatically. As the cuff inflates, the
blood pressure monitor automatically determines your ideal inflation level. This blood
pressure monitor detects the pulse during inflation. Do not move your arm and remain still
until the entire measurement process is completed.
14
Note
To stop the inflation or measurement, press and release the « Stop » button. The
blood pressure monitor will stop inflating and start deflating.
• Inflation stops and the measurement is started. As the cuff deflates, the heartbeat symbol
flashes at every heartbeat.
• When the measurement is complete, the arm cuff completely deflates.
• After the selected interval, a second and a third measurement will start.
• Your average blood pressure is displayed.
• Unplug the blood pressure monitor from your iPhone, iPad or iPod Touch to see your
results in advanced mode. Rotate your device to display your graphs.
•
•
•
•
Notes
The three individual measurement results are not displayed while auto mode is taking
the measurements. However, the results for each individual measurement can be displayed on your graph.
Self-diagnosis of measured results and treatment are dangerous. Please follow the instructions of your doctor.
Wait 2-3 minutes before taking another blood pressure measurement. Waiting between
readings allows the arteries to return to the condition prior to taking the blood pressure
measurement.
You will have to activate the auto mode each time you want to use it.
15
Access your historical datas and graphs
In order to access your historical datas and graphs, open the Withings application with the
blood pressure unplugged or unplug the blood pressure monitor from your device after a
measurement. The advanced results will show-up if you are in portrait mode and your historical graphs will show-up if you are in landscape mode.
16
In portrait mode, you can manually enter new results or edit existing results by using the
wheel.
17
Maintenance
To protect your blood pressure monitor from damage, please oberve the following:
• Do not subject your blood pressure monitor to extreme temperatures, humidity, moisture
or direct sunlight.
• Do not disassemble the blood pressure monitor.
• Do not amend the blood pressure monitor yourself.
• Do not carry out repairs of any kind yourself. If a defect occurs, consult the Withings distributor or customer service through the Withings website.
• Do not subject the blood pressure monitor to strong shocks or vibrations (for example
dropping the blood pressure monitor on the floor).
• Do not use volatile liquids to clean the blood pressure monitor. The blood pressure monitor
should be cleaned with a soft, dry cloth.
• Do not wash the arm cuff or immerse it in water.
• Use a soft, moistened cloth and foam to clean the arm cuff.
• Do not modify the blood pressure monitor.
• Remove the alkaline cells if the blood pressure monitor is not likely to be used for some
time.
• Dispose the waste blood pressure monitor and accessories according to the national law.
18
Troubleshooting
For technical documentation, please contact the manufacturer.
Problem
Though the batteries are installed, there is nothing happening when connected to iOS device.
Remedy
1. Check that your iOS device is unlocked
2. Check and correct the AAA alkaline cells polarities
3. Remove the AAA alkaline cells and wait for one minute. Then install the AAA alkaline cells
or replace them
4. If you are using a device with iOS 3, you will have to launch the application manually
Problem
The inflation action cannot be done or the air pressure cannot rise
Remedy
1. Check the cuff position and fasten the cuff correctly ad re-measure the pressure again
2. Check the blood pressure monitor connection to the iOS device
Problem
The low battery icon is shown in the application
Remedy
Replace the old alkaline cells by four new AAA alkaline cells.
19
Problem
The blood pressure cannot be taken and the application shows an error message or wrong
result
Remedy
1.
2.
3.
4.
5.
Re-fasten the cuff
Relax yourself and sit down
Keep the cuff and heart at the same level during the measurement period
Keep silent and still during measurement
If the patient has sever heart beat problem, then the blood pressure may not be read correctly
Problem
Under normal measuring circumstance, the reading at home is different from that of the clinics or each measurement has various reading
Remedy
1. The variation is due to the different environments
2. The blood pressure is changing according to the physiological or psychological status of
the human body
3. Show your recorded values to your physician
For technical support, please email [email protected]
20
Technical data
•
•
•
•
•
•
•
•
•
•
•
•
•
•
•
•
•
Product description: Digital automatic Blood Pressure Monitor
Model: BP-800 (Withings)
Pressure sensor: Gauge sensor
Measurement range(pressure): 0 to 250 mmHg
Measurement range (pulse): 30 to 200 beats/min
Accuracy (pressure): Within +- 3 mmHg or 2% of reading
Accuracy (pulse): Within +-5% of reading
Sensor: Semiconductor pressure sensor
Operating conditions: 10 to 40°C . 15 to 90%RH
Storage and transport conditions: -20 to 60°C. 10 to 95%RH
Arm type: Circumference 22-42cm (8.5”-16.5”)
Dimensions: 150(L) x 140(W) x 100(H)
Power source: AAA alkaline cells (x4)
Weight: Approx. 600g without cells
Accessories: AAA Alkaline cells x4, Instruction manual
This device complies with the following normative documents :
COUNCIL DIRECTIVE 93/42/EEC of 14 June 1993 concerning medical devices.
* IEC60601-1: 2005 + CORR. 1 (2006) + CORR. 2 (2007);
* EN 60601-1: 2006 / AC:2010 Medical electrical equipment - Part 1: General requirements for
basic safety and essential performance
* ANSI/AAMI ES60601-1: 2005: Medical Electrical Equipment-Part1: General requirement for basic
safety and essential performance
* EN1060-1: 1995 with Amendment A2: 2009:Non-invasive sphygmomanometer
Part 1: General requirements
* EN1060-3: 1997 with Amendment A2: 2009: Non-invasive sphygmomanometers,
Part 3: Supplementary requirements for electro-mechanical blood pressure measuring
systems
* EN55011: 2007 + A2: 2007;
21
* EN60601-1-2: 2007 / AC 2010: Medical electrical equipment: Part 1-2: General requirements for
basic safety and essential performance
* EN1060-4: 2004 Non-invasive sphygmomanometers. Test procedures to determine the overall
system accuracy of automated non-invasive sphygmomanometers.
* FCC 47 CFR PART 18: Electromagnetic Compatibility
*EN 60601-1-4 :1996 /A1:1999
Medical electrical equipment -- Part 1-4: General requirements for safety - Collateral standard:
Programmable electrical medical
*EN ISO10993-1:2009 Biological evaluation of medical devices - Part 1: Evaluation and testing
within a risk management process
*EN ISO13485:2003/AC : 2009 Medical devices - Quality management systems - Requirements for
regulatory purposes
* EN ISO14971:2009 Medical devices - Application of risk management to medical devices
* EN 980:2008 :Graphical symbols for use in the labeling of medical devices
* ANSI/AAMI SP10:2002/(R)2008 -Manual, electronic, or automated sphygmomanometers
P/N : BP-800
0434
Guarantee
This blood pressure monitor is guaranteed for 1 year from date of purchase. The guarantee
does not apply to damage caused by improper handling, damage from leaking batteries,
accidents, not following the operating instructions or alterations made to the instrument by
third parties.
22
EU representative
Kahl Handelsyertretung
Address: Isarstr, 33 40699 Erkrath
Germany
Tel: 49-2104-47754
Manufacturer
YA HORNG (DONGGUAN) ELECTRONIC CO., LTD.
- District,
188 Industrial District, Ping Chan Administrative
Tang Shia Tow, Dongguan, Guangdong,
China 2011
EU Distributor
Withings SAS
37bis rue du Général Leclerc
92442 Issy-les-Moulineaux Cedex
France
US Agent
Withings Inc.
16192 Coastal Highway
Lewes DE 19958
United States of America
23
Manual version: 1.8 — March 4, 2011
© 2011 Withings. All right reserved.
iPhone, iPad and iPod touch are trademarks of Apple inc.