1
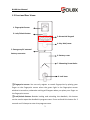
BL100 User Manual BL100 Fingerprint Lock User Manual Version: 1.0 About This Manual This user manual explains how to operate the BL100 fingerprint deadbolt and how to navigate through its programming menu options. For the fingerprint deadbolt installation, see the installation manual. BL100 User Manual BL100 User Manual Thank you for purchasing the Scilox BL-100 fingerprint deadbolt. Please read the documentation carefully before operating the deadbolt. This manual describes all possible operations of the fingerprint deadbolt. Note: The manufacturer, dealers and distributors of the Scilox BL100 will not be held responsible for any damages caused by incorrect installation or mishandling of the fingerprint deadbolt. Any such damages will void the manufacturer’s warranty. Due to manufacturer’s product updates during the life of the deadbolt, the manufacturer cannot guarantee 100% consistency of the actual deadbolt as described by this manual. If the reader discovers inconsistencies in this manual, please bring them to the attention of the manufacturer so the corrections can be published in subsequent revisions of the manual. Thank you. BL100 User Manual IMPORTANT NOTICE – To ensure optimum performance of the fingerprint deadbolt, please read the tips below before programming and installing. 1. Keep your fingers clean when operating the deadbolt, so that your fingerprints can be recognized by the deadbolt’s fingerprint sensor. 2. When you first purchase and operate your new deadbolt, its factory default setting allows you to unlock the deadbolt with ANY finger. 3. To ensure security, the manufacturer strongly suggests you immediately change the default master passcode (98989) after initial installation 4. Prior to enrolling ordinary (non-Administrator) users, you must first enroll at least one “Administrator User”. Administrator Users have the unique ability to program the deadbolt and add/delete users. Conversely, “Ordinary Users” can only open the door and have no access to the deadbolt’s programming menu. 5. Each user can register one fingerprint and one PIN (Personal Identification Number). 6. When opening the door, if you hear the deadbolt alarm beep and see the indicator light flashing, this indicates the deadbolt’s AA batteries soon need to be changed with fresh AA batteries. 7. The deadbolt automatically shuts off after 10 seconds of inactivity. This setting helps conserve battery life. 8. You can register up to 100 users on the deadbolt. 5 can be Administrator Users (Code: 995-999), and the other 95 will be Ordinary Users (Code: 000-994). 9. To ensure accuracy of the deadbolt’s fingerprint sensor, be sure to keep the sensor clean. 10. When cleaning the entire deadbolt, exercise caution by not using corrosive cleaning agents which could damage the deadbolt’s glossy finish. Instead, the manufacturer recommends periodically cleaning the deadbolt with furniture polish wax (e.g. Pledge). i BL100 User Manual 11. If after installation you discover the deadbolt’s latch-bolt fails to freely move back and forth or that the door no longer closes properly, this can normally be corrected by properly re-aligning the strike plate's position on the door. 12. If at times you discover registered fingerprints or passwords fails to unlock the deadbolt, use the mechanical key to unlock the deadbolt. 13. While programming the deadbolt, you can cancel out of any operation by pressing and holding “0” at any time. When cancelling, NO changes will be saved. Notice: Remember to record user names along with user ID and codes on the provided page in the back of this user manual. ii BL100 User Manual Table of Contents 1 Operating Instructions ......................................................................- 1 1.1 Introduction to Fingerprint Deadbolt Functions ....................- 1 1.2 Front and Rear Views .............................................................- 2 1.3 Precautions ............................................................................- 4 1.4 User Privileges........................................................................- 4 1.5 Finger Placement ...................................................................- 5 2. Basic Operation ................................................................................- 6 2.1 Change Master Pass Code (MPC) ...........................................- 6 2.2 Enroll an Administrator User ..................................................- 7 2.2.1 Enroll Administrator User’s Fingerprint ......................- 7 2.2.2 Enroll Administrator User’s PIN Code .........................- 8 2.3 Enroll an Ordinary User ..........................................................- 8 2.3.1 Enroll an Ordinary User’s Fingerprint .........................- 9 2.3.2 Enroll an Ordinary User’s PIN Code.......................... - 10 2.4 User Verification.................................................................. - 11 2.4.1 Fingerprint Verification ............................................ - 11 2.4.2 PIN Code Verification ............................................... - 11 2.5 Delete a User....................................................................... - 12 2.5.1 Delete a User............................................................ - 12 2.5.2 Delete All Ordinary Users ......................................... - 12 2.6 Enable / Disable a User ....................................................... - 13 2.7 Reset Deadbolt to Factory Default Settings ........................ - 14 3 Other Functions ............................................................................. - 15 3.1 Routine Operation Indications ............................................ - 15 3.2 Deadbolt Initialization ......................................................... - 16 3.3 Unlock the Non-lock Status Alarm .......................................- 17 3.4 Automatic Menu Program Exit and System Power-off ........- 17 iii BL100 User Manual 3.5 Using External Power ...........................................................- 17 3.6 Unlocking Deadbolt with Mechanical Key .......................... - 19 3.7 Battery “Low Voltage” Warning ...........................................- 20 4. Appendix ....................................................................................... - 21 4.1 Technical Specifications ...................................................... - 21 Warranty ........................................................................................... - 22 Support ............................................................................................. - 23 User Codes ........................................................................................ - 24 - iv BL100 User Manual 1 Operating Instructions 1.1 Introduction to Fingerprint Deadbolt Functions 1. By leveraging the perfect combination of biometrics and cryptography, the Scilox BL100 fingerprint dead-bolt ensures door-security through its fingerprint and PIN unlocking feature. 2. The deadbolt is very intuitive and user friendly. Indicator sounds and lights help guide the user. 3. Enroll both “ordinary” users and “Administrator” users. Ordinary Users only have door access, while Administrator Users can program the deadbolt and add/delete users. 4. Administrator Users can quickly and easily delete users whose door access rights have been revoked. 5. Deadbolt can recognize users by either Fingerprint or PIN code verification. 6. Upon total AA battery failure, the deadbolt can still operate temporarily by connecting a 9V battery to the deadbolt’s 9V battery external connector. 7. Non-lock Alarm: When the deadbolt’s latch-bolt fails to pop out and secure the door, the deadbolt’s deadbolt will make a short, sharp alarming sound which will last one minute unless the alarm is de-activated manually by locking or unlocking the deadbolt. 1 BL100 User Manual 1.2 Front and Rear Views 1. Fingerprint Sensor 2. Lock/Unlock button 3. Numerical Keypad 4. Key Hole/cover 5. Emergency 9V external battery connector 6. Battery cover 7. Mounting Screw Holes 8. Lock lever ①Fingerprint sensor: You can only register or match fingerprints by placing your finger on the fingerprint sensor when the green light in the fingerprint sensor window is turned on; otherwise nothing will happen when you place your finger on the fingerprint sensor. ②Lock/Unlock Button: Besides locking and unlocking the deadbolt, this button can be used to open the deadbolt’s program menu. Press and hold this button for 3 seconds until it beeps to enter the program menu. 2 BL100 User Manual ③Numerical Keypad: Used to enter a user’s PIN code or user ID. ④Key Hole/cover: You can use the included mechanical key for emergency door opening. The key hole also has a detachable cover, to help hide the keyhole from unauthorized users. ⑤9V External battery connector: External battery connector to be used with a 9-volt battery when internal batteries do not operate. LED Indicators: The deadbolt’s lock/unlock button and keypad change color to further help the user operate the deadbolt. The general rule: Successful = 1 Long Beep, Failed = 2 Short Beeps, flashes green flashes red Verify State: Fingerprint sensor flashes green every second Management Mode: Keypad LED flashes blue every second All deadbolt LED indicators should respond as above. If not, please contact your local dealer/distributor or visit our website at www.scilox.com. 3 BL100 User Manual 1.3 Precautions 1. User must change Master Pass Code (MPC) upon initial installation of the deadbolt (See Change MPC section on pg 6). User must have at least one “Administrator User” enrolled before adding any “Ordinary Users”. If you don't change the MPC, you can't use any deadbolt functions. And if you don't enroll an “Administrator User” you can't add any “Ordinary Users”. 2. Do not remove batteries when matching, registering/adding or deleting fingerprints or PIN codes; the sudden power-loss may result in loss of data. Prior to removing the batteries, make sure the deadbolt is not in the middle of a program operation (i.e. registering a user, deleting fingerprints, etc.). 3. It is recommended to replace the deadbolt AA batteries at least once every six months. Further delay risks damage to the deadbolt due to battery leakage or corrosion. Do not use poor-quality batteries. 1.4 User Privileges The user privileges are classified into two types: Administrator Users and Ordinary Users. Administrator User: Refers to users who have access to all operations like program settings and registering users. Ordinary User: Refers to all users other than the Administrator Users. Ordinary Users only have door access privileges. 4 BL100 User Manual 1.5 Finger Placement Recommended finger selection: The index finger, middle finger or the ring finger is recommended; the thumb and little finger are not recommended (because they are usually clumsy when pressing on the fingerprint sensor). 1. Proper finger placement The finger must be placed flat and centered on the fingerprint sensor. 2. Improper finger placement Not flat on the surface Off-center Sideways Off-center Please be sure to use proper finger placement when registering and verifying your users’ fingerprints. Improper finger placement on the sensor is the primary cause for perceived problems with the deadbolt. The fingerprint sensor is extremely accurate. Proper finger placement will ensure users have a very favorable and positive experience with the deadbolt. -5- BL100 User Manual 2. Basic Operation 2.1 Change Master Pass Code (MPC) Notice: (1) User must change master pass code when they first install the deadbolt, otherwise you can't register Administrator Users. (2) User must have registered at least one Administrator User before enrolling any Ordinary Users. (3) All deadbolt operations must be completed within 10 seconds or deadbolt will time-out. To change MPC, follow the procedures shown: 1. Press button to start lock, which will then enter the “Verify State”. The LED flashes green. 2. Press and hold the button until you hear 1 long beep and the keypad’s green LED changes to blue. Enter the default MPC "98989", and then press 3. button to enter the “Management Mode”. Press "5" key on the deadbolt and enter the new 5 digit MPC, then press the button to confirm. Enter the new MPC once again, then press the button to confirm. Once you hear 1 long beep and the green, you have successfully changed the MPC code. -6- . LED flashes BL100 User Manual 2.2 Enroll an Administrator User The deadbolt has two kinds of users: “Administrator User” and “Ordinary User”. If the deadbolt has no Administrator User, then you can’t enroll Ordinary Users. You must at least enroll one Administrator User before enrolling any Ordinary Users. To enroll an Administrator User, enter Management Mode by following below: 1. Press button to start deadbolt, and then enter the “Verify State”. 2. Press and hold the MPC, and then press 3. button until you hear 1 long beep, enter the 5 digit button to enter the “Management Mode”. Press "9" on the deadbolt to enter the “Enroll Administrator User” mode. The next step is to register fingerprint(s) and PIN code for administrator. 2.2.1 Enroll an Administrator User’s Fingerprint Note: Steps 1-3 are above. 4. After you enter the “Enroll Administrator User” mode, enter a 3 digit user ID, and then press button to confirm. Note: The Administrator User's ID must be between "995" and "999". 5. Press finger on the fingerprint sensor properly (For details, see 1.5 Finger Placement), and remove once you hear a beep, repeat 2 additional times (total 3 three times), until you hear one long beep and LED turns green. Note: During the fingerprint registration process, if the fingerprint sensor successfully registers the fingerprints, the button will turn green. If not, try repeating the registration process with a different finger. -7- BL100 User Manual Note: (1) If the deadbolt fails to register a finger, it will give 2 short beeps and the . will flash red. If you are unable to register, you can try again for two more times. (2) If the deadbolt registers a finger successfully, the deadbolt will automatically exit the “Enroll Administrator User” mode. (3) You can press and hold "0" key to cancel operation and exit at any time. (4) If you want to enroll more Administrator Users, then repeat steps 1-5. 2.2.2 Enroll an Administrator User PIN code Note: Steps 1-3 are same as before (2.2) 4. After you enter the “Enroll Administrator User” mode, enter the 3 digit user ID, press 5. button to confirm. Enter a 4 digit user PIN code and press button to confirm, and then enter the same 4 digit user PIN code once again and press . button to confirm, you will hear one long beep and LED turns green (if it fails to register – it will give 2 short beeps and LED will flash red instead). Note: (1) If PIN code does not match, the deadbolt will fail registration. In this case, you will need to follow step 1 to 5 again. (2) If successful, the deadbolt will automatically exit the “Enroll Administrator User” mode. (3) You can press and hold "0" key to cancel operation and exit anytime. (4) If you want to enroll more Administrator Users, then repeat the step 1-5. -8- BL100 User Manual 2.3 Enroll an Ordinary User Note: You must change the MPC and enroll an Administrator User first; otherwise you can't enroll any Ordinary Users. 2.3.1 Enroll an Ordinary User’s Fingerprint 1. Press button to start the deadbolt and enter the “Verify State”. 2. There are two methods to enter the “Management Mode”: (1) Press and hold the button until you hear 1 long beep, enter the 5-digit MPC, and then press button to enter the “Management Mode”. OR (2) Verify the registered Administrator's PIN code or fingerprint (please see2.4 User Verification) to enter the “Management Mode”. 3. Press "1" to enter the Enroll Ordinary User's Fingerprint Mode. 4. Enter a 3 digit User ID, then press button to confirm. Note: The Ordinary Users' ID must be between "001" and "994". 5. Place finger on the fingerprint sensor properly (For details, see 1.5 Finger Placement), and repeat it three times, until you hear one long beep and LED flashes green. Note: (1) If deadbolt fails to register, the deadbolt will give 2 short beeps and the LED will flash red. If the deadbolt failed to register, you can try again for two more times. (2) If the deadbolt registers successfully, it will automatically exit the Enroll Administrator User mode. (3) You can press and hold "0" key to cancel operation and exit anytime. (4) If you want to enroll more Administrator Users, then repeat steps 1-5. -9- BL100 User Manual 2.3.2 Enroll an Ordinary User’s PIN Code 1. Press button to start the deadbolt and enter the “Verify State”. 2. Enter the “Management Mode”, (see step 2 in 2.3.1 Enroll an Ordinary User’s Fingerprint). 3. Press "2" on the deadbolt to enter the “Enroll Ordinary User's PIN Code” mode. 4. Enter a 3 digit User ID, and press button to confirm. Note: The Ordinary Users' ID must between "001" and "994". 5. Enter a 4 digit user PIN, press PIN once again and press key to confirm. Enter the same 4 digit user key to confirm until you hear one long beep and the LED flashes green. The keypad’s blue LED will turn off. If it fails to register - it will give 2 short beeps and the LED will flash red. Note: (1) If PIN code does not match, the deadbolt will fail registration. In this case, you will need to follow step 1 to 5 again. (2) If successful, the deadbolt will automatically exit the “Enroll Administrator User Mode”. (3) You can press and hold "0" key to cancel operation and exit anytime. (4) If you want to enroll more Ordinary Users, then repeat the step 1-5. - 10 - BL100 User Manual 2.4 User Verification The users can use fingerprint or PIN code verification to unlock the deadbolt. 2.4.1 Fingerprint Verification 1. Press button to start the deadbolt and enter the “Verify State”. The fingerprint sensor is in a “Ready State”. 2. Press finger on the fingerprint sensor properly (For detail, please see 1.5 Finger Placement), until you hear one long beep. (1) If verification is successful, the deadbolt will sound a long beep and deadbolt will unlock, the button will flash green for 3 seconds, the fingerprint sensor will flash green for 5 seconds. (2) If verification failed, the deadbolt will sound two short beeps, the . button will flash red for 3 seconds, and then the green LED will flash. The user can use their fingerprint to verify again until verification is successful. 2.4.2 PIN Code Verification 1. Press button to start the deadbolt and enter the “Verify State”. 2. Enter the programmed 4-digit PIN code and press button to confirm. (1) If verification is successful, the deadbolt will sound a long beep and unlock, the button will flash green for 3 seconds, the fingerprint sensor will flash green for 5 seconds. (2) If verification failed, the deadbolt will sound two short beeps, the . button will flash red for 3 seconds, and then the LED will flash green. The user can use PIN code to verify again until verification is successful. Note: After successful verification, the deadbolt is unlocked. Press button again to lock and power off the deadbolt. - 11 - - BL100 User Manual 2.5 Delete User 2.5.1 Delete a user 1. Press button to start the deadbolt and enter the “Verify State”. 2. Enter the “Management Mode”, please see step 2 in 2.3.1 Enroll an Ordinary User’s Fingerprint. 3. Press "3" on the deadbolt to enter “Delete User mode”. 4. Enter the User's ID which you want to delete, and then press confirm. Enter the user ID again, and press will sound a long beep, and the button to key to confirm. The deadbolt key will flash green. 5. After deleting the user, you can restart the deadbolt and verify the deleted user's fingerprint or password again to assure the user has been deleted. Note: The Administrator can't delete their self or the most recent administrator. 2.5.2 Delete All Ordinary Users 1. Press button to start the deadbolt and enter the “Verify State”. 2. Enter the “Management Mode”, (see step 2 in 2.3.1 Enroll an Ordinary User’s Fingerprint). 3. Press "6" on the deadbolt to enter “Delete All Ordinary Users” mode. 4. Enter "000" and press press button to confirm, then enter "000" again and button to confirm. The deadbolt will sound a long beep, the - button will flash green. Note: The operation can only delete Ordinary Users. If you want to delete administrators, you must reset the system, for detail, (see 2.7 Reset Deadbolt to Factory Default Settings). - 12 - BL100 User Manual 2.6 Enable / Disable a User 1. Press button to start the deadbolt and enter the “Verify State”. 2. Enter the “Management Mode”, (see step 2 in 2.3.1 Enroll an Ordinary User’s Fingerprint). 3. Press "4" on the deadbolt to enter “Enable/Disable User Mode”. 4. Enter the user ID which you want to enable or disable, press confirm, enter the user ID again and press will sound a long beep and the button to confirm. The deadbolt button will flash green. Note: (1) You can only enable or disable Ordinary Users. (2) The disabled user can no longer unlock the deadbolt. - 13 - button to BL100 User Manual 2.7 Reset Deadbolt to Factory Default Settings 1. Press button to start the deadbolt and enter the “Verify State”. 2. Enter the “Management Mode”, (see step 2 in 2.3.1 Enroll an Ordinary User’s Fingerprint). 3. Press "7" on the deadbolt to enter “Reset Settings Mode”. 4. Enter "0000" and press press . button to confirm, enter "0000" again and button to confirm. The deadbolt will sound a long beep and the . button flash green. You have now reset the deadbolt’s settings to factory default. Note: After resetting the deadbolt’s settings, the MPC will reset to "98989" (The factory default MPC), and delete all users in the deadbolt, including the Administrator and Ordinary Users, automatically entering demo mode. - 14 - BL100 User Manual 3. Other Functions 3.1 Routine Operation Indicators Successful user operation: The deadbolt beeps once and the LED indicator will turn green for 3 seconds. Failed user operation: The deadbolt beeps a short tone twice and the LED indicator will turn red for 3 seconds. Verify State: LED flashes green Management Mode: Keypad will flash blue LED and sensor will turn off. Warning Indication: The deadbolt beeps five times intermittently. Note: You can only enter numbers, such as PIN codes, user ID’s or master pass code when the keypad is flashing blue. - 15 - BL100 User Manual 3.2 Deadbolt Initialization In case you ever forget the master pass code or any other setting’s information and you are not allowed to access or change the settings, you can use the initialization key to reset the deadbolt to factory-default settings. Use a screwdriver to remove the screws in the back of the deadbolt cover and then press the initialization key to reset the deadbolt. Shown below: Initialization Key - 16 - BL100 User Manual 3.3 Unlock the Non-Locking Status Alarm The non-locking status alarm occurs when the deadbolt detects that the latch-bolt isn’t properly extended to secure the door. This can be fixed in either of the following two ways: 1. Press the button and the deadbolt will lock automatically. The alarm will sound continuously until the latch-bolt is properly extended and securing the door. 2. Lock the deadbolt by using the mechanical key or by turning the lock lever inside. The alarm will turn off after the door is properly secured by the deadbolt. 3.4 Automatic Program Exit and System Power-off The deadbolt powers off automatically upon successful fingerprint or PIN code matching and unlocking. The deadbolt powers off automatically when the AA batteries become too weak. The deadbolt powers off automatically if there is no activity for 10 seconds. After successful verification, press press button to lock the deadbolt, and then button again to unlock and power off the deadbolt. 3.5 Using External Power While running on only 9V external battery power, the deadbolt will continue performing ONLY fingerprint or password matching and unlocking. Note that while on external 9V power, the fingerprint deadbolt CANNOT perform enrollment, deletion nor configuration changes. These system functions are too critical to perform while the deadbolt is running on only 9V and the threat of total power - 17 - BL100 User Manual failure and data loss exists. As shown in the figure below, connect a 9V battery to the battery connector at the bottom of the deadbolt. Emergency 9V external battery connector 9V battery If you power off the deadbolt without first locking it, the latch-bolt will NOT automatically extend. The deadbolt will remain “unlocked”. Replace the AA batteries to resume locking the deadbolt. - 18 - BL100 User Manual 3.6 Unlock With an Emergency Mechanical Key You can open the deadbolt by using an emergency mechanical key in case the deadbolt’s electronics fail. ① Use your fingernails or a thin chip to remove the keyhole cover. ② Insert the emergency mechanical key into the keyhole and rotate 90º to unlock or lock the deadbolt. ① ② Note: For security purposes, only the key provided with your deadbolt will work. After unlocking or locking the deadbolt, replace the keyhole cover to keep keyhole concealed. - 19 - BL100 User Manual 3.7 Battery “Low Voltage” Warning When the AA batteries are running low, the deadbolt’s low-voltage alarm signals users to change the batteries as follows: 1. When the battery voltage reaches lower than 4.8V, the alarm deadbolt will beep five times. Users can unlock the deadbolt normally but will not be able to enter the “Administrative User” mode. 2. When the battery voltage reaches lower than 4.5V, the alarm deadbolt will beep five times, and then the deadbolt will power off. Note: When the low-voltage alarm occurs, please change the batteries immediately to help prevent data loss. - 20 - BL100 User Manual 4. Appendix 4.1 Technical Specifications Item Description Power 6V DC Capacity 100 users(100 fingerprints) Sensor Optical Fingerprint Sensor Algorithm Version 10.0 LED Three colors (red, green, blue) - 21 - BL100 User Manual BL100 – Warranty Information BL100 comes with a five year mechanical and finish warranty and one year electronics warranty to the original residential user of Scilox™ against defects in material and workmanship as long as the original user occupies the residential premises upon which the product was originally installed. This warranty only applies to Original user of the product. This warranty is not transferable. This warranty DOES NOT COVER: Any cost including, but not limited to; removal and reinstallation of the product. Freight and shipping charges/expenses required to return product to Scilox™ Direct sunlight, scratches; abrasions; deterioration due to the use of paints, cleaners, solvents or other chemicals; Abuse; misuse; or product(s) used in commercial/common area application Improper storage, installation or operation Which have been improperly stored, installed, maintained or operated Improper alteration, misuse, abuse, negligence and accident Improper exposure to temperature, humidity or other hazardous conditions Upon return of a defective product to Scilox™, Scilox™ at its own discretion may repair or replace the product or refund the purchase price. Scilox™ is not liable for incidental or consequential damages. Scilox’ maximum liability under this warranty is limited to the purchase price of the product. Some states do not allow the exclusion or limitation of incidental or consequential damages, so the above exclusion may not apply to you. This warranty gives you specific legal rights and you may also have other rights that vary from state to state. If a mechanical or finish defect occurs, please call 732-444-3556 in the U.S. and Canada to receive and Return/Repair authorization number. Scilox™ will only pay shipping to repair the product within continental United States (excludes Hawaii and Alaska). Customer must pay shipping charges to ship the repaired product back under this warranty. For customers in Hawaii, Alaska or Canada, claims under this warranty must be made only to the place of purchase. - 22 - BL100 User Manual Support: Contact the Scilox BL100 distributor/dealer that you purchased the deadbolt from. Or Go to: www.scilox.com - 23 - BL100 User Manual USER CODES USER USER ID # PIN # Hand (L or R) & finger ___________________________ _________ ________ __________________ ___________________________ _________ ________ __________________ ___________________________ _________ ________ __________________ ___________________________ _________ ________ __________________ ___________________________ _________ ________ __________________ ___________________________ _________ ________ __________________ ___________________________ _________ ________ __________________ ___________________________ _________ ________ __________________ ___________________________ _________ ________ __________________ ___________________________ _________ ________ __________________ ___________________________ _________ ________ __________________ ___________________________ _________ ________ __________________ ___________________________ _________ ________ __________________ ___________________________ _________ ________ __________________ ___________________________ _________ ________ __________________ ___________________________ _________ ________ __________________ ___________________________ _________ ________ __________________ ___________________________ _________ ________ __________________ ___________________________ _________ ________ __________________ ___________________________ _________ ________ __________________ ___________________________ _________ ________ __________________ ___________________________ _________ ________ __________________ ___________________________ _________ ________ __________________ ___________________________ _________ ________ __________________ ___________________________ _________ ________ __________________ ___________________________ _________ ________ __________________ - 24 -