1
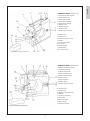
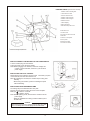
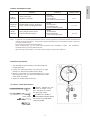
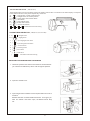
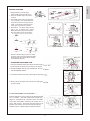
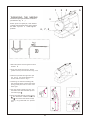
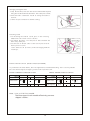
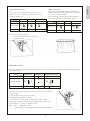
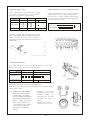
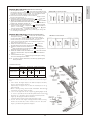
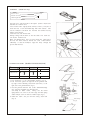
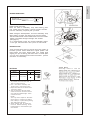
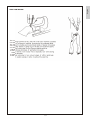
Another quality product from
EURO-PRO
TM
INSTRUCTION MANUAL
English
Spanish
French
Model 377/374/373/372/372H
EURO-PRO Operating LLC, 94 Main Mill Street, Door 16, Plattsburgh, NY 12901
4400 Bois Franc,St. Laurent, QC,H4S 1A7
When using an electrical sewing machine, basic safety precautions should always be followed, including
the following.
Read all instructions before using this sewing machine.
This sewing machine is designed for household use.
DANGER- TO REDUCE RISK OF ELECTRIC SHOCK:
A sewing machine should never be left unattended when plugged in. Always unplug this sewing machine
from the electrical outlet immediately after using and before cleaning.
Warning -To reduce the risk of burns, fire, electric shock or injury to persons...
1. Do not allow to be used as a toy. Attention is necessary when this sewing machine is used by
or near children.
2. Use this sewing machine only for its intended use as described in this manual. Use only attachments
recommended by the manufacturer as contained in this manual.
3. Never operate this sewing machine if it has a damaged cord or plug, if it is not working properly,
if it has been dropped or damaged, or dropped into water. Return the sewing machine to the nearest
authorized dealer or service center for examination, repair,electrical or mechanical adjustment.
4. Never operate the sewing machine with any air openings blocked. Keep ventilation openings from
the sewing machine and foot control free from the accumulation of lint, dust, and loose cloth.
5. Never drop or insert any object into any opening.
6. Do not use outdoors.
7. Do not operate where aerosol spray products are being used or where oxygen is being administered.
8. To disconnect, turn all controls to the off O¡± position, then remove plug from outlet.
¡±
9. Do not unplug by pulling on cord. To unplug, grasp the plug, not the cord.
10. Keep fingers away from all moving parts. Special care is required around the sewing machine needle.
11. Always use the proper needle plate. The wrong plate can cause the needle to break.
12. Do not use bent needles.
13. Do not pull or push fabric while stitching. It may deflect the needle, causing it to break.
¡±
14. Switch the sewing machine off O ¡±when making any adjustments in the needle area, such as
threading needle, changing needle, threading bobbin, or changing presser foot and the like.
15. Always unplug sewing machine from the electrical outlet when removing covers, lubricating,
or when making any other user servicing adjustments mentioned in the instruction manual.
16. Always unplug before replacing lamp. Replace bulb with the same rated 15 watts.
SAVE THESE INSTRUCTIONS
1
English
¡°± IMPORTANT SAFETY INSTRUCTIONS
Contents
Principal parts
3-4
How to connect the machine to the power supply
4
How to use the foot control
4
How to replace the sewing lamp
4
Changing the needle
5
Thread and needle chart
5
To select a suitable needle
5
Removing and attaching the presser foot
6
Regulating the thread tension
Reverse stitch
6
7
The pattern selector
7-8
Removing the bobbin case and bobbin
8
Winding the bobbin
9
Threading the bobbin case
9
Threading the needle
10
Drawing up the bobbin thread
11
Straight stitch and zigzag stitch
11
Changing sewing direction
12
Fastening seams
12
Triple stretch stitch
12
Tricot zigzag stitch
13
Smocking stitch
13
Overlock stitch
13
Double action stitch
14
Double overlock stitch
15
Sewing buttonholes
14-15
Sewing zippers
15
Hemming
16
Sewing blind hems
16
Sewing embroidery
17
Darning plate
17
Buttons
Cleaning the feed dog
17
18
Cleaning the shuttle race
18
Free arm sewing
19
Trouble shooting: causes and remedies
20
2
3 17 4 5
2
PRINCIPAL PARTS ( Model 377 )
1.Bobbin winder thread guide
2.Thread tension dial
3.Pattern selector dial
15
6
4.Bobbin winder spindle
5.Bobbin winder stopper
6.Balance wheel
14
7
8
16
7.Stitch length dial
8.Reverse button
9.Needle clamp and screw
10.Shuttle cover
13
12
11
11.Presser foot
12.Presser foot thumb screw
13.Needle
14.Screw for face plate
15.Face plate
16.Extension table
17.Stitch display
(Accessories storage compartment)
10
9
18
18.Presser foot lifter
PRINCIPAL PARTS ( Model 374 )
1.Bobbin winder thread guide
2.Thread tension dial
3.Pattern selector dial
4.Bobbin winder spindle
5.Bobbin winder stopper
6.Balance wheel
7.Stitch length dial
8.Reverse button
9.Needle clamp and screw
10.Shuttle cover
11.Presser foot
12.Presser foot thumb screw
13.Needle
14.Screw for face plate
15.Face plate
16.Extension table
17.Stitch display
18.Presser foot lifter
(Accessories storage compartment)
3
English
1
PRINCIPAL PARTS ( Model 373/372/372H )
1.Bobbin winder thread guide
2.Thread tension dial
3.Pattern selector dial
4.Bobbin winder spindle
5.Bobbin winder stopper
6.Balance wheel
7.Stitch display
8.Reverse button
9.Needle clamp and screw
10.Shuttle cover
11.Presser foot
12.Presser foot thumb screw
13.Needle
14.Screw for face plate
15.Face plate
16.Extension table
17.Presser foot lifter
(Accessories storage compartment)
HOW TO CONNECT THE MACHINE TO THE POWER SUPPLY
1.Fit the machine plug into the machine.
2.Plug the power cord to the power supply.
Note:*Before plugging in the machine, ensure the voltage and
number of cycles indicated, conforms to your electrical
power supply.
HOW TO USE THE FOOT CONTROL
Sewing speed can be varied by the foot control. The harder you press
on the controller, the faster the machine runs.
Note:*By releasing the controller, the machine stops running automatically.
*Before using the machine, practice controlling the speed
without threading.
HOW TO REPLACE THE SEWING LAMP
The sewing lamp is located behind the face plate.
Remove the face plate by loosing the screw of the face plate.
Bulb type: To remove...Unscrew
To replace...Screw
Note:*Before replacing a bulb, disconnect the machine from the
power supply.
*Bulbs are available from sewing machine retailers.(Use a
15-Watt bulb)
Caution!
Before leaving the machine, changing parts or doing any other
work on it, always disconnect the plug from the wall socket.
4
Switch
THREADS
FABRICS
NEEDLE SIZE
LIGHT
WEIGHT
Sheer cottons, Silk,
Synthetics, Georgette
Fine Silk
Fine Cotton
Fine Synthetic
Fine Cotton Covered Polyester
MEDIUM
WEIGHT
Medium Weight Cottons, Synthetics,
Poplin, Velvet, Light Weight Woollens
50 silk
50 to 80 Cotton
50 to 60 Synthetic
Cotton Covered Polyester
11 or 14
HEAVY
WEIGHT
Heavy Weight Cottons, Denim
Tweed, Gaberdine, Drapery
50 Silk
40 to 50 Cotton
40 to 50 Synthetic
Cotton Covered Polyester
14 or 16
Note:
9 or 11
*In general, fine threads and needles are used for sewing thin fabrics, and thicker threads and needles are
used for sewing heavy fabrics, Always test thread and needle size on a small piece of fabric which will
be used for actual sewing.
*Use the same thread for needle and bobbin.
*When sewing stretch, very fine fabrics and synthetics, use a STRETCH needle. The STRETCH
needle effectively prevents skipped stitches.
*When sewing very fine fabrics, sew over a piece of paper to prevent yarn distortion.
CHANGING THE NEEDLE
1. Turn the balance wheel towards you until the needle is in
its highest position.
2. Loosen the needle clamp screw by turning its top edge
towar ds you. Remove the needle from the clamp.
,
3. Place the new needle into the needle clamp with it s flat
side f acing away from you. Push the needle up into needle
clamp as far as possible.
4. Tighten the needle clamp screw firmly.
TO SELECT A SUITABLE NEEDLE
(4)
Stem
stretch needle
A number indicating the size
of needle is marked on the
stem. The higher the number,
the thicker the needle.
A STRETCH needle is
recommended for stretch fabrics.
* Do not use any needle which
is bent or blunted.
5
(3)
English
THREAD AND NEEDLE CHART
REMOVING AND ATTACHING THE PRESSER FOOT
To Remove:
1. Turn the balance wheel towards you until the needle is at its highest position.
2. By lifting the lever on the back of the foot holder, the presser foot will drop off.
presser
foot
lifter
1
Note: *Do not force the presser foot to remove it.
To Attach:
1. Place the presser foot so that the pin on the foot lies just under the groove of the
foot holder. Lower the foot holder.
,
2. When the presser foot lifter is raised youll fin d the presser foot is locked in place.
2
lever
groove
pin
1
2
REGULATING THE THREAD TENSION
Generally, should any tension adjustment be necessary, the adjustment can normally be made by regulating
the upper thread tension dial only. Bobbin thread tension has been adjusted at the factory and readjustment
is seldom required except for special instances, thread and fabric.
Bobbin thread tension is just right when you can pull the thread from bobbin case easily with a little resistance.
Thread tension may be adjusted by tightening or loosening the thread tension dial.
Properly adjusted thread
tension for straight sewing
The needle thread and the bobbin thread
should interiock in the center of two layers of fabric
* How to adjust the bobbin
thread tension
The needle thread is too
tight
The needle thread is too
loose
The bobbin
thread appears on the
upper surface
of the fabrics
Loosen the needle thread tension by
moving the dial to the lower number
To increase tension,
turn screw clock wise.
To decrease tension.
turn screw counterclock wise.
The needle
thread appears on the
underside of
the fabrics
Tighten the needle thread tension by
moving the dial to the higher number
Remember the higher the number, the tighter the tension. Correctly balanced tensions for one fabric may not
be suitable for another. The required tension depends upon the stiffness of fabric, thickness of the fabric,
numbers of layers of fabric being sewn, as well as the type of stitch you are making. It is better to test the stitching on a scrap of the fabric you are using before starting to make a garment. The general range for many fabrics is 3-5.
6
To change the length of the stitches proceed as follows:
Tu r n t h e d i a l s o t h a t t h e n u m b e r f o r t h e r e q u i r e d s t i t c h l e n g t h i s a t s e t t i n g m a r k . T h e n u m b e r s i n d i c a t e t h e a p p r o x i m a t e
s t i t c h l e n g t h i n m m . Th e s m a l l e r t h e n u m b e r s , t h e s h o r t e r t h e s t i t c h .
Model 374
Model 377
setting
mark
stitch lengths
REVERSE STITCH: ( Model EP 377/374/373/372/372H )
Press center of the stitch length dial (reversing button) and hold for reverse stitching. Fabric will immediately start feeding
backwards. Release button and machine will resume normal forward sewing. Very useful for fastening ends of seams and
darts without having to tie threads, and for strengthening seams.
Model EP 377
Model 374
Model 373/372/372H
THE PATTERN SELECTOR ( Model 377 )
The desired pattern can be selected by turning the pattern selector dial. The marks on the dial correspond to the
patterns shown on the panel respectively, as follows;
M(
) straight stitch, middle needle position
O(
) straight stitch, left needle position
1-5( 54321) zigzag stitch with variable width
A(
) tricot stitch
B(
) stretch blind stitch
SS
C(
) double action stitch
D(
) reverse blind stitch
automatic buttonhole sewing
SS
Selecting Stretch Stitch:
When sewing stretch stitch, set the stitch length dial at
S.S. .
When you release the engagement on the dial, the
Standard djustment
stretch stitch mechanism will be off automatically.
M(
) triple straight stretch stitch, middle needle
position.
O(
) triple straight stretch stitch, left needle
Turn the stitch length dial so that
the SS mark is uppermost.
This is a standard adjustment for most types of fabric.
For different types of fabric, adjustment may be necessary.
To shorten the stretch stitches, turn the dial slightly towards¡°±
To lengthen, turn the dial towards¡°±
.
On most fabrics, these adjustments allow for various
pattern possibilities.
When making stretch stitches, the mark ¡°±
must always
be within the SS range - (see drawing).
position.
1-5( 54321) triple zigzag stretch stitch or ric-rac stitch
A(
) smocking stitch
B(
)
C(
D(
) double overlock stitch
) overlock stitch
fancy stretch stitch or blanket stitch
7
English
STITCH LENGTH DIAL ( Model 377 and 374 only )
THE PATTERN SELECTOR
( Model 374)
The desired pattern can be selected by turning the pattern selector dial. The marks in the stitch display correspond
to the patterns shown on the panel respectively, as follows:
A(
) straight stitch, middle needle position
B(
) straight stitch, left needle position
C(
) zigzag stitch with variable width
D(
) tricot stitch
E(
) stretch blind stitch
F (
) double action stitch
G (
) reverse blind stitch
automatic buttonhole sewing
THE PATTERN SELECTOR ( Model 373/372/372H)
1-3 (
) straight stitch
4-6 (
) zigzag stitch
7
(
8
(
) triple zigzag stretch stitch
) triple straight stretch stitch
9 (
10 (
) overlock stitch
11 (
) tricot stitch
12 (
) shell stitch
(
) smocking stitch
)
automatic buttonhole sewing
RE MOVING THE BOBBIN CASE AND BOBBIN
1. Raise the presser foot and turn the balance wheel towards
you until the thread takd-up lever is at its highest position.
2. Open the shuttle cover.
Open
3. Open hinged latch of bobbin case and pull bobbin case out of
machine.
Release the latch and the bobbin will fall out. As long as you
hold the bobbin case latch open, the bobbin cannot drop
out.
8
English
WINDING THE BOBBIN
1. Draw thread from spool through
bobbin winder tension disc as shown.
2. Pull end of thread through hole in bobbin
as shown.
3. Push bobbin winder shaft to far left position,
if it is not already there. Place bobbin onto
shaft with end of thread coming from top of
bobbin. Push bobbin winder shaft to right
1
2
3
4
until it clicks. Hold onto end of thread.
4. Start machine. The thread that is held will
snap or may be trimmed with a scissors,
Bobbin will cease turning when completely
filled. Push shaft to left to remove bobbin.
When the bobbin winding is incorrect, release
the screw of the upper thread guide and adjust
the thread guide up or down until the winding
of the bobbin is balanced.
bobbin case
bobbin
THREADING THE BOBBIN CASE
Hold the bobbin between the thumb and forefinger of your right
hand and pull off about 15cm (6 inches) of thread.
1. Hold the bobbin case in your left hand as shown and place
the filled bobbin inside.
slot
2. Pull the thread into the slot in the edge of the bobbin case.
3. Now pull the thread under the tension spring and into the
thread eyelet.
tension spring
eyelet
To insert the bobbin case and bobbin......
long finger
Ensure that about 15 cm (6 inches) of thread extends
out of bobbin. Hold the bobbin case so that long
finger on case points up. Open the latch of bobbin
case. Slip the bobbin case over the center pin of
hook and press in place until the long finger of the
bobbin case enters the notch entirely to lock the
bobbin in place. Release latch and press it down.
latch
latch
9
notch
1
2
5
A
THREADING THE NEEDLE
Install the spool pin behind the machine
(as shown in fig A ).
Place spool on spool pin, with thread
coming from the back of the spool. Place
the take - up lever 5 in the highest
position.
3
B
6, 7, 8
4
fig A
1. Raise the presser foot using the foot lever
marked B .
2. Draw the thread through the thread
ÙÚ 1 & 2.
guides on the top cover as shown in ¢.Fig.
B
3. Hold the spool still with right hand, pull
the end of the thread between the
tension disk as shown in Fig. 3¢. Û
4. Following the slotted threading path,
pull the thread down to the thread check
spring (inside) and lead it across from
left to right.
2
1
5. Pull the thread upward and slip into
the slotted hole of thread take-up level
from left to fight 5 .
5
6. Draw the thread through guides 6 and
7 , and thread the needle from front to
rear 8 , leave the thread about 15cm(6
inches) long underneath the presser
foot.
3
6
7
4
10
8
English
DRAWING UP THE BOBBIN THREAD
1.Hold the end of the needle thread with your left hand.
needle thread
1
2.Turn the balance wheel slowly towards you with your right
hand until the needle goes down and comes up. Then stop
the balance wheel when the take-up lever is at its highest
position.
Lightly draw up the needle thread forming a loop with the
bobbin thread.
2
3.Puil about 15cm (6 inches) of both threads away from you
under the presser foot.
needle
thread
bobbin
thread
3
STRAIGHT STITCH AND ZIGZAG STITCH
Presser foot
Pattern selector
Model 377
Model 374
zigzag foot
zigzag foot
) or O
(for straight gtitch)
)
A(
1 - 5 (54321) (for zigzag stitch)
C(
M(
Stitch length dial
(
0.3-4
) or B
(for straight stitch)
(
) (for zigzag stitch)
0.3-4
Model 373/372/372H
)
(
) (for straight stitch)
(
) (for zigzag stitch)
-
Starting Sewing
1. Be sure both the threads are drawn back under the presser foot.
2. While holding the threads with your left hand, turn the balance
wheel toward you to bring the needle into the fabric where you
wish to start sewing.
3. Lower the presser foot, and press the speed controller gently,
then start sewing slowly.
*Sew a few reverse stitches by pushing reverse button for
reinforcing the end of seams.
*Raise the needle to its
highest position before turning the
pattern selector dial and stitch width dial.
11
zigzag foot
C hanging S ewing Direc tions
1. S top the ma chine , a nd turn the ba la nc e whe e l towa rd you to
bring the ne e dle down into the fabric . R a is e the pres s e r foot.
2. P ivot the fa bric a round the ne e dle to c ha nge dire c tion a s
de s ire d.
3. L owe r the pre s s e r foot and c ontinue s e wing.
F as tening S eams
1. F or fa s te ning the e nds of s ea ms , pre s s in the re ve rs ing
button a nd s e w s e ve ra l re ve rs e s titc he s .
2. To re move the fabric , ra is e the pre s s e r foot a nd dra w the
fa bric a wa y from you.
thre a d c utte r
3. C ut thre a ds on thre a d c utte r a t the re a r of pre s s e r ba r or
with a pa ir of s c is s ors .
L e a ve a bout 15 cm ( 6 inc he s ) of hre a d ha nging from the
ne e dle e ye .
T R IP L E S T R E T C H S T IT C H ( Mode l 374/373/372/372H)
If you wis h to s e w s tre tc h fa bric s , this is the right s titc h to a void thre a d bre a king. T his is a ls o ve ry s uita lbe
for s e a ms tha t ne e d gre a t s tre ngth, e . g. c rutc h s e a ms or poc ke t s e a ms .
T R IP L E ZIG ZA G S T R E T C H S T IT C H
T R IP L E S T R A IG HT S T R E T C H S T IT C H
Presser foot
M odel 377
zigzag foot
Pattern selector
M(
Stitch length dial
M odel 374 M odel 373/372/372H
zigzag foot
)
8(
)
Presser foot
Pattern selector
S .S .
Stitch length dial
N ote : * U s e a S T R E T C H ne e dle .
T he blue tippe d s ha nk ne e dle e ffe c tive ly pre ve nts
s kippe d s titc he s .
12
M odel 377
zigzag foot
O(
)
S .S .
M odel 374 M odel 373/372/372H
zigzag foot
7(
)
S MOC K ING S T IT C H
T his s titc h is ve ry s uita ble for da rning te a rs . It c a n
a ls o be us e d for re inforc ing s tre tc h ma te ria ls a nd
s e wing on fa bric pa rts .
W ith a na rrow s trip of fa bric dire ctly unde r the line
of ga the ring, s titch ove r the ga the rs . T he de s ign will
be a s e rie s of s ma ll dia monds .
W he n s mocking a ga rme nt, the s titching s hould be
done be fore the pie ce is s e wn into the ga rme nt.
M odel 377
zigzag foot
Presser foot
Pattern selector
A(
)
0.3 to 4
S titch length dial
M odel 374 M odel 373/372/372H
zigzag foot zigzag foot
D(
) 11(
zigzag foot
Pattern selector
A(
)
-
0.5 to 4
M odel 374 M odel 373/372/372H
M odel 377
Presser foot
S titch length dial
S .S .
zigzag foot
)
10(
)
-
N ote : *U s e a S T R E T C H ne e dle .
T he s tre tc h ne e dle e ffe c tive ly pre ve nts
s kippe d s titc he s .
OV E R L OC K S T IT C H
W ith this s e a m it is pos s ible to pre ve nt ra w e dge s , e s pe c ia lly on e a s ilyfra ying fa bric s , with a good-loc king and
la s ting edge finis h.
M odel 377
Presser foot
zigzag foot
Pattern selector
D(
S titch length dial
M odel 374
Model 373/372/372H
zigzag foot
)
9(
S .S .
P la c e the fa bric unde r the pre s s e r foot s o tha t the s titc he s a re ma de
ove r the e dge .
L owe r the pre s s e r foot a nd s ta rt s e wing.
G uide the ma te ria l lightly a s s hown.
S e w on a pie c e of wa s te fa bric to c he c k the ma c hine s e tting.
T he ove rloc k s titc he s a re forme d c orre c tly whe n the ne e dle s e ws
to the right a nd
N ote : *U s e a
jus t mis s e s the fa bric edge .
S T R E T C H ne e dle .
T he s tre tc h ne e dle e ffe c tive ly pre ve nts s kippe d s titc he s .
13
)
English
T R IC OT ZIG ZA G S T IT C H
DOUB L E A C T ION S T IT C H
DOUB L E OV E R L OC K S T IT C H (Model E P 377 only)
T his is a good s tilc h to us e in a tta c hing or binding
e la s tic fa bric s a nd s tre tc h la c e , linge rie s tre tc h knit.
T he s titc h is de c ora tive a s we ll a s us e ful.
U s e this ve rs a tile s titc h to ins e rt e la s tic in ga rme nts .
S imply s titc h e la s tic into pla c e , ma king s ure it is
e ve nly s pa c e d. To do this , ma rk the c orre c t le ngth
pie c e into qua rte rs , the n ma tc h the s e ma rkings with
c e nte r front a nd s ide s e a ms .
M odel 377
M odel 374
Presser foot
zigzag foot
zigzag foot
Pattern selector
C(
F(
Stitch length dial
)
1 to 2.5
M odel 373/372/372H
P re s s e r foot
P a tte rn s e le c tor
S titc h le ngth dia l
)
1 to 2.5
z igz a g foot
C(
S .S .
)
DE C OR AT IV E E DG ING
T urn the ra w e dge unde r 2c m a nd pre s s . P la c e the
fa bric right s ide up with the middle of the turnove r
unde r the c e nte r of the pre s s e r foot, s o tha t the
s titc h s e ws on to the fold a nd jus t ove r the ra w e dge
unde rne a th.
S E WING B UT TONHOL E S
T he built -in buttonhole me c ha nis m of this ma c hine ma ke s it pos s ible to s e w
button hole s in a s hort time without turning the ma te ria l.
M odel 377/374
Presser foot
buttonhole foot
A rrow
( S ta rt he re )
M odel 373/372/372H
buttonhole foot
F oot
Pattem selector
S le igh
buttonhole foot
S titch length dial
0.5 to 1
R a is e the foot a nd the ne e dle to its highe s t pos ition. R e pla c e the foot with
the tra ns pa re nt buttonhole foot for s e wing buttonhole s .
Ma rk the loc a tion a nd the de s ire d le ngth of buttonhole on the fa bric us ing a
,
pe nc il or ta ilor s c ha lk.
N ote :
(Model E P 377 and 374 only)
*To find the mos t s uita ble
s titc h le ngth, it is be tte r
to s e w a s a mple buttonhole
on a pie c e of wa s te fa bric .
* W he n s e wing ve ry fine
fa bric s a nd s ynthe tic s , de c re a s e the pre s s ure of foot
a nd s e w ove r a pie c e of
pa pe r to pre ve nt ya rn dis tortion.
* T he ma rk
on
c oa rs e
s titc he s
for he a vy
fa bric s
de ns e
s titc he s
for light
fa bric s
the s titc h
le ngth dia l s hows a ra nge of
buttonhole s e wing.
An
a djus tme nt c a n be ma de
by s e tting
the
ma rk, a s
s hown.
* B uttonhole s titc h le ngth is
a djus ta ble only on one s ide .
14
ra nge of
s titc h le ngth
1. Set the pattern selector at
¡°¡± . Then pass the needle thread
throughthe opening in the buttonhole foot and draw both needle
and bobbin threads to the left side. Turn the balance wheel
towards you until the needle comes to the point (1).
2.Lower the foot and sew slowly until the desired length is sewn,
then stop the machine at (2).
3. Raise the needle and set the selector at¡
. Then sew
°
±
several stitches of bar tack until the needle is at point (3).
E nglis h
SEWING BUTTONHOLES (Model 377 and 374)
(Model EP 377 and 374 only)
4. Raise the needle and set the selector at¡
then sewthe
°
±
right side of buttonhole the same length as the left side of
buttonhole. Stop the machine at (4).
5. Raise needle and set the selector at¡
then sew several
°
±
stitches of final bar tack. Stop the machine with the needle at
point (5).
.
To lock thre ads, set the pattern selector at
¡
° B§(zero
point of zigzag width). And sew a few stitches.
6. Cut thebuttonhole open carefully using a seam ripper, taking care
not to damage the bar tacks.
SEWING BUTTONHOLES (Model 373/372/372H)
1. Set the pattern selector at¡°¡±
Then pass the needle thread
through the opening in the buttonhole foot and draw both of
needle and bobbin threads to the right side. Turn the balance
wheel towards you until the needle comes to the point (1).
2. Lower the foot and sew slowly until a desired length is sewn,
(Model 373/372/372H)
then stop the machine at (2).
3. Raise the needle and set the selector at¡°¡±
then sew
several stitches of bar tack until the needle is at point (3).
4. Raise the needle and set the selector at¡°¡±
then sew the
left side of buttonhole just as the same length as the right side of
buttonhole. Stop the machine at (4).
5. Raise the needle and set the selector at
¡°¡± then sew several
stitches of final bar tack. Stop the machine with the needle at
point (5).
6. Cut the buttonhole open carefully using a seam ripper, taking
care not to damage the bar tacks.
Note: To make a heavier buttonhole, sew twice by repeating the
same procedure.
S E W ING ZIP P E R S
Presser foot
M odel 377
zi pper foot
Pattern sel ector
M(
S titch l ength di al
R a is e the
1 to 4
)
M odel 374 Model 373/372/372H
zi pper foot zi pper foot
A(
)
Z ippe r foot
1-3(
)
ta pe
E le me nts
1 to 4
foot a nd the ne e dle to its highe s t pos ition by turning
the ba la nc e whe e l towa rds you. R e pla c e the foot with the z ippe r
F a bric
E le me nts
foot.
1 . P in or ba s te the z ippe r ta pe to the fa bric a nd pla c e the workpie c e in pos ition unde r the foot.
A tta c h s na p on z ippe r foot s o tha t the ne e dle pa s s e s on its
S lide r
le ft ha nd s ide .
* W he n s ta rting s e wing, both ne e dle a nd bobbin thre a ds e nds
s hould be put a wa y unde r the foot.
2 . S e w on the right s ide of the z ippe r by guiding Z ippe r te e th
E le me nt
a s c los e a s pos s ible to the ne e dle drop. B e fore the foot re a c he s
the s lide r on
the z ippe r ta pe , ra is e the foot a nd ope n the
z ippe r by ke e ping the ne e dle in the fa bric .
L owe r the foot a nd s e w on the re ma ining of the s e a m,
3 . To s e w the le ft s ide z ippe r c ha nge pos ition of foot to bring
the foot to the le ft s ide of the ne e dle . S e w on in the s a me
wa y a s you did on the right s ide of z ippe r.
15
Z ippe r foot
Ta pe
N e e dle
F a bric
E le me nt
S lide r
F ia . 1
HE MMING
(Model 377 only)
P re s s e r foot
he mme r foot
P a tte rn s e le c tor
M(
S titc h le ngth dia l
)
1 to 4
hemmer foot
R ais e the foot and the needle to its highes t pos ition. R eplace the
foot with the hemmer foot.
F old over the fabric edge by about 3mm (1/8 inches ) and place it
under the foot. S ecure the folded edge with a few s titches . Take
out the workpiece and draw the hem into the hemmer foot by
pulling on the threads .
3mm
Lower the foot and s we the hem.
During s ewing, fold the fabric to the left a little and allow it to
run into the hemmer foot.
Make s ure that the fabric does not move under the right half of
the foot. T he fabric mus t be fed into the s croll of the hemmer
s ufficiently s o that the workpiece edge runs freely through the
groove under the foot.
S E WING B L IND HE MS
Presser foot
Pattern selector
S titch length dial
(Model 377/374/373/372/372H)
M odel 377
M odel 374
blind hem foot
blind hem foot
B(
)
1 to 3
E(
M odel 373/372/372H
( F ig. 1)
,,
4mm ( 1/6 )
)
1 to 3
1. T urn up the hem to the des ired width and pres s . ( F ig. 1)
2. F old hem back agains t the right s ide of the garment with
top edge of hem extending about 4 mm (1/6 inches ) to the
right s ide of the garment folded. (F ig. 2)
3. P lace the garment under the foot s o that double-folded edge
runs along the hemlguide and lower the foot.
S ew s lowly for better control, making s ure the narrow
zigzag s titches are s ewn on the hem edge and wide zigzag
s titches will jus t catch one thread of folded edge. (F ig. 3)
4. Unfold the
(F ig. 4)
fabric
and you will have a bling
( F ig. 2)
G uide
a djus ting
s c re w( F ig. 1)
G uide
s titch hem
F oide d e dge
( F ig. 3)
( F ig. 4)
16
English
SEWING EMBROIDERY
Presser foot
Pattern selector
darning plate
(
) or
zig zag
embroidery hoop
Raise and take off the foot.
Place the fabric in embroidery hoop. Place darning plate
over needle plate (see below). Lower the presser foot lifter.
Hold the embroidery hoop firmly with your hand.
While sewing the desired pattern, move the embroidery hoop
slowly and do not allow your fingers to get near the needle.
*Set the needle thread tension a little looser so that the bobbin
thread is not pulled through to the right side of fabric.
(See page 13).
*It is recommended to mark the required embroidery pattern
,
on the right side of the fabric with a pencil or tailor s chalk.
DARNING PLATE
There are a few times when you want to control the feeding of
the fabric yourself. Raise needle to its highest position and
raise presser foot. Place darning plate over needle plate
aligning two pins of darning plate with holes of needle plate.
You may then determine the movement of the fabric yourself.
See above for embroidery.
Thread Shank
BUTTONS
Model 377
Presser foot
Pattern selector
Model 374
button foot
1-5(54321)
Model 373/372
button foot
4-6(
)
Button foot
1. Align two holes of button with slot
of presser foot and lower foot to
hold the button securely.
2. Turn hand wheel manually until
needle point is just above button.
3. Adjust stitch selector so needle enters
right hole of button.
4. Turn hand wheel by hand so needle
enters second hole. The stitch selector
may need to be adjusted again. Stitch
a number of times.
NOTE:
You may find it helpful to use transparent tape to position your button
and to keep it in place during sewing.
Tear away after stitching.
5. Finish sewing with an extra two
inches of thread remaining. Draw
these threads to reverse side of garment and tie.
Holes of button
17
Sew-through buttons on coats and
jackets should nave a thread shank to
make them stand away from the fabric.
Place a straight pin or sewing machine
needle on top of button between the
holes, and sew over the pin or needle.
Pull thread to back of button and wind
around stitches to form a firm shank.
Tie thread ends securely.
CLEANING THE FEED DOG
It is necessary to keep the feed dog teeth always cleaned in order
to ensure smooth sewing.
1. Remove the needle and the presser foot.
2. Unscrew the needle plate set screws with a screw driver to take
off the needle plate from the machine.
3. With a brush, clean out dust and lint clogged on the feed dog
teeth.
4. Refit the needle plate.
CLEANING THE SHUTTLE RACE
Unplug the machine from the power supply.
To remove shuttle:
Raise needle to its highest position and remove bobbin case.
Turn levers away from shuttle and lift out retaining ring and
shuttle, by grasping center pin.
Clean the reverse side of feed dog with a small brush. Remove
lint and thread from all parts of shuttle and wipe with a lightly
oiled cloth.
shuttle driver
lever
lever
To reassemble:
Hold shuttle by center pin and fit carefully back into shuttle
race, forming perfect circle with shuttle driver..
Replace retaining ring polished side out, making sure the bottom
pin fits into notch. Lock retaining ring by turning levers back into
position, Refit bobbin case with bobbin.
shuttle
bobbin
18
retaining ring
bobbin case
English
FREE ARM SEWING
This sewing machine can be used like a flat bed machine, but easily
converts to a free arm machine by removing the extension table.
The free arm enables you to sew tubular types of pieces more easily.
Just slip the sleeve or pants leg on the free arm as shown above.
You will find many uses for this free arm feature such as:
1. Mend elbows and knees of garments more easily.
2. Sew in sleeves more easily. This is especially true when sewing
smaller garments.
3. Applique, embroider or hem around edges of cuffs or pants legs.
4. Sew in elastic casings in skirts or pants at the waist line.
19
TROUBLE SHOOTING: CAUSES AND REMEDIES
THREAD FORMS LOOPS
REMEDY
CAUSE
Read instructions for regulating needle-and bobbin thread tension
Thread machine properly and/or wing bobbin thread correctly
Thread tension not properly regulated
Needle thread properly threaded and/or bobbin thread
not properly wound
Thread size not suited to fabric
Thread check spring not working properly
See Size of needle and thread
Have spring replaced
SHRINKING OR PUCKERING OF THE SEAM
Read instructions for regulating needle-and bobbin thread tensions
Read instructions for regulating sewing foot pressure
Tension too tight
Sewing foot pressure too strong
IRREGULAR STITCHES
Use top quality threads
Re-wind bobbin
Needle and bobbin threads of poor quality
Bobbin thread unevenly wound
MACHINE DOES NOT RUN FREELY AND MAKES A NOLSE
Read instructions on how to oil
Read instructions on how to clean shuttle race
Clean machine carefully and re-oil with top quality oil
Loosen tension of drive belt
Machine needs oiling
Dust and thread in shuttle
Wrong oil used, has now clogged machine
Drive belt tension too tight
TROUBLE SHOOTING: CAUSES AND REMEDIES
NEEDLE THREAD BREAKS
REMEDY
CAUSE
Thread properly
loosen tension
Replace needle
Change
Have a new spring fitted
Insert needle properly
Replace
Needle not properly threaded
Thread tension too tight
Something wrong with the needle
Thread is too heavy for needle
Thread check spring is broken
Needle not properly inserted
Needle plate, shuttle or sewing foot damaged
BOBBIN THREAD BREAKS
Wind bobbin correctly
Thread bobbin correctly
Bobbin thread entangled because of incorrectly wound bobbin
Bobbin thread not under tension spring on bobbin case
STITCHES ARE LEFT OUT
Fit needle properly
Replace
Replace
Needle not properly fitted on needle bar
Needle bent or blunt
Needle worn
NEEDLE BREAKS
Replace
Fit needle properly
Use needle of correct size
Do not pull
Needle bent
Needle not properly fitted
Fabric too heavy or too hard
You are pulling on the fabric
20
25 YEAR LIMITED WARRANTY
EURO-PRO Operating LLC warrants this sewing machine for a period of 25 years from date of the original purchase, to
be free of defective parts due to imperfections in the workmanship and materials, subject to the following conditions,
exclusions and exceptions.
EURO-PRO Operating LLC will, at its option, repair or replace this sewing machine free of charge if it fails to operate
according to specifications due to factory defects in materials or workmanship within one year from date of purchase. For
25 years from date of purchase, EURO-PRO Operating LLC will repair or replace defective sewing machine head parts;
owner pays for labor charges. The sewing machine must be shipped freight and insurance prepaid to:
In U.S. :EURO-PRO Operating LLC, 94 Main Mill Street, Door 16, Plattsburgh, N.Y. 12901 Tel.: (800) 361-4639
In Canada: EURO-PRO Operating LLC, 4400 Bois Franc, St. Laurent, Quebec, H4S 1A7 Tel.: (800) 361-4639
A copy of your sales receipt and $15.95 for handling and return packing/shipping charges must be included.*
The electrical equipment (motor, rheostat, control, light, electronic parts etc.) are warranted free from defects in material
and workmanship for a period of two years from the date of original purchase. Non-durable parts including, without
limitation, needles, belts, bobbins, bulbs, bobbin cases, shuttles, springs, and parts which normally require replacement
are specifically excluded from this warranty.
This warranty is in effect provided the sewing machine is used only for normal household use by the original purchaser
when new, and is given reasonable good care and proper maintenance in accordance with the accompanying instruction
book. The manufacturer is not held responsible for damage, normal wear, accident, abuse, neglect, negligence or if the
machine has been repaired by unqualified personnel.
This warranty is extended to the original purchaser of the unit and excludes all other legal and/or conventional
warranties. The responsibility of EURO-PRO Operating LLC if any, is limited to the specific obligations expressly
assumed by it under the terms of the limited warranty. In no event is EURO-PRO Operating LLC liable for any indirect,
incidental or consequential damages of any nature whatsoever. Some states do not permit the exclusion or limitation of
incidental or consequential damages, so the above may not apply to you.
This warranty gives you specific legal rights, and you may also have other rights which vary from state to state or
province to province.
*Important: Carefully pack item to avoid damage in shipping. We recommend you insure the package (as
damage in shipping is not covered by your warranty). Be sure to include a copy of your sales receipt and attach
a tag to the machine with your name, address and telephone number. Please include $15.95 to cover return
shipping and handling.
------------------------------------------------------------------------------------------------------------------------------------------------------OWNERSHIP REGISTRATION CARD
Please fill out and mail the product registration card within ten (10) days of purchase. The registration will enable us to contact you in the unlikely
event of a product safety notification. By returning this card you acknowledge to have read and understood the instructions for use, and warnings set
forth in the accompanying instructions.
RETURN TO:
In US: EURO-PRO Operating LLC, 94 Main Mill Street, Door 16, Plattsburgh, N.Y. 12901 Tel.: (800) 361-4639
In Canada: EURO-PRO Operating LLC, 4400 Bois Franc, St. Laurent, QC, H4S 1A7 Tel.: (800) 361-4639
__________________________________________________________________________________________________________
Appliance model
______________________________________________________________________________________________________________________
Date purchased
Name of store
______________________________________________________________________________________________________________________
Owner’s name
______________________________________________________________________________________________________________________
Address
City
State/Prov.
Zip/Postal Code
Rev. 09/02B