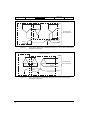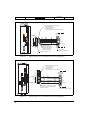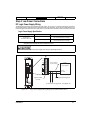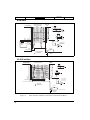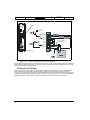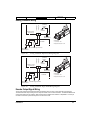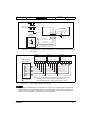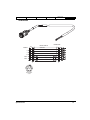
1
Installation Manual
Epsilon EP Drive
P/N 400518-01
Revision: A7
Date: May 5, 2010
© Control Techniques Americas LLC, 2006-2010
Epsilon EP Drive
Installation Manual
Information furnished by Control Techniques Americas LLC (Control Techniques) is believed
to be accurate and reliable. However, no responsibility is assumed by Control Techniques for
its use. Control Techniques reserves the right to change the design or operation of the
equipment described herein and any associated motion products without notice. Control
Techniques also assumes no responsibility for any errors that may appear in this document.
Information in this document is subject to change without notice.
P/N 400518-01
Revision: A7
Date: May 5, 2010
© Control Techniques Americas LLC, 2006-2010
© Control Techniques Americas LLC, 2006-2010
Part Number: 400518-01
Revision: A7
Date: May 2010
Printed in United States of America
Information in this document is subject to change without notice. No part of this document
may be reproduced or transmitted in any form or by any means, electronic or mechanical, for
any purpose, without the express written permission of Control Techniques Americas LLC.
Control Techniques Americas LLC a division of EMERSON Co.
Control Techniques Americas LLC is not affiliated with Microsoft Corporation, owner of the
Microsoft, Windows, and Windows NT trademarks.
Modbus is a trademark of Gould, Inc.
Schaffner is a trademark of Schaffner
Mate-N-Lok is a trademark of Amp Incorporated Corp.
DeviceNet is a trademark of Open DeviceNet Vendor Association.
This document has been prepared to conform to the current released version of the product.
Because of our extensive development efforts and our desire to further improve and enhance
the product, inconsistencies may exist between the product and documentation in some
instances. Call your customer support representative if you encounter an inconsistency.
ii
Customer Support
Control Techniques Americas LLC
12005 Technology Drive
Eden Prairie, Minnesota 55344-3620
U.S.A.
Telephone: (952) 995-8000 or (800) 893-2321
It is Control Techniques’ goal to ensure your greatest possible satisfaction with the
operation of our products. We are dedicated to providing fast, friendly, and accurate
assistance. That is why we offer you so many ways to get the support you need. Whether
it’s by phone, fax or modem, you can access Control Techniques support information 24
hours a day, seven days a week. Our wide range of services include:
FAX
(952) 995-8099
You can FAX questions and comments to Control Techniques. Just send a FAX to the
number listed above.
Website and Email
www.emersonct.com
Website: www.emersonct.com
Email: [email protected]
If you have Internet capabilities, you also have access to technical support using our
website. The website includes technical notes, frequently asked questions, release notes
and other technical documentation. This direct technical support connection lets you
request assistance and exchange software files electronically.
Technical Support
(952) 995-8033 or (800) 893-2321
Email: [email protected]
Control Techniques’ “Motion Made Easy” products are backed by a team of professionals
who will service your installation. Our technical support center in Eden Prairie, Minnesota
is ready to help you solve those occasional problems over the telephone. Our technical
support center is available 24 hours a day for emergency service to help speed any
problem solving. Also, all hardware replacement parts, if needed, are available through our
customer service organization.
When you call, please be at your computer, with your documentation easily available, and
be prepared to provide the following information:
• Product version number, found by choosing About from the Help menu
• The type of controller or product you are using
• Exact wording of any messages that appear on your screen
• What you were doing when the problem occurred
• How you tried to solve the problem
iii
Need on-site help? Control Techniques provides service, in most cases, the next day. Just
call Control Techniques’ technical support center when on-site service or maintenance is
required.
Training Services
(952) 995-8000 or (800) 893-2321
Email: [email protected]
Control Techniques maintains a highly trained staff of instructors to familiarize customers
with Control Techniques’ “Motion Made Easy” products and their applications. A number of
courses are offered, many of which can be taught in your plant upon request.
Application Engineering
(952) 995-8000 or (800) 893-2321
Email: [email protected]
An experienced staff of factory application engineers provides complete customer support
for tough or complex applications. Our engineers offer you a broad base of experience and
knowledge of electronic motion control applications.
Customer Service (Sales)
(952) 995-8000 or (800) 893-2321
Email: [email protected]
Authorized Control Techniques distributors may place orders directly with our Customer
Service department. Contact the Customer Service department at this number for the
distributor nearest you.
Reference Materials
The following related reference manuals may be useful with your particular system.
Epsilon EP-I Indexing Drive Reference Manual (400518-02)
Epsilon EP-B Drive Reference Manual (400518-03)
Epsilon EP-P Drive and FM-3/4 Modules Reference Manual (400518-04)
Epsilon EP-P Drive Connectivity Reference Manual (400518-05)
Epsilon EP-IDN DeviceNet Reference Manual (400518-08)
iv
Safety Information
Product Overview
Installation
Diagnostics
Options and
Accessories
Specification
Safety Information
Safety Precautions
This product is intended for professional incorporation into a complete system by qualified persons. If you install the
product incorrectly, it may present a safety hazard. The product and system may use high voltages and currents,
carry a high level of stored electrical energy, or are used to control mechanical equipment that can cause injury.
You must give close attention to the electrical installation and system design to avoid hazards either in normal
operation or in the event of equipment malfunction. System design, installation, commissioning and maintenance
must be carried out by personnel who have the necessary training and experience. Read and follow this safety
information and this instruction manual carefully.
Qualified Person
For the purpose of this manual and product, a “qualified person” is one who is familiar with the installation,
construction and operation of the equipment and the hazards involved. In addition, this individual has the following
qualifications:
Is trained and authorized to energize, de-energize, clear and ground and tag circuits and equipment in accordance
with established safety practices.
Is trained in the proper care and use of protective equipment in accordance with established safety practices.
Is trained in rendering first aid.
Enclosure
This product is intended to be mounted in an enclosure that prevents access except by qualified persons and that
prevents the ingress of contamination. This product is designed for use in an environment classified as pollution
degree 2 in accordance with IEC664-1. This means that only dry, non-conducting contamination is acceptable.
Setup, Commissioning and Maintenance
It is essential that you give careful consideration to changes to drive settings. Depending on the application, a change
could have an impact on safety. You must take appropriate precautions against inadvertent changes or tampering.
Restoring default parameters in certain applications may cause unpredictable or hazardous operation.
Safety of Machinery
Within the European Union all machinery in which this product is used must comply with Directive 89/392/EEC,
Safety of Machinery.
The product has been designed and tested to a high standard, and failures are very unlikely. However the level of
integrity offered by the product’s control function – for example stop/start, forward/reverse and maximum speed – is
not sufficient for use in safety-critical applications without additional independent channels of protection. All
applications where malfunction could cause injury or loss of life must be subject to a risk assessment, and further
protection provided where needed.
Identification of Safety Information
Safety related information through out this manual is identified with the following markings.
“Warning” indicates a potentially hazardous situation that, if not avoided, could result in death or serious injury.
“Caution” indicates a potentially hazardous situation that, if not avoided, may result in minor or moderate
injury.
Safety Information
v
Safety Information
Product Overview
Installation
Diagnostics
Options and
Accessories
Specification
“Caution” used without the safety alert symbol indicates a potentially hazardous situation that, if not avoided,
may result in property damage.
For the purpose of this manual and product, “Note” indicates essential information about the product or the
respective part of the manual.
Throughout this manual, the word “drive” refers to an Epsilon EP drive.
General warning
Failure to follow safe installation guidelines can cause death or serious injury. The voltages used in this unit can
cause severe electric shock and/or burns, and could be lethal. Extreme care is necessary at all times when working
with or adjacent to this equipment. The installation must comply with all relevant safety legislation in the country
of use.
Supply isolation device
The AC supply or high voltage DC supply must be removed from the drive using an approved isolation device or
disconnect before any servicing work is performed, other than adjustments to the settings or parameters specified
in the manual. The drive contains capacitors which remain charged to a potentially lethal voltage after the supply
has been removed. Allow at least 6 minutes for Epsilon EP206/209/216 and 3 minutes for Epsilon EP202/204 after
removing the supply before carrying out any work which may involve contact with electrical connections to the
drive.
Products connected by plug and socket
A special hazard may exist where the drive is incorporated into a product which is connected to the AC supply by
a plug and socket. When unplugged, the pins of the plug may be connected to the drive input, which is only
separated from the charge stored in the bus capacitor by semiconductor devices. To avoid any possibility of
electric shock from the pins, if they are accessible, a means must be provided for automatically disconnecting the
plug from the drive (e.g., a latching contactor).
Grounding (Earthing, equipotential bonding) - High Leakage Current
The drive must be grounded by a conductor sufficient to carry all possible fault current in the event of a fault. This
equipment has high earth leakage current. You must comply with local safety regulations with respect to minimum
size and special installation requirements on the protective earth conductor for high leakage current equipment.
The ground connections shown in the manual must be followed.
Fuses
Fuses or over-current protection must be provided at the input in accordance with the instructions in the manual.
The drive alone does not provide branch circuit protection. Branch circuit protection must be provided in
accordance with the National Electrical Code and any additional local codes.
Isolation of control circuits
The installer must ensure that the external control circuits are isolated from human contact by at least one layer
of insulation rated for use at the applied AC supply voltage. External control circuits identified as PELV circuits do
not need this isolation when they are completely within a zone of equipotential bonding, generally within a single
enclosure or group of enclosures bonded together.
vi
Safety Information
Product Overview
Installation
Diagnostics
Options and
Accessories
Specification
Underwriters Laboratories Listed
LISTED 768R
IND. CONT. EQ.
File E 58592 Sec.5
The Epsilon Digital Servo Drives are marked with the “UL Listed” label after passing a rigorous set of design and
testing criteria developed by UL (UL508C). This label indicates that UL certifies this product to be safe when installed
according to the installation guidelines and used within the product specifications.
The “conditions of acceptability” required by UL are:
•
Operating within ratings for Input Voltage, Input Current, and Output Current
Rated Output Current (Amps RMS)
Drive Model
Continuous
(Full Load Amperes)
Peak
EP202
2.2
4.4
EP204
4.0
8.0
EP206
6.5
13.0
EP209
9.0
18.0
EP216
16.0
32.0
•
Epsilon drive maximum surrounding air temperature 40°C (104°F) at rated Full Load Amperes (FLA)
•
Epsilon drive maximum surrounding air temperature 50°C (122°F) with output current derated 15% for EP209,
20% for EP206, 10% for EP204, and no derating required for EP202 or EP216
•
Integral solid state short circuit protection does not provide branch circuit protection. Branch circuit protection
must be provided in accordance with the National Electrical Code and any additional local codes
•
Copper only conductors with 75°C minimum insulation rating at all power and motor terminals
•
EP202,EP204 and EP206 are suitable for use on a circuit capable of delivering not more than 10,000 rms
symmetrical Amperes, 240 Volts maximum, when protected by a Class RK1 fuse or equivalent. rated 15A, or
when protected by a circuit breaker having an interrupting rating not less than 10,000 rms symmetrical
Amperes, 240 Volts maximum, and a trip rating of 15 A.
•
EP209 and EP216 are suitable for use on a circuit capable of delivering not more than 10,000 rms symmetrical
Amperes, 240 Volts maximum, when protected by a Class RK1 fuse or equivalent. rated 20A, or when protected
by a circuit breaker having an interrupting rating not less than 10,000 rms symmetrical Amperes, 240 Volts
maximum, and a trip rating of 20 A.
•
Logic power and I/O power are to be supplied with a UL listed or "recognized component" power supply rated
as limited voltage/limited current or limited voltage/limited power
•
The following warning is presented here and furnished on a label to be placed on the enclosure door
Drive has high fault current rating. The opening of the branch circuit protective device may be an indication that
a fault current has been interrupted. All current carrying parts and other components protected by this device
should be examined and replaced if damaged. If burn-out of the current element of an overload relay occurs,
the complete overload relay must be replaced.
Safety Information
vii
Safety Information
Product Overview
Installation
Options and
Accessories
Diagnostics
Specification
Drive Overload Protection
Solid state motor overload protection is provided in each model at no more than 115% of rated FLA. This overload
protection is based on maximum continuous output current capacity. It will allow up to 200 percent of drive FLA to
be delivered for the amount of time determined by the following chart.
Drive Output Current vs. Time graph
60
Time (seconds)
50
40
30
20
10
0
100
125
150
175
200
% Drive Rated Current
When motor rated FLA is less than drive FLA, the motor FLA parameter is to be entered into drive configuration.
Drive will then provide motor overload protection at correct value.
viii
Safety Information
Product Overview
Installation
Diagnostics
Options and
Accessories
Specification
CE Declaration of Conformity
The Epsilon Digital Servo Drives are marked with the “Conformite Europeenne Mark” (CE mark) after passing a
rigorous set of design and testing criteria. This label indicates that this product meets safety and noise immunity and
emissions (EMC) standards when installed according to the installation guidelines and used within the product
specifications.
Declaration of Conformity
Manufacturer’s Name:
Control Techniques Americas LLC
Manufacturer’s Address:
12005 Technology Drive
Eden Prairie, MN 55344
USA
Declares that the following products:
Epsilon EP Digital Servo Drive
Product Name:
EP202-B00, EP202-I00, EP202-IDN, EP202-P00, EP202-PDN, EP202-PPB,
EP204-B00, EP204-I00, EP204-IDN, EP204-P00, EP204-PDN, EP204-PPB,
EP206-B00, EP206-I00, EP206-IDN, EP206-P00, EP206-PDN, EP206-PPB,
EP209-B00, EP209-I00, EP209-IDN, EP209-P00, EP209-PDN, EP209-PPB,
EP216-B00, EP216-I00, EP216-IDN, EP216-P00, EP216-PDN, EP216-PPB
Model Number:
STI-24IO Interface Board, STI-SNCOA Analog/Sync Output Interface Board,
STI-SNCI Sync Input Interface Board, BRM-1 Motor Brake Relay, and SMHeatsink DBR-1 Brake Resistor
System Options:
Conforms to the following product specification:
Electomagnetic Compatibility (EMC):
EN 61800-3; 1997,
For second environment restricted distribution
Electrical Thermal and Energy Safety Requirements:
EN 61800-5-1:2003
Supplementary information:
The products herewith comply with the requirements of the Low Voltage Directive (LVD) 73/23/EEC and amended by 93/
68/EEC and the EMC Directive 89/336/EEC
This servo drive is intended to be used with an appropriate motor, electrical protection components and other equipment
to form a complete end product or system. It must be installed by a professional assembler who is familiar with safety
and electromagnetic compatibility (“EMC”) requirements. The assembler is responsible for ensuring that the end product
or system complies with all the relevant laws in the country where it is to be used. Refer to the product manual for
installation guidelines.
December 12, 2006
Steve Bartz, Director, Motion Control Product Line
European Contact:
Safety Information
Date
Sobetra Automation
Langeveldpark Lot 10
P. Dasterleusstraat 2
1600 St. Pieters Leeuw, Belgium
ix
Safety Information
x
Product Overview
Installation
Diagnostics
Options and
Accessories
Specification
Table of Contents
Customer Support . . . . . . . . . . . . . . . . . . . . . . . . . . . . . . . . . . . . . . . . . . . . . . . . . . . . . . . . . . . . iii
Reference Materials . . . . . . . . . . . . . . . . . . . . . . . . . . . . . . . . . . . . . . . . . . . . . . . . . . . . . . . . . . . iv
Safety Information
v
Safety Precautions . . . . . . . . . . . . . . . . . . . . . . . . . . . . . . . . . . . . . . . . . . . . . . . . . . . . . . . . . . . . . v
Qualified Person . . . . . . . . . . . . . . . . . . . . . . . . . . . . . . . . . . . . . . . . . . . . . . . . . . . . . . . . . . . v
Enclosure . . . . . . . . . . . . . . . . . . . . . . . . . . . . . . . . . . . . . . . . . . . . . . . . . . . . . . . . . . . . . . . . v
Setup, Commissioning and Maintenance . . . . . . . . . . . . . . . . . . . . . . . . . . . . . . . . . . . . . . . . v
Safety of Machinery . . . . . . . . . . . . . . . . . . . . . . . . . . . . . . . . . . . . . . . . . . . . . . . . . . . . . . . . v
Identification of Safety Information. . . . . . . . . . . . . . . . . . . . . . . . . . . . . . . . . . . . . . . . . . . . v
Underwriters Laboratories Listed . . . . . . . . . . . . . . . . . . . . . . . . . . . . . . . . . . . . . . . . . . . . . . . . vii
Drive Overload Protection . . . . . . . . . . . . . . . . . . . . . . . . . . . . . . . . . . . . . . . . . . . . . . . . . viii
CE Declaration of Conformity. . . . . . . . . . . . . . . . . . . . . . . . . . . . . . . . . . . . . . . . . . . . . . . . . . . ix
Product Overview
1
Epsilon EP Drive . . . . . . . . . . . . . . . . . . . . . . . . . . . . . . . . . . . . . . . . . . . . . . . . . . . . . . . . . . . . . . 1
Installation
3
Step 1: Basic Installation Guidelines. . . . . . . . . . . . . . . . . . . . . . . . . . . . . . . . . . . . . . . . . . . . . . . 3
Electromagnetic Compatibility (EMC) . . . . . . . . . . . . . . . . . . . . . . . . . . . . . . . . . . . . . . . . . 3
Achieving Low Impedance Connections . . . . . . . . . . . . . . . . . . . . . . . . . . . . . . . . . . . . . . . . 3
Electrostatic Discharge (ESD) Protection . . . . . . . . . . . . . . . . . . . . . . . . . . . . . . . . . . . . . . . 4
Environmental Considerations . . . . . . . . . . . . . . . . . . . . . . . . . . . . . . . . . . . . . . . . . . . . . . . . 4
Wiring Notes . . . . . . . . . . . . . . . . . . . . . . . . . . . . . . . . . . . . . . . . . . . . . . . . . . . . . . . . . . . . . 4
Panel Layout. . . . . . . . . . . . . . . . . . . . . . . . . . . . . . . . . . . . . . . . . . . . . . . . . . . . . . . . . . . . . . 6
Cable to Enclosure Shielding . . . . . . . . . . . . . . . . . . . . . . . . . . . . . . . . . . . . . . . . . . . . . . . . . 7
AC Line Filters . . . . . . . . . . . . . . . . . . . . . . . . . . . . . . . . . . . . . . . . . . . . . . . . . . . . . . . . . . . . 8
Step 2: Mechanical Installation . . . . . . . . . . . . . . . . . . . . . . . . . . . . . . . . . . . . . . . . . . . . . . . . . . . 8
Step 3: High Power Connections. . . . . . . . . . . . . . . . . . . . . . . . . . . . . . . . . . . . . . . . . . . . . . . . . 13
System Grounding . . . . . . . . . . . . . . . . . . . . . . . . . . . . . . . . . . . . . . . . . . . . . . . . . . . . . . . . 13
AC Power Requirements . . . . . . . . . . . . . . . . . . . . . . . . . . . . . . . . . . . . . . . . . . . . . . . . . . . 14
Transformer Sizing. . . . . . . . . . . . . . . . . . . . . . . . . . . . . . . . . . . . . . . . . . . . . . . . . . . . . . . . 17
Line Fusing and Wire Size . . . . . . . . . . . . . . . . . . . . . . . . . . . . . . . . . . . . . . . . . . . . . . . . . . 18
AC Input Power Connections. . . . . . . . . . . . . . . . . . . . . . . . . . . . . . . . . . . . . . . . . . . . . . . . 19
Operation on DC Input Supply. . . . . . . . . . . . . . . . . . . . . . . . . . . . . . . . . . . . . . . . . . . . . . . 21
External Shunt Electrical Installation. . . . . . . . . . . . . . . . . . . . . . . . . . . . . . . . . . . . . . . . . . 22
Motor Power Wiring. . . . . . . . . . . . . . . . . . . . . . . . . . . . . . . . . . . . . . . . . . . . . . . . . . . . . . . 24
Step 4: Low Power Connections . . . . . . . . . . . . . . . . . . . . . . . . . . . . . . . . . . . . . . . . . . . . . . . . . 31
xi
DC Logic Power Supply Wiring . . . . . . . . . . . . . . . . . . . . . . . . . . . . . . . . . . . . . . . . . . . . .
Motor Feedback Wiring (J6) . . . . . . . . . . . . . . . . . . . . . . . . . . . . . . . . . . . . . . . . . . . . . . . .
Motor Brake Wiring. . . . . . . . . . . . . . . . . . . . . . . . . . . . . . . . . . . . . . . . . . . . . . . . . . . . . . .
Input/Output and Drive Enable Wiring . . . . . . . . . . . . . . . . . . . . . . . . . . . . . . . . . . . . . . . .
Analog Command Wiring . . . . . . . . . . . . . . . . . . . . . . . . . . . . . . . . . . . . . . . . . . . . . . . . . .
Encoder Output Signal Wiring. . . . . . . . . . . . . . . . . . . . . . . . . . . . . . . . . . . . . . . . . . . . . . .
Communications . . . . . . . . . . . . . . . . . . . . . . . . . . . . . . . . . . . . . . . . . . . . . . . . . . . . . . . . .
Diagnostics and Troubleshooting
51
Diagnostic Display . . . . . . . . . . . . . . . . . . . . . . . . . . . . . . . . . . . . . . . . . . . . . . . . . . . . . . . . . . .
Status Codes . . . . . . . . . . . . . . . . . . . . . . . . . . . . . . . . . . . . . . . . . . . . . . . . . . . . . . . . . . . . .
Fault Codes . . . . . . . . . . . . . . . . . . . . . . . . . . . . . . . . . . . . . . . . . . . . . . . . . . . . . . . . . . . . .
Fault Descriptions . . . . . . . . . . . . . . . . . . . . . . . . . . . . . . . . . . . . . . . . . . . . . . . . . . . . . . . .
Diagnostic Analog Output Test Points . . . . . . . . . . . . . . . . . . . . . . . . . . . . . . . . . . . . . . . . . . . .
Drive Faults . . . . . . . . . . . . . . . . . . . . . . . . . . . . . . . . . . . . . . . . . . . . . . . . . . . . . . . . . . . . . . . . .
Options and Accessories
xii
59
60
61
62
63
65
Epsilon EP Specifications . . . . . . . . . . . . . . . . . . . . . . . . . . . . . . . . . . . . . . . . . . . . . . . . . . . . . .
Epsilon EP Drive Dimensions. . . . . . . . . . . . . . . . . . . . . . . . . . . . . . . . . . . . . . . . . . . . . . . . . . .
Cable Diagrams . . . . . . . . . . . . . . . . . . . . . . . . . . . . . . . . . . . . . . . . . . . . . . . . . . . . . . . . . . . . . .
XV Motor Cables . . . . . . . . . . . . . . . . . . . . . . . . . . . . . . . . . . . . . . . . . . . . . . . . . . . . . . . . .
NT and MG Motor Cables . . . . . . . . . . . . . . . . . . . . . . . . . . . . . . . . . . . . . . . . . . . . . . . . . .
Sync Cables . . . . . . . . . . . . . . . . . . . . . . . . . . . . . . . . . . . . . . . . . . . . . . . . . . . . . . . . . . . . .
Communications Cables . . . . . . . . . . . . . . . . . . . . . . . . . . . . . . . . . . . . . . . . . . . . . . . . . . .
Index
51
51
52
54
57
57
59
Epsilon EP Drive Options . . . . . . . . . . . . . . . . . . . . . . . . . . . . . . . . . . . . . . . . . . . . . . . . . . . . . .
STI-24IO . . . . . . . . . . . . . . . . . . . . . . . . . . . . . . . . . . . . . . . . . . . . . . . . . . . . . . . . . . . . . . .
STI-SNCOA. . . . . . . . . . . . . . . . . . . . . . . . . . . . . . . . . . . . . . . . . . . . . . . . . . . . . . . . . . . . .
STI-SNCI . . . . . . . . . . . . . . . . . . . . . . . . . . . . . . . . . . . . . . . . . . . . . . . . . . . . . . . . . . . . . . .
STI-ENC . . . . . . . . . . . . . . . . . . . . . . . . . . . . . . . . . . . . . . . . . . . . . . . . . . . . . . . . . . . . . . .
Specifications
31
33
35
37
43
43
48
65
69
72
73
79
82
85
87
Safety Information
Product Overview
Installation
Options and
Accessories
Diagnostics
Specification
Product Overview
Epsilon EP Drive
The Epsilon EP drive is a stand-alone, fully digital brushless servo drive designed and built to reliably provide high
performance and flexibility without sacrificing ease of use.
The use of State-Space algorithms make tuning very simple and forgiving. The drives are designed to operate with
up to a 10:1 inertia mismatch right out of the box. Higher (50:1 and more) inertia mismatches are possible with two
simple parameter settings.
The Epsilon EP drive can be quickly configured to many applications in less than 5 minutes with PowerTools Pro
software on a PC running Windows® 98, NT 4.0, 2000, ME and XP.
Complete diagnostics are provided for quick troubleshooting. A status/diagnostic display on the front of the drive
informs the user of the operational or fault status. The last 10 faults are stored in non-volatile memory along with a
time stamp for easy recall.
Shunt Connector (J8)
Status/Diagnostic Display
Reset Button
AC Power Connections
Motor Connections
24 Vdc Logic Power Supply Connections
Serial
Connectors (J2)
Ethernet
Connector (J4)
(EP-Pxx only)
DeviceNet Connector (J9)
(EP-IDN or EP-PDN only)
Digital I/O Connector (J3)
Model Number, Part Number,
Revision and Serial Number Label
Sync Input Connector (J10)
Analog/Sync Output
Connector (J5)
Figure 1:
Product Overview
Encoder Feedback Connector (J6)
Epsilon EP-PDN Drive Feature Location
1
Safety Information
Product Overview
Installation
Options and
Accessories
Diagnostics
Specification
Shunt Connector (J8)
Status/Diagnostic Display
24 Vdc Logic Power
Supply Connector
Reset Button
AC Power Connections
Serial
Connectors (J2)
Motor Power Connections
Ethernet Connector (J4)
(EP-Pxx only)
Model Number, Part Number,
Revision and Serial Number Label
Sync Input Connector (J10)
Digital I/O Connector (J3)
Profibus Connector (J13)
(EP-PPB only)
Analog/Sync Output
Connector (J5)
Figure 2:
Encoder Feedback Connector (J6)
Epsilon EP216 Drive Feature Location
Epsilon EP drives are rated at 240 Vac input voltage and can operate with an input voltage from 20 Vac to 264 Vac.
The EP drives are available in five current ratings.
2
Drive Model
Continuous Power Rating
Continuous Current
Peak Current
Epsilon EP202
775 W
2.2 A RMS
4.4 A RMS
Epsilon EP204
1275 W
4.0 A RMS
8.0 A RMS
Epsilon EP206
1775 W
6.5 A RMS
13.0 A RMS
Epsilon EP209
2325 W
9.0 A RMS
18.0 A RMS
Epsilon EP216
4800 W
16.0 A RMS
32.0 A RMS
Safety Information
Product Overview
Installation
Diagnostics
Options and
Accessories
Specification
Installation
Installation of the Epsilon EP drive is completed by following a simple step-by-step process. The Epsilon EP
installation begins by mounting the drive to a metal mounting panel. Next, the high power connections are made to
the drive, then the low power connections are made.
Step 1: Basic Installation and Panel Layout, page 3
Step 2: Mechanical Installation, page 8
Step 3: High Power Connections, page 13
Step 4: Low Power Connections, page 31
Step 1: Basic Installation Guidelines
You are required to follow all safety precautions during start-up such as providing proper equipment grounding,
correctly fused power and an effective Emergency Stop circuit which can immediately remove power in the case of
a malfunction. See the "Safety Considerations" section for more information.
Electromagnetic Compatibility (EMC)
Drives are designed to meet the requirements of EMC. Under extreme conditions a drive might cause or suffer from
disturbances due to electromagnetic interaction with other equipment. It is the responsibility of the installer to ensure
that the equipment or system into which the drive is incorporated complies with the relevant EMC legislation in the
country of use.
The following instructions provide you with installation guidance designed to help you meet the requirements of the
EMC Directive 89/336/EEC.
Adhering to the following guidelines will greatly improve the electromagnetic compatibility of your system, however,
final responsibility for EMC compliance rests with the machine builder, and Control Techniques Americas LLC cannot
guarantee your system will meet tested emission or immunity requirements.
If you need to meet EMC compliance requirements, EMI/RFI line filters must be used to control conducted and
radiated emissions as well as improve conducted immunity.
Physical location of these filters is very important in achieving these benefits. The filter output wires should be kept
as short as practical and routed away from the filter input wires. In addition:
•
Choose an enclosure made of a conductive material such as steel, aluminum or stainless steel.
•
Devices mounted to the enclosure mounting plate, which depend on their mounting surfaces for grounding,
must have the paint removed from their mounting surfaces and the mating area on the mounting plate to ensure
a good ground. See “Achieving Low Impedance Connections” on page 3 for more information.
•
If grounding is required for cable grommets, connectors and/or conduit fittings at locations where cables are
mounted through the enclosure wall, paint must be removed from the enclosure surface at the contact points.
• Cables should be shielded, and all shields must be grounded to the enclosure.
To meet radiated emissions requirements, the enclosure door must be closed and have electrical conduction at
hinges and closure hardware or be fitted with a conductive gasket. Route cables away from the door where possible
to minimize coupling emissions to door where they can re-radiate. The door generally must be bonded to the
enclosure for electrical safety, but this is not sufficient to meet EMC.
Achieving Low Impedance Connections
Noise immunity can be improved and emissions reduced by making sure that all the components have a low
impedance connection to the same ground point. A low impedance connection is one that conducts high frequency
current with very little resistance. Impedance cannot be accurately measured with a standard ohmmeter, because
an ohmmeter measures DC resistance. For example, a 12 inch long 8 gauge round wire has a significantly higher
impedance than a 12 inch long 12 gauge flat braided conductor. A short wire has less impedance than a long one.
Multiple connections such as at the four corners of a plate provide much lower impedance than a single connection.
Straight line connections provide much lower impedance than ones with bends or corners.
Low impedance connections can be achieved by bringing large areas of conductive surfaces into direct contact with
each other. In most cases this requires paint removal because a ground connection through bolt threads is not
sufficient. However, component materials should be conductive, compatible and exhibit good atmospheric corrosion
Installation
3
Safety Information
Product Overview
Installation
Diagnostics
Options and
Accessories
Specification
resistance to prevent loss through corrosion that will hinder the low impedance connection. Enclosure manufacturers
offer corrosion resistant, unpainted mounting plates to help.
Bringing components into direct contact cannot always be achieved. In these situations a conductor must be relied
upon to provide a low impedance path between components. Remember a flat braided wire has lower impedance
than a round wire of a large gauge rating.
A low impedance connection should exist between the following components, but not limited to:
•
Enclosure and mounting plate
•
Enclosure and door, if door does not have RF gaskets
•
Servo drive chassis and mounting plate
•
EMI/RFI AC line filter chassis and mounting plate
•
Other interface equipment chassis and mounting plate
•
Cable shields and enclosure, or terminal block, or connector
•
Enclosure and conduit fittings or electrical connectors
•
Enclosure mounting plate and earth ground
•
Motor frame and conduit fittings or electrical connectors
•
Encoder chassis and electrical connector
Electrostatic Discharge (ESD) Protection
Do not allow ESD to the drive while operating.
Though no damage occurs with electrostatic discharge at levels tested for EMC compliance, ESD directly to the drive
cover can interrupt proper drive operation. ESD to terminals on the breakout boards has not been evaluated because
wiring to these terminals is a maintenance activity. When doing any maintenance activity, make sure static electric
charge is drained off by touching the enclosure away from the drive before contacting the drive or its wiring terminals.
Use of ground straps or other techniques to prevent static buildup is a necessary part of any maintenance activity.
Environmental Considerations
The drive is rated to operate only in a pollution degree 2 environment, meaning that normally only non-conductive
pollution occurs and there is no condensation, but occasional condensation may occur when not operating.
If the installation environment contains atmospheric contaminants such as moisture, oils, conductive dust, chemical
contaminants and metallic particles, you must mount it vertically in a metal NEMA type 12 enclosure.
To prevent operation with condensation present, it is best to energize the logic power several minutes before
applying main power or keep logic power applied continuously.
If the ambient temperature inside the enclosure will exceed 40°C (104°F), you must consider forced air cooling.
It is necessary to maintain the drive surrounding air temperature at 40°C (104°F) or 50°C (122ºF) with
appropriate derating or below to maintain the drive UL ratings. See “Specifications” on page 65.for derating
by model.
The amount of cooling depends on the size of the enclosure, the thermal transfer of the enclosure to the ambient air
and the amount of power being dissipated inside the enclosure. Consult your enclosure manufacturer for assistance
with determining cooling requirements.
The power dissipated by a EP202-P is 35 W, a EP204-P is 55 W, a EP-206-P is 85 W, a EP209-P is 115 W and a
EP216 is 200 W. The power dissipation values includes up to 12 W of power from the logic power supply.
Wiring Notes
•
4
To avoid problems associated with EMI (electromagnetic interference), you should route high power lines (AC
input power and motor power) away from low power lines (encoder feedback, serial communications, etc.).
Safety Information
Product Overview
Installation
Diagnostics
Options and
Accessories
Specification
•
If a neutral wire (not the same as Earth Ground) is supplied from the building distribution panel, it should never
be bonded with PE wire in the enclosure.
•
You should consider future troubleshooting and repair when installing all wiring. All wiring should be either color
coded and/or tagged with industrial wire tabs.
•
As a general rule, the minimum cable bend radius is ten times the cable outer diameter.
•
All wiring and cables, stationary and moving, must be protected from abrasion.
•
Ground wires should not be shared or "daisy-chained" with other equipment.
•
Ensure that full metal to metal surface contact is made between the enclosure ground lug and the metal
enclosure, not simply through the mounting bolt and threads.
•
All inductive coils must be suppressed with appropriate devices, such as diodes or resistor/capacitor (RC)
networks, except as described in this manual.
•
If using a non-shielded Ethernet cable, install a clamp on ferrite, Control Techniques part number 157016-07,
Steward 28A0593-0A2 or equivalent.
Installation
5
Safety Information
Product Overview
Installation
Options and
Accessories
Diagnostics
Specification
Panel Layout
NEMA Enclosure
Metallic
Raceway
PE
Filter
Fuses
AC In
L2
L1
Bonded to mounting plate
and enclosure wall
External Encoder
Drive
Through wall shield grommets
Customer supplied
terminal strip (optional)
Connect shield through
and to mounting plate
Motor Feedback Cable
Motor Power Cable
Motor
Figure 3:
6
AC Filter and Cable Connections
Safety Information
Product Overview
Installation
Diagnostics
Options and
Accessories
Specification
Cable to Enclosure Shielding
Shielded motor, feedback, serial communications and external encoder cables were used for compliance testing and
are necessary to meet the EMC requirements. Each cable shield was grounded at the enclosure wall by the type of
grommet described earlier and shown in the following figure.
Outside Enclosure
Inside Enclosure
O-Ring seals against outside of enclosure
to meet IP68 (comparable to NEMA 6)
Spring Contacts
When Lock Nut is tightened to inside of
enclosure, lock nut will cut through varnished,
anodized, and powder coated finishes.
Tighten lock nut so it cuts through the
finish and into housing.
Cable Shielding
Cable Jacket
Remove 1/2 to 1 inch of cable jacket.
The Spring Contacts will make a continuous
electrical path from the shield of the cable to
equipment ground.
After tightening lock nut and positioning cable
so that Spring Contacts are contacting the
cable shield, tighten Cable Seal Housing.
Figure 4:
Through Wall Shield Grommet
Cable Type
Cable Model
Shielded Cable Grommet
Kit Model
Actual Hole Size
Motor Cable, 18 Ga
XTMDS
CGS-047
0.8125 or 13/16"
Motor Cable, 16 Ga
Motor Cable, 18 Ga
Motor Cable, 12 Ga
Feedback Cable
Flex Motor Cable, 16 Ga
Flex Motor Cable, 12 Ga
Flex Feedback Cable
CMDS
CGS-047
0.8125 or 13/16"
4X16SS
CGS-047
0.8125 or 13/16"
XCMDS
CGS-047
0.8125 or 13/16"
CMMS
CGS-069
1.125 or 1 1/8"
4X12SS
CGS-069
1.125 or 1 1/8"
CFOS
CGS-047
0.8125 or 13/16"
MGFS
CGS-047
0.8125 or 13/16"
CMDF
CGS-047
0.8125 or 13/16"
4X16SF
CGS-047
0.8125 or 13/16"
CMMF
CGS-069
1.125 or 1 1/8"
4X12SF
CGS-069
1.125 or 1 1/8"
CFCF
CGS-069
1.125 or 1 1/8"
CFOF
CGS-069
1.125 or 1 1/8"
MGFF
CGS-069
1.125 or 1 1/8"
External Encoder
ENCO
CGS-047
0.8125 or 13/16"
AC Power
user supplied
user supplied
user supplied
Installation
7
Safety Information
Product Overview
Installation
Diagnostics
Options and
Accessories
Specification
AC Line Filters
The AC line filters are necessary to comply with EMC emission and immunity standards. The drive was tested with
the filters presented in the table below and recommended by Control Techniques.
Epsilon EP
Control Techniques Part #
Rating
Schaffner FN2070-10/06
960307-01
10 A, 240 V, 1 Ø
Schaffner FS5278-16/08
960305-01
EP206
Schaffner FS5278-16/08
960305-01
EP209
Corcom 20EQ1
960308-01
20 A, 240 V, 1 Ø
EP216
Schaffner FN3258-16-44
960310-01
16 A, 480 V, 3 Ø
EP202, EP204
Part #
16 A, 240 V, 1 Ø
The following filters are a suitable alternative:
Epsilon EP
Part #
Control Techniques Part #
Rating
EP202
Schaffner FN2070-6/06
6 A, 240 V, 1 Ø
EP202, EP204, EP206
Corcom 20EQ1
20 A, 240 V, 1 Ø
EP206
Schaffner FN2070M-16/08
16 A, 240 V, 1 Ø
EP209
Schaffner FN2070-25/08
25 A, 240 V, 1 Ø
EP216
Schaffner FN3270H-20-29
Schaffner FN258/16
20 A, 480 V, 3 Ø
960304-01
16 A, 480 V, 3 Ø
AC Line Filter Installation Notes
•
It is important to keep the filter inputs routed away from any electrical noise sources.
•
EMC criteria can be met in installations where multiple drives are supplied through a single filter, however, it is
the installers responsibility to verify EMC compliance.
Step 2: Mechanical Installation
The drive must be back mounted vertically on a metal mounting panel such as a NEMA enclosure, Additional space
is necessary above and below the drive for wiring and cable connections.
To allow sufficient air flow for cooling, leave at least 0.25" [6.3 mm] clear space on vented cover (left) side plus 0.50"
[12.7 mm] on heatsink (right) side. Leave additional space if cables are routed through this space.
When drilling holes in mounting plate or trimming wires during installation of this or other equipment, do not
allow drill shavings or wire trimmings to enter the EP drive. Such foreign objects can compromise electrical
isolation creating a hazard or result in equipment failure.
8
Safety Information
Product Overview
Installation
Diagnostics
Options and
Accessories
Specification
The following table applies to the "A" dimension as shown in figure 5 below for the EP202 - EP206 base and indexing
drives.
Drive Model
Dimension "A"
inches [mm]
Minimum Panel Width
inches [mm]
EP202-B, -I, -IDN
2.11 [53.59]
2.90 [74]
EP204-B, -I, -IDN
2.11 [53.59]
2.90 [74]
EP206-B, -I, -IDN
2.82 [71.63]
3.60 [91]
“A”
2.11
[53.59]
5.94
[150.88]
5.22
[132.59]
1.20
[30.48]
.200
[5.08]
0.45
[23.4]
(4X)Ø.219
[5.56]
8.099
[205.72]
7.70
[195.58]
Figure 5:
Installation
Mechanical Drawing for Epsilon EP202-206 Base and Indexing Drives
9
Safety Information
Product Overview
Installation
Diagnostics
Options and
Accessories
Specification
The following table applies to the "A" dimension as shown in figure 6 for the EP202 - EP206 programming drives.
Drive Model
Dimension "A"
inches [mm]
Minimum Panel Width
inches [mm]
EP202-P, -PDN, -PPB
2.69 [68.3]
3.45 [88]
EP204-P, -PDN, -PPB
2.69 [68.3]
3.45 [88]
EP206-P, -PDN, -PPB
3.40 [86.4]
4.15 [105]
“A”
5.94
[150.88]
2.69
[68.3]
5.22
[132.59]
1.03
[26.16]
1.20
[30.48]
.200
[5.08]
(4X)Ø.219
[5.56]
8.099
[205.72]
7.70
[195.58]
Figure 6:
Mechanical Drawing for Epsilon EP202-206 Programming Drive
To prevent drive from dropping out of position during installation, partially pre-install lower mounting screws,
then set drive in place with lower mounting screws in slots and then install at least one upper mounting screw.
For removal, loosen lower screws, remove upper screws and lift drive out.
10
Safety Information
Product Overview
Installation
Options and
Accessories
Diagnostics
Specification
The following table applies to the minimum panel width for the EP209 drive.
Drive Model
Minimum Panel Width
inches [mm]
EP209-B, -I, -IDN, -P, -PDN, -PPB
4.15 (105)
3.40
[86.36]
5.94
[150.88]
5.86
[148.85]
2.69
[68.33]
1.03
[26.16]
5.23
[132.84]
1.20
[30.48]
0.20 [5.08]
4X Ø.219
9.60
[243.84]
9.20
[233.68]
EP209-XXX-XX00
9606XX-XX A1
SN 0610E014
Figure 7:
Mechanical Drawing for All Epsilon EP209 Models (EP209-PDN shown)
To prevent drive from dropping out of position during installation, partially pre-install lower mounting screws,
then set drive in place with lower mounting screws in slots and then install at least one upper mounting screw.
For removal, loosen lower screws, remove upper screws and lift drive out.
Installation
11
Safety Information
Product Overview
Installation
Diagnostics
Options and
Accessories
Specification
The following table applies to the minimum panel width for the EP216 drive.
Drive Model
Minimum Panel Width
inches [mm]
EP216-B, -I, -IDN, -P, -PDN, -PPB
4.15 (105)
3.40
[86.36]
5.96
[151.38]
1.03
[26.16]
5.23
[132.84]
9.60
[243.84]
Figure 8:
1.20
[30.48]
9.20
[233.68]
Mechanical Drawing for All Epsilon EP216 Models (EP216-PDN shown)
To prevent drive from dropping out of position during installation, partially pre-install lower mounting screws,
then set drive in place with lower mounting screws in slots and then install at least one upper mounting screw.
For removal, loosen lower screws, remove upper screws and lift drive out.
12
Safety Information
Product Overview
Installation
Diagnostics
Options and
Accessories
Specification
Step 3: High Power Connections
System Grounding
To insure a safe and quiet electrical installation, good system grounding is imperative. The figure below is an
overview of the recommended system grounding. For more information on achieving an electrically quiet installation
refer to “Step 1: Basic Installation Guidelines” on page 3.
Conduit or
Metal
Raceway
AC Power Supply
Enclosure
To Enclosure Door
Door Bond Wire
Conduit Raceway Bond
Fuses
Redundant PE
Connection
PE
Connection
PE
Connection
Control
Transformer
J8
EMERSON
TM
Industrial Automation
Epsilon EP
Logic
Power
Supply
24 Vdc
reset
Output
L1
L2
PE
motor
serial (J2)
R
logic
+
3 Phase
Line Power
Single Point Ground
(Bonded to Enclosure)
S
Neutral
T
+
_
Hot
digital i/o (J3)
3 MIN
EP209-I00-0000
9606XX-XX A1
SN 0610E014
EP204-I00-0000
9606XX-XX A1
SN 0610E014
J5 J10
Epsilon
Drive
J6
Epsilon
EP202-206
Drive
Epsilon
EP209
Drive
Motor
Convenience
Outlet
Motor
NOTE: The aluminum heatsink is electrically connected to the PE terminal.
Figure 9:
Installation
Typical System Grounding Diagram
13
Safety Information
Product Overview
Installation
Options and
Accessories
Diagnostics
Specification
Fixed Protective Earth (PE) connections are mandatory for human safety and proper operation. These
connections must not be fused or interrupted by any means. Failure to follow proper PE wiring can cause
death or serious injury. This equipment has high earth leakage current and requires a redundant PE
connection from either terminal marked PE at J8 to PE connection point.
AC Power Requirements
The Epsilon EP drives require 20 Vac to 264 Vac single phase power but, may operate on DC supplies, (See
Operation on DC Supply). An Epsilon EP drive can be connected to any pair of power phases on a 1 Ø or 3 Ø power
source that is grounded as shown in the following diagrams. Local electrical codes should be consulted before
installation.
When operating the drive at 90 V or less disable the Low DC Bus fault so the drive does not fault.
Where regeneration occurs, bus voltage will rise to 400 Vdc before shunt operation or a High DC Bus fault
limit voltage, whether shunt resistor is installed or not. Motors must have insulation rated for inverter duty at
240 Vac no matter what the operating voltage is, or bus voltage must be limited by other means.
The maximum voltage applied to the drive terminals must not exceed 264 Vac phase to phase and phase to
PE ground. The AC supply must be earthed (type TN) with PE connected to the earthed point at the source,
which is usually a distribution transformer but could be a service entrance.
AC Supplies NOT Requiring Transformers
If the distribution transformer is configured as shown in the figures below, the AC power supply can be connected
directly to the drive terminals.
DISTRIBUTION PANEL
L3
L2
SECONDARY
To Fusing and
Drive Terminals
Typ. 208 Vac
120 Vac
L1
PE
(Protective Earth)
EARTH
GROUND
Figure 10:
14
N
Neutral is used only when 120 Vac operation
is desired. It is never fused.
Earth Grounded WYE Distribution Transformer, 120/208Y 3Ø
Safety Information
Product Overview
Installation
Options and
Accessories
Diagnostics
Specification
DISTRIBUTION PANEL
L3
SECONDARY
L2
230 Vac
No Fuse
L1
(N)
To Fusing and
Drive Terminals
PE
(Protective Earth)
EARTH
GROUND
NOTE: For single phase drives using lines L1 & L2 or L1 & L3, only one fuse is
required on the high leg (L2 or L3). Lines L2 & L3 may be used to balance
the load, requiring two fuses.
Figure 11:
Earth Grounded Delta Distribution Transformer, 240 Vac 3Ø
DISTRIBUTION PANEL
L3
SECONDARY
Typ. 240 Vac
L2
L1
PE
(Protective Earth)
EARTH
GROUND
N
Used only for 120 Vac operation
with L1 or L2.
NOTE: L3 is a high leg, 208 Vac from Neutral/PE.
For single phase drives it is best to use lines L1 and L2.
L1 & L3 or L2 & L3 maybe used to balance loads.
Figure 12:
Three Phase Delta (with mid-phase GND) Distribution,
120 Vac split/240 Vac 3Ø supply
AC Supplies Requiring Transformers
If the distribution transformer is configured as shown in the figures below, an isolation transformer is required.
If an isolation transformer is used between the power distribution point and the drives, the transformer secondary
must be grounded for safety reasons as shown in the figures below.
Installation
15
Safety Information
Product Overview
DISTRIBUTION PANEL
Installation
Options and
Accessories
Diagnostics
Specification
3 Ø Isolation Transformer
L3
L2
To Fusing and
Drive Terminals
L1
N
PE
(Protective Earth)
EARTH
GROUND
Figure 13:
Three-Phase WYE (ungrounded) Distribution to a Three-Phase Delta/WYE
Isolation Transformer
DISTRIBUTION PANEL
3 Ø Isolation Transformer
L3
L2
No Fuse
EARTH
GROUND
Figure 14:
16
(Protective Earth)
To Fusing and
Drive Terminals
L1
PE
Three-Phase Delta (ungrounded) Distribution to a Three-Phase Delta
Isolation Transformer
Safety Information
Product Overview
DISTRIBUTION PANEL
Installation
Diagnostics
Options and
Accessories
Specification
3 Ø Isolation Step Down Transformer
L3
L2
To Fusing and
Drive Terminals
> 140 Vac
L1
N
PE
(Protective Earth)
EARTH
GROUND
Figure 15:
Grounded WYE Distribution >140 Vac Phase to Neutral. Recommend Using
Step Down Transformer so Line to Line is 240 Vac or less.
Fuse
L1
To Drive
Terminals
L2
Fuse
L1
To Drive
Terminals
L2
Fuse
Figure 16:
Single Phase Power Supply Connections
Transformer Sizing
If your application requires a transformer, choose a transformer with a continuous power rating greater then the
maximum power usage of the drive/motor combination. Other factors that may influence the required KVA rating are
high transformer ambient temperatures (>40° C or >104° F) and drive operation near the maximum speeds.
Transformer output voltage drop may become a limiting factor at motor speeds and loads near maximum ratings.
Typically, higher KVA transformers have lower voltage drop due to lower impedance.
When multiple drives are connected to a single isolation transformer, add the suggested KVA ratings of the drives
that would be operating simultaneously together for transformer sizing.
Installation
17
Safety Information
Product Overview
Installation
Options and
Accessories
Diagnostics
Specification
Line Fusing and Wire Size
You must incorporate over current protection for the incoming AC power with the rating shown here. The drive alone
does not provide branch circuit protection. Branch circuit protection must be provided in accordance with the National
Electrical Code and any additional local codes.
Drive Model
EP202
EP204
EP206
EP209
EP216
Recommended
Minimum AC/PE
Line Wire Gauge Fuse Class & Action
16 AWG
ISO 1,5
16 AWG
ISO 1,5
14 AWG
ISO 2,5
12 AWG
ISO 4
12 AWG
ISO 4
Fuse
Miniature Circuit Breaker
Bussman
FerrazShawmut
RK1 Time-Delay
LPN-RK-6SP
A2D6R
RK1 Quick-Acting
KTN-R-6
A2K6R
CC Time-Delay
LP-CC-6
ATDR6
CC Quick-Acting
KTK-R-6
ATMR6
RK1 Time-Delay
LPN-RK-10SP
A2D10R
RK1 Quick-Acting
KTN-R-10
A2K10R
CC Time-Delay
LP-CC-10
ATDR10
CC Quick-Acting
KTK-R-10
ATMR10
RK1 Time-Delay
LPN-RK-15SP
A2D15R
RK1 Quick-Acting
KTN-R-15
A2K15R
CC Time-Delay
LP-CC-15
ATDR15
CC Quick-Acting
KTK-R-15
ATMR15
RK1 Time-Delay
LPN-RK-20SP
A2D20R
RK1 Quick-Acting
KTN-R-20
A2K20R
CC Time-Delay
LP-CC-20
ATDR20
CC Quick-Acting
KTK-R-20
ATMR20
RK1 Time-Delay
LPN-RK-20SP
A2D20R
RK1 Quick-Acting
KTN-R-20
A2K20R
CC Time-Delay
LP-CC-20
ATDR20
CC Quick-Acting
KTK-R-20
ATMR20
Allen Bradley
Square D
1489-A1D060
6 A, 1 pole
60124
6 A. 1 pole
1489-A2 D060
6 A, 2 pole
60158
6 A, 2 pole
1489-A1D100
10 A, 1 pole
60127
10 A, 1 pole
1489-A2D100
10 A, 2 pole
60161
10 A, 2 pole
1489-A1D150
15 A, 1 pole
60129
15 A, 1 pole
1489-A2D150
15 A, 2 pole
60163
15 A, 2 pole
1489-A1D200
20 A, 1 pole
60130
20 A, 1 pole
1489-A2D200
20 A, 2 pole
60164
20 A, 2 pole
1489-A1D200
20 A, 1 pole
60130
20 A, 1 pole
1489-A2D200
20 A, 2 pole
60164
20 A, 2 pole
1489-A3D200
20 A, 3 pole
60196
20 A, 3 pole
Use copper conductors only. Conductors must be rated 75°C or higher, preferably 90°C.
Suitable for use on a circuit capable of delivering not more than 10,000 rms symmetrical Amperes. When one of the
above current protection devices are used.
The Protective Earth (PE) wire connection is mandatory for human safety and proper operation. This
connection must not be fused or interrupted by any means. Failure to follow proper PE wiring can cause death
or serious injury.
18
Safety Information
Product Overview
Drive Model
Installation
Input Voltage (Vac)
Frequency
(Hz)
Options and
Accessories
Diagnostics
Input Current (Amps RMS) at
Full Drive Output Current
Specification
Inrush Current
(Amps)
EP202
5.0
40 (5 ms)
EP204
8.5
65 (5 ms)
12.0
100 (5 ms)
16.0
34 (5 ms)
16.0
34 (5 ms)
EP206
240 / 1 Ø
47 - 63
EP209
EP216
240 / 3 Ø or
240 / 1 Ø
This inrush current specification assumes the drive has been powered off for at least 8 minutes at 40ºC (104ºF)
ambient or 5 minutes at 25ºC (77ºF) ambient. If this amount of time has not elapsed since power off, the inrush
current will be higher. Exception is the EP209 and EP216, they use active inrush limiting. Listed inrush current is
maximum.
AC Input Power Connections
Power must be "Off" for a minimum of 6 minutes for the Epsilon EP206, EP209 and EP216 drives and 3
minutes for the Epsilon EP202 and EP204 drives before unplugging the power connection. This will ensure the
bus voltage has bled down to a safe level (below 50 Vdc).
Do not connect or disconnect AC power by inserting or removing the AC power connector. Using the
connector in this manner, even once, will damage the connector making it unusable.
Installation
19
Product Overview
Installation
Options and
Accessories
Diagnostics
B+ PE SH PE B-
Safety Information
Front View
PE
Specification
Redundant PE connection
J8
L1
L2 *
PE
L1
L2
PE
50/60 Hz
90-264 Vac
S
Tighten screws
to 5 in-lb.
T
24 Vdc
MOTOR
R
J1
Terminals are suitable for one 16 AWG to 12 AWG
or ISO 1,5 or ISO 2,5 stranded conductors.
EP204-I00-0000
9606XX-XX A1
SN 0610E014
* Note: If L2 is 120 Vac neutral it should not be fused.
Epsilon EP202-206 AC Power Wiring Diagram
B+ PE SH PE B-
Figure 17:
PE
Redundant PE connection
J8
L1
L2 *
50/60 Hz
90-264 Vac
PE
J1
EP209-I00-0000
9606XX-XX A1
SN 0610E014
Tighten screws
to 5 in-lb.
Terminals are suitable for one 16 AWG to 12 AWG
or ISO 1,5 or ISO 4 stranded conductors.
* Note: If L2 is 120 Vac neutral it should not be fused.
Figure 18:
20
Epsilon EP209 AC Power Wiring Diagram
Product Overview
Installation
Options and
Accessories
Diagnostics
B+ PE SH PE B-
Safety Information
PE
Specification
Redundant PE connection
J8
L1
L1
L2
L2*
L3
L3*
PE
MOTOR
R
S
50/60 Hz
90-264 Vac
PE
Tighten screws
to 5 in-lb.
T
Terminals are suitable for one 16 AWG to 10 AWG
or ISO 1,5 to ISO 6 stranded conductors.
* Note: If L2 or L3 is 120Vac Neutral it should not be fused.
Figure 19:
Epsilon EP216 AC Power Wiring Diagram
Operation on DC Input Supply
At this time, the EP drive is NOT UL listed for operation on a DC input supply,
The Epsilon EP202, EP204 and EP206 drive can operate on DC input as low as 20 Vdc, recommended minimum is
24 Vdc. The Epsilon EP209 and EP216 drive’s minimum is 140 Vdc. It can also operate from a common DC link with
voltage to 373 Vdc, the voltage resulting from 264 Vac applied to a rectifier, with regen to 400 Vdc intermittently.
For DC input supply less than 24 Vdc, the DC input should be connected to the B+ and B- terminals at J8 to avoid
losses in the rectifier and inrush limiter. At such low voltages the bus caps do not need inrush protection. For DC
supply greater than 24 Vdc, the supply should be connected to L1 and L2 terminals on J1. Polarity does not matter.
The rectifier blocks reverse current so regen energy will not come back to the supply. DC supply greater than 24 Vdc
may be applied to the B+ and B- terminals of J8, but the supply must provide soft-start or inrush current limiting and
must be able to handle any anticipated regen energy.
Both supply conductors must be fused except one that is grounded. The fuse must be rated for at least the voltage
applied. The current rating of the fuse should match the rated output current of the drive. A slow-blow fuse should
be used if high peak loads are expected.
Please contact Technical Support at Control Techniques Americas before connecting any EP drives with a
common DC link.
Installation
21
Safety Information
Product Overview
Installation
Diagnostics
Options and
Accessories
Specification
External Shunt Electrical Installation
Shunt connections at J8 remain at dangerous Voltages after disconnecting AC Power. Power must be "Off"
for a minimum of 6 minutes for an EP206/209/216 and 3 minutes for an EP202/204 before touching these
terminals.
The EP204, EP206, EP209, and EP216 drives provide an internal shunt transistor to direct regen energy to an
external shunt or braking resistor. The resistor is connected to the B+ and SH terminals at J8 on the top of the drive.
Shunt Control
The shunt transistor turns on when the bus voltage reaches 405 Vdc and shuts off when the bus voltage falls below
390 Vdc. An internal shunt control algorithm is used to prevent the external shunt resistor from overloading. It is
necessary to enter shunt energy rating, power rating and resistance for the attached shunt resistor in PowerTools
Pro software. Energy rating is the amount of energy that the resistor can absorb in a single shunt event assumed to
be so short that power dissipation is negligible. Power rating is the long term average power that can be dissipated.
PowerTools Pro default values are for the Control Techniques "SM-Heatsink DBR-1" resistor kit, marked P/N 12202756-01 on the resistor.
External Shunt Resistor
Control Techniques offers an external shunt resistor kit, SM-Heatsink DBR-1, that attaches directly to the EP drive
heatsink. The resistance is 75 Ohms and has 1500 Joule energy rating and 50 W continuous power rating. It is
adequate for most infrequent machine stop sequences due to relatively high energy rating for its power rating. It
should be suitable for any EP204 application unless average power exceeds 50 W for repetitive cycles. For EP206,
EP209 and EP216, some applications may require lower resistance to prevent a high bus fault or higher energy
rating for a single event, as well as higher average power rating. The resistor in the kit is designed to eventually open
in the event of a shorted control transistor when operating with an AC input greater than 200 Vac. At this time the kit
should be used only when the drive is operating at 200 Vac to 240 Vac.
A different external shunt resistor should be used if average power is above 50 W, or other limits are exceeded as
described above. Higher power resistors should be mounted away from the drive to prevent overheating. If thermal
loading inside a cabinet is an issue, a resistor with suitable enclosure may be installed external to the drive enclosure.
The minimum resistance for an external shunt resistor is 33 Ohms. The resistor must have thermal overload
protection to remove power in the event of a shorted control transistor. The protection can simply open the circuit, in
which case a high bus fault will occur, or be wired to a contactor that isolates input power from the drive on overtemp.
Shunt Resistor Kit Installation
The SM-Heatsink DBR-1 attaches to the side of the EP204, EP206, EP209, or EP216 drive by lining up the two
captive screws to the special width slots in the heat sink. The exact position along the slot does not matter as long
as the body of the resistor does not extend beyond the top or bottom of the drive. Use a T-20 Torx driver to thread
the screws into position. After both are well started but not tight, carefully turn each screw until it is seated against
the resistor and the resistor back is seated against the heat sink. Then turn the screw 1/8 turn more. Do not
overtighten.
Strip 0.12 inch [3.0 mm] insulation from the ends of the resistor wires. Install the wires in the SH and B+ terminals of
J8 and tighten to 5 in-lb. Make sure the locking screws are installed on J8 to prevent the connector from pulling out.
22
Safety Information
Product Overview
Installation
Options and
Accessories
Diagnostics
Specification
SELF TAPPING SCREW (2)
B+ PE SH PE B-
B+
SH
Figure 20:Shunt Resistor Installation for the Epsilon EP and SM-Heatsink DBR-1 Kit
Do Not make any shunt resistor connections to B-.
Shunt connections are at main voltage potential. Components connected must be rated for the voltage and
selected for safety. The external shunt resistor must have protection for a failed ON state of the shunt control.
Installation
23
Safety Information
Product Overview
Installation
Diagnostics
Options and
Accessories
Specification
Motor Power Wiring
The following paragraphs provide details of motor connections. When motor power cables are long, 100ft. [30 m], a
ferrite (Control Techniques p/n 157016-13, Steward p/n 28A3851-0A2 or equivalent) installed on the three phase
conductors but not the shield, near J1 can significantly reduce high frequency switching harmonics that in some
cases can cause communications and encoder errors, see figures below. Maximum cable length is 200 ft [60 m].
With the Epsilon EP202/204/206/209 drive the J1 terminals are suitable for one 18 AWG to 14 AWG or ISO 0,75 to
ISO 2,5 stranded conductors. The Epsilon EP216 drive J1 terminals are suitable for one 16 AWG to 10 AWG or ISO
1,5 to ISO 6 stranded conductors. The ground/shield terminal may contain the shield and ground conductors together
if each is 16 AWG or ISO 0,75 or ISO 1,5. Otherwise a ferrule must be used to crimp both connectors together.
Front View
Ferrite
Motor
Power Connections
L1
L2
MOTOR
PE
R
R
S
S
T
T
24 Vdc
Ground
Connector Shell
EP204-I00-0000
9606XX-XX A1
SN 0610E014
Figure 21:
EP202-206 Ferrite Placement with Cable Lengths Longer Than 100 FT.
Front View
Ferrite
MOTOR
Motor
Power Connections
R
R
S
S
T
T
EP209-I00-0000
9606XX-XX A1
SN 0610E014
Figure 22:
24
logic
Ground
Connector Shell
EP209 Ferrite Placement with Cable Lengths Longer Than 100 FT.
Safety Information
Product Overview
Installation
Diagnostics
Options and
Accessories
Specification
Front View
L1
L2
L3
Ferrite
Motor
Power Connections
MOTOR
PE
R
R
S
S
T
T
Ground
Connector Shell
Figure 23:
Installation
EP216 Ferrite Placement with Cable Lengths Longer Than 100 FT.
25
Safety Information
Product Overview
Installation
Diagnostics
Options and
Accessories
Specification
NT and MG Motors
NT and MG motors are equipped with up to three male MS (Military Standard) connectors, one for stator
connections, one for encoder connections and one for the brake (if so equipped).
Stator connections from the drive to the motor are made with the CMDS or CMMS cable have a female MS style
connector on the motor end and four individual wires and shield that connect to the motor power connector on the
front of the drive.
The motor ground wire and shields must be run all the way back to the drive terminal and must not be
connected to any other conductor, shield or ground except the enclosure wall for EMC.
Wire crimp ferrules are recommanded:
For ground lead use Pheonix Contact p/n AI-TWIN 2X1, 5-8Bk/32 00 82 3
American Electrical/DigiKey 1381015/288-1130-ND
For motor leads use Pheonix Contact p/n AI 1,5-8 RD/32 01 13 6 or
ALTEC p/n H1.5/14 2204.0 Pk/100
Front View
NT or MG Motor
Power Connection
L1
L2
PE
24 Vdc
MOTOR
R
S
T
Brown
Black
Blue
Green/Yellow
Shield
Important: PE ground
should connect to drive
and motor only. Nothing
should be connected
between these devices.
EP204-I00-0000
9606XX-XX A1
SN 0610E014
Figure 24:
26
R
S
T
Ground
Connector Shell
2" and 3" motor cable
connector (CMDS-xxx cable)
Tighten screws to 5 in-lb.
Epsilon EP202-EP206 Drive - NT/MG Motor Power Wiring Diagram
Safety Information
Product Overview
Installation
Options and
Accessories
Diagnostics
Specification
Front View
Wire crimp ferrules are recommanded:
For ground lead use Pheonix Contact p/n AI-TWIN 2X1, 5-8Bk/32 00 82 3
American Electrical/DigiKey 1381015/288-1130-ND
For motor leads use Pheonix Contact p/n AI 1,5-8 RD/32 01 13 6 or
ALTEC p/n H1.5/14 2204.0 Pk/100
NT or MG Motor
Power Connection
Brown
Black
Blue
Green/Yellow
EP209-I00-0000
9606XX-XX A1
SN 0610E014
S
T
Shield
logic
MOTOR
R
R
S
T
Ground
Connector Shell
Important: PE ground
should connect to drive
and motor only. Nothing
should be connected
between these devices.
2" and 3" motor cable
connector (CMDS-xxx cable)
Tighten screws to 5 in-lb.
Figure 25:
Epsilon EP209 - NT/MG Motor Power Wiring Diagram
Front View
Wire crimp ferrules are recommanded:
For ground lead use Pheonix Contact p/n AI-TWIN 2X1, 5-8Bk/32 00 82 3
American Electrical/DigiKey 1381015/288-1130-ND
For motor leads use Pheonix Contact p/n AI 1,5-8 RD/32 01 13 6 or
ALTEC p/n H1.5/14 2204.0 Pk/100
L1
NT or MG Motor
Power Connections
L2
L3
PE
Brown
MOTOR
R
S
T
Black
Blue
Green/Yellow
Shield
Important: PE ground should connect to drive
and motor only. Nothing should be connected
between these devices.
Figure 26:
Installation
R
S
T
Ground
Connector Shell
3" motor cable
connector (CMDS-xxx cable)
Epsilon EP216 - NT/MG Motor Power Wiring Diagram
27
Safety Information
Product Overview
Installation
Diagnostics
Options and
Accessories
Specification
XV Motor Power Wiring
The XV 40 mm to 80 mm motors are equipped with up to three connectors, one for stator connections, one for
encoder connections and one for the brake (if so equipped).
Stator connections from the drive to the motor are made using the XTMDS cable, the motor end of the cable has an
Amp "Mate-N-Lok"® connector and the drive end has four individual wires and shield that connect to the motor power
connector on the front of the drive.
Wire crimp ferrules are recommanded:
For ground lead use Pheonix Contact p/n AI-TWIN 2X1-8RD/32 00 81 0 or
American Electrical/DigiKey 1381010/288-1127-ND
For motor leads use Pheonix Contact p/n AI 1-RD/32 00 03 0 or
American Electrical/DigiKey 1181010/288-1015-ND
Front View
XVM 40M, 60M, 80M Motor
Power Connection
L1
L2
PE
24 Vdc
MOTOR
R
S
T
Brown
Black
Blue
Green/Yellow
S
3
T
2
Ground
4
Shield
Connector Shell
Important: PE ground
should connect to drive
and motor only. Nothing
should be connected
between these devices.
EP204-I00-0000
9606XX-XX A1
SN 0610E014
R
1
motor cable
connector (XTMDS-xxx)
Tighten screws to 5 in-lb.
Figure 27:
Epsilon EP202-EP206 - XV 40 mm - 80 mm Motor Power Wiring Diagram
Front View
Wire crimp ferrules are recommanded:
For ground lead use Pheonix Contact p/n AI-TWIN 2X1-8RD/32 00 81 0 or
American Electrical/DigiKey 1381010/288-1127-ND
For motor leads use Pheonix Contact p/n AI 1-RD/32 00 03 0 or
American Electrical/DigiKey 1181010/288-1015-ND
XVM 40M, 60M, 80M Motor
Power Connection
EP209-I00-0000
9606XX-XX A1
SN 0610E014
logic
MOTOR
R
S
T
Brown
Black
Blue
Green/Yellow
Shield
Important: PE ground
should connect to drive
and motor only. Nothing
should be connected
between these devices.
1
R
3
S
2
4
T
Ground
Connector Shell
motor cable
connector (XTMDS-xxx)
Tighten screws to 5 in-lb.
Figure 28:
28
Epsilon EP209 - XV 40 mm - 80 mm Motor Power Wiring Diagram
Safety Information
Product Overview
Installation
Options and
Accessories
Diagnostics
Specification
Front View
Wire crimp ferrules are recommanded:
For ground lead use Pheonix Contact p/n AI-TWIN 2X1-8RD/32 00 81 0 or
American Electrical/DigiKey 1381010/288-1127-ND
For motor leads use Pheonix Contact p/n AI 1-RD/32 00 13 0 or
American Electrical/DigiKey 1181010/288-1015-ND
L1
XVM 40M, 60M, 80M Motor
Power Connections
L2
L3
PE
Brown
1
3
2
4
MOTOR
R
S
T
Black
Blue
Green/Yellow
R
S
T
Ground
Shield
Connector Shell
Important: PE ground should connect to drive
and motor only. Nothing should be connected
between these devices.
Figure 29:
motor cable
connector (XTMDS-xxx cable)
Epsilon EP216 - XV 40 mm - 80 mm Motor Power Wiring Diagram
The XV 130 mm motors have two MS (Military Standard) connectors, one for the stator connections and one for the
encoder connections. Stator connections from the drive to the motor are made with the XCMDS (motor without
brake) or the XCMDBS (motor with brake) cable.
Wire crimp ferrules are recommanded:
For ground lead use Panduit p/n PV10-P55-L
For motor leads use Pheonix Contact p/n AI 1,5-8 BU/32 00 52 2
Front View
XVM 130M Motor
Power Connection
L1
L2
PE
24 Vdc
MOTOR
R
S
T
Brown
Black
Blue
Green/Yellow
Shield
Important: PE ground
should connect to drive
and motor only. Nothing
should be connected
between these devices.
EP204-I00-0000
9606XX-XX A1
SN 0610E014
Figure 30:
Installation
A
U
C
V
B
D
W
Ground
Connector Shell
motor cable
connector (XCMDS-xxx)
Tighten screws to 5 in-lb.
Epsilon EP202-EP206 - XV 130 mm Motor Power Wiring Diagram
29
Safety Information
Product Overview
Installation
Options and
Accessories
Diagnostics
Specification
Front View
Wire crimp ferrules are recommanded:
For ground lead use Panduit p/n PV10-P55-L
For motor leads use Pheonix Contact p/n AI 1,5-8 BU/32 00 52 2
XVM 130M Motor
Power Connection
Brown
Black
Blue
Green/Yellow
EP209-I00-0000
9606XX-XX A1
SN 0610E014
S
T
Shield
logic
MOTOR
R
U
C
V
W
B
D
Ground
Connector Shell
Important: PE ground
should connect to drive
and motor only. Nothing
should be connected
between these devices.
Tighten screws to 5 in-lb.
Figure 31:
A
motor cable
connector (XCMDS-xxx)
Epsilon EP209 - XV 130 mm Motor Power Wiring Diagram
Front View
Wire crimp ferrules are recommanded:
For ground lead use Panduit p/n PV10-P55-L
For motor leads use Pheonix Contact p/n AI 1,5-8 BU/32 00 52 2
L1
XVM 1300M Motor
Power Connections
L2
L3
PE
Brown
MOTOR
R
S
T
Black
Blue
Green/Yellow
Shield
Important: PE ground should connect to drive
and motor only. Nothing should be connected
between these devices.
Figure 32:
30
A
C
B
D
R
S
T
Ground
Connector Shell
motor cable
connector (XCMDS-xxx cable)
Epsilon EP216 - XV 130 mm Motor Power Wiring Diagram
Safety Information
Product Overview
Installation
Options and
Accessories
Diagnostics
Specification
Step 4: Low Power Connections
DC Logic Power Supply Wiring
The Epsilon drive requires a user supplied logic power supply, 24 Vdc ±10%, to power the internal logic of the drive.
Use the table below to determine the current requirements of the application. Users should consider keeping logic
power energized at all times because it helps prevent condensation and maintains position information in the drive.
Logic Power Supply Specification
Voltage Range
24 Vdc ±10%
(21.6 Vdc to 26.4 Vdc)
Model
Current
EP-Pxx
0.50 A* without sync encoder
0.57 A* with 250 mA sync encoder
All EP Models except EP-Pxx
0.31 A* without sync encoder
0.38 A* with 250 mA sync encoder
* All Epsilon EP216 models will draw an additional 100 mA.
Do not wire AC line into the logic power supply input. Doing so will damage the drive.
Front View
L1
L2
PE
L2
motor
S
logic
R
+
_
motor
L1
PE
S
logic
R
+
_
EP204-I00-0000
9606XX-XX A1
SN 0610E014
Installation
24 Vdc
Logic Power Supply
(User Supplied)
T
T
Tighten screws
to 5 in-lb.
Figure 33:
Fuse, if required
to protect wiring
24 Vdc
24 V RTN
Single point PE ground
To other drives or equipment , I/O supplies, etc..
Logic Power Supply Wiring Diagram for EP202-EP206 Drives
31
Safety Information
Product Overview
Installation
Options and
Accessories
Diagnostics
Front View
Fuse, if required
to protect wiring
EP209-I00-0000
9606XX-XX A1
SN 0610E014
S
24 Vdc
Logic Power Supply
(User Supplied)
T
24 Vdc
24 V RTN
logic
MOTOR
R
Single point PE ground
Tighten screws
to 5 in-lb.
To other drives or equipment , I/O supplies, etc.
Figure 34:
Logic Power Supply Wiring Diagram for EP209 Drive
Front View
logic
Fuse, if required
to protect wiring
24 Vdc
Logic Power Supply
(User Supplied)
24 Vdc
24 V RTN
Single point PE ground
To other drives or equipment , I/O supplies, etc.
Figure 35:
32
Logic Power Supply Wiring Diagram for EP216 Drive
Specification
Safety Information
Product Overview
Installation
Diagnostics
Options and
Accessories
Specification
For UL applications, the logic power supply must be a UL recognized or UL listed limited voltage/limited energy or
limited voltage/limited current supply, or a limited voltage supply with overcurrent protection appropriate for the wiring
and not to exceed 12 A. Isolate line connected circuits from low voltage circuits.
For applications to meet the EU Low Voltage Directive, an approved 24V supply must be used and the negative side
must be grounded to PE. PELV circuits must have protective separation for 300 V system voltage from mains
connected circuits, including separation between encoder circuits and motor power wiring. If all circuits connected
to the logic supply are PELV, the wiring need not be isolated from direct contact within a zone of equipotential
bonding, normally an enclosure or set of enclosures bonded together. Otherwise, logic wiring and circuits must be
isolated from direct contact by basic insulation for 300 V system voltage.
In all applications, do not interconnect extra low voltage power supplies so that voltages add.
Motor Feedback Wiring (J6)
Encoder feedback connections are made with the 15-pin high density “D” connector (J6) on the drive. Maximum
feedback cable length is 200 ft [60 m]. Voltage drop in encoder power connections is usually the limiting factor on
encoder cable lengths.
Connection of Encoder Quadrature and Marker Signals
For A, A/, B, B/ and Z, Z/ pairs, Control Techniques cables use low capacitance (~10 pf/ft) wire to get a high
characteristic impedance and low loss. The differential input circuit accepts RS-485 level signals, but if the differential
voltage is less than ±400 mV, an encoder fault is generated.
Connection of Encoder Commutation Signals to the Drive
The drive is capable of receiving U, V, and W commutation signals from either a differential or single ended source.
Figures 36 through 38 show a simplified circuit for the U, U/, V, V/, W, and W/ inputs on the drive. For single-ended
encoder outputs, leave U/, V/, and W/ unconnected at the drive. No PowerTools configuration is required. U, V, and
W have a 1K pull-up to 5V. Logic threshold is about 2.5 V with 0.1 V hysteresis.
Motor Overtemp Wiring
The motor overtemp circuit is compatible with PTC thermistor sensor with 2 k ohm resistance at the over temperature
trip point. The circuit provides 5V open circuit and 0.5 mA closed contacts to an overload switch. For motors without
over temperature protection sensors, pins 14 and 15 of J6 must be shorted together to prevent an overtemp fault in
the drive. Fault turn-on threshold is 0.83V and fault turn-off (reset) threshold is approximately 0.41 V.
Installation
33
Safety Information
Product Overview
Installation
Options and
Accessories
Diagnostics
Specification
NT/MG Motor
NT or MG Motor
N
P
B
C
M
U
F
S
E
R
G
H
K
GND
T
Motor
A
Overtemp
J
L
Internal
Motor
Overtemp GND D
Thermal
V
Switch
W
X
Y
Shield Z
Connector Shell
A
A/
B
B/
Z
Z/
U
U/
V
V/
W
W/
+ 5 Vdc
Motor Feedback Cable
Model # UFCS-XXX
Green
Brown
Blue
Orange
Black
Yellow
White/Gray
Gray/White
White/Brown
Brown/White
Red/Orange
Orange/Red
*Red/Blue
*Blue/Red
Red/Green
Green/Red
Epsilon EP
Drive
1
2
3
4
5
6
7
8
9
10
11
12
13
14
15
+5 V
A
A/
A
B
B/
A/
Z
Z/
U
U/
V
V/
W
W/
+5 Vdc
GND
Motor Overtemp
2K
2K
220 Ohm
Differential
Receiver
+5 V
2K
1K
U
U/
Differential
Receiver
2K
+5 V
Fault Thersholds
Turn ON: 0.83 V
Turn OFF: 0.41 V
10K
10 Ohm
PE
* = Note:18 ga Wire
= Twisted Pair
Figure 36:
Single Point
Ground
Motor Encoder Feedback Connector Pinout
XV 40-80 mm Motor
XVM 40mm, 60mm,
and 80mm Motor
3
4
1
2
5
6
9
10
7
8
11
12
13
14
15
A
A/
B
B/
Z
Z/
U
U/
V
V/
W
W/
+ 5 Vdc
GND
Shield
Connector Shell
Motor Feedback Cable
Model # XUFTS-XXX
Green
Brown
Blue
Orange
Black
Yellow
White/Gray
Gray/White
White/Brown
Brown/White
Red/Orange
Orange/Red
*Red/Blue
*Blue/Red
Red/Green
Green/Red
Epsilon
Drive
1
2
3
4
5
6
7
8
9
10
11
12
13
14
15
+5 V
A
A/
B
B/
Z
Z/
U
2K
U/
U
V
U/
V/
W
W/
+5 Vdc
GND
Motor Overtemp
2K
2K
A
220 Ohm
A/
+5 V
1K
2K
+5 V
Overall Shield Drain Wire
Fault Thersholds
Turn ON: 0.83 V
Turn OFF: 0.41 V
10K
* = 18 ga Wire
= Twisted Pair
10 Ohm
PE
Single Point
Ground
Figure 37:
34
Motor Encoder Feedback Connection For XV 40-80 mm Motors
Safety Information
Product Overview
Installation
Options and
Accessories
Diagnostics
Specification
XV 130 mm Motor
XVM 130mm Motor
C
D
A
B
E
F
M
N
K
L
P
R
H
G
J
A
A/
B
B/
Z
Z/
U
U/
V
V/
W
W/
+ 5 Vdc
GND
Shield
Connector Shell
Motor Feedback Cable
Model # XUFCS-XXX
Green
Brown
Blue
Orange
Black
Yellow
White/Gray
Gray/White
White/Brown
Brown/White
Red/Orange
Orange/Red
*Red/Blue
*Blue/Red
Red/Green
Green/Red
Epsilon
Drive
1
2
3
4
5
6
7
8
9
10
11
12
13
14
15
+5 V
A
A/
B
B/
Z
Z/
U
2K
U/
U
V
U/
V/
W
W/
+5 Vdc
GND
Motor Overtemp
2K
2K
A
220 Ohm
A/
+5 V
1K
2K
Fault Thersholds
Turn ON: 0.83 V
Overall Shield Drain Wire
+5 V Turn OFF: 0.41 V
10K
* = 18 ga Wire
= Twisted Pair
10 Ohm
PE
Single Point
Ground
Figure 38:
Motor Encoder Feedback Connection For XV 130 mm Motors
Motor Brake Wiring
The NT and MG motors equipped with brakes have a three-pin MS style connector. The brake power cable (model
CBMS-XXX) has an MS style connector on the motor end and three wire leads on the drive end (see the following
wiring diagrams). The XV 40-80 mm motors with brakes have a two-position connector. The brake power cable
(model XTBMS-XXX) has a two position connector on the motor end and three wire leads on the drive end. The XV
130 mm motors equipped with brakes have two MS style connectors; one is the encoder feedback and the other has
the motor power and brake connections. The motor power/brake cable (model XCMDBS-XXX) has an MS style
connector on the motor end and six wire leads on the drive end.
You must provide a DC power supply rated at +24 Vdc with a 2 A minimum current capacity for the brake. If you use
this voltage source to power other accessories such as I/O or more than one brake, size the power supply for total
load.
Installation
35
Safety Information
Product Overview
Installation
Options and
Accessories
Diagnostics
Specification
CBMS-xxx Cable
Black -
L1
L2
A2
A1
PE
motor
S
logic
R
+
_
T
digital i/o (J3)
Output #3
Drive Enable
8
10
I/O Supply
19
I/O Common
20
Customer
supplied drive
enable contact
C
B
A
K1
Internal
to Motor
2 Amp
Fuse
14
1 Amp
Fuse
EP204-I00-0000
9606XX-XX A1
SN 0610E014
J3
11
Relay:
Model# BRM-1
Red +
NT or MG
Motor
- +
Single point
PE ground
Connected to
grounded
mounting panel.
24 VDC
Figure 39: Epsilon EP to NT or MG Motor Brake Wiring Diagram
Black -
L1
XV 40mm-80mm
Motor
L2
A2
A1
PE
motor
S
logic
R
+
_
T
digital i/o (J3)
Output #3
Drive Enable
8
10
I/O Supply
19
I/O Common
20
Customer
supplied drive
enable contact
14
1 Amp
Fuse
Figure 40:
36
11
Relay:
Model# BRM-1
- +
Single point
PE ground
Internal
to Motor
2 Amp
Fuse
EP204-I00-0000
9606XX-XX A1
SN 0610E014
J3
C
B
A
K1
Red +
XTBMS-xxx Cable
Connected to
grounded
mounting panel.
24 VDC
Epsilon EP/XV 40-80 mm Motor Brake Wiring Diagram
Safety Information
Product Overview
Installation
Options and
Accessories
Diagnostics
Specification
XV 130mm
Motor
Blue/Wht
- -
L1
L2
A2
A1
PE
motor
S
logic
R
+
_
T
Internal to Motor
digital i/o (J3)
Output #3
Drive Enable
8
10
I/O Supply
19
I/O Common
20
Customer
supplied drive
enable contact
C
D
2 Amp
Fuse
14
1 Amp
Fuse
11
Relay:
Model# BRM-1
EP204-I00-0000
9606XX-XX A1
SN 0610E014
Blu +
XCMDBS-xxx Cable
J3
- +
Single point
PE ground
Figure 41:
F
E
A
B
K1
24 VDC
Epsilon EP/XV 130 mm Motor Brake Wiring Diagram
Input/Output and Drive Enable Wiring
The Epsilon EP-B drive is equipped with 5 optically isolated input lines (one is dedicated to a drive enable function)
and 3 optically isolated output lines. The Epsilon EP-I, EP-IDN and EP-P drives are equipped with 16 optically
isolated input lines (one is dedicated to a drive enable function) and 8 optically isolated output lines. All inputs and
outputs are configured as sourcing; that is, the outputs "source" current from the positive side of the I/O supply when
ON and the inputs are compatible with a sourcing output returning current to the grounded negative side of the I/O
supply.
Inputs are ON with +10 Vdc to +30 Vdc applied and OFF when less than +1.5 Vdc or 0.2 mA is applied. Input current
at 24 Vdc is 4.8 mA and input resistance is about 4.8k ohms.
Maximum load on each output channel is 150 mA with 3.5 Vdc max voltage drop from I/O supply + to output. Outputs
are rugged and require no freewheeling diode on inductive loads. Outputs are short-circuit proof to ground (0 V) or
any voltage from 0V to the I/O power supply voltage.
Optical isolation for I/O is functional only and does not provide safety rated isolation. I/O circuits must be PELV for
any extra low voltage circuits to be PELV. For UL installations, I/O wiring must be from a limited voltage/limited
energy or limited voltage.limited current supply.
Installation
37
Safety Information
Product Overview
Installation
Diagnostics
Options and
Accessories
Specification
Front View
I/O supply
+10 to +30 Vdc
L1
L2
PE
motor
T
Output #3
8
+
_
Output #2
17
4.8 K
digital i/o (J3)
devicenet (J9)
S
logic
R
EP204-I00-0000
9606XX-XX A1
SN 0610E014
Figure 42:
Output #1
7
Input #4
12
Input #3
2
Input #2
11
Input #1
1
Drive Enable Input
10
I/O Supply +
19
I/O Conmmon -
20
Fuse if required to
protect wiring
Epsilon EP-B Input/Output Wiring Diagram
As part of PELV wiring, I/O circuits are intended to be used within a zone of equipotential bonding where cables or
wiring would typically be no more than 10 ft [3 m] long. These circuits have not been evaluated for EMC immunity
which would be required for longer cables.
I/O Connector (J3) Functions
The I/O connector is a 26-pin male high-density dsub connector on the front of the drive. A low profile standard
terminal interface board (STI-24IO) and cable assembly (EIO26-xxx) are available for making connections
convenient. Figure 42 shows pin-outs for I/O channels supported in the EP-B drive and for external wiring typical of
all I/O channels. Figure 43 shows pin-outs for EP-I and EP-P models. Input channels 1-8 have high speed capture
capability in the EP-P models. Figure 44 shows the STI-24IO interface board for discrete wiring to I/O.
38
Safety Information
Product Overview
Installation
Diagnostics
J3 Connector
Pin#
Figure 43:
Options and
Accessories
Specification
Function
1
Input Line 1
2
Input Line 3
3
Input Line 5
4
Input Line 7
5
Input Line 9
6
Input Line 11
7
Output Line 1
8
Output Line 3
9
Output Line 5
10
Enable
11
Input Line 2
12
Input Line 4
13
Input Line 6
14
Input Line 8
15
Input Line 10
16
Input Line 12
17
Output Line 2
18
Output Line 4
19
I/O +V
20
I/O Common
21
Output Line 8
22
Input Line 13
23
Input Line 14
24
Input Line 15
25
Output Line 6
26
Output Line 7
I/O Connector (J3) Functions
INPUTS
EN
0
TB1
1
2
3
4
5
6
7
8
TB2
9
OUTPUTS
1
2
11
3
12
4
13
5
14
15
6
7
8
3.2
10
TB3
TB4
+24V
0V
2.1
Figure 44:
Installation
STI-24IO Interface Board
39
Safety Information
Product Overview
Installation
Diagnostics
Options and
Accessories
Specification
Analog/Sync Output Connector (J5)
All command, diagnostic, and sync signals are available using the 15-pin Analog/Sync Output connector.
If interfacing the drive using field wiring, the optional standard terminal interface board (STI-SNCOA) may be used.
It provides convenient connections using screw terminal strips.
1 2 3 4 5 6 7 8
9 10 11 12 13 14 15
Figure 45:
STI-SNCOA
J5 Connector
Pin#
Function
1
Motor Encoder A
2
Motor Encoder B
3
Motor Encoder Z
4
Pulse
5
Analog Input +
6
Analog Ground
7
Analog Output 1
8
Logic Common
9
Motor Encoder A/
10
Motor Encoder B/
11
Motor Encoder Z/
12
Direction
13
Analog Input -
14
Analog Ground
15
Analog Output 2
Figure 46:Analog/Sync Output Connector (J5) Functions
40
Safety Information
Product Overview
Function
Installation
Pin Numbers
Diagnostics
Options and
Accessories
Specification
Electrical Characteristics
Encoder Out
1, 2, 3, 9, 10, 11
Differential line driver output (RS 422)
Diagnostic Output
7, 15
± 10 Vdc 10 mA maximum analog diagnostic, ref. to pins 6 and 14
Diagnostic Output Common
6, 14
0.0 V, 10 ohms away from PE. 0 ohms away Logic Common (pin 8)
Pulse In
4
Single ended pulse input
Direction
12
Single ended direction input
Analog Command
5, 13
Differential; Analog Command Input
As part of PELV wiring, circuits at J5 are intended to be used within a zone of equipotential bonding where cables
or wiring would typically be no more than 10 ft [3 m] long. These circuits have not been evaluated fro EMC immunity
which would be required for longer cables.
Installation
41
Safety Information
Product Overview
Installation
Diagnostics
Options and
Accessories
Specification
Sync Input Connector (J10)
Sync Input signals are connected to the drive using the 9-pin Sync Input connector.
If interfacing the drive using field wiring, the optional standard terminal interface board (STI-SNCI) may be used.
1234
5678
Figure 47:
STI-SNCI Interface Board
J10 Connector
Pin#
Function
1
Encoder A
2
Encoder A/
3
Encoder B
4
+ 5 Vdc
5
Encoder B/
6
Encoder Z
7
Encoder Z/
8
Logic Common
9
NC
Figure 48:Sync Input Connector (J10) Functions
Function
Encoder In
Pin Number
1, 2, 3, 5, 6, 7
Electrical Characteristics
Differential line driver input (RS 422)
5 Vdc
4
+5 Vdc supply voltage
Ground
8
Logic Common
The Sync Input power meets EMC emissions and immunity for cables longer than 3 meters [10 ft], when using a
shielded cable. When a remote encoder is used, cable length may be limited by encoder supply voltage drop, and
should not exceed 200 ft [60 m].
42
Safety Information
Product Overview
Installation
Diagnostics
Options and
Accessories
Specification
Analog/Sync Output
Connector (J5)
- Analog In
+ Analog In
Analog Command Wiring
(Internal)
10 Ohm
Logic
Common
PE
5 13
Single Point
Panel Ground
External
Controller
+
CW Rotation
+ Command = CW
With positive direction = CW
Vdc
_
Controller Logic Common
Single Point
Panel Ground
Analog/Sync Output
Connector (J5)
- Analog In
Analog Command, Differential Wiring Diagram
+ Analog In
Figure 49:
(Internal)
10 Ohm
Logic
Common
PE
5 13
Single Point
Panel Ground
+
Vdc
External
Controller
CW Rotation
+ Command = CW
With positive direction = CW
_
Single Point
Panel Ground
Figure 50:
Controller Logic Common
Analog Command, Single Ended Wiring Diagram
Encoder Output Signal Wiring
The encoder outputs meet RS-422 line driver specifications and can drive up to ten RS-422 signal receivers.
The default encoder output scaling is set to output the actual motor encoder resolutions. The standard MG and NT
motors have 2048 lines per revolution. With PowerTools Pro software this resolution is adjustable in one line per
revolution increments up to the density of the encoder in the motor.
Installation
43
Safety Information
Product Overview
Installation
Diagnostics
Options and
Accessories
Specification
Note: If the external controller does not have an internal terminating resistor
R1, R2 and R3 must be mounted within 3 ft [1 m] of the external controller. A
120 ohm resistor is recommended for high frequency encoders (over 250 kHz)
or cables longer than 25 feet. If encoder signals are multi-dropped, termination
resistors are required only at the last drop point. Do not terminate at more than
one point.
Drive (J5)
A
A/
B
1
A
R1
9
A/
2
B
R2
B/ 10
Z
B/
3
External
Controller
Encoder
Input
Z
R3
Z/ 11
Z/
Connector Shell
Internal
10 Ohm
PE
44
Single Point
PE Ground
= Twisted Pair
Figure 51:
Analog/Sync Output Connector (J5) Encoder Output Wiring
Figure 52:
Direction Convention Diagram
Safety Information
Product Overview
Installation
Options and
Accessories
Diagnostics
Specification
Pulse Mode Wiring, Differential Inputs
500 ns Minimum
500 ns Minimum
250 ns Minimum
Motion occurs
on rising edge
Shield connected
to connector shell
Drive
Sync Input Connector
(J10)
10 Ohm
(A) Pulse
CW
CCW
RS-422 Type
Differential Drives
A
A/
B
B/
1
2
3
5
PE
(B) Direction
Single Point
Panel Ground
R1
= Twisted Pair
R2
Single Point
PE Ground
Figure 53:
Note: If the external controller does not have an internal terminating
resistor R1, and R2 must be mounted within 3 ft [1 m] of the drive.
A 120 ohm resistor is recommended for high frequency
(over 250 kHz) feedback signals or cable lengths longer
than 25 feet.
Pulse Mode, Differential Output to Differential Input
500 ns Minimum
500 ns Minimum
250 ns Minimum
Motion occurs
on falling edge
(A/) Pulse
Shield connected
to connector shell
Drive
Sync Input Connector
(J10)
10 Ohm
CW
CCW
(B) Direction
+5 Out
R1
R2
A
A/
B
B/
1
2
3
5
PE
Single Point
Panel Ground
R3
Pulse
Resistor Values
Direction
R1, R2
1K Ohm Maximum
240 Ohm Minimum
R3
1K Ohm Maximum
240 Ohm Minimum
R4
1/2 R3
120 Ohm Minimum
R4
Single Point
PE Ground
Figure 54:
Installation
= Twisted Pair
Pulse Mode, Single Ended Output to Differential Input
45
Safety Information
Product Overview
Installation
Options and
Accessories
Diagnostics
Specification
Pulse Mode Wiring, Single Ended Inputs
1 µs Minimum
1 µs Minimum
500 ns Minimum
Motion occurs
on falling edge
Pulse
Drive
Analog/Sync Output
Shield connected
to connector shell
(J5)
CW
CCW
10
Ohm
Direction
Pulse
Direction
12 8
4
Sinking
Outputs (typ)
logic
common
PE
Single Point
Panel Ground
Pulse
Direction
= Twisted Pair
Common isolated from other sources
Figure 55:
Pulse Mode, Single Ended Output to Single Ended Input (twisted pair cable)
1 µs Minimum
1 µs Minimum
500 ns Minimum
Motion occurs
on falling edge
Pulse
Drive
Analog/Sync Output Connector
(J5)
CW
CCW
Pulse
Shield connected
to connector shell
Direction
Direction
4
Sinking
Outputs (typ)
Pulse
12 8
10
Ohm
logic
common
PE
Single Point
Panel Ground
Direction
Common isolated from other sources
Figure 56:
46
Pulse Mode, Single Ended Output to Single Ended Input (non-twisted pair
cable)
Safety Information
Product Overview
Installation
1 µs Minimum
Options and
Accessories
Diagnostics
Specification
1 µs Minimum
500 ns Minimum
Motion occurs
on falling edge
CW Pulse
Drive
Analog/Sync Output Connector
(J5)
CW
CCW
CCW Pulse
Shield connected
to connector shell
Pulse
12 8
4
Sinking
Outputs (typ)
10
Ohm
Direction
logic
common
PE
Single Point
Panel Ground
CW Pulse
CCW Pulse
Common isolated from other sources
Figure 57:
Pulse/Pulse Mode, Single Ended Output to Single Ended Input (non-twisted
pair cable)
Slave Drive
Sync Input Connector (J10)
Master Encoder
or Drive Output
Slave Drive
Slave Drive
Sync Input Connector (J10)
Sync Input Connector (J10)
A
A/
B
B/
Z
Z/
A
A/
B
B/
Z
Z/
A
A/
B
B/
Z
Z/
1
2
3
5
6
7
1
2
3
5
6
7
1
2
3
5
6
7
RS-422
Drivers
R1
= Twisted Pair
Figure 58:
R2
R3
Note: R1, R2, and R3 must be mounted within 3 ft [1m] of the end drive.
A 120 ohm resistor is recommended for high frequency
(over 250 kHz) stepping or cable lengths longer than 25 feet.
Master/Slave Encoder Connections
Encoder outputs meet RS-422 driver specifications and can drive up to 10 RS-422 signal receivers. Each
differential pulse input is an RS-422 line receivers. The default encoder output resolution is 2048 lines per
motor revolution. This resolution is adjustable in one line per revolution increments with PowerTools Pro
software. The range is between 1 and the actual motor encoder density.
Installation
47
Safety Information
Product Overview
Installation
Diagnostics
Options and
Accessories
Specification
Communications
Communications with the drive is provided through the RJ45 connectors located on the front of the drive. The two
RJ45 connectors are identical and are used to provide a way to daisy chain two or more drives together using the
DDC-RJ45 cable, see Figure 60. The Epsilon EP serial communication connector (serial port) as standard, supports
2 wire EIA485 communications. The RS-485 communications port is not isolated from drive electronics and the "0V"
pins are internally connected through a 10 Ohm resistor to PE. Interconnected drives should be within a zone of
equipotential bonding. Connection to a master device on the network, such as a MMI, SCADA, PLC, or PR can be
remote, but care should be taken to make sure the entire network operates within the +/-7 V common mode voltage
range of RS-485. Though the comm port is part of PELV circuits when properly installed, if the master device is
outside the zone of equipotential bonding the circuit needs to be isolated against direct contact. The minimal RS-485
network cable contains a shielded twisted pair for RX TX (pin 2) and RX/ TX/ (pin 7) with shield to the shell, though
a 0 V reference signal (pin 3) can improve immunity to ground differentials. See the following table for the connection
details for the RJ45 serial communication connector.
Pin
Function
1
220 ohm Termination resistor to RX TX
2
RX TX
3
Isolated 0V
4
+15V (100 mA max)
5
NC
6
TX Enable
7
RX/ TX/
8
RX/ TX/ (If termination resistors are required, link to pin 1)
SHELL
PE
The provision for connection of the internal 220 ohm terminating resistor at pin 1 and pin 8 would rarely, if ever, be
needed unless data rates much higher than 19.2K are supported. Since a terminator connection is only made at the
end of a trunk, it is most conveniently accomplished by crimping a short link from pin 1 to pin 8 in a new RJ45
connector and plugging it into the second RJ45 port on the "last" drive. Cable conductors should not be connected
to these pins.
The modbus protocol is sensitive to transitions on an idle line. In some cases it may be necessary to apply bias to
the trunk consisting of a pull-up resistor to RX TX and a pull-down resistor to RX/ TX/. Biasing is most important when
termination resistors are used. As an example, if the internal 220 ohm termination is connected at the last node on
the trunk, a 10K resistor from RX TX (pin 2) to +15 V (pin 4) and a 1 K resistor from RX/ TX/ (pin 7) to Isolated 0V
(pin 3) would provide good idle line bias. Only one node needs to provide bias, even with terminators at each end.
It is usually most convenient to provide bias at the connection to the Modbus master node.
Communication Converter Cables
The CT-Comms cable is an isolated RS-232 to RS-485 converter cable that may be used to connect one or more
EP drives to a master device using a standard 9 pin D-sub RS-232 serial comms port. The CT-USB-Cable is an
isolated USB to RS-485 converter cable that may be used to connect one or more drives to a master device using
a USB port.
The +15 V supply (pin 4) and the 0 V connection (pin 3) are intended only to provide power to the isolators in the CT
converter cables and are not to be used for any other purpose.
The TX Enable signal (pin 6) and 0 V (pin 3) provide a transmit enable signal from each interconnected drive to the
CT converter cable and are not to be used for any other purpose. They may be wired from drive to drive in a zone
of equipotential bonding to allow the CT converter cable to communicate with all drives in the group.
The DDC-RJ45 cable provides drive to drive (daisy chain) connections between EP drives, including support for the
CT converter cable in a group of drives.
48
Safety Information
Product Overview
Installation
Diagnostics
Options and
Accessories
Specification
1
8
1
8
Figure 59: Epsilon EP Serial Communication Connector
DDC-RJ45
cable
Figure 60:
2 Epsilon Drives Daisy Chained Together
When connecting the serial port of your PC to the serial port of the drive, verify that your PC’s ground is the
same as the drive PE ground. Failure to do so can result in damage to your PC and/or your drive. It is best to
use an isolating cable such as the CT-Comms cable.
Installation
49
Safety Information
Product Overview
Installation
Options and
Accessories
Diagnostics
Specification
Modbus Communications
The drive’s serial communication protocol is Modbus RTU slave with a 32 bit data extension. The Modbus protocol
is available on most operator interface panels and PLC’s.
Serial Communications Specifications
Max baud rate
19.2k
Start bit
1
Stop bit
2
Parity
none
Data
8
Ethernet Port
The Ethernet port at J11 has only functional isolation from other low voltage circuits and PE at the drive. In order to
classify any low voltage circuits in the drive as PELV, the ethernet circuit must be installed as a PELV circuit. Refer
to installation instructions with the hub, switch or other devices connected for details.
The system meets EMC emissions and immunity requirements using unshielded ethernet cables when a clamp on
ferrite is attached to the ethernet cable as it leaves the enclosure or when using shielded ethernet cables.
DeviceNet Port
The DeviceNet port at J9 has only functional isolation from other low voltage circuits and PE at the drive.
In order to classify any low voltage circuits in the drive as PELV, the DeviceNet circuit must also be installed as a
PELV circuit.
Profibus Port
The Profibus port at J13 conforms to standard Profibus implementation, and may be used with a variety of trunk to
node connectors for Profibus. The signal wires are isolated to SELV requirements but the shell (shield connection)
is directly connected to PE. Classification of the Profibus circuit as PELV is independent of other circuits in the drive.
50
Safety Information
Product Overview
Installation
Diagnostics
Options and
Accessories
Specification
Diagnostics and Troubleshooting
Diagnostic Display
Status Codes
The diagnostic display on the front of the drive shows drive status and fault codes. When a fault condition occurs,
the drive will display the fault code, overriding the status code. The decimal point is “On” when the drive is enabled
and the Stop input is not active. This indicates that the drive is ready to run and will respond to motion commands.
Commands will not cause motion unless the decimal point is “On”.
Display Indication
Status
Description
Brake Engaged (Output "Off")
Motor brake is mechanically engaged. This
character will only appear if the Brake output
function is assigned to an output line.
See Brake Operation section for detailed
description of Brake Output function.
Disabled
Power Stage is disabled.
Ready
The system is functioning normally and is ready
to execute a motion command
Program
Program is executing. Other motion commands
do not function.
Position or Pulse
Pulse mode operation.
Velocity
Velocity mode operation.
Decelerating from Stop or Travel
Limit Decel
Deceleration ramp after the Stop or Travel Limit
function is activated. The ramp is displayed while
decelerating, and the display will go back to
normal after completing the decel ramp.
Torque
Analog Torque mode operation.
Diagnostics and Troubleshooting
51
Safety Information
Product Overview
Display Indication
Installation
Diagnostics
Options and
Accessories
Specification
Status
Description
Summation
Summation mode operation.
RMS Foldback
Motor torque is limited to 80 percent.
Stall Foldback
Drive output current is limited to 80 percent of the
drive’s stall current.
Ready to Run
Drive enabled, no Stop input.
Homing
Home cycle is executing. Other motion
commands do not function.
Indexing
A Index is executing. Other motion commands do
not function.
Jogging
Jog function is executing. Other motion
commands do not function.
AutoTune
AutoTune function is executing.
Gearing
Gear function is executing.
Fault Codes
A number of diagnostic and fault detection circuits are incorporated to protect the drive. Some faults, like high DC
bus and drive or motor over temperature, can be reset with the Reset button on the front of the drive or the Reset
input function. Other faults, such as encoder faults, can only be reset by cycling power “Off” (wait until the diagnostics
display turns “Off”), then power “On”.
The drive accurately tracks motor position during fault conditions. For example, if there is a "Low DC Bus" fault where
the power stage is disabled, the drive will continue to track the motor’s position provided the logic power is not
interrupted.
52
Safety Information
Product Overview
Installation
Diagnostics
Options and
Accessories
Specification
The +/- Travel Limit faults are automatically cleared when the fault condition is removed. The table below lists all the
fault codes in priority order from highest to lowest. This means that if two faults are active, only the higher priority
fault will be displayed.
Display
Fault
Action to Reset
Bridge Disabled
Flash Invalid
Reprogram the Flash
Yes
Drive Power Up Test
Cycle Logic Power
Yes
NVM Invalid
Reset Button or Input Line
Yes
Invalid Configuration
Reset Button or Input Line
Yes
Drive Overtemp
Allow Drive to cool down
Yes
Power Module
Reset Button or Input Line
Yes
High DC Bus
Reset Button or Input Line
Yes
Low DC Bus
Reset Button or Input Line
Yes
Encoder State
Reset Button or Input Line on EP-P drive
and
Cycle Logic Power on the other models
Yes
Encoder Hardware
Reset Button or Input Line on EP-P drive
and
Cycle Logic Power on the other models
Yes
Diagnostics and Troubleshooting
53
Safety Information
Product Overview
Display
Installation
Diagnostics
Options and
Accessories
Specification
Fault
Action to Reset
Bridge Disabled
Motor Overtemp
Allow Motor to cool down,
Reset Button or Input Line
Yes
RMS Shunt Power
or
Shunt Short Circuit
Reset Button or Input Line
Yes
Overspeed
Reset Button or Input Line
Yes
Following Error
(Pulse mode only)
Reset Button or Input Line
Yes
Travel Limit +/-
Auto
No
Sync Fault
Cycle Logic Power
Yes
Run Time
(EP-P Only)
Reset Button or Input Line
Yes
All "On"
Normally "On" for one second during powerup
Yes
Fault Descriptions
Flash Invalid
This fault indicates that the firmware checksum has failed. From the Tools>Program Flash menu in PowerTools Pro
the firmware stored in flash memory can be reprogram or upgrade. If this problem persists, call Control Techniques.
A common cause would be an interrupted F/W Flash upgrade (cable disconnected during an upgrade process).
Power Up Test
This fault indicates that the power-up self-test has failed. This fault cannot be reset with the reset command or reset
button.
54
Safety Information
Product Overview
Installation
Diagnostics
Options and
Accessories
Specification
NVM Invalid
At power-up the drive tests the integrity of the non-volatile memory. This fault is generated if the contents of the nonvolatile memory are invalid.
Invalid Configuration
This fault will occur if the digital board in the drive does not match the power board settings. It is only useful during
manufacturing. A drive with this fault should be returned for service.
Drive Overtemp
Indicates the drive internal temperature has reached an over temperature condition - not currently implemented in
the EP202, EP204 or EP206 models. For Epsilon EP209 and EP216 drive models, this fault will occur if the soft-start
circuit has failed or mis-wiring of the bus or shunt prevents proper start-up, resulting in overheating the soft-start
resistor internal to the drive. With the EP216 model this over temperature condition could be the result of fan failure.
Power Module
This fault is generated when a power stage over-temperature, over-current or loss of power stage logic supply
occurs. This can be the result of a motor short to ground, a short in the motor windings, a motor cable short or the
failure of a switching transistor.
High DC Bus
This fault will occur whenever the voltage on the DC bus exceeds the High DC Bus threshold. The most likely cause
of this fault would be an open external shunt, a high AC line condition, or an application that requires an external
shunt (e.g., a large load with rapid deceleration) but none is installed.
High DC Bus Threshold
Epsilon EP
415 Vdc
Low DC Bus
This fault will occur whenever the voltage on the DC bus drops below the Low DC Bus threshold. The most likely
cause of this fault is a reduction (or loss) of AC power. A 50 ms debounce time is used with this fault to avoid faults
caused by intermittent power disruption. With an Epsilon EP drive, the low DC bus monitoring can be disabled. In an
EP-B and EP-I this fault is disabled by clearing the check box on the Faults view, and for an EP-P the check box is
located on the Advanced view
Low DC Bus Threshold
Epsilon EP
60 Vdc
Special note for EP209 and EP216 drives, the Low DC Bus fault may not be disabled. The bus voltage must reach
140 Vdc (100 Vac input) before this fault will reset and it will reset automatically. It will occur again when the bus
voltage drops by 50 V from the voltage on the bus when soft-start mode ends and the drive is ready to run.
Encoder State
Certain encoder state transitions are invalid and will cause the drive to report an encoder state fault. This is usually
the result of noisy encoder feedback caused by poor shielding. For some types of custom motors it may be necessary
to disable this fault. With an Epsilon EP drive, the Encoder State monitoring can be disabled. In an EP-B and EP-I
this fault is disabled by clearing the check box on the Faults view, and for an EP-P the check box is located on the
Advanced view.
Diagnostics and Troubleshooting
55
Safety Information
Product Overview
Installation
Diagnostics
Options and
Accessories
Specification
Encoder Hardware
If any pair of complementary encoder lines (A, B, Z) are in the same state, an encoder line fault is generated. Also,
can be generated if all three commutation channels (U, V, W) are 0 or 1, an illegal state. The most likely cause is a
missing or bad encoder connection.
Motor Overtemp
This fault is generated when the motor thermal switch is open due to motor over-temperature or incorrect wiring.
Overspeed
This fault occurs in one of two circumstances:
1.
When the actual motor speed exceeds the Overspeed Velocity Limit parameter or 150% of motor maximum
operating speed. This parameter can be accessed with PowerTools Pro software.
2.
If the combination of command pulse frequency and Pulse Ratio can generate a motor command speed in
excess of the fixed limit of 13000 RPM, an Overspeed Fault will be activated. In Pulse mode operation and any
Summation mode which uses Pulse mode, the input pulse command frequency is monitored and this
calculation is made. For example, with a Pulse Ratio of 10 pulses per motor revolution, the first pulse received
will cause an Overspeed fault even before there is any motor motion.
RMS Shunt
This fault is generated when filtered average shunt power dissipation is greater than the design rating of the shunt
resistor.
Following Error
This fault is generated when the following error exceeds the following error limit (default following error limit for an
EP-I and EP-B is 0.2 revs). With PowerTools Pro you can change the Following Error Limit value or disable it in the
Position view. In an EP-B and EP-I the Following Error Limit is functional in Pulse mode only.
Travel Limit +/This fault is caused when either the + or - Travel Limit input function is active.
Sync Fault
This fault occurs when the user selected trajectory update rate is set too short based on the processor requirements.
The three possible trajectory update rates are 800µs, 1200 µs, or 1600 µs. Try changing the trajectory update rate
to the largest value (1600 µs) and run the application again. If the problem persists after setting to 1600 µs, contact
Control Techniques technical support. For more information on the trajectory update rate see the Epsilon EP-P
Drive and FM-3/4 Modules Reference Manual (P/N 400518-04).
Run Time Faults (EP-P only)
The "4" fault is caused by any of the following internal routine faults:
Trajectory Fault #1
This fault occurs when the drive commands motion that cannot be achieved due to excessive following error, accel,
decel, velocity settings, or unusable user units. Check the user units, velocities, accels and decels for correct values.
56
Safety Information
Product Overview
Installation
Diagnostics
Options and
Accessories
Specification
Trajectory Fault #2
This fault occurs when using the "Using Capture.#" option in a user program. If the capture has never been triggered,
or the capture data has gone "stale", the drive will not be able to process motion properly.
Program Fault
This fault indicates a problem was encountered in a user program. For example: an illegal math operation resulting
in a divide by zero or overflow of 32-bit data. This error can also occur if trying to access a drive parameter that is
non-existent or not available to the user.
Invalid Configuration Fault #2
The user program in flash memory will not run. Download the user program again using PowerTools Pro. A common
cause of this fault could be an interrupted configuration download, such as a cable being disconnected during the
download.
No Program
This fault will be displayed on initial power-up indicating that no configuration has been downloaded to the drive. To
clear the fault, download a valid configuration to the drive.
All "On"
This is a normal condition during power up of the drive. It will last for less than 1 second. If this display persists, call
Control Techniques Americas LLC for service advice.
Normally, "All On" for less than one second during power-up. All segments dimly lit when power is "Off" may occur
when an external signal is applied to the encoder inputs (motor or master) or serial port from an externally powered
device.
Diagnostic Analog Output Test Points
The drive has two 10-bit real-time Analog Outputs which may be used for diagnostics, monitoring or control
purposes. These outputs are referred to as Channel 1 and Channel 2. They can be accessed from the Analog/Sync
Output Connector (J5) on the drive.
Each Channel provides a programmable Analog Output Source.
Analog Output Source options are:
•
•
•
•
•
•
•
•
Velocity Command
Velocity Feedback
Torque Command (equates to Torque Command Actual parameter)
Torque Feedback
Following Error
Position Feedback (EP-B, EP-I, and EP-IDN)
Custom Variable (EP-P only)
Analog In (EP-P only)
Channel
Analog/Sync Output Connector (J5)
Pin#
1
7
2
15
Drive Faults
The Active Drive Faults dialog box is automatically displayed whenever a fault occurs. There are two options in this
dialog box: Reset Faults and Ignore Faults.
Diagnostics and Troubleshooting
57
Safety Information
Product Overview
Figure 61:
Installation
Diagnostics
Options and
Accessories
Specification
Active Drive Faults Detected Dialog Box
Resetting Faults
Some drive faults are automatically reset when the fault condition is cleared. Other faults require drive logic power
to be cycled or the drive to be “rebooted”. If you wish to continue working in the PowerTools Pro software without
resetting the fault, click the Ignore Fault button.
To reset faults that can be reset with the Reset Faults button, simply click the Reset Faults button in the Drive Faults
Detected dialog box or push the Reset button on the front of the drive where the fault occurred.
Viewing Active Drive Faults
To view all active drive faults, select the View Faults command from the Device menu or by clicking on the View
Faults button on the toolbar. The dialog box displayed is the same as Active Drive Faults Detected dialog box
described above.
Rebooting the Drive
To reboot the drive, cycle power or select the Reboot Drive command from the Device menu. This command reboots
the drive attached to the active Configuration Window.
58
Safety Information
Product Overview
Installation
Options and
Accessories
Diagnostics
Specification
Options and Accessories
Epsilon EP Drive Options
Drive Brake Relay,
BRM-1
External Shunt Resistor,
SM-Heatsink DBR1
40, 60, 80 mm XV Motors
Motor Power Cable, XTMDS-xxx
Motor Brake Cable, XTBMS-xxx
CTVue HMI to Drive,
CTVUE-EP-485-xxx
130 mm XV Motors
Motor Power or Motor Power/Brake Cable,
XCMDS-xxx or XCMDBS-XXX
Drive to Drive,
Drive RS-485 to Drive RS-485,
DDC-RJ45-xxx
NT or MG Motors
J8
PC to Drive, PC RS232 to Drive RS485
Serial Interface Cable,
CT-COMMS
Epsilon EP
Motor Power Cable,
CMDS-xxx or CMMS-xxx*
Motor Brake Cable,
CBMS-xxx*
FM Motors
reset
L1
Ethernet to Drive,
ETH-PATCH--xxx
Motor Power Cable,
PSBAA-xxx, PBBAA-xxx
L2
PE
Ethernet 4-port Switch,
ETH-S4
CT-MME-POWER-CD
Contains PowerTools Pro
+
_
ether net ( J4 )
act link
motor
Windows 98, NT 4.0, 2000 or XP
Compatible Computer
(Customer Supplied)
S
log ic
seria l (J2)
R
T
Drive Sync In to Drive Sync Out Cable, SNCDD-915-xxx
Drive Sync In Cable, SNCFLI-xxx
3 MIN
Drive Sync In from FM-3/4 Module Out Cable, SNCMD-89-xxx
digital i/o (J3)
Epsilon EP I/O Cable,
EIO26-xxx
INPUTS
1
2
3
Drive Sync In from SCSLD Encoder Cable, SNCE-xxx
4
5
6
7
8
EP204-IDN-EN00
EP204-P00-0000
9606XX-XX A1
9606XX-XX
A1
SN 0610E014
0610E014
SN
9
OUTPUTS
10
1
11
2
12
3
13
15
5
EN
6
8
1234
5678
J6
14
4
7
J5 J10
Drive Sync In Breakout Board, STI-SNCI
+24V
0V
STI-24IO
40, 60, 80 mm XV Motors
1 2 3 4 5 6 7 8
9 10 11 12 13 14 15
Motor Feedback Cable, XUFTS-XXX
Drive Sync Out to
Drive Sync In Cable,
SNCDD-915-xxx
1 2 3 4 5 6 7 8
9 10 11 12 13 14 15
130 mm XV Motors
Motor Feedback Breakout Board,
STI-ENC
Drive Sync Out Cable,
SNCFLOA-xxx
Drive Sync Out Breakout Board,
STI-SNCOA
Motor Feedback Cable, XUFCS-XXX
NT or MG Motors
Drive Sync Out to
FM-3/4 Module In Cable,
SNCMD-815-xxx
Motor Feedback Cable, UFCS-XXX
FM Motors
Drive Command to
MC Controller Cable,
MC-CEP-xxx
Figure 62:
Motor Feedback Cable, SIBAA-xxx
* Flex duty versions of these cables
are also available.
Epsilon EP-P Drive shown with Options
Options and Accessories
59
Safety Information
Product Overview
Installation
Diagnostics
Options and
Accessories
Specification
STI-24IO
The STI-24IO interface board allows access to all digital input and output signals. The STI-24IO mounts directly to
the digital I/O connector (J3) on the front of the EP drive. See figure 63 below.
Do not allow ESD directly to terminals. Always discharge static electricity to enclosure, not the drive when
performing maintenance.
Shield connection points are connected to the shell of the 26 pin “D” connector on the STI-24IO.
The STI-24IO wire range is #18 to 24 AWG stranded insulated wire.
Wiring should be done with consideration for future troubleshooting and repair. All wiring should be either color
coded and/or tagged with industrial wire tabs. Low voltage wiring should be routed away from high voltage wiring.
INPUTS
EN
0
TB1
1
2
3
4
5
6
7
8
TB2
OUTPUTS
9
1
10
TB3
2
11
3
12
4
13
5
14
15
6
7
8
TB4
+24V
0V
2.1
Figure 63:
60
Dimensions of the STI-24IO Board
3.2
Safety Information
Product Overview
Installation
Diagnostics
Options and
Accessories
Specification
STI-SNCOA
The STI-SNCOA interface board allows access to the analog/sync signals. The STI-SNCOA plugs directly into the
J5 connector on the bottom of the drive. The numbers printed on the connector label correlate to the screw terminal
numbers.
Do not allow ESD directly to terminals. Always discharge static electricity to enclosure, not the drive when
performing maintenance.
Shield connection points are connected from the shell of the "D" connector to the faston lug connector.
1 2 3 4 5 6 7 8
9 10 11 12 13 14 15
Figure 64:
STI-SNCOA Drive Analog/Sync Output Breakout Board
Options and Accessories
61
Safety Information
Product Overview
Installation
Diagnostics
Options and
Accessories
Specification
STI-SNCI
The STI-SNCI interface board allows access to the sync input connections on the EP drive. The STI-SNCI plugs
directly into the J10 connector on the bottom of the drive. The numbers printed on the connector label correlate to
the screw terminal numbers.
Do not allow ESD directly to terminals. Always discharge static electricity to enclosure, not the drive when
performing maintenance.
Shield connection points are connected from the shell of the "D" connector to the faston lug connector.
1234
5678
Figure 65:
62
STI-SNCI Drive Sync In Breakout Board
Safety Information
Product Overview
Installation
Diagnostics
Options and
Accessories
Specification
STI-ENC
The STI-ENC interface board allows the user access to the encoder feedback connector (J6) on the EP drive. The
STI-ENC plugs directly in J6 on the bottom of the drive. The numbers printed on the connector label correlate to the
screw terminal numbers.
Do not allow ESD directly to terminals. Always discharge static electricity to enclosure, not the drive when
performing maintenance.
Shield connection points are connected from the shell of the "D" connector to the faston lug connector.
1 2 3 4 5 6 7 8
9 10 11 12 13 14 15
Figure 66:
STI-ENC Drive Encoder Feedback Board
Options and Accessories
63
Safety Information
64
Product Overview
Installation
Diagnostics
Options and
Accessories
Specification
Safety Information
Product Overview
Installation
Diagnostics
Options and
Accessories
Specification
Specifications
Epsilon EP Specifications
Epsilon EP Series
AC Power
DC Power
(UL Pending)
20 Vac-264 Vac,
1 Ø, 47-63 Hz
10 Vdc - 340 Vdc
90 Vac - 264 Vac
1 Ø, 47-63 Hz
140 Vdc - 340 Vdc
Model
EP202
EP204
Power Requirements
(240 Vac for rated performance)
EP206
EP209
EP216
90 Vac - 264 Vac
3 Ø, 47-63 Hz
90 Vac - 264 Vac
1 Ø, 47-63 Hz
SCCR
(Short Circuit Current Rating)
10,000 Symmetrical RMS Amps
Solid State Motor
Overload Protection
115% of rated FLA
Rated Output Current and Power
Continuous Input Current
(AC Input)
140 Vdc - 340 Vdc
Model
Continuous Power
Continuous Current
Peak Current
EP202
775 W
2.2 A RMS at 40°C or 50°C
4.4 A RMS
EP204
1275 W
4.0 A RMS at 40° C
3.6 A RMS at 50° C
8 A RMS
EP206
1775 W
6.5 A RMS at 40° C
5.2 A RMS at 50° C
13 A RMS
EP209
2325 W
9.0 A RMS at 40° C
7.7 A RMS at 50° C
18 A RMS
EP216
3 Ø Input
4800 W
16.0 A RMS at 40° C
16.0 A RMS at 50° C
32 A RMS
EP216
1 Ø Input
2325 W
16.0 A RMS at 40° C
16.0 A RMS at 50° C
32 A RMS
Model
Continuous Current
Inrush Current
EP202
5.0 A RMS at 40° C or 50° C
40 A RMS for 5 ms
EP204
8.5 A RMS at 40° C
7.6 A RMS at 50° C
65 A RMS for 5 ms
EP206
12.0 A RMS at 40° C
9.6 A RMS at 50° C
100 A RMS for 5 ms
EP209
16.0 A RMS at 40° C
13.6 A RMS at 50° C
34 A RMS for 5 ms
16.0 A RMS at 40° C
16.0 A RMS at 50° C
34 A RMS for 5 ms
EP216, 3 Ø Input
EP216, 1 Ø Input
Specifications
Type TN (Grounded)
Installation
Category III
65
Safety Information
Product Overview
Installation
Diagnostics
Options and
Accessories
Specification
Epsilon EP Series
24 Vdc ±10%
Logic Power Supply Input
EP-Pxx: 0.50 A* without master encoder,
0.57 A* with master encoder
Other models: 0.31 A* without motor encoder,
0.38 A* with master motor encoder
* = All EP216 drive models will draw an additional 100 mA
Switching Frequency
10 kHz
Power Supply Output
5 Vdc, 250 mA maximum (for master encoder)
Efficiency - Drive AC Power
95% at full rated output power for each model
Ingress Protection (IP) Rating
Drive: IP20
NT motors: IP65/IP54
Molded motor and feedback cables: IP65
Serial Interface
RS-485
IModbus protocol with 32 bit data extension
19.2 k baud (default) or 9600 baud
EtherNet Interface
EP-P Only
10/100 M baud, auto negotiated
Auto crossover
Full/Half Duplex, auto negotiated
EtherNet I/P, Modbus TCP/IP, HTTP, and SMSC
DeviceNet Interface
EP-xDN Only
Baud Rates: 125K, 250K, 500K
Power from Network: 25 mA max.
Analog command: ±10 Vdc 14 bit, 100k ohm impedance, differential
Absolute Maximum Input Voltage Input: +/- 14 Vdc to ground or differential, including
drive enable
Control Inputs
Digital Inputs: 5 on the EP-B and 16 on the EP-I and EP-P including the drive enable
input, 10 Vdc - 30 Vdc, 4.8k ohm impedance; current sourcing signal compatible (active
high); max input response time is 500 µs; optically isolated.
Input debounce: 0-2000 ms configured in PowerTools Pro
Diagnostic Analog Outputs: (2) ±10 Vdc into 10k ohm (single ended), short circuit proof
to ground, short circuit proof to ground, 10 bit, software selectable output signals
Control Outputs
Digital Outputs: 3 on EP-B, 8 on the EP-I and EP-P, 150 mA max each, short circuit
proof, current source from 10 Vdc - 30 Vdc I/O power supply, 3.5 Vdc max supply to output
voltage drop @ 150 mA, opto-isolated
Motor Temp Sensor: Contact: 5 Vdc O.C. (tripped), 0.5 mA S.C. (normal)
Compatible with PTC thermistor with 2k ohm resistance at trip point. Fault Turn-on
Threshold = 0.83V and Fault Turn-off (Reset) Threshold = 0.41 V
Interface: Software selectable differential (RS422) or single ended (TTL Schmitt Trigger)
Pulse Mode
Maximum Input Frequency:
Differential - 1 MHz per channel; (4 million counts/second in quadrature),
0.5 µs minimum pulse width
Single ended - 500 kHz per channel; (2 million counts/second in quadrature),
1 µs minimum pulse width
Ratio Capabilities: 20 to 163,840,000 PPR
Single ended inputs have 1k ohm pull-up to 5 V
66
Safety Information
Product Overview
Installation
Diagnostics
Options and
Accessories
Specification
Epsilon EP Series
Differential line driver, RS-422 and TTL compatible
Encoder Output Signal
Scalable in one line increment resolution up to 2048 lines/rev of the motor (NT)
Energy storage available in bus caps:
EP202: 8 J @ 240 Vac, 18 J @ 208 Vac, 39 J @ 120 Vac
EP204:12 J @ 240 Vac, 28 J @ 208 Vac, 58 J @ 120 Vac
EP206:20 J @ 240 Vac, 46 J @ 208 Vac, 97 J @ 120 Vac
EP209:24 J @ 240 Vac, 55 J @ 208 Vac, 117 J @ 120 Vac
EP216: 28 J @ 240 Vac, 62 J @ 208 Vac, 132 J @ 120 Vac
Shunt Resistor Capacity/
Regeneration Capacity
Values are calculated based on maximum allowable input voltage above
nominal which is +10%. Operating at input voltages below this may increase
the energy storage available.
EP204/EP206/EP209 External Shunt Control:
12 A peak, 2 kW max average power, 30 ohm minimum external resistor
EP216 External Shunt Control:
20 A peak, 5 kW max average power, 20 ohm minimum external resistor
Earth Leakage Current and RCD
Compatibility
25 mA AC and < 0.1 mA DC with 15 ft (4.6 m) CMDS motor power cable and NT-330
motor at 240 Vac. Leakage is higher with longer cables.
The EP drive is compatible with a Type A Residual current Detector (RCD) that allows
expected leakage currents.
Fault Detection Capability
Low DC bus (can be disabled)
High DC bus
Power Stage fault
Logic power
Encoder state
Encoder line break
Drive overtemperature
Motor overtemperature
Overspeed
Travel limit (+)
Travel limit (-)
Following error
Power-up self test failure
Non-volatile memory invalid
Cooling Method
EP202, EP204, EP206, and EP209: Natural Convection
Power Dissipation
EP202-P - 35 W* at Continuous Full Load
EP204-P - 55 W* at Continuous Full Load
EP206-P - 85 W* at Continuous Full Load
EP209-P - 115 W* at Continuous Full Load
EP216-P - 200 W* at Continuous Full Load
* Includes up to 12 W of power from Logic Power Supply
Environmental
Pollution degree 2 environment, Maximum surrounding air temperature: 40°C full
50°C with derating
Minimum operating temperature: 0°C
Storage Temperature: -25°C to 75°C
Rated Altitude: 3250 ft [1000 m]
Higher Altitude: Derate output current; 1% / 100m above 1000m
Humidity: 10% to 95% - non-condensing
Vibration: 2g, 10 Hz to 2000 Hz
Standards and Agency Approvals
UL listed
Canadian UL listed
CE Mark: Low voltage directive; EMC directive
Specifications
rating,
67
Safety Information
Product Overview
Installation
Diagnostics
Epsilon EP Series
Drive Weights
68
EP202-B, -I, -IDN
EP204-B, -I, -IDN
EP206-B, -I, -IDN
EP209-B, -I, -IDN
EP202-P, -PDN, PPB
EP204-P, -PDN, PPB
EP206-P, -PDN, PPB
EP209-P, -PDN, PPB
EP216-P, -PDN, PPB
3.6 lb (1.63 kg)
3.6 lb (1.63 kg)
4.2 lb (1.91 kg)
5.2 lb (2.35 kg)
3.9 lb (1.77 kg)
3.9 lb (1.77 kg)
4.5 lb (2.04 kg)
5.5 lb (2.50 kg)
5.6 lb (2.54 kg)
Options and
Accessories
Specification
Safety Information
Product Overview
Installation
Options and
Accessories
Diagnostics
Specification
Epsilon EP Drive Dimensions
The following table applies to A* and B* as shown in Figure 67 below.
Drive Model
Dimension A*
(shown in inches/mm)
Dimension B*
(shown in inches/mm)
EP202-B,-I,-IDN
2.11 [53.59]
0.45 [11.4]
EP204-B,-I,-IDN
2.11 [53.59]
0.45 [11.4]
EP206-B,-I,-IDN
2.82 [71.63]
0.45 [11.4]
EP202-P
2.69 [68.3]
1.03 [26.16]
EP204-P
2.69 [68.3]
1.03 [26.16]
EP206-P
3.40 [86.9]
1.03 [26.16]
5.94
[150.88]
5.22
[132.59]
“A”
2.5
[63.50]
“B”
.200
[5.08]
DDC-RJ45
1.20
[30.48]
(4X)Ø.219
[5.56]
8.099
[205.72]
7.70
[195.58]
3.50
[88.0]
Cable
Clearence
Figure 67:
Specifications
0.75
[19.05]
EIO26 Cable
Dimensional Drawing for the Epsilon EP202 through EP206 Drives
69
Safety Information
Product Overview
Installation
Diagnostics
Options and
Accessories
Specification
3.40
[86.36]
5.94
[150.88]
5.86
[148.85]
2.69
[68.33]
1.03
[26.16]
5.23
[132.84]
2.5
[63.50]
1.20
[30.48]
0.20 [5.08]
4X Ø.219
DDC-RJ45
9.60
[243.84]
9.20
[233.68]
EP209-XXX-XX00
9606XX-XX A1
SN 0610E014
3.50
[88.0]
Cable
Clearence
0.75
[19.05]
EIO26 Cable
Figure 68:
70
Dimensional Drawing for all Epsilon EP209 Drives
Safety Information
Product Overview
Installation
Options and
Accessories
Diagnostics
Specification
3.40
[876.9]
5.96
[151.38]
1.03
[26.16]
5.23
[132.84]
1.20
[30.48]
2.5
[63.50]
DDC-RJ45
9.60
[243.84]
9.20
[233.68]
0.75
[19.05]
3.50
[88.0]
Cable
Clearence
EIO26 Cable
Figure 69:
Specifications
Dimensional Drawing for all Epsilon EP216 Drives
71
Safety Information
Product Overview
Installation
Diagnostics
Cable Diagrams
EIO26-XXX
1.530
EIO
PIN 1
0.770
10
LT. BLU
INPUT LINE 1
1
RED/WHT
INPUT LINE 2
11
INPUT LINE 3
2
INPUT LINE 4
12
INPUT LINE 5
3
INPUT LINE 6
13
INPUT LINE 7
4
ENABLE
OUTPUT LINE 1
7
OUTPUT LINE 2
17
OUTPUT LINE 3
8
OUTPUT LINE 4
18
I/O +V
19
I/O COM
20
INPUT LINE 8
14
INPUT LINE 9
5
INPUT LINE 10
15
INPUT LINE 11
6
INPUT LINE12
16
OUTPUT LINE 8
21
INPUT LINE 13
22
INPUT LINE 14
23
INPUT LINE15
24
OUTPUT LINE 5
9
OUTPUT LINE 6
25
OUTPUT LINE 7
26
LT. BLU/WHT
ORG/WHT
LT. GRN/WHT
GRN/WHT
YEL/GRY
PNK/WHT
ORG
YEL
PNK
BLU
RED
BLK
BLU/WHT
GRY/WHT
PUR/WHT
BRN/WHT
BRN
BLK/WHT
WHT/BLK
GRN
LIGHT GRN
GRY
PUR
WHT
DRAIN WIRE
1
2 3 4 5 6 7 8 9
10 11 12 13 14 15 16 17 18
19 20 21 22 23 24 25 26
SOLDER SIDE
Socket
72
Options and
Accessories
Specification
Safety Information
Product Overview
Installation
Diagnostics
Options and
Accessories
Specification
XV Motor Cables
XTMDS-XXX
PIN 1
PE/GND
4
R
1
S
3
T
2
1
BRAID SHIELD
GRN/YEL
FORM WIRE
BRN
BLK
BLU
2
3
4
REAR VIEW OF
CONNECTOR
Specifications
73
Safety Information
Product Overview
Installation
Diagnostics
Options and
Accessories
XCMDS-XXX
PE/GND
D
U
A
V
C
W
B
BRAID SHIELD
GRN/YEL
BRN
BLK
BLU
BLU
(20 AWG)
BLU/WHT (20 AWG)
Drain Wire
D
A
C
B
SOLDER SIDE
Socket
74
FORM WIRE
Specification
Safety Information
Product Overview
Installation
Diagnostics
Options and
Accessories
Specification
XCMDBS-XXX
PE/GND
D
U
A
V
C
W
B
BRK+
E
BRK -
F
BRAID SHIELD
GRN/YEL
FORM WIRE
BRN
BLK
BLU
BLU
(20 AWG)
BLU/WHT (20 AWG)
Drain Wire
F
A
G
E
D
B
C
SOLDER SIDE
Socket
Specifications
75
Safety Information
Product Overview
Installation
XTBMS-XXX
PIN 1
+24V
1
0V
2
RED
BLK
DRAIN WIRE
1
2
REAR VIEW OF
CONNECTOR
76
Diagnostics
Options and
Accessories
Specification
Safety Information
Product Overview
Installation
Options and
Accessories
Diagnostics
Specification
XEFTS-XXX / XUFTS-XXX
Pin 1
PIN 1
A
3
A/
4
B
1
B/
2
Z
5
GRN
P
BRN
BLU
Inner Drain Wire
P
ORN
BLK
Inner Drain Wire
YEL
Z/
6
U
9
U/
10
P
WHT/GRY Inner Drain Wire
GRY/WHT
P
WHT/BRN
V
7
V/
W
8
11
W/
12
+5 VDC
13
0V
14
BRN/WHT
P
RED/ORG
ORG/RED
P
RED/BLU (18 ga.)
BLU/RED (18 ga.)
P
RED/GRN Inner Drain Wire
GRN/RED
1
A
2
A/
3
B
4
B/
5
Z
6
Z/
7
U
8
U/
9
V
10
11
V/
W
12
W/
13
+5 VDC
14
COMMON
15
MOTOR TEMP
P
15
SHIELD
Overall Shield Drain Wire
1
2
3
4
5
6
10
7
9
11 12 13 14 15
8
5
4
3
2
1
10 9 8 7 6
15 14 13 12 11
SOLDER SIDE
Pin
REAR VIEW OF
CONNECTOR
Specifications
77
Safety Information
Product Overview
Installation
Diagnostics
Options and
Accessories
Specification
XEFCS-XXX / XUFCS-XXX
Pin 1
A
GRN
C
A/
D
B
A
B/
B
Z
E
Z/
F
U
M
U/
N
V
K
V/
W
L
P
W/
R
+5 VDC
H
0V
G
P
BRN
BLU
Inner Drain Wire
P
ORN
BLK
Inner Drain Wire
P
YEL
WHT/GRY
Inner Drain Wire
P
GRY/WHT
WHT/BRN
P
BRN/WHT
RED/ORG
P
ORG/RED
RED/BLU (18 ga.)
BLU/RED (18 ga.)
RED/GRN
P
Inner Drain Wire
GRN/RED
P
1
A
2
A/
3
B
4
B/
5
Z
6
Z/
7
U
8
U/
9
V
10
11
V/
W
12
W/
13
+5 VDC
14
COMMON
15
MOTOR TEMP
J
SHIELD
Overall Shield Drain Wire
A
M
L
K
P
H
G
C
D
E
R
S
J
B
N
T
F
SOLDER SIDE
Socket
78
5 4 3 2 1
10 9 8 7 6
15 14 13 12 11
SOLDER SIDE
Pin
Safety Information
Product Overview
Installation
Diagnostics
Options and
Accessories
Specification
NT and MG Motor Cables
CMDS-XXX
1 1/2" MAX.
3 3/4" MAX.
GRN/YEL
BRN
D
A
B
C
BLK
BLU
SHELL
A
G
B
H
F
E
C
D
SOLDER SIDE
CMMS-XXX
1 1/2" MAX.
GRN/YEL
BRN
BLK
BLU
D
A
B
C
SHELL
F
A
B
G
E
D
C
SOLDER SIDE
Specifications
79
Safety Information
Product Overview
Installation
CBMS-XXX
RED
B
BLK
C
DRAIN WIRE
A
GND
C
A
B
SOLDER SIDE
Socket
80
Diagnostics
Options and
Accessories
Specification
Safety Information
Product Overview
Installation
Options and
Accessories
Diagnostics
Specification
EFCS-XXX / UFCS-XXX
Pin 1
A
N
A/
P
B
B
GRN
BLU
C
Z
M
U
U
F
U/
S
V
E
V/
W
R
G
W/
H
+5 VDC
K
GND
T
MOTOR OVERTEMP
A
NOT USED
V
BLK
GRY/WHT
BRN/WHT
P
P
RED/ORG
ORG/RED
P
RED/BLU
BLU/RED
P
RED/GRN Inner Drain Wire
GRN/RED
P
1
A
2
A/
3
B
4
B/
5
Z
6
Z/
7
U
8
U/
9
V
10
11
V/
W
12
W/
13
+5 VDC
14
COMMON
15
MOTOR TEMP
Outer Drain Wire
A
P
B
R
Z
S
T
V
U
G
F
C
D
5 4 3 2 1
10 9 8 7 6
15 14 13 12 11
E
SOLDER SIDE
Socket
To Motor MG/NT/MH
Specifications
P
WHT/BRN
N
X
W
K
J
H
Inner Drain Wire
WHT/GRY Inner Drain Wire
Z
L
P
YEL
Z/
Y
Inner Drain Wire
ORN
B/
M
P
BRN
SOLDER SIDE
Pin
To Epsilon EP
81
Safety Information
Product Overview
Installation
Options and
Accessories
Diagnostics
Sync Cables
SNCDD-915-XXX
Pin 1
Pin 1
A
1
A
2
BLK
RED
3
B
Z
6
Z
7
GND
8
5V
4
P
ORG
5
B
P
BRN
YEL
P
GRN
BLU
1
A
9
A
2
B
10
B
3
Z
11
Z
8
GND
4
3
P
PUR
Drain Wire
4
5
9
3
8
2
7
8
1
7
6
5
2
1
15 14 13 12 11 10 9
6
SOLDER SIDE
SOLDER SIDE
Pin
Pin
SNCFLOA-XXX
Pin 1
Blunt end
ENCODER OUT A
1
ENCODER OUT A
9
ENCODER OUT B
2
ENCODER OUT B
10
ENCODER OUT Z
3
ENCODER OUT Z
11
PULSE IN A (SINGLE ENDED)
4
PULSE IN B (SINGLE ENDED)
12
ANALOG OUT CHANNEL 1 +
7
ANALOG OUT CHANNEL 2 +
15
ANALOG OUT 0V
6
ANALOG OUT 0V
14
ANALOG COMMAND IN +
5
ANALOG COMMAND IN -
13
GND
8
BLU
ORN
BRN
7
6
5
YEL
BRN/WHT
P
WHT/GRY
GRY/WHT
P
RED/ORG
ORG/RED
P
RED/BLU
BLU/RED
P
GRN/RED
4
3
SOLDER SIDE
82
P
WHT/BRN
2
15 14 13 12 11 10 9
Pin
P
BLK
RED/GRN
8
P
GRN
1
P
Specification
Safety Information
Product Overview
Installation
Options and
Accessories
Diagnostics
Specification
SNCMD-815-XXX
Pin 1
+A
-A
+B
-B
+Z
-Z
GND
+5 VDC
RED
ORG
GRN
YEL
BLK
BRN
PUR
BLU
DRAIN WIRE
1
2
3
5
6
7
8
4
6
3
1
9
2
10
P
3
11
8
P
P
8
7
6
5
4
3
2
1
7
4
2
1
P
5
15 14 13 12 11 10 9
8
SOLDER SIDE
CONNECTOR END VIEW
Pin
Pin
SNCFLI-XXX
Pin 1
Blunt end
A
1
A
2
B
3
B
5
Z
6
Z
7
GND
8
5V
4
BLK
BRN
ORG
GRN
9
P
BLU
PUR
P
Drain Wire
4
5
P
YEL
9
N/C
P
RED
3
8
2
7
1
6
SOLDER SIDE
Pin
Specifications
83
Safety Information
Product Overview
Installation
Options and
Accessories
Diagnostics
SNCMD-89-XXX
Pin 1
A
1
A
2
B
3
B
5
Z
6
Z
7
GND
8
5V
4
N/C
9
RED
1
P
ORG
2
GRN
3
P
YEL
5
BLK
6
P
BRN
7
PUR
8
P
BLU
4 Pin removed
Drain Wire
Completely remove pin 4
4
5
3
2
1
6
3
9
8
7
6
1
4
2
5
7
8
SOLDER SIDE
CONNECTOR END VIEW
Pin
Pin
SNCE-XXX
Pin 1
A+
1
A-
2
B+
3
B-
5
Z+
6
Z-
7
+5 Vdc
4
GND
8
RED/WHT
YEL/WHT
BLU/WHT
BLK/WHT
P
YEL
BLU
P
RED
BLK
DRAIN WIRE
84
P
P
A
A+
H
A-
B
B+
I
B-
C
Z+
J
Z-
D
+5 Vdc
F
GND
Specification
Safety Information
Product Overview
Installation
Options and
Accessories
Diagnostics
Specification
Communications Cables
ESA-SP-485-XXX
Drain Wire
GRN
3
7
WHT/BLU
7
10 TXRX-
WHT/ORG
5
ORG
6
P
15
16
WHT/BRN
1
BRN
8
SIGNAL GND
22 TXRX+
P
220 Ω
BLU
470 Ω
TXRX+ 2
TXRX-
5
P
470 Ω
SIGNAL GND
4
WHT/GRN
4
18
P
25
470 Ω
13 12 11 10 9
8
7
6
5
4
3
2
25 24 23 22 21 20 19 18 17 16 15
1
14
470 Ω
220 Ω
SOLDER SIDE
Pin
PIN 1
Pin 1
ETH-PATCH-XXX
8
1
1
8
1
2
3
6
4
5
7
8
Specifications
WHITE
ORANGE
P
LIGHT GREEN
GREEN
6
4
P
LIGHT BROWN
BROWN
2
3
P
BLUE
LIGHT BLUE
1
5
7
P
8
85
Safety Information
86
Product Overview
Installation
Diagnostics
Options and
Accessories
Specification
Index
A
E
AC Line Filter Installation Notes, 8
AC Line Filters, 7
AC Supplies NOT Requiring Transformers,
14
AC Supplies Requiring Transformers, 15
Achieving Low Impedance Connections, 3
Analog Command Wiring, 43
EIO26-XXX Cable, 72
Electromagnetic Compatibility, 3
Encoder Output Signal Wiring, 43
Environmental Considerations, 4
Epsilon EP Drive Options, 59
Epsilon EP Specifications, 65
B
Basic Installation Guidelines, 3
C
Cable Diagrams, 72
Cable to Enclosure Shielding, 7
CMDS-XXX Cable, 79
CMMS-XXX Cable, 79
D
DC Logic Power Supply Wiring, 31
Declaration of Conformity, ix
Diagnostic Analog Output Test Points, 57
Diagnostic Display, 51
Diagnostics and Troubleshooting, 51
Drive Enable Wiring, 37
Drive Faults, 57
Drive overload protection, viii
F
Fault Codes, 52
Fault Descriptions, 54
Feature Location, 1
H
High Power Connections, 13
I
Input Power Connections, 19
Input/Output, 37
Installation, 3
L
Line Fusing, 18
Logic Power Supply Specification, 31
87
M
U
Motor Brake Wiring, 35
Motor Feedback Wiring, 33
Motor Power Wiring, 24
Underwriters Laboratories Recognition, vii
O
Options and Accessories, 59
P
Product Overview, 1
Pulse Mode Wiring, 45
R
Rebooting the Drive, 58
Resetting Faults, 58
S
Safety Information, v
Safety of Machinery, v
Safety Precautions, v
Setup, Commissioning and Maintenance, v
Shunt Control, 22
Shunt Resistor Kit Installation, 22
Specifications, 65
T
Transformer Sizing, 17
88
V
Viewing Active Drive Faults, 58
W
Wire Size, 18
Wiring Notes, 4
Since 1979, the “Motion Made Easy” products, designed and manufactured in
Minnesota U.S.A., are renowned in the motion control industry for their ease of
use, reliability and high performance.
For more information about Control Techniques “Motion Made Easy” products
and services, call (800) 893-2321 or contact our website at
www.emersonct.com.
Control Techniques Americas LLC
Division of EMERSON Co.
12005 Technology Drive
Eden Prairie, Minnesota 55344-3620
U.S.A.
Customer Service
Phone: (952) 995-8000 or (800) 893-2321
Fax: (952) 995-8129
Technical Support
Phone: (952) 995-8033 or (800) 893-2321
Fax (952) 995-8020
Printed in U.S.A.