1
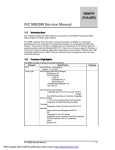
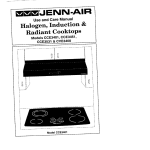
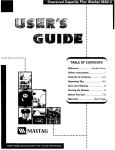
r
Dryer
Model:
Welcome
MUG2000,
MUE2000
1
Washer
Model:
..... ....... .... ....... ...... ..................
Welcome
and congratulations
on your purchase of a Maytag
Neptune _' Super Stack! Your
complete
important
satisfaction
to us.
is very
2) Have proof of original
MHW2000
..... ... .... ...... ......
date of purchase.
Please attach your sales receipt here. Keep this
information for your records (should you ever need
warranty
service).
Read
this manual
for best
results. It contains instructions
to acquaint
you with proper
operating and maintenance
procedures.
In addition you will find a Laundering
Tips guide
packed with your washer. It contains information on recommended
laundering
procedures,
stain removal and
special laundering situations.
go wrong,
we suggest
consulting
the
"Before
Youand
Call"
sectionIf in
the back should
of this
Save time
money.
something
For additional
questions,
please contact
us:
problems
book. It is designed to help you solve basic
before consulting a servicer
Maytag Appliances Sales Company
Attn: CAIR sMCenter
EO. Box 2370
However,
should you need assistance
Cleveland, TN 37320-2370
1-888-462-9824
USA & CANADA
1-800-688-2080
TTY USA
in the future, it is
helpful to:
1) Have complete
model
and serial number
tion of your washer and dryer. Record
below for easy access.
identifica-
(Mon.-Fri.,
8am-Spin Eastern Time)
Internet: http://www.maytag.com
these numbers
For service
Dryer Model
Number
Dryer Model
Dryer Serial Number
Washer
Model
Number
Washer
Serial
Number
and Serial
Number Location
Washer Model
and Serial
Number Location
and warranty
information,
see back page.
Important
The
Safety
California
Safe
Drinking
Notice
Water
and
Toxic
Enforcement
Act of 1986 (Proposition 65) requires the
Governor of California to publish a list of substances
known to the State of California
to cause cancer or
reproductive harm, and requires businesses to warn customers of potential exposures to such substances.
Users of this appliance
are hereby warned
that the burn-
ing of gas can result in low-level exposure to some of the
listed substances, including benzene, formaldehyde
and
soot, due primarily to the incomplete combustion of natural gas or liquid petroleum (LP) fuels. Exhaust ducts
should be kept free of obstructions
and properly
exhausted dryers will minimize exposure.
-_ WARNING
-- For your safety the
information
in this manual must be
followed to minimize the risk of fire or
explosion or to prevent property damage, personal injury or death.
- Do not store or use gasoline or other
flammable
vapors and liquids in the
vicinity of this or any other appliance.
- WHAT TO DO IF YOU SMELL GAS
• Do not try to light
Immediately
call
from a neighbor's
gas supplier's
building
or area of
formed
agency
and
your gas supplier
phone. Follow the
instructions,
service
by a qualified
or the
Appliances
with the @ symbol on the data plate have
been listed with Underwriters'
Laboratories,
Inc. Those
with a CSA Monogram on the data plate have been certified by the CSA Testing Laboratories
as complying
with Canadian Standards Association requirements.
Gas
dryers with an AGA symbol on the data plate have been
design certified with the American
Gas Association;
those with a CGA symbol on the data plate have been
approved
by
the
Canadian
Gas
Association.
Nevertheless,
as with any equipment using electricity
and having moving parts, there are potential hazards. To
use this appliance safely, the operator should become
familiar with the instructions for operation of the appliance and always exercise care when using it.
WARNING
.... Do not place into your
dryer items that have been spotted
or
soaked with vegetable
oil or cooking oil.
Even after being washed, these items may
contain
significant
The remaining
The
must
oil
heat.
Heat
installer,
per-
service
gas supplier.
Save
of these
spontaneous
the
items
or cooking
Oxidation
escape,
to
oils.
sources,
ignition
containing
oil
veg-
are exposed
such
as your
creates
to
clothes
the items
catch
fire.
escaping
can become
Piling,
gerous;
or
not
eliminate,
"cool
down"
reduce
the
remove
these
while
these
the hazard.
cycle
for
items"
items
have
down"
cycle.
items
when they
Instructions
in hot water
reduce,
but
Always
these
use the
temperature.
the drying
through
pile
are hot.
or
will
items
to
Never
from the clothes
run
Never
oil can be dan-
items
will
hot or interrupt
items
fabrics that con-
oil or cooking
detergent
storing
heat from
a fire hazard.
and unwashed
Washing
extra
cannot
hot enough
stacking
and can create
tain vegetable
the
These
heat. if this heat
these kinds of items may prevent
with
be
for
when
etable
amounts
oil can ignite spontaneously.
potential
increases
All washed
• if you cannot reach your gas supplier, call the fire department.
Installation
.... .
dryer, can warm these items, allowing
an
oxidation
reaction
in the oil to occur.
any appliance.
Do not touch any electrical switch;
do not use any phone in your building.
• Clear the room,
all occupants.
and Instructions..........
dryer
cycle until
the
stack
"cool
these
Important
I_)k
WARNING--.
to persons
when
.
2.
Safety
Instructions
To reduce
riskof
using
your the
appliance
electric shock,
property
i fire,
followexplosion,
basic :precautions,
including
the damage
following: or injury
Read all instructions before using the appliance.
4.
Before the appliance is removed from service or discarded, remove the door to the clothes washer and clothes
dryer compartment.
5.
Do not reach into the appliance if the tub or drum is moving.
6.
Do not install or store this appliance where it will be
exposed to the weather.
7.
Do not tamper with controls.
8.
Do not repair or replace any part of the appliance or
attempt any servicing unless specifically recommended in
published user-repair instructions that you understand
and have the skills to carry out.
To avoid the possibility of fire or explosion:
a, Do not wash or dr), items that have been previously
cleaned in, washed in, soaked in, or spotted with gasoline, dry-cleaning solvents, other flammable or explosive substances as they give off vapors that could ignite
or explode. Hand wash and line dry any items containing these substances.
Any material on which you have used a cleaning solvent, or which is saturated with flammable liquids or
solids, should not be placed in the appliance until all
traces of these liquids or solids and their fumes have
been removed.
.
These items include acetone, denatured alcohol, gasoline, kerosene, some liquid household cleaners, some
spot removers, turpentine, waxes and wax removers.
10. Clean the dryer lint screen before or after each load.
b. Do not add gasoline, dry-cleaning solvents, or other
flammable or explosive substances to the wash water.
These substances give off vapors that could ignite or
explode.
11. Keep the area around the exhaust opening and surrounding areas free from lint accumulation, dust and dirt.
12. The interior of the dryer and exhaust duct should be
cleaned yearly by qualified service personnel.
c. Under certain conditions, hydrogen gas may be produced in a hot water system that has not been used for
2 weeks or more. HYDROGEN GAS IS EXPLOSIVE. If the hot water system has not been used for
such a period, before using a washing machine or
combination washer-dryer, turn on all hot water
faucets and let the water flow from each for several
minutes. This will release any accumulated hydrogen
gas. As the gas is flammable, do not smoke or use an
open flame during this time.
13. This appliance must be properly grounded. Never plug
the appliance cord into a receptacle which is not grounded adequately and in accordance with local and national
codes. See Installation Instructions for grounding this
appliance.
14. Unplug power supply cord before attempting to service
your appliance.
15. Store laundry aids and other material in a cool, dry place
where children cannot reach them.
d. Items containing foam rubber (may be labeled latex
foam) or similarly textured rubber-like materials must
not be dried on a heat setting. Foam rubber materials
when heated, can under certain circumstances produce
fire by spontaneous combustion.
16. Do not use chlorine bleach and ammonia or acids (such
as vinegar or rust remover) in the same wash. Hazardous
fumes can form.
17. Do not machine
wash fiberglass
cles can stick to fabrics washed
cause skin irritation.
e. Do not place items exposed to cooking oils in your
dryer. Items contaminated with cooking oils may contribute to a chemical reaction that could cause a load
to catch rite.
.
18. Install
and level washer
materials.
Small partiin following loads and
on a floor that can support
the
weight.
Do not allow children to play on or in the appliance.
C!ose supervision of children is necessary when the
appliance is used near children.
Save
Do not use fabric softeners or products to eliminate static unless recommended by the manufacturer of the fabric
softener or product.
19. As with any equipment
using electricity
and having mow
ing parts, there are potential hazards.
To use this appli_
ance safely, the operator should become familiar with the
instructions
for operation
of the appliance
and always
exercise care when using it.
These
Instructions
2
l
Washer
Step 0
Press
Select
the appropriate
Follow
Controls
the garment
Wash/Rinse
button
care
At A Glance...
to select
Water
the wash
and rinse
label for best results.
War_rdWarm
Some delicate
fast items
Moderately
Warm]Cold
Brightly
water
temperatures.
below
as a guide.
HOT
COLD
soiled,
and color-
WARM
WARM
soiled,
colored items;
Care_e_Tnanent
Cold/Cold
Temperatures
Use the chart
White and heavily
color-fast
items
Hot/Cold
...... ............ .... ....
most Easy
Press items
colored,
soiled items;
woolens
;!,i__ilil
lightly
WARM
COLD
COLD
COLD
washable
WASH/RINSE
A
Step
Press
_
Select
the appropriate
Options
button(s)
to select
Removes
Max Extract
more
load during
towels
(if desired)
water
an additional
the end of the cycle
Rinse
pletely
perfumes,
Reset
a
spin. Use for jeans,
Extra
Signal
from
MAX .....
EXTRACT
EXTRA
RINSE
and bedding.
Provides
Provides
one or more options.
remove
rinse
to more
laundry
: i•i:ii
: ii! <i¸ :i
_?i;i
_!
near
com-
SIGNAL
additives,
ii i?_
_
etc.
an audible
the completion
signal
RESET
upon
of a cycle.
Cancels
any or all previously
selected
options.
OPTIONS
3
Step 0
Select
Cycle
Rotate the control dial clockwise to the desired cycle.
The triangle symbol, Jl,, is the appropriate setting for the
majority of loads for most effective cleaning.
REGULAR
- Designed
for durable
items. Tumbles more often and has a
greater
spin
extraction.
EASY
CARE/PERMANENT
Designed
to
tangling
by
tumble
Load
minimize
using
pattern
Type:
poly/cotton
PRESS
wrinkling
a slightly
and decreased
Dress
blend
shirts,
loads. Approx.
reduced
dress
pants,
heavily
soiled
detergent.
HEAVY-
Used for cleaning
loads. Approx.
heavily
soiled
cycle time 46 rain.
ik _ Used for most loads. Approximately
37
40 minutes
the cycle.
LIGHT
- Used for cleaning lightly
loads. Approx. cycle time 32 min.
water
PREWASH
- Extends the wash time by 9
minutes to clean very heavily
soiled
loads. Add 1 l/2 times the amount of
spin speed.
cycle time 45 rain.
to complete
better
Load Type: Jeans, towels, bedding.
and
A - Used for most loads. Approximately
minutes
for
-
clothing.
HEAtiY - Used for cleaning
speed
to complete
the cycle.
LIGHT - Used for cleaning lightly soiled
loads. Approx. cycle time 35 rain.
soiled
Oil
0
il
II Il
0
il
III II Il ii Il
VVASH
ilil
ilil
EASY
PERM
CARE /
PRESS
ER
REGULAR
EXTRAOFF
SPIN
PREWASH
HEAVY
OFF'
LIGHT
RINSES
RINSES
LIGHT
DELICATES
- Offers a gentle tumble
and long pause to properly handle these
items. Although there is a reduced spin
speed, water extraction is appropriate.
H
SPIN
OFF
)FF
EXTR_
R_NSE
Load
Type:
Dress
skirts/blouses,
nylons, sheer or lacy garments.
HEAVY-
Used for cleaning heavily
loads. Approx.
sP!
RINSES
soiled
DELICATES
cycle time 45 min.
ik - Used for most loads. Approximately
OOililOQilO
40 minutes to complete
RINSE
)FF
EAVY
O000IlO0
the cycle.
LIGHT - Used for cleaning lightly soiled
loads. Approx. cycle time 34 min.
4
LIGHT
For detailed
Step 0
information
on sorting, pretreating
Load the Clothes
The tub can be loaded completely
unfolded
clothes. However, do not
tightly.
stains,
full with dry
pack the tub
a few towels may be added
To load a forgotten
item immediately
after the
clothes washer has started, press the START/STOP
button. The door will remain unlocked for approximately 3 minutes into the start of the cycle. Add the
Step 0
Start
Your Maytag
Tips pamphlet,
Neptune
the door has locked,
it is possible
to load a
forgotten item. Press the START/STOP
button and
wait approximately 2 minutes for the "Door Locked"
indicator to turn off. Open the door, add the item(s),
close the door and press the START/STOP
resume the cycle.
Add laundry detergent
additives
TM
button to
on top of the load in the tub and
to the dispensers
(See Detergent
Washer
• Close the washer door.
• Push the START/STOP
i
item(s), close the door and press the START/STOP
button to resume the cycle.
Once
big bulky items, such as a rug, that do
not fill the tub completely,
for best performance.
_undering
Washer
Overloading may reduce washing efficiency and possibly cause creasing or wrinkling of the load.
When washing
etc;:i see theenclosed
button.
• The washer has started when the ON light is lit and
an audible tone is heard.
START/STO
P
page 6).
I! 12!Washer
Features....
...... ... ..... ....... ....... ... ...... .........
Detergent
Your Maytag Neptune '_ stacked washer is designed to
use a high efficiency laundry detergent or laundry detergent normally used with top loading washers.
For best cleaning results, use a high efficiency detergent specially formulated for front load washers such
as Tide HE or Wisk*. "[b identify this type of detergent, look for the High Efficiency symbol shown to
the right.
If you are unable
to locate the High Efficiency
laun-
dry detergent products in your area, you will achieve
successful
cleaning results with laundry detergent
normally used in top loading washers.
Adding
Detergent
Either liquid or granular detergent may be used to wash
clothes. Follow the directions on the box or bottle to
determine the appropriate amount of detergent. Pour the
detergent directly on top of the load in the tub.
If color-safe
bleach is to be used, it should be added on
top of the load with detergent
for best results.
If using the "PREWASH'!
1 1/2 times the amount
Automatic
_etting,
measure
of detergent,
Dispenser
'Chlorine
Bleach
Dispenser
There are two automatic dispensing compartments.
One
holds liquid chlorine bleach and the other holds liquid
fabric softener. The laundry additives can be added to
Fabric Softener
Dispenser
their respective dispenser compartments.
They will be
dispensed at the appropriate time for the most effective
cleaning and softening.
*Brand names are trademarks
6
of the respective
manufacturer.
Adding
Chlorine
The dispenser
bleach before
Bleach
automatically
dilutes liquid chlorine
it reaches the wash load. Follow these
steps when using liquid chlorine
bleach:
1. Add liquid chlorine bleach to the chlorine bleach
compartment
but do not exceed the MAX FILL 3/4
CUP line. The chlorine bleach compartment
will hold
3/4 of a cup,
2. ,avoid splashing
or over-filling
the compartment.
Over-filling the compartment
will release the chlorine bleach into the clothes washer too early.
NOTE:
Never pour undiluted liquid chlorine bleach directly
onto the load or into the tub. It is a powerful chemical
and can cause fabric damage, such as weakening of
the fibers or color loss, if not used properly.
If you prefer to use color-safe, non-chlorine
bleach,
add it with the detergent. Do not pour color-safe
bleach
ment.
into the
Adding
liquid
chlorine
bleach
compart-
Fabric Softener
This compartment automatically dilutes and releases liquid fabric softener at the proper time during the cycle.
Follow these steps when using liquid fabric softener:
1. Pour liquid
compartment
package.
fabric softener imo the fabric softener
using the amount recommended
on the
2. Fabric softener may be diluted with warm water until
it reaches the MAX FILL DILUTED
line on the
compartment.
Do not fill the liquid fabric softener
compartment
above the MAX FILL DILUTED
line. If the compartment
is filled above the MAX
FILL DILUTED
line, it will enter the clothes
washer too early.
NOTE:
Never pour fabric softener
directly on the load. It may
leave spots and stains.
Use the fabric softener
fabric softeners.
compartment
only for liquid
• Using the Downy Ball* is not recommended
with this
washer. It will be ineffective in reducing static cling
and providing softness.
7
Cleaning
the Dispensers
The dispensers may need to be cleaned periodically
due to laundry
penser, follow the directions for the corresponding
dispenser.
Removing
the
1. Grasp the corner
Lift the dispenser
Chlorine
Bleach
Replacing
Dispenser
lip of the chlorine bleach dispenser.
up and tip it to the right to avoid hit-
ting the washer frame. (Illustration
3, Take the bleach
compartment.
#1 )
dispenser
(Illustration
For easy clean-up
the Chlorine
Bleach Dispenser
3. Grasp the corner lip of the chlorine bleach dispenser.
Tilt it slightly to the right and insert it back into the
dispenser compartment.
(Illustration
#6)
grate to
the sink. Be careful, there may be chlorine bleach left
in the dispenser. Lift the gray siphon cap out of the
chlorine bleach dispenser. (Illustration #3)
4. Run warm water over the dispenser, gray siphon cap
and overflow grate to remove any build-up. A soft
cloth may be used for stubborn stains.
#1
#3
, #2
,t_ Overflow
Grate
\
#5
#6
i
,J
Maytag
does not recommend
placing the plastic dispenser
If laundry additives were on the parts when washed
they
of the dis-
2. Place the gray siphon cap over the stand pipe in the
chlorine bleach dispenser. It should fall into place.
(Illustration #5)
#2)
and the overflow
build-up.
1. Grasp the overflow grate so the word "CAUTION"
can be read. Place it in the dispensing compartment
as
shown in illustration #4.
2. Under the chlorine bleach dispenser in the dispensing
compartment
is an overflow grate. Grasp the overflow
grate by the word "CAUTION"
and pull it up and out
of the dispensing
additive
may cause oversudsing
8
parts in the dishwasher.
in the dishwasher,
in the dishwasher.
Removing the Fabric Softener Dispenser
Replacing
1. Grasp the corner lip of the fabric softener dispenser,
Lift the dispenser up and tip it to the left to avoid hitting the washer frame. (Illustration #1)
1. Grasp the overflow grate so the word "CAUTION"
can be read. Place it in the dispensing compartment
as
shown in illustration #4.
2. Under the fabric softener
2. Place the light blue siphon cap over the stand pipe in
the fabric softener dispenser. It should fall into place.
(Illustration #5)
dispenser
in the dispensing
compartment
is an overflow grate. Grasp the overflow
grate by the word "CAUTION" and pull it up and out
of the dispensing compartment.
(Illustration #2)
(Illustration
Dispenser
3. Grasp the corner lip of the fabric softener dispenser.
Tilt it slightly to the left and insert it back into the dis-
3. Take the fabric softener dispenser and the overflow
grate to the sink. Be careful, there may be fabric softener left in the dispenser. Lift the light blue siphon cap
out of the fabric softener dispenser.
the Fabric Softener
penser compartment.
(Illustration
#6)
#3)
4. Run warm water over the dispenser, light blue siphon
cap and overflow grate to remove any build-up. A soft
cloth may be used for stubborn stains.
I#1
#2
Overflow
Dispenser
Grate
Compartment
/
#5
#6
F
',
I
i'
b"
Ma-_gdo_-s
noi
If laundry
recommend
additives
they
were
placing
tile plasiic dispenser
on the parts when washed
may cause oversudsing
9
parts in the dishwaSher._t
in the dishwasher,
in the dishwasher.
_1
I
Replacing
Instructions
1) Unplug
for replacing
or disconnect
the bu
the sta
2) Open the door and use a Phill
to the door lock assembly.
3) Pull down on the light cover.
4) Unscrew
the light bulb counter
clockwise
from the socket.
5) Replace
the bulb with a 120 volt, l0 watt candelabra
6) Replace
the light cover by inserting
base light bulb and rotate clockwise.
the front tabs into the door lock assembly
and push
the rear of light cover into position.
7) Replace
the screw into the light cover/door
8) Plug in or reconnect
stacked unit to the power supply.
Reversing
Clothes
lock assembly.
the
washer door swing direction
Clothes
can be changed
using the following
1) Swing door fully open and support it while removing
assembly).
2) Set door aside and transfer four color matched
Washer
four counter
sunk hinge screws (which
3) Remove
one screw holding
top hinge to cabinet and one screw holding
4) Remove
hinge and bracket
from cabinet
5) Install hinge and bracket in swapped
6) Compare
locations
procedure:
door screws to the opposite
by moving
Door ....... ...........
side of the door assembly.
top hinge cover to cabinet
them up and down to a position
4 through
6 for bottom hinge to cabinet
8) Support door in fully open position
hinges to door assembly.
and bottom bracket
on hinge side and drive four counter
9) Close door and check to see that clothes washer operates
(opposite
side).
where they are released.
and drive screws to attach them securely
top hinge and top bracket to bottom hinge and bottom bracket for correct
7) Repeat procedures
hold hinges to door
to the cabinet.
assembly
position.
to cabinet.
sunk hinge
screws to securely
attach
properly.
Counter Sunk Screw
Door
Screws
Door
Screws
11
Dryer
Step 0
At A Glance.
Controls
Select
....... . ..... ..... .........
Note: The dial can be turned in either
Cycle
direction
..
to
select a cycle. Once started, the dial will not advance
at a specific rate during the lntelliDry cycles. At first
IntelliDry
EASY
automatically
CARE/PERM
senses
the
the dial may not advance at all. Toward the end of the
cycle (when the load begins to dry) the dial will
advance at a more regular rate and much more
quickly. This is normal operation.
PRESS
moisture
in the
load and shuts off when the selected dryness
level is reached.
This cycle minimizes
wrinkles of man-made
fabrics such as acrylic,
nylon, polyester or blends with an extended
coo!-down
which
tumbles
the load in
unheated
control
air at the end of the cycle.
to the desired
dry - less dry).
ferred
setting
The
_ness
e
level (more
',&'" is the initial
for the majority
e
Set the
o
pre-
e
of loads.
dryness level is reached. This cycle
is designed for loads such as tow-
o
e
o
els_ underwear, t-shirts, jeans, etc.
Set the control to the desired dryness level (more dryless dry).
The "&" is the initial preferred
setting for the majority of loadsl
o
o
0
Q
".
Inte//iOry
DRY
E R
EASY CARE /
PERM
PRESS
OFF
IntelliDry REGULAR
automatically senses the moisture in the load
and shuts off when the selected
IntelliDry
REGULAR
MORE
DRY"
LESS
DRY
COOL
DOWN
OFF
LESS
DRY
TIME :DRY/AIR
0 °
0 °
ii '11
MORE
DRY
TIME DRY/
AIR FLUFF
OFF
WRINKLE
RELEASE
FLUFF: may be
selected
for any load if the
lntelliD,y
sensor
system ::is not
desired.
Set the control
to the
desired number of minutes.
DAMP DRY
•o
°oOOOo
e•o••
WRINKLE
RELEASE
will
release
wrinkles
DAMP
DRY is designed
to "partially": dry items. It provides
approxi-
from :items that are Clean and dry but: slightly wfinkledi
such
or suitcase
or _om
as from
a crowded
sitting
_e
long after the end of the: cycle.
minutes
cool
of heated
down
tumbling
tumbling
without
closet
dryer
It provides
and5
minutes
mately
too
bling
t0
20 minutes
and
tumbling
of
heat::
12
5 minutes
without
of heated
tum-
of cool
down
heat.
Step 0
Select
Temperature
TEMPERATURE
REGULAR
- for sturdy
"Tumble
cottons
or those
labeled
Dry".
MEDIUM
- for permanent
press,
synthetics,
light!_ L:¸
weight
cottons
or items
labeled
"Tumble
....
REGULAR
Dry
Medium".
DELICATE
"Tumble
-
for
heat
Dry Low"
AIR FLUFF
or "Tumble
- tumbles
sitive loads
or items
sensitive
without
items
'_':MEDIUM
labeled
Dry Warm".
DELICATE
heat. Used for sen-
needing
........
_:i:):
¸
freshening.
.......
AI R FLU FF
Step 0
Press Start
Push
this button
must
be shut for the dryer
opened
during
pushed
closed.
again
When
the
to start the
the cycle,
to resume
cycle
dryer.
The
to operate.
the
start
the cycle
is complete,
dryer
START
door
If the door is
button
after
a signal
must
the door
will
be
is
sound
momentarily.
13
Dryer
Operating
Tips ................
Clean the Lint Filter...
• after each load,
• to shorten drying time.
• to operate more efficiently
Load the Dryer Properly...
• by placing
a time.
only
one
wash
load
in the
dryer
• by avoiding
very small loads or mixed loads.
at
• by adding one or more similar items to the dryer
when only one or two articles need drying. This
improves the tumbling action and drying efficiency
Add A Fabric Softener
Sheet...
(If Desired)
• after loading
the dryer,
• to control static cling.
• before
the load becomes
greasy-looking
softener
warm
This helps prevent
stains.
• and remove any used softener sheets from the dryer
to prevent greasy-looking
softener stains.
14
... .................
... ....
[
,_
Dryer
Exhaust
WARNING
--
Tips ..... ..... ...... ..... .......... ..... .........
Plastic or nonmetal
flexible
Do
Read the installation
a potential
fire hazard.
Don't
instructions
and
Let a poor exhaust
the user's guide.
,o
duct presents
slow drying,
l!
Don't
Let your
dryer exhaust
the air easily.
Restrict your dryer
with a poor
exhaust system.
Don't
Do
Use plastic, thin
foil, or nonmetal flexible
duct.
Use 4 inch diameter
rigid metal duct. Tape at1 joints.
Never use lint-trapping screws.
Don't
Do
Use longer than
necessary duct
runs with many
elbows.
_t
Keep duct runs
as straight as
possible.
Don't
Do
Allow crushed
Clean all old ducts
or clogged
ducts and vent.
before installing your new
dryer. Be sure vent flap
opens and closes freely.
15
system
cause
]
Replacing
Instructions
the
for replacing
1) Unplug
Light
the stacked
2) Open the door and use a Phillips
the tumbler front.
unit from the electrical
screwdriver
to remove
lens cover by pulling cover toward center
4) Rotate bulb counter-clockwise
5) Replace
the screw attaching
the lens to
to remove from socket.
6) Turn the light bulb clockwise
candelabra
base light bulb.
into socket.
lens cover by hooking
8) Reinstall
power supply.
of tumbler.
the bulb with a 120 volt, 10 watt maximum
7) Replace
.... .......... .. ..................
the bulb:
or disconnect
3) Remove
Drum
plastic tabs into tumbler
front below the light housing.
the screw into the lens cover screw hole.
9) Reconnect
stacked
unit to power supply.
Reversing
Directions
for reversing
l) Carefully
opposite
remove
the
Dryer
Door .......... ... .......... ....... ....
the dryer door.
the hinge hole covers with a flathead
screwdriver.
Move the door catch cover to the
side.
2) While supporting the door, remove the 4 counter sunk hinge screws which secure the hinges to the cabinet. When removing the 4 counter sunk hinge screw's, alternate between the top and bottom hinge to prevent bending the hinge.
3) Move the following parts to the opposite side of the door: 2 hinges, 4 counter
door screws; door strike and screw; inner door cover plate and screw,
sunk hinge screws and 4
4) Attach the door to the opposite side of the cabinet using the 4 counter sunk hinge screws. (See below).
Screw the lower counter sunk hinge screw in first. This will help to align the door and hinges.
5) Replace
the hinge hole covers to the opposite
/-_
[.
side.
Door Catch _
/
/
Counter Sunk Screw
\
--...
I
ii
i !
Door
/
I
rews
•
/
I
/
I
/
!
\
! I
I I
! I
I
\
I
I
,
Door
Strike
t
\ I
!
i
I
!
I
!
Door
/]
16
Water
The amount of water used to wash loads of laundry will
vary with each load. The Maytag Neptune _'' stacked
washer uses an IntelliFill
Care
ate amount of water for efficient cleaning
and conservation of water and energy.
performance
device to provide the appropri-
and Cleaning
.......... ...... .................
.. ............
Washer
Dryer
Turn off the water faucets after finishing the day's
washing.
This will shut off the water supply to the
clothes washer and prevent the unlikely possibility of
damage from escaping water.
Tumbler
- If the tumbler becomes stained by a crayon,
ink pen or other item inadvertently
left in a garment,
clean the tumbler with an all purpose cleaner such as:
Fantastik, Soft Scrub or Formula 409®.* Then tumble
Use a soft cloth to wipe up all detergent,
spills as they occur.
old towels or rags to remove
ing substance.
Clean the following
bleach or other
Exhaust
System Cleaning - While the lint filter will
catch most of the lint from the load, some will get
through and may buildup in the ductwork. It is important
as recommended:
Control Panel - clean with a soft, damp cloth or glass
cleaner.
Do not use abrasive powders or cleaning
pads.
Cabinet
- clean with soap and water followed
appliance
to completely
inspect and clean all lint accumulation
from the interior of the ductwork once a year to maintain
drying performance. The exhaust hood at the outside of
the home should be cleaned more frequently to ensure
the damper opens and closes freely.
with an
wax, if desired.
Interior - hard water deposits may be removed, if
needed, using a recommended
cleaner labeled clothes
washer safe.
Refer to the Installation
the
Instructions for more details on
proper exhausting.
*Brand
Storing
any excess stain or clean-
Neptune'"
names
Super
are trademarks
Stack
manufacturers.
..............
• Disconnect
• Select
° Clean the dryer tumbler with an all purpose cleaner
such as Fantastik or Formula 409* and disconnect
setting on the REGULAR
cycle of the
off and disconnect
the electrical
from power supply.
cups of water and pour the solution into the rob. Close
the door, press the START/STOP button and allow the
washer to complete a cycle.
faucets
from
supply and leave the washer door open to let air circulate inside the tumbler.
clothes washer and press the START/STOP
button.
After one minute of filling, stop the washer and open
the door. Mix one cup of bleach or vinegar with four
• Turn the water
washer
....
Washers can be damaged if water is not removed from
hoses and internal components
before storage. Prepare
the washer for storage as follows:
the •
the clothes
_?f the respective
For extended periods of storage or
storage during extreme cold temperatures,
call Maytag Customer Assistance
the inlet
toll-free
at 1-888-462-9824.
hoses.
:
• Advance the cycle control knob to Spin and lower the
drain hose to eliminate any water that may be in the
drain hose.
17
U.S, customers
using_Yfordeaf,
hearing impaired or speech impaired,
call 1.800-688-2080.
N
Washer
Operating
High pitched sound during a spin cycle.
Flushing water sound
the dispenser area.
coming
from
Sounds............
...... ... ...... .. .....
This occurs as the motor increases
remove moisture from the load.
speed
to spin the tub to
"Water enters the dispensers
to flush chlorine bleach and!or
fabric softener into the tumbler during the appropriate
time of
the cycle.
Sloshing
or gurgling
from inside the washer
is rotated.
water sound
when the tub
This sound
used
comes
to make
from the sealed
the washer
counter
run more
balance
smoothly
ring.
It is
and efficiently.
"Whirring"
sound followed
by a
pause, repeated throughout the wash
cycle.
The tub rotates one direction
reverses direction and pauses.
Clothes washer maintains a slightly
reduced spin speed after achieving a
higher spin speed.
After reaching the maximum
spin speed, the machine may
reduce spin speed slightly to create less noise and vibration.
The spin speed slows down dramatically when it sounds like an out-ofbalance load.
The tumbler will begin to accelerate up to speed,
back down to redistribute the load more evenly.
The Maytag
Neptune *_clothes
followed
washer
by a pause.
The tub
then slows
uses a true adaptive
fill.
This will add more water during the wash cycle as it is needed.
Clothes washer adds water after it has
been tumbling
for a while.
OR
Water is being added to the dispensers to dilute and rinse chlorine bleach or fabric sofiener into the tumbler at the appropriate
time. This will occur even if chlorine bleach and fabric softener
are not used.
18
You Call.. ....... ........ ..... ...... .......... ......... ....
Before
For problem
laundry
procedures,
solutions(i.e,
see the enclosed
fabric
da_ge,
I_unde_ng
residue,
tangling)
and
special
laundry
care
Tipspamphlet.
• Be sure the door
is tightly
• ON light
be lit
should
closed.
• Plug cord into a live electrica!
outlet.
• Check ['use or reset circuit breaker.
• Turn
the control
dial to the proper
Be sure the buttons
Won't Fill
• Turn both faucets
• Straighten
• Low
• Turn
are fully depressed.
and close
• Close
clothes
screens.
the door, then push
Hose
filter
screens
the START/STOP
may be plugged.
button.
pressure.
fuse
the
and clean
or reset
control
circuit
dial
Be sure the buttons
Won't Tumble
button.
on fully.
hoses
water
• Check
and push the START/STOP
inlet hoses.
• Disconnect
• Open
cycle
the
door
washer
breaker.
to proper
cycle
push
the
START/STOP
button.
are fully depressed.
and
push
the
START/STOP
will not tumble
• ON light should
and
button.
or spin unless
For
your
safety,
the
the door is closed.
be lit
• Check fuse or reset circuit breaker.
• Straighten drain hoses. Eliminate
call for service.
Won't Spin
or Drain
t...I,o.eQo_it
• Close the door and push the START!STOP button. For your safety, washer
will not tumble or spin unless the door is closed.
• After pressing the START/STOP button, it may take a few moments before
the clothes washer begins to spin. The door must lock before spin can be
achieved.
Locked
• Press
Shut; Will
• ._og,
_.q,
_***,
the START!STOP
• It may take
Not Open
_g
If there is a drain restriction,
woa_aQ.liwe*_**
Door
• •,.
kinked hoses.
button
1 1/2 to 2 minutes
• Pull on the door indentation
I.eo
• • t_a,
,_**.
i ,og
• ,it•
_ ,eQ•,
• • •_•
• s.o.
•,.
to stop the washer.
for the door lock mechanism
opposite
• t • • • • •.
o_
• * ._a
to disengage.
the hinges.
• • .t.,
•,
•..o
• .o.•
• _ • ••,,
_ _ • • i •o.a
• •**_
_,
• _oo
• • •co
(Continued on next page.)
19
Before
(continued)
You Call
.................................
• Plug cord into live electrical
outlet.
• Check fuse or reset circuit breaker.
• Turn
the
control
start the clothes
Stops
• Close
dial
to proper
washer.
cycle
door and push the START/STOP
your safety,
washer
and push
Be sure the buttons
will not tumble
button
or soak period
• Low water
time.
Try not to run a shower
START/STOP
to start the clothes
or spin unless
• This may be a pause
pressure.
the
button
to
are fully depressed.
in the cycle.
door
For
is closed.
Wait briefly
and/or
washer.
and it may start.
dishwasher
at the
same
Dleeo
Leaks Water
e
a*l.e*
Make sure hose connections are tight.
Make sure end of drain hose is correctly
Avoid overloading.
goloeoooealIpo_**i**t
s.e_
• Clothes washer
instruction s.
Is Noisy
•
•
•
•
the Wrong
Temperature
Water
should
be
leveled
properly
as outlined
in
installation
Turn both faucets on fully.
Check that the temperature selector button is fully depressed.
Make sure temperature selection is correct.
Make sure hoses are connected to correct faucets and inlet connections.
Flush
water line before filling washer.
• Check the water heater. It should be set to deliver a minimum 120°F (49°C)
hot water at the tap. Also check water heater capacity and recovery rate.
• Disconnect hoses and clean screens. Hose filter screens may be plugged.
Jo_t.o,o.t,oo._,**..ll.i,
Cycle Selector
Knob Advances
Through
et
J***,_io_*QIt*o*oiJllmml**ooalo_OO*_ioat_omoooeoaeaeooe*eloe_
• Weak floors can cause vibration and walking.
• Be sure rubber feet are installed on leveling legs.
• Check that the leveling leg lock nuts are tightened.
Fills with
I J.o
inserted and secured to drain facility.
I****I
• Extra rinse option is selected.
"off"
,._o,i_4**
ol_..lloo.,
Tub is
Completely
Full of Suds
• Run the clothes washer through another complete cycle using cold water.
• Reduce detergent amount for that specific toad size and soil level.
• Use high efficiency or low sudsing detergent specially formulated for front
load washers.
• See "Won't
Spin or Drain" section on page 19.
2O
• Plug cord into live electrical
outlet.
• Check fuse or reset circuit breaker.
Doesn't
Run
• Check the home's
circuit breaker
and fuses.
• Press the START button again if the door is opened
t _i
J I o._
s i,
o_e
J _ _,
_
• • o _,
i J t o.o
• Q oto.
e.
_
• I.
t t,,
• • m I.l.
,.,
II.
during the cycle.
• _ _
t o 1 o w.
, m.o,
_ i m toe
•.
o • _ • • i i i.l_
o
• Check fuse or reset circuit breaker.
Doesn't Heat
• Select a heat setting, not air-fluff.
• On a gas dryer, check that the gas supply is on.
• Clean the lint filter and exhaust duct.
• Check all of the above, plus...
• Be sure the exhaust hood at the outside of the home can open and close freely.
•
Doesn't
Dry
IS Noisy
Use 4" rigid metal exhaust
• Do not overload.
duct.
1 Wash load = 1 Dryer load.
• Sort heavy items from lightweight
items.
• Check that the washer is draining
properly
nails, etc.
• Be sure the Super Stack is leveled properly
tions.
in the installation
• Check
that the leveling
• This is normal operation
Knob
Advances
What
Slowly
is not covered
water from the load.
° Check the load for objects such as coins, loose buttons,
Remove promptly.
• Be sure the rubber feet are installed
Control
to extract adequate
as outlined
on the leveling
instruc-
legs.
leg lock nuts are tightened.
for an lntelliDry
cycle, especially
at the beginning
cycle. Once the load begins to dry, the control knob will start to advance.
of the
The rate
of advancement
will be slow at the beginning of the cycle because there is more
moisture in the toad. As the load becomes more dry, the control knob will advance
more quickly.
by the warranties
1. Conditions and damages resulting from any of the following:
a. Improper installation, delivery, or maintenance.
b. Any repair, modification, alteration or adjustment not
authorized by the manufacturer or an authorized servicer.
e. Misuse, abuse, accidents, or unreasonable use.
d. Inco_:rect electric current, voltage or supply.
e. Improper setting of any control.
on the next page:
4. Products
purchased
for commercial
or industrial use.
5. The cost of service or service call to:
a. Correct installation errors.
b. Instruct the user on proper use of the product.
c. Transport the appliance to the servicer.
6. Consequential or incidental damages sustained
as a result of any breach of these warranties.
2. Warranties are void if the original serial numbers have been
removed, altered, or cannot be readily determined.
by any person
Some states do not allow the exclusion or limitation of consequentin or incidental damages, so the above exclusion may not
apply.
3. Light bulbs.
21
Maytag ® Neptune
TM
Super Stack
Warranty
Full One Year Warranty
For one (1) year from the date of original
repaired or replaced free of charge.
Limited
retail purchase,
any part which fails in normal
home
use will be
Parts Warranty
After the first year from the date of original retail purchase through the time periods listed below, the parts designated below which fail in normal home use will be repaired or replaced free of charge for the part itself, with
the owner paying all other costs, including labor, mileage and transportation.
Second
Year - All parts.
Third
through Fifth Year - Dryer tumbler.
Third
through Tenth Year - The washer drive motor.
Third
through
Additional
Lifetime
Limited
- Stainless
Warranty
steel inner wash basket.
Against
Rust-Through
Should any of the parts listed below rust-through during the one year period starting from the date of retail purchase, repair or replacement
will be made free of charge. After the first and through the tenth year, repair or
replacement will be made free of charge for the part itself, with the owner paying aJl other costs, including labor,
mileage and transportation.
Automatic
Dryer:
Washer:
Exterior
Exterior
cabinet,
door and baseframe.
cabinet, top and door.
Please Note: This full warranty and the limited warranties apply when the appliance is located in the United
States or Canada.
Appliances
located elsewhere are covered by the limited warranties
only, including parts
which fail during the first year.
Canadian
Residents
This warranty covers only those appliances installed in Canada that have been listed with Canadian Standards
Association unless the appliances are brought into Canada due to transfer of residence from the United States to
Canada.
The specific warranties expressed above are the ONLY warranties provided by the manufacturer.
gives you specific legal rights, and you may also have other rights that vary from state to state.
To Receive
Warranty
This warranty
Service
To locate an authorized service company in your area, call Maytag Customer Assistance toll-tree at 1-888-462-9824. Should
you not receive satisfactory warranty service, please cal! or write:
Maytag Appliances Sales Company
Attn: CAIR sMCenter
RO. Box 2370
Cleveland, TN 37320-2370
U.S. or CANADA (toll-free) 1-888-462-9824
U.S. customers using TTY for deaf', hearing impaired or speech impaired, call 1-800-688-2080.
When contacting Maytag Appliances Sales Company, Maytag Customer Assistance about a service problem, please include
the following:
(a) Your name, address and telephone number;
(b) Model and serial number of dryer (found on the lower center of the dryer door opening)
number of the washer (found beneath the chlorine bleach dispenser);
(c) Name and address of your dealer and the date the appliance was purchased;
(d) A clear description of the problem you are having;
(e) Proof of purchase.
MAYTAG
FormNo. 537CMA
PartNo. 63706640
• One Dependability Square
, , "
,
w=_--
'
and model and serial
° Newton, Iowa 50208
http:i/www.maytag.com
JN
Litho U.S.A.