1
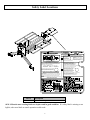
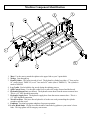
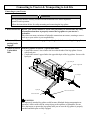
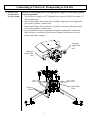
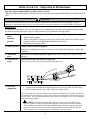
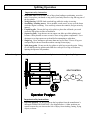
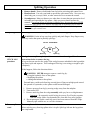
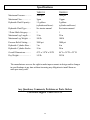
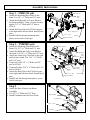
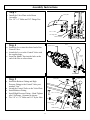
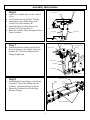
MTMH1315A.1 ITEM NUMBER: TMH1315, TMH2015 SERIAL NUMBER: _______________ Owner’s Manual Instructions for Assembly, Testing, Operation, Servicing & Storage 3 Point Log Splitter: Category 1 tractor implement that splits wood logs. Uses tractor’s auxiliary hydraulics. WARNING READ and UNDERSTAND this manual completely before using log splitter. All operators of this equipment must read and completely understand all safety information, operating instructions, maintenance and storage instructions. Failure to properly operate and maintain the log splitter could result in serious injury to the operator or bystanders from moving parts that can crush or cut, flying objects, escaping high pressure hydraulic fluid, fire, or carbon monoxide poisoning. In particular, be aware of the following hazards: Crush and Cut Hazards Moving parts can crush and cut hands and fingers. Keep hands clear of endplate, wedge, and logs while splitting. High Pressure Hydraulic Fluid Hazards High fluid pressures and temperatures are developed in hydraulic log splitters. Hydraulic fluid escaping through even a pin-size hole opening can puncture skin and cause severe blood poisoning. Inspect hydraulic system regularly for possible leaks. Never check for leaks with your hand while the system is pressurized. Seek medical attention immediately if injured by escaping fluid. Fire Hazards Keep a fire extinguisher with you that is rated for ordinary combustibles and flammable liquids if you will be using your log splitter near any ignitable forest, brush, or grassy covered land. STOP! READ YOUR TRACTOR MANUAL TO DETERMINE HOW TO HOOK UP TO TRACTOR ASSEMBLY REQUIRED: This product requires assembly before use. See “Assembly” section for instructions. INSPECT COMPONENTS. Closely inspect upon receipt to make sure no components are missing or damaged. See “Assembly” section for instructions on whom to contact to report missing or damaged parts. HYDRAULICS: There are many variations of auxiliary hydraulic connections on tractors. Read your tractor manual or check with your local dealer to determine how to properly connect the log splitter to your tractor’s auxiliary hydraulics. HYDRAULIC CONNECTION HOSE NOT INCLUDED: You need to provide your own supply and return hoses for connecting the log splitter to your tractor’s auxiliary hydraulic connections. See p. 9 for instructions on determining the type and length of hoses you will need. DETERMINE TRACTOR RPM THAT WILL PRODUCE THE PROPER HYDRAULIC FLOW RATE: Your tractor’s engine speed will determine the flow rate, and it is unsafe to operate the log splitter at a flow rate higher than 3 GPM (item# TMH1315), 11 GPM (item# TMH2015). You should read your tractor manual in advance to know how to keep the flow rate at or below 3 GPM (item# TMH1315), 11 GPM (item# TMH2015) before you operate the log splitter. Any Questions, Comments, Problems, or Parts Orders Call Brave Support 1-800-350-8739 1 Hazard Signal Word Definitions 2 Table of Contents About Your Log Splitter ................................................................................................................ 4 Safety Label Locations .................................................................................................................. 5 Machine Components Identification ............................................................................................. 6 Initial Unpacking & Set-Up ........................................................................................................... 7 Connecting to Tractor & Transporting to Job Site......................................................................... 8 Before Each Use Step One: Inspection / Maintenance ...................................................................................... 12 Step Two: Work Site Selection & Set-Up ............................................................................ 13 Splitting Operation ................................................................................................................. 14 Storage ......................................................................................................................................... 18 Troubleshooting ........................................................................................................................... 19 Specifications ............................................................................................................................... 20 Parts Breakdown – Exploded View ............................................................................................. 21 Summary of Important Safety Information for Operation ........................................................... 23 Assembly Instructions .................................................................................................................. 28 Limited Warranty ......................................................................................................................... 34 Registration Form ........................................................................................................................ 35 3 About Your Log Splitter Thank you for purchasing your Brave log splitter! About Your Log Splitter This log splitter is a machine designed to split wood logs using a hydraulically powered moving wedge. The log splitter is connected to and powered by your tractor’s hydraulic system. This log splitter is capable of splitting logs lengthwise with the grain only. This log splitter is designed to split logs: up to 19” long and 12” in diameter (item # TMH1315) up to 25” long and 16” in diameter (item # TMH2015) This log splitter model is designed with a unique, timesaving feature - a double-edged cutting wedge that is capable of splitting wood on both the extension and retraction strokes of the wedge. The technical specifications for your log splitter are provided on p.20 of this manual. WARNING This log splitter uses a high-pressure hydraulic system to generate a very strong splitting force. Read the manual completely before using the machine to understand how to safely operate and maintain it. Follow all safety precautions presented through this manual. A summary of important safety information can be found at the end of the manual. Contact Brave Support at 1-800-350-8739 for any questions about the appropriate use of this log splitter and/or optional accessories. Warranty Registration: Please fill out and submit the warranty registration card so that we may have your contact information for any future product literature or replacement parts you may need. Attention: All Rental Companies and Private Owners who loan this equipment to others! All persons to whom you rent/loan the log splitter must have access to read this manual. Keep this owner’s manual with the splitter at all times and advise all persons who will operate the machine to read it. You must also provide personal instruction on how to safely operate the splitter and remain available to answer any questions a renter/borrower might have. 4 Safety Label Locations N DANGER Log splitter exhaust contains carbon monoxide. This is a poison you cannot see or smell. WARNING ESCAPING HIGH PRESSURE HYDRAULIC FLUID HAZARD NEVER use inside a home or Only use OUTSIDE and far garage. EVEN IF doors and away from windows, doors, windows are open. and vents. Avoid other log splitter hazards. READ MANUAL BEFORE USE. IF LOG BECOMES STUCK ON WEDGE A log can become stuck to the wedge if the wedge becomes embedded in the log and the log doesn't split and separate. This can happen if the log is too stringy or tough to split completely. If this happens NEVER attempt to remove a stuck log by: Using the hydraulic Modifying the Adding attachments force of the splitter splitter to the splitter Personal injury could result from log or metal pieces flying out at high speed toward the operator or bystanders, or the splitter could become damaged. ALWAYS remove the log MANUALLY using this procedure: 1. Retract wedge just enough to remove pressure between the log and endplate. 2. Turn engine OFF. 3. Remove stuck log from wedge manually with a pry bar or sledgehammer. Important: Be extremely careful as log pieces may fly off as they separate from wedge. Wear safety goggles and make sure bystandersare clear. 4. Do not attempt to resplit a stuck log once it has been removed from wedge. High fluid pressures and temperatures are developed in the hyd. system. Hydraulic fluid escaping through even a pin-size hole opening can puncture skin and cause blood poisoning. Inspect hydraulic system regularly for leaks. Never check for leaks with your hand while system is pressurized. Seek medical attention immediately if injured by escaping fluid. Moving parts can crush and cut. Pieces can fly out while splitting. Follow safety rules for operating the log splitter or serious injury could result. READ the Owner's Manual completely before operating. Only one person should operate the log splitter. If an assistant is helping to load logs, the operator should not actuate controls until the assistant is at least 10 ft away. Stay in the designated OPERATOR POSITION while actuating the controls. Split wood in direction of the grain only. Hold bark side of logs when loading. Keep hands away from wedge, endplates, and partly split logs. Never leave log splitter unattended during operation. Stay off slopes and slippery surfaces. See additional safety rules in the Owner's Manual. OPERATING INSTRUCTIONS PN 781832 Part # 781832 Description Splitter Warning / Instructions Decal ALWAYS make sure warning labels are in place and in good condition. If a safety label is missing or not legible, order new labels or unsafe operation could result. 5 Machine Component Identification 1. Mast. Use the mast to attach the splitter to the upper link on your 3-point hitch. 2. Wedge. Cuts through log. 3. Beam/Cylinder. The beam is made of steel. The hydraulic cylinder has either a 3” bore and an 18” stroke (item # TMH1315) or a 4” bore and a 24” stroke (item # TMH2015). The cylinder is rated to 3000 PSI. 4. Log Cradle. Used to hold the log steady during the splitting process 5. Split Control Lever. Use the split control lever to move the wedge forward and backward. 6. Hydraulic Return Port. (not shown) The hydraulic return hose from the tractor connects here. This is a 1/2”NPT threaded connection. 7. Hydraulic Supply Port. The hydraulic supply hose from the tractor connects here. This is a 1/2” NPT threaded connection. 8. Work Port Hose. This hose directs hydraulic oil to the rear work port making the cylinder extend to split the wood. 9. Endplates. Position log against endplates for proper operation. 10. Lower Hitch Studs. Use the lower hitch studs to attach the log splitter to your tractor’s lower links. This log splitter will fit category one tractors. 6 Initial Unpacking & Set-up WARNING Carefully read and follow all instructions for initial assembly and set-up of this log splitter. Failure to properly assemble and set up this equipment could result in serious injury to the user or bystanders, or cause equipment damage. Step One: Assemble log splitter Assemble your log splitter. See the “Assembly” section of this manual – It will provide you with detailed instructions on: Inspecting shipped components and whom to contact if anything is missing or damaged. Assembly. 7 Connecting to Tractor & Transporting to Job Site Connecting to your Tractor WARNING The log splitter must be correctly mounted and then attached to the tractor hydraulic system for safe operation. Follow the instructions below for safety mounting and connecting the log splitter. 1. Read instructions Review your tractor manual or check with your dealer for instructions and safety information about how to properly connect the log splitter to your tractor’s hydraulics. Since there are many variations of hydraulic connections on tractors, ensuring a correct hook-up to your tractor is your responsibility. 2. Tractor off & parking brake engaged Turn off the tractor and engage the parking brake before attaching the log splitter. 3. Attach to tractor Attach log splitter to tractor’s 3-point hitch links. 3-point hitch a. Connect the tractor’s lower link to the lower hitch studs of the log splitter. Secure links with lynch pins. b. Connect the tractor’s upper link to the upper hitch pin of the log splitter. Secure with lynch pin. Upper hitch pin Tractor’s upper link Lynch pin Lynch pin Lynch pin Tractor’s lower links Lower hitch stud WARNING: An improperly attached log splitter could become dislodged during transportation or operation, which could result in serious injury to the operator or bystanders. Do not drive the tractor or operate the log splitter until you are sure the log splitter is properly attached and hitch pins are fully engaged. 8 Connecting to Tractor & Transporting to Job Site 4. Measure & cut hydraulic hoses to correct length. Measure & cut hydraulic hoses to the appropriate length for connecting log splitter to tractor hydraulics: a. You will need to supply two 1/2” hydraulic hoses rated for 3000 PSI with male, 1/2” NPT threaded ends. b. Measure the distance from your tractor’s hydraulic supply port to the supply inlet port on the log splitter’s control valve. c. Measure the distance from your tractor’s hydraulic return port to the return outlet port on the log splitter’s control valve. d. Cut two hydraulic hoses to an appropriate length for making these connections. Make sure there is sufficient, but not excessive length, such that hoses will not stretch, bind, kink, or dangle. Hydraulic supply inlet port Hydraulic return outlet port Beam Slide Zone Hoses to Tractor 9 Connecting to Tractor & Transporting to Job Site 5. Connect hydraulic hoses Connect the hydraulic hoses: a. Connect one hose from the tractor’s hydraulic supply port to the supply inlet port on the log splitter’s control valve. b. Connect the second hose from the tractor’s return port to the connection at the return outlet port on the log splitter’s control valve. c. Check to be sure that all fittings are tight. . WARNING: Make sure all fittings are tight before applying pressure. High fluid pressures and temperatures are developed in the hydraulic system. Hydraulic fluid escaping through even a tiny opening can burn or puncture skin, resulting in wounds that could cause blood poisoning, infections, disability, gangrene, amputation, or death. If injured by escaping fluid, no matter how small the wound is, see a doctor at once. 6. Add Hydraulic Oil to Reservoir 7. Hydraulic components 1. Start tractor and use split control lever to extend and retract wedge 5 (five) times to remove air from the high pressure lines. 2. With wedge retracted, check oil level again. Fill if necessary. Check the hydraulic components carefully: 1. 2. Visually inspect all hoses and clamps/fittings for cracks, fraying, kinks, or other damage. Check all components for oily residue, which may indicate a leak. Do NOT operate the log splitter if there is any indication of damage or oily residue. Small leaks in hydraulic lines can cause severe injuries and can also be an indication of catastrophic failure in the near future. The life of hydraulic hoses may be from a few months to a few years, depending on use and storage patterns. WARNING: High fluid pressures and temperatures are developed in hydraulic log splitters. Hydraulic fluid escaping through a pin hole sized opening can burn or puncture skin, resulting in wounds that could cause blood poisoning, infection, disability, gangrene, amputation, or death. Therefore, the following instructions should be heeded at all times when inspecting or servicing the hydraulic components of the log splitter: Stop the tractor and move all split control levers back and forth to relieve pressure before changing or adjusting hydraulic system components such as hoses, tubing, fittings or other components. NEVER check for leaks with your hand. Leaks can be located by holding a piece of cardboard or wood (at least two feet long) with your hand at one end and passing the other end over the suspected area (wear eye protection). Look for discoloration of the cardboard or wood. NEVER adjust the pressure of the pump or valve. If injured by escaping fluid, no matter how small the wound is, see a doctor at once. A typical injection injury may be a small puncture wound that does not look serious. However, severe infection or reaction can result if proper medical treatment is not administered immediately by a doctor who is familiar with injection injuries. 8. Lubricate slide rail beam Lubricate wedge slide. Extend the wedge slide as shown, and lubricate the surface of it with grease. This will help prevent wear between the wedge slide and beam. 10 Connecting to Tractor & Transporting to Job Site Transporting log splitter to the job site: WARNING Serious injury can occur if the tractor on which the log splitter is mounted is driven unsafely. 1. Drive to desired location Drive tractor and log splitter carefully to desired work site. (See instructions on pg.13 on selecting an appropriate work site) Important safety instructions: Read tractor instructions. Review safety instructions in your tractor manual with regard to driving with 3-point hitch mounted equipment attached. Securely attached. Be sure splitter is securely attached before transporting. Added length. Be aware of the added length of the splitter. Reduced road stability. Be aware that heavy, 3-point hitch mounted equipment can reduce road stability, regardless of the amount of front-end counterweight added. Drivers should take extra caution when driving with the log splitter attached. Reduce your speed and take extra caution during turns or while driving on rough or sloped terrain. No riding or cargo on splitter. Never ride or transport cargo on the log splitter. On public roads. If transporting the log splitter on a public road, make sure to comply with all local, state, and federal requirements. Unattended. Turn off the tractor before leaving the splitter unattended. Under the influence. Never transport or operate this splitter while under the influence of alcohol, drugs, or medication. 2. Engage parking brake Make sure the tractor’s parking brake is engaged before operating the log splitter. WARNING: If the parking brake is not engaged, the tractor could roll while you are operating the log splitter. Personal injury could result. Always engage the parking brake before leaving the tractor while the splitter is attached. 11 Before Each Use – Inspection & Maintenance Step One: Inspect and maintain log splitter before each use If the log splitter has been used previously it must be inspected and maintained BEFORE EACH SUBSEQUENT USE. WARNING ALWAYS shut off the tractor, relieve system pressure, and disconnect hydraulic lines before inspecting, cleaning, adjusting, or repairing the splitter. Relieve system pressure by moving split control lever back and forth several times. IMPORTANT: If a part needs replacement, only use parts that meet the manufacturer’s specifications. Replacement parts that do not meet specifications may result in a safety hazard or poor condition of the log splitter. 1. Tractor off / relieve hydraulic pressure Perform all inspections/repairs with the tractor off and hydraulic pressure relieved. 1. Turn off tractor engine. 2. Relieve all hydraulic system pressure by moving the split control lever and the tractor hydraulic control valve handles back and forth several times. 3. Disconnect the hydraulic lines. 2. Remove debris Remove debris from moving parts. Debris on moving parts can cause excess wear. Clear debris from the beam, wedge, and endplates. 3. Mechanical parts Check to be sure all nuts and bolts are tight to make sure the log splitter is in safe working condition. 4. Lubricate slide wedge Lubricate all beam slide surfaces with grease. 5. Hydraulic components Check the hydraulic components carefully: This will help prevent wear between the slide wedge and beam. 1. Visually inspect all hoses and clamps/fittings for cracks, fraying, kinks, or other damage. 2. Check all components for oily residue, which may indicate a leak. Do NOT operate the log splitter if there is any indication of damage or oily residue. Small leaks in hydraulic lines can cause severe injuries and can also be an indication of catastrophic failure in the near future. The life of hydraulic hoses may be from a few months to a few years, depending on use and storage patterns. WARNING: High fluid pressures and temperatures are developed in hydraulic log splitters. Hydraulic fluid escaping through a pin hole sized opening can burn or puncture skin, resulting in wounds that could cause blood poisoning, infection, disability, gangrene, amputation, or death. Therefore, the following instructions should be heeded at all times when inspecting or servicing the hydraulic components of the log splitter: 12 Before Each Use – Inspection & Maintenance 6. Shields / guards Stop the engine and move all split control levers back and forth to relieve pressure before changing or adjusting hydraulic system components such as hoses, tubing, fittings or other components. NEVER check for leaks with your hand. Leaks can be located by holding a piece of cardboard or wood (at least two feet long) with your hand at one end and passing the other end over the suspected area (wear eye protection). Look for discoloration of the cardboard or wood. If injured by escaping fluid, no matter how small the wound is, see a doctor at once. A typical injection injury may be a small puncture wound that does not look serious. However, severe infection or reaction can result if proper medical treatment is not administered immediately by a doctor who is familiar with injection injuries. Replace all guards and shields after servicing the log splitter. Step Two: Work Site selection and log splitter set-up WARNING It is important to select an appropriate work site and properly set-up the log splitter to minimize the risks of slips and falls, equipment rolling or tipping over, carbon monoxide, and accidental fires. 1. Select location Select an appropriate location for operating the log splitter. Requirements: a. Dry, level surface with good footing. Stay clear of areas with mud, ice, tall grass, weeds, or brush. b. Outdoors, away from air intakes. DANGER: The running tractor engine gives off carbon monoxide, a poisonous gas that can kill you. You CANNOT smell it, see it, or taste it. ONLY run log splitter OUTDOORS and away from air intakes. NEVER run log splitters inside homes, garages, sheds or other buildings or semi-enclosed spaces. These spaces can trap poisonous gases, EVEN if you run a fan or open windows. If you start to feel sick, dizzy, or weak while using the log splitter, shut off the engine and get fresh air RIGHT AWAY. See a doctor. You may have carbon monoxide poisoning. 2. Fire Precautions Take the following precautions against fire. Keep a fire extinguisher available (classified for both ordinary combustibles and flammable liquids) as a precautionary measure when operating the log splitter in dry areas. 3. Position 7’ from any combustibles or flammable liquids Position tractor exhaust and other hot elements of the tractor engine at least 7 ft. from combustible objects during splitter operation. Hot exhaust fumes from tractor could cause fire. 4. Engage parking brake Make sure the tractor’s parking brake is engaged before operating the log splitter. WARNING: If the parking brake is not engaged, the tractor could roll while you are operating the log splitter. Personal injury could result. 13 Splitting Operation WARNING Before starting the log splitter, review the following instructions and safety information for safe operation. Failure to follow these rules may result in serious injury to the operator or bystanders from moving parts that crush, cut, or entangle; from flying objects, fire, falling or tripping; or from carbon monoxide poisoning. General safety information: Read manual. Do not allow anyone to operate the log splitter who has not read the Owner’s Manual or has not been instructed on the safe use of the splitter. The log splitter owner should instruct all operators in safe log splitter operation. Age restrictions. Never allow anyone under 16 years old to operate the log splitter. Children 16 years and older must be trained and supervised by a trained adult. Intended use. Log splitters should only be used for splitting wood logs, lengthwise with the grain. Do not use for other purposes as unforeseen hazards may result. Modifications. Never modify or alter the log splitter in any way. Modifications can create serious safety hazards and will void the warranty: Attachments. Never add attachments to the splitter, except for authorized accessories supplied by the manufacturer with instructions for safe installation and use. Remote control. NEVER attach a rope, cable, or other remote device to the splitting control. Splitting wedge. NEVER attempt to change the height or speed of the splitting wedge. Safety equipment / controls. Always operate the log splitter with all safety equipment in place and in good working order, and all controls properly adjusted for safe operation. Know how to stop. Be thoroughly familiar with all controls and with the proper use of the equipment. Know how to stop the log splitter and relieve system pressures quickly if needed. Operating speed. Always operate the log splitter at the manufacturer’s recommended speed. Adjust the tractor speed so the flow rate does not exceed 3 GPM (item # TMH1315) or 11 GPM (item # TMH2015). Make sure to see the tractor specification for determining relationship between flow rate and engine speed since a higher flow rate makes the beam slide move dangerously fast. Daylight only. Only use the log splitter in daylight so you can see what you are doing. Smoking / sparks. Never smoke while operating the log splitter, and never operate near sources of sparks or flames. Under the influence. Never operate, or let anyone else operate, the log splitter while under the influence of alcohol, drugs, or medication. Unattended. Never leave the machine unattended while the engine is running. Adjusting / repairing. Turn the tractor off before cleaning, repairing, or adjusting the log splitter. Before changing or adjusting hydraulic system components such as hoses or fittings, first relieve hydraulic line pressure by moving the split control lever and the tractor hydraulic control valve handles back and forth several times, and then disconnect hydraulic lines. Replace labels. Always make sure safety labels are in place and in good condition. If a safety label is missing or not legible, order new labels because unsafe operation can result. Call 1-800-350-8739 to order new safety labels. 14 Splitting Operation 1. Put on protective clothing / gear Wear the following protective clothing and safety gear. a. Eye protection. Always wear safety glasses or goggles when operating the machine. Pieces of log may fly out and serious eye injury can occur. b. Boots. Falling logs can crush feet. Always wear safety shoes or heavy boots when operating or helping to load logs. c. Gloves. Wear snug fitting without drawstrings or loose cuffs. d. Hearing protection. The use of earplugs or other hearing protection device is recommended. e. No Loose / dangling apparel. Loose or dangling apparel can be come entangled in moving parts, never wear jewelry or loose-fitting clothing. 2. Engage parking brake Secure log splitter from unintended movement—make sure the tractor’s parking brake is engaged before operating the log splitter. WARNING: If the parking brake is not engaged, the tractor could roll while you are operating the log splitter. Personal injury could result. 3. Load log Load log onto beam with a cut end against an endplate - positioned for a lengthwise cut. NOTES: a) This log splitter is equipped with a unique double-edged cutting wedge, which is capable of splitting wood on either the extension or retraction stroke of the wedge. b) The log splitter is designed only for cutting lengthwise with the grain, NOT for cutting across the grain. c) This log splitter is designed for cutting logs up to 12” in diameter and 19” long (item # TMH1315), 16” in diameter and 25” long (item # TMH2015). Larger diameter logs could get stuck on the wedge and longer logs would not fit on the beam. Incorrect log orientation Correct log orientation FIG02218 WARNING: ALWAYS keep hands and feet away from the endplates, wedge, and partially split logs while loading, operating and unloading the log splitter. 15 Splitting Operation 4. Extend wedge Important safety instruction: Hold bark side. Hold the bark side of logs when loading or positioning, never the ends. Never place your hands or any part of your body between a log and any part of the log splitter. Wedge moving. NEVER load or unload logs while the wedge is moving. Straddling / reaching across. Never straddle, reach across, or step over the beam while the engine is running. You could trip, actuate the controls, and get seriously injured. Unsplit log pile. Do not pile logs to be split in a place that will make you reach across the log splitter in order to load them. Square log ends. Logs that are not cut square can slide out while splitting and become a safety hazard or cause excessive force to log splitter components. Use a chainsaw to cut logs square on each end before attempting to split them. Single log. Never attempt to split more than one log at a time. Pieces of log can unexpectedly be thrown from the machine causing serious injury. Split along grain. Do not use the log splitter to split logs across the grain. Doing so will damage the log splitter and could also cause pieces of log to be thrown, injuring the operator or bystanders. Move split control lever toward an end plate to extend wedge and split log. SPLIT CONTROL N Split Log Split Log Important safety instructions: Operator position. ALWAYS operate the log splitter from the manufacturer’s indicated OPERATOR POSITION. (See diagram above.) Other positions are unsafe because they can increase the risk of injury from crushing, cutting, flying objects, or burns. 16 Splitting Operation 5. Stop wedge Remove hands. Remove both hands from log before activating split control lever. Hand activate. Use only your hand to operate the split control lever. Never use any other body part, or a rope, cable, or other remote device to actuate the control. Second person. Many accidents occur when there is more than one person involved in loading and operating the log splitter. Only one person should operate the controls. If a second person is assisting in loading logs, the operator must NEVER actuate the split control lever until the assistant and all bystanders are at least 10 feet away. NEVER allow an assistant to hold the log in place while the operator actuates the split control lever. Release split control lever to stop wedge movement when log is split. WARNING: Cracks in logs can close quickly and pinch fingers. Keep fingers away from any cracks that open in partially split logs. SPLIT CONTROL N Split Log 6. Important STUCK LOG procedure Split Log If a log does not split completely and becomes stuck on the wedge, follow the instructions below to remove the log. A log can become stuck to the wedge if the wedge becomes embedded in the log and the log doesn’t split and separate. This can happen if the log is too stringy or tough to split completely. If this happens, follow the directions below. WARNING: NEVER attempt to remove a stuck log by: • Using the hydraulic force of the splitter • Modifying the splitter • Adding attachments to the splitter Personal injury could result from log or metal pieces flying out at high speed toward the operator or bystanders, or the splitter could become damaged. 1. 2. 3. Remove pressure from log by moving wedge away from the endplate. Turn tractor OFF. Remove stuck log from the wedge manually with a pry bar or a sledgehammer. Important: Be extremely careful as log pieces may fly off as they separate from the wedge. Make sure bystanders are clear and wear safety goggles. 4. Do not attempt to resplit a stuck log once it has been removed from the wedge. Manually split with an axe, or cut with a chainsaw. 7. Remove split wood Remove split wood from area. Move each log away from log splitter after it is split. Split logs left near the log splitter are a trip hazard. 17 Storage Follow the instructions below for storing your log splitter between uses. 1. Retract wedge Retract the wedge completely to the hitch end of the log splitter to keep the rod protected from corrosion. 2. Wipe with oily rag Wipe the beam and wedge slide with an oily rag to prevent corrosion. 3. Splitter storage location Store the log splitter in a dry location away from corrosive materials. NOTE: Do not store the log splitter near fertilizer or similar corrosive materials. 18 Troubleshooting WARNING Before troubleshooting or attempting to service, read the following safety instructions to avoid serious injury to the operator or bystanders from moving parts that can crush or cut, burns, fire or explosion, or escaping high pressure hydraulic fluid. Important Safety Instructions: 1. Engine off. Always make sure the tractor engine is off before cleaning, repairing or adjusting the splitter, except as recommended by the manufacturer. 2. Hydraulic safety. High fluid pressures and temperatures are developed in hydraulic log splitters. Hydraulic fluid escaping through a pin hole sized opening can burn or puncture skin, resulting in wounds that could cause blood poisoning, infection, disability, gangrene, amputation, or death. Therefore, the following instructions should be heeded at all times when inspecting or servicing the hydraulic components of the log splitter: Turn off tractor engine, move all split control levers back and forth to relieve pressure, and disconnect hydraulic lines before changing or adjusting hydraulic system components such as hoses, tubing, fittings or other components. NEVER check for leaks with your hand. Leaks can be located by holding a piece of cardboard or wood (at least two feet long) with your hand at one end and passing the other end over the suspected area (wear eye protection). Look for discoloration of the cardboard or wood. If injured by escaping fluid, no matter how small the wound is, see a doctor at once. A typical injection injury may be a small puncture wound that does not look serious. However, severe infection or reaction can result if proper medical treatment is not administered immediately by a doctor who is familiar with injection injuries. Problem Cylinder rod will not move Slow cylinder shaft speed when extending or retracting Wood will not split or splits extremely slowly Tractor engine bogs down during splitting Tractor engine stalls under low load condition Solution: A,D,E,H,J Solution: A,B,C,H,I,K Solution: A,B,C,F,I,K Solution: G Solution: D,E Cause A- Insufficient oil to pump B- Air in oil C- Excessive pump inlet vacuum D- Blocked hydraulic lines E- Blocked control valve F- Low control valve setting G- High control valve setting H- Damaged control valve I- Internal control valve leak J- Damaged cylinder piston K- Internally damaged cylinder Solution Check oil level in reservoir Check oil level in reservoir Check pump inlet hose for blockage or kinks Flush and clean the splitter hydraulic system Flush and clean the splitter hydraulic system Adjust control valve with a pressure gauge Adjust control valve with a pressure gauge Return control valve for authorized repair Return control valve for authorized repair Return cylinder for authorized repair Return cylinder for authorized repair Any Questions, Comments, Problems or Parts Orders Call Brave Support 1-800-350-8739 19 Specifications TMH1315 TMH2015 Maximum Pressure......…... 3000 psi 3000 psi Maximum Flow...........…... 3gpm 11gpm Hydraulic Fluid Capacity... 1.5 gallons (cylinder and hoses) 2 gallons (cylinder and hoses) Hydraulic Fluid Type……. See tractor manual See tractor manual 3 Point Hitch Category.….. 1 1 Maximum Log Length..…. 19 in 25 in Maximum Log Weight…... 100 lb 100 lb Pressure Relief Setting…... 3000 psi 3000 psi Hydraulic Cylinder Bore… 3 in 4 in Hydraulic Cylinder Stroke.. 18 in 24 in Overall Dimensions........… 43”L x 34”W x 20”H 46”L x 34”W x 22”H Dry Weight....................…. 143 lb 293 lb The manufacturer reserves the right to make improvements in design and/or changes in specifications at any time without incurring any obligation to install them on units previously sold. Any Questions, Comments, Problems or Parts Orders Call Brave Support 1-800-350-8739 20 Parts Breakdown - Exploded View – MTMH1315 - Rev A.1 21 Parts Breakdown - Exploded View – MTMH1315 - Rev A.1 Item# 1 2 3 4 5 6 7 8 9 10 11 12 13 14 15 16 17 18 19 20 21 22 23 24 25 Part # 406518 792205 791601 792206 791609 791607 782400 50RAS8 50CSC128 781825 791603 791602 82139 2501930 39159 792200 792208 777919 792202 792210 792201 792209 792212 782257 782256 792207 791606 782543 782432 780146 782431 82140 791695 Description Clevis Pin Beam Slide Beam Slide Beam Assembly Beam Assembly Hose Guide Grommet High Pressure Fitting Reducer Fitting Control Valve Valve Plate Log Table 1/8” x 1” Cotter Pins Draw Pin Lynch Pin Left Lower Hitch Left Lower Hitch Link Pin Mounting Mast Plate Mounting Mast Plate Right Lower Hitch Right Lower Hitch Lower Leg Cross Bar 3”x 18” Hydraulic Cylinder 4”x 24” Hydraulic Cylinder 3” x 18” Bottom Plate 4” x 24” Bottom Plate Long Hydraulic Hose (42”) Long Hydraulic Hose (50”) Short Hydraulic Hose (24”) Short Hydraulic Hose (27”) 2” Cotter Pins Brave Decal 22 Item ALL TMH1315 TMH2015 TMH1315 TMH2015 ALL ALL ALL ALL ALL ALL ALL ALL ALL ALL TMH1315 TMH2015 TMH2015 TMH1315 TMH2015 TMH1315 TMH2015 TMH2015 TMH1315 TMH2015 TMH1315 TMH2015 TMH1315 TMH2015 TMH1315 TMH2015 All All Qty 2 1 1 1 1 1 2 4 2 1 1 2 2 2 3 1 1 1 2 2 1 1 1 1 1 1 1 1 1 1 1 2 2 Summary of Important Safety Information for Operation WARNING Carefully read and make sure you understand the following safety information before using the log splitter. Improper use or maintenance of the log splitter can result in serious injury to the operator or bystanders from moving parts that can crush or cut, flying objects, escaping high pressure hydraulic fluid, or carbon monoxide poisoning. Introduction Read manual. Read this Operator’s Manual and the engine Owner’s Manual completely before attempting to use the log splitter. Serious injury or death can result if safety instructions are not followed. Instruct operators. The log splitter owner should instruct all operators in safe log splitter operation. Intended use. Log splitters should only be used for splitting wood logs, lengthwise with the grain. Do not use for other purposes, as unforeseen hazards may result. Prohibition Against Modifications Never modify or alter the log splitter in any way. Modifications can create serious safety hazards and will void the warranty. Attachments. Never add attachments to the splitter, except for authorized accessories supplied by the manufacturer with instructions for safe installation and use. Remote control. NEVER attach a rope, cable, or other remote device to the splitting control. Splitting wedge. NEVER attempt to change the height or speed of the splitting wedge. Operator Restrictions Untrained operators. Do not allow anyone to operate the log splitter who has not read the Owner’s Manual or been instructed on the safe use of the splitter. Minimum operator age. Never allow anyone under 16 years old to operate the log splitter. Children 16 years and older must be trained and supervised by a trained adult. Safety in Connecting to Tractor & Transporting WARNING The log splitter must be correctly mounted and then attached to the tractor hydraulic system for safe operation. Follow the instructions below for safely moving and towing the log splitter. Safety in Connecting Log Splitter to Tractor Read tractor instructions. Review tractor manual or get instructions from your tractor dealer about how to properly connect the log splitter to your tractor’s auxiliary hydraulics. Engage tractor brake. Make sure the tractor’s parking brake is engaged while you are attaching the log splitter. Tractor off. The tractor engine must be off while mounting the log splitter and making connections to the tractor’s hydraulics. Check mounting. An improperly mounted log splitter could become dislodged during transportation or operation, which could result in serious injury to the operator or bystanders. Do not drive the tractor or operate the log splitter until you are sure the log splitter is properly mounted and hitch pins are fully engaged. 23 Summary of Important Safety Information for Operation Check hydraulic connections/fittings. Make sure all hydraulic line fittings are tight before applying pressure. High fluid pressures and temperatures are developed in the hydraulic system. Hydraulic fluid escaping through even a tiny opening can burn or puncture skin, resulting in wounds that could cause blood poisoning, infection, amputation or death. If injured by escaping hydraulic fluid, no matter how small the wound is, see a doctor at once. Safety in Transporting to Job Site Read tractor instructions. Review safety instructions in your tractor manual with regard to driving with 3point hitch mounted equipment attached. Securely attached. Be sure splitter is securely attached before transporting. Added length. Be aware of the added length of the splitter. Reduced road stability. Be aware that heavy, 3-point hitch mounted equipment can reduce road stability, regardless of the amount of front-end counterweight added. Drivers should take extra caution when driving with the log splitter attached. Reduce your speed and take extra caution during turns or while driving on rough or sloped terrain. No riding or cargo on splitter. Never ride or transport cargo on the log splitter. On public roads. If transporting the log splitter on a public road, make sure to comply with all local, state, and federal requirements. Under the influence. Never tow or operate this splitter while under the influence of alcohol, drugs, or medication Engage brake before operating. Engage tractor’s parking brake before operating log splitter. Unattended. Turn off the tractor and engage parking brake before leaving the splitter unattended. Safety – Before Use Read/instruct Read manual. Do not allow anyone to operate the log splitter who has not read the Owner’s Manual or has not been instructed on the safe use of the splitter. Review safety rules. Before starting this log splitter, review the instructions for safe operation. Failure to follow these instructions may result in serious injury to the operator or bystanders. Know how to stop. Be thoroughly familiar with all controls and with the proper use of the equipment. Know how to stop the log splitter and relieve system pressure quickly if needed. Personal protective equipment Eye protection. Always wear safety glasses or goggles when operating the machine. Pieces of log may fly out and serious eye injury can occur. Boots. Falling logs can crush feet. Always wear safety shoes or heavy boots when operating or helping to load logs. Loose / dangling. Loose or dangling apparel can become entangled in moving parts. Never wear jewelry or loose-fitting clothing. Gloves. Wear snug fitting gloves without drawstrings or loose cuffs. Hearing protection. The use of earplugs or other hearing protection device is recommended. Safety During Inspection/Maintenance Always inspect your log splitter before each use, and repair as needed, to keep it in safe working condition: Engine off. Always make sure the tractor engine is off before cleaning, repairing, or adjusting the splitter, except as recommended by the manufacturer. Other debris. Debris on moving parts can cause excess wear. With tractor engine off, clear debris from moving parts. 24 Summary of Important Safety Information for Operation Mechanical parts. Check to be sure all nuts and bolts are tight to make sure the log splitter is in safe working condition. Hydraulic components. Check the hydraulic components (hoses, tubing, and clamps/fittings) carefully before each use. Do not operate the log splitter with frayed, kinked, cracked or damaged hydraulic hoses, fittings, or tubing, or if oily residue is observed on any of the components. High fluid pressures and temperatures are developed in hydraulic log splitters. Hydraulic fluid escaping through a pin hole sized opening can burn or puncture skin, resulting in wounds that could cause blood poisoning, infection, disability, gangrene, amputation, or death. Therefore, the following instructions should be heeded at all times when inspecting or servicing the hydraulic components of the log splitter: Do not check for leaks with your hand. Leaks can be located by holding a piece of cardboard or wood (at least two feet long) with your hand at one end and passing the other end over the suspected area (wear eye protection). Look for discoloration of the cardboard or wood. Turn off the tractor engine, move tractor and log splitter hydraulic split control levers back and forth to relieve pressure, and then disconnect the hydraulic lines BEFORE changing or adjusting hydraulic components such as hoses, tubing, fittings or other components. If injured by escaping fluid, no matter how small the wound is, see a doctor at once. A typical injection injury may be a small puncture wound that does not look serious. However, severe infection or reaction can result if proper medical treatment is not administered immediately by a doctor who is familiar with injection injuries. Guards / shields. Make sure all guards and shields are replaced after servicing the log splitter. Replacement parts. If a part needs replacement, only use parts that meet the manufacturer’s specifications. Replacement parts that do not meet specifications may result in a safety hazard or poor operation of the log splitter. Safety in Work Site Selection / Set-up Hot exhaust. Hot exhaust fumes from the tractor engine can cause fire. Position exhaust and other hot elements of engine at least 7’ from combustible objects during operation. Fire extinguisher. Have a Class B fire extinguisher available as a precautionary measure when operating the log splitter in dry areas. Level, dry surface. To prevent accidental falls and equipment tip over, make sure the splitter is situated on a dry, level surface with good footing. Stay clear of areas with mud, ice, tall grass, weeds, or brush. Engage parking brake. Always engage the tractor’s parking brake before operating the splitter to prevent unintended movement. Carbon monoxide. The running tractor engine gives off carbon monoxide, a poisonous gas that can kill you. You CANNOT smell it, see it, or taste it. ONLY run log splitter OUTDOORS and away from air intakes. NEVER run log splitter inside homes, garages, sheds, or other semi-enclosed spaces. These spaces can trap poisonous gases, EVEN if you run a fan or open windows. If you start to feel sick, dizzy, or weak while using the log splitter, shut off the engine and get to fresh air RIGHT AWAY. See a doctor. You may have carbon monoxide poisoning. Safety – During Use General Safety During Use WARNING: Before starting this log splitter, review the following rules for safe operation. Failure to follow these rules may result in serious injury to the operator or bystanders. Safety equipment / controls. Always operate the log splitter with all safety equipment in place and in good working order, and all controls properly adjusted for safe operation. 25 Summary of Important Safety Information for Operation Operating speed. Always operate the log splitter at the manufacturer’s recommended speed. You must adjust the tractor engine speed so the flow rate does not exceed 3 GPM (item # TMH1315) or 11 GPM (item # TMH2015) Make sure to see the tractor specification for determining relationship between flow rate and engine speed since a higher flow rate makes the beam slide move dangerously fast. Know how to stop. Be thoroughly familiar with all controls and with the proper use of the equipment. Know how to stop the log splitter and relieve system pressures quickly if needed. Daylight only. Only use the log splitter in daylight so you can see what you are doing. Smoking / sparks. Never smoke while operating the log splitter, and never operate near sources of sparks or flames. Unattended. Never leave the machine unattended while the engine is running. Under the influence. Never operate, or let anyone else operate, the log splitter while under the influence of alcohol, drugs, or medication. Adjusting / repairing. Turn the tractor off before cleaning, repairing, or adjusting the log splitter. Before changing or adjusting hydraulic system components such as hoses or fittings, first relieve hydraulic line pressure by moving the split control lever and the tractor hydraulic control valve handles back and forth several times, then disconnect hydraulic lines. Carbon monoxide. The running tractor engine gives off carbon monoxide, a poisonous gas that can kill you. You CANNOT smell it, see it, or taste it. If you start to feel sick, dizzy, or weak while using the log splitter, shut off the engine and get to fresh air RIGHT AWAY. See a doctor. You may have carbon monoxide poisoning. Other exhaust dangers. Engine exhaust, some of its constituents, and certain vehicle components contain or emit chemicals known to the State of California to cause cancer, birth defects, or other reproductive harm. Avoid inhalation of exhaust. Safety in Loading, Operating, and Unloading Square log ends. Logs that are not cut square can slide out while splitting and become a safety hazard or cause excessive force to log splitter components. Use a chainsaw to cut logs square on each end before attempting to split them. Single log. Never attempt to split more than one log at a time. Pieces of log can unexpectedly be thrown from the machine causing serious injury. Split along grain. Do not use the log splitter to split logs across the grain. Doing so will damage the log splitter and could also cause pieces of log to be thrown, injuring the operator or bystanders. Keep hands clear. ALWAYS keep hands and feet away from the endplates, wedge, and partially split logs while loading, operating and unloading the log splitter. Operator position. ALWAYS operate the log splitter from the manufacturer’s indicated OPERATOR POSITION. Other positions are unsafe because they can increase the risk of injury from crushing, cutting, flying objects, or burns. Straddling / reaching across. Never straddle, reach across, or step over the beam while the engine is running and the log splitter is in the horizontal position. You could trip, actuate the controls, and get seriously injured. Second person. Many accidents occur when there is more than one person involved in loading and operating the log splitter. Only one person should operate the controls. If a second person is assisting in loading logs, the operator must NEVER actuate the split control lever until the assistant and all bystanders are at least 10 feet away. NEVER allow an assistant to hold the log in place while the operator actuates the split control lever. 26 Summary of Important Safety Information for Operation Loading/Unloading o Unsplit log pile. Do not pile logs to be split in a place that will make you reach across the log splitter in order to load them. o Hold bark side. Hold the bark side of logs when loading or positioning, never the ends. Never place your hands or any part of your body between a log and any part of the log splitter. o Wedge moving. Never load or unload logs while the wedge is moving. o Cracks. Cracks in logs can close quickly and pinch fingers. Keep fingers away from any cracks that open in partially split logs. o Split log pile. Move each log away from log splitter after it is split. Split logs left near the log splitter are a trip hazard. o Remove hands. Remove both hands from log before activating split control lever. o Hand activate. Use only your hand to operate the split control lever. Never use any other body part, or a rope, cable, or other remote device to actuate the control. o Log stuck on wedge. A log can become stuck to the wedge if the wedge becomes embedded in the log and the log doesn’t split and separate. This can happen if the log is too stringy or tough to split completely. If this happens, follow the directions below to manually remove the log: IMPORTANT: NEVER attempt to remove a stuck log by using the hydraulic force of the splitter, or by modifying or adding attachments to splitter. Personal injury could result from log or metal pieces flying out at high speed toward the operator or bystanders, or the splitter could become damaged. 1. Remove pressure from log by moving wedge away from the endplate. 2. Turn engine OFF. 3. Remove stuck log from the wedge manually with a pry bar or a sledgehammer. IMPORTANT: Be extremely careful as log pieces may fly off as they separate from the wedge. Make sure bystanders are clear and wear safety goggles. 4. Do not attempt to resplit a stuck log once it has been removed from the wedge. Manually split with an axe, or cut with a chainsaw. Safety – After use Storage location. Store the log splitter in a dry location away from corrosive material. Periodic maintenance. Perform periodic maintenance as directed in this manual to keep the log splitter in safe working condition. 27 Assembly Instructions Closely inspect all log splitter components and contents of manual bag (see diagrams). If you have missing components, contact Brave Support 1-800-350-8739. If you have damaged components, contact the freight company that delivered the unit and file a claim. CAUTION! Heavy lifting required. Some of the components in these assembly instructions are heavy and cannot be lifted by one person safely. Please plan on assembling this product when another person can be available to help out. Tools needed: Adjustable wrenches, Torque Wrench, Soft Faced Mallet, Flat Blade Screw Driver Error! 28 Assembly Instructions 29 Assembly Instructions Step 1 – TMH1315 only Beam assembly Link Pin Attach the Mounting Mast Plates to the beam. Use 3/8” x 1” Bolts and 3/8” nuts. Attach the Right and Left Lower Hitch to the beam assembly. Using a Torque wrench, tighten 3/8” x 1” Bolts and 3/8” nuts to 42 lb-ft. Attach the Draw Pins with 570 lb-ft torque, to the right and left lower hitch. Install lynch pins. Install Link Pin through mounting mast plates, secure with a lynch pin. Mast plate Left Lower Hitch Lynch Pin 3/8” Flange Nut 3/8” x 1” bolt Draw Pin Right Lower Hitch Step 1 – TMH2015 only Attach the Mounting Mast Plates to the beam. Use 3/8” x 1” Bolts and 3/8” nuts. Attach the Right and Left Lower Hitch to the beam. Use 3/8” x 1” Bolts and 3/8” nuts. Attach the Lower Leg Cross Bar to the right and left lower hitch. Use 5/16” x ¾” Bolts and 5/16” nuts. Torque all of the 3/8” x 1” Bolts and 3/8” nuts to 42 lb-ft. Torque all of the 5/16” x ¾” Bolts and 5/16” nuts to 20 lb-ft. Attach the Draw Pins with 570 lb-ft torque, to the right and left lower hitch. Install lynch pins. Install Link Pin through mast plates, secure with a lynch pin. Link Pin Beam assembly Mast plate 3/8” Flange Nut 3/8” x 1” bolt Left Lower Hitch Lynch Pin 5/16” Flange Nut 5/16” x ¾” bolt Lower Leg Cross Bar Draw Pin Right Lower Hitch Step 2 Attach the Hose Guide to the Beam Assembly. Use 3/8” x 1” Bolts and 3/8” Nuts. Install Grommets into the Hose Guide. Beam assembly 3/8” Flange Nut 3/8” x 1” bolts Grommets 30 Hose guide Assembly Instructions Step 3 Install the Valve Plate to the Beam Assembly. Use 3/8” x 1” Bolts and 3/8” Flange Nut. Valve plate 3/8” x 1” bolts 3/8” flange nuts Beam assembly Step 4 Control valve Lever Install the Lever into the slotted end of the Control Valve. Attach the Lever to the Control Valve with the supplied pins. Insert the Small Clips into the holes at the end of the Pins to secure them. Small Clips Pins Step 5 Valve plate Install the Reducer Fitting and High Pressure Fitting to the Control Valve port marked “Out”. Attach the Control Valve to the Valve Plate. Install Reducer Fitting. Install High Pressure Fitting - Hand Tighten plus 2 full turns. Orientate as shown. Use 1/4” x 1.75” Bolts and 1/4” Nyloc Nuts Control valve 1/4” x 1.75” bolts High pressure fitting Reducer fitting 31 1/4” nuts Assembly Instructions Step 6 Control valve Attach the Cylinder Hoses to the Control Valve. Use Thread sealer on the Hose Threads. Attach the Long Cylinder Hose to the Control Valve Port marked “B”. Attach the Short Cylinder Hose to the Control Valve Port marked “A”. Route the Cylinder Hoses through the Hose Guide as shown. B A Long hose Step 7 Short hose Reducer fitting Attach the Reducer Fitting and the High Pressure Fitting to the Control Valve port marked “IN”. Orient the High Pressure Fitting straight back. High Pressure Fitting Control valve Short Hose Long Hose Hose guide Beam assembly Step 8 Beam Assembly Install High Pressure Fittings to the Beam Assembly. Thread the Fittings into the Cylinder. Orient the Fittings as shown. Attach the Cylinder Hoses to the High Pressure Fittings. Short Hose Long Hose High pressure fittings 32 Assembly Instructions Step 9 Log tables Install the Log Tables to the Beam Assembly. A soft-faced mallet may be required. Secure the Log Tables with the supplied Cotter Pins. Cotter pins Step 10 Refer to “Connecting to Tractor and Transporting to Job Site” section for testing and inspection. Beam assembly 33 Limited Warranty Dear Valued Customer: The Brave product you just purchased is built with the finest material and craftsmanship. Use this product properly and enjoy the benefits from its high performance. By purchasing a Brave product, you show a desire for quality and durability. Like all mechanical equipment this unit requires a due amount of care. Treat this unit like the high quality piece of machinery it is. Neglect and improper handling may impair its performance. Thoroughly read the instructions and understand the operation before using your product. Always contact Brave Product Support at 1-800-350-8739 prior to having any service or warranty work performed, as some services performed by parties other than Brave approved service centers may void this warranty. This limited warranty is in lieu of any other warranty expressed or implied, written or oral and Brave assumes no other responsibility or liability outside that expressed within this limited warranty. Limited Warranty for Brave and Brave Pro Log Splitter Models: PCLS13BS PCLS1513GC PCLS2013GC XR1322BS VH1322GC VH1322GX VH1326VN VH1326GX VH1334VN VH1334GX Consumer Warranty Period Commercial Warranty Period 2 years from date of purchase by user 2 year from date of purchase by user Weldments Cylinders, Valves, Pumps 2 years from date of purchase by user 1 year from date of purchase by user Wear Parts In addition to the normal warranty, Brave shall warrant some normal wear items from defects in material or workmanship for a period of 30 days from the date of purchase by user. Normal wear items covered under this warranty are limited to: pins, grease zerks, keepers, wheel bearings, wires, hoses, springs, cables, couplers, filters, tires, and switches. Routine maintenance items such as lubricants, clutch adjustments, tune ups are not covered under warranty. Engines The engine warranty is covered under the terms and conditions as outlined by the engine manufactures warranty contained herein and is the sole responsibility of the engine manufacturer. Normal engine maintenance such as spark plugs, oil changes, air filters, adjustments, fuel system cleaning and obstruction due to build up is not covered by this Brave limited warranty. “Consumer use” means personal residential household use by a consumer. “Commercial use” means all other uses, including, but not limited to, use for commercial, income producing or rental purposes or when purchased by a business. This limited warranty applies to the original purchaser of the equipment (verification of purchase, in the form of a receipt, is the responsibility of the buyer), is non-transferable, and covers parts and labor. Parts will be replaced or repaired at no charge, except when the equipment has failed due to lack of proper maintenance. If a part is no longer available, the part may be replaced with a similar part of equal function. Any misuse, abuse, alteration or improper installation or operations will void warranty. Determining whether a part is to be replaced or repaired is the sole decision of Brave. Brave will not provide for replacement of complete products due to defective parts. Any costs incurred due to replacement or repair of items outside of a Brave approved facility is the responsibility of the buyer and not covered under warranty. Transportation costs to and from service center and/or service calls are the responsibility of the customer. This limited warranty specifically excludes the following; failure of parts due to damage caused by accident, fire, flood, windstorm, acts of God, applications not approved by Brave in writing, corrosion caused by chemicals, use of replacement parts which do not conform to manufacturer’s specifications, damage related to rodent and/or insect infestation and damage caused by vandalism. Additional exclusions: loss of running time, inconvenience, loss of income, or loss of use, including any implied warranty of merchantability of fitness for a specific use. Also, outdoor power equipment needs periodic parts and service to perform well, and this limited warranty does not cover instances when normal use has exhausted the life of a component or the engine. This limited warranty does not cover any personal injury or damage to surrounding property caused by failure of any part, misuse or inability to use the product. Alteration of the product, including safety features, shall void this limited warranty. Repair or replacement of parts does not extend the warranty period. This limited warranty gives you specific legal rights. You may also have other rights that vary by state. Please have model number, item number and serial number on hand prior to making a warranty claim or inquiry. 34 BRAVE Product Registration Form Your Information Full Name: Last First M.I. Address: Street Address Apartment/Unit # City State ZIP Code Alternate Phone: Home Phone: Email Address: Purchased From Company: Address: Street Address Apartment/Unit # City State ZIP Code Model Information Purchase Date: Application Type: □ Homeowner □ Commercial Model (i.e. VH1326GX) □ Rental Serial # (i.e. VH1326GX A012345678) Signature: 35 20195 S. Diamond Lake Rd, Ste 100 Rogers, MN 55374 800-350-8739 www.braveproducts.com [email protected] Made in the USA 36