1
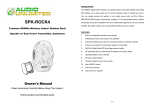
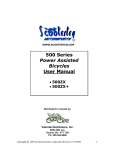
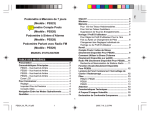
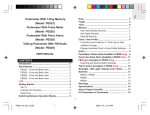
Veloteq
Owner Manual
2008
Veloteq Corporation
2151 Richmond Avenue
Shepherd Square
Houston, TX 77098
www.Veloteq.com
(713 524-1175
Printed in China
Veloteq 2008 Electric Bicycle Owner Manual
To our customers,
Forward
Thank you for choosing Veloteq as your alternate energy vehicle for recreation and local
commuting. We specialize in the design and manufacture of electric bicycles that incorporate the
most advanced motor, electrical systems, suspension, and braking systems currently available use
in the North American environment. Advanced features, available only on Veloteq ebikes include
fully automatic cruise control, anti-theft systems and extra heavy duty controllers and battery
chargers. Power-on-Demand electric bicycles by Veloteq are safe, reliable, noiseless and totally
pollution-free.
Please read this manual thoroughly before you operate your Veloteq. Always keep to
the right side of the road and use designated bike lanes whenever possible. Use the turn signals
while executing turns or changing lanes and never swerve in and out of traffic. Observe road
conditions and always allow for longer braking distances in wet or slippery conditions. Do not
permit inexperienced riders to operate the vehicle without close supervision and training. Bicycle
operators are subject to the rules of the road and safe riding practices. Observe them at all times.
Electric Bicycle Manual
Warnings (Read Features and Operation Carefully)
Veloteq electric bicycles are engineered as complete systems. Do not attempt to replace any
parts with those not supplied by your Veloteq dealer or distributor. The use of chargers, batteries and other non-Veloteq parts can result in serious damage to the electrical system and void
all product warranties. Electric bicycles should be operated on the right side of the roadway.
Allow additional braking distance when operating in wet or snowy conditions.
The optimum load capacity of Veloteq electric bicycles using Consumer Product Safety Commission standards is 170 lbs. including rider and cargo. Increased weight will lower the travel
range of the vehicle and require more frequent charging of the power supply. Do not permit
people unfamiliar with riding the vehicle to do so without proper instruction. Strictly comply
with the rules of the road and all relevant traffic laws for bicycles.
Automatic Cruise Control is activated automatically by maintaining the throttle position for
six seconds. To turn off automatic cruise control, activate either the right or left brake handle.
The power supply unit consists of four 12V Sealed Lead Acid maintenance free batteries
which generate an operating voltage of 48V. Do not under any circumstances touch the poles
of the batteries or permit them to come into contact with metal or wet objects. This may lead
to the destruction of the power supply and damage to the controller and charger.
This manual applies only to Veloteq 2008 models named below. It may be updated as required. Updates may be downloaded from the Veloteq web site at www.Veloteq.com. Manuals
for previous model years are available on the web site.
Models: Cavalier RSV-GT; Challenger RSV-GT; Commander SHO-GT, Commuter RSV-GT;
Cougar XR8, Sorrento-GT.
Veloteq Owner Manual 2008
P. 1 of 15
2/18/2008
Electric Bicycle Manual Contents
FORWARD….……………………………………………………………………………...1
FEATURES AND OPERATION ........................................................................... 3 NOTICE AND WARNING: (PAY PARTICULAR ATTENTION TO ANY TEXT
HIGHLIGHTED IN RED.) ................................................................................... 4 HOW TO CHARGE YOUR VELOTEQ ELECTRIC BICYCLE ......................... 5 ASSEMBLY AND ADJUSTMENT ....................................................................... 6 FRONT-WHEEL ASSEMBLY AND ADJUSTMENT: ....................................... 6 FRONT DRUM BRAKE ADJUSTMENT: ............................................................ 8 REAR DRUM BRAKE ADJUSTMENT:............................................................... 7 CHAIN ADJUSTMENT: ........................................................................................ 7 OPERATIONAL CHECK: ...................................................................................... 7 PARKING YOUR ELECTRIC BICYCLE: ........................................................... 9 CIRCUIT BREAKER LOCATION AND OPERATION: ................................... 9 PEDAL INSTALLATION: ................................................................................... 10 PERIODIC ADJUSTMENTS AND MAINTENANCE: ................................... 10 TROUBLESHOOTING GUIDE ...........................................................................11 PRODUCT WARRANTY FOR NEW VEHICLES ............................................ 12 OWNER’S RECORD OF SERVICE/REPAIR ................................................. 14
ADDENDUM I.- LUBRICATION OF GEAR REDUCTION MOTOR……….15
Veloteq Owner Manual 2008
P. 2 of 15
2/18/2008
Features and operation
Veloteq electric bicycles are equipped with a brushless DC, pulse wave modulated, 3
-phase electric motor powered by four VRSL colloided, sealed lead acid maintenance-free batteries enclosed in a heavy duty polypropolene case with associated
hardware. The core electrical system contains an extra heavy duty controller and is
equipped with a high quality automatic smart charger rated at 1.8-2A@20Ah. Mechanical parts include a motorcycle grade frame, heavy duty automotive ABS body
fairings with a high gloss enamel finish, polypropolene deck and undercarriage
parts, and advanced motorcycle cushioned drum brakes. Anti-theft systems include
an audible alarm system supplied with two remotes and a keyed digital rear wheel
lock. All models have locking handlebars. Veloteq products have been inspected
and certified for export by the Commodities Inspection Bureau of the China Ministry
of Trade and Industry and are compliant with US Consumer Product Safety and Department of Transportation regulations and Par. 2. (1) of the Canada Motor Vehicle
Safety Act.
Brushless DC (BLDC) Electromotor: The BLDC motor incorporates high-performance
rare earth nickel-dymium boron (NiB) permanent magnet, outer-rotor direct drive
wheel, and an ECVT transmission featuring efficiency, energy economy, long life,
and no maintenance noise-free operation. Maximum output is fixed at 750W in the
U.S. and 500W in Canada.
Drive controller: The central controller performs the functions of electric motor
drive, battery under-voltage protection, cross current protection and speed limiting,
automatic braking power kill, power storage display, speed governor and ECVT
(electronic cont continuously variable transmission) control. The system is integrated with the gearless accelerator to regulate the ECVT. These fully integrated
functions insure safe and reliable operation under all road conditions.
VRSL (Voltage Regulated Sealed Lead Acid) Power Supply: The batteries contained
in the power supply are VRSL-type sealed and maintenance-free. A colloiding agent
renders the electrolyte spill-proof even in the event that the cases are cracked.
They are specifically designed and matched to the Veloteq deep cycle, deep discharge requirements and have a very high power density, long life-time (greater
than 400 recycles at an 80% discharge rate), and are easily recycled using current
widespread disposal technology. The models 500A-GT, 500C-GT, 500D-GT SHO,
and 500ZX-GT use 20Ah batteries. The models 500B-GT and 500XR8 use 14Ah
batteries.
Automatic Smart Charger: The power supply chargers supplied with Veloteq electric
bicycles are specifically matched to the 14Ah and 20Ah rated battery systems. The
power supply may be recharged either while installed in the electric bicycle or while
removed for long term storage or transportation. Operation is fully automatic to
Veloteq Owner Manual 2008
P. 3 of 15
2/18/2008
protect both the charger and the power supply unit against overcharging and does not require
supervision. It may be used over an input range of 110V/60HZ to 220V/50Hz. and carry CCC,
CE, and cUL or cTUV safety certification. The charger, power supply, motor and electrical systems are protected by a high power circuit breaker.
Notice and Warning: (Pay particular attention to any text highlighted in red.)
The PSU (Power Supply Unit) is a key component of the electric bicycle power system. We use
only UL Recognized premium quality batteries designed for long life. Fully discharged batteries
can be recharged up to 400 times. To prolong the life of the batteries always recharge after
use. Conserving the use of your power supply to no more than 80% discharged as indicated on
the instrument power meter will greatly extend the life of the batteries and under normal circumstances will exceed 400 recycles.
Do not store the charger or power supply or charge the battery in ambient temperature environments below 14oF (-10oC). Prolonged exposure to below freezing temperatures will change
the electrical characteristics of the charging unit causing possible serious malfunction.
Application and Use Practices:
Do not fully discharge the battery supply. Recharge after each use to prolong battery life. Extensive long term in-plant testing has revealed that frequent recharging, avoiding full discharge, will prolong battery life to approximately 9,500 miles (15,000km) of regular use.
The efficiency of the batteries is influenced by temperature. The power supply will function better in warmer to hot temperatures. At temperatures below 32F (0℃) battery performance may
decrease more than 1/3. Full functionality and power density will be restored when the surrounding temperature rises to 68F (20℃).
Frequent stopping and starting, riding uphill, riding against the wind, on muddy roads continuous
use of lights and accessories while not riding, or carrying an additional passenger or extra cargo
are all factors that will reduce the travel distance per charge of your Veloteq.
If the electric bicycle or PSU is stored for a prolonged period it should be fully charged prior to
storage. We recommend that the PSU be removed and recharged at intervals of 20 days during
the storage period to prolong battery life and prevent sulphication of the battery cells. Sulphication of the battery plates can be compared to the rusting of metal parts. It occurs when a
discharged battery is left in an uncharged state. The batteries used in your electric bicycle do not
have “memory” however all batteries self-discharge while not in use.
Use or storage at temperatures higher than 140F (60℃) such as unventilated storage in high
summer temperatures, will adversely effect the normal working functions of the electric bicycle.
Sudden relocation of the electric bicycle from a cold outside area to a warm interior may result in
crystallization of electric components. Before moving from a cold exterior to a heated interior,
remove the PSU and permit natural cooling and dissipation of any crystals.
The electric bicycle may be ridden in both rain and snow, however under no circumstances allow
it to be immersed in water. Immersion in water such as deep puddles may cause the controller
Veloteq Owner Manual 2008
P. 4 of 15
2/18/2008
and other electrical components to be submerged resulting in short circuiting and failure of the
electrical system.
The vehicle weight range of Veloteq electric bicycles is 132lbs (60kg) to 172lbs (78kg) depending
on the model, with the PSU installed. They are designed in accordance with US Consumer Product
Safety Commission regulations and brake testing standards to carry a 170lb (77kg) passenger.
The vehicle frame is designed to exceed the designed passenger load by 100%, or 340lbs (154kg).
Excess loading will decrease the usable travel range and may present difficulty climbing grades.
Extreme overloading may damage the vehicle, controller, motor, and may make the vehicle hard
to maneuver and bring to a rapid stop, and present a danger to the operator and others.
Do not under any circumstances use a charger other than that supplied by Veloteq or a direct
replacement obtained from a Veloteq dealer or distributor. Veloteq, its dealers and distributors will
not be held liable for any accidents or damages resulting from the use of unauthorized chargers.
Chargers from many after-market suppliers have been tested and found to be unsafe and inadequate. They may cause fires and severe damage to the batteries.
How to Charge Your Veloteq Electric Bicycle
The electric capacity of the PSU may be deficient on arrival because of natural discharge during the
period of transportation to your location. After first installation of the PSU, turn on the ignition and
observe the Power Supply Level on the instrument panel. If the meter shows that the storage
level is less than fully charged, plug in the charger and charge for up to eight (8) hours to insure
that all electrical systems are fully operational.
The PSU may be charged either on-board
(installed in the vehicle) using the external plug provided or removed for storage or transportation. We recommend removal of the PSU when it is transported in a recreational vehicle, on a
carrier or similar method in order to reduce the transport weight. Do not leave the charger
connected for more than 24 hours!
During charging, the battery and charger should be placed on a level surface where they will not
be tipped over. Do not cover the charger or battery while charging to insure ventilation and air
circulation. DO NOT charge the PSU with the ignition key in the ignition. Remove it before
plugging in the charger to prevent possible damage to the electrical system while the power
system is operational. Never switch the power off while the vehicle is in motion using
electric power. Momentary activation of either brake handle will stop power to the motor by
acting as a kill-switch.
The charging process:
Check that the input voltage rating of the charger (AC110-220V) is matched to the line voltage to
which you are plugging in the charger.
The PSU can be charged on board the bicycle or removed for charging. (See Fig. 1)
Veloteq Owner Manual 2008
P. 5 of 15
2/18/2008
After insuring that the ignition key is removed, 1) connect the charger output plug to the input
plug on the vehicle. 2) then connect the charger input plug to the AC electric source. The red
indicator light will glow showing that the unit is properly attached to the power source.
The indicator light will continue to glow red which will indicate that the PSU is charging. It will
change to green after the PSU is fully charged. The normal charging time is about 4-7 hours
depending on depth to which the PSU has been discharged.
When the battery is full charged, the indicator light remains green and the PSU automatically
changes into a constant float charge state. We recommend that the charger remain connected
for an additional 2-3 hours.
Note: If within the above time, if the indicator light does not change to green, the battery is
nevertheless fully charged. Momentary removal of the charger plug from the power source will
normally result in the change of the indicator from red to green.
After charging, first unplug the charger form the AC electric source, and remove the charger
from the PSU charging plug.
In the event of failure of the PSU to charge after prolonged attempts do not leave the charger
attached to the AC power source. Bring your vehicle or the PSU to your dealer for service.
Bicycle Frame: The electric bicycle frames are individually constructed to match the body fairings, seats, and suspension and shock absorption systems. The finish is rust-proof, baked
enamel, and manufactured to motorcycle specifications to ensure many years of maintenancefree use.
Assembly and Adjustment
Veloteq electric bicycles should be assembled only by personnel qualified to perform the necessary mechanical and electrical set up, and adjustment of the wheel alignment and brakes.
Front-wheel Assembly and Adjustment:
The front wheel is attached to the inside of the front fork insuring equal separation and depth of
seating between the right and left fork extensions in relation to the center column. Attach the
front axle nuts tightly applying no less than 30N m. of torque between the front and rear nuts.
This must be performed only by authorized personnel. Refer to your dealer for service.
Front Drum Brake Adjustment:
Veloteq electric bicycles use motorcycle grade cushion drum brakes. To adjust the front drum
brake turn the adjusting screw located at the end of the brake line. When the brake is adjusted
for normal low sensitivity permitting a travel of 1-1.5” (25-35mm) of the brake handle the front
Veloteq Owner Manual 2008
P. 6 of 15
2/18/2008
wheel will spin freely without a brake damping effect. (See Fig. 2)
Rear Drum Brake Adjustment:
To adjust the rear drum brake turn the adjustment screw located at the end of the brake line forward of
the brake assembly as above, test the travel of the brake handle and securely tighten the locking nut.
(See Fig. 5) Take care to not over-tighten the rear brake! This will create drag on the motor
which may result in failure of the controller. When the brake pad is worn down to ½ of the original
thickness it must be replaced. Return to your dealer for service if the rear brake becomes difficult to
apply. (See Fig. 3)
Chain Adjustment:
To adjust the chain link, turn the rear wheel chain adjustment screw as show in Fig. 4, until the chain is
allowed to turn freely. The chain slack should be approximately as shown.
Veloteq Owner Manual 2008
P. 7 of 15
2/18/2008
Operational Check:
Before riding, check that there is an adequate charge level available in the power supply. Recharge as
required before using. The power supply unit must be installed in the PSU well in the lower deck and
locked securely in place. See Fig. 5 and examples:
Insert the key into the ignition, turn all the way to the right (see Fig. 6); the power indicator will light
 there is a proper power source connection. Firmly seated on the vehicle, turn the right
indicating that
handgrip accelerator inwards toward the body to accelerate (see Fig. 7).
After accelerating to the desired travel speed, maintaining the throttle position for six seconds will activate the automatic cruise control. The speed will be maintained until either the right or left handbrake
is activated. To reactivate proceed to the desired travel speed and once again maintain the throttle
position for six seconds.
Accelerate gradually from a full stop to avoid damage to the controller, motor and other electrical components. The vehicle is equipped with brake and power failure interlocking devices. Activation of either
the front or rear brake cuts power to the motor (acts as a kill switch). Avoid rapid acceleration by
maintaining gradual pressure on the throttle. As a function of the advanced gear reduction motor and
controller, motor RPM will increase from starting speed or climbing grades to coasting speed.
When the voltage indicator falls into the red, low supply region, charge as soon as possible. Always
recharge the power supply after using for any length of time to insure that a full supply is maintained.
This will significantly increase battery life. The instrument panel includes a speedometer, odometer,
power indicator, lights-on and turn signal indicator. Light switches, turn signal switches and horn button
are conveniently located on the right and left handgrip for easy activation while riding.
Veloteq Owner Manual 2008
P. 8 of 15
2/18/2008
The Cavalier RSV-GT (500!-GT), Challenger RSV-GT (500C-GT) , Commander SHO-GT (500D-GT) and
Commuter RSV-GT (500ZX-GT), Cougar XR8 (500XR) and Sorrento-GT (500B-GT) are equipped with
both a speedometer and an odometer.
Parking Your Electric Bicycle:
When parking, grasp the brake handle to steady the vehicle while alighting, turn off the ignition and
remove the key. Lower the kickstand and insure that the vehicle that the ebike is firmly in place.
Turn the front wheel to the right after parking. It is a good practice to park with the rear of the ebike
towards a wall or other structure with the front end facing out. Activate the anti-theft alarm system if
desired to discourage tampering with your vehicle or to use as a vehicle locater. Avoid riding or parking on muddy or bumpy roads or surfaces as far as possible. Use the main center kickstand only
when necessary for service or parking on un-level surfaces. Do not, under any circumstances, sit on
the vehicle while it is elevated on the main kickstand. This can result in damage that may require repair or replacement. All Veloteq electric bicycles have locking steering columns to hold your vehicle in
place after parking.
Circuit Breaker Location and Operation:
The electrical system is protected by a CCC Approved circuit breaker. An adverse load condition as a
result of current overload will cause the circuit breaker to trip, cutting power to the electrical system
until the adverse load condition has been corrected. This can be brought about by continuous operation on long inclines, particularly in hot weather. The circuit breaker is located inside the glove compartment of the 500A-GT, 500C-GT, 500XR and 500ZX-GT models. On the 500D-GT model, it is located beneath a small access door behind the seat and on the 500B-GT, it is inside the underseat storage compartment. After re-setting, if the circuit breaker continues to trip, bring your vehicle in for ser-
Veloteq Owner Manual 2008
P. 9 of 15
2/18/2008
vice immediately.
Pedal Installation:
Insert the pedals in the pedal insertion holes as shown in the example below. The insertion hole is cut
out at the factory. Take
care to install the pedals correctly as marked Left and
Right to the pedal arm and
insertion hole. The pedals
are shipped in the rear cargo
carrier. Insert the gray
caps included with the accessories.
Periodic Adjustments and Maintenance:
The newly purchased vehicle from your dealer should be fully set up and tested by skilled personnel for
proper operation. Customer assembly is not recommended. For enquiries, please refer to your dealer.
We recommend a comprehensive inspection or your vehicle every 1000km (650 miles). Lubricate the
front and rear axle, front fork, transmission and chain using a good quality chain lubricant. Check that all
nuts and bolts are securely attached and that the brakes are operating properly.
Avoid flooding in standing water which can severely damage electrical components. Avoid prolonged
exposure to hot sun and rain. For reason of safety avoid riding in heavy rain or downpours.
After prolonged use it is advisable to return to your dealer for complete maintenance and inspection. This
will insure safety of operation on the road and extend the life of your vehicle. Insure that the chain
and all mechanical parts are properly lubricated at all time. Use a chain lube specifically
formulated for bicycle or motorcycle chains. See the addendum to this manual for periodic
lubrication of the GT gear-reduction, lube injected motor.
Veloteq Owner Manual 2008
P. 10 of 15
2/18/2008
Troubleshooting Guide
Number
Fault
1
Governor failure or
1. Battery voltage is too
unable to attain maxi- low.
mum speed.
2. Governor switch connections are loose.
3. Governor spring catches
or fails.
1. Battery level insufficient, recharge.
2. Tighten connection after rechecking.
3. See your dealer for spring replacement.
2
When power is on,
the rear wheel electric
motor does not operate.
1. Possible loose electrical
connection or PSU fuse.
2. Power failures around
switches.
3. Electrical wiring plugs
around the wheel loose or
damaged.
4. Circuit breaker has
tripped.
1. If equipped with a fuse holder
and fuse, bypass the fuse using a
crimp-type electrical crimp connector. Do not replace the fuse.
2. Repair and re-wire.
3. See your dealer for inspection
and repair.
4. Reset the circuit breaker located in the glove compartment
or top panel (SHO only)
3
Traveling distance
inadequate after a
complete charge.
1. Tire pressure inadequate.
2. Insufficient charge level
or charger failure.
3. Excess uphill riding,
strong head winds, frequent
braking and activation,
overload.
4. The battery aging or
damaged.
1. Check tire inflation. Inflate to
correct tire pressure.
2. Insure that AC power is source
is functional; inspect battery
charger plug, or request charger
inspection or maintenance from
your dealer.
3. Walk up steep hills using cruise
control assistance.
4. Replace the battery(s).
4
Battery charger does 1. The battery charger plug
not work.
has fallen off or the connection with the plug is inadequate.
2. Fuse in battery charger is
blown blow out.
3. The battery wiring is not
properly connected.
4. Battery charger failures.
1 Tighten or repair the plug.
Other breakdowns.
If the above methods of diagnosis
and repair to not fix the problem,
do not attempt further repair.
Return to your dealer. Attempts
to repair by unqualified personnel
may void product warranties.
5
Veloteq Owner Manual 2008
Cause
Effect/Repair
1. Unable to diagnose or
repair in accordance with
about methods.
2. Electric motor, controller,
charger, or battery damage.
P. 11 of 15
2 Replace fuse.
3. Check battery terminal screws
to insure a proper connection.
4 .Repair or replace the charger.
Do not attempt to use if it has
been exposed for prolonged periods at below freezing temperatures!
2/18/2008
Product Warranty for New Vehicles
In order to protect your warranty rights and privileges, retain a copy of your original sales receipt with
your serial number and date of purchase. Verify that the vehicle has been properly prepared and inspected for on road use by the dealer. Record complete contact information for your dealer. Electrical
repairs MUST be performed by an authorized dealer or warranty repair station in possession of electrical circuit diagrams.
1. Repair or replacement scope and term.
Content
Warranty Period
Chassis, forks, and frame components, breakage not due to accident or misuse.
2 Years
Electric motor internal gears, broken bearings, separation of motor enclosure,
electric coil damage and other non-repairable items not due to accident or misuse.
1 Year or 2,500
miles (4200 kms)
The controller and the battery charger failure not due to accident or misuse.
1 Year or 2,500
miles (4200 kms)
Battery case failure or breakage, leaks or loss of storage capacity more than
35%.
6 Months
Handgrip mechanism failure not due to accident or misuse, unable to repair.
6 Months
2. Not included above:
a. Accidents including those due to improper maintenance, vehicle overload, external environmental corrosion or misuse causing damage to the vehicle.
b. Owner or User attempted repair beyond the scope of those described in the Troubleshooting Guide.
c. Unsupervised repairs other than those described in the Troubleshooting Guide or outside
the premises of an authorized dealer, installation or replacement of parts voluntarily or
otherwise before inspection by a dealer, vehicle overhaul outside premises of or not performed by a dealer, use of any non-Veloteq replacement parts, improper maintenance or
maintenance of purchase documentation.
d. Consumables including brake pads, fuses, bulbs, inner tubes, tires, body fairing breakage,
scratches and abrasions, horns, reflective films and miscellaneous connectors.
e. Any costs associated with repairs by other than an authorized dealer.
f. Transportation cost to authorized repair locations.
3. Warranty Policy other than stated in sections 1 and 2.
a. Equipment failures that are not covered in the stated time periods under section 1 may be
repaired or replaced subject to partial payment for replacement parts and labor for up to
one year.
b.
Batteries which fail after the stated warranty period of six months may be replaced upon
presentation of purchase documentation and usage records by the dealer subject to depreciation for up to one year and return to the dealer for disposal.
c.
Reimbursement for parts s certified by the quality control department and approved returned goods will be collected from the amortization fund according to national standards
and set-asides. (Depreciation time: From purchase date to return date)
Veloteq Owner Manual 2008
P. 12 of 15
2/18/2008
Name of Purchaser
Address, City, ST/
Prov.
Model
No.
Zipcode
Motor Ser.
No.
Frame Ser. No.
Charger Supply Ser.
No.
Tel. No.
Date of Purch.
Invoice No.
Quality control and after-sale warranty commitment.
One year for vehicles sold in accordance with Schedule 1, above, breakdown or failure due to manufacturing defect in parts or materials, repair only by authorized dealers or warranty repair stations.
This constitutes the entire warranty as stated in Sections 1-3 above.
Warranty stations consist of Veloteq distributors, dealers or other authorized locations.
The owner is required to retain all records, proof of purchase and warranty information as stated
above.
Illustrations used in this manual may be updated or modified from time to time.
Product specifications and relevant drawings and instructions may be updated from time to time in the
interest of product improvement and continuing development. When your electrically operated bicycle
needs service, please carry this warranty card together with the receipt to the maintenance stations
for maintenance.
This manual applies to the following Veloteq 2008 Models.
1.Cavalier-GT 2.Challenger RSV-GT 3.Commander SHO-GT 4.Commuter RSV-GT
5.Cougar XR8 6. Sorrento GT 7. La Tote 8. Osprey 9. Ranger
Veloteq Owner Manual 2008
P. 13 of 15
2/18/2008
OWNER RECORD OF SERVICE
Note: It is a good idea to note when you have taken your electric bicycle out of seasonal service and insure that the power supply and charger are stored at above freezing temperatures. The power supply
must be periodically recharged. We recommend that this be done at three week intervals to prolong the
life of the batteries.
DATE
LOCATION
Veloteq Owner Manual 2008
SERVICE PERFORMED
P. 14 of 15
2/18/2008
Lube-injection Auto-geared Electric Motor Installation and Oil Maintenance
Gear oil Replacement
After the first 300km of use, subsequently replace the gear oil after every 3000km. Use approximately 150ML of No.26 Universal Gear
Oil, HQ-10 lubricating oil or SAE 10W/30 15W/40 Engine oil. With vehicle on the center stand, idle for three minutes to preheat the oil.
Turn off the ignition.
Unscrew gear case oiling screw and oil drain screw. Drain out the oil.
Replace the oil drain screw and screw tightly. Then fill the new oil from Gear Filler opening,about 100 ML.
Install and screw the fill bolt and drain bolt.
Motor Bushing Lubrication & Oil Fill Reservoir
(Apply grease to bushings.)
There are oil seals on both sides of the fork. Apply grease to the interface of oil seal and bushing. Avoid sand or dirt and listen for an
abnormal sound while filling, which will cause fraying of the oil seals.
Veloteq Owner Manual 2008
P. 15 of 15
2/18/2008