1
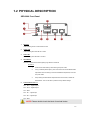
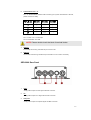
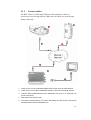
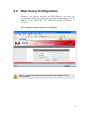
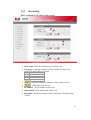
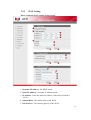
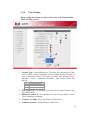
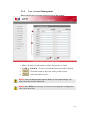
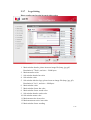
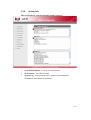
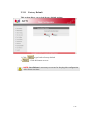
Video Transcoder
SED-3200
User’s Manual
i
SED-3200
2nd May, 2005
This document is copyrighted, 2005, by ACTi Corporation. All rights are reserved. ACTi Corporation
reserves the right to make improvements to the products described in this manual at any time without
notice.
No part of this manual may be reproduced, copied, translated or transmitted in any form or by any
means without the prior written permission of the original manufacturer. Information provided in this
manual is intended to be accurate and reliable. However, the original manufacturer assumes no
responsibility for its use, or for any infringements upon the rights of third parties that may result from
its use.
All other product names or trademarks are properties of their respective owners.
ii
Table of Contents
1
2
INTRODUCTION ______________________________________________ 1-1
1.1
PACKAGE CONTENTS _________________________________________ 1-1
1.2
PHYSICAL DESCRIPTION ______________________________________ 1-2
INSTALLATION _______________________________________________ 2-1
2.1
Hardware Installation____________________________________________ 2-1
2.2
Web Server Configuration ________________________________________ 2-3
2.2.1
Login ______________________________________________________________ 2-4
2.2.2
Host Setting _________________________________________________________ 2-5
2.2.3
WAN Setting ________________________________________________________ 2-7
2.2.4
Video Setting ________________________________________________________ 2-9
2.2.5
User Account Management ____________________________________________ 2-11
2.2.6
Port Setting ________________________________________________________ 2-12
2.2.7
Logo Setting _______________________________________________________ 2-13
2.2.8
System Info ________________________________________________________ 2-15
2.2.9
Image Upgrade (1/2) _________________________________________________ 2-16
2.2.10
Image Upgrade (2/2) _________________________________________________ 2-17
2.2.11
Factory Default _____________________________________________________ 2-18
2.2.12
Save Reboot _______________________________________________________ 2-19
2.2.13
Logout____________________________________________________________ 2-20
iii
11
INTRODUCTION
1.1 PACKAGE CONTENTS
SED-3200
Warranty Card
Software CD
Terminal Blocks & Screws
Power Adaptor
1-1
1.2 PHYSICAL DESCRIPTION
SED-3200 Front Panel
1.
Red LED
LED Indicating Power or H/W Reset Function
2.
Yellow LED
LED Indicating when RS-485 Rx is active
3.
Green LED
LED Indicating when RS-485 Tx is active
4.
Reset Button
Get back to default value while forgetting Login Name & Password
Procedure
1.
Switch off the SED-3200 by disconnecting the power cable
2.
Using a suitable pointed object, press and continue to hold the Reset Button
depressed. While continuing to hold the Reset Button depressed, reconnect
the power cable.
3.
Keep holding the Reset Button depressed around 6 seconds, release the
Reset Button. The unit will start up with the factory default settings.
5.
Terminal Blocks Pin 1~6
Pin 1: DO 1 – Digital Output
Pin 2: DO 2 – Digital Output
Pin 3: GND
Pin 4: DI 1 – Digital Input
Pin 5: DI 2 – Digital Input
Pin 6: GND
NOTE: Please double check the label of terminal blocks.
1-2
6.
Terminal Blocks Pin 7~12
Pin 7~10: RS232/422/485. Default mode is RS-485 (if your system needs RS-232 or RS-422,
please contact ACTi sales)
Pin
Mode
7
8
9
10
RS-232
RS-422
RS-485
Tx
Rx
-
Tx+
TxRx+
Rx-
D+
D-
Pin 11: Power +12V – 12V DC Input
Pin 12: Power GND – DC GND
NOTE: Please double check the label of terminal blocks.
7.
LAN Port
10/100 Mbps auto-sensing, fast Ethernet port of secure LAN.
8.
WAN Port
10/100 Mbps auto-sensing, fast Ethernet port of WAN for FTTH or xDSL connectivity
SED-3200 Rare Panel
1
YPbPr
Analog Video Output of YPbPr Signal with BNC Connector
2
Y/C
Analog Video Output of Y/C Signal with S-Video Connector
3
Composite
Analog Video Output of Composite Signal with BNC Connector
1-3
22
2.1
INSTALLATION
Hardware Installation
Please follow the following steps to configure your SED-3200 before you
install and running ACTi bundled software application.
2.1.1
Make sure network environment
Default IP of SED-3200 is 192.168.1.1. Please make sure SED-3200 and
your PC are in the same network segment before running the installation.
Please set your PC IP
address to number
from 2 to 254.
e.g. 192.168.1.2
2-1
2.1.2
Connect cables
The BNC cable for video input, Ethernet cable and power cable are
necessary for previewing function. Make sure all cables are correctly and
firmly connected.
1. Video Source can be CAM-5100/CAM-5100S or other ACTi encoding devices
2. Video Source can be SED-2100R/SED-2100S or other ACTi encoding devices
3. Connect SED-2100R/CAM-5100 and SED-3200 LAN port to an Ethernet hub
(RJ45 connectors)
4. SED-3200 is the receiver side
5. Connect the coaxial cable to TV monitor and display the video which encoded and
transferred from SED-2100R/CAM-5100
2-2
2.2
Web Server Configuration
Whenever you want to configure the SED-3200,you can access the
Configuration Utility by opening the web-browser and typing in the IP
Address of the SED-3200. The SED-3200 default IP Address is
192.168.1.1
Please open the internet browser as 192.168.1.1
NOTE: If your web browser is earlier than IE6, then download IE6 is
recommended.
2-3
2.2.1
Login
Please login with specific Account and Password
1.
Account : Type Admin as the default account name.
2.
Password : Type 123456 as the default password.
3.
Language : Choose the language of Web Configurator. The default
setting is English.
Value
0
1
2
3
Description
English
Tradition Chinese
Simplified Chinese
Japanese
4.
: Click this button to login.
5.
: Click this button to reset.
2-4
2.2.2
Host Setting
Please config the LAN setting of this section.
1. Host Name : Enter the domain name for SED-3200
2. Language : Language setting for Web Configurator after Save
Reboot. Default setting is English.
Value
0
1
2
3
Description
English
Tradition Chinese
Simplified Chinese
Japanese
3.
: Click this button to apply the setting of this section.
4.
: Click this button to reset.
5. IP Address : The IP address of the LAN.
6. Subnet Mask : The subnet mask of the LAN.
7. Baud Rate : Baud rate setting of Video Transcoder. Default setting
is 9600.
2-5
Value
0
1
2
3
4
5
6
7
8
Description
1200
2400
4800
9600
19200
38400
57600
115200
230400
NOTE: Save Reboot is necessary to execute for keeping this configuration
after reboot next time.
2-6
2.2.3
WAN Setting
Please config the WAN setting of this section
1. Dynamic IP Address : Set DHCP mode.
2. Static IP Address : Set Static IP Address mode.
3. IP Address : Enter the Static IP Address of the WAN. Default is
10.0.0.1.
4. Subnet Mask : The subnet mask of the WAN.
5. ISP Gateway : The internet gateway of the WAN.
2-7
6. PPPoE : Point-to-Point Protocol over Ethernet (PPPoE) merges PPP,
which is usually used for dial-up connections (e.g. ADSL, Cable
Modem).
7. User Name : Enter the user name for the PPPoE connection.
8. Password : Enter the password for the PPPoE connection.
9. Primary DNS Server : Set the primary DNS server IP address.
10. Secondary DNS Server : Set the secondary DNS server IP address.
11. DDNS Type : Set Disable or Enable
12. Service ISP : Pick one of ISP provider.
13. Host Name : Enter the host name (e.g. acti.dyndns.org)
14. User Name : Enter the user name of xxxx.dyndns.org
15. Password : Enter the password of xxxx.dyndns.org
16.
: Click this button to apply the setting of this section
17.
: Click this button to reset
NOTE: Check with your MIS department, if Client PC and SED-3200 are
setting in different VLANs, please connect to WAN port.
NOTE: Save Reboot is necessary to execute for keeping this configuration
after reboot next time.
2-8
2.2.4
Video Setting
Please config the settings to connect Video Server/IP Camera/Other
ACTi encoding devices
1. Connect Type : Select Multicast or TCP mode for connecting to Video
Server. While setting to Multicast, choose “Multicast W/O Control” if
your environment doesn’t link with any DI/O and RS-485 device.
Otherwise, choose “Multicast Streaming” with control DI/O and
RS-485.
Value
0
1
2
Description
Multicast W/O Control
Multicast Streaming
TCP Streaming
2. TCP Connect IP : Set IP address of Video Server while Connect Type
is TCP Streaming.
3. Multicast Connect IP : Set IP address of Video Server while Connect
Type is Multicast streaming.
4. Connect User Name : Set Login Name of Video Server.
5. Connect Password : Set Password of Video Server.
2-9
6. Remote Register Port : Port of video registeration.
7. Remote Control Port : Port for video controlling.
8. Remote Streaming Port : Port of video streaming.
9. Remote Multicast Port : Port of video multicasting.
10. Video Out : Type of Video Out
Value
0
1
Description
Composite/S Video
Composite/YPbPr
11. Default TV Type : Default TV system type. Default setting is PAL.
Value
0
1
Description
PAL
NTSC
12. OSD Display : On Screen Display will show information/icon when
following event is triggered.
Value
0
1
2
3
Description
Remote IP
Time Code
DIO Status
Motion Detection
13.
: Click this button to apply the setting of this section.
14.
: Click this button to reset.
NOTE: Save Reboot is necessary to execute for keeping this configuration
after reboot next time
2-10
2.2.5
User Account Management
Please set the users account and password in this section
1. Root : Default Account name is Admin, Password is 123456.
2. USER 1 ~USER 10 : 10 users Account & Password could be defined.
3.
: Click this button to apply the setting of this section.
4.
: Click this button to reset.
NOTE: Only root administrator has the ability for full range settings, the
other users are preview video only.
NOTE: Save Reboot is necessary to execute for keeping this configuration
after reboot next time.
2-11
2.2.6
Port Setting
Please config port settings of SED-3200
1. Host HTTP Port : HTTP Port Setting.
2. Host Search Port1 : The port of “Send” protocol for searching server.
3. Host Search Port2 : The port of “Receive” protocol for searching
server.
4. Host SDK Port1 : The port of “Send” protocol for SDK.
5. Host SDK Port2 : The port of “Receive” protocol for SDK.
6.
: Click this button to apply the setting of this section
7.
: Click this button to reset
NOTE: Save Reboot is necessary to execute for keeping this configuration
after reboot next time.
2-12
2.2.7
Logo Setting
Please config your favorite layout in this section
1. Main window header, please insert an image file (bmp, jpg, gif).
Resolution is 776x81, and size < 12000 bytes
2. Main menu bar color
3. Sub window header bar color
4. Sub window color
5. Sub window title bar logo, please insert an image file (bmp, jpg, gif).
Resolution is 31x11, and size < 2000bytes
6. Main window color
7. Main window footer bar color
8. Main window footer words color
9. Sub window header words color
10. Sub window menu color
11. Main menu active item color
12. Main menu non-active item color
13. Main window footer wording
2-13
14.
15.
: Click this button to apply the setting of this section
: Click this button to reset
NOTE: Before re-connect to SED-3200, please run Tools -> Internet
Options -> General, and execute “Delete Cookies” and “Delete Files” in
Temporary Internet files to clean temp files of IE Browser.
NOTE: Save Reboot is necessary to execute for keeping this configuration
after reboot next time.
2-14
2.2.8
System Info
This section shows system information and system log
1.
2.
3.
System Information : View system information.
WAN Status : View WAN status.
System Log : View network status, system events and gather
information about hardware problems.
2-15
2.2.9
Image Upgrade (1/2)
Please upgrade the web server firmware in this section
1.
2.
Click
to upload firmware.
: Click this button to reset
2-16
2.2.10 Image Upgrade (2/2)
3.
Firmware Images File :
You can update the Firmware Image version of your device by
downloading the latest firmware released from the
http://www.acti.com to your hard drive or to a local directory,
and then using the WebUI to load the new release onto your
Hardware device.
4.
MD5 File :
You can update the MD5 File version of your device by
downloading the latest firmware released from the
http://www.acti.com to your hard drive or to a local directory,
and then using the WebUI to load the new release onto your
Hardware device.
5.
: Click this button to upload the firmware
6.
: Click this button to reset
2-17
2.2.11 Factory Default
This section allows you to load factory default settings
1. Click
2
to get back to factory default
: Click this button to reset
NOTE: Save Reboot is necessary to execute for keeping this configuration
after reboot next time.
2-18
2.2.12 Save Reboot
When you finish all settings, please click Save Reboot and wait about
30 seconds for system save and reboot, until the LAN/WAN yellow
LED is flashing, means boot up successful and start streaming.
2-19
2.2.13 Logout
Click Logout to logout web server, and will close the IE window.
2-20